
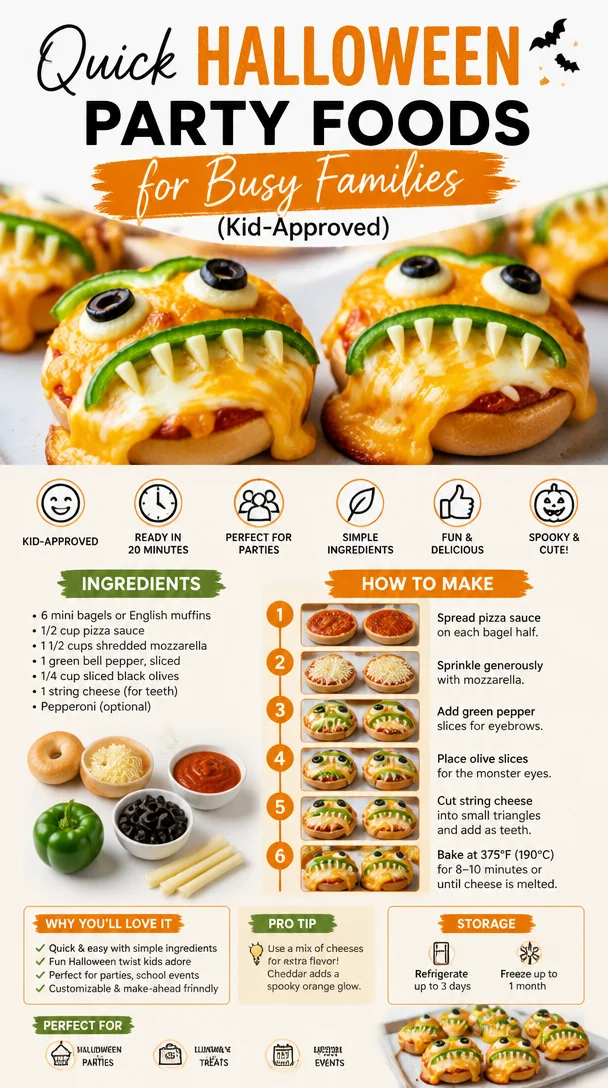
Quick Halloween Party Foods for Busy Families (Kid-Approved)
75 Fun Halloween Food Ideas for Kids: Spooktacular Treats for All Ages!
Welcome to my kitchen, food lovers! It’s that time of year again when the leaves turn golden, pumpkins appear at every corner store, and the air fills with the aroma of cinnamon and spice. Yes, my friends, it’s Halloween season — a time for costumes, trick-or-treaters, and, of course, spooky snacks! If you’re looking to create some hauntingly delightful dishes that will not only please the kiddos but also keep the grown-ups smiling, you’ve come to the right place.
This Halloween, let’s amp up the fun with 75 incredible food ideas that will make your guests shriek with delight (and maybe a little bit of fright!). From playful finger foods to creepy desserts, there’s something for everyone here. So, grab your mixing bowls and spatulas, and let’s have some wicked fun in the kitchen!
Personal Story: Haunted Memories in the Kitchen
As a kid, Halloween was my absolute favorite holiday. Every year, my friends and I would gather to carve pumpkins and concoct the most outrageous costumes we could dream up. But my most cherished memories were made in the kitchen. For weeks leading up to October 31st, my mother and I would whip up batches of “monster cookies,” a concoction of oatmeal, chocolate chips, and a sprinkle of colorful Halloween candies.
Each bite was a nostalgia bomb, sending me back to the thrill of running through the neighborhood, my plastic pumpkin bucket clanking against my legs, filled to the brim with candy. Those cookies had a way of bringing us together, filled with laughter and sticky fingers. It’s those kitchen moments that inspire me to ignite that same joy in others. I can still hear my mom saying, “Cooking should be fun, darling!” If you ask me, it definitely is, especially when you’re crafting spooky treats to share with those you love.
Ingredients: Spooky Goodies Galore
Let’s gear up for a Halloween feast! Here’s a breakdown of some crucial ingredients that will elevate our spooky spread.
-
Pumpkin Puree: The star of fall! Puree makes for moist brownies and bread. You can use homemade puree by roasting your pumpkin or opt for canned for convenience.
-
Chocolate Chips: A must-have for any Halloween treat! Use dark or milk chocolate; both options bring rich flavor. Dairy-free chips are also available for a vegan twist.
-
Oats: Ideal for texture in cookies and granola bars. Old-fashioned oats give more chewiness, whereas quick oats meld seamlessly into batter.
-
Food Coloring: Transform ordinary treats into frightful delights! Gel food coloring will give your creations vibrant hues, while liquid coloring can work as a substitute when needed.
-
Sprinkles: They add not just flavor but also a festive touch! Get creative with Halloween-themed sprinkles to add some lively color to cupcakes or cookies.
-
Cream Cheese: Perfect for frosting spooky cakes or for making dip. Swap with Greek yogurt for a healthier alternative or vegan cream cheese for plant-based goodies.
Step-by-Step Instructions: Spooky Snacks That Steal the Show
Now that you’ve gathered your ingredients, it’s time to dive into some devilishly delicious recipes! I’m here to provide step-by-step guidance with a sprinkle of chef commentary. Let’s start crafting our Halloween menu!
Pumpkin Monster Cookies
-
Prep the Oven: Preheat your oven to 350°F (175°C). Line a baking sheet with parchment paper. This makes for easy clean-up, leaving you with more time to scare your friends!
-
Mix the Dry Ingredients: In a medium bowl, whisk together 2 cups of oats, 1 cup of flour, and 1 teaspoon of baking soda. This combo builds the base for your cookies, adding both texture and volume.
-
Cream the Butter and Sugar: In your mixing bowl, beat 1 stick of softened butter with 1 cup of brown sugar and ½ cup of granulated sugar. Creaming these ingredients gets a lovely fluffy texture and enhances flavor.
-
Add Pumpkin Puree: Stir in 1 cup of pumpkin puree along with 1 teaspoon of vanilla extract. This step not only gives moisture but also infuses the cookies with that signature seasonal flavor.
-
Combine the Mixtures: Gradually add the dry ingredients to the wet, mixing just until combined. Avoid overmixing to keep those cookies soft and chewy – we want them to be downright monsterously delicious!
-
Incorporate Fun Mix-Ins: Fold in 1 cup of chocolate chips and ½ cup of festive sprinkles. Feel free to mix in nuts or coconut for added crunch – go wild!
-
Scoop and Bake: Use a cookie scoop to drop dough onto the baking sheet. Bake in the oven for 12-15 minutes or until the edges are golden. Watch them closely; you want soft, chewy centers with a bit of crispiness around the edges.
-
Cool and Enjoy: Let them sit on the baking tray for a couple of minutes before moving them to a wire rack to cool completely. Enjoy the delightful smell as they waft through your home—pure Halloween magic!
Serving Suggestions: How to Plate Your Spooky Snack
To add flair to your Halloween sweets, consider serving these cookies on a creepy spiderweb tablecloth or a ghostly platter. For added drama, dust them with powdered sugar and arrange them in a tiered cake stand, garnished with mini pumpkins or faux spider decorations. Don’t forget to pair these cookies with a glass of spooky punch or warm apple cider!
Recipe Variations: Monster Cookie Twist-Ups
Here are a few fun variations to explore with your monster cookies:
-
Vegan Monster Cookies: Swap the butter with coconut oil and replace the egg with a flaxseed meal or a chia seed substitute.
-
Nutty Delight: Fold in ½ cup chopped pecans or walnuts for added crunch and a wonderful flavor contrast.
-
Choco-Mint Version: Add a few drops of peppermint extract to the dough. Pair with dark chocolate chips for that refreshing wintery vibe!
-
Creepy-Crawly Cookies: Shape your cookies into monster shapes and add candy eyes for a fun decoration that will impress the kids.
Chef’s Notes: A Journey Through Halloween Treats
Every Halloween, I find myself reflecting on how my cookie recipes evolve. One year, I tried using gluten-free flour, and it didn’t quite work out. However, I learned from that experience, and now I keep a stash of alternatives handy when experimenting. Who knew a simple cookie could hold so many memories and lessons? It’s all about the journey we create in the kitchen, and I invite you to explore your own culinary evolution!
FAQs and Troubleshooting: Common Cookie Conundrums
-
Why are my cookies flat? This could be due to not using enough flour or not chilling the dough before baking. Always ensure your butter isn’t too soft—room temperature is best!
-
Can I freeze the cookie dough? Absolutely! You can freeze the dough for up to 3 months. Just scoop the dough onto a tray, freeze until solid, and then store in an airtight container.
-
My cookies turned out dry. What happened? Dry cookies usually mean they were overbaked. Keep an eye on them, as they will continue to bake on the sheet even after being removed from the oven.
-
How do I store these cookies? Keep your cookies in an airtight container on the kitchen counter for up to a week (if they last that long!). They can also be frozen for up to 3 months.
Nutritional Information
For those watching their dietary intake, here’s a quick look at the nutritional information per cookie (based on a standard recipe yielding about 24 cookies):
- Calories: 120
- Total Fat: 6g
- Saturated Fat: 3g
- Cholesterol: 12mg
- Sodium: 75mg
- Total Carbohydrates: 16g
- Dietary Fiber: 1g
- Sugars: 7g
- Protein: 2g
As always, you can modify the ingredients to suit your dietary needs or preferences. Remember, cooking is about creating joy — let’s scare off those kitchen anxieties!
There you have it folks! An upbeat, vibrant collection of Halloween food ideas filled with little touches of nostalgia and hands-on tips to guide you along your culinary journey. Let’s embrace the spookiness of the season with fun and tasty dishes that bring everyone together. May your Halloween be filled with laughter, delicious treats, and unforgettable memories! Happy cooking!
Print
Pumpkin Monster Cookies
- Total Time: 30 minutes
- Yield: 24 cookies 1x
- Diet: Vegetarian
Description
These Pumpkin Monster Cookies are a delightful Halloween treat that combines oats, chocolate chips, and festive sprinkles for a fun and chewy snack.
Ingredients
- 2 cups oats
- 1 cup all-purpose flour
- 1 teaspoon baking soda
- 1 stick softened butter
- 1 cup brown sugar
- ½ cup granulated sugar
- 1 cup pumpkin puree
- 1 teaspoon vanilla extract
- 1 cup chocolate chips
- ½ cup festive sprinkles
Instructions
- Preheat your oven to 350°F (175°C). Line a baking sheet with parchment paper.
- Mix together the oats, flour, and baking soda in a medium bowl.
- Cream the softened butter, brown sugar, and granulated sugar until fluffy.
- Add the pumpkin puree and vanilla extract to the wet mixture.
- Combine the dry ingredients with the wet ingredients until just mixed.
- Incorporate the chocolate chips and festive sprinkles into the batter.
- Scoop dough onto the baking sheet and bake for 12-15 minutes.
- Cool on the tray for a few minutes before transferring to a wire rack.
Notes
For added fun, shape cookies into monsters and add candy eyes for decoration.
- Prep Time: 15 minutes
- Cook Time: 15 minutes
- Category: Dessert
- Method: Baking
- Cuisine: American
Nutrition
- Serving Size: 1 cookie
- Calories: 120
- Sugar: 7g
- Sodium: 75mg
- Fat: 6g
- Saturated Fat: 3g
- Unsaturated Fat: 2g
- Trans Fat: 0g
- Carbohydrates: 16g
- Fiber: 1g
- Protein: 2g
- Cholesterol: 12mg
Keywords: Halloween cookies, pumpkin cookies, monster cookies
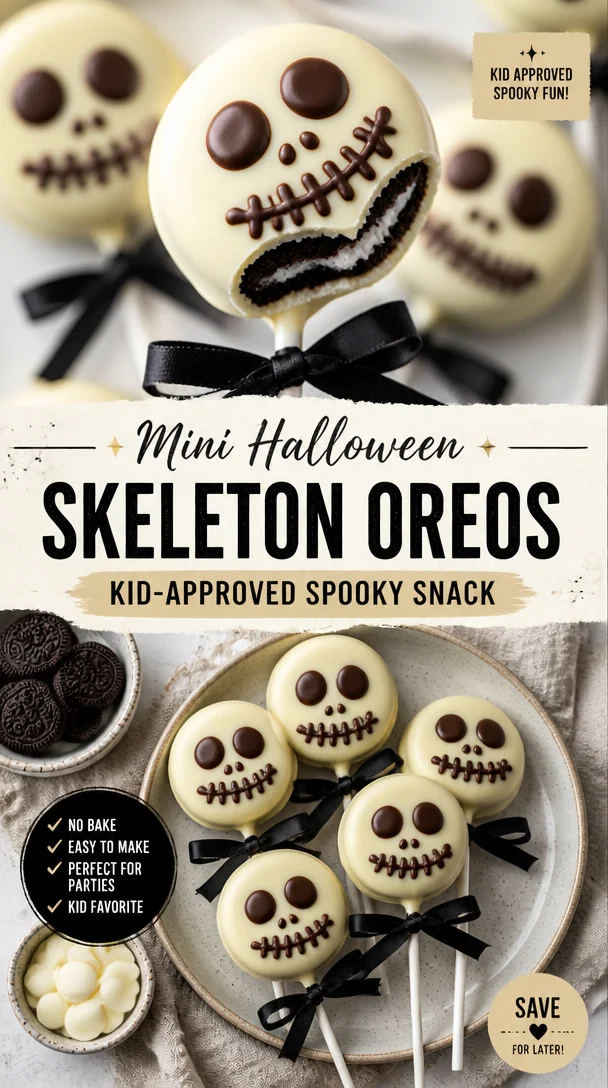
Min Halloween Skeleton Oreos: Kid-Approved Spooky Snack
Spooky Skeleton Oreos: The Perfect Halloween Treat!
Welcome, fellow food lovers, to my cozy kitchen! Halloween is just around the corner, and you know what that means—it’s time for treats that are frightfully fun and delicious! Today, I’m excited to share a recipe that combines two of my favorite things: Oreos and spooky vibes. Say hello to Spooky Skeleton Oreos, your new go-to Halloween delight!
Just imagine the scene: a crisp autumn evening, the air filled with the scent of fallen leaves, and your favorite Halloween movie playing in the background. Now, picture a platter of these adorable Skelly Oreos, all decked out in white chocolate and spooky designs. Whether you’re hosting a Halloween party, attending a potluck, or simply want to treat your family, these delightful cookies are sure to impress and bring a smile to faces of all ages.
What I love about this recipe is that it bridges the gap between the creativity of cooking and the joy of sharing. You don’t have to be a professional pastry chef to whip up these cuties, just a bit of imagination and the willingness to get a little messy in the kitchen—my favorite pastime!
Let’s dive into this sweet and spooky experience together. I promise these Spooky Skeleton Oreos will not only be a treat but also a fun-filled activity to enjoy with friends and family. So, gather your ingredients, roll up your sleeves, and let’s get started on making some memorable Halloween treats!
A Trip Down Memory Lane
I have to tell you, one of my fondest memories is intertwined with Halloween and, of course—cookies! Every year, my mom and I would transform our kitchen into a spooky bakery. It was a tradition; we’d crank up the Halloween playlist, don our festive aprons, and begin mixing, baking, and decorating.
One year, inspired by the skeletons from the Halloween decorations, we decided to create our own spooky treats. We dipped Oreos in white chocolate and drew ghoulish faces on them with icing. I remember giggling as I tried to create the perfect ‘skull’ face, but they ended up looking more like cartoon characters! Still, we had a blast and the cookies were a hit at our neighborhood block party. Each bite was filled with laughter, and they disappeared faster than we could keep up with them.
That experience has stayed with me and inspired me to create these Spooky Skeleton Oreos with my own little twist. So let’s channel that nostalgia, dive into our creative juices, and make some skeleton friends of our own!
Ingredients
To whip up your spooky skeleton cookies, you’ll need a handful of fun and simple ingredients. Here’s what you’ll need:
-
Oreos: The star of our show! You can use classic Oreos or try Golden Oreos for a different flavor profile. If you’re looking for a gluten-free option, try using gluten-free chocolate sandwich cookies instead.
-
White Chocolate Melts: These will give our skeletons a spooky glow! Consider using almond bark if you prefer, as it melts smoothly and sets quickly. If you want to color it, feel free to add gel food coloring.
-
Black Food Coloring Gel: Essential for creating those spooky details. Gel coloring is best as it doesn’t water down the chocolate.
-
Decorating Icing: Look for piping icing in a tube—it’s perfect for detailed designs. It makes it easy to create expressions and patterns. If you’re feeling adventurous, make your own icing with powdered sugar, egg whites, and a dash of lemon juice for a more homemade touch.
-
Candy Eyes: Because every skeleton needs to see! You can find these at most craft stores or online, or opt for chocolate chips if you’d like something more straightforward.
-
Lollipop Sticks (optional): If you want to create skeleton pops, grab some lollipop sticks to insert into your Oreos before dipping them. This adds a fun presentation touch!
Step-by-Step Instructions
Now that we’ve gathered our ingredients, let’s get cooking! Here’s your step-by-step guide to crafting your Spooky Skeleton Oreos.
-
Prepare Your Workspace: Start by setting up a clean workspace. Lay down some parchment paper on a baking tray where you’ll place your finished Oreos. This will make clean-up a breeze.
-
Melt the White Chocolate: In a microwave-safe bowl, melt the white chocolate melts. Heat them in 30-second intervals, stirring well after each. This helps prevent burning. You want the chocolate to be smooth and entirely melted—think of it as a velvety pool of sweetness.
-
Dip the Oreos: Once the chocolate is melted, take each Oreo and dip it in the melted chocolate, ensuring it’s wholly coated. Use a fork to lift it out, letting the excess chocolate drip off before placing it on the prepared parchment. If you’re using lollipop sticks, dip them into the chocolate before inserting them into the Oreo for that pop effect.
-
Chill to Set: Place your dipped Oreos in the fridge for about 15-20 minutes to allow the chocolate to harden. This step is crucial; you want the chocolate to be firm before you start decorating.
-
Get Creative with Decorating: Once the white chocolate is set, it’s time to create our spooky faces! Take your decorating icing and pipe on eyes, noses, and smiles to form the skeleton’s visage. Remember, they don’t have to be perfect—let your creativity flow and enjoy the process!
-
Add Candy Eyes: While the icing is still wet, place the candy eyes in position on each Oreo for a fun, whimsical touch. This step adds personality and is bound to bring giggles!
-
Rest and Enjoy: Allow the decorative icing to set for another 10-15 minutes before carefully transferring the Spooky Skeleton Oreos to a serving dish.
And voila! You have crafted some eye-catching, fun, and festive Skelly Oreos just in time for Halloween!
Serving Suggestions
When it comes to serving your Spooky Skeleton Oreos, keep it simple yet fun! Arrange them on a festive platter and add some Halloween-themed decorations like mini pumpkins or spooky confetti for extra flair. If you’re feeling extra festive, you can even place them in clear cellophane bags tied with orange ribbons—perfect for giving away as treats!
Recipe Variations
Want to put your own twist on these delightful cookies? Here are a few creative ideas:
-
Dark Chocolate Dipped: Try dipping Oreos in dark chocolate for a richer flavor. The contrast with the white decorations will create a striking look.
-
Flavored Oreos: Use specialty flavored Oreos like Pumpkin Spice or Peppermint to mix things up! These seasonal selections can add a delightful surprise!
-
Nut Butter Dip: For a twist on the classic, why not dip Oreos in melted peanut butter or almond butter? Once set, drizzle with white chocolate for a fun fusion!
-
Sugar Skull Inspiration: Go wild with colors by using various colored chocolate melts, mixing and matching the designs, mimicking the beautiful sugar skulls seen in Dia de los Muertos celebrations.
-
Spooky Sprinkles: Add some texture with festive sprinkles after the chocolate dip—think orange, black, and purple shapes. They can provide a fun pop!
Chef’s Notes
Looking back, this recipe has evolved a bit from when my mom and I first dipped our Oreos all those years ago. I’ve learned to create more detailed designs and make them even more fun and festive. The laughter shared while decorating is what I cherish the most when I think of creating these treats. Don’t stress about making them perfect; embrace a bit of messiness—it adds to the charm!
I once had a little mishap when a batch of chocolate seized up on me, not wanting to melt. Instead of tossing it, I added a splash of coconut oil and it turned into an amazing creamy texture that worked perfectly for dipping! Who knew that ‘disaster’ would lead to deliciousness? Always be open to a little kitchen improv!
FAQs and Troubleshooting
-
What if the chocolate is too thick?
If your melted chocolate is too thick, you can thin it out by adding a small amount of coconut oil or vegetable oil. This will help achieve a smoother consistency for dipping. -
How do I store leftover cookies?
Store your decorated Spooky Skeleton Oreos in an airtight container at room temperature for up to one week. If you need them for longer, consider freezing them—layer them between parchment paper to avoid sticking. -
Can I use a different type of cookie?
Absolutely! Feel free to experiment with different cookies—try vanilla wafers, graham crackers, or chocolate chip cookies for a fun variation! -
What if I don’t have decorating icing?
If you don’t have piping icing, you can make a quick icing using powdered sugar and water or milk. Combine until you achieve a drizzling consistency!
Nutritional Information
(If applicable: Include a brief table or summary of calories, fat content, etc. If you choose to omit, that is fine! Just note it here.)
And that’s a wrap on our Spooky Skeleton Oreos! I hope you enjoyed this recipe and that it inspires creativity and laughter in your kitchen this Halloween season. Don’t forget, cooking should be fun, so gather your loved ones, get a little messy, and whip up some delightful treats to share! Happy Halloween, and happy baking! 🎃👻
Print
Spooky Skeleton Oreos
- Total Time: 30 minutes
- Yield: 20 servings 1x
- Diet: Vegetarian
Description
Delightfully spooky Oreos dipped in white chocolate, perfect for Halloween.
Ingredients
- 1 package Oreos (classic or Golden)
- 1 cup White Chocolate Melts
- Black Food Coloring Gel
- Decorating Icing (or homemade)
- Candy Eyes
- Lollipop Sticks (optional)
Instructions
- Prepare your workspace with parchment paper on a baking tray.
- Melt the white chocolate in a microwave-safe bowl at 30-second intervals, stirring well.
- Dip each Oreo into the melted chocolate, ensuring it’s fully coated.
- Chill dipped Oreos in the fridge for 15-20 minutes until the chocolate sets.
- Get creative and pipe on decorating icing to form spooky faces.
- Add candy eyes while the icing is still wet.
- Rest the decorated Oreos for another 10-15 minutes before serving.
Notes
These treats can be presented on festive platters with Halloween decorations. If desired, customize with different Oreos and decorations.
- Prep Time: 20 minutes
- Cook Time: 10 minutes
- Category: Dessert
- Method: Dipping
- Cuisine: American
Nutrition
- Serving Size: 1 cookie
- Calories: 120
- Sugar: 12g
- Sodium: 50mg
- Fat: 6g
- Saturated Fat: 4g
- Unsaturated Fat: 2g
- Trans Fat: 0g
- Carbohydrates: 15g
- Fiber: 0g
- Protein: 1g
- Cholesterol: 5mg
Keywords: Halloween, spooky treats, Oreo recipes, festive cookies, easy desserts




