
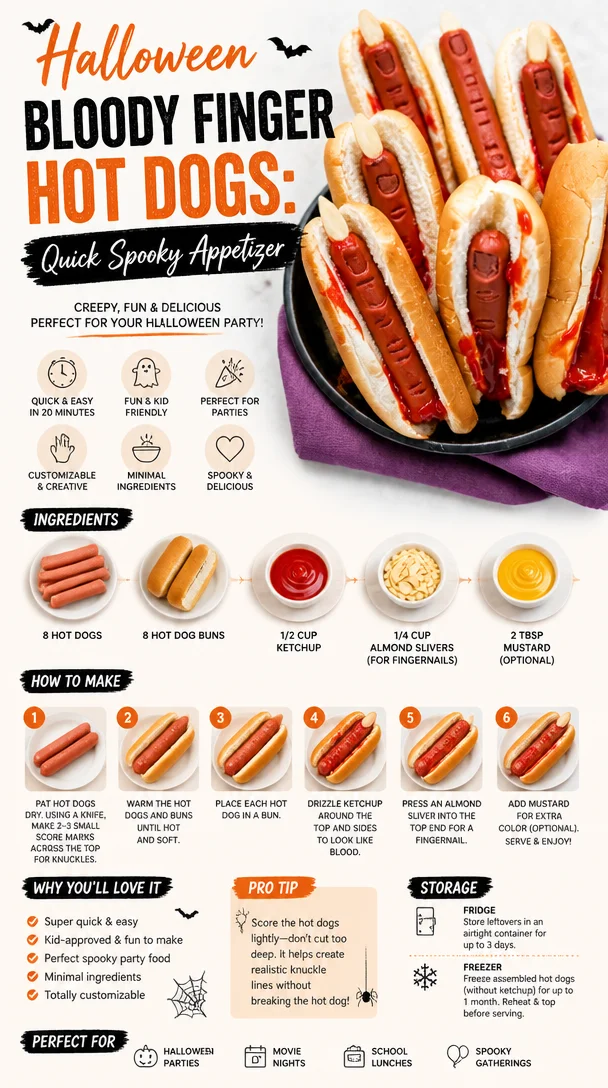
Halloween Bloody Finger Hot Dogs: Quick Spooky Appetizer
Unleashing Halloween Fun in the Kitchen: Bloody Finger Hot Dogs
Halloween is that magical time of the year when spooky costumes, spine-tingling decorations, and edible treats come together to create unforgettable experiences. It’s a time for laughter, joy, and a sprinkle of delightful fright. This year, I’m taking you on a journey to create something that’s sure to be a showstopper at your Halloween gathering: Bloody Finger Hot Dogs! Not only are they adorable and a bit gruesome (in the best way possible), but they also capture that playful spirit of the holiday.
When I think about Halloween, my mind drifts back to my childhood years of trick-or-treating in the neighborhood. The air would be filled with the scent of candy corn, and we would brave the chill with our costumes stuffed and adorned with layers to keep us warm. I remember one year, my mom transformed our kitchen into a concoction of inventive treats, including ghostly cupcakes and witch’s brew. But it was her finger hot dogs that had us giggling and squealing. Little did I know then that such a simple snack could spark so many happy memories.
This dish’s whimsical charm lies in its simplicity. It’s fun, engaging, and surprisingly easy to make, even for novice cooks. As you gather your ingredients and prep your kitchen, throw on some Halloween tunes (I’m partial to “Thriller,” of course!). The best part? They’re not just for kids; adults can join in the fun, too! So let’s dive in and create these spine-chilling yet totally delicious Bloody Finger Hot Dogs that will leave your party guests raving.
Personal Story: A Trip Down Memory Lane
I’ll never forget the first time I made these Bloody Finger Hot Dogs with my niece, Ella. She was no more than six years old, and the combination of her giggles with the eerie aesthetic of the dish made it a Halloween to remember. We donned our ghostly aprons and got started, turning ordinary hot dogs into slender fingers with a few simple cuts. As we sliced and sculpted, Ella’s eyes widened with delight at each transformation.
“Are we really going to eat these?” she asked, her curiosity bubbling over as she observed the hot dogs become something so silly yet strangely appealing.
“Of course!” I replied, trying to contain my laughter. “But only if they’re painted with some creepy ketchup.”
We gathered our ingredients and made messy faces while we crafted each freaky finger, complete with almond slivers for nails. It felt as if we had conjured a new Halloween tradition right there in my cozy kitchen. By the time we were done, the platter of Bloody Finger Hot Dogs looked just eerie enough to induce a few giggles mixed with shrieks. They were an instant hit at our Halloween party, disappearing as fast as Ella finished her pumpkin juice.
Now, every Halloween, it’s become a family tradition to whip up these creepy snacks. It’s a reminder of the joy of cooking together and how food can strengthen our bonds while creating lasting memories.
Ingredients
Let’s gather our ingredients to assemble these horrifyingly tasty Bloody Finger Hot Dogs. Here’s what you’ll need:
-
Hot Dogs (10-12): Go for your favorite type – beef, chicken, turkey, or even plant-based options! If you’re opting for a healthier choice, turkey hot dogs are a great alternative.
-
Slivered Almonds (10-12): These will serve as the "fingernails." If you’re not a fan of almonds or have nut allergies, try using slices of cheese or even small pieces of carrot as alternatives.
-
Ketchup (½ cup): The classic choice for “blood.” You can swap ketchup with a spicy sauce if you want to add a kick, or use BBQ sauce for a different flavor profile.
-
Mustard (optional): For added decoration, dollop mustard to create a “bandage” effect on your fingers.
-
Hot Dog Buns (optional): For serving, though you can skip the buns if you prefer to keep it simple.
-
Food Coloring (optional): If you want to get extra creative, red food coloring can help intensify that blood-red hue!
Now that we have our ingredients prepped, let’s move on to whipping up these deliciously creepy hot dogs!
Step-by-Step Instructions
Step 1: Preheat Your Oven
Preheat your oven to 400°F (200°C). This preheating step ensures that the hot dogs will cook thoroughly and develop a nice texture when we pop them in for that finishing touch.
Step 2: Prepare the Hot Dogs
Grab your hot dogs and start by making a small incision on one end of each hot dog. Carefully slice down about half an inch to create a “finger” shape. As you cut, remember to envision those creepy fingers you see in horror movies—it adds to the fun! The more you can mimic the shape of a finger (with a slight curve for the knuckles), the more real they look.
Chef Hack: If you’re struggling to get a smooth cut, you can warm the hot dogs for a minute or so to soften them slightly. Just ensure they aren’t too hot to handle!
Step 3: Add the Fingernails
Now for the fun part—adding the almond slivers! Stick one slivered almond into the end of each hot dog where you made the cut. Press it down gently to secure it in place. If you’ve chosen a non-nut option, don’t hesitate to let creativity guide you!
Tip: If you find the almonds aren’t staying in, a little dab of ketchup or mustard can act like glue to hold everything in place.
Step 4: Bake the Fingers
Place your prepared hot dogs on a baking sheet lined with parchment paper. Bake them in the preheated oven for about 10-15 minutes or until they’re heated through and starting to crisp. As they cook, the edges will brown slightly, giving them a more authentic look—like real, bloody fingers!
Step 5: The Bloody Effect
Once the hot dogs are fully cooked, remove them from the oven and allow to cool slightly. Drizzle or dip them in ketchup generously to create that iconic bloody effect.
Chef Tip: To get that true Halloween horror look, you can mix a bit of red food coloring with your ketchup for extra vibrancy!
Step 6: Serve Them Up
Now it’s time to plate your horrifying creations! You can use a skeleton platter, a simple white dish, or even serve them in a faux coffin for added drama.
Plating Tip: Arrange the Bloody Finger Hot Dogs neatly, and consider garnishing the plate with some “gore” made from ketchup. If you like, add a few strategically placed pumpkin candies for a splash of color.
Serving Suggestions
These Bloody Finger Hot Dogs are perfect for Halloween parties, school events, or even just an eerie dinner at home. Serve them alongside a bowl of chips or some spooky-themed sides like “witches’ fingers” (celery sticks with almond "fingernails") for a matched horror feast. You can serve them in hot dog buns as usual, but don’t hesitate to get creative with your serving dishes! Think of a bewitching platter with grave-looking decor or even a spooky candlelit setting for that added atmosphere.
Recipe Variations
Let’s spice things up a bit! Here are some variations to keep your Bloody Fingers fresh and exciting:
-
Spicy Fingers: Use spicy sausages or hot dogs for those who dare! Add a spicy ketchup to ramp up the heat.
-
Cheesy Fingers: Make cheese-stuffed hot dogs by inserting cheese sticks inside before proceeding to slice them into fingers.
-
Veggie Delight: Use zucchini or carrot sticks in place of hot dogs for a crunchy, healthy alternative.
-
Ghostly Fingers: Incorporate ghost-shaped cheese slices over the hot dogs for an added spooky effect—think melted cheese ghosts!
-
Themed Dips: Serve with a creamy dip dyed green or orange to pair with the whole spooky theme!
Chef’s Notes
These Bloody Finger Hot Dogs aren’t just a fun dish; they’ve evolved into something my family and friends continue to look forward to every Halloween. I’ve showcased them at gatherings, and they never fail to create conversation—and a few giggles!
When I was crafting this post, I chuckled at the ridiculous scenarios we imagined while cooking. One year, my niece, Ella, dressed as a witch, used a cauldron alongside our hot dog fingers, insisting we concoct a potion to accompany them. It was a mess but in the best way possible!
Every Halloween, I find inspiration in simple food ideas that evoke emotion—whether it’s the nostalgic warmth of the kitchen or the delightful chaos with family. These hot dogs have become a symbol of creativity, laughter, and bonding through food, and I hope they bring that same joy to your kitchen!
FAQs and Troubleshooting
Q: My hot dogs split while baking! What went wrong?
A: If your hot dogs split, it’s often due to cooking them too long or at too high a temperature. Try not to overcook and keep a close eye after 10 minutes or so!
Q: Can I make these fingers in advance?
A: Absolutely! You can prepare the hot dogs ahead of time, slice them, and even insert the almonds. Just cover them and store them in the fridge. Bake them right before serving for optimum freshness.
Q: What if I can’t find slivered almonds?
A: If almonds are unavailable, consider using sunflower seeds or cheese slices as an alternative for the fingernails.
Q: Can I freeze the hot dogs once cooked?
A: Yes! You can freeze the cooked hot dogs for up to three months. Just make sure to wrap them tightly and reheat them directly from frozen when ready to serve!
Nutritional Info
(Per serving – 2 hot dogs with ketchup):
- Calories: 250
- Protein: 10g
- Carbohydrates: 20g
- Total Fat: 15g
Now that you’re all set, it’s time to don your apron and channel your inner spooky chef! Unleash the eerie culinary adventurer in you and make Bloody Finger Hot Dogs for your Halloween party this year. I can’t wait to hear how many laughs they bring to your festive gathering! Happy cooking, and may your Halloween be filled with fun and flavor!
Print
Bloody Finger Hot Dogs
- Total Time: 30 minutes
- Yield: 4 servings
- Diet: Non-Vegetarian
Description
A spooky and fun recipe for Halloween, these Bloody Finger Hot Dogs are sure to delight guests of all ages with their creepy appearance and delicious flavor.
Ingredients
- Hot Dogs (10-12)
- Slivered Almonds (10-12)
- Ketchup (½ cup)
- Mustard (optional)
- Hot Dog Buns (optional)
- Food Coloring (optional)
Instructions
- Preheat your oven to 400°F (200°C).
- Prepare the hot dogs by making an incision on one end of each to create a ‘finger’ shape.
- Add the slivered almonds at the end of each hot dog for fingernails.
- Place the prepared hot dogs on a baking sheet lined with parchment paper.
- Bake in the preheated oven for about 10-15 minutes until heated through and slightly crisp.
- Remove from the oven and drizzle or dip in ketchup for a bloody effect.
- Serve on a spooky platter, garnished creatively.
Notes
Consider using cheese or carrot slices if slivered almonds are not available.
- Prep Time: 15 minutes
- Cook Time: 15 minutes
- Category: Appetizer
- Method: Baking
- Cuisine: American
Nutrition
- Serving Size: 2 hot dogs
- Calories: 250
- Sugar: 10g
- Sodium: 900mg
- Fat: 15g
- Saturated Fat: 3g
- Unsaturated Fat: 12g
- Trans Fat: 0g
- Carbohydrates: 20g
- Fiber: 1g
- Protein: 10g
- Cholesterol: 25mg
Keywords: Halloween, Hot Dogs, Finger Food, Spooky Recipe, Party Snacks

Minute No-Bake Halloween Treats for Busy Families
Easy No-Bake Halloween Treats
Welcome to my kitchen, fellow food lovers! I’m thrilled you’re here, especially as we dive into the delightful world of Halloween treats that require absolutely no baking. That’s right! With just some simple ingredients and a sprinkle of creativity, we’ll whip up spooky, sweet delights perfect for any Halloween gathering or cozy night in.
As the leaves begin to fall and the air turns crisp, I can’t help but feel excited about all the festive possibilities this season brings. There’s something so magical about Halloween—the costumes, the decorations, the hauntingly fun parties—and of course, the treat-making! It’s the one time of year when indulgence is not just appreciated, but expected. Whether you’re planning a party, treating your little ghouls and goblins, or simply looking to satisfy your own sweet tooth, these easy no-bake treats will be the star of the show.
Join me as we create some treats that will not only impress your friends but also be a blast to make. Let’s roll up our sleeves, don those aprons (messy ones are the best!), and get ready for some kitchen fun!
A Personal Halloween Tale
One Halloween, I vividly recall a night spent with my childhood best friend, Emma. Armed with a handful of colorful sprinkles and an assortment of chocolate, we decided to create our own concoctions for our classmates. After sneaking pieces of candy from our trick-or-treat bags, we huddled over the kitchen counter, giggling, mixing, and crafting what we thought were the ultimate Halloween treats.
We melted chocolate (which we promptly dropped on the floor—oops!), layered gummy worms, and even tried to create spooky faces with candy corn. The end result? A chaotic, colorful assortment that looked like a Halloween explosion. While my mom may have needed to clean the kitchen afterward, our concoctions were a hit! Even now, thinking back on that night fills me with warmth and nostalgia. It’s this feeling I want to share with you through easy, no-bake Halloween recipes. Let’s create some wonderful memories, just like Emma and I did!
Ingredients
Let’s gather our Halloween spirit and get our ingredients ready! Here’s what you’ll need for our fabulous easy no-bake treats:
-
Chocolate Chips (1 cup): Perfect for melting and drizzling. You can use semi-sweet or milk chocolate depending on your preference. If you’re looking for a healthier option, dark chocolate works great too!
-
Cereal (3 cups): A classic base for our treats. Crisped rice or corn flakes are popular choices, but feel free to substitute with gluten-free cereal if needed.
-
Peanut Butter (1/2 cup): Creamy or crunchy works! If allergies are a concern, almond butter or sunflower seed butter are fantastic alternatives that still add that nutty goodness.
-
Marshmallows (2 cups): Mini marshmallows are perfect for adding a chewy texture. If you want to go vegan, check out plant-based marshmallows.
-
Sprinkles (1/2 cup): For decoration! Use Halloween-themed sprinkles or any colorful mix you fancy. Swap with nuts or dried fruit for a healthier twist.
-
Candy Corn (for topping): Classic and iconic, candy corn screams Halloween! If you’re not a fan, consider gummy worms or chocolate-covered raisins instead.
-
Vanilla Extract (1 tsp): This will add depth to our flavors. Replace it with almond extract for an interesting twist.
Now that we have our ingredients, let’s get that spooky creativity flowing!
Step-by-Step Instructions
Step 1: Prepare Your Workspace
First things first! Clean and set up your kitchen counter or workspace. Lay out the parchment paper where we’ll form our treats. I like to have all ingredients within reach—it makes the process smoother and way more enjoyable.
Step 2: Melt the Chocolate
In a microwave-safe bowl, add your chocolate chips. Heat them in 30-second intervals, stirring in between, until they are completely melted and smooth. (This is the time to sneak a taste. I won’t tell!)
Step 3: Mix in Peanut Butter
Once the chocolate is melted, stir in the peanut butter until well combined. The mixture should become glossy and irresistible. If you like a bit of crunch, add some crushed nuts at this stage—they give an amazing texture!
Step 4: Add Cereal and Marshmallows
Gently fold in your cereal and marshmallows, ensuring everything is coated in that beautiful chocolate-peanut butter mixture. This is where it gets fun—seeing how it all comes together!
Step 5: Shape the Treats
Using a spatula (or your hands, if you’re feeling adventurous), scoop out portions of the mixture and form them into small bars or clusters on your parchment-covered surface. Don’t worry about making them perfect; the delightful irregular shapes add character!
Step 6: Decorate
Here comes the fun part! Before the mixture sets, add sprinkles on top of each treat. Get creative—use candy corn, gummy worms, or whatever you like. Make it festive and fun!
Step 7: Chill and Set
Place your tray in the refrigerator for about 30 minutes to let everything set properly. While you wait, you can clean up your workspace, or sneak another taste of those melted chocolate remnants!
Step 8: Serve
Once set, take them out of the fridge and cut or break them into pieces. These treats are great served on a colorful platter for a Halloween party or wrapped in cellophane for handouts.
Serving Suggestions
To serve your delightful no-bake Halloween treats, place them on a spooky-themed platter adorned with faux cobwebs or miniature pumpkins for that extra flair. You can also package them up in cellophane bags tied with colorful ribbons for a charming gift. Trust me, these will be the treats everyone remembers!
Recipe Variations
Feeling adventurous? Here are some creative spins on our basic no-bake treats:
-
Pumpkin Spice Treats: Add a teaspoon of pumpkin spice to the chocolate-peanut butter mixture for a seasonal twist.
-
S’mores Bars: Swap out the cereal for crushed graham crackers and add mini marshmallows for a campfire-inspired treat.
-
Nut-Free Delight: Replace peanut butter with sunflower seed butter and use dairy-free chocolate for an allergen-friendly option.
-
Crispy Caramel Treats: Drizzle caramel sauce over your formed bars for an extra layer of sweetness.
-
Vegan Halloween Treats: Use dark chocolate, coconut cream, and nut butter to make a completely vegan-friendly version.
Chef’s Notes
These no-bake Halloween treats have evolved from that messy kitchen night with Emma into a favorite family tradition. Over the years, I’ve played with flavors, textures, and decorations. One year, I poured extra melted chocolate over the top and sprinkled crushed pretzels for a sweet-and-salty combo!
I’ll never forget the laughter that fills the kitchen when I make these with my own kids. They have their own quirky ideas of how to decorate, and it’s such a joy to see their creativity blossom. It’s recipes like this—simple, adaptable, and fun—that create lasting memories.
FAQs and Troubleshooting
1. Why are my treats falling apart?
If your treats are crumbling, it’s likely that the mixture wasn’t pressed together tightly enough. Next time, try compressing it more firmly into your chosen shape.
2. How do I store these treats?
Store them in an airtight container at room temperature for up to a week. If you live in a particularly warm area, keeping them in the fridge might be a good idea to keep the chocolate from melting.
3. What can I use instead of chocolate chips?
You can use white chocolate, carob chips, or even yogurt-covered raisins for a different flavor profile!
4. Are these treats gluten-free?
Yes, as long as you use gluten-free cereal, these treats can easily cater to gluten-sensitive diets. Always check the labels to be sure!
Nutritional Info (Optional)
While I’ve focused on the fun and creativity behind these treats, it’s always good to be mindful of indulgence. Each treat, depending on size, can range around 150 calories but provides a delightful combo of textures and flavors that make the occasional treat totally worth it.
So there you have it: Easy no-bake Halloween treats that are sure to bring a smile to anyone who tries them. Grab your ingredients, get ready to unleash your creativity, and most importantly, enjoy the process! Happy Halloween, and may your kitchen always be filled with love and laughter.
Print
Easy No-Bake Halloween Treats
- Total Time: 45 minutes
- Yield: 12 servings 1x
- Diet: Vegetarian
Description
Delightful no-bake Halloween treats perfect for any gathering, made with simple ingredients and a sprinkle of creativity.
Ingredients
- 1 cup Chocolate Chips
- 3 cups Cereal (Crisped rice or corn flakes)
- 1/2 cup Peanut Butter
- 2 cups Mini Marshmallows
- 1/2 cup Sprinkles (Halloween-themed)
- Candy Corn (for topping)
- 1 tsp Vanilla Extract
Instructions
- Prepare Your Workspace: Clean and set up your counter with parchment paper.
- Melt the Chocolate: Heat chocolate chips in intervals until melted.
- Mix in Peanut Butter: Stir until glossy and well combined.
- Add Cereal and Marshmallows: Fold in until coated.
- Shape the Treats: Scoop and form into small bars or clusters.
- Decorate: Add sprinkles and toppings before setting.
- Chill and Set: Refrigerate for about 30 minutes.
- Serve: Cut into pieces and present on a festive platter.
Notes
Store in an airtight container for up to a week. Can be made gluten-free with the right cereal.
- Prep Time: 15 minutes
- Cook Time: 0 minutes
- Category: Dessert
- Method: No-Bake
- Cuisine: American
Nutrition
- Serving Size: 1 piece
- Calories: 150
- Sugar: 20g
- Sodium: 75mg
- Fat: 8g
- Saturated Fat: 3g
- Unsaturated Fat: 5g
- Trans Fat: 0g
- Carbohydrates: 14g
- Fiber: 1g
- Protein: 2g
- Cholesterol: 0mg
Keywords: Halloween treats, no-bake dessert, easy recipes, festive snacks




