
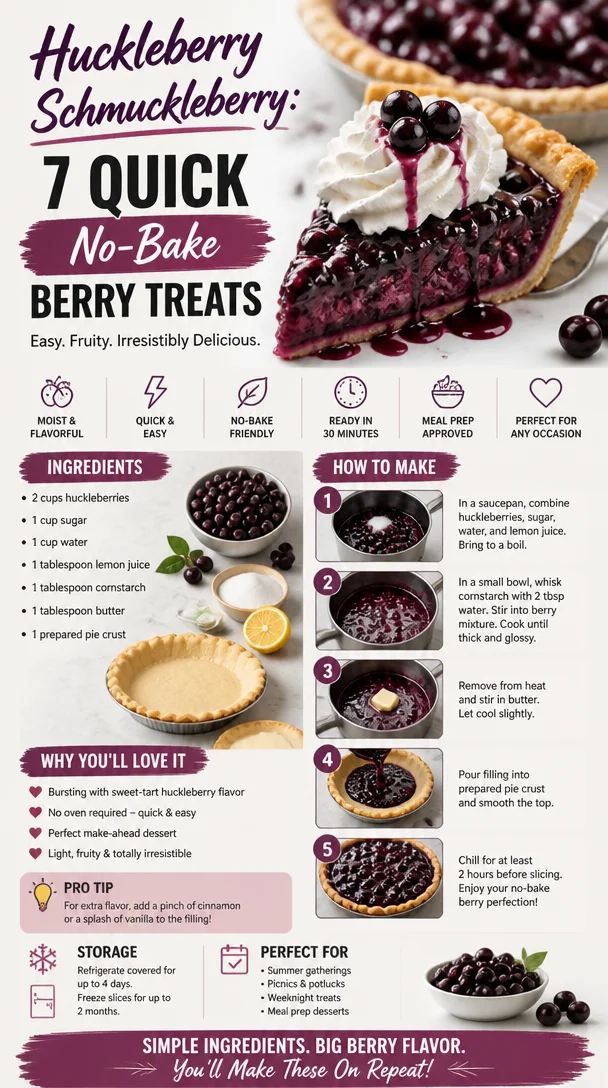
Huckleberry Schmuckleberry: 7 Quick No-Bake Berry Treats
Huckleberry Schmuckleberry: A Cozy Recipe for Sweet Memories
Welcome back to my kitchen, fellow food lovers! Today, I’m inviting you to whip up something that is not just delicious but also packed with warm, fuzzy nostalgia – the delectable Huckleberry Schmuckleberry! This dish isn’t just a recipe; it’s a journey through memories, flavors, and a dash of magic that comes from the heart.
Now, we’re diving into the enchanting world of huckleberries – those tiny, tart berries that are a hidden gem of nature. Growing up in the Pacific Northwest, I was lucky enough to experience the joy of huckleberry-picking with my family every summer. Imagine running through the woods, sun shining, with the sweet scent of wild berries hanging in the air. We’d fill our baskets to the brim, giggling and chatting about the best berry-picking spots. And the best part? Transforming our colorful haul into scrumptious desserts that filled our home with the incredible aroma of baking goodness!
Whether it’s a refreshing huckleberry crumble, a scrumptious pancake topping, or a heavenly jam, these tiny powerhouses of flavor have a way of making everything taste better. And trust me, when you combine huckleberries with some comforting, buttery goodness, you’re in for a real treat.
So, grab your favorite apron and let’s get cooking! I promise you’ll want to share this recipe with your family and friends – they’ll be begging for the secret to this mouthwatering dish!
A Sweet Memory with Huckleberries
Let me take you back to a sun-soaked afternoon in my childhood. It was one of those beautiful days where the sun painted everything golden, and the sweet smell of summer hung in the air like a gentle hug. My family and I ventured into the nearby woods, baskets in hand and excitement bubbling over. We were on the hunt for huckleberries, and let me tell you, it was a quest like no other!
As we trekked through the trails, my little feet would dart from bush to bush, my hands stained with berry juice and my laughter echoing through the trees. The huckleberry bushes seemed to be hiding their treasures just for us, and I remember the thrill of spotting those tiny, plump blue-black berries, glistening like jewels in the dappled sunlight.
Once our baskets were full, it was time for the best part – baking! My mom would turn our treasure into the most scrumptious huckleberry pie, filling our kitchen with warmth and sweet aromas. We’d sit around the kitchen table, eagerly awaiting that first slice, and I’ll never forget the delicious sense of pride that came from tasting something made with love and joy. That’s what I want to share with you today – the beauty of creating something from scratch that brings people together and fills your heart with warmth.
Let’s delve into the ingredients that will bring this huckleberry delight to life!
Ingredients You’ll Need
Here’s a little overview of the ingredients you’ll need to create your Huckleberry Schmuckleberry.
-
Fresh or Frozen Huckleberries (2 cups): These are the star of the show! If you can’t find huckleberries, blueberries or blackberries work too. Just note that huckleberries have a unique tartness that you may want to balance with a little extra sugar.
-
Granulated Sugar (¾ cup): This adds sweetness, balancing the tartness of the berries. Feel free to adjust it based on your preference. You could also substitute with honey or maple syrup for a natural sweetener.
-
Lemon Juice (2 tablespoons): The acidity of lemon juice elevates the flavor. Don’t skip it! If lemons aren’t handy, lime juice works like a charm, or even a splash of vinegar to mimic that tang.
-
Flour (1 cup): For binding everything together! You can use all-purpose flour, or if you’re going gluten-free, almond flour or oat flour can be good substitutes. Just keep an eye on the texture!
-
Old-Fashioned Rolled Oats (1 cup): This adds a fabulous chewy texture. If you’re looking for a gluten-free twist, ensure you choose certified gluten-free oats.
-
Brown Sugar (½ cup): For that hint of caramel flavor. If you don’t have brown sugar, granulated sugar can work as well, though the flavor will be a tad different.
-
Butter (½ cup, melted): The magic ingredient that makes everything come together! Coconut oil can be a fantastic dairy-free alternative.
-
Cinnamon (1 teaspoon): Adds warmth and depth. If you don’t have cinnamon, nutmeg or cardamom could make interesting substitutes.
-
Salt (½ teaspoon): Just a pinch to balance the sweetness.
Step-by-Step Instructions
Grab your apron and let’s get started! Here’s how to create your Huckleberry Schmuckleberry:
-
Preheat the Oven: Set your oven to 350°F (175°C). This way, it’s nice and hot by the time you’re ready to bake, ensuring a bubbly, golden topping!
-
Prepare the Huckleberries: In a medium bowl, combine the huckleberries, granulated sugar, and lemon juice. Stir gently, being careful not to mash the berries. Let this mixture sit for about 10 minutes – this helps the juices release and creates a delicious filling!
-
Mix the Dry Ingredients: In a large bowl, whisk together the flour, rolled oats, brown sugar, cinnamon, and salt until well blended. This is where the cozy aroma begins to fill your kitchen!
-
Incorporate the Butter: Pour the melted butter into the dry ingredients and mix with a fork until everything is combined and crumbly. You want a texture that’s similar to wet sand. If it feels too dry, a splash of milk or a bit of coconut oil can help bring it together.
-
Layer the Dish: Grab a baking dish (8×8 inches works perfectly) and spread half of your oat mixture evenly across the bottom. This is your base!
-
Add the Berry Filling: Spoon the huckleberry mixture on top of the base. Make sure to distribute the berries evenly for a tasty bite every time.
-
Top It Off: Sprinkle the remaining oat mixture over the huckleberries. This will create a lovely topping that crisps up beautifully in the oven.
-
Bake to Perfection: Place your dish in the preheated oven and bake for 30-35 minutes, or until the top is golden brown and bubbly. You’ll know it’s ready when your kitchen smells like a warm hug!
-
Cool and Serve: Once out of the oven, let it cool for about 10-15 minutes. This allows the filling to set up a bit for easier serving.
Serving Suggestions
To serve your delightful Huckleberry Schmuckleberry, scoop generous portions into bowls and top with a dollop of whipped cream or a scoop of vanilla ice cream for a beautiful contrast of temperatures and textures. Drizzling a bit of honey or maple syrup on top adds an extra touch of sweetness! Enjoy it warm, and embrace the wonderful company around you. Remember, this dish is all about sharing and celebrating the flavor!
Recipe Variations
Feel free to get creative with your Huckleberry Schmuckleberry. Here are a few fun twists to consider:
- Nutty Crumble: Add ½ cup of chopped nuts (like almonds or pecans) to the topping for a crunchy texture.
- Berry Duo: Mix huckleberries with raspberries or strawberries for an extra fruity flavor explosion!
- Spiced Up: Add a pinch of nutmeg or allspice to the filling for a warm, aromatic twist.
- Dairy-Free Delight: Swap out regular butter for coconut oil and use almond milk instead to make the recipe completely dairy-free.
- Vegan Version: Use flax eggs (1 tablespoon of ground flaxseed mixed with 3 tablespoons of water) in place of the butter and add maple syrup instead of granulated sugar.
Chef’s Notes
This recipe has evolved from countless kitchen experiments and cherished family gatherings. Each time I make it, I’m reminded of those sun-soaked afternoons spent berry-picking with my loved ones. My mom would often say that the messier I got with the dough and berry juices, the more delicious the dish would turn out. And let me tell you, that’s a philosophy I absolutely live by!
One of my most memorable kitchen mishaps happened when I accidentally forgot to add the sugar one day. I was so worried about making it perfect, I skipped it altogether! But when family arrived and tasted the “experiment,” we all laughed so hard at the unexpectedly tart version. Sometimes, the best memories evolve from little mistakes – just don’t forget the sugar!
FAQs and Troubleshooting
-
Q: My huckleberry filling is too runny. What did I do wrong?
- A: This can happen if your berries are super juicy. Next time, try adding a tablespoon of cornstarch to help thicken the filling while it bakes!
-
Q: How can I make this dish more flavorful?
- A: Adding a teaspoon of vanilla extract to the berry mixture or a citrus zest can amp up the flavors beautifully!
-
Q: Can I prepare this ahead of time?
- A: Absolutely! You can pre-mix the dry ingredients and the huckleberry filling, store them separately in the fridge, and assemble the topping just before you bake.
-
Q: Why is my crumbles topping too crumbly?
- A: If it’s separating too much, you might have added too much butter or flour. Just ensure the mixture stays a bit moist, like wet sand, when you’re mixing.
Nutritional Info
While I believe in enjoying every bite without guilt, it’s also helpful to have a sense of what you’re consuming. Here’s a rough estimate per serving (based on 8 servings):
- Calories: 280
- Carbohydrates: 42g
- Protein: 3g
- Fat: 12g
- Fiber: 4g
And there you have it – your very own Huckleberry Schmuckleberry. I hope this delightful recipe brings as much joy to your kitchen as it has to mine. Remember, the best dishes are made with love, laughter, and a hint of nostalgia. Now, get cooking and share those delicious moments with the people you love! Happy baking!
Print
Huckleberry Schmuckleberry
- Total Time: 50 minutes
- Yield: 8 servings
- Diet: Vegetarian
Description
A nostalgic and delightful dessert featuring huckleberries, perfect for sharing with loved ones.
Ingredients
- Fresh or Frozen Huckleberries (2 cups)
- Granulated Sugar (¾ cup)
- Lemon Juice (2 tablespoons)
- Flour (1 cup)
- Old-Fashioned Rolled Oats (1 cup)
- Brown Sugar (½ cup)
- Butter (½ cup, melted)
- Cinnamon (1 teaspoon)
- Salt (½ teaspoon)
Instructions
- Preheat the Oven: Set your oven to 350°F (175°C).
- Prepare the Huckleberries: In a medium bowl, combine the huckleberries, granulated sugar, and lemon juice. Let this mixture sit for about 10 minutes.
- Mix the Dry Ingredients: In a large bowl, whisk together the flour, rolled oats, brown sugar, cinnamon, and salt until well blended.
- Incorporate the Butter: Pour the melted butter into the dry ingredients and mix until everything is combined and crumbly.
- Layer the Dish: Spread half of your oat mixture evenly across the bottom of an 8×8 inch baking dish.
- Add the Berry Filling: Spoon the huckleberry mixture on top of the base, distributing evenly.
- Top It Off: Sprinkle the remaining oat mixture over the huckleberries.
- Bake to Perfection: Place your dish in the preheated oven and bake for 30-35 minutes.
- Cool and Serve: Let it cool for about 10-15 minutes before serving.
Notes
Serve warm with whipped cream or vanilla ice cream on top.
- Prep Time: 15 minutes
- Cook Time: 35 minutes
- Category: Dessert
- Method: Baking
- Cuisine: American
Nutrition
- Serving Size: 1 serving
- Calories: 280
- Sugar: 15g
- Sodium: 200mg
- Fat: 12g
- Saturated Fat: 7g
- Unsaturated Fat: 4g
- Trans Fat: 0g
- Carbohydrates: 42g
- Fiber: 4g
- Protein: 3g
- Cholesterol: 30mg
Keywords: huckleberry, dessert, nostalgic, baking, summer recipe
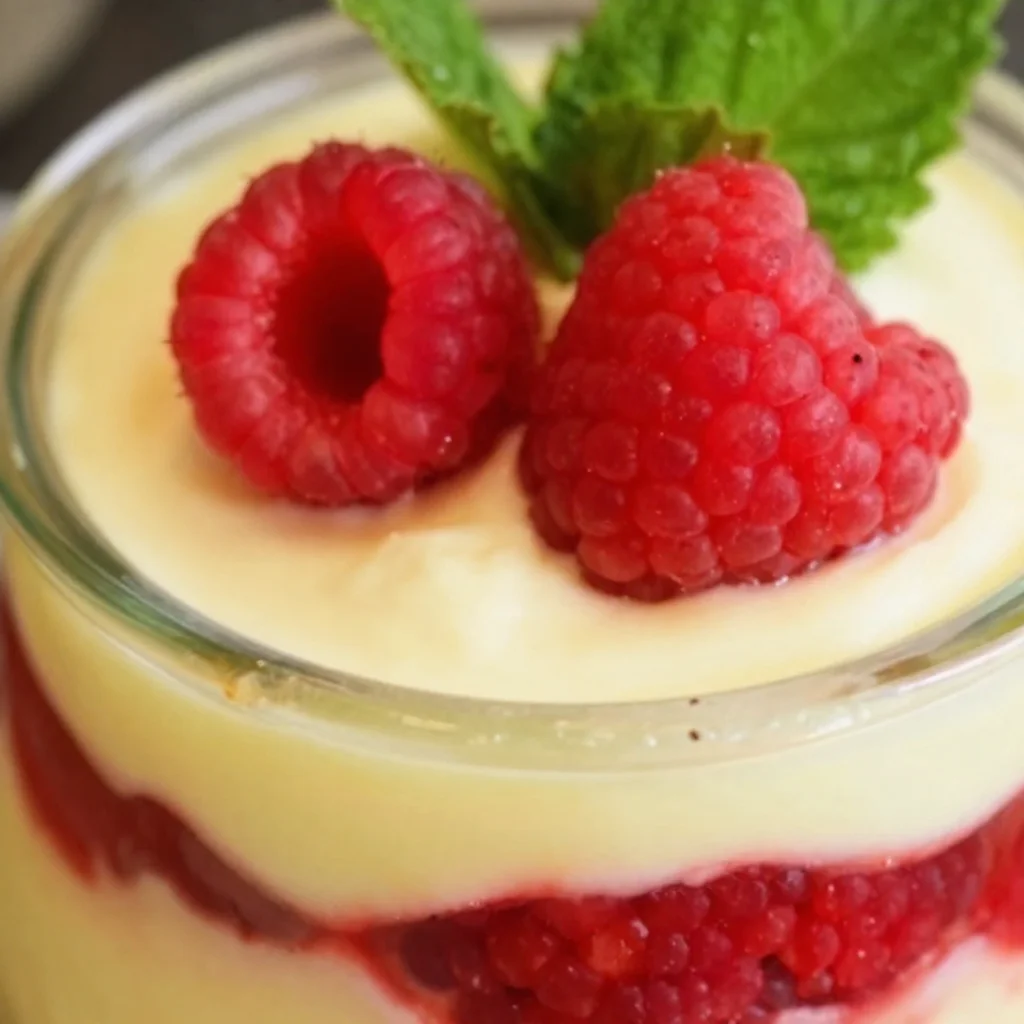
No-Bake Lemon Raspberry Fluff: Quick Summer Dessert
Lemon Raspberry Fluff: A Light and Luscious Dessert That Delights
Hello, fellow food lovers! Welcome back to my kitchen! Today, we’re diving into a recipe that sings of sunshine and sweetness: Lemon Raspberry Fluff. It’s a delightful, airy dessert that brings together the zesty brightness of lemons and the sweet-tartness of fresh raspberries. Imagine sitting on your porch, digging into a fluffy bowl of this light dessert, with the smell of lemon wafting through the air and the vibrant colors dancing in front of your eyes. Doesn’t that sound divine?
Fluff is one of those magical desserts that can elevate any meal or occasion. It’s perfect for summer picnics or lazy Sunday brunches. What I love most about it is how ridiculously simple it is to make! You won’t need to be a pastry chef or have a culinary degree to impress your friends and family. All you need are a few fresh ingredients, a touch of creativity, and of course, a little love (which I believe is the secret ingredient in all great home cooking!).
One of my favorite things about this recipe is its versatility. Serve it straight up or sprinkle on some graham cracker crumbs for an extra crunch. You can even layer it in parfait glasses for a stunning presentation. Trust me, your guests will think you’re a kitchen superstar!
So, grab your apron (maybe a messy one because we all know how that goes), and let’s whip up a Lemon Raspberry Fluff that’s guaranteed to evoke some joy in your kitchen!
A Slice of Nostalgia
I’ll never forget the summer I spent with my grandmother at her lakeside cottage. She had this magical way of conjuring dessert flavors that would dance on your palate. One afternoon, she offered me a simple bowl of fluffy lemon mousse topped with fresh raspberries. The first bite was a revelation! The tartness of the lemon combined with the vibrant sweetness of the raspberries was pure bliss.
Every spoonful felt like sunshine on my taste buds, and from that moment on, I was hooked. Grandma and I would whip it up together, and as the kitchen filled with laughter and joy, I learned that cooking was about more than just the food—it was about connection, memories, and love. That memory has steered my passion for cooking ever since, and it inspires me to create flavorful dishes that foster joy and togetherness in every bite.
I’ve taken that nostalgia and put my own spin on it to bring you this Lemon Raspberry Fluff recipe that will surely transport you back to sun-drenched days filled with sweetness and smiles.
Ingredients
Let’s talk about what you’ll need to create this delicious fluff! Here’s your shopping list:
-
1 cup fresh raspberries
Raspberries bring that sweet-tart punch to the dish. Look for plump, ripe berries; frozen ones can work too, but fresh is always better. -
1 lemon, zested and juiced
Fresh lemon juice adds acidity and brightness. Make sure to zest before juicing! You can also use bottled juice in a pinch, but fresh is always recommended. -
3 tablespoons sugar
For sweetening up the fluff. You can replace this with honey or a sugar substitute if you’re watching your sugar intake. -
2 cups heavy cream
This is what gives the fluff its rich, creamy texture. Whipping cream can be used as a lighter alternative. -
1 teaspoon vanilla extract
Adds a warm layer of flavor to balance the acidity of the lemon. Pure vanilla extract is best! -
Optional: graham cracker crumbs for garnish
Crunchy goodness to sprinkle on top for added texture! If you want a gluten-free option, use crushed nuts or gluten-free crumbs.
Step-by-Step Instructions
Now, let’s get our hands a little messy and whip up this dreamy Lemon Raspberry Fluff! Follow these simple steps, and you’ll be on your way to dessert nirvana.
-
Prep Your Ingredients: Start by rinsing your fresh raspberries gently under cold water. Pat them dry with a paper towel to avoid any excess moisture. Set aside a few to decorate the top later. Zest your lemon and then juice it, making sure it’s fresh.
-
Whip the Cream: In a large mixing bowl, pour in your heavy cream. Using an electric mixer, whip the cream on medium-high speed until soft peaks form. This means the cream should hold its shape but still look fluffy. Be careful not to over-whip or you’ll end up with butter instead!
-
Mix the Lemon Base: In another bowl, combine the lemon juice, lemon zest, sugar, and vanilla extract. Stir until the sugar is dissolved. This mixture is zesty magic; you’re going to love it!
-
Combine the Mixtures: Gently fold the lemon mixture into the whipped cream using a spatula. Use a folding motion to keep the fluffiness intact. This process is crucial; we don’t want to deflate our lovely whipped cream!
-
Add the Raspberries: Now, it’s time to gently fold in the fresh raspberries. You want to break some of them up slightly to release their juices but keep others whole for lovely bursts of flavor.
-
Chill: Spoon the fluff into individual serving bowls or a large dish. Cover with plastic wrap and refrigerate for at least 2 hours, or until chilled and set. This is when the flavors meld together beautifully!
-
Serve and Garnish: When you’re ready to serve, take it out of the fridge. Optionally, sprinkle the top with graham cracker crumbs and add those reserved raspberries for a beautiful, fresh touch!
Serving Suggestions
To plate this fluffy delight, consider serving it in individual glass bowls or parfait glasses. The layers will make for a visually appealing dessert! A sprinkle of graham cracker crumbs or crushed nuts on top will give it a charming crunch. Pair with mint leaves for a pop of color and extra freshness. It’s all about creating that wow factor!
Recipe Variations
Feeling adventurous? Here are some fun twists you can try out:
-
Berry Bliss: Mix it up by adding strawberries or blueberries along with or instead of raspberries. Great for a mixed berry fluff!
-
Coconut Cream: Substitute half of the heavy cream with coconut cream for a tropical flair. Just imagine that creamy, coconut flavor mingling with lemon!
-
Lemon-Lavender Fluff: Add a teaspoon of dried culinary lavender to the lemon mixture for a floral twist that is oh-so-refreshing!
-
Ginger Snap Crunch: For a little zing, add crushed ginger snaps instead of graham cracker crumbs for a spicy sweetness that complements the lemon.
Chef’s Notes
As with any recipe in my kitchen, I always encourage you to make it your own! This Lemon Raspberry Fluff has evolved over the years, initially starting with a simple basic lemon mousse. Each time I’ve made it, I’ve tweaked the proportions and added new flavors. I’ve discovered that sometimes the simplest desserts hold the most memories and joy.
A funny kitchen story: the last time I made this fluff, I accidentally swapped the sugar with salt while in a rush. Let’s just say, surprise and laughter erupted when I offered my family ‘dessert’! Now we have a running joke whenever I make this recipe, “Make sure to check the sugar!”.
FAQs and Troubleshooting
-
What if my fluff is too runny?
If your Lemon Raspberry Fluff is too runny, it could be due to under-whipped cream. Ensure you’re whipping the cream until soft peaks form, and try chilling it longer in the fridge. -
Can I use frozen raspberries?
Yes, but be mindful that they may release more juice, which can make the fluff runnier. If using frozen, let them thaw and drain excess liquid. -
How long will it keep in the fridge?
Your Lemon Raspberry Fluff should stay fresh for about 3 days in the refrigerator. Just be sure it’s covered tightly! -
Can I make it a day ahead?
Absolutely! Making it the day before allows the flavors to meld beautifully and saves you time on the day of your gathering. Just ensure it’s kept covered to maintain its fluffiness.
Nutritional Info
Note: Nutritional values may vary based on portion sizes and specific ingredients used. Always a good idea to calculate if you’re following a strict diet!
That’s it, my dear foodie friends! I hope you enjoy creating and sharing this Lemon Raspberry Fluff as much as I do. Gather your loved ones around the table, share some stories, and celebrate the joy of home cooking. Happy cooking! 🍋🍓
Print
Lemon Raspberry Fluff
- Total Time: 120 minutes
- Yield: 4 servings 1x
- Diet: Vegetarian
Description
A delightful, airy dessert that combines the zesty brightness of lemons with the sweet-tartness of fresh raspberries.
Ingredients
- 1 cup fresh raspberries
- 1 lemon, zested and juiced
- 3 tablespoons sugar
- 2 cups heavy cream
- 1 teaspoon vanilla extract
- Optional: graham cracker crumbs for garnish
Instructions
- Prep Your Ingredients: Rinse raspberries under cold water, pat dry, and set aside a few for decoration. Zest and juice the lemon.
- Whip the Cream: Whip heavy cream in a bowl until soft peaks form.
- Mix the Lemon Base: Combine lemon juice, lemon zest, sugar, and vanilla in another bowl, stirring until sugar is dissolved.
- Combine the Mixtures: Gently fold the lemon mixture into the whipped cream.
- Add the Raspberries: Gently fold in the raspberries, breaking some up slightly.
- Chill: Spoon into serving bowls and refrigerate for at least 2 hours.
- Serve and Garnish: Optionally sprinkle with graham cracker crumbs and add reserved raspberries before serving.
Notes
Feel free to customize with different berries or flavors, such as coconut cream or lavender!
- Prep Time: 15 minutes
- Cook Time: 0 minutes
- Category: Dessert
- Method: Chilling
- Cuisine: American
Nutrition
- Serving Size: 1 serving
- Calories: 250
- Sugar: 12g
- Sodium: 50mg
- Fat: 22g
- Saturated Fat: 13g
- Unsaturated Fat: 9g
- Trans Fat: 0g
- Carbohydrates: 20g
- Fiber: 2g
- Protein: 3g
- Cholesterol: 80mg
Keywords: Lemon Raspberry, Desserts, Fluff Dessert
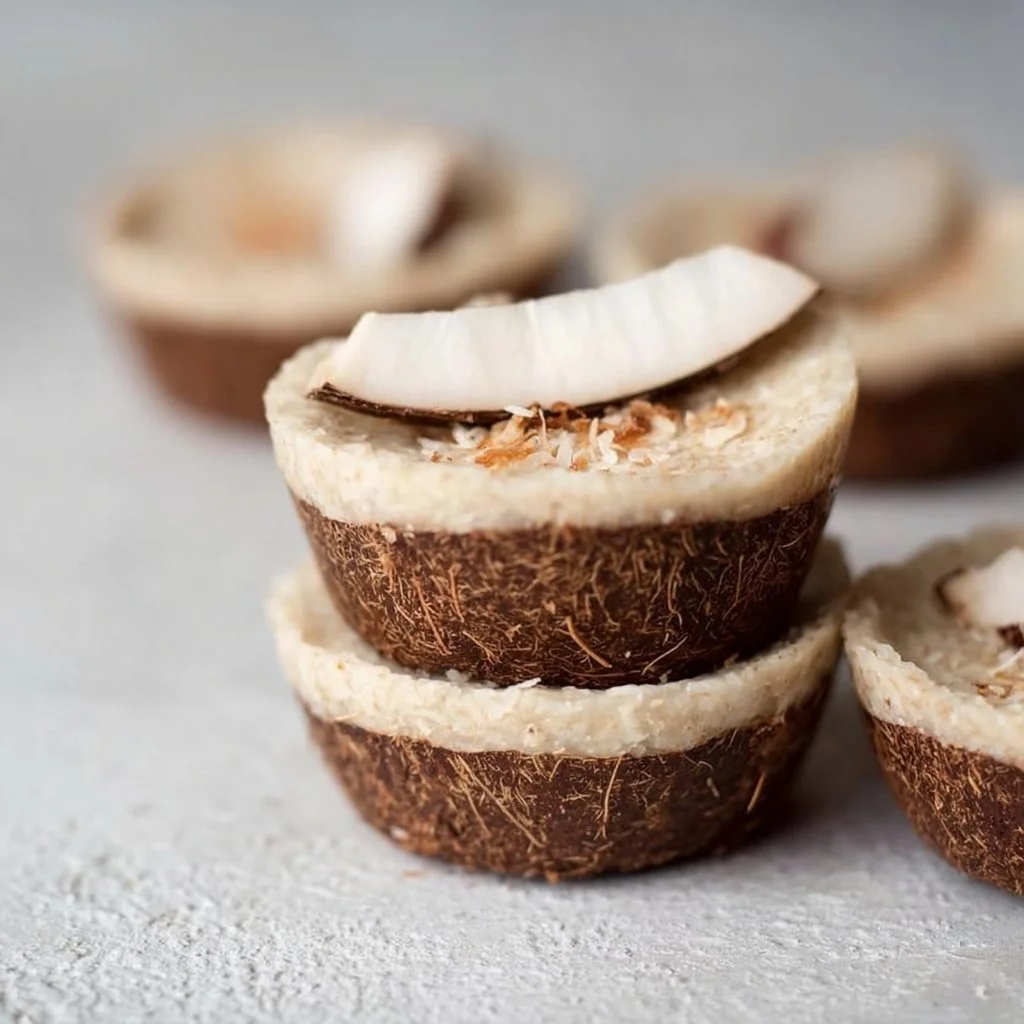
No-bake Vegan Coconut Cups
No-Bake Vegan Coconut Cups: A Sweet Escape to Paradise
Welcome back to my cozy corner of the internet, foodies! Today, we’re diving into a scrumptious treat that’s not only easy to whip up but also a delightful taste of tropical paradise: No-Bake Vegan Coconut Cups. I mean, who doesn’t love a dessert that makes you feel like you’re lounging on a sun-soaked beach? These little gems are the perfect blend of creamy coconut, sweet maple syrup, and luscious nuts, bringing together a medley of flavors that is sure to light up your taste buds.
Now, I know we’re all busy, juggling life, work, and everything in between. That’s why I adore no-bake recipes—they give you all the satisfaction of homemade goodness without tethering you to the oven for hours! Just a few simple steps, and you’ll have delightful coconut cups to share (or not, I won’t judge if you want to keep them all to yourself). What I love about these treats is their versatility. They’re fantastic for any occasion—whether it’s a potluck, a cozy night in, or a fun brunch with friends.
But wait, before we get our hands sticky, let’s talk about why these coconut cups are not just delicious but also a more health-conscious option. They’re vegan, naturally sweetened, and can easily be made gluten-free. Plus, coconut is packed with fiber and healthy fats that provide quick energy—perfect for an afternoon pick-me-up!
So grab your mixing bowls, and let’s get ready to create these delightful No-Bake Vegan Coconut Cups that are as fun to make as they are to eat!
Personal Story
As I sit here thinking about coconut, I can’t help but reminisce about my childhood summers spent at my grandma’s small beach house. The air was always rich with the smell of saltwater and sun-kissed coconut palms, and finding a mug of coconut cream pie or coconut cookies waiting for me was the highlight of my day. Grandma would whip up treats that reminded her of her childhood in the Caribbean, and I’d sit on the patio soaking in both the sun and the flavors.
Every bite took me back to those carefree summers, where the only worries were whether to build sandcastles or collect seashells. That nostalgia inspired these No-Bake Vegan Coconut Cups! They are a tribute not only to grandma’s love for coconut but also to those lazy beach days that seemed endless. Each cup is like a little bite of summer, and I hope making these brings you just as much joy as those sunny memories brought me.
Ingredients
Let’s gather all the goodness we need! Below is a list of ingredients you’ll need to create these delectable coconut cups, along with some handy notes and substitution tips.
-
Unsweetened Shredded Coconut (2 cups): The star of the show! This adds incredible flavor and texture. You can opt for sweetened shredded coconut, but keep in mind it will change the sweetness of your cups.
-
Coconut Cream (1 cup): For that luscious, decadent texture. If you can’t find coconut cream, a can of full-fat coconut milk works just fine—just scoop out the cream from the top after it’s been chilled overnight.
-
Maple Syrup (1/3 cup): This natural sweetener adds a warm, rich quality. You can replace it with agave syrup or date syrup for a different flavor profile.
-
Almond Flour (1/2 cup): It provides a nice nutty undertone. If you have nut allergies, feel free to substitute with oat flour or even all-purpose flour.
-
Vanilla Extract (1 teaspoon): This enhances all the flavors. Pure vanilla extract is best, but if you need to, you could use vanilla essence.
-
Pinch of Sea Salt: Don’t skip this! A little salt enhances sweetness and brings everything together.
-
Dark Chocolate (for drizzling, optional): This adds a rich finish. You can use vegan chocolate chips or even melted cacao for a healthier option.
With this lineup, we’re ready to create something that feels indulgent yet is genuinely wholesome.
Step-by-Step Instructions
Alright, it’s time to get our hands moving! Here’s how to make these delightful No-Bake Vegan Coconut Cups.
-
Prepare Your Muffin Tin: Line a standard 12-cup muffin tin with paper liners or lightly grease with coconut oil. This will ensure an easy release once your cups are set.
-
Mix the Coconut Base: In a large mixing bowl, combine shredded coconut, almond flour, and a small pinch of sea salt. Use a spatula or your hands (get ready for a bit of stickiness!) to mix until well combined. This will be the crusty base that holds all that coconut goodness together!
-
Add Creamy Ingredients: Next, pour in the coconut cream and maple syrup into the dry coconut mix. Stir until it becomes a thick, sticky mass. This is where the magic happens! Make sure everything is well coated—the consistency should be moldable, similar to cookie dough. Pro Tip: If you find it too sticky, add a little more almond flour to absorb some moisture.
-
Form Your Cups: Using a cookie scoop or a tablespoon, portion out the mixture into your muffin tin. Press it down firmly to create a well-formed cup shape; the denser, the better! Make sure it’s packed tightly so it doesn’t fall apart later.
-
Chill: Place your muffin tin in the refrigerator for about 30-60 minutes. This helps the cups firm up nicely, ensuring they’ll hold their shape when you take them out.
-
Optional Chocolate Drizzle: While they chill, melt your dark chocolate in a microwave-safe bowl, using 30-second intervals to avoid burning. Once your coconut cups have set, take them out and drizzle the melted chocolate over each one. This is the glamorous finishing touch that’s sure to impress!
-
Serve and Enjoy: Allow the chocolate to set for a few more minutes, then serve straight from the muffin tin or plate them up for your guests.
These no-bake delights will have you feeling like a kitchen guru in no time!
Serving Suggestions
When it comes to serving these coconut cups, the presentation is key! You can serve them straight from the muffin tin with a colorful napkin underneath for a casual vibe. For a more elegant touch, try placing them on a decorative serving platter with a sprinkle of extra shredded coconut or a few fresh mint leaves for a pop of color. They also pair wonderfully with a fresh fruit salad or a scoop of coconut sorbet on the side for a refreshing contrast.
Recipe Variations
The beauty of these No-Bake Vegan Coconut Cups lies in their versatility. Here are a few fun twists you can try:
-
Chocolate Coconut Cups: Incorporate cocoa powder into the coconut mixture for a chocolatey flair. Simply use 1/4 to 1/2 cup of cocoa powder in place of the almond flour.
-
Nutty Twist: Fold in some chopped nuts such as walnuts or pecans for a satisfying crunch.
-
Fruit Infusion: Add a tablespoon of your favorite jam inside the cups before refrigerating for a sweet surprise!
-
Citrus Zing: Grate some orange or lime zest into the coconut mixture to brighten the flavors.
-
Spiced Coconut Cups: Mix in a bit of cinnamon or nutmeg for a warm, cozy vibe, perfect for cooler months!
Chef’s Notes
You know what’s funny? I used to be a bit of a baking snob, thinking everything needed to be baked to be delicious. But the moment I embraced no-bake treats, my world expanded! These coconut cups have become a go-to for last-minute gatherings or when I want to whip up something sweet without the heat. They’re so easy to customize, and every variation seems like a new adventure.
Another funny kitchen story: the first time I made these, I got so excited about the chocolate drizzle that I may have overdone it. My kitchen looked like a chocolate bomb went off, but the results were totally worth it! Each cup was a little work of art, and seeing friends’ faces light up made it all worth the mess.
FAQs and Troubleshooting
1. Why are my coconut cups too crumbly?
If your cups are falling apart, it might be that they aren’t packed tightly enough or didn’t have enough coconut cream. Next time, make sure to really press them down when forming the cups, and add a splash more coconut cream if needed.
2. How long will these coconut cups last?
Stored in an airtight container in the refrigerator, they can last about a week. But trust me, they’ll be gone long before that!
3. Can I freeze them?
Absolutely! These coconut cups freeze beautifully. Just separate layers with parchment paper and store in a freezer-safe bag. When you’re ready to indulge, let them thaw in the fridge overnight.
4. Can I make these chocolate-covered?
Yes! Just dip each coconut cup into melted chocolate instead of drizzling. This gives them an indulgent chocolatey shell that complements the coconut perfectly.
Nutritional Info (Optional)
While the specific nutritional information can vary based on ingredient brands and quantities, here’s a rough idea of what you’re looking at per coconut cup:
- Calories: ~150
- Protein: 2g
- Fat: 10g
- Carbohydrates: 14g
- Fiber: 3g
- Sugar: 5g
These No-Bake Vegan Coconut Cups are not just a sweet treat; they’re a little reminder of the joys of cooking from the heart. So, roll up your sleeves, get creative, and most importantly, have fun! Here’s to many more kitchen adventures together—you’ve got this, and your taste buds will thank you! Happy cooking!
Print
No-Bake Vegan Coconut Cups
- Total Time: 60 minutes
- Yield: 12 servings 1x
- Diet: Vegan
Description
A delightful treat that combines creamy coconut, sweet maple syrup, and luscious nuts, perfect for any occasion.
Ingredients
- 2 cups Unsweetened Shredded Coconut
- 1 cup Coconut Cream
- 1/3 cup Maple Syrup
- 1/2 cup Almond Flour
- 1 teaspoon Vanilla Extract
- Pinch of Sea Salt
- Dark Chocolate (for drizzling, optional)
Instructions
- Prepare Your Muffin Tin: Line a standard 12-cup muffin tin with paper liners or lightly grease with coconut oil.
- Mix the Coconut Base: In a large mixing bowl, combine shredded coconut, almond flour, and salt; mix until well combined.
- Add Creamy Ingredients: Pour in coconut cream and maple syrup; stir until a thick, sticky mass forms.
- Form Your Cups: Portion out the mixture into muffin tin, pressing down firmly to create a cup shape.
- Chill: Place muffin tin in the refrigerator for 30-60 minutes to firm up the cups.
- Optional Chocolate Drizzle: Melt dark chocolate and drizzle over the set coconut cups.
- Serve and Enjoy: Serve straight from the muffin tin or plate them up for guests.
Notes
These coconut cups can be stored in an airtight container in the refrigerator for up to a week. They also freeze beautifully!
- Prep Time: 15 minutes
- Cook Time: 0 minutes
- Category: Dessert
- Method: No-Bake
- Cuisine: Vegan
Nutrition
- Serving Size: 1 cup
- Calories: 150
- Sugar: 5g
- Sodium: 10mg
- Fat: 10g
- Saturated Fat: 9g
- Unsaturated Fat: 1g
- Trans Fat: 0g
- Carbohydrates: 14g
- Fiber: 3g
- Protein: 2g
- Cholesterol: 0mg
Keywords: no-bake, vegan, coconut, dessert, healthy treat


