
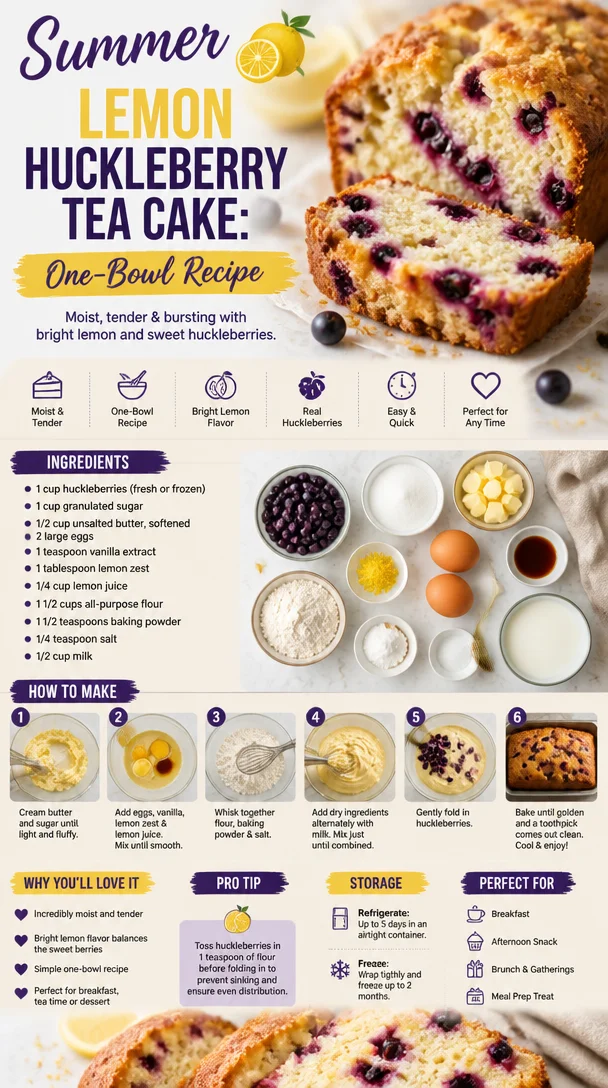
Summer Lemon Huckleberry Tea Cake: One-Bowl Recipe
Lemon Huckleberry Tea Cake: A Slice of Sunshine in Every Bite
Welcome to my kitchen, dear friends! Today, we’re diving into a recipe that feels like the essence of summer captured in a cake: Lemon Huckleberry Tea Cake. Imagine a warm afternoon, the sun dancing through your kitchen window, and the delightful aroma of freshly baked cake surrounding you. It’s a moment that invites laughter, connection, and perhaps a cup of your favorite tea. If huckleberries are in season, you’re in for a real treat, but if you can’t find them, don’t worry—I’ve got you covered with some fantastic substitutions!
Baking this Lemon Huckleberry Tea Cake is not just about following a recipe; it’s about creating a moment—a memory—much like my childhood summers spent at my grandparents’ cabin in the mountains. Those days were filled with picking berries, making lemonade, and, of course, baking with my grandmother, who could whip up a cake in no time flat. Her secret? Love and a zest for life, which I’ve infused into this very recipe.
I still remember the day we baked a cake filled with fresh huckleberries picked right from the lush ravines behind their home. We’d sing off-key as we mixed the batter, and as the cake rose in the oven, it filled the cabin with a sweet, tangy aroma that promised deliciousness. My grandparents would sit with us at the table, their faces lighting up with joy as we shared our creation. That experience inspired this Lemon Huckleberry Tea Cake—a tribute to unconditional love and cherished memories.
Ingredients
Here’s what you’ll need to get started on your Lemon Huckleberry Tea Cake:
-
1 ½ cups all-purpose flour
This is the backbone of your cake. If you want a gluten-free option, feel free to swap in a 1:1 gluten-free baking flour mix. Ensure it’s one with xanthan gum for better structure! -
1 teaspoon baking powder
This helps our cake rise, giving it a light and airy texture. You could use baking soda if you’re out, but remember to adjust the acid in your recipe (a splash of vinegar or lemon juice) to balance it out. -
½ teaspoon baking soda
Just a little extra lift! It works in tandem with the baking powder for that perfectly fluffy cake. -
½ teaspoon salt
Salt enhances all the flavors. Don’t skip it; it’s like the background music to your culinary masterpiece! -
½ cup unsalted butter, softened
Butter gives your cake that rich flavor. If you’re dairy-free, you can swap it with coconut oil, but keep that in mind if you want a hint of coconut in your cake. -
1 cup granulated sugar
Sweetness is essential! You can substitute part of it with honey or maple syrup—reduce the liquid in your recipe slightly if you go this route. -
2 large eggs
These not only add moisture but also bind the ingredients together. For a vegan option, use 1/2 cup of unsweetened applesauce or flax eggs (1 tablespoon ground flaxseed mixed with 2.5 tablespoons of water). -
Zest of one lemon
This is where the magic starts—zest brightens flavors and gives a lovely aroma. If you don’t have lemons, some orange zest could work in a pinch! -
Juice of one lemon (about 2–3 tablespoons)
The tartness balances the sweetness perfectly. If you’ve got limes on hand, feel free to use their juice as a twist! -
1 cup huckleberries (fresh or frozen)
These little gems provide bursts of sweet-tart flavor. If you can’t find huckleberries, blueberries make a delicious substitute! -
1 teaspoon vanilla extract
A must-have for that aromatic depth!
Let’s get mixing!
Step-by-Step Instructions
1. Preheat Your Oven
Begin by preheating your oven to 350°F (175°C). This is super important as it ensures your cake starts cooking as soon as it goes in. Nothing like a perfectly preheated oven to get those baking vibes flowing!
2. Prepare Your Baking Pan
Grease a 9-inch round cake pan or line it with parchment paper to ensure your lovely creation doesn’t stick. I always like to use parchment on the bottom because it makes it so easy to pop the cake out later.
3. Mix the Dry Ingredients
In a medium bowl, whisk together the flour, baking powder, baking soda, and salt. This step ensures that your leavening agents are evenly distributed (no one likes a cake with a random lump of baking powder!).
4. Cream Butter and Sugar
In a large mixing bowl, cream the softened butter and granulated sugar together until you achieve a light and fluffy texture—about 3-4 minutes using an electric mixer. This is where all your hard work pays off, making sure to scrape down the sides of the bowl so everything’s incorporated!
5. Add the Eggs and Flavorings
Next, beat in the eggs one at a time, mixing well after each addition. Then add the lemon zest, lemon juice, and vanilla extract. The batter should now smell divine!
6. Combine the Wet and Dry Ingredients
Gradually add the dry ingredients to the wet mixture, alternating with 1/2 cup of milk (or a dairy-free alternative). Start and end with the dry mix for the best texture. Mix until just combined—overmixing can lead to a dense cake, and nobody wants that!
7. Fold in the Huckleberries
Gently fold in the huckleberries. This is where you introduce those sweet bursts of flavor! If using frozen berries, there’s no need to thaw them—just fold them in gently. The batter may turn a little purple—that’s okay; it’s going to be delicious!
8. Pour and Bake
Pour the batter into your prepared cake pan, smoothing out the top with a spatula. Place in the oven and bake for 25-30 minutes, or until a toothpick inserted into the center comes out clean or with just a few moist crumbs. Keep an eye on it after 25 minutes; ovens can be tricky!
9. Cool and Serve
Once baked, remove the cake from the oven and let it cool in the pan for about 10 minutes before transferring it to a wire rack. Let it cool completely before dusting with powdered sugar or a drizzle of lemon glaze. Oh, that final touch really makes it sing!
Serving Suggestions
Slice your Lemon Huckleberry Tea Cake and serve it with a dollop of freshly whipped cream or a scoop of vanilla ice cream—heavenly! Pair it with a lovely cup of Earl Grey or your favorite herbal tea for an afternoon treat that feels just a bit special. Don’t forget to share with friends; it makes every bite even sweeter!
Recipe Variations
-
Berry Mix: Instead of just huckleberries, combine blueberries, raspberries, and blackberries for a delightful berry medley.
-
Lemon Blueberry: Use blueberries instead of huckleberries; the classic combo is always a crowd-pleaser and beautifully vibrant.
-
Gluten-Free: Substitute all-purpose flour with a gluten-free flour blend and add a pinch of xanthan gum to improve texture.
-
Lemon-Lavender Twist: Add a teaspoon of dried culinary lavender to the batter to create a subtly fragrant cake.
-
Coconut Flavored: Swapping out half of the butter for coconut oil and adding shredded coconut to the batter can elevate the tropical vibes!
Chef’s Notes
Ah, baking—and the countless memories wrapped in those joyful moments! I can’t help but chuckle when I think about those early baking experiments that didn’t go as planned. One time, I accidentally mistook salt for sugar and created a delightfully hilarious kitchen disaster—with some very confused taste testers! But hey, every mishap in the kitchen is a memory in the making!
Over the years, this Lemon Huckleberry Tea Cake has seen many variations. Sometimes I’ve made it with a crumb topping (delicious!), or added a glaze of lemon juice and powdered sugar for an extra sweetness. The beauty of baking is that you can always play—creating something new every time!
FAQs and Troubleshooting
1. Why did my cake sink in the middle?
This can happen if the batter was overmixed or if the oven temperature was too low. Be gentle with your mixing and ensure your oven is properly calibrated!
2. Can I use frozen huckleberries?
Absolutely! Frozen huckleberries work just fine. There’s no need to thaw them, although they may lend a bit more moisture to your batter, which is usually welcome in a cake.
3. How do I know when my cake is done?
Perform the toothpick test—if it comes out clean or with a few moist crumbs clinging, it’s ready!
4. Can I make this ahead of time?
Definitely! The cake keeps well at room temperature for a few days, or you can freeze it wrapped tightly for up to 3 months. Just thaw it in the fridge overnight before serving.
Nutritional Info
The nutrition information for this Lemon Huckleberry Tea Cake varies based on specific ingredients and portion sizes. However, a standard slice (1/12th of the cake) can range from 200-250 calories, with a good source of vitamin C from the lemon. For more exact details, consider using a nutritional calculator with the exact quantities and specific brands of ingredients you use.
I hope you’re as excited to create this delightful cake as I am! Remember, it’s not just about baking; it’s about the joy and warmth you bring into your kitchen. Happy baking, and be sure to share your creations with loved ones—they’ll savor every slice! 🌼
Print
Lemon Huckleberry Tea Cake
- Total Time: 45 minutes
- Yield: 12 servings 1x
- Diet: Vegetarian
Description
A delightful cake capturing the essence of summer with the sweet-tart flavor of huckleberries and a hint of lemon.
Ingredients
- 1 ½ cups all-purpose flour
- 1 teaspoon baking powder
- ½ teaspoon baking soda
- ½ teaspoon salt
- ½ cup unsalted butter, softened
- 1 cup granulated sugar
- 2 large eggs
- Zest of one lemon
- Juice of one lemon (about 2–3 tablespoons)
- 1 cup huckleberries (fresh or frozen)
- 1 teaspoon vanilla extract
Instructions
- Preheat your oven to 350°F (175°C).
- Prepare a 9-inch round cake pan, greasing or lining it with parchment paper.
- Mix the dry ingredients: whisk together the flour, baking powder, baking soda, and salt.
- Cream the butter and sugar together until light and fluffy.
- Add the eggs one at a time, beating well after each addition, then mix in the lemon zest, lemon juice, and vanilla extract.
- Combine the wet and dry ingredients, alternating with milk until just combined.
- Fold in the huckleberries gently.
- Pour the batter into the prepared pan and bake for 25-30 minutes.
- Cool the cake in the pan for 10 minutes, then transfer to a wire rack.
Notes
Tip: Serve the cake with whipped cream or vanilla ice cream. It’s perfect with a cup of tea!
- Prep Time: 15 minutes
- Cook Time: 30 minutes
- Category: Dessert
- Method: Baking
- Cuisine: American
Nutrition
- Serving Size: 1 slice
- Calories: 220
- Sugar: 10g
- Sodium: 300mg
- Fat: 9g
- Saturated Fat: 5g
- Unsaturated Fat: 3g
- Trans Fat: 0g
- Carbohydrates: 30g
- Fiber: 1g
- Protein: 3g
- Cholesterol: 50mg
Keywords: cake, lemon, huckleberry, dessert, summer, baking
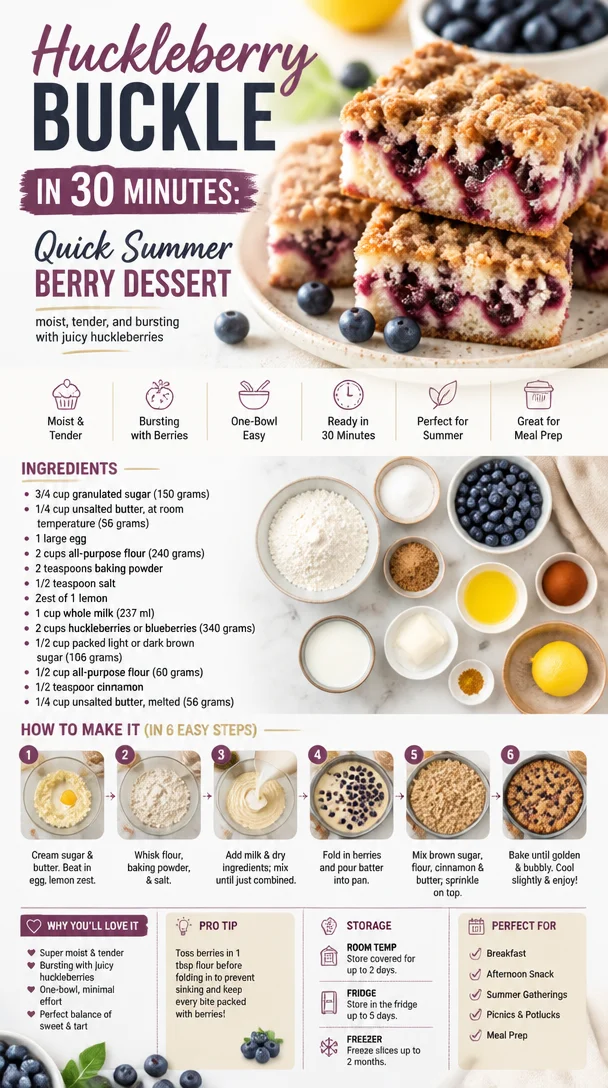
Huckleberry Buckle in 30 Minutes: Quick Summer Berry Dessert
Huckleberry Buckle: A Cozy, Berry-Laden Delight
Welcome back to my kitchen friends! I’m so thrilled you’re here today because we’re delving into one of my all-time favorite bakes: Huckleberry Buckle. Now, let me tell you, this isn’t just a dessert; it’s a slice of nostalgia, a warm hug on a chilly day, and a way to bring a little piece of summer into your home—all wrapped up in a delicious, buttery cake layered with sweet, tart huckleberries.
Huckleberries bring such a unique flavor to the table. Their sweet-tartness captures the essence of wild blueberries, but with a delightful hit of earthiness that makes them stand out. When I think of huckleberries, I’m reminded of my childhood adventures, foraging in the woods behind my grandparents’ house with my siblings. Those lazy summer days, sun beaming down, the smell of earth mixing with the sweet fragrance of berries—it was pure magic. We would return home, arms stained and fingers sticky, eager to help Grandma whip up a batch of her famous huckleberry pie or buckle. The kitchen would fill with the warmth of vanilla and butter, enticing the whole family to gather ’round.
Creating this Huckleberry Buckle is not just about the final product; it’s about the memories we make and the love we share as we create something special. Whether you’re whipping this up for a dinner party, a cozy family brunch, or just because you want to treat yourself, I promise you, it’ll become a cherished part of your own kitchen story. So, grab those huckleberries and let’s get started!
Personal Story
Picture this: I was no more than ten years old, immersed in a summer adventure. Armed with a small basket and a strong sense of adventure, I wandered through the wilds of my grandparents’ backyard, coaxing my siblings to join the hunt for the elusive huckleberry. With each tiny berry we plucked, we shared giggles and tales of mischief while trying to see who could fill their basket first. Eventually, we’d head inside, resonating with the laughter that echoed off the kitchen walls.
Grandma was waiting, apron tied firmly around her waist, a twinkle in her eye as she beckoned us to help her in the kitchen. The huckleberries would soon become something magical—a huckleberry buckle that filled the house with warmth, filling us with happiness for hours afterward. Fast forward to today, and every time I bake this buckle, I’m whisked back to that lovely kitchen filled with family, laughter, and the sweet scent of baked huckleberries. So here I am, ready to share this love with you. Let’s dive into the ingredients for this delightful dessert!
Ingredients
-
Fresh Huckleberries (2 cups)
The star of the show! If you can’t find huckleberries, blueberries or blackberries work well, but you’ll lose some of that unique huckleberry flavor. You can also try frozen huckleberries if fresh ones aren’t available, but make sure to thaw and drain them well to avoid excess moisture in the buckle. -
All-Purpose Flour (1 ½ cups)
A staple in almost every baking recipe! This will form the cake base. For gluten-free options, use a 1:1 gluten-free flour mix, but keep an eye on the texture—it might need a little more liquid. -
Granulated Sugar (1 cup)
Sweetness is key! If you prefer a less sweet dessert, feel free to reduce the sugar by ¼ cup. -
Unsalted Butter (½ cup or 1 stick, softened)
Butter brings richness and flavor. For a dairy-free option, you can use coconut oil or a vegan butter substitute. -
Large Eggs (2)
Helps bind everything together for a perfect texture. If you’re looking for an egg substitute, you can use ¼ cup of applesauce or a flaxseed meal mix (1 tbsp flaxseed meal combined with 2.5 tbsp water). -
Milk (½ cup)
A splash of milk adds moisture. You can replace it with almond milk, oat milk, or any other non-dairy milk if needed. -
Baking Powder (2 tsp)
This is our leavening agent, making the buckle rise. If you run out of baking powder, you can use baking soda mixed with an acid (like vinegar or lemon juice) in a pinch—1 tsp baking soda plus 1 tsp vinegar will do the trick! -
Salt (½ tsp)
A touch of salt enhances all the flavors, so don’t skip it! -
Vanilla Extract (1 tsp)
Adds warmth and depth to your buckle. For a twist, try almond extract! -
Cinnamon (½ tsp)
A warm spice that complements the huckleberries beautifully. You can also add a pinch of cardamom for a unique flavor.
Step-by-Step Instructions
Preheat the Oven
- Preheat your oven to 350°F (175°C).
While your oven warms up, this is a great time to gather and measure out your ingredients—organization is key in the kitchen!
Prepare Your Baking Dish
- Grease a 9×9-inch square baking dish or a round cake pan.
Use butter or non-stick spray liberally to prevent sticking. You can even line the bottom with parchment paper for an extra precaution.
Mix the Dry Ingredients
- In a large mixing bowl, whisk together the flour, baking powder, salt, and cinnamon.
Make sure everything is combined for even distribution of those beautiful flavors.
Cream the Butter and Sugar
- In another bowl, cream together the softened butter and sugar until light and fluffy.
This is key for a tender cake. Use an electric mixer if you have one; it takes less time and delivers a lighter texture.
Add the Eggs and Vanilla
- Add the eggs, one at a time, followed by the vanilla, mixing until smooth.
The mixture might look a bit curdled; that’s just fine—everything will come together beautifully with the dry ingredients.
Combine the Wet and Dry Ingredients
- Gradually add your dry ingredients to the butter mixture.
Mix on low speed until no flour is visible. The batter should be thick and creamy—don’t over-mix it, though!
Add Huckleberries
- Fold in the huckleberries gently, ensuring they are evenly distributed without breaking them too much.
This is a fun step—feel free to use your hands if you’re comfortable! Just be gentle.
Pour into Baking Dish
- Pour the batter into your prepared baking dish.
Use a spatula to spread it evenly; the batter may look a bit thick—that’s how we want it!
Bake!
- Bake in your preheated oven for 35–40 minutes, or until a toothpick inserted in the center comes out clean.
The edges should be golden brown and the top slightly puffed. Keep an eye on it! Every oven is a little different.
Cool and Serve
- Once baked, allow to cool in the pan for about 10 minutes before transferring to a wire rack.
This cooling step is crucial; it helps the buckle set. Serve slightly warm, perhaps with a drizzle of cream or scoop of ice cream on top!
Serving Suggestions
To plate your Huckleberry Buckle, cut it into squares or wedges and arrange them on a beautiful serving platter. Dust with a light sprinkling of powdered sugar for a touch of elegance. If you’re feeling indulgent, add a scoop of whipped cream or vanilla ice cream on top! You can also serve it warm with a generous dollop of Greek yogurt for a delightful balance of flavors. Enjoy it with your favorite coffee or tea—it’s the perfect pairing!
Recipe Variations
- Lemon Zest Addition: Add a tablespoon of fresh lemon zest to the batter for a bright citrus kick.
- Nutty Flavor: Stir in ½ cup of chopped walnuts or pecans for extra texture and nutty flavors.
- Dairy-Free Twist: Substitute all dairy ingredients with non-dairy alternatives without compromising the flavor or texture.
- Mixed Berries: Combine huckleberries with raspberries or strawberries for a colorful and flavorful twist.
- Spiced Buckle: Experiment with spices by adding nutmeg or ground ginger for a warming flavor profile.
Chef’s Notes
I’ve been making this Huckleberry Buckle for years now, and it has undergone a few delightful transformations along the way. One particularly funny story comes to mind: I once confused baking soda with baking powder, resulting in what I called “Berry Flatbread.” Not quite the fluffy buckle I was hoping for, but an impromptu brunch recipe was born! I’ve learned to keep my baking supplies organized since then, and it’s those little mishaps that keep cooking fun, right?
FAQs and Troubleshooting
Q: My buckle turned out too dense. What did I do wrong?
A: Density can come from over-mixing the batter or not enough leavening agents. Ensure you don’t over-mix once the dry ingredients are added, and double-check that your baking powder is fresh.
Q: How do I adjust this recipe for a larger group?
A: This recipe can easily be doubled for a 9×13-inch baking pan! Just keep an eye on baking time as it may require a few extra minutes.
Q: Can I make this ahead of time?
A: Absolutely! You can prepare it the day before and store it covered at room temperature. Reheat slices in the oven or microwave before serving.
Q: What can I use instead of huckleberries?
A: If huckleberries aren’t available, blueberries, blackberries, or even chopped strawberries can be delightful substitutes!
Nutritional Info
Nutritional values can vary, but one serving (1/16 of the finished buckle) typically has around 220 calories, 8g of fat, 35g of carbohydrates, and 2g of protein. Remember, it’s all about balance, so indulge and enjoy every bite!
There you have it, my friends—your ultimate guide to crafting a beautiful Huckleberry Buckle. I can’t wait to hear about your baking adventures, and I’m here to support you every step of the way. Happy baking, and may your kitchen be filled with joy and delicious scents!
Print
Huckleberry Buckle
- Total Time: 55 minutes
- Yield: 16 servings
- Diet: Vegetarian
Description
A cozy, berry-laden delight that brings a slice of summer into your home, layered with sweet, tart huckleberries in a buttery cake.
Ingredients
- Fresh Huckleberries (2 cups)
- All-Purpose Flour (1 ½ cups)
- Granulated Sugar (1 cup)
- Unsalted Butter (½ cup, softened)
- Large Eggs (2)
- Milk (½ cup)
- Baking Powder (2 tsp)
- Salt (½ tsp)
- Vanilla Extract (1 tsp)
- Cinnamon (½ tsp)
Instructions
- Preheat your oven to 350°F (175°C).
- Grease a 9×9-inch square baking dish or a round cake pan.
- In a large bowl, whisk together the flour, baking powder, salt, and cinnamon.
- Cream together the softened butter and sugar until light and fluffy.
- Add the eggs, one at a time, followed by the vanilla, mixing until smooth.
- Gradually add your dry ingredients to the butter mixture.
- Fold in the huckleberries gently.
- Pour the batter into your prepared baking dish.
- Bake for 35–40 minutes, or until a toothpick comes out clean.
- Once baked, allow to cool in the pan for about 10 minutes before transferring to a wire rack.
Notes
Dust with powdered sugar before serving. Can serve warm with whipped cream or yogurt.
- Prep Time: 15 minutes
- Cook Time: 40 minutes
- Category: Dessert
- Method: Baking
- Cuisine: American
Nutrition
- Serving Size: 1 serving
- Calories: 220
- Sugar: 10g
- Sodium: 200mg
- Fat: 8g
- Saturated Fat: 5g
- Unsaturated Fat: 3g
- Trans Fat: 0g
- Carbohydrates: 35g
- Fiber: 2g
- Protein: 2g
- Cholesterol: 30mg
Keywords: huckleberry, buckle, dessert, cake, summer, baking
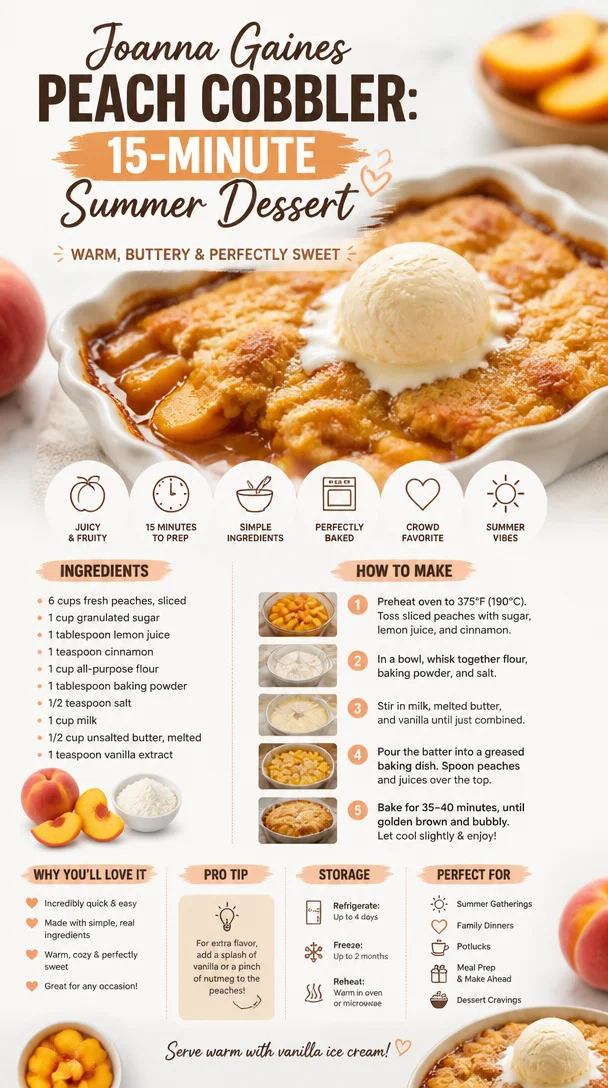
Joanna Gaines Peach Cobbler: 15-Minute Summer Dessert
The Ultimate Joanna Gaines Inspired Peach Cobbler Recipe
Welcome to my kitchen! Today, we’re diving into the world of comfort food with a delightful recipe that embodies warmth and nostalgia: Joanna Gaines’ Peach Cobbler. If there’s anything that brings people together quite like the smell of sweet, caramelized peaches mingling with buttery biscuit topping, it’s this classic dish. This peach cobbler is not just about satisfaction; it’s about creating memories, sharing stories, and, of course, indulging in a well-deserved treat after a long day.
Whether you’re serving it at a family gathering, an afternoon picnic, or for a cozy night in, this cobbler has a way of sparking joy and conversation. As you whip up the batter, you might find yourself reminiscing about summertime visits to grandma’s house or backyard barbecues with friends. Each bite is like a warm hug — light, flaky, and packed with juicy peaches that transport you directly to those sunny memories.
So, grab your apron, pour yourself a cup of something warm, and let’s embark on this peachy adventure together. With summer fruit at its peak, there’s no better time to whip up this easy, delicious dessert that’ll have everyone asking for seconds! Trust me, once you make this cobbler, it’ll become a staple in your home, a dish you return to time and time again.
All set? Let’s get cooking!
A Slice of Nostalgia
I remember the first time I made a peach cobbler. It was a spontaneous decision one summer afternoon when the sun was shining, and the air was thick with warmth. I was rummaging through my kitchen when I stumbled upon a bag of fresh peaches that had been given to me by a neighbor. They were perfectly ripe, just waiting to be transformed into something magical.
Gathering my ingredients, I decided to channel my inner Joanna Gaines — because who doesn’t want to cook like a modern-day culinary queen with a charming farmhouse vibe? As I sliced the peaches, the sweet, fragrant aroma filled my kitchen, almost making me giddy with nostalgia. It transported me back to those lazy summer days at my grandmother’s house, where cobblers simmered in the oven, their scents wafting through the open windows.
I decided to make a simple cobbler recipe I had memorized but with a couple of Joanna’s signature twists. The first bite was pure bliss, and I knew I had struck gold. Friends gathered and laughed as we dug into that cobbler, topped with a scoop of vanilla ice cream, each bite sparking stories and joy. Since that day, I’ve made it countless times, adapting it here and there, but always keeping that first adventurous spirit alive.
Ingredients to Bring This Cobbler to Life
Let’s gather our ingredients! Each component plays a vital role in ensuring our peach cobbler is nothing short of perfection:
-
Fresh Peaches (4-6 cups): The star of our show! Choose ripe, juicy peaches for the best flavor. If peaches aren’t in season, feel free to substitute with canned peaches (be sure to drain them well!).
-
Granulated Sugar (1 cup): To enhance the sweetness of those luscious peaches. You can swap it for brown sugar if you prefer a deeper, caramel flavor.
-
All-Purpose Flour (1 cup): This is the base for our cobbler topping. If you’re looking for gluten-free options, almond flour or a gluten-free flour blend works great too.
-
Baking Powder (1 tablespoon): This will give our cobbler the lift it needs. Make sure your baking powder is fresh for that perfect rise.
-
Salt (1/4 teaspoon): Just a pinch to balance the sweetness and enhance the flavors.
-
Milk (1 cup): Whole milk adds richness, but you can use almond milk or any other non-dairy milk if you’re looking to lighten it up.
-
Butter (1/2 cup, melted): Because everything is better with butter! If you’re in a pinch, coconut oil or a dairy-free alternative can be used here.
-
Ground Cinnamon (1 teaspoon): A warm spice that complements the peaches beautifully. Feel free to add nutmeg for an extra depth of flavor.
These ingredients not only create that gooey, irresistible filling and fluffy topping; they also remind us of simple, wholesome cooking.
Step-by-Step Instructions
Now, let’s roll up our sleeves and get to the fun part! Here’s how to whip up this peach cobbler from scratch:
-
Preheat Your Oven: Start by preheating your oven to 375°F (190°C). This ensures that the cobbler bakes evenly and turns golden brown.
-
Prepare Your Peaches: If you’re using fresh peaches, wash, peel, and slice them. Place the sliced peaches in a large bowl and toss them with half of the sugar (about 1/2 cup) and the ground cinnamon. Let them sit for about 10-15 minutes so that they release their natural juices.
-
Mix the Batter: In a separate bowl, whisk together the flour, baking powder, remaining sugar, and salt. Slowly add the milk and melted butter to this mixture, stirring just until combined. Be careful not to overmix; it’s okay if there are a few lumps!
-
Assemble the Cobbler: Grease a large baking dish (about 9×13 inches) with butter or cooking spray. Pour the batter evenly into the bottom of the dish without stirring (yes, it’s supposed to look a bit awkward, but trust the process). Carefully spoon the peach mixture over the batter. Don’t worry if it looks messy; it will all come together beautifully in the oven!
-
Bake to Perfection: Pop the baking dish in the preheated oven and bake for about 40-45 minutes or until the top is golden brown and the filling is bubbly. You’ll want to keep an eye on it in the last few minutes — the aroma will drive you crazy!
-
Let it Cool: Once golden, take it out and let it cool for at least 10-15 minutes before serving. This allows the cobbler to set, making it easier to slice.
Chef’s Tips:
-
Peeling Peaches: A quick tip for peeling peaches is to blanch them. Simply drop them in boiling water for 30 seconds and then transfer them to an ice bath. The skins will slip off easily!
-
Adjusting Sweetness: Before baking, taste your peaches! If they are a bit tart, don’t hesitate to add more sugar to accentuate the sweetness.
-
Layering Flavors: Feel free to add a teaspoon of vanilla extract to the batter for an aromatic touch.
Serving Suggestions
When it comes to serving your peach cobbler, the sky’s the limit! I love to serve it warm, straight from the oven, garnished with a generous scoop of vanilla ice cream or a dollop of freshly whipped cream. The combination of warm cobbler and cold ice cream creates that perfect balance of temperature and texture that takes it over the top. For an extra touch, sprinkle some ground cinnamon or chopped nuts over the top for added crunch.
Recipe Variations
Feeling adventurous? Here are some fun variations to personalize your peach cobbler:
-
Berry Twist: Add in some fresh blueberries or raspberries along with the peaches for a mixed berry cobbler. The tartness of the berries perfectly complements the sweetness of the peaches.
-
Swap the Peaches: Don’t limit yourself to just peaches! Try using apples, cherries, or even apricots in the same recipe for a unique twist.
-
Add Zest: For an extra burst of flavor, add a teaspoon of lemon or orange zest to the peach mixture. It can brighten up the flavors in a delightful way.
-
Brown Butter: For a nutty flavor, brown the butter before adding it to the batter. This adds a deeper richness and a unique twist that is sure to impress.
Chef’s Notes
This peach cobbler recipe has traveled through my kitchen, evolving with each batch I make. I remember one particularly hilarious mishap where I grabbed a container labeled "sugar" from my pantry — only to realize later it was actually salt! Talk about a salty surprise! Since then, I’ve learned to check my containers. But, every experience in the kitchen is a lesson, and I love that. The best part about making things yourself is how unique each creation can be, just like the stories behind them.
Each summer, I make it a goal to experiment with whatever fruit is in season, and peach cobbler always takes me back to simplicity and joy. Over the years, I’ve shared this recipe with friends, family, and even at potlucks, and it has never failed to delight!
FAQs and Troubleshooting
-
Why is my cobbler too runny?
- If your cobbler is too runny, it could be that the peaches had too much juice or you didn’t use enough flour. Next time, consider adding a tablespoon of cornstarch to the peach mixture to help thicken it up.
-
Can I make this a day in advance?
- Absolutely! You can prepare everything the day before and store it in the fridge. However, for the best results, I recommend baking it fresh on the day you plan to serve it.
-
What can I use if I don’t have baking powder?
- If you don’t have baking powder, you can make a substitute using 1/4 teaspoon of baking soda with 1/2 teaspoon of cream of tartar or simply use self-rising flour in place of all-purpose flour since it contains baking powder.
-
Can I freeze leftover cobbler?
- Yes! Once cooled, wrap it tightly and freeze for up to three months. To reheat, simply thaw overnight in the fridge and bake at 350°F (175°C) until warmed through.
Nutritional Info
For those curious about nutritional information, here’s a rough breakdown per serving (assuming 12 servings):
- Calories: 270
- Fat: 10g
- Carbohydrates: 40g
- Protein: 3g
- Sugar: 14g
(Please note that these values may vary depending on specific ingredients used.)
Whipping up this Joanna Gaines-inspired peach cobbler not only honors tradition and homemade goodness, but it also celebrates the simple joys in life that food brings. I hope you find as much happiness in creating this dish as I do. Now, let’s bake, gather our loved ones, and enjoy the sweet moments together! 🍑✨
Print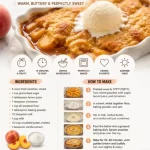
Joanna Gaines Inspired Peach Cobbler
- Total Time: 60 minutes
- Yield: 12 servings
- Diet: Vegetarian
Description
A delightful peach cobbler recipe inspired by Joanna Gaines, featuring sweet caramelized peaches and a buttery biscuit topping.
Ingredients
- Fresh Peaches (4-6 cups)
- Granulated Sugar (1 cup)
- All-Purpose Flour (1 cup)
- Baking Powder (1 tablespoon)
- Salt (1/4 teaspoon)
- Milk (1 cup)
- Butter (1/2 cup, melted)
- Ground Cinnamon (1 teaspoon)
Instructions
- Preheat your oven to 375°F (190°C).
- Prepare your peaches by washing, peeling, and slicing them. Toss with half of the sugar and ground cinnamon, and let sit for 10-15 minutes.
- Mix together the flour, baking powder, remaining sugar, and salt in a bowl. Add milk and melted butter, stirring gently until combined.
- Assemble the cobbler by greasing a baking dish and pouring the batter in. Spoon the peach mixture on top without stirring.
- Bake for 40-45 minutes until golden brown and bubbly.
- Let it cool for 10-15 minutes before serving.
Notes
For added flavors, consider adding vanilla extract or experimenting with different fruits.
- Prep Time: 15 minutes
- Cook Time: 45 minutes
- Category: Dessert
- Method: Baking
- Cuisine: American
Nutrition
- Serving Size: 1 serving
- Calories: 270
- Sugar: 14g
- Sodium: 100mg
- Fat: 10g
- Saturated Fat: 6g
- Unsaturated Fat: 4g
- Trans Fat: 0g
- Carbohydrates: 40g
- Fiber: 2g
- Protein: 3g
- Cholesterol: 30mg
Keywords: peach cobbler, dessert, sweet, Joanna Gaines, comfort food, summer recipe
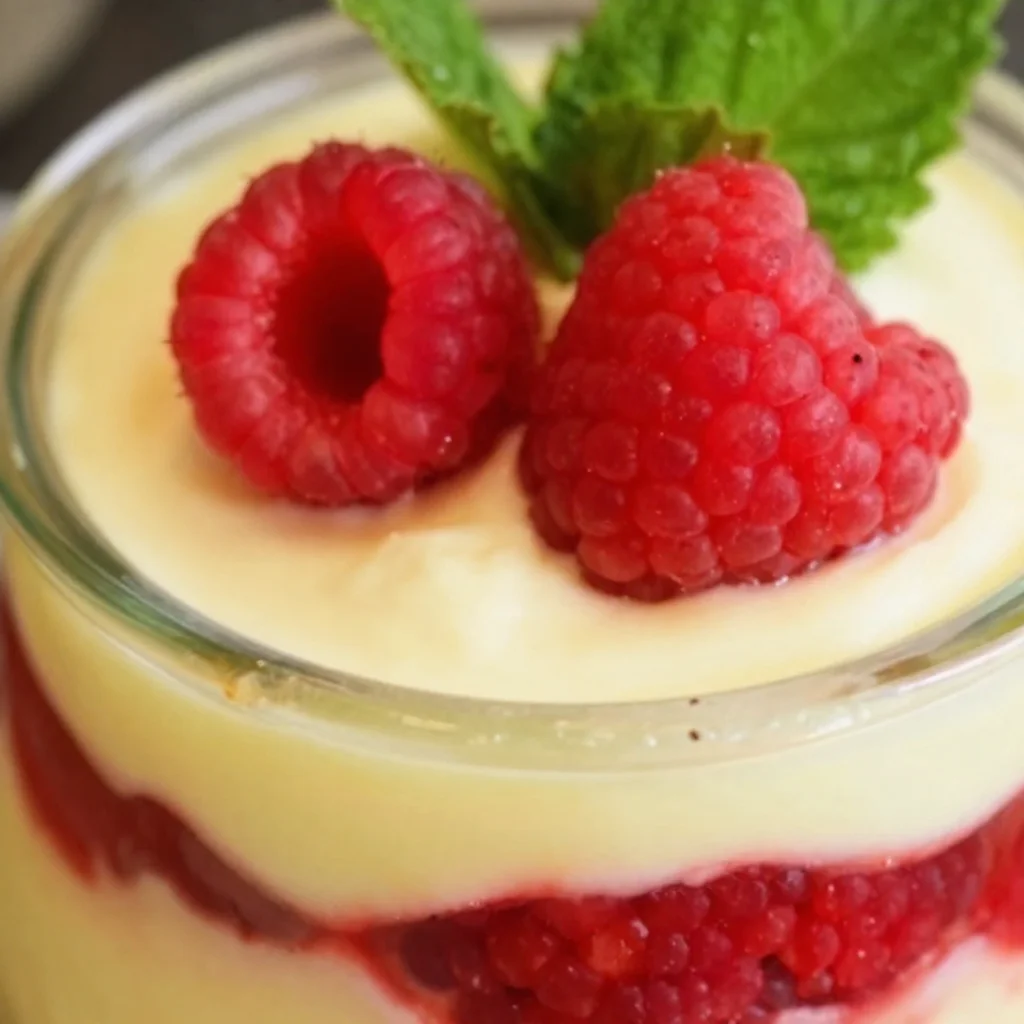
No-Bake Lemon Raspberry Fluff: Quick Summer Dessert
Lemon Raspberry Fluff: A Light and Luscious Dessert That Delights
Hello, fellow food lovers! Welcome back to my kitchen! Today, we’re diving into a recipe that sings of sunshine and sweetness: Lemon Raspberry Fluff. It’s a delightful, airy dessert that brings together the zesty brightness of lemons and the sweet-tartness of fresh raspberries. Imagine sitting on your porch, digging into a fluffy bowl of this light dessert, with the smell of lemon wafting through the air and the vibrant colors dancing in front of your eyes. Doesn’t that sound divine?
Fluff is one of those magical desserts that can elevate any meal or occasion. It’s perfect for summer picnics or lazy Sunday brunches. What I love most about it is how ridiculously simple it is to make! You won’t need to be a pastry chef or have a culinary degree to impress your friends and family. All you need are a few fresh ingredients, a touch of creativity, and of course, a little love (which I believe is the secret ingredient in all great home cooking!).
One of my favorite things about this recipe is its versatility. Serve it straight up or sprinkle on some graham cracker crumbs for an extra crunch. You can even layer it in parfait glasses for a stunning presentation. Trust me, your guests will think you’re a kitchen superstar!
So, grab your apron (maybe a messy one because we all know how that goes), and let’s whip up a Lemon Raspberry Fluff that’s guaranteed to evoke some joy in your kitchen!
A Slice of Nostalgia
I’ll never forget the summer I spent with my grandmother at her lakeside cottage. She had this magical way of conjuring dessert flavors that would dance on your palate. One afternoon, she offered me a simple bowl of fluffy lemon mousse topped with fresh raspberries. The first bite was a revelation! The tartness of the lemon combined with the vibrant sweetness of the raspberries was pure bliss.
Every spoonful felt like sunshine on my taste buds, and from that moment on, I was hooked. Grandma and I would whip it up together, and as the kitchen filled with laughter and joy, I learned that cooking was about more than just the food—it was about connection, memories, and love. That memory has steered my passion for cooking ever since, and it inspires me to create flavorful dishes that foster joy and togetherness in every bite.
I’ve taken that nostalgia and put my own spin on it to bring you this Lemon Raspberry Fluff recipe that will surely transport you back to sun-drenched days filled with sweetness and smiles.
Ingredients
Let’s talk about what you’ll need to create this delicious fluff! Here’s your shopping list:
-
1 cup fresh raspberries
Raspberries bring that sweet-tart punch to the dish. Look for plump, ripe berries; frozen ones can work too, but fresh is always better. -
1 lemon, zested and juiced
Fresh lemon juice adds acidity and brightness. Make sure to zest before juicing! You can also use bottled juice in a pinch, but fresh is always recommended. -
3 tablespoons sugar
For sweetening up the fluff. You can replace this with honey or a sugar substitute if you’re watching your sugar intake. -
2 cups heavy cream
This is what gives the fluff its rich, creamy texture. Whipping cream can be used as a lighter alternative. -
1 teaspoon vanilla extract
Adds a warm layer of flavor to balance the acidity of the lemon. Pure vanilla extract is best! -
Optional: graham cracker crumbs for garnish
Crunchy goodness to sprinkle on top for added texture! If you want a gluten-free option, use crushed nuts or gluten-free crumbs.
Step-by-Step Instructions
Now, let’s get our hands a little messy and whip up this dreamy Lemon Raspberry Fluff! Follow these simple steps, and you’ll be on your way to dessert nirvana.
-
Prep Your Ingredients: Start by rinsing your fresh raspberries gently under cold water. Pat them dry with a paper towel to avoid any excess moisture. Set aside a few to decorate the top later. Zest your lemon and then juice it, making sure it’s fresh.
-
Whip the Cream: In a large mixing bowl, pour in your heavy cream. Using an electric mixer, whip the cream on medium-high speed until soft peaks form. This means the cream should hold its shape but still look fluffy. Be careful not to over-whip or you’ll end up with butter instead!
-
Mix the Lemon Base: In another bowl, combine the lemon juice, lemon zest, sugar, and vanilla extract. Stir until the sugar is dissolved. This mixture is zesty magic; you’re going to love it!
-
Combine the Mixtures: Gently fold the lemon mixture into the whipped cream using a spatula. Use a folding motion to keep the fluffiness intact. This process is crucial; we don’t want to deflate our lovely whipped cream!
-
Add the Raspberries: Now, it’s time to gently fold in the fresh raspberries. You want to break some of them up slightly to release their juices but keep others whole for lovely bursts of flavor.
-
Chill: Spoon the fluff into individual serving bowls or a large dish. Cover with plastic wrap and refrigerate for at least 2 hours, or until chilled and set. This is when the flavors meld together beautifully!
-
Serve and Garnish: When you’re ready to serve, take it out of the fridge. Optionally, sprinkle the top with graham cracker crumbs and add those reserved raspberries for a beautiful, fresh touch!
Serving Suggestions
To plate this fluffy delight, consider serving it in individual glass bowls or parfait glasses. The layers will make for a visually appealing dessert! A sprinkle of graham cracker crumbs or crushed nuts on top will give it a charming crunch. Pair with mint leaves for a pop of color and extra freshness. It’s all about creating that wow factor!
Recipe Variations
Feeling adventurous? Here are some fun twists you can try out:
-
Berry Bliss: Mix it up by adding strawberries or blueberries along with or instead of raspberries. Great for a mixed berry fluff!
-
Coconut Cream: Substitute half of the heavy cream with coconut cream for a tropical flair. Just imagine that creamy, coconut flavor mingling with lemon!
-
Lemon-Lavender Fluff: Add a teaspoon of dried culinary lavender to the lemon mixture for a floral twist that is oh-so-refreshing!
-
Ginger Snap Crunch: For a little zing, add crushed ginger snaps instead of graham cracker crumbs for a spicy sweetness that complements the lemon.
Chef’s Notes
As with any recipe in my kitchen, I always encourage you to make it your own! This Lemon Raspberry Fluff has evolved over the years, initially starting with a simple basic lemon mousse. Each time I’ve made it, I’ve tweaked the proportions and added new flavors. I’ve discovered that sometimes the simplest desserts hold the most memories and joy.
A funny kitchen story: the last time I made this fluff, I accidentally swapped the sugar with salt while in a rush. Let’s just say, surprise and laughter erupted when I offered my family ‘dessert’! Now we have a running joke whenever I make this recipe, “Make sure to check the sugar!”.
FAQs and Troubleshooting
-
What if my fluff is too runny?
If your Lemon Raspberry Fluff is too runny, it could be due to under-whipped cream. Ensure you’re whipping the cream until soft peaks form, and try chilling it longer in the fridge. -
Can I use frozen raspberries?
Yes, but be mindful that they may release more juice, which can make the fluff runnier. If using frozen, let them thaw and drain excess liquid. -
How long will it keep in the fridge?
Your Lemon Raspberry Fluff should stay fresh for about 3 days in the refrigerator. Just be sure it’s covered tightly! -
Can I make it a day ahead?
Absolutely! Making it the day before allows the flavors to meld beautifully and saves you time on the day of your gathering. Just ensure it’s kept covered to maintain its fluffiness.
Nutritional Info
Note: Nutritional values may vary based on portion sizes and specific ingredients used. Always a good idea to calculate if you’re following a strict diet!
That’s it, my dear foodie friends! I hope you enjoy creating and sharing this Lemon Raspberry Fluff as much as I do. Gather your loved ones around the table, share some stories, and celebrate the joy of home cooking. Happy cooking! 🍋🍓
Print
Lemon Raspberry Fluff
- Total Time: 120 minutes
- Yield: 4 servings 1x
- Diet: Vegetarian
Description
A delightful, airy dessert that combines the zesty brightness of lemons with the sweet-tartness of fresh raspberries.
Ingredients
- 1 cup fresh raspberries
- 1 lemon, zested and juiced
- 3 tablespoons sugar
- 2 cups heavy cream
- 1 teaspoon vanilla extract
- Optional: graham cracker crumbs for garnish
Instructions
- Prep Your Ingredients: Rinse raspberries under cold water, pat dry, and set aside a few for decoration. Zest and juice the lemon.
- Whip the Cream: Whip heavy cream in a bowl until soft peaks form.
- Mix the Lemon Base: Combine lemon juice, lemon zest, sugar, and vanilla in another bowl, stirring until sugar is dissolved.
- Combine the Mixtures: Gently fold the lemon mixture into the whipped cream.
- Add the Raspberries: Gently fold in the raspberries, breaking some up slightly.
- Chill: Spoon into serving bowls and refrigerate for at least 2 hours.
- Serve and Garnish: Optionally sprinkle with graham cracker crumbs and add reserved raspberries before serving.
Notes
Feel free to customize with different berries or flavors, such as coconut cream or lavender!
- Prep Time: 15 minutes
- Cook Time: 0 minutes
- Category: Dessert
- Method: Chilling
- Cuisine: American
Nutrition
- Serving Size: 1 serving
- Calories: 250
- Sugar: 12g
- Sodium: 50mg
- Fat: 22g
- Saturated Fat: 13g
- Unsaturated Fat: 9g
- Trans Fat: 0g
- Carbohydrates: 20g
- Fiber: 2g
- Protein: 3g
- Cholesterol: 80mg
Keywords: Lemon Raspberry, Desserts, Fluff Dessert
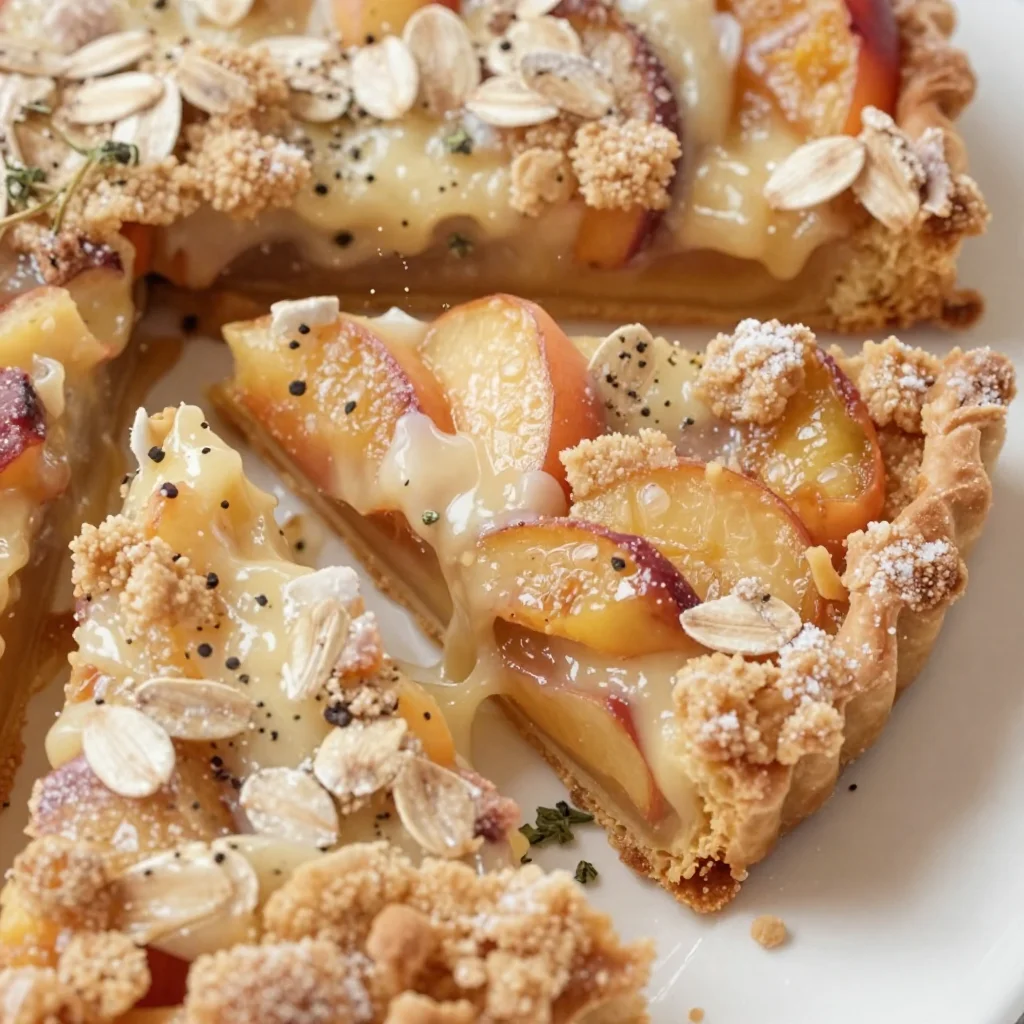
Summer Nectarine Crumb Tart: Quick, Fresh, Crisp & Easy
The Delight of Baking: Nectarine Crumb Tart
Welcome to my cozy kitchen, where the air is positively bursting with the aromas of freshly baked goods! I’m Olivia Bennett, and today, I’m excited to share with you a delightful recipe that has become a cherished staple in my home: the Nectarine Crumb Tart. If you love the sweet taste of summer and the crunch of a perfect crumbly topping, you’re in for a treat. This dessert isn’t just about satisfying your sweet tooth—it’s a celebration of seasons and gatherings, reminiscent of sun-soaked picnics and laughter shared over slices of something delicious.
There’s something inherently comforting about tarts, don’t you think? They evoke memories of afternoon teas, sunny outdoor gatherings, and family traditions passed down through generations. And this Nectarine Crumb Tart? It’s the epitome of those wonderful moments. Imagine biting into a buttery, crumbly crust, followed by juicy, sweet nectarines, all topped with a crisp, cinnamon-spiced crumb. It’s like summer on a plate, and it’s sure to make your kitchen feel like home.
Now, let me take you back to my childhood for just a moment. My grandmother used to make peach tarts every summer when the fruit was at its peak. I remember standing on a stool, peering over the countertop as she rolled out the dough, dusting it lightly with flour. The best part was always the moment she handed me a slice to savor. The smile on her face as she watched me enjoy her creation filled my heart with warmth and love. Fast forward a few years, and I’ve adapted that family recipe into my very own Nectarine Crumb Tart, honoring those sweet memories while creating new ones in my kitchen.
So, grab your apron, and let’s work together to create something magic!
Ingredients
Here’s what you’ll need to whip up this Nectarine Crumb Tart:
For the Tart Crust:
-
1 ½ cups all-purpose flour
A standard in any baking recipe, the flour provides the foundation for our crust. You can substitute it with almond flour for a gluten-free version—it’ll have a delightful nutty flavor! -
½ cup unsalted butter, softened
The secret to a flaky crust! You might use coconut oil as a dairy-free alternative, but I recommend keeping it simple with butter if you can. -
½ cup granulated sugar
Sweetens the crust just enough. If you prefer a more complex flavor, try using brown sugar! -
1 egg yolk
This adds richness to our crust. You can omit it for a vegan option, but keep in mind that the texture might change a bit.
For the Filling:
-
4 ripe nectarines, sliced
The star of the show! Substitute with peaches or plums if nectarines aren’t available. -
¼ cup brown sugar
For a deeper, caramel-like sweetness. Feel free to use maple syrup for a unique twist! -
1 tbsp lemon juice
Balances the sweetness and enhances the fruit’s flavor. Fresh is always best!
For the Crumb Topping:
-
¾ cup all-purpose flour
Just like our pie crust, this helps create that irresistible crumb topping. -
½ cup oats
Adds texture and heartiness. Swap these out for crushed nuts if you’re looking for a gluten-free option. -
½ cup brown sugar
Use this to bring out a lovely caramel flavor in the topping. -
1 tsp cinnamon
A warm spice that complements the nectarines beautifully. You can experiment with nutmeg for a slightly different flavor profile! -
½ cup unsalted butter, melted
Helps bind the crumbs together. If you’re in a pinch, melted coconut oil works as a substitute!
Step-by-Step Instructions
Preheat and Prep
-
Preheat your oven to 350°F (175°C).
Let’s get that oven nice and warm! This will ensure your tart bakes evenly. -
Prepare the tart pan.
Grease a 9-inch tart pan with non-stick spray or butter. This is a crucial step to ensure easy removal after baking, so don’t skip it!
Make the Tart Crust
-
Combine the dry ingredients.
In a mixing bowl, combine 1 ½ cups all-purpose flour and ½ cup granulated sugar. Whisk them together so they’re evenly mixed. -
Add the butter.
Cut in ½ cup of softened unsalted butter using a pastry cutter or your fingers until the mixture resembles coarse crumbs. It’s okay to get a little messy here—embrace it! -
Incorporate the egg yolk.
Add the egg yolk and mix until the dough comes together. It should be slightly crumbly but hold its shape when pressed. -
Press the dough into the pan.
Flatten the dough evenly across the bottom and up the sides of the tart pan. Make sure there are no cracks for a perfect bake! -
Chill the crust.
Pop your tart pan in the fridge for about 30 minutes. This helps prevent it from shrinking while baking.
Prepare the Filling
-
Slice the nectarines.
While the crust chills, slice up those delicious nectarines. Aim for even slices for a beautifully styled tart! -
Mix the filling.
In a bowl, toss the nectarines with ¼ cup brown sugar and 1 tablespoon lemon juice. This will not only sweeten the nectarines but also add a lovely brightness!
Make the Crumb Topping
-
Combine dry ingredients for the topping.
In another bowl, combine ¾ cup flour, ½ cup oats, ½ cup brown sugar, and 1 teaspoon cinnamon. Stir until mixed well. -
Add melted butter.
Pour in ½ cup melted unsalted butter and mix until crumbly—you want it to hold together slightly but remain crumb-like.
Assemble and Bake
-
Spread the filling.
Take your chilled crust out of the fridge and add the sweetened nectarines in an even layer over the crust. -
Top with crumbs.
Evenly sprinkle the crumb topping over the nectarines. It’s okay if some of the filling peeks through; it adds character! -
Bake the tart.
Place the tart in the preheated oven and bake for 40-45 minutes, or until the top is golden and the nectarines are bubbling. The kitchen will smell incredible, trust me! -
Cool and serve.
Once baked, allow the tart to cool for at least 15 minutes before slicing. This will help the filling to set up a tad.
Serving Suggestions
When it comes to serving, I love presenting my Nectarine Crumb Tart warm from the oven with a scoop of vanilla ice cream or a dollop of freshly whipped cream. A light dusting of powdered sugar adds a touch of elegance, and don’t forget a sprig of mint for a pop of color! You can even pair it with a refreshing herbal tea for a delightful afternoon treat.
Recipe Variations
-
Mixed Fruit Tart: This recipe isn’t just limited to nectarines! Use a medley of summer fruits like peaches, plums, and cherries for a colorful twist.
-
Crispy Walnut Crust: Replace the all-purpose flour for the crust with ground walnuts for a gluten-free and nutty base.
-
Spiced Crumb: Add nutmeg or cardamom to the crumb topping for an extra aromatic flavor.
-
Coconut Twist: Swap half the butter in the crust for coconut oil and add shredded coconut to the crumb mixture for a tropical vibe.
-
Savory Option: For a savory turn on this dish, consider using tomatoes and fresh herbs in place of nectarines—perfect for a brunch or light lunch!
Chef’s Notes
This Nectarine Crumb Tart has evolved over the years in my kitchen. Originally inspired by my grandmother’s peach tarts, I started experimenting with different fruits and toppings. One hilarious memory comes to mind when I accidentally used salt instead of sugar in a batch once. Let’s just say, the surprise face of my family was priceless! Their laughter was worth every salty bite! Now, I always double-check my ingredients before diving in. The beauty of this dish lies in its versatility—don’t be afraid to mix things up and make it your own!
FAQs and Troubleshooting
-
Why is my crust soggy?
Make sure you pre-bake the crust according to the recipe—this helps to set it before adding the filling. If your crust is still soggy, it may have needed longer in the oven or lacked chilling time. -
How do I prevent the nectarines from browning?
Tossing the nectarines in lemon juice as specified in the recipe will help prevent browning and enhance flavor! -
My crumb topping isn’t holding together like I wanted. Any tips?
Make sure your butter is melted and well incorporated with the dry ingredients. You want it crumbly yet somewhat compact. If it’s too loose, adding a bit more melted butter can help bind it. -
Can I make this tart ahead of time?
Absolutely! You can make the tart a day in advance; simply reheat it slightly before serving to enjoy that fresh-baked taste!
Nutritional Info
While I typically focus on the joy of cooking rather than strict nutritional guidelines, here’s a little breakdown per serving to help you enjoy this delightful dish guilt-free (approximate values):
- Calories: 260
- Fat: 12g
- Carbohydrates: 36g
- Fiber: 2g
- Sugar: 12g
- Protein: 3g
There you have it: my beloved Nectarine Crumb Tart! Remember, it’s not just about the food; it’s about the memories we create around it. I hope this tart finds its way into your kitchen and your heart, just like it did mine. Happy baking!
Print
Nectarine Crumb Tart
- Total Time: 75 minutes
- Yield: 8 servings 1x
- Diet: Vegetarian
Description
A delightful Nectarine Crumb Tart with a buttery crust and cinnamon-spiced topping, perfect for summery gatherings.
Ingredients
- 1 ½ cups all-purpose flour
- ½ cup unsalted butter, softened
- ½ cup granulated sugar
- 1 egg yolk
- 4 ripe nectarines, sliced
- ¼ cup brown sugar
- 1 tbsp lemon juice
- ¾ cup all-purpose flour (for crumb topping)
- ½ cup oats
- ½ cup brown sugar (for crumb topping)
- 1 tsp cinnamon
- ½ cup unsalted butter, melted (for crumb topping)
Instructions
- Preheat your oven to 350°F (175°C).
- Prepare a 9-inch tart pan by greasing it with non-stick spray or butter.
- Combine 1 ½ cups all-purpose flour and ½ cup granulated sugar in a mixing bowl.
- Add ½ cup softened unsalted butter and cut until the mixture resembles coarse crumbs.
- Incorporate the egg yolk and mix until the dough comes together.
- Press the dough into the bottom and up the sides of the tart pan.
- Chill the crust in the fridge for about 30 minutes.
- Slice the nectarines while the crust chills.
- Mix nectarines with ¼ cup brown sugar and 1 tablespoon lemon juice in a bowl.
- Combine ¾ cup flour, ½ cup oats, ½ cup brown sugar, and 1 teaspoon cinnamon for the crumb topping.
- Add ½ cup melted unsalted butter to the dry ingredients and mix until crumbly.
- Spread the nectarines evenly over the chilled crust.
- Top with the crumb mixture, allowing some filling to peek through.
- Bake the tart for 40-45 minutes until golden and the nectarines are bubbling.
- Cool for at least 15 minutes before slicing.
Notes
Serve warm with vanilla ice cream or whipped cream for a delightful treat.
- Prep Time: 30 minutes
- Cook Time: 45 minutes
- Category: Dessert
- Method: Baking
- Cuisine: American
Nutrition
- Serving Size: 1 slice
- Calories: 260
- Sugar: 12g
- Sodium: 100mg
- Fat: 12g
- Saturated Fat: 7g
- Unsaturated Fat: 5g
- Trans Fat: 0g
- Carbohydrates: 36g
- Fiber: 2g
- Protein: 3g
- Cholesterol: 30mg
Keywords: nectarine tart, crumb tart, summer dessert, baked tart, fruit dessert


