
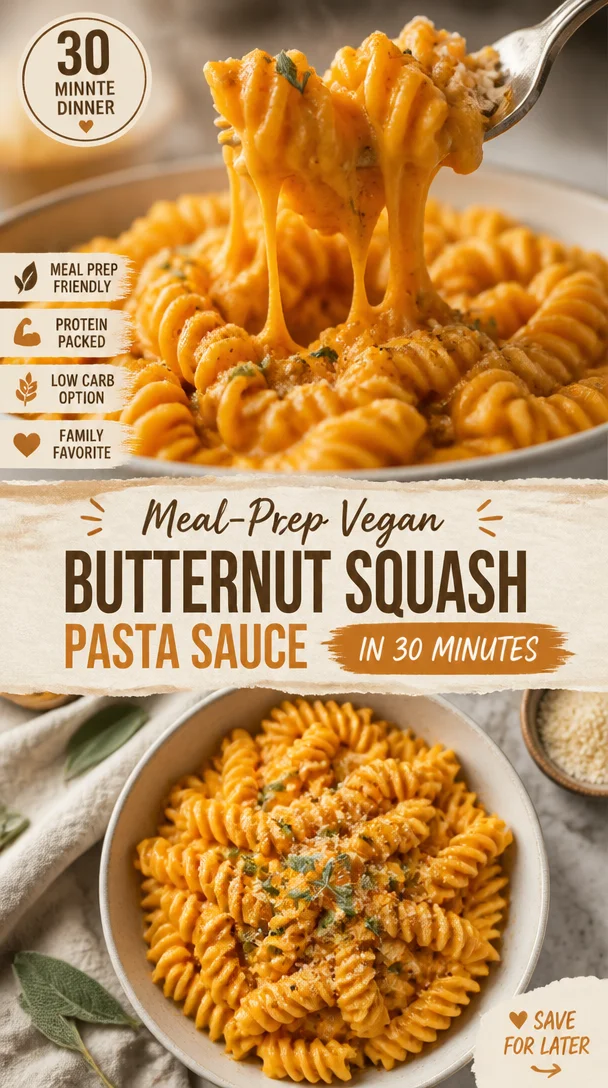
Meal-Prep Vegan Butternut Squash Pasta Sauce in 30 Minutes
Vegan Butternut Squash Pasta Sauce: A Wholesome Hug in a Bowl
Welcome to my cozy corner of the internet! I’m Olivia, your friendly kitchen guide, and today we’re diving into the delightful world of vegan cooking with an incredibly flavorful and creamy Butternut Squash Pasta Sauce. This sauce isn’t just another recipe; it’s a celebration of fall flavors and comfort all rolled into one delicious bowl. Whether you’re a seasoned cook or a kitchen newbie, I’m here to help you create a dish that’s not only healthy but also tastes like a big hug from your favorite sweater.
Picture this: it’s a crisp autumn evening, the air is filled with the sweet scent of fallen leaves, and your kitchen is warm and inviting. You’ve got that undeniable itch to whip up something cozy, something that screams comfort. Enter this Butternut Squash Pasta Sauce! It’s velvety, rich, and packed with nutrients, making it the perfect companion to your favorite pasta. Plus, it’s super easy to make, and let me tell you—it’s a crowd-pleaser!
What I love most about this sauce is its versatility. It’s not just for pasta; you can drizzle it over roasted vegetables, use it as a pizza base, or even enjoy it on a toasted slice of sourdough. The options are endless, and I can already hear your taste buds cheering! So, let’s roll up our sleeves and create something wonderful together. Trust me, once you try this sauce, you’ll wonder how you ever lived without it.
A Memory to Relish
Reminiscing about the first time I made this Butternut Squash Pasta Sauce brings a warm smile to my face. It was a chilly October evening, and my good friend Mia came over for a dinner party. We had planned for a casual get-together, but as we sat in the kitchen, chopping and stirring, it turned into a true culinary adventure.
Mia, being a die-hard pasta lover, suggested I try making a sauce that was different from our usual marinara. That’s when I grabbed a plump butternut squash from the counter and decided to get creative. We roasted it with garlic, tossed in some spices, and blended it into a smooth perfection that had us both giddy with excitement. As we twirled our pasta around our forks, we couldn’t believe how delicious it was!
That dinner ended up being filled with laughter, stories, and a dash of friendly competition over who could create the best pasta dish. And from that day forward, this creamy butternut squash sauce became my go-to recipe whenever I wanted to bring warmth and joy to my table.
Ingredients
Let’s gather our ingredients together! For this scrumptious vegan butternut squash pasta sauce, you’ll need:
-
Butternut Squash (1 medium-sized)
This is the star of the show! Its natural sweetness balances well with savory spices. If you can’t find butternut squash, pumpkin or any other sweet winter squash works as a great substitute. -
Garlic (3 cloves)
Garlic adds a wonderful depth of flavor. Roasting it will caramelize the sugars, making it sweeter and less pungent. If you prefer a milder taste, you can reduce the amount to one or two cloves. -
Olive Oil (2 tablespoons)
This healthy fat helps to sauté the garlic and gives the sauce a creamy texture. You can swap olive oil with coconut oil if you’re looking for a sweeter note. -
Vegetable Broth (1 cup)
Using vegetable broth enhances the flavor without being overpowering. You can make your own or use store-bought. For a low-sodium version, look for broth labeled as such. -
Nutritional Yeast (1/4 cup)
This is a vegan superhero! It adds a cheesy flavor while providing extra vitamins. If you can’t find it, you can skip it, but I highly recommend trying to include it for a lovely cheesy vibe. -
Salt (to taste)
As always, seasoning is key! Start with a pinch and add more based on your preference. -
Pepper (to taste)
A few cracks of black pepper will enhance all the flavors beautifully. For something with a kick, consider adding some red pepper flakes. -
Fresh Sage or Thyme (2 tablespoons, optional)
These herbs pair beautifully with the butternut squash. If you don’t have fresh herbs, dried herbs will work, just remember to reduce the quantity to 1 tablespoon as dried herbs are more potent.
Step-by-Step Instructions
Now that we’ve got everything prepped, let’s get to cooking! Follow these simple steps to create a sauce that you’ll be dreaming about.
-
Preheat the Oven
Preheat your oven to 400°F (200°C). A hot oven is key to roasting our butternut squash and garlic! -
Prepare the Squash
Carefully slice your butternut squash in half lengthwise. Scoop out the seeds and lay the halves cut-side up on a baking sheet. Drizzle them with a tablespoon of olive oil and sprinkle with salt and pepper. Roast it in the oven for about 30-40 minutes, or until it’s fork-tender and caramelized.Chef Tip: If you prefer quicker prep, you can peel and cube the squash before roasting; just keep an eye on it as the cooking time may change!
-
Roast the Garlic
While your squash is roasting, let’s roast the garlic! Peel the cloves and wrap them in aluminum foil with a drizzle of olive oil. Place them on the same baking sheet for the last 20 minutes of roasting. You’ll be greeted with a sweet, heavenly aroma! -
Blend it All
Once your squash and garlic are done, let them cool slightly. Scoop the roasted squash into your blender, add the roasted garlic, and pour in the vegetable broth. If you have fresh herbs, toss them in too! Blend until smooth and creamy. You can add more broth for a thinner sauce if you prefer.Pro Tip: Always taste the sauce before you remove it from the blender. Adjust the seasoning as needed!
-
Heat it Up
Transfer the blended sauce into a large skillet over medium heat. Add the nutritional yeast, stirring to combine. Let it simmer for 5-10 minutes, allowing the flavors to meld together. -
Serve Over Pasta
As your sauce simmers, cook your preferred pasta according to package instructions. Once cooked, drain the pasta and toss it right into the skillet with the sauce. Coat the pasta well and let it soak up that flavor!
Serving Suggestions
Now the moment you’ve been waiting for: serving it up! Plate your butternut squash pasta with a flourish. Consider garnishing it with fresh herbs like chopped sage or thyme. A sprinkle of extra nutritional yeast or a dash of olive oil can tie it all together beautifully. If you’re feeling fancy, finish with a few chili flakes for heat or some freshly cracked black pepper on top!
Recipe Variations
Switch things up with these variations!
- Add Protein: Incorporate chickpeas or white beans for added protein and texture.
- Spicy Kick: Add a tablespoon of sriracha or chili paste to the sauce for a spicy twist.
- Creamy Touch: Stir in a splash of coconut milk for a richer sauce that adds a touch of sweetness.
- Pasta Choices: Swap out regular pasta for zucchini noodles or gluten-free pasta to cater to dietary needs.
- Roasted Veggie Medley: Toss in roasted vegetables like bell peppers, spinach, or kale for a colorful and nutritious addition!
Chef’s Notes
Creating this butternut squash sauce has been a journey of love and flavor! Over time, I’ve altered it based on seasons and what I have on hand. I once added a splash of balsamic vinegar for a tangy kick, and it was a game changer!
The beauty of this sauce is that it’s forgiving. Didn’t roast enough squash? No problem! You can add more broth and cook it down to achieve the desired flavor.
Remember, a little improvisation in the kitchen can lead to the best creations!
FAQs and Troubleshooting
1. My sauce is too thick; what can I do?
Just add a splash of vegetable broth or water until you reach your desired consistency.
2. How do I store leftovers?
Store any leftovers in an airtight container in the fridge for up to 4 days. Just reheat on the stove or in the microwave before serving!
3. Can I freeze the sauce?
Yes! This sauce freezes beautifully. Place it into freezer-safe bags or containers and store for up to 3 months. Just thaw in the refrigerator before reheating.
4. What if it’s too sweet?
If you find your sauce is sweeter than you’d like, add a pinch more salt or a squeeze of lemon juice to balance the flavors.
Nutritional Info
For a general idea, one serving of the butternut squash pasta sauce contains:
- Calories: 160
- Protein: 4g
- Carbohydrates: 28g
- Dietary Fiber: 4g
- Sugars: 6g
- Fat: 5g
(Note: Nutritional values may vary depending on specific ingredients used.)
So, there you have it! Your guide to creating a comforting, velvety Vegan Butternut Squash Pasta Sauce that is as delightful to prepare as it is to eat. I’m so excited for you to try this and make it your own! Remember, cooking is all about creativity and enjoying the process, so don’t be shy—get in that kitchen and let the magic happen! Happy cooking!
Print
Vegan Butternut Squash Pasta Sauce
- Total Time: 50 minutes
- Yield: 4 servings 1x
- Diet: Vegan
Description
A delightful and creamy vegan butternut squash pasta sauce that brings warmth and comfort to your table.
Ingredients
- 1 medium-sized Butternut Squash
- 3 cloves Garlic
- 2 tablespoons Olive Oil
- 1 cup Vegetable Broth
- 1/4 cup Nutritional Yeast
- Salt to taste
- Pepper to taste
- 2 tablespoons Fresh Sage or Thyme (optional)
Instructions
- Preheat your oven to 400°F (200°C).
- Prepare the butternut squash by slicing it in half and scooping out the seeds. Drizzle with olive oil and sprinkle with salt and pepper.
- Roast the squash for about 30-40 minutes until fork-tender.
- Roast the garlic wrapped in foil for the last 20 minutes of the squash roasting time.
- Blend the roasted squash and garlic with vegetable broth until smooth and creamy.
- Heat the blended sauce in a skillet over medium heat and stir in nutritional yeast.
- Serve over cooked pasta, garnished with fresh herbs and additional nutritional yeast if desired.
Notes
This sauce is versatile; use it on pasta, roasted vegetables, or pizza. It can be frozen for up to 3 months.
- Prep Time: 10 minutes
- Cook Time: 40 minutes
- Category: Main Course
- Method: Roasting and Blending
- Cuisine: Vegan
Nutrition
- Serving Size: 1 serving
- Calories: 160
- Sugar: 6g
- Sodium: 300mg
- Fat: 5g
- Saturated Fat: 0.5g
- Unsaturated Fat: 4.5g
- Trans Fat: 0g
- Carbohydrates: 28g
- Fiber: 4g
- Protein: 4g
- Cholesterol: 0mg
Keywords: Vegan, Butternut Squash, Pasta Sauce, Comfort Food, Easy Recipes
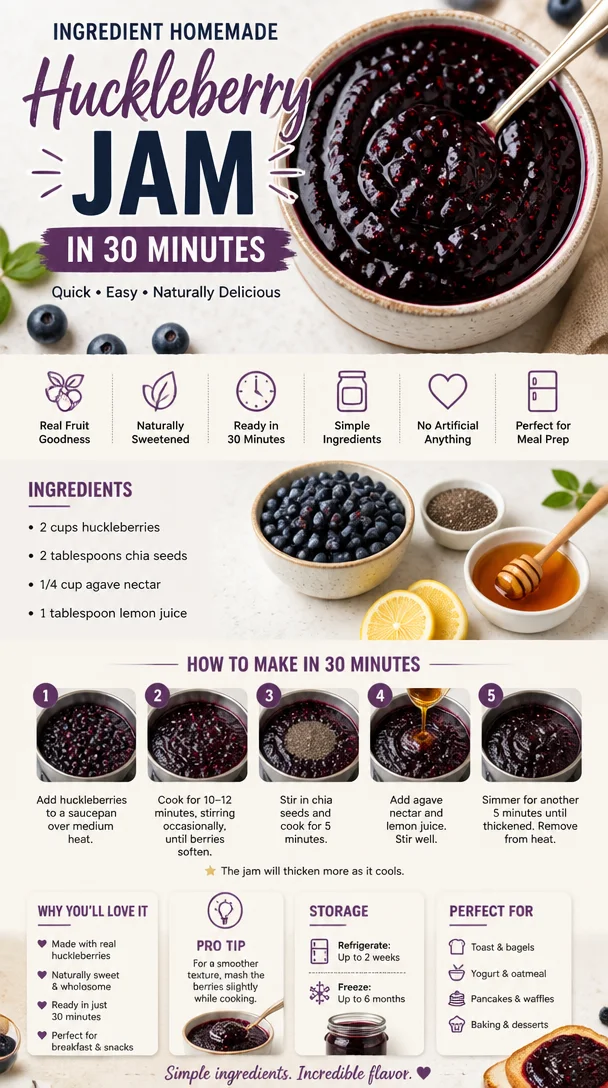
Ingredient Homemade Huckleberry Jam in 30 Minutes
Homemade Huckleberry Jam: A Sweet Little Jar of Joy
Welcome to my kitchen! Today, we are diving headfirst into one of my absolute favorite recipes: homemade huckleberry jam. There’s something magical about spreading a sweet, tangy jam over buttered toast or fluffy pancakes, and when it’s homemade, every bite is filled with love and nostalgia. Huckleberries are like little bursts of sunshine, and their vibrant flavor makes them the perfect star for this jam.
Imagine waking up on a lazy Sunday morning, sunlight streaming through the kitchen window as you pull out a jar of huckleberry jam from the fridge. You can almost smell the sweet aroma wafting through the air already, can’t you? Whether you’re new to canning or an old pro, making homemade jam is not just about preserving fruit—it’s about creating cherished memories and sharing something truly special with your loved ones.
So, why huckleberries? Growing up, my family would go picking for these gems in the wilds of the Pacific Northwest. I’ll never forget the thrill of finding a bush full of plump, juicy huckleberries shining like little treasures under the sun. We’d spend hours filling our baskets, our fingers stained with the inky juice, and laughter echoing through the trees. Those summer days spent outdoors are some of my happiest memories, and now, I can recreate that joy in each jar of jam.
In this post, I’ll guide you step-by-step on how to make your very own huckleberry jam, share some kitchen tips, and sprinkle in a few personal stories along the way. So, grab your spoon, put on your favorite apron (mine’s always a bit messy), and let’s get cooking!
A Memory Worth Preserving
As I mentioned, my love for huckleberries started in childhood. My grandmother, the queen of jams and jellies, would gather the whole family for our annual berry-picking adventures. I remember one summer in particular—the sun was shining, and the berries were abundant. My little cousin and I were so engrossed in our hunt that we completely lost track of time. Suddenly, we were called back to the picnic blanket for lunch, and I was convinced we had the most huckleberries picked. My grandmother’s legendary huckleberry jam was the reward for our hard work, and as we spooned it onto buttermilk biscuits, I remember thinking that life couldn’t be sweeter.
Cooking for me is deeply intertwined with those beautiful moments of connection—sharing a meal, a story, or a simple jar of jam. Now, every time I scoop huckleberry jam from my fridge, it transports me back to those carefree childhood days, sharing laughter and sweet treats with loved ones. I want to help you create those same memories for you and your family!
Ingredients
Before we dive into the recipe, here’s what you’ll need to make your huckleberry jam:
-
Huckleberries (4 cups): Look for ripe, plump huckleberries. If you can’t find them, blueberries can work as a substitute; they’ll yield a slightly different flavor but still delicious!
-
Sugar (2 cups): Regular granulated sugar works best, helping to balance the tangy flavor of the berries. You can reduce the sugar if you prefer it less sweet or use a sugar substitute (be sure to check the package for equivalent ratios).
-
Lemon juice (1/4 cup): Freshly squeezed lemon juice adds brightness to the jam and helps preserve it. If you don’t have fresh lemons, bottled juice will work as well; just aim for the organic kind, if possible.
-
Pectin (1 box): This is critical for helping your jam set. There are low-sugar pectins available if you want to cut down on the sugars. Just follow the instructions on the box for quantities.
-
Water (1/4 cup): Used to help simmer the fruit at the beginning.
Step-by-Step Instructions
Now that we’ve gathered our ingredients, let’s roll up our sleeves and get started!
-
Prepare Your Jars: First things first, let’s sanitize our jars. Begin by washing your jars and lids in hot, soapy water, then rinse well. You can sterilize them further by boiling them in water for 10 minutes. This step ensures your jam stays fresh longer!
-
Wash the Huckleberries: Rinse your huckleberries gently under cold running water. This step removes any dirt while keeping those precious berries intact. Drain well and set aside.
-
Cook the Berries: In a large pot, combine the huckleberries, sugar, lemon juice, and water. Stir everything together and bring it to a gentle boil over medium heat. Cook for about 10-15 minutes, stirring frequently to prevent sticking (I know it’s tempting to keep a spoon in there to taste the delightful mixture!).
-
Check for Consistency: This is where your jam magic happens! Using a ladle, take a small amount of the jam and spoon it onto a plate. Let it cool for a minute, then run your finger through it. If it holds its shape and wrinkles slightly, it’s ready for pectin. If not, continue cooking for another few minutes and test again.
-
Add the Pectin: Stir in the pectin according to the package instructions. Bring the mixture back to a boil for another minute, stirring constantly. It should start to thicken up beautifully!
-
Fill Your Jars: Carefully pour your hot jam into the sterilized jars, leaving about 1/4 inch of space at the top. Wipe the rims with a clean cloth to remove any sticky residue before sealing with the lids.
-
Process the Jars: To ensure a good seal and to keep your jam fresh, you can process the jars in a boiling water bath. Place them in a pot of boiling water and let them bath for 10-15 minutes. Once done, carefully remove the jars and allow them to cool on a clean kitchen towel. You should hear the satisfying "pop" of the lids sealing!
-
Cool and Store: Leave your huckleberry jam at room temperature for 24 hours. Make sure the lids are sealed properly (they should not flex when pressed). Store your jars in a cool, dark place for up to a year (if they last that long!).
Serving Suggestions
There’s no better way to enjoy your homemade huckleberry jam than by slathering it on warm, buttered toast! It also pairs beautifully with creamy yogurt, drizzled on top of pancakes or waffles, or even as a filling for pastries. I love it on a charcuterie board, served alongside cheeses and crackers. The tangy-sweet flavor complements many savory items perfectly!
Recipe Variations
Feeling adventurous? Here are a few creative twists to try with your huckleberry jam:
-
Spicy Twist: Add a pinch of cinnamon or a dash of cayenne pepper to the mix for some warming spice that will tickle your taste buds!
-
Herb Infusion: For a unique flavor, try adding fresh herbs like rosemary or thyme while the jam simmers. Just strain them out before jarring.
-
Tropical Blend: Mix in crushed pineapple or a bit of mango puree for a huckleberry-pineapple jam that brings a fun, tropical twist.
-
Chia Jam: Replace the pectin with chia seeds! They create a gel-like consistency and boost the nutritional value, plus it has a fabulous crunch.
-
Sugar-Free Version: Use a sugar substitute like erythritol or monk fruit sweetener if you’re looking for a low-sugar jam.
Chef’s Notes
As with any recipe, this huckleberry jam has evolved over the years in my kitchen. I’ve experimented with everything from adding spices to mixing fruits, and I love how versatile it is. I remember one time, I must have been in a creative mood, and I decided to throw in some fresh ginger. The results were delightful, and I was pleasantly surprised by how that little kick complemented the huckleberries!
Also, don’t be discouraged if your jam doesn’t set the very first time. There’s always a learning curve when you’re canning! Just know that your efforts are worth it; there’s nothing like the satisfaction of seeing rows of homemade jam lining your pantry shelves.
FAQs and Troubleshooting
-
Why didn’t my jam set?
If your jam didn’t set, it could be due to not enough pectin or cooking time. Make sure to boil long enough for the pectin to activate and dissolve fully. You can also reheat the jam and add more pectin if needed! -
How long does homemade huckleberry jam last?
If processed and sealed properly, it can last up to a year in a cool, dark place. Once opened, store in the fridge and consume within a month for freshness. -
Can I use frozen huckleberries?
Absolutely! Just thaw and drain excess liquid before using. Frozen berries are a great option when fresh ones aren’t in season. -
What do I do if my jam is too sweet?
If your jam turns out too sweet, try mixing in a bit of lemon juice or adding some tangy fruit like cranberries during cooking next time. A touch more acidity can balance out sweetness beautifully.
Nutritional Info
(Note: nutritionally, this will vary depending on the amount of sugar and fruit used):
- Serving Size: 1 tablespoon
- Calories: 50
- Total Fat: 0g
- Sugars: 12g
- Protein: 0g
Now, my kitchen friend, you have all the tools you need to create your own batch of huckleberry jam! I can’t wait for you to experience the same joy and nostalgia that fills my heart when I make it. Let me know how it turns out, and share your kitchen stories. Happy cooking!
Print
Homemade Huckleberry Jam
- Total Time: 55 minutes
- Yield: 4 cups
- Diet: Vegetarian
Description
A delightful homemade huckleberry jam that’s sweet, tangy, and perfect for spreading on toast or pancakes.
Ingredients
- Huckleberries (4 cups)
- Sugar (2 cups)
- Lemon juice (1/4 cup)
- Pectin (1 box)
- Water (1/4 cup)
Instructions
- Prepare your jars: Wash and sterilize the jars and lids in hot, soapy water or boil them for 10 minutes.
- Wash the huckleberries: Rinse them gently under cold running water and drain well.
- Cook the berries: Combine huckleberries, sugar, lemon juice, and water in a large pot and bring to a gentle boil over medium heat. Cook for 10-15 minutes.
- Check for consistency: Test the jam on a cooled plate to see if it holds its shape.
- Add the pectin: Stir in pectin according to package instructions and boil for another minute.
- Fill your jars: Pour hot jam into sterilized jars, leaving 1/4 inch space at the top.
- Process the jars: Process in a boiling water bath for 10-15 minutes to seal.
- Cool and store: Let jars sit at room temperature for 24 hours to ensure they are sealed.
Notes
If your jam doesn’t set, reheat and add more pectin. Store opened jars in the fridge and consume within a month.
- Prep Time: 30 minutes
- Cook Time: 25 minutes
- Category: Preserves
- Method: Canning
- Cuisine: American
Nutrition
- Serving Size: 1 tablespoon
- Calories: 50
- Sugar: 12g
- Sodium: 0mg
- Fat: 0g
- Saturated Fat: 0g
- Unsaturated Fat: 0g
- Trans Fat: 0g
- Carbohydrates: 13g
- Fiber: 0g
- Protein: 0g
- Cholesterol: 0mg
Keywords: huckleberry jam, homemade jam, preserves, sweet spread, canning, fruit jam
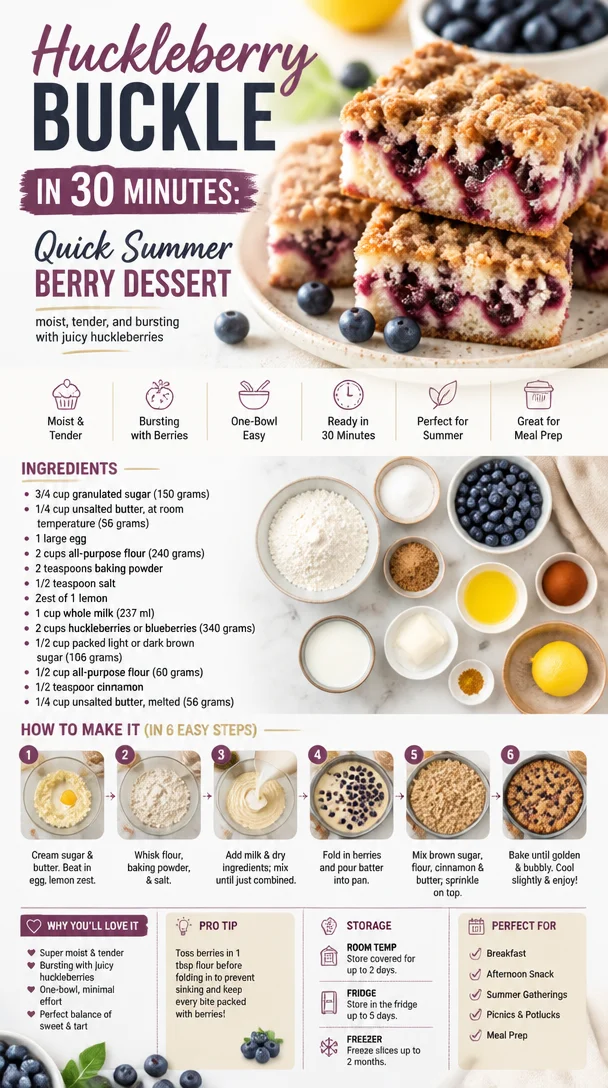
Huckleberry Buckle in 30 Minutes: Quick Summer Berry Dessert
Huckleberry Buckle: A Cozy, Berry-Laden Delight
Welcome back to my kitchen friends! I’m so thrilled you’re here today because we’re delving into one of my all-time favorite bakes: Huckleberry Buckle. Now, let me tell you, this isn’t just a dessert; it’s a slice of nostalgia, a warm hug on a chilly day, and a way to bring a little piece of summer into your home—all wrapped up in a delicious, buttery cake layered with sweet, tart huckleberries.
Huckleberries bring such a unique flavor to the table. Their sweet-tartness captures the essence of wild blueberries, but with a delightful hit of earthiness that makes them stand out. When I think of huckleberries, I’m reminded of my childhood adventures, foraging in the woods behind my grandparents’ house with my siblings. Those lazy summer days, sun beaming down, the smell of earth mixing with the sweet fragrance of berries—it was pure magic. We would return home, arms stained and fingers sticky, eager to help Grandma whip up a batch of her famous huckleberry pie or buckle. The kitchen would fill with the warmth of vanilla and butter, enticing the whole family to gather ’round.
Creating this Huckleberry Buckle is not just about the final product; it’s about the memories we make and the love we share as we create something special. Whether you’re whipping this up for a dinner party, a cozy family brunch, or just because you want to treat yourself, I promise you, it’ll become a cherished part of your own kitchen story. So, grab those huckleberries and let’s get started!
Personal Story
Picture this: I was no more than ten years old, immersed in a summer adventure. Armed with a small basket and a strong sense of adventure, I wandered through the wilds of my grandparents’ backyard, coaxing my siblings to join the hunt for the elusive huckleberry. With each tiny berry we plucked, we shared giggles and tales of mischief while trying to see who could fill their basket first. Eventually, we’d head inside, resonating with the laughter that echoed off the kitchen walls.
Grandma was waiting, apron tied firmly around her waist, a twinkle in her eye as she beckoned us to help her in the kitchen. The huckleberries would soon become something magical—a huckleberry buckle that filled the house with warmth, filling us with happiness for hours afterward. Fast forward to today, and every time I bake this buckle, I’m whisked back to that lovely kitchen filled with family, laughter, and the sweet scent of baked huckleberries. So here I am, ready to share this love with you. Let’s dive into the ingredients for this delightful dessert!
Ingredients
-
Fresh Huckleberries (2 cups)
The star of the show! If you can’t find huckleberries, blueberries or blackberries work well, but you’ll lose some of that unique huckleberry flavor. You can also try frozen huckleberries if fresh ones aren’t available, but make sure to thaw and drain them well to avoid excess moisture in the buckle. -
All-Purpose Flour (1 ½ cups)
A staple in almost every baking recipe! This will form the cake base. For gluten-free options, use a 1:1 gluten-free flour mix, but keep an eye on the texture—it might need a little more liquid. -
Granulated Sugar (1 cup)
Sweetness is key! If you prefer a less sweet dessert, feel free to reduce the sugar by ¼ cup. -
Unsalted Butter (½ cup or 1 stick, softened)
Butter brings richness and flavor. For a dairy-free option, you can use coconut oil or a vegan butter substitute. -
Large Eggs (2)
Helps bind everything together for a perfect texture. If you’re looking for an egg substitute, you can use ¼ cup of applesauce or a flaxseed meal mix (1 tbsp flaxseed meal combined with 2.5 tbsp water). -
Milk (½ cup)
A splash of milk adds moisture. You can replace it with almond milk, oat milk, or any other non-dairy milk if needed. -
Baking Powder (2 tsp)
This is our leavening agent, making the buckle rise. If you run out of baking powder, you can use baking soda mixed with an acid (like vinegar or lemon juice) in a pinch—1 tsp baking soda plus 1 tsp vinegar will do the trick! -
Salt (½ tsp)
A touch of salt enhances all the flavors, so don’t skip it! -
Vanilla Extract (1 tsp)
Adds warmth and depth to your buckle. For a twist, try almond extract! -
Cinnamon (½ tsp)
A warm spice that complements the huckleberries beautifully. You can also add a pinch of cardamom for a unique flavor.
Step-by-Step Instructions
Preheat the Oven
- Preheat your oven to 350°F (175°C).
While your oven warms up, this is a great time to gather and measure out your ingredients—organization is key in the kitchen!
Prepare Your Baking Dish
- Grease a 9×9-inch square baking dish or a round cake pan.
Use butter or non-stick spray liberally to prevent sticking. You can even line the bottom with parchment paper for an extra precaution.
Mix the Dry Ingredients
- In a large mixing bowl, whisk together the flour, baking powder, salt, and cinnamon.
Make sure everything is combined for even distribution of those beautiful flavors.
Cream the Butter and Sugar
- In another bowl, cream together the softened butter and sugar until light and fluffy.
This is key for a tender cake. Use an electric mixer if you have one; it takes less time and delivers a lighter texture.
Add the Eggs and Vanilla
- Add the eggs, one at a time, followed by the vanilla, mixing until smooth.
The mixture might look a bit curdled; that’s just fine—everything will come together beautifully with the dry ingredients.
Combine the Wet and Dry Ingredients
- Gradually add your dry ingredients to the butter mixture.
Mix on low speed until no flour is visible. The batter should be thick and creamy—don’t over-mix it, though!
Add Huckleberries
- Fold in the huckleberries gently, ensuring they are evenly distributed without breaking them too much.
This is a fun step—feel free to use your hands if you’re comfortable! Just be gentle.
Pour into Baking Dish
- Pour the batter into your prepared baking dish.
Use a spatula to spread it evenly; the batter may look a bit thick—that’s how we want it!
Bake!
- Bake in your preheated oven for 35–40 minutes, or until a toothpick inserted in the center comes out clean.
The edges should be golden brown and the top slightly puffed. Keep an eye on it! Every oven is a little different.
Cool and Serve
- Once baked, allow to cool in the pan for about 10 minutes before transferring to a wire rack.
This cooling step is crucial; it helps the buckle set. Serve slightly warm, perhaps with a drizzle of cream or scoop of ice cream on top!
Serving Suggestions
To plate your Huckleberry Buckle, cut it into squares or wedges and arrange them on a beautiful serving platter. Dust with a light sprinkling of powdered sugar for a touch of elegance. If you’re feeling indulgent, add a scoop of whipped cream or vanilla ice cream on top! You can also serve it warm with a generous dollop of Greek yogurt for a delightful balance of flavors. Enjoy it with your favorite coffee or tea—it’s the perfect pairing!
Recipe Variations
- Lemon Zest Addition: Add a tablespoon of fresh lemon zest to the batter for a bright citrus kick.
- Nutty Flavor: Stir in ½ cup of chopped walnuts or pecans for extra texture and nutty flavors.
- Dairy-Free Twist: Substitute all dairy ingredients with non-dairy alternatives without compromising the flavor or texture.
- Mixed Berries: Combine huckleberries with raspberries or strawberries for a colorful and flavorful twist.
- Spiced Buckle: Experiment with spices by adding nutmeg or ground ginger for a warming flavor profile.
Chef’s Notes
I’ve been making this Huckleberry Buckle for years now, and it has undergone a few delightful transformations along the way. One particularly funny story comes to mind: I once confused baking soda with baking powder, resulting in what I called “Berry Flatbread.” Not quite the fluffy buckle I was hoping for, but an impromptu brunch recipe was born! I’ve learned to keep my baking supplies organized since then, and it’s those little mishaps that keep cooking fun, right?
FAQs and Troubleshooting
Q: My buckle turned out too dense. What did I do wrong?
A: Density can come from over-mixing the batter or not enough leavening agents. Ensure you don’t over-mix once the dry ingredients are added, and double-check that your baking powder is fresh.
Q: How do I adjust this recipe for a larger group?
A: This recipe can easily be doubled for a 9×13-inch baking pan! Just keep an eye on baking time as it may require a few extra minutes.
Q: Can I make this ahead of time?
A: Absolutely! You can prepare it the day before and store it covered at room temperature. Reheat slices in the oven or microwave before serving.
Q: What can I use instead of huckleberries?
A: If huckleberries aren’t available, blueberries, blackberries, or even chopped strawberries can be delightful substitutes!
Nutritional Info
Nutritional values can vary, but one serving (1/16 of the finished buckle) typically has around 220 calories, 8g of fat, 35g of carbohydrates, and 2g of protein. Remember, it’s all about balance, so indulge and enjoy every bite!
There you have it, my friends—your ultimate guide to crafting a beautiful Huckleberry Buckle. I can’t wait to hear about your baking adventures, and I’m here to support you every step of the way. Happy baking, and may your kitchen be filled with joy and delicious scents!
Print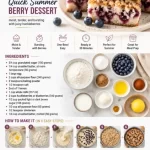
Huckleberry Buckle
- Total Time: 55 minutes
- Yield: 16 servings
- Diet: Vegetarian
Description
A cozy, berry-laden delight that brings a slice of summer into your home, layered with sweet, tart huckleberries in a buttery cake.
Ingredients
- Fresh Huckleberries (2 cups)
- All-Purpose Flour (1 ½ cups)
- Granulated Sugar (1 cup)
- Unsalted Butter (½ cup, softened)
- Large Eggs (2)
- Milk (½ cup)
- Baking Powder (2 tsp)
- Salt (½ tsp)
- Vanilla Extract (1 tsp)
- Cinnamon (½ tsp)
Instructions
- Preheat your oven to 350°F (175°C).
- Grease a 9×9-inch square baking dish or a round cake pan.
- In a large bowl, whisk together the flour, baking powder, salt, and cinnamon.
- Cream together the softened butter and sugar until light and fluffy.
- Add the eggs, one at a time, followed by the vanilla, mixing until smooth.
- Gradually add your dry ingredients to the butter mixture.
- Fold in the huckleberries gently.
- Pour the batter into your prepared baking dish.
- Bake for 35–40 minutes, or until a toothpick comes out clean.
- Once baked, allow to cool in the pan for about 10 minutes before transferring to a wire rack.
Notes
Dust with powdered sugar before serving. Can serve warm with whipped cream or yogurt.
- Prep Time: 15 minutes
- Cook Time: 40 minutes
- Category: Dessert
- Method: Baking
- Cuisine: American
Nutrition
- Serving Size: 1 serving
- Calories: 220
- Sugar: 10g
- Sodium: 200mg
- Fat: 8g
- Saturated Fat: 5g
- Unsaturated Fat: 3g
- Trans Fat: 0g
- Carbohydrates: 35g
- Fiber: 2g
- Protein: 2g
- Cholesterol: 30mg
Keywords: huckleberry, buckle, dessert, cake, summer, baking

Summer Nectarine Blueberry Galette: 30-Minute Recipe
Deliciously Simple: French Nectarine Blueberry Galette Recipe
Hello, fellow food lovers! Welcome back to my cozy kitchen! Today, I’m excited to whisk you away to a rustic French bistro table with a heavenly dessert that’s as delightful to eat as it is to make. So, grab your apron and get ready to dive into the scrumptious world of this French Nectarine Blueberry Galette!
Introduction
Ah, the galette! This baked wonder captures the essence of rustic French baking, bringing together the sweet juiciness of nectarines and the vibrant burst of blueberries nestled within a flaky crust. Picture this: a golden, slightly rustic pastry enveloping a tender filling, straight from the oven, lightly dusted with sugar. Sounds heavenly, right?
You don’t need to be a master chef to create this masterpiece! Galettes are all about celebrating the simplicity of fresh ingredients. They don’t require the precision of a traditional pie and allow for a little artistic flair in the folding of that lovely crust. Whether you’re hosting a dinner party, having a cozy family night, or looking for a sweet treat to impress your guests, this galette is here to shine.
What I love most about this recipe is its versatility. Grab some local nectarines and blueberries from your farmer’s market—trust me, those summer flavors are unbeatable—and let’s create something beautiful! But first, let me take you down memory lane, sharing a little personal story behind my love for this delightful dessert.
Personal Story
When I was a little girl, summers were synonymous with sweet fruit and family gatherings. One of my fondest memories is of my grandmother bustling around her kitchen, her apron dusted with flour, while we picked fresh fruit from the garden. I can still hear her laugh, the smell of sweet nectarines and blueberries wafting through the air as she prepared her famous galette.
Every time she pulled that glorious, golden pastry from the oven, my heart would skip a beat. The crispy crust paired with the sweet, juicy filling was pure bliss! It wasn’t just dessert; it was a celebration of family, tastes, and stories shared over the kitchen table. As I grew older, I realized that this wasn’t just about baking—it was about bringing people together. It’s this very spirit that inspired me to recreate her recipe and share it with all of you. Now let’s get into the nitty-gritty of making this scrumptious galette!
Ingredients
Let’s take a close look at what you’ll need for this delicious treat:
-
All-Purpose Flour (1 ¼ cups)
- This is the backbone of your crust. You can substitute it with a 1:1 gluten-free blend if you need a gluten-free option.
-
Unsalted Butter (½ cup, chilled and cubed)
- Chilling the butter ensures that we get a flaky crust. For a dairy-free option, try coconut oil or vegan butter.
-
Powdered Sugar (2 tablespoons)
- This adds a subtle sweetness without the graininess of granulated sugar. Feel free to use granulated sugar if that’s what you have!
-
Ice Water (3-4 tablespoons)
- This helps bring the dough together. You can use cold mineral water for an extra crisp crust!
-
Nectarines (3 medium, sliced)
- The stars of this recipe! Summer nectarines are juicy and flavorful. You can interchange them with peaches or other stone fruits!
-
Blueberries (1 cup, fresh or frozen)
- These little bursts of sweetness add a vibrant color and flavor. If using frozen, don’t thaw; just add them straight to the filling.
-
Granulated Sugar (¼ cup, plus extra for sprinkling)
- This elevates the sweetness of the fruit. Adjust according to your taste!
-
Cornstarch (1 tablespoon)
- This is essential for thickening the filling and absorbing excess juices. You can use arrowroot powder as an alternative.
-
Ground Cinnamon (¼ teaspoon)
- A hint of warmth and spice! If you like a little more zing, feel free to add a pinch of nutmeg.
Now that we have our ingredients, let’s move on to the fun part—putting everything together!
Step-by-Step Instructions
-
Prepare the Dough:
- In a large mixing bowl, whisk together the all-purpose flour and powdered sugar. Add the cubed, chilled butter. Use a pastry cutter or simply your fingertips to mix until the mixture resembles coarse crumbs. The key is to keep some chunks of butter; these will give us that flaky crust.
-
Bring it Together:
- Gradually add ice water, one tablespoon at a time, mixing until the dough just comes together. Don’t overmix! Once it forms a cohesive ball, wrap it in plastic wrap and pop it into the fridge for about 30 minutes.
-
Make the Filling:
- While the dough chills, prepare the fruit filling. In a mixing bowl, toss together the sliced nectarines, blueberries, granulated sugar, cornstarch, and ground cinnamon. Let this mixture sit for about 10 minutes to allow the flavors to meld together.
-
Preheat Your Oven:
- Preheat your oven to 400°F (200°C). This is perfect for getting that crust golden and crisp!
-
Roll Out the Dough:
- Lightly flour your surface and roll out the chilled dough into a circle about 12 inches in diameter. It doesn’t have to be perfect! Transfer it to a parchment-lined baking sheet.
-
Add the Filling:
- Spoon the fruit mixture into the center of the dough, leaving about a 2-inch border around the edges. Don’t worry if some juice spills over; it’ll caramelize and taste amazing!
-
Fold the Edges:
- Carefully fold the edges of the dough over the filling, pleating it as you go. This rustic look is what makes galettes so charming!
-
Egg Wash and Sugar Sprinkle:
- Beat an egg with a bit of water to create an egg wash, then brush it over the crust. Sprinkle a little granulated sugar on top for that extra sweet touch.
-
Bake to Perfection:
- Bake for about 30-35 minutes, or until the crust is golden brown and the filling is bubbling. Your kitchen will smell heavenly, and your friends and family will wonder what’s cooking!
-
Cool and Serve:
- Let the galette cool on the baking sheet for a few minutes before transferring it to a wire rack. This cooling time lets the filling set, making it easier to slice.
Serving Suggestions
To serve this galette, cut it into wedges and place them on beautiful plates. A scoop of vanilla ice cream or a dollop of freshly whipped cream on top takes it to the next level! For an elegant touch, garnish with a sprig of fresh mint. Trust me; your guests will be impressed!
Recipe Variations
Want to switch things up a bit? Here are a few creative ideas:
- Summer Berry Galette: Swap out nectarines for peaches or toss in some strawberries along with blueberries.
- Spiced Galette: Add some ginger or cardamom to the fruit filling for an exotic twist.
- Nutty Addition: Sprinkle some chopped almonds or walnuts over the filling before folding the dough for an added crunch.
- Vegan Option: Use coconut oil rather than butter and substitute the egg wash with almond milk.
Chef’s Notes
This French Nectarine Blueberry Galette is not just a recipe to me; it’s a reminder of family traditions and summertime joy. Over the years, I’ve played with different fruits and spices, turning it into an ever-evolving dish that matches the season. I once made an apricot and raspberry version at a friend’s wedding, and it was a total hit! Whatever the variations, the core idea remains the same: to bring people together through the love of food. Don’t worry if it doesn’t look perfect; those little rustic edges are what make it unique!
FAQs and Troubleshooting
1. My dough is too dry. What do I do?
If your dough seems crumbly, add a teaspoon of cold water at a time until it comes together. Remember, the key is to handle it minimally!
2. How can I prevent the galette from getting soggy?
Make sure to use well-drained fruits and avoid overmixing them with sugar and cornstarch. Letting the filling sit for a few minutes allows the juices to combine beautifully without making the crust soggy.
3. What if my galette crust cracks?
It’s okay! Just gently pinch or fold it back together while assembling. Remember, the rustic look is part of its charm!
4. Can I make the dough ahead of time?
Absolutely! You can prepare the dough a day in advance and keep it wrapped in the refrigerator. Just allow it to sit at room temperature for a few minutes before rolling it out.
Nutritional Info
(If applicable, please add here)
Now that you’ve got all the details, it’s time to roll up your sleeves and get to baking! This French Nectarine Blueberry Galette is bound to be a showstopper at your next gathering. I can’t wait to hear how it turns out for you. Remember, cooking is all about joy, experimentation, and creating memories. Happy baking! 🍑✨
Print
French Nectarine Blueberry Galette
- Total Time: 50 minutes
- Yield: 8 servings 1x
- Diet: Vegetarian
Description
A rustic French galette filled with juicy nectarines and sweet blueberries, perfect for summer gatherings.
Ingredients
- 1 ¼ cups All-Purpose Flour
- ½ cup Unsalted Butter, chilled and cubed
- 2 tablespoons Powdered Sugar
- 3–4 tablespoons Ice Water
- 3 medium Nectarines, sliced
- 1 cup Blueberries, fresh or frozen
- ¼ cup Granulated Sugar, plus extra for sprinkling
- 1 tablespoon Cornstarch
- ¼ teaspoon Ground Cinnamon
Instructions
- Prepare the Dough: In a large mixing bowl, whisk together the all-purpose flour and powdered sugar. Add the cubed, chilled butter. Use a pastry cutter or your fingertips to mix until the mixture resembles coarse crumbs.
- Bring it Together: Gradually add ice water, one tablespoon at a time, mixing until the dough just comes together. Wrap it in plastic wrap and refrigerate for about 30 minutes.
- Make the Filling: While the dough chills, prepare the fruit filling. Toss together the sliced nectarines, blueberries, granulated sugar, cornstarch, and ground cinnamon. Let sit for about 10 minutes.
- Preheat Your Oven: Preheat your oven to 400°F (200°C).
- Roll Out the Dough: Lightly flour your surface and roll out the chilled dough into a circle about 12 inches in diameter. Transfer it to a parchment-lined baking sheet.
- Add the Filling: Spoon the fruit mixture into the center of the dough, leaving about a 2-inch border around the edges.
- Fold the Edges: Carefully fold the edges of the dough over the filling, pleating it as you go.
- Egg Wash and Sugar Sprinkle: Beat an egg with a bit of water, brush it over the crust, and sprinkle a little granulated sugar on top.
- Bake to Perfection: Bake for about 30-35 minutes, or until the crust is golden brown and the filling is bubbling.
- Cool and Serve: Let the galette cool on the baking sheet for a few minutes before transferring it to a wire rack.
Notes
Serve with vanilla ice cream or whipped cream for an elevated touch.
- Prep Time: 15 minutes
- Cook Time: 35 minutes
- Category: Dessert
- Method: Baking
- Cuisine: French
Nutrition
- Serving Size: 1 slice
- Calories: 280
- Sugar: 15g
- Sodium: 300mg
- Fat: 12g
- Saturated Fat: 7g
- Unsaturated Fat: 4g
- Trans Fat: 0g
- Carbohydrates: 36g
- Fiber: 2g
- Protein: 3g
- Cholesterol: 30mg
Keywords: galette, dessert, summer fruits, baking, rustic dessert, French dessert


