

Min Protein-Packed Espresso Cottage Cheese Brownies
Indulge Guilt-Free: Protein Cottage Cheese Espresso Brownies
Welcome to my warm and cozy kitchen! I’m Olivia Bennett, and today I’m stealing you away from the ordinary with a recipe that melds indulgence and nutrition: Protein Cottage Cheese Espresso Brownies! How can a brownie be healthy, you ask? Well, let’s just say I’m all about transforming classic treats into something spectacular without sacrificing flavor. With these brownies, we’re diving into a delightful blend of richness, a hint of espresso kick, and the lovely creaminess of cottage cheese. Trust me, your sweet tooth won’t know what hit it!
The world of baking often conjures images of flour clouds, sweet smell wafting through the air, and, oh yes, a bit of a mess — but that’s part of the fun, isn’t it? Growing up, I remember spending countless weekends in my grandma’s kitchen. We’d mix and taste and giggle as we tried to decipher the perfect balance of sugar and chocolate. It was here that I learned that a little experimentation could lead to something lovely. Fast forward to today, as I whip up these brownies, I can still feel the warmth of those memories, reminding me that food is about love, creativity, and sharing. So, let’s ignite our ovens and get baking these glorious Protein Cottage Cheese Espresso Brownies together!
Personal Story
One of my fondest memories in the kitchen occurred when I was about twelve years old. I had decided to take a stab at my first-ever baking project: a classic batch of chocolate brownies. I was so excited and convinced that I was about to become the baking sensation of our small town! Armed with a dog-eared recipe card from my grandma and an endless supply of enthusiasm, I went to work.
As I mixed my ingredients, I couldn’t help but sneak spoonfuls of batter – I mean, who can resist that rich chocolaty goodness? But in my eagerness, I miscalculated and doubled the cocoa—talk about a chocolate explosion! Panic set in, but rather than discard the mixture, I added some cottage cheese for creaminess and went with it. What I ended up with was a bizarre concoction that, surprisingly, turned out deliciously moist and surprisingly rich.
Years later, that memory inspired this recipe for Protein Cottage Cheese Espresso Brownies. They embody that spirit of creativity (and accidental genius) I discovered as a kid! So let’s not waste time and dive right into these delightful brownies that promise to be both fantastic and fulfilling!
Ingredients
Here’s everything you’ll need to whip up these decadent Protein Cottage Cheese Espresso Brownies:
-
1 cup cottage cheese: This provides creaminess and a protein boost. Looking for alternatives? Greek yogurt works well too for a slightly tangy flavor.
-
⅓ cup unsweetened cocoa powder: An essential for that rich brownie flavor. If you prefer something sweet, unsweetened chocolate can substitute, but keep the ratios in check as it’s less concentrated.
-
1 cup honey or maple syrup: A natural sweetener that enhances the brownie’s texture and taste. You can swap in coconut sugar for a different sweetness level, but your brownies may be less gooey.
-
2 large eggs: They bind everything together and contribute to that fudgy consistency. If you want to make this vegan, replace with flax eggs (1 tablespoon ground flax + 2.5 tablespoons water = 1 egg).
-
1 tablespoon vanilla extract: This adds flavor depth. Use a high-quality extract for the best results, or even try almond extract for a delightful twist!
-
1 teaspoon baking powder: Gives brownies that perfect rise. Baking soda can be used, but adjust your acid levels accordingly.
-
1 tablespoon instant espresso powder: This elevates the chocolate flavor with a subtle coffee note. Don’t have it? Brewed espresso works! Just reduce the liquid slightly.
-
½ teaspoon salt: Essential to enhance the flavors and balance sweetness; it truly cuts through the richness!
-
Optional toppings: A sprinkle of chocolate chips, chopped nuts, or a drizzle of melted dark chocolate can take these brownies over the top.
Step-by-Step Instructions
Now let’s dive into the fun part! Here’s how to make your Protein Cottage Cheese Espresso Brownies step by step:
-
Preheat Your Oven: Begin by preheating your oven to 350°F (175°C). This is crucial for evenly baking those brownies – nobody wants a mushy middle!
-
Blend the Base: In a mixing bowl, combine the cottage cheese, honey/maple syrup, eggs, and vanilla extract. Blend until smooth using a mixer or a handheld blender. This step is essential; a creamy mixture is the secret to a luscious brownie.
-
Mix in Dry Ingredients: In another bowl, combine the cocoa powder, baking powder, espresso powder, and salt. This way, you’ll ensure every bite has that chocolate-coffee goodness without clumps. Now, gradually add this dry mixture into the wet ingredients. Stir until just combined; be careful not to overmix!
-
Prepare the Pan: Line an 8×8-inch baking dish with parchment paper or lightly grease it. Do this to make sure your brownies have an easy exit; nobody enjoys wrestling their sweet treats out of the pan!
-
Pour and Spread: Pour the batter into your prepared pan, and use a rubber spatula to smooth it out. If you’re feeling adventurous, sprinkle some chocolate chips or nuts on top for extra flavor and texture.
-
Bake: Pop those beauties into the oven and bake for about 25-30 minutes. Stick a toothpick in the center; if it comes out with a few moist crumbs, you’re golden! If it’s completely clean, they might be overcooked — oops!
-
Cool Down: Once out of the oven, allow the brownies to cool in the pan for about 10 minutes, then lift them out using the parchment paper. Let them cool completely on a wire rack before cutting them into squares. The patience is worth it!
Serving Suggestions
These brownies are delightful on their own, but let’s talk about how to take them to the next level! Serve them warm with a scoop of vanilla ice cream or a dollop of Greek yogurt for an indulgent dessert. A sprinkle of fresh berries adds a beautiful pop of color and a fruity contrast that brightens the brownie experience.
For a more elegant plating, layer them with a simple chocolate sauce drizzle or serve with a side of homemade whipped cream. You could also try pairing them with a hot cup of coffee or a rich dark roast to heighten the espresso flavors!
Recipe Variations
Feeling creative? Here are a few variations to try with your Protein Cottage Cheese Espresso Brownies:
-
Nutty Almond Brownies: Add chopped almonds or almond butter to the batter for a delightful crunch.
-
Minty Fresh: Throw in some peppermint extract for a refreshing twist, or top with crushed peppermint candies for a holiday flair!
-
Fruity Addition: Mix in a half cup of raspberries or dried cherries for a fruity burst that complements the chocolate perfectly.
-
Spiced Up: Add a pinch of cinnamon or even chili powder for a subtle kick that transforms your brownies into something exciting.
-
Gluten-Free: Swap the cocoa powder for gluten-free cocoa and ensure all ingredients are certified gluten-free!
Chef’s Notes
As you can see, this recipe has truly unfolded into a personal journey for me! The transformation from my childhood mishap to a well-thought-out treat is incredibly gratifying. These brownies have not only become a staple in my own home, but they’ve also been a hit at parties and gatherings. Friends often ask for the secret behind them, and they are always shocked to hear about the cottage cheese – it’s my little surprise ingredient that adds a delightful depth!
Don’t be afraid to get creative in the kitchen; it’s truly where the spice of life resides. Remember, each batch can carry a story, much like my accidental brownie creation that turned into something delicious!
FAQs and Troubleshooting
Q: My brownies turned out dry. What went wrong?
A: Overbaking is typically the culprit! Ensure you keep an eye on them near the end of the baking time. It’s always better to err on the side of underbaking as they’ll continue to cook as they cool.
Q: Can I use regular cheese instead of cottage cheese?
A: It’s best to stick with cottage cheese for that creamy texture. Regular cheese may make your brownies heavy and alter the flavor profile significantly.
Q: I want these brownies sweeter. What can I do?
A: You can definitely add a bit more honey or maple syrup, or even throw in some chocolate chips, as they melt and contribute additional sweetness!
Q: How can I store leftovers?
A: These brownies keep well in an airtight container at room temperature for up to three days or can be refrigerated for about a week. You can also freeze them; just slice and place them in a freezer-safe bag or container, then thaw when ready to enjoy!
Nutritional Info
While the actual nutrition may vary, each brownie typically packs in about 120-150 calories, 5-7 grams of protein, and a nice balance of healthy carbs and fats. Given the protein boost from cottage cheese and a reduced amount of sugar, they make a great choice for a post-workout snack or a guilt-free dessert!
Now, are you ready to bring the comforting magic of these Protein Cottage Cheese Espresso Brownies to your kitchen? Each bite is a celebration of flavor, nostalgia, and a fun modern twist on a classic treat. Let’s turn your kitchen into a haven of sweetness and creativity. Happy baking, my fellow food lovers!
Print
Protein Cottage Cheese Espresso Brownies
- Total Time: 40 minutes
- Yield: 16 brownies 1x
- Diet: Vegetarian
Description
Indulge in these guilt-free Protein Cottage Cheese Espresso Brownies, a perfect blend of richness and nutrition.
Ingredients
- 1 cup cottage cheese
- ⅓ cup unsweetened cocoa powder
- 1 cup honey or maple syrup
- 2 large eggs
- 1 tablespoon vanilla extract
- 1 teaspoon baking powder
- 1 tablespoon instant espresso powder
- ½ teaspoon salt
- Optional toppings: chocolate chips, chopped nuts, or melted dark chocolate
Instructions
- Preheat your oven to 350°F (175°C).
- Blend the cottage cheese, honey or maple syrup, eggs, and vanilla extract until smooth.
- Mix the cocoa powder, baking powder, espresso powder, and salt in another bowl.
- Gradually add the dry mixture into the wet ingredients and stir until just combined.
- Prepare an 8×8-inch baking dish with parchment paper or grease it lightly.
- Pour the batter into the pan and smooth it out with a spatula. Add optional toppings if desired.
- Bake for 25-30 minutes, checking for moist crumbs with a toothpick.
- Cool in the pan for 10 minutes, then transfer to a wire rack to cool completely before cutting.
Notes
These brownies are delightful warm or served with ice cream or yogurt. Feel free to experiment with different toppings and variations!
- Prep Time: 10 minutes
- Cook Time: 30 minutes
- Category: Dessert
- Method: Baking
- Cuisine: American
Nutrition
- Serving Size: 1 brownie
- Calories: 135
- Sugar: 10g
- Sodium: 150mg
- Fat: 4g
- Saturated Fat: 2g
- Unsaturated Fat: 2g
- Trans Fat: 0g
- Carbohydrates: 22g
- Fiber: 2g
- Protein: 7g
- Cholesterol: 50mg
Keywords: brownies, healthy dessert, protein brownies, cottage cheese brownies, espresso brownies
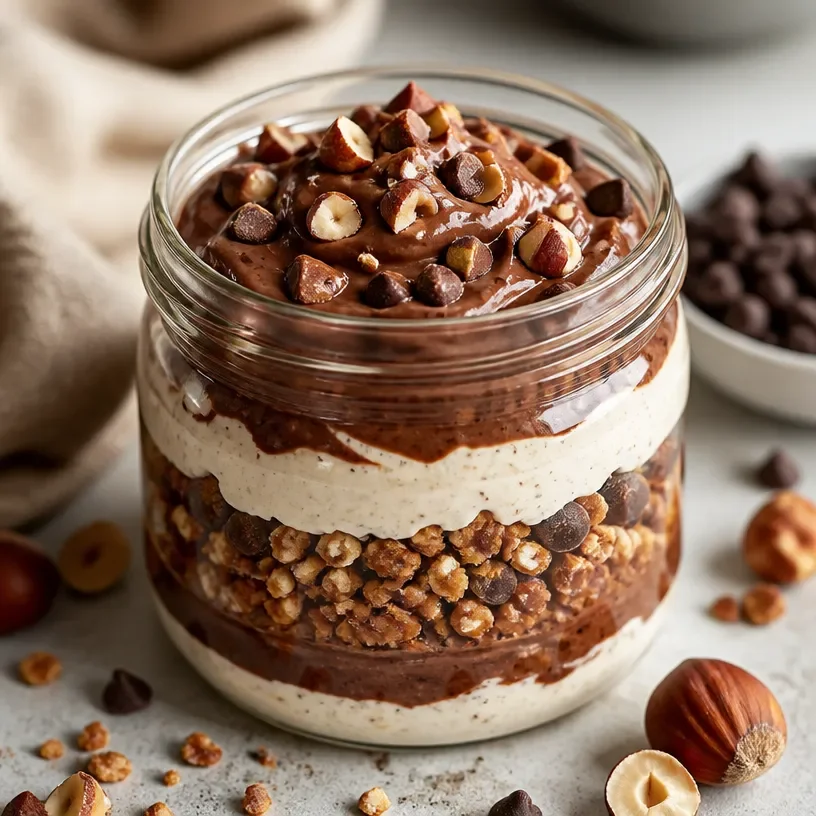
Protein Hazelnut Chocolate Jar: 5-Min No-Bake Snack
The Ultimate Protein Chocolate Hazelnut Jar: A Decadent Delight!
Welcome to my kitchen, fellow food lovers! Today, we’re diving into the world of indulgence with a nutritious twist. If the mere mention of "chocolate" makes your heart race and your taste buds tingle, you’re in just the right spot. I’m Olivia Bennett, and I’m on a mission to unwrap the magic of homemade delights — the ones that bring warmth, comfort, and joy to every bite.
What’s even better? This fabulous recipe is not just a tasty treat; it’s a guilt-free pleasure that packs a protein punch! We’re putting a delightful spin on your favorite spreads with my Protein Chocolate Hazelnut Jar. Imagine the creaminess of hazelnuts merging with chocolatey goodness — all while fueling your day with nutritious ingredients. Whether you’re dolloping it on toast, stirring it into your morning oatmeal, or just grabbing a spoon and indulging straight from the jar, this recipe is about to become your new best friend in the kitchen.
A Bite of Nostalgia
Let me take you back to my childhood for a moment. I remember my grandma’s kitchen on a rainy Saturday afternoon. The sweet scent of vanilla wafted through the air as I would anxiously wait for her daily treat. One of our staples? A homemade chocolate hazelnut spread that was just heavenly! It was rich, creamy, and I could never resist sneaking spoonfuls when Grandma wasn’t looking. Those afternoons were filled with laughter, love, and of course, the sweetest moments shared over a jar of goodness.
As I grew older and began my own culinary journey, the memory of that spread inspired me to create something similar but with a modern twist. Enter my Protein Chocolate Hazelnut Jar: a childhood favorite reimagined with a nutritious twist that fits into today’s health-conscious lifestyle. It brings back that warmth and all those cozy memories while keeping up with our modern food philosophies.
Let’s jump in and create some deliciousness together!
Ingredients
Here’s what you’ll need to whip up your very own Protein Chocolate Hazelnut Jar. Each ingredient plays an essential role in creating that dreamy texture and flavor you crave.
-
Roasted Hazelnuts (1 cup)
These nuts offer a nutty flavor and a creamy base for our spread. If you don’t have hazelnuts, feel free to swap with macadamias or almonds — just adjust the flavor profile accordingly! -
Cocoa Powder (1/4 cup)
This is where the chocolatey magic happens! Look for unsweetened cocoa powder for the best result. If you prefer a sweeter mix, incorporate some dark chocolate chips in place of a bit of cocoa powder. -
Maple Syrup (1/3 cup)
This natural sweetener adds depth and a hint of caramel flavor. If you want to keep it sugar-free, consider using agave nectar or a sugar-free substitute like stevia. -
Protein Powder (1/2 cup)
Choose your favorite flavor — chocolate or vanilla both work like a charm. If you’re vegan or lactose intolerant, look for plant-based protein powder. -
Vanilla Extract (1 tsp)
A dash of pure vanilla extract enhances all the flavors and gives it that homemade touch. If you’re in a pinch, you can use vanilla essence. -
Nut Milk (1/4 cup)
This helps blend everything together smoothly. Almond milk or oat milk are great options, but you can use any nut milk you have at home! -
Pinch of Salt
A little salt enhances the sweetness and balances flavors beautifully. Don’t skip it!
Step-by-Step Instructions
Let’s get those hands busy! We’re about to transform these simple ingredients into a heavenly spread in just a few easy steps.
-
Preheat Your Oven (if necessary)
If your hazelnuts aren’t roasted and you have raw ones, preheat your oven to 350°F (175°C). Spread the hazelnuts in a single layer on a baking sheet and roast for about 10-12 minutes, or until they’re golden and fragrant. Keep an eye on them; you want them perfectly roasted, not burnt! -
Blend the Hazelnuts
Once cooled, transfer the hazelnuts to a high-speed blender or food processor. Blend on high until they begin to break down and turn into a nut butter, scraping down the sides as needed. This process takes about 3-5 minutes. Don’t rush; the creaminess comes with patience! -
Add the Cocoa Powder and Protein Powder
Now it’s time to add the cocoa powder and protein powder! Blend again until well combined. If the mixture looks a bit dry, don’t worry — we’ll add moisture soon! -
Sweeten it Up
Pour in the maple syrup and vanilla extract. Then, add your nut milk one tablespoon at a time. Blend until the mixture reaches your desired consistency. If it’s too thick, add another splash of milk! I always find the consistency is just right when it’s thick yet spreadable — perfect for dolloping on toast. -
Season to Perfection
Sprinkle in a pinch of salt and blend one last time to combine all the elements. Taste it — yes, it’s okay to sample! Adjust sweetener or cocoa to your liking. -
Jar it Up
Transfer your blissful spread into a clean jar. Store it in the fridge for up to two weeks (if it lasts that long!). Enjoy the rich, nutty, chocolatey goodness every day!
Serving Suggestions
Serving your Protein Chocolate Hazelnut Jar is just as delightful as making it. Slather it on whole grain toast for a satisfying breakfast, stir it into your morning smoothie for a protein boost, or top off a bowl of oatmeal for a genuinely luxurious start to your day. For a more indulgent dessert, use it as a dip for fresh fruits like strawberries or apple slices. The options are endless, and each one is a cozy celebration of flavor!
Recipe Variations
Don’t be afraid to get creative! Here are a few fun variations to give your Protein Chocolate Hazelnut Jar an exciting twist:
- Mocha Delight: Mix in a teaspoon of instant coffee for a coffee-infused flavor.
- Spiced Treat: Add a pinch of cinnamon or nutmeg for a warm spiced kick.
- Nutty Crunch: Fold in chopped nuts or cacao nibs after blending for added texture.
- Fruit Fusion: Stir in a tablespoon of pureed fruit like banana or raspberry for a fruity version.
Chef’s Notes
This recipe has come a long way since I first started experimenting in the kitchen! At first, I simply blended hazelnuts with cocoa and sugar, but it wasn’t until I added protein powder and natural sweeteners that I found the right balance. Fun fact: one time, I added too much cocoa and ended up with a chocolate brick — quite the lesson in moderation!
As I continue to refine this recipe over time, I’ve discovered that each batch has its unique personality. So, don’t hesitate! Make this your own and enjoy the journey!
FAQs and Troubleshooting
-
Why is my spread too thick?
If your spread is too thick, simply add more nut milk, one tablespoon at a time, until you reach your desired consistency. -
Can I use other nuts?
Absolutely! While hazelnuts are classic, feel free to experiment with almonds, walnuts, or even cashews. Each nut will yield a slightly different flavor profile. -
Is it okay to sweeten with something else?
Yes! If maple syrup isn’t your thing, you can opt for honey, agave, or your preferred sweetener. Just remember to adjust the liquid content accordingly! -
How long will it stay fresh?
This spread will stay delicious in the fridge for up to two weeks — but I doubt it will last that long in your house!
Nutritional Info
This Protein Chocolate Hazelnut Jar can be packed with nutrients, providing you with healthy fats, protein, and a bit of sweetness. Depending on the exact ingredients and proportions you use, a standard serving (2 tablespoons) contains approximately:
- Calories: 180
- Protein: 7g
- Fat: 13g
- Carbohydrates: 12g
- Fiber: 2g
Wrap-Up
And there you have it — your very own Protein Chocolate Hazelnut Jar, full of cozy flavors and bursting with nutrients. It’s the perfect blend of indulgence and health, bringing the best of both worlds into your kitchen and onto your table. Whether you’re treating yourself or sharing with loved ones, every spoonful is a reminder that delicious homemade food brings us together.
Now, gather your ingredients and let the magic unfold! Remember that cooking is all about having fun. Feel free to make this recipe uniquely yours, and don’t forget to share your creations with me. Happy cooking, friends! 🍫💚
Print
Protein Chocolate Hazelnut Jar
- Total Time: 22 minutes
- Yield: 12 servings 1x
- Diet: Vegetarian
Description
A nutritious twist on your favorite chocolate hazelnut spread, packed with protein and creamy goodness.
Ingredients
- 1 cup Roasted Hazelnuts
- 1/4 cup Cocoa Powder
- 1/3 cup Maple Syrup
- 1/2 cup Protein Powder
- 1 tsp Vanilla Extract
- 1/4 cup Nut Milk
- Pinch of Salt
Instructions
- Preheat your oven to 350°F (175°C) if using raw hazelnuts. Roast for about 10-12 minutes.
- Blend the cooled hazelnuts in a high-speed blender until nut butter forms, about 3-5 minutes.
- Add cocoa powder and protein powder; blend until combined.
- Pour in maple syrup and vanilla extract, then add nut milk a tablespoon at a time until desired consistency is reached.
- Season with a pinch of salt and blend one last time.
- Transfer the mixture into a clean jar and store in the fridge for up to two weeks.
Notes
Feel free to substitute hazelnuts with other nuts or adjust the sweetener to your preference.
- Prep Time: 10 minutes
- Cook Time: 12 minutes
- Category: Spread
- Method: Blending
- Cuisine: American
Nutrition
- Serving Size: 2 tablespoons
- Calories: 180
- Sugar: 8g
- Sodium: 0mg
- Fat: 13g
- Saturated Fat: 1g
- Unsaturated Fat: 12g
- Trans Fat: 0g
- Carbohydrates: 12g
- Fiber: 2g
- Protein: 7g
- Cholesterol: 0mg
Keywords: protein spread, chocolate hazelnut, healthy snacks, homemade spread, nut-based spread
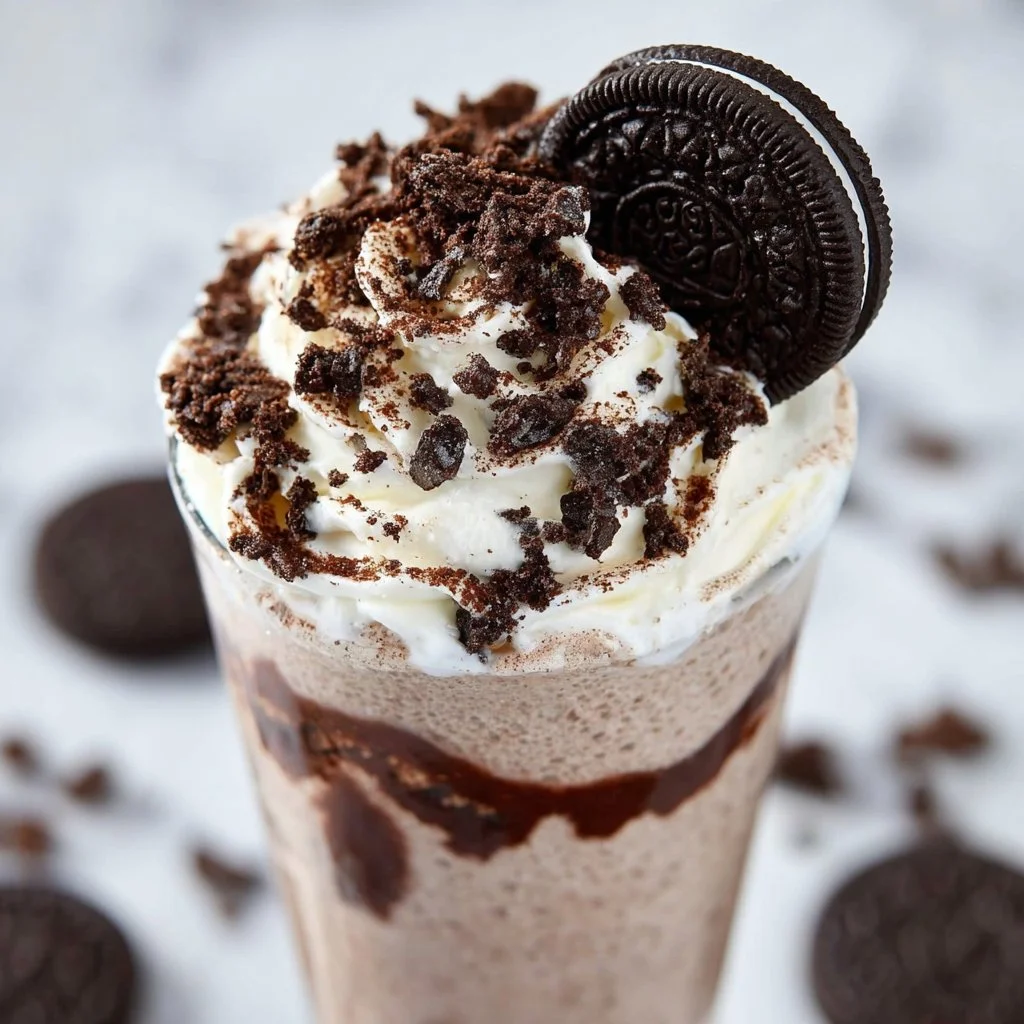
Oreo Milkshake
Whip Up a Delightful Oreo Milkshake: A Sweet Journey into Nostalgia
Hey there, fellow food lovers! Welcome to my cozy corner of the kitchen, where today, we’re diving into a sweet indulgence that’s sure to stir up some fond memories and take our tastebuds on a delicious ride. That’s right; we’re making an Oreo Milkshake! If you’ve ever taken a sip of this creamy, chocolatey goodness, you know it’s not just a drink; it’s a delightful experience packed with nostalgia and comfort.
Picture this: It’s a warm summer day, and the ice cream truck is parked down the street, its jingle echoing through the neighborhood. The excitement builds as you rush outside, clutching your allowance tightly. The moment you lay your eyes on the giant ice cream cones and delicious milkshakes, your eyes light up. Ah, to be a kid again, right? Well, with this Oreo Milkshake recipe, you can channel that joy anytime, anywhere!
This milkshake is the perfect blend of creamy vanilla ice cream, rich chocolate cookies, and velvety milk, all coming together in one glorious glass. You don’t need fancy ingredients or cooking skills to whip this up; just a little enthusiasm and a love for cookies (and who doesn’t love those?). Plus, it’s a fun way to get your little ones involved in the kitchen!
As we go through this delightful journey of creating the perfect Oreo Milkshake, you’ll find tips, tricks, and creative twists that I’ve picked up over the years. So, grab your blender, put on your favorite tunes, and let’s get shaking – it’s time for some deliciousness!
Personal Story
Let me take you back a few years to one of my favorite childhood memories. It was a scorching July afternoon, and my friends and I were gathered for a backyard movie night under the stars. My mom decided to surprise us all with homemade Oreo Milkshakes!
I remember her filling the blender as we gathered around, our excitement bubbling just like the concoction inside. The sound of the blender filled the air, a melody of whirring that meant something delicious was coming our way. When those frosty milkshakes were finally poured into our cups, topped with whipped cream and a single Oreo balancing precariously on top, our eyes lit up with delight.
Sipping on that creamy treat while snuggled in blankets under the stars made that summer night feel magical. Now, years later, every time I blend up an Oreo Milkshake, it transports me back to that joyful evening, filled with laughter, sticky fingers, and endless chatter among friends. That’s the beauty of food—it has a way of connecting us to our happiest moments and the people we cherish most. And today, I’m here to help you create a new memory or two with this delicious treat!
Ingredients
Here’s what you’ll need to create your own scrumptious Oreo Milkshake. Let’s talk ingredients!
-
Oreo Cookies (6-8 cookies)
Classic Oreo cookies are the star of this show! Their chocolatey crunch pairs perfectly with the sweetness of creamy ice cream. Can’t find Oreos? Try any chocolate sandwich cookie you love—it’ll work just as well! -
Vanilla Ice Cream (2 cups)
The creaminess of vanilla ice cream is what gives this shake its luxurious texture. If you’re looking for a lighter option, low-fat or dairy-free ice cream can still give you that delightful creamy feel. -
Milk (1 cup)
Whole milk adds richness to our shake, but you can use any type of milk—almond, oat, or even chocolate milk for an extra flavor punch! -
Whipped Cream (for topping)
A dollop of whipped cream on top not only makes your milkshake look fantastic but also adds a lovely creamy finish. Store-bought is great, or you can whip it up fresh if you’re feeling adventurous! -
Additional Oreos (for garnish)
Crushed or whole, these cookies add a lovely crunchy surprise as you sip on your shake. Plus, they make for a pretty presentation!
Step-by-Step Instructions
Alright, let’s get down to business and whip up this irresistible Oreo Milkshake! Follow these simple steps to enjoy the most delightful treat:
-
Gather Your Ingredients
Prep your workspace by laying out all your ingredients. This helps to make the process smoother and more organized. You’ll want your ice cream slightly softened for easier blending, so dig in and let it sit for a few minutes while you grab your blender. -
Crush the Oreos
Grab 6-8 Oreo cookies and gently break them into pieces. You can crush them in a plastic bag with a rolling pin or by using the blender for a few quick pulses. We want a mix of fine crumbs and larger chunks for that perfect texture! -
Blend It Up!
Pour the crushed cookies into your blender, followed by the vanilla ice cream and milk. Make sure to add the milk gradually—if you like your milkshake thick, start with ¾ cup and add more if needed. Pop the lid on and blend on high until it reaches a smooth and creamy consistency. Pause to scrape down the sides if needed. -
Adjust the Consistency
Check your milkshake’s consistency. Too thick? Add a splash of milk. Too thin? Toss in another scoop of ice cream! Blend until perfectly combined, and you’re almost there! -
Taste Test
Here comes the fun part! Get a straw or a spoon, taste a little, and see if it needs more cookie crumbles or even a pinch of chocolate syrup if you’re feeling extra cheeky. This is the time to personalize your shake based on your unique taste preferences! -
Serve with Style
Pour your Oreo Milkshake into chilled glasses (this keeps it cold for longer). For the ultimate presentation, top with whipped cream, crushed Oreos, and maybe even a drizzle of chocolate syrup. -
Get Ready to Enjoy!
Dive into that glorious shake with a straw or spoon and share it with your favorite people—or keep it all to yourself if you prefer! Get cozy and enjoy every sip.
Serving Suggestions
To present your delightful Oreo Milkshake, serve it in tall, frosty glasses topped with a generous swirl of whipped cream. You can sprinkle some crushed Oreos on top for an eye-catching finish. For a truly decadent treat, consider pairing it with a slice of chocolate cake or some freshly baked cookies on the side. Who said you can’t have dessert with dessert?
Recipe Variations
Want to switch things up? Here are a few creative twists you can try with your Oreo Milkshake:
- Minty Fresh: Add a drop of peppermint extract and use mint Oreos for a refreshing mint chocolate flavor!
- Peanut Butter Bliss: Toss in a couple of spoonfuls of peanut butter for an indulgent and nutty version.
- Chocolate Lovers: Use chocolate ice cream instead of vanilla for an extra chocolatey experience—an absolute must-try for chocolate enthusiasts!
- Extra Crunch: Fold in some crushed nuts or even a few scoops of your favorite brownie bites for extra texture and flavor.
- Dairy-Free Delight: Substitute traditional ingredients with almond milk, cashew ice cream, and vegan Oreos for a delicious dairy-free version that still offers all the satisfaction!
Chef’s Notes
Creating this Oreo Milkshake has been a delightful journey for me over the years. Each time I blend up this treat, I’m reminded of those joyful summer nights with my friends. Sometimes, I play around with flavors and ingredients! Once, I tried mixing in some espresso powder for a coffee-infused Oreo shake, and let me tell you, it was an absolute game changer for those mornings when you need a little extra caffeine. Food truly evolves, just like the memories attached to it.
FAQs and Troubleshooting
1. My milkshake is too thick. What should I do?
If your milkshake ends up thicker than you’d like, simply add a splash more milk and blend again. Start with small amounts until it reaches your desired consistency.
2. Can I use regular milk instead of ice cream?
While milk can add creaminess, it won’t replicate the thickness of ice cream. Stick with ice cream for that perfect shake!
3. What’s a good substitute for vanilla ice cream?
If you’re out of vanilla, any flavor of ice cream will do! Just remember that it will change the final flavor of your shake—try chocolate or cookies and cream for a fun twist.
4. How can I make my Oreo Milkshake healthier?
You can reduce the calories slightly by using low-fat ice cream or yogurt as a base and adding less sugar or cookies than the recipe calls for. It may not be as indulgent, but it’ll still be a tasty treat!
Nutritional Info
(If you want to keep track of the nutritional information for your Oreo Milkshake, here’s a rough estimate per serving:)
- Calories: 500-600
- Protein: 10g
- Carbohydrates: 70g
- Sugars: 55g
- Fat: 25g
(Note: Values may vary based on exact ingredients used.)
So, there you have it! Just a few simple steps to create an Oreo Milkshake that’s bound to become a favorite in your household. Remember to savor the process, enjoy the little moments in the kitchen, and find joy in home-cooked treats. Happy shaking, my fellow foodies! 🍦🥛
Print
Oreo Milkshake
- Total Time: 5 minutes
- Yield: 2 servings 1x
- Diet: Vegetarian
Description
A delightful and creamy Oreo Milkshake that captures the joy of childhood memories.
Ingredients
- 6–8 Oreo Cookies
- 2 cups Vanilla Ice Cream
- 1 cup Milk
- Whipped Cream (for topping)
- Additional Oreos (for garnish)
Instructions
- Gather your ingredients.
- Crush the Oreos.
- Blend it up!
- Adjust the consistency.
- Taste test.
- Serve with style.
- Get ready to enjoy!
Notes
Consider variations like adding mint, peanut butter, or using different ice cream flavors for creative twists.
- Prep Time: 5 minutes
- Cook Time: 0 minutes
- Category: Dessert
- Method: Blending
- Cuisine: American
Nutrition
- Serving Size: 1 serving
- Calories: 550
- Sugar: 55g
- Sodium: 250mg
- Fat: 25g
- Saturated Fat: 15g
- Unsaturated Fat: 5g
- Trans Fat: 0g
- Carbohydrates: 70g
- Fiber: 2g
- Protein: 10g
- Cholesterol: 50mg
Keywords: Oreo, milkshake, dessert, summertime, ice cream
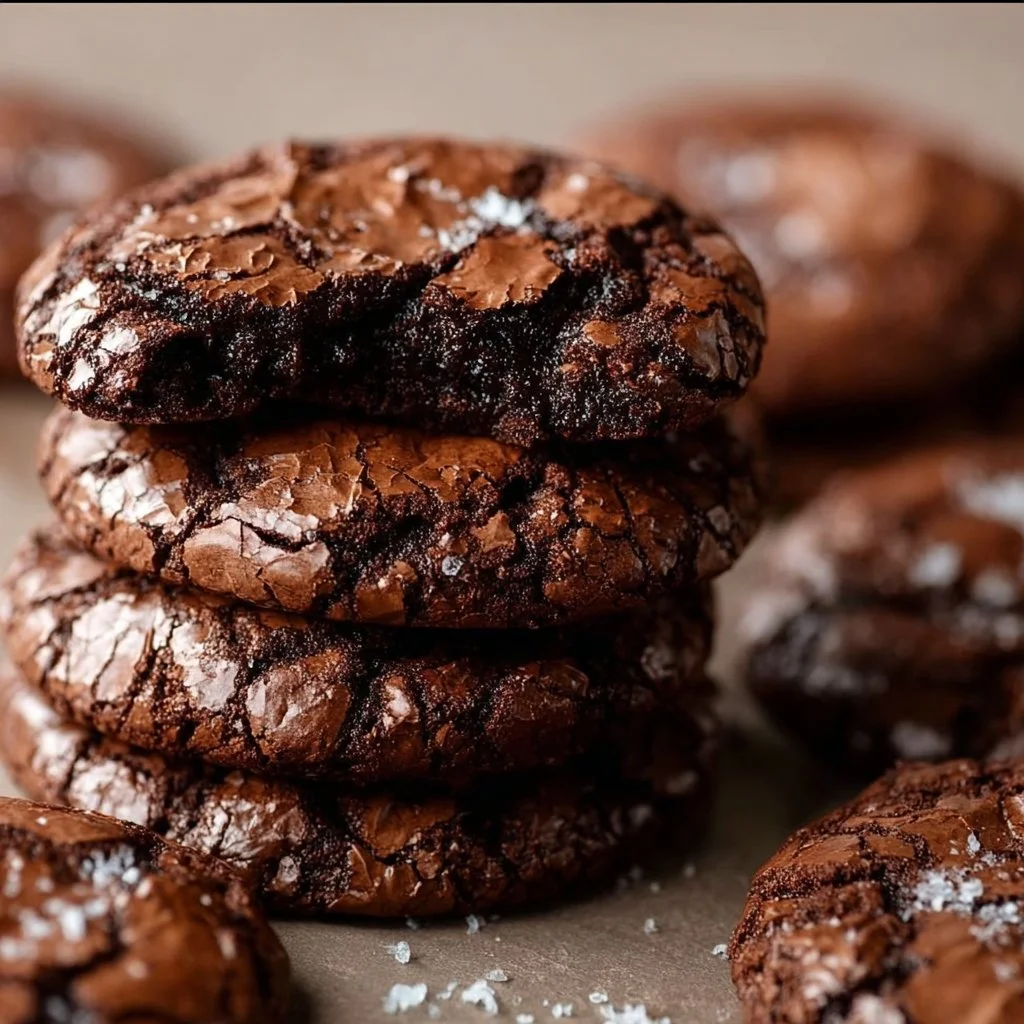
Gourmet Brownie Cookies
Gourmet Brownie Cookies: The Perfect Fusion of Brownies and Cookies!
Welcome back to my cozy kitchen, my fellow food enthusiasts! Today, we’re diving into a recipe that’s sure to steal the show at your next gathering—Gourmet Brownie Cookies! These little delights boast all the rich, fudgy decadence of brownies combined with the delightful chewiness of cookies. Imagine biting into a deeply chocolatey cookie that’s crisp on the edges and gooey in the middle—a slice of heaven right here on Earth!
I’ve always believed that some of the best memories are made in the kitchen, especially when it comes to baking. The aroma of chocolate melting, sugar whisking, and a sprinkle of flour dusting the countertops takes me on a nostalgic trip back to my childhood. I remember my grandma’s kitchen filled with laughter and warmth as she’d gather all of us around her. Making cookies felt like a sacred ritual, and though we often ended up with a flour fight, the joy of baking together was always worth it.
Whether you’re whipping these up for a family gathering or just because it’s a Tuesday, these gourmet brownie cookies are sure to impress. What’s more? They’re surprisingly easy to make! So gather your ingredients and let’s embark on this chocolatey adventure together.
Personal Story
Oh, let me take you back to a sunny Saturday morning at my grandma’s house. The whole family was buzzing with excitement as the smell of something chocolatey wafted through the air. Grandma was making her signature brownie cookie recipe, and you know what that meant—each of us had a specific job. My sister and I would race to measure the flour and cocoa powder, while our cousins fought over who got to crack the eggs. We’d find ourselves peeking into the oven, eyes wide with anticipation, as the cookies baked to a beautiful, glossy finish.
It was during one of those kitchen adventures that I learned the importance of patience—fighting the urge to devour them straight from the oven and waiting just a few minutes for them to cool. Little did I know, this recipe would become a cherished tradition in my life. It holds memories of laughter, love, and, the occasional chocolate-covered disaster. I revisit this recipe from time to time, not just for its rich flavor but for the connection it builds. Now, it’s my turn to share this love with you!
Ingredients
Here’s what you’ll need to create these heavenly treats:
For the Cookies:
-
1 cup (2 sticks) unsalted butter
- Why? The butter adds richness and flavor.
- Substitution: You can use coconut oil or a dairy-free butter alternative for a vegan version.
-
1 ½ cups granulated sugar
- Why? This helps your cookies spread out beautifully while keeping them chewy.
-
1 cup brown sugar, packed
- Why? The molasses in brown sugar adds depth and a chewy texture.
-
2 large eggs
- Why? Eggs help bind the cookies together.
- Tip: If you’re vegan, you can replace each egg with 1/4 cup unsweetened applesauce.
-
2 teaspoons vanilla extract
- Why? Pure vanilla takes the flavor from good to great!
-
1 cup all-purpose flour
- Why? This gives your cookies structure.
- Substitution: For a gluten-free option, substitute with a 1:1 gluten-free flour blend.
-
1 cup unsweetened cocoa powder
- Why? Essential for that brownie taste!
- Tip: Use Dutch-processed cocoa for a deeper flavor.
-
1 teaspoon baking powder
- Why? Helps the cookies rise just a tad without losing that chewy brownie-like texture.
-
1/2 teaspoon salt
- Why? A touch of salt amplifies sweetness and balances flavors.
-
2 cups semi-sweet chocolate chips or chunks
- Why? Melty chocolate bits in each bite—need I say more?
- Variation: Swap for dark chocolate or even white chocolate chips for a unique twist!
Step-by-Step Instructions
Now that we have our ingredients prepped, let’s get rolling on these delicious brownie cookies!
Step 1: Preheat Your Oven
Preheat your oven to 350°F (175°C). This step is crucial because we want those cookies to bake evenly and help them achieve that perfect chewy texture.
Step 2: Cream the Butters and Sugars
In a large mixing bowl, beat the unsalted butter, granulated sugar, and brown sugar together until light and fluffy. This should take about 2-3 minutes. You can use a handheld mixer or a stand mixer. Pro tip: allow your butter to sit at room temperature for about 30 minutes before using it. This will give you that creamy texture we’re after!
Step 3: Incorporate Eggs and Vanilla
Next, add in the eggs (one at a time) and the vanilla extract. Beat until everything is combined. You want that batter to be smooth—trust me, this is going to make it all come together beautifully!
Step 4: Mix the Dry Ingredients
In a separate bowl, whisk together the flour, cocoa powder, baking powder, and salt. Now, this step is important—sifting the cocoa powder before adding it to the mixture ensures there are no lumps and keeps our batter silky smooth. Once combined, gradually add this dry mixture into the wet ingredients. Mix until just combined—overmixing could lead to dry cookies!
Step 5: Fold in the Chocolate Chips
Here comes the fun part! Fold in the chocolate chips or chunks gently into your dough. You might want to save a few to sprinkle on top right before baking for that professional touch!
Step 6: Scoop and Bake
Using a cookie scoop or two tablespoons, drop heaping amounts of dough onto a baking sheet lined with parchment paper, spacing them about 2 inches apart to allow for spreading. Pop them into the preheated oven and bake for 10-12 minutes. Keep an eye on them—the edges should be set while the centers will look slightly underbaked (trust me, they’ll firm up as they cool).
Step 7: Cool
Remove the cookies from the oven and let them rest on the baking sheet for about 5 minutes. This helps them set up before transferring them to a wire rack to cool completely. Don’t skip this step—this is where that gooey center magic happens!
Enjoy Your Cookies
Wait for them to cool a bit before diving in. I know it’s hard, but those few minutes will reward you with a fudgy, melty, chocolate-filled experience!
Serving Suggestions
These gourmet brownie cookies can be served on a beautiful platter, perhaps garnished with a dusting of powdered sugar or a drizzle of chocolate sauce for that eye-catching finish. Pair them with a tall glass of milk or a scoop of vanilla ice cream for an irresistible treat that nobody will be able to resist. ❤️ They also make fantastic gifts in cute cookie tins—just try not to eat them all before you get a chance to give them away!
Recipe Variations
If you’re feeling adventurous or catering to specific dietary preferences, here are a few ideas to switch up this recipe:
- Nutty Addition: Fold in 1 cup of your favorite nuts, such as walnuts or pecans, for a delightful crunch.
- Minty Fresh: Add a few drops of peppermint extract for a chocolate-mint flair that’s perfect during the holidays.
- Spicy Kick: Incorporate a pinch of cayenne pepper into the dry ingredients for a subtle kick that enhances the chocolate flavor.
- Flourless Option: Go for a gluten-free version by omitting the flour entirely and using ground almonds instead, yielding ultra-fudgy cookies.
Chef’s Notes
Over the years, this brownie cookie recipe has become a staple in my home, and I can’t help but tweak it each time I make it! Lately, I’ve been experimenting with adding a hint of espresso powder to the mix, which enhances that chocolate flavor even more! One of my funniest kitchen memories was when I accidentally used salt instead of sugar—I had a room full of disappointed taste testers whose faces were priceless! Remember to check your ingredients before diving in, friends!
FAQs and Troubleshooting
1. My cookies are too cakey! What went wrong?
This could happen if you overmixed the dough or added too much flour. Make sure to measure accurately and mix until just combined to maintain that chewy texture.
2. Why are my cookies spreading too much?
Chilling your dough for at least 30 minutes can help the cookies maintain their shape while baking, as well as keeping your ingredients cool.
3. My cookies didn’t turn out gooey!
If they were left in the oven for too long, they might dry out. Remember, they’ll continue to cook on the baking sheet after being pulled from the oven, so take them out while they still look slightly underbaked.
4. Can I freeze the dough?
Absolutely! You can scoop the dough into balls and freeze them on a baking sheet. Once frozen, transfer them to a zip-top bag and pop them in the freezer. When you’re ready, bake directly from frozen, adding an extra minute or two to the bake time.
Nutritional Information (optional)
Caloric Content: Each cookie is approximately 150 calories.
Health Tip: These cookies are rich in antioxidants from the cocoa but should be consumed in moderation due to their sugar content.
Now, are you ready to transform your kitchen into a chocolatey wonderland? Collect your ingredients, turn on those ovens, and let’s get baking! Share your creations with me—there’s nothing better than the joy of homemade goodies shared with love. Happy baking! 🍪❤️
Print
Gourmet Brownie Cookies
- Total Time: 27 minutes
- Yield: 24 cookies 1x
- Diet: Vegetarian
Description
Delicious gourmet brownie cookies that combine the fudgy richness of brownies with the chewy texture of cookies. Perfect for any gathering!
Ingredients
- 1 cup (2 sticks) unsalted butter
- 1 ½ cups granulated sugar
- 1 cup brown sugar, packed
- 2 large eggs
- 2 teaspoons vanilla extract
- 1 cup all-purpose flour
- 1 cup unsweetened cocoa powder
- 1 teaspoon baking powder
- 1/2 teaspoon salt
- 2 cups semi-sweet chocolate chips or chunks
Instructions
- Preheat your oven to 350°F (175°C).
- Cream the unsalted butter, granulated sugar, and brown sugar in a large mixing bowl until light and fluffy.
- Incorporate the eggs and vanilla extract, beating until combined.
- Mix the flour, cocoa powder, baking powder, and salt in a separate bowl.
- Gradually add the dry mixture into the wet ingredients, mixing until just combined.
- Fold in the chocolate chips or chunks.
- Scoop heaping amounts of dough onto a parchment-lined baking sheet, spacing them 2 inches apart.
- Bake for 10-12 minutes until edges are set and centers are slightly underbaked.
- Cool on the baking sheet for 5 minutes before transferring to a wire rack.
Notes
For variations, consider adding nuts, peppermint extract, or a pinch of cayenne. These cookies can also be frozen in dough form for later baking.
- Prep Time: 15 minutes
- Cook Time: 12 minutes
- Category: Dessert
- Method: Baking
- Cuisine: American
Nutrition
- Serving Size: 1 cookie
- Calories: 150
- Sugar: 15g
- Sodium: 150mg
- Fat: 7g
- Saturated Fat: 4g
- Unsaturated Fat: 3g
- Trans Fat: 0g
- Carbohydrates: 23g
- Fiber: 2g
- Protein: 2g
- Cholesterol: 30mg
Keywords: brownies, cookies, chocolate, dessert, baking

Greek Yogurt Brownies Recipe
Indulge in Guilt-Free Bliss: The Ultimate Greek Yogurt Brownies Recipe!
Welcome to my cozy kitchen! I’m so excited to share something absolutely delicious and a little surprising today: Greek Yogurt Brownies! As someone who adores the rich, decadent taste of brownies—but also believes in striking a balance—this recipe has become a cherished favorite of mine. Using Greek yogurt brings moisture and a lovely texture while cutting back on some of that guilt that can come with traditional brownies. Trust me; these fudgy delights will have your friends and family begging for more!
Baking, for me, is all about creating moments. Whether it’s the comforting aroma wafting through the house or the excitement of watching the confection rise in the oven, there’s a certain magic in the air. I remember the first time I ever made brownies on my own. I was in high school, and my friends had gathered for a little movie night. I had just discovered a simple brownie recipe in a dusty cookbook and was eager to impress. Surprisingly, they turned out wonderfully, and we devoured every last crumb while laughing and sharing silly stories. That night sparked my love for cooking and the joy of sharing with others, which is what this blog is all about!
So, shall we put on our favorite aprons and get started? Grab your favorite whisk, a mixing bowl, and let’s make some mouthwatering Greek Yogurt Brownies that will leave everyone (including you!) wanting just one more indulgent bite.
Personal Story
I remember the joy of my first brownie-making adventure fondly, but I want to take you to the moment I decided to jazz up that classic recipe with a healthy twist. It all started during a health kick a few years back, where I had mostly swapped out comfort food for salads and smoothies. One day, I was craving something sweet, especially the brownies I used to make. They just brought me so much happiness! So, I rummaged through my pantry and came across a tub of Greek yogurt that had been living there for a while. The light bulb moment hit me: what if I could create a brownie that wouldn’t derail my healthy eating goals?
The first batch came out of the oven with a hint of skepticism in the air. I took a bite, and—to my delight—they were every bit as fudgy and rich as the traditional version, yet light enough that I didn’t feel like an instant sugar crash was just around the corner. I shared them with friends who were on their own health journeys, and they were amazed at the delicious surprise. From that day on, my Greek Yogurt Brownies became a staple in my kitchen—and I think they’ll become a favorite in yours, too!
Ingredients
Here’s what you’ll need to whip up these delightful Greek Yogurt Brownies:
-
1 cup Greek yogurt
Choose plain, unsweetened Greek yogurt for the best results. This ingredient helps keep these brownies moist while adding some protein! If you don’t have Greek yogurt, regular yogurt can be used, but swap it out for ¾ cup and adjust baking time. -
½ cup unsweetened cocoa powder
Cocoa powder is your key to achieving that decadent chocolate flavor. Use high-quality cocoa for a richer taste. You can also substitute half with dark chocolate for an intense flavor boost! -
½ cup granulated sugar
Feel free to use coconut sugar or brown sugar for a hint of caramel flavor. You can also reduce the sugar to ⅓ cup if you want a less sweet brownie or try using a sugar substitute like Stevia. -
1 cup all-purpose flour
All-purpose flour provides the necessary texture, but you can use whole wheat flour for a healthier option. Just keep in mind that the texture will change slightly. -
½ teaspoon baking powder
This is essential; it gives the brownies a lovely rise and fluffy texture. If you’re feeling adventurous, try adding a hint of baking soda for an even fluffier finish! -
2 large eggs
Eggs bind the brownies together! For a vegan alternative, you can substitute with flaxseed eggs (2 tablespoons ground flaxseed mixed with 6 tablespoons water) and let it sit for a few minutes until it thickens. -
1 teaspoon vanilla extract
This adds depth to the flavor profile. You can even experiment with almond extract for a unique twist! -
1/2 cup chocolate chips (optional)
You can’t go wrong with chocolate! Use semi-sweet or dark chocolate chips, or even swap them for nuts or dried fruit for added texture!
Step-by-Step Instructions
Now, let’s break down the steps to creating these luscious Greek Yogurt Brownies. Follow along, and I promise you’ll have an amazing batch of brownies ready to devour in no time!
Step 1: Preheat Your Oven
Start by preheating your oven to 350°F (175°C) and greasing or lining an 8×8-inch baking pan with parchment paper. This ensures easy removal after baking!
Step 2: Mix the Wet Ingredients
In a medium mixing bowl, combine the Greek yogurt, eggs, sugar, and vanilla extract. Use a whisk to mix it all together until you achieve a smooth, creamy consistency. The yogurt should integrate well with the eggs, creating a luscious base.
Step 3: Sift in the Dry Ingredients
Now, in another bowl, sift together the cocoa powder, flour, and baking powder. Sifting helps avoid clumps and ensures an even distribution of the dry ingredients. Once sifted, gently fold it into the wet mixture until just combined. Don’t over-mix; you want a luscious brownie batter that’s rich and thick!
Step 4: Add Chocolate Chips
If you’re using them, this is where you fold in the chocolate chips for an extra decadent touch! Gently mix them into the batter, making sure they’re evenly distributed.
Step 5: Pour and Spread
Pour the brownie batter into your prepared pan and use a spatula to spread the mixture evenly. This step is key to achieving that beautiful, consistent bake!
Step 6: Bake
Pop the brownies into your preheated oven and bake for 20-25 minutes. The smell will be incredible! To check for doneness, insert a toothpick into the center; it should come out with a few moist crumbs, not wet batter.
Step 7: Cool and Slice
Once baked, remove the pan from the oven and let the brownies cool in the pan for about 10-15 minutes before transferring them to a cooling rack. Once they’re completely cool, slice them into squares and prepare for the oohs and ahhs!
Serving Suggestions
When it comes to serving these delightful brownies, you can keep it simple. A dusting of powdered sugar is always a classic touch, or plate them warm with a scoop of vanilla ice cream for a truly indulgent dessert. Serve them alongside fresh berries for a refreshing contrast—whatever your heart desires!
Recipe Variations
Ready for some fun twists on these Greek Yogurt Brownies? Here are a few ideas:
- Nutty Surprise: Fold in a half-cup of walnuts or pecans for a delightful crunch.
- Peppermint Twist: Add a few drops of peppermint extract to the batter and top with crushed candy canes for a festive treat!
- Dried Fruit Delight: Mix in dried cherries or cranberries for a sweet and tart flavor combination.
- Spicy Kick: Incorporate a pinch of cayenne pepper in the batter for a surprising warm finish!
- Gluten-Free Option: Swap out the all-purpose flour for almond flour or a gluten-free baking blend.
Chef’s Notes
These Greek Yogurt Brownies have not only become a staple but also a canvas for my creativity. The original recipe has gone through many iterations, often inspired by what I have on hand in my kitchen. One memorable time, I swapped in pumpkin puree instead of Greek yogurt for a fall twist, and let me tell you, it led to the most incredible pumpkin spice brownies! The beauty of this recipe is in its flexibility. Don’t be afraid to play around with it and make it yours!
FAQs and Troubleshooting
1. Why are my brownies dry?
Dry brownies can occur if they’re overbaked or if there’s an incorrect measurement of flour. Make sure to check your brownies a couple of minutes before the recommended baking time!
2. Can I store these brownies?
Absolutely! Store them in an airtight container at room temperature for up to 3 days, or in the fridge for about a week. You can even freeze them for up to three months. Just make sure to wrap them tightly!
3. Can I use non-dairy yogurt?
Definitely! Non-dairy yogurt works well too! Just make sure to choose a thicker variety to keep the same texture.
4. What if I want even more chocolaty goodness?
You can increase the cocoa powder to ¾ cup for a richer brownie! Also, don’t forget those chocolate chips for that extra hit of chocolate flavor!
Nutritional Info (Optional)
Each brownie (based on 16 servings) contains approximately:
- Calories: 135
- Protein: 4g
- Carbohydrates: 20g
- Fat: 5g
- Sugar: 6g
And there you have it, my friends! A delightful, easy-to-make, guilt-free Greek Yogurt Brownies recipe that’ll satisfy your sweet tooth without the heavy feeling afterward. Now, it’s your turn to grab those mixing bowls and start creating delicious memories in your kitchen. I can’t wait to see how your brownies turn out—be sure to share your creations with me! Happy baking!
Print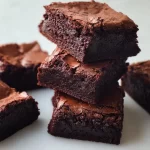
Greek Yogurt Brownies
- Total Time: 40 minutes
- Yield: 16 servings 1x
- Diet: Vegetarian
Description
Indulge in these moist and fudgy Greek Yogurt Brownies that are a healthier twist on a classic treat. Perfect for satisfying your sweet tooth without the guilt!
Ingredients
- 1 cup Greek yogurt
- ½ cup unsweetened cocoa powder
- ½ cup granulated sugar
- 1 cup all-purpose flour
- ½ teaspoon baking powder
- 2 large eggs
- 1 teaspoon vanilla extract
- ½ cup chocolate chips (optional)
Instructions
- Preheat your oven to 350°F (175°C) and grease or line an 8×8-inch baking pan with parchment paper.
- Mix the Greek yogurt, eggs, sugar, and vanilla extract together in a medium mixing bowl until smooth.
- Sift together the cocoa powder, flour, and baking powder in another bowl. Gradually fold it into the wet mixture until just combined.
- Add in the chocolate chips, if using, mixing gently into the batter.
- Pour the brownie batter into your prepared pan and spread evenly.
- Bake for 20-25 minutes, checking for doneness with a toothpick.
- Cool in the pan for 10-15 minutes before transferring to a cooling rack. Once cool, slice into squares.
Notes
For a healthier option, substitute half of the cocoa with dark chocolate or use coconut sugar for sweetness. Experiment with adding nuts, dried fruits, or different extracts for variety.
- Prep Time: 15 minutes
- Cook Time: 25 minutes
- Category: Dessert
- Method: Baking
- Cuisine: American
Nutrition
- Serving Size: 1 brownie
- Calories: 135
- Sugar: 6g
- Sodium: 50mg
- Fat: 5g
- Saturated Fat: 2g
- Unsaturated Fat: 3g
- Trans Fat: 0g
- Carbohydrates: 20g
- Fiber: 2g
- Protein: 4g
- Cholesterol: 30mg
Keywords: brownies, healthy dessert, Greek yogurt, chocolate, baking

Gourmet Brownie Cookies
The Ultimate Guide to Gourmet Brownie Cookies
Hey there, fellow food enthusiasts! Welcome back to Feastical, where we’re all about creating kitchen magic and sharing good vibes through delicious recipes. If you’re ready to tickle your taste buds and dive into something absolutely scrumptious, buckle up because today we’re whipping up Gourmet Brownie Cookies!
Imagine the best of both worlds: the rich, fudgy texture of classic brownies melded beautifully with the delightful bite of a cookie. Sounds dreamy, right? Well, I can hardly hear my taste buds file their complaint letters because they’re just so excited about these cookies! They are soft, chewy, and packed to the brim with chocolatey goodness, guaranteed to make you swoon.
Now, let me just say this: making these cookies is not just about satisfying your sweet tooth; it’s about the experience. From mixing the batter to the intoxicating aroma wafting through your kitchen, baking is a beautiful adventure. Whether you’re baking for a crowd, surprising a friend, or indulging in a cozy night in, these brownies turned cookies are sure to elevate your mood. Trust me, once you sink your teeth into one, you’ll find it hard to eat just one!
So, grab your apron, roll up those sleeves, and let’s get ready to unleash your inner baker with these delectable Gourmet Brownie Cookies!
Personal Story
Let me take you back to a sunny Saturday afternoon—oh, how nostalgic this memory is! It was my mom’s day off, and the kitchen was like a playground. She had a way of turning any day into a special occasion, especially if it involved baking. With classic rock tunes on the radio, we’d whip up everything from cakes to cookies, but there was one treat that always stood out: her ultimate brownie cookies.
I vividly remember her explaining how to achieve the perfect balance between chewy and fudgy, while I eagerly cracked eggs (probably a bit carelessly) and stirred the bowl just a bit too vigorously. The kitchen transformed into a flutter of laughter, flour, and chocolate as we experimented with different toppings—think nuts, sprinkles, and all the chocolate chips we could find!
Today, whenever I make these Gourmet Brownie Cookies, I’m instantly transported back to that warm kitchen filled with love and laughter. It’s an experience I love to recreate and share with you! Let’s carry on that tradition together, shall we?
Ingredients
Let’s start gathering what you’ll need for your Gourmet Brownie Cookies. Here’s the list:
-
1/2 cup unsalted butter
Butter is a must for that rich, indulgent flavor. If you’re out of unsalted butter, you can use salted butter and omit the added salt. -
1 cup granulated sugar
This sweet agent helps to create that perfect chewy texture. You could swap half for brown sugar for a hint of molasses flavor! -
2 large eggs
Eggs bind everything together and provide moisture. You can use flax eggs if you’re looking for a vegan alternative—just mix 1 tablespoon of ground flaxseed with 2.5 tablespoons of water and let it sit until gelatinous. -
1 teaspoon vanilla extract
Vanilla adds a lovely depth to the flavor. If you’re feeling adventurous, try almond extract instead for a nutty twist! -
1/2 cup all-purpose flour
This is the base for our cookies. For gluten-free options, you can use a 1:1 gluten-free flour blend, ensuring it contains xanthan gum. -
1/3 cup unsweetened cocoa powder
The star of the show! Cocoa powder gives that deep chocolate flavor. If you’re out, you might sub in some chocolate protein powder, but the texture will change slightly. -
1/4 teaspoon baking powder
This gives our cookies a bit of lift and a lovely chewy texture. If you don’t have baking powder, baking soda works too—just use half the amount. -
1/4 teaspoon salt
Salt enhances the sweetness of the cookies. You could even use a flaky sea salt for topping if you fancy! -
1 cup chocolate chips
Chocolate chips, the ultimate flavor boost! Go for dark, semi-sweet, or even white chocolate chips for a fun twist.
Step-by-Step Instructions
Now that we’ve rounded up all the delicious ingredients, it’s time to get down to baking! Here’s how you’ll make these luscious Gourmet Brownie Cookies:
-
Preheat the Oven
Preheat your oven to 350°F (175°C). This is crucial because a properly preheated oven helps your cookies rise beautifully and cook evenly. -
Melt the Butter
In a small saucepan over low heat, melt the butter gently—don’t let it boil! If you’re feeling reckless, you can microwave it in 30-second intervals until melted. Just be careful not to cook it. -
Mix Sugar and Eggs
In a mixing bowl, combine the melted butter and granulated sugar. Mix until well combined. I like to switch to a hand whisk here—the more muscle, the better! Next, add in the eggs, one at a time, and whisk until the mixture is smooth. This is where you’ll start to see everything blend together beautifully! -
Add Vanilla
Pour in that heavenly vanilla extract (or almond extract if you’re swapping). Stir it in, and trust me, the aroma will make you giddy! -
Sift the Dry Ingredients
In a separate bowl, sift together the flour, cocoa powder, baking powder, and salt. Sifting helps create a lighter cookie, making them chewy and delicious. -
Combine Wet and Dry Ingredients
Gradually add the dry mixture into the egg mixture, stirring gently with your spatula. Be careful not to over-mix—just until the flour disappears! -
Fold in Chocolate Chips
Now, for the pièce de résistance! Fold in those luscious chocolate chips until evenly distributed. Feel free to add more if you’re feeling bold—nobody’s judging! -
Scoop the Dough
Using a cookie scoop (or two spoons if you don’t have one), drop generous amounts of dough onto a lined baking sheet, spacing them about 2 inches apart. They will spread, trust me! -
Bake ‘Em Up
Pop your baking sheet into the preheated oven and bake for about 10-12 minutes. You want the edges to be set while the center remains soft and slightly underbaked. They’ll continue to cook a bit as they cool, delivering that perfect chewy texture. -
Let Them Cool
Once out of the oven, let them cool on the baking sheet for about 5 minutes before transferring them to a wire rack. This is the hardest part! Just breathe in that chocolatey goodness during the wait.
Serving Suggestions
Now, let’s talk about how to serve these delightful Gourmet Brownie Cookies. For an Instagram-worthy presentation, you can stack them up on a colorful plate and dust the tops with powdered sugar or a sprinkle of sea salt. Pair them with a big glass of cold milk or a scoop of vanilla ice cream for an epic dessert experience.
Feeling a bit fancy? You can serve them warm, topped with a scoop of your favorite ice cream and drizzled with chocolate or caramel sauce. The warmth of the cookie melting onto the ice cream creates a delectable combo that will leave everyone reaching for seconds!
Recipe Variations
Want to mix things up? Here are some creative twists you can try out:
-
Nutty Brownie Cookies
Add in 1/2 cup of chopped walnuts or pecans for an added crunch and a touch of nuttiness. -
Peppermint Crunch
During the holiday season, toss in some crushed peppermint candies for a festive flair! -
Spicy Chili Chocolate
Add 1/2 teaspoon of cayenne pepper to the dry ingredients for a spicy kick that pairs surprisingly well with chocolate. -
Nut-Free Version
If you need these to be nut-free, stick with chocolate chips and avoid any nut toppings, but consider adding shredded coconut for texture! -
Vegan Brownie Cookies
Swap eggs for flax eggs, use coconut oil instead of butter, and enjoy a delightful plant-based treat!
Chef’s Notes
I have to confess, these Gourmet Brownie Cookies have evolved over the years. Originally, I experimented on family and friends with different flavors and add-ins, and after much trial and error (and many taste tests), I landed on this perfect recipe!
Some kitchen disasters happened along the way, including a batch that mysteriously turned into brownie soup. But those mistakes taught me so much about texture and blending flavors—it’s all part of the culinary journey, right?
Every time I make these cookies, I’m reminded that cooking is about more than just following a recipe; it’s about sharing delicious moments and memories with the people we love. So feel free to experiment until you find your favorite version!
FAQs and Troubleshooting
-
Why are my cookies flat?
A common issue can often be attributed to not chilling the dough before scooping or incorrect measurements (too little flour can also cause spreading). -
How can I make sure my cookies are fudgy?
Slightly underbaking them will help retain that chewy, fudgy center. Trust your instincts and take them out while still soft! -
Can I store these cookies?
Certainly! Keep them in an airtight container at room temperature for up to a week—or freeze them for longer storage, up to three months! -
What if I don’t have chocolate chips?
You can always chop up your favorite chocolate bar into chunks or even use cocoa nibs for a different texture.
Nutritional Info
While we love indulging in treats like these Gourmet Brownie Cookies, it’s always good to know what we’re munching on! Each cookie contains approximately:
- Calories: 180 per cookie
- Total Fat: 9g
- Saturated Fat: 5g
- Cholesterol: 40mg
- Sodium: 50mg
- Total Carbohydrates: 22g
- Dietary Fiber: 1g
- Sugars: 12g
- Protein: 2g
Of course, these numbers can vary based on specific brands and ingredient swaps. Remember, everything in moderation is key, especially with goodies like this!
Final Thoughts
And there you have it, folks! Your guide to whipping up the delightful and sophisticated Gourmet Brownie Cookies. Whether you’re pouring your heart into baking for loved ones or just indulging in a little self-care with a cozy night in, these cookies truly embody the love of cooking.
The kitchen can be a sanctuary, filled with the aromas of baked wonders and sweet memories. So next time you’re looking for a sweet treat, remember this recipe, savor every bite, and maybe pass it on to your own loves. After all, the joy of cooking and sharing food is what life is all about.
Now go forth and bake, my friends! You’ve got this, and I can’t wait to hear about your own kitchen adventures. Happy baking!
Print
Gourmet Brownie Cookies
- Total Time: 27 minutes
- Yield: 12 servings 1x
- Diet: Vegetarian
Description
Indulge in the rich, fudgy texture of classic brownies melded beautifully with the delightful bite of a cookie.
Ingredients
- 1/2 cup unsalted butter
- 1 cup granulated sugar
- 2 large eggs
- 1 teaspoon vanilla extract
- 1/2 cup all-purpose flour
- 1/3 cup unsweetened cocoa powder
- 1/4 teaspoon baking powder
- 1/4 teaspoon salt
- 1 cup chocolate chips
Instructions
- Preheat your oven to 350°F (175°C).
- Melt the butter gently in a saucepan over low heat.
- Mix the melted butter and granulated sugar until well combined, then add the eggs one at a time.
- Add the vanilla extract and stir it in.
- Sift the flour, cocoa powder, baking powder, and salt into a separate bowl.
- Combine the dry mixture with the wet mixture, stirring gently.
- Fold in the chocolate chips until evenly distributed.
- Scoop the dough onto a lined baking sheet, spacing them about 2 inches apart.
- Bake for about 10-12 minutes until the edges are set.
- Let them cool on the baking sheet for about 5 minutes.
Notes
For a chewy texture, underbake slightly and let cool on a wire rack for the best results.
- Prep Time: 15 minutes
- Cook Time: 12 minutes
- Category: Dessert
- Method: Baking
- Cuisine: American
Nutrition
- Serving Size: 1 cookie
- Calories: 180
- Sugar: 12g
- Sodium: 50mg
- Fat: 9g
- Saturated Fat: 5g
- Unsaturated Fat: 4g
- Trans Fat: 0g
- Carbohydrates: 22g
- Fiber: 1g
- Protein: 2g
- Cholesterol: 40mg
Keywords: brownie cookies, dessert, chocolate, baking


