
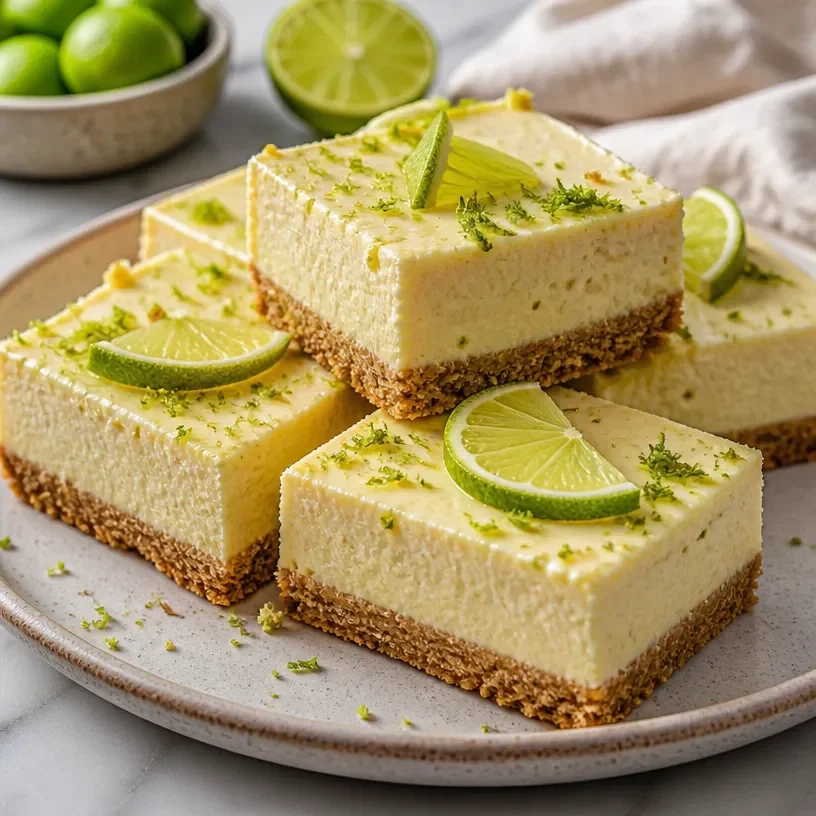
High-Protein Key Lime Pie Bars (Cottage Cheese) No-Bake
Protein Cottage Cheese Key Lime Pie Bars: A Delicious Twist on a Classic!
Welcome to my cozy corner of the kitchen, where I’m so excited to share a little treasure that’s bursting with flavor and nostalgia! If you’re a fan of key lime pie—and who isn’t?—then you’re in for a delightful surprise with my Protein Cottage Cheese Key Lime Pie Bars. These bars maintain all the zippiness of that classic dessert but with a healthy twist that makes them perfect for any time of the day. You’ll want to stash this recipe in your back pocket for those moments when you crave something sweet yet guilt-free.
Key lime pie has always held a special place in my heart. I remember my first taste of it during a family vacation to Florida. The tangy-sweet filling, the buttery crust, and that unmistakable brightness—it’s a flavor combo that embodies sunshine in a slice! I remember sitting at a little beachside café, sharing laughter and stories as we indulged in the creamy goodness. This memory sparked my passion not just for cooking, but for transforming classic recipes into something that fits my healthy lifestyle without sacrificing the joy of flavors.
So, why cottage cheese, you ask? Well, this creamy powerhouse is packed with protein, making it perfect for powering up your energy levels. It’s a great base for those luscious filling layers, and trust me, you won’t even taste it! With just the right balance of sweet and tart, these bars will whisk you away to that sunny beach—I promise you won’t miss the heavy calories. Ready to dive into this deliciousness? Grab your apron, and let’s get started!
Personal Story
One of my fondest family memories is the annual summer picnic we hosted in our backyard. A vibrant gathering of family and friends, filled with laughter, games, and of course, a spectacular spread of food! My mom would whip up a traditional key lime pie, its bright green filling gleaming under the sun, while I helped by zesting limes and stirring the mixtures. I always marveled at how a simple dessert could bring so much joy and good vibes, and I wanted to replicate that magic in a healthier way. Thus, the Protein Cottage Cheese Key Lime Pie Bars were born! They are a blend of nostalgia and innovation, allowing me to bring those family memories back while staying aligned with my health goals.
Now, let me bring that legacy into your kitchen!
Ingredients
Here’s what you’ll need to make these delightful Protein Cottage Cheese Key Lime Pie Bars:
-
Cottage Cheese (2 cups): This creamy base adds protein and a silk-like texture. Opt for low-fat or fat-free varieties to keep it lighter. You can substitute with Greek yogurt for a different flavor profile if desired.
-
Key Lime Juice (1/2 cup): Freshly squeezed key lime juice packs a tangy punch! If you can’t find key limes, regular limes work just as well.
-
Honey or Maple Syrup (1/4 cup): This natural sweetener balances the tartness. Feel free to adjust the quantity based on your sweetness preference, or use a sugar substitute like stevia.
-
Eggs (2 large): Eggs help bind everything together and give a lovely structure to the bars. For a vegan option, you can use flax eggs (1 tbsp flaxseed meal + 2.5 tbsp water per egg).
-
Vanilla Extract (1 tsp): The warm aroma of vanilla elevates the flavors! Don’t skip it.
-
Graham Cracker Crumbs (1 ½ cups): This crumbly crust adds a nostalgic crunch. You can swap with almond flour for a gluten-free version!
-
Melted Coconut Oil (1/3 cup): Provides a lovely richness to the crust. Unsalted butter is a good substitute if desired.
-
Salt (1/4 tsp): Just a pinch enhances all the flavors, bringing everything to life.
These ingredients come together seamlessly to create a delightfully light treat that perfectly balances tart and sweet!
Step-by-Step Instructions
Let’s get to the fun part! Here’s how to whip up these Protein Cottage Cheese Key Lime Pie Bars:
-
Preheat Your Oven: Start by preheating your oven to 350°F (175°C). This step ensures your bars bake evenly while you prepare the rest of the ingredients.
-
Prepare the Crust: In a mixing bowl, combine the graham cracker crumbs, melted coconut oil, and a pinch of salt. Mix until the crumbs are coated well. Transfer this mixture to a greased baking dish (I love using an 8×8-inch dish) and press it down firmly with your hands or a flat surface. This creates a nice, solid base for your bars!
-
Bake the Crust: Place your crust in the preheated oven and bake for about 8-10 minutes, just until it’s golden and fragrant. While waiting, you can clean up your workspace (always a good idea) and grab a glass of water!
-
Blend the Filling: In a food processor or blender, add the cottage cheese, key lime juice, honey or maple syrup, eggs, and vanilla extract. Blend until smooth and creamy. Here’s a little chef tip: if you don’t have a blender, a hand mixer works in a pinch!
-
Pour the Filling: Once your crust is ready and slightly cooled, pour the delicious key lime mixture over the crust, spreading it evenly.
-
Bake Again: Return the pan to the oven for another 20-25 minutes. The filling should be set but still a tad wobbly in the center. This is what gives it that dreamy texture!
-
Cool and Chill: Remove from the oven and let it cool to room temperature. Once cooled, pop it in the fridge for at least 2 hours (or overnight for best results)—this step is crucial for achieving perfect bars!
-
Slice and Serve: Once cooled and set, slice into squares and serve! You can garnish with some fresh lime zest or whipped cream to make it extra special.
Remember, the wait is totally worth it!
Serving Suggestions
When it comes to serving these bars, simplicity is key! I love plating them on a rustic wooden board or white porcelain dish for that gorgeous contrast. A drizzle of honey and a sprinkle of lime zest on top not only adds an elegant touch but enhances the flavor too! They’re perfect for any occasion—whether it’s a cozy dessert after dinner, a picnic treat, or a post-workout snack to refuel.
Recipe Variations
Here are a few fun variations you can try with this recipe:
-
Berry Twist: Add a layer of pureed strawberries or blueberries on top of the filling before baking for a fruity enhancement.
-
Chocolate Chunk: Fold in some dark chocolate chips to the filling before pouring it over the crust—because who says you can’t have chocolate with lime?
-
Nutty Crunch: Mix in some chopped nuts like almonds or pecans into the crust for an extra crunch.
-
Coconut Flake Bar: Add a sprinkle of unsweetened coconut flakes in the filling for a tropical vibe.
-
Spicy Citrus: For a kick, add a pinch of cayenne pepper or chili powder to the filling—trust me, it’s a game-changer!
Feel free to get creative and make this recipe your own!
Chef’s Notes
This recipe has evolved beautifully over the years. It originally started with heavy cream and sugar, but as I leaned towards healthier choices, I replaced those ingredients with cottage cheese and natural sweeteners. It’s been amazing to see how a few simple swaps can yield not only a healthier dish but one that’s just as delicious. The smiles and happy faces I see when sharing these bars remind me why I love cooking so much!
I once had a mishap where I forgot to add the eggs—let’s just say, my first attempt ended up more like key lime pudding than pie! Lesson learned: double-check your ingredient list!
FAQs and Troubleshooting
-
Can I Use Regular Lime Instead of Key Lime?
Absolutely! While key limes offer a unique tang, regular limes work perfectly as well. Just remember to adjust the sweetness if they’re particularly tart. -
How Do I Store Leftovers?
These bars store beautifully in the fridge for up to a week. Make sure you cover them to maintain freshness, or store them in an airtight container! -
What If My Bars Are Too Wobbly After Baking?
If they haven’t set completely after cooling, pop them back in the fridge for a bit longer. This cooling time is key to getting that perfect texture. -
Can I Freeze These Bars?
Yes! They freeze very well. Wrap individual bars in plastic wrap and store in a freezer-safe container for up to three months. Just make sure to thaw in the fridge before serving.
Nutritional Info
Each bar contains approximately:
- Calories: 150
- Protein: 8g
- Carbohydrates: 19g
- Fat: 6g
These protein-packed bars are a guilt-free way to satisfy your sweet tooth!
And there you have it—a delightful recipe for Protein Cottage Cheese Key Lime Pie Bars that’s sure to bring joy to your kitchen. I can’t wait for you to try it, and I’d love to hear your thoughts! What tweaks did you make? Did you try any delicious variations? Keep cooking, sharing, and spreading the joy of food! Enjoy!
Print
Protein Cottage Cheese Key Lime Pie Bars
- Total Time: 50 minutes
- Yield: 12 servings 1x
- Diet: Healthy
Description
A delicious twist on classic key lime pie made healthier with cottage cheese, perfect for any time of the day!
Ingredients
- 2 cups Cottage Cheese (low-fat or fat-free)
- 1/2 cup Key Lime Juice (freshly squeezed)
- 1/4 cup Honey or Maple Syrup
- 2 large Eggs
- 1 tsp Vanilla Extract
- 1 ½ cups Graham Cracker Crumbs
- 1/3 cup Melted Coconut Oil
- 1/4 tsp Salt
Instructions
- Preheat your oven to 350°F (175°C).
- Prepare the crust by combining graham cracker crumbs, melted coconut oil, and salt in a mixing bowl. Transfer to a greased baking dish and press down firmly.
- Bake the crust for about 8-10 minutes until golden and fragrant.
- Blend the filling ingredients in a food processor until smooth and creamy.
- Pour the key lime mixture over the crust.
- Bake again for 20-25 minutes until the filling is set but still a tad wobbly.
- Cool to room temperature, then refrigerate for at least 2 hours before slicing.
- Slice into squares and serve.
Notes
These bars can be customized with fruit layers, chocolate chips, or nutty additions. They store well in the fridge for a week or can be frozen for up to three months.
- Prep Time: 15 minutes
- Cook Time: 35 minutes
- Category: Dessert
- Method: Baking
- Cuisine: American
Nutrition
- Serving Size: 1 bar
- Calories: 150
- Sugar: 8g
- Sodium: 100mg
- Fat: 6g
- Saturated Fat: 4g
- Unsaturated Fat: 2g
- Trans Fat: 0g
- Carbohydrates: 19g
- Fiber: 1g
- Protein: 8g
- Cholesterol: 30mg
Keywords: key lime pie, protein bars, cottage cheese, healthy dessert, guilt-free treat
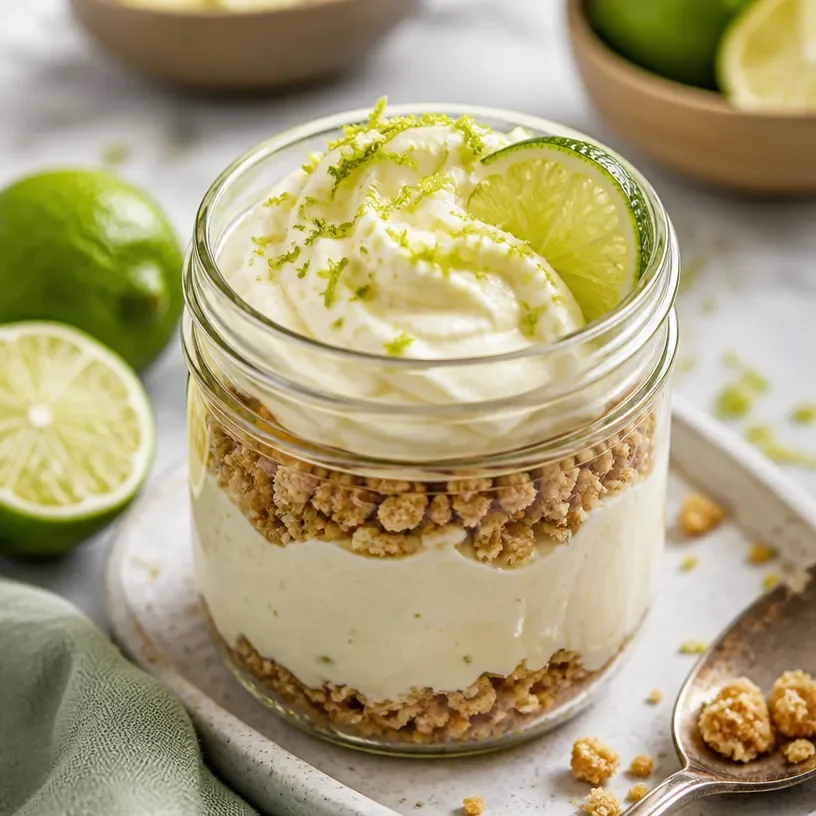
Protein Key Lime Pie Jar
Ultimate Protein Key Lime Pie Jars: A Healthy Twist on a Classic Treat
Welcome to my kitchen, friends! If you’re as enchanted by the tart, creamy goodness of Key Lime Pie as I am, then brace yourself for a treat that combines nostalgia and nutrition into a deliciously satisfying creation: Protein Key Lime Pie Jars. 🎉
The aroma of zesty lime mixed with a hint of buttery crust can transport you straight to sunny Florida beaches, even on a drizzly day. But who says we can’t enjoy this classic dessert while staying healthy? That’s exactly what I’m here to show you! Not only is this recipe bursting with flavor, but it also brings a generous protein punch, making it perfect for a post-workout snack or a guilt-free dessert after dinner.
I’ve discovered over the years that cooking is so much more than just following a recipe; it’s about sharing moments and making memories. The best part about this dessert is that it’s a no-bake wonder, so you can whip it up in a jiffy. Whether you’re entertaining guests or indulging in some “me-time,” these jars are sure to impress everyone.
So, roll up those sleeves, throw on your favorite apron (messy is the new chic, after all), and let’s dive into this delightful journey of creamy, zesty goodness!
A Nostalgic Twist: My Childhood Love for Key Lime Pie
Growing up, my summers were filled with trips to the coast, where the warm sun kissed my skin and the salty air filled my lungs. Each year, we’d stop by a quaint little beachside shack that served the best Key Lime Pie I’ve ever tasted. The moment I took my first bite, I was hooked. The sweet, tangy filling paired with that crumbly crust created a symphony of flavors that danced on my palate.
That little shack became a summer tradition, and I would always beg my parents to let me have a second slice. The joy of sharing that pie with family and friends while telling stories and laughing is something I cherish. As I grew older and became more conscious of nutrition, I realized I didn’t want to let go of that beloved dessert. Instead, I decided to reinvent it into something healthier, without compromising the flavors I adored. And thus, the Protein Key Lime Pie Jar was born!
Ingredients to Whip Up Some Magic!
Now that you’re feeling inspired, let’s gather the ingredients! By the end of this list, you’ll be diving right into the preparation like a pro.
-
Greek Yogurt (1 cup)
This creamy delight is the star of our filling. Packed with protein and probiotics, it adds a luscious texture while keeping it light. For a dairy-free alternative, opt for coconut yogurt! -
Key Lime Juice (1/2 cup)
The essential ingredient for that iconic tang! You can find bottled Key lime juice, but if you’re feeling adventurous, freshly squeezed limes are unbeatable. -
Honey or Maple Syrup (1/4 cup)
A natural sweetener to balance the tartness. If you’re looking to cut calories, you can use a sugar substitute like stevia or monk fruit sweetener. -
Coconut Cream (1/2 cup)
Adds that rich flavor and creaminess. For a lighter version, you can use low-fat whipped cream. Just keep in mind the flavor might differ slightly. -
Vanilla Extract (1 tsp)
A must-have for depth of flavor! If you want to get fancy, try swapping for almond extract for a unique twist. -
Graham Cracker Crumbs (1 cup)
These are for our crust! If you want a gluten-free option, use almond flour mixed with a bit of melted coconut oil. -
Butter or Coconut Oil (1/4 cup)
This ingredient binds the crumbs together. For the vegan option, coconut oil works perfectly! -
Protein Powder (Optional: 1/2 cup)
Boost your protein content by adding your favorite flavor. Vanilla or unflavored protein powder blends seamlessly!
Step-by-Step Instructions: Let’s Get Cooking!
Ready to make your jars? Follow these detailed steps, and don’t forget to check out my chef hacks along the way!
-
Prepare Your Crust
In a mixing bowl, combine 1 cup of graham cracker crumbs and 1/4 cup of melted butter (or coconut oil). Mix until all crumbs are fully coated.
Chef Hack: If you like your crust extra crunchy, bake it in a preheated oven at 350°F (175°C) for 5–7 minutes until lightly golden. -
Create the Filling
In another bowl, whisk together 1 cup of Greek yogurt, 1/2 cup of Key lime juice, 1/4 cup of honey or maple syrup, and 1/2 cup of coconut cream. Make sure everything is well incorporated.
Tip: Taste your mixture before adding more sweetener. Adjust to your preference! -
Incorporate the Protein Powder
If you’re using protein powder, gently mix it into your filling until it’s fully blended. This helps keep the texture creamy rather than chalky.
Chef Insight: I usually opt for a plant-based protein for a more balanced, lighter flavor. -
Assemble the Jars
Grab your cute jars (or bowls, no judgment here!) and start layering. Begin with a spoonful of the crust at the bottom, followed by a generous layer of the Key lime filling, then repeat until you reach the top.
Pro Tip: Leave a little space at the top for garnishes! -
Chill for Perfection
Cover your jars and pop them in the refrigerator for at least 2 hours (or overnight, if you can resist!). This helps the flavors meld together beautifully.
Funny Story: I once made these for a gathering and forgot to chill them! I served them warm, and while they weren’t what I intended, they turned out to be a hit anyway!
Serving Suggestions: Presentation Matters!
When it comes to serving, the beauty is in the simplicity of presentation. You can garnish your Protein Key Lime Pie Jars with a dollop of whipped cream, a sprinkle of graham crumbs, and a slice of lime on top. Serve them on a colorful platter for a pop of color, and watch your friends’ faces light up!
Recipe Variations: Get Creative!
Looking to switch things up? Here are a few fun variations to elevate your Protein Key Lime Pie Jars:
- Berry Bliss Version: Mix in some fresh raspberries or blueberries into the filling for an added fruity twist.
- Coconut Lime Combo: Fold in shredded coconut into your filling for that tropical zing!
- Choco Key Lime Delight: Add cocoa powder to the crust for a chocolatey flavor that perfectly complements the lime.
- Vegan Option: Substitute Greek yogurt with silken tofu blended until smooth and use maple syrup as a sweetener.
Chef’s Notes: A Touch of Reflection
Looking back, I have made this recipe countless times for friends and family, and it never fails to spark joy and laughter. It’s an evolution of my childhood memories, wrapped up in a healthier package. One time, I accidentally mistook lime juice for lemon juice and ended up creating a brand new favorite! Life in the kitchen is all about experimenting and having fun.
Whenever you’re whipping up a treat, remember that mistakes can often lead to the most delicious discoveries. Keep your spirits high, and don’t be afraid to get creative!
FAQs and Troubleshooting: Let’s Clear Up the Confusion
1. Why is my filling too runny?
If your filling is too thin, try adding more Greek yogurt or chilling the jars for a little longer so it can firm up.
2. Can I make this recipe dairy-free?
Absolutely! Substitute Greek yogurt with coconut yogurt and use vegan alternatives for cream and sweeteners. The flavor will still shine through wonderfully!
3. How do I store leftovers?
These treats can last in the fridge for up to 3 days if kept covered. Just make sure to add any toppings (like whipped cream) just before serving to keep it fresh!
4. What if I can’t find Key limes?
Regular limes work just fine! The flavor might be slightly different but still delicious—just remember to adjust the sweetness if they’re more tart than Key limes.
Nutritional Info (Optional)
While this recipe is designed to be a healthier take on a classic dessert, here’s a rough estimate per serving (1 jar):
- Calories: 250-300
- Protein: 15-20g
- Carbohydrates: 30g
- Fats: 12g
- Fiber: 3-4g
Now, there you have it, my friends! Whether needed for a summer gathering or a cozy dessert to savor in silence, these Protein Key Lime Pie Jars are a fun, creative, and healthy way to enjoy a beloved classic. Now it’s your turn to head into the kitchen, whip these up, and make some delicious memories of your own! Happy cooking! 🍋✨
Print
Ultimate Protein Key Lime Pie Jars
- Total Time: 120 minutes
- Yield: 4 servings 1x
- Diet: Healthy, High Protein
Description
A healthy twist on a classic Key Lime Pie, packed with protein and perfect for a post-workout snack or guilt-free dessert.
Ingredients
- 1 cup Greek Yogurt
- 1/2 cup Key Lime Juice
- 1/4 cup Honey or Maple Syrup
- 1/2 cup Coconut Cream
- 1 tsp Vanilla Extract
- 1 cup Graham Cracker Crumbs
- 1/4 cup Butter or Coconut Oil
- Optional: 1/2 cup Protein Powder
Instructions
- Prepare your crust by combining 1 cup of graham cracker crumbs and 1/4 cup of melted butter (or coconut oil) in a mixing bowl. Mix until all crumbs are coated.
- Create the filling by whisking together 1 cup of Greek yogurt, 1/2 cup of Key lime juice, 1/4 cup of honey or maple syrup, and 1/2 cup of coconut cream in another bowl.
- Incorporate the protein powder, if using, into your filling until fully blended.
- Assemble the jars by layering the crust and filling until filled.
- Chill the jars for at least 2 hours in the refrigerator.
Notes
Garnish with whipped cream, graham crumbs, and a slice of lime before serving. You can also switch up ingredients for different variations.
- Prep Time: 15 minutes
- Cook Time: 0 minutes
- Category: Dessert
- Method: No-Bake
- Cuisine: American
Nutrition
- Serving Size: 1 jar
- Calories: 300
- Sugar: 20g
- Sodium: 150mg
- Fat: 12g
- Saturated Fat: 7g
- Unsaturated Fat: 5g
- Trans Fat: 0g
- Carbohydrates: 30g
- Fiber: 3g
- Protein: 20g
- Cholesterol: 30mg
Keywords: Key Lime Pie, Healthy Dessert, Protein Snack




