
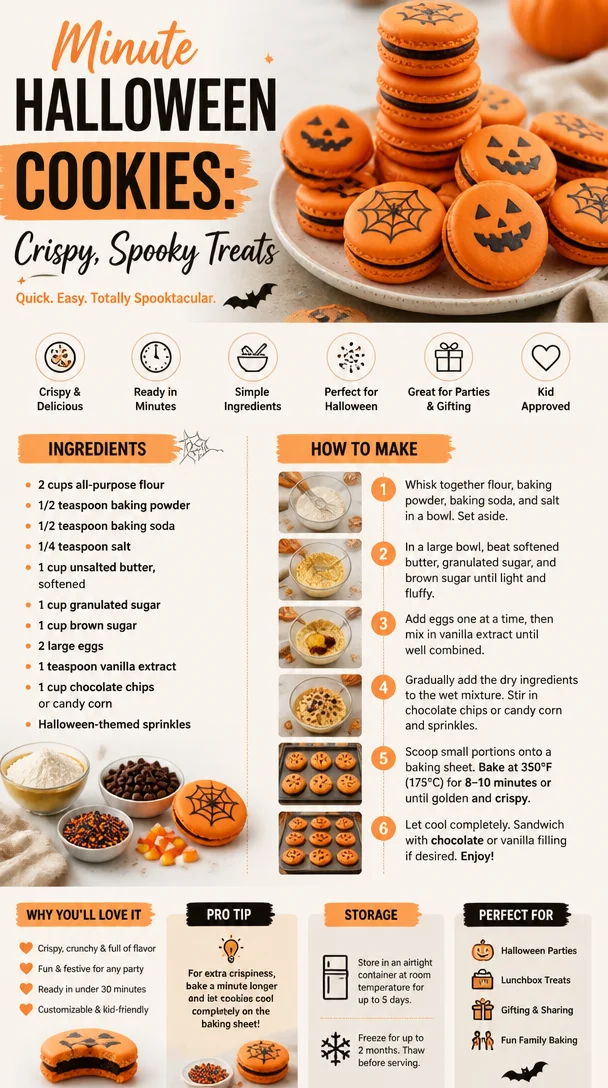
Minute Halloween Cookies: Crispy, Spooky Treats
Spooktacular Halloween Cookies: A Taste of Fall Fun
Welcome back to my cozy kitchen, food lovers! As the leaves rustle and the air turns crisp with the scent of pumpkin spice, my favorite holiday comes creeping around the corner: Halloween! I can hardly contain my excitement as I prepare to whip up these delightful Halloween cookies that are sure to bring smiles to both children and adults alike.
Halloween is more than just costumes and trick-or-treating in my book; it’s about creating memories and indulging in treat-filled afternoons. Picture this: a rainy October afternoon where I used to huddle with my siblings at the kitchen table, rolling out dough and getting our hands a little too sticky with the colored icing we always overestimated our need for. We’d surround our cookies with all the sprinkles we could find in the pantry, transforming them into spooky monsters, smiling pumpkins, or whatever our imaginations could conjure. Those moments are forever etched in my heart—and now, I’m thrilled to share a bit of that joy with you.
Nothing beats the feeling of creating something delicious while capturing the essence of a holiday. Whether you’re a seasoned baker or just stepping into the kitchen for the first time, these Halloween cookies are accessible, fun, and filled with your favorite fall flavors. So grab your aprons, summon your courage (because we might get a little messy), and let’s dive into the world of Halloween baking!
Personal Story
One of my most cherished Halloween memories beckons right back to childhood, where I first discovered my passion for baking. My older sister and I would plan weeks in advance, deciding on the perfect themes for our cookies—one year being spooky ghosts and the other year, ghoulish jack-o’-lanterns. My mom played the role of an enthusiastic food critic, which only fueled our excitement to try new cookie designs each October.
One particular Halloween, we decided to go bold with an entire batch of monster cookies covered in vibrant frosting. Each cookie was a mini canvas, adorned with googly candy eyes and colorful sprinkles, ready to charm any trick-or-treating ghost or goblin. We ended up hosting a little neighborhood gathering that turned into a cookie decorating fiasco with icing everywhere and laughter echoing through the house. It wasn’t just about the cookies; it was about sharing joy, creativity, and sweetness all wrapped up in a warm, delicious package. So now, every time Halloween rolls around, those memories bubble to the surface, reminding me of the beautiful mess that is baking with family.
Ingredients
Here’s what you need for these delightful Halloween cookies:
-
2 ¾ cups all-purpose flour
The backbone of any cookie! For a gluten-free option, you can substitute with a 1-to-1 gluten-free flour blend. -
1 teaspoon baking soda
This helps your cookies rise perfectly! If you’re out, cream of tartar can work as a substitute. -
½ teaspoon salt
Just a pinch to enhance all those sweet flavors. Don’t skip it—salt balances everything! -
1 cup unsalted butter, softened
Use real butter for that rich, creamy taste. You can substitute with coconut oil for a dairy-free version. -
1 cup granulated sugar
Adds sweetness! For a deeper flavor, try using brown sugar for part of the granulated sugar. -
1 cup brown sugar, packed
This will give your cookies a chewy texture. Light or dark brown sugar will both work beautifully. -
2 large eggs
Helps bind everything together. For an egg substitute, use ¼ cup of unsweetened applesauce per egg. -
1 teaspoon vanilla extract
A must-have for depth of flavor! I love using pure vanilla extract, but imitation works too. -
Food coloring (optional)
For making your cookies Halloween-themed, don’t be shy! Gel food coloring gives rich colors without altering the dough consistency. -
Halloween-themed sprinkles
Decoration is key! Use fun sprinkles like candy corn, ghost shapes, or anything that feels spooky.
Step-by-Step Instructions
Let’s get baking, shall we? Here’s how we’ll turn those ingredients into cookies that will frighten away the ordinary:
-
Preheat Your Oven
Start by preheating your oven to 350°F (175°C). This step is crucial! A hot oven will help your cookies bake evenly and become golden brown. -
Mix Dry Ingredients
In a bowl, combine the flour, baking soda, and salt. Whisk them together until well mixed. This ensures that all those leavening agents are evenly distributed, making sure your cookies rise perfectly! -
Cream Butter and Sugars
In a large mixing bowl, cream together the softened butter, granulated sugar, and brown sugar until light and fluffy (about 3-4 minutes). This step is vital as it incorporates air into the dough, making your cookies light. A hand mixer makes this easy, but a sturdy spoon and some muscle will also do the job! -
Add Eggs and Vanilla
Beat in the eggs one at a time, followed by the vanilla extract. Be sure to scrape down the sides of your bowl. Sometimes, those little bits of butter and sugar like to hide out there! -
Combine Wet and Dry
Gradually add the dry ingredients to the wet mixture, stirring until just combined. Avoid overmixing at this stage, as this can lead to tough cookies. If you want to add food coloring, this is the time! Just a few drops can transform your batter into a Halloween masterpiece. -
Scoop the Dough
Using a cookie scoop or tablespoon, drop rounded balls of dough onto a baking sheet lined with parchment paper. Leave enough space between each cookie for them to spread—you don’t want a cookie army clumping together! -
Bake
Pop them into the oven and bake for 10-12 minutes, or until the edges are slightly golden. Remember, cookies will continue to firm up outside the oven, so don’t worry if they look a little soft. -
Cool on Wire Racks
Remove the cookies from the oven and let them cool on the baking sheet for a couple of minutes before transferring them to wire racks to cool completely. This helps retain that gooey goodness! -
Decorate
Once cooled, unleash your inner artist! Use your favorite frosting to pipe on designs and sprinkle with Halloween-themed candy. Remember: the messier, the better! -
Enjoy!
There’s nothing quite like the taste of freshly baked cookies. Grab a friend, enjoy your spooky treats, and make some memories!
Serving Suggestions
When it comes to serving these delightful Halloween cookies, you can get really creative! Arrange them on a festive platter with orange and black decorations, stack them in a mason jar for a cozy gift, or even serve them with a side of warm apple cider. Pairing the cookies with a splash of milk just brings the whole experience to another level. Go ahead and make it festive—after all, Halloween is all about indulging in sugary delights!
Recipe Variations
Here are a few fun twists you can try with your Halloween cookie base:
-
Pumpkin Spice Cookies: Add 1 cup of pumpkin puree and 2 teaspoons of pumpkin pie spice to the mix for an autumnal twist!
-
Choco-Boo Cookies: Mix in 1 cup of chocolate chips for a rich chocolatey bite. You can even sprinkle some sea salt on top right after baking for a sweet and salty surprise.
-
Nutty Add-ins: Toss in ½ cup of chopped nuts for added crunch and flavor! Pecans or walnuts would work wonders.
-
Vegan-Friendly Cookies: Swap the eggs for flax eggs (1 tablespoon of ground flaxseed mixed with 3 tablespoons of water for each egg) and use coconut oil instead of butter.
-
Layered Frosting: Instead of traditional frosting, dip half of each cookie in melted chocolate and let it cool for a treat that’s both cute and tastefully indulgent.
Chef’s Notes
While every baking session has its triumphs, it has its near-disasters too! One Halloween, I had a grand plan to make cookies shaped like bats and witches. Excitedly, I rolled out my dough but forgot to flour the surface! The result? A doughy disaster stuck to the counter. Instead of throwing in the towel, I took a deep breath and turned it into an impromptu baking session with my friends. We rolled those sticky dough balls into balls instead and made monster cookies instead! It just goes to show that baking is about the journey, not just the destination.
FAQs and Troubleshooting
Q: Why didn’t my cookies spread?
A: If your cookies aren’t spreading, it could be that your dough was over-chilled or you added too much flour. Always use the spoon-and-level method for measuring flour to avoid this!
Q: How can I stop my cookies from getting too hard after cooling?
A: Overbaking is the culprit! Keep an eye on your cookies and remember they will firm up as they cool. Taking them out when they are slightly underbaked is a great hack!
Q: Can I freeze these cookies?
A: Absolutely! These cookies freeze beautifully. Just ensure they are in an airtight container, and they’ll stay fresh for up to 3 months. You can either freeze them unbaked (just scoop out the dough onto a tray, freeze, then transfer to a bag) or baked!
Q: What if my frosting is too runny?
A: If your frosting is too watery, you can easily thicken it by adding a bit more powdered sugar. Don’t forget to whip it well after adding until you reach the desired consistency!
Nutritional Info (optional, if applicable)
Calories: 180
Total Fat: 8g
Saturated Fat: 5g
Cholesterol: 30mg
Sodium: 150mg
Total Carbohydrates: 25g
Dietary Fiber: 1g
Sugars: 12g
Protein: 2g
There you have it, my sweet friends! These Halloween cookies are not just about a sugar rush; they are a wonderful way to bond and create lasting memories with family and friends. So gather your loved ones in the kitchen, sprinkle some Halloween magic, and make this season unforgettable with a batch (or two) of these spooktacular treats! Happy baking!
Print
Spooktacular Halloween Cookies
- Total Time: 27 minutes
- Yield: 24 cookies 1x
- Diet: Vegetarian
Description
Delightful Halloween cookies filled with fall flavors, perfect for creating memories with family and friends.
Ingredients
- 2 ¾ cups all-purpose flour
- 1 teaspoon baking soda
- ½ teaspoon salt
- 1 cup unsalted butter, softened
- 1 cup granulated sugar
- 1 cup brown sugar, packed
- 2 large eggs
- 1 teaspoon vanilla extract
- Food coloring (optional)
- Halloween-themed sprinkles
Instructions
- Preheat your oven to 350°F (175°C).
- Mix the flour, baking soda, and salt in a bowl until well combined.
- Cream together the softened butter, granulated sugar, and brown sugar until light and fluffy (about 3-4 minutes).
- Add the eggs one at a time, followed by the vanilla extract.
- Combine the dry ingredients with the wet mixture, stirring until just combined.
- Scoop rounded balls of dough onto a baking sheet lined with parchment paper.
- Bake for 10-12 minutes, or until the edges are slightly golden.
- Cool on the baking sheet for a couple of minutes, then transfer to wire racks.
- Decorate with frosting and Halloween-themed candy.
- Enjoy! Freshly baked cookies with friends and family.
Notes
For variations, try adding pumpkin puree, chocolate chips, or nuts.
- Prep Time: 15 minutes
- Cook Time: 12 minutes
- Category: Dessert
- Method: Baking
- Cuisine: American
Nutrition
- Serving Size: 1 cookie
- Calories: 180
- Sugar: 12g
- Sodium: 150mg
- Fat: 8g
- Saturated Fat: 5g
- Unsaturated Fat: 3g
- Trans Fat: 0g
- Carbohydrates: 25g
- Fiber: 1g
- Protein: 2g
- Cholesterol: 30mg
Keywords: Halloween cookies, fall baking, festive treats

Spooky Halloween Desserts for Quick Party Prep Ideas
75 Best Halloween Desserts: A Spooktacular Guide to Sweet Treats
Welcome to my kitchen, my fellow food lovers! I’m Olivia Bennett, your enthusiastic guide to everything cozy, delicious, and a bit spooky this Halloween season. If you’re like me, the crisp autumn air and the scent of cinnamon and nutmeg signal it’s time for some fun in the kitchen. Halloween is not just about costumes and trick-or-treating; it’s a fantastic occasion for whipping up some delightful desserts that will impress friends and family, and create sweet memories that will last a lifetime.
In today’s blog post, we’re diving into a treasure trove of 75 Halloween desserts that are fun to make, stunning to look at, and absolutely delectable to taste! Whether you’re hosting a haunted gathering, heading to a costume party, or just looking to bring some festive cheer to your kitchen, I’ve got homemade treats that are sure to be the highlight of the season.
Personal Story
Growing up, Halloween was always my favorite time of the year, and it wasn’t just about the candy. I have vivid memories of my mom and I spending the weekend before Halloween in our cozy kitchen. We’d put on our favorite fall music, roll up our sleeves, and dive into an array of spooky baking projects. One year, we decided to create our very own pumpkin patch with cake pops that looked like little pumpkins, complete with green frosting tendrils. Each tiny creation came with its own charm, and the kitchen was filled with laughter and the kind of sweet scent only freshly baked goods can bring.
That experience laid the foundation for my love of seasonal baking. Today, nothing excites me more than sharing spooky treats that will brighten your gathering or create a little magic in your home. Trust me; your friends will be talking about these sweets long after the last piece has been devoured!
Ingredients
Before we roll up our sleeves and get baking, let’s gather the staples you’ll need for these spooky desserts. While we’ll touch on some specific treats, here’s a handy list of common ingredients you’ll find across many Halloween delights:
- All-Purpose Flour: The backbone of most sweets. You can substitute with a gluten-free blend if needed.
- Granulated Sugar: This sweetener is used in nearly every dessert. For a darker flavor, consider using brown sugar.
- Eggs: They provide structure and moisture. If you’re baking vegan treats, applesauce or flaxseed meal can work as substitutes.
- Butter: This adds richness and creaminess. Try using coconut oil for a dairy-free option.
- Baking Powder and Baking Soda: These leavening agents help our sweets rise.
- Vanilla Extract: Always a great flavor enhancer! You can also use almond extract for a different twist.
- Cocoa Powder: Essential for chocolatey treats. If you’re looking for extra depth, try using Dutch-processed cocoa.
- Pumpkin Puree: The star of many autumn recipes—great for flavor and moisture!
- Candy Corn, Sprinkles, or Edible Glitter: For that Halloween flair. They’re also perfect for decorating!
Each ingredient plays a vital role in creating the sweet masterpieces we’ll whip up. Remember, experimenting can lead to some of the best flavors—don’t hesitate to get creative and swap ingredients based on your taste and dietary needs.
Step-by-Step Instructions
Now that we’ve gathered our ingredients, let’s dig into making some fabulous Halloween desserts! Here’s how to whip up my crowd-pleasing Pumpkin Spice Cupcakes (one of many fantastic options among our 75 treats):
1. Preheat the Oven
- Preheat your oven to 350°F (175°C). This ensures a perfectly baked cupcake. Remember, a hot oven helps in achieving that coveted dome shape!
2. Prepare the Pan
- Line a cupcake pan with fun Halloween-themed liners. You can’t have Halloween without themed decorations, right? If you don’t have liners, just grease the pan well!
3. Mix the Dry Ingredients
- In a large bowl, whisk together 1 ½ cups of all-purpose flour, 1 cup of granulated sugar, 1 tsp of baking powder, ½ tsp of baking soda, ½ tsp of salt, and 1 tbsp of pumpkin pie spice. This blend will create a flavorful base for your cupcakes.
4. Combine the Wet Ingredients
- In another bowl, whisk together ½ cup of melted butter, 2 large eggs, and 1 cup of pumpkin puree. Tip: use room temperature eggs to ensure a smoother batter!
5. Mix It All Together
- Gradually add your wet ingredients to the dry mixture. Stir until just combined. Overmixing can lead to dense cupcakes—nobody wants that!
6. Fill the Liners
- Fill each cupcake liner about ¾ full with the batter. Use a cookie scoop for even portions and less mess!
7. Bake
- Pop the pan in the preheated oven and bake for 18-20 minutes, or until you can poke a toothpick in the center and it comes out clean. Let them cool in the pan for a few minutes before transferring them to a wire rack. Pro Tip: The aroma will be irresistible—try not to eat them all!
8. Decorate
- Once cooled, top your cupcakes with cream cheese frosting (and maybe a sprinkle of orange and black sprinkles for that Halloween flair). You can even pipe little pumpkin faces on them—get creative!
This recipe is a delightful representation of the many charming desserts you can make during the spooky season. The process is simple and allows for creativity and joy, much like my childhood baking adventures.
Serving Suggestions
When serving your Halloween desserts, presentation is everything! Arrange your cupcakes on a spooky platter, and feel free to add little decorations like plastic spiders or faux cobwebs. Beautifully decorated cupcakes deserve to be on full display, making them the centerpiece of your Halloween table.
Recipe Variations
- Gingerbread Cookies: Switch it up with a gingerbread cookie recipe, perfect for spooky decor.
- Spooky Brownies: Top brownies with green buttercream skulls for a ghoulish twist.
- Ghost Meringues: Use egg whites and sugar to whip up light and airy ghost-shaped meringues.
- Witch Hat Cupcakes: Place a cookie on top of a frosted cupcake to resemble a witch’s hat!
- Vegan Pumpkin Bars: Swap ingredients for a vegan-friendly version using almond milk and flax eggs.
Chef’s Notes
The beauty of Halloween desserts is their versatility! I remember one year, a friend brought over her take on spider web cookies using melted chocolate and a bit of white frosting. We had a blast creating our spooky masterpieces, and it sparked endless fun ideas for our next baking sessions. Halloween is the perfect excuse to let your imagination run wild, and what better way to do that than by baking together?
FAQs and Troubleshooting
1. My cupcakes didn’t rise. What happened?
- This can happen if your baking soda or powder is old. Always check the freshness before using, and remember to preheat your oven!
2. How do I store my Halloween desserts?
- Keep them in an airtight container at room temperature for about 2-3 days or refrigerate for longer freshness.
3. Can I freeze these desserts?
- Absolutely! Most treats can be frozen. Just make sure they’re in an airtight container or freezer bag. They’ll be great for last-minute festivities.
4. What if I overmix my batter?
- Don’t worry too much—while it may be denser than intended, it’ll still taste delightful! Next time, just mix until combined.
Nutritional Info (Optional)
If you’re looking for nutritional information, here’s a quick reference for our Pumpkin Spice Cupcakes (per cupcake):
- Calories: 200
- Fat: 8g
- Carbohydrates: 30g
- Protein: 2g
(Note: Nutritional values can vary based on specific ingredients used and portion sizes.)
So there you have it, a spooktacular guide to making delightful Halloween desserts! I hope you feel inspired to dive into your kitchen this season. Remember, the best part about baking is not only the treats you’ll create but the memories you’ll make along the way. Happy Halloween baking!
Print
Pumpkin Spice Cupcakes
- Total Time: 35 minutes
- Yield: 12 servings 1x
- Diet: Vegetarian
Description
Deliciously spiced pumpkin cupcakes, perfect for Halloween festivities.
Ingredients
- 1 ½ cups all-purpose flour
- 1 cup granulated sugar
- 1 tsp baking powder
- ½ tsp baking soda
- ½ tsp salt
- 1 tbsp pumpkin pie spice
- ½ cup melted butter
- 2 large eggs
- 1 cup pumpkin puree
- Cream cheese frosting
- Orange and black sprinkles (for decoration)
Instructions
- Preheat the oven to 350°F (175°C).
- Prepare the pan by lining it with Halloween-themed cupcake liners.
- Mix the dry ingredients in a large bowl: flour, sugar, baking powder, baking soda, salt, and pumpkin pie spice.
- Combine the wet ingredients in another bowl: melted butter, eggs, and pumpkin puree.
- Mix the wet ingredients into the dry ingredients until just combined.
- Fill each cupcake liner about ¾ full with batter.
- Bake for 18-20 minutes, until a toothpick comes out clean.
- Decorate the cooled cupcakes with cream cheese frosting and sprinkles.
Notes
Feel free to get creative with decorations and flavors! Consider adding different types of frosting or toppings.
- Prep Time: 15 minutes
- Cook Time: 20 minutes
- Category: Dessert
- Method: Baking
- Cuisine: American
Nutrition
- Serving Size: 1 cupcake
- Calories: 200
- Sugar: 12g
- Sodium: 200mg
- Fat: 8g
- Saturated Fat: 5g
- Unsaturated Fat: 3g
- Trans Fat: 0g
- Carbohydrates: 30g
- Fiber: 1g
- Protein: 2g
- Cholesterol: 30mg
Keywords: Halloween, cupcakes, pumpkin spice, dessert, festive baking




