
Minute Halloween Jack-O’-Lantern Peppers for Spooky Snacks
Jack-O’-Lantern Peppers: A Whimsical Fall Recipe to Share with Loved Ones
Welcome back to my cozy kitchen, dear friends! As the leaves turn golden brown and the air gets that delightful chill, we know one thing for sure: it’s time for fall flavors and all things pumpkin spice (and everything nice). One of my absolute favorite ways to celebrate this magical season is with a dish that is not only delicious but also nostalgic—let me introduce you to my Jack-O’-Lantern Peppers. 🎃
Why Jack-O’-Lantern Peppers, you ask? Well, these adorable stuffed bell peppers are like a canvas for your creativity. They’re the perfect centerpiece for a Halloween get-together, a fun family dinner, or a captivating dish to impress your friends. And the best part? They’re as delicious as they are cute! Imagine vibrant orange and green peppers carved with joyful little faces, filled with savory goodness. My heart just skips a beat at the thought!
Each fall, I transform my kitchen into a bustling hub of creativity, scenting the air with spices and simmering sauces, all while carving playful expressions into my peppers. This dish not only lights up the dinner table but also ignites cherished memories with loved ones. So, grab your favorite apron, and let’s dive into this festive recipe together. 🎉
A Memory Steeped in Spice
I still remember the first time I made these Jack-O’-Lantern Peppers. It was the height of autumn, and my niece, Ella, had just turned four. The excitement of Halloween was palpable, and I wanted to create something magical for our family dinner. We gathered in the kitchen, the air filled with laughter, the sound of Ella’s giggles ringing in my ears as we carved silly faces into orange and green bell peppers.
As we cooked together, she eagerly stuffed the peppers with a blend of ground turkey, cheese, and spices. I taught her how to mix the filling, and she was so proud to decorate our spooky dinner. That night, we not only shared a meal but created memories that I hold dear to my heart. The joy of seeing her giggle as she took a bite of her creation was simply priceless. It’s moments like these that remind us how food has this incredible power to bring us together.
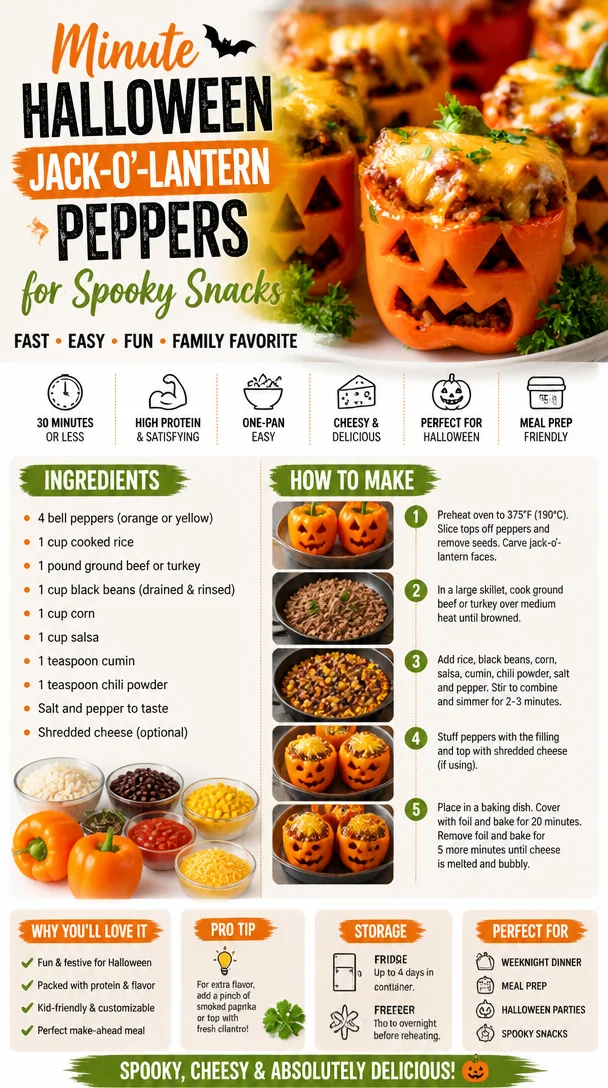
Ingredients
Here’s what you’ll need to create your own Jack-O’-Lantern Peppers. Don’t worry if you don’t have everything on hand; I’ve got tips for substitutions too!
-
Bell Peppers (4 orange and 2 green): These are the stars of our show! Orange peppers scream Halloween, while green adds a bit of color contrast. If you can’t find orange peppers, yellow ones work beautifully too!
-
Ground Turkey or Beef (1 pound): I like using ground turkey as a healthier option. However, feel free to swap it with ground beef, chicken, or even plant-based alternatives like lentils or mushrooms for a vegetarian twist.
-
Cooked Rice (1 cup): This helps bulk up the filling and gives it a wonderful texture. Leftover rice from your previous meals works perfectly. You can also use quinoa or cauliflower rice for a grain-free option.
-
Shredded Cheese (1 cup): Cheddar is my go-to, but feel free to experiment with peppers or mozzarella! To make it dairy-free, use vegan cheese.
-
Onion (1 small, diced): Onions add sweetness and depth to the filling. Swap it for shallots or skip it altogether if you prefer a milder flavor.
-
Garlic (2 cloves, minced): A necessary flavor boost! If you’re not a garlic fan, just reduce the amount or use garlic powder as a substitute.
-
Tomato Sauce (1/2 cup): This adds moisture and tanginess to our filling. You can use fresh tomatoes, salsa, or even canned diced tomatoes if you’re in a pinch.
-
Spices: (1 tsp each of cumin, paprika, salt, and pepper): These will warm your filling with layers of flavor. Feel free to add any other spices you love, like chili powder for a kick!
Step-by-Step Instructions
Now that we have our ingredients lined up, let’s get cooking! Follow along with these steps, and don’t hesitate to add your own flair.
-
Preheat your oven to 375°F (190°C). This step is important; we want our peppers to roast perfectly, softening while we prepare the filling.
-
Cut the tops off the peppers and scoop out the seeds. Use a small knife to carve out fun Jack-O’-Lantern faces on the front. Remember to make them as silly or spooky as you like! Once you’re done carving, set these cute little guys aside.
-
Sauté the onion and garlic. In a skillet over medium heat, drizzle a little olive oil and add your diced onion. Sauté until translucent, about 4-5 minutes. Next, add the minced garlic and stir for another minute—it will smell heavenly.
-
Add the ground turkey (or beef) to the skillet. Cook until browned, breaking it apart with a wooden spoon for even cooking—around 7-10 minutes. This is where you’ll want to season with salt, pepper, cumin, and paprika, ensuring the meat is bursting with flavor.
-
In a large bowl, combine the meat mixture with cooked rice, tomato sauce, and half of the shredded cheese. Stir until everything is well incorporated. This is where you can taste and adjust any seasonings!
-
Stuff the peppers generously with filling. Don’t be shy—fill them until they’re overflowing! Place them upright in a baking dish. If they don’t stand upright, you can slice a tiny bit from the bottom to create a flat base.
-
Top each stuffed pepper with the remaining cheese. This cheesy goodness will melt into a delicious crust as they bake!
-
Cover with foil and bake for 30 minutes. This allows the peppers to steam a little, making them tender. Once you remove the foil, bake for an additional 15 minutes until the cheese is bubbly and golden.
-
Serve hot, garnished with fresh herbs like cilantro or parsley for a pop of color. They’re best enjoyed right out of the oven but still delicious as leftovers!
Serving Suggestions
To make your Jack-O’-Lantern Peppers even more festive, serve them with a side of vibrant mixed greens and a zesty vinaigrette. Alternatively, a bowl of creamy, homemade pumpkin soup pairs beautifully, adding to that warm, autumn vibe. For a touch of fun, place your peppers in a carved pumpkin or use spooky plates for added flair. It’s all about creating a cozy atmosphere to celebrate the season!
Recipe Variations
Want to mix things up? Here are a few creative twists to try with your Jack-O’-Lantern Peppers:
-
Fiesta Style: Swap the ground turkey for chorizo and add black beans and corn to the filling! Top with avocado for a fresh touch.
-
Italian Twist: Use Italian sausage and mix in some marinara sauce and mozzarella. Top with fresh basil for an Italian flair!
-
Vegetarian Delight: Replace the meat with a mix of black beans, quinoa, and your favorite vegetables to create a hearty plant-based filling.
-
Spicy Kick: Add diced jalapeños or crushed red pepper flakes to the filling for an extra zing!
-
Cheesy Broccoli Edition: Incorporate finely chopped broccoli and swap out some cheese for extra creaminess and a pop of color.
Chef’s Notes
One of my favorite kitchen memories with these Jack-O’-Lantern Peppers happened when I experimented with leftovers! One time, I had some roasted sweet potatoes lying around, and I decided to toss them into the filling. My family freaked out at how delicious it was! So, remember, let your creativity run wild—cooking is all about experimenting and having fun.
These peppers have evolved over the years, and now they hold a special place in my heart. They remind me of laughter, love, and shared meals with those who matter most. So don’t hesitate to adapt this recipe to your taste while creating your own beautiful memories!
FAQs and Troubleshooting
Q: Can I make these ahead of time?
Absolutely! You can prep your Jack-O’-Lantern Peppers a day in advance. Just stuff them and store them in the fridge, covered. When ready, pop them in the oven for a little longer since they’ll be chilled.
Q: What if my peppers are too tough?
No worries! If you find that your peppers are firm after baking, you can always sprinkle a tablespoon of water into the baking dish and re-cover it with foil for an additional 10 minutes in the oven to steam them.
Q: Can I freeze the stuffed peppers?
Yes! After baking, let them cool completely and then wrap each pepper in plastic wrap and store in an airtight container. They can be frozen for up to three months. Just reheat in the oven until warmed through.
Q: My filling is too dry. What can I do?
If you find your filling is on the dry side, add a splash of broth or some more tomato sauce to moisten it up! You want it to be flavorful and tender.
Nutritional Info
Per serving (1 stuffed pepper): approximately 300 calories, 20g protein, 15g carbohydrates, and 10g fats (may vary depending on ingredients used).
So there you have it! Jack-O’-Lantern Peppers that not only serve as a tasty treat but also as a celebration of creativity, nostalgia, and warmth. Happy cooking, and may your kitchen be filled with laughter and love! 🍂✨
Print
Jack-O’-Lantern Peppers
- Total Time: 60 minutes
- Yield: 6 servings 1x
- Diet: Gluten-Free
Description
Delightful stuffed bell peppers that bring festive fall flavors to your table while creating cherished memories.
Ingredients
- 4 orange bell peppers
- 2 green bell peppers
- 1 pound ground turkey (or beef)
- 1 cup cooked rice
- 1 cup shredded cheese
- 1 small onion, diced
- 2 cloves garlic, minced
- 1/2 cup tomato sauce
- 1 tsp cumin
- 1 tsp paprika
- 1 tsp salt
- 1 tsp pepper
Instructions
- Preheat your oven to 375°F (190°C).
- Cut the tops off the peppers and scoop out the seeds, carving Jack-O’-Lantern faces.
- Sauté the onion and garlic in a skillet over medium heat until translucent.
- Add the ground turkey (or beef) to the skillet and cook until browned.
- Combine the meat mixture with cooked rice, tomato sauce, and half of the shredded cheese in a large bowl.
- Stuff the peppers generously with the filling and place them upright in a baking dish.
- Top each stuffed pepper with the remaining cheese.
- Cover with foil and bake for 30 minutes, then remove foil and bake for another 15 minutes.
- Serve hot, garnished with fresh herbs.
Notes
These peppers can be prepped a day in advance and stored in the fridge, or frozen for up to three months.
- Prep Time: 15 minutes
- Cook Time: 45 minutes
- Category: Main Course
- Method: Baking
- Cuisine: American
Nutrition
- Serving Size: 1 stuffed pepper
- Calories: 300
- Sugar: 4g
- Sodium: 500mg
- Fat: 10g
- Saturated Fat: 4g
- Unsaturated Fat: 4g
- Trans Fat: 0g
- Carbohydrates: 15g
- Fiber: 3g
- Protein: 20g
- Cholesterol: 70mg
Keywords: Halloween, stuffed peppers, fall recipe, family dinner, cozy cooking

Minute Cowboy Caviar: Fresh, Tangy Bean Dip for Summer
Easy Cowboy Caviar: A Flavorful Fiesta in a Bowl!
Welcome to my kitchen! I’m Olivia Bennett, and today I’m excited to share a scrumptious dish that will make your taste buds dance: Easy Cowboy Caviar! If you’re anything like me, you find pure joy in colorful, fresh ingredients coming together to create something fabulous. This dish is not just a regular salsa; it’s a vibrant party in a bowl, bursting with flavor and perfect for any occasion.
Cowboy Caviar is like a Texan roots-inspired guacamole, often served as a dip but versatile enough to be enjoyed as a salad or side dish. Picture this: a colorful mix of black beans, corn, peppers, tomatoes, and a zesty dressing that tantalizes your palate. It’s a crowd-pleaser that’s quick to whip up, making it ideal for everything from game day snacking to backyard barbecues to casual dinners at home. Plus, it’s a fantastic option if you want something healthy yet hearty. Trust me; once you’ve had a taste, you’ll be coming back for seconds (or thirds).
But before we dive into the recipe, let me set the scene for you. Picture me in my cozy kitchen, with sunlight streaming through the window, fresh produce spread out on the counter, and the anticipation of good food filling the air. This isn’t just cooking; it’s an experience filled with laughter, stories, and moments to cherish. Are you ready to join the fun? Let’s get started on making your new favorite appetizer!
A Slice of Nostalgia
Let me take you back to one of my fondest culinary memories. Growing up, my family had a tradition of hosting summer barbecues. My aunt Clara was the ultimate entertainer, and her Cowboy Caviar was the star of the show. She’d set out a giant bowl of it on the picnic table, and we’d all gather around, plates in hand, ready to dive in. The vibrant colors of the black beans, tomatoes, and bell peppers were not only a feast for the eyes but also for the taste buds.
I remember the mouthwatering smell of the lime and cilantro dressing as I helped her toss it all together. Aunt Clara always encouraged me to add my own twist, and together we experimented with different ingredients, like adding diced avocado or a sprinkle of feta cheese. Those delicious bites were accompanied by hours of laughter, games, and the sweet sound of our family coming together. Every scoop of that Cowboy Caviar brought us closer, creating memories that still warm my heart today.
And so, as I share this recipe with you, my hope is that it becomes a cherished addition to your kitchen, bringing your loved ones together, just like it did for me and my family.
Ingredients
Here’s what you need to whip up this delightful Cowboy Caviar:
-
1 can black beans, drained and rinsed
Black beans are a fantastic source of protein and fiber. If you’re looking for a different flavor, feel free to substitute with chickpeas or pinto beans. -
1 can sweet corn, drained
The sweetness of corn balances the dish beautifully. You can also use fresh corn on the cob if it’s in season—just grill or boil it first! -
1 cup cherry tomatoes, halved
Cherry tomatoes add bursty sweetness. If you don’t have them, any diced tomatoes will work, but fresh is best! -
1 red bell pepper, diced
This adds crunch and a sweet flavor. You could swap in yellow or orange bell peppers for a different twist! -
1 green bell pepper, diced
The green bell pepper adds freshness. You could also use jalapeños if you want a spicy kick. -
1/2 red onion, finely chopped
Onions provide depth of flavor. If you’re sensitive to raw onions, soak them in cold water for 10 minutes before adding them to reduce their bite. -
1/4 cup fresh cilantro, chopped
Cilantro adds a fresh, herbal note. If you’re not a fan, try substituting with parsley or omitting it altogether. -
Juice of 2 limes
Lime juice brightens everything up. You can use lemon juice in a pinch, but it will change the flavor slightly. -
1 tablespoon olive oil
This adds richness and helps meld the flavors. You can swap for avocado oil if you prefer a neutral taste. -
1 teaspoon ground cumin
Cumin gives this dish an earthy depth. If you’re looking to switch things up, smoked paprika can bring a lovely smoky flavor. -
Salt and pepper to taste
Essential for enhancing the dish’s flavor! Use sea salt and freshly cracked black pepper for the best taste.
Step-by-Step Instructions
Now that we’ve gathered our ingredients, let’s get cooking! Here’s how to make your Cowboy Caviar step by step.
-
Prep the Veggies
Start by washing your fresh produce. It’s essential to have clean veggies! Drain and rinse the black beans and corn. I like to use a colander for this step — it’s an easy clean-up! -
Chop and Dice
Dice the bell peppers, cherry tomatoes, and red onion. Aim for uniform pieces so they’re visually appealing and easy to scoop up. If you’re feeling artistic, try cutting the vegetables in fun shapes (kids love this!). -
Combine Everything
In a large mixing bowl, toss together the black beans, corn, cherry tomatoes, red bell pepper, green bell pepper, red onion, and cilantro. Take a moment to enjoy the vibrant colors! -
Make the Dressing
In a small bowl, whisk together the lime juice, olive oil, ground cumin, salt, and pepper. This is where the magic happens! The tanginess of the lime and the warmth of the cumin will elevate all those fresh ingredients. -
Mix it All Together
Pour the dressing over the vegetable mixture and gently stir until everything is coated. I like to use a rubber spatula for this — it’s gentle but effective. -
Taste and Adjust
Here’s where you can put on your chef hat! Give it a taste and adjust seasoning if necessary. Sometimes, a little extra lime juice can make all the difference. -
Chill and Marinate
Cover the bowl with plastic wrap or a lid and let it chill in the fridge for at least 30 minutes. This allows the flavors to meld. If you can let it sit longer, even better! -
Serve and Enjoy
When you’re ready to serve, stir the Cowboy Caviar one last time and transfer it to a beautiful serving dish. Don’t forget the tort tortilla chips for dipping!
Serving Suggestions
To make your Cowboy Caviar stand out, consider serving it in a vibrant bowl that complements the colors of the dish. Use colorful tortilla chips, pita chips, or even fresh veggie sticks for dipping. Another delightful way to present it is over mixed greens for a refreshing salad. Drizzle some extra lime juice on top for an added zing!
Recipe Variations
Cowboy Caviar is incredibly versatile! Here are some creative twists you can try:
- Spicy Kick: Add diced jalapeños or a splash of hot sauce for heat.
- Creamy Avocado: Mash in some ripe avocado for a creamy texture.
- Zesty Citrus: Swap half of the lime juice for orange juice for a unique sweetness.
- Protein Boost: Toss in some diced grilled chicken or shrimp for a heartier meal.
- Herbal Remix: Experiment with different herbs like dill or basil for exciting flavor profiles.
Chef’s Notes
I love experimenting with this recipe! There have been times when I’ve found leftover ingredients from my fridge that I’ve tossed in, from black olives to diced mango. Never be afraid to get creative! One of the best parts of cooking is adapting and making a dish your own. Remember, my Cowboy Caviar recipe was inspired by Aunt Clara’s amazing version, and I’ve added my twists along the way. I encourage you to do the same!
Don’t forget to share your Cowboy Caviar stories with me! I love hearing how my recipes fit into your life and bring joy to your gatherings.
FAQs and Troubleshooting
Q1: Can I make Cowboy Caviar ahead of time?
Absolutely! It tastes even better after marinating overnight. Just be sure to store it in an airtight container in the fridge.
Q2: How long will it last in the fridge?
If stored properly, it should last for 3-5 days. Just make sure to give it a good stir before you serve it again.
Q3: Is it okay to use frozen corn and beans?
Yes, frozen corn works wonderfully! Just thaw it first. If using frozen beans, make sure they’re fully cooked.
Q4: What can I serve with Cowboy Caviar?
It pairs beautifully with grilled meats, on nachos, or in a burrito bowl. You can even elevate it by placing a scoop on top of tacos for an added crunch!
Nutritional Info
Here’s a rough breakdown of each serving (based on eight servings):
- Calories: 120
- Protein: 5g
- Carbohydrates: 24g
- Fat: 2g
- Fiber: 6g
- Sugar: 3g
Cowboy Caviar is not only delicious but packed with fiber and nutrients, making it a great addition to any meal!
And there you have it! A fabulous, vibrant dish that’s so easy to make and even easier to share. Now, roll up your sleeves, put on your favorite apron, and let’s get cooking! I can’t wait to hear how your Cowboy Caviar turns out, so don’t forget to share your creations with me. Happy cooking, friends!
Print
Easy Cowboy Caviar
- Total Time: 45 minutes
- Yield: 8 servings 1x
- Diet: Vegan
Description
A vibrant mix of black beans, corn, and fresh vegetables in a zesty dressing, perfect as a dip or a salad.
Ingredients
- 1 can black beans, drained and rinsed
- 1 can sweet corn, drained
- 1 cup cherry tomatoes, halved
- 1 red bell pepper, diced
- 1 green bell pepper, diced
- 1/2 red onion, finely chopped
- 1/4 cup fresh cilantro, chopped
- Juice of 2 limes
- 1 tablespoon olive oil
- 1 teaspoon ground cumin
- Salt and pepper to taste
Instructions
- Prep the Veggies: Start by washing your fresh produce. It’s essential to have clean veggies! Drain and rinse the black beans and corn.
- Chop and Dice: Dice the bell peppers, cherry tomatoes, and red onion into uniform pieces.
- Combine Everything: In a large mixing bowl, toss together the black beans, corn, cherry tomatoes, red bell pepper, green bell pepper, red onion, and cilantro.
- Make the Dressing: In a small bowl, whisk together the lime juice, olive oil, ground cumin, salt, and pepper.
- Mix it All Together: Pour the dressing over the vegetable mixture and gently stir until everything is coated.
- Taste and Adjust: Give it a taste and adjust seasoning if necessary.
- Chill and Marinate: Cover the bowl and let it chill in the fridge for at least 30 minutes.
- Serve and Enjoy: Stir the Cowboy Caviar and transfer it to a serving dish with tortilla chips.
Notes
Cowboy Caviar can be made ahead of time and tastes even better after marinating overnight.
- Prep Time: 15 minutes
- Cook Time: 0 minutes
- Category: Appetizer
- Method: Mixing
- Cuisine: Tex-Mex
Nutrition
- Serving Size: 1 serving
- Calories: 120
- Sugar: 3g
- Sodium: 200mg
- Fat: 2g
- Saturated Fat: 0g
- Unsaturated Fat: 2g
- Trans Fat: 0g
- Carbohydrates: 24g
- Fiber: 6g
- Protein: 5g
- Cholesterol: 0mg
Keywords: cowboy caviar, dip, salad, Tex-Mex, fresh vegetables, party food


