
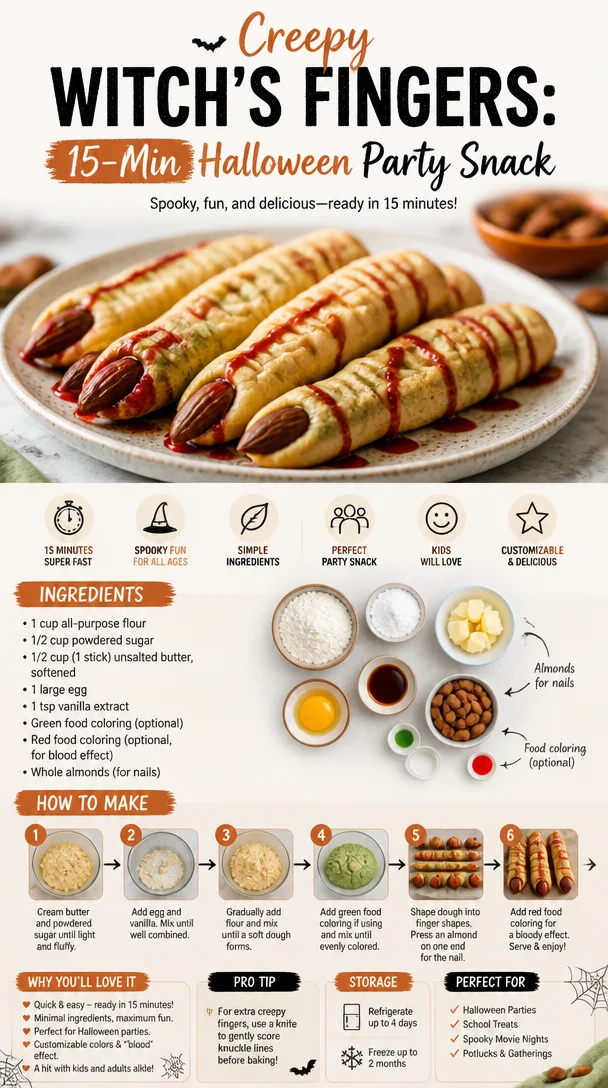
Creepy Witch’s Fingers: 15-Min Halloween Party Snack
Witch’s Fingers: A Spooktacular Halloween Treat
Welcome to my kitchen, food lovers! With Halloween lurking just around the corner, it’s the perfect time to whip up some delightfully creepy treats that will thrill and chill your friends and family. Today, I’m excited to share my enchanting recipe for Witch’s Fingers. These eerie snacks are not just visually fun; they are also incredibly delicious and easy to make, bringing together flavors and textures that everyone will love. So, let’s get our cauldrons bubbling and dive into this fantastically creepy culinary adventure!
Now, I know what you’re thinking: “Witch’s Fingers? Really?!" But trust me, these treats are nothing to be afraid of. Picture it: a buttery, melt-in-your-mouth almond cookie shaped like, well, a witch’s finger! Topped with a spooky almond “nail” and dusted with just the right amount of innocence, these cookies bring just the right amount of whimsy to your Halloween festivities.
Whether you’re hosting a Halloween party, attending a spooky potluck, or just want to surprise your kids with something extra special, Witch’s Fingers are the perfect go-to treat. And let me tell you, they are as much fun to make as they are to eat!
So, grab your favorite apron and get ready to conjure up some sweets that will have even the most discerning ghosts and goblins coming back for more!
A Trip Down Memory Lane
I remember the first time I made Witch’s Fingers with my younger sister, Emily. It was a cold October afternoon, and the leaves outside were painted in hues of orange, yellow, and red—like nature itself was preparing for Halloween. We decided to have a little baking competition, and I was determined to impress her with my culinary wizardry.
With bowls overflowing with flour and sugar, we giggled and experimented in the kitchen. I used my mom’s old rolling pin to form the cookie dough into strange, elongated shapes and topped them with almonds, hoping they would look spooky enough to frighten our neighborhood friends. When we pulled them out of the oven, the cookies were just the right shade of golden brown, and Emily’s eyes lit up with delight.
That Halloween, we set up a little corner in our living room to display our spooky creations, and I can still hear the laughter and shrieks from the kids who dared to take a bite of those witchy snacks! Cooking was more than just about the end result; it was about the journey, the creativity, and the joy of sharing it with those we love. Those memories, combined with the enchanting flavors of these cookies, hold a special place in my heart, and I can’t wait to share this spooky delight with you!
Ingredients
Here’s everything you’ll need to create your own Witch’s Fingers. Don’t worry; these ingredients are easy to find and mostly staples in your kitchen pantry!
-
Unsalted Butter (1 cup): Butter makes these cookies incredibly rich and gives them that melt-in-your-mouth texture. If you’re looking for a dairy-free option, feel free to swap in coconut oil or a vegan butter alternative.
-
Granulated Sugar (1 cup): Sugar sweetens the deal and helps create a lovely golden color in the cookies. You could use brown sugar for a richer flavor; just note that it might darken the cookies slightly.
-
Egg (1 large): This binds everything together! You can use a flaxseed meal or chia seed mix (1 tablespoon flaxseed with 3 tablespoons water) if you want to make it vegan.
-
Vanilla Extract (2 teaspoons): This is where the magic happens! Vanilla adds a beautiful depth of flavor. For a twist, you could try almond extract instead for a nutty variation.
-
All-Purpose Flour (2 ½ cups): The base of your cookies! If you’re gluten-free, look for a 1:1 gluten-free flour blend that includes xanthan gum.
-
Almonds (20 pieces): Whole blanched almonds work perfectly for the “nails” of the fingers. If you have nut allergies, you can use pumpkin seeds or chocolate chips cut into the shape of a nail.
-
Powdered Sugar (for dusting): This is optional, but a light sprinkle gives a sweet touch and can mimic the look of powdered "witch dust." Use granulated sugar if you’d like a little more crunch.
Step-by-Step Instructions
Let’s get to the good part! Here’s how to whip up these ghoulish goodies step by step:
Step 1: Preheat Your Cauldron
Preheat your oven to 325°F (160°C). It’s crucial that your oven is at the right temperature so your cookies bake correctly!
Step 2: Cream the Butter and Sugar
In a large bowl, use a hand mixer or stand mixer to beat together the softened unsalted butter and granulated sugar until the mixture is creamy and pale. This should take about 2-3 minutes. Be sure to scrape down the sides of the bowl for even mixing. This process incorporates air into the dough, making your cookies light and tender.
Step 3: Add Egg and Vanilla
Add the egg and vanilla extract to the butter-sugar mixture. Beat until well combined. The mixture should be smooth and luscious. When you crack the egg, be sure to check for any shell fragments – they don’t belong in our witch’s concoction!
Step 4: Mix in Dry Ingredients
In a separate bowl, whisk together the flour and a pinch of salt. Gradually add the dry mix into the wet ingredients, mixing until just combined. Be careful not to overmix; you want the flour to be just incorporated. Too much mixing can lead to tough cookies—nobody wants that!
Step 5: Shape the Cookies
Now comes the fun part! Take a small amount of dough (about a tablespoon) and roll it into a finger shape. You want them to be about 3-4 inches long and slightly thick to withstand the “nail.” Flatten one end to create a fingertip. Use a butter knife to make knuckle indentations to add detail. Place each finger on a parchment-lined baking sheet, leaving some space between each one.
Step 6: Add the Almond "Nails"
Gently press an almond into the flattened end of each finger. This is where your Witch’s Fingers come to life! If you want extra creepiness, you can use melted chocolate to “glue” the almond on, allowing it to ooze over the edges.
Step 7: Bake!
Pop those fingers in the preheated oven and bake for 15-18 minutes or until they’re lightly golden. The aroma that fills your kitchen? Pure magic! Allow them to cool on the baking sheet for about 5 minutes before transferring them to a wire rack to cool completely.
Step 8: Dust with Powdered Sugar
Once cooled, feel free to give your cookies a light dusting of powdered sugar if you like. It adds an extra special touch and just the right hint of sweetness. Don’t dust too heavily—you want them to look “witchy,” not fluffy!
Serving Suggestions
These Witch’s Fingers are best served on a spooky platter adorned with Halloween-like decorations. Consider surrounding them with fake spiders or adding some eerie green-colored candies for an extra festive touch. They also make a fantastic centerpiece for Halloween-themed gatherings, or simply stack them vertically in a jar for a fun grab-and-go treat!
Recipe Variations
Now, let’s get those creative juices flowing! Here are some fun variations you can try with your Witch’s Fingers:
- Chocolate Chip Fingers: Mix in some chocolate chips for an extra burst of flavor.
- Spiced Pumpkin Fingers: Substitute part of the flour with pumpkin puree and add warm spices like cinnamon and nutmeg!
- Blood-Spattered Fingers: Drizzle some red icing over the fingers for a gory twist—perfect for horror-loving friends!
- Gluten-Free Version: Use gluten-free flour and ensure your baking powder is gluten-free!
- Nut-Free Option: Swap out the almonds for pumpkin seeds or a small piece of chocolate to mimic the nail.
Chef’s Notes
As with any recipe, I welcome you to make these Witch’s Fingers your own! This recipe has evolved over the years from a simple butter cookie into this spooktacular delight folks rave about. I remember trying it with different flavors, and it turns out pumpkin spice is a total winner for the fall season! My kitchen was full of laughter, flour-covered counters, and far too many cookie tastings (not that I’m complaining!). Just remember, the best recipes are made with love, creativity, and a sprinkle of fun!
FAQs and Troubleshooting
Here are some common questions you might have when diving into making these treats:
-
Why are my cookies spreading too much?
If your cookies are spreading too much, it could be that your butter was too warm or you didn’t chill your dough before baking. Always use softened butter, not melted! -
How can I make my cookies crispier?
If you prefer a crisper cookie, you can bake them a little longer. Just keep a close eye on them, so they don’t burn. -
Can I freeze these cookies?
Absolutely! Just make sure they are completely cooled before freezing. You can store them in an airtight container for up to a month. Perfect for future spooky gatherings! -
How can I store my Witch’s Fingers?
Store them in an airtight container at room temperature for up to a week. Just know they might lose some of their initial crispiness.
Nutritional Info
For all my health-conscious friends out there, here’s a quick breakdown of a single Witch’s Finger cookie:
- Calories: 120
- Total Fat: 8g
- Saturated Fat: 4g
- Carbohydrates: 11g
- Protein: 1g
- Sugar: 4g
Feel free to adjust this recipe to your personal taste and dietary needs, and enjoy every delicious bite.
There you have it! Witch’s Fingers, a spooktacular Halloween treat, overflowing with flavor and nostalgia. Get ready to impress your friends with these delightful cookies while creating new memories in the kitchen. Happy Halloween baking! 🌕🕷️
Print
Witch’s Fingers
- Total Time: 33 minutes
- Yield: 24 servings 1x
- Diet: Vegetarian
Description
Delightfully spooky almond cookies shaped like witch’s fingers, perfect for Halloween parties.
Ingredients
- 1 cup Unsalted Butter
- 1 cup Granulated Sugar
- 1 large Egg
- 2 teaspoons Vanilla Extract
- 2 ½ cups All-Purpose Flour
- 20 pieces Almonds
- Powdered Sugar (for dusting)
Instructions
- Preheat your oven to 325°F (160°C).
- Cream the butter and sugar in a large bowl until creamy and pale.
- Add the egg and vanilla extract; beat until combined.
- Mix in the dry ingredients until just incorporated.
- Shape the dough into finger shapes, about 3-4 inches long.
- Add an almond into the flattened end of each cookie.
- Bake for 15-18 minutes or until lightly golden.
- Dust with powdered sugar if desired.
Notes
Store in an airtight container at room temperature for up to a week.
- Prep Time: 15 minutes
- Cook Time: 18 minutes
- Category: Dessert
- Method: Baking
- Cuisine: American
Nutrition
- Serving Size: 1 cookie
- Calories: 120
- Sugar: 4g
- Sodium: 100mg
- Fat: 8g
- Saturated Fat: 4g
- Unsaturated Fat: 4g
- Trans Fat: 0g
- Carbohydrates: 11g
- Fiber: 0g
- Protein: 1g
- Cholesterol: 30mg
Keywords: Halloween, cookies, Witch's Fingers, dessert, spooky treats


