
Milkshake
Creamy Dreamy Milkshake: Your Ultimate Guide to Bliss in a Glass
Hey there, fellow food lovers! Welcome back to my cozy kitchen, where today we’re about to embark on a sweet adventure that will take you right back to those carefree summer days when the sun kissed your skin and a thick, creamy milkshake was the ultimate treat. If you’re like me, you know that nothing beats the joy of sipping a chilled milkshake while lounging with friends or family (bonus points if you’re outdoors).
Milkshakes are the quintessential comfort food that span generations. Whether you’re feeling nostalgic about those trips to the local diner in your childhood or looking to recreate that magical moment at home, I’ve got you covered. With just a few simple ingredients, we’ll whip up a shake so delicious, you’ll wonder why you ever settled for anything bottled. Plus, I promise it’ll be a cinch—trust me, if I can make it with flour on one hand and a whisk in the other, you can totally do this!
Today, I will guide you step-by-step to make a classic milkshake with heaps of flavor and inspiration drawn from my fondest memories in the kitchen. So grab your favorite glass and let’s get ready to create a deliciously creamy milkshake that’s perfect any time of year!
Personal Story
Whenever I think of milkshakes, I’m transported back to my childhood summer vacations spent at Grandma’s house. The moment we arrived, there would be the unmistakable sound of her old blender whirring and the sweet aroma of vanilla wafting through the air. Grandma had a knack for creating creamy delights that brought everyone together, and the milkshakes were the highlight. Her secret? A little bit of love and a lot of laughter blended right in!
One particular memory stands out—I remember sitting on her porch with my cousins, big sun hats perched on our heads, giggling and making a mess as we tried to finish those towering milkshakes topped with whipped cream and maraschino cherries. We’d make bets on who could finish first while the ice cream dripped down our arms. It was a chaotic, sticky mess, but in that moment, I felt so alive, so connected. That’s the magic of food; it transcends the plate and creates bonds that last a lifetime.
Now, every time I make a milkshake, I think of those sunny days and the timeless joy they brought. Let’s create some new memories together, shall we?
Ingredients
Here’s what you’ll need to make a classic milkshake:
-
Ice Cream (2 cups): The star of the show! I love using vanilla for a classic shake, but feel free to experiment with rich flavors like chocolate or strawberry. Pro tip: For a sundae-style shake, go for chunks of ice cream!
-
Milk (1 cup): Whole milk gives it a creamy texture, but you can use any milk you prefer (almond, oat, or soy) for a dairy-free option. Just adjust the amount based on your desired thickness.
-
Flavorings (optional): A splash of vanilla extract (1 tsp) or chocolate syrup can elevate your milkshake to another level. Don’t skip this if you want a pop of extra flavor!
-
Toppings: Whipped cream, chocolate shavings, sprinkles, or even a drizzle of caramel are excellent choices! Feel free to go wild—this is your shake!
Each ingredient plays a crucial role in achieving a milkshake that not only satisfies your sweet tooth but also invites creativity from your heart.
Step-by-Step Instructions
Step 1: Gather Your Ingredients
Start by prepping your work area. Measure out your ice cream and milk, and have your toppings ready. Having everything in arms reach makes the process smoother. Trust me, nothing is worse than mid-blend chaos!
Step 2: Blend It Up!
In a blender, combine the ice cream and milk. If you’re adding any flavorings or extras, toss them in now! For a thicker shake, start with about ½ cup of milk, and add more as needed.
Tip: Blend until just mixed; you want to see some chunks of ice cream still visible. It makes for a creamier texture rather than a soupy shake.
Step 3: Taste Test
Here’s a fun chef hack—use a spoon (or a straw!) to taste a little of your creation before pouring it out. This is where you can decide if it needs more chocolate or maybe a touch more milk for a thinner consistency!
Step 4: Serve It Up
Pour the milkshake into your favorite glass. Halfway through, consider adding layers of whipped cream or sprinkles for a fun treat. Such an easy way to impress your guests!
Step 5: Top It Off
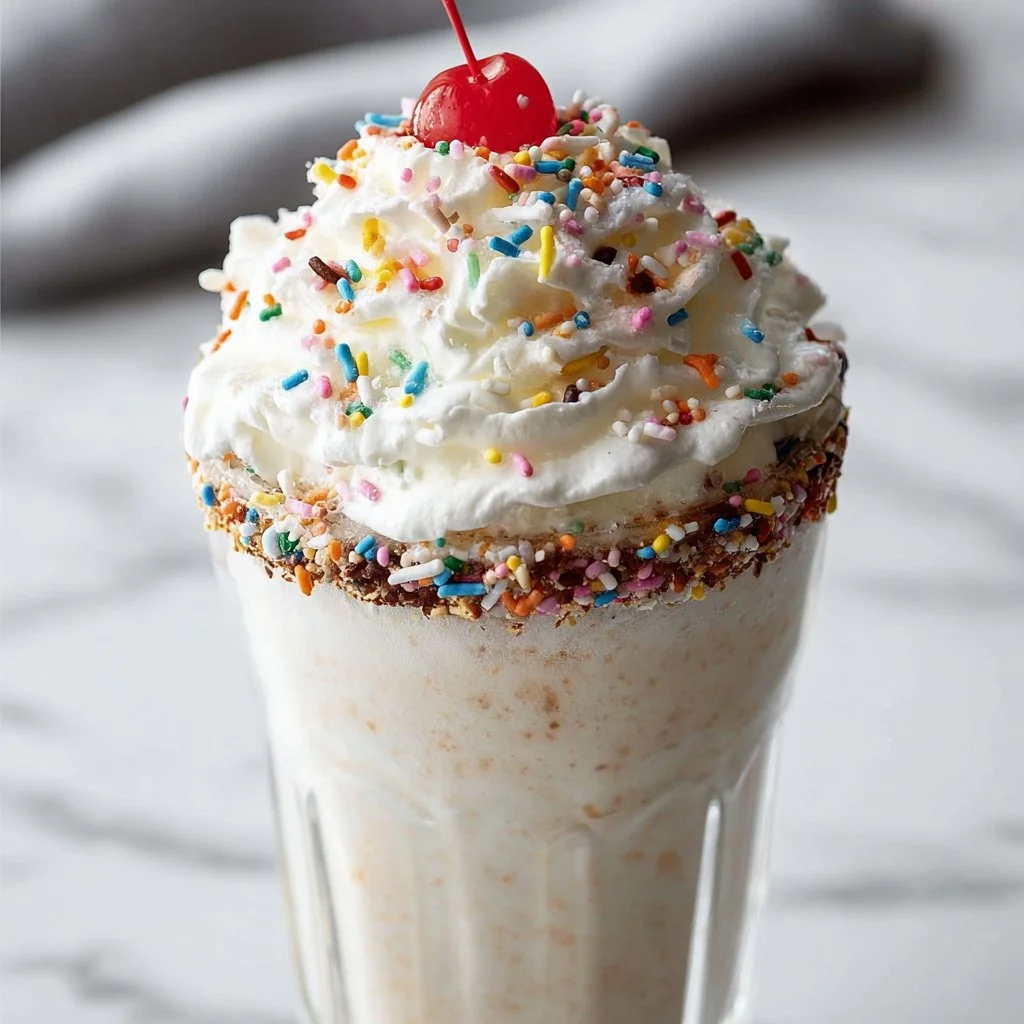
Finish your shake with a generous dollop of whipped cream on top, a sprinkle of chocolate shavings, and a cherry. Don’t forget the straw—this is a milkshake, after all!
Step 6: Enjoy!
Savor every sip! There’s nothing like sitting back and enjoying something you’ve created yourself. Let each sip take you back to those sun-soaked memories and savor that sweet nostalgic bliss.
Serving Suggestions
For an added touch of elegance (and fun!), consider serving your milkshake in mason jars or unique glassware. Garnish with whipped cream and a sprinkle of your favorite toppings, and if you’re feeling adventurous, add a homemade cookie on the side. Instant happiness!
Recipe Variations
-
Chocolate Banana Shake: Add half a ripe banana to the blender for a fruity twist. Delicious!
-
Mint Chocolate Chip Shake: Swap the vanilla for mint chocolate chip ice cream and top with crushed mint candies. Perfect for mint lovers!
-
Peanut Butter Cup Shake: Throw in a couple of tablespoons of peanut butter and a handful of crushed chocolate peanut butter candies for a decadent treat.
-
Protein Power Shake: Swap ice cream with a scoop of vanilla/yogurt protein powder and use Greek yogurt for a healthy pick-me-up.
-
Coffee Lover’s Shake: Add a scoop of coffee ice cream and a splash of brewed coffee for a pick-me-up after dinner.
Chef’s Notes
Over the years, my milkshake recipe has transformed as I’ve experimented with different flavor profiles and toppings. I’ve tried everything from crushed cookies to fresh fruit and even savory spices! Each iteration, though different, always reminds me of Grandma’s kitchen—the heart of our family celebrations.
I remember one fateful summer when cousin Beta thought it would be fun to make a “spicy milkshake” and added cinnamon. Surprisingly, it became a hit! It was quirky ideas like that, born out of spontaneity, that added a new twist to my classic recipe. Always remember, the kitchen is a space for creativity and experimentation!
FAQs and Troubleshooting
-
Why is my milkshake too thin?
- You might need more ice cream! A dash more should help thicken it right up. If you’ve added too much milk, don’t panic; simply add a scoop of ice cream to balance it out.
-
Can I make it ahead of time?
- Sure! Blend the ingredients together but store it in the freezer. However, you’ll want to give it a quick blend again before serving, as it can harden quite a bit.
-
What’s the best way to clean my blender?
- Fill your blender with warm water and a drop of dish soap. Blend on high for 30 seconds and rinse. Voila!
-
How can I make my milkshake vegan?
- Simply swap regular milk for almond, soy, or oat milk and use dairy-free ice cream. You won’t lose any deliciousness!
Nutritional Info (if applicable)
Each serving (based on the classic recipe) contains approximately:
- Calories: 350
- Total Fat: 18g
- Saturated Fat: 10g
- Carbohydrates: 45g
- Sugars: 35g
- Protein: 7g
Note: Nutritional values will vary based on ingredient choices.
And there you have it, my deliciously creamy milkshake adventure! I hope the nostalgia inspired you to create your own memories in the kitchen, not to mention enjoying every creamy sip along the way. Remember, cooking isn’t just about the food—it’s about the love, laughter, and memories you share. Happy blending, friends!

Vanilla Milkshake
The Ultimate Vanilla Milkshake Recipe: A Creamy Escape to Nostalgia
Introduction:
Hey there, fellow food lovers! Welcome back to my cozy corner of the culinary universe. Today, I’m thrilled to share a recipe that’s as dreamy and delightful as a summer breeze—the classic Vanilla Milkshake. Now, I know you might be thinking that a vanilla milkshake is just, well, a vanilla milkshake—but trust me when I say it’s so much more than that! It’s a nostalgic experience, a comforting treat, and the perfect way to unwind after a long day.
Picture this: it’s a hot afternoon, and the sun is streaming through your kitchen window. The ice cream is just waiting to be scooped, and the thought of that frosty, creamy elixir is too enticing to resist. There’s something magical about a vanilla milkshake that transcends age; it brings back memories of childhood summers, lazy weekends, and those fun moments spent hanging out with friends.
Whether you’re whipping one up as a sweet treat for yourself or crafting a whole batch for a family movie night, this milkshake will make your taste buds dance. Its rich, creamy texture paired with the sweet, fragrant notes of vanilla make it an irresistible sip of happiness. Plus, you’ll be the star of the kitchen, and what’s better than that? So grab your blender, and let’s create a luscious vanilla milkshake that will transport us back to those carefree days!
Personal Story:
Growing up, my summers were more often than not defined by ice cream trucks rolling through the neighborhood. The sound of the classic ice cream jingle had an almost magical effect, sending us kids dashing out of our houses, armed with coins and wide smiles. One of my favorite indulgences was the simple vanilla milkshake. My siblings and I would gather around the kitchen table, proudly wielding our tall, frosty glasses, each decorated with a glob of whipped cream, a cherry on top, and perhaps even sprinkles for flair.
I remember sneaking a few spoonfuls of my mom’s homemade vanilla ice cream while she prepared our shakes. The thick, creamy goodness paired with a hint of nostalgia in every sip was something truly special. As we laughed and shared stories about our day—who had the best playground adventures, the funniest moments at the local pool—I realized that vanilla milkshakes were more than just a drink; they were a way to connect with the people I loved. Now, I pass that joy on to you, hoping to inspire you to create those same beautiful memories in your kitchen with the love of your life or your favorite friends!
Ingredients:
Here’s what you’ll need to craft your perfect vanilla milkshake:
-
Vanilla Ice Cream (2 cups)
- The star of the show! Look for good-quality vanilla ice cream with real vanilla beans for the best flavor. For a lighter option, use frozen yogurt or a dairy-free alternative like coconut or almond milk ice cream.
-
Milk (1 cup)
- Whole milk creates a creamier texture, but feel free to use 2%, skim, or even non-dairy milk options like almond, oat, or soy milk for a lighter shake.
-
Pure Vanilla Extract (1 teaspoon)
- This ingredient really amps up the vanilla flavor. If you’re feeling adventurous, try using vanilla bean paste or even steeping whole vanilla beans in your milk for an ultimate flavor experience.
-
Whipped Cream (for topping)
- A nostalgic classic! You can make your own whipped cream for a fresher taste or use store-bought for convenience. Consider adding a pinch of powdered sugar or vanilla extract for extra sweetness and flavor.
-
Maraschino Cherries (for garnish)
- A cherry on top brings back the ice cream parlor vibes! You can swap it out for fresh fruit like strawberries, blueberries, or even chocolate syrup for a fun twist.
-
Sprinkles (optional)
- Because who doesn’t love a bit of color? Feel free to get creative with your toppings—go wild with colors and shapes!
Step-by-Step Instructions:
Now let’s get down to the fun part—making that vanilla milkshake! Follow these steps for a milkshake that will leave you smiling:
-
Prep Your Blender:
- Grab your blender—this is where the magic will happen. Make sure it’s clean and ready to use. If you don’t have a high-powered blender, fear not, just stay patient; the shake might take a bit longer to blend.
-
Add the Ingredients:
- Start by adding the 2 cups of vanilla ice cream to your blender. If it’s slightly softened, it makes blending easier! Now pour in 1 cup of milk. You can start with less milk and add more if you prefer a thinner consistency.
-
Vanilla Extravaganza:
- Add 1 teaspoon of pure vanilla extract. Trust me; this is where the extra zing comes in. It’ll elevate your milkshake from good to absolutely heavenly!
-
Blend, Blend, Blend:
- Blend the ingredients on high until smooth and creamy. You’ll know it’s ready when you see it swirling like a fluffy cloud of happiness in the blender. If it feels too thick, add a splash more milk. If it’s too thin, throw in a scoop more of ice cream!
-
Taste Test:
- Here’s where you have all the power. Taste a small spoonful to see if it meets your vanilla-flavored dreams. If you’re feeling adventurous, you could add a touch more vanilla extract or even a pinch of sugar if your ice cream isn’t sweet enough.
-
Prepare to Serve:
- Pour your creamy creation into tall glasses. I recommend using glasses that make you feel fancy, even if you’re just hanging out in your pajamas. This makes every sip a bit more magical!
-
The Finishing Touch:
- Generously top your milkshake with luscious whipped cream. Don’t shy away; make it sky-high! This is also where you can sprinkle those rainbow sprinkles or add a maraschino cherry on top for that classic touch!
Serving Suggestions:
To serve your milkshakes, put them in chilled glasses to keep them frosty for longer. You can add fun straws to give it that playful vibe! For an extra flair, serve alongside homemade cookies, brownies, or a slice of pie. Nothing like a little indulgence on the side!
Recipe Variations:
Now that you’ve mastered the classic vanilla milkshake, here are some variations to play with:
-
Chocolate Vanilla Shake:
- Drizzle chocolate syrup in the blender and top with chocolate whipped cream for a sweet twist!
-
Strawberry Vanilla Shake:
- Toss in some fresh or frozen strawberries for a fruity and refreshing addition.
-
Coffee Lovers Milkshake:
- Swirl in a shot of espresso or cold brew for a caffeinated kick!
-
Cookie Dough Delight:
- Add chunks of cookie dough into the shake for that extra indulgent texture.
-
Nutty Banana Bark:
- Toss in a ripe banana and some peanut butter for a creamy, nutty flavor.
Chef’s Notes:
Over the years, I’ve had my fair share of milkshake experiments. I once tried adding crushed Oreos, which led to the sweetest accidental discovery—the Oreo milkshake! Using homemade whipped cream adds a freshness that really sets the shake apart and reminds me of those joyful kitchen moments with my family. Life’s too short not to experiment, so don’t hesitate! Play around with flavors and toppings until you find your absolute favorite.
FAQs and Troubleshooting:
-
Why is my milkshake too thick?
- If your shake turns out too thick, you can blend in a little more milk until you reach the desired consistency.
-
Can I make this dairy-free?
- Absolutely! Substitute the ice cream and milk for dairy-free versions, like coconut or almond milk options. They work wonderfully!
-
How can I make my milkshake less sweet?
- If your shake leans too sweet, try adding a bit more milk or a pinch of salt to balance the flavors.
-
Can I store leftover milkshake?
- Milkshakes are best enjoyed fresh due to their creamy texture, but if you have leftovers, you can store them in the freezer. Give them a good blend when you’re ready to enjoy again!
Nutritional Info (optional):
For those keeping an eye on their intake, a typical 12-ounce vanilla milkshake can contain around:
- Calories: 500-600
- Protein: 10g
- Fat: 25g
- Carbohydrates: 70g
Feel free to adjust the ingredients for a healthier version, such as using low-fat ice cream or milk alternatives!
There you have it: your complete guide to creating the ultimate vanilla milkshake! I hope this recipe brings you joy and takes you on a flavor journey back to those carefree days of youth. Happy blending, and cheers to delicious memories—one shake at a time!
Print
The Ultimate Vanilla Milkshake
- Total Time: 10 minutes
- Yield: 2 servings 1x
- Diet: Vegetarian
Description
A nostalgic and creamy vanilla milkshake that brings back childhood memories.
Ingredients
- 2 cups Vanilla Ice Cream
- 1 cup Milk
- 1 teaspoon Pure Vanilla Extract
- Whipped Cream (for topping)
- Maraschino Cherries (for garnish)
- Sprinkles (optional)
Instructions
- Prep your blender: Grab your blender—this is where the magic will happen. Make sure it’s clean and ready to use.
- Add the Ingredients: Start by adding the 2 cups of vanilla ice cream to your blender, followed by 1 cup of milk.
- Add the vanilla extract: Add 1 teaspoon of pure vanilla extract to elevate the flavor.
- Blend: Blend the ingredients on high until smooth and creamy.
- Taste Test: Taste a small spoonful to see if it meets your vanilla-flavored dreams.
- Prepare to Serve: Pour your creamy creation into tall glasses.
- The Finishing Touch: Generously top your milkshake with whipped cream and optional garnishes.
Notes
For variations, try adding chocolate syrup, strawberries, or cookie dough.
- Prep Time: 10 minutes
- Cook Time: 0 minutes
- Category: Beverage
- Method: Blending
- Cuisine: American
Nutrition
- Serving Size: 1 serving
- Calories: 500
- Sugar: 60g
- Sodium: 150mg
- Fat: 25g
- Saturated Fat: 15g
- Unsaturated Fat: 8g
- Trans Fat: 0g
- Carbohydrates: 70g
- Fiber: 0g
- Protein: 10g
- Cholesterol: 80mg
Keywords: vanilla milkshake, dessert, creamy drink, nostalgia, ice cream


