
Huckleberry Scones Recipe
The Ultimate Huckleberry Scones Recipe: Cozy Mornings in Your Kitchen
Welcome to my kitchen, fellow food lovers! Today, we’re diving into the delightful world of huckleberry scones. There’s something incredibly special about the smell of baked goods wafting through your home, especially when those goodies come together so effortlessly. As someone who believes in the power of homemade treats, these scones have a way of bringing a sprinkle of magic to your breakfast table or afternoon tea.
Picture this: you wake up on a lazy weekend morning, the sun peeking through your kitchen window. You can hear the birds chirping outside, and the aroma of freshly brewed coffee fills the air. What better way to complement that cup of joe than with warm, flaky huckleberry scones? Not only are they incredibly easy to whip up, but they also capture the essence of cozy gatherings, offering a bit of delicious nostalgia with every bite.
Huckleberries have an enchanting sweetness and tartness that dances on your palate. If you haven’t had the pleasure of tasting these little gems, now’s your chance! When my dear friend Mia first introduced me to these delightful berries during a hiking trip in the Pacific Northwest, I was smitten. We’d picked them right off the bush, laughing as we tried to fill our baskets, and then we headed back to her cozy cabin where I had the joy of baking my first batch of huckleberry scones. The combination of fresh berries, rich butter, and the fragrant scent of vanilla filled the air, and I decided right then that scones would hold a special place in my heart (and my kitchen). Today, I’ll share that very recipe with you!
In this blog post, you will learn not only how to make these scrumptious scones but also some little tips and tricks, variations to tickle your tastebuds, and stories that make the kitchen a second home. So, grab your apron, preheat that oven, and let’s get into the magic of huckleberry scones!
Personal Story: A Huckleberry Adventure
I can still recall the thrill of our huckleberry-picking adventure like it was yesterday. It was the height of summer, and Mia and I had no idea the treasure we were about to uncover. With our backpacks filled with water, snacks, and ample enthusiasm, we set out on a hiking trail known for its vibrant wildflowers and luscious huckleberry bushes. We laughed at our amateur navigating skills and our constant chatter about what we’d make with the huckleberries we so hoped to find.
After a few hours filled with stunning views and laughter, we found ourselves surrounded by bushes bursting with plump, juicy huckleberries. With every handful we picked, we couldn’t contain our joy! Once we returned to Mia’s cabin, we set about creating something memorable. That’s how a spontaneous session in the kitchen turned into an afternoon of baking and bonding. The first bite of those warm scones, fresh from the oven, was a blissful moment. It sparked something in me—the realization that simple ingredients can create cherished memories. I knew I had to share this recipe, and now, I’m thrilled to pass that joy on to you!
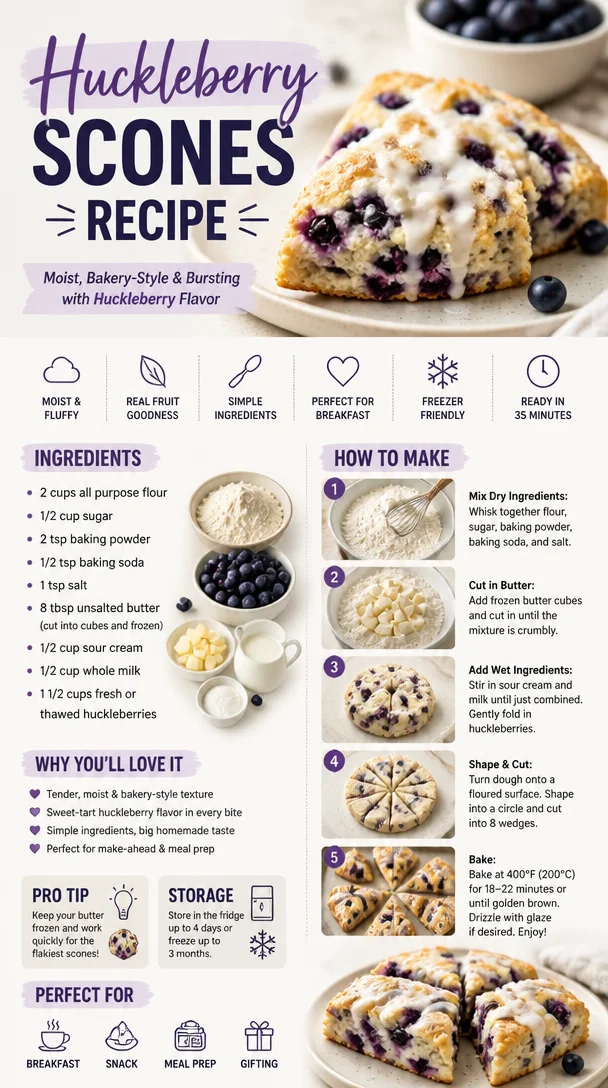
Ingredients
Let’s gather our ingredients for these delightful huckleberry scones! Here’s what you’ll need:
-
2 cups all-purpose flour
A must-have for structure; if gluten-free is your style, use a gluten-free all-purpose blend! It will work beautifully! -
1/4 cup granulated sugar
For a hint of sweetness; consider using coconut sugar for a deeper flavor or a sugar substitute if you’re watching your intake. -
1 tablespoon baking powder
This ingredient is key for that rise. Be sure it’s fresh for the best results! -
1/2 teaspoon salt
A pinch of salt enhances all the flavors. You can sub with sea salt for a gourmet touch! -
1/2 cup unsalted butter, cold and cubed
Butter brings that rich flavor and flaky texture. Cold is the secret for delicious scones! If you’re dairy-free, coconut oil or vegan butter can work as a substitute. -
1/2 cup heavy cream
Add richness; half-and-half can be a great substitute if you’re in a pinch! -
1 large egg
The binding agent; if you need a vegan option, a flax egg works wonders! Just mix 1 tablespoon of ground flaxseed with 2.5 tablespoons of water and let it sit for a few minutes. -
1 teaspoon vanilla extract
This adds a beautiful aroma and depth. Swap with almond extract if you want a twist! -
1 cup fresh or frozen huckleberries
The star ingredient! Fresh is best, but frozen works well too; just toss them in flour to avoid clumping.
Step-by-Step Instructions
Now to the fun part! Here’s how to whip up these huckleberry scones like a pro:
-
Preheat the oven to 425°F (220°C). This will ensure your scones bake quickly and evenly!
-
Mix dry ingredients. In a large bowl, whisk together the flour, sugar, baking powder, and salt until well combined. This step is crucial as it evenly distributes the leavening agents throughout the flour, which will help your scones rise beautifully.
-
Cut in the butter. Using a pastry cutter or your fingers, mix in the cold, cubed butter until the mixture resembles coarse crumbs. This process creates those coveted flaky layers, so don’t rush it!
-
Combine wet ingredients. In a separate bowl, whisk together the heavy cream, egg, and vanilla extract. Don’t skip the whisking—this adds air to the mixture!
-
Mix it all together. Pour the wet ingredients into the dry ingredients, and gently stir using a spatula or wooden spoon until just combined. DO NOT overmix! It’s okay if there are a few lumps; that’s what keeps our scones tender.
-
Fold in the huckleberries. Gently fold in your huckleberries, being careful not to crush them. The goal is to have those little gems spread evenly without turning the dough purple. Think of it as a dance; you want them to waltz into the mixture, not slam!
-
Shape the dough. Turn the dough onto a floured surface and knead it gently just a couple of times until it holds together. Pat it into a circle about 1 inch thick. Using a sharp knife, cut into 8 wedges (like a pizza!), or use a biscuit cutter for round shapes.
-
Prepare for baking. Place the scones on a lined baking sheet, about 2 inches apart. If you’d like, brush the tops with a bit of heavy cream for a golden crust, then sprinkle some sugar on top for that extra sweetness.
-
Bake. Pop those beauties in the oven for about 15-20 minutes, or until they’re golden brown and a toothpick comes out clean. The aroma will drive you wild!
-
Cool and enjoy! Let the scones cool on a wire rack for a few minutes before diving in. Serve them warm with a drizzle of honey or a slather of butter (or both if you’re feeling adventurous!).
Serving Suggestions
For a cozy breakfast or afternoon tea, plate your warm huckleberry scones on a lovely cake stand or a rustic wooden board. Pair them with a dollop of whipped cream, a side of fresh jam, or even a scoop of clotted cream—heavenly! I love to serve them alongside a hot cup of Earl Grey or freshly brewed coffee to elevate the experience.
Recipe Variations
Want to put a spin on this classic recipe? Try these delightful variations:
- Lemon Zest Addition: Add the zest of one lemon to the dry ingredients for a refreshing citrus kick.
- Chocolate Chip Delight: Fold in some dark chocolate chips with the huckleberries for a sweet twist.
- Berry Blend: Swap out huckleberries for blueberries or raspberries, or use a mix of all three!
- Spiced Version: Incorporate a teaspoon of cinnamon or ginger into the dry ingredients for a warm, spiced flavor!
- Oatmeal Upgrade: Substitute half a cup of flour for quick oats for added texture.
Chef’s Notes
I absolutely adore these scones, and they have a special place in my heart. I can’t help but laugh at my initial attempts—they were more like huckleberry hockey pucks! But with practice, I perfected the light and flaky texture. Over the years, I’ve also experimented with different flavors and substitutions, discovering the beauty of adaptability in baking. The kitchen should be fun, and it’s all about finding what works for you. So, don’t be afraid to play around with flavors, and keep that oven warm with delicious creations!
FAQs and Troubleshooting
Q: Why did my scones turn out too dry?
A: Overmixing the dough can lead to dry scones, as can using too much flour. Measure carefully and mix just until combined. Remember, lumps are okay!
Q: Can I use frozen huckleberries?
A: Absolutely! Just thaw them out and toss them in flour to prevent them from sinking in the dough.
Q: How can I store leftover scones?
A: These scones are best eaten fresh, but you can store them in an airtight container for up to 3 days. Reheat in the oven for a few minutes to bring that fresh-baked goodness back!
Q: Can I freeze the dough?
A: Yes! You can freeze shaped and unbaked scones. Just pop them in the oven directly from the freezer; add a few extra minutes to the baking time.
Warm, comforting, and utterly satisfying—these huckleberry scones are sure to become a cherished recipe in your home, just as they have in mine. So, gather your loved ones, put on a pot of tea, and enjoy the cozy memories created in your kitchen. Happy baking, and remember, the best ingredient is always joy!
Print
Huckleberry Scones
- Total Time: 30 minutes
- Yield: 8 servings 1x
- Diet: Vegetarian
Description
Delightful huckleberry scones that are flaky and perfect for breakfast or afternoon tea.
Ingredients
- 2 cups all-purpose flour
- 1/4 cup granulated sugar
- 1 tablespoon baking powder
- 1/2 teaspoon salt
- 1/2 cup unsalted butter, cold and cubed
- 1/2 cup heavy cream
- 1 large egg
- 1 teaspoon vanilla extract
- 1 cup fresh or frozen huckleberries
Instructions
- Preheat the oven to 425°F (220°C).
- Mix dry ingredients: whisk together the flour, sugar, baking powder, and salt until well combined.
- Cut in the butter until the mixture resembles coarse crumbs.
- Combine wet ingredients in a separate bowl and whisk together.
- Mix the wet ingredients into the dry until just combined.
- Fold in the huckleberries gently.
- Shape the dough and cut into 8 wedges or round shapes.
- Prepare for baking by placing the scones on a lined baking sheet; brush with heavy cream and sprinkle sugar on top.
- Bake for 15-20 minutes or until golden brown.
- Cool on a wire rack and enjoy warm!
Notes
Best served fresh with whipped cream or jam. Can freeze the dough for later use.
- Prep Time: 10 minutes
- Cook Time: 20 minutes
- Category: Bakery
- Method: Baking
- Cuisine: American
Nutrition
- Serving Size: 1 scone
- Calories: 250
- Sugar: 5g
- Sodium: 200mg
- Fat: 12g
- Saturated Fat: 7g
- Unsaturated Fat: 5g
- Trans Fat: 0g
- Carbohydrates: 30g
- Fiber: 1g
- Protein: 4g
- Cholesterol: 30mg
Keywords: scones, huckleberry, breakfast, baking, easy recipe

Strawberry Banana Smoothie
Strawberry Banana Smoothie: A Deliciously Nourishing Treat
Welcome to my kitchen, my fellow food lovers! Today, we’re diving into a vibrant and refreshing recipe that’s as delightful as a warm sunny day spent with friends—a strawberry banana smoothie! This drink is a staple in my household and has a special place in my heart. Not only is it a quick and easy way to get your daily dose of fruit, but it’s also a burst of nostalgia wrapped in a creamy, frosty glass. So grab your blender, and let’s blend some sunshine together!
A Taste of Nostalgia
I can still remember the first time my mom made a strawberry banana smoothie for me. It was a hot summer afternoon, and I came home from playing outside, parched and ready for something refreshing. I could smell the sweet strawberries before I even reached the kitchen. That fruity aroma wafting through the air made me feel right at home. I watched in wonder as my mom tossed fresh strawberries and ripe bananas into the blender, adding a splash of milk and a dollop of yogurt. The whirring of the blender and the bright pink hue that emerged was nothing short of magic. The first sip was like a mini-vacation for my taste buds, and ever since, I’ve been hooked. Now, as I share this recipe with you, it’s almost like passing down a delicious family tradition that we can all enjoy. So, let’s fire up those blenders!
Ingredients
Here’s what you’ll need for a creamy, dreamy strawberry banana smoothie:
-
2 cups fresh strawberries: The stars of our show! Choose ripe, red strawberries for maximum flavor. You can use frozen if they’re out of season—just remember to adjust the liquid!
-
1 ripe banana: Bananas add natural sweetness and creaminess. If you’re out of bananas, avocado is a great alternative for a similar texture.
-
1 cup plain yogurt: For a creamy base with a little tang. Greek yogurt ups the protein factor, but any yogurt will do, including dairy-free versions!
-
1/2 cup milk: Adjust the creaminess to your liking! Use almond milk, oat milk, or coconut milk for a dairy-free option.
-
1 tablespoon honey or maple syrup (optional): Sweeten to taste! Omit this if your strawberries are sweet enough, or use agave syrup for a vegan twist.
-
Ice cubes: To achieve that frosty consistency! Just a handful will do unless you prefer your smoothie extra icy.
Step-by-Step Instructions
-
Prep your ingredients: Start by washing your strawberries thoroughly. Remove the green tops and slice them in half. As for the banana, peel it and cut it into chunks. Trust me, this makes blending so much easier!
-
Combine ingredients in your blender: Place the halved strawberries, banana chunks, yogurt, and milk into your blender. If you’re adding honey or maple syrup, toss that in now, too!
-
Blend it up: Close your blender with the lid tightly (we don’t want any smoothie explosions, do we?). Start blending on low speed and gradually increase to high. Blend for about 30-60 seconds until smooth and creamy. If your smoothie is too thick, just add a splash more milk!
-
Check the consistency: Stop the blender and take a peek. If you want a thicker smoothie, add some ice and blend again. For a thinner texture, add more milk until it reaches your desired consistency.
-
Taste and adjust: Give it a little taste. If you’d like it sweeter, throw in a bit more honey or syrup and blend briefly to mix.
-
Serve it up: Pour the smoothie into tall glasses, and don’t forget to give it a little swirl for that fancy look! You can also garnish it with a few whole strawberries or banana slices on top for some extra pizazz.
Serving Suggestions
Serve your strawberry banana smoothie in a chilled glass with a colorful straw for that extra flair! It’s perfect for breakfast or as a refreshing snack after a workout. Consider pairing it with a slice of toast topped with peanut butter or some granola on the side for a wholesome meal.
Recipe Variations
Feeling adventurous? Here are a few fun twists to shake up your strawberry banana smoothie:
-
Berry Blast: Add a handful of blueberries or raspberries for an extra antioxidant boost.
-
Green Machine: Toss in a handful of spinach or kale for a vibrant green smoothie—don’t worry, you won’t taste it!
-
Tropical Paradise: Swap half the strawberries for pineapple or mango for a tropical flavor explosion.
-
Peanut Butter Banana: Add a tablespoon of peanut butter for a nutty twist that pairs beautifully with banana.
-
Cocoa Delight: Stir in a tablespoon of cocoa powder for a chocolatey version—perfect for chocolate lovers!
Chef’s Notes
This smoothie recipe has become one of my go-to snacks, evolving over the years as I’ve incorporated seasonal fruits and made it more adventurous. I often reminisce about those summer afternoons spent in my mom’s kitchen. It’s amazing how a simple smoothie can bring back such wonderful memories and create new ones with my friends and family. I love to experiment with whatever fruits I have on hand, and the blender has become my best friend!
FAQs and Troubleshooting
Q: Can I use frozen fruit?
A: Absolutely! Frozen strawberries and bananas work well. Just remember to adjust the milk for your desired consistency!
Q: My smoothie turned out too watery. What did I do wrong?
A: If you used a lot of ice or thin milk, that could be the reason. Next time, try less liquid or more fruit to thicken it up.
Q: Can I make this smoothie ahead of time?
A: While it’s best fresh, you can prep and store the ingredients in the fridge the night before. A quick blend in the morning will bring it back to life!
Q: What else can I add for extra nutrition?
A: Consider adding flaxseeds, chia seeds, or protein powder for an additional health punch!
Nutritional Info
This recipe provides a great balance of carbohydrates, protein, and healthy fats, making it ideal as a meal replacement or snack. Each serving is packed with vitamins, minerals, and antioxidants from the fresh fruit and yogurt, giving you a deliciously nutritious start to your day.
So there you have it, my friends! A simple yet scrumptious strawberry banana smoothie recipe that is bound to be a hit in your kitchen. May it fill your home with delightful aromas and happy memories, just like it has in mine. Happy blending!
Print
Strawberry Banana Smoothie
- Total Time: 10 minutes
- Yield: 2 servings 1x
- Diet: Vegetarian
Description
A refreshing strawberry banana smoothie that’s quick and easy to prepare, perfect for a nutritious treat.
Ingredients
- 2 cups fresh strawberries
- 1 ripe banana
- 1 cup plain yogurt
- 1/2 cup milk
- 1 tablespoon honey or maple syrup (optional)
- Ice cubes
Instructions
- Prep your ingredients: Start by washing your strawberries thoroughly, removing the green tops, and slicing them in half. Peel and cut the banana into chunks.
- Combine ingredients in your blender: Place strawberries, banana, yogurt, and milk into your blender. Add honey or syrup if desired.
- Blend it up: Tightly close the lid and blend starting on low, gradually increasing to high for about 30-60 seconds until smooth and creamy.
- Check the consistency: Stop the blender and adjust thickness by adding ice or more milk as desired.
- Taste and adjust: Taste your smoothie and add more honey or syrup if you want it sweeter, then blend briefly.
- Serve it up: Pour into tall glasses, garnish with strawberries or banana slices, and enjoy!
Notes
This smoothie can be made with frozen fruits—just adjust milk for desired consistency.
- Prep Time: 10 minutes
- Cook Time: 0 minutes
- Category: Beverage
- Method: Blending
- Cuisine: American
Nutrition
- Serving Size: 1 serving
- Calories: 250
- Sugar: 17g
- Sodium: 70mg
- Fat: 5g
- Saturated Fat: 2g
- Unsaturated Fat: 3g
- Trans Fat: 0g
- Carbohydrates: 45g
- Fiber: 3g
- Protein: 10g
- Cholesterol: 10mg
Keywords: smoothie, strawberry banana, healthy drink, refreshing, quick breakfast


