

Strawberry Banana Smoothie
Strawberry Banana Smoothie: A Deliciously Nourishing Treat
Welcome to my kitchen, my fellow food lovers! Today, we’re diving into a vibrant and refreshing recipe that’s as delightful as a warm sunny day spent with friends—a strawberry banana smoothie! This drink is a staple in my household and has a special place in my heart. Not only is it a quick and easy way to get your daily dose of fruit, but it’s also a burst of nostalgia wrapped in a creamy, frosty glass. So grab your blender, and let’s blend some sunshine together!
A Taste of Nostalgia
I can still remember the first time my mom made a strawberry banana smoothie for me. It was a hot summer afternoon, and I came home from playing outside, parched and ready for something refreshing. I could smell the sweet strawberries before I even reached the kitchen. That fruity aroma wafting through the air made me feel right at home. I watched in wonder as my mom tossed fresh strawberries and ripe bananas into the blender, adding a splash of milk and a dollop of yogurt. The whirring of the blender and the bright pink hue that emerged was nothing short of magic. The first sip was like a mini-vacation for my taste buds, and ever since, I’ve been hooked. Now, as I share this recipe with you, it’s almost like passing down a delicious family tradition that we can all enjoy. So, let’s fire up those blenders!
Ingredients
Here’s what you’ll need for a creamy, dreamy strawberry banana smoothie:
-
2 cups fresh strawberries: The stars of our show! Choose ripe, red strawberries for maximum flavor. You can use frozen if they’re out of season—just remember to adjust the liquid!
-
1 ripe banana: Bananas add natural sweetness and creaminess. If you’re out of bananas, avocado is a great alternative for a similar texture.
-
1 cup plain yogurt: For a creamy base with a little tang. Greek yogurt ups the protein factor, but any yogurt will do, including dairy-free versions!
-
1/2 cup milk: Adjust the creaminess to your liking! Use almond milk, oat milk, or coconut milk for a dairy-free option.
-
1 tablespoon honey or maple syrup (optional): Sweeten to taste! Omit this if your strawberries are sweet enough, or use agave syrup for a vegan twist.
-
Ice cubes: To achieve that frosty consistency! Just a handful will do unless you prefer your smoothie extra icy.
Step-by-Step Instructions
-
Prep your ingredients: Start by washing your strawberries thoroughly. Remove the green tops and slice them in half. As for the banana, peel it and cut it into chunks. Trust me, this makes blending so much easier!
-
Combine ingredients in your blender: Place the halved strawberries, banana chunks, yogurt, and milk into your blender. If you’re adding honey or maple syrup, toss that in now, too!
-
Blend it up: Close your blender with the lid tightly (we don’t want any smoothie explosions, do we?). Start blending on low speed and gradually increase to high. Blend for about 30-60 seconds until smooth and creamy. If your smoothie is too thick, just add a splash more milk!
-
Check the consistency: Stop the blender and take a peek. If you want a thicker smoothie, add some ice and blend again. For a thinner texture, add more milk until it reaches your desired consistency.
-
Taste and adjust: Give it a little taste. If you’d like it sweeter, throw in a bit more honey or syrup and blend briefly to mix.
-
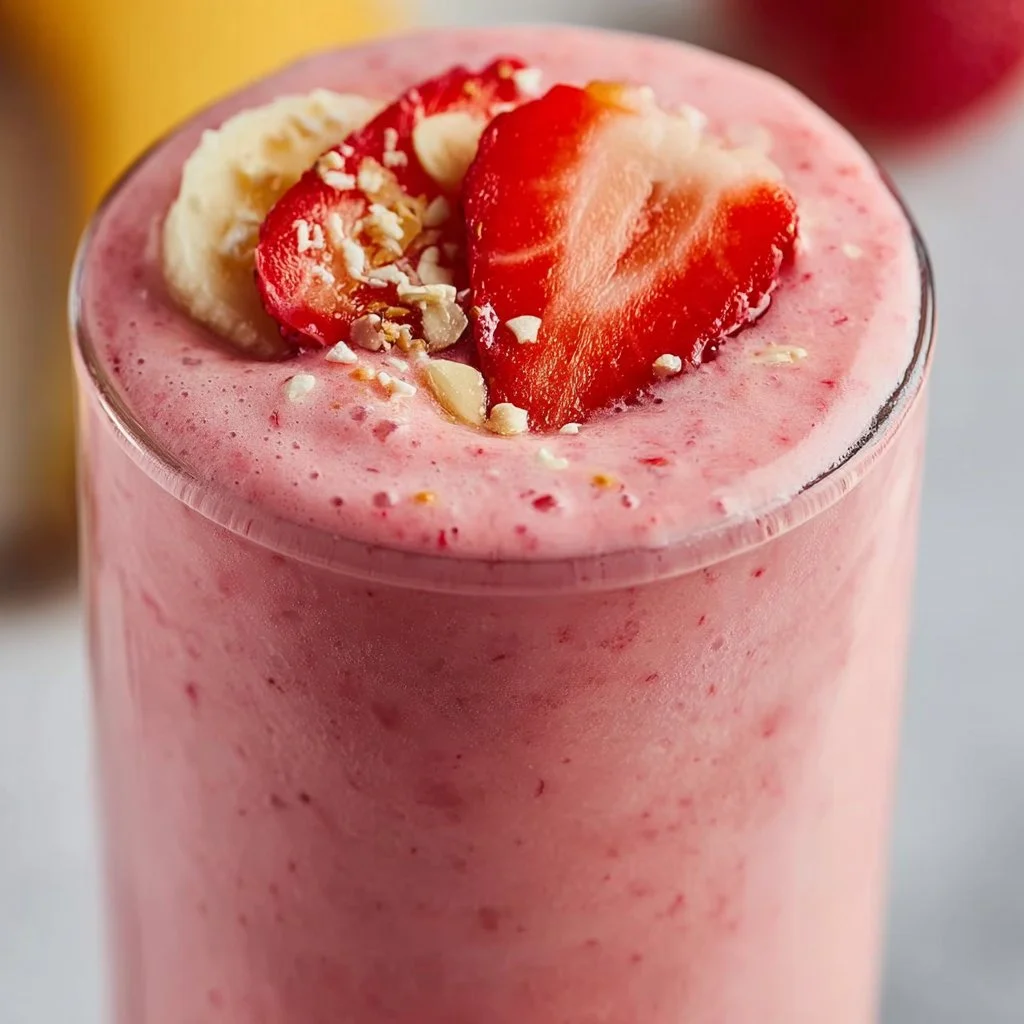
Serve it up: Pour the smoothie into tall glasses, and don’t forget to give it a little swirl for that fancy look! You can also garnish it with a few whole strawberries or banana slices on top for some extra pizazz.
Serving Suggestions
Serve your strawberry banana smoothie in a chilled glass with a colorful straw for that extra flair! It’s perfect for breakfast or as a refreshing snack after a workout. Consider pairing it with a slice of toast topped with peanut butter or some granola on the side for a wholesome meal.
Recipe Variations
Feeling adventurous? Here are a few fun twists to shake up your strawberry banana smoothie:
-
Berry Blast: Add a handful of blueberries or raspberries for an extra antioxidant boost.
-
Green Machine: Toss in a handful of spinach or kale for a vibrant green smoothie—don’t worry, you won’t taste it!
-
Tropical Paradise: Swap half the strawberries for pineapple or mango for a tropical flavor explosion.
-
Peanut Butter Banana: Add a tablespoon of peanut butter for a nutty twist that pairs beautifully with banana.
-
Cocoa Delight: Stir in a tablespoon of cocoa powder for a chocolatey version—perfect for chocolate lovers!
Chef’s Notes
This smoothie recipe has become one of my go-to snacks, evolving over the years as I’ve incorporated seasonal fruits and made it more adventurous. I often reminisce about those summer afternoons spent in my mom’s kitchen. It’s amazing how a simple smoothie can bring back such wonderful memories and create new ones with my friends and family. I love to experiment with whatever fruits I have on hand, and the blender has become my best friend!
FAQs and Troubleshooting
Q: Can I use frozen fruit?
A: Absolutely! Frozen strawberries and bananas work well. Just remember to adjust the milk for your desired consistency!
Q: My smoothie turned out too watery. What did I do wrong?
A: If you used a lot of ice or thin milk, that could be the reason. Next time, try less liquid or more fruit to thicken it up.
Q: Can I make this smoothie ahead of time?
A: While it’s best fresh, you can prep and store the ingredients in the fridge the night before. A quick blend in the morning will bring it back to life!
Q: What else can I add for extra nutrition?
A: Consider adding flaxseeds, chia seeds, or protein powder for an additional health punch!
Nutritional Info
This recipe provides a great balance of carbohydrates, protein, and healthy fats, making it ideal as a meal replacement or snack. Each serving is packed with vitamins, minerals, and antioxidants from the fresh fruit and yogurt, giving you a deliciously nutritious start to your day.
So there you have it, my friends! A simple yet scrumptious strawberry banana smoothie recipe that is bound to be a hit in your kitchen. May it fill your home with delightful aromas and happy memories, just like it has in mine. Happy blending!
Print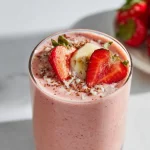
Strawberry Banana Smoothie
- Total Time: 10 minutes
- Yield: 2 servings 1x
- Diet: Vegetarian
Description
A refreshing strawberry banana smoothie that’s quick and easy to prepare, perfect for a nutritious treat.
Ingredients
- 2 cups fresh strawberries
- 1 ripe banana
- 1 cup plain yogurt
- 1/2 cup milk
- 1 tablespoon honey or maple syrup (optional)
- Ice cubes
Instructions
- Prep your ingredients: Start by washing your strawberries thoroughly, removing the green tops, and slicing them in half. Peel and cut the banana into chunks.
- Combine ingredients in your blender: Place strawberries, banana, yogurt, and milk into your blender. Add honey or syrup if desired.
- Blend it up: Tightly close the lid and blend starting on low, gradually increasing to high for about 30-60 seconds until smooth and creamy.
- Check the consistency: Stop the blender and adjust thickness by adding ice or more milk as desired.
- Taste and adjust: Taste your smoothie and add more honey or syrup if you want it sweeter, then blend briefly.
- Serve it up: Pour into tall glasses, garnish with strawberries or banana slices, and enjoy!
Notes
This smoothie can be made with frozen fruits—just adjust milk for desired consistency.
- Prep Time: 10 minutes
- Cook Time: 0 minutes
- Category: Beverage
- Method: Blending
- Cuisine: American
Nutrition
- Serving Size: 1 serving
- Calories: 250
- Sugar: 17g
- Sodium: 70mg
- Fat: 5g
- Saturated Fat: 2g
- Unsaturated Fat: 3g
- Trans Fat: 0g
- Carbohydrates: 45g
- Fiber: 3g
- Protein: 10g
- Cholesterol: 10mg
Keywords: smoothie, strawberry banana, healthy drink, refreshing, quick breakfast

Raspberry Vanilla Breakfast Smoothie – Healthy Start!
Raspberry Vanilla Breakfast Smoothie – Healthy Start!
Welcome to my kitchen, food lovers! Today, we’re diving into a refreshing and scrumptious Raspberry Vanilla Breakfast Smoothie that’s not only delicious but also packed with nutrients to kickstart your day. If you’re like me and the thought of a creamy, fruity smoothie brightens your morning, you’re in for a treat. Imagine waking up to the sweet aroma of fresh raspberries mixed with the warm notes of vanilla — it’s like a hug in a glass!
Smoothies are a magical thing. They’re versatile, quick, and the perfect canvas for showing off your creative side! Whether you’re racing out the door or tinkering in the kitchen on a slow Sunday, this smoothie will elevate your breakfast game. I love how each sip feels like a little celebration of flavors, and it hardly takes any time to make. The best part? You can customize it to fit your dietary preferences or craving of the day!
I’m excited to share this recipe with you because it holds a special place in my heart. Smoothies were a big part of my childhood mornings. My mom would whip up the freshest fruit smoothies before school — always filled with love and, usually, whatever fruit we had on hand. I remember watching her blend ingredients together, mesmerized by the whirl of color and the delightful smell that filled the kitchen.
Now, as a home cook, I relish recreating those cherished moments and flavors with my own twist. The Raspberry Vanilla Breakfast Smoothie reminds me of my childhood, and each sip takes me back to those carefree mornings. So grab your blender, and let’s whip up something delightful together!
Ingredients
Here’s what you’ll need for your Raspberry Vanilla Breakfast Smoothie:
-
1 cup fresh raspberries: These little gems are bursting with flavor and antioxidants! If you can’t find fresh ones, frozen will work just fine.
-
1 banana, sliced: A great natural sweetener that adds creaminess to your smoothie. If you’re avoiding bananas, try a ripe avocado for a creamy texture without the sweetness.
-
1 cup spinach (optional): This adds a beautiful green hue and boosts the nutritional value without altering the taste much. Kale works too, but spinach is milder in flavor.
-
1 cup unsweetened almond milk (or milk of choice): Almond milk is a nutty delight, but feel free to swap it out with oat milk, coconut milk, or regular dairy milk for a creamier texture.
-
1-2 tablespoons vanilla yogurt: For creaminess and a hint of tang. You can use any flavored yogurt, like coconut or strawberry, if you want to mix things up!
-
1 teaspoon vanilla extract: This is the magic touch! Vanilla extract lifts the entire flavor profile.
-
A drizzle of honey or maple syrup (optional): Only if you want it a touch sweeter! Adjust based on your personal taste.
-
Ice (optional): For a frosty, refreshing smoothie — use a handful of ice cubes if you like it extra cold and thick.
Step-by-Step Instructions
Now that we have our ingredients ready let’s get to the fun part — blending! Follow these simple steps, and you’ll have a delicious smoothie in no time.
-
Prep Your Ingredients: Start by rinsing the raspberries and any other fresh ingredients. Make sure your banana is ripe — the sweeter, the better! If you’re using spinach, give it a good rinse as well. Clean ingredients result in a better-tasting smoothie!
-
Blend It Up: In a blender, add the raspberries, banana, spinach, and almond milk. Start with the liquids first; this helps create a smoother blend. My little trick? Always layer softer and juicy ingredients at the bottom!
-
Add the Creamy Elements: Next, throw in the vanilla yogurt and a splash of vanilla extract. Blend on high speed until everything is well combined and smooth. It should take about 30-60 seconds.
-
Adjust the Consistency: If your smoothie is too thick, add a splash more almond milk to reach your desired consistency. If it’s too thin, toss in a few ice cubes to thicken it up or add a bit more yogurt.
-
Taste Test!: At this stage, it’s crucial to taste your masterpiece. If you want more sweetness, drizzle in some honey or maple syrup and blend again for a couple of seconds.
-
Serve and Enjoy: Pour the smoothie into your favorite glass. If you have time, garnish with a sprinkle of chopped nuts or seeds on top for a little crunch.
Don’t forget to clean your blender while these delightful colors brighten your kitchen. Just fill it with warm water and a drop of dish soap, blend, and rinse – easy peasy!
Serving Suggestions
Serve your Raspberry Vanilla Breakfast Smoothie with a sprig of fresh mint for a lovely touch, or pop a few extra raspberries on top for presentation. If you’re in the mood for a power breakfast, pair it with a slice of whole-grain toast or some peanut butter and banana rice cakes for an extra protein boost.
Recipe Variations
Here are a few creative twists to make this smoothie even more fun:
-
Berry Blast: Swap out raspberries for strawberries or blueberries for a whole different flavor profile.
-
Protein Boost: Add a scoop of your favorite protein powder for a post-workout fuel-up.
-
Nutty Treat: Blend in a tablespoon of peanut butter or almond butter for a nutty sensation!
-
Chia Surprise: Add a tablespoon of chia seeds for an extra boost of fiber and omega-3 fatty acids.
-
Tropical Vibes: Toss in some pineapple or mango to make it a tropical delight!
Chef’s Notes
This recipe has evolved over time — from a quick morning fuel for my busy schedule to a delightful treat I look forward to making, especially on busy weekdays! I’ll admit, I’ve sometimes added a pinch of cinnamon for a warm undertone; it creates a cozy feeling, especially when autumn rolls around.
Oh, and here’s a funny kitchen story — the first time I made a smoothie without measuring, I accidentally added a whole bag of spinach! Let’s just say it was more like a swamp in a glass than the vibrant drink I had hoped for. Now, I stick to careful measuring and consider every ingredient, which leads to far tastier results!
FAQs and Troubleshooting
Q1: My smoothie is too thick. What should I do?
A: Simply add more almond milk or a splash of water to thin it out. Blend until smooth!
Q2: How can I make it vegan?
A: This recipe is already vegan! Make sure that your yogurt is plant-based and you’re good to go.
Q3: Can I use frozen fruit?
A: Absolutely! Frozen raspberries work wonderfully and can even make your smoothie colder and creamier. Just be mindful of the quantity, as frozen fruit tends to be denser.
Q4: My smoothie turned out too sweet! How can I fix that?
A: Try adding more spinach or a squeeze of lemon juice to add a tang and balance out the sweetness.
Nutritional Info (Optional)
Each serving of this Raspberry Vanilla Breakfast Smoothie contains approximately:
- Calories: 250
- Protein: 6g
- Fat: 5g
- Carbohydrates: 45g
- Fiber: 7g
Feel free to tweak the ingredients for your nutritional needs!
Now you’re ready to create a Raspberry Vanilla Breakfast Smoothie that will dazzle the taste buds of everyone around you! Whether you enjoy it solo or share it with loved ones, remember, the heart of every meal is about connection and love. Happy blending, my kitchen friends!
Print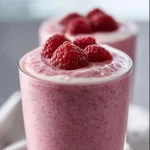
Raspberry Vanilla Breakfast Smoothie
- Total Time: 10 minutes
- Yield: 2 servings 1x
- Diet: Vegan
Description
A refreshing and nutritious Raspberry Vanilla Breakfast Smoothie to kickstart your day.
Ingredients
- 1 cup fresh raspberries
- 1 banana, sliced
- 1 cup spinach (optional)
- 1 cup unsweetened almond milk
- 1–2 tablespoons vanilla yogurt
- 1 teaspoon vanilla extract
- A drizzle of honey or maple syrup (optional)
- Ice (optional)
Instructions
- Prep your ingredients: Rinse the raspberries and any other fresh ingredients, ensuring the banana is ripe and sweet.
- Blend it up: In a blender, add the raspberries, banana, spinach, and almond milk, starting with the liquids for a smoother blend.
- Add the creamy elements: Include the vanilla yogurt and vanilla extract, and blend on high speed until smooth.
- Adjust the consistency: If too thick, add more almond milk; if too thin, add ice cubes or more yogurt.
- Taste test: Sweeten with honey or maple syrup if desired and blend again briefly.
- Serve and enjoy: Pour into a glass and garnish with nuts or seeds if you like.
Notes
Serve with a sprig of fresh mint or some whole-grain toast for a complete breakfast. Be sure to clean your blender afterward for convenience.
- Prep Time: 10 minutes
- Cook Time: 0 minutes
- Category: Breakfast
- Method: Blending
- Cuisine: American
Nutrition
- Serving Size: 1 serving
- Calories: 250
- Sugar: 18g
- Sodium: 120mg
- Fat: 5g
- Saturated Fat: 1g
- Unsaturated Fat: 4g
- Trans Fat: 0g
- Carbohydrates: 45g
- Fiber: 7g
- Protein: 6g
- Cholesterol: 0mg
Keywords: smoothie, breakfast, raspberry, healthy, vegan
Wake Up Smoothie
Wake Up Smoothie: Your Morning Gamechanger
Welcome to my kitchen! I’m Olivia Bennett, your go-to gal for all things cozy and homemade. Today, I’m excited to share with you one of my absolute favorite recipes that has transformed my mornings: the Wake Up Smoothie. If you’re someone who craves a delicious way to kickstart your day, you’re in for a treat!
Ah, mornings! They can be such a whirlwind, can’t they? Between school runs, work meetings, or simply trying to beat the morning rush, it’s easy to skip breakfast. But let’s face it: those hectic mornings don’t have to mean sacrificing a nourishing start to your day. That’s where the Wake Up Smoothie comes in!
This smoothie is more than just a drink; it’s a burst of energy, a delicious hug in a glass, and a perfect fuel for whatever your day holds. Think vibrant fruits, creamy yogurt, a touch of honey, and a sprinkle of secret ingredients that will have you feeling alive and ready to take on the universe!
What I love most about this smoothie is its versatility. Not only is it packed with goodness, but you can easily customize it to your liking. Whether you’re a berry enthusiast or a green smoothie aficionado, I’ll guide you through everything you need to know to create your own Wake Up Smoothie masterpiece.
So grab your blender, and let’s get ready to blend up some magic!
A Trip Down Memory Lane
Growing up, breakfast was kind of a big deal in my family. My parents believed it was the most important meal of the day, and they set the bar high! I vividly remember Saturday mornings when my mom would whip up fluffy pancakes while my dad brewed fresh coffee. The smell of syrup and warm cinnamon would waft through the house, inviting everyone to the kitchen. But as much as I loved those pancakes, there were days when I wanted something lighter and more refreshing.
One sunny Saturday, while rummaging through the fridge, I came up with my first smoothie—random, right? It was a jumble of leftover fruits, a splash of juice, and a generous dollop of yogurt. I tossed everything into the blender, pushed the button, and voilà! Out came a bright pink concoction that not only tasted divine but was a feast for the eyes as well. My family laughed and challenged me to make a better version the following week.
Fast forward to today, and I’ve perfected my Wake Up Smoothie. Every time I make it, I’m transported back to that carefree moment and reminded that cooking—like life—is all about experimenting, having fun, and sharing love with those around us. Ready to seize the day and create your own memories? Let’s dive into the recipe!
Ingredients: What You’ll Need
Here’s a list of the ingredients you’ll need for the perfect Wake Up Smoothie. Each one has been meticulously chosen to add flavor and nutritional value, so let’s break them down:
-
1 banana: A fantastic source of potassium and natural sweetness. If you’re out of bananas, feel free to swap it out for ½ cup of applesauce or a ripe mango.
-
1 cup frozen mixed berries: Blueberries, raspberries, strawberries—take your pick! These are packed with antioxidants. No frozen berries? Fresh ones work beautifully, just add a handful of ice for chill.
-
½ cup Greek yogurt: This creamy goodness adds protein and probiotics, making your smoothie both delicious and gut-friendly. If you prefer dairy-free, try coconut yogurt!
-
1 tablespoon honey or maple syrup: A natural sweetener that elevates every sip. Use agave syrup or skip it altogether if your fruit is sweet enough.
-
1 cup almond milk (or any milk of your choice): This acts as the base for your smoothie. For a creamier texture, oat milk or full-fat coconut milk are great substitutions.
-
1 tablespoon chia seeds or flaxseeds: These tiny powerhouses add fiber and omega-3 fatty acids. Feel free to skip them if seeds aren’t your thing.
-
Optional: A handful of spinach: Sneak some greens into your smoothie without compromising taste! If you’re not a fan of greens, rest assured, you won’t taste it.
Finding balance in flavors and staying true to what makes your taste buds dance is what it’s all about! Each ingredient plays a critical role, so don’t be shy to mix things up based on what’s in your kitchen.
Step-by-Step Instructions: How to Blend It Up
Now that we’ve gathered our ingredients, let’s get down to the nitty-gritty of smoothie-making. Follow along with these easy steps, and you’ll have your Wake Up Smoothie ready in no time!
-
Prep Your Blender: Start by placing your blender on a flat, stable surface. Trust me; a wobbly blender isn’t going to give you the best outcome!
-
Add the Banana: Peel the banana and break it into chunks. Toss those into the blender first. Bananas act as a fantastic base for smoothies, giving them a creamy texture. Bonus tip: freezing your bananas beforehand adds even more creaminess!
-
Toss in the Berries: Next, add your frozen mixed berries. If you’re using fresh berries, add a handful of ice to keep that refreshing chill.
-
Spoon in the Yogurt: Add your Greek yogurt on top. This ingredient thickens the smoothie and packs in protein. If you’re using coconut yogurt, I suggest using the unsweetened variety to keep it balanced.
-
Pour the Milk: Now, add your milk of choice. To control the thickness of your smoothie, start with less and add more to achieve your desired consistency.
-
Drizzle in Sweetener: Give your smoothie a touch of sweetness by drizzling in honey or maple syrup. Adjust according to your sweetness preference.
-
Add the Seeds: If you’re using chia seeds or flaxseeds, this is the time to add them! They absorb liquid and help create that perfect creamy texture.
-
Sneak in the Greens: If you’re feeling adventurous and adding spinach, toss it in last. Don’t worry; it’ll be virtually undetectable!
-
Blend Away: Secure the blender lid tightly and blend on high speed for about 30-60 seconds. Start with a low speed to break down the ingredients, then increase to high. Blend until the mixture is smooth and creamy. If you notice any stubborn chunks, stop and scrape down the sides, then blend again.
-
Taste and Adjust: Before pouring, give your smoothie a taste. If it needs a sweeter kick, add a little more honey, or if it’s too thick, splash in a bit more milk.
-
Serve it Up: Pour your Wake Up Smoothie into your favorite glass. You’ll see that vibrant color is just ready to brighten your day!
With each of these steps, feel free to add your unique touch. You know your palate best, so don’t ever hesitate to tweak it to your liking!
Serving Suggestions: Presentation is Key
Now that your Wake Up Smoothie is beautifully blended, it’s time for the final flourish! I recommend serving it in a tall glass to show off its vibrant colors. For an extra touch, you can garnish with a few whole berries on top or sprinkle a few chia seeds for a delightful crunch. Additionally, if you want to elevate it further, you can serve it with a slice of your favorite toast or paired with a homemade granola bar on the side.
Is there anything more delightful than a colorful smoothie in the morning? It’s a feast for the eyes and the perfect way to make your breakfast feel special!
Recipe Variations: Get Creative
The Wake Up Smoothie is incredibly versatile, so don’t hesitate to experiment! Here are a few yummy variations to inspire your creativity:
-
Tropical Twist: Swap the mixed berries for a combination of pineapple and mango. Add a splash of coconut water to cement that tropical vibe!
-
Nutty Delight: Toss in a tablespoon of almond or peanut butter for a protein boost and a nutty flavor that pairs beautifully with bananas.
-
Green Machine: Load it up with a cup of kale instead of spinach for an even greener option. It adds nutrients without overpowering the flavor!
-
Chocolate Indulgence: Add a tablespoon of cocoa powder for a chocolatey twist. If you’re feeling decadent, throw in a few chocolate chips or nibs for good measure.
-
Oatmeal Smoothie: Blend in ¼ cup of rolled oats for a more filling smoothie. This will add a lovely texture and keep you satisfied for longer.
Remember, the kitchen is your playground, so feel free to swap out ingredients based on what you like and have on hand!
Chef’s Notes: It’s About the Journey
Making smoothies has been an evolving journey for me. I started with whatever was in my fridge, and over time, I began to experiment more consciously with flavors and nutrients. Having fun in the kitchen is the core joy of cooking. I love trying out different seasonal fruits or a new nut butter just to see what happens.
Oh, and here’s a funny little story: I once tried to cereal-ize my smoothie by adding breakfast cereal right into the blender. Spoiler alert: it was a crunchy disaster! But those moments teach us the most and remind us to embrace the mishaps. Every cooking adventure has a story, and that’s what makes it so special!
FAQs and Troubleshooting
To ensure you have the most successful smoothie experience, I’ve put together some commonly asked questions and troubleshooting tips:
-
Q: My smoothie turned out too thick! What can I do?
A: Don’t worry! Just add a little more milk, splash by splash, until you achieve your desired consistency. -
Q: How can I make my smoothie less sweet?
A: If you find it too sweet, you can add more yogurt or a squeeze of fresh lemon juice to balance it out. -
Q: How long can I store leftovers?
A: While smoothies are best enjoyed fresh, you can store leftovers in the fridge for up to 24 hours. Just be aware that some separation may occur; give it a good shake or stir before drinking. -
Q: Can I prep this smoothie in advance?
A: Absolutely! You can prep the ingredients the night before and stash them in the fridge or freezer. Just dump everything in the blender and blend in the morning!
Your Wake Up Smoothie is all about making mornings easier and tastier. Don’t shy away from adjusting this recipe, engaging in the process, and finding your own twist. Cooking should be fun, after all!
Nutritional Info (per serving, approx.)
- Calories: 250
- Protein: 10g
- Carbohydrates: 45g
- Fiber: 8g
- Sugars: 15g
- Fat: 5g
So there you have it, my friends! With this Wake Up Smoothie in your toolkit, you can start each day with a smile and some delicious fuel. Happy blending, and as always, I can’t wait to see how you make this recipe your own!
Don’t forget to share your smoothie creations with me! Happy cooking!
Print
Wake Up Smoothie
- Total Time: 10 minutes
- Yield: 1 serving 1x
- Diet: Vegetarian
Description
A delicious and energizing smoothie packed with fruits, yogurt, and a touch of honey, perfect for starting your day.
Ingredients
- 1 banana
- 1 cup frozen mixed berries
- ½ cup Greek yogurt
- 1 tablespoon honey or maple syrup
- 1 cup almond milk (or any milk of your choice)
- 1 tablespoon chia seeds or flaxseeds
- Optional: A handful of spinach
Instructions
- Prep your blender: Start by placing your blender on a flat, stable surface.
- Add the banana: Peel the banana and break it into chunks. Toss those into the blender first.
- Toss in the berries: Next, add your frozen mixed berries.
- Spoon in the yogurt: Add your Greek yogurt on top.
- Pour the milk: Now, add your milk of choice.
- Drizzle in sweetener: Add honey or maple syrup.
- Add the seeds: If using chia or flaxseeds, add them now.
- Sneak in the greens: If adding spinach, toss it in last.
- Blend away: Secure the blender lid and blend on high speed for about 30-60 seconds.
- Taste and adjust: Give your smoothie a taste and adjust sweetness or thickness as needed.
- Serve it up: Pour into a glass and enjoy!
Notes
Feel free to customize with your favorite fruits or add-ins!
- Prep Time: 10 minutes
- Cook Time: 0 minutes
- Category: Breakfast
- Method: Blending
- Cuisine: American
Nutrition
- Serving Size: 1 serving
- Calories: 250
- Sugar: 15g
- Sodium: 100mg
- Fat: 5g
- Saturated Fat: 1g
- Unsaturated Fat: 4g
- Trans Fat: 0g
- Carbohydrates: 45g
- Fiber: 8g
- Protein: 10g
- Cholesterol: 5mg
Keywords: smoothie, healthy breakfast, quick breakfast, vegetarian smoothie, fruit smoothie
Strawberry Banana Smoothie 🍓
The Ultimate Strawberry Banana Smoothie Recipe 🍓
Welcome to my kitchen! I’m delighted you’re here to embark on this flavorful journey with me. As the sun rises and warms the day, there’s nothing quite like the refreshing, vibrant taste of a Strawberry Banana Smoothie to start your morning off right! This delightful blend of sweetness and nutrition not only tantalizes your taste buds but also fuels your body with essential vitamins and minerals. Perfect for breakfast or a mid-afternoon snack, it’s become a staple in my household, and I can’t wait to share all the juicy details with you.
A Delicious Blend of Memories
When I think about strawberry banana smoothies, I can’t help but chuckle at the hilarious memories from my early cooking adventures. I remember one summer afternoon when I decided I wanted to make smoothies from scratch for my family. Instead of pouring my ingredients into a blender, I got so excited that I too eagerly tossed everything in—frozen strawberries, ripe bananas, yogurt, and a splash of juice. The blender whirred to life, and instead of a smooth concoction, I ended up with an explosion of strawberry banana goodness all over the kitchen! My mother still giggles about it, recalling how I stood there, utterly shocked in a mess of fruit.
From that day on, the strawberry banana smoothie turned into our family favorite—an effortless recipe that combined simplicity, nutrition, and a touch of nostalgia. Fast forward to today, and I’ve perfected my method to avoid any chaotic kitchen explosions. So grab your blender, and let’s create something delightful together!
Ingredients
Here’s what you need to make this beautiful smoothie. Each ingredient plays a vital role in creating the perfect balance of flavor and nutrition!
-
Fresh Strawberries (1 cup)
- These juicy gems add natural sweetness and vibrant color! When selecting strawberries, look for ones that are deep red and slightly firm for the best flavor. If you’re short on fresh ones, frozen strawberries work wonders too.
-
Ripe Banana (1 medium)
- A ripe banana gives the smoothie a creamy texture and boosts the sweetness. Brown spots are your friend here! If you don’t have bananas, you can swap them with a half-cup of unsweetened applesauce.
-
Greek Yogurt (1/2 cup)
- This adds a lovely creamy texture and is packed with protein. If you’re looking for a dairy-free option, opt for coconut or almond yogurt; they’ll bring their unique flavors to the mix!
-
Milk (1 cup)
- Use any kind you like—cow’s, almond, oat, or coconut milk work perfectly. If you prefer a thicker smoothie, use less milk.
-
Honey or Maple Syrup (1-2 tablespoons, optional)
- A drizzle of sweetness never hurt anyone! Use honey for a classic touch or maple syrup for a more earthy flavor. Agave nectar is a great alternative if you’re keeping it vegan.
-
Chia Seeds (1 tablespoon)
- These little powerhouses add fiber and omega-3 fatty acids. If you don’t have chia seeds, you can skip them or substitute with flaxseeds.
Step-by-Step Instructions
Ready to whip up that luscious smoothie? Let’s get blending!
-
Gather Your Ingredients
- Set everything out on the counter. This is a great time to put on some upbeat music—it makes the whole process feel more fun! Don’t forget to wash your strawberries and slice off their green tops.
-
Slice the Banana
- Peel your ripe banana and slice it into thick chunks. They’ll blend much easier this way! Pro tip: If you want to make smoothies in advance, freeze banana slices ahead of time for a creamier texture.
-
Blend the Strawberries and Banana
- Into the blender, add the cut banana and halved strawberries. If you’re using frozen strawberries, there’s no need to thaw them; they’ll help chill the smoothie!
-
Add the Yogurt and Milk
- Add the Greek yogurt and pour in your milk of choice. This is where things get creamy! Start with one cup of milk—you can always adjust later to reach your desired consistency.
-
Sweeten It Up
- If you prefer a sweeter smoothie, add your honey or maple syrup. Remember, you can always taste and adjust!
-
Sprinkle in Chia Seeds
- Toss in the chia seeds for that extra oomph of nutrition. Blend for about 30 seconds to a minute until everything is smooth. Stop to scrape down the sides if necessary to ensure all fruit gets blended.
-
Adjust Consistency
- After blending, check the thickness. If it’s too thick, add a splash more milk and blend again.
-
Taste Test
- This is my favorite part! Grab a spoon, take a tiny taste, and if you need a bit more sweetness or tang, add either honey or maybe an extra dollop of yogurt. Blend for just a few more seconds.
-
Pour and Enjoy!
- Carefully pour the smoothie into glasses and savor the beautiful color. It’s visually inviting, and trust me, the aroma is totally invigorating!
Serving Suggestions
For an extra touch, garnish your smoothie with a sprinkle of seeds or a few slices of strawberry on top. It’s all about that presentation! Pair it with a few granola clusters or a slice of whole-grain toast for a well-rounded meal.
Recipe Variations
Let’s shake things up a little! Here are some creative twists to take your smoothie game to the next level:
- Tropical Vibes: Add a few chunks of mango or pineapple for a tropical twist.
- Nutty Banana: Toss in a tablespoon of almond butter for a creamy, nutty flavor.
- Green Power: Add a handful of fresh spinach or kale. You won’t even taste it, and it will pack in more nutrients!
- Berry Blast: Mix in 1/2 cup of blueberries or raspberries to diversify the flavor profile.
- Protein Boost: Add a scoop of protein powder for post-workout recovery.
Chef’s Notes
This strawberry banana smoothie is a staple in my kitchen, but it didn’t start that way. My first attempts were often too runny or too thick; I struggled to find the right balance of flavors. It took several kitchen mishaps and a minor explosion of strawberries (cue the laughter) to refine my technique. Now, it’s a comforting blend that brings a smile to my face, reminding me of those childhood afternoons. Cooking is all about learning, and this recipe perfectly embodies the joy of trying, failing, and succeeding!
FAQs and Troubleshooting
1. What if my smoothie is too thick?
No problem! Just add a splash more milk (or your milk alternative) and blend until you reach your desired consistency.
2. Can I make this ahead of time?
Absolutely! You can prepare the smoothie the night before. Store it in the fridge, but give it a good shake (or stir) before enjoying it.
3. My smoothie is too sweet. How can I fix it?
Balance it out by adding a splash of lemon juice or a handful of spinach, which will create a more refreshing taste without the extra sweetness.
4. How can I make this smoothie vegan?
Simply replace the Greek yogurt with a dairy-free alternative, and use maple syrup as your sweetener. You can also leave out any other non-vegan ingredients.
Nutritional Info
(Serving Size: 1 smoothie)
- Calories: 250
- Protein: 9g
- Fat: 3g
- Carbohydrates: 47g
- Fiber: 5g
And there you have it, my delightful Strawberry Banana Smoothie! It’s colorful, delicious, and guarantees a smile with every sip. Whether you’re starting your day or enjoying an afternoon break, this smoothie is bound to brighten your mood. Now, take a moment to let the flavors meld together in your kitchen and channel your inner chef. Until next time, happy blending!
Print
The Ultimate Strawberry Banana Smoothie
- Total Time: 10 minutes
- Yield: 1 serving 1x
- Diet: Vegetarian
Description
A refreshing and nutritious Strawberry Banana Smoothie perfect for breakfast or a snack.
Ingredients
- 1 cup Fresh Strawberries
- 1 medium Ripe Banana
- 1/2 cup Greek Yogurt
- 1 cup Milk (cow’s, almond, oat, or coconut)
- 1–2 tablespoons Honey or Maple Syrup (optional)
- 1 tablespoon Chia Seeds
Instructions
- Gather your ingredients.
- Slice the banana into thick chunks.
- Blend the strawberries and banana in the blender.
- Add the yogurt and milk.
- Sweeten it up with honey or maple syrup.
- Sprinkle in chia seeds and blend until smooth.
- Adjust consistency with more milk if needed.
- Taste test and adjust flavors.
- Pour and enjoy the smoothie!
Notes
For variations, try adding mango for a tropical twist or almond butter for nuttiness.
- Prep Time: 10 minutes
- Cook Time: 0 minutes
- Category: Beverage
- Method: Blending
- Cuisine: American
Nutrition
- Serving Size: 1 smoothie
- Calories: 250
- Sugar: 20g
- Sodium: 100mg
- Fat: 3g
- Saturated Fat: 1g
- Unsaturated Fat: 2g
- Trans Fat: 0g
- Carbohydrates: 47g
- Fiber: 5g
- Protein: 9g
- Cholesterol: 10mg
Keywords: strawberry banana smoothie, healthy smoothie, breakfast smoothie
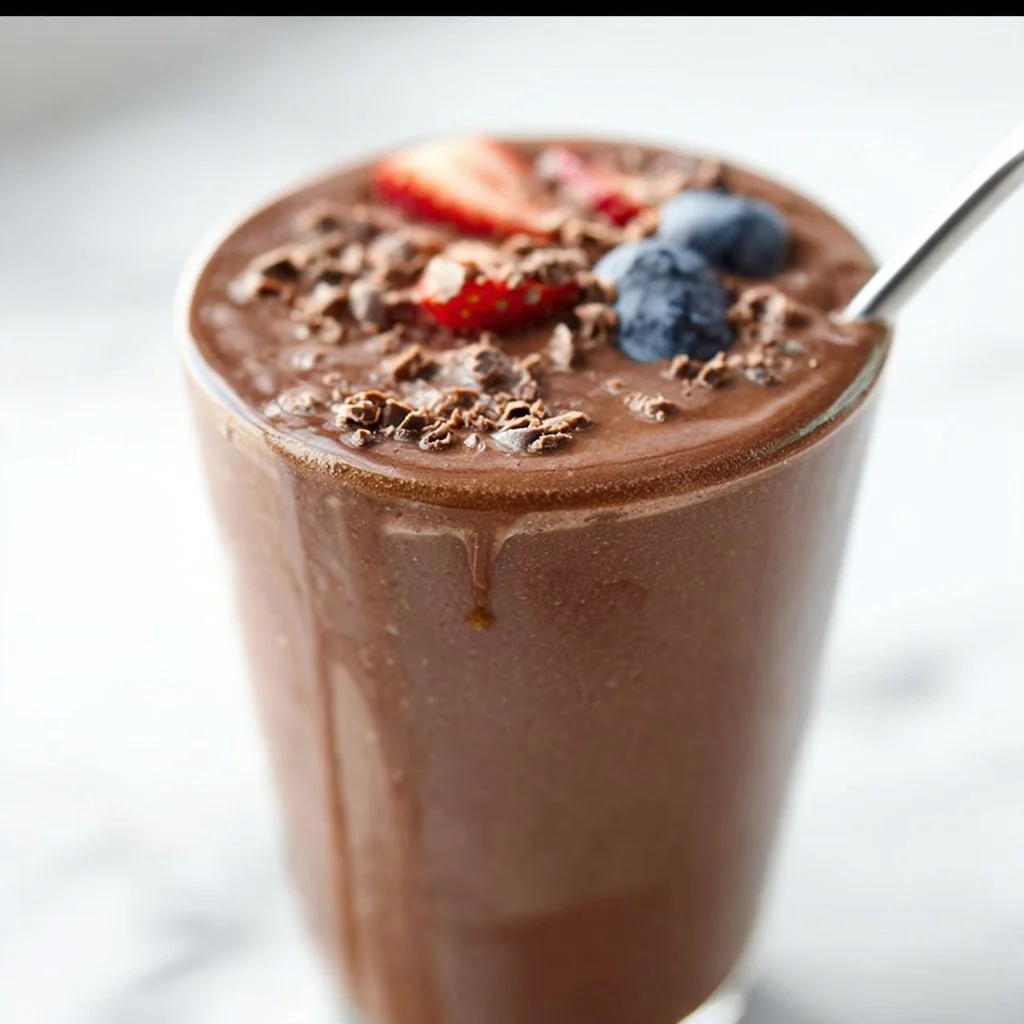
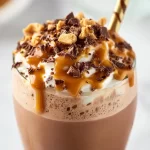
Chocolate Peanut Butter Milkshake
The Ultimate Chocolate Peanut Butter Milkshake Recipe
Hey there, fellow food lovers! Welcome back to my cozy kitchen, where I whip up everything from hearty dinners to sweet delights! Today, we’re diving into a dreamy dessert that’s bound to make your taste buds dance: the Chocolate Peanut Butter Milkshake. Picture this: you’re nestled on the couch after a long day, and you crave something sweet, creamy, and utterly indulgent. That’s where this delightful concoction comes in.
This milkshake is not just a beverage; it’s a nostalgic sip of happiness that evokes memories of summer evenings and carefree childhood days. Whether you enjoyed it at a local diner or made it at home with your family, this icy treat has a way of bringing warmth to your heart—even on the chilliest days!
In today’s recipe, I’ll share my favorite methods to create this liquid joy filled with the classic combo of chocolate and peanut butter. Don’t worry if you’re new to the kitchen! I’ll walk you through every step, ensuring you not only make the perfect milkshake but enjoy the experience along the way. Grab your blender and let’s blend our way to milkshake magic!
Personal Story
I still remember the very first time I made a milkshake with my mom. We were having a lazy Sunday afternoon, and she decided to surprise me with a special treat. We gathered the ingredients—scoops of chocolate ice cream, rich peanut butter, and milk. I loved how she blended everything together, the sounds of the blender mixing our laughter, and of course, the rich aroma wafting through the kitchen.
As we poured the thick, creamy shake into tall glasses, I noticed the way Mom added a sprinkle of crushed peanuts on top for that extra crunch. With cherry-red straws and big grins, we annihilated those milkshakes within minutes! It was such a simple thing, yet the joy was unforgettable.
Years later, as I found my passion for cooking and blogging, I never forgot that happiness in a glass. Making this Chocolate Peanut Butter Milkshake has become a ritual—a way to relive those sweet memories and create new ones. So, fill your glass, sit back, and let the nostalgia take over.
Ingredients
Here’s what you’ll need to create this creamy delight:
-
Chocolate Ice Cream (2 cups): The star of our show! Use your favorite brand or homemade; bitter-sweet, dark, or classic chocolate ice cream all work fantastically. If you’re looking for a healthier option, try frozen bananas or yogurt instead.
-
Peanut Butter (¼ cup): The creamy (or chunky) texture adds a delightful richness to your shake! For nut-free versions, sunflower seed butter is a brilliant substitute—just as tasty, with a similar consistency!
-
Milk (1 cup): Choose your milk of choice—whole, skim, almond, or oat milk. For a thicker milkshake, you can reduce the amount a bit or even use heavy cream for added richness.
-
Chocolate Syrup (2 tablespoons): A drizzle will amplify the chocolate flavor and give you that perfect milkshake look! You can use store-bought syrup or homemade, depending on your preference.
-
Whipped Cream (for topping): An optional but highly encouraged topping! Make it homemade for that fluffy texture, or grab some canned whipped cream for convenience.
-
Crushed Peanuts (for garnish): Not mandatory, but they give your shake that extra crunch and blend beautifully with the chocolate and peanut butter flavors.
-
Optional Add-ins: Feeling adventurous? Add a pinch of sea salt to enhance flavors or a scoop of protein powder if you want a post-workout treat!
Step-by-Step Instructions
Alright, let’s get blending! Follow these steps to whipped up your fabulous Chocolate Peanut Butter Milkshake:
-
Gather Your Ingredients: Start by arranging all the ingredients on your countertop. A tidy workspace makes the whole cooking experience smoother and more enjoyable!
-
Blend the Goodies: Toss in the 2 cups of chocolate ice cream, ¼ cup of peanut butter, and 1 cup of milk into your blender. Use more or less milk depending on how thick you like your shakes. The ice cream and peanut butter will give you that wonderfully thick texture!
-
Add Chocolate Syrup: This is where the magic happens! Drizzle in 2 tablespoons of chocolate syrup for that indulgent flavor. If you’re a total chocolate lover like me, feel free to add an extra tablespoon.
-
Blend Away: Secure the lid tightly, and blend on high speed for about 30 seconds. Be sure to occasionally stop the blender to scrape down the sides—this ensures all the ingredients get mixed up beautifully. You want a smooth and creamy texture, so blend as necessary!
-
Tasting Time: Before you pour, give it a quick taste! Adjust the flavors if needed—a touch more peanut butter or an extra scoop of ice cream might just do the trick!
-
Serve It Up: Pour the delicious milkshake into tall glasses. I love using large mason jars for that vintage touch. Memory of that first milkshake floods back as I see those jars filled to the brim!
-
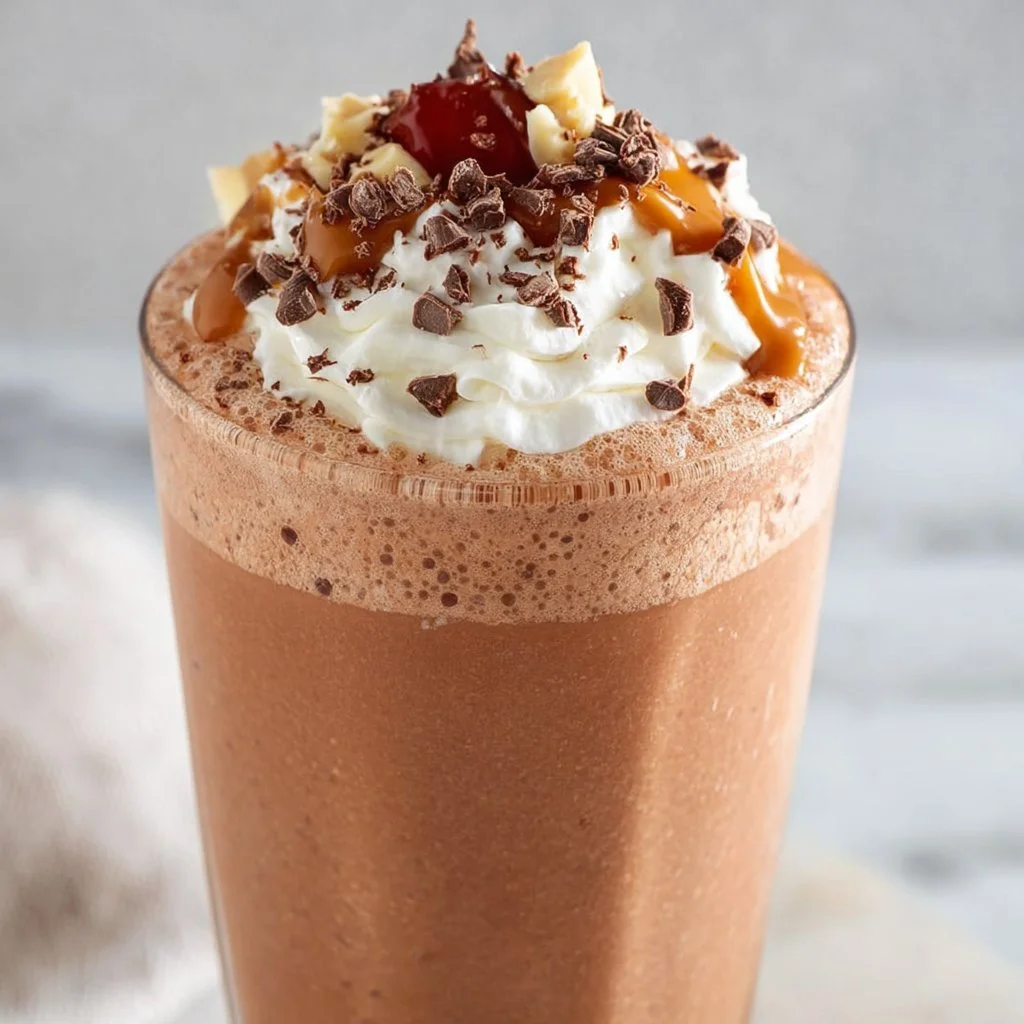
Top It Off: Here’s where you can get a bit fancy. Slather a swirl of whipped cream on top, drizzle more chocolate syrup, and sprinkle the crushed peanuts for some extra flair!
-
Grab a Straw and Enjoy: Finish it off with a colorful straw, take a delightful sip, and savor the flavors! This is where all the hard work pays off, my friend.
Serving Suggestions
Let’s get creative with how you serve this mouthwatering milkshake! Pour your Chocolate Peanut Butter Milkshake into frosty glasses and add a decorative touch with an extra dollop of whipped cream and a drizzle of chocolate syrup on top. For a festive occasion, serve with a side of cookies or brownies for the ultimate indulgence!
If you’re hosting a BBQ or party, consider setting up a milkshake bar with various toppings like crushed cookies, fruit, or even sprinkles. Everyone can customize their shake!
Recipe Variations
Feeling like mixing things up? Here are a few creative twists to elevate your milkshake game:
-
Banana Bliss: Toss in half a ripe banana for a hint of fruity flavor. The banana adds natural sweetness and creaminess.
-
Minty Fresh Twist: Add a few drops of peppermint extract before blending for a refreshing chocolate mint variation that’s reminiscent of your favorite ice cream parlor!
-
Cookie Monster Shake: Crumble some Oreo cookies into the milkshake for a delightful texture and extra chocolate indulgence.
-
Healthy Peanut Butter Version: Use frozen yogurt or the banana trick to create a lower-calorie shake without sacrificing flavor!
-
More Nutty Flavors: Toss in some almond butter or hazelnut spread in place of peanut butter for a different nutty profile!
Chef’s Notes
Oh, let me share a little kitchen side story. Once, I was making this marvel for a group of friends, but I mistakenly grabbed the chili chocolate ice cream instead of the regular chocolate. In a moment of panic, I just ran with it! I blended it up, and it turned out to be a spicy-sweet hit! Who knew experimenting could yield delightful surprises?
This recipe has evolved over time—different variations, experimental ingredients, but the core love for the classic remains. It truly represents the joy of cooking and creating something that speaks to your taste buds!
FAQs and Troubleshooting
1. My milkshake is too thick! What do I do?
Don’t worry! Just add milk a tablespoon at a time while blending until you reach your desired consistency.
2. Can I use frozen milk instead of ice cream?
Absolutely! If you’re looking for a healthier alternative, frozen bananas or yogurt will work perfectly as a base. Just blend them with milk to achieve a creamy texture!
3. Is it possible to make this milkshake dairy-free?
Definitely! Use your preferred non-dairy ice cream and milk (almond, coconut, or oat milk are fantastic options) to make it completely dairy-free!
4. My shake is too sweet; how can I tone it down?
If your shake is overly sweet, add a pinch of salt to balance the flavors. You can also mix in a scoop of plain yogurt to cut through the sweetness!
Nutritional Info (Optional)
- Calories: Approximately 500-600 kcal per serving (depends on specific brands and quantities used)
- Protein: 12-15g
- Fat: 20-25g
- Carbohydrates: 70-80g
Conclusion
And there you have it! Your very own Chocolate Peanut Butter Milkshake! Whether you’re enjoying it solo or sharing it with friends and family, this treat brims with charm and flavor that’ll leave everyone wanting more. Remember, cooking is a journey filled with delicious moments and lovely memories. So don’t hesitate to experiment, share your creations, and most importantly, enjoy every sip!
Thanks for joining me today in my kitchen. Keep that apron on and happy cooking!
Print
Chocolate Peanut Butter Milkshake
- Total Time: 10 minutes
- Yield: 2 servings 1x
- Diet: Vegetarian
Description
This indulgent Chocolate Peanut Butter Milkshake combines rich chocolate ice cream with creamy peanut butter for a delightful treat.
Ingredients
- 2 cups Chocolate Ice Cream
- ¼ cup Peanut Butter
- 1 cup Milk
- 2 tablespoons Chocolate Syrup
- Whipped Cream (for topping)
- Crushed Peanuts (for garnish)
- Optional Add-ins: pinch of sea salt, scoop of protein powder
Instructions
- Gather Your Ingredients: Start by arranging all the ingredients on your countertop.
- Blend the Goodies: Toss in the chocolate ice cream, peanut butter, and milk into your blender.
- Add Chocolate Syrup: Drizzle in chocolate syrup for that indulgent flavor.
- Blend Away: Secure the lid and blend on high speed for about 30 seconds.
- Tasting Time: Before you pour, give it a quick taste and adjust flavors if needed.
- Serve It Up: Pour the delicious milkshake into tall glasses.
- Top It Off: Slather a swirl of whipped cream on top and sprinkle crushed peanuts.
- Grab a Straw and Enjoy: Finish it off with a straw, take a sip, and savor the flavors!
Notes
For a healthier option, substitute chocolate ice cream with frozen bananas or yogurt. Customize with your favorite toppings!
- Prep Time: 10 minutes
- Cook Time: 0 minutes
- Category: Dessert
- Method: Blending
- Cuisine: American
Nutrition
- Serving Size: 1 serving
- Calories: 550
- Sugar: 60g
- Sodium: 300mg
- Fat: 25g
- Saturated Fat: 10g
- Unsaturated Fat: 12g
- Trans Fat: 0g
- Carbohydrates: 75g
- Fiber: 4g
- Protein: 15g
- Cholesterol: 80mg
Keywords: milkshake, chocolate, peanut butter, dessert, creamy, indulgent
Chocolate Peanut Butter Milkshake Recipe
# The Ultimate Chocolate Peanut Butter Milkshake Recipe
## Introduction
Hey there, fellow foodies! Welcome back to my cozy corner of the internet—my kitchen! Today, I’m excited to take you on a delicious journey as we whip up a decadent **Chocolate Peanut Butter Milkshake**. This treat is the perfect blend of creamy, nutty, and chocolatey goodness that will transport you right back to your childhood. It's one of those recipes that brings joy to both the cook and anyone lucky enough to enjoy it.
I can still remember the first time I savored this delightful concoction. It was a warm summer afternoon, and my best friend Lily and I decided to embark on a mini cooking adventure in her parents' kitchen. We had stolen a couple of ripe bananas and a half-empty jar of peanut butter from the pantry, and after a bit of haphazard mixing, we ended up with something magical. Little did we know we were on the brink of creating a classic treat that would become a staple in our summer hangouts.
Fast-forward to today, and I still get that same rush of happiness whenever I hear the blender whirl and the sweet, nutty aroma fills the air. Whether you’re planning a cozy movie night or searching for a sweet treat to surprise friends, this milkshake is sure to impress. Plus, who doesn’t love a recipe with only a handful of ingredients that comes together in a snap?
So grab your blender and put on your favorite playlist, because it’s time to create a chocolate peanut butter paradise that you won’t be able to resist!
---
## Personal Story
Oh! How can I forget the summer of 2015? I was visiting my grandparents’ house, and they had just renovated their kitchen. My grandma, an incredible cook, always encouraged me to experiment with flavors. One afternoon, we decided it was time for a milkshake extravaganza. After blending up some classic vanilla, we thought, "Why not add some chocolate and peanut butter?" I’ll never forget my grandma's mischievous smile as we poured a splash of chocolate syrup into the mix.
As we blended it all together, the kitchen quickly filled with laughter, and the delicious aroma made our tummies rumble. When we finally poured the milkshake into tall glasses and topped it off with whipped cream and a drizzle of peanut butter, it felt like a masterpiece! We raised our glasses in a toast: “To the best summer ever!”
That first sip was like a burst of happiness, and I knew right then that chocolate and peanut butter were a match made in heaven. Since then, it’s become a celebrated treat in my family, shared during game nights, birthday parties, and just-because moments. I can’t wait for you to create your own sweet memories with this milkshake recipe!
---
## Ingredients
To make our delightful Chocolate Peanut Butter Milkshake, you only need a few simple ingredients. Here's what you’ll need to gather:
- **Vanilla Ice Cream (2 cups)**
The backbone of our milkshake! You can substitute with dairy-free or low-fat ice cream if you want a lighter version.
- **Milk (1 cup)**
Whole milk gives a rich flavor and texture, but feel free to use almond, soy, or oat milk for dairy alternatives.
- **Creamy Peanut Butter (1/3 cup)**
Go for the creamy variety for a smooth blend. If you're feeling adventurous, try crunchy peanut butter for added texture!
- **Chocolate Syrup (1/4 cup)**
A classic! Use your favorite chocolate syrup or even make your own by melting dark chocolate if you're feeling fancy.
- **Optional Toppings:**
- **Whipped Cream:** For a luscious finish.
- **Chocolate Shavings or Chips:** To add a touch of sweetness and garnish.
- **Sliced Bananas:** A nod to our childhood whimsy and a fun twist!
---
## Step-by-Step Instructions
Let's make this milkshake! Follow my steps closely, and don’t be afraid to channel your inner chef!
1. **Gather Your Ingredients:**
Gather all your ingredients and tools: a blender, a measuring cup, and a few tall glasses. This part is key—trust me, a well-organized workspace makes a world of difference.
2. **Scoop the Ice Cream:**
With an ice cream scoop, measure out 2 cups of creamy vanilla ice cream directly into your blender. This is where the magic begins! If it’s too hard to scoop, let it sit at room temperature for a few minutes to soften.
3. **Add the Milk:**
Pour in 1 cup of milk of your choice. The more milk you add, the thinner your milkshake will be. If you like it thicker, start with 3/4 cup and adjust from there.
4. **Incorporate Peanut Butter:**
Now for the star of the show! Add 1/3 cup of creamy peanut butter. This is where it gets fun—use a spatula to scrape out every last bit, because we don’t want any peanut goodness left behind!
5. **Add Chocolate Syrup:**
Drizzle in 1/4 cup of chocolate syrup. Honestly, if you want to channel your inner Willy Wonka, feel free to add more. You do you!
6. **Blend Away!**
Secure the lid tightly and blend on high until all ingredients are well combined and smooth. Here’s a little tip: if the mix is too thick to blend, add a splash more milk to help it along. If it’s too thin, just toss in another scoop of ice cream!
7. **Taste Test:**
Once you have a beautifully creamy texture, stop blending and taste! Is it chocolatey enough? Feel free to add more syrup or peanut butter if desired!
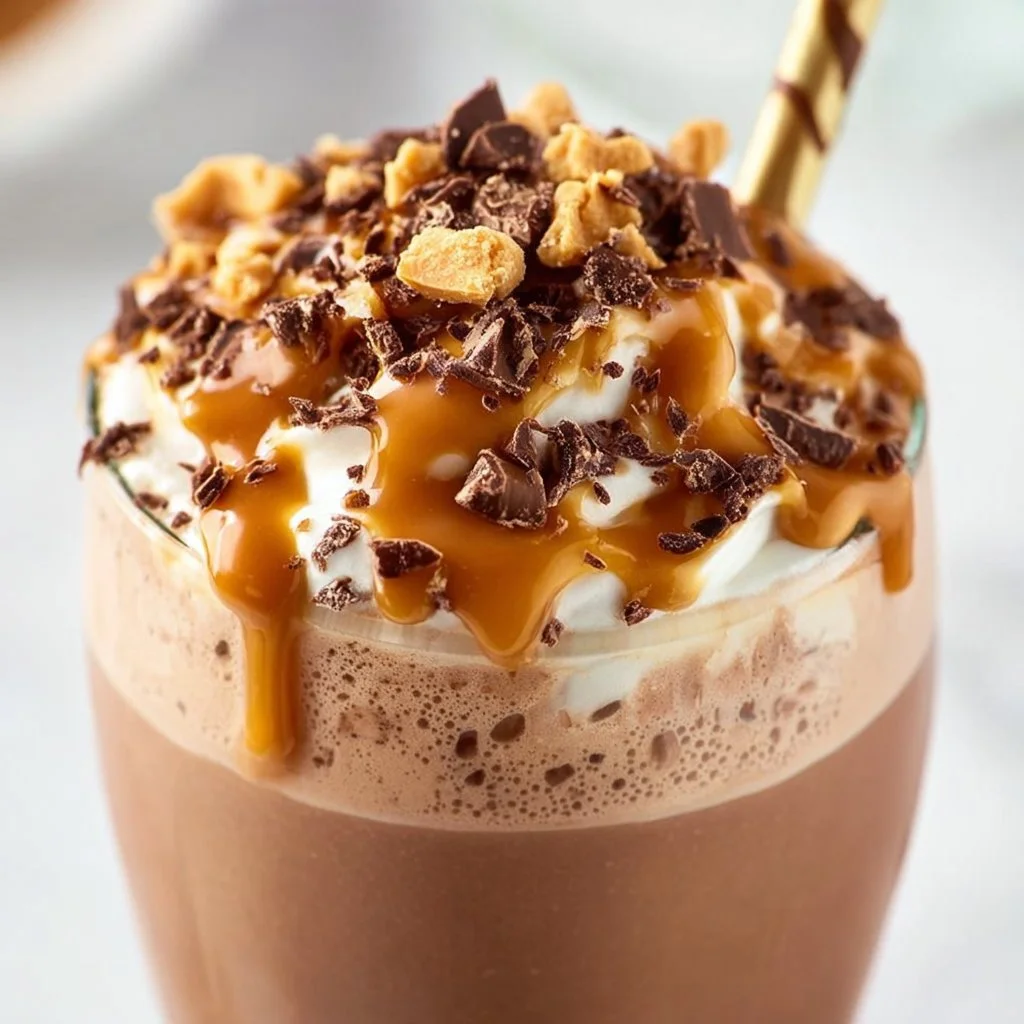
8. **Pour and Serve:**
Grab your tall glasses and pour in your delicious milkshake! Enjoy the swirls of chocolate and peanut butter—how gorgeous is that?
---
## Serving Suggestions
Ready to serve? Top your milkshake with a generous dollop of whipped cream and sprinkle on some chocolate shavings or crushed peanuts for added flair. For a fun twist, insert a colorful straw or a fancy spoon for that extra touch. This milkshake is perfect for a cozy movie night, a casual hangout, or even a mini celebration! Don’t forget to snap a picture for Instagram before diving in!
---
## Recipe Variations
Here are a few fun variations you might want to try out:
1. **Banana Chocolate Peanut Butter Milkshake:**
Toss in half a ripe banana before blending for a delightful fruit twist—it’s like having a sundae smoothie!
2. **Mint Chocolate Peanut Butter Milkshake:**
Add a few drops of mint extract for a refreshing minty flavor. Garnish with crushed mint chocolate candies for added flair!
3. **Spicy Chocolate Peanut Butter Milkshake:**
For the adventurous, add just a pinch of cayenne pepper or a dash of cinnamon. It will surprise everyone with a flavor kick!
4. **Vegan Delight:**
Substitute dairy milk for almond milk and the ice cream for a coconut-based alternative, making this milkshake creamy and dairy-free.
---
## Chef’s Notes
As with any recipe, you can easily make your **Chocolate Peanut Butter Milkshake** uniquely yours! There have been times when I’ve thrown in leftover crushed cookies or even a scoop of protein powder when I’m feeling active. No two shakes need to be the same!
One sunny weekend, my friends and I had a little milkshake-off. We each made our version using whatever ingredients we could find in the pantry. It was a hilarious mess but resulted in some to-die-for shakes (and a kitchen that needed serious cleaning). I learned that creativity in the kitchen is just as important as following a recipe!
---
## FAQs and Troubleshooting
**1. My milkshake is too thin; how can I thicken it?**
Don’t worry! Simply add an extra scoop of ice cream or blend in a little bit of frozen banana to give it that creamy texture.
**2. Is there a way to make it less sweet?**
Absolutely! Reduce the amount of chocolate syrup, and you can even use dark chocolate options as they usually have less sugar.
**3. What if I don’t have a blender?**
If you don’t have a blender, you can mix the ingredients using a handheld mixer in a large bowl until combined. It’ll take a bit more time, but you’ll still love the end result!
**4. Can it be made ahead of time?**
I recommend making it fresh, as milkshakes are best enjoyed right after blending. However, if you must make it ahead, keep it in the freezer, let it soften a bit before serving, and blend again!
---
## Nutritional Info
(Feel free to include this if applicable)
- **Calories:** Approximately 450 per serving (depending on specific ingredient choices)
- **Fat:** 20g
- **Carbohydrates:** 55g
- **Protein:** 10g
---
There you have it—your guide to making a delicious, sloppy, creamy **Chocolate Peanut Butter Milkshake**! I hope this recipe inspires you to get into your kitchen and whip up something delicious. Remember, cooking is about having fun and creating joyful moments!
Happy blending, and cheers to sweet memories!
The Ultimate Chocolate Peanut Butter Milkshake
- Total Time: 10 minutes
- Yield: 2 servings 1x
- Diet: Vegetarian
Description
A decadent chocolate peanut butter milkshake that combines creamy, nutty, and chocolatey goodness in a quick and easy recipe.
Ingredients
- 2 cups Vanilla Ice Cream
- 1 cup Milk
- 1/3 cup Creamy Peanut Butter
- 1/4 cup Chocolate Syrup
- Optional Toppings: Whipped Cream, Chocolate Shavings or Chips, Sliced Bananas
Instructions
- Gather Your Ingredients: Gather all your ingredients and tools: a blender, a measuring cup, and a few tall glasses.
- Scoop the Ice Cream: Measure out 2 cups of creamy vanilla ice cream directly into your blender.
- Add the Milk: Pour in 1 cup of milk of your choice.
- Incorporate Peanut Butter: Add 1/3 cup of creamy peanut butter.
- Add Chocolate Syrup: Drizzle in 1/4 cup of chocolate syrup.
- Blend Away!: Secure the lid tightly and blend on high until smooth.
- Taste Test: Once creamy, stop blending and taste.
- Pour and Serve: Pour in your milkshake and top with whipped cream and any other garnishes.
Notes
You can easily modify the milkshake with different flavor additions or substitutions for a unique taste.
- Prep Time: 10 minutes
- Cook Time: 0 minutes
- Category: Dessert
- Method: Blending
- Cuisine: American
Nutrition
- Serving Size: 1 serving
- Calories: 450
- Sugar: 40g
- Sodium: 200mg
- Fat: 20g
- Saturated Fat: 10g
- Unsaturated Fat: 8g
- Trans Fat: 0g
- Carbohydrates: 55g
- Fiber: 2g
- Protein: 10g
- Cholesterol: 60mg
Keywords: milkshake, chocolate, peanut butter, dessert, summer treat

Cinnamon Vanilla Milkshake
Cinnamon Vanilla Milkshake: A Cozy Delight to Savor
Welcome back to my kitchen, my lovely foodies! Today, I’m thrilled to share one of my favorite treats that takes me right back to those lazy afternoons spent with my family — the Cinnamon Vanilla Milkshake. Picture this: it’s a hot summer day, and the sun is shining just right. The smell of cinnamon wafts through the air, reminding me of the cozy evenings spent gathered around the kitchen table, laughing and creating sweet memories. You know that feeling when you take that first sip of something utterly delightful? Well, this milkshake is the embodiment of that happiness!
This isn’t just any ordinary milkshake; it’s a rich and creamy blend that combines the warmth of cinnamon with the sweet allure of vanilla. The flavor is so comforting that it feels like a hug in a glass! And let’s be honest — who doesn’t need a little bit of that cozy love in their lives? Whether you’re indulging after a long day or treating yourself on a weekend brunch, this milkshake will surely brighten your spirits.
Now, the beauty of this recipe is that it’s wonderfully easy to whip up. With simple ingredients and minimal kitchen fuss, you can bring a little magic to your day. As you blend everything together, you’ll feel like a rockstar in your own kitchen, creating a delightful drink that’s sure to impress — even if it’s just for yourself! So, let me guide you through this delicious journey. Trust me; you’ll be sipping on this fabulous shake in no time!
Personal Story
Let me take you back to about ten summers ago when my little sister, Emma, would come over to visit during her break. I vividly remember one day, the sun pouring in through the windows, and the scent of cinnamon tipped into the air when I decided to surprise her with a decadent milkshake. It was one of those spontaneous kitchen adventures that turned into a cherished memory!
We rummaged through the pantry, pulling out every possible ingredient we could find, but it was the combination of vanilla ice cream, milk, and that sweet-smoky cinnamon that made our taste buds dance. We blended our concoction in a vintage blender — the kind that wobbled just a bit while we curiously waited for it to whirr up our treat. The moment we poured it into those tall glasses, topped with a dusting of cinnamon and a cherry, we were in heaven!
Emma’s eyes lit up at that first sip, and I knew we had created something special. This milkshake became our secret summer ritual, reminding us to embrace simplicity and joy in cooking. As you make this recipe, I hope it brings you as much happiness and warmth as it did for us. Now, let’s dive into the ingredients for this delightful goodness!
Ingredients
Here’s what you’ll need to create your Cinnamon Vanilla Milkshake:
-
Vanilla Ice Cream (4 cups)
The star of the show! Use your favorite brand, but make sure it’s a rich, creamy vanilla to get that deliciously smooth texture. If you prefer a lighter version, try frozen yogurt or a dairy-free alternative! -
Whole Milk (1 cup)
Whole milk adds richness, but you can swap it with skim milk or unsweetened almond milk for a lighter version. Keep an eye on the thickness; thinner milk will give you a more liquid shake! -
Ground Cinnamon (1 teaspoon)
This warming spice is what brings the magic! If you’re feeling adventurous, you could use a cinnamon stick for a stronger flavor — just blend it in and strain it out later. -
Vanilla Extract (1 teaspoon)
A splash of vanilla enhances the ice cream’s flavor. Pure vanilla extract is best, but if you’re out, feel free to use imitation vanilla in a pinch. -
Whipped Cream (optional)
For that extra indulgent topping! You can make homemade whipped cream in seconds or grab a can from the store. -
Maraschino Cherry (optional)
A cute cherry on top makes everything more delightful! Feel free to skip this step if you’re avoiding added sugar.
Step-by-Step Instructions
Get ready for some smooth blending action! Follow these steps, and you’ll be sipping bliss in no time:
-
Gather Your Ingredients
Before you start, gather all your ingredients. Trust me; it makes the process smoother! Plus, it’s fun to see all the yummy components laid out. -
Add Ice Cream to Blender
Scoop 4 cups of vanilla ice cream into your blender. You can let it sit for a few minutes to soften slightly — this makes blending easier and ensures you won’t need to wrestle with a stubborn ice cream block! -
Pour in the Milk
Next, add 1 cup of whole milk to the blender. If you want a thicker shake, hold back a splash of milk until you find the consistency you like. You can always add more — but it’s tricky to thicken up! -
Blend Until Smooth
Lock the lid on your blender and blend on medium speed until everything is creamy and smooth, about 20-30 seconds. Make sure to glance at the sides of the blender; you might want to scrape down any ice cream clinging onto the walls! -
Add Cinnamon and Vanilla
Now, sprinkle in the ground cinnamon and pour in the vanilla extract. Give it another quick blend for about 5-10 seconds to distribute that warm cinnamon aroma evenly throughout. -
Taste Test
Here comes the fun part! Carefully taste your shake. Is it sweet enough? If you want a little extra sweetness, consider adding a tablespoon of sugar or honey at this stage. Just blend it one last time! -
Serve Immediately
Pour your delightful shake into tall glasses. For a little flair, you can drizzle some chocolate or caramel sauce inside the glass before pouring in the shake. Can you say extravagant? -
Top with Whipped Cream and Cherry
If you’re feeling fancy, top with a dollop of whipped cream and plop a maraschino cherry right on top! Grab a straw, take a moment to admire your masterpiece, and dive in.
Serving Suggestions
To plate this delicious Cinnamon Vanilla Milkshake, I recommend using tall, clear glasses to showcase its creamy texture. If you’re feeling extra fancy, add a sprinkle of cinnamon on top of the whipped cream and perhaps a little extra swirl of chocolate or caramel sauce. Serve with wide straws, napkins galore, and that infectious smile of yours!
Recipe Variations
-
Chocolate Cinnamon Milkshake
Blend in 2 tablespoons of chocolate syrup for a chocolatey twist on this classic shake. -
Nutty Delight
Add a tablespoon of almond butter or peanut butter to your shake before blending for a creamy, nutty flavor. -
Spiced Twist
Experiment by adding a dash of nutmeg or allspice along with the cinnamon for a more complex flavor profile. -
Fruit-Fusion Milkshake
Toss in half a banana before blending for a fruity, creamy variation that’s equally delightful. -
Dairy-Free Option
Use dairy-free ice cream and nut or oat milk for an equally scrumptious shake, perfect for those with dietary restrictions!
Chef’s Notes
I’ve made this milkshake countless times, and every batch brings back those sweet summer memories with my sister. Once, I even hosted a "Shake-Off" party with friends, where we each brought our unique twist on the milkshake. It became a fun competition filled with laughter, spills, and, yes, too many milkshakes to count!
Over the years, this recipe has evolved, but the core remains the same — a love for cozy flavors and shared moments. Think of this as more than just a drink; it’s an opportunity to connect with loved ones, whether you’re sitting around the kitchen or catching up on the back porch.
FAQs and Troubleshooting
-
Can I use low-fat or almond milk instead of whole milk?
Yes, you absolutely can! Low-fat milk will work perfectly fine, but be ready for a slightly less creamy texture. Almond milk is a great dairy-free alternative, but the milkshake will be thinner — so adjust the quantity as needed! -
What if my milkshake is too thick?
No worries! Simply add a splash more milk and blend again; that should loosen it right up! -
Can I store leftovers?
While it’s tempting, milkshakes are best enjoyed fresh. If you do have leftovers, store them in an airtight container in the freezer. Let them sit out for a bit to soften before relishing again, but ice crystals may form. -
How can I make my milkshake sweeter?
For sweetness, try adding a tablespoon of vanilla syrup, honey, or sugar right before blending! Just be careful; a little goes a long way.
Nutritional Info
(This section is optional and can be customized according to dietary preferences.)
Serving: 1 milkshake
Calories: ~350
Fat: 17g
Carbohydrates: 50g
Fiber: 1g
Sugar: 35g
Protein: 9g
And there you have it, my sweet friends! Your very own cozy Cinnamon Vanilla Milkshake to enjoy on any occasion. I hope this recipe fills your kitchen with warmth and laughter just the way it has in mine! Now go ahead and treat yourself to a refreshing sip of nostalgia. Cheers to you and your kitchen adventures! 🌟🥤
Print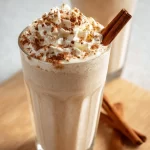
Cinnamon Vanilla Milkshake
- Total Time: 10 minutes
- Yield: 1 serving 1x
- Diet: Vegetarian
Description
A rich and creamy blend of vanilla ice cream and cinnamon, perfect for a hot summer day.
Ingredients
- 4 cups Vanilla Ice Cream
- 1 cup Whole Milk
- 1 teaspoon Ground Cinnamon
- 1 teaspoon Vanilla Extract
- Whipped Cream (optional)
- Maraschino Cherry (optional)
Instructions
- Gather your ingredients.
- Add ice cream to the blender.
- Pour in the milk.
- Blend until smooth.
- Add cinnamon and vanilla.
- Taste test for sweetness.
- Serve immediately.
- Top with whipped cream and cherry.
Notes
For a thicker shake, adjust the milk. Optional variations include chocolate syrup or nut butter.
- Prep Time: 10 minutes
- Cook Time: 0 minutes
- Category: Dessert
- Method: Blending
- Cuisine: American
Nutrition
- Serving Size: 1 milkshake
- Calories: 350
- Sugar: 35g
- Sodium: 100mg
- Fat: 17g
- Saturated Fat: 10g
- Unsaturated Fat: 5g
- Trans Fat: 0g
- Carbohydrates: 50g
- Fiber: 1g
- Protein: 9g
- Cholesterol: 60mg
Keywords: milkshake, cinnamon, vanilla, dessert, summer treat

Banana Milkshake
The Ultimate Banana Milkshake Recipe: A Creamy Adventure Awaits!
Welcome to my kitchen, where we’re about to embark on a delightful journey that’s creamy, dreamy, and oh-so-banana-y! I’m Olivia Bennett, your friendly guide to all things delicious. Today, we’re diving into the world of smoothies with one of my all-time favorites — the classic Banana Milkshake. It’s a drink that’s not only fun to whip up, but it also brings back some sweet memories for me, and I bet it will do the same for you!
Picture this: it’s a sunny Saturday morning, and I’m back at my grandmother’s cozy cottage, the air thick with the sweet scent of ripe bananas. I remember standing on my tiptoes to reach the blender on the kitchen counter, barely able to contain my excitement. Grandma would laugh as she tightened the blender’s lid, reminding me to “stand back, sweetheart — things might get a little bananas!” Her famous banana milkshake was like a golden ticket to a world of flavor — thick, creamy, and topped with a dollop of whipped cream that crowned the glass like royalty. This treat was our breakfast ritual, a little bit of tradition that made those mornings feel extra special.
Banana milkshakes are not just for kids; they are pure nostalgia in a glass! So grab your blender and let’s create a milkshake that’s perfectly chilled, sweetly fruity, and super easy to make. This recipe is sure to bring a smile to your face (and maybe a little dance in the kitchen, too!).
Ingredients
To whip up your banana milkshake, you’ll need a handful of simple ingredients that come together to create a harmonious blend of flavors:
-
Ripe Bananas: Look for bananas with a few brown spots for the sweetest flavor. You can substitute with frozen bananas for an even creamier shake!
-
Milk: Whole milk will give you a rich and creamy texture, but feel free to swap in almond milk, oat milk, or your favorite dairy alternative if you prefer.
-
Vanilla Ice Cream: The magic ingredient that adds indulgence — you can use dairy-free ice cream or frozen yogurt for a lighter touch.
-
Vanilla Extract: A splash of pure vanilla extract enhances the flavor beautifully; choose quality extract for the best taste.
-
Honey or Maple Syrup: This gives a touch of extra sweetness. You can adjust this based on your taste preferences or leave it out if your bananas are perfectly ripe!
-
Optional Toppings: Whipped cream, chocolate syrup, or a sprinkle of cinnamon for the ultimate finish.
Each ingredient has a role to play in making this banana milkshake utterly delicious, so let’s make sure we choose wisely!
Step-by-Step Instructions
Time to get blending! Here’s how to create the perfect banana milkshake:
-
Choose Your Bananas: Start by peeling and slicing 2 ripe bananas. I prefer medium-sized ones; they’re just the right amount of banana flavor. Slicing them allows them to blend smoother.
Tip: If you have overly ripe bananas, don’t toss them! They’re perfect for this recipe, and you can even freeze them to use later—just peel and pop them in a freezer bag.
-
Add the Milk: Pour 1 cup of milk into your blender. If you’re not sure what milk to use, I’m a fan of whole milk for creaminess, but oat milk adds a nice nutty flavor too.
Chef Insight: If you’re using frozen bananas, reduce the amount of milk slightly, as they’ll thicken the shake more than fresh ones.
-
Ice Cream Time!: Scoop in 2 generous scoops of vanilla ice cream. This is where the indulgence happens! Make sure it’s slightly softened for easier blending.
-
Vanilla Extract: Add 1 teaspoon of pure vanilla extract. It’s a simple addition that lifts the flavor to new heights!
-
Sweeten It Up: Drizzle in 1 tablespoon of honey or maple syrup. Taste as you go, and adjust the sweetness to your liking.
-
Blend It Up: Secure the lid on your blender and blend on high until all the ingredients are smooth and creamy. About 30-45 seconds should do it!
Chef Trick: For an extra frothy milkshake, pulse the blender a few times, then give it a good shake before blending again.
-
Taste Test: Grab a spoon and indulge in a quick taste! If you want it thicker, add more ice cream; if it’s too thick, a splash of milk will do the trick.
-
Serve: Pour your beautifully blended banana milkshake into tall glasses, and don’t skimp on the froth!
Tip: For a fun presentation, dip your glasses in chocolate syrup before pouring in the shake for a decadent twist.
Serving Suggestions
Now, it’s time to present your banana milkshake! Top it with a generous swirl of whipped cream, and drizzle with chocolate syrup for that extra touch of decadence. Sprinkle some crushed graham crackers or a dusting of cinnamon on top, and you’ve got a show-stopping treat! You can even add a slice of banana on the rim or a cute paper straw for that perfect Instagram-worthy finish.
Recipe Variations
Here are some fun twists to keep your banana milkshake game fresh:
-
Chocolate Banana Milkshake: Add 2 tablespoons of unsweetened cocoa powder or chocolate syrup for a chocolatey delight.
-
Nutty Banana Milkshake: Toss in a tablespoon of almond butter or peanut butter for a protein-packed treat.
-
Tropical Twist: Add a handful of frozen pineapple chunks for a fruity explosion that will transport you to a beach resort.
-
Spiced Banana Milkshake: Mix in a dash of nutmeg or pumpkin spice for a cozy, autumnal flavor.
-
Vegan Banana Milkshake: Substitute ice cream with a non-dairy version and use almond milk for a vegan-friendly treat!
Chef’s Notes
Banana milkshakes are a go-to for me, not just because they taste incredible, but also because they remind me of sweet moments spent with family. I’ve whipped up this recipe for birthday parties, lazy Sunday afternoons, and even as an after-school snack for my little niece, who absolutely adores them!
Over the years, I’ve tried countless variations, always excited to experiment with new flavors and toppings. Once, on a whim, I added a pinch of cayenne to a batch I made for friends — and let’s just say their surprised faces were priceless! It’s all about finding joy in the kitchen and making these flavors your own.
FAQs and Troubleshooting
-
Why is my milkshake too thin?
If your milkshake is thinner than you’d like, add more ice cream to thicken it up! Alternatively, reduce the amount of milk next time. -
Can I use frozen bananas?
Absolutely! Frozen bananas will make your milkshake extra creamy. Just use a bit less milk for the right consistency! -
What if my milkshake is too thick?
If it’s too thick to blend, just add a little more milk, one splash at a time, until you reach your desired consistency. -
How do I store leftovers?
Drink it up! But if you have to save any, pour it into an airtight container and place it in the freezer. Just blend it again before serving to restore its creamy texture.
Nutritional Info (Optional)
While I love sharing recipes that make our hearts sing, I also think it’s good to know what we’re nourishing our bodies with! A typical banana milkshake made from the ingredients listed above contains approximately:
- Calories: 350-450 (depending on portion size and added ingredients)
- Protein: 8-10g
- Sugar: 30-40g
- Fat: 12-15g
Remember, these figures can vary based on your ingredients and serving sizes.
Now, go ahead and grab those bananas, fire up the blender, and make some incredible memories with your very own banana milkshake! Whether enjoyed solo or shared with friends, this drink never fails to warm my heart. Enjoy, and remember, every sip is a little moment of joy! Happy blending! 🍌🥤
Print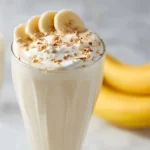
The Ultimate Banana Milkshake
- Total Time: 10 minutes
- Yield: 2 servings 1x
- Diet: Vegetarian
Description
A classic and creamy banana milkshake that brings back sweet memories, perfect for any occasion!
Ingredients
- 2 ripe bananas
- 1 cup whole milk (or almond/oat milk)
- 2 scoops vanilla ice cream (or dairy-free ice cream)
- 1 teaspoon vanilla extract
- 1 tablespoon honey or maple syrup
- Optional toppings: whipped cream, chocolate syrup, cinnamon
Instructions
- Choose your bananas: Peel and slice 2 ripe bananas.
- Add the milk: Pour 1 cup of milk into your blender.
- Scoop in ice cream: Add 2 generous scoops of vanilla ice cream.
- Add vanilla extract: Put in 1 teaspoon of pure vanilla extract.
- Drizzle in honey or maple syrup: Adjust the sweetness to your liking.
- Blend it up: Blend on high until smooth and creamy.
- Taste test: Adjust thickness with more ice cream or milk as needed.
- Serve: Pour into glasses and top with optional toppings.
Notes
For a fun presentation, dip glasses in chocolate syrup before pouring in the shake. Enjoy with a slice of banana on the rim or a cute paper straw!
- Prep Time: 10 minutes
- Cook Time: 0 minutes
- Category: Beverage
- Method: Blending
- Cuisine: American
Nutrition
- Serving Size: 1 serving
- Calories: 400
- Sugar: 30g
- Sodium: 150mg
- Fat: 15g
- Saturated Fat: 8g
- Unsaturated Fat: 5g
- Trans Fat: 0g
- Carbohydrates: 60g
- Fiber: 3g
- Protein: 10g
- Cholesterol: 50mg
Keywords: banana milkshake, creamy drink, easy recipe, smoothie, dessert


