
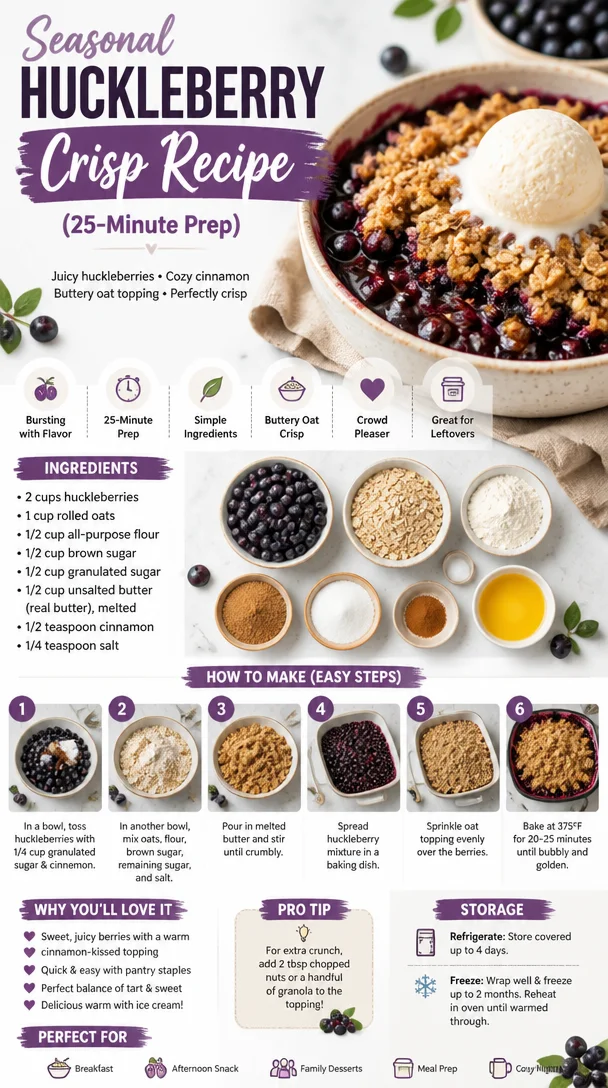
Seasonal Huckleberry Crisp Recipe (25-Minute Prep)
Huckleberry Crisp: A Touch of Sweet Nostalgia
Welcome back to my cozy kitchen, food lovers! Today, I’m excited to share a recipe that’s dear to my heart: Huckleberry Crisp. If you’re one of those people who hits the brakes when you spot a roadside stand bursting with fresh berries, or if the thought of a warm dessert topped with a scoop of vanilla ice cream sends you into a blissful dream, you’re in for a treat.
Huckleberries, often dubbed as nature’s candy, are tiny, sweet, and slightly tart gems that are a delight to work with. They bring an element of whimsy and joy to any dish, but in a crisp, they reach a whole new level of perfection! Picture this: a delectable combination of huckleberries bubbling away, mingling with oats, brown sugar, and buttery goodness—what could be better than that?
I remember the first time I made this crisp. It was a crisp fall evening, and my best friend and I decided to go berry-picking in the woods. With baskets in hand, laughter in the air, and a hint of autumn chill, we ventured into the wild. We stumbled upon a secret spot where huckleberries grew freely. We picked and sampled until we could hardly hold another berry, and by the end of the day, our fingers were stained purple, but our spirits were soaring.
Fast forward a few hours, and we turned our treasure haul into that warming, fruity crisp—the aroma wafting through my home filled us with pure joy as we dug into our creation. It was the perfect way to savor the fruits of our labor, and it sparked an enduring love for cooking with fresh huckleberries. Now, every time I whip up this Huckleberry Crisp, it transports me back to that beautiful day in nature, sharing laughter and love with friends.
Ingredients
Here’s a list of ingredients you’ll need to create your very own Huckleberry Crisp:
-
Huckleberries (4 cups): These beauties are the star of the show! Their sweet-tart flavor is a perfect match for the buttery crisp topping. If you can’t find huckleberries, blueberries or blackberries are great substitutes.
-
Granulated Sugar (1/2 cup): This helps to sweeten the huckleberries and balance their natural tartness. You can also use coconut sugar for a lower-glycemic option.
-
Lemon Juice (2 tablespoons): A splash of lemon juice brightens the flavor and complements the huckleberries beautifully. If you’re out of fresh lemons, bottled lemon juice works too.
-
Cornstarch (2 tablespoons): This is your thickener, helping to create that perfect, gooey berry filling. You can swap it with arrowroot powder for a gluten-free version.
-
Oats (1 cup): Rolled oats create a lovely chewy texture in the crisp topping. Quick oats can be used in a pinch, but they won’t give you that heartiness.
-
Brown Sugar (1/2 cup): It adds a hint of molasses flavor and moisture to the crisp topping, making it irresistible. For a lighter version, use light brown sugar or granulated sugar.
-
All-Purpose Flour (1/2 cup): Flour helps bind the topping together while adding a nice crunch. If you’re avoiding gluten, almond flour or oat flour can be great alternatives.
-
Butter (1/2 cup or 1 stick, softened): Butter provides that rich, decadent flavor. If you’d like to make it dairy-free, coconut oil or vegan butter works wonderfully.
-
Cinnamon (1 teaspoon): A sprinkle of cinnamon will warm your flavor profile and remind you of cozy days. If you’re a spice fan, add a pinch of nutmeg too!
Step-by-Step Instructions
Ready to get your hands a little messy? Let’s dive into the steps for making this delightful Huckleberry Crisp!
-
Preheat Your Oven: Start by preheating your oven to 350°F (175°C). This ensures that the crisp bakes evenly and gets that golden brown topping we all love.
-
Prepare the Huckleberries: In a large mixing bowl, combine your huckleberries, sugar, lemon juice, and cornstarch. Gently toss them together until the huckleberries are well coated. This step is crucial! The sugar and cornstarch will create a syrupy filling while baking.
-
Transfer to a Baking Dish: Pour the huckleberry mixture into a greased 9×9-inch baking dish. Use a wooden spoon to spread the mixture evenly—these berries deserve a good home!
-
Make the Topping: In another bowl, mix together the oats, brown sugar, flour, cinnamon, and softened butter. Using your fingers or a pastry cutter, work the butter into the dry ingredients until it resembles coarse crumbs. This is the fun part—get in there and feel the textures change, leaning into the creative process!
-
Assemble the Crisp: Evenly distribute the crumbly topping over the huckleberry mixture. Don’t worry about covering it perfectly. The uneven topping gives it that homemade charm!
-
Bake: Place the baking dish in the preheated oven and bake for 30-35 minutes, or until the top is golden brown and the huckleberries are bubbling away. Keep an eye on it after the 25-minute mark to avoid burning those precious oats.
-
Cool and Serve: Once you take it out of the oven, let the crisp cool for about 10 minutes. This step allows the juices to thicken up a bit more. It’s tough to resist, but trust me, the wait is worth it!
Serving Suggestions
When it comes to serving your Huckleberry Crisp, a scoop of vanilla ice cream on top is non-negotiable! The cold creaminess perfectly complements the warm, fruity goodness beneath. Plus, it adds a delightful contrast in temperatures. You can also serve it with a dollop of fresh whipped cream, or if you’re feeling adventurous, try a sprinkle of chopped nuts for that extra crunch.
Recipe Variations
Let’s get a little creative, shall we? Here are a few fun ideas to switch things up with your Huckleberry Crisp:
-
Add Some Spice: Mixing in a bit of ginger or nutmeg can add a lovely warmth and depth.
-
Nutty Topping: Add 1/2 cup of chopped nuts such as walnuts or pecans to the crisp topping for added texture.
-
Mix Berries: Pair huckleberries with raspberries or strawberries for a berry medley that packs a flavor punch.
-
Coconut Crisp: Swap some flour for shredded coconut in the topping for a tropical twist.
-
Vegan Version: Use plant-based butter and maple syrup instead of sugar to make this crisp vegan-friendly!
Chef’s Notes
This Huckleberry Crisp recipe has evolved over the years, influenced by the seasons and whatever I have on hand. Once, I made it using coconut oil and added a handful of walnuts to the topping—it was a game-changer! My friends raved about the crunchy texture.
Also, it’s worth mentioning just how forgiving this recipe is! If you find you have a bit too many huckleberries or not quite enough, it’s very adaptable. Just get those juicy berries into that dish and let the oven do the magic!
FAQs and Troubleshooting
-
Can I use frozen huckleberries?
Absolutely! Frozen huckleberries are a great option. Just be sure to thaw and drain excess moisture before mixing with other ingredients. -
Why did my topping turn out soggy?
If your topping became soggy, it might have had too much moisture or not enough oats. Make sure to use the right proportions for the ingredients, and try letting it bake a little longer. -
How can I make this gluten-free?
Swap out regular flour for gluten-free all-purpose flour and ensure your oats are certified gluten-free. -
Can I make this ahead of time?
Yes! You can prepare the huckleberry filling and the topping separately ahead of time. Just store them in the refrigerator until you’re ready to bake.
Nutritional Info (If Applicable)
Note: Nutritional info may vary based on brands and measurements used. Here’s a rough estimate per serving:
- Calories: 250
- Total Fat: 10g
- Saturated Fat: 5g
- Carbohydrates: 40g
- Sugars: 15g
- Protein: 2g
And there you have it, my friends—a warm, inviting Huckleberry Crisp that will not only fill your belly but also your heart with cherished memories. Remember, the kitchen is a place for exploration, creativity, and connecting with those you love, so don’t hesitate to make this recipe your own! Happy baking, and as always, I can’t wait to hear your stories!
Print
Huckleberry Crisp
- Total Time: 50 minutes
- Yield: 8 servings
- Diet: Vegetarian
Description
A warm, inviting Huckleberry Crisp that blends sweet-tart huckleberries with a buttery, crunchy topping, perfect for a cozy dessert.
Ingredients
- Huckleberries (4 cups)
- Granulated Sugar (1/2 cup)
- Lemon Juice (2 tablespoons)
- Cornstarch (2 tablespoons)
- Oats (1 cup)
- Brown Sugar (1/2 cup)
- All-Purpose Flour (1/2 cup)
- Butter (1/2 cup, softened)
- Cinnamon (1 teaspoon)
Instructions
- Preheat your oven to 350°F (175°C).
- Prepare the huckleberries by combining them with sugar, lemon juice, and cornstarch in a large mixing bowl.
- Transfer the huckleberry mixture into a greased 9×9-inch baking dish.
- Make the topping by mixing oats, brown sugar, flour, cinnamon, and softened butter in another bowl until crumbly.
- Assemble the crisp by spreading the crumbly topping over the huckleberry mixture.
- Bake in the preheated oven for 30-35 minutes until the top is golden brown and the huckleberries are bubbling.
- Cool for about 10 minutes before serving.
Notes
Serve warm with a scoop of vanilla ice cream or a dollop of whipped cream.
- Prep Time: 15 minutes
- Cook Time: 35 minutes
- Category: Dessert
- Method: Baking
- Cuisine: American
Nutrition
- Serving Size: 1 serving
- Calories: 250
- Sugar: 15g
- Sodium: 50mg
- Fat: 10g
- Saturated Fat: 5g
- Unsaturated Fat: 5g
- Trans Fat: 0g
- Carbohydrates: 40g
- Fiber: 3g
- Protein: 2g
- Cholesterol: 30mg
Keywords: huckleberry, dessert, fruit crisp, warm dessert, baking

Beginner-Friendly One-Bowl Double-Chocolate Zucchini Cake
Double Chocolate Zucchini Cake: Decadence Meets Wholesome Goodness
Welcome to my cozy kitchen, friends! Today, we’re diving into a delightful recipe that marries indulgence with healthy eating—my Double Chocolate Zucchini Cake! I know, I know; the idea of zucchini in a dessert might raise some eyebrows, but trust me when I say this cake is nothing short of magical. It’s rich, moist, and packed with that deep chocolate flavor that chocolate lovers dream of. Plus, it’s a sneaky way to get some veggies into your dessert, and who doesn’t love that?
There’s something about the combination of chocolate and surprise ingredients that feels like a little culinary adventure. The zucchini adds moisture without altering the flavor, making the cake incredibly tender. And let’s be honest, who wouldn’t feel great about indulging in a slice of cake that also provides a little nutritional boost? I’m all for deliciousness wrapped in a cocoon of health-conscious choices.
This cake is particularly special to me, as it reminds me of family gatherings where my aunt would whip up the most mouthwatering treats—her signature being a rich chocolate cake that always disappeared in mere minutes. Inspired by her creations, I embarked on a mission to create something equally delectable but with a twist. That’s when this Double Chocolate Zucchini Cake came into play. It’s now a staple at birthday parties, potlucks, and even cozy weeknight dinners. Plus, it’s incredibly easy to make—so gather your ingredients, throw on your favorite apron, and let’s get baking!
A Sweet Memory from My Childhood
I remember, as a kid, the aroma of warm chocolate wafting through the house, signaling that something extraordinary was underway in the kitchen. My aunt would host Sunday dinners where dessert was simply a must! One memorable afternoon, I watched in awe as she mixed chocolatey batter in a big bowl. She had a magical touch, and somehow, she could elevate simple ingredients to create the most incredible desserts. We used to sneak spoonfuls of the batter while it was still warm, giggling about how we were “helping” in the kitchen.
Years later, I found myself yearning for those joyful experiences with my loved ones, culminating in my Double Chocolate Zucchini Cake. It evokes the same feelings of love and comfort, making it the perfect centerpiece for any gathering. Not only does it nourish the body with a hidden veggie, but it also satisfies the soul with each decadent bite.
Gather Your Ingredients
Before we kick things off in the kitchen, let’s ensure you have everything you need. Here’s what you’ll require to whip up this delightful cake:
- 1 cup (130g) all-purpose flour: The base of any great cake! For a healthier twist, use whole wheat flour. It’ll give it a nutty flavor and added fiber.
- 1/2 cup (40g) cocoa powder: Unsweetened is the way to go! This is where the deep, rich chocolate flavor comes from. If you’re feeling adventurous, consider using dark cocoa powder for an even bolder taste.
- 1 tsp baking soda: This will give our cake that lovely rise. Baking powder can be used instead if you’re out of baking soda—just use about 1.5 teaspoons.
- 1/2 tsp salt: A pinch to balance the sweetness; trust me, it makes a difference!
- 1/2 cup (120ml) vegetable oil: This provides moisture. You can swap it out for melted coconut oil for a nice tropical twist or even applesauce for a lower-fat option.
- 1 cup (200g) granulated sugar: The sweet stuff! Feel free to substitute with brown sugar for a deeper flavor or coconut sugar for a lower glycemic index.
- 2 large eggs: These will bind everything together. For a vegan version, flax eggs are a fantastic substitute (1 tbsp ground flaxseed + 2.5 tbsp water per egg).
- 1 tsp vanilla extract: Pure vanilla extract takes the flavor up a notch. If you’re in a pinch, use vanilla essence.
- 1 cup (about 250g) grated zucchini: This is our secret ingredient! For best results, use fresh, young zucchini; it’s juicier and more flavorful. If you’re feeling adventurous, you can swap with grated carrots for a delightful twist.
- 1 cup (170g) chocolate chips: Because the more chocolate, the better, right? Go for dark chocolate chips, or even white chocolate for a unique flair!
Step-by-Step Instructions
Now that we’ve rounded up our ingredients, let’s get down to business! Here’s how to make this scrumptious Double Chocolate Zucchini Cake step by step.
-
Prep Your Oven and Pan: Preheat your oven to 350°F (175°C). Grease a 9×9-inch square baking pan, or line it with parchment paper for easy removal.
-
Mix the Dry Ingredients: In a medium bowl, whisk together the flour, cocoa powder, baking soda, and salt. This helps to distribute the leavening agents evenly throughout the flour so you get that perfect rise.
-
Combine Wet Ingredients: In a large bowl, combine the vegetable oil, granulated sugar, eggs, and vanilla extract. Beat this mixture until it’s light and fluffy—about 2 to 3 minutes. This aeration is key to ensuring your cake has that delightful texture!
-
Add Zucchini: Fold in the grated zucchini until well combined. You’ll want to make sure the zucchini is evenly distributed, giving every bite a hint of moisture.
-
Incorporate Dry Ingredients: Gradually add the dry ingredients to the wet mixture. Stir until just combined—don’t overmix! A few lumps are totally fine; this keeps your cake light and airy.
-
Chocolate Time: Gently fold in the chocolate chips (saving a few to sprinkle on top, of course!). This is where the magic happens—the gooey, melted chocolate will create little pockets of happiness!
-
Transfer to Pan: Pour the batter into your prepared baking pan, spreading it evenly. If you saved some chocolate chips, now’s the time to sprinkle them on top for that extra chocolaty goodness!
-
Bake: Place the pan in the preheated oven and bake for 30-35 minutes, or until a toothpick inserted in the center comes out clean or with a few moist crumbs. Be careful not to overbake; that will lead to a dry cake!
-
Cool Down: Once baked, let the cake cool in the pan for about 10 minutes before transferring to a wire rack to cool completely. Patience is key here, but the smells wafting through your kitchen will test your resolve!
Serving Suggestions
When it’s finally time to serve, cut yourself a generous slice and plate it up with a dusting of powdered sugar or a scoop of vanilla ice cream. For a more indulgent experience, drizzle some warm chocolate ganache over the top. Your guests (and you!) will feel like they’ve entered chocolate heaven!
Recipe Variations
Feeling creative? Here are a few fun twists you can try with this recipe:
- Nutty Addition: Fold in 1/2 cup of chopped walnuts or pecans for some delightful crunch and an added layer of flavor.
- Spicy Kick: Add a pinch of cayenne pepper or cinnamon for a hint of warmth and spice that complements the chocolate beautifully.
- Gluten-Free Option: Use a 1:1 gluten-free flour blend to make this a gluten-free treat without sacrificing any flavor or texture.
- Fruity Surprise: Swap out half of the zucchini for mashed ripe bananas for a naturally sweeter flavor and a tender cake.
- Marble Cake: For a fun twist, reserve 1/3 of the batter and mix it with additional cocoa powder, then dollop the chocolate batter into the pan creating a marbled effect before baking.
Chef’s Notes
This Double Chocolate Zucchini Cake is a recipe that is close to my heart, having transformed my childhood memories into something everyone can enjoy. Over time, I’ve played with the recipe to make it my own, and it continues to evolve. I once accidentally forgot to add sugar and ended up with a “healthy option”—it was a hit with those who preferred a less-sweet treat! Since then, I offer a low-sugar version for my health-conscious friends, proving it’s versatile enough to please diverse palates.
FAQs and Troubleshooting
1. Why is my cake dry?
This could be due to overbaking! Keep a close eye on it in the last few minutes, or add a bit more zucchini to increase moisture next time.
2. Can I use frozen zucchini?
Absolutely! Just make sure to thaw and drain it well so it doesn’t add excess moisture to your batter.
3. What if I don’t have eggs?
You can substitute each egg with 1/4 cup of unsweetened applesauce or half a ripe banana. Both options will help bind the ingredients while keeping it moist.
4. Can I make this cake ahead of time?
Yes! This cake holds up well in the fridge and even tastes better the next day once the flavors have had time to mingle. Just be sure to cover it well!
Nutritional Info
While I don’t log my calorie intake meticulously, this delicious cake is packed with beneficial ingredients like zucchini to boost your fiber and nutrient content. Each slice provides a delightful balance of protein, healthy fats, and that essential dose of joy that only chocolate can bring.
So there you have it, my friends! A foolproof recipe for Double Chocolate Zucchini Cake that’s sure to steal the show at your next gathering. With love, warmth, and a sprinkle of creativity, your kitchen will become a haven of culinary delights. Happy baking, and may your cake always be delicious and your spirits ever high!
Print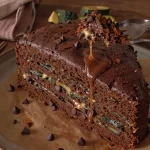
Double Chocolate Zucchini Cake
- Total Time: 45 minutes
- Yield: 9 servings 1x
- Diet: Vegetarian
Description
This decadent Double Chocolate Zucchini Cake blends indulgence with healthy eating, offering a rich and moist chocolate experience with a secret ingredient.
Ingredients
- 1 cup (130g) all-purpose flour
- 1/2 cup (40g) cocoa powder
- 1 tsp baking soda
- 1/2 tsp salt
- 1/2 cup (120ml) vegetable oil
- 1 cup (200g) granulated sugar
- 2 large eggs
- 1 tsp vanilla extract
- 1 cup (about 250g) grated zucchini
- 1 cup (170g) chocolate chips
Instructions
- Preheat your oven to 350°F (175°C). Grease a 9×9-inch square baking pan, or line it with parchment paper for easy removal.
- Whisk together the flour, cocoa powder, baking soda, and salt in a medium bowl.
- Combine the vegetable oil, granulated sugar, eggs, and vanilla extract in a large bowl. Beat until light and fluffy, about 2 to 3 minutes.
- Fold in the grated zucchini until well combined.
- Gradually add the dry ingredients to the wet mixture and stir until just combined.
- Gently fold in the chocolate chips.
- Pour the batter into the prepared baking pan and sprinkle any reserved chocolate chips on top.
- Bake for 30-35 minutes, or until a toothpick inserted comes out clean with a few moist crumbs.
- Let the cake cool in the pan for about 10 minutes before transferring it to a wire rack to cool completely.
Notes
For additional flavor, consider adding nuts or spices. This recipe can be adapted for gluten-free or vegan diets.
- Prep Time: 15 minutes
- Cook Time: 30 minutes
- Category: Dessert
- Method: Baking
- Cuisine: American
Nutrition
- Serving Size: 1 slice
- Calories: 350
- Sugar: 22g
- Sodium: 400mg
- Fat: 12g
- Saturated Fat: 4g
- Unsaturated Fat: 6g
- Trans Fat: 0g
- Carbohydrates: 45g
- Fiber: 3g
- Protein: 6g
- Cholesterol: 30mg
Keywords: cake, chocolate, zucchini, dessert, baking
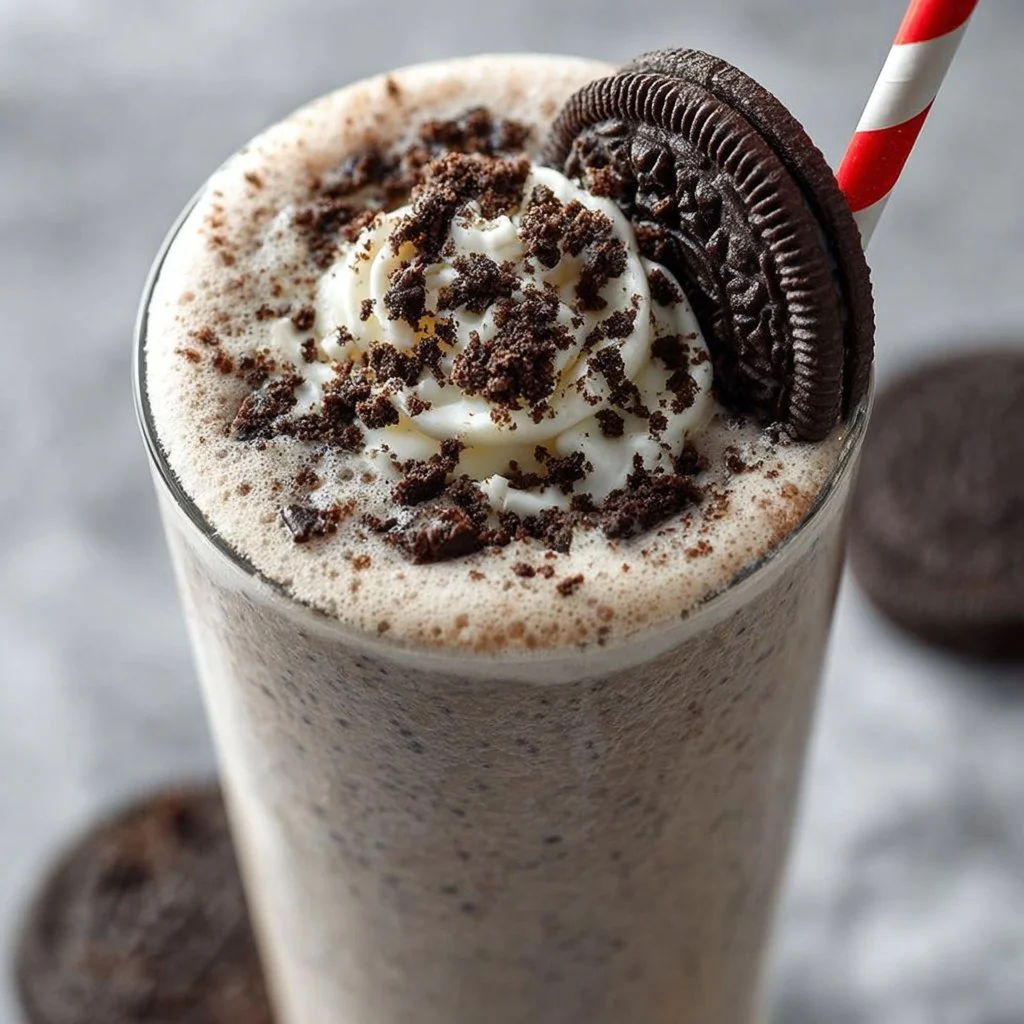
Oreo Milkshake
Creamy Dreamy Oreo Milkshake Recipe
Welcome to my cozy corner of the kitchen! Today, I’m excited to share a recipe that’s not just a treat, but a nostalgic trip down memory lane: the delicious Oreo milkshake. There’s something undeniably magical about this simple combination of ice cream, milk, and those iconic black-and-white cookies. With every sip, we’re transported back to carefree summer days and the joyful hugs of family gatherings.
As a passionate home cook, I truly believe that food is more than just fuel; it’s an experience meant to be shared. Whether you’re enjoying it alone on a quiet evening or whipping up a batch for a gathering of friends, an Oreo milkshake never fails to put a smile on my face (and I’m sure it’ll do the same for you!).
Today’s recipe is about more than just a tasty indulgence — it’s about creating memories with the people you cherish most. Let’s dive into the delightful world of Oreo milkshakes, where the only requirement is a love for delicious flavors and a willingness to sprinkle a little happiness into your day.
Personal Story
I remember the first time I made an Oreo milkshake. I was about ten years old, standing on a stool in my mom’s kitchen while trying to reach the blender on the countertop. The kitchen was filled with warm scents of baking cookies, and in the background, my siblings were busy with their own fun kitchen experiments. We had just come back from our favorite ice cream parlor, where we were dessert-testing for the family.
Eager to recreate that magical shake, I took a little trip to the pantry and grabbed a bag of Oreos. I carefully opened them, but the cookies crumbled under the weight of my excitement, and chocolate crumbs flew everywhere! Instead of worrying about the mess, my mom joined in the fun, helping me toss the cookies into the blender along with scoops of cool vanilla ice cream.
The milkshake was a little lumpy, twinkling with bits of Oreos floating around like stars in a chocolate galaxy. Once it was done, we each grabbed a straw and took that first sip together. It was a moment that sparked laughter, joy, and the pure bliss of homemade treats. That creamy, sweet concoction taught me that cooking is more than technique; it’s about having fun and making memories.
Ingredients
Now, let’s gather our ingredients! Here’s what you’ll need for this fantastic Oreo milkshake:
-
Oreo Cookies: The stars of the show! Famous for their creamy filling and cookie crunch, these iconic treats provide the base flavor. You can experiment with different Oreo varieties, like double-stuffed or mint, for a unique twist.
-
Vanilla Ice Cream: This creamy delight gives the milkshake its luscious texture. Feel free to swap with any ice cream you love — chocolate or cookies and cream work beautifully too.
-
Whole Milk: This adds the right amount of creaminess and helps blend everything smoothly together. If you want to cut down on calories, opt for 2% milk or your favorite milk alternative like almond or oat milk.
-
Whipped Cream: While optional, it’s a glorious topping that adds extra fluff and sweetness. You can either whip your own or grab a can from the store.
-
Chocolate Syrup: Drizzled on top or blended in, it amps up the chocolatey goodness! Use store-bought or homemade syrup for a personal touch.
-
Chocolate Shavings or Crushed Oreos for Garnish: These are perfect for that finishing touch. Don’t skip out on garnishing; it makes the treat feel extra special!
Chef Insight:
For a richer flavor, consider adding a splash of vanilla extract to the milkshake mixture. It enhances the taste just like a scoop of love!
Step-by-Step Instructions
Now that we’ve got our ingredients lined up, let’s get to the fun part – making your Oreo milkshake!
-
Crush the Oreos: Start by crushing about 4-5 Oreo cookies. You can use a food processor or pop them into a zip-lock bag and give them a hearty whack with a rolling pin. This will create a delightful crumb texture in your shake! Reserve some crumbs for garnish later.
-
Blend the Ingredients: In a blender, combine 3-4 scoops of vanilla ice cream, about 1 cup of whole milk, and the crushed cookies. The amount of milk can be adjusted based on how thick you want your shake. For a thicker shake, start with less milk and add gradually.
- Tip: Always add ice cream before the milk to prevent a messy blender situation. Trust me, I’ve been there!
-
Add Chocolate Syrup: For an extra indulgent flavor, next drizzle in 2 tablespoons of chocolate syrup. If you’re like me and love a good chocolate taste, don’t hold back!
-
Blend Again: Put the lid on and blend until combined and smooth — about 30 seconds to a minute. You want to see a beautiful, thick milkshake with cookie bits peppered throughout.
-
Taste Test: Here comes the most fun part! Pour a little bit into a glass to taste. If it’s perfect, wonderful! If not, tweak it — maybe a little more syrup or ice cream, depending on your taste.
-
Serve it Up: Pour the milkshake into tall glasses. You can go fancy if you want by drizzling chocolate syrup on the insides of the glass before pouring in the shake.
-
Top with Whipped Cream & Oreos: Now, the pièce de résistance! Add whipped cream to the top, and sprinkle those reserved Oreo crumbs and/or chocolate shavings to make it visually appealing and extra delicious!
Chef Hack:
If you want to get fancy, you can add a dollop of whipped cream followed by a whole Oreo cookie standing proud on top! It makes for a show-stopper treat.
Serving Suggestions
Presentation is key! Serve your Oreo milkshake in tall, clear glasses so that those layers of rich chocolate and creamy white ice cream are showing off. You can even accompany your milkshake with a few extra Oreos on the side for some dipping fun (and another way to experience that creamy goodness)!
Recipe Variations
Feeling adventurous? Let’s shake things up! Here are a few tasty twists to try with your Oreo milkshake:
-
Mint Oreo Shake: Swap regular Oreos for Mint Oreos and add a drop of peppermint extract for a refreshingly cool flavor.
-
Peanut Butter Oreo Shake: Toss in a tablespoon of creamy peanut butter before blending for a deliciously nutty twist.
-
Coffee Oreo Shake: If you love your caffeine fix, add a shot of espresso or strong brewed coffee to give it a delightful kick!
-
Cookies and Cream Oreo Shake: For an ultra-creamy treat, use cookies and cream ice cream as the base, combining both flavors in every sip.
-
Vegan Version: Use dairy-free ice cream and plant-based milk for a version that everyone can enjoy, regardless of dietary restrictions!
Chef’s Notes
This recipe has transformed over time, reflecting the various delights of my own kitchen experiments. I once discovered that tossing in a sprinkle of cinnamon elevated the chocolatey experience further! I urge you to think outside the box and personalize your shake; it’s all about making memories and having fun! And hey, if you find yourself making a bit of a mess — embrace it! Every splash and spill is a story waiting to be told.
FAQs and Troubleshooting
-
Why is my milkshake too thick?
- If it’s too thick, just add a bit more milk until you get the desired consistency. Blend again to ensure everything mixes nicely.
-
Can I make this milkshake ahead of time?
- Milkshakes are best enjoyed fresh, but you can prepare the base ahead. Just blend the ice cream and milk, then add the Oreos just before serving.
-
What’s the best way to store leftovers?
- If you have any leftover milkshake (rare, but it happens!), store it in an airtight container in the freezer. Let it sit at room temperature for a few minutes before trying to blend again.
-
How do I adjust the sweetness?
- If it’s too sweet for your liking, add a pinch of sea salt or a dash of unsweetened cocoa powder to balance flavors.
Nutritional Info
While I don’t often dwell on numbers in my kitchen adventures, a typical serving of this Oreo milkshake contains around 540 calories, with varying amounts depending on specific brands of ingredients used. Don’t forget — it’s all about balance and treating ourselves now and then!
So there you have it! Your very own Oreo milkshake recipe, filled with love and kitchen tales that spark joy. I hope you enjoy making this rich and creamy drink as much as I do. Cheers to sweet indulgences and even sweeter memories! Happy cooking!
Print
Creamy Dreamy Oreo Milkshake
- Total Time: 10 minutes
- Yield: 2 servings 1x
- Diet: Vegetarian
Description
A rich and creamy Oreo milkshake that captures the joy of childhood memories with every sip.
Ingredients
- 4–5 Oreo Cookies
- 3–4 scoops Vanilla Ice Cream
- 1 cup Whole Milk
- 2 tablespoons Chocolate Syrup
- Whipped Cream (optional)
- Chocolate Shavings or Crushed Oreos for garnish
Instructions
- Crush the Oreos: Start by crushing about 4-5 Oreo cookies in a food processor or zip-lock bag.
- Blend the Ingredients: In a blender, combine 3-4 scoops of vanilla ice cream, 1 cup of whole milk, and the crushed cookies.
- Add Chocolate Syrup: Drizzle in 2 tablespoons of chocolate syrup.
- Blend Again: Blend until combined and smooth, about 30 seconds to a minute.
- Taste Test: Pour a little into a glass to taste. Adjust sweetness or thickness as needed.
- Serve it Up: Pour the milkshake into tall glasses, drizzling chocolate syrup inside the glass if desired.
- Top with Whipped Cream & Oreos: Add whipped cream, and garnish with reserved Oreo crumbs and/or chocolate shavings.
Notes
For a richer flavor, consider adding a splash of vanilla extract. Serve with extra Oreos for dipping!
- Prep Time: 10 minutes
- Cook Time: 0 minutes
- Category: Dessert
- Method: Blending
- Cuisine: American
Nutrition
- Serving Size: 1 serving
- Calories: 540
- Sugar: 45g
- Sodium: 170mg
- Fat: 25g
- Saturated Fat: 14g
- Unsaturated Fat: 6g
- Trans Fat: 0g
- Carbohydrates: 53g
- Fiber: 2g
- Protein: 8g
- Cholesterol: 70mg
Keywords: Oreo Milkshake, Dessert, Ice Cream, Summer Treat

Cinnamon Vanilla Milkshake
Cinnamon Vanilla Milkshake: A Cozy Delight to Savor
Welcome back to my kitchen, my lovely foodies! Today, I’m thrilled to share one of my favorite treats that takes me right back to those lazy afternoons spent with my family — the Cinnamon Vanilla Milkshake. Picture this: it’s a hot summer day, and the sun is shining just right. The smell of cinnamon wafts through the air, reminding me of the cozy evenings spent gathered around the kitchen table, laughing and creating sweet memories. You know that feeling when you take that first sip of something utterly delightful? Well, this milkshake is the embodiment of that happiness!
This isn’t just any ordinary milkshake; it’s a rich and creamy blend that combines the warmth of cinnamon with the sweet allure of vanilla. The flavor is so comforting that it feels like a hug in a glass! And let’s be honest — who doesn’t need a little bit of that cozy love in their lives? Whether you’re indulging after a long day or treating yourself on a weekend brunch, this milkshake will surely brighten your spirits.
Now, the beauty of this recipe is that it’s wonderfully easy to whip up. With simple ingredients and minimal kitchen fuss, you can bring a little magic to your day. As you blend everything together, you’ll feel like a rockstar in your own kitchen, creating a delightful drink that’s sure to impress — even if it’s just for yourself! So, let me guide you through this delicious journey. Trust me; you’ll be sipping on this fabulous shake in no time!
Personal Story
Let me take you back to about ten summers ago when my little sister, Emma, would come over to visit during her break. I vividly remember one day, the sun pouring in through the windows, and the scent of cinnamon tipped into the air when I decided to surprise her with a decadent milkshake. It was one of those spontaneous kitchen adventures that turned into a cherished memory!
We rummaged through the pantry, pulling out every possible ingredient we could find, but it was the combination of vanilla ice cream, milk, and that sweet-smoky cinnamon that made our taste buds dance. We blended our concoction in a vintage blender — the kind that wobbled just a bit while we curiously waited for it to whirr up our treat. The moment we poured it into those tall glasses, topped with a dusting of cinnamon and a cherry, we were in heaven!
Emma’s eyes lit up at that first sip, and I knew we had created something special. This milkshake became our secret summer ritual, reminding us to embrace simplicity and joy in cooking. As you make this recipe, I hope it brings you as much happiness and warmth as it did for us. Now, let’s dive into the ingredients for this delightful goodness!
Ingredients
Here’s what you’ll need to create your Cinnamon Vanilla Milkshake:
-
Vanilla Ice Cream (4 cups)
The star of the show! Use your favorite brand, but make sure it’s a rich, creamy vanilla to get that deliciously smooth texture. If you prefer a lighter version, try frozen yogurt or a dairy-free alternative! -
Whole Milk (1 cup)
Whole milk adds richness, but you can swap it with skim milk or unsweetened almond milk for a lighter version. Keep an eye on the thickness; thinner milk will give you a more liquid shake! -
Ground Cinnamon (1 teaspoon)
This warming spice is what brings the magic! If you’re feeling adventurous, you could use a cinnamon stick for a stronger flavor — just blend it in and strain it out later. -
Vanilla Extract (1 teaspoon)
A splash of vanilla enhances the ice cream’s flavor. Pure vanilla extract is best, but if you’re out, feel free to use imitation vanilla in a pinch. -
Whipped Cream (optional)
For that extra indulgent topping! You can make homemade whipped cream in seconds or grab a can from the store. -
Maraschino Cherry (optional)
A cute cherry on top makes everything more delightful! Feel free to skip this step if you’re avoiding added sugar.
Step-by-Step Instructions
Get ready for some smooth blending action! Follow these steps, and you’ll be sipping bliss in no time:
-
Gather Your Ingredients
Before you start, gather all your ingredients. Trust me; it makes the process smoother! Plus, it’s fun to see all the yummy components laid out. -
Add Ice Cream to Blender
Scoop 4 cups of vanilla ice cream into your blender. You can let it sit for a few minutes to soften slightly — this makes blending easier and ensures you won’t need to wrestle with a stubborn ice cream block! -
Pour in the Milk
Next, add 1 cup of whole milk to the blender. If you want a thicker shake, hold back a splash of milk until you find the consistency you like. You can always add more — but it’s tricky to thicken up! -
Blend Until Smooth
Lock the lid on your blender and blend on medium speed until everything is creamy and smooth, about 20-30 seconds. Make sure to glance at the sides of the blender; you might want to scrape down any ice cream clinging onto the walls! -
Add Cinnamon and Vanilla
Now, sprinkle in the ground cinnamon and pour in the vanilla extract. Give it another quick blend for about 5-10 seconds to distribute that warm cinnamon aroma evenly throughout. -
Taste Test
Here comes the fun part! Carefully taste your shake. Is it sweet enough? If you want a little extra sweetness, consider adding a tablespoon of sugar or honey at this stage. Just blend it one last time! -
Serve Immediately
Pour your delightful shake into tall glasses. For a little flair, you can drizzle some chocolate or caramel sauce inside the glass before pouring in the shake. Can you say extravagant? -
Top with Whipped Cream and Cherry
If you’re feeling fancy, top with a dollop of whipped cream and plop a maraschino cherry right on top! Grab a straw, take a moment to admire your masterpiece, and dive in.
Serving Suggestions
To plate this delicious Cinnamon Vanilla Milkshake, I recommend using tall, clear glasses to showcase its creamy texture. If you’re feeling extra fancy, add a sprinkle of cinnamon on top of the whipped cream and perhaps a little extra swirl of chocolate or caramel sauce. Serve with wide straws, napkins galore, and that infectious smile of yours!
Recipe Variations
-
Chocolate Cinnamon Milkshake
Blend in 2 tablespoons of chocolate syrup for a chocolatey twist on this classic shake. -
Nutty Delight
Add a tablespoon of almond butter or peanut butter to your shake before blending for a creamy, nutty flavor. -
Spiced Twist
Experiment by adding a dash of nutmeg or allspice along with the cinnamon for a more complex flavor profile. -
Fruit-Fusion Milkshake
Toss in half a banana before blending for a fruity, creamy variation that’s equally delightful. -
Dairy-Free Option
Use dairy-free ice cream and nut or oat milk for an equally scrumptious shake, perfect for those with dietary restrictions!
Chef’s Notes
I’ve made this milkshake countless times, and every batch brings back those sweet summer memories with my sister. Once, I even hosted a "Shake-Off" party with friends, where we each brought our unique twist on the milkshake. It became a fun competition filled with laughter, spills, and, yes, too many milkshakes to count!
Over the years, this recipe has evolved, but the core remains the same — a love for cozy flavors and shared moments. Think of this as more than just a drink; it’s an opportunity to connect with loved ones, whether you’re sitting around the kitchen or catching up on the back porch.
FAQs and Troubleshooting
-
Can I use low-fat or almond milk instead of whole milk?
Yes, you absolutely can! Low-fat milk will work perfectly fine, but be ready for a slightly less creamy texture. Almond milk is a great dairy-free alternative, but the milkshake will be thinner — so adjust the quantity as needed! -
What if my milkshake is too thick?
No worries! Simply add a splash more milk and blend again; that should loosen it right up! -
Can I store leftovers?
While it’s tempting, milkshakes are best enjoyed fresh. If you do have leftovers, store them in an airtight container in the freezer. Let them sit out for a bit to soften before relishing again, but ice crystals may form. -
How can I make my milkshake sweeter?
For sweetness, try adding a tablespoon of vanilla syrup, honey, or sugar right before blending! Just be careful; a little goes a long way.
Nutritional Info
(This section is optional and can be customized according to dietary preferences.)
Serving: 1 milkshake
Calories: ~350
Fat: 17g
Carbohydrates: 50g
Fiber: 1g
Sugar: 35g
Protein: 9g
And there you have it, my sweet friends! Your very own cozy Cinnamon Vanilla Milkshake to enjoy on any occasion. I hope this recipe fills your kitchen with warmth and laughter just the way it has in mine! Now go ahead and treat yourself to a refreshing sip of nostalgia. Cheers to you and your kitchen adventures! 🌟🥤
Print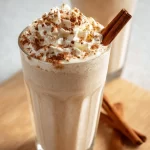
Cinnamon Vanilla Milkshake
- Total Time: 10 minutes
- Yield: 1 serving 1x
- Diet: Vegetarian
Description
A rich and creamy blend of vanilla ice cream and cinnamon, perfect for a hot summer day.
Ingredients
- 4 cups Vanilla Ice Cream
- 1 cup Whole Milk
- 1 teaspoon Ground Cinnamon
- 1 teaspoon Vanilla Extract
- Whipped Cream (optional)
- Maraschino Cherry (optional)
Instructions
- Gather your ingredients.
- Add ice cream to the blender.
- Pour in the milk.
- Blend until smooth.
- Add cinnamon and vanilla.
- Taste test for sweetness.
- Serve immediately.
- Top with whipped cream and cherry.
Notes
For a thicker shake, adjust the milk. Optional variations include chocolate syrup or nut butter.
- Prep Time: 10 minutes
- Cook Time: 0 minutes
- Category: Dessert
- Method: Blending
- Cuisine: American
Nutrition
- Serving Size: 1 milkshake
- Calories: 350
- Sugar: 35g
- Sodium: 100mg
- Fat: 17g
- Saturated Fat: 10g
- Unsaturated Fat: 5g
- Trans Fat: 0g
- Carbohydrates: 50g
- Fiber: 1g
- Protein: 9g
- Cholesterol: 60mg
Keywords: milkshake, cinnamon, vanilla, dessert, summer treat

Chocolate Strawberry Yogurt Clusters (Viral Recipe!)
Chocolate Strawberry Yogurt Clusters: A Sweet Surprise!
Hello, foodies! It’s Olivia Bennett here, and today, we’re diving into the delightful world of Chocolate Strawberry Yogurt Clusters. Now, if you’ve never tasted one of these scrumptious bites, let me tell you — you’re in for a treat! Picture this: strawberries dipped in creamy yogurt and enveloped in rich, dark chocolate. They’re not just delicious; they’re also a feast for the eyes!
These clusters are as fun to make as they are to eat, making them a perfect afternoon activity to share with family or friends. They bring a burst of sweetness, a crunch of chocolate, and a splash of freshness with every bite. Not to mention, they’re super easy to whip up! Whether you’re looking for a cozy treat to enjoy at home or a fun snack to impress at a gathering, these chocolate-covered creations are bound to brighten your day.
What I love most about cooking is how it connects us. So, let’s gather our ingredients, throw on our aprons, and turn the kitchen into our very own sweet-making factory. Dive in with me as we craft these yummy little delights, perfect for satisfying that sweet tooth while still feeling pretty wholesome. Ready? Let’s bring some joy into the kitchen!
Personal Story
This recipe takes me back to summer afternoons spent in my grandmother’s kitchen. She was the queen of simple but delicious snacks, and my favorite was her chocolate-covered strawberry treat. I remember one sunny day, she invited me to help her in the kitchen. Armed with fresh strawberries from her garden and a bowl of melted chocolate, we created the most divine concoction.
We laughed and chatted as our hands got messy — a sure sign of fun in the kitchen! The sweet scent of chocolate wafting through the air was simply irresistible, and when we finally got to taste our creations, it felt like we had struck gold. That long-ago afternoon became a cherished memory, inspiring me to develop my own take on it. Now, with my Chocolate Strawberry Yogurt Clusters, I hope to recreate that same joy and also share the love and fun of cooking with you.
Ingredients
Here’s what you’ll need to whip up these Chocolate Strawberry Yogurt Clusters, along with some chef tips to guide you along the way:
-
Fresh Strawberries: Look for ripe, firm strawberries that are vibrant red. You can substitute with raspberries or cherries for a fun twist!
-
Plain Greek Yogurt: This is the base for our yogurt clusters! It’s thick, creamy, and packed with protein. You can use regular yogurt or even coconut yogurt for a dairy-free option.
-
Semi-Sweet or Dark Chocolate Chips: Choose your favorite chocolate! You can also use milk chocolate if you prefer a sweeter taste. For a healthier option, opt for dark chocolate with a higher cocoa content (70% or more).
-
Honey or Maple Syrup: To sweeten the yogurt, you can use honey, agave, or maple syrup. Feel free to adjust the sweetness according to your taste!
-
Vanilla Extract: A splash of vanilla adds depth to our yogurt mixture. If you’re out of vanilla, almond extract could work in a pinch for a different flavor profile.
-
Sea Salt (optional): A sprinkle of flaky sea salt on top of the chocolate adds a delightful contrast to the sweetness. Trust me, it makes a difference!
Step-by-Step Instructions
Let’s get down to the fun part: making our Chocolate Strawberry Yogurt Clusters! Follow these steps, and I promise you won’t be disappointed:
Step 1: Prepare the Strawberries
Rinse the strawberries under cold water and gently pat them dry with a clean kitchen towel. Make sure they’re completely dry; otherwise, the yogurt won’t stick well! Pro tip: You can hull the strawberries (remove the green tops) for a neater look, but it’s totally up to you!
Step 2: Make the Yogurt Mixture
In a bowl, combine about 1 cup of plain Greek yogurt with 2 tablespoons of honey or maple syrup and 1 teaspoon of vanilla extract. Stir it well until everything is nicely mixed together! Chef hack: Taste the mixture! If it’s not sweet enough for your liking, add a bit more honey.
Step 3: Dip the Strawberries
Now comes the fun part! Take each strawberry by the stem and dip it into the yogurt mixture. Coat it generously until fully covered. You can also use a fork for a different technique if you prefer. Place the yogurt-coated strawberries on a parchment-lined baking sheet. Important: Ensure they’re spaced well so they don’t stick together later!
Step 4: Chill the Yogurt Coated Strawberries
Pop the tray into the freezer for about 30 minutes to let the yogurt harden a bit. This will create a nice base for our chocolate coating. Tip: If you want to speed up the process, you can freeze them for just 10-15 minutes, but I prefer the longer chill for the best texture!
Step 5: Melt the Chocolate
While the strawberries chill, melt your chocolate chips. You can do this by placing them in a microwave-safe bowl. Microwave in 30-second intervals, stirring in between, until smooth and melted. Alternatively, you can melt them in a double boiler over simmering water for more control.
Step 6: Dip in Chocolate
Once the strawberries have chilled, it’s time to dip them! Take each yogurt-covered strawberry and dip it into the melted chocolate, ensuring it’s well-coated. Let any excess chocolate drip off before placing it back on the parchment paper. Tip: For a fun finishing touch, you can drizzle some extra chocolate over the clusters with a contrasting color of chocolate!
Step 7: Add Sea Salt
If you’re sprinkling sea salt over your chocolate, do it now while the chocolate is still warm so it sticks!
Step 8: Chill Again
Return the tray to the freezer for another 15-30 minutes until the chocolate is set. Note: You can also pop them in the fridge if you’re short on time, but just make sure the chocolate is completely solidified before serving!
Serving Suggestions
These Chocolate Strawberry Yogurt Clusters are perfect for sharing! Serve them on a beautiful platter, perhaps with some extra strawberries or a sprinkle of crushed nuts for added texture. They make a delightful addition to any gathering, brunch, or even as a sweet snack after dinner. Enjoy them fresh from the freezer for that delightful icy crunch – you won’t be able to eat just one!
Recipe Variations
Feeling creative? Here are some fun variations to consider:
-
Add Nuts: Roll the yogurt-coated strawberries in chopped nuts like almonds or pistachios before dipping them in chocolate. It adds a wonderful crunch!
-
Try Different Yogurts: Switch it up by using flavored yogurts, such as strawberry or vanilla, to enhance the flavor profile even more.
-
Make It Vegan: Use dairy-free yogurt and vegan chocolate chips for a delicious plant-based version!
-
Add Spice: Mix a pinch of cinnamon or chili powder into the yogurt for a unique kick. It sounds bold, but you’ll love the flavor surprise!
-
Create Layers: Instead of dipping, create layered clusters by drizzling melted chocolate in between layers of yogurt-coated strawberries for a pretty dessert parfait vibe!
Chef’s Notes
Creating these clusters brings back so much nostalgia for me! I couldn’t help but share them at family gatherings, and now, they’ve become my go-to dessert request! I’ve fondly watched friends return to the kitchen for seconds, their faces lighting up with joy. Cooking is all about those shared moments, and these little clusters have sparked many great conversations.
The recipe has also evolved over time as I experimented with different swirls of chocolate or additions of spices. I love that it’s so adaptable! Children love helping out by dipping and rolling, so get those tiny hands into the action — it’s a fabulous way to bond and have fun!
FAQs and Troubleshooting
1. Why won’t my yogurt stick to the strawberries?
Ensure the strawberries are completely dry before dipping them in the yogurt. Also, try dipping the cold strawberries directly into the yogurt; it will help it adhere better!
2. Can I use frozen strawberries?
Fresh strawberries yield the best result, but if frozen is all you have, drain excess liquid from thawed strawberries first and use them immediately to prevent sogginess.
3. How do I store the clusters?
Store them in an airtight container in the freezer for up to two weeks. They taste best straight from the freezer!
4. What if the chocolate isn’t smooth?
If your chocolate seized and became grainy, adding a teaspoon of coconut oil or vegetable oil while melting can help regain its smoothness.
Nutritional Info
(if applicable, add based on your ingredient choices)
Enjoy the Sweetness!
There you have it — my beloved Chocolate Strawberry Yogurt Clusters! This recipe isn’t just about making a tasty treat; it’s about enjoying the process and sharing it with those you love. I hope you end up with a batch that brings as much joy to you as they continue to bring to me! Happy cooking, my friends, and don’t forget to savor every bite! 🍓🍫
Print
Chocolate Strawberry Yogurt Clusters
- Total Time: 30 minutes
- Yield: 4 servings 1x
- Diet: Vegetarian
Description
Delightful clusters of strawberries dipped in creamy yogurt and rich dark chocolate, perfect for satisfying your sweet tooth.
Ingredients
- 1 cup Fresh Strawberries
- 1 cup Plain Greek Yogurt
- 2 tablespoons Honey or Maple Syrup
- 1 teaspoon Vanilla Extract
- 1 cup Semi-Sweet or Dark Chocolate Chips
- Sea Salt (optional)
Instructions
- Prepare the strawberries by rinsing them under cold water and patting dry.
- Make the yogurt mixture by combining yogurt, honey, and vanilla in a bowl and stirring until mixed.
- Dip each strawberry in the yogurt mixture, ensuring they are well-coated.
- Chill the yogurt-coated strawberries in the freezer for about 30 minutes.
- Melt the chocolate chips in the microwave or using a double boiler.
- Dip the chilled strawberries in the melted chocolate, letting any excess drip off.
- Add sea salt if desired while the chocolate is still warm.
- Chill again until the chocolate is set, about 15-30 minutes.
Notes
For a fun twist, try adding nuts or using flavored yogurt. These clusters are best enjoyed fresh from the freezer.
- Prep Time: 15 minutes
- Cook Time: 15 minutes
- Category: Dessert
- Method: Freezing
- Cuisine: American
Nutrition
- Serving Size: 3 clusters
- Calories: 200
- Sugar: 15g
- Sodium: 50mg
- Fat: 10g
- Saturated Fat: 5g
- Unsaturated Fat: 4g
- Trans Fat: 0g
- Carbohydrates: 25g
- Fiber: 2g
- Protein: 5g
- Cholesterol: 10mg
Keywords: chocolate, strawberries, yogurt, dessert, healthy snack, summer treat


