
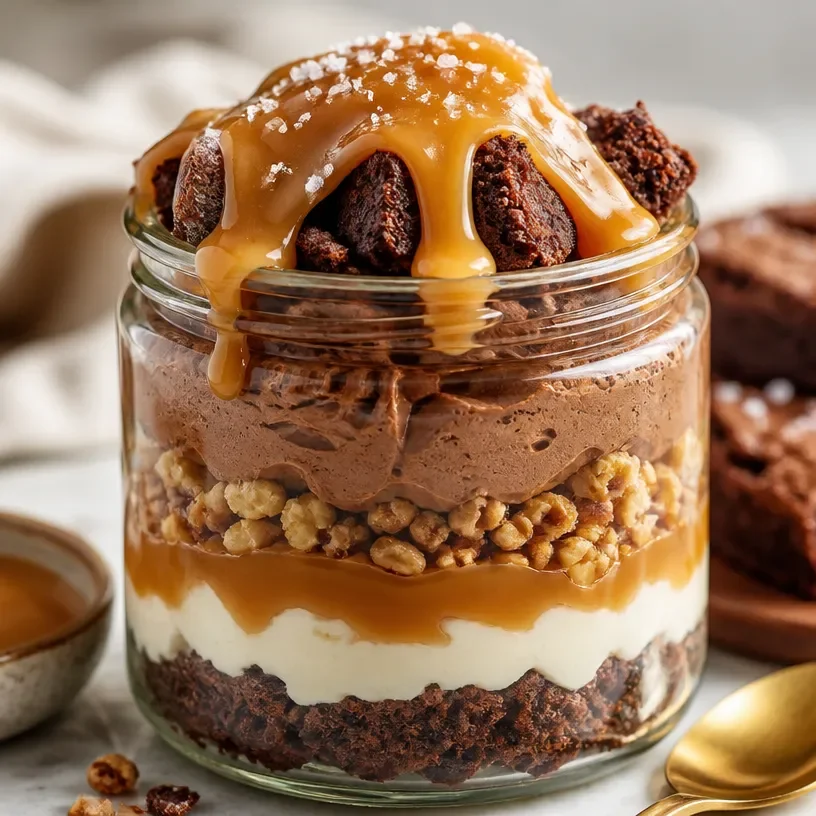
High-Protein Salted Caramel Brownie Jar (Meal-Prep Friendly)
Indulge in Decadence: Protein Salted Caramel Brownie Jar
Welcome to my kitchen, dear foodies! Today, we’re diving into something utterly delicious: Protein Salted Caramel Brownie Jars. Imagine rich, fudgy brownies layered with a creamy salted caramel and topped off with a sprinkle of sea salt. These little jars of joy are not just delightful to eat but also packed with protein, making them a perfect guilt-free indulgence. Whether you’re a fitness enthusiast looking for a post-workout treat or simply someone who loves a good dessert (guilty as charged!), this recipe has got your name written all over it.
You know, there’s just something about brownies that sparks joy in so many of us. The warm, chocolatey aroma wafting through the kitchen, the anticipation as they bake, and the joy of devouring a rich, gooey square of brownie — are we feeling this, or what? This recipe takes the goodness of brownies and elevates it into a layered dessert that can be prepped in advance and enjoyed whenever the sweet tooth strikes.
Why jars, you might ask? Well, besides being super cute and portable, they also make for perfect portion control! Plus, there’s something inherently satisfying about digging into layers of harmony, don’t you think? So, grab your spoons and let’s get into it!
A Nostalgic Sweet Reminder
When I was a kid, my mom would whip up a batch of her famous brownies every Sunday afternoon. The whole house would fill with the mouth-watering scent of chocolate as we anticipated the warm squares topped with a generous scoop of vanilla ice cream. She had this way of turning simple moments into cherished memories, and for me, those brownies were always the highlight.
One day, my little brother got creative and decided to experiment by drizzling some leftover caramel sauce from another dessert all over the brownies fresh out of the oven. The combination was pure magic! We all dove in, and I remember giggling about how we’d discovered a new favorite.
Years later, I wanted to reinvent that nostalgic flavor into something a bit healthier and find a way to enjoy it daily without the guilt. Hence, the Protein Salted Caramel Brownie Jar was born! It’s a way to keep that warm family memory alive while nourishing my body at the same time.
Ingredients
Here’s what you’ll need to make your own decadent Protein Salted Caramel Brownie Jars:
-
Nuts (Walnuts or Pecans): These add a nice crunch. Chef Tip: Don’t have nuts? You can totally leave them out or swap them for seeds like pumpkin or sunflower seeds for a nut-free version!
-
Unsweetened Cocoa Powder: This is where the rich chocolate flavor comes from. Substitution: You can use carob powder for a caffeine-free option.
-
Protein Powder (Chocolate Flavor): This gives our brownies an extra boost. Substitution: If you’re not a fan of chocolate protein, vanilla works nicely too.
-
Almond or Peanut Butter: Smooth and creamy, these add richness. Note: You can also use sunflower seed butter for a nut-free treat!
-
Maple Syrup or Honey: A hint of natural sweetness. Chef Insight: If you are vegan, go with maple syrup; it’s totally plant-based!
-
Eggs: Just regular ol’ eggs will help bind everything together. Aquafaba (the liquid from chickpeas) can be a fantastic substitute for a vegan option—3 tablespoons equals one egg!
-
Salt: To balance the sweetness. Tip: Use a good quality sea salt for that perfect touch.
-
Caramel Sauce: Look for a protein-packed version or make your own! Tip: Adding a pinch of sea salt to your caramel can elevate the flavor to heavenly status—trust me on this!
-
Greek Yogurt: Creates a creamy layer when you jar it up. Alternative: Use dairy-free yogurt if you’re going plant-based!
-
Sea Salt Flakes: To finish it off with a crunch. Just a light sprinkle really does the trick!
Step-by-Step Instructions
Now that we’ve gathered our ingredients, let’s get to the fun part — cooking!
-
Preheat Your Oven to 350°F (175°C): It’s always so delightful to feel the warmth as the oven does its magic. Your kitchen is about to smell heavenly!
-
Combine the Dry Ingredients: In a mixing bowl, stir together the cocoa powder, protein powder, chopped nuts, and a pinch of salt. This step sets the chocolatey foundation for our brownies.
-
Mix the Wet Ingredients: In a separate bowl, whisk together the almond or peanut butter, maple syrup (or honey), and eggs until smooth. If you’re using any nut-free alternatives, this is a good time to mix them in.
-
Combine Wet and Dry: Now, pour the wet mixture into the dry ingredients and mix until well combined. Don’t overwork it; just aim for that fudgy consistency!
-
Prepare Your Baking Dish: Grease an 8×8-inch baking pan with a bit of olive oil or line it with parchment paper. This will ensure your brownies come out without a hitch.
-
Pour and Bake: Spread the brownie mix evenly into the prepared pan and pop it into the preheated oven for about 20–25 minutes. The goal is to bake them until the edges are set, but the center is still a little gooey. Trust your instincts here!
-
Cool and Layer: Once baked, let the brownies cool in the pan. Once cooled, cut them into squares and layer them in your jars. Start with a layer of brownie, followed by a layer of Greek yogurt, a drizzle of caramel, and repeat. It’s like layering flavors of joy!
-
Finishing Touch: Top with a sprinkle of sea salt flakes just before serving. This step adds that delightful contrast of sweet and salty!
Serving Suggestions
When it comes to serving, the presentation can make a world of difference! Serve your Protein Salted Caramel Brownie Jars chilled or slightly warmed, depending on your mood. For a more aesthetically pleasing option, consider garnishing them with a sprig of mint or topping with fresh berries for a pop of color. These jars also make for an impressive treat to bring to gatherings—you’ll be the star of the show!
Recipe Variations
Want to switch things up? Here are a few creative twists you can try:
-
Mint Chocolate: Add a drop or two of peppermint extract to the brownie mix for a refreshing minty flavor. Think about pairing it with a chocolate mint yogurt for those layers!
-
Nut-Free Option: Swap out the walnuts for oats—just a 1/2 cup of rolled oats will provide that delightful texture without nuts.
-
Vegan Version: Use flax eggs instead of regular eggs and a dairy-free yogurt. Your taste buds won’t even realize the difference!
-
Peanut Butter Swirl: Drop spoonfuls of peanut butter into the brownie batter before baking for delightful peanut butter pockets.
-
Spiced Twist: Sprinkle in some cinnamon or nutmeg into your layers for a cozy autumn vibe.
Chef’s Notes
Every recipe tells a story, and this one is close to my heart. The Protein Salted Caramel Brownie Jar has evolved over time through numerous trials of balancing flavors and healthiness, but the nostalgic memory of those Sunday brownies will always linger in my mind. I fondly remember the laughter shared with my family around the table, and now, I bring this joy into my kitchen whenever I whip up these jars.
And let’s be real, things can get messy—there’s been flour on my face and chocolate spread all over my kitchen counter during testing (oops!), but those ‘oops’ moments only add to the joy of cooking. So, don’t stress if things get a little chaotic in your kitchen; embrace it! Cooking is as much about the journey as it is about the final dish.
FAQs and Troubleshooting
1. My brownies seem dry or crumbly—what went wrong?
Most likely, they were overbaked. Keep an eye on them! The center should look a bit underdone when you pull them out. Remember, they will continue to cook as they cool.
2. Can I make these jars in advance?
Absolutely! They store beautifully in the fridge for about 4–5 days. Just make sure to top them with the sea salt flakes right before serving for freshness.
3. What if I don’t have Greek yogurt?
No worries! Regular yogurt or any dairy-free substitute will do just fine. The texture will change a bit, but they’ll still taste delicious!
4. How do I ensure my layers look pretty in the jar?
Take your time layering! Using a piping bag for the yogurt can help keep those layers clean and neat for a beautiful presentation.
Nutritional Info
Each jar is uniquely satisfying, and here’s a rough nutritional breakdown:
- Calories: Around 300-400 (depending on ingredients used)
- Protein: 20g (thanks to your protein powder and Greek yogurt)
- Fats: 15g (mostly healthy fats from nuts and nut butter)
- Carbohydrates: 45g (mostly from the brownie and natural sweeteners)
So, whether you’re making these delightful jars for yourself or to impress family and friends, I hope they bring as much joy to your kitchen as they’ve brought to mine. Here’s to more sweet memories filled with laughter, love, and deliciousness! Enjoy!
Print
Protein Salted Caramel Brownie Jar
- Total Time: 40 minutes
- Yield: 4 servings 1x
- Diet: High Protein
Description
Delicious layered brownies with creamy salted caramel, packed with protein for a guilt-free indulgence.
Ingredients
- 1 cup Nuts (Walnuts or Pecans), chopped
- 1/2 cup Unsweetened Cocoa Powder
- 1 scoop Protein Powder (Chocolate Flavor)
- 1/2 cup Almond or Peanut Butter
- 1/3 cup Maple Syrup or Honey
- 2 Eggs
- 1/4 teaspoon Salt
- 1/2 cup Caramel Sauce
- 1 cup Greek Yogurt
- Sea Salt Flakes, for topping
Instructions
- Preheat your oven to 350°F (175°C).
- Combine the dry ingredients: cocoa powder, protein powder, chopped nuts, and a pinch of salt.
- Mix the wet ingredients: almond or peanut butter, maple syrup (or honey), and eggs until smooth.
- Combine the wet mixture into the dry ingredients and mix until just combined.
- Prepare an 8×8-inch baking pan, greasing it or lining it with parchment paper.
- Pour the brownie mix into the pan and bake for about 20-25 minutes.
- Cool brownies in the pan; cut into squares and layer in jars with yogurt and caramel.
- Top with a sprinkle of sea salt flakes before serving.
Notes
These jars can be prepped in advance and stored in the fridge for 4-5 days. Top with sea salt just before serving for best taste.
- Prep Time: 15 minutes
- Cook Time: 25 minutes
- Category: Dessert
- Method: Baking
- Cuisine: American
Nutrition
- Serving Size: 1 jar
- Calories: 350
- Sugar: 12g
- Sodium: 200mg
- Fat: 15g
- Saturated Fat: 4g
- Unsaturated Fat: 8g
- Trans Fat: 0g
- Carbohydrates: 45g
- Fiber: 5g
- Protein: 20g
- Cholesterol: 70mg
Keywords: brownie jar, salted caramel, protein dessert, healthy dessert, indulgent recipe
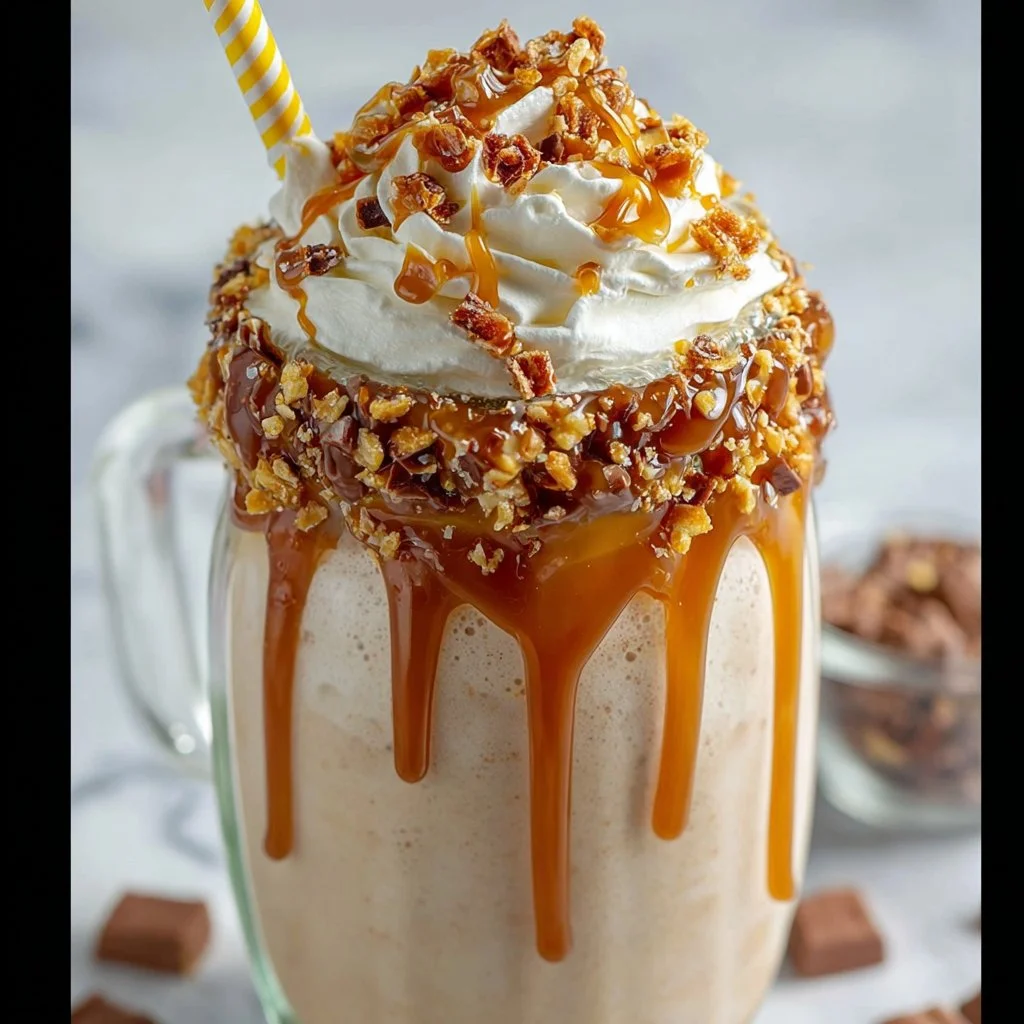
Salted Caramel Milkshake
The Ultimate Salted Caramel Milkshake Recipe: A Sweet Journey Through Flavor
Welcome back to my cozy kitchen, friends! Today, I’m beyond excited to take you on a delicious journey through one of my all-time favorite treats: the salted caramel milkshake. Picture this: a creamy, dreamy concoction that’s rich with the goodness of homemade salted caramel, perfectly blended with ice cream, and finished with whipped cream and a sprinkle of crunchy sea salt. Now tell me that doesn’t make your sweet tooth tingle!
Milkshakes have a special place in my heart. They remind me of lazy summer afternoons spent at the local diner, where the clinking of glasses and joyful chatter filled the air. As an enthusiastic home cook, there’s something magical about creating a dessert that instantly transports you back in time. The salted caramel milkshake, in particular, combines the nostalgia of childhood with the sophisticated touch of salty sweetness, making it perfect for any occasion or just a little treat for yourself!
In this post, I’ll walk you through every step of crafting the ideal salted caramel milkshake, complete with my personal stories, tips, and tricks in the kitchen. Whether you’re looking to impress friends at a summer BBQ or indulge your cravings on a cozy night at home, you’re in for a deliciously smooth ride. So grab your apron and let’s get started on making this dreamy milkshake that will, without a doubt, bring a smile to your face!
Personal Story
Growing up, my family had a weekend tradition of going to this delightful little ice cream shop down the street. Every Saturday, without fail, we’d pile into the car and head there, excitement filling the air as we flipped through the vibrant menu filled with flavors, all promising instant joy in a cup. But there was one flavor that always won me over: the salted caramel. The blend of sweet and salty was something I looked forward to every week, a delicious little ritual that sparked laughter and shared stories.
Fast forward to today, and I can’t help but bring those sunny memories into my kitchen. The first time I attempted to recreate that unforgettable salted caramel milkshake at home, I felt a flutter of nostalgia. I whipped up a batch for my friends, and as we sipped our homemade creations, I was flooded with laughter and stories from yesteryears. That day, I realized that cooking is not just about ingredients but about emotions, memories, and shared experiences. That’s the beauty I want to share with you in this recipe!
Ingredients
Before we dive headfirst into this delightful experience, let’s gather our ingredients. Here’s what you’ll need for the ultimate salted caramel milkshake:
-
Ice Cream (4 cups): The foundation of any milkshake! Vanilla ice cream works beautifully here, but you could swap it with salted caramel ice cream for an extra flavor punch! If you’re looking for a healthier option, try using frozen yogurt or dairy-free ice cream.
-
Milk (1 cup): Any milk will do! Whole milk adds creaminess, while almond or oat milk caters to dairy-free needs without sacrificing the flavor. Adjust the quantity based on how thick you like your shakes.
-
Homemade Salted Caramel Sauce (1/2 cup): This is the star of the show! You can either make it from scratch following my easy recipe below or grab a jar at the store if you’re in a pinch. Just be sure to look for one with high-quality ingredients!
-
Whipped Cream (for topping): Who said you can’t go extra? A generous dollop of whipped cream adds sweetness and beauty. Use store-bought or whip up your own fresh cream for that added homemade touch.
-
Sea Salt (a pinch for garnish): The key to bringing out that sweet caramel flavor! Use flaky sea salt for the best crunch and flavor. A sprinkle on top before serving elevates your milkshake to new heights.
-
Optional Add-Ins: Feel free to throw in chocolate chips, crushed pretzels, or even a shot of espresso to amp up the flavor and texture!
Step-by-Step Instructions
So, let’s jump into making this delightful salted caramel milkshake! Follow these steps, and your taste buds will be thanking you.
-
Make the Salted Caramel Sauce: If you’re going for homemade, in a medium saucepan over medium heat, melt 1 cup of granulated sugar, stirring constantly until it turns golden brown. Soon after reaching the desired color, carefully add 1/2 cup of heavy cream (watch out for splattering!). Stir in a pinch of salt and 2 tablespoons of butter until smooth. Let it cool. (Tip: Make extra to drizzle on other desserts!)
-
Blend the Ingredients: In a blender, combine the vanilla ice cream, milk, and 1/2 cup of the cooled salted caramel sauce. (Hint: Start with less milk if you want a thicker shake.) Blend on high until creamy and well combined, stopping to scrape down the sides if necessary. You should be left with a luscious mixture that makes your heart sing!
-
Taste Test: Here comes the fun part! Grab a spoon and taste. Adjust the caramel sauce to suit your sweetness preference. Want it a little sweeter? Add more caramel. Want more saltiness? A tiny pinch of sea salt goes a long way!
-
Prepare to Serve: Grab your favorite glasses (the more whimsical, the better!). Drizzle some of the leftover salted caramel sauce down the insides of each glass so that it coats the sides. This adds visual flair and a flavor bonus with every sip!
-
Pour & Assemble: Pour the blended milkshake into the prepared glasses, filling them about three-quarters full to make room for the whipped cream. Don’t hold back; you deserve this delicious sweet treat!
-
Top It Off: Finish off that lovely milkshake with a generous mountain of whipped cream. Top it off with an extra drizzle of salted caramel and a sprinkle of sea salt. Because, let’s be honest, you can never have too much caramel!
-
Enjoy Every Sip: Grab a straw or a long spoon and dive in with delight. Don’t forget to share (if you want, that is)!
Serving Suggestions
When it comes to serving, presentation is key! I love to place my salted caramel milkshake in tall, frosty glasses to enhance that nostalgic diner vibe. Drizzle extra salted caramel inside each glass before pouring the shake in for a stunning effect. You can accompany this sweet treat with a plate of chocolate chip cookies or mini brownies for a mini dessert spread that your friends (and yourself!) will adore.
Recipe Variations
Every good recipe has room for creativity, and this salted caramel milkshake is no exception! Here are a few fun variations to consider:
-
Nutty Delight: Add a tablespoon of nut butter—like almond or peanut butter—into the mix for a nutty twist that goes beautifully with the caramel flavor.
-
Chocolate Lovers: Incorporate chocolate ice cream instead of vanilla for a decadent chocolate salted caramel shake. You could even blend in some cocoa powder!
-
Dairy-Free Option: Use coconut milk ice cream and almond milk for a smooth, dairy-free alternative. You won’t miss the dairy one bit!
-
Coffee Caramel: For those who love coffee, add a shot of espresso or cold brew to the shake for a sweet pick-me-up!
-
Pumpkin Spice Bliss: Around fall, mix in some pumpkin puree and pumpkin spice for a seasonal twist that’s perfect for cozy vibes.
Chef’s Notes
The salted caramel milkshake has evolved in my kitchen over the years. There was a time I thought I’d never get the caramel sauce right, often ending up with a burnt mess. After a few attempts, I realized that patience is crucial—and so is the alarm on my timer! Now, it’s a go-to recipe that never fails to impress. Plus, I love how it can adapt to the seasons. It feels so fulfilling to share this with friends, reminiscing about simpler times while creating new memories. So, grab your loved ones, and let’s shake up some fun in the kitchen!
FAQs and Troubleshooting
1. My caramel sauce didn’t turn out right. What did I do wrong?
Common issues include not stirring the sugar constantly or cooking it too long. Keep an eye on the color! When it turns amber, it’s ready. If it’s grainy, you may have cooked it too long or added the cream too quickly. Don’t worry, practice makes perfect!
2. Can I use store-bought salted caramel sauce?
Absolutely! While homemade has its charm, store-bought options can save you a lot of time. Just be sure to choose one made with quality ingredients!
3. How can I make this milkshake thicker?
To achieve a thicker consistency, reduce the amount of milk or add more ice cream. You could also throw in some frozen bananas or extra ice to help shape it up.
4. Can I make this milkshake ahead of time?
While best enjoyed fresh, you can blend the ingredients and store them in the refrigerator for a few hours. Just give it a good stir before serving, as it’ll thicken up in the fridge.
Nutritional Info (Optional)
Calories: Approximately 350-450 calories per serving (depending on specific ingredients used).
Fat: 20g
Carbohydrates: 50g
Protein: 8g
Sodium: 150mg
And there you have it, friends! Your very own salted caramel milkshake recipe that’s bound to add a sprinkle of joy to your day. I hope you enjoy making this indulgent treat as much as I do. I can’t wait to hear about your experiences in the kitchen! Happy blending!
Print
The Ultimate Salted Caramel Milkshake
- Total Time: 30 minutes
- Yield: 4 servings 1x
- Diet: Vegetarian
Description
A creamy, dreamy salted caramel milkshake with homemade salted caramel, rich ice cream, and whipped cream.
Ingredients
- 4 cups vanilla ice cream
- 1 cup milk
- 1/2 cup homemade salted caramel sauce
- Whipped cream (for topping)
- A pinch of sea salt (for garnish)
- Optional add-ins: chocolate chips, crushed pretzels, or a shot of espresso
Instructions
- Make the Salted Caramel Sauce: In a medium saucepan over medium heat, melt 1 cup of granulated sugar, stirring constantly until it turns golden brown. Add 1/2 cup of heavy cream carefully, then stir in a pinch of salt and 2 tablespoons of butter until smooth. Let it cool.
- Blend the Ingredients: In a blender, combine the vanilla ice cream, milk, and 1/2 cup of the cooled salted caramel sauce. Blend on high until creamy.
- Taste Test: Adjust the caramel sauce to suit your sweetness preference.
- Prepare to Serve: Drizzle some of the leftover salted caramel sauce down the insides of each glass.
- Pour & Assemble: Pour the blended milkshake into the prepared glasses.
- Top It Off: Finish with whipped cream, an extra drizzle of salted caramel, and a sprinkle of sea salt.
- Enjoy Every Sip: Dive in with delight.
Notes
Consider adding nut butter or using different ice cream flavors for variations.
- Prep Time: 15 minutes
- Cook Time: 15 minutes
- Category: Dessert
- Method: Blending
- Cuisine: American
Nutrition
- Serving Size: 1 serving
- Calories: 400
- Sugar: 40g
- Sodium: 150mg
- Fat: 20g
- Saturated Fat: 10g
- Unsaturated Fat: 8g
- Trans Fat: 0g
- Carbohydrates: 50g
- Fiber: 0g
- Protein: 8g
- Cholesterol: 50mg
Keywords: salted caramel, milkshake, dessert, sweet treat, nostalgia
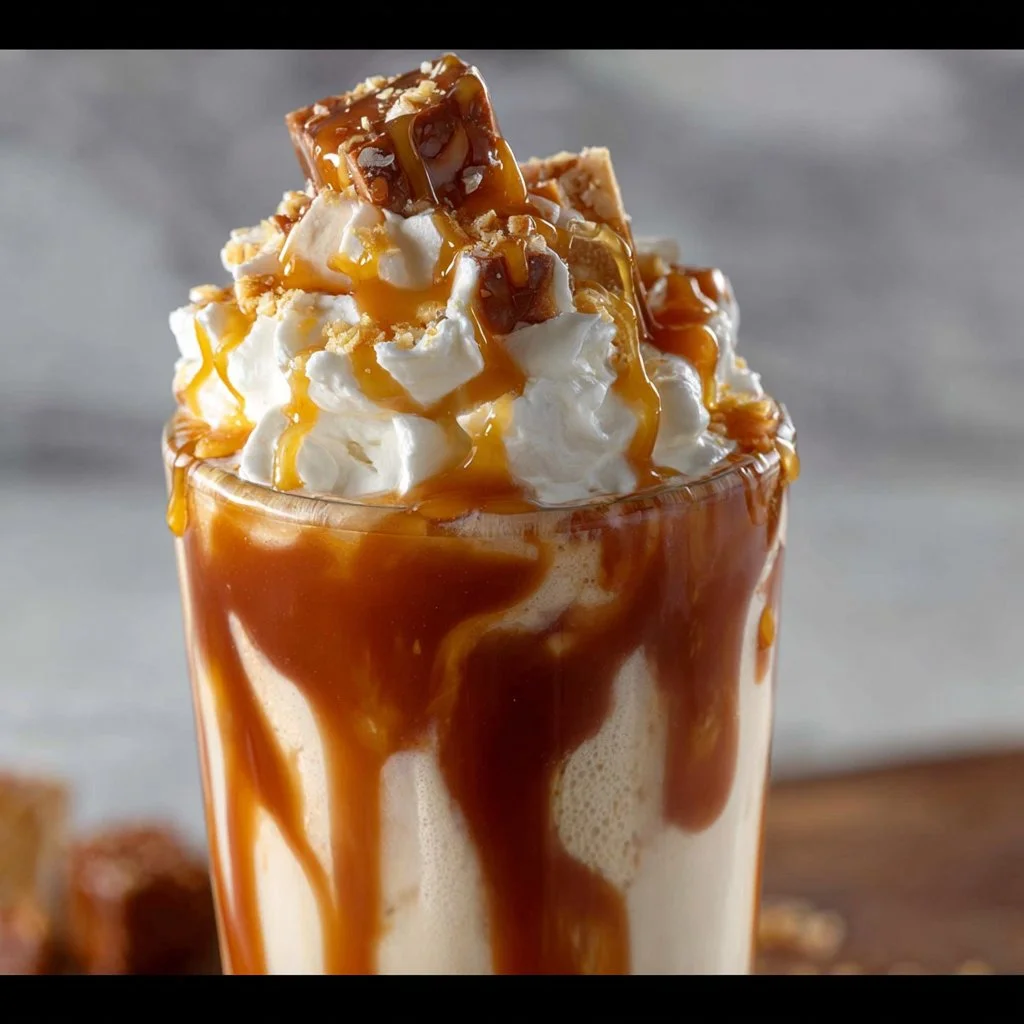
Salted Caramel Milkshake
Salted Caramel Milkshake: A Dreamy Indulgence
Welcome to my kitchen, food lovers! Today, we’re diving into a treat that’s sure to create a heavenly smile on your face and a little dance in your heart. Get ready for the ultimate Salted Caramel Milkshake! This luscious blend of creamy vanilla ice cream, rich caramel sauce, and a touch of salt creates a flavor explosion that makes indulging feel like a party — because let’s be honest, sometimes we all need a sweet escape. So grab your aprons, and let’s whip up a milkshake that’s as memorable as a warm hug on a chilly day.
A Sweet Memory Resurrected
This milkshake isn’t just any ordinary shake for me; it’s a delightful reminder of that unforgettable summer during my college days. One lazy afternoon, my friends and I decided to take a break from our relentless study sessions and do something fun. We ambled our way to a charming little diner, famed for its decadent desserts. The moment we walked in, the aroma of freshly whipped cream and melted caramel danced through the air, sparking a craving that pulled us straight to the milkshake menu.
After some serious deliberation (you know the kind where it feels like time has stopped?), I ordered their famous salted caramel milkshake. You guys, it was bliss in liquid form. That silky sweetness hit all the right notes! Sipping that shake took me to cloud nine, and I can still feel the laughter and chatter swirling around that small diner as we indulged. It was one of those moments that stick with you, and since then, I’ve been on a mission to perfect my own version. So, let’s create some memories together while we blend this delightful concoction!
Ingredients
Here’s what you’ll need to make this sensational Salted Caramel Milkshake, along with some handy insights and substitutions if you’re out of something or looking to mix it up:
-
Vanilla Ice Cream (4 cups)
The star of our show. This creamy goodness gives the milkshake its base. You can substitute it with dairy-free or vegan ice cream if you prefer. -
Whole Milk (1 cup)
Helps to blend the ice cream smoothly, creating that milkshake texture we love. You can swap it with almond milk or oat milk if you’re looking for a lactose-free option. -
Caramel Sauce (1/2 cup)
Go for store-bought for simplicity, but homemade is always a treasured touch! If you don’t have caramel on hand, try using butterscotch sauce. -
Sea Salt (1/2 teaspoon)
This is the magic element that balances the sweetness and brings out the flavors. Use a flaky sea salt for texture—trust me, it makes a difference! -
Whipped Cream (1 cup)
Smooth and fluffy topping for that perfect finish. You can top it with homemade whipped cream or store-bought if you’re in a hurry. -
Chocolate or Caramel Syrup (for drizzling)
Optional, but come on, who could resist? Drizzling a touch of syrup elevates your shake to a whole new level. Use it generously!
Step-by-Step Instructions
Now, let’s get our hands dirty and create this creamy dream! Follow these steps, and I promise you’ll not only enjoy crafting this masterpiece but maybe even dance a little while waiting.
-
Gather Your Ingredients
First things first, gather all your ingredients. This step might seem basic, but believe me, it helps keep things organized, and less mess equals more fun! -
Blend It Up
In a blender, combine 4 cups of vanilla ice cream, 1 cup of whole milk, and 1/2 cup of caramel sauce. This is where the magic starts! Don’t be afraid to dive in with a little enthusiasm. For a super creamy shake, blend on a medium speed until smooth, about 30 to 45 seconds.Chef Tip: If your shake is too thick, add a splash more milk until you reach your desired consistency. Remember, you can always add but can’t take away!
-
Season It Right
Now it’s time to add 1/2 teaspoon of sea salt to the blender. Blend for another 10 seconds to incorporate that delightful saltiness, balancing out that sweet caramel flavor. -
Taste Test!
This part is perhaps the most important step—taste! Isn’t that the best part of cooking? If you want a hint more sweetness, feel free to add a bit more caramel and blend it again. -
Get Ready to Serve
Grab your favorite tall glasses or milkshake mugs— presentation is key! Drizzle a generous amount of chocolate or caramel syrup down the insides of the glass, and then pour in your luscious milkshake. -
Top It Off
Finish it off with a hearty dollop of whipped cream on top. You can go wild here—add as much or little as you like! If you want to get fancy, sprinkle a little extra sea salt on top for that stylish touch. -
Chill and Enjoy!
Grab your favorite straw, and dive right in. And don’t forget to take a moment to admire your creation!
Serving Suggestions
Your Salted Caramel Milkshake will look fabulous just as it is, but here’s a little extra something: pair it with some homemade cookies or a slice of warm chocolate fudge cake for an indulgent treat that’ll make your dessert dreams come true. Guests will rave about this dreamy combination!
Recipe Variations
Now that you know the basic recipe, let’s mix it up a bit! Here are some delicious variations to keep things interesting:
-
Chocolate Salted Caramel Milkshake: Add a couple of tablespoons of cocoa powder or a handful of chocolate chips to your blender for a rich, chocolatey twist.
-
Nutty Caramel Bacon Milkshake: Crumble some crispy bacon on top and swirl in some crushed nuts for a smoky, savory note.
-
Pumpkin Spice Salted Caramel Milkshake: In fall, swap in pumpkin ice cream and add a sprinkle of pumpkin spice to the mix for a seasonal delight.
-
Banana Salted Caramel Shake: Toss in a ripe banana before blending for a fruity flavor that complements the caramel beautifully.
-
Vegan Salted Caramel Shake: Use coconut or almond milk, and a dairy-free ice cream for a plant-based treat that everyone can enjoy!
Chef’s Notes
This Salted Caramel Milkshake has come a long way since that summer in the diner. Over the years, I’ve experimented with various ingredients — different types of ice cream, homemade caramel sauce, and new flavor pairings. It’s beautiful to see how something can evolve from a beloved memory to a staple in my kitchen. I often enjoy making this milkshake when friends come over, and no matter the occasion, it always hits the sweet spot! It’s not just about the flavors; it’s about the laughter and joy that come with sharing good food.
Oh, and a funny story for you! One time, I had a little mishap with the blender while making this shake for a party. I hit the wrong speed, and let’s just say caramel was everywhere. We all shared a good laugh while cleaning up that sticky mess, but the milkshakes still turned out to be a crowd-pleaser, proving that sometimes the mishaps bring the best memories!
FAQs and Troubleshooting
1. My Milkshake is too thick! What should I do?
- Add a splash of milk a tablespoon at a time to dilute it until you reach your desired consistency.
2. How can I store leftover milkshake?
- You can store it in an airtight container in the freezer. Just remember to thaw it slightly before trying to drink it again.
3. How do I make my milkshake even sweeter?
- You can blend in a little more caramel sauce or use flavored syrups, like vanilla or butterscotch, for an added kick!
4. Can I make this the day before?
- Milkshakes are best enjoyed fresh, but if you’re prepping ahead, mix everything and store it in the fridge before blending it fresh to serve.
Nutritional Info
While indulging is the key to enjoying a Salted Caramel Milkshake, keeping in mind nutritional content is always a good idea. An average serving of this milkshake is usually around 600 calories, depending on your ingredient choices. It’s made up mostly of carbohydrates and sugar, with some protein coming from the ice cream and milk. It’s meant to be a treat, so enjoy it occasionally!
There you have it, my delightful food friends! Your homemade Salted Caramel Milkshake awaits! Whether it’s a sunny afternoon or a cozy evening in, treat yourself to this concoction that’s sure to bring warmth and sweet joy. You’ll find that every sip sparks a memory and every batch creates another story. Happy blending, and remember to share the love!
Print
Salted Caramel Milkshake: A Dreamy Indulgence
- Total Time: 10 minutes
- Yield: 4 servings 1x
- Diet: Vegetarian
Description
A luscious blend of creamy vanilla ice cream, rich caramel sauce, and a touch of salt creates a flavor explosion in this delightful milkshake.
Ingredients
- 4 cups Vanilla Ice Cream
- 1 cup Whole Milk
- 1/2 cup Caramel Sauce
- 1/2 teaspoon Sea Salt
- 1 cup Whipped Cream
- Chocolate or Caramel Syrup (for drizzling)
Instructions
- Gather Your Ingredients
- Blend It Up: In a blender, combine the ice cream, milk, and caramel sauce, blending until smooth.
- Season It Right: Add the sea salt and blend for another 10 seconds.
- Taste Test!
- Get Ready to Serve: Drizzle syrup inside the glasses and pour in the milkshake.
- Top It Off: Add whipped cream and extra sea salt for garnish.
- Chill and Enjoy!
Notes
This milkshake pairs well with cookies or a slice of chocolate fudge cake.
- Prep Time: 10 minutes
- Cook Time: 0 minutes
- Category: Dessert
- Method: Blending
- Cuisine: American
Nutrition
- Serving Size: 1 serving
- Calories: 600
- Sugar: 75g
- Sodium: 200mg
- Fat: 20g
- Saturated Fat: 10g
- Unsaturated Fat: 8g
- Trans Fat: 0g
- Carbohydrates: 84g
- Fiber: 0g
- Protein: 10g
- Cholesterol: 50mg
Keywords: milkshake, dessert, salted caramel, ice cream, indulgent treat, sweet drink




