
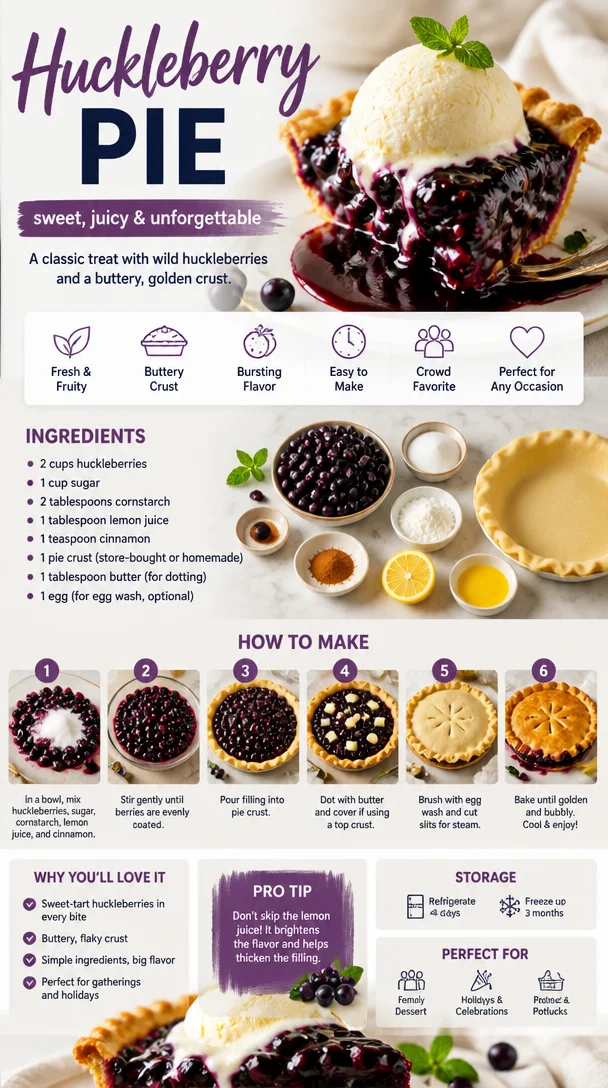
Huckleberry Pie
The Delights of Huckleberry Pie: A Slice of Nostalgia
Welcome back to my kitchen, friends! Today, we’re diving into one of my favorite desserts that brings a smile to my face every time I make it — huckleberry pie. Whether you’re a huckleberry aficionado or someone who has yet to be introduced to these tiny, tart beauties, this pie is bursting with flavor and love.
Imagine this: it’s a splendid summer day, and you’re surrounded by the lush greenery of the forest. You’ve got a basket in hand, and you’re on a quest to gather wild huckleberries. One by one, you pluck these plump little gems from their leafy homes, their sweet-tart aroma filling the air. The thrill of foraging them with loved ones, the laughter that floats through the trees, and the storytelling that follows those harvests make these moments truly special. And when we get back home? Well, it’s time to transform those huckleberries into a pie that’s sure to spark joy and nostalgia.
For me, making huckleberry pie is more than just a cooking process; it’s a tradition that connects me to the moments spent with my family. My grandmother had her special recipe, and every summer, she’d invite us into her cozy kitchen to help her with the filling. I remember standing on a stool to reach the countertop, rolling out dough with my tiny hands, laughing with my siblings, and occasionally sneaking a huckleberry or two! Those memories are ingrained in my heart and have become a cherished part of my culinary journey.
So, whether you’re dusting off grandma’s old recipe or trying your hand at making this delightful dessert for the first time, I promise that huckleberry pie is an experience that will create sweet memories. Let’s get started, so you can fill your home with that irresistible scent of baking pie!
Ingredients
To make this huckleberry pie, here’s what you’ll need:
- Fresh Huckleberries (4 cups): The star of our show! Fresh huckleberries are deep purple and burst with flavor. If you can’t find them, blueberries or blackberries can be fantastic substitutes. Just make sure to adjust the sugar level depending on the sweetness of the fruit.
- Granulated Sugar (1 cup): This balances the tartness of the huckleberries. For a healthier option, feel free to use coconut sugar or honey, but keep in mind that it might change the texture slightly.
- All-Purpose Flour (1/4 cup): This is a thickening agent that helps form a beautiful filling. If you need a gluten-free option, you can replace it with a gluten-free flour blend.
- Lemon Juice (2 tablespoons): This brightens the flavors and enhances the huckleberries’ natural tartness. You can also experiment with lime juice for a fun twist.
- Butter (2 tablespoons, unsalted): For richness, this ingredient brings a lovely flavor to the filling. You can quickly swap with coconut oil for a dairy-free version.
- Ground Cinnamon (1 teaspoon): A sprinkle of this adds warmth to the pie’s flavor. If you’re feeling adventurous, cardamom or nutmeg could be a delightful touch!
- Pie Crust (1 double-crust recipe): You can use either a homemade pie crust or store-bought, depending on your time situation. For a twist, try a graham cracker crust for a sweeter, crunchier base.
Step-by-Step Instructions
1. Preheat Your Oven
First things first, let’s set the vibe for your kitchen! Preheat your oven to 425°F (220°C). This will ensure your pie bakes beautifully with that perfect golden crust and bubbling filling.
2. Prepare the Pie Crust
If you’re making your own crust, roll it out to fit your 9-inch pie dish. Make sure to keep it thick enough for structure but thin enough to enjoy that buttery goodness. Don’t worry if it doesn’t look perfect; we’re going for homemade charm here! If you’re using a store-bought crust, just follow the instructions on the package. Once you have your bottom crust in place, trim the edges and set it aside.
3. Mix the Filling
In a large mixing bowl, combine your huckleberries, sugar, flour, lemon juice, butter, and cinnamon. Gently fold the ingredients together to avoid squishing those lovely berries. Take a moment to relish the vibrant colors and enchanting smell — it’s all about those little joys in the kitchen!
Chef Tip: Make sure your huckleberries are clean! Rinse them gently under cold water and pat them dry to avoid excess moisture in the filling.
4. Fill the Pie
Pour the huckleberry mixture into the prepared bottom crust, giving it a little shake to settle everything. It should look luscious and inviting! If you like, you can add some lattice work on top or simply cover it with another sheet of pie crust. If you choose to go with the latter, make sure to cut a few slits for steam to escape — we don’t want it to explode in the oven!
5. Bake Your Pie
Place the pie on a baking sheet (to catch any drips) and pop it in the oven. Bake for 15 minutes at 425°F, then reduce the temperature to 350°F (175°C) and continue baking for an additional 30-35 minutes. You want that crust to be a delightful golden brown, and the filling to be bubbling up through the openings.
Chef Hack: If you notice the crust browning too fast, you can gently cover the edges with aluminum foil to protect them from burning.
6. Cool and Serve
Once your huckleberry pie is beautifully baked, remove it from the oven and let it cool for at least 1-2 hours. This cooling time allows the filling to set perfectly. It’s tough to wait, but trust me, it’ll be worth it when you slice into it later!
Serving Suggestions
For that extra cozy touch, serve your huckleberry pie warm with a scoop of vanilla ice cream or a dollop of freshly whipped cream. You can even sprinkle a bit of cinnamon on top for a charming finish. If you’re feeling fancy, pair it with a pot of herbal tea or a cup of freshly brewed coffee — it’s a match made in culinary heaven!
Recipe Variations
Here are some creative twists you might like to try with this huckleberry pie:
- Huckleberry-Lemon Pie: Add a bit more lemon zest for a refreshing zing that elevates the flavor profile.
- Mixed Berry Pie: Combine huckleberries with blueberries, raspberries, or chopped strawberries for a delightful mixed berry experience.
- Nutty Crust: Use ground almonds or pecans in your pie crust for a nutty flavor that pairs perfectly with the huckleberries.
- Vegan Version: Substitute butter with vegan margarine and use a vegan pie crust; swap out sugar for your favorite vegan-friendly sweetener!
- Spiced Huckleberry Pie: Add a touch of ginger or cardamom to the filling for a warm and inviting flavor.
Chef’s Notes
As I’ve made this pie over the years, I’ve learned a few things along the way. One of my favorite moments was when I decided to throw in a hint of almond extract into the filling, and oh my goodness! The twist was simply delightful. Watching smiles spread across my family’s faces as they tasted my latest creation is what keeps me going in the kitchen. Every batch is an opportunity for a sweet surprise and a new memory in making!
FAQs and Troubleshooting
Q1: Why did my huckleberry pie become runny?
Sometimes, it’s all about moisture in the fruit. If your huckleberries were too juicy, adding an extra tablespoon of flour in the filling can help absorb that excess moisture.
Q2: How do I keep my crust from getting soggy?
Use a light brush of egg wash or melted butter on the bottom of your crust before adding the filling. This helps create a barrier and keeps it crisp.
Q3: Can I freeze huckleberry pie?
Absolutely! Just make sure it’s completely cooled, wrap it tightly in plastic wrap and then in foil. It should hold up nicely for about 2-3 months. To serve, bake directly from the freezer, just add a few extra minutes to the baking time.
Q4: Is there a way to make my huckleberry pie less sweet?
You can reduce the amount of sugar you use in the filling. I recommend gradually reducing it instead of cutting it out completely to maintain a balance of flavors.
Nutritional Info
Each slice of huckleberry pie (1/8 of the pie) typically contains around 200-250 calories, depending on your crust and ingredients. It’s packed with antioxidants from the huckleberries and can absolutely be part of a balanced diet!
Now that you have all the tips and tricks, it’s time for you to grab your apron and get to baking! I can’t wait to hear about your huckleberry pie adventures. Remember, cooking is about joy, share it, and create those beautiful moments. Happy baking!
Print
Huckleberry Pie
- Total Time: 1 hour 5 minutes
- Yield: 8 servings
- Diet: Vegetarian
Description
This delightful huckleberry pie is bursting with flavor and nostalgia, perfect for summer gatherings and creating sweet memories.
Ingredients
- Fresh Huckleberries (4 cups)
- Granulated Sugar (1 cup)
- All-Purpose Flour (1/4 cup)
- Lemon Juice (2 tablespoons)
- Butter (2 tablespoons, unsalted)
- Ground Cinnamon (1 teaspoon)
- Pie Crust (1 double-crust recipe)
Instructions
- Preheat your oven to 425°F (220°C).
- Prepare the pie crust by rolling it out to fit a 9-inch pie dish.
- Mix the huckleberries, sugar, flour, lemon juice, butter, and cinnamon in a large mixing bowl.
- Fill the prepared bottom crust with the huckleberry mixture.
- Bake the pie: Bake for 15 minutes at 425°F, then reduce the temperature to 350°F (175°C) for an additional 30-35 minutes.
- Cool the pie for at least 1-2 hours before serving.
Notes
For a twist, serve warm with ice cream or whipped cream. Can substitute huckleberries with blueberries or blackberries if necessary.
- Prep Time: 20 minutes
- Cook Time: 45 minutes
- Category: Dessert
- Method: Baking
- Cuisine: American
Nutrition
- Serving Size: 1 slice
- Calories: 225
- Sugar: 20g
- Sodium: 50mg
- Fat: 8g
- Saturated Fat: 5g
- Unsaturated Fat: 3g
- Trans Fat: 0g
- Carbohydrates: 36g
- Fiber: 3g
- Protein: 2g
- Cholesterol: 15mg
Keywords: huckleberry, pie, dessert, summer, berries
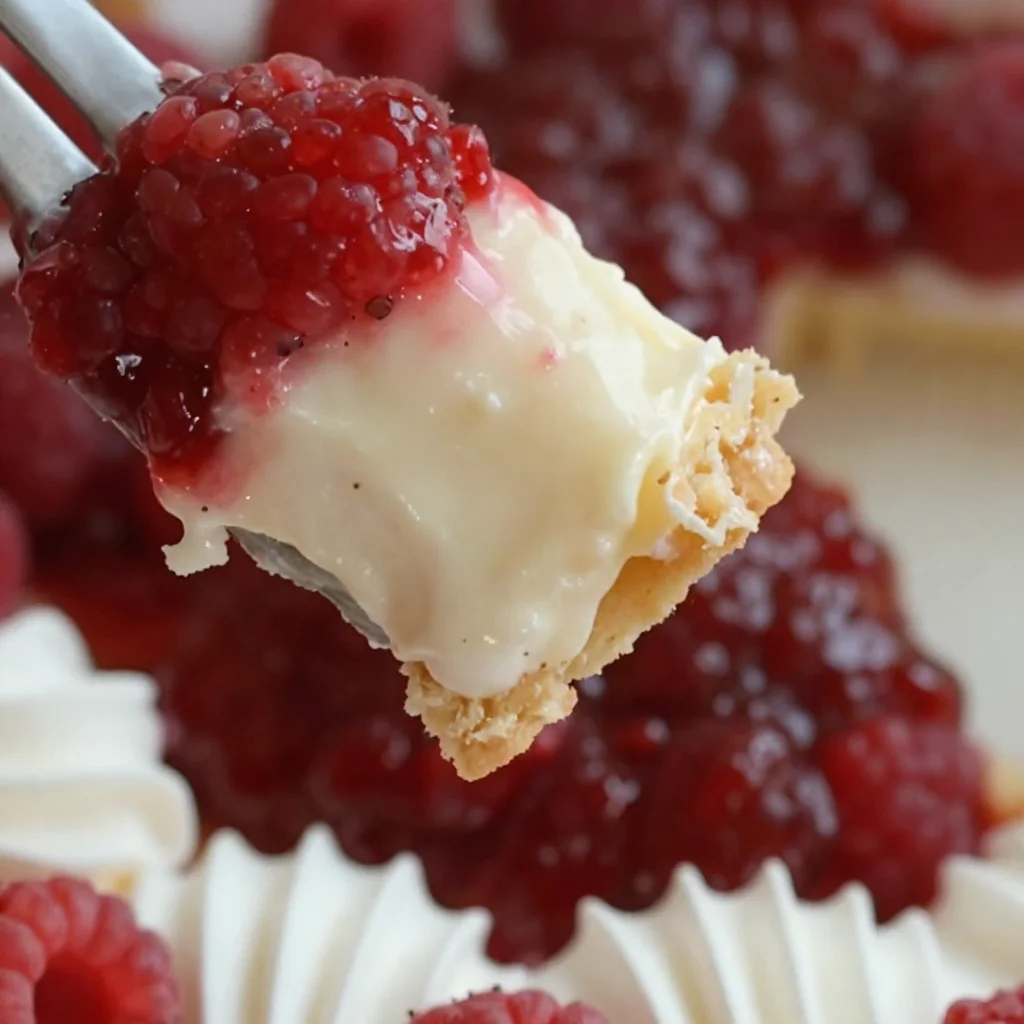
No-Bake Raspberry Cream Pie: Easy Summer Dessert Recipe
Raspberry Cream Pie: A Slice of Summer in Every Bite
Welcome to my kitchen! Today, I’m thrilled to take you on a delightful journey, where we’ll celebrate the vibrant flavors of fresh raspberries with a recipe that truly captures the essence of summer — Raspberry Cream Pie. This dessert is one of my all-time favorites, and I can’t wait to share it with you. Whether you’re a seasoned pro or a kitchen newbie, this pie is approachable, satisfying, and guaranteed to put a smile on your face.
Imagine this: it’s a warm afternoon, sunlight filters through the trees, and you’re surrounded by loved ones. The sweet scent of freshly baked crust fills the air, mingling with the tangy aroma of ripe raspberries, creating a cozy atmosphere that feels like home. That’s what Raspberry Cream Pie is all about — sharing, laughter, and the joy of good food.
Personal Story
Let me take you back to my childhood summers at my grandmother’s house, where the most decadent treats blossomed from her kitchen. She had a small garden filled with plump, juicy raspberries that I would pick during our outdoor escapades. I remember the sweet, tart juice staining my fingers as I quickly snacked on the ripe berries, forgetting entirely that they were meant for dessert.
One day, she decided we’d make the Raspberry Cream Pie together. I was enthralled by the whir of the mixer and the rich cream taking shape. She guided me patiently, every now and then giving me tastes of the luscious filling. That pie wasn’t just a dessert; it was a piece of my childhood wrapped in buttery crust and fluffy filling, a creation of love and togetherness. Each summer since, I’ve held onto that memory, eager to recreate it and share its magic with others. And now, I’m excited for you to experience it too!
Ingredients
Before we dive into the cooking, let’s gather our ingredients. Having everything prepped and ready to go will make the process smooth and enjoyable.
-
For the Pie Crust:
- 1 ½ cups all-purpose flour: This is the backbone of your crust. If you’re looking for a gluten-free option, almond or oat flour works beautifully!
- ½ cup unsalted butter, chilled and cubed: Butter adds richness and flavor. If you prefer a lighter version, you could use coconut oil.
- 2-4 tablespoons ice water: This brings the dough together. If you don’t have ice water, cold milk can also work in a pinch.
-
For the Raspberry Filling:
- 2 cups fresh raspberries: The star of the show! Frozen raspberries are also a great alternative if fresh ones aren’t available.
- ½ cup granulated sugar: This balances the tartness of the berries. Substitute with honey or maple syrup for a natural touch.
- 2 tablespoons cornstarch: This helps to set the filling. If you’re avoiding cornstarch, arrowroot powder can be an excellent alternative.
- 1 tablespoon lemon juice: A splash of acidity enhances the raspberry flavor. Lime juice also adds a lovely twist!
-
For the Cream Topping:
- 1 cup heavy cream: This creates the dreamy whipped topping. You could try coconut cream for a dairy-free version.
- 2 tablespoons powdered sugar: Adds sweetness and stability. You can use agave syrup instead for a less processed option.
- 1 teaspoon vanilla extract: This adds depth to your cream. Feel free to experiment with almond or lemon extract!
Step-by-Step Instructions
Alright, let’s get cooking! Follow these steps, and I promise you’ll create a gorgeous Raspberry Cream Pie that’ll wow your friends and family.
Step 1: Prepare the Pie Crust
-
Mix the Dry Ingredients: In a large bowl, combine the all-purpose flour and a pinch of salt. This combo creates a flavorful crust base.
-
Cut in the Butter: Add the chilled, cubed butter to the flour mixture. Using a pastry cutter or your fingertips, work the butter into the flour until the mixture resembles coarse crumbs. This step is crucial for obtaining that flaky texture we all love.
-
Add Ice Water: Gradually add the ice water, one tablespoon at a time. Mix until the dough comes together but is not sticky. If you squeeze it and it holds, you’re golden!
-
Chill the Dough: Shape the dough into a disk, wrap it in plastic, and refrigerate it for at least 30 minutes. This helps the gluten relax and makes rolling easier later on.
Step 2: Bake the Pie Crust
-
Preheat Your Oven: While the dough chills, preheat your oven to 375°F (190°C).
-
Roll out the Dough: On a lightly floured surface, roll out your chilled dough until it’s about 1/8 inch thick. Carefully place it into a 9-inch pie pan. Trim any excess dough and crimp the edges for that homemade touch.
-
Pre-bake the Crust: Prick the bottom of the crust with a fork to prevent it from puffing up. Place it in the oven and bake for about 20 minutes, or until it’s just golden brown. A little chef hack? Cover the edges with aluminum foil halfway through to prevent over-browning.
Step 3: Prepare the Raspberry Filling
-
Cook the Raspberries: In a saucepan over medium heat, combine the raspberries, sugar, cornstarch, and lemon juice. Stir gently until the mixture comes to a simmer. This will take about 5-7 minutes. You want the raspberries to break down a bit and create a beautiful sauce.
-
Cool the Mixture: Once simmered, remove the pan from the heat and let the filling cool slightly. This ensures it doesn’t cook the crust when assembled.
Step 4: Whip the Cream
- Make the Whipped Cream: In a mixing bowl, combine the heavy cream, powdered sugar, and vanilla extract. Using a hand mixer, beat on medium speed until soft peaks form. Don’t whip too much or you’ll end up with butter — not what we want here!
Step 5: Assemble the Pie
-
Fill the Crust: Pour the raspberry filling into your cooled pie crust, spreading it evenly.
-
Top with Cream: Spoon the whipped cream over the raspberries, creating a fluffy blanket of goodness. If you’re feeling fancy, use a piping bag to create decorative swirls!
-
Chill: Refrigerate the pie for at least 2 hours to allow everything to set up nicely.
Serving Suggestions
When it’s finally time to serve, slice into your beautiful Raspberry Cream Pie and present it like a true masterpiece. Fresh mint leaves make a lovely garnish, and a sprinkle of extra raspberries on top adds a burst of color. Consider serving it alongside a scoop of vanilla ice cream or a glass of sparkling lemonade for the full summer experience!
Recipe Variations
- Berry Medley Pie: Mix in some blueberries or blackberries for a colorful twist.
- Chocolate Raspberry Cream: Add some melted chocolate to the cream for a delicious chocolate raspberry combo!
- Lemon Raspberry Pie: Incorporate lemon zest into the filling for a zesty kick.
- Vegan Version: Substitute the heavy cream with coconut cream and the butter in the crust with vegan butter.
- Healthier Option: Swap sugar for a natural sweetener like stevia or monk fruit in the filling.
Chef’s Notes
As I reflect on this recipe, I can’t help but think about how it’s evolved over the years. Originally, my grandmother added a sprinkle of nutmeg to her crust, which I still adore. The beauty of cooking is that it can adapt to your palate and personal touch. Don’t be afraid to play around with flavors! And trust me, this pie isn’t just a dessert — it’s a celebration of flavors, seasons, and memories.
FAQs and Troubleshooting
1. My filling didn’t thicken; what happened?
This could be due to not enough cornstarch or cooking the filling for too short a time. Make sure to simmer it long enough for the cornstarch to activate fully!
2. Can I make this pie ahead of time?
Absolutely! You can prepare it one day in advance. Just make sure to cover it well to keep it fresh.
3. What if my crust is too dry?
If your crust feels crumbly, it likely needed a bit more water when mixing. Next time, add just a teaspoon at a time until you get a workable dough.
4. How do I store leftovers?
Cover the pie with plastic wrap and store it in the refrigerator. It’s best enjoyed within 3 days for the freshest flavor!
Nutritional Info
While I understand that desserts should be enjoyed, I know some of you keep an eye on nutritional values. A slice of Raspberry Cream Pie contains approximately:
- Calories: 350
- Fat: 20g
- Carbohydrates: 40g
- Protein: 3g
Remember, the joy of cooking is about balance and indulgence, so treat yourself to a slice or two!
And there you have it, your very own Raspberry Cream Pie! I hope you’ve enjoyed this journey with me and feel empowered to recreate this recipe in your kitchen. Cooking is all about love, creativity, and sharing delicious moments. Happy baking, my friends — I can’t wait to hear your stories and see your beautiful pies!
Print
Raspberry Cream Pie
- Total Time: 150 minutes
- Yield: 8 servings 1x
- Diet: Vegetarian
Description
A delightful Raspberry Cream Pie that captures the essence of summer with vibrant flavors of fresh raspberries.
Ingredients
- 1 ½ cups all-purpose flour
- ½ cup unsalted butter, chilled and cubed
- 2–4 tablespoons ice water
- 2 cups fresh raspberries
- ½ cup granulated sugar
- 2 tablespoons cornstarch
- 1 tablespoon lemon juice
- 1 cup heavy cream
- 2 tablespoons powdered sugar
- 1 teaspoon vanilla extract
Instructions
- Mix the dry ingredients: In a large bowl, combine the all-purpose flour and a pinch of salt.
- Cut in the butter: Add the chilled, cubed butter and work it into the flour until it resembles coarse crumbs.
- Add ice water: Gradually mix in the ice water until the dough comes together.
- Chill the dough: Shape into a disk, wrap in plastic, and refrigerate for at least 30 minutes.
- Preheat your oven: Preheat to 375°F (190°C).
- Roll out the dough: On a floured surface, roll out the dough to 1/8 inch thick and place into a 9-inch pie pan.
- Pre-bake the crust: Prick the bottom and bake for about 20 minutes until golden brown.
- Cook the raspberries: In a saucepan, combine raspberries, sugar, cornstarch, and lemon juice and simmer for 5-7 minutes.
- Cool the mixture: Remove from heat and let it cool slightly.
- Make the whipped cream: Beat heavy cream, powdered sugar, and vanilla until soft peaks form.
- Fill the crust: Pour the raspberry filling into the cooled crust.
- Top with cream: Spoon the whipped cream over the raspberries.
- Chill: Refrigerate for at least 2 hours.
Notes
For variations, consider adding blueberries for a berry medley, or substitute coconut cream for a dairy-free option.
- Prep Time: 30 minutes
- Cook Time: 20 minutes
- Category: Dessert
- Method: Baking
- Cuisine: American
Nutrition
- Serving Size: 1 slice
- Calories: 350
- Sugar: 18g
- Sodium: 100mg
- Fat: 20g
- Saturated Fat: 12g
- Unsaturated Fat: 6g
- Trans Fat: 0g
- Carbohydrates: 40g
- Fiber: 4g
- Protein: 3g
- Cholesterol: 60mg
Keywords: Raspberry Pie, Summer Dessert, Cream Pie, Fresh Berries




