
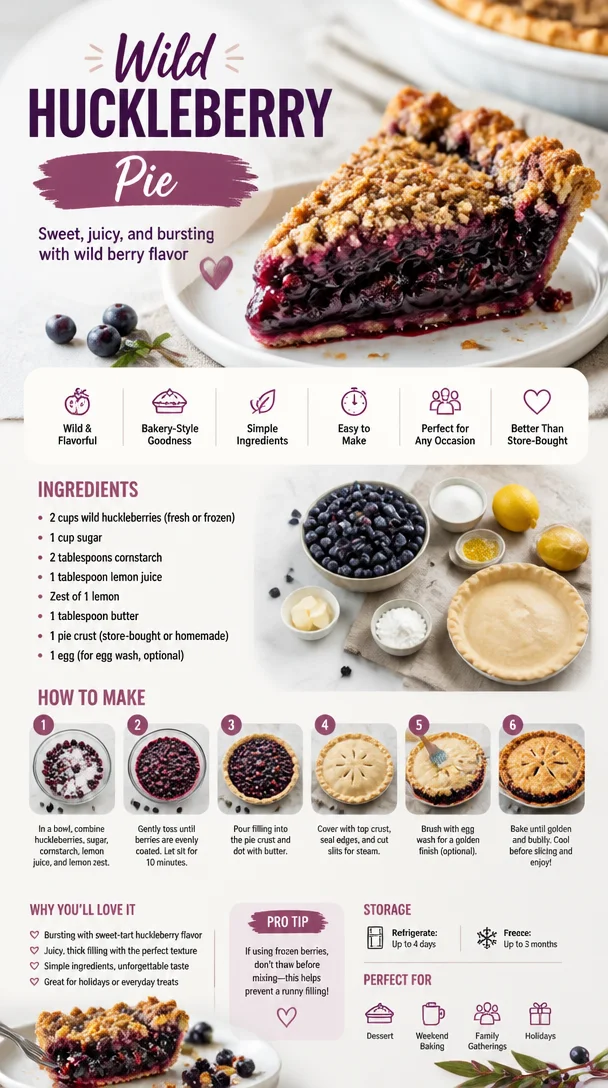
Wild Huckleberry Pie
The Joy of Wild Huckleberry Pie: A Slice of Nostalgia
Welcome to my kitchen! Today, we’re diving into one of my all-time favorites: Wild Huckleberry Pie. There’s something truly magical about this dessert that not only tantalizes your taste buds but also stirs up warm, loving memories of summers spent in nature’s embrace. Picture this: plump, juicy huckleberries, vibrant in color, bursting with sweet-tart goodness, and enveloped by a flaky, buttery crust. It’s like a hug in dessert form, and I can’t wait to share my love of this pie with you.
Let’s rewind to the summer I turned ten years old. My family decided to escape the hustle and bustle of city life for a week in the woods. My parents packed the car with camping gear, and my siblings and I packed our excitement. Little did I know, this adventure would kick off my lifelong obsession with huckleberries. Nestled near our campsite was a hidden patch of dark purple berries, and with my mother’s guidance, I learned to spot the ripest ones. Eventually, we returned to our campsite with buckets overflowing with huckleberries, our hands stained with juice, our laughter echoing through the trees.
That night, we baked our first pie outdoors over a campfire. With the smell of that sweet aroma wafting through the air, we gathered around the flickering flames, sharing stories and making memories that still bring a smile to my face. As we dove into that pie, I could see the joy on everyone’s faces; it was a simple symbol of togetherness, a bond forged in the kitchen and warmed by the spirit of family.
Now that I’ve recounted this delightful memory, let’s roll up our sleeves and jump into this recipe! I promise it’s easy and rewarding, perfect for any occasion, whether you’re in search of a simple weeknight dessert or looking to impress your friends at a summer gathering.
Ingredients
Before we start, let’s gather our ingredients. Here’s what you’ll need to make this delicious Wild Huckleberry Pie:
-
2 cups fresh wild huckleberries
These little gems are the star of the show! If you can’t find wild huckleberries, blueberries make a fantastic substitute. Just remember to adjust the sugar slightly, as blueberries tend to be sweeter. -
1 cup granulated sugar
This will sweeten our filling. You can use coconut sugar or honey for a healthier alternative. If you enjoy less sweetness, feel free to scale back on the sugar. -
1 tablespoon cornstarch
This acts as a thickener, ensuring your pie filling has that perfect luscious texture. If you prefer a gluten-free option, tapioca starch does the trick beautifully. -
1 teaspoon lemon juice
A splash of acidity balances the sweetness of the berries. Fresh lemon juice is ideal, but bottled juice will work if you’re in a pinch! -
1 teaspoon vanilla extract
Vanilla adds a warm depth to the flavor. You can switch it up with almond extract for a different nutty twist or skip it entirely if you want to keep it simple. -
1 tablespoon butter (for dotting)
Just a little pat of butter adds richness to the filling. You can use margarine if you’re looking for a dairy-free option. -
1 homemade or store-bought pie crust
I usually go for a homemade, flaky pie crust. But if time is short, don’t shy away from the convenience of pre-made crusts! -
Egg wash (1 egg beaten with a tablespoon of water)
This is optional but gives your pie that beautiful golden finish.
Step-by-Step Instructions
Now, let’s get to the fun part! Here’s a detailed guide on how to make your Wild Huckleberry Pie:
-
Preheat Your Oven:
Start by preheating your oven to 425°F (220°C). A hot oven ensures that your crust will be flaky and perfectly cooked. Trust me, a well-preheated oven is the key to baking success! -
Prepare the Filling:
In a large mixing bowl, combine your huckleberries, sugar, cornstarch, lemon juice, and vanilla extract. Gently toss to coat the berries and let them sit for about 15 minutes. This step allows the juices to be released and helps the flavors meld together beautifully. I love taking this moment to reminisce about that camping trip while I wait! -
Roll Out the Pie Crust:
Whether you’re using store-bought or homemade crust, roll it out on a lightly floured surface to about 1/8-inch thick. Carefully transfer it to your pie dish, pressing gently to fit into the corners. If using store-bought dough, follow the package instructions for thawing and placement. -
Fill the Pie:
Pour the huckleberry mixture into the prepared crust, making sure it fills all the nooks and crannies. Dot the filling with little bits of butter for added richness—trust me, it’s worth it! -
Top with Another Crust:
If you love a double-crust pie, roll out your second dough and place it over the filling. Cut slits in the top to allow steam to escape. This is where you can get creative: make a lattice pattern or cut out shapes for fun! -
Brush with Egg Wash:
If you’re feeling fancy, brush the crust with the egg wash. This will give it a glorious golden sheen. Not only does it make your pie look professional, but it also adds a slight richness when you bite into it. -
Bake the Pie:
Place your pie on a baking sheet (to catch any drips) and slide it into the oven. Bake for 15 minutes at 425°F (220°C), then reduce the temperature to 350°F (175°C) and continue baking for 30–35 minutes, or until the crust is golden brown and the filling is bubbling beautifully. -
Cool and Enjoy:
Once baked to perfection, remove your pie from the oven and let it cool for at least an hour before slicing. This allows the filling to set. Plus, it gives you a moment to enjoy that incredible aroma filling your kitchen!
Serving Suggestions
When it comes to serving your Wild Huckleberry Pie, let your creativity shine! A generous scoop of vanilla ice cream or a dollop of whipped cream on the side adds a delightful creamy contrast to the tartness of the berries. For a seasonal twist, top it with a sprinkle of fresh mint or powdered sugar for a pop of color and flavor.
Recipe Variations
-
Huckleberry Blueberry Mix: Combine huckleberries and blueberries for a fun flavor twist! The blueberries will naturally sweeten the pie.
-
Lemon Huckleberry: Enhance the filling with extra zest from a lemon for a more pronounced citrus flavor that brightens up the berries!
-
Spiced Huckleberry: Add a pinch of cinnamon or nutmeg to the filling for a warm, cozy flavor that’s perfect for fall gatherings.
-
Gluten-Free Crust: Use a gluten-free pie crust or a mixture of almond flour and coconut flour for a deliciously different base.
-
Vegan Twist: Substitute butter with coconut oil and the egg wash with a mixture of almond milk and maple syrup for a scrumptious vegan pie.
Chef’s Notes
Huckleberry pie holds a special place in my heart, and I’ve tinkered with this recipe over the years. Your instincts as a cook will guide you. If you taste the filling and think it needs a little more sweetness, feel free to adjust! And here’s a funny kitchen story for you: the first time I made this pie solo, I forgot to dot the filling with butter. I ended up with a delicious yet slightly dry pie! It was a great reminder that every misstep in the kitchen is an opportunity to learn and evolve. Feel free to put your own twist on this pie and make it your own!
FAQs and Troubleshooting
-
Why is my pie filling runny?
Runny filling can happen if you undercooked the cornstarch or didn’t allow the pie to cool before serving. Ensure you mix the cornstarch thoroughly with the berries, and patience is key—let it cool properly! -
How can I prevent my crust from getting soggy?
For a flakier crust, you can blind bake it for about 10 minutes before adding the filling! This helps seal off the bottom and ensures it stays crisp. -
What should I do if I can’t find huckleberries?
Blueberries, blackberries, or even cranberries can serve as excellent alternatives. Each brings its own unique flavor that will still create a delightful dessert! -
How do I store leftover pie?
Cover your pie loosely with plastic wrap or aluminum foil and store it in the fridge for up to 3 days. You can also freeze slices for up to 3 months—just make sure they’re well-wrapped to avoid freezer burn.
Remember, cooking is all about enjoyment, exploration, and sharing with others. I hope you’ll be inspired to try this Wild Huckleberry Pie recipe, whether it’s for yourself or to share with loved ones. Happy baking, and may your kitchen always be filled with laughter and delightful aromas!
Print
Wild Huckleberry Pie
- Total Time: 1 hour 5 minutes
- Yield: 8 servings 1x
- Diet: Vegetarian
Description
A delightful Wild Huckleberry Pie recipe that evokes nostalgic summer memories, featuring sweet-tart huckleberries in a flaky buttery crust.
Ingredients
- 2 cups fresh wild huckleberries
- 1 cup granulated sugar
- 1 tablespoon cornstarch
- 1 teaspoon lemon juice
- 1 teaspoon vanilla extract
- 1 tablespoon butter (for dotting)
- 1 homemade or store-bought pie crust
- 1 egg beaten with a tablespoon of water (for egg wash)
Instructions
- Preheat your oven to 425°F (220°C).
- Combine huckleberries, sugar, cornstarch, lemon juice, and vanilla extract in a large mixing bowl. Let sit for 15 minutes.
- Roll out the pie crust to about 1/8-inch thick and transfer it to your pie dish.
- Pour the huckleberry mixture into the prepared crust and dot with butter.
- Top with another crust, cutting slits for steam to escape.
- Brush with egg wash for a golden finish.
- Bake for 15 minutes at 425°F, then reduce to 350°F (175°C) and bake for 30–35 minutes.
- Cool for at least an hour before slicing.
Notes
Serve with a scoop of vanilla ice cream or whipped cream for a delightful contrast. Consider variations like a Huckleberry Blueberry mix or a spiced version with cinnamon.
- Prep Time: 20 minutes
- Cook Time: 45 minutes
- Category: Dessert
- Method: Baking
- Cuisine: American
Nutrition
- Serving Size: 1 slice
- Calories: 300
- Sugar: 24g
- Sodium: 200mg
- Fat: 14g
- Saturated Fat: 7g
- Unsaturated Fat: 6g
- Trans Fat: 0g
- Carbohydrates: 40g
- Fiber: 3g
- Protein: 3g
- Cholesterol: 70mg
Keywords: huckleberry, pie, dessert, summer, baking
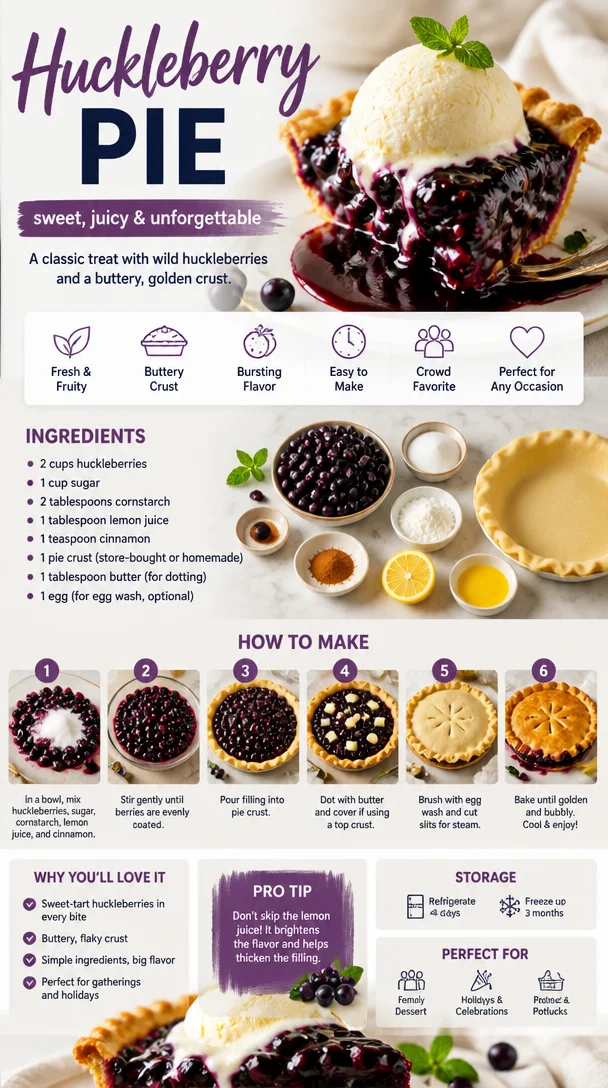
Huckleberry Pie
The Delights of Huckleberry Pie: A Slice of Nostalgia
Welcome back to my kitchen, friends! Today, we’re diving into one of my favorite desserts that brings a smile to my face every time I make it — huckleberry pie. Whether you’re a huckleberry aficionado or someone who has yet to be introduced to these tiny, tart beauties, this pie is bursting with flavor and love.
Imagine this: it’s a splendid summer day, and you’re surrounded by the lush greenery of the forest. You’ve got a basket in hand, and you’re on a quest to gather wild huckleberries. One by one, you pluck these plump little gems from their leafy homes, their sweet-tart aroma filling the air. The thrill of foraging them with loved ones, the laughter that floats through the trees, and the storytelling that follows those harvests make these moments truly special. And when we get back home? Well, it’s time to transform those huckleberries into a pie that’s sure to spark joy and nostalgia.
For me, making huckleberry pie is more than just a cooking process; it’s a tradition that connects me to the moments spent with my family. My grandmother had her special recipe, and every summer, she’d invite us into her cozy kitchen to help her with the filling. I remember standing on a stool to reach the countertop, rolling out dough with my tiny hands, laughing with my siblings, and occasionally sneaking a huckleberry or two! Those memories are ingrained in my heart and have become a cherished part of my culinary journey.
So, whether you’re dusting off grandma’s old recipe or trying your hand at making this delightful dessert for the first time, I promise that huckleberry pie is an experience that will create sweet memories. Let’s get started, so you can fill your home with that irresistible scent of baking pie!
Ingredients
To make this huckleberry pie, here’s what you’ll need:
- Fresh Huckleberries (4 cups): The star of our show! Fresh huckleberries are deep purple and burst with flavor. If you can’t find them, blueberries or blackberries can be fantastic substitutes. Just make sure to adjust the sugar level depending on the sweetness of the fruit.
- Granulated Sugar (1 cup): This balances the tartness of the huckleberries. For a healthier option, feel free to use coconut sugar or honey, but keep in mind that it might change the texture slightly.
- All-Purpose Flour (1/4 cup): This is a thickening agent that helps form a beautiful filling. If you need a gluten-free option, you can replace it with a gluten-free flour blend.
- Lemon Juice (2 tablespoons): This brightens the flavors and enhances the huckleberries’ natural tartness. You can also experiment with lime juice for a fun twist.
- Butter (2 tablespoons, unsalted): For richness, this ingredient brings a lovely flavor to the filling. You can quickly swap with coconut oil for a dairy-free version.
- Ground Cinnamon (1 teaspoon): A sprinkle of this adds warmth to the pie’s flavor. If you’re feeling adventurous, cardamom or nutmeg could be a delightful touch!
- Pie Crust (1 double-crust recipe): You can use either a homemade pie crust or store-bought, depending on your time situation. For a twist, try a graham cracker crust for a sweeter, crunchier base.
Step-by-Step Instructions
1. Preheat Your Oven
First things first, let’s set the vibe for your kitchen! Preheat your oven to 425°F (220°C). This will ensure your pie bakes beautifully with that perfect golden crust and bubbling filling.
2. Prepare the Pie Crust
If you’re making your own crust, roll it out to fit your 9-inch pie dish. Make sure to keep it thick enough for structure but thin enough to enjoy that buttery goodness. Don’t worry if it doesn’t look perfect; we’re going for homemade charm here! If you’re using a store-bought crust, just follow the instructions on the package. Once you have your bottom crust in place, trim the edges and set it aside.
3. Mix the Filling
In a large mixing bowl, combine your huckleberries, sugar, flour, lemon juice, butter, and cinnamon. Gently fold the ingredients together to avoid squishing those lovely berries. Take a moment to relish the vibrant colors and enchanting smell — it’s all about those little joys in the kitchen!
Chef Tip: Make sure your huckleberries are clean! Rinse them gently under cold water and pat them dry to avoid excess moisture in the filling.
4. Fill the Pie
Pour the huckleberry mixture into the prepared bottom crust, giving it a little shake to settle everything. It should look luscious and inviting! If you like, you can add some lattice work on top or simply cover it with another sheet of pie crust. If you choose to go with the latter, make sure to cut a few slits for steam to escape — we don’t want it to explode in the oven!
5. Bake Your Pie
Place the pie on a baking sheet (to catch any drips) and pop it in the oven. Bake for 15 minutes at 425°F, then reduce the temperature to 350°F (175°C) and continue baking for an additional 30-35 minutes. You want that crust to be a delightful golden brown, and the filling to be bubbling up through the openings.
Chef Hack: If you notice the crust browning too fast, you can gently cover the edges with aluminum foil to protect them from burning.
6. Cool and Serve
Once your huckleberry pie is beautifully baked, remove it from the oven and let it cool for at least 1-2 hours. This cooling time allows the filling to set perfectly. It’s tough to wait, but trust me, it’ll be worth it when you slice into it later!
Serving Suggestions
For that extra cozy touch, serve your huckleberry pie warm with a scoop of vanilla ice cream or a dollop of freshly whipped cream. You can even sprinkle a bit of cinnamon on top for a charming finish. If you’re feeling fancy, pair it with a pot of herbal tea or a cup of freshly brewed coffee — it’s a match made in culinary heaven!
Recipe Variations
Here are some creative twists you might like to try with this huckleberry pie:
- Huckleberry-Lemon Pie: Add a bit more lemon zest for a refreshing zing that elevates the flavor profile.
- Mixed Berry Pie: Combine huckleberries with blueberries, raspberries, or chopped strawberries for a delightful mixed berry experience.
- Nutty Crust: Use ground almonds or pecans in your pie crust for a nutty flavor that pairs perfectly with the huckleberries.
- Vegan Version: Substitute butter with vegan margarine and use a vegan pie crust; swap out sugar for your favorite vegan-friendly sweetener!
- Spiced Huckleberry Pie: Add a touch of ginger or cardamom to the filling for a warm and inviting flavor.
Chef’s Notes
As I’ve made this pie over the years, I’ve learned a few things along the way. One of my favorite moments was when I decided to throw in a hint of almond extract into the filling, and oh my goodness! The twist was simply delightful. Watching smiles spread across my family’s faces as they tasted my latest creation is what keeps me going in the kitchen. Every batch is an opportunity for a sweet surprise and a new memory in making!
FAQs and Troubleshooting
Q1: Why did my huckleberry pie become runny?
Sometimes, it’s all about moisture in the fruit. If your huckleberries were too juicy, adding an extra tablespoon of flour in the filling can help absorb that excess moisture.
Q2: How do I keep my crust from getting soggy?
Use a light brush of egg wash or melted butter on the bottom of your crust before adding the filling. This helps create a barrier and keeps it crisp.
Q3: Can I freeze huckleberry pie?
Absolutely! Just make sure it’s completely cooled, wrap it tightly in plastic wrap and then in foil. It should hold up nicely for about 2-3 months. To serve, bake directly from the freezer, just add a few extra minutes to the baking time.
Q4: Is there a way to make my huckleberry pie less sweet?
You can reduce the amount of sugar you use in the filling. I recommend gradually reducing it instead of cutting it out completely to maintain a balance of flavors.
Nutritional Info
Each slice of huckleberry pie (1/8 of the pie) typically contains around 200-250 calories, depending on your crust and ingredients. It’s packed with antioxidants from the huckleberries and can absolutely be part of a balanced diet!
Now that you have all the tips and tricks, it’s time for you to grab your apron and get to baking! I can’t wait to hear about your huckleberry pie adventures. Remember, cooking is about joy, share it, and create those beautiful moments. Happy baking!
Print
Huckleberry Pie
- Total Time: 1 hour 5 minutes
- Yield: 8 servings
- Diet: Vegetarian
Description
This delightful huckleberry pie is bursting with flavor and nostalgia, perfect for summer gatherings and creating sweet memories.
Ingredients
- Fresh Huckleberries (4 cups)
- Granulated Sugar (1 cup)
- All-Purpose Flour (1/4 cup)
- Lemon Juice (2 tablespoons)
- Butter (2 tablespoons, unsalted)
- Ground Cinnamon (1 teaspoon)
- Pie Crust (1 double-crust recipe)
Instructions
- Preheat your oven to 425°F (220°C).
- Prepare the pie crust by rolling it out to fit a 9-inch pie dish.
- Mix the huckleberries, sugar, flour, lemon juice, butter, and cinnamon in a large mixing bowl.
- Fill the prepared bottom crust with the huckleberry mixture.
- Bake the pie: Bake for 15 minutes at 425°F, then reduce the temperature to 350°F (175°C) for an additional 30-35 minutes.
- Cool the pie for at least 1-2 hours before serving.
Notes
For a twist, serve warm with ice cream or whipped cream. Can substitute huckleberries with blueberries or blackberries if necessary.
- Prep Time: 20 minutes
- Cook Time: 45 minutes
- Category: Dessert
- Method: Baking
- Cuisine: American
Nutrition
- Serving Size: 1 slice
- Calories: 225
- Sugar: 20g
- Sodium: 50mg
- Fat: 8g
- Saturated Fat: 5g
- Unsaturated Fat: 3g
- Trans Fat: 0g
- Carbohydrates: 36g
- Fiber: 3g
- Protein: 2g
- Cholesterol: 15mg
Keywords: huckleberry, pie, dessert, summer, berries
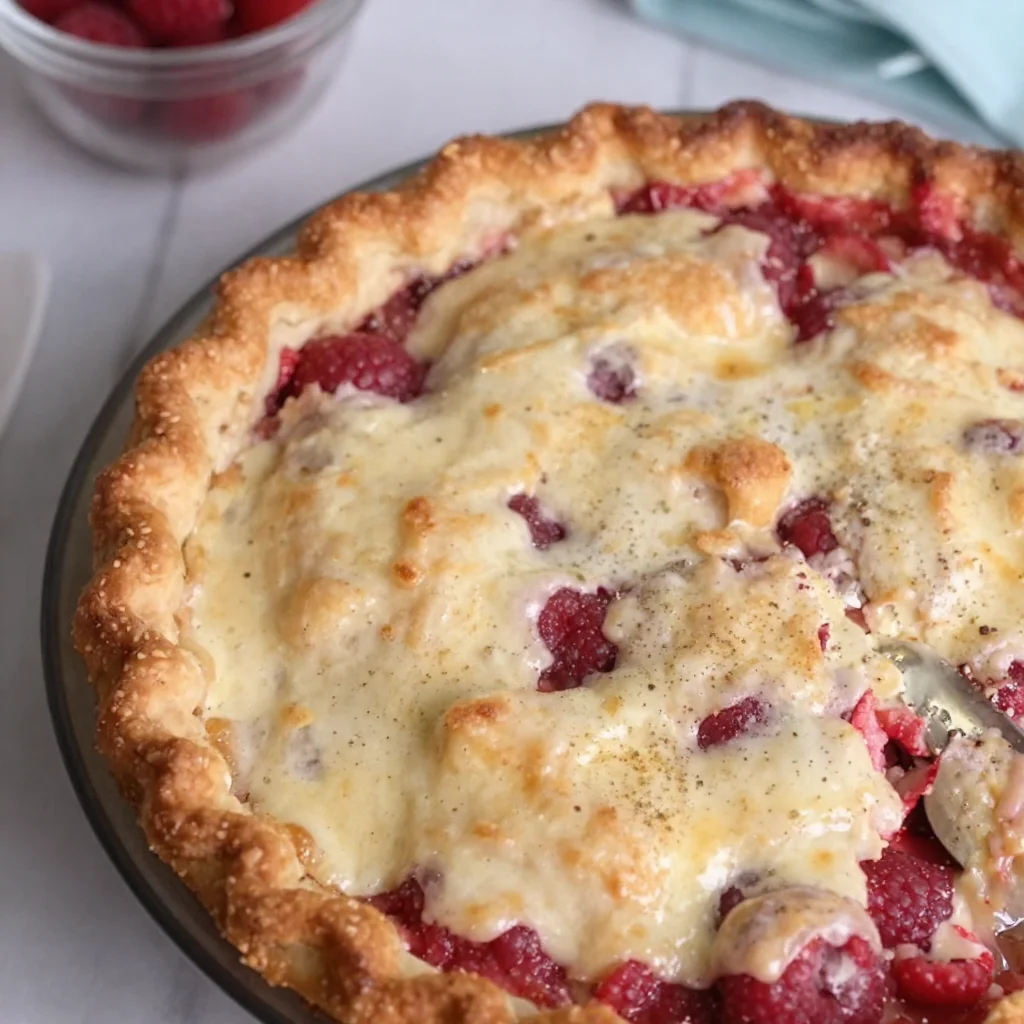
Raspberry Pie
The Joy of Baking: Raspberry Pie Love
Welcome to my kitchen, dear friends! Today, we’re diving into a dish that embodies summer, sweetness, and nostalgia: Raspberry Pie. Oh, how this pie takes me back! The delightful aroma of raspberries filling the air has always brought a smile to my face and a warmth to my heart. Whether enjoyed after a family meal or served during a backyard gathering, Raspberry Pie has a way of turning ordinary moments into cherished memories.
Picture this: a sunlit kitchen, laughter bouncing off the walls, and my grandmother expertly rolling out dough as we prepare for our favorite summer tradition—pie making! Every summer, we’d gather the juiciest raspberries from her garden, the plump little gems bursting with flavor. I can still hear her voice, mixing up the sweet filling, telling stories of pies she made as a child. The magic of those moments is what drives my passion for cooking today.
Making Raspberry Pie is not just about creating a dessert; it’s about celebrating life’s sweetest moments with those you love. Each bite is filled with memories of time spent together, and if you close your eyes, the taste takes you back to simpler times—an experience I want to share with all of you! So, let’s roll up our sleeves, grab our ingredients, and create something extraordinary. Trust me, your family and friends will thank you for it!
A Slice of Nostalgia
One summer, I was around ten years old, and my grandmother decided it was time for me to take on the sacred responsibility of pie-making. Armed with a rolling pin almost as tall as me and a heart full of enthusiasm, I was ready to dive into the world of baking. Grandma showed me how to coax the delicate dough into submission while ensuring our raspberry filling shimmered like jewels.
We scooped those ripe, tart raspberries lovingly plucked from her garden, and I learned the balance of sweetness and tartness—skills that I carry with me to this day. Little did I know then that these hours spent in the kitchen would shape my life and my passion for flavorful, homemade dishes. It was more than making a pie; it was about storytelling, connection, and the love of beautiful food. And those moments created a symphony of flavors, laughter, and memories that will forever be dear to my heart.
Ingredients for the Perfect Raspberry Pie
Now that we’re warmed up with nostalgia, let’s gather our ingredients! Here’s what you’ll need for this delightful Raspberry Pie, along with some tips to make your life easier:
-
Fresh Raspberries (6 cups)
Sweet, juicy raspberries are the star of our show! If you don’t have fresh ones on hand, you can use frozen raspberries (just don’t forget to thaw and drain them first). -
Granulated Sugar (1 cup)
This balances the tartness of the raspberries. Feel free to swap with coconut sugar or honey for a different flavor profile. -
Cornstarch (2 tablespoons)
This thickens the filling. Don’t have cornstarch? You can use tapioca starch as a one-to-one replacement. -
Lemon Juice (2 tablespoons)
Adds brightness and brings out the raspberry flavor. Stay away from bottled lemon juice—fresh is always best! -
Vanilla Extract (1 teaspoon)
A splash of vanilla enhances the raspberry flavor. If you’re in a pinch, you can substitute it with almond extract for a unique twist. -
Pie Crust (store-bought or homemade)
Use your favorite crust recipe or a pre-made one for convenience. If you’re going homemade, I recommend using a buttery pie crust for that perfect flaky texture. -
Egg Wash (1 egg, beaten)
For that golden, glossy finish that makes your pie shine! You can also use milk or cream if you prefer.
Step-by-Step Instructions
Let’s get down to business! Here’s how to turn those ingredients into a masterpiece.
-
Preheat Your Oven
Preheat your oven to 425°F (220°C). This step is crucial for achieving a beautifully baked pie. The high heat helps the crust get that lovely golden color while the filling bubbles away. -
Prepare the Filling
In a large bowl, gently toss the raspberries, sugar, cornstarch, lemon juice, and vanilla extract. Be careful not to mash the berries too much— we want them intact to provide that delightful burst of flavor in every bite. Let this mixture rest for 10-15 minutes. This helps the sugar draw out the juices, creating a delicious filling. -
Roll Out the Dough
If you’re making homemade dough, roll it out on a floured surface to about 1/8-inch thickness. For store-bought, let it sit at room temperature for a few minutes before unrolling. This allows it to be more pliable and easier to work with. -
Assemble the Pie
Lay half of the pie crust in a 9-inch pie pan. Pour the raspberry filling into the crust, spreading it evenly. Top it off with the remaining crust. You can make a full top crust or lattice for a more beautiful presentation—just be sure to cut slits for steam to escape! -
Brush the Crust
Brush the top crust with the beaten egg wash. This is where that golden color comes from! You can also sprinkle a little sugar on top for added crunch and sweetness. -
Bake
Place the pie in the oven and bake for 15 minutes at 425°F. After that, reduce the temperature to 350°F (175°C) and continue baking for 20-25 minutes until the filling is bubbly, and the crust is golden brown. The smell wafting through your kitchen will be pure bliss! -
Cool Down
Let your pie cool for at least 30 minutes before slicing. This step allows the filling to set, making it easier to serve those perfect slices. Patience is key here!
Serving Suggestions
When it comes to serving Raspberry Pie, simplicity is key! I love to serve it warm with a scoop of vanilla ice cream or a dollop of freshly whipped cream. The creamy contrast against the tart raspberries is simply divine. For an elegant touch, sprinkle powdered sugar on top or garnish with a few fresh raspberries and a mint leaf. Voila! You’ve got a showstopper!
Recipe Variations
Fancy switching things up? Here are a few ideas to make this Raspberry Pie your own:
-
Mixed Berry Pie: Swap out some of the raspberries for blueberries or blackberries for a delightful berry medley.
-
Almond Raspberry Pie: Add a teaspoon of almond extract in addition to vanilla for a nutty flavor twist that complements the raspberries beautifully.
-
Gluten-Free Option: Use a gluten-free pie crust to accommodate dietary needs, and don’t worry—the flavor will still shine!
-
Chocolate Raspberry Pie: Mix in a handful of chocolate chips to the filling for an indulgent chocolate twist.
-
Spiced Raspberry Pie: Sprinkle in some cinnamon and nutmeg to the filling for a warm, aromatic touch.
Chef’s Notes
It’s amazing how recipes evolve over time. This Raspberry Pie wasn’t always a summer staple in my kitchen. I’ve adapted and tweaked it to align with what’s freshest and in season, and every time I make it, I find new ways to explore flavors. Plus, there’s a certain joy that comes from getting a little messy in the kitchen! If you’re ever feeling down, I suggest rolling out dough or tossing some berries around—it’s therapeutic, I promise!
I once had a mishap where I forgot to add sugar to the filling. Let’s just say, it was a tart surprise for my family! But life in the kitchen—like life itself—sometimes you just have to roll with it and learn. That’s what makes cooking so fun!
FAQs and Troubleshooting
-
Why did my filling bubble over?
If your pie filling isn’t thick enough, it can bubble over. Make sure to add enough cornstarch and let the mixture sit before filling the pie. -
What if my crust is too dry?
If your dough feels crumbly, it may be too dry. Add a teaspoon of cold water at a time until the dough comes together nicely. -
How do I know when my pie is done?
Your pie is ready when the crust is golden, and you can see the filling bubbling through the top. If you’re unsure, use a thermometer; the filling should reach about 200°F. -
Can I make this ahead of time?
Absolutely! You can prepare the pie and refrigerate it before baking or freeze it before it goes in the oven. Just make sure to adjust baking time as needed!
Nutritional Info (Optional)
(Nutritional information can vary based on specific brands and portion sizes)
- Serving Size: 1 slice (1/8 of pie)
- Calories: Approximately 250
- Total Fat: 10g
- Saturated Fat: 5g
- Carbohydrates: 38g
- Fiber: 3g
- Sugars: 15g
- Protein: 3g
I hope you find joy in making this Raspberry Pie as much as I do. Whether you’re creating it alone or bringing friends and family into the kitchen, remember that every moment spent cooking is a moment invested in love and connection. So, go ahead, put on that messy apron, and let’s bake some magic!
Print
Raspberry Pie
- Total Time: 60 minutes
- Yield: 8 servings
- Diet: Vegetarian
Description
A delightful Raspberry Pie that embodies summer, sweetness, and nostalgia, perfect for family gatherings.
Ingredients
- Fresh Raspberries (6 cups)
- Granulated Sugar (1 cup)
- Cornstarch (2 tablespoons)
- Lemon Juice (2 tablespoons)
- Vanilla Extract (1 teaspoon)
- Pie Crust (store-bought or homemade)
- Egg Wash (1 egg, beaten)
Instructions
- Preheat your oven to 425°F (220°C).
- Prepare the filling in a large bowl by tossing raspberries, sugar, cornstarch, lemon juice, and vanilla extract gently.
- Roll out the dough on a floured surface to about 1/8-inch thickness.
- Assemble the pie by placing half the crust in a 9-inch pie pan, pouring in the filling, and topping with the remaining crust.
- Brush the top crust with the beaten egg wash.
- Bake for 15 minutes at 425°F, then reduce to 350°F (175°C) for 20-25 minutes.
- Cool down for at least 30 minutes before slicing.
Notes
Serve warmed with vanilla ice cream or whipped cream for a delightful treat. Experiment with different berries for variations.
- Prep Time: 20 minutes
- Cook Time: 40 minutes
- Category: Dessert
- Method: Baking
- Cuisine: American
Nutrition
- Serving Size: 1 slice
- Calories: 250
- Sugar: 15g
- Sodium: 100mg
- Fat: 10g
- Saturated Fat: 5g
- Unsaturated Fat: 3g
- Trans Fat: 0g
- Carbohydrates: 38g
- Fiber: 3g
- Protein: 3g
- Cholesterol: 0mg
Keywords: raspberry pie, summer dessert, pie recipe, baking, homemade pie




