
Ingredient Huckleberry Chantilly Cake: Summer Recipe
Huckleberry Chantilly Cake: A Slice of Joy
Welcome to my kitchen! Today, we’re diving into a delightful confection that embodies summer’s sweet embrace — the Huckleberry Chantilly Cake. As the season’s berries start to burst with color and flavor, there’s no better way to celebrate nature’s bounty than with a light and airy cake topped with a luscious chantilly cream. If the mention of huckleberries makes your heart flutter, then you’re in for a treat! This cake isn’t just a dessert; it’s a joyful explosion of happiness and nostalgia that can transport you back to lazy summer days filled with laughter and love.
But wait, let me take a moment to pull you into my little world. I remember the first time I stumbled upon huckleberries. I was about twelve, spending summer weekends with my grandparents in their cozy cabin tucked away in the woods. The moment we stepped outside, the air was rich with the scent of pine and the sounds of nature — the perfect backdrop for a little adventure. Armed with tiny pails and an insatiable curiosity, my grandfather and I ventured into the wild to forage for these little blue gems that grew in abundance.
Those days spent scouring the underbrush, discovering the sweet, juicy huckleberries hidden among the leaves, were magical. When we returned, sticky-fingered and beaming with pride, my grandmother would have all the ingredients ready to whip up her famous berry pie. While her recipe will always have a special place in my heart, I love to shake things up in the kitchen! Every year, as huckleberry season rolls around, I find new ways to incorporate these beauties into my cooking. This Huckleberry Chantilly Cake is one of my proudest creations — it brings all those cherished memories flooding back with every bite.
So, grab your apron, and let’s make this easy yet stunning cake that will have your friends asking for seconds (and maybe thirds!). Trust me, this recipe is a delightful celebration that’s meant to be shared.
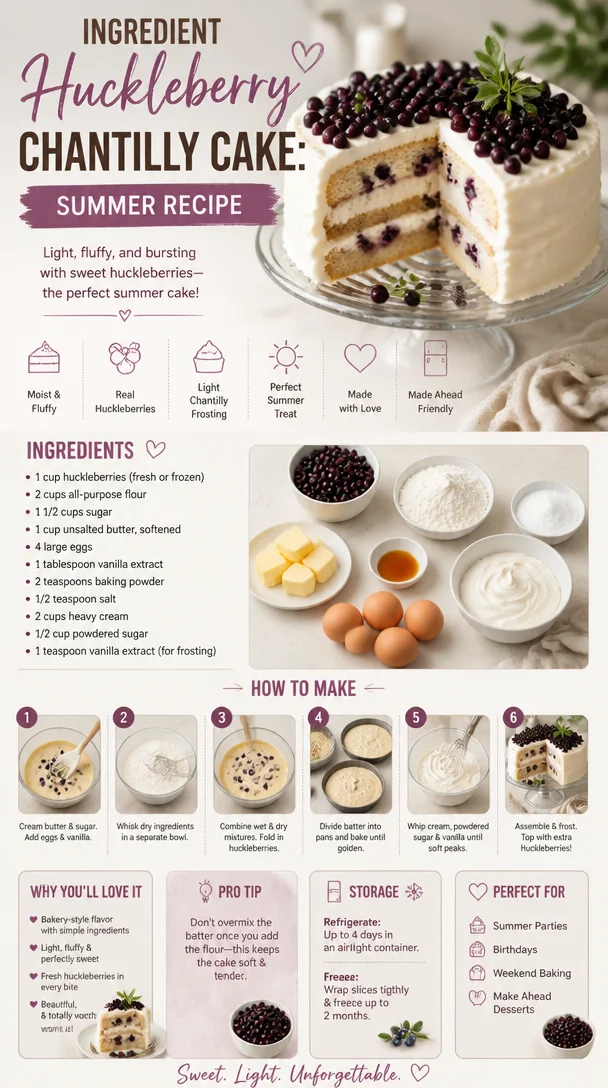
Ingredients
Here’s what you’ll need to create this dreamy Huckleberry Chantilly Cake:
-
2 cups all-purpose flour
- This is the foundation of our cake. For a gluten-free option, try using a 1:1 gluten-free flour blend.
-
1 ½ cups granulated sugar
- Sweetness is key! If you want a lower-sugar version, you can substitute with coconut sugar, but adjust the liquids slightly as it absorbs more moisture.
-
½ cup unsalted butter (softened)
- Butter adds richness! If you’re aiming for a dairy-free cake, feel free to swap it with coconut oil or vegan butter.
-
1 cup buttermilk
- This helps in creating a moist cake with a tender crumb. No buttermilk? Mix 1 cup of milk with a tablespoon of vinegar or lemon juice and let it sit for five minutes.
-
3 large eggs
- Eggs provide structure. For an egg-free version, consider using flax eggs (1 tablespoon of flaxseed meal mixed with 3 tablespoons of water per egg) — just give it a few minutes to thicken.
-
1 tablespoon baking powder
- This ensures our cake rises beautifully and has a fluffy texture.
-
½ teaspoon baking soda
- Helps to balance the acidity of the buttermilk, promoting a nice rise.
-
1 teaspoon vanilla extract
- Always use pure vanilla for the best flavor. If you’re adventurous, try using almond extract for a deeper, nutty note.
-
2 cups huckleberries (fresh or frozen)
- The star of our show! If huckleberries are hard to find, blueberries make an excellent substitute. Just adjust the sweetness slightly since blueberries can be a tad sweeter.
-
2 cups heavy whipping cream
- Essential for our chantilly cream. If you want a lighter option, you can use a whipped coconut cream.
-
½ cup powdered sugar
- For sweetening the chantilly cream without the graininess of granulated sugar.
-
1 teaspoon vanilla extract
- Again, pure vanilla is key here for that lovely, aromatic flavor in your cream.
Step-by-Step Instructions
-
Preheat your oven to 350°F (175°C). Preheating is crucial so that your cake begins baking immediately, leading to a beautiful rise.
-
Prepare your cake pans. Grease two 9-inch round cake pans with butter or non-stick spray, then line the bottoms with parchment paper for easy removal. This little step ensures that your cake won’t stick and you’ll have picture-perfect layers.
-
Mix the dry ingredients. In a large mixing bowl, whisk together the flour, baking powder, baking soda, and a pinch of salt. This aerates the flour and distributes the leavening agents evenly.
-
Cream the butter and sugar. In another bowl, beat the softened butter and granulated sugar together until the mixture is light and fluffy — about 3-4 minutes. This step creates air pockets in the butter, which is essential for a light cake.
-
Add the eggs and vanilla. One at a time, mix in the eggs, scraping down the sides of the bowl as needed. Add the vanilla extract next and blend until just combined.
-
Combine wet and dry ingredients. Gradually stir in the flour mixture and buttermilk, alternating between both, starting and ending with the dry mix. Each addition needs to be mixed just until combined to avoid overworking the flour, which can lead to a tough cake.
-
Fold in the huckleberries. Gently fold the huckleberries into the batter, being careful to keep them whole to avoid purple swirls in your cake.
-
Divvy up the batter. Pour equal amounts of batter into the prepared cake pans and smooth the tops with a spatula.
-
Bake! Pop those pans into your preheated oven and bake for 25-30 minutes or until a toothpick inserted in the center comes out clean. Keep an eye on them, as overbaking can lead to dry cake.
-
Cool the layers. Once baked, remove the pans from the oven and let them cool in the pans for about 10 minutes. Then, carefully invert them onto a wire rack to cool completely. This helps prevent a soggy bottom.
-
Prepare the chantilly cream. Here comes the fun part! In a large mixing bowl, pour the heavy cream and add the powdered sugar and vanilla extract. Using an electric mixer, whip it on medium-high speed until soft peaks form. Don’t overwhip, or you’ll end up with butter!
-
Assemble the cake. Once the cake layers are completely cool, place one layer on a serving plate. Spread a thick layer of chantilly cream on top and scatter some more huckleberries over it. Place the second layer on top and spread the remaining chantilly cream over the top and sides.
-
Garnish and serve. Finish the cake by scattering more huckleberries on top for a stunning presentation. Your cake is now ready to impress!
Serving Suggestions
When it comes to serving, a slice of Huckleberry Chantilly Cake deserves a beautiful presentation. Place it on a nice cake stand, and serve with a side of fresh fruit or a drizzle of berry sauce for a pop of color. A thin dusting of powdered sugar on top creates an elegant finish. Encourage your guests to take their time, savoring the flavors of light sponge cake, fresh fruit, and fluffy cream.
Recipe Variations
Feeling adventurous? Here are a few variations to spice things up:
-
Lemon Zest: Add the zest of one lemon to the batter for a touch of citrus brightness.
-
Cream Cheese Frosting: Swap out the chantilly cream for a tangy cream cheese frosting, which pairs wonderfully with the sweetness of the huckleberries.
-
Nutty Addition: Fold finely chopped walnuts or pecans into the batter for a delightful crunch.
-
Layer it up: Make a three-tiered cake by adding an additional layer of your favorite flavor (like a vanilla or chocolate) for variety.
-
Gluten-Free: Substitute all-purpose flour with almond flour or a gluten-free flour blend for a gluten-free treat.
Chef’s Notes
This Huckleberry Chantilly Cake is a true reflection of my kitchen’s ethos — simple yet indulgent. Each year, I find myself experimenting with this recipe, whether it’s swapping berries or even trying different creams. One funny memory I treasure is the time I accidentally used salt instead of sugar in the chantilly cream. The reactions were priceless (and definitely not repeatable)! I love how recipes evolve over time. Each addition or change is like adding a new chapter to a beloved book. I hope this cake will inspire you to create your own kitchen stories and memories!
FAQs and Troubleshooting
-
Q: My cake turned out dense. What happened?
- A: This could be due to overmixing the batter. Mix until just combined, and be gentle when folding in the berries.
-
Q: How do I store leftovers?
- A: Store any leftover cake in an airtight container in the fridge for up to 3 days. Just know that the cream may soften the cake a bit over time.
-
Q: Can I freeze this cake?
- A: Absolutely! You can freeze the cake layers without frosting. Wrap them in plastic wrap, and use foil for extra protection. Thaw in the fridge before frosting.
-
Q: What do I do if the huckleberries are too tart?
- A: If you find huckleberries too tart for your taste, consider macerating them in a little sugar for 15-20 minutes before adding them to the batter. This helps to sweeten them!
So there you have it, my sweet friends — a detailed, scrumptious guide to creating a Huckleberry Chantilly Cake that’s sure to be the star of any gathering. Every slice brings back fond memories and creates new ones, so I hope you’ll whip this up and share it with your loved ones. Happy baking, and let the delicious flavors of huckleberries spark joy in your kitchen!
Print
Huckleberry Chantilly Cake
- Total Time: 50 minutes
- Yield: 8 servings 1x
- Diet: Vegetarian
Description
A delightful Huckleberry Chantilly Cake topped with luscious chantilly cream, celebrating summer’s fresh huckleberries.
Ingredients
- 2 cups all-purpose flour
- 1 ½ cups granulated sugar
- ½ cup unsalted butter (softened)
- 1 cup buttermilk
- 3 large eggs
- 1 tablespoon baking powder
- ½ teaspoon baking soda
- 1 teaspoon vanilla extract
- 2 cups huckleberries (fresh or frozen)
- 2 cups heavy whipping cream
- ½ cup powdered sugar
- 1 teaspoon vanilla extract
Instructions
- Preheat your oven to 350°F (175°C).
- Prepare your cake pans by greasing with butter or non-stick spray and lining with parchment paper.
- Mix the dry ingredients: whisk together flour, baking powder, baking soda, and salt in a large bowl.
- Cream the butter and sugar together until light and fluffy (about 3-4 minutes).
- Add the eggs one at a time, mixing in the vanilla extract until just combined.
- Combine wet and dry ingredients, alternating between flour mixture and buttermilk.
- Fold in the huckleberries gently to keep them whole.
- Divvy up the batter into prepared pans, smoothing the tops.
- Bake for 25-30 minutes until a toothpick comes out clean.
- Cool the layers in pans for about 10 minutes, then invert onto wire racks to cool completely.
- Prepare the chantilly cream: whip together heavy cream, powdered sugar, and vanilla extract until soft peaks form.
- Assemble the cake by stacking layers with chantilly cream and huckleberries between them.
- Garnish with additional huckleberries on top before serving.
Notes
For a gluten-free version, substitute the all-purpose flour with a gluten-free flour blend. Adjust the sweetness of the huckleberries if needed.
- Prep Time: 20 minutes
- Cook Time: 30 minutes
- Category: Dessert
- Method: Baking
- Cuisine: American
Nutrition
- Serving Size: 1 slice
- Calories: 400
- Sugar: 32g
- Sodium: 200mg
- Fat: 26g
- Saturated Fat: 15g
- Unsaturated Fat: 8g
- Trans Fat: 0g
- Carbohydrates: 45g
- Fiber: 2g
- Protein: 6g
- Cholesterol: 80mg
Keywords: cake, huckleberry, chantilly, dessert, summer
Beginner-Friendly Buttermilk Huckleberry Cake Recipe
Buttermilk Huckleberry Cake: A Slice of Happiness
Welcome to my kitchen! I’m so glad you’re here, and I can’t wait to share a delicious recipe that’s truly close to my heart: Buttermilk Huckleberry Cake. This cake is not just a dessert; it’s a celebration of summer, family gatherings, and sweet nostalgia. With its moist, tender crumb and the burst of juicy huckleberries, this cake makes for the perfect centerpiece at any occasion—from Sunday brunch to cozy family dinners.
Picture this: the sun is shining, and the air is warm with the sweet scent of wild berries. As a child, I spent countless afternoons in the woods behind my grandmother’s house, foraging for huckleberries. Those charming little blue-black gems were always a delight to find, hiding among the leaves, waiting to be picked. I remember my grandmother’s laugh as she whisked up her famous huckleberry pancakes in the mornings, reminding us of the timeless connection between food and memories.
One beautiful summer day, she decided to surprise us all with something special—a huckleberry cake! That day in her cozy kitchen, filled with the sounds of whisking and laughter, ignited my love for baking and the sheer joy of sharing food with those I love. Now, every time I whip up this Buttermilk Huckleberry Cake, I’m reminded of those precious moments spent with her, and I hope this recipe brings as much joy to your kitchen as it has to mine.
Let’s dive into the ingredients and get cooking!
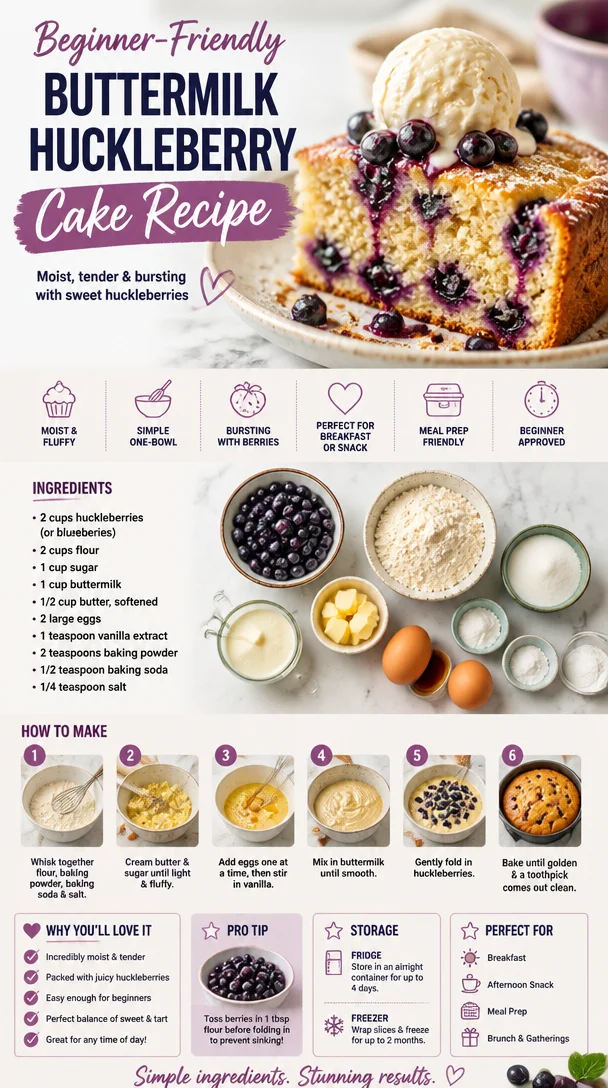
Ingredients
-
2 cups all-purpose flour
Perfect for creating a light and tender cake. You can substitute with whole wheat flour for a nuttier flavor, but keep in mind that it might make the cake denser. -
1 cup granulated sugar
This adds the right amount of sweetness. For a lower-calorie option, consider using coconut sugar or a sugar substitute; just remember to adjust the quantity according to the substitution guidelines. -
1/2 teaspoon baking powder
A vital ingredient that helps your cake rise and prevents it from being too dense. -
1 teaspoon baking soda
This interacts with the acidity of buttermilk to create a wonderfully fluffy texture. -
1/2 teaspoon salt
Balances the sweetness and enhances the flavors of the cake. -
1 cup buttermilk
Adds moisture and a slight tang. If you don’t have buttermilk on hand, you can make your own by mixing one cup of milk with a tablespoon of vinegar or lemon juice and letting it sit for about 10 minutes. -
1/2 cup vegetable oil
Keeps the cake moist and tender. Melted butter can also be used for a richer flavor. -
2 large eggs
Essential for binding the ingredients together and adding a bit of richness. Flaxseed eggs (1 tablespoon flaxseed meal mixed with 2.5 tablespoons water) could be a great vegan substitute. -
1 ½ cups fresh huckleberries
Deliciously sweet and tart—they make this cake sing! If you can’t find huckleberries, blueberries work beautifully as well. -
1 teaspoon vanilla extract
Adds warmth and rounds out the flavors. Use pure vanilla extract for the best results.
Ready to embark on your baking adventure? Let’s mix up this delicious Buttermilk Huckleberry Cake together!
Step-by-Step Instructions
-
Preheat Your Oven
Start by preheating your oven to 350°F (175°C). This ensures that your cake will bake evenly and create that perfect golden crust. -
Prepare Your Cake Pan
Grease a 9×13-inch baking dish (or two 8-inch round pans, if you prefer layers) with butter or cooking spray. For an extra non-stick guarantee, you can also dust the pan with a bit of flour—this helps the cake slide right out. -
Combine Dry Ingredients
In a large mixing bowl, whisk together the flour, sugar, baking powder, baking soda, and salt. This is where we bring together all those dry ingredients, ensuring they’re well-mixed for even flavor and texture. -
Mix Wet Ingredients
In a separate bowl, whisk together the buttermilk, vegetable oil, eggs, and vanilla extract until thoroughly combined. You want these ingredients to blend smoothly—don’t be afraid to put some elbow grease into it! -
Combine Wet and Dry Ingredients
Pour the wet mixture into the dry ingredients, and stir gently until just combined. Be careful not to overmix; this will keep your cake light and fluffy. You might see some lumps, and that’s perfectly fine! -
Fold in the Huckleberries
Now for the star of the show! Gently fold in the huckleberries, taking care not to break them apart too much—they should remain intact to create those lovely bursts of fruit in every slice. -
Transfer to the Pan
Pour the batter into your prepared baking dish, spreading it evenly. If you want a little extra flair, you can save a handful of huckleberries to sprinkle on top before baking! -
Bake the Cake
Place the cake in your preheated oven and bake for about 30-35 minutes. You’ll know it’s done when a toothpick inserted in the center comes out clean or with just a few moist crumbs clinging to it. -
Cooling Time
Once baked, remove the cake from the oven and allow it to cool in the pan for about 10 minutes. Then, transfer it to a wire rack to cool completely. This step is crucial as it helps set the cake and prevents it from becoming soggy. -
Slice and Serve!
Once the cake has cooled, it’s time for the best part—enjoying a slice (or two) of your Buttermilk Huckleberry Cake. Feel free to serve it plain, dusted with powdered sugar, or topped with a dollop of whipped cream for an extra indulgence!
Serving Suggestions
To serve your Buttermilk Huckleberry Cake, slice it into generous squares and place them on colorful dessert plates. A light dusting of powdered sugar makes for an appealing presentation, or add fresh huckleberries and mint leaves for that extra pop of color. If you’re feeling fancy, serve it alongside a scoop of vanilla ice cream or a drizzle of cream cheese frosting—trust me, you can’t go wrong with that!
Recipe Variations
Looking to switch things up? Here are a few ideas:
-
Lemon Zest: Add a tablespoon of lemon zest to the batter for a refreshing citrus twist.
-
Spices: Incorporate cinnamon or nutmeg for a warm spice profile, perfect for those cozy autumn days.
-
Coconut Flakes: Stir in some sweetened coconut flakes for an exotic flair and added texture.
-
Nuts: Chopped walnuts or pecans could add a delightful crunch and a nutty flavor contrast.
-
Gluten-Free Option: Substitute in a 1:1 gluten-free flour blend to make it gluten-free without sacrificing flavor.
Chef’s Notes
Every time I make this cake, it takes me back to my grandmother’s kitchen. I often find myself reminiscing about those carefree summer afternoons spent berry-picking and the laughter shared over delicious food. The beauty of this recipe is in its simplicity; it’s a canvas for your creativity! Over the years, I’ve tried different flavors and variations. One fun memory is when I surprised my grandmother with a ‘Huckleberry Lemon Cheesecake’ for her birthday, inspired by this very cake. She took one bite and it was like I had transported her back to her own childhood. That’s the magic of cooking—it connects generations and creates a tapestry of memories.
FAQs and Troubleshooting
1. My cake turned out too dense; what did I do wrong?
This could be due to overmixing the batter or using too much flour. Be gentle when combining wet and dry ingredients and measure flour accurately (spoon it into your measuring cup and level it off!).
2. I can’t find huckleberries; how can I substitute?
You can use fresh or frozen blueberries, blackberries, or even raspberries. Just adjust the quantity if the substitute is more or less sweet.
3. Can I make this cake ahead of time?
Absolutely! This cake stores well. Just make sure to keep it wrapped in an airtight container at room temperature for up to 3 days (or refrigerate for longer freshness).
4. How can I make the cake gluten-free?
Simply substitute the all-purpose flour with a gluten-free 1:1 flour blend. Make sure to check that other ingredients (like baking powder) are gluten-free too.
Nutritional Info
While this cake is definitely a treat, here’s a quick glance at the estimated nutritional info per slice (based on 12 slices per cake):
- Calories: 220
- Protein: 3g
- Total Fat: 10g
- Saturated Fat: 1g
- Dietary Fiber: 1g
- Total Sugars: 12g
As always, adjust based on your serving size and ingredients used, and enjoy every delicious bite guilt-free!
There you have it: my beloved Buttermilk Huckleberry Cake recipe, filled with love, memories, and loads of flavor! I hope you find as much joy in baking it as I do. Happy baking, and may your kitchen always be filled with warmth and laughter!
Print
Buttermilk Huckleberry Cake
- Total Time: 50 minutes
- Yield: 12 servings 1x
- Diet: Vegetarian
Description
A delightful cake celebrating summer with juicy huckleberries and a tender crumb, perfect for family gatherings.
Ingredients
- 2 cups all-purpose flour
- 1 cup granulated sugar
- 1/2 teaspoon baking powder
- 1 teaspoon baking soda
- 1/2 teaspoon salt
- 1 cup buttermilk
- 1/2 cup vegetable oil
- 2 large eggs
- 1 ½ cups fresh huckleberries
- 1 teaspoon vanilla extract
Instructions
- Preheat your oven to 350°F (175°C).
- Grease a 9×13-inch baking dish with butter or cooking spray.
- Combine the flour, sugar, baking powder, baking soda, and salt in a large bowl.
- Mix the buttermilk, vegetable oil, eggs, and vanilla extract in another bowl until blended.
- Pour the wet mixture into the dry ingredients and stir gently until just combined.
- Fold in the huckleberries carefully.
- Transfer the batter to your prepared pan, spreading it evenly.
- Bake for about 30-35 minutes, until a toothpick comes out clean.
- Cool in the pan for 10 minutes, then transfer to a wire rack.
- Slice and serve with powdered sugar or whipped cream.
Notes
This cake can be made ahead of time and stored in an airtight container for up to 3 days. You can substitute various fruits if huckleberries are unavailable.
- Prep Time: 15 minutes
- Cook Time: 35 minutes
- Category: Dessert
- Method: Baking
- Cuisine: American
Nutrition
- Serving Size: 1 slice
- Calories: 220
- Sugar: 12g
- Sodium: 200mg
- Fat: 10g
- Saturated Fat: 1g
- Unsaturated Fat: 9g
- Trans Fat: 0g
- Carbohydrates: 32g
- Fiber: 1g
- Protein: 3g
- Cholesterol: 35mg
Keywords: cake, huckleberry, dessert, summer, baking, family


