
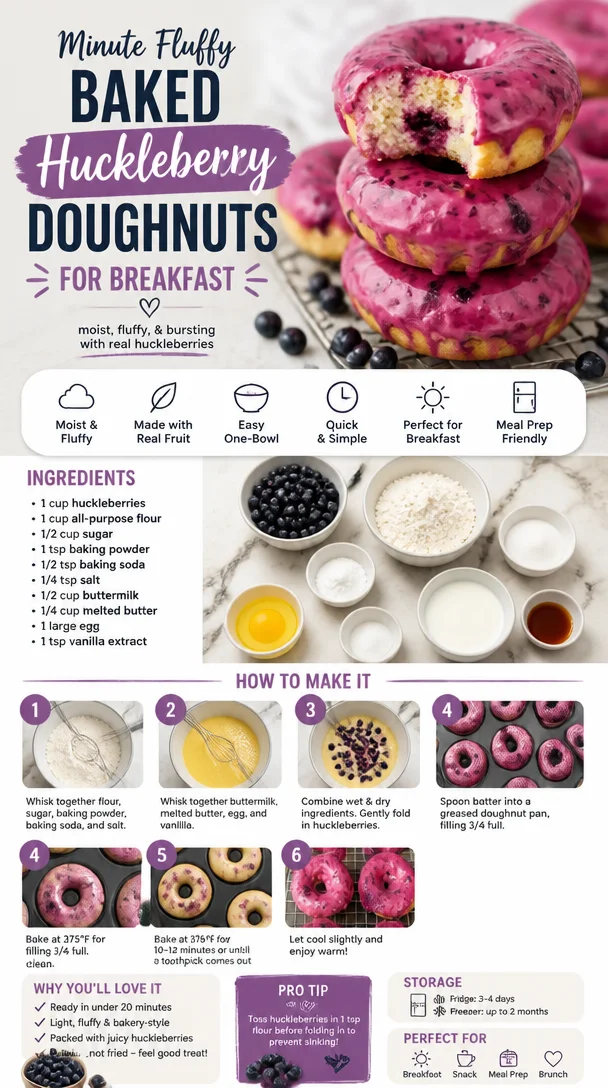
Minute Fluffy Baked Huckleberry Doughnuts for Breakfast
Baked Huckleberry Doughnuts: A Sweet Adventure in the Kitchen
Welcome, fellow foodies! I’m so excited you found your way into my cozy kitchen today. The sweet aroma of baked doughnuts is wafting through the air, and let me tell you, there’s nothing quite like the joy of whipping up a batch of baked huckleberry doughnuts. If you’re new to the world of homemade sweets—or even if you’re a seasoned baker—you’re in for a delightful treat that’ll make your taste buds dance.
As the temperature starts to drop and leaves begin to adorn their stunning fall colors, you may find yourself yearning for something warm and sweet to brighten your day. Baked huckleberry doughnuts are not just a simple treat; they’re a hug in a doughnut form. Trust me when I say there’s a story behind every batch, and I’m thrilled to share mine with you.
When I first tasted huckleberries as a child, I was enchanted. Picture this: my family and I, with baskets in hand, scouring the woods for these little treasures, their deep purple color beckoning us as if they were the jewels of nature. The thrill of foraging, combined with the joy of sharing our finds around the family dinner table, played a pivotal role in my love for cooking and baking. I remember my grandmother insisting that we use only the ripest ones for her famous doughnut recipe, claiming they had a magical way of making everything taste better. It’s with this nostalgia and love that I share these baked huckleberry doughnuts with you today.
Ingredients
Let’s dive into the ingredients that will transform simple kitchen staples into extraordinary baked huckleberry doughnuts. Here’s what you’ll need:
-
1 cup fresh or frozen huckleberries
- If you can’t find huckleberries, blueberries make a great substitute! Feel free to use either fresh or frozen. Just remember, the flavor of huckleberries is uniquely sweet and tangy, a real delight.
-
1 cup all-purpose flour
- This is your doughnut base! You can swap it for a gluten-free blend if needed, but I recommend stick to the classic for the best texture.
-
1/2 cup granulated sugar
- For sweetness! If you’re watching your sugar intake, coconut sugar or a sugar substitute can work, but it may alter the flavor slightly.
-
2 tsp baking powder
- This little hero helps your doughnuts rise to fluffy perfection!
-
1/2 tsp baking soda
- This is your doughnut’s best friend, providing an extra lift.
-
1/4 tsp salt
- Just a pinch to balance the sweetness!
-
1/2 tsp vanilla extract
- A natural flavor enhancer! You can also use almond extract if you want a deeper flavor profile.
-
1/2 cup buttermilk (or milk with a splash of vinegar)
- Buttermilk gives your doughnuts a fluffy texture. If you don’t have it on hand, just add a tablespoon of vinegar to regular milk and let it sit for a few minutes.
-
1/4 cup vegetable oil
- For moisture and richness. You can substitute it with melted coconut oil for a hint of tropical flavor.
-
1 large egg
- This helps bind everything together. If you’re vegan, you can use a flax egg (1 tablespoon ground flaxseed mixed with 2.5 tablespoons water).
Step-by-Step Instructions
Now that you have all your ingredients gathered, let’s get baking! Here’s how to make these beautiful baked huckleberry doughnuts step-by-step:
-
Preheat Your Oven: Start by preheating your oven to 350°F (175°C). This ensures that your doughnuts cook evenly and come out fluffy.
-
Prep the Pan: Grease a doughnut pan with cooking spray or a light coat of oil. This is crucial because we don’t want our delicious doughnuts to stick!
-
Mix the Dry Ingredients: In a large mixing bowl, combine the flour, sugar, baking powder, baking soda, and salt. Give it a good whisk to ensure everything is evenly mixed.
-
Combine the Wet Ingredients: In a separate medium bowl, whisk together the egg, buttermilk, vanilla extract, and vegetable oil until everything is well combined. Here’s a chef tip: don’t overmix; just combine until you see no dry flour!
-
Fold in the Berries: Gently fold the huckleberries into the wet mixture. If you’re using frozen berries, be careful not to crush them too much; we want whole chunks to burst in our doughnuts!
-
Combine Wet and Dry: Pour the wet ingredients into the dry ingredients and fold them together gently. Again, I emphasize being gentle here; overmixing can lead to dense doughnuts!
-
Fill the Pan: Using a piping bag or a spoon, fill each doughnut cavity about halfway. You can also use a Ziploc bag with a corner snipped off if you don’t have a piping bag handy.
-
Bake: Pop those beauties in the oven and bake for 12–15 minutes, or until a toothpick inserted into the center comes out clean. They should be lightly golden on top.
-
Cool Down: Allow the doughnuts to cool in the pan for about 5 minutes before transferring them to a wire rack. This step is crucial to prevent them from becoming soggy!
-
Optional Glaze or Coating: While the doughnuts cool, you can whip up a simple glaze with powdered sugar and milk. Drizzle it over the warm doughnuts for a sweet finish!
Serving Suggestions
Once your baked huckleberry doughnuts have cooled a bit, it’s time to serve! These doughnuts are delicious on their own, but they look especially beautiful when plated on a rustic wooden board, perhaps with a little berry compote or whipped cream on the side. You could even add fresh huckleberries or edible flowers for that Instagram-worthy touch.
Recipe Variations
Love to get creative in the kitchen? Here are a few fun variations to try:
- Lemon Glaze: Add lemon zest to your glaze for a refreshing zing.
- Chocolate Drizzle: Melt some chocolate and drizzle it over the doughnuts for a decadent twist.
- Nutty Topping: Sprinkle chopped nuts on top of the glaze for some added crunch!
- Spiced Doughnuts: Add a pinch of cinnamon or nutmeg to the batter for a warm, spiced flavor.
- Vegan Option: Make a vegan version using a flax egg, almond milk, and coconut oil—delicious and guilt-free!
Chef’s Notes
These baked huckleberry doughnuts hold a special place in my heart (and my recipe box). I’ve made countless batches over the years, each one adapting to the seasons and my mood. One particularly memorable batch was during a family reunion when my aunt pulled out her childhood recipe, and we all improvised together. We ended up with huckleberry doughnuts frosted with a maple glaze that left everyone asking for seconds! Cooking is all about making memories, after all.
FAQs and Troubleshooting
-
Can I use frozen huckleberries?
- Absolutely! Just make sure to fold them in gently to avoid crushing them.
-
What if my doughnuts stick to the pan?
- Ensure the pan is well-greased, and consider letting them cool for a few minutes before trying to remove them.
-
How do I store leftover doughnuts?
- Store them in an airtight container at room temperature for 2–3 days. You can also freeze them for later enjoyment!
-
Why did my doughnuts come out dense?
- Overmixing the batter can lead to denser doughnuts. Aim to mix just until combined for light and fluffy results!
Nutritional Info
While I’m all for indulging every now and then, keeping track of what goes into our treats is always a good idea. Each baked huckleberry doughnut comes in at approximately 180 calories, with 4g of protein and 8g of fat. Don’t forget, they’re chock-full of delicious flavors, and best enjoyed in good company!
There you have it! A delicious journey into the world of baked huckleberry doughnuts. I hope you’ll add this recipe to your baking repertoire and create beautiful memories as you do. Happy baking!
Print
Baked Huckleberry Doughnuts
- Total Time: 30 minutes
- Yield: 12 servings 1x
- Diet: Vegetarian
Description
Indulge in these delightful baked huckleberry doughnuts that are sweet, tangy, and perfect for any occasion.
Ingredients
- 1 cup fresh or frozen huckleberries
- 1 cup all-purpose flour
- 1/2 cup granulated sugar
- 2 tsp baking powder
- 1/2 tsp baking soda
- 1/4 tsp salt
- 1/2 tsp vanilla extract
- 1/2 cup buttermilk (or milk with a splash of vinegar)
- 1/4 cup vegetable oil
- 1 large egg
Instructions
- Preheat your oven to 350°F (175°C).
- Prep the pan by greasing a doughnut pan with cooking spray or oil.
- Mix the dry ingredients in a large mixing bowl: flour, sugar, baking powder, baking soda, and salt.
- Combine the wet ingredients in a medium bowl: egg, buttermilk, vanilla extract, and vegetable oil.
- Fold in the huckleberries gently into the wet mixture.
- Combine the wet and dry ingredients, being careful not to overmix.
- Fill each doughnut cavity about halfway with the batter.
- Bake for 12–15 minutes or until a toothpick comes out clean.
- Cool the doughnuts for 5 minutes in the pan before transferring to a wire rack.
- Optional: Glaze with powdered sugar and milk if desired.
Notes
Store leftover doughnuts in an airtight container at room temperature for 2–3 days. They can also be frozen for later enjoyment.
- Prep Time: 15 minutes
- Cook Time: 15 minutes
- Category: Dessert
- Method: Baking
- Cuisine: American
Nutrition
- Serving Size: 1 doughnut
- Calories: 180
- Sugar: 6g
- Sodium: 150mg
- Fat: 8g
- Saturated Fat: 1g
- Unsaturated Fat: 7g
- Trans Fat: 0g
- Carbohydrates: 25g
- Fiber: 1g
- Protein: 4g
- Cholesterol: 30mg
Keywords: doughnuts, huckleberry, baked dessert, sweet treat
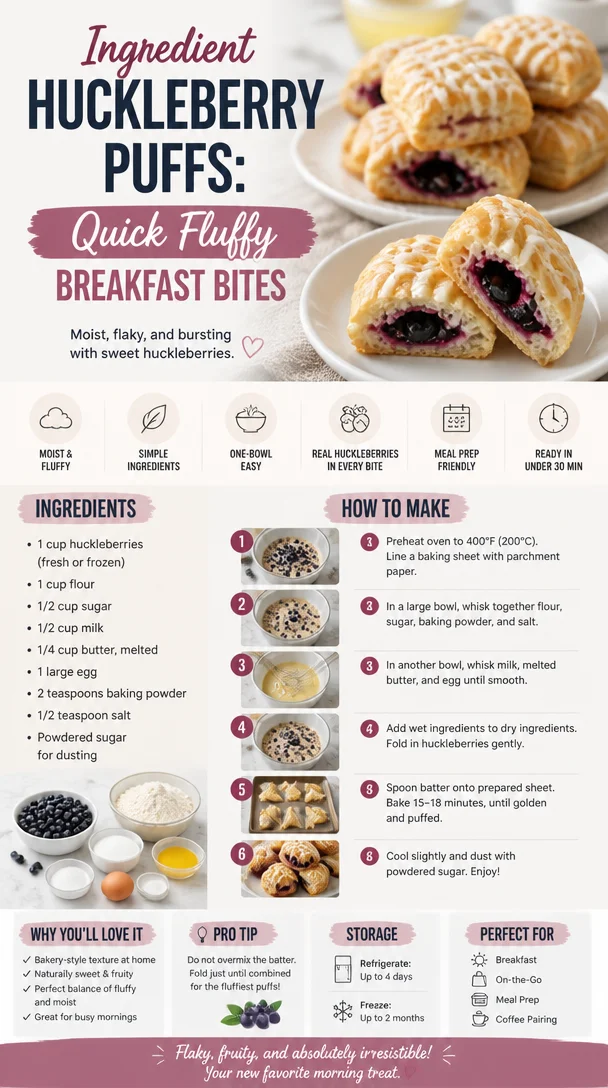
Ingredient Huckleberry Puffs: Quick Fluffy Breakfast Bites
Huckleberry Puffs: A Sweet Tale of Flavor and Nostalgia
Welcome back to my kitchen, friends! Today, I’m over the moon excited to share a recipe that’s incredibly close to my heart: Huckleberry Puffs! Imagine a light, airy pastry with pockets of sweet, tart huckleberries bursting through. It’s the kind of treat that not only satisfies your sweet tooth but also wraps you in cozy memories with every bite.
Huckleberries have always held a special place in my culinary adventures. When I was a kid, my family would go on end-of-summer hikes in the mountains, and one of our favorite activities was picking huckleberries. My dad would lead the charge, showing us the best spots to find those plump, dark purple berries hidden beneath the leaves. There’s something magical about standing in the serene woods, with birds chirping and the smell of earth and pine swirling around us while we collect these little gems. By the time we returned home, our hands would be stained with berry juice, and our stomachs full of impromptu snacks.
Once back in the kitchen, my mom would whip up her famous huckleberry pie. And let me tell you, the aroma of that pie baking would draw everyone in like a moth to a flame! Those summer afternoons spent cooking together, draping flour on the counters with giggles and sugar-fueled silliness, laid the foundation for my love of cooking. As I grew older, I wanted to mimic those joyous moments in my own way. And voila, here we are with my version – Huckleberry Puffs!
Not only are these little delights a way to celebrate huckleberries, but they also remind us of the importance of gathering in the kitchen and savoring life’s simple pleasures. So, put on your favorite apron, and let’s get baking together!
Ingredients
Here’s what you’ll need to create these delightful Huckleberry Puffs:
-
1 cup fresh huckleberries
Oh, the star of our show! These little beauties are sweet and a tad tart, bringing a burst of flavor that’s hard to resist. If you can’t find huckleberries, feel free to swap in blueberries or blackberries for a delicious alternative! -
1 sheet puff pastry (thawed)
This flaky, buttery pastry is a game changer! Store-bought makes it easy (we love a good shortcut), but for the adventurous at heart, you could always try your hand at making your own puff pastry. Just remember, keep it cold for the flakiest results! -
1 tablespoon sugar (plus extra for sprinkling)
A touch of sweetness to help the huckleberries shine! If you’re looking to reduce sugar, you can use coconut sugar or a sugar substitute. -
1 egg (for egg wash)
An egg wash gives the puffs that beautiful golden color. If you’d like a vegan option, use a brush of almond milk or aquafaba instead. -
1 teaspoon vanilla extract
Adding vanilla takes the flavor profile up a notch, complementing the huckleberries perfectly. You can also use almond extract for a different twist. -
Pinch of salt
Just a dash to balance the sweetness and elevate the flavors! -
Powdered sugar (for dusting, optional)
A finishing touch that adds a lovely sweetness and an elegant presentation. Who doesn’t love a little powdered sugar?
Step-by-Step Instructions
Let’s dive into the deliciousness! Follow these steps to create your very own Huckleberry Puffs.
-
Preheat the Oven
Start by preheating your oven to 400°F (200°C). This ensures that our puffs will rise beautifully when they hit the warm air. -
Prepare the Huckleberries
In a bowl, combine the fresh huckleberries, 1 tablespoon of sugar, and vanilla extract. Give it a gentle toss to coat the berries. If you’re using frozen huckleberries, be sure to thaw them and pat them dry to avoid soggy puffs. You want that juicy burst without the sog! -
Roll Out the Puff Pastry
Unroll your sheet of puff pastry on a floured surface. If it’s too thick, you can lightly roll it out to make it slightly thinner. Cut the pastry into squares or circles (about 4×4 inches or doodle-like circles). -
Add the Huckleberries
Place a heaping tablespoon of the huckleberry mixture in the center of each pastry square. Be careful not to overload them, or they’ll spill out during baking like a wild party! -
Seal the Puffs
Fold over one corner of the pastry to meet the opposite side, forming a triangle (or a pocket if you’re using circles). Press the edges together to seal, and then use a fork to crimp the edges for that adorable, rustic look. -
Brush with Egg Wash
Beat the egg in a small bowl and brush it over the tops of your puffs for that golden shine. If you’re vegan, go with almond milk or aquafaba – both work just as well to help the puffs get that gorgeous color! -
Sprinkle with Sugar
Don’t forget the extra sprinkle of sugar on top! It’s like giving your pastries a glittery finish that not only looks stunning but enhances that sweet crunch. -
Bake to Perfection
Pop them in the preheated oven and bake for about 15-20 minutes or until they’re puffed and golden brown. The scent wafting through your kitchen will be nothing short of heavenly! -
Cool and Dust
Once out of the oven, let them cool for a few minutes. Dust with powdered sugar right before serving for that extra touch of elegance!
Serving Suggestions
For a delightful serving experience, arrange your Huckleberry Puffs on a beautiful platter, preferably with a fresh sprig of mint or edible flowers to elevate the visual appeal. Pair them with a scoop of vanilla ice cream or a dollop of whipped cream to bring even more joy to this sweet indulgence. And don’t be shy – drizzle a little honey or maple syrup over the top for added decadence!
Recipe Variations
Feeling adventurous? Here are a few fun twists you can try with your Huckleberry Puffs:
- Lemon Zest: Add a teaspoon of lemon zest to the huckleberry filling for a zesty kick!
- Cheese Factor: Fold in some cream cheese or mascarpone cheese with the huckleberries for a richer, decadent version.
- Spicy Kick: Incorporate some cinnamon or cardamom into the sugar for those who love a little warmth in their desserts.
- Nutty Crunch: Toss in some chopped pecans or walnuts with the huckleberries for added texture and flavor.
Chef’s Notes
These Huckleberry Puffs are a lovely recipe that has evolved over time in my kitchen. Initially, I made them using various fruits depending on the season, from peaches in summer to apples in the fall. But there’s just something about huckleberries that keeps calling me back! Plus, I can’t get enough of that childhood nostalgia.
Whenever I make them, I remember my dad’s jovial spirit as we’d laugh and share stories in the wilderness. Now, I enjoy making them for family gatherings, sharing those lovely moments of joy with a new generation. It’s all about creating memories and cozy moments around the kitchen table – that’s what cooking is truly about!
FAQs and Troubleshooting
-
What if my puff pastry is soggy?
If your puff pastry appears soggy, you might have overloaded the filling or used frozen berries without thawing them properly. Make sure to pat them dry and avoid excess filling to keep that delightful puff! -
How can I make this recipe in advance?
You can prepare the puffs ahead of time and store them in the fridge for a day or two before baking. Just remember to brush them with the egg wash right before popping them in the oven for that fresh-baked taste! -
Can I freeze the puffs?
Absolutely! Before baking, you can freeze them on a baking sheet. Once frozen, transfer them into a freezer bag for up to a month. When you’re ready to enjoy, bake them straight from the freezer, adding an extra few minutes to the cooking time. -
What can I substitute for huckleberries?
If huckleberries are hard to find, don’t worry! Blueberries, blackberries, or even chopped strawberries can work beautifully. Just adjust the sugar type based on the sweetness of the substitute fruit used!
Nutritional Info (optional)
If you’re curious about the nutritional side of these puffs, here’s a rough estimate per puff (without powdered sugar):
- Calories: 200
- Fat: 9g
- Carbohydrates: 28g
- Protein: 2g
- Fiber: 1g
(Note: Values may vary based on specific ingredients used and serving sizes.)
Join me in relishing the warm, buttery goodness of Huckleberry Puffs, while cherishing the fond memories they create. I hope you feel inspired to bring a little bit of joy into your kitchen today! Remember, the best recipes are the ones that bring us together and celebrate life’s sweetest moments. Happy baking, my fellow foodies!
Print
Huckleberry Puffs
- Total Time: 35 minutes
- Yield: 8 servings 1x
- Diet: Vegetarian
Description
Delightful pastries filled with sweet and tart huckleberries, reminiscent of cherished childhood memories.
Ingredients
- 1 cup fresh huckleberries
- 1 sheet puff pastry (thawed)
- 1 tablespoon sugar (plus extra for sprinkling)
- 1 egg (for egg wash)
- 1 teaspoon vanilla extract
- Pinch of salt
- Powdered sugar (for dusting, optional)
Instructions
- Preheat the oven to 400°F (200°C).
- Combine the fresh huckleberries, 1 tablespoon of sugar, and vanilla extract in a bowl and toss gently.
- Unroll the puff pastry on a floured surface and cut into squares or circles.
- Place a heaping tablespoon of the huckleberry mixture in the center of each pastry piece.
- Fold the pastry to form a triangle and crimp the edges to seal.
- Brush the tops with egg wash or almond milk for a golden finish.
- Sprinkle with extra sugar on top.
- Bake for about 15-20 minutes or until golden brown.
- Cool for a few minutes and dust with powdered sugar before serving.
Notes
Feel free to substitute huckleberries with blueberries or blackberries. You can also add lemon zest or cream cheese to the filling for additional flavor.
- Prep Time: 15 minutes
- Cook Time: 20 minutes
- Category: Dessert
- Method: Baking
- Cuisine: American
Nutrition
- Serving Size: 1 pastry
- Calories: 200
- Sugar: 9g
- Sodium: 150mg
- Fat: 9g
- Saturated Fat: 3g
- Unsaturated Fat: 5g
- Trans Fat: 0g
- Carbohydrates: 28g
- Fiber: 1g
- Protein: 2g
- Cholesterol: 30mg
Keywords: Huckleberry Puffs, pastries, dessert, huckleberries, easy recipe, nostalgia
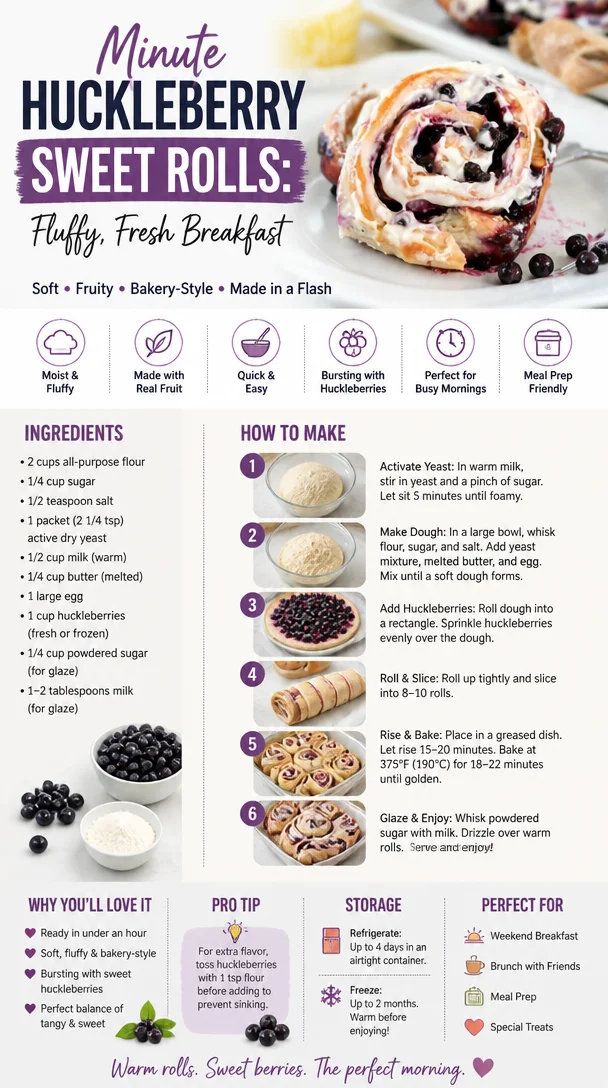
Minute Huckleberry Sweet Rolls: Fluffy, Fresh Breakfast
Huckleberry Sweet Rolls: A Cozy Adventure in Every Bite
Welcome back to my kitchen, dear friends! Today, I’m absolutely thrilled to take you on an exciting flavorful journey with my beloved Huckleberry Sweet Rolls. They might just be the sweetest and coziest addition to your baking repertoire. Imagine fluffy rolls, dripping with fresh huckleberry goodness, each one promising a comforting hug wrapped in dough. Are you drooling yet? I know I am!
Now, if you’ve been following my blog, you know I have a deep passion for creating dishes that not only fill your belly but also warm your heart. Huckleberries remind me of carefree summer days spent hiking in the mountains, the juicy, tart berries staining our fingers as we picked them fresh from the bushes. Those were some magical moments, and each bite of these rolls captures that nostalgia.
Baking these luscious Huckleberry Sweet Rolls is not just about the sweet reward at the end; it’s about the process, the creativity, and above all, the enjoyment of sharing with the people you love. So, if you’re ready to make magic in your kitchen and create aromas that will have everyone wandering in to see what’s cooking, let’s jump right in!
A Sweet Memory in Every Bite
Growing up, my family had a tradition of picking huckleberries every summer in the nearby mountains. My siblings and I would race to see who could fill their buckets up the fastest, with the promise of sweet rewards waiting at home. One year, my grandmother decided to turn our harvest into sweet rolls. I remember the kitchen filled with laughter, flour dusting our noses, and that incredible smell of dough rising.
As we waited for the rolls to bake, the anticipation was almost unbearable. I can still hear my grandma’s gentle voice, teaching me how to knead the dough just right, the sense of community in the kitchen wrapping around us like a warm blanket. Those rolls were the highlight of every summer get-together, served fresh and warm with a drizzle of glaze. To this day, they’re a cherished family tradition that I’ve carried into my adult life, finding joy in recreating those beautiful moments with my loved ones.
Ingredients
To whip up these delightful Huckleberry Sweet Rolls, you’ll need the following ingredients:
-
All-purpose flour
The backbone of any good roll! All-purpose flour works beautifully, but feel free to use bread flour for a chewier texture. -
Active dry yeast
This little magic maker is responsible for making your rolls fluffy. If you want a quicker rise, instant yeast works wonders, too! -
Sugar
A mix of granulated and brown sugar not only sweetens but adds a nice depth of flavor and helps with browning. -
Salt
A pinch of salt is crucial! It enhances the sweetness and balances all the flavors, making it a necessity in any baked good. -
Milk
Whole milk is my go-to, but any milk will do. For a dairy-free version, try almond or oat milk; just ensure it’s unsweetened. -
Butter
We use unsalted butter for optimal control of flavor, and don’t skip melting it—those rolls need all that love! -
Eggs
Eggs help bind everything together and add richness. If you’re going egg-free, you can substitute with flax or chia eggs—just mix 1 tablespoon of ground flaxseed or chia seeds with 2.5 tablespoons of water for each egg. -
Huckleberries
Fresh, frozen, or dried will work! If huckleberries aren’t available, blueberries make a fantastic substitute and will still give you those delightful sweet bursts. -
Powdered sugar
To make a simple glaze to drizzle over the rolls at the end. Feel free to add a splash of vanilla for extra flavor!
Let’s not forget the love and energy you’ll pour into your creation — that’s the vital ingredient that makes everything taste better!
Step-by-Step Instructions
1. Prepare the Dough
In a small bowl, combine 1 cup of warm milk (around 110°F) with 2 tablespoons of sugar and your yeast. Let it sit for 5-10 minutes until it’s bubbly and foamy. This bubbling is your yeast coming to life — it’s like a party in a bowl!
2. Mix the Dry Ingredients
In a large mixing bowl, whisk together 4 cups of all-purpose flour, 1 teaspoon of salt, and the remaining 2 tablespoons of sugar. When you combine them, envision all the deliciousness that’s going to happen next.
3. Combine Wet and Dry
Once your yeast is ready, pour it into the flour mix along with 1 melted stick of butter and 2 beaten eggs. Use a spatula or wooden spoon to combine everything together until it forms a shaggy dough.
4. Knead the Dough
Transfer the dough onto a floured surface and knead for about 8-10 minutes until it’s smooth and elastic. This is where you can let out any frustrations! If you find the dough too sticky, sprinkle on little bits of flour — but be careful not to over-flour.
5. First Rise
Place the dough into a greased bowl, cover it with a kitchen towel, and let it rise in a warm spot for an hour or until it doubles in size. While it’s rising, think about all the scrumptious things you can do with huckleberries — maybe even grab a few for snacking!
6. Prepare the Filling
While the dough is rising, mix together 1 cup of huckleberries, 1/2 cup of brown sugar, and a sprinkling of cinnamon in a bowl for the filling. The sweetness of the sugar complements the tartness of the huckleberries beautifully.
7. Roll It Out
Once the dough has risen, punch it down to release the air. Roll the dough out into a rectangle about 1/4 inch thick. Think of this as your canvas for the flavor masterpiece!
8. Spread the Filling
Spread melted butter over the rolled-out dough, then sprinkle the huckleberry mixture across the top. You want to cover every inch to guarantee each bite is bursting with flavor!
9. Roll and Slice
Starting from the long edge, roll the dough tightly into a log. Pinch the seam to seal it, then slice the log into 12 equal pieces. Place them cut-side up in a greased baking dish, leaving space between them to rise again.
10. Second Rise
Cover the rolls with a kitchen towel and let them rise for another 30-40 minutes until they puff up beautifully. It’s like watching a magic trick unfold right in your kitchen!
11. Bake
Preheat your oven to 350°F (175°C). When they’re all fluffy and cozy, pop those rolls into the oven and bake for 20-25 minutes or until golden brown. Your kitchen is about to fill with that indescribable smell of baking that makes you want to dance!
12. Glaze and Serve!
While the rolls are baking, whip up the glaze by combining 1 cup of powdered sugar and 2 tablespoons of milk. Drizzle it over the warm rolls once they come out of the oven for that extra touch of sweetness that makes them irresistible!
Serving Suggestions
To serve these delightful Huckleberry Sweet Rolls, I recommend plating them on a beautiful serving dish, drizzling extra glaze on top, and garnishing with a few fresh huckleberries or mint leaves. Not only does this make for a stunning presentation, but it also invites everyone to dig in and enjoy a cozy treat. Perfect for breakfast, brunch, or as an afternoon snack with a cup of tea!
Recipe Variations
- Mixed Berry Sweet Rolls: Add a mix of blueberries, raspberries, or blackberries for a berry medley twist!
- Vegan Sweet Rolls: Swap out milk for almond milk, butter for coconut oil, and use flax eggs to make these rolls completely dairy-free.
- Spiced Sweet Rolls: Incorporate some nutmeg or cardamom in the filling for a warming, spiced flavor.
- Chocolate-Huckleberry Rolls: Add chocolate chips to the filling for a decadent treat that combines huckleberries and rich chocolate.
- Savory Version: Try using cream cheese and herbs for a savory roll, perfect for brunch or as a side dish!
Chef’s Notes
Oh, where do I even begin? Baking these Huckleberry Sweet Rolls brings back so many beautiful memories. My grandma always insisted on letting the dough rise in the sun through our kitchen window — it truly felt like we were bringing the warmth of the summer into our hearts! The recipe has evolved with each passing year, and I love experimenting with new flavors and techniques, but the nostalgia remains the same.
I once got a bit too adventurous and tried adding lemon zest to the filling; let me tell you, it was oddly refreshing, but nothing beats the classic huckleberry flavor! Don’t be afraid to embrace your creativity, as every kitchen mistake can lead to something unexpectedly wonderful!
FAQs and Troubleshooting
1. My dough isn’t rising. What did I do wrong?
If your dough isn’t rising, it might be due to inactive yeast. Make sure your yeast is fresh and the liquid was warm, not hot. If you’re unsure, do the “float test” with a little sugar and warm water before starting.
2. Why did my sweet rolls come out dense?
If your rolls are dense, it may be due to overworking the dough or using too much flour. Remember to avoid adding too much flour during kneading; it should be soft and slightly tacky.
3. Can I make the rolls ahead of time?
Absolutely! You can prepare the rolls, place them unbaked in the refrigerator overnight, and then bake them fresh in the morning. Just allow them to come to room temperature before baking.
4. How can I store leftovers?
Store leftover rolls in an airtight container at room temperature for 2-3 days. If you want to keep them longer, pop them in the freezer. Just be sure to wrap them tightly to prevent freezer burn!
Nutritional Info
(Sample nutritional info per roll—adjust based on your specific ingredients)
- Calories: 220
- Total Fat: 9g
- Saturated Fat: 5g
- Cholesterol: 40mg
- Sodium: 150mg
- Carbohydrates: 31g
- Fiber: 2g
- Sugars: 7g
- Protein: 3g
And there you have it, friends! A warm, hearty, and delightful recipe for Huckleberry Sweet Rolls that are sure to steal your heart. They are more than just a recipe; they’re an opportunity to create cherished memories and share love through food. So, gather your loved ones, roll up those sleeves, and let’s bake something beautiful together! Happy cooking!
Print
Huckleberry Sweet Rolls
- Total Time: 70 minutes
- Yield: 12 servings 1x
- Diet: Vegetarian
Description
Fluffy rolls filled with fresh huckleberries, perfect for breakfast or a cozy snack.
Ingredients
- 4 cups all-purpose flour
- 2 tablespoons active dry yeast
- 2 tablespoons granulated sugar
- 1/2 cup brown sugar
- 1 teaspoon salt
- 1 cup whole milk
- 1 stick unsalted butter, melted
- 2 large eggs
- 1 cup huckleberries (fresh, frozen, or dried)
- 1 cup powdered sugar (for glaze)
- 2 tablespoons milk (for glaze)
Instructions
- Prepare the Dough: In a small bowl, combine warm milk with 2 tablespoons of sugar and yeast. Let it sit for 5-10 minutes until bubbly.
- Mix the Dry Ingredients: In a large bowl, whisk together flour, salt, and remaining sugar.
- Combine Wet and Dry: Once yeast is ready, pour it into the flour mix along with melted butter and beaten eggs. Mix until shaggy dough forms.
- Knead the Dough: Transfer dough onto a floured surface, knead for 8-10 minutes until smooth and elastic.
- First Rise: Place dough in a greased bowl, cover, and let it rise for an hour until doubled in size.
- Prepare the Filling: Mix huckleberries, brown sugar, and cinnamon in a bowl.
- Roll It Out: Punch down the dough and roll it out to a rectangle about 1/4 inch thick.
- Spread the Filling: Spread melted butter over the dough, top with huckleberry mixture.
- Roll and Slice: Roll tightly from the long edge, slice into 12 pieces, and place cut-side up in a greased dish.
- Second Rise: Cover rolls and let them rise for another 30-40 minutes.
- Bake: Preheat oven to 350°F (175°C). Bake rolls for 20-25 minutes until golden brown.
- Glaze and Serve: Mix powdered sugar and milk for glaze and drizzle over warm rolls.
Notes
For a vegan option, substitute milk with almond milk and butter with coconut oil.
- Prep Time: 20 minutes
- Cook Time: 25 minutes
- Category: Dessert
- Method: Baking
- Cuisine: American
Nutrition
- Serving Size: 1 roll
- Calories: 220
- Sugar: 7g
- Sodium: 150mg
- Fat: 9g
- Saturated Fat: 5g
- Unsaturated Fat: 4g
- Trans Fat: 0g
- Carbohydrates: 31g
- Fiber: 2g
- Protein: 3g
- Cholesterol: 40mg
Keywords: sweet rolls, huckleberry, dessert, baking, breakfast
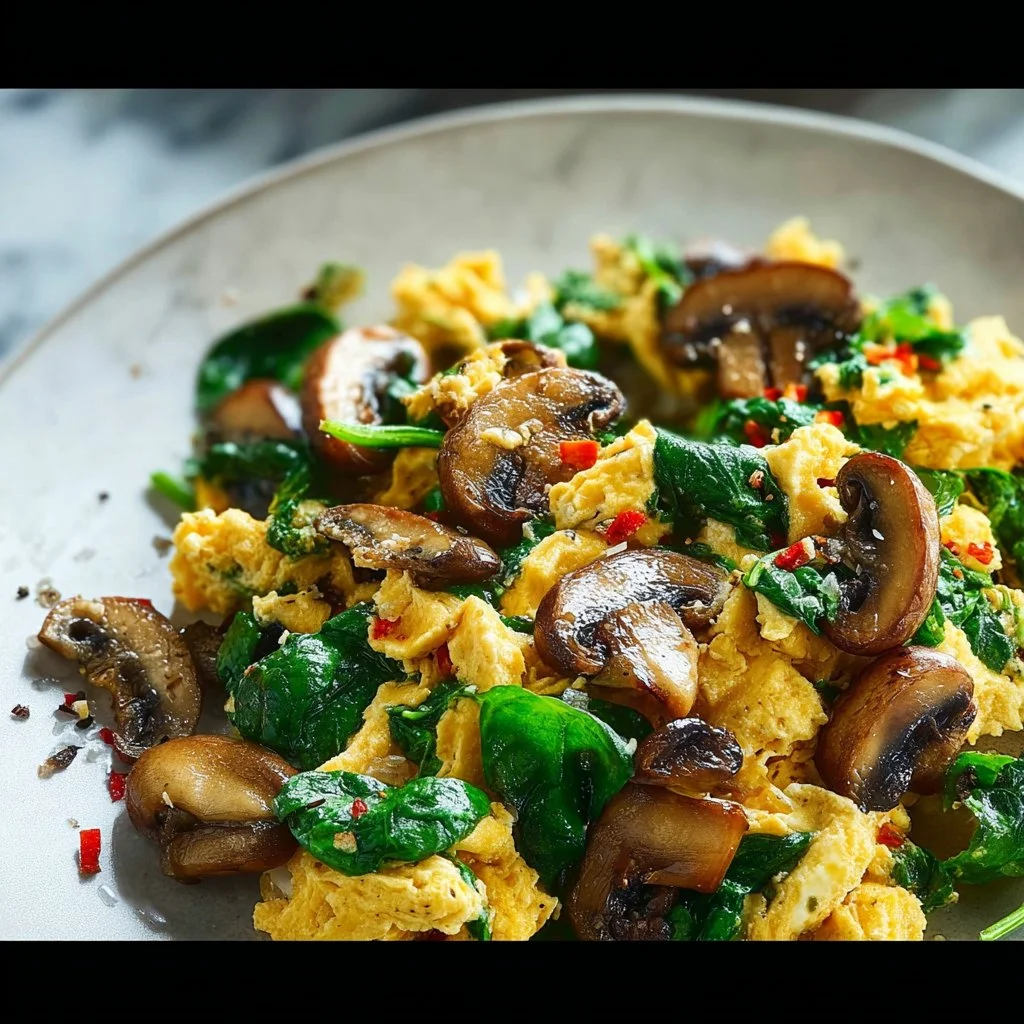
Mushroom Spinach Scrambled Eggs
Deliciously Cozy Mushroom Spinach Scrambled Eggs: A Weekend Breakfast Favorite
Hey there, fellow food enthusiasts! Welcome back to my cozy little corner of the internet where I get to share the heartwarming dishes that I whip up in my kitchen. Today, we’re diving into a breakfast classic — Mushroom Spinach Scrambled Eggs. If you’re anything like me, mornings can often feel rushed, but nothing beats the comfort of a delicious, homemade breakfast that fuels you for the day ahead!
Imagine waking up to the smell of earthy mushrooms sautéing in butter, mixed with vibrant green spinach and fluffy, golden scrambled eggs. Sounds dreamy, right? That’s exactly what I’m talking about! This dish brings together some of the most comforting ingredients, and the best part? It comes together in a matter of minutes, allowing you to savor every last bite and maybe even linger over that cup of coffee a little longer.
What I adore about this recipe is its versatility. Whether you’re cooking for one, throwing together a fancy brunch for friends, or just trying to sneak in some greens, these scrambled eggs have your back! So, let’s not waste any more time — grab your apron, and let’s sprinkle some love and flavor into our morning meal!
Personal Story
Every time I make Mushroom Spinach Scrambled Eggs, I’m transported back to lazy Sunday mornings at my grandmother’s house. The sun would peek through the kitchen window as the aroma of sautéed mushrooms filled the air. Grandma was a culinary wizard, and her love for cooking was infectious. I still remember standing on a little stool, peering over the counter as she expertly cracked eggs into a bowl, whisking them to perfection with a sprinkle of salt and pepper.
Her secret? Always, and I mean always, using fresh ingredients. That meant visiting the local farmer’s market early in the morning to pick up mushrooms so fresh you could still taste the earth in them and vibrant spinach that was practically bursting with nutrients. As she cooked, she’d share little tales from her youth, and those stories mingled with the sizzling sounds in the pan, creating an aromatic symphony.
Now, I carry on that tradition in my kitchen. Whenever I make these scrambled eggs, I’m not just feeding my family; I’m passing on a legacy of love and memories, one delicious bite at a time.
Ingredients
Here’s what you’ll need to whip up these delightful Mushroom Spinach Scrambled Eggs:
-
Fresh Eggs: The star of the show! Opt for high-quality eggs for richer flavor. If you’re looking for a lighter option, feel free to substitute with egg whites or a plant-based egg alternative.
-
Mushrooms: Cremini, button, or shiitake work beautifully. They add a lovely umami depth to the dish. If you find yourself without mushrooms, you could use diced bell peppers or zucchini as a tasty substitute.
-
Fresh Spinach: This leafy green adds color, nutrients, and a hint of earthy flavor. If spinach isn’t your thing, kale or Swiss chard are excellent stand-ins.
-
Butter: For that rich, velvety finish. You can replace it with olive oil or coconut oil if you’re looking for a dairy-free option.
-
Salt and Pepper: Essential for enhancing flavors. Feel free to experiment with other spices like garlic powder or a pinch of chili flakes for some heat.
-
Optional Add-ins: A splash of milk or cream for creamier eggs, grated cheese for an indulgent touch, or herbs like chives or parsley for a fresh finish.
Who knew something so simple could bring so much flavor? The key is using fresh, high-quality ingredients that speak for themselves!
Step-by-Step Instructions
Let’s get started! Here’s how to create the most delicious Mushroom Spinach Scrambled Eggs:
-
Prep Your Ingredients: Start by cleaning your mushrooms and trimming off the stems. Slice them thinly for even cooking. Rinse your spinach under cold water and pat it dry — this will get rid of any grit. Crack 4-6 eggs into a bowl, adding a pinch of salt and pepper, and whisk until the yolks are well combined with the whites.
Chef Tip: If you want the eggs to be super fluffy, add a splash of milk or cream to your whisked eggs — trust me, it makes a difference!
-
Sauté the Mushrooms: In a non-stick skillet, melt 1-2 tablespoons of butter over medium heat. Add the sliced mushrooms and a pinch of salt. Sauté until the mushrooms are golden brown and tender, about 5-7 minutes. This is where the flavor really starts to develop!
Chef Hack: Make sure not to overcrowd the pan with mushrooms; otherwise, they’ll steam instead of sauté. If you have a lot, it’s better to do this in batches.
-
Add Spinach: Toss in your fresh spinach and stir it around until wilted, which should take about 1-2 minutes. The vibrant greens add a fantastic pop of color!
-
Incorporate the Eggs: Pour the whisked eggs directly over the sautéed mushrooms and spinach. Allow them to sit for a few seconds, then gently stir with a wooden spoon or spatula. Keep the motion gentle and slow.
Chef Insight: Cook the eggs over low to medium heat; high temperatures can make them rubbery. Patience is key here for smooth, creamy eggs!
-
Finish Cooking: Continue to stir until the eggs reach your desired doneness. I like mine soft and slightly runny, but feel free to scramble them longer for firmer textures.
-
Add Final Touches: Once done, remove the pan from heat and toss in additional salt and pepper to taste. If you’re using cheese, sprinkle it on while the eggs are still warm so it melts beautifully.
-
Plate and Serve: Transfer the scrambled eggs to plates and garnish with fresh herbs if you like.
And there you have it! A beautiful, hearty breakfast that’s ready to be devoured.
Serving Suggestions
These Mushroom Spinach Scrambled Eggs are delicious on their own but can be elevated in so many ways! Serve them on a slice of crusty, toasted bread or atop a warm, fluffy English muffin for a gourmet feel. Drizzle with a little hot sauce or serve alongside crispy bacon for a hearty breakfast spread. If you want to impress your brunch guests, plate them with sliced avocado and fresh tomato on the side — a feast for the eyes and stomach!
Recipe Variations
-
Cheesy Delight: Stir in some crumbled feta or shredded cheddar for a seriously gooey, indulgent dish.
-
Spicy Twist: Add diced jalapeños or a pinch of cayenne pepper for those of you who like a little heat in the morning!
-
Herb Infusion: Mix in fresh dill, basil, or chives for herbaceous freshness.
-
Meaty Marvel: Brown some crumbled sausage or diced ham before adding the mushrooms for a protein-packed breakfast.
-
Vegan Version: Use plant-based eggs, and sauté with olive oil instead of butter, along with sautéed cherry tomatoes for added flavor!
Chef’s Notes
Oh, the memories tied to breakfast! Over the years, my Mushroom Spinach Scrambled Eggs have evolved from my grandma’s classic recipe. I’ve added my own twist with creamy cheese here, a dash of hot sauce there, and I keep discovering new ingredients from my local farmer’s market that inspire me. I remember one Sunday, aiming for a healthy breakfast for friends, I really went crazy with the toppings — think avocado, feta, and a sprinkle of smoked paprika — we all laughed, but it turned out to be the best breakfast ever!
Cooking is all about experimentation and adapting to what you love. Get creative! You never know what lovely things might come from a little kitchen adventure.
FAQs and Troubleshooting
-
Why are my eggs rubbery?
- Cooking at too high a temperature is usually the culprit. Make sure to keep the heat low and stir gently for a creamy texture.
-
How do I store leftovers?
- If you have any leftover scrambled eggs (though they rarely last in my house!), store them in an airtight container in the fridge for up to 2 days. Reheat low and slow to avoid overcooking.
-
Can I make this dish in advance?
- While scrambled eggs are best fresh, you can prep your mushrooms and spinach in advance. Just store them in separate containers and combine them with the eggs the morning of.
-
What can I do if my spinach is wilted?
- You can still use it! Just give it a rinse and dry it thoroughly before cooking. If it’s too far gone, though, it’s best to toss it. Fresh ingredients make a world of difference!
Nutritional Info (Optional)
Each serving of these Mushroom Spinach Scrambled Eggs is packed with protein and nutrients. They cater to various dietary preferences while being gluten-free, and when made with eggs and spinach, they contain a good amount of vitamins A and D, iron, and essential amino acids. If you’re keeping an eye on calories, using fewer eggs or lightening up with just egg whites can also be a great option.
Thank you for joining me on this delightful journey of culinary comfort! I hope you feel inspired to whip up these Mushroom Spinach Scrambled Eggs and create your own breakfast memories. Happy cooking, friends! 🥚✨
Print
Mushroom Spinach Scrambled Eggs
- Total Time: 15 minutes
- Yield: 2 servings 1x
- Diet: Gluten-Free, Vegetarian
Description
A comforting and delicious breakfast featuring fluffy scrambled eggs with earthy mushrooms and vibrant spinach, perfect for any morning.
Ingredients
- 4–6 Fresh Eggs
- 1 cup Mushrooms, sliced (Cremini, button, or shiitake)
- 2 cups Fresh Spinach, rinsed
- 1–2 tablespoons Butter
- Salt, to taste
- Pepper, to taste
- Optional: Splash of milk or cream
- Optional: Grated cheese
- Optional: Fresh herbs (chives or parsley)
Instructions
- Prep Your Ingredients: Clean mushrooms, slice them, and rinse spinach. Crack eggs into a bowl, add salt and pepper, and whisk.
- Sauté the Mushrooms: Melt butter in a skillet, add sliced mushrooms and salt, and sauté until golden brown, about 5-7 minutes.
- Add Spinach: Toss in spinach and stir until wilted, about 1-2 minutes.
- Incorporate the Eggs: Pour whisked eggs over the mixture and let sit for a few seconds, then gently stir.
- Finish Cooking: Stir until eggs reach desired doneness, keeping the heat low.
- Add Final Touches: Remove from heat and season with additional salt and pepper; add cheese if desired.
- Plate and Serve: Serve eggs on plates and garnish with fresh herbs if desired.
Notes
Feel free to add in your favorite spices or herbs for extra flavor. This dish is versatile for various dietary preferences.
- Prep Time: 5 minutes
- Cook Time: 10 minutes
- Category: Breakfast
- Method: Sautéing
- Cuisine: American
Nutrition
- Serving Size: 1 serving
- Calories: 300
- Sugar: 2g
- Sodium: 400mg
- Fat: 20g
- Saturated Fat: 10g
- Unsaturated Fat: 8g
- Trans Fat: 0g
- Carbohydrates: 5g
- Fiber: 1g
- Protein: 20g
- Cholesterol: 300mg
Keywords: scrambled eggs, breakfast, mushroom, spinach, healthy breakfast, quick meal
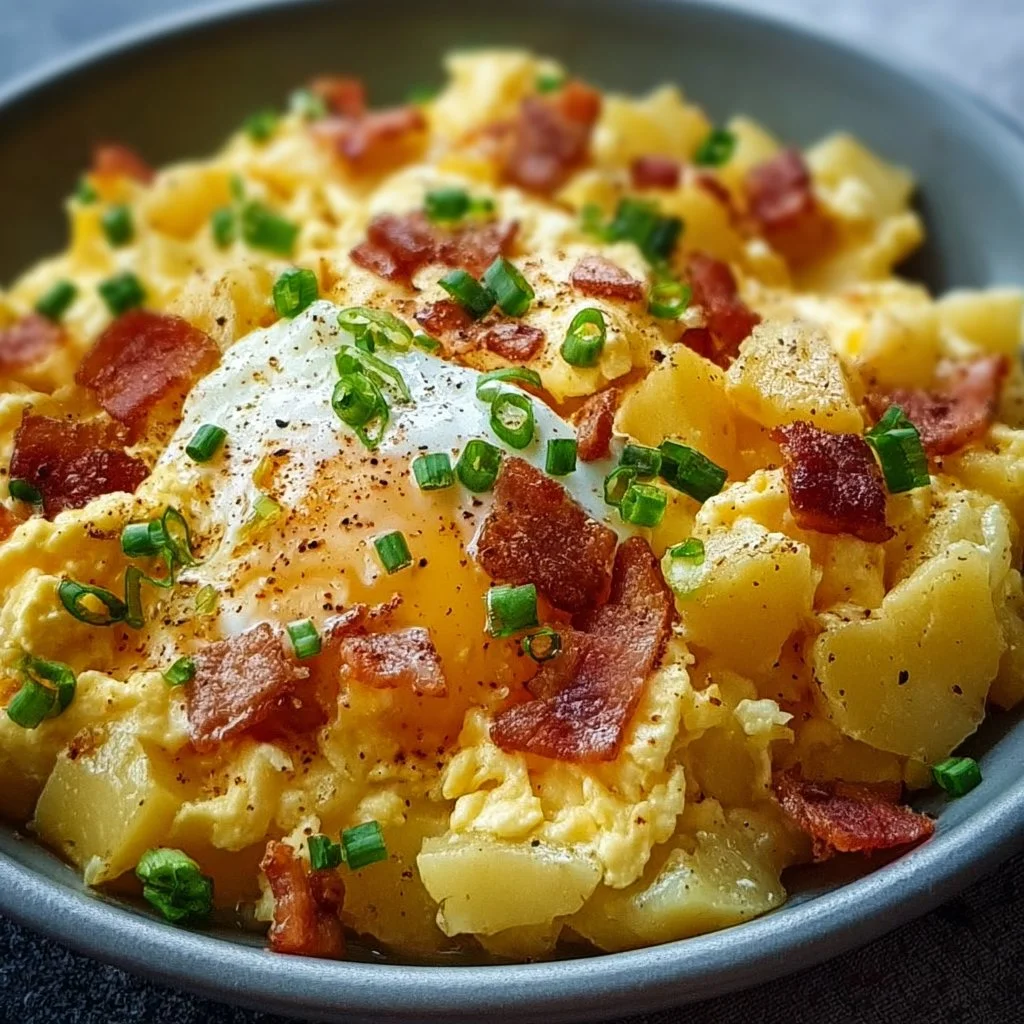
Cheesy Potato Egg Scramble
# The Ultimate Cheesy Potato Egg Scramble: Comfort in a Bowl!

## Introduction

Welcome, dear friends, to my cozy corner of the kitchen! Today, we’re diving into a delightful dish that’s sure to brighten your mornings and warm your soul: the **Cheesy Potato Egg Scramble**. Imagine fluffy eggs mingling with tender potatoes, all wrapped up in gooey, melted cheese. It’s comfort food at its best, perfect for a leisurely brunch or a quick weekday breakfast that makes you feel like you’re treating yourself.

Growing up, weekends meant hearty breakfasts, and the star of the show was often a potato and egg dish made by my grandma. She had a magical way of turning simple ingredients into something extraordinary, and her scrambles had an irresistible charm. The aroma of sizzling potatoes and eggs wafting through the house was enough to get everyone out of bed and into the kitchen!

What I love most about this Cheesy Potato Egg Scramble is that it’s incredibly versatile and can be customized to suit your taste buds. Plus, it’s a shop-local kind of dish; just pop over to your local farmers' market or grocery store for fresh ingredients! So grab your apron, and let’s create some kitchen magic together!

---

## Personal Story

Let me take you back to a Sunday morning at my grandma’s house when I was a kid. The sun filtered through the kitchen window, creating a soft golden glow that made everything feel warm and inviting. I’d wake up to the sound of sizzling, a symphony of crackling potatoes and eggs colliding in the pan—the perfect soundtrack to a lazy weekend.

On this particular morning, my grandma was whipping up her famous cheesy potato egg scramble. She was the queen of breakfast, and each plate she served was loaded with love. Sitting at her old wooden table, I remember the way the cheese melted into a gooey blanket over the potatoes and eggs, leaving a smile on my face with each comforting bite.

As we passed around the plates filled with vibrant colors and sizzling goodness, stories flowed just as freely as the sunlight streaming in. It was in those moments that I learned how food brings people together. Little did I know that years later, I’d be sharing my own version of this beloved dish with all of you!

---

## Ingredients

Here's what you’ll need for an unforgettable **Cheesy Potato Egg Scramble**:

- **2 medium potatoes (Russet or Yukon Gold)**
  - *Tip:* Russet potatoes are great for a fluffy texture, while Yukon Gold yield creamier results.

- **4 large eggs**
  - *Chef Insight:* Use fresh eggs for the best flavor and texture—look for bright orange yolks!

- **1 cup shredded cheese (cheddar or a cheese blend)**
  - *Substitution:* Feel free to experiment with pepper jack for some spice or mozzarella for a milder flavor.

- **1/2 medium onion, diced**
  - *Quick Insight:* Sweet onions, such as Vidalia, can add a nice touch if you want milder flavors.

- **1 bell pepper, diced (any color)**
  - *Flexibility:* Switch it up with jalapeños for heat or zucchini for a different texture!

- **2 tablespoons olive oil**
  - *Keep in Mind:* You can use butter for added richness, but olive oil is a healthier choice.

- **Salt and pepper to taste**
  - *Insider Scoop:* Don’t be shy! Season throughout the cooking process for deeper flavor.

- **Fresh herbs (like chives or parsley) for garnish**
  - *Exploration Tip:* Feel free to use whatever herbs you have on hand; fresh dill plays exceptionally well here too!

---

## Step-by-Step Instructions

Now that we’ve gathered our ingredients, let’s get cooking! Here’s how to create your perfect Cheesy Potato Egg Scramble:

### Step 1: Prepare the Potatoes

1. **Peel and Dice:** Start by peeling your potatoes and cutting them into small, evenly-sized cubes to ensure they cook evenly (about 1/2 inch).
2. **Parboil (Optional):** If you like your potatoes really soft, give them a quick parboil in salted water for about 5 minutes until they're just tender. Drain them well and let them dry—we want them crispy!

### Step 2: Sauté to Perfection

3. **Heat the Oil:** In a large skillet, heat the olive oil over medium heat until shimmering.
4. **Add Onions & Peppers:** Toss in the diced onions and bell peppers. Sauté for about 3-5 minutes until they start to soften and become fragrant.
   - *Chef Tip:* To deepen the flavor, add a pinch of salt to draw out moisture from the veggies!

### Step 3: Cook the Potatoes

5. **Add the Potatoes:** Carefully add the diced potatoes to the skillet. Spread them out evenly in the pan. Let them cook without stirring for about 5-7 minutes until they get nicely browned and crispy on one side.
   - *Hack Alert:* Resist the urge to stir too soon; you want that lovely crispiness!

6. **Toss & Cook:** Once browned, toss the potatoes and cook for another 5-7 minutes, stirring occasionally, until golden and cooked through.
   - *Secret Chef Move:* For a golden crust, avoid overcrowding the pan—work in batches if needed!

### Step 4: Get Scrambling!

7. **Whisk the Eggs:** While the potatoes are cooking, crack the eggs into a bowl and whisk them with a bit of salt and pepper until well combined.

8. **Pour in the Eggs:** Once the potatoes are ready, lower the heat and pour the whisked eggs over them. Gently stir to combine. Cook until the eggs are just set but still slightly soft, about 3-4 minutes.
   - *Final Touch:* It’s okay to leave a bit of runny egg; it will continue to cook off the heat!

9. **Add Cheese:** Sprinkle the cheese generously over the top, cover with a lid, and let it melt for 1-2 minutes. Uncover, and give everything a good stir to incorporate the melted cheese.
   - *Flavor Boost:* Feel free to toss in some cooked bacon or sausage for a hearty kick!

---

## Serving Suggestions

To serve your glorious Cheesy Potato Egg Scramble, simply scoop generous portions onto warm plates. You can garnish with a sprinkle of fresh herbs for that burst of color and flavor. A side of crispy toast or a fresh salad compliments this dish beautifully, creating a delightful breakfast or brunch experience that everyone will love!

---

## Recipe Variations

Here are a few creative twists to keep your Cheesy Potato Egg Scramble exciting:

1. **Veggie Lover’s Delight:** Add in your favorite vegetables! Spinach, kale, or tomatoes bring extra nutrition and flavor.
2. **Spicy Kick:** Mix in chopped jalapeños or a dash of hot sauce for a fiery flavor explosion.
3. **Protein Power:** Swap in cooked sausage or bacon, or try crumbled tofu for a vegetarian option.
4. **Herbaceous Touch:** Infuse flavor with mixed herbs such as thyme, dill, or basil!
5. **Breakfast Burrito:** Wrap your scramble in a tortilla for a portable breakfast that’s just as delicious on-the-go!

---

## Chef’s Notes

This Cheesy Potato Egg Scramble has evolved since I first began preparing it! Initially, I followed my grandma's classic recipe, but over the years, I've embraced creativity and adapted it to my family's tastes. I love sneaking in seasonal veggies, and there’s nothing more satisfying than playing around with different cheese blends. Every batch feels personal, and I hope that with this recipe, you’ll create your own versions to cherish and pass down as I have!

---

## FAQs and Troubleshooting

**Q1: My potatoes aren't getting crispy! What’s wrong?**
- A: Make sure your skillet is sufficiently heated before adding the potatoes. Avoid overcrowding the pan—cook in batches if necessary to give them space to get that lovely golden brown.

**Q2: Can I prep this scramble in advance?**
- A: You can certainly prep the ingredients ahead of time! Chop your veggies and potatoes the night before and store them in the fridge. Cook as directed in the morning for a quick breakfast.

**Q3: What’s the best way to store leftovers?**
- A: Store any leftovers in an airtight container in the fridge for up to 3 days! Reheat in the microwave or on the stovetop, adding a splash of water to keep the eggs from drying out.

**Q4: Can I use egg substitutes for a healthier option?**
- A: Absolutely! You can substitute with egg whites or a plant-based egg alternative. Just keep in mind that the taste and texture may vary slightly!

---

## Nutritional Info

**Per Serving (about 1 cup):**
- Calories: 350
- Protein: 18g
- Carbohydrates: 30g
- Fat: 20g
- Fiber: 3g

This Cheesy Potato Egg Scramble is not just tasty—it’s nourishing too! Packed with protein and healthy carbs, it's a great start to your day!

---

And there you have it! A completely addictive, welcoming, and utterly delicious **Cheesy Potato Egg Scramble** that’s guaranteed to win hearts (and appetites!). Go ahead and make it your own, and remember, cooking is all about joy and discovering flavors that make YOU happy. Enjoy your culinary adventure, and until next time, happy cooking!

Cheesy Potato Egg Scramble
- Total Time: 35 minutes
- Yield: 4 servings 1x
- Diet: Vegetarian
Description
A comforting bowl of fluffy eggs, tender potatoes, and gooey melted cheese, perfect for brunch or breakfast.
Ingredients
- 2 medium potatoes (Russet or Yukon Gold)
- 4 large eggs
- 1 cup shredded cheese (cheddar or a cheese blend)
- 1/2 medium onion, diced
- 1 bell pepper, diced (any color)
- 2 tablespoons olive oil
- Salt and pepper to taste
- Fresh herbs (like chives or parsley) for garnish
Instructions
- Peel and dice potatoes into small cubes.
- Parboil if you prefer softer potatoes.
- Heat olive oil in a large skillet over medium heat.
- Add diced onions and bell peppers, sautéing until softened.
- Carefully add the diced potatoes and allow to brown and crisp.
- Toss the potatoes and cook until golden and cooked through.
- Whisk the eggs with salt and pepper.
- Pour the eggs over the potatoes and stir gently.
- Add cheese on top, cover, and let melt.
Notes
Feel free to customize with your favorite veggies or proteins.
- Prep Time: 15 minutes
- Cook Time: 20 minutes
- Category: Breakfast
- Method: Sautéing
- Cuisine: American
Nutrition
- Serving Size: 1 serving
- Calories: 350
- Sugar: 3g
- Sodium: 400mg
- Fat: 20g
- Saturated Fat: 8g
- Unsaturated Fat: 9g
- Trans Fat: 0g
- Carbohydrates: 30g
- Fiber: 3g
- Protein: 18g
- Cholesterol: 240mg
Keywords: cheesy, potato, egg, scramble, breakfast, brunch, easy recipe
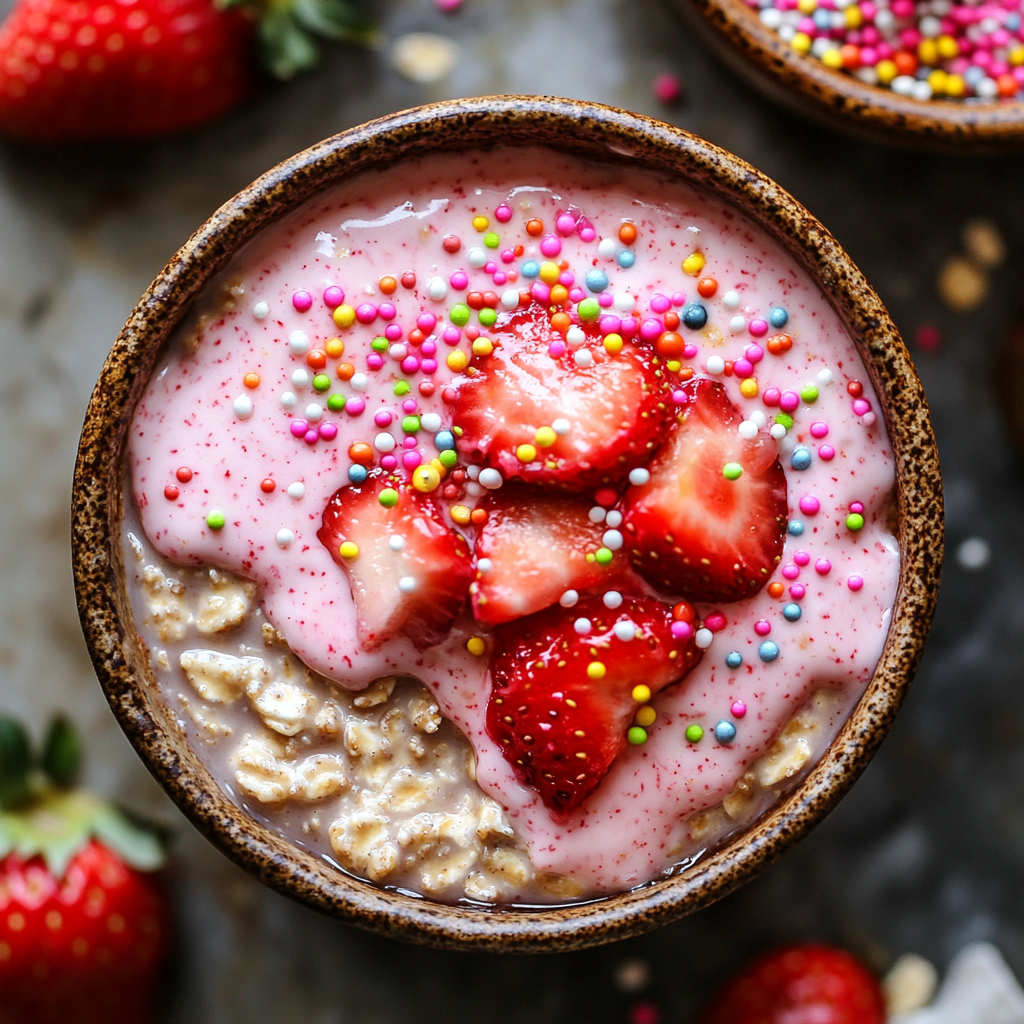
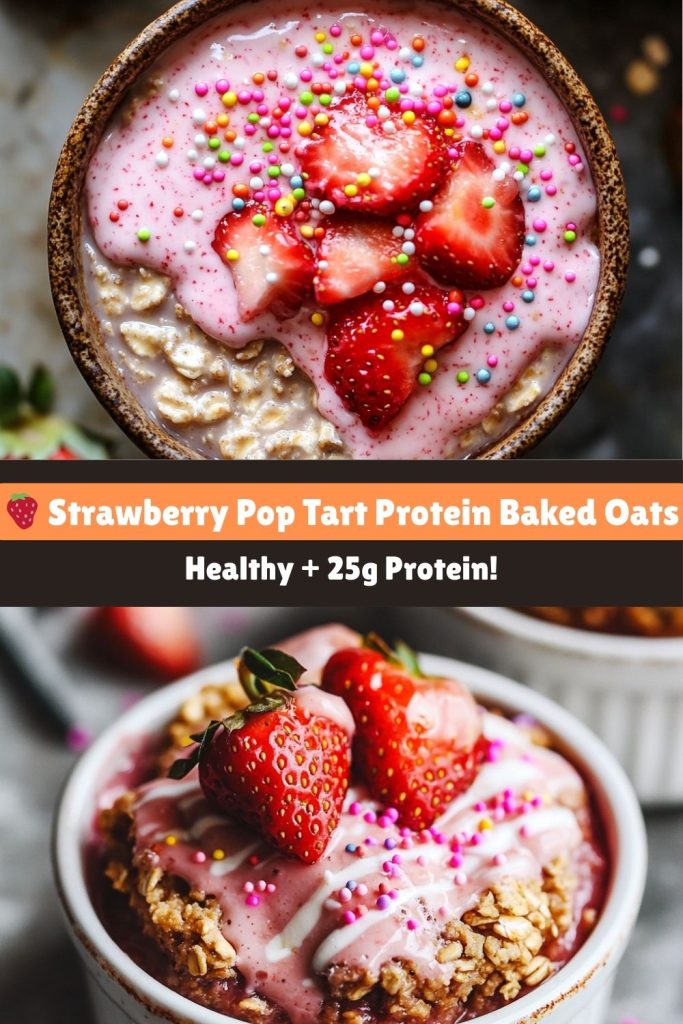
Strawberry Pop Tart Protein Baked Oats
Strawberry Pop Tart Protein Baked Oats: A Breakfast Hug from Your Childhood (But Healthier!)
Hey there, breakfast rebels! I’m ready to spill the oats on how to turn your favorite childhood treat into strawberry pop tart protein baked oats, a protein-packed powerhouse. Picture this: Saturday morning sunlight streaming through the curtains, the ding of the toaster, and that sweet, sticky smell of strawberry Pop-Tarts melting into your soul. Now imagine that exact vibe—but in a warm, gooey, guilt-free baked oat form that’ll keep you fueled ’til lunch.
I’ve always believed breakfast should taste like a celebration, not a chore. But let’s be real—most “healthy” swaps taste like cardboard confetti. That’s why I spent months tweaking this recipe, determined to nail that nostalgic Pop-Tart magic without the sugar crash. The result? A cozy, single-serving bake with 25g of protein, hidden jammy surprises, and a drizzle of yogurt “frosting” that’ll make you feel like a kid with a grown-up palate. Plus, it’s ready in 30 minutes flat. Cartoon marathons optional but highly encouraged.
My Pop-Tart Redemption Arc (And Why This Recipe Matters)
Confession time: I once smuggled a Pop-Tart into a 5-star kitchen. Yep, you read that right. Picture 22-year-old me, staging at a fancy NYC restaurant where everything was plated with tweezers, secretly nibbling my toaster pastry behind the walk-in while the sous chef ranted about the “nuanced crumb structure” of artisanal croissants. I loved the thrill of that sugary rebellion—but hated how it left me hangry by 10 AM.
That sugar rush always felt like a high-stakes gamble. One minute, you’re living the dream—gooey strawberry filling, neon icing, rainbow sprinkles dancing on your tongue. The next, you’re crashing harder than a toddler post-Halloween. It felt unfair that breakfast had to be a choice between indulgent and nutritious.
Years later, during a chaotic breakfast rush at my café, a regular joked: “Make this oatmeal taste like my kid’s Pop-Tart, and I’ll name my firstborn after you.” Challenge accepted. After 17 batches (and one jam volcano incident we don’t discuss), these strawberry pop tart protein baked oats became our top seller. Now, whenever I pull a golden ramekin from the oven, I grin thinking about that grumpy sous chef. Take that, croissant snob.
Your Grocery List (Plus Sneaky Chef Secrets)
Here’s everything you’ll need to make your own Strawberry Pop Tart Protein Baked Oats masterpiece. No need for a culinary degree—just a spoon, a blender, and a rebellious spirit.
Main Ingredients:
-
½ cup rolled oats – The MVP. Old-fashioned oats give the best texture—chewy, tender, and satisfying. If you’re in a time crunch, quick oats work too. (GF friends: Bob’s Red Mill gluten-free oats are a safe and tasty choice.)
-
1 scoop vanilla protein powder – Choose your weapon wisely. My personal favorite is PEScience Snickerdoodle for its rich flavor and blend texture. Plant-based option? Vega Sport Vanilla is a rockstar. Pro tip: If your protein powder is ultra-sweet, reduce the jam slightly to keep balance.
-
½ tsp baking powder – Tiny but mighty. This gives the oats their fluffy rise. Double-check your expiration date—this ingredient only performs when fresh.
-
½ cup milk of choice – I love oat milk for its creamy vibe, but almond, cow’s milk, or even (hear me out) coffee creamer can work in a pinch.
-
1 egg or flax egg – Flax egg = 1 tbsp ground flax + 3 tbsp water. Let it sit until thick and gel-like. Vegan-friendly and super satisfying.
-
1 tsp vanilla extract – The real deal. Splurge on high-quality vanilla—it’s the difference between “meh” and magical.
-
2 tbsp strawberry jam – Go classic with Smucker’s low-sugar, or elevate things by smashing fresh berries with a little chia seed for a quick homemade jam.
-
1 tbsp Greek yogurt + 1 tsp honey – This is our “frosting.” Creamy, sweet, and totally Instagrammable. Use coconut yogurt and agave for a dairy-free twist.
-
Sprinkles – Non-negotiable. I will die on this hill. Rainbow jimmies > all. Fight me.
Let’s Get Baking (Without Burning Down the Kitchen)
Don’t let the gourmet vibe fool you—this strawberry pop tart protein baked oats is one of the simplest, coziest things you can make in your oven. Here’s how to channel your inner breakfast magician:
1. Fire up the oven
Preheat to 350°F (175°C). Prep your ramekin like it’s about to host the Oscars. Grease that baby thoroughly with coconut oil spray or a swipe of butter. Nonstick is key—no one wants a jam-stuck disaster.
2. Blend it like Beckham
Toss oats, protein powder, baking powder, milk, egg, and vanilla into a blender. Hit “go” until it’s smoother than a TikTok dance move. If you don’t have a blender, no problem—use oat flour instead and whisk like your life depends on it.
3. Layer the love
Pour half the batter into your ramekin. Now, drop that jam in the center like you’re hiding buried treasure. Keep a little border around the edges to avoid jam explosions (trust me on this one).
4. Top it off
Gently pour in the rest of the batter and smooth the top with a spoon. Make sure all that jammy goodness is sealed inside. It’s like constructing a mini Pop-Tart fortress.
5. Bake the magic
Slide the ramekin into the oven and bake for 20–25 minutes. You’ll know it’s done when the top is springy and golden, like the perfect polite handshake. Don’t overbake! Dry oats = sad breakfast.
6. Cool your jets
Let it cool for 5 minutes while you mix your “frosting.” Combine Greek yogurt and honey until smooth. Drizzle like Jackson Pollock, sprinkle liberally, and snap a photo—this baby’s Instagram gold.
Plate It Pretty (Because We Eat With Our Eyes First)
Sure, you could eat your strawberry pop tart protein baked oats straight from the ramekin. But if you want to feel fancy, here’s the move: run a butter knife around the edges, flip it onto a plate, and admire your work. Add a spoonful of extra jam, a few fresh strawberry slices, maybe even a mint sprig if you’re feeling chef’s kiss extra. Serve with an iced latte in your sassiest mug—because you deserve that.
Mix It Up! (Because Boredom is the Enemy of Delicious)
Once you’ve mastered the basic version, the flavor options are endless. Here are a few remix ideas that have earned standing ovations in my kitchen:
- Brown Sugar Cinnamon Classic
Take a nostalgic trip back to those golden toaster pastries by swapping the strawberry jam for a swirl of cinnamon applesauce and a sprinkle of brown sugar. Want it extra cozy? Add a dash of nutmeg or a splash of maple syrup to the batter. Dust the top with cinnamon after baking for a warm, hug-in-a-bowl finish. - Chocolate Fudge Fantasy
Calling all chocoholics—this one’s your morning dessert (minus the regret). Stir 1 tablespoon of unsweetened cocoa powder into the batter and replace the jam with a center of dark chocolate chips and a spoonful of peanut butter. Want it richer? Add a drizzle of chocolate protein frosting post-bake. - Vegan Vibes
Going plant-based? Easy fix. Swap in a flax egg, use your favorite plant-based protein powder, and top with coconut yogurt instead of Greek. Add a splash of almond extract or some mashed ripe banana to enhance sweetness and moisture. Vegan never tasted so nostalgic. - PB&J Remix
An after-school snack turned breakfast dream. Add 1 tablespoon of powdered peanut butter (or the real stuff, if you’re bold) to the batter, then plop grape or raspberry jelly in the center. After baking, top with a drizzle of warmed peanut butter and a sprinkle of crushed roasted peanuts. Lunchbox feels, grown-up fuel. - Banana Nut Bliss
Mashed ripe banana in the batter brings natural sweetness and extra moisture. Add chopped walnuts or pecans for crunch, and swap the jam for banana slices or banana-chia jam. Top with a drizzle of maple yogurt and a pinch of cinnamon. Bonus points for a caramelized banana garnish.
Kitchen Confessions (Learn From My Mistakes)
Let’s keep it real—recipe development isn’t always glamorous.
The first time I tested this, I used a shallow ramekin. The jam bubbled over like Mount Vesuvius, smoked up my oven, and triggered my apartment’s fire alarm. My cat hasn’t looked at me the same since. Moral of the story? Use a deep enough dish, friend.
Also, this recipe doubles as muffins! Just divide the batter into 2–3 muffin tins and bake for 15 minutes. They’re adorable, portable, and perfect for meal prep. Call them “Pop-Tart Bites” and watch them disappear.
Burning Questions (Answered Before You Ask)
Q: Can I meal prep this?
A: Absolutely. Mix all the dry ingredients in a jar and add the wet stuff when you’re ready to bake. Or prep four ramekins on Sunday night—they reheat like a dream in the microwave (30–45 seconds does the trick).
Q: Why is my center still runny?
A: Oven temps vary, and jam can be tricky. If the center’s too gooey, bake for an extra 5 minutes. Still struggling? Freeze your jam dollop before adding—it helps it hold shape better.
Q: My oats turned out chalky. Help?!
A: It’s probably your protein powder. Whey isolate can get grainy. Try a blend or casein-based powder. Also, adding 1 tbsp mashed banana or a splash of applesauce helps with moisture.
Nutrition Facts (Because Knowledge is Power)
-
Calories: 320
-
Protein: 25g
-
Carbs: 30g
-
Fat: 10g
-
Fiber: 4g
-
Sugar: 8g
All that satisfaction in one warm, jam-filled, protein-boosted ramekin. It’s like a love letter to your inner child—written in oats.
Whether you’re fueling a morning workout, brunching with friends, or simply chasing that sweet pop-tart nostalgia, this strawberry pop tart protein baked oats recipe hits the mark every time. It’s proof that you can eat like a grown-up and still enjoy the flavors that made your childhood magical.




