
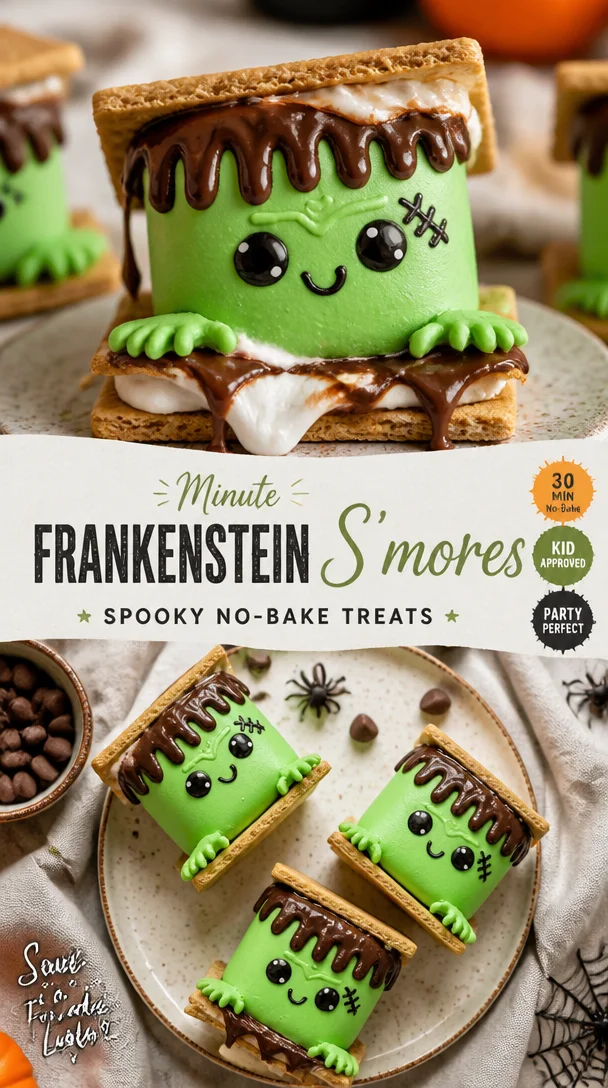
Minute Frankenstein S’mores: Spooky No-Bake Treats
Frankenstein S’mores: A Spooktacular Twist on a Classic Treat
Welcome, my fellow food lovers! Today, we’re diving into a fun kitchen adventure that’s perfect for anyone looking to add a little spooky flair to their dessert table. Inspired by the beloved campfire classic, I’m excited to introduce you to my Frankenstein S’mores: a ghoulishly green twist that’s just as delicious as the original without losing that playful charm we all adore. Whether you’re hosting a Halloween party, a cozy movie night, or just in the mood for some treats that will impress friends and family, these s’mores are sure to steal the show!
Let’s face it: there’s something magical about the combination of melted chocolate, sticky marshmallows, and crispy graham crackers. They transport us back to our childhood, reminding us of laughter around the campfire and sticky fingers at sleepovers. Now, imagine taking that nostalgic recipe and adding a modern, monstrous twist. Trust me, your taste buds will thank you!
As we embark on this sugary journey, I’ll be your guide, sharing personal stories, essential tips, and every step of the way to ensure your Frankenstein S’mores are a hit. So grab your apron (or don’t; I know how messy things can get), and let’s get cooking!
A Sweet Memory
I have a particularly fond memory that revolves around s’mores. It takes me back to those summer nights spent at my grandparents’ cabin in the woods. You could smell the pine trees mingling with the smoke from the campfire as my siblings and I giggled, dodging around the flickering firelight. My grandmother would always station herself at the fire, expertly roasting marshmallows to achieve that perfect golden-brown texture. I remember eagerly waiting for my turn, clutching my graham crackers and chocolate.
One night, in a cheeky spirit of culinary creativity, we decided to switch things up. Instead of regular chocolate, we rummaged through the pantry and found some colorful candies. We dubbed our creation “witches’ s’mores” that night, and it sparked an idea that never truly left me. Now, as an adult, I love taking simple recipes and putting a whimsical spin on them, just like that night. With Halloween around the corner, I thought it was time to breathe new life into my childhood nostalgia with these Frankenstein S’mores!
Ingredients
Here’s what you’ll need to whip up these delightful treats:
-
Graham Crackers:
- Explanation: The classic base for s’mores! Their crunchy texture and honey sweetness are essential.
- Substitution Tips: You can swap them with chocolate graham crackers for a chocolatey boost or use gluten-free options if needed.
-
Green Marshmallows (or regular plus food coloring):
- Explanation: These are crucial for that Frankenstein vibe.
- Quick Chef Insight: You can actually use white marshmallows and dip them in green candy melts for an even more vibrant look!
-
Chocolate Bars:
- Explanation: Mini chocolate bars work best for easy melting and layering.
- Substitution Tips: Use dark, milk, or even white chocolate, depending on your preference, or try flavored chocolates like peppermint for a fun twist.
-
Vanilla Frosting:
- Explanation: This will act as our “green goo” to make these s’mores extra creepy.
- Chef Insight: If you’d like a healthier option, try Greek yogurt mixed with a bit of green food coloring.
-
Plastic “Monster” Eyeballs (optional):
- Explanation: These are purely for decoration and fun!
- Fun Tip: You can find edible candy eyeballs for a sweet touch instead!
-
Cooking Spray (optional):
- Explanation: Helps prevent sticking if you’re using a pan method.
- Chef Insight: Just a light spray will do; we don’t want our marshmallows to slide off!
Step-by-Step Instructions
Now that we’ve got our ingredients lined up, let’s dive right into making these spooky treats! Follow along and don’t hesitate to get messy—after all, kitchen magic often comes with a sprinkle of chaos.
-
Prep Your Ingredients:
- Gather all your ingredients and preheat your oven to 350°F (175°C) if you’re using it. This will make the s’mores nice and gooey inside!
-
Line Your Baking Tray:
- If going the oven route, line a baking tray with parchment paper. Be generous with that spray to avoid any sticky situations.
-
Layer the Graham Crackers:
- Take a graham cracker and place it on the tray. You can break them in half if you prefer smaller s’mores or keep them whole for a substantial bite.
-
Add the Chocolate:
- Place a piece of your chosen chocolate bar on top of the graham cracker. Feel free to use layers if you’re feeling adventurous!
-
Melt the Marshmallows:
- Now, either roast marshmallows over the fire, use a kitchen torch, or pop them in the microwave for about 10-15 seconds just until they start to puff up. Try not to overdo it!
-
Assemble the S’mores:
- Top those gooey marshmallows with a second graham cracker. Press down gently so they stick together, and let the melted chocolate do its magic.
-
Frost with Green Goo:
- Smear vanilla frosting on top of the assembled s’mores to create that creepy effect. Don’t skimp on the “goo”—this is what makes them Frankenstein!
-
Decorate with Eyeballs:
- If using edible eyeballs, now’s the time to stick them on for that perfectly frightening look!
-
Chill or Serve Warm:
- You can serve these immediately for that gooey factor or pop them in the fridge for a bit if you prefer them a bit firm.
Serving Suggestions
To really make these Frankenstein S’mores pop, consider arranging them on a platter alongside some fake spider webs and mini plastic spiders for a fun Halloween touch. You could even place a few candles around them for that perfect ambiance. For a cozy movie night, serve them on a rustic wooden board, paired with your favorite film snacks. And don’t forget to have napkins on hand—these treats can get a little messy (in the best way possible)!
Recipe Variations
Looking to put your own spin on these Frankenstein S’mores? Here are a few fun variations to consider:
- Nutty Crunch: Add crushed nuts like almonds or peanuts for a delightful crunch.
- Spooky Spices: A sprinkle of cinnamon or cayenne can add a warm bite to the frosting!
- Different Flavors: Replace the chocolate with caramel squares for a sweet twist, or use flavored marshmallows, such as strawberry or mint.
- Vegan Version: Swap regular marshmallows for vegan options and use dairy-free chocolate for a plant-based treat.
- Mini-Mores: Use mini graham crackers and marshmallows for bite-sized treats perfect for parties.
Chef’s Notes
When I created these Frankenstein S’mores, I was reminded of how fun and creative the kitchen can be, especially when you’re not afraid to experiment. I remember one year I attempted a “Monster Marshmallow Cake” for a Halloween party, which ended in a flour explosion and a lot of laughter. The best part of cooking is embracing the mess and madness that comes with it. This recipe has evolved over time, wandering from traditional s’mores to something a little more whimsical and spooky.
FAQs and Troubleshooting
Q: Can I make these s’mores in advance?
Absolutely! You can prepare the components separately and assemble them right before serving to maintain that gooey goodness.
Q: My marshmallows aren’t melting! What did I do wrong?
Make sure your marshmallows are puffed up and soft before adding them to the s’mores. If they seem stiff, try microwaving them for an extra few seconds.
Q: Can I use different flavors for the frosting?
Of course! Feel free to experiment with chocolate, strawberry, or even mint frosting to match your flavor preferences. The sky’s the limit!
Q: How do I store leftovers?
If you have any s’mores left (unlikely!), store them in an airtight container at room temperature for up to three days. Just be aware they may lose some of their delicious gooeyness.
Nutritional Info
While indulgent, these Frankenstein S’mores can be a fun treat! Though I don’t typically offer nutritional info, a single treat will usually clock in around 150-200 calories depending on your ingredients—sugar is a devilish friend.
And there you have it—your ultimate guide to making irresistible Frankenstein S’mores! I hope this recipe not only brings a hint of spookiness to your kitchen but also stirs up fond memories of your own. Remember, cooking is about joy, exploration, and perhaps a touch of creative madness. Now roll up your sleeves, get those ingredients ready, and let’s make some food memories together! Happy cooking, and may your treats be as delightful as your kitchen tales!
Print
Frankenstein S’mores
- Total Time: 30 minutes
- Yield: 12 servings
- Diet: Vegetarian
Description
A spooktacular twist on the classic s’mores, featuring green marshmallows and chocolate goo.
Ingredients
- Graham Crackers
- Green Marshmallows (or regular plus food coloring)
- Chocolate Bars
- Vanilla Frosting
- Plastic “Monster” Eyeballs (optional)
- Cooking Spray (optional)
Instructions
- Prep Your Ingredients: Gather all your ingredients and preheat your oven to 350°F (175°C) if you’re using it.
- Line Your Baking Tray: If going the oven route, line a baking tray with parchment paper and spray it lightly.
- Layer the Graham Crackers: Place a graham cracker on the tray, breaking them in half if desired.
- Add the Chocolate: Place a piece of chocolate bar on top of the graham cracker.
- Melt the Marshmallows: Roast marshmallows, use a kitchen torch, or microwave them until puffy.
- Assemble the S’mores: Top marshmallows with a second graham cracker and press down gently.
- Frost with Green Goo: Apply vanilla frosting on top of the assembled s’mores.
- Decorate with Eyeballs: Stick on edible eyeballs if using.
- Chill or Serve Warm: Serve immediately or chill in the fridge for a firmer texture.
Notes
Feel free to customize with nuts, spices, or different chocolates to match personal taste.
- Prep Time: 15 minutes
- Cook Time: 15 minutes
- Category: Dessert
- Method: Baking
- Cuisine: American
Nutrition
- Serving Size: 1 s'more
- Calories: 200
- Sugar: 15g
- Sodium: 150mg
- Fat: 7g
- Saturated Fat: 3g
- Unsaturated Fat: 4g
- Trans Fat: 0g
- Carbohydrates: 29g
- Fiber: 1g
- Protein: 2g
- Cholesterol: 0mg
Keywords: Halloween, dessert, s'mores, fun, easy recipes, spooky treats
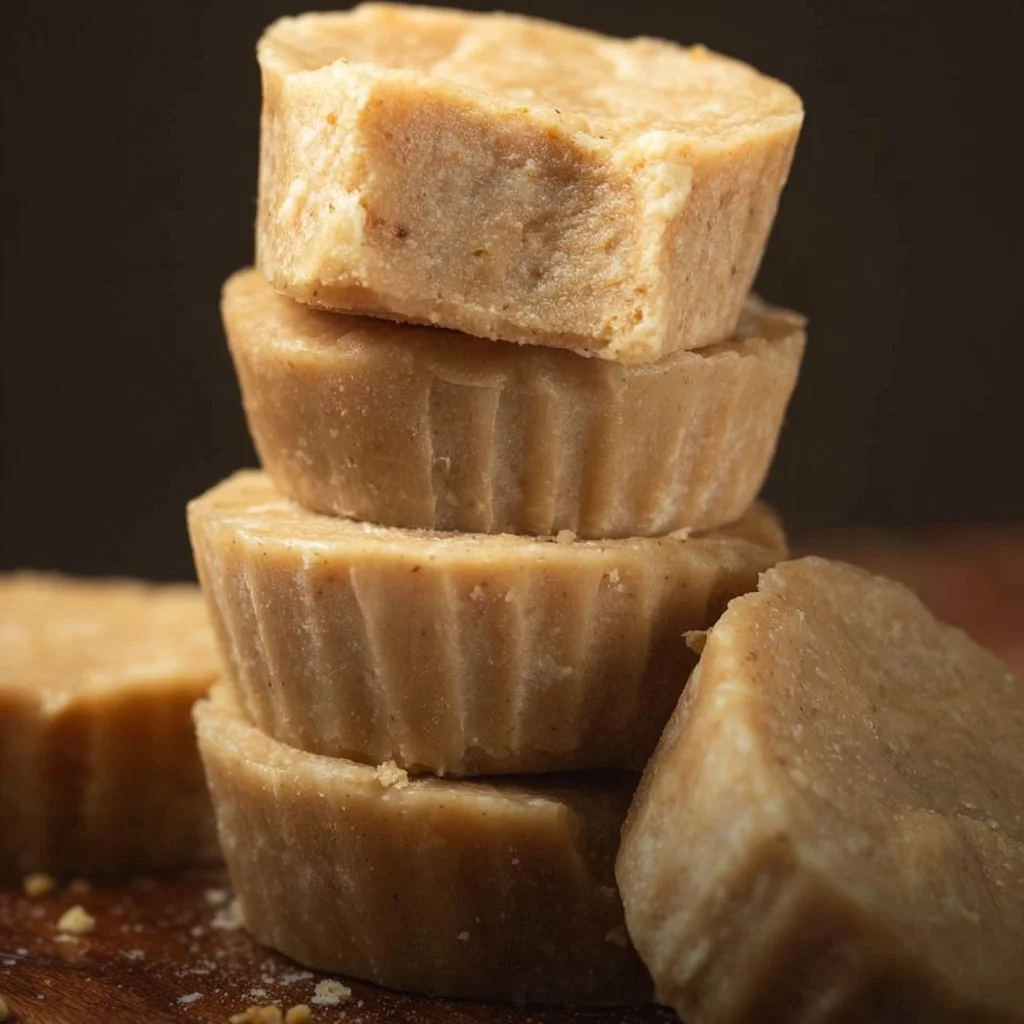
3 Ingredient Banana Fudge
The Ultimate 3-Ingredient Banana Fudge Recipe – Your New Favorite Treat!
Welcome to my kitchen, friend! I’m thrilled you’re joining me today because we’re about to embark on a simple yet delectable journey into the world of flavors with my quick and easy 3-ingredient banana fudge. Not only is this recipe bursting with chocolatey goodness and the natural sweetness of bananas, but it’s also so easy that even the most novice of bakers can whip it up with confidence. Plus, who doesn’t love a dessert that requires minimal effort and delivers maximum happiness?
Now, let’s talk a little about what makes this dish so special. This banana fudge is a perfect example of how simplicity can lead to extraordinary flavors. With just three humble ingredients, we’ll transform your ripe bananas into a heavenly treat that’s perfect for snacking, sharing, or indulging after a long day. It’s one of those recipes that’ll make you wonder how something so ridiculously easy can taste so darn good.
But enough intro—let’s dive into the sweet, sweet world of banana fudge! By the time we’re done here, you’ll have a delightful treat that will impress your friends and family, all while making your kitchen smell like a dreamy, chocolatey paradise. I can’t wait for you to try this!
A Nostalgic Moment in the Kitchen
Growing up, my kitchen was a buzzing hub of activity, laughter, and, of course, incredible smells. One of my fondest memories is helping my mom whip up homemade fudge during the summer. The fun started with melting chocolate chips on the stovetop, and I, being a curious little chef, was always there to taste-test. While we stirred the chocolate, we would share stories, and I loved how my mom’s face lit up when the fudge turned out perfectly.
Years later, vermilion-hued memories of those kitchen escapades inspired me to experiment with my favorite flavors. That’s when this 3-ingredient banana fudge recipe was born. It felt so fitting to combine the simplicity of childhood joys with the flavors I adore. Now, instead of traditional fudge, we’re making it banana-style, and believe me, it’s been a game changer! Picture this: smooth and creamy, every square of fudge melts in your mouth, delivering sweet banana goodness with a hint of chocolate. It’ll make you feel like a kid in a candy shop all over again!
Ingredients You’ll Need
Let’s gather our ingredients, shall we? Here’s what we need to make this delightful banana fudge:
-
Ripe Bananas (2 large): The stars of our show! Choose bananas that have plenty of brown spots for maximum sweetness. If you have overripe bananas lying around, now is the perfect time to use them! A great substitute would be mashed avocado for a healthier twist.
-
Chocolate Chips (1 cup): I prefer semi-sweet or dark chocolate chips for a richer flavor, but feel free to switch it up with milk chocolate or even white chocolate if you’d like! For a dairy-free option, go for vegan chocolate chips.
-
Nut Butter (1/2 cup): I love natural peanut butter, but almond or sunflower seed butter works beautifully too. This will add creaminess to our fudge and give it a nutty flavor. If you’re looking for a nut-free version, you can try coconut cream instead, but note that it will change the texture a bit.
Chef Insight
- When selecting bananas, the more speckles, the better! These spots indicate ripeness and sweetness, two essential components for delicious fudge!
Step-by-Step Instructions
Now, let’s get to the fun part—making the banana fudge! Grab your apron and let’s get cooking!
Step 1: Prepare YourBananas
First, peel your ripe bananas and slice them into chunks. Then, place them in a mixing bowl. Use a fork or potato masher to mash them until they’re smooth and creamy, with just a few small lumps for texture. This is where the banana flavor really shines through! Tip: If you ever feel like you’re spending too much time mashing, let me tell you a secret—get a handheld immersion blender! It’ll make the process super fast.
Step 2: Melt the Chocolate Chips
In a microwave-safe bowl, add your chocolate chips. Microwave them in 30-second intervals, stirring in between until melted and smooth. Make sure not to overheat the chocolate, as it can seize up! Chef Hack: If you prefer the stovetop method, melt the chocolate in a double boiler for a more controlled heat.
Step 3: Mix in the Nut Butter
Once your chocolate is ready and perfectly gooey, stir in the nut butter. The combination of the warm chocolate and nut butter will create an irresistible, silky texture. Pro Tip: If your nut butter is too thick, microwave it for a few seconds to soften it up.
Step 4: Combine Everything
Pour the mashed bananas into the melted chocolate and nut butter mixture. Stir it all together until you achieve a smooth, uniform blend. The key here is to incorporate all the flavors well! It should look rich and inviting.
Step 5: Set the Fudge
Line a square baking dish (about 8×8 inches) with parchment paper, leaving a little overhang for easy removal later. Pour the fudge mixture into the dish and gently press it down to create an even layer. Tip: For added texture and flavor, consider sprinkling some chopped nuts or sea salt on top.
Step 6: Chill
Pop your fudge into the refrigerator for about 2-3 hours or until it’s set. This step is essential for creating the perfect fudge consistency. Chef’s Secret: Don’t rush this step; it’s all about patience for that perfect slice later!
Step 7: Slice and Serve
Once the fudge is set, remove it from the dish using the parchment paper overhang and cut it into squares. Place the fudge on a fun serving plate—don’t forget to take a few beautiful photos for your Instagram!
Serving Suggestions
These delightful banana fudge squares are perfect for sharing! You can serve them as a decadent dessert, a fun treat for gatherings, or simply keep them for late-night snack sessions. If you want a little extra flair, serve them on a rustic wooden board garnished with fresh banana slices or a sprinkle of flaky sea salt. A dollop of whipped cream or a scoop of vanilla ice cream alongside wouldn’t hurt either!
Recipe Variations
Feeling adventurous? Here are a few fun twists on the classic banana fudge:
- Add Some Spice: Mix in a pinch of cinnamon or a dash of vanilla extract to elevate the flavors.
- Nutty Delight: Fold in some chopped nuts for added crunch and richness. Walnuts or pecans work wonderfully.
- Fruit Burst: Incorporate chopped dried fruits like cranberries or apricots for a sweet-tart twist.
- Minty Fresh: Add a few drops of peppermint extract for a refreshing mint-chocolate combo!
- Caramel Swirl: Drizzle some caramel sauce on top before chilling for a sweet surprise.
Chef’s Notes
It’s amazing how just three ingredients can create something so delicious and comforting! I’ve experimented with this base recipe over the years, tweaking it a bit here and there. However, the beauty of this fudge is in its adaptability. After years of making these for myself and friends, I discovered that it’s not just a treat; it’s a canvas for creativity! Every batch tends to have its own personality, thanks to the addition of different nut butters or toppings. In the end, it always brings a smile to my face—and a satisfied one at that!
FAQs and Troubleshooting
Q: How do I store the leftovers?
A: Keep the fudge in an airtight container in the refrigerator for up to a week. You can also freeze it for longer storage!
Q: Can I use frozen bananas?
A: Absolutely! Just make sure to thaw them and drain any excess liquid before mashing.
Q: Why did my fudge turn out too soft?
A: If the fudge is too soft, it might need some extra chilling time. Ensure the mixture is completely set before cutting.
Q: Can I make it vegan?
A: Yes! Simply use dairy-free chocolate chips and any nut or seed butter that’s plant-based!
Nutritional Info (Optional)
While I believe in indulging freely, it can be helpful to know what you’re munching on. Each square of this fabulous fudge is packed with protein, healthy fats, and natural sugars from the bananas—definitely a guilt-free treat for your sweet tooth!
And there you have it—your comprehensive guide to making this mouthwatering 3-ingredient banana fudge! I hope this recipe brings back nostalgia and creates new memories in your kitchen. Happy cooking and even happier eating!
Print
3-Ingredient Banana Fudge
- Total Time: 180 minutes
- Yield: 12 squares 1x
- Diet: Vegan
Description
A quick and easy recipe for delicious banana fudge made with just three ingredients.
Ingredients
- 2 large Ripe Bananas
- 1 cup Chocolate Chips
- 1/2 cup Nut Butter
Instructions
- Prepare your bananas by peeling and slicing them into chunks, then mash until smooth.
- Melt the chocolate chips in a microwave-safe bowl in 30-second intervals.
- Mix in the nut butter until combined with the melted chocolate.
- Combine the mashed bananas with the chocolate mixture until smooth.
- Set the mixture in a lined baking dish, pressing down to create an even layer.
- Chill in the refrigerator for 2-3 hours until set.
- Slice into squares and serve.
Notes
Use overripe bananas for maximum sweetness. Consider adding chopped nuts or sea salt for added texture.
- Prep Time: 10 minutes
- Cook Time: 0 minutes
- Category: Dessert
- Method: Chilling
- Cuisine: American
Nutrition
- Serving Size: 1 square
- Calories: 150
- Sugar: 8g
- Sodium: 5mg
- Fat: 7g
- Saturated Fat: 1g
- Unsaturated Fat: 6g
- Trans Fat: 0g
- Carbohydrates: 20g
- Fiber: 2g
- Protein: 3g
- Cholesterol: 0mg
Keywords: banana fudge, vegan dessert, easy recipes, quick treats, chocolate




