

Easy Baked Raspberry Cheesecake
Easy Baked Raspberry Cheesecake: Your New Go-To Dessert
Welcome to my cozy kitchen! Today, we’re diving into a delightful treat that’s sure to steal the hearts of your friends and family: Easy Baked Raspberry Cheesecake. Oh, the joy of cheesecake—smooth, creamy, and oh-so-decadent! The best part? It’s surprisingly simple to whip up, even on those busy weeknights when you just want to treat yourself (or someone special).
For me, baking is more than just a task; it’s a form of self-expression and a way to connect with the people I love. There’s something magical about the smell of something sweet wafting from the oven, drawing everyone to the kitchen like bees to honey. As I’m prepping this cheesecake, I can practically hear the giggles and conversations bubbling and swirling around me, and that’s when I know it’s time to share a slice.
I want you to experience that same joy and love when you bake this cheesecake. With every layer and every step, we’ll turn simple ingredients into an unforgettable dessert that’s both elegant for entertaining and comforting for a cozy night in. So, grab your apron (mine might be a little messy, but that’s called character!), and let’s get started on this delicious journey together!
A Sweet Memory: My First Cheesecake
Ah, cheesecake—my love affair with this dessert dates back to childhood. I still vividly remember the first time I helped my mom make a cheesecake for a family gathering. I was about eight years old, perched on a kitchen stool, my little hands dripping in batter. I can still picture the moment when I excitedly blended the cream cheese, sugar, and eggs—all while my mom guided me with her patient words. We used a simple vanilla base, but what I remember most vividly was the feeling of joy and love that pulsed between us in that warm kitchen.
Years later, I found my way to using tangy raspberries to add a delightful twist. Raspberries have always been one of my favorites—sweet yet slightly tart, adding a perfect zing that brightens up any dish. Fast forward, and this Easy Baked Raspberry Cheesecake has become a family staple at gatherings, embodying those early lessons my mom taught me: laughter, patience, and sharing good food with the people you love.
Ingredients
Here’s a rundown of what you’ll need to create your own slice of cheesecake heaven:
-
Graham cracker crumbs (1 ½ cups)
A classic base for any cheesecake, the crispy texture provides a delightful crunch. If you’re trying to avoid glutin or want a healthier option, feel free to use almond flour or gluten-free cookies as a substitute. -
Unsalted butter (½ cup)
Melted butter holds the crust together and adds richness. If you’re looking for a dairy-free option, coconut oil works wonders here, giving a slightly different (but delightful) flavor. -
Cream cheese (24 oz, softened)
This is the star of our show! Make sure your cream cheese is at room temperature for a super smooth and creamy filling. Alternatively, ricotta cheese can be blended in for a lighter texture. -
Granulated sugar (1 cup)
The sugar balances out the rich creaminess. If you’re watching your sugar intake, you might try using coconut sugar or a sugar substitute, but keep in mind the flavor might differ a bit. -
Sour cream (1 cup)
Adds tanginess and creaminess! Greek yogurt is a fantastic alternative, and it’ll give you a slightly different flavor while keeping it creamy. -
Eggs (3 large)
These bind everything together and create that dreamy texture. For a vegan option, you can experiment with flax eggs (1 tablespoon ground flaxseed mixed with 2.5 tablespoons of water equals one egg). -
Vanilla extract (1 tablespoon)
A classic flavor enhancer! You can also use almond or peppermint extract for an exciting twist. -
Fresh raspberries (1 cup)
These beauties add flavor and color. If they’re out of season, frozen raspberries work just as well—just make sure to thaw and drain them before mixing! -
Optional: powdered sugar (for dusting)
Just a light dusting on top before serving adds the perfect finishing touch!
Step-by-Step Instructions
Let’s jump into the fun part! Grab your mixing bowls, and let’s create some dessert magic.
-
Preheat your oven to 325°F (160°C)
The first step is always the most important! Preheating ensures even baking and a perfectly set cheesecake. Trust me, there’s nothing worse than a cheesecake that hasn’t fully baked. -
Make the crust
- In a mixing bowl, combine graham cracker crumbs and melted butter until well mixed. You want it to feel like wet sand—moist enough to hold together. If it’s too crumbly, just add a little more melted butter.
- Press the mixture firmly into the bottom of a springform pan (9 inches works perfectly). Don’t be shy! You want a firm base—use the bottom of a measuring cup for an even finish.
-
Bake the crust
- Pop that crust into the preheated oven for 10 minutes until it’s lightly golden. This step is crucial—it gives the crust a nice crunch and locks in the flavor.
-
Prepare the filling
- In a large mixing bowl, add your softened cream cheese. Use a hand mixer or a stand mixer on medium speed to cream it until it’s super smooth! Scrape down the sides to ensure everything is blended.
- Gradually add the granulated sugar and mix until it’s fully incorporated. Can you smell that sweet goodness already?
- Beat in the sour cream, eggs, and vanilla extract one at a time, mixing just until combined after each addition. Remember, overmixing can lead to cracks in your cheesecake. Yikes!
-
Fold in the raspberries
- Gently fold in your fresh or thawed raspberries. You want to distribute them evenly without breaking them up too much—those little bursts of flavor are what makes this cheesecake special!
-
Pour the filling
- Carefully pour your luscious filling over the pre-baked crust, leveling it out with a spatula. This step is crucial—make it as smooth as possible for that picture-perfect finish!
-
Bake the cheesecake
- Bake in the oven for about 50-60 minutes until the edges are set but the center is still a little jiggly. It will continue to firm up as it cools.
-
Cool and chill
- When the cheesecake is done, turn off the oven and crack the oven door open, letting the cheesecake cool slowly. This will help prevent cracking! After about an hour, cover it and let it chill in the fridge for at least 4 hours (or overnight for best results).
-
Serve and enjoy
- Once chilled, remove from the springform pan, dust with powdered sugar if desired, and slice it up. Each piece should have that beautiful raspberry swirl—just like a work of art!
Serving Suggestions
When it comes to serving this gorgeous cheesecake, keep it simple to let the flavors shine. You can plate it alongside a small scoop of vanilla ice cream or whipped cream for that extra indulgence. Don’t forget to garnish with a few fresh raspberries on top and a sprig of mint for that gorgeous pop of color! Setting the scene at your dining table with soft lighting and cozy napkins will make it a memorable experience. Here’s to sweet moments with loved ones!
Recipe Variations
Now, if you’re feeling adventurous, here are a few variations to amp up your cheesecake game:
-
Chocolate Raspberry Cheesecake: Add half a cup of melted chocolate (dark or white) into the filling before baking for a decadent twist.
-
Lemon Zest: Incorporate the zest of one lemon into the filling for a refreshing citrusy flavor that pairs beautifully with raspberries.
-
Nutty Crust: Try using almond meal instead of graham cracker to create a gluten-free option, lending a unique flavor to your crust.
-
Swirled Raspberry Sauce: Drizzle raspberry sauce on top before baking for a stunning marbled effect.
-
Mixed Berries: Substitute or mix in blueberries or strawberries with raspberries for a delightful berry medley!
Chef’s Notes
Each time I make this Easy Baked Raspberry Cheesecake, I’m reminded of how versatile it is. My mom’s recipe has evolved over the years, adapting to my tastes and the seasons. Some days, I love adding hints of citrus, while others, I revel in chocolatey goodness. It’s all about experimenting with flavors! Plus, I have a little secret: if there’s any leftover cheesecake (which is rare!), it freezes beautifully! Just wrap individual slices tightly, and you’ll have instant treats ready whenever the craving strikes.
FAQs and Troubleshooting
Here are a few common questions you might have while making this cheesecake:
-
Why did my cheesecake crack?
Overmixing the batter or baking at too high a temperature can lead to cracks during cooling. Be gentle with the mixing and monitor the baking temperature closely! -
How do I know my cheesecake is done?
The edges should be set, while the center looks slightly jiggly. Remember that it continues to cook as it cools! -
Can I make this a day ahead?
Absolutely! In fact, it’s best served chilled overnight. Just cover it well to keep those flavors intact. -
What if I don’t have a springform pan?
You can use a regular round cake pan. Just make sure to line it with parchment paper for easy removal, or you can also convert this recipe into cupcake form for individual servings!
Nutritional Info
While I don’t typically dwell on the nitty-gritty of calories, here’s a quick glance at the estimated nutritional info for one slice (based on 12 servings):
- Calories: 300
- Total fat: 20g
- Saturated fat: 12g
- Carbohydrates: 30g
- Sugars: 18g
- Protein: 5g
With that said, enjoy in moderation—this cheesecake is all about celebrating special moments!
So there you have it, my friends! This Easy Baked Raspberry Cheesecake isn’t just a recipe; it’s a celebration of flavors, memories, and love. Each slice tells a story filled with warmth and joy, evoking laughter and connection. I can’t wait for you to try it and create your own memories in the kitchen. Happy baking, foodie friends!
Print
Easy Baked Raspberry Cheesecake
- Total Time: 80 minutes
- Yield: 12 servings
- Diet: Vegetarian
Description
A delightful and creamy raspberry cheesecake that’s simple to make and perfect for any occasion.
Ingredients
- Graham cracker crumbs (1 ½ cups)
- Unsalted butter (½ cup, melted)
- Cream cheese (24 oz, softened)
- Granulated sugar (1 cup)
- Sour cream (1 cup)
- Eggs (3 large)
- Vanilla extract (1 tablespoon)
- Fresh raspberries (1 cup)
- Powdered sugar (for dusting, optional)
Instructions
- Preheat your oven to 325°F (160°C).
- Combine graham cracker crumbs and melted butter until well mixed. Press the mixture into the bottom of a springform pan.
- Bake the crust in the oven for 10 minutes.
- Add softened cream cheese to a large mixing bowl and cream until smooth. Gradually add the granulated sugar and mix fully.
- Beat in the sour cream, eggs, and vanilla extract one at a time, mixing just until combined.
- Fold in the raspberries gently.
- Pour the filling over the pre-baked crust and level it out.
- Bake in the oven for about 50-60 minutes until the edges are set.
- Cool and chill the cheesecake for at least 4 hours in the fridge.
- Serve chilled, dusting with powdered sugar if desired.
Notes
This cheesecake can be made a day ahead for the best flavor. It can also be frozen for future treats.
- Prep Time: 20 minutes
- Cook Time: 60 minutes
- Category: Dessert
- Method: Baking
- Cuisine: American
Nutrition
- Serving Size: 1 slice
- Calories: 300
- Sugar: 18g
- Sodium: 400mg
- Fat: 20g
- Saturated Fat: 12g
- Unsaturated Fat: 8g
- Trans Fat: 0g
- Carbohydrates: 30g
- Fiber: 1g
- Protein: 5g
- Cholesterol: 80mg
Keywords: cheesecake, raspberry, dessert, baking, easy recipe
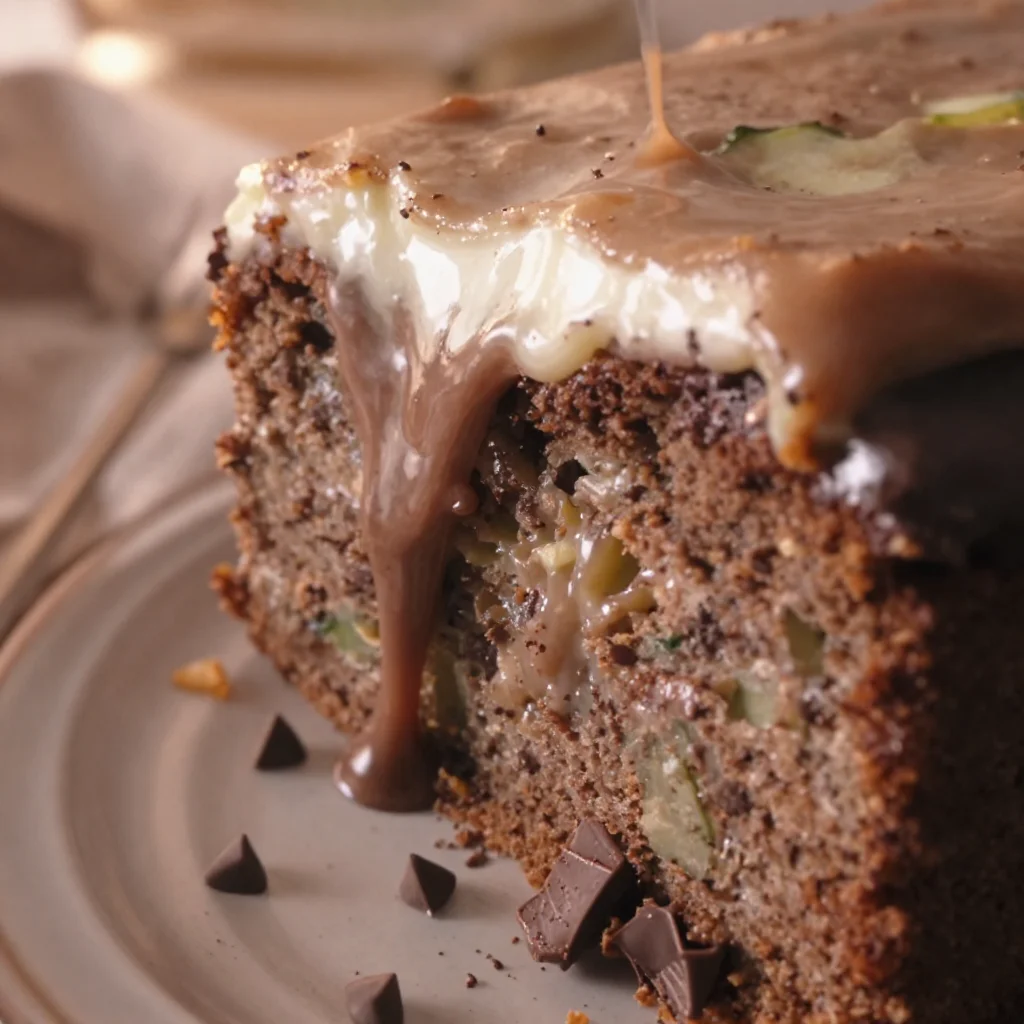
Min Chocolate Zucchini Cake: Easy One-Bowl Bake
Indulge in Moist and Decadent Chocolate Zucchini Cake
Welcome to my kitchen, friends! Today we’re about to embark on a deliciously sweet adventure with a recipe that combines the rich, luscious flavors of chocolate with the unexpected freshness of zucchini. Yes, you heard that right! My Chocolate Zucchini Cake is a delightful treat that proves that veggies really can be part of dessert.
Now, I can hear some of you skeptics saying, "Zucchini in cake? Really?" Trust me when I say that this combo creates a uniquely moist and tender cake that you won’t be able to resist. There’s something heartwarming about biting into a piece of rich chocolate cake while knowing there’s a hidden veggie making it even more wonderful. This cake is perfect for any occasion — whether it’s an afternoon treat with a cup of coffee, a dessert to impress your guests, or even a sneaky way to add some good-for-you ingredients into your day.
Baking should always be a joyful experience, so I’m here to make sure you feel confident and excited! So, roll up your sleeves, gather your ingredients, and let’s get baking!
A Slice of Nostalgia
Let me take you back to my childhood, where the kitchen always had that enchanting scent of something baking, typically on a rainy Saturday afternoon. My grandmother was the queen of creative baking, and her specialty was an old family recipe she made: Chocolate Zucchini Bread. I remember watching her grate fresh zucchini with a smile, knowing it would soon transform into something magical.
The way she would sneak vegetables into our sweet treats felt like a little culinary trickery, but it always ended with smiles, laughter, and, most importantly, empty plates! As I grew older and began experimenting in the kitchen, I made sure to carry forward that lovely tradition, crafting my own version of her chocolate zucchini delight.
And so, my Chocolate Zucchini Cake was born, inspired by those warm memories of love and laughter shared over sweet flavors. I’m thrilled to share this recipe with all of you, hoping you can create your own beautiful memories in the kitchen!
Ingredients
Here’s what you’ll need to make the most delicious Chocolate Zucchini Cake:
-
Zucchini (2 cups, grated)
Fresh and vibrant, zucchini keeps the cake moist. You can also use yellow squash if zucchini is not available. Don’t worry; you won’t taste the veggies! -
All-Purpose Flour (1 ¾ cups)
The backbone of every cake! For a gluten-free version, try almond flour or a gluten-free blend. -
Unsweetened Cocoa Powder (¾ cup)
This adds that deep chocolate flavor. Make sure to use unsweetened for the right balance of sweetness. -
Granulated Sugar (1 cup)
The sweetness! You can substitute with coconut sugar or a sugar alternative like Splenda if you’re watching your sugar intake. -
Brown Sugar (½ cup)
Adding brown sugar gives that lovely caramel-like richness. It can be replaced with more granulated sugar or a sugar substitute. -
Baking Soda (1 tsp)
Helps the cake rise beautifully. Ensure it’s fresh for the best results! -
Baking Powder (½ tsp)
Also aids in leavening. Check the expiration date—the fizz should bubble up right away when mixed with wet ingredients. -
Salt (½ tsp)
Balances the sweetness and enhances flavor. Don’t skip this step! -
Vegetable Oil (½ cup)
This keeps the cake moist and tender. If you prefer, you can use melted coconut oil or applesauce for a healthier twist. -
Eggs (2 large)
Bind everything together and provide structure. To make it vegan, substitute with flax eggs (1 tbsp ground flaxseed + 2.5 tbsp water = 1 egg). -
Vanilla Extract (2 tsp)
Enhances all the flavors! Always choose pure vanilla extract for the best taste. -
Chocolate Chips (1 cup, optional)
For that extra chocolatey goodness! Semi-sweet, dark, or even white chocolate chips work perfectly.
Step-by-Step Instructions
Now, let’s get to the fun part! Follow these steps, and you’ll have a scrumptious Chocolate Zucchini Cake on your hands in no time!
-
Preheat Your Oven
Preheat your oven to 350°F (175°C). This sets the stage for baking perfection. -
Prepare Your Baking Pan
Grease a 9×13 inch baking pan (or two 9-inch round pans for a layered cake) with cooking spray or butter. You might like to line it with parchment paper for easy removal. Trust me, you want every piece to come out perfectly! -
Grate the Zucchini
Wash and dry your zucchini first. Grab a box grater, and grate the zucchini using the large holes. It should yield about 2 cups. No need to squeeze out excess moisture; it helps keep the cake moist! -
Mix Dry Ingredients
In a large mixing bowl, whisk together the flour, cocoa powder, baking soda, baking powder, and salt. Make sure these dry ingredients are well mixed to ensure an even rise. Pro tip: sift the cocoa powder to avoid any lumps. -
Mix Wet Ingredients
In another bowl, whisk together the granulated sugar, brown sugar, and oil until smooth. Add the eggs and vanilla extract and mix until well-combined. -
Combine Wet and Dry Mixtures
Pour the wet ingredients into the bowl with the dry ingredients. Gently fold them together with a spatula until just combined. Be careful not to overmix; a few lumps are okay! -
Add the Zucchini and Chocolate Chips
Fold in the grated zucchini and chocolate chips until they are evenly distributed in the batter. This is where the magic happens! That zucchini is going to make your cake so moist. -
Pour the Batter
Pour the batter into your prepared baking pan, smoothing it out with a spatula. Give it a gentle shake to level it. -
Bake!
Place the pan in the preheated oven and bake for 30-35 minutes, or until a toothpick inserted into the center comes out clean. If you’re using round pans, keep an eye on them; they might bake a bit faster. -
Cool the Cake
Once baked, allow the cake to cool in the pan for about 10-15 minutes. Run a knife around the edges before transferring it to a wire rack to cool completely. -
Frost if Desired
Once completely cool, you can frost it with your favorite chocolate frosting or simply dust it with powdered sugar. -
Serve and Enjoy!
Cut into squares (or slices) and serve to your friends and family. Don’t forget to grab a piece for yourself and enjoy the chocolatey goodness you’ve just created!
Serving Suggestions
This Chocolate Zucchini Cake is fabulous on its own, but to elevate it even more, consider serving it warm with a scoop of vanilla ice cream on the side. A drizzle of chocolate sauce or caramel can also take it to the next level for those extra chocolate cravings!
Recipe Variations
- Spiced Chocolate Zucchini Cake: Add a teaspoon of cinnamon and a pinch of nutmeg to the batter for a cozy fall spice flavor.
- Zucchini Chocolate Muffins: Use the same batter but pour it into a muffin tin for delightful individual servings.
- Nutty Addition: Stir in some chopped walnuts or pecans for a delightful crunch alongside the chocolate.
- Vegan Option: Swap eggs with flax eggs and use a vegan chocolate for a delicious vegan treat.
- Fruity Twist: Mix in some fresh raspberries or cherries for a fruity surprise!
Chef’s Notes
This Chocolate Zucchini Cake recipe has lived through quite a journey! The original inspiration came from my grandmother, but over the years, I’ve tweaked the ratio of ingredients and added chocolate chips for extra indulgence. I remember the first time I took this cake to a gathering; I was so nervous. But after the first slice was served, it was gone in minutes, and I was dubbed the “Zucchini Cake Queen” of my friends!
Baking, for me, is much more than just a process; it’s about bringing joy, memories, and deliciousness into the lives of those we love. Enjoy this recipe and make it your own!
FAQs and Troubleshooting
-
My cake is too dry. What did I do wrong?
Make sure you measure your flour correctly; too much flour can lead to a dry cake. Also, keep an eye on your baking time! -
Can I make this in advance?
Absolutely! This cake holds up wonderfully, and you can store it in an airtight container for up to 3 days. You can also freeze it for up to 3 months. -
What if my zucchini is very watery?
If your zucchini seems overly watery, you could lightly squeeze some moisture out, but it’s generally fine to use without draining. The extra moisture will result in a beautifully moist cake. -
How do I know when my cake is done?
Use a toothpick! Insert it into the center of the cake — if it comes out clean or with a few moist crumbs, your cake is ready. If it has wet batter on it, give it a few more minutes.
Nutritional Info
While I believe in indulging in treats, it’s always good to be aware of the nutritional content. A typical slice of Chocolate Zucchini Cake (without frosting) contains approximately:
- Calories: 230
- Fat: 10g
- Protein: 3g
- Carbohydrates: 34g
- Fiber: 2g
- Sugars: 18g
Remember, this is an estimate and can vary based on specific ingredients and serving sizes.
Now that you have this delightful Chocolate Zucchini Cake recipe in your arsenal, I can’t wait for you to try it! Happy baking, and may your kitchen always be filled with warmth and the smell of deliciousness!
Print
Chocolate Zucchini Cake
- Total Time: 50 minutes
- Yield: 12 servings 1x
- Diet: Vegetarian
Description
Indulge in a moist and decadent Chocolate Zucchini Cake that combines rich chocolate flavors with the unexpected freshness of zucchini.
Ingredients
- 2 cups Zucchini, grated
- 1 ¾ cups All-Purpose Flour
- ¾ cup Unsweetened Cocoa Powder
- 1 cup Granulated Sugar
- ½ cup Brown Sugar
- 1 tsp Baking Soda
- ½ tsp Baking Powder
- ½ tsp Salt
- ½ cup Vegetable Oil
- 2 large Eggs
- 2 tsp Vanilla Extract
- 1 cup Chocolate Chips, optional
Instructions
- Preheat your oven to 350°F (175°C).
- Prepare a 9×13 inch baking pan (or two 9-inch round pans) with cooking spray or butter.
- Grate the zucchini using a box grater to yield about 2 cups.
- Mix the flour, cocoa powder, baking soda, baking powder, and salt in a large bowl.
- Mix together the granulated sugar, brown sugar, and oil until smooth in another bowl.
- Add the eggs and vanilla extract and mix until well-combined.
- Combine the wet ingredients into the dry ingredients, folding until just combined.
- Fold in the grated zucchini and chocolate chips until evenly distributed.
- Pour the batter into the prepared pan, smoothing it out.
- Bake for 30-35 minutes until a toothpick comes out clean.
- Cool the cake in the pan for 10-15 minutes before transferring to a wire rack.
- Frost if desired or serve dusted with powdered sugar.
- Serve and enjoy!
Notes
For a gluten-free version, try almond flour or a gluten-free blend. Can be stored in an airtight container for up to 3 days or frozen for up to 3 months.
- Prep Time: 15 minutes
- Cook Time: 35 minutes
- Category: Dessert
- Method: Baking
- Cuisine: American
Nutrition
- Serving Size: 1 slice
- Calories: 230
- Sugar: 18g
- Sodium: 150mg
- Fat: 10g
- Saturated Fat: 1g
- Unsaturated Fat: 9g
- Trans Fat: 0g
- Carbohydrates: 34g
- Fiber: 2g
- Protein: 3g
- Cholesterol: 25mg
Keywords: chocolate cake, zucchini cake, dessert, baking, moist cake

Lemon Cottage Cheese Pudding
The Zesty Delight of Lemon Cottage Cheese Pudding: A Sweet Escape
Hey there, fellow food lovers! Welcome back to my kitchen. Today, we’re diving into a delightful little dessert that’s not only bursting with flavor but also carries a silky, creamy texture that will have your taste buds dancing: Lemon Cottage Cheese Pudding. Yes, you heard it right! This is not just any pudding; it’s a luscious blend of tangy lemon and smooth cottage cheese that will remind you of sunny days and happy gatherings.
Every time I whip up this simple yet inventive dish, I’m taken back to lazy summer afternoons spent in my grandmother’s sunlit kitchen. The zest of fresh lemons filled the air as we mixed our ingredients, and laughter echoed around us. This recipe holds so much nostalgia for me—it’s the perfect blend of comfort and brightness. And guess what? It’s a breeze to make!
Whether you’re hosting a brunch, treating your sweet tooth after a long day, or just trying to impress your friends with a unique dessert, this pudding is your new best friend. Filled with protein and made with wholesome ingredients, it’s a sweet escape that feels indulgent without packing on the guilt. Ready to take a trip down memory lane and create some new delicious moments? Let’s get started!
Personal Story: A Sweet Memory
My journey with lemon pudding began when I was a little girl standing on a stool, precariously reaching for the mixing bowl on the counter. My grandmother, a culinary wizard in her own right, was teaching me the art of balance—life and flavor. Lemon Cottage Cheese Pudding was our go-to dish for family get-togethers.
I can still picture her vibrant yellow apron, flour dust swirling in the air as she squeezed fresh lemons while sharing stories of her childhood. Each bite of that pudding was like a burst of sunshine! We often served it chilled with a sprinkle of crushed graham crackers on top, giving it that perfect contrast of textures.
The flavors and memories melded into one perfect bite, sparking joy not just for us but for everyone who got to enjoy it! As I got older, I carried on this tradition, adapting the recipe here and there while staying true to the fundamental charm it had in my grandmother’s kitchen. Today, I’m excited to share this beloved recipe with you, along with some personal twists I’ve designed to make it your own.
Ingredients
Let’s gather our ingredients to create this delectable lemon cottage cheese pudding! Here’s what you’ll need:
-
Cottage Cheese (2 cups): The backbone of our pudding! It adds creaminess and a delightful flavor. If you’re after a smoother texture, opt for small or blended cottage cheese. You can substitute with Greek yogurt for a tangier kick.
-
Fresh Lemons (2 large): Using fresh lemons adds vibrant flavor and zest to the pudding. If you’re in a pinch, bottled lemon juice works, but fresh is always best!
-
Granulated Sugar (½ cup): This sweetens the tartness of the lemon. For a twist, consider using honey or maple syrup as a natural sweetener!
-
Vanilla Extract (1 teaspoon): A hint of vanilla elevates the flavor profile. Feel free to swap in almond extract for a nutty undertone!
-
Cornstarch (2 tablespoons): This helps set the pudding and give it that delightful pudding-like consistency. If you’re in need of a gluten-free alternative, arrowroot powder works great!
-
Milk (½ cup): A splash of milk helps blend everything smoothly. You can use almond milk, oat milk, or any dairy-free alternative for a vegan version.
-
Salt (a pinch): Don’t forget this! It balances the sweetness and enhances the overall flavor.
Ready to create some magic? Let’s jump into the cooking process!
Step-by-Step Instructions
Step 1: Prep Your Ingredients
Start by gathering all your ingredients so they’re within arm’s reach. Take a moment to slice your lemons and extract their juice—aim for about ¼ cup of fresh lemon juice. Zesting a lemon can add an extra zing, so don’t shy away from that colorful yellow skin!
Step 2: Blend the Cottage Cheese
In a blender or food processor, toss in the cottage cheese along with the lemon juice, zest, vanilla extract, and sugar. Blend until you achieve a smooth, creamy consistency. This will be your flavorful base! If you find the mixture a bit thick, add a splash more milk until it’s silky.
Chef’s Tip: Taste the mixture before moving on! Adjust the sweetness or tartness to your liking. Want more lemon? Squeeze it in!
Step 3: Prepare the Pudding Mixture
In a small saucepan over medium heat, combine the blended cottage cheese mixture with cornstarch and a pinch of salt. Stir continuously until the mixture begins to thicken, about 5-7 minutes. Be careful not to let it boil; you’re looking for a gently steaming mix!
Chef Hack: Whisking is your best friend here! It helps incorporate air, giving the pudding a lightness while eliminating any lumps.
Step 4: Chill the Pudding
Once it’s thickened up nicely, remove it from heat and transfer it to serving cups or a large bowl. Cover with plastic wrap, pressing it directly onto the pudding’s surface to prevent a skin from forming, and let it chill in the fridge for at least 2 hours (or overnight for the best flavor).
Chef Insight: This pudding is great for meal prep! Make it a day in advance, and let those flavors meld together in the fridge.
Step 5: Serve and Enjoy
When you’re ready to serve, remove the pudding from the fridge and give it a quick stir. Optionally, you can garnish with fresh berries, crushed graham crackers, or even a sprig of mint for that extra pop!
Serving Suggestions
To plate your Lemon Cottage Cheese Pudding, scoop it into individual servings for a lovely presentation. Top with a sprinkling of lemon zest and fresh fruit, or even a dollop of whipped cream—if you’re feeling indulgent! This way, each bite is a refreshing explosion of flavor and creaminess.
You can also serve it as part of a brunch spread or alongside a delicious handmade cake for a delightful dessert platter!
Recipe Variations
Want to shake things up a bit? Here are some creative variations to consider:
-
Berry Bliss: Fold in fresh strawberries, blueberries, or raspberries for a fruity twist. You can even create a berry compote to drizzle on top!
-
Chocolate Lover’s Delight: Add a tablespoon of cocoa powder for a chocolatey version, or fold in mini chocolate chips.
-
Coconut Classic: Mix in shredded coconut and a splash of coconut milk for a tropical flair.
-
Herbal Infusion: Consider blending in some fresh chopped herbs like basil or mint for a unique, refreshing touch.
-
Spice It Up: A dash of cinnamon or nutmeg can provide unexpected warmth to your pudding!
Chef’s Notes
This recipe has traveled with me through many kitchen adventures! I’ve swapped ingredients, played with flavors, and even made it for various dietary needs. It started as a simple family recipe, and over the years, it has become a crowd favorite at gatherings.
One of my favorite moments was when I hosted a potluck and someone insisted it wasn’t cottage cheese in the dessert. Pleasingly surprised, they left with the recipe—You’d be amazed at how many people are turned off by cottage cheese until they give it a try!
FAQs and Troubleshooting
Q: Can I use low-fat cottage cheese for this recipe?
Yes, you can! Just keep in mind that the pudding may have a slightly different texture, but it will still be delicious.
Q: How long does this pudding keep in the fridge?
Stored properly in an airtight container, this pudding can keep for about 3-5 days. Just remember to give it a stir before serving if it thickens!
Q: Can I freeze the pudding?
While you technically can freeze it, the texture might change once thawed. It’s best enjoyed fresh!
Q: What if my pudding didn’t thicken?
If your pudding doesn’t thicken, it might be due to not cooking long enough or not enough cornstarch. Next time, ensure to stir continuously and follow the cooking time closely. You can always whisk a bit more cornstarch in a little milk and bring it back to the heat.
Nutritional Info (optional)
While the exact nutritional content can vary based on your ingredient choices, here’s a rough estimate for one serving (makes about 4):
- Calories: 120
- Protein: 10g
- Fat: 5g
- Carbohydrates: 12g
- Sugar: 7g
And there you have it! Lemon Cottage Cheese Pudding is not just a dessert; it’s a celebration of flavors and memories. I hope you enjoy making it as much as I do. Feel free to improvise and make it your own, turning it into a memorable treat for you and your loved ones. Let me know how it turns out, and happy cooking!
Print
Lemon Cottage Cheese Pudding
- Total Time: 120 minutes
- Yield: 4 servings 1x
- Diet: Vegetarian
Description
A delightful lemon cottage cheese pudding that combines tangy lemon with creamy cottage cheese for a refreshing dessert.
Ingredients
- 2 cups Cottage Cheese
- 2 large Fresh Lemons
- ½ cup Granulated Sugar
- 1 teaspoon Vanilla Extract
- 2 tablespoons Cornstarch
- ½ cup Milk
- a pinch Salt
Instructions
- Prep your ingredients by slicing the lemons and extracting the juice.
- Blend the cottage cheese, lemon juice, zest, vanilla extract, and sugar until smooth.
- Prepare the pudding mixture by combining the blended mixture with cornstarch and salt in a saucepan and heat until thickened.
- Chill the pudding in the fridge for at least 2 hours.
- Serve the pudding in cups, garnished with fresh fruit or crushed graham crackers.
Notes
Feel free to experiment by adding fresh fruit, chocolate, or spices to the pudding.
- Prep Time: 15 minutes
- Cook Time: 7 minutes
- Category: Dessert
- Method: Chilling
- Cuisine: American
Nutrition
- Serving Size: 1 serving
- Calories: 120
- Sugar: 7g
- Sodium: 200mg
- Fat: 5g
- Saturated Fat: 2g
- Unsaturated Fat: 3g
- Trans Fat: 0g
- Carbohydrates: 12g
- Fiber: 0g
- Protein: 10g
- Cholesterol: 15mg
Keywords: dessert, lemon pudding, cottage cheese, refreshing dessert, summer treat


