
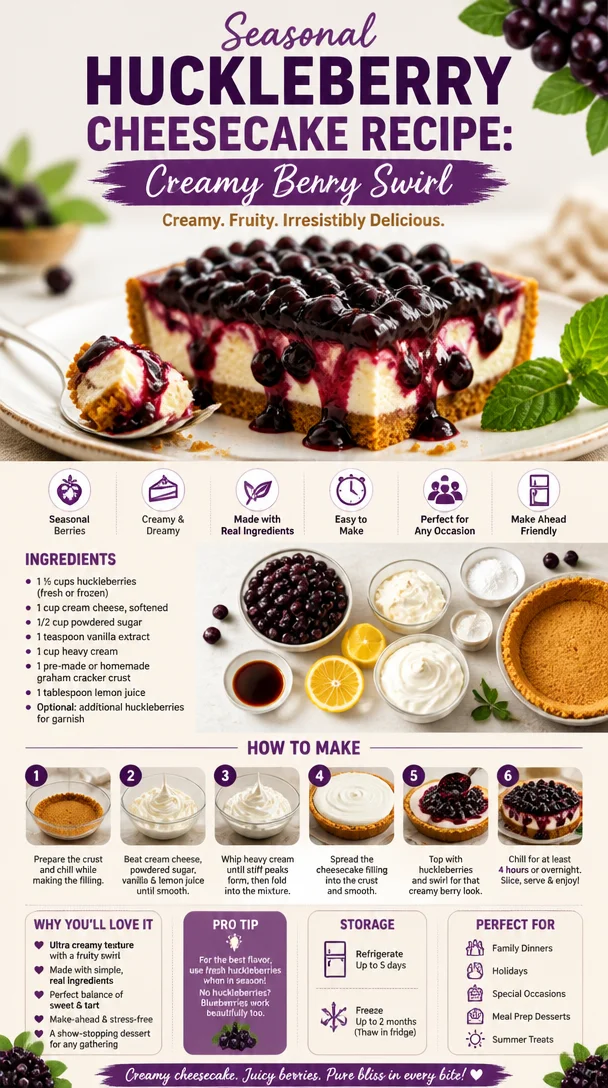
Seasonal Huckleberry Cheesecake Recipe: Creamy Berry Swirl
The Creamy Delight of Huckleberry Cheesecake: A Slice of Sweet Nostalgia
Welcome to my cozy little corner of the culinary world! Today, we’re diving into a dessert that not only delights the taste buds but also stirs up warm memories—the luscious Huckleberry Cheesecake. This dessert combines the creamy richness of cheesecake with the vibrant, slightly tangy flavor of huckleberries, creating a heavenly experience in every bite.
For me, cheesecake has always held a special place in my heart. It’s not just a dessert; it’s a celebration of family gatherings, summer picnics, and holidays filled with laughter and love. And when huckleberries—the little gems of the forest—are thrown into the mix, everything feels just a bit more magical. So grab a comfy seat, a cup of coffee, and let’s embark on a sweet journey together!
A Slice of Memory
Growing up, my summers were always filled with adventures in the wild. One of my favorite activities was berry picking with my grandmother. We would rise early in the morning, armed with buckets and excitement, heading into the woods to find the sweetest huckleberries. The thrill of spotting those dark purple berries among the green bushes was exhilarating!
After hours spent in the sun, we’d return home with our treasures. My grandmother would whip up the most delightful huckleberry cheesecake that I’ve ever tasted. It wasn’t just about the flavors, it was about the love and laughter shared in her kitchen. I remember her saying, “Cooking is about making memories as much as it is about the food.” Now, every time I make this Huckleberry Cheesecake, I can still hear her laughter and the sound of us reminiscing about our berry-picking adventures. It’s a dish that connects generations and fills the kitchen with warmth.
Ingredients
Let’s gather our ingredients for this dreamy Huckleberry Cheesecake. Each plays a key role in creating that perfect balance of creamy and fruity:
-
Huckleberries (2 cups)
Fresh or frozen will work! If you can’t find huckleberries, blueberries or blackberries make great substitutes. -
Cream Cheese (16 oz)
Make sure it’s softened for easy blending! Neufchâtel cheese can be a lighter alternative. -
Granulated Sugar (1 cup)
Sweetness is adjustable! Feel free to use coconut sugar or a sugar substitute for a healthier choice. -
Sour Cream (1 cup)
This adds richness and a delightful tang. Greek yogurt is a great substitute if you’d like a lighter version. -
Eggs (3 large)
They bind everything together. For a vegan option, consider using a flaxseed meal or aquafaba. -
Vanilla Extract (1 tablespoon)
The star seasoning! Use pure vanilla extract for the best flavor, or experiment with almond extract for a unique twist. -
Graham Cracker Crumbs (1 ½ cups)
This will be the base! If you want gluten-free, graham crackers made from almond flour are a fine alternative. -
Butter (½ cup, melted)
This is crucial for binding those crumbs. Coconut oil can be an excellent dairy-free replacement.
Step-by-Step Instructions
Now, let’s roll up our sleeves and make this scrumptious Huckleberry Cheesecake! Don’t worry; I’ll guide you through every step with a few tips and tricks along the way.
-
Preheat the Oven
Start by preheating your oven to 325°F (160°C). A preheated oven ensures an even baking process, crucial for that creamy texture! -
Make the Crust
In a bowl, combine your graham cracker crumbs and melted butter. Mix until the crumbs are evenly coated. Press the mixture into the bottom of a springform pan to create a solid base. Tip: Use the bottom of a measuring cup to pack it down tightly for a sturdy crust! -
Prepare the Filling
In a large mixing bowl, beat the softened cream cheese until it’s smooth and creamy. Gradually add in the sugar while continuing to mix until well combined. Add sour cream, vanilla extract, and eggs one at a time, blending after each addition until completely incorporated. Quick hack: Scrape down the sides of the bowl regularly to ensure everything gets mixed evenly! -
Fold in the Huckleberries
Gently fold in your huckleberries, being careful not to crush them too much. The goal is to maintain their shape and the burst of flavor they bring! Tip: If using frozen huckleberries, do not thaw them beforehand to prevent bleeding into the cheesecake. -
Pour and Bake
Pour the filling over your prepared crust, smoothing out the top. Bake in the preheated oven for about 50-60 minutes, or until the edges are set and the center has a slight jiggle. Keep an eye on it in the last few minutes to avoid overbaking! -
Cool and Chill
Once baked, turn off the oven and let the cheesecake cool inside for about an hour. This helps prevent cracking. After that, refrigerate for at least 4 hours (or overnight for the best flavor) until fully chilled and set. Pro tip: Cheesecake is even better the next day!
Serving Suggestions
When serving your Huckleberry Cheesecake, consider a few fun touches to enhance its presentation:
-
Fresh Huckleberries: Scatter a handful of fresh huckleberries on top for that vibrant, picturesque look.
-
Whipped Cream: A dollop of lightly sweetened whipped cream adds a lightness that perfectly complements the rich cheesecake.
-
Mint Leaves: A few sprigs of fresh mint can elevate your dish, adding a pop of color and freshness.
Recipe Variations
Here are some creative spins if you’re in the mood to mix things up:
-
Chocolate Huckleberry: Add a cup of melted dark chocolate to the cheesecake filling for a rich chocolatey flavor.
-
Lemon Zing: Incorporate the zest of one lemon for a bright, citrusy note that complements the huckleberries beautifully.
-
Nutty Add-In: Mix in some chopped pecans or walnuts into the crust for added crunch and flavor.
-
Gluten-Free Option: Swap out the graham crackers for gluten-free cookies or almond flour for the crust.
Chef’s Notes
You know, the best part about this recipe is its flexibility. If you have leftover berries from your last adventure, toss them in! I remember one summer, we had an abundance of huckleberries, and I ended up making huckleberry jam, huckleberry muffins, and of course, this cheesecake multiple times. It became a ritual every Sunday afternoon—a little slice of heaven to share with family.
Also, don’t fret if your cheesecake cracks! It’s still going to taste fantastic, and those cracks will be covered by whipped cream and huckleberries anyway! Just remember, love is the secret ingredient in cooking.
FAQs and Troubleshooting
-
Why did my cheesecake crack?
Cheesecakes can crack if they bake too long or at too high of a temperature. To avoid this, keep an eye on it and use a water bath for moist baking. -
How do I know when my cheesecake is done?
The edges should look set, yet the center will have a slight jiggle. It’ll firm up as it cools! -
Can I make this ahead of time?
Absolutely! In fact, cheesecake often tastes better the next day. Just store it in the fridge, and you’re good to go. -
How should I store leftovers?
Cover tightly and store in the refrigerator for up to a week. It can also be frozen for up to a month—just make sure to thaw it overnight in the fridge before enjoying!
Nutritional Info
While it’s best to enjoy desserts like this in moderation, here’s a general idea of what you’re serving up (per slice)**:
- Calories: 350
- Carbohydrates: 32g
- Protein: 6g
- Fat: 24g
- Sugar: 22g
So there you have it! A delightful, nostalgic journey into the heart of my favorite Huckleberry Cheesecake. Whether you’re serving it at your next gathering or simply indulging yourself (I won’t tell!), it’s bound to become a cherished recipe in your kitchen as it is in mine. Happy baking, dear friends, and may your kitchen be filled with laughter and love!
Print
Huckleberry Cheesecake
- Total Time: 80 minutes
- Yield: 8 servings
- Diet: Vegetarian
Description
A luscious cheesecake with creamy richness and vibrant huckleberry flavor, evoking sweet memories of family gatherings and berry picking.
Ingredients
- Huckleberries (2 cups)
- Cream Cheese (16 oz, softened)
- Granulated Sugar (1 cup)
- Sour Cream (1 cup)
- Eggs (3 large)
- Vanilla Extract (1 tablespoon)
- Graham Cracker Crumbs (1 ½ cups)
- Butter (½ cup, melted)
Instructions
- Preheat the oven to 325°F (160°C).
- Combine graham cracker crumbs and melted butter in a bowl.
- Press the mixture into the bottom of a springform pan to create a solid base.
- Beat the softened cream cheese in a large mixing bowl until smooth.
- Gradually add sugar and mix until well combined.
- Add sour cream, vanilla extract, and eggs one at a time, blending after each addition.
- Fold in the huckleberries gently.
- Pour the filling over the prepared crust and smooth out the top.
- Bake for about 50-60 minutes until edges are set and center has a slight jiggle.
- Cool in the oven for one hour before refrigerating for at least 4 hours.
Notes
For a vegan option, use flaxseed meal or aquafaba instead of eggs. If using frozen huckleberries, do not thaw before adding to the filling.
- Prep Time: 20 minutes
- Cook Time: 60 minutes
- Category: Dessert
- Method: Baking
- Cuisine: American
Nutrition
- Serving Size: 1 slice
- Calories: 350
- Sugar: 22g
- Sodium: 300mg
- Fat: 24g
- Saturated Fat: 12g
- Unsaturated Fat: 8g
- Trans Fat: 0g
- Carbohydrates: 32g
- Fiber: 1g
- Protein: 6g
- Cholesterol: 80mg
Keywords: cheesecake, huckleberry dessert, nostalgic recipe, family recipe, American dessert
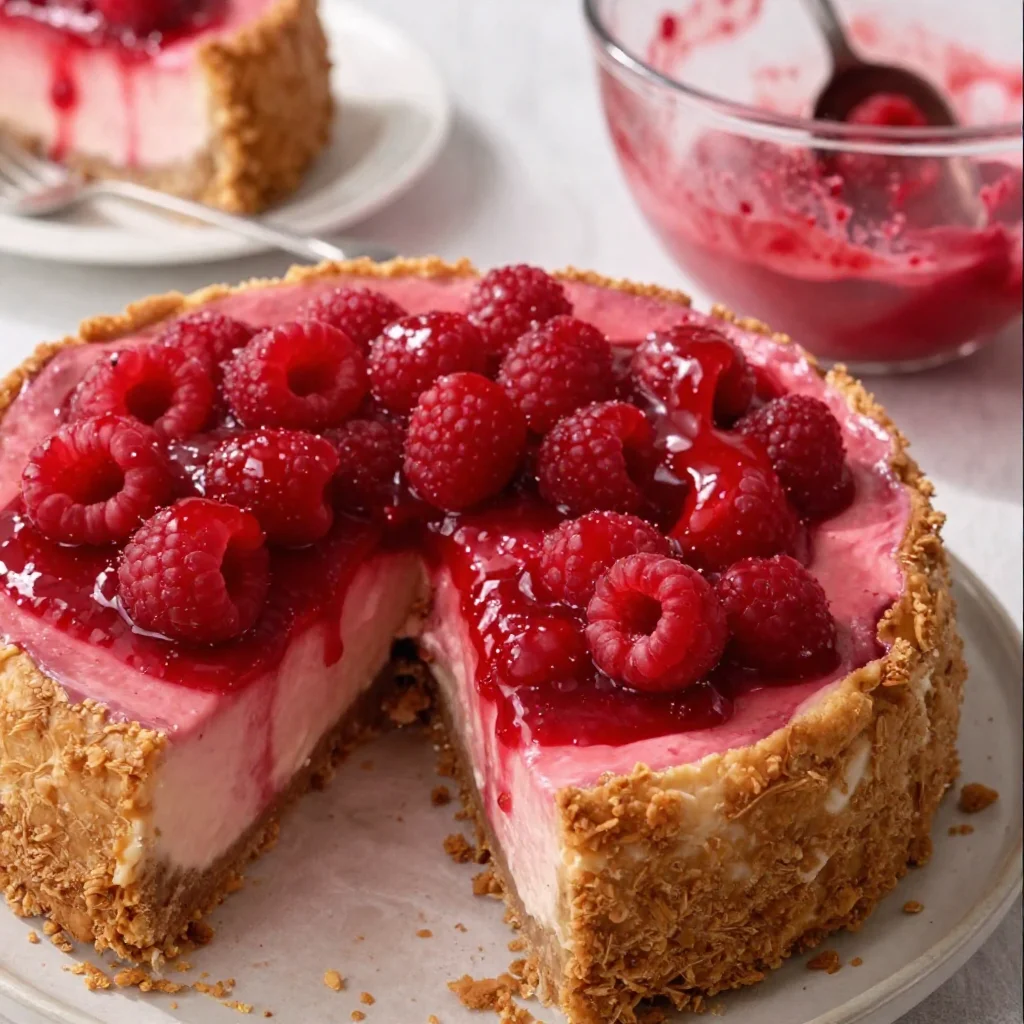
Easy Baked Raspberry Cheesecake
Easy Baked Raspberry Cheesecake: Your New Go-To Dessert
Welcome to my cozy kitchen! Today, we’re diving into a delightful treat that’s sure to steal the hearts of your friends and family: Easy Baked Raspberry Cheesecake. Oh, the joy of cheesecake—smooth, creamy, and oh-so-decadent! The best part? It’s surprisingly simple to whip up, even on those busy weeknights when you just want to treat yourself (or someone special).
For me, baking is more than just a task; it’s a form of self-expression and a way to connect with the people I love. There’s something magical about the smell of something sweet wafting from the oven, drawing everyone to the kitchen like bees to honey. As I’m prepping this cheesecake, I can practically hear the giggles and conversations bubbling and swirling around me, and that’s when I know it’s time to share a slice.
I want you to experience that same joy and love when you bake this cheesecake. With every layer and every step, we’ll turn simple ingredients into an unforgettable dessert that’s both elegant for entertaining and comforting for a cozy night in. So, grab your apron (mine might be a little messy, but that’s called character!), and let’s get started on this delicious journey together!
A Sweet Memory: My First Cheesecake
Ah, cheesecake—my love affair with this dessert dates back to childhood. I still vividly remember the first time I helped my mom make a cheesecake for a family gathering. I was about eight years old, perched on a kitchen stool, my little hands dripping in batter. I can still picture the moment when I excitedly blended the cream cheese, sugar, and eggs—all while my mom guided me with her patient words. We used a simple vanilla base, but what I remember most vividly was the feeling of joy and love that pulsed between us in that warm kitchen.
Years later, I found my way to using tangy raspberries to add a delightful twist. Raspberries have always been one of my favorites—sweet yet slightly tart, adding a perfect zing that brightens up any dish. Fast forward, and this Easy Baked Raspberry Cheesecake has become a family staple at gatherings, embodying those early lessons my mom taught me: laughter, patience, and sharing good food with the people you love.
Ingredients
Here’s a rundown of what you’ll need to create your own slice of cheesecake heaven:
-
Graham cracker crumbs (1 ½ cups)
A classic base for any cheesecake, the crispy texture provides a delightful crunch. If you’re trying to avoid glutin or want a healthier option, feel free to use almond flour or gluten-free cookies as a substitute. -
Unsalted butter (½ cup)
Melted butter holds the crust together and adds richness. If you’re looking for a dairy-free option, coconut oil works wonders here, giving a slightly different (but delightful) flavor. -
Cream cheese (24 oz, softened)
This is the star of our show! Make sure your cream cheese is at room temperature for a super smooth and creamy filling. Alternatively, ricotta cheese can be blended in for a lighter texture. -
Granulated sugar (1 cup)
The sugar balances out the rich creaminess. If you’re watching your sugar intake, you might try using coconut sugar or a sugar substitute, but keep in mind the flavor might differ a bit. -
Sour cream (1 cup)
Adds tanginess and creaminess! Greek yogurt is a fantastic alternative, and it’ll give you a slightly different flavor while keeping it creamy. -
Eggs (3 large)
These bind everything together and create that dreamy texture. For a vegan option, you can experiment with flax eggs (1 tablespoon ground flaxseed mixed with 2.5 tablespoons of water equals one egg). -
Vanilla extract (1 tablespoon)
A classic flavor enhancer! You can also use almond or peppermint extract for an exciting twist. -
Fresh raspberries (1 cup)
These beauties add flavor and color. If they’re out of season, frozen raspberries work just as well—just make sure to thaw and drain them before mixing! -
Optional: powdered sugar (for dusting)
Just a light dusting on top before serving adds the perfect finishing touch!
Step-by-Step Instructions
Let’s jump into the fun part! Grab your mixing bowls, and let’s create some dessert magic.
-
Preheat your oven to 325°F (160°C)
The first step is always the most important! Preheating ensures even baking and a perfectly set cheesecake. Trust me, there’s nothing worse than a cheesecake that hasn’t fully baked. -
Make the crust
- In a mixing bowl, combine graham cracker crumbs and melted butter until well mixed. You want it to feel like wet sand—moist enough to hold together. If it’s too crumbly, just add a little more melted butter.
- Press the mixture firmly into the bottom of a springform pan (9 inches works perfectly). Don’t be shy! You want a firm base—use the bottom of a measuring cup for an even finish.
-
Bake the crust
- Pop that crust into the preheated oven for 10 minutes until it’s lightly golden. This step is crucial—it gives the crust a nice crunch and locks in the flavor.
-
Prepare the filling
- In a large mixing bowl, add your softened cream cheese. Use a hand mixer or a stand mixer on medium speed to cream it until it’s super smooth! Scrape down the sides to ensure everything is blended.
- Gradually add the granulated sugar and mix until it’s fully incorporated. Can you smell that sweet goodness already?
- Beat in the sour cream, eggs, and vanilla extract one at a time, mixing just until combined after each addition. Remember, overmixing can lead to cracks in your cheesecake. Yikes!
-
Fold in the raspberries
- Gently fold in your fresh or thawed raspberries. You want to distribute them evenly without breaking them up too much—those little bursts of flavor are what makes this cheesecake special!
-
Pour the filling
- Carefully pour your luscious filling over the pre-baked crust, leveling it out with a spatula. This step is crucial—make it as smooth as possible for that picture-perfect finish!
-
Bake the cheesecake
- Bake in the oven for about 50-60 minutes until the edges are set but the center is still a little jiggly. It will continue to firm up as it cools.
-
Cool and chill
- When the cheesecake is done, turn off the oven and crack the oven door open, letting the cheesecake cool slowly. This will help prevent cracking! After about an hour, cover it and let it chill in the fridge for at least 4 hours (or overnight for best results).
-
Serve and enjoy
- Once chilled, remove from the springform pan, dust with powdered sugar if desired, and slice it up. Each piece should have that beautiful raspberry swirl—just like a work of art!
Serving Suggestions
When it comes to serving this gorgeous cheesecake, keep it simple to let the flavors shine. You can plate it alongside a small scoop of vanilla ice cream or whipped cream for that extra indulgence. Don’t forget to garnish with a few fresh raspberries on top and a sprig of mint for that gorgeous pop of color! Setting the scene at your dining table with soft lighting and cozy napkins will make it a memorable experience. Here’s to sweet moments with loved ones!
Recipe Variations
Now, if you’re feeling adventurous, here are a few variations to amp up your cheesecake game:
-
Chocolate Raspberry Cheesecake: Add half a cup of melted chocolate (dark or white) into the filling before baking for a decadent twist.
-
Lemon Zest: Incorporate the zest of one lemon into the filling for a refreshing citrusy flavor that pairs beautifully with raspberries.
-
Nutty Crust: Try using almond meal instead of graham cracker to create a gluten-free option, lending a unique flavor to your crust.
-
Swirled Raspberry Sauce: Drizzle raspberry sauce on top before baking for a stunning marbled effect.
-
Mixed Berries: Substitute or mix in blueberries or strawberries with raspberries for a delightful berry medley!
Chef’s Notes
Each time I make this Easy Baked Raspberry Cheesecake, I’m reminded of how versatile it is. My mom’s recipe has evolved over the years, adapting to my tastes and the seasons. Some days, I love adding hints of citrus, while others, I revel in chocolatey goodness. It’s all about experimenting with flavors! Plus, I have a little secret: if there’s any leftover cheesecake (which is rare!), it freezes beautifully! Just wrap individual slices tightly, and you’ll have instant treats ready whenever the craving strikes.
FAQs and Troubleshooting
Here are a few common questions you might have while making this cheesecake:
-
Why did my cheesecake crack?
Overmixing the batter or baking at too high a temperature can lead to cracks during cooling. Be gentle with the mixing and monitor the baking temperature closely! -
How do I know my cheesecake is done?
The edges should be set, while the center looks slightly jiggly. Remember that it continues to cook as it cools! -
Can I make this a day ahead?
Absolutely! In fact, it’s best served chilled overnight. Just cover it well to keep those flavors intact. -
What if I don’t have a springform pan?
You can use a regular round cake pan. Just make sure to line it with parchment paper for easy removal, or you can also convert this recipe into cupcake form for individual servings!
Nutritional Info
While I don’t typically dwell on the nitty-gritty of calories, here’s a quick glance at the estimated nutritional info for one slice (based on 12 servings):
- Calories: 300
- Total fat: 20g
- Saturated fat: 12g
- Carbohydrates: 30g
- Sugars: 18g
- Protein: 5g
With that said, enjoy in moderation—this cheesecake is all about celebrating special moments!
So there you have it, my friends! This Easy Baked Raspberry Cheesecake isn’t just a recipe; it’s a celebration of flavors, memories, and love. Each slice tells a story filled with warmth and joy, evoking laughter and connection. I can’t wait for you to try it and create your own memories in the kitchen. Happy baking, foodie friends!
Print
Easy Baked Raspberry Cheesecake
- Total Time: 80 minutes
- Yield: 12 servings
- Diet: Vegetarian
Description
A delightful and creamy raspberry cheesecake that’s simple to make and perfect for any occasion.
Ingredients
- Graham cracker crumbs (1 ½ cups)
- Unsalted butter (½ cup, melted)
- Cream cheese (24 oz, softened)
- Granulated sugar (1 cup)
- Sour cream (1 cup)
- Eggs (3 large)
- Vanilla extract (1 tablespoon)
- Fresh raspberries (1 cup)
- Powdered sugar (for dusting, optional)
Instructions
- Preheat your oven to 325°F (160°C).
- Combine graham cracker crumbs and melted butter until well mixed. Press the mixture into the bottom of a springform pan.
- Bake the crust in the oven for 10 minutes.
- Add softened cream cheese to a large mixing bowl and cream until smooth. Gradually add the granulated sugar and mix fully.
- Beat in the sour cream, eggs, and vanilla extract one at a time, mixing just until combined.
- Fold in the raspberries gently.
- Pour the filling over the pre-baked crust and level it out.
- Bake in the oven for about 50-60 minutes until the edges are set.
- Cool and chill the cheesecake for at least 4 hours in the fridge.
- Serve chilled, dusting with powdered sugar if desired.
Notes
This cheesecake can be made a day ahead for the best flavor. It can also be frozen for future treats.
- Prep Time: 20 minutes
- Cook Time: 60 minutes
- Category: Dessert
- Method: Baking
- Cuisine: American
Nutrition
- Serving Size: 1 slice
- Calories: 300
- Sugar: 18g
- Sodium: 400mg
- Fat: 20g
- Saturated Fat: 12g
- Unsaturated Fat: 8g
- Trans Fat: 0g
- Carbohydrates: 30g
- Fiber: 1g
- Protein: 5g
- Cholesterol: 80mg
Keywords: cheesecake, raspberry, dessert, baking, easy recipe
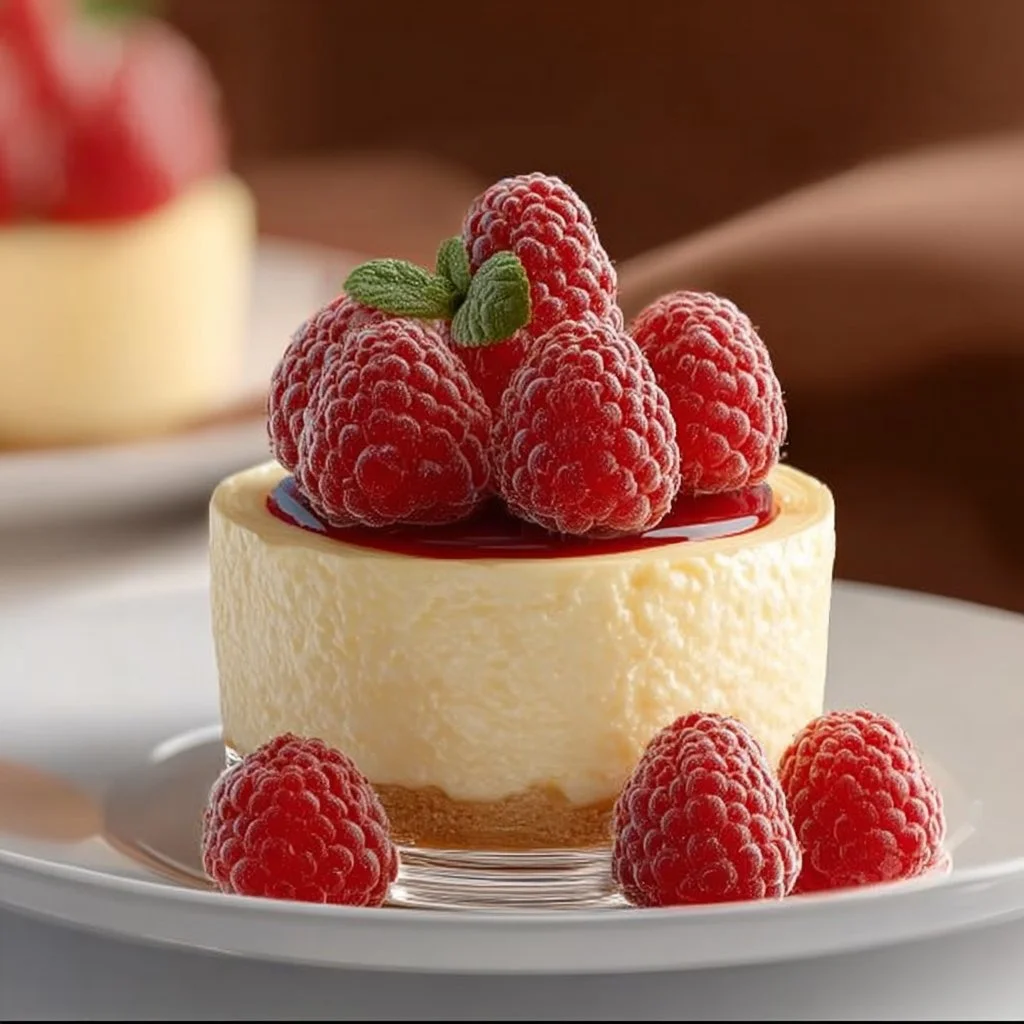
Cheesecake
The Ultimate Cheesecake Recipe: A Slice of Pure Heaven
Welcome to my kitchen! I’m so excited to share one of my all-time favorite desserts with you today — a delectable, creamy cheesecake that will have you swooning at the first bite. Cheesecake holds a special place in my heart, not just because of its rich flavor and velvety texture, but also due to the memories wrapped around it. Whether you’re celebrating a special occasion or simply treating yourself (because, why not?), this cheesecake is the perfect canvas for your creativity. Get ready to unleash your inner pastry chef!
A Slice of Nostalgia
Growing up, my family had a tradition where every birthday was marked with a homemade cheesecake, courtesy of my beloved grandmother. She had this special recipe that she perfected over the years, each layer telling a story of family love and culinary adventure. I still remember standing on a little stool beside her, trying to measure ingredients while she mixed them with effortless grace. The kitchen would fill with sweet scents, and I could hardly wait to dig in.
I’ll never forget one birthday when my grandma experimented by adding a swirl of blueberry compote on top. I watched in amazement as she transformed the classic cheesecake into something spectacular. That day, I learned that with a little creativity, you can make magic happen in the kitchen. Although she may have passed on her physical presence, her recipes and the feelings they evoke will always live on in my heart and in my kitchen.
Now, I want to share this magic with you through my own version of a classic cheesecake. With a few tips and tricks up my sleeve, you’ll be ready to impress your family and friends or just indulge all by yourself. Let’s get started!
Ingredients
Here’s what you’ll need to create this irresistible cheesecake:
-
Graham Cracker Crumbs:
- About 1.5 cups make for a crunchy, sweet base.
- Tip: You can substitute with digestive biscuits or even crushed Oreo cookies for a chocolatey twist.
-
Unsalted Butter:
- One third of a cup, melted.
- Chef Insight: Always use unsalted butter when baking; it allows you to control the salt content in your dish.
-
Cream Cheese:
- Two (8-ounce) packages, softened to room temperature.
- Tip: For a lighter version, you can use reduced-fat cream cheese, but it won’t be quite as creamy.
-
Granulated Sugar:
- One cup adds sweetness and balances the flavors.
- Substitution: Coconut sugar can be used for a unique flavor profile that’s less refined.
-
Sour Cream:
- ½ cup brings in a tangy edge that counteracts the sweetness.
- Tip: Greek yogurt can be a nice substitute here for a healthier option.
-
Vanilla Extract:
- Two teaspoons for that comforting aroma.
- Pro Tip: For an extra boost of flavor, use vanilla bean paste or the seeds from a real vanilla bean.
-
Eggs:
- Three large, room temperature, to help set the cheesecake.
- Note: You can use flax eggs for a vegan version, but texture might differ.
-
Zest of One Lemon:
- This is optional, but it brightens the flavors beautifully!
- Substitute: Orange zest can also provide a wonderful citrus twist.
Step-by-Step Instructions
-
Prepare the Crust:
- Begin by preheating your oven to 325°F (163°C).
- In a medium bowl, mix together the graham cracker crumbs and melted butter until the crumbs are well coated and hold together when pressed.
- Tip: If you’re feeling ambitious, toast the crumbs in the oven for about 5 minutes before adding the butter for an extra depth of flavor.
-
Form the Base:
- Press the crumb mixture firmly into the bottom of a 9-inch springform pan. Make sure it’s even and well packed. You can use a measuring cup or your fingers for this.
- Chef Hack: Use a flat-bottomed glass to compress the crust nicely for a smooth finish.
-
Make the Filling:
- In a large bowl, beat the softened cream cheese with a hand mixer until smooth and creamy.
- Gradually add the sugar, mixing well. Then, add the sour cream and vanilla extract, mixing until fully incorporated.
- Next, add the eggs one at a time, mixing on low speed just until combined after each addition.
- Important: Be careful not to overbeat. Too much air in your batter can lead to cracks!
-
Add Lemon Zest:
- Fold in the lemon zest if using, and ensure everything is mixed evenly.
-
Pour and Spread:
- Pour the filling over the crust, smoothing the top with a spatula to create an even layer.
- Tip: If you’re adding any toppings or swirls of flavor, gently fold them in at this stage for a marbled effect.
-
Bake:
- Bake in the preheated oven for about 50-60 minutes, or until the edges are set and the center has a slight jiggle.
- Chef Insight: To avoid cracks on top, place a shallow pan of water in the oven while it bakes; this helps to create steam.
-
Cool Down:
- Once done, turn off the oven and crack the door open, allowing the cheesecake to cool slowly for about an hour. This helps minimize cracking.
-
Chill in Fridge:
- After that, refrigerate it for at least four hours, although overnight is best for setting the flavors!
Serving Suggestions
When it’s time to serve your beautifully chilled cheesecake, try removing the sides of the springform pan carefully. A clean slice can be achieved by running a warm knife around the edges before cutting. Serve each slice on a plate, adorned with fresh berries, a dollop of whipped cream, or a drizzle of your favorite chocolate sauce. For crunch, consider sprinkling some crushed nuts or even more graham cracker crumbs.
Recipe Variations
-
Fruit Swirls: Incorporate strawberry, blueberry, or raspberry coulis for a fruity explosion.
-
Chocolate Lovers: Add melted chocolate to the filling or the crust for a chocolate cheesecake.
-
Nutty Delight: Instead of a graham cracker crust, use crushed nuts like almonds or pecans for an extra crunch and flavor.
-
Vegan Cheesecake: Use cashew cream, coconut cream, and flax eggs for an entirely plant-based version.
-
Flavored Cheesecakes: Experiment with matcha, pumpkin, or caramel cake flavored spin-offs to make seasonal cheesecakes.
Chef’s Notes
This recipe has evolved from my grandmother’s classic, but I’ve added my personal touches over the years. Sometimes, when I’m feeling bold, I throw in a splash of amaretto or Frangelico for a nutty flavor. Also, learn from my past mishaps! The first time I made this, I proudly served it only to realize I forgot to add the sugar. A sweet disaster, you could say! Now, I always double-check my ingredients.
FAQs and Troubleshooting
-
Why did my cheesecake crack?
- Cracking often occurs due to temperature changes. Make sure to cool it gradually in the oven, and avoid overmixing your batter.
-
Can I make it a day in advance?
- Yes! In fact, cheesecakes often taste better the next day as the flavors meld together in the fridge.
-
How do I store leftover cheesecake?
- Store in an airtight container in the fridge for up to a week. You can also freeze it; wrap it tightly in plastic wrap and then foil for extended freshness.
-
What if my cheesecake is too runny?
- If the filling doesn’t set properly, it may need more baking time. Always check if the edges are firm and the center jiggles slightly.
Nutritional Info (Optional)
- Serving Size: 1 slice (1/12 of the recipe)
- Calories: Approximately 320
- Fat: 22g
- Carbohydrates: 29g
- Protein: 6g
And there you have it, your very own cheesecake masterpiece! So grab that mixing bowl and enjoy the process. Remember, cooking should be fun, messy, and filled with love. I’d love to hear how yours turns out; feel free to share your cheesecake stories or variations with me! Happy baking!
Print
The Ultimate Cheesecake Recipe
- Total Time: 75 minutes
- Yield: 12 servings 1x
- Diet: Vegetarian
Description
A delectable, creamy cheesecake that combines rich flavor and velvety texture, perfect for celebrations or personal indulgence.
Ingredients
- 1.5 cups Graham Cracker Crumbs
- 1/3 cup Unsalted Butter, melted
- 2 (8-ounce) packages Cream Cheese, softened to room temperature
- 1 cup Granulated Sugar
- 1/2 cup Sour Cream
- 2 teaspoons Vanilla Extract
- 3 large Eggs, room temperature
- Zest of 1 Lemon (optional)
Instructions
- Preheat your oven to 325°F (163°C).
- Mix together the graham cracker crumbs and melted butter in a medium bowl until well coated.
- Press the crumb mixture into the bottom of a 9-inch springform pan, ensuring it’s evenly packed.
- Beat the cream cheese with a hand mixer in a large bowl until smooth and creamy.
- Gradually add the sugar, mixing well, then add the sour cream and vanilla extract.
- Add the eggs one at a time, mixing on low speed just until combined.
- Fold in the lemon zest if using.
- Pour the filling over the crust, smoothing the top with a spatula.
- Bake for 50-60 minutes, until the edges are set and the center has a slight jiggle.
- Cool in the oven with the door cracked for about an hour.
- Refrigerate for at least four hours before serving, preferably overnight.
Notes
Serve with fresh berries, whipped cream, or a drizzle of chocolate sauce. You can also create fruit swirls or chocolate variations.
- Prep Time: 15 minutes
- Cook Time: 60 minutes
- Category: Dessert
- Method: Baking
- Cuisine: American
Nutrition
- Serving Size: 1 slice
- Calories: 320
- Sugar: 20g
- Sodium: 250mg
- Fat: 22g
- Saturated Fat: 12g
- Unsaturated Fat: 10g
- Trans Fat: 0g
- Carbohydrates: 29g
- Fiber: 1g
- Protein: 6g
- Cholesterol: 90mg
Keywords: cheesecake, dessert, baking, creamy dessert, holiday treats




