
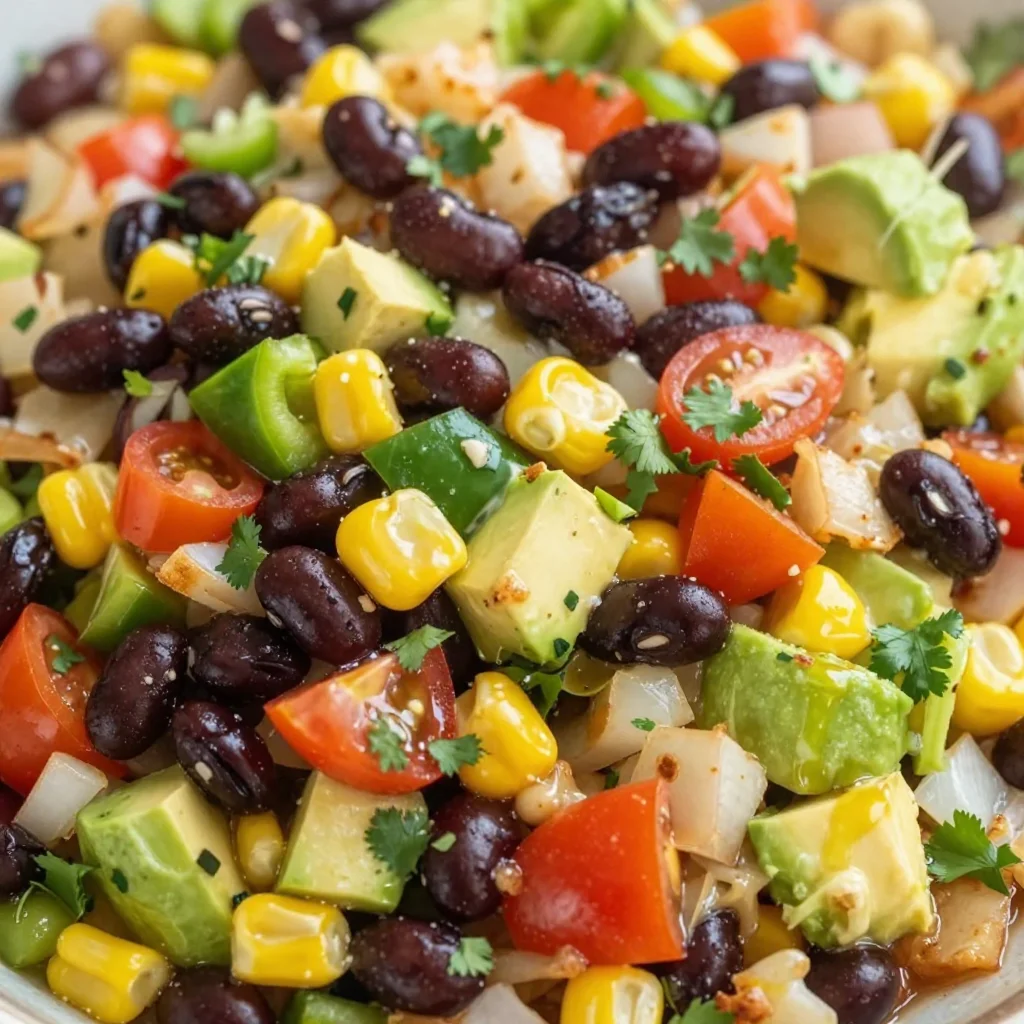
Cowboy Caviar
Cowboy Caviar: A Colorful Dip for Every Occasion
Welcome to my kitchen, my foodie friends! Today, I’m beyond excited to share a recipe that brings a burst of flavor and a bit of sunshine to any gathering: Cowboy Caviar. This vibrant dish is not only a feast for the eyes, but it’s also packed with nutrients and love. Picture this: a colorful medley of black beans, corn, tomatoes, and zesty dressings that combine to create a dip that is simply irresistible. Perfect for parties, picnics, or even just a cozy evening at home, Cowboy Caviar has become a staple in my kitchen, and I can’t wait for you to experience it too!
Now, let me take you back to a warm summer day when I first encountered this crowd-pleaser. My best friend Sarah invited me over for a casual backyard BBQ, and as soon as I stepped through the gate, I was hit with the inviting scent of grilled veggies and something oh-so-fresh. It was then that I saw it — a big bowl of Cowboy Caviar sitting pretty on the table, glimmering in the sunlight like a rainbow. I took a dip with some crispy tortilla chips, and the explosion of flavors made my taste buds dance! From that moment, I was hooked. Since then, I’ve played around with the traditional recipe and made it my own. It’s a dish that brings people together, and I can guarantee that this version will do just that!
But before we dive into the delicious details, let’s talk ingredients. No need for fancy-schmancy stuff here. Just a few simple, fresh ingredients will do the trick, and I promise you’ll be amazed by the incredible flavors that come together. So grab your apron, and let’s get cooking!
Ingredients
Here’s what you’ll need to create your own Cowboy Caviar:
-
Black Beans (1 can, rinsed and drained)
Black beans are not only delicious but also packed with protein and fiber. If you don’t have black beans, feel free to substitute them with kidney beans or pinto beans for a different twist! -
Corn (1 can, drained)
Sweet corn adds a natural sweetness and crunch. You can also use fresh corn off the cob when it’s in season or even frozen corn—just make sure to thaw and drain it well! -
Cherry Tomatoes (1 cup, halved)
Cherry tomatoes add a pop of color and juiciness. Any tomato variety works here, though I recommend using grape tomatoes for their sweetness. If fresh isn’t available, you can use a can of diced tomatoes, just drain them! -
Red Bell Pepper (1, finely chopped)
The sweetness and crunch of red bell peppers are essential for that crunchy texture. If you’re looking for more spice, diced jalapeños can offer a delightful kick, or you can use green bell peppers for a milder flavor. -
Red Onion (1/2, finely chopped)
Adds a delightful sharpness to the mix. If you find raw onion too intense, soak the chopped onion in cold water for about 10 minutes to mellow out the flavor. -
Fresh Cilantro (1/4 cup, chopped)
This herb elevates the dish with its fresh flavor. If you’re not a fan of cilantro, try using parsley or omit it altogether. -
Lime Juice (from 2 limes)
Lime juice gives Cowboy Caviar its zesty brightness. You can switch it up with lemon juice for a slightly different flavor profile. -
Olive Oil (2 tablespoons)
A splash of olive oil helps bring everything together. Avocado oil is a great alternative if you’d like a change in flavor. -
Seasoning (1 teaspoon each of salt, pepper, cumin, and chili powder)
These spices bring warmth and depth to the dish. Feel free to add more chili powder if you like it spicy or swap in taco seasoning for a different flavor spin.
Step-by-Step Instructions
Now that we’ve got our vibrant cast of ingredients ready, let’s bring this Cowboy Caviar to life! Trust me, it’s easier than you think.
-
Prep the Veggies: Start by gathering all your fresh ingredients. Rinse and drain the black beans and corn in a colander. Then, chop the red onion, red bell pepper, and cilantro, halving the cherry tomatoes as you go.
Tip: A sharp knife is your best friend—keep everything tidy and neat to make it easier to mix later!
-
Mix It Up: In a large mixing bowl, combine the black beans, corn, chopped cherry tomatoes, red bell pepper, red onion, and cilantro. Use a spatula or wooden spoon to gently fold everything together. You want to make sure all the ingredients are well incorporated without smashing them!
Hack: If you’re using canned beans, give them a quick rinse to get rid of excess sodium and residue. This really elevates the fresh flavor!
-
Dressing Time: In a separate small bowl, whisk together the lime juice, olive oil, salt, pepper, cumin, and chili powder. This dressing is the magic sauce that ties all the flavors together, so don’t skip this step!
Chef Insight: If you love a little heat, consider adding a few dashes of hot sauce to the dressing before mixing it in!
-
Combine Everything: Pour the dressing over the vegetable mixture and gently fold until everything is well coated. Taste and adjust the seasoning if needed—you want to find that perfect balance of flavors!
-
Let It Chill: Cover the bowl with plastic wrap or a lid and let it chill in the fridge for at least 30 minutes. This allows the ingredients to meld beautifully. Trust me, it’s worth the wait!
Tip: If you’re short on time, you can serve it right away, but letting it chill enhances the flavors significantly!
-
Serve It Up: Once the flavors have mingled beautifully, scoop your Cowboy Caviar into a serving bowl! You can garnish it with a sprinkle of additional cilantro or maybe a few diced avocados for added creaminess.
Serving Suggestions
Cowboy Caviar is versatile! Serve it as a dip with tortilla chips, pile it onto a bed of greens for a zesty salad, or use it as a topping for grilled chicken or fish. The colorful presentation will not only delight your guests but will also have everyone asking for the recipe!
Recipe Variations
-
Add Avocado: Cube up a ripe avocado and fold it into the mix right before serving for creaminess that’s heavenly!
-
Spicy Twist: Add diced jalapeños if you like some heat, or use a spicy bean mix instead of regular beans.
-
Tropical Touch: Toss in some diced mango or pineapple for a sweet, tropical flair.
-
Grain Boost: For a heartier dish, serve it with cooked quinoa or brown rice to create a filling bowl.
-
Cheesy Fun: Sprinkle crumbled feta or shredded cheese on top for a decadent twist!
Chef’s Notes
Cowboy Caviar has evolved so much in my kitchen over the years. Initially, I followed traditional recipes strictly, but as I began to experiment, I discovered how forgiving and versatile it is. I’ve enjoyed it during vibrant summer barbecues, cozy winter gatherings, and even as a quick snack when I’m craving something fresh. Plus, it’s a fantastic recipe to make with the kids—let them choose their favorite ingredients for a fun, family cooking session!
FAQs and Troubleshooting
-
Why is my Cowboy Caviar too watery?
If your dip seems too liquidy, ensure you’ve drained everything well, especially the beans and corn. You might also want to add more solid ingredients like bell peppers to balance it out! -
Can I make it ahead of time?
Yes! Cowboy Caviar actually tastes better the next day as the flavors have time to blend. Just keep it in an airtight container in the fridge for up to 3 days. -
What can I serve it with?
Cowboy Caviar pairs fabulously with tortilla chips, but it can also be served with pita chips, on tacos, or even as a topping for grilled meats and fish. -
Can I freeze it?
It’s best enjoyed fresh, but if you have leftover, you can freeze it. However, the texture may change once thawed, so it’s better as a fresh dish!
Nutritional Info
While nutritional information may vary based on specific ingredients and brands used, here’s a general breakdown per serving (1/2 cup):
- Calories: 120
- Protein: 7g
- Carbohydrates: 20g
- Fiber: 5g
- Fat: 4g
And there you have it—your very own Cowboy Caviar! So whether you’re dipping into it on game day or serving it for a fancy brunch with friends, this recipe is sure to bring joy and deliciousness to your table. I’d love to hear about your adventures in the kitchen as you whip up this gem, so feel free to share your stories or any fun twists you create! Happy cooking!
Print
Cowboy Caviar
- Total Time: 45 minutes
- Yield: 4 servings 1x
- Diet: Vegan
Description
A vibrant dip made with black beans, corn, tomatoes, and zesty dressings, perfect for parties and gatherings.
Ingredients
- 1 can Black Beans, rinsed and drained
- 1 can Corn, drained
- 1 cup Cherry Tomatoes, halved
- 1 Red Bell Pepper, finely chopped
- 1/2 Red Onion, finely chopped
- 1/4 cup Fresh Cilantro, chopped
- Juice from 2 Limes
- 2 tablespoons Olive Oil
- 1 teaspoon Salt
- 1 teaspoon Pepper
- 1 teaspoon Cumin
- 1 teaspoon Chili Powder
Instructions
- Prep the Veggies: Gather all your fresh ingredients. Rinse and drain the black beans and corn in a colander. Chop the red onion, red bell pepper, and cilantro, halving the cherry tomatoes as you go.
- Mix It Up: In a large mixing bowl, combine the black beans, corn, cherry tomatoes, red bell pepper, red onion, and cilantro. Use a spatula to gently fold everything together.
- Dressing Time: In a separate small bowl, whisk together the lime juice, olive oil, salt, pepper, cumin, and chili powder.
- Combine Everything: Pour the dressing over the vegetable mixture and gently fold until well coated. Taste and adjust seasoning if needed.
- Let It Chill: Cover the bowl and let it chill in the fridge for at least 30 minutes.
- Serve It Up: Scoop the Cowboy Caviar into a serving bowl and garnish as desired.
Notes
This dip is perfect as a snack or served with tortilla chips. It tastes even better the day after as flavors meld.
- Prep Time: 15 minutes
- Cook Time: 0 minutes
- Category: Appetizer
- Method: Mixing
- Cuisine: Tex-Mex
Nutrition
- Serving Size: 1/2 cup
- Calories: 120
- Sugar: 4g
- Sodium: 300mg
- Fat: 4g
- Saturated Fat: 0.5g
- Unsaturated Fat: 3g
- Trans Fat: 0g
- Carbohydrates: 20g
- Fiber: 5g
- Protein: 7g
- Cholesterol: 0mg
Keywords: cowboy caviar, dip recipe, black bean dip, healthy appetizer
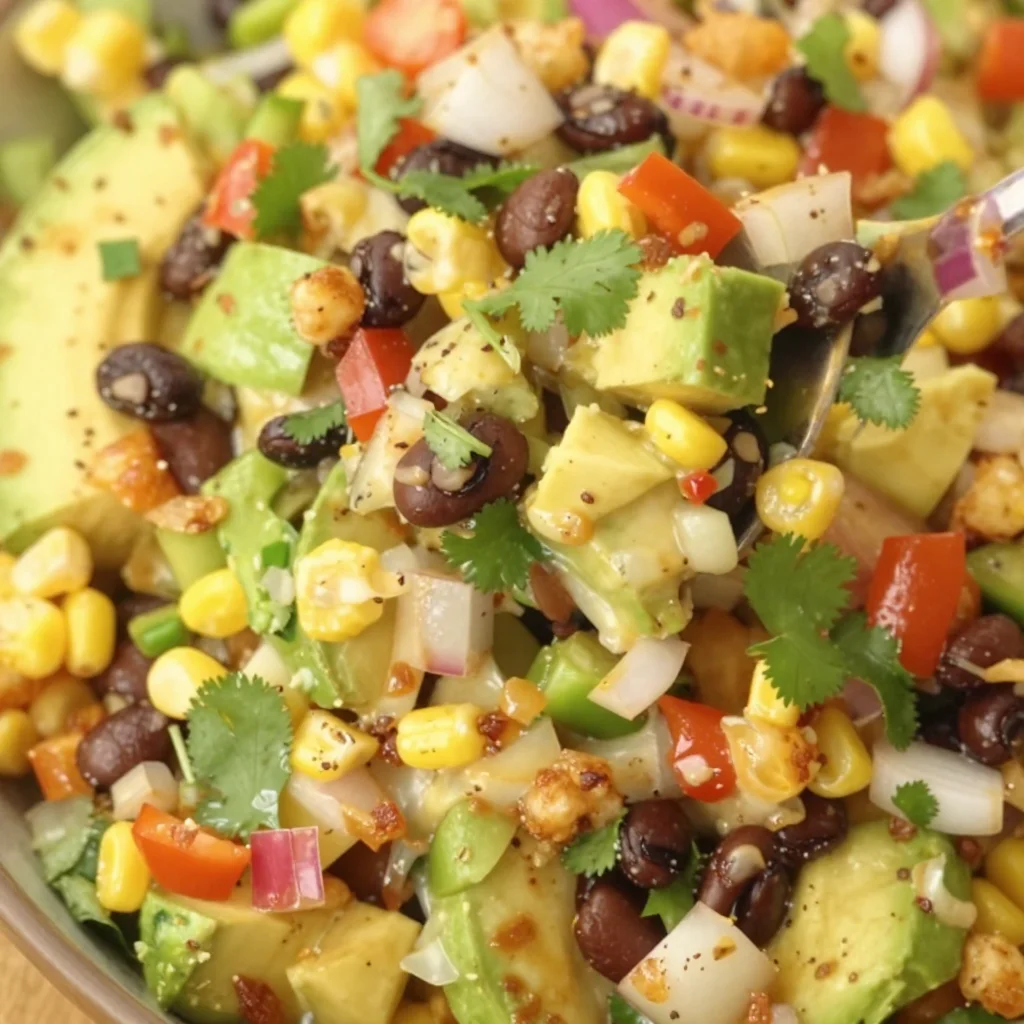
Cowboy Caviar
Whipping Up a Fiesta: Cowboy Caviar Recipe
Welcome to my cozy corner of the culinary world! I’m so thrilled you’re here. Today, we’re diving into a dish that brings a burst of color, flavor, and a whole lot of love into any gathering: Cowboy Caviar. This dish is a delightful salsa-like appetizer that captures the spirit of togetherness—perfect for summer barbecues, game day gatherings, or any casual get-together where laughter is shared over good food.
Picture this: it’s a warm summer evening, and the sun is setting, casting a golden hue across the party as people mingle. You’re standing near the snack table, a bowl of Cowboy Caviar in hand, scooping it with crispy tortilla chips. The vibrant colors of the tomatoes, bell peppers, and black beans mirror the happy faces around you. Everyone is laughing and chatting, enjoying the refreshing zing of lime and cilantro in the air. That’s the magic of Cowboy Caviar; it’s not just food; it’s a catalyst for connections, memories, and stories shared over a meal.
What I love about Cowboy Caviar is how versatile it is. You can tweak the ingredients based on what’s fresh or what tickles your taste buds. Plus, it’s not just a pretty face; it’s packed with protein and loads of vibrant veggies. It’s an easy, approachable dish that even the most novice cook can whip up without breaking a sweat. So grab your apron and let’s get cooking!
A Fond Memory with Cowboy Caviar
Let me take you back to a summer a few years ago when my friends and I decided to host a potluck picnic at the park. It was one of those magical days—sunshine, laughter, and the intoxicating smell of grass on hot pavement. Everyone was tasked with bringing something delicious. I had a plan: I was going to wow them with my version of Cowboy Caviar.
As I chopped fresh veggies, I was reminded of summers spent with my grandma in her kitchen, where we would prepare meals using whatever was in season. She always said, “Cooking is all about balance and love.” So, I made sure to add a little extra love and a zesty twist to my recipe that day.
When I arrived at the picnic, the vibrant bowl of Cowboy Caviar was a total showstopper—and it vanished within minutes! Friends were asking for the recipe, and I felt my heart swell with joy. That is the beauty of this dish; it’s simple, yet it holds the capacity to evoke such warm memories and spark connection. It’s not just food; it’s a celebration of life, friendship, and the joy of gathering around a table.
Ingredients
Here’s what you’ll need to create this colorful delight:
-
1 can black-eyed peas (drained and rinsed)
- These little legumes are the star of the dish! If you can’t find black-eyed peas, feel free to substitute with black beans or chickpeas.
-
1 can black beans (drained and rinsed)
- Rich in protein and fiber, black beans add a great texture. Super versatile: you can swap them out for kidney beans if you like.
-
1 can corn (drained)
- Sweet and crunchy, corn adds a refreshing pop. If you’re feeling adventurous, use fresh corn cut off the cob in peak season for even better flavor.
-
1 cup cherry tomatoes (halved)
- Juicy and flavorful, tomatoes are essential here. You can mix it up with heirloom tomatoes for a colorful twist!
-
1 bell pepper (any color, diced)
- Pick your favorite. Red, yellow, or green all bring their own vibe. They add a crispness and sweetness that complements the dish beautifully.
-
1 small red onion (finely chopped)
- This onion brings a bite that elevates the flavor profile. For a milder taste, consider using green onions.
-
1 avocado (diced)
- Creamy and rich, avocado adds a decadent twist. If you need a substitute, consider some diced mango for sweetness!
-
1-2 jalapeños (finely chopped)
- For a spicy kick! Make sure you adjust this based on your spice tolerance, and consider removing the seeds if you want to tone it down.
-
1/4 cup fresh cilantro (chopped)
- Fresh cilantro adds brightness. If you’re not a fan, parsley or basil can be a delightful alternative.
-
Juice of 2 limes
- Zesty and tangy, lime juice brings everything together. You can also use lemon juice in a pinch.
-
Salt and pepper (to taste)
- Always season to your liking! Remember, you can adjust the salt after everything is mixed.
Step-by-Step Instructions
Now that we have our colorful cast of ingredients, let’s get down to the nitty-gritty of making this Cowboy Caviar!
-
Prep Your Ingredients:
- Gather your fresh produce and start by washing everything thoroughly. A clean kitchen is a happy kitchen! Chop your cherry tomatoes in half, finely dice the red onion, and chop the bell pepper.
-
Can-Do Approach:
- Open your cans of black-eyed peas, black beans, and corn, then drain and rinse them well under cold water. This helps get rid of any excess sodium and preserves their freshness.
-
Mixing Bowl Time:
- Grab a large mixing bowl because it’s time for a colorful explosion! Toss in the black-eyed peas, black beans, corn, halved cherry tomatoes, diced bell pepper, and chopped red onion. My tip? Use a clear bowl to showcase all those gorgeous colors!
-
Adding Freshness:
- Now, let’s fold in the diced avocado and finely chopped jalapeños. Be gentle with the avocado so it doesn’t turn mushy—it should bring creaminess to the dish without becoming guacamole!
-
Cilantro and Lime Love:
- Add the chopped cilantro and squeeze the fresh lime juice over everything. This is where the magic happens! The lime not only brings brightness but also helps preserve the beautiful green color of the avocado.
-
Season to Perfection:
- Sprinkle in salt and pepper. Here’s a little chef hack: start with less and adjust according to your taste. Remember, you can always add more, but you can’t take it away!
-
Give It a Good Toss:
- With clean hands or a gentle spatula, give all those ingredients a good toss. You want everything to be evenly coated in that fresh lime juice and mixed well.
-
Chill Time:
- For best results, let your Cowboy Caviar chill in the fridge for at least 30 minutes, allowing all the flavors to meld together. Trust me; patience is key!
Serving Suggestions
When it comes time to serve, I love placing the Cowboy Caviar in a large, vibrant bowl to showcase its stunning colors. Set it in the center of the table with a platter of crispy tortilla chips surrounding it. If you’re feeling fancy, garnish with a few whole cilantro leaves or some extra lime wedges. Dive in and watch your guests swoon with delight!
Recipe Variations
Feeling adventurous? Here are some creative twists you can try:
- Tropical Twist: Add diced pineapple for a sweet, tangy flair.
- Tex-Mex Inferno: Amp up the heat with some diced habanero or a dash of hot sauce.
- Creamy Dreamy: Mix in some crumbled feta cheese for a savory bite.
- Chickpea Delight: Swap out black beans for chickpeas for a different texture.
- Herby Freshness: Add a sprinkle of fresh mint for an unexpected herbal note.
Chef’s Notes
This Cowboy Caviar recipe has a special place in my heart. Evolving over the years, I’ve played around with various ingredients and flavors. I once even threw in some roasted corn and bacon bits for a smoky twist, which was an undeniable hit at a family BBQ! One time, I forgot the lime and ended up rushing to the grocery store, only to discover that sometimes a bit of spontaneity leads to a breakthrough dish. Food is about experimentation and evolving—so don’t be afraid to make it your own!
FAQs and Troubleshooting
1. My Cowboy Caviar is too bland. What did I do wrong?
Not to worry! Cowboy Caviar loves seasonings. Try adding more lime juice, salt, or even a pinch of cumin for extra flavor. Don’t shy away from tasting as you go!
2. My avocado turned brown. How can I prevent this?
To keep your avocado vibrant, make sure to coat it in lime juice right after cutting. The acid helps slow down the browning process.
3. What if I can’t find fresh ingredients?
No problem at all! Canned veggies work great. Just be aware of excess sodium; always rinse them well.
4. Can I make this ahead of time?
Absolutely! Cowboy Caviar actually tastes better after a day in the fridge as the flavors meld together. Just leave the avocado out until you’re ready to serve it for best freshness.
Nutritional Info
While Cowboy Caviar brings joy and connection, it also packs a nutritional punch! Each serving is loaded with healthy proteins, fiber from the beans, and vitamins from the fresh veggies. It’s a guilt-free, feel-good dish that you can indulge in without hesitation.
I hope you find this Cowboy Caviar recipe as enjoyable to make as it is to eat! Gather your loved ones, whip up a batch, and watch as it becomes the star of your next gathering. Cooking is not just about the food; it’s about creating moments that linger long after you’ve finished your meal. Happy cooking! 🍽️✨
Print
Cowboy Caviar
- Total Time: 45
- Yield: 4 servings 1x
- Diet: Vegetarian
Description
A vibrant and flavorful salsa-like appetizer perfect for gatherings, packed with protein and fresh veggies.
Ingredients
- 1 can black-eyed peas (drained and rinsed)
- 1 can black beans (drained and rinsed)
- 1 can corn (drained)
- 1 cup cherry tomatoes (halved)
- 1 bell pepper (diced)
- 1 small red onion (finely chopped)
- 1 avocado (diced)
- 1–2 jalapeños (finely chopped)
- 1/4 cup fresh cilantro (chopped)
- Juice of 2 limes
- Salt and pepper (to taste)
Instructions
- Prep your ingredients: Wash thoroughly, chop tomatoes, finely dice onion, and chop the bell pepper.
- Open cans of black-eyed peas, black beans, and corn; drain and rinse well.
- Toss in a large mixing bowl the black-eyed peas, black beans, corn, cherry tomatoes, bell pepper, and red onion.
- Fold in diced avocado and jalapeños gently.
- Add chopped cilantro and squeeze lime juice over everything.
- Sprinkle with salt and pepper, adjusting to taste.
- Toss gently to combine all ingredients.
- Chill in the fridge for at least 30 minutes before serving.
Notes
For best flavor, let the Cowboy Caviar chill and the flavors meld together before serving.
- Prep Time: 15
- Category: Appetizer
- Method: Mixing
- Cuisine: Tex-Mex
Nutrition
- Serving Size: 1 serving
- Calories: 210
- Sugar: 5g
- Sodium: 230mg
- Fat: 9g
- Saturated Fat: 1.5g
- Unsaturated Fat: 7g
- Trans Fat: 0g
- Carbohydrates: 38g
- Fiber: 10g
- Protein: 8g
- Cholesterol: 0mg
Keywords: Cowboy Caviar, appetizer, healthy salsa, summer recipe, party food
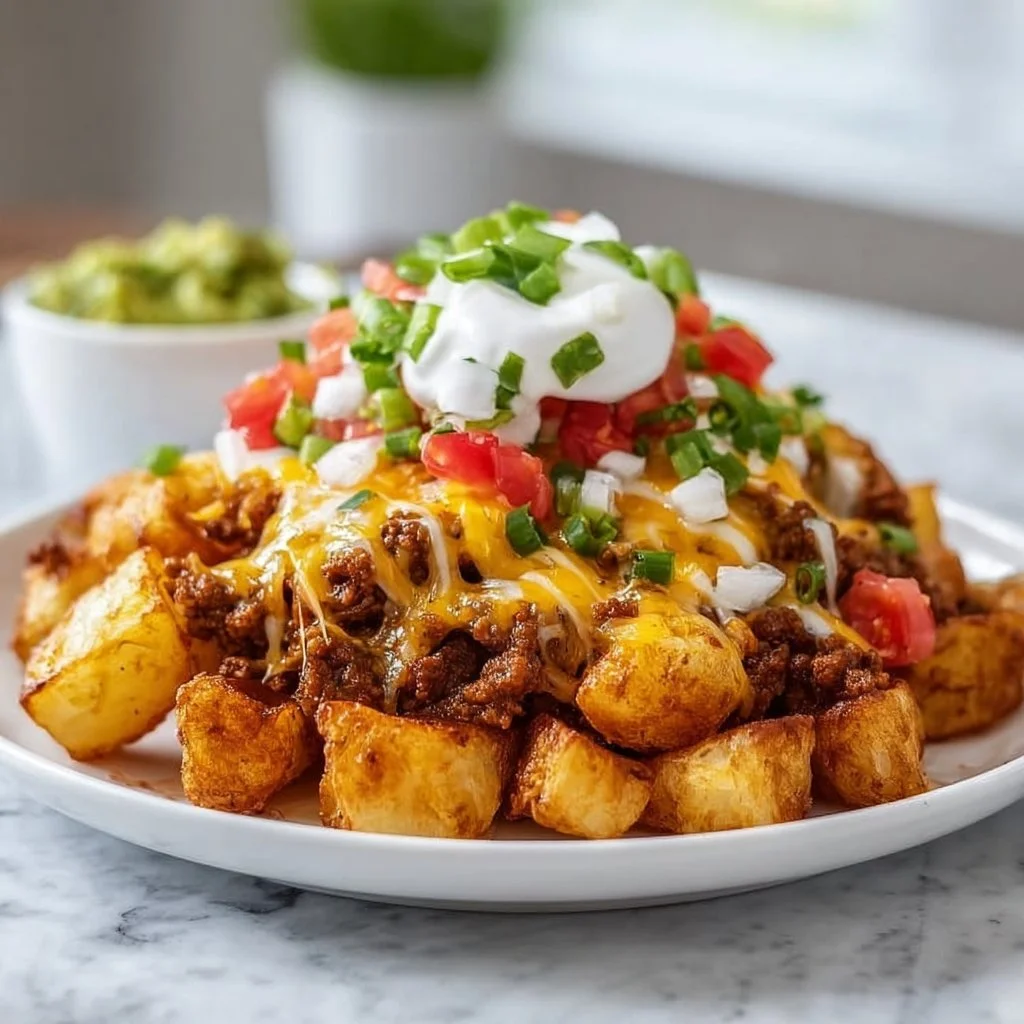
Cheesy Taco Potatoes
Cheesy Taco Potatoes: A Cozy Comfort Dish to Bring Everyone Together
Welcome to my kitchen! Today, we’re diving into a dish that’s close to my heart—Cheesy Taco Potatoes. Picture crispy golden potatoes, smothered in melted cheese, and packed with all the bold, zesty flavors of taco night. It’s a comforting blend that’s sure to bring smiles, laughter, and maybe even a bit of nostalgia to your dinner table. Whether you’re having a casual weeknight meal or hosting friends for game night, these cheesy potatoes will be the star of your spread!
Cheesy Taco Potatoes are more than just a recipe; they’re a celebration of flavors that transform humble ingredients into something spectacular. With pantry staples like potatoes, cheese, and taco seasoning, this dish is simple yet oh-so-satisfying. Plus, it’s versatile enough to please everyone’s taste buds, making it the perfect option for family dinners or gatherings with friends!
A Taste of Nostalgia
Growing up, taco night was always a family favorite. I vividly remember my parents whipping up tacos with all the fixings—ground beef simmering with spices, fresh veggies chopped, and an array of toppings laid out in colorful bowls. But what I looked forward to the most was when we made taco-loaded potatoes. My mom would bake some potatoes until crisp and fluffy and then let us go wild adding our favorite taco toppings. It became a tradition, and those meals were filled with laughter, creativity, and a whole lot of cheese!
To this day, I cherish those memories, and every time I whip up a batch of Cheesy Taco Potatoes, I’m transported back to those joyful evenings around the dinner table. It’s not just a dish; it’s a connection to my roots, and I can’t wait to share it with you!
Ingredients
Here’s what you’ll need to make your own Cheesy Taco Potatoes:
-
Potatoes (Russet or Yukon Gold)
Tip: These starchy varieties are ideal for baking. If you’re in a pinch, sweet potatoes add a lovely twist, too!
-
Ground Beef or Turkey
Chef Insight: Use lean ground meat for a healthier option. You can also substitute with black beans for a vegetarian version!
-
Taco Seasoning
Substitution: Homemade taco seasoning is super easy to whip up with spices like cumin, chili powder, garlic powder, and paprika!
-
Cheddar Cheese
Quick Tip: Experiment with different cheese types—Monterey Jack or Pepper Jack can add a spicy kick!
-
Sour Cream
Substitution: Greek yogurt is a fantastic substitute for a lighter option that still packs that creamy flavor.
-
Chopped Green Onions
Nutritional Bonus: These add a fresh crunch and a burst of color! Feel free to toss in some bell peppers or tomatoes for extra veggies.
-
Corn (canned or frozen)
Chef Advice: Corn adds sweetness and texture. You can swap it for black olives or diced avocados if you prefer!
-
Olive Oil
Tip: A splash of butter will add richness, but olive oil keeps things light and fragrant.
Step-by-Step Instructions
Let’s get cooking! Follow these steps for the yummiest Cheesy Taco Potatoes.
1. Preheat the Oven
Start by preheating your oven to 400°F (200°C). This will ensure that your potatoes have a crispy texture on the outside while remaining fluffy on the inside.
2. Prepare the Potatoes
Wash your potatoes thoroughly, then pierce them a few times with a fork. This will allow steam to escape while they bake. Drizzle with a little olive oil and sprinkle with salt before wrapping them in aluminum foil. This will help them roast evenly and keep them moist.
3. Bake the Potatoes
Pop those bad boys in the preheated oven for about 45-60 minutes or until they’re fork-tender. Pro tip: you can check if they’re done by simply inserting a fork into the center. If it slides in easily, you’re good to go!
4. Cook the Meat
While your potatoes are baking, it’s time to get the taco meat ready. In a skillet, heat a splash of olive oil over medium heat. Add in your ground beef or turkey and cook it until it’s browned. Be sure to break it up with a spatula to ensure even cooking.
Once the meat is fully cooked, add in your taco seasoning with a splash of water. Let it simmer for about 5-7 minutes until the flavors meld beautifully. Ooh, that aroma!
5. Assemble Your Ingredients
Now, it’s assembly time! Once the potatoes are baked, carefully remove them from the oven. When they’re cool enough to handle, slice them open (but don’t cut all the way through!). Gently fluff the insides with a fork.
6. Load It Up
For each potato, start with a generous scoop of the seasoned meat. Follow it up with a handful of corn, a sprinkle of cheese, and a dollop of sour cream. Top with chopped green onions. Can you smell that? Heaven!
7. Back to the Oven
Return the loaded potatoes back to the oven for an additional 10 minutes or until the cheese is perfectly melted and bubbly. Trust me; this step is crucial for that melty goodness!
8. Final Touches
Once your Cheesy Taco Potatoes are out of the oven, let them cool for a minute before serving. You can garnish them with additional toppings like diced tomatoes, jalapeños, or even a drizzle of hot sauce for that extra kick!
Serving Suggestions
Plate these beauties by arranging them on a large platter, sprinkle with chopped cilantro, or keep it casual by serving them in their skins. These potatoes are perfect for sharing and make an impressive centerpiece for any gathering!
Recipe Variations
Feel free to get creative with your Cheesy Taco Potatoes! Here are a few variations to consider:
-
Tex-Mex Loaded Potatoes: Add black beans, corn, and salsa to your meat mixture for a zesty twist.
-
Buffalo Chicken Version: Swap taco meat for buffalo chicken and top with ranch dressing instead of sour cream for a spicy kick!
-
Vegetable Medley: Load your potatoes with sautéed bell peppers, onions, and mushrooms for a flavorful veggie option.
-
Breakfast Style: Top your potatoes with scrambled eggs, avocado, and salsa for a hearty brunch dish.
Chef’s Notes
This recipe has evolved over the years as I’ve played around with flavors and ingredients. My favorite memory is when a friend suggested I try making them with sweet potatoes instead of regular ones. Although initially skeptical, I gave it a shot, and it turned out AMAZING! Who knew they could be so versatile and delicious?
Another tip—sometimes I even whip up a batch and freeze the leftovers. The next time you have a craving for a cheesy fix, just pop them in the oven, and you’re all set!
FAQs and Troubleshooting
1. My potatoes are undercooked—what do I do?
If your potatoes are still hard after the first cook, pop them back in the oven for an additional 10-15 minutes. You can also microwave them for a quick fix, but be sure to check them frequently.
2. How do I prevent my potatoes from getting soggy?
Keeping the skin on while baking helps maintain their integrity. Be sure to only wrap them loosely in aluminum foil—not tightly, as this can trap steam.
3. Can I make this ahead of time?
Absolutely! You can prep everything ahead of time—just assemble your loaded potatoes and store them in the fridge. When you’re ready, just pop them in the oven to heat and melt the cheese.
4. What if I don’t have taco seasoning?
No problem! You can mix up your own with chili powder, cumin, garlic powder, onion powder, and a pinch of salt.
Nutritional Information
While I didn’t calculate exact nutritional values, these Cheesy Taco Potatoes can be a satisfying and hearty meal! Just remember to indulge in portions that fit your dietary needs.
So, there you have it—my delightful take on Cheesy Taco Potatoes. As you whip up this cozy dish, I hope you feel the warmth of those family dinners I cherish so much, and I can’t wait to hear about your own culinary adventures! Happy cooking! 🍽️🤗
Print
Cheesy Taco Potatoes
- Total Time: 75 minutes
- Yield: 4 servings
- Diet: Gluten-Free, Vegetarian (if using beans)
Description
A cozy comfort dish featuring crispy golden potatoes smothered in melted cheese and packed with bold taco flavors.
Ingredients
- Russet or Yukon Gold Potatoes
- Ground Beef or Turkey
- Taco Seasoning
- Cheddar Cheese
- Sour Cream
- Chopped Green Onions
- Corn (canned or frozen)
- Olive Oil
Instructions
- Preheat the oven to 400°F (200°C).
- Prepare the potatoes by washing and piercing them with a fork, drizzling with olive oil, and seasoning with salt.
- Bake the potatoes for 45-60 minutes until fork-tender.
- Cook the meat in a skillet with olive oil until browned; add taco seasoning and a splash of water. Simmer for 5-7 minutes.
- Assemble by removing baked potatoes and fluffing the insides.
- Load each potato with seasoned meat, corn, cheese, and sour cream. Top with green onions.
- Return the loaded potatoes to the oven for an additional 10 minutes to melt the cheese.
- Cool for a minute before serving and garnish with additional toppings if desired.
Notes
Feel free to substitute with black beans for a vegetarian version or try different cheeses for variety.
- Prep Time: 15 minutes
- Cook Time: 60 minutes
- Category: Main Course
- Method: Baking
- Cuisine: Mexican
Nutrition
- Serving Size: 1 potato
- Calories: 350
- Sugar: 5g
- Sodium: 400mg
- Fat: 12g
- Saturated Fat: 4g
- Unsaturated Fat: 6g
- Trans Fat: 0g
- Carbohydrates: 45g
- Fiber: 3g
- Protein: 15g
- Cholesterol: 30mg
Keywords: cheesy potatoes, taco potatoes, comfort food, Mexican cuisine, easy recipes


