

Frozen Yogurt Granola Power Cups
Frozen Yogurt Granola Power Cups: A Joyful Treat to Energize Your Day!
Hey there, fellow food lovers! 🌟 Welcome back to my cozy kitchen! Today, we’re diving into a delightful recipe that’s just as fun to make as it is to devour — Frozen Yogurt Granola Power Cups. Picture this: creamy yogurt paired with crunchy granola, sweet fruits, and a drizzle of honey. They’re bite-sized bundles of joy that will fuel your day and satisfy your craving for something sweet yet wholesome.
Now, I know what you’re thinking. "Frozen yogurt? Granola? This sounds like a fancy café treat!" But let me assure you, these power cups are super easy to whip up at home, and you don’t need any culinary degree to impress with them. Just a love for delicious food and a few ingredients from your pantry. Whether you’re prepping for breakfast, a snack on the go, or a fun dessert to share with friends, these cups come to the rescue!
As we journey through this recipe, I’ll share a little bit of my backstory and highlight some tips and tricks along the way. So grab your favorite apron (mine has flour stains that tell stories of countless baking adventures), and let’s get started on making these flavorful cups that are perfect for any occasion!
Personal Story
I’ll never forget the first time I attempted to create my own frozen yogurt treats. It was a summer afternoon, and the sun was blaring down on our backyard. My cousin and I were looking for a way to beat the heat, so we headed to the kitchen to concoct something refreshing. We didn’t have much in the fridge, but we had plain yogurt, some leftover granola from breakfast, and a few frozen berries hiding in the freezer.
With laughter echoing through the kitchen, we mixed everything together haphazardly, packed the mixture into muffin tins, and shoved them into the freezer without much thought. After a couple of hours, we dove into our newfound creation — it was a glorious mess of creamy, fruity goodness! From that day on, frozen yogurt cups have held a special place in my heart. They remind me of sunny days, giggles, and a happy sense of freedom in the kitchen. Now, I’m passing on that joy to you!
Ingredients
Here’s what you’ll need to create your own Frozen Yogurt Granola Power Cups:
-
Greek Yogurt: The star of this recipe! Greek yogurt is creamy, tangy, and loaded with protein. If you’re looking for a lighter option, you can substitute it with low-fat yogurt or dairy-free yogurt alternatives, like coconut yogurt.
-
Granola: A crunchy topper that adds texture and flavor. Look for a granola that isn’t overly sweet, or make your own! You can easily swap this with puffed rice or crushed nuts for a gluten-free option.
-
Honey or Maple Syrup: A natural sweetener that brings everything together. If you prefer a vegan option, maple syrup works beautifully here. Need it sugar-free? Try using stevia or another natural sweetener.
-
Fresh or Frozen Fruits: Berries, bananas, or even apples — the possibilities are endless! Fresh fruits give a vibrant color and flavor, while frozen fruits can add a refreshing touch. You can also swap them for dried fruits like raisins or cranberries for different textures.
-
Nut Butter (optional): To give your cups an extra boost, consider adding a spoonful of almond or peanut butter. This will not only enhance the flavor but also add more healthy fats to keep you satisfied.
-
Chia Seeds (optional): If you’re looking to up the nutritional profile, add some chia seeds. They’re a fantastic source of omega-3 fatty acids and fiber. No chia? No problem! You can skip this ingredient without compromising the recipe.
Step-by-Step Instructions
Let’s get cooking! Here’s how you create these delicious Frozen Yogurt Granola Power Cups:
-
Prepare Your Molds: Grab a muffin tin or silicone cupcake tray. I love using silicone because it makes removing the cups a breeze! If you’re using a metal muffin tin, consider putting paper liners in for easier serving.
-
Combine the Yogurt and Sweetener: In a mixing bowl, add 2 cups of Greek yogurt and a generous drizzle of honey or maple syrup (about 2-3 tablespoons). Stir well until the mixture is smooth and creamy. The sweetness is all about personal preference, so taste it as you mix and adjust accordingly!
-
Add Nut Butter: If you decided to use nut butter, now’s the time to mix in ¼ cup of your favorite nut butter. This will enrich the flavor and texture. Make sure to fold it in gently so you keep that beautiful, creamy yogurt base.
-
Layer Your Ingredients: Spoon a layer of your yogurt mixture into each muffin tin compartment, filling them about halfway. Then grab your granola — about a tablespoon per cup — and sprinkle it on top of the yogurt. Press it gently so it sticks and creates a nice layer.
-
Top with Fruits: Now it’s time for the fun part! Add your fresh or frozen fruit on top of the granola layer. If you’re using frozen fruit, try to break it into smaller pieces so they fit well in the cups.
-
Complete the Layers: Spoon a little more yogurt on top of the fruits until you reach the top of each cup. Give a little tap on the counter to settle everything down — it ensures the yogurt fills in any gaps.
-
Final Touches: If you’d like, you can sprinkle a few more granola bits on the top for added crunch and garnish. This is also where you can sprinkle chia seeds if you’re using them.
-
Freeze: Cover the muffin tin with plastic wrap or foil and pop it in the freezer for at least 4 hours, or until the power cups are frozen solid.
-
Serve: Once they’re nicely frozen, carefully pop the cups out of the molds. If it’s a bit tricky, run a little warm water over the bottom of the muffin tin to help release them.
-
Enjoy: Serve as a delicious snack or a sweet breakfast treat! They can stay in the freezer for weeks, so feel free to batch-make them and always have some on hand. Enjoy every delightful bite!
Serving Suggestions
For serving, I like to arrange the Frozen Yogurt Granola Power Cups on a lovely platter, garnished with a sprinkle of fresh mint or edible flowers for a pop of color. They’re perfect for summer parties, breakfast on-the-go, or just as a cozy treat in the evening. Pair them with a cup of coffee or a refreshing iced tea, and you’ve got a winning combination that’s sure to impress!
Recipe Variations
Feeling creative? Here are a few fun twists you can try with your Frozen Yogurt Granola Power Cups:
-
Chocolate Lovers: Add a spoonful of cocoa powder to the yogurt mix for a chocolatey trend, or drizzle melted dark chocolate over the top before freezing. Yum!
-
Tropical Escape: Replace the berries with diced mango and pineapple, and use coconut yogurt for a refreshing tropical twist.
-
Peanut Butter & Jelly: Layer your favorite fruit jam or jelly between the yogurt and granola layers for a nostalgic flavor.
-
Autumn Vibes: Mix in some pumpkin puree and pumpkin pie spice into the yogurt for a fall-inspired treat, and top with chopped pecans.
-
Protein Power: Stir a scoop of your favorite protein powder into the yogurt for an extra boost, making these perfect post-workout snacks!
Chef’s Notes
Oh, the memories these cups bring! I often whip them up when I’m having a busy week. They’re fantastic for breakfast on rushed mornings or as a mid-afternoon pick-me-up that keeps my energy levels up while I tackle my to-do list. This recipe has evolved over the years, influenced by friends and family. I still remember hosting a brunch where I served these alongside pancakes, and everyone raved about how refreshing they were. It’s all about sharing delicious memories through food, right?
Every time I make them, I like to change things up a bit, tossing in whatever fruits I have hanging around or whatever nut butter is in the pantry. The only consistent factor is the joy it brings to everyone who bites into them.
FAQs and Troubleshooting
Q: Can I use flavored yogurt instead of plain?
A: Yes, you can absolutely use flavored yogurt! Just keep an eye on the sweetness, as it may be sweeter than plain yogurt. This can add extra flavors to your cups!
Q: How can I prevent the cups from sticking to the molds?
A: Using silicone molds works wonders for easy removal. If you’re using metal, oiling the cups lightly with cooking spray before filling can help.
Q: Can I make these ahead of time?
A: Yes! These power cups freeze beautifully. Just make sure to store them in an airtight container or keep them covered in the muffin tin after they’re frozen. They’ll stay good for up to a month!
Q: My yogurt cups are too hard to bite into! What can I do?
A: Sometimes, they might freeze a little too solid. Let them sit at room temperature for a few minutes before serving, so they soften up a bit.
Nutritional Info (if applicable):
Each Frozen Yogurt Granola Power Cup (made with Greek yogurt, granola, and fruits) is approximately:
- Calories: 120
- Protein: 6g
- Carbohydrates: 15g
- Fats: 4g
- Fiber: 2g
- Sugar: 5g
(Note: Nutritional values will vary based on specific ingredients used.)
And there you have it! A straightforward, delicious, and versatile recipe for Frozen Yogurt Granola Power Cups. I can’t wait for you to try these! Remember to have fun while creating in the kitchen and make sure to share your creations with family and friends. Happy cooking! 🍽️✨
Print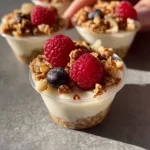
Frozen Yogurt Granola Power Cups
- Total Time: 255 minutes
- Yield: 12 servings 1x
- Diet: Vegetarian
Description
Delightful bite-sized Frozen Yogurt Granola Power Cups filled with creamy yogurt, crunchy granola, and sweet fruits — a perfect energizing treat for any occasion!
Ingredients
- 2 cups Greek yogurt
- 2–3 tablespoons honey or maple syrup
- ¼ cup nut butter (optional)
- Granola, about 1 tablespoon per cup
- Fresh or frozen fruits (berries, bananas, apples, etc.)
- Chia seeds (optional)
Instructions
- Prepare your molds: Grab a muffin tin or silicone cupcake tray.
- Combine the yogurt and sweetener in a mixing bowl until smooth.
- Add nut butter if using, folding in gently.
- Layer yogurt mixture into muffin tin, filling halfway.
- Top with granola, pressing gently to stick.
- Add fruits on top of the granola layer.
- Complete with more yogurt until cups are full.
- Freeze for at least 4 hours until solid.
- Serve by popping the cups out of the molds and enjoy!
Notes
These cups can stay in the freezer for weeks, making them a convenient snack to have on hand. Feel free to customize with different fruits or nut butters.
- Prep Time: 15 minutes
- Cook Time: 240 minutes
- Category: Snack
- Method: Freezing
- Cuisine: American
Nutrition
- Serving Size: 1 cup
- Calories: 120
- Sugar: 5g
- Sodium: 50mg
- Fat: 4g
- Saturated Fat: 1g
- Unsaturated Fat: 3g
- Trans Fat: 0g
- Carbohydrates: 15g
- Fiber: 2g
- Protein: 6g
- Cholesterol: 10mg
Keywords: frozen yogurt, granola cups, healthy snack, meal prep, easy dessert, vegetarian

Frozen Greek Yogurt Peanut Butter Bites
Frozen Greek Yogurt Peanut Butter Bites: The Perfect Cool Treat
Welcome to my kitchen! I’m so glad you’re here and ready to whip up something delicious. Today, we’re diving into a fun, easy, and oh-so-creamy treat: Frozen Greek Yogurt Peanut Butter Bites. If you’re looking for a sweet snack that feels indulgent without the guilt, you’ve stumbled upon a gem. Let’s get cozy, shall we?
These little bites are not just a dessert; they’re a burst of flavor that combines the creaminess of Greek yogurt with the rich, nutty goodness of peanut butter. Plus, they’re frozen, so they’re a refreshing treat for warm days or anytime you want a quick and healthy snack. All it takes is a few simple ingredients and a little bit of time, but trust me—the smiles they’ll bring are worth every minute!
As the summer heat rolls in and we find ourselves craving something cool and refreshing, these bites become the perfect antidote. Imagine biting into a sweet, creamy, and slightly frozen treat while lounging in the sun. Ahh, bliss! So grab your apron, and let’s get cooking—well, freezing—in the most delicious way possible!
My Peanut Butter Love Story
Ah, peanut butter. The mere thought of it takes me back to my childhood. I can vividly recall those lazy summer afternoons at my grandma’s house in the countryside. She had this magical kitchen where amazing smells wafted through the air, and her pantry was stocked full of goodies, including a giant jar of peanut butter that always had a spoon resting nearby. I remember sneaking spoonfuls whenever I could, occasionally getting caught red-handed and met with her warm giggles.
It wasn’t long before I started getting adventurous and combining that creamy indulgence with Greek yogurt to make my own delicious concoctions. That first attempt at a peanut butter yogurt treat was a happy accident—I’d meant to make smoothies, but I realized I had a jar of yogurt that needed using. Fast-forward a few years, and here we are, creating these delightful Frozen Greek Yogurt Peanut Butter Bites! They remind me of simpler times while allowing me to enjoy the flavors I fell in love with as a child.
Ingredients
To make these creamy bites of happiness, you need just a handful of ingredients:
-
Greek Yogurt: (2 cups) This is the star of the show! Creamy and rich in protein, Greek yogurt is the perfect base. Opt for plain, full-fat yogurt for a thicker consistency, or use low-fat if you prefer.
-
Peanut Butter: (¾ cup) Whether you want creamy or chunky, this adds that nutty flavor we crave. For a healthier twist, try natural peanut butter with no added sugars.
-
Honey or Maple Syrup: (2-4 tablespoons) This sweetener balances the tangy yogurt. Adjust the sweetness to your taste, or swap it with agave syrup for a vegan alternative.
-
Vanilla Extract: (1 teaspoon) Just a dash transforms the flavor, giving it a lovely roundness. Don’t skimp on this – it makes a world of difference!
-
Chocolate Chips (optional): (½ cup) Fold in some mini chocolate chips for extra indulgence or swap for dried fruits or nuts for a different crunch!
Chef Insight:
Feel free to get creative with these ingredients! For example, if you want protein-packed bites, toss in some chia seeds or flaxseeds for added nutrition. And don’t fret if you’re out of one thing—it’s all about using what you have!
Step-by-Step Instructions
Step 1: Gather and Prep (10 minutes)
Before we start mixing, let’s gather all of our ingredients. Lay out bowls and measuring cups so everything is at arm’s reach. This helps ensure a smooth cooking experience. Tip: If you’re a fan of multitasking, fill your sink with warm soapy water to wash your mixing tools as you go!
Step 2: Mix the Base (5 minutes)
In a mixing bowl, combine the Greek yogurt and peanut butter. Chef Hack: Use a hand mixer (or whisk for a workout) to blend until smooth and creamy. This will create a nice fluffy texture that makes the bites extra delightful!
Step 3: Sweeten It Up (3 minutes)
Add in the honey or maple syrup along with the vanilla extract. Stir until it’s completely combined. Insider Tip: Give it a little taste test; if it’s not sweet enough for your liking, add a touch more! Remember that you can customize it to suit your palate.
Step 4: Chocolate Love (Optional, 2 minutes)
If you’re choosing to use chocolate chips, fold them into the mixture now. If you’re feeling cheeky, you can also add a handful of crushed nuts or dried fruit for an added crunch!
Step 5: Shape the Bites (15 minutes)
Line a baking sheet with parchment paper. Using a tablespoon, scoop out the mixture and roll it into small balls. Think of them like tiny, delightful energy bites! Place them evenly spaced on the baking sheet. Chef Tip: If the mixture is sticky, wet your hands slightly to help roll the bites more easily.
Step 6: Freeze It (3 hours)
Pop the baking sheet into the freezer and let them sit for about 3 hours, or until firm. This is the hardest part—waiting! You can always stick around for a couple of "test bites" before shaking them for the final freeze.
Step 7: Store and Enjoy!
Once frozen, you can keep them in a freezer-safe bag or container, layering parchment paper between the layers to avoid sticking. They should last a couple of weeks—if you can resist devouring them all at once!
Serving Suggestions
To serve these Frozen Greek Yogurt Peanut Butter Bites, simply take them out of the freezer and let them sit at room temperature for a couple of minutes before enjoying. This makes them slightly softer and easier to eat. You can also plate them with a drizzle of chocolate sauce or a sprinkle of crushed nuts for an elegant touch!
Recipe Variations
-
Nut-Butter Bliss: Swap out peanut butter for almond, cashew, or sunflower seed butter for an allergy-friendly option.
-
Berry Infusion: Mix in some mashed berries like strawberries or blueberries into the yogurt for a fruity twist.
-
Spiced Flavor: Add a pinch of cinnamon or nutmeg to the mixture for a hint of warmth and spice.
-
Cacao Crunch: Use cacao nibs instead of chocolate chips for a healthier chocolate fix packed with antioxidants.
-
Mocha Delight: Stir in a bit of instant coffee granules for a delicious mocha flavor.
Chef’s Notes
Cooking is a journey of discovery, and this recipe has certainly evolved over time. I started by experimenting with different textures and flavors, and each batch was better than the last! Funny enough, my first attempt resulted in sticky blobs — not quite the eye-catching treat I envisioned. But hey, that’s what makes cooking exciting! Embrace the messiness, and you’ll find some real gems—like these bites.
I often find myself making these for gatherings or even as a quick breakfast option, tossing them in my bag on busy mornings. The joy they bring to friends and family is unparalleled!
FAQs and Troubleshooting
Q: Can I use non-dairy yogurt?
Absolutely! Coconut, almond, or soy yogurt can be great options for a dairy-free version.
Q: What do I do if my mixture is too runny?
If your mixture is too runny, you can add a bit more Greek yogurt or even some powdered peanut butter to thicken it up.
Q: How long do these bites last in the freezer?
When properly stored, these bites can last up to two weeks. But I doubt they will survive that long!
Q: Can I add other ingredients?
For sure! Feel free to get creative—add spices, fruits, or mix in some protein powder. The sky’s the limit!
Nutritional Info (approx. per bite, recipe yields about 20 bites)
- Calories: 80
- Protein: 3g
- Fat: 5g
- Carbohydrates: 7g
- Sugar: 3g
And there you have it! Your guide to whipping up Frozen Greek Yogurt Peanut Butter Bites that are delicious, nutritious, and downright irresistible. I hope you enjoy making these as much as I do! Remember, every good kitchen story begins with a little bit of creativity and a whole lot of love. Happy cooking!
Print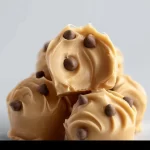
Frozen Greek Yogurt Peanut Butter Bites
- Total Time: 180 minutes
- Yield: 20 bites 1x
- Diet: Vegetarian
Description
A creamy and delicious frozen treat combining Greek yogurt and peanut butter, perfect for a guilt-free snack on warm days.
Ingredients
- 2 cups Greek Yogurt
- ¾ cup Peanut Butter
- 2–4 tablespoons Honey or Maple Syrup
- 1 teaspoon Vanilla Extract
- ½ cup Chocolate Chips (optional)
Instructions
- Gather and Prep
- Mix the Base
- Sweeten It Up
- Chocolate Love (Optional)
- Shape the Bites
- Freeze It
- Store and Enjoy!
Notes
Feel free to get creative with ingredients like adding chia seeds or flaxseeds for additional nutrition.
- Prep Time: 10 minutes
- Cook Time: 0 minutes
- Category: Snack
- Method: Freezing
- Cuisine: American
Nutrition
- Serving Size: 1 bite
- Calories: 80
- Sugar: 3g
- Sodium: 30mg
- Fat: 5g
- Saturated Fat: 1g
- Unsaturated Fat: 4g
- Trans Fat: 0g
- Carbohydrates: 7g
- Fiber: 1g
- Protein: 3g
- Cholesterol: 0mg
Keywords: frozen treat, Greek yogurt, peanut butter, healthy snack, dessert

Frozen Greek Yogurt Peanut Butter Bites
Frozen Greek Yogurt Peanut Butter Bites: A Sweet and Simple Treat!
Welcome back to my cozy kitchen, food enthusiasts! Today, I’m bringing you a delightful treat that marries the creamy goodness of Greek yogurt with the rich, nutty flavor of peanut butter. Frozen Greek Yogurt Peanut Butter Bites are your new best friend when you’re craving something sweet but also want a healthier option. These little bites are not only easy to whip up, but they also satisfy that sweet tooth while providing a boost of protein and calcium. Who knew healthy could taste this good?
Let me tell you, there’s something magical about the combination of Greek yogurt and peanut butter. It’s like a hug in food form! The creamy yogurt balances perfectly with the smooth, nutty peanut butter—creating a luxurious, indulgent flavor without the guilt. And let’s be honest, who doesn’t love a snack that you can pop in your mouth whenever you want? These bites are ideal for busy afternoons, a sweet snack for kids, or even a late-night dessert when you’re feeling a little naughty but not too naughty.
Now, not to get too sentimental, but these bites bring me back to simpler times—snack times with friends, making memories in the kitchen with family, and the joy of sharing something delicious that’s also good for you. By the end of this post, you’ll not only have a recipe in hand but also a cozy story to go along with it! So, let’s roll up our sleeves and dive in!
Personal Story
There’s a vivid memory I hold close to my heart that involves a summer spent in my grandmother’s kitchen. She was a master at turning ordinary ingredients into pure magic. One particularly hot afternoon, as we were looking for something cool and tasty, she introduced me to the world of frozen treats made from yogurt. We didn’t have fancy gadgets back then—just a simple mixing bowl, a spatula, and lots of love!
She would whip up yogurt mixtures infused with peanut butter, vanilla, and whatever fruits we had on hand. I remember impatiently waiting for those little bites to freeze, sneaking tastes of the mixture before it made its way to the freezer. It became our little ritual: making scrumptious frozen bites while sharing stories and giggles. Every summer since, I’ve felt the urge to recreate those lovely afternoons, and my Frozen Greek Yogurt Peanut Butter Bites are my homage to her legacy. Now, let’s bring a taste of that nostalgia into your kitchen!
Ingredients
Here’s what you’ll need to create your own frozen delights. Each ingredient plays a crucial role in building that yummy flavor we’re after!
-
Greek Yogurt (Plain or Vanilla): This creamy base is packed with protein and probiotics. Plain yogurt gives you more control over the sweetness, while vanilla adds a lovely flavor boost. If you’re not a fan of Greek yogurt, regular yogurt will work too, but it may give a slightly different texture.
-
Peanut Butter (Creamy or Crunchy): Smooth peanut butter will create a velvety finish, while crunchy offers a delightful texture. If you’re allergic to peanuts or want a twist, try almond butter or sun butter.
-
Honey or Maple Syrup: This natural sweetener balances out the tanginess of the yogurt. For a lower-sugar option, you can use stevia or monk fruit; just adjust to your taste!
-
Mini Chocolate Chips (Optional): Because who doesn’t appreciate a bit of chocolate? Feel free to skip these, or replace them with dried fruit or nuts for a different crunch.
-
Vanilla Extract: A splash of this will elevate your bites to a whole new level of deliciousness, adding warmth and depth. If you’re out of vanilla, a hint of almond extract can do the trick!
-
Pinch of Salt: A tiny bit of salt enhances all the other flavors, making everything pop! Don’t skip it; it’s like the secret handshake between flavors!
Step-by-Step Instructions
Now that we’ve got our ingredients prepped, it’s time to get cooking… or, should I say, mixing! Here’s how to put it all together:
-
Gather Your Equipment: Grab a mixing bowl, a spatula, a measuring cup, and a mini muffin tin or silicone mold (the season’s hottest molds—because they make everything more fun!).
-
Mix the Yogurt and Peanut Butter: In the mixing bowl, add 1 cup of Greek yogurt and ½ cup of peanut butter. Use your spatula and mix until the two ingredients are fully combined. You want it creamy and smooth without any streaks (think of this as a workout for your arms!).
-
Sweeten the Deal: Next, drizzle in about 2 tablespoons of honey or maple syrup (or to taste). Mix again until beautifully blended. Remember, you can always start with less and add more, depending on your sweet tooth!
-
Add the Vanilla and Salt: Pour in ½ teaspoon of vanilla extract and add a pinch of salt. This step is crucial for enhancing the overall flavor profile! Stir everything together until smooth and well incorporated.
-
Fold in Chocolate Chips: If you’re using mini chocolate chips, gently fold them in at this step. This part is so satisfying—imagine each chip being a pocket of joy waiting to burst in your mouth!
-
Scoop and Freeze: Using a spoon or an ice cream scoop, fill your muffin tin or silicone mold with the mixture. Press it down gently for even pops. Leave a little room at the top as they might expand slightly while freezing.
-
Freeze Blissfully: Pop your filled molds into the freezer and let them chill for at least 2 hours, or until solid. This is the hardest part (waiting!), but trust me, the end result is worth it.
-
Enjoy Your Treats: Once they’re frozen solid, pop them out of the molds. You can store them in an airtight container in the freezer for up to a month—if they last that long!
Serving Suggestions
When it comes to serving, the world is your oyster! These bites are fabulous as-is, but you could also do a little extra magic by drizzling some melted chocolate on top or dusting them with a sprinkle of crushed nuts. Serve them in colorful cupcake liners for a festive touch at gatherings, or present them on a pretty platter at your next movie night. They’re perfect alongside fresh fruit or nutty granola, making for a fun DIY yogurt parfait!
Recipe Variations
Y’all know I love a twist! Here are a few fun ideas to switch up your Frozen Greek Yogurt Peanut Butter Bites:
-
Nutty Banana Bliss: Add a mashed ripe banana to the yogurt mixture for a fruity twist. It pairs beautifully with peanut butter!
-
Berry Delicious: Fold in fresh or frozen berries alongside or instead of the chocolate chips for an antioxidant-packed treat.
-
Coconut Craze: Mix in unsweetened shredded coconut for that tropical flair! Pair it with macadamia nut butter for an extra layer of flavor.
-
Spicy Kick: For those who love a little heat, consider adding a small pinch of cayenne or cinnamon. It adds an unexpected zing that’s delightful!
-
Dairy-Free Delight: Substitute the Greek yogurt with a dairy-free yogurt alternative (almond, coconut, or cashew) and use a plant-based peanut butter for a vegan-friendly treat!
Chef’s Notes
Every recipe tells a story, and this one has evolved over the years! I first started making these bites as a healthy after-school snack for my kids. As we began experimenting, the flavors developed, and soon they became a staple in our home. I have even found myself making versions that are more indulgent for parties and gatherings. One of my funniest kitchen mishaps involved misreading the quantities—a bit too much peanut butter led to some delicious peanut butter ice cream instead of bites! Ah, the chaos of creativity!
FAQs and Troubleshooting
-
Why are my bites not freezing properly?
If your bites aren’t freezing well, it may be due to too much peanut butter or yogurt. Try adjusting the ratios slightly. Adding more yogurt can create a firmer texture! -
Can I reuse the molds after making these?
Absolutely! Just give them a good wash to remove any residue, and you’re good to go for your next batch. -
How do I store my Frozen Greek Yogurt Peanut Butter Bites?
Store them in an airtight container in the freezer. You can separate layers with parchment paper to ensure they don’t stick together! -
What if I don’t have mini muffin tins?
No worries! You can use ice cube trays or even silicone molds in fun shapes! The bites will still taste fantastic!
Nutritional Info
While I’m not one to count every calorie, here’s a quick overview of what you can expect per serving (this is an estimate and can vary based on specific brands):
- Calories: Approximately 100
- Protein: 5g
- Fat: 6g
- Carbohydrates: 8g
- Fiber: 1g
- Sugar: 4g (depends on the sweetness of yogurt and added sweetener)
And there you have it, my lovely foodies! Your very own Frozen Greek Yogurt Peanut Butter Bites recipe is ready to delight! Whether you whip these up for a snack, dessert, or a cozy gathering, I hope they bring you just as much joy as they have brought to my kitchen. Remember, cooking is about sharing love and joy, so go ahead, make a batch, and feel that good vibe! Happy cooking!
Print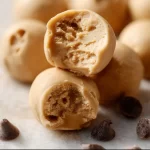
Frozen Greek Yogurt Peanut Butter Bites
- Total Time: 135 minutes
- Yield: 12 servings 1x
- Diet: Vegetarian
Description
A sweet and simple treat that combines Greek yogurt and peanut butter for a healthy, protein-packed snack.
Ingredients
- 1 cup Greek Yogurt (Plain or Vanilla)
- ½ cup Peanut Butter (Creamy or Crunchy)
- 2 tablespoons Honey or Maple Syrup
- ½ teaspoon Vanilla Extract
- Pinch of Salt
- Mini Chocolate Chips (Optional)
Instructions
- Gather your equipment: Grab a mixing bowl, a spatula, a measuring cup, and a mini muffin tin or silicone mold.
- Mix the yogurt and peanut butter in the mixing bowl until creamy and smooth.
- Sweeten the deal by drizzling in honey or maple syrup and mixing again.
- Add the vanilla extract and salt, stirring until smooth.
- Fold in the chocolate chips if using.
- Scoop the mixture into the muffin tin or mold, pressing down gently.
- Freeze for at least 2 hours until solid.
- Enjoy your treats and store in an airtight container in the freezer.
Notes
For variations, consider adding fruits, coconut, or spices to customize your bites.
- Prep Time: 15 minutes
- Cook Time: 120 minutes
- Category: Dessert
- Method: Freezing
- Cuisine: American
Nutrition
- Serving Size: 1 bite
- Calories: 100
- Sugar: 4g
- Sodium: 80mg
- Fat: 6g
- Saturated Fat: 1g
- Unsaturated Fat: 3g
- Trans Fat: 0g
- Carbohydrates: 8g
- Fiber: 1g
- Protein: 5g
- Cholesterol: 0mg
Keywords: frozen yogurt, peanut butter bites, healthy treat, snack, dessert


