

Crispy 5-Ingredient Butternut Squash Fritters for Weeknights
5-Ingredient Butternut Squash Fritters: A Cozy Kitchen Adventure
Introduction
Hey there, kitchen warriors! I’m Olivia Bennett, your friendly neighborhood cooking enthusiast, and today, we’re diving into a dish that is not only simple to make but will also leave your taste buds dancing with delight: 5-Ingredient Butternut Squash Fritters! These little gems are crispy on the outside, tender on the inside, and absolutely bursting with flavor. If you haven’t yet discovered the joy of cooking with butternut squash, let me tell you — you’re in for a treat.
Butternut squash has been my favorite fall vegetable for years. Its natural sweetness and buttery texture make it a versatile ingredient that can be used in everything from soups to salads. But when I discovered the magic of fritters, it was like a light bulb went off in my kitchen. This recipe is all about highlighting the squash while keeping things easy and approachable — perfect for busy weeknights or a cozy weekend gathering!
Imagine yourself at home, the smell of fritters sizzling away in the skillet, perhaps a podcast playing in the background, or your favorite playlist setting the mood. Fritters are communal by nature — great finger food for sharing and perfect for dipping. Whether you pair them with a spicy yogurt sauce, a vibrant salsa, or keep it classic with some sour cream, these Butternut Squash Fritters are destined to become a staple in your kitchen.
So grab that apron and get ready to unleash your inner chef! Let me walk you through this delightful recipe filled with personal anecdotes, handy tips, and, of course, some good old-fashioned kitchen fun.
Personal Story
I remember the first time I made fritters; it was during my college years, just before a big family gathering. With my family notoriously known for their culinary critiques, I was determined to impress everyone with my newfound cooking skills. I decided to create something special using butternut squash, which was abundant at the farmer’s market that week.
After some trial and error, I landed on these fritters. The first bite was met with silence around the table — the kind of silence that only happens when you’ve hit the jackpot in flavor! My cousin, with a small fry in hand, leaned over and exclaimed, “These taste like fall!” Suddenly, everyone was grabbing seconds, and I felt like a kitchen rock star! It was in that moment that I knew I had a hit on my hands. Ever since, these butternut squash fritters have been a beloved recipe in our family, and I’m excited to share them with you!
Ingredients
Here’s what you’ll need to make these delicious 5-Ingredient Butternut Squash Fritters, along with some nifty tips for each ingredient:
-
1 medium butternut squash (about 2 cups, grated)
- The star of the show! When picking one, look for a squash that feels heavy for its size and has a smooth, tan skin. If you can’t find butternut squash, you can use sweet potatoes or zucchini — just remember to squeeze out any extra moisture from the zucchini!
-
1/2 cup all-purpose flour
- This helps bind the fritters together. If you’re looking for a gluten-free option, quinoa flour or chickpea flour works beautifully as alternatives!
-
1 large egg
- The egg is crucial for binding. If you’re egg-free, try substituting it with a flax egg (1 tablespoon ground flaxseed mixed with 2.5 tablespoons water) or applesauce (1/4 cup works)!
-
1/4 teaspoon salt
- Don’t underestimate salt! It enhances the flavors, making each bite pop. Feel free to adjust the amount to suit your taste.
-
1/4 teaspoon pepper (optional; adjust to taste)
- A little kick adds depth! If you’re feeling adventurous, try adding some smoked paprika or chili powder for an extra flavor boost.
Step-by-Step Instructions
Alright, friends, it’s time to get cooking! Follow these simple steps to whip up your fritters, and remember, cooking is all about having fun and experimenting. Let’s go!
-
Prep the Squash:
- Start by peeling the butternut squash. This can be a bit tough, so make sure to use a sharp vegetable peeler or a sturdy knife. Once peeled, slice it in half lengthwise and scoop out the seeds. Grate the squash using a box grater or the grating attachment of a food processor. You’ll want about 2 cups of grated squash.
Chef Hack: If you have a busy schedule, you can bake the squash whole for about 45-60 minutes at 400°F (204°C) until soft, cool, peel, and then grate. This makes the process a breeze!
-
Mix the Ingredients:
- In a bowl, combine the grated butternut squash, all-purpose flour, egg, salt, and pepper. Stir until well incorporated. You should have a thick batter that holds together nicely.
Tip: Don’t be afraid to get your hands in there! Mixing with your hands can help better combine the ingredients and ensure everything is evenly distributed.
-
Heat the Skillet:
- Heat a medium skillet over medium heat and add a tablespoon of oil (olive oil or vegetable oil works well). You want enough oil to coat the bottom of the pan for frying.
Chef Insight: If you prefer baking, preheat your oven to 375°F (190°C) and line a baking sheet with parchment paper. You can scoop out the fritter mixture and flatten them a bit before popping them in the oven.
-
Form and Fry the Fritters:
- Once the oil is hot, take about 2 tablespoons of the fritter mixture and form them into small patties with your hands. Place them in the skillet, making sure to leave enough space between each fritter. Cook for about 3-4 minutes on one side or until golden brown and crispy. Flip them over carefully and cook for another 3-4 minutes on the other side.
Chef Hack: If you find the fritters falling apart, try adding a touch more flour until the consistency holds together better.
-
Drain and Cool:
- Once cooked, transfer the fritters to a paper towel-lined plate to absorb any excess oil. Let them cool slightly before digging in — they’re perfect while still warm!
Serving Suggestions
Served up hot and delicious, these Butternut Squash Fritters can be plated simply for an elegant touch. Stack fritters high and drizzle with your favorite dipping sauce, possibly a zesty yogurt mix with lemon and herbs, or even serve them with a side of tangy apple chutney. They also pair beautifully with fresh salad greens and a splash of vinaigrette!
Recipe Variations
- Herbed Versions: Add chopped fresh herbs like parsley, cilantro, or chives for an extra burst of freshness.
- Spiced Fritters: Consider folding in some feta cheese and spice it up with cumin or coriander for a Mediterranean twist.
- Vegan Delight: Swap the egg for a flax egg and use chickpea flour instead of all-purpose flour for a vegan take.
- Cheesy Goodness: Add a handful of grated cheese like cheddar or parmesan for an extra savory flavor.
- Baked Not Fried: Prefer a lighter option? Bake them at 375°F (190°C) for about 20-25 minutes, flipping halfway through until golden brown.
Chef’s Notes
These Butternut Squash Fritters hold a special place in my heart as they always remind me of that gathering years ago. As I’ve shared them with friends and family, I’ve witnessed how they can bring people together. The recipe has evolved over time, adapting to the flavors and spices I’ve fallen in love with throughout my cooking journey. There’s something magical about cooking that transcends beyond just feeding people — it creates memories, laughter, and bonds.
FAQs and Troubleshooting
-
Why are my fritters falling apart?
- Ensure you have enough binding agents like flour and eggs. If they’re too wet, adding a bit more flour can help!
-
Can I make these in advance?
- Absolutely! You can prep and form the fritters in advance, just pop them in the fridge until you’re ready to fry. They can also be frozen — fry right from frozen, but increase cooking time.
-
How can I tell when the fritters are done?
- They should be golden brown and crispy on the outside. A quick poke with a fork should show they are tender on the inside without any raw spots.
-
Can I air-fry these fritters?
- Yes! Preheat your air fryer and cook the fritters at 375°F (190°C) for about 15 minutes, flipping halfway through for evenly crisp perfection!
Nutritional Info
(Per fritter, based on the recipe yielding 8 fritters)
- Calories: 120
- Fat: 5g
- Carbohydrates: 15g
- Protein: 2g
And there you have it, friends! Your guide to creating delightful 5-Ingredient Butternut Squash Fritters that are sure to delight your family and friends. Get ready to enjoy the coziness of cooking, the joy of sharing, and the satisfaction of creating something delicious from scratch. Happy cooking!
Print
5-Ingredient Butternut Squash Fritters
- Total Time: 30 minutes
- Yield: 4 servings 1x
- Diet: Vegetarian
Description
Crispy on the outside and tender on the inside, these Butternut Squash Fritters are easy to make and bursting with flavor. Perfect for sharing!
Ingredients
- 1 medium butternut squash (about 2 cups, grated)
- 1/2 cup all-purpose flour
- 1 large egg
- 1/4 teaspoon salt
- 1/4 teaspoon pepper (optional; adjust to taste)
Instructions
- Prep the squash: Peel, halve, seed, and grate the butternut squash to yield about 2 cups.
- Mix the ingredients: Combine grated squash, flour, egg, salt, and pepper in a bowl until well incorporated.
- Heat the skillet: Heat a medium skillet over medium heat with a tablespoon of oil.
- Form and fry the fritters: Shape 2-tablespoon amounts of the mixture into patties and fry until golden brown, about 3-4 minutes per side.
- Drain and cool: Transfer cooked fritters to a paper towel-lined plate to absorb excess oil before serving.
Notes
These fritters can be baked at 375°F (190°C) for a lighter option. You can also make them in advance and freeze for later use.
- Prep Time: 15 minutes
- Cook Time: 15 minutes
- Category: Appetizer
- Method: Frying
- Cuisine: American
Nutrition
- Serving Size: 2 fritters
- Calories: 120
- Sugar: 2g
- Sodium: 200mg
- Fat: 5g
- Saturated Fat: 1g
- Unsaturated Fat: 3g
- Trans Fat: 0g
- Carbohydrates: 15g
- Fiber: 2g
- Protein: 2g
- Cholesterol: 25mg
Keywords: butternut squash, fritters, vegetarian appetizer, fall recipe, easy cooking
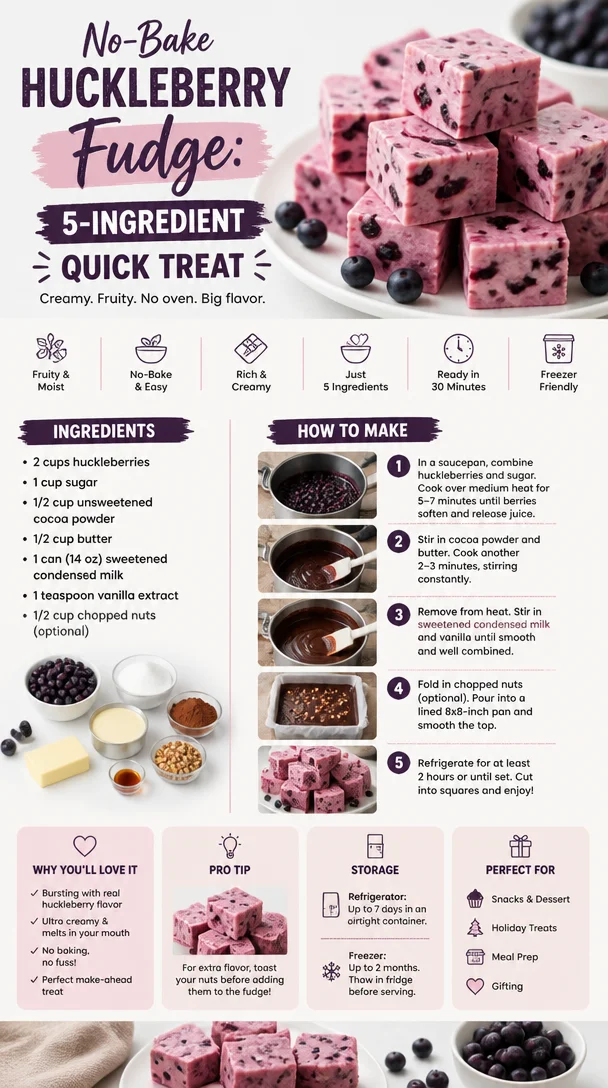
No-Bake Huckleberry Fudge: 5-Ingredient Quick Treat
Huckleberry Fudge: A Cozy Treat with a Personal Touch
Welcome to my kitchen, dear friends! Today, I’d love to share a delightful treat that’s as rich in flavor as it is in sentiment—Huckleberry Fudge. If you’re a lover of sweet desserts and bright, fruity flavors, this recipe embraces all that and more. There’s something so satisfying about picking berries bursting with flavor and crafting them into a luscious piece of fudge that melts in your mouth. Every bite is a wave of nostalgia, taking you back to sun-filled afternoons spent in the great outdoors.
When I think of huckleberries, I remember those long summer days exploring the wild, fragrant woods behind my childhood home. My family would gear up with buckets and head out to gather the tiny, sweet berries, all the while delighting in the mix of laughter, the occasional silly argument over the biggest berry found, and the soothing sounds of nature. After our adventures, we’d return home with our treasures and create all sorts of delicious delights, but this fudge always stood out as a favorite. It was our sweet reward for a successful day, and my mom’s recipe has become a treasured family tradition.
The beauty of Huckleberry Fudge is that it brings together the richness of chocolate and the tartness of huckleberries, creating a harmony that dances on your palate. Plus, it’s a treat you can easily whip up at home, even in a messy apron—just like any dish I love to share! So, roll up your sleeves, grab a pot, and let’s dive into the wonderful world of huckleberries and chocolate.
Personal Story
As I mentioned, my journey with huckleberries started way back when I was a kid. My family used to embark on berry-picking adventures, and each trip felt like embarking on a grand expedition. I vividly recall the pure joy that came with plucking those ripe, dark purple berries off the bushes, careful not to squish them in our excitement. Inevitably, there would be a small family competition on who could gather the most berries. My younger brother would always manage to outdo us all, but it didn’t matter; the thrill was in sharing those moments together.
After gathering all those huckleberries, we would come home, wash them, and decide how best to devour them. Most of the time, we would go classic and make pies or jams, but one summer, my mom decided to whip up some huckleberry fudge. I can still remember the first bite of that fudge—decadent chocolate with vibrant bursts of huckleberry flavor that made my taste buds dance! That summer set the stage for many fudge-making sessions in our family, and now, years later, I still find so much joy in making this sweet treat, reminiscing about those simple yet profound moments spent in the great outdoors with my loved ones.
Ingredients
Let’s gather our ingredients to make this delicious Huckleberry Fudge! Here’s what you’ll need for a batch that will serve about 12 people (or yourself, no judgment here!):
-
2 cups huckleberries: These sweet little gems bring a delightful tart flavor. If you can’t find huckleberries, feel free to substitute them with blueberries or blackberries—both work fantastically.
-
2 cups granulated sugar: A must for sweetness! You can replace granulated sugar with coconut sugar for a deeper flavor. Just keep in mind that it might alter the color of your fudge a bit.
-
3/4 cup unsweetened cocoa powder: This is where the chocolatey goodness comes from! Look for high-quality cocoa powder for a richer taste. Carob powder can be a good alternative for those avoiding chocolate.
-
1/2 cup unsalted butter: Adds a creamy texture to our fudge. If you’re looking for a dairy-free option, you can substitute with coconut oil.
-
1 can (14 oz) sweetened condensed milk: This ingredient provides the right creaminess and sweetness. If you prefer a vegan option, look for coconut-based sweetened condensed milk or make your own at home.
-
1 tsp vanilla extract: Enhances the overall flavor of the fudge. Use pure vanilla extract rather than imitation for the best aroma and taste.
-
A pinch of salt: Balances out the sweetness perfectly. You may use sea salt or Himalayan salt; both will do the trick!
Ready to transform these ingredients into delightful fudge? Grab your apron, and let’s get to cooking!
Step-by-Step Instructions
Now, the best part—cooking! Here are the step-by-step instructions to make Huckleberry Fudge:
-
Gather Your Supplies: Start by getting out a medium saucepan, a wooden spoon, and an 8×8-inch baking dish. Line the baking dish with parchment paper (this makes for easier removal later) and set it aside.
-
Prepare the Huckleberries: Rinse your huckleberries in cold water. Gently pat them dry with a paper towel. If they’re large, you can give them a little mash with a fork to release some juices, but be careful not to turn them into huckleberry mush!
-
Melt the Butter: In your medium saucepan over medium heat, add in the unsalted butter. Let it melt slowly, swirling occasionally to ensure it doesn’t brown. This step is essential as browned butter will alter the flavor profile of our fudge (great for some recipes, but not this one).
-
Mix in Sugar and Cocoa Powder: Once the butter is melted, add the granulated sugar and cocoa powder. Stir vigorously to combine until you form a semi-smooth mixture. This may take a minute or two—don’t rush it!
-
Add Sweetened Condensed Milk: Slowly pour in the sweetened condensed milk while continuing to stir. It will feel thick and luxurious—let it warm up through. Cook for about 5-7 minutes until the mixture starts to bubble gently. Keep stirring to prevent any burning. This is where the magic happens, my friends!
-
Incorporate Vanilla and Salt: Once you see those lovely bubbles, remove the saucepan from heat. Add the vanilla extract and pinch of salt, giving it another good stir. The aroma will be incredible at this point!
-
Fold in Huckleberries: Now for the star of the show—gently fold in the huckleberries. This is your chance to be a little whimsical; some berries might burst and infuse the fudge with lovely purple swirls while some stay intact for juicy bites.
-
Pour Into the Baking Dish: Carefully pour the fudge mixture into your prepared baking dish. Use a spatula to smooth the top evenly. Let it chill at room temperature for about 2-3 hours or until set. If you’re in a hurry (I get it!), you can speed things up by putting it in the fridge.
-
Cutting and Enjoying: Once the fudge is set, lift it out of the pan using the parchment paper. Place it on a cutting board and slice into squares.
-
Celebrate the Fudge: Grab a piece and celebrate your masterpiece! Every bite will remind you of those berry-picking days and warm memories in the kitchen.
Serving Suggestions
Huckleberry fudge is divine on its own, but there are a few ways to elevate your serving game! For an elegant touch, plate the squares on a beautiful serving platter and dust with a bit of cocoa powder or powdered sugar. You can also pair the fudge with a scoop of vanilla ice cream for a heavenly combination. If you’re feeling extra, drizzle some chocolate sauce or caramel over the top. Either way, your loved ones will be impressed!
Recipe Variations
Feeling adventurous? Here are some creative twists you can try with this Huckleberry Fudge recipe:
-
Nutty Fudge: Add some chopped walnuts or almonds for a crunchy texture and a flavor contrast that complements the chocolate.
-
Swirled Fudge: Swirl in some peanut butter or almond butter for a rich and nutty taste.
-
Spiced Fudge: Sprinkle in some cinnamon or a pinch of chili powder for an unexpected flavor kick.
-
Harvest Fudge: For a fall-inspired treat, add in chopped dried apples or pecans alongside your huckleberries.
-
Citrus Zest: A hint of lemon or orange zest can provide a refreshing brightness to your fudge!
Chef’s Notes
This recipe has come a long way since my childhood kitchen adventures. Initially, I used whatever berries we had on hand, and it was always a bit of a surprise how different each batch turned out! Over time, I perfected the balance between the chocolate and berry flavors, and it became a winter favorite as well.
Once, I tried substituting the huckleberries with some intense cherry preserves on a whim, and lo and behold, I ended up with Cherry Chocolate Fudge! It was a hit as well. The joy in cooking always lies in experimentation and creativity; don’t be afraid to try new things.
FAQs and Troubleshooting
1. My fudge didn’t set! What went wrong?
If your fudge remains soft after cooling, it might be due to not cooking it long enough to reach the right temperature. Next time, ensure it bubbles gently for at least 5 minutes to allow enough moisture to evaporate.
2. Can I use frozen huckleberries?
Absolutely! Just make sure to thaw and drain excess moisture before adding them to your fudge. This will help maintain the right consistency.
3. How can I store leftover fudge?
Place the fudge squares in an airtight container at room temperature for up to a week. For longer storage, you can refrigerate it or freeze it. Just remember to layer parchment paper between the squares to avoid sticking!
4. What if I want to give this as a gift?
Great idea! Cut the fudge into squares and package them in a lovely box with a ribbon. Don’t forget to include a little note sharing the story behind the recipe—it’s a sweet personal touch.
Nutritional Info
While I believe desserts are all about enjoying indulgent moments, it’s good to know what you’re enjoying! Each piece of huckleberry fudge has approximately:
- Calories: 160
- Fat: 6g
- Carbohydrates: 25g
- Fiber: 1g
- Sugars: 20g
Remember, moderation is key, and sharing is always encouraged!
As we wrap up our huckleberry adventure, I hope this recipe brings joy, warmth, and delicious memories to you and your loved ones, just as it has in my family. Happy cooking! 🍫💜
Print
Huckleberry Fudge
- Total Time: 120 minutes
- Yield: 12 servings 1x
- Diet: Vegetarian
Description
Rich and fruity Huckleberry Fudge that melts in your mouth, capturing the nostalgic essence of outdoor berry-picking adventures.
Ingredients
- 2 cups huckleberries
- 2 cups granulated sugar
- 3/4 cup unsweetened cocoa powder
- 1/2 cup unsalted butter
- 1 can (14 oz) sweetened condensed milk
- 1 tsp vanilla extract
- A pinch of salt
Instructions
- Gather your supplies: medium saucepan, wooden spoon, and an 8×8-inch baking dish lined with parchment paper.
- Prepare the huckleberries by rinsing them in cold water and patting them dry.
- Melt the butter in the saucepan over medium heat, stirring occasionally.
- Mix in sugar and cocoa powder, stirring until combined.
- Add sweetened condensed milk, cooking for about 5-7 minutes until the mixture bubbles.
- Incorporate vanilla extract and salt, stirring well.
- Fold in huckleberries gently, then pour the mixture into the prepared baking dish.
- Let it chill at room temperature for 2-3 hours until set.
- Cut the fudge into squares and enjoy!
Notes
For a dairy-free option, replace unsalted butter with coconut oil and use coconut-based sweetened condensed milk.
- Prep Time: 15 minutes
- Cook Time: 20 minutes
- Category: Dessert
- Method: No-Bake
- Cuisine: American
Nutrition
- Serving Size: 1 piece
- Calories: 160
- Sugar: 20g
- Sodium: 40mg
- Fat: 6g
- Saturated Fat: 3g
- Unsaturated Fat: 2g
- Trans Fat: 0g
- Carbohydrates: 25g
- Fiber: 1g
- Protein: 2g
- Cholesterol: 15mg
Keywords: huckleberry, fudge, dessert, chocolate, homemade candy
Raspberry Mousse in 15 Minutes: 5-Ingredient Creamy Delight
Raspberry Mousse: An Incredible Ultimate Recipe
Introduction
Hey there, fellow food lovers! If you’re anything like me, the mere mention of raspberry mousse might summon dreams of light, fluffy clouds of sweetness resting elegantly on a plate. Perhaps you can picture a sunlit afternoon gathering with friends, laughter mingling with the aroma of desserts swirling in the air. Well, you’re in the right place! Today, we’re diving into an easy-to-follow, yet absolutely delicious raspberry mousse recipe that will not only wow your taste buds but also impress your loved ones.
Raspberry mousse holds a special place in my heart—like many of my kitchen adventures, it’s steeped in nostalgia and cozy moments. I remember the first time I made this delight as a young cook. My mom and I spent an entire Saturday afternoon in the kitchen, battling the heat wave and an overabundance of berries from the garden. With sticky fingers and laughter, we whipped up a batch that ended up being the star of the family barbecue later that evening. Watching my cousins take their first bites, their eyes widening with delight—it was priceless!
So, let’s recreate some of that magic together! Whether you’re planning a romantic dinner, a chic brunch, or simply a night of self-pampering, this raspberry mousse recipe is here to elevate your culinary repertoire. Trust me, it’s fancy enough to look great on any holiday table, but simple enough for any night of the week. Let’s get those mixing bowls ready!
Personal Story
As I mentioned, my love for raspberry mousse began in the warm embrace of my family’s kitchen. One steamy summer, we found ourselves with a garden bursting with fresh, ripe raspberries. I can still see my mom meticulously picking the juiciest ones, her fingers stained with berry juice, while I eagerly waited with a bowl at the ready.
It was during this berry bonanza that we decided to throw together a raspberry mousse, a recipe my mom claimed was "the easiest yet most delightful dessert" she had up her sleeve. We spent hours whisking and folding, chatting about everything from school to her childhood memories. The best part? As the mousse chilled in the fridge, we took turns sneaking spoonfuls instead of waiting for the final presentation. Each spoonful was a burst of flavor that reminded me how wonderful it is to create something together. That day not only sparked my love for cooking but also created an everlasting bond through food and laughter.
Ingredients
Now that we’ve set the mood, let’s talk about what you’ll need to whip up this raspberry mousse. Here’s your shopping list:
-
Fresh Raspberries (2 cups): The star of the show! Look for vibrant, plump berries for the best flavor. If they’re out of season, frozen berries work too—just thaw and drain the excess liquid.
-
Sugar (1/2 cup): This will sweeten the puree. Feel free to adjust based on your taste—agave or honey work as fantastic substitutes if you want a natural sweetener.
-
Heavy Cream (1 1/2 cups): This adds richness and creaminess to the mousse. Keep it cold for optimal whipping. If you’re looking for a lighter option, whipped coconut cream is a great alternative.
-
Vanilla Extract (1 teaspoon): Adds a warm, aromatic note to the mousse. Homemade vanilla extract elevates the flavor, but store-bought is perfectly fine!
-
Gelatin Powder (1 tablespoon): This helps the mousse firm up beautifully. If you prefer a vegetarian option, try using agar-agar instead! Just follow the package instructions for usage.
-
Water (2 tablespoons): Needed for blooming the gelatin. Keep it warm so it dissolves easily.
Step-by-Step Instructions
Now comes the fun part! Let’s whip up this raspberry mousse step by step. Grab your mixing bowls and let’s get started!
-
Prepare the Raspberries:
- Wash the fresh raspberries gently and place them in a blender or food processor. Aim for about 2 cups (you can adjust this based on how raspberry-flavored you want your mousse).
- Add the sugar to the raspberries and blend until smooth. You can leave tiny seeds if you like a bit of texture; otherwise, feel free to strain the puree through a sieve to achieve a silky-smooth consistency.
- Chef Tip: Reserve a few whole raspberries for garnish later—they’ll add a pop of color to your final presentation!
-
Bloom the Gelatin:
- In a small bowl, sprinkle gelatin over the warm water and let it stand for about 5 minutes until it swells up, creating a “bloom.”
- Glad to have this step out of the way? I always keep some gelatin handy—it’s a secret weapon for so many desserts!
-
Combine the Raspberry Puree and Gelatin:
- Place the bloomed gelatin in the microwave for about 10 seconds just to slightly heat it (make sure it’s warm enough to dissolve but not bubbling hot).
- Stir the gelatin into the raspberry puree until completely dissolved. This is where the magic happens!
-
Whip the Cream:
- In a medium mixing bowl, pour in the heavy cream and add the vanilla extract. Using an electric mixer, whisk on medium speed until soft peaks form. You’re looking for a frothy, pillowy cloud, not a butter!
- Chef Tip: Keep your mixing bowl and beaters chilled for easier whipping!
-
Fold It All Together:
- Gradually add the raspberry mixture into the whipped cream. Use a folding motion—gently lift and turn the cream, combining them without deflating the air you’ve whipped in. Aim for a beautiful swirly texture that still shows off those lovely pink hues.
- If you want deeper flavors, consider folding in a bit of lemon zest for brightness!
-
Chill the Mousse:
- Once everything is mixed, scoop the mousse into serving glasses or bowls, leaving some room at the top for garnishing later. Cover them with plastic wrap and pop them into the fridge for at least 4 hours (or overnight best) to set.
- Chef Tip: This is where you can take a breather—go catch up on your favorite show while your mousse works its magic!
Serving Suggestions
When you’re ready to serve, bring out those beautiful glasses brimming with raspberry goodness. To really wow your guests, you can top each mousse with a dollop of whipped cream (a little more never hurt, right?), some whole raspberries, and a sprinkle of mint leaves for an elegant touch. Drizzle a bit of raspberry sauce or chocolate sauce over the top, and you’re ready to dig in!
Recipe Variations
Feeling adventurous? Here are a few creative variations to try:
- Chocolate Raspberry Mousse: Fold in some melted dark chocolate into the mousse for a rich twist that balances sweet-tart goodness.
- Mint Infusion: Add a few finely chopped mint leaves or a drop of mint extract to the raspberry puree for a refreshing hint.
- Bourbon Raspberry Mousse: Add a tablespoon of bourbon to the raspberry puree for an adult-only twist that complements the sweet tartness perfectly.
- Vegan Raspberry Mousse: Substitute heavy cream with whipped coconut cream and gelatin with agar-agar to create a delightful plant-based version.
Chef’s Notes
This raspberry mousse holds a treasure trove of memories for me, evolving over the years from my mom’s original recipe to my own playful adaptation. Every time I make it, I’m reminded of those sweet summer afternoons full of raspberries and laughter. It’s not just a dessert; it’s a connection to my roots, but it also seamlessly fits into any occasion—be it a family gathering or a cozy dessert for one. Oh, and don’t let those berries go to waste—switch it up with different fruits as the seasons change!
FAQs and Troubleshooting
-
Why is my mousse not setting?
- Make sure your gelatin is properly bloomed and dissolved before folding it into the mixture. If it’s too warm when added, it might not set properly!
-
Can I use other berries?
- Absolutely! Strawberries, blueberries, or mixed berries can be a fantastic substitute for raspberries. Just remember that sweetness and acidity might vary.
-
How can I get the mousse to look pretty in the serving glass?
- For a layered look, alternate spoonfuls of raspberry mousse and whipped cream into the serving glasses before chilling—it’ll give a beautiful visual contrast once set!
-
What if I want a less sweet mousse?
- Simply reduce the amount of sugar in the raspberry puree. The natural tartness of the berries will shine through beautifully!
Nutritional Info
(Optional) Each serving of raspberry mousse contains approximately:
- Calories: 250
- Fat: 18g
- Carbohydrates: 24g
- Protein: 2g
And there you have it! An incredible raspberry mousse recipe filled with flavor, texture, and heart. I hope you enjoy creating this delicious dish as much as I do. Remember, the kitchen is your playground—don’t be afraid to get messy and have fun! Happy cooking, my fellow food enthusiasts!
Print
Raspberry Mousse
- Total Time: 240 minutes
- Yield: 4 servings
- Diet: Vegetarian
Description
An effortless yet delightful raspberry mousse that will impress your loved ones and elevate your culinary repertoire.
Ingredients
- Fresh Raspberries, 2 cups
- Sugar, 1/2 cup
- Heavy Cream, 1 1/2 cups
- Vanilla Extract, 1 teaspoon
- Gelatin Powder, 1 tablespoon
- Water, 2 tablespoons
Instructions
- Prepare the Raspberries: Wash and place in a blender with sugar; blend until smooth.
- Bloom the Gelatin: Sprinkle gelatin over warm water and let it stand for 5 minutes.
- Combine the Raspberry Puree and Gelatin: Heat the bloomed gelatin, then stir it into the raspberry puree.
- Whip the Cream: Beat heavy cream with vanilla extract until soft peaks form.
- Fold It All Together: Gently combine the raspberry mixture with the whipped cream.
- Chill the Mousse: Scoop into glasses, cover, and refrigerate for at least 4 hours.
Notes
Serve with whipped cream, whole raspberries, and mint for an elegant touch. Consider variations like chocolate or vegan options.
- Prep Time: 15 minutes
- Cook Time: 0 minutes
- Category: Dessert
- Method: Chilling
- Cuisine: American
Nutrition
- Serving Size: 1 serving
- Calories: 250
- Sugar: 22g
- Sodium: 30mg
- Fat: 18g
- Saturated Fat: 11g
- Unsaturated Fat: 7g
- Trans Fat: 0g
- Carbohydrates: 24g
- Fiber: 2g
- Protein: 2g
- Cholesterol: 70mg
Keywords: raspberry mousse, dessert, easy recipe, summer treat, mousse recipe

No-Bake Raspberry Truffles: Quick 5-Ingredient Treat
Indulge in Decadence: Homemade Raspberry Truffles
Welcome to my cozy corner of the kitchen! Today, we’re diving into a delightful DIY adventure that’s bound to tickle your taste buds—homemade raspberry truffles. There’s something incredibly satisfying about creating these bite-sized pieces of heaven in your very own kitchen. Not only do they look impressive, but they also make for a perfect treat to share with friends, family, or just to indulge in during a quiet moment at home.
I can’t help but smile every time I think about chocolate. The rich, velvety goodness brings me back to my childhood, where each visit to my grandmother’s house was laced with the aroma of chocolate chip cookies baking in the oven. However, my absolute favorite sweet treat was her famous raspberry truffles. Fluffy ganache mixed with the vibrant, tart sweetness of raspberries, coated in a delicate layer of chocolate—pure bliss!
Now, imagine inviting friends over and showering them with these elegant delights. It’s impressive and utterly delightful. And here’s the best part—you don’t need a culinary degree to whip up these little luxuries. With just a handful of simple ingredients and a bit of love, you can create your raspberry truffles right at home. Are you ready? Let’s roll!
A Whiff of Nostalgia
When I think back to my grandmother’s kitchen, I can almost feel the warmth radiating from the oven as she expertly crafted her truffles. The moment those little chocolate gems were ready, she’d call us over, and we’d gather around the table in anticipation. It was one of those familial traditions that bonded us over shared smiles and laughter.
I remember the joyous chaos as we helped her dip the ganache in melted chocolate, our little hands smudged with the magical concoction while chocolate dripped melodramatically down our arms. And each time we bit into those truffles, a burst of flavors would dance on our pallets, each one reminding us just how special and meaningful those moments were.
Now, when I make these raspberry truffles, I’m not just making a treat—I’m creating memories. Every bite is a flashback to those lovely afternoons, where love was the secret ingredient. So, let’s grab those aprons, roll up our sleeves, and make some raspberry truffles that will have you reminiscing for years to come!
Ingredients
- Dark chocolate (8 oz): Use high-quality dark chocolate, preferably 60-70% cocoa for a rich flavor. If you prefer a sweeter taste, feel free to use semi-sweet chocolate as a substitute.
- Fresh raspberries (1 cup): Use fresh raspberries for the brightest flavor. Frozen can work too; just make sure to drain excess moisture.
- Heavy cream (1/2 cup): This is essential for a smooth ganache. If you want a lighter version, coconut cream is a fantastic substitute!
- Powdered sugar (1/4 cup): For sweetness and easy incorporation into the mixture. You can use maple syrup or honey as an alternative if you’re looking for a natural sweetener.
- Vanilla extract (1 tsp): This adds depth to the flavor! Vanilla bean paste is a yummy alternative for a more intense flavor.
- Coating options: You can use cocoa powder, crushed nuts, or even sprinkles to roll the truffles in. Get creative here!
Step-by-Step Instructions
-
Prepare the Raspberries: Start by washing the fresh raspberries gently under cold water. Pat them dry carefully with a paper towel. This is key to avoiding excess moisture in your truffles. Set aside about 4-5 beautiful berries for garnish later.
-
Make the Ganache: In a small saucepan, heat the heavy cream over medium heat until it just begins to simmer. You don’t want it boiling—this can scorch the cream! Turn off the heat and add the chopped dark chocolate. Let it sit for a minute to soften. Gently stir until the chocolate is fully melted and the mixture is smooth. This is your ganache, folks!
-
Add the Raspberries: With a fork, mash the fresh raspberries in a bowl until they’re pureed. You want to get those juices flowing to combine with the ganache. Fold the raspberry puree into the chocolate mixture with a spatula. The explosion of flavors here is going to be incredible! Add the vanilla extract and powdered sugar, mixing until well combined.
-
Chill the Mixture: Transfer the ganache mixture to a container and cover it with plastic wrap. Refrigerate for at least 2 hours, or until it’s firm enough to handle. Patience is key, friends—this is where the magic happens!
-
Shape the Truffles: Once chilled, it’s time to roll! Use a small cookie scoop or a spoon to scoop out the mixture. Roll the scoops of ganache between your palms to form small balls. Don’t worry if they’re not perfect—each one has its own charm!
-
Coat Your Truffles: Use your chosen coating options to roll the truffles. You can coat them in cocoa powder, crushed nuts, or sprinkles. This adds texture and makes them visually stunning! I like to roll them in cocoa powder for that classic look—just be sure to shake off any excess.
-
Serve and Enjoy: Place them in an airtight container in the fridge until you’re ready to serve. These little gems can last up to a week, so feel free to make them ahead of time for your next gathering!
Serving Suggestions
When it comes to serving your homemade raspberry truffles, presentation is everything! Arrange them on a beautiful platter, perhaps with some fresh raspberries scattered alongside for a pop of color. For a special touch, you could dust them lightly with more cocoa powder or add a drizzle of melted chocolate on top. Voila! You’ve transformed a simple treat into a stunning centerpiece!
Recipe Variations
- Minty Chocolate Raspberry Truffles: Add a few drops of peppermint extract to the ganache for a refreshing twist. Garnish with mint leaves for an extra pop of color!
- Nutty Raspberry Truffles: Roll your truffles in finely chopped nuts like pistachios or walnuts for a delightful crunch.
- Vegan Option: Swap dark chocolate for a vegan version, such as dairy-free chocolate, and use coconut cream for the ganache. Make sure to check that your powdered sugar is vegan-friendly!
- Fruit Surprise: Mix in diced strawberries or blueberries along with the raspberries for a mixed berry truffle that adds variety to each bite.
Chef’s Notes
Ah, the beauty of cooking is that it’s always evolving! I remember when I first tried making these truffles, I thought I could skip the chilling phase—what a mess that turned out to be! The ganache was too soft to roll, and I had a gooey situation on my hands. Trust me, don’t rush this step! Now, I embrace the chilling time as the perfect moment for a cup of tea or a good book.
Feel free to experiment with flavors; I once added a hint of orange zest for a zesty kick. They were a hit at my last dinner party, proving that truffles can have many faces!
FAQs and Troubleshooting
-
Why is my ganache too runny?
If your ganache is too runny, it could be that the cream was too hot or there wasn’t enough chocolate. You can fix this by melting a bit more chocolate and mixing it in, letting it chill again until firm. -
Can I use frozen raspberries?
Yes, but be sure to drain excess moisture after thawing. The texture will be slightly different, but they’ll still taste great! -
How do I store my truffles?
Keep your truffles in an airtight container in the refrigerator to maintain their freshness. Bring them to room temperature before serving for the best flavor! -
What can I do if my truffles are too soft to roll?
Simply refrigerate the ganache longer until it firms up enough to handle. You could also try adding a little cocoa powder or melted chocolate to help with consistency.
Nutritional Info (Optional)
While I encourage you to enjoy these raspberry truffles as an occasional indulgence, here’s some quick info to keep in mind:
- Serving Size: 1 truffle
- Calories: Approximately 110 calories per truffle
- Fat: 7g (from chocolate and cream)
- Carbohydrates: 10g
- Protein: 1g
And there you have it—your very own raspberry truffles! These delectable bites of sweetness will surely impress anyone lucky enough to receive them. So roll up your sleeves, gather those ingredients, and enjoy the delightful journey of creating these little bursts of joy. Happy cooking!
Print
Homemade Raspberry Truffles
- Total Time: 135 minutes
- Yield: 24 truffles
- Diet: Vegetarian
Description
Delicious homemade raspberry truffles with fluffy ganache and a rich chocolate coating.
Ingredients
- Dark chocolate (8 oz, 60-70% cocoa)
- Fresh raspberries (1 cup)
- Heavy cream (1/2 cup)
- Powdered sugar (1/4 cup)
- Vanilla extract (1 tsp)
- Coating options: cocoa powder, crushed nuts, or sprinkles
Instructions
- Prepare the raspberries by washing them gently under cold water and patting them dry. Set aside 4-5 berries for garnish.
- Make the ganache: Heat the heavy cream in a saucepan until it simmers, then turn off the heat and stir in the chopped dark chocolate until smooth.
- Add the raspberries: Mash them with a fork and fold the puree into the ganache, then mix in the vanilla extract and powdered sugar.
- Chill the mixture for at least 2 hours until firm.
- Shape the truffles by scooping the ganache mixture and rolling them into balls.
- Coat the truffles in your chosen coatings.
- Serve and enjoy! Store in an airtight container in the fridge for up to a week.
Notes
For a refreshing twist, add mint extract. Experiment with different coatings for variety!
- Prep Time: 15 minutes
- Cook Time: 0 minutes
- Category: Dessert
- Method: Chilling
- Cuisine: French
Nutrition
- Serving Size: 1 truffle
- Calories: 110
- Sugar: 7g
- Sodium: 5mg
- Fat: 7g
- Saturated Fat: 4g
- Unsaturated Fat: 2g
- Trans Fat: 0g
- Carbohydrates: 10g
- Fiber: 1g
- Protein: 1g
- Cholesterol: 15mg
Keywords: raspberry truffles, chocolate dessert, homemade sweets
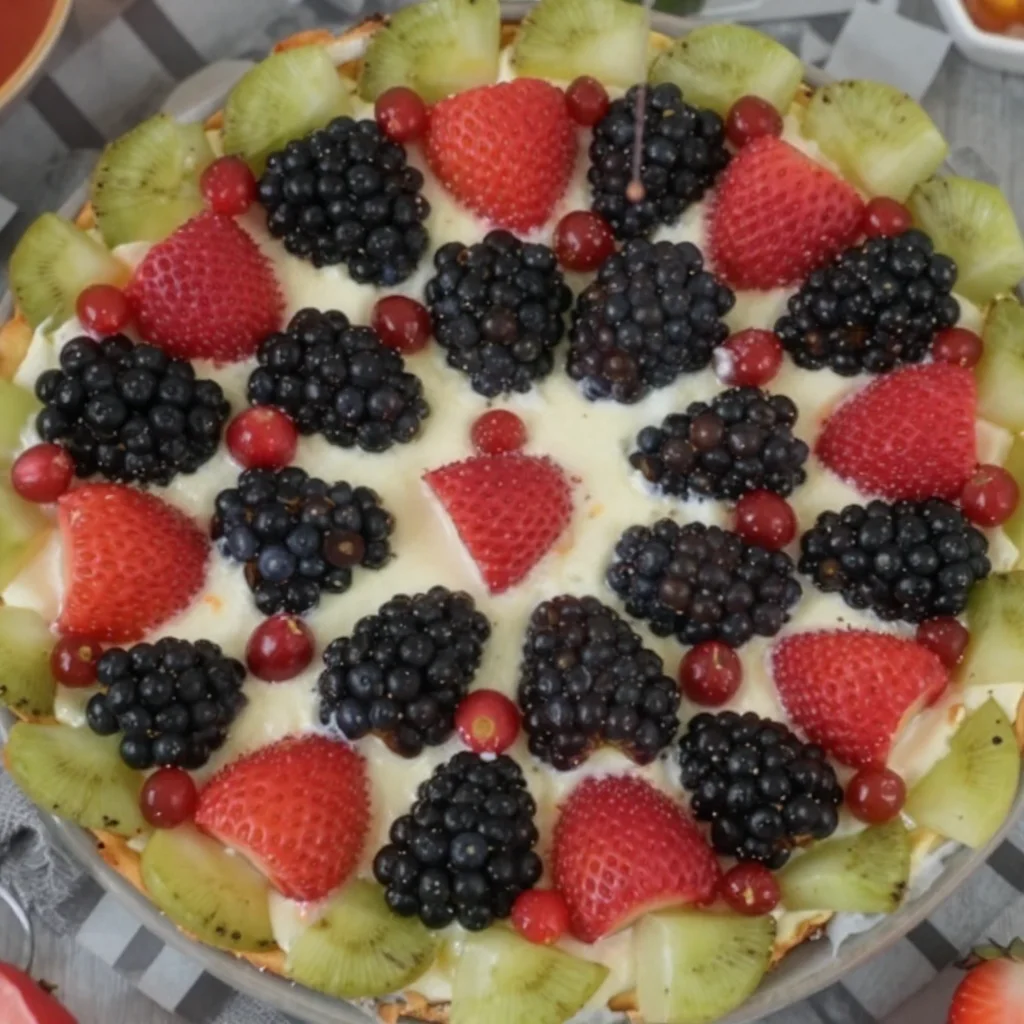
No-Bake Fruit Pizza: 5-Ingredient Weeknight Treats
Homemade Fruit Pizza: A Slice of Joy
Welcome! I’m Olivia Bennett, and today we’re diving into one of my all-time favorite recipes that absolutely screams “summer fun” — Homemade Fruit Pizza! Picture this: a velvety cream cheese frosting, a sweet, buttery cookie crust, and an array of vibrant fruits that will make your taste buds dance. Is your mouth watering yet?
There’s something inherently joyful about fruit pizza. It’s not just a treat; it’s a canvas for creativity, a chance to play with colors, textures, and flavors. Whether you’re hosting a backyard barbecue, celebrating a birthday, or simply craving something sweet and refreshing, fruit pizza fits the bill perfectly. And the best part? It’s incredibly easy to whip up, even if you’re new to the kitchen.
This recipe is all about embracing the seasonal fruits you love. Strawberries, kiwis, blueberries, and mandarin oranges are my go-tos, but feel free to take artistic liberty! So grab your apron (things might get a bit messy, and that’s part of the fun!) and let’s create a delicious masterpiece that will impress everyone at the table.
A Slice of Nostalgia
Growing up, my family had a tradition of hosting summer picnics in our backyard. We’d set up a long table adorned with checkered tablecloths, and the smell of barbecued goodness wafted through the air. My mom would always make her famous fruit pizza, and I fondly remember the anticipation as the creamy frosting and colorful fruits were assembled. It was often the centerpiece of our dessert table.
One particular afternoon, as the sun dipped below the trees, I claimed the last slice for myself, grinning from ear to ear. A burst of juicy strawberries and a hint of tangy kiwi made every bite a delightful explosion of flavor. I’ll never forget my little brother’s exaggerated sigh when he realized I had indulged in the final piece. It became a gentle family rivalry over who could create the most magnificent fruit pizza, and every summer since, it’s been our delicious tradition.
Ingredients
To make your very own fruit pizza, you’ll need the following ingredients:
-
Sugar Cookie Dough
This will be the base of your pizza. You can use store-bought dough for convenience or make your own from scratch for a homemade touch. -
Cream Cheese
Essential for the frosting! Feel free to use reduced-fat cream cheese if you’re looking for a lighter option. It will still be creamy and delicious! -
Powdered Sugar
This adds the necessary sweetness to the cream cheese frosting. If you’re looking to avoid sugar, you can substitute with a sugar alternative like erythritol or stevia. -
Vanilla Extract
A hint of vanilla elevates the flavor of the frosting. Always opt for pure vanilla extract for the best taste — imitation can be a little too harsh. -
Mixed Fresh Fruits
Choose your favorites! I love strawberries, blueberries, kiwis, and mandarin oranges for their vibrant colors and contrasting flavors. Remember, the fresher, the better! -
Lemon Juice (optional)
A squeeze of lemon juice in your frosting can brighten up the flavors. If you’re not a lemon fan, feel free to skip this.
Step-by-Step Instructions
Now, let’s roll up our sleeves and get cooking! Here’s a detailed guide:
-
Prepare the Sugar Cookie Base
Preheat your oven to 350°F (175°C). If you’re using store-bought dough, get it out and ready. If you’re making your own, mix your ingredients until dough forms. Spread the sugar cookie dough onto a parchment-lined baking sheet, shaping it into a large pizza shape — about 12 inches in diameter. Make it slightly thicker for a chewier base or thinner for a crispier finish. Bake for 10-15 minutes until it’s golden brown. Tip: Keep an eye on it — burnt edges are nobody’s friend! -
Cool the Cookie
Once out of the oven, let your cookie base cool completely on a wire rack. Many baking disasters can happen when you try to frost a warm cookie (it just turns into a melty mess, trust me!). -
Make the Cream Cheese Frosting
In a mixing bowl, combine 8 oz of cream cheese and ½ cup of powdered sugar. Blend until smooth and creamy. Add 1 tsp of vanilla extract and mix until incorporated. Chef insight: Taste as you go. If you prefer a sweeter frosting, you can always add a little more powdered sugar! -
Frost Your Cookie
Once your cookie base is completely cool, dollop the cream cheese frosting on top and spread it evenly with a spatula or the back of a spoon. Don’t be shy; the frosting should have a luscious layer—this is what makes it a pizza! -
Add the Fruits
Now for the fun part—adding the fruits! Arrange your mixed fresh fruits over the frosted cookie in an artistic manner. Consider creating sections with different fruits or going for a rainbow pattern. Tip: Start with larger fruits as a base and fill in gaps with smaller ones to create a colorful mosaic. -
Chill and Serve
Once you’re happy with your masterpiece, pop it in the refrigerator for about 30 minutes to set. This makes slicing much easier and gives the flavors a chance to meld.
Serving Suggestions
When it’s time to serve your fruit pizza, slice it into wedges just as you would a regular pizza. I recommend using a sharp knife so you don’t disturb the beautiful fruit arrangement. For a fun presentation, place slices on colorful plates, and serve with a sprig of mint on top. Trust me; it adds a touch of elegance that will impress your guests.
Recipe Variations
Feeling adventurous? Here are some fun variations to try with your fruit pizza:
- Chocolate Drizzle: Melt some dark chocolate and drizzle it over the top for a rich, decadent twist.
- Nut Butter Swirl: Incorporate a layer of almond or peanut butter between the cookie base and frosting for added flavor and a hint of nuttiness.
- Seasonal Spices: Try adding a pinch of cinnamon or nutmeg to your frosting for a warm, cozy flavor.
Chef’s Notes
This fruit pizza recipe has been a staple in my family for years, and it’s always evolving. I remember one summer, I tried using figs and walnuts instead of the traditional fruits. I thought I’d amazed everyone with my gourmet remix, but the kids were having none of it! They wanted their classic fruit pizza, and I quickly learned that sometimes, sticking to the tried-and-true is just as important as experimenting.
In the spirit of family and friends, this fruit pizza has become more than just a dessert — it’s a way to connect, share, and create memories. So, gather around the table, slice up that pizza, and enjoy the smiles from your loved ones!
FAQs and Troubleshooting
Q: My cookie base is too soft. What went wrong?
A: Make sure to let your cookie cool completely before frosting. If it’s still warm, it can make the frosting melt and lead to a soggy base.
Q: Can I make this ahead of time?
A: Absolutely! You can bake the cookie base a day ahead and store it tightly wrapped. Just frost and add the fruit on the day you plan to serve it for optimal freshness.
Q: What if I have leftover frosting?
A: Lucky you! Leftover frosting can be stored in the refrigerator for about a week. Try using it on bagels or as a cake frosting for another sweet treat.
Q: Can I freeze the fruit pizza?
A: Fruit pizza is best enjoyed fresh, but you can freeze the cookie base wrapped tightly in plastic wrap. Just be aware that freezing fresh fruit can affect its texture, so it’s best to add them fresh when you’re ready to serve!
Nutritional Info (Optional)
While I like to think of fruit pizza as a delightful treat filled with fresh produce, it’s always good to keep an eye on the calories if you’re counting them. Depending on your ingredient choices, here’s a rough estimate per slice (based on 12 slices):
- Calories: 200-300
- Protein: 3g
- Carbs: 30g
- Fat: 9g
Conclusion
There you have it—a delightful Homemade Fruit Pizza that’s not just delicious but also an adventure in the kitchen! I hope you enjoy creating this vibrant dish as much as I do. The memories made around a slice of fruit pizza are just as sweet as the dessert itself. So turn on that music, gather your favorite fruits, and embrace your inner chef! Happy cooking, my friends! 🍕✨
Print
Homemade Fruit Pizza
- Total Time: 30 minutes
- Yield: 12 servings 1x
- Diet: Vegetarian
Description
A delightful summer treat featuring a buttery cookie crust, creamy frosting, and a vibrant array of fresh fruits.
Ingredients
- Sugar Cookie Dough
- 8 oz Cream Cheese
- ½ cup Powdered Sugar
- 1 tsp Vanilla Extract
- Mixed Fresh Fruits (strawberries, blueberries, kiwis, mandarin oranges)
- Lemon Juice (optional)
Instructions
- Preheat your oven to 350°F (175°C). Spread the sugar cookie dough onto a parchment-lined baking sheet, shaping it into a large pizza about 12 inches in diameter. Bake for 10-15 minutes until golden brown.
- Cool the cookie base completely on a wire rack.
- Combine 8 oz of cream cheese and ½ cup of powdered sugar in a mixing bowl. Blend until smooth. Add 1 tsp of vanilla extract and mix well.
- Dollop the cream cheese frosting on top of the cool cookie base and spread it evenly.
- Arrange your mixed fresh fruits over the frosted cookie in an artistic manner.
- Chill in the refrigerator for about 30 minutes to set.
- Slice into wedges just like a pizza and serve with a sprig of mint for garnish.
Notes
Feel free to experiment with different fruits or toppings such as chocolate drizzle or nut butter for added flavor.
- Prep Time: 15 minutes
- Cook Time: 15 minutes
- Category: Dessert
- Method: Baking
- Cuisine: American
Nutrition
- Serving Size: 1 slice
- Calories: 250
- Sugar: 12g
- Sodium: 200mg
- Fat: 10g
- Saturated Fat: 4g
- Unsaturated Fat: 4g
- Trans Fat: 0g
- Carbohydrates: 32g
- Fiber: 1g
- Protein: 3g
- Cholesterol: 30mg
Keywords: homemade fruit pizza, summer dessert, fruit dessert, cream cheese frosting, colorful fruits


