
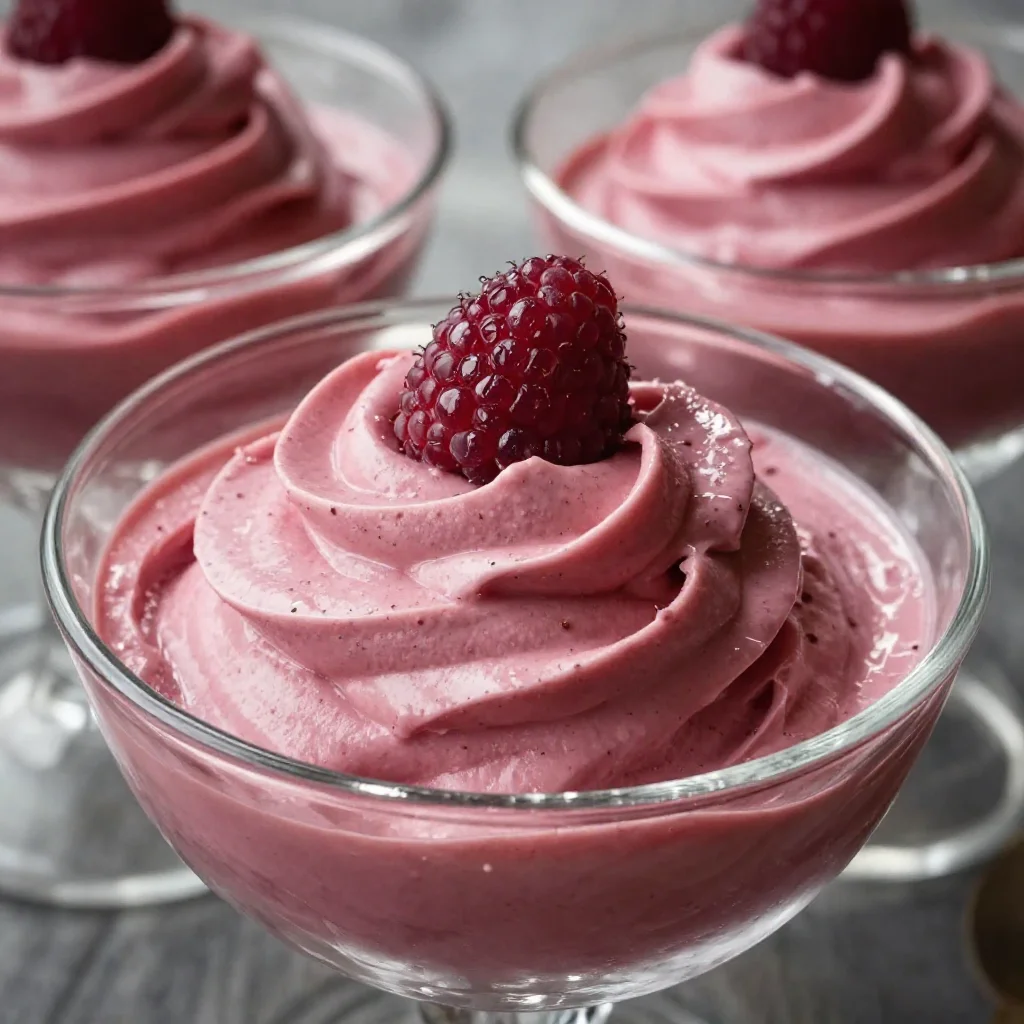
Raspberry Mousse in 15 Minutes: 5-Ingredient Creamy Delight
Raspberry Mousse: An Incredible Ultimate Recipe
Introduction
Hey there, fellow food lovers! If you’re anything like me, the mere mention of raspberry mousse might summon dreams of light, fluffy clouds of sweetness resting elegantly on a plate. Perhaps you can picture a sunlit afternoon gathering with friends, laughter mingling with the aroma of desserts swirling in the air. Well, you’re in the right place! Today, we’re diving into an easy-to-follow, yet absolutely delicious raspberry mousse recipe that will not only wow your taste buds but also impress your loved ones.
Raspberry mousse holds a special place in my heart—like many of my kitchen adventures, it’s steeped in nostalgia and cozy moments. I remember the first time I made this delight as a young cook. My mom and I spent an entire Saturday afternoon in the kitchen, battling the heat wave and an overabundance of berries from the garden. With sticky fingers and laughter, we whipped up a batch that ended up being the star of the family barbecue later that evening. Watching my cousins take their first bites, their eyes widening with delight—it was priceless!
So, let’s recreate some of that magic together! Whether you’re planning a romantic dinner, a chic brunch, or simply a night of self-pampering, this raspberry mousse recipe is here to elevate your culinary repertoire. Trust me, it’s fancy enough to look great on any holiday table, but simple enough for any night of the week. Let’s get those mixing bowls ready!
Personal Story
As I mentioned, my love for raspberry mousse began in the warm embrace of my family’s kitchen. One steamy summer, we found ourselves with a garden bursting with fresh, ripe raspberries. I can still see my mom meticulously picking the juiciest ones, her fingers stained with berry juice, while I eagerly waited with a bowl at the ready.
It was during this berry bonanza that we decided to throw together a raspberry mousse, a recipe my mom claimed was "the easiest yet most delightful dessert" she had up her sleeve. We spent hours whisking and folding, chatting about everything from school to her childhood memories. The best part? As the mousse chilled in the fridge, we took turns sneaking spoonfuls instead of waiting for the final presentation. Each spoonful was a burst of flavor that reminded me how wonderful it is to create something together. That day not only sparked my love for cooking but also created an everlasting bond through food and laughter.
Ingredients
Now that we’ve set the mood, let’s talk about what you’ll need to whip up this raspberry mousse. Here’s your shopping list:
-
Fresh Raspberries (2 cups): The star of the show! Look for vibrant, plump berries for the best flavor. If they’re out of season, frozen berries work too—just thaw and drain the excess liquid.
-
Sugar (1/2 cup): This will sweeten the puree. Feel free to adjust based on your taste—agave or honey work as fantastic substitutes if you want a natural sweetener.
-
Heavy Cream (1 1/2 cups): This adds richness and creaminess to the mousse. Keep it cold for optimal whipping. If you’re looking for a lighter option, whipped coconut cream is a great alternative.
-
Vanilla Extract (1 teaspoon): Adds a warm, aromatic note to the mousse. Homemade vanilla extract elevates the flavor, but store-bought is perfectly fine!
-
Gelatin Powder (1 tablespoon): This helps the mousse firm up beautifully. If you prefer a vegetarian option, try using agar-agar instead! Just follow the package instructions for usage.
-
Water (2 tablespoons): Needed for blooming the gelatin. Keep it warm so it dissolves easily.
Step-by-Step Instructions
Now comes the fun part! Let’s whip up this raspberry mousse step by step. Grab your mixing bowls and let’s get started!
-
Prepare the Raspberries:
- Wash the fresh raspberries gently and place them in a blender or food processor. Aim for about 2 cups (you can adjust this based on how raspberry-flavored you want your mousse).
- Add the sugar to the raspberries and blend until smooth. You can leave tiny seeds if you like a bit of texture; otherwise, feel free to strain the puree through a sieve to achieve a silky-smooth consistency.
- Chef Tip: Reserve a few whole raspberries for garnish later—they’ll add a pop of color to your final presentation!
-
Bloom the Gelatin:
- In a small bowl, sprinkle gelatin over the warm water and let it stand for about 5 minutes until it swells up, creating a “bloom.”
- Glad to have this step out of the way? I always keep some gelatin handy—it’s a secret weapon for so many desserts!
-
Combine the Raspberry Puree and Gelatin:
- Place the bloomed gelatin in the microwave for about 10 seconds just to slightly heat it (make sure it’s warm enough to dissolve but not bubbling hot).
- Stir the gelatin into the raspberry puree until completely dissolved. This is where the magic happens!
-
Whip the Cream:
- In a medium mixing bowl, pour in the heavy cream and add the vanilla extract. Using an electric mixer, whisk on medium speed until soft peaks form. You’re looking for a frothy, pillowy cloud, not a butter!
- Chef Tip: Keep your mixing bowl and beaters chilled for easier whipping!
-
Fold It All Together:
- Gradually add the raspberry mixture into the whipped cream. Use a folding motion—gently lift and turn the cream, combining them without deflating the air you’ve whipped in. Aim for a beautiful swirly texture that still shows off those lovely pink hues.
- If you want deeper flavors, consider folding in a bit of lemon zest for brightness!
-
Chill the Mousse:
- Once everything is mixed, scoop the mousse into serving glasses or bowls, leaving some room at the top for garnishing later. Cover them with plastic wrap and pop them into the fridge for at least 4 hours (or overnight best) to set.
- Chef Tip: This is where you can take a breather—go catch up on your favorite show while your mousse works its magic!
Serving Suggestions
When you’re ready to serve, bring out those beautiful glasses brimming with raspberry goodness. To really wow your guests, you can top each mousse with a dollop of whipped cream (a little more never hurt, right?), some whole raspberries, and a sprinkle of mint leaves for an elegant touch. Drizzle a bit of raspberry sauce or chocolate sauce over the top, and you’re ready to dig in!
Recipe Variations
Feeling adventurous? Here are a few creative variations to try:
- Chocolate Raspberry Mousse: Fold in some melted dark chocolate into the mousse for a rich twist that balances sweet-tart goodness.
- Mint Infusion: Add a few finely chopped mint leaves or a drop of mint extract to the raspberry puree for a refreshing hint.
- Bourbon Raspberry Mousse: Add a tablespoon of bourbon to the raspberry puree for an adult-only twist that complements the sweet tartness perfectly.
- Vegan Raspberry Mousse: Substitute heavy cream with whipped coconut cream and gelatin with agar-agar to create a delightful plant-based version.
Chef’s Notes
This raspberry mousse holds a treasure trove of memories for me, evolving over the years from my mom’s original recipe to my own playful adaptation. Every time I make it, I’m reminded of those sweet summer afternoons full of raspberries and laughter. It’s not just a dessert; it’s a connection to my roots, but it also seamlessly fits into any occasion—be it a family gathering or a cozy dessert for one. Oh, and don’t let those berries go to waste—switch it up with different fruits as the seasons change!
FAQs and Troubleshooting
-
Why is my mousse not setting?
- Make sure your gelatin is properly bloomed and dissolved before folding it into the mixture. If it’s too warm when added, it might not set properly!
-
Can I use other berries?
- Absolutely! Strawberries, blueberries, or mixed berries can be a fantastic substitute for raspberries. Just remember that sweetness and acidity might vary.
-
How can I get the mousse to look pretty in the serving glass?
- For a layered look, alternate spoonfuls of raspberry mousse and whipped cream into the serving glasses before chilling—it’ll give a beautiful visual contrast once set!
-
What if I want a less sweet mousse?
- Simply reduce the amount of sugar in the raspberry puree. The natural tartness of the berries will shine through beautifully!
Nutritional Info
(Optional) Each serving of raspberry mousse contains approximately:
- Calories: 250
- Fat: 18g
- Carbohydrates: 24g
- Protein: 2g
And there you have it! An incredible raspberry mousse recipe filled with flavor, texture, and heart. I hope you enjoy creating this delicious dish as much as I do. Remember, the kitchen is your playground—don’t be afraid to get messy and have fun! Happy cooking, my fellow food enthusiasts!
Print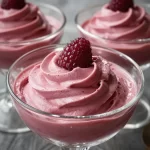
Raspberry Mousse
- Total Time: 240 minutes
- Yield: 4 servings
- Diet: Vegetarian
Description
An effortless yet delightful raspberry mousse that will impress your loved ones and elevate your culinary repertoire.
Ingredients
- Fresh Raspberries, 2 cups
- Sugar, 1/2 cup
- Heavy Cream, 1 1/2 cups
- Vanilla Extract, 1 teaspoon
- Gelatin Powder, 1 tablespoon
- Water, 2 tablespoons
Instructions
- Prepare the Raspberries: Wash and place in a blender with sugar; blend until smooth.
- Bloom the Gelatin: Sprinkle gelatin over warm water and let it stand for 5 minutes.
- Combine the Raspberry Puree and Gelatin: Heat the bloomed gelatin, then stir it into the raspberry puree.
- Whip the Cream: Beat heavy cream with vanilla extract until soft peaks form.
- Fold It All Together: Gently combine the raspberry mixture with the whipped cream.
- Chill the Mousse: Scoop into glasses, cover, and refrigerate for at least 4 hours.
Notes
Serve with whipped cream, whole raspberries, and mint for an elegant touch. Consider variations like chocolate or vegan options.
- Prep Time: 15 minutes
- Cook Time: 0 minutes
- Category: Dessert
- Method: Chilling
- Cuisine: American
Nutrition
- Serving Size: 1 serving
- Calories: 250
- Sugar: 22g
- Sodium: 30mg
- Fat: 18g
- Saturated Fat: 11g
- Unsaturated Fat: 7g
- Trans Fat: 0g
- Carbohydrates: 24g
- Fiber: 2g
- Protein: 2g
- Cholesterol: 70mg
Keywords: raspberry mousse, dessert, easy recipe, summer treat, mousse recipe
Peanut Butter Milkshake
Creamy Peanut Butter Milkshake: A Sweet Nostalgic Treat
Welcome to my kitchen! Today, I’m thrilled to share a recipe that’s close to my heart: the creamy, dreamy peanut butter milkshake. It’s not just a drink; it’s a trip down memory lane, filled with the joys of summertime, lazy afternoons, and the sound of laughter echoing in the air. If you’re like me and adore the comforting flavors of peanut butter combined with the rich creaminess of ice cream, then you’re in for a treat!
A Sip of Nostalgia
Growing up, Saturday afternoons were a magical time in my house. My mom, with her apron tied snugly, would whisk us away into the world of flavors and fun. One of our weekends rituals was the peanut butter milkshake. I can still remember the feeling of excitement as I rushed into the kitchen—my taste buds tingling in anticipation. The blender would whir, and the sweet scent of peanut butter would fill the air, mingling perfectly with the soft sounds of my mom humming her favorite tunes.
As a kid, I’d watch in awe, standing on my tiptoes to see the magical transformation from simple ingredients into a thick, creamy shake. Then came the best part—plopping a generous dollop of whipped cream on top and diving in with a straw, the first sip filling my world with sweet satisfaction!
In my own kitchen today, I whip up this treat not just for myself, but for my family and friends, keeping that joyful tradition alive. Each time I draw on this sweet memory, I can’t help but smile, knowing I’m passing on a delicious piece of nostalgia to the next generation.
Now, let’s get started on creating this delectable peanut butter milkshake in your own kitchen!
Ingredients
Here’s what you’ll need to make this delightful milkshake:
-
Vanilla Ice Cream
- Tip: Use high-quality ice cream for a creamier texture. You can substitute with dairy-free or low-fat versions for a lighter option.
-
Milk
- Tip: Whole milk gives the richest flavor, but any milk (almond, soy, oat) will work. Adjust the amount depending on how thick you like your milkshake.
-
Peanut Butter
- Chef Insight: Natural peanut butter will provide the best flavor without added sugars. If you’re avoiding peanuts, almond butter makes a delicious substitute.
-
Honey or Maple Syrup
- Tip: This is optional, depending on how sweet you like your shake. You can also use agave nectar or a sugar-free alternative.
-
Whipped Cream
- Quick Insight: Don’t skip this! It’s the crowning glory of your milkshake. You can make your own or use store-bought.
-
Chocolate Syrup (optional)
- Tip: A drizzle inside the glass adds a fun chocolatey element if you’re feeling indulgent!
Step-by-Step Instructions
Creating the perfect peanut butter milkshake is a straightforward process! Let’s break it down:
-
Gather Your Ingredients:
- Before you get started, pull all your ingredients out. It makes the process smoother and more enjoyable. Trust me, no one likes scrambling for an ingredient mid-shake!
-
Blend the Ice Cream and Milk:
- In your blender, combine 2 cups of vanilla ice cream and about 1 cup of milk. Blend on medium speed until smooth. If you prefer a thicker milkshake, start with less milk and add more until you reach your desired consistency.
-
Add Peanut Butter and Sweetener:
- Now it’s time to add in ¼ cup of peanut butter and 1-2 tablespoons of honey or maple syrup (if using). Blend again until fully incorporated. The peanut butter should become creamy and fully mix into the shake.
-
Taste Test!:
- Here’s a little chef tip: always taste your milkshake! Adjust the sweetness by adding more honey if needed or more milk if it’s too thick.
-
Prepare for Serving:
- If you’re feeling extra fancy, drizzle some chocolate syrup inside your serving glasses! It adds a beautiful touch and makes for an Instagram-worthy presentation.
-
Pour and Top Off:
- Carefully pour the milkshake into your prepared glasses, filling them generously. Top off each shake with a mountain of whipped cream, and perhaps a sprinkle of crushed peanuts for a delightful crunch.
-
Grab Your Straws:
- Serve immediately with colorful straws (or spoons) and watch as everyone dives into the rich, creamy goodness of your creation!
Serving Suggestions
To elevate your milkshake experience, consider pairing it with some homemade cookies or brownies. The contrast of textures and flavors is simply divine! You can also serve it in a tall glass for a classic approach or a mason jar for that rustic touch. Don’t forget to add some fun toppings—mini chocolate chips or additional peanut butter drizzle over the whipped cream makes for an irresistible presentation!
Recipe Variations
Get creative with your peanut butter milkshake! Here are a few fun variations to try:
-
Chocolate Peanut Butter Milkshake:
- Blend in 2 tablespoons of cocoa powder or ¼ cup of chocolate ice cream for a rich chocolate twist.
-
Banana Peanut Butter Milkshake:
- Toss in a ripe banana before blending for a fruity flavor and creamy texture.
-
Protein-Packed Peanut Butter Shake:
- Add a scoop of your favorite protein powder for a post-workout treat that will keep you energized!
-
Nutty Banana Split Shake:
- Layer it with sliced strawberries and bananas for a fruity peanut butter delight.
-
Vegan Version:
- Use vegan ice cream and almond milk, making a deliciously creamy shake suitable for all!
Chef’s Notes
This peanut butter milkshake is a recipe that continues to evolve in my kitchen. I sometimes swap ingredients based on what I have on hand—like using flavored ice creams like salted caramel or even adding a spoonful of Nutella for a hazelnut flair! Every shake tells a new story, and that’s part of the fun.
Don’t forget the chaos of the kitchen is where the best memories are made, so embrace the messiness while you whip up this delightful treat!
FAQs and Troubleshooting
Q: Why is my milkshake too thick?
A: If it’s too thick, just add a little more milk and blend. Start with a tablespoon at a time until you reach your desired consistency.
Q: Can I make this ahead of time?
A: While it’s best enjoyed fresh, you can prepare the base without whipped cream and store it in the freezer. Just remember to let it sit out for a few minutes before blending again!
Q: Can I make this milkshake without ice cream?
A: Absolutely! You can use frozen bananas or a plant-based yogurt to create a creamy texture or even use crushed ice, though it may change the flavor slightly.
Q: How do I make it dairy-free?
A: Just swap the regular ice cream for a dairy-free version and use your choice of plant-based milk. Almond or cashew milk works beautifully!
Nutritional Info
For a classic peanut butter milkshake made with vanilla ice cream and whole milk, here’s a quick rundown of nutritional info (per serving):
- Calories: Approximately 450-500
- Protein: 12g
- Fat: 18g
- Carbohydrates: 60g
- Sugar: 50g
(Note: Nutritional info will vary significantly based on specific ingredients and serving sizes.)
So there you have it, my delightful peanut butter milkshake recipe! I hope it adds a scoop of joy to your kitchen and creates sweet memories for you and your loved ones. Happy shaking! 🍦🥤
Print
Creamy Peanut Butter Milkshake
- Total Time: 10 minutes
- Yield: 2 servings 1x
- Diet: Vegetarian
Description
A nostalgic treat featuring rich peanut butter, creamy ice cream, and a touch of sweetness, perfect for summer days.
Ingredients
- 2 cups Vanilla Ice Cream
- 1 cup Milk
- ¼ cup Peanut Butter
- 1–2 tablespoons Honey or Maple Syrup (optional)
- Whipped Cream for topping
- Chocolate Syrup (optional)
Instructions
- Gather your ingredients.
- Blend the ice cream and milk until smooth.
- Add peanut butter and sweetener, then blend until fully incorporated.
- Taste test and adjust sweetness if necessary.
- Prepare your serving glasses by drizzling chocolate syrup inside.
- Pour the milkshake into glasses and top with whipped cream.
- Grab your straws and serve immediately.
Notes
Feel free to get creative with variations, such as adding bananas or using chocolate ice cream.
- Prep Time: 10 minutes
- Cook Time: 0 minutes
- Category: Dessert
- Method: Blending
- Cuisine: American
Nutrition
- Serving Size: 1 serving
- Calories: 450
- Sugar: 50g
- Sodium: 200mg
- Fat: 18g
- Saturated Fat: 8g
- Unsaturated Fat: 7g
- Trans Fat: 0g
- Carbohydrates: 60g
- Fiber: 2g
- Protein: 12g
- Cholesterol: 60mg
Keywords: milkshake, peanut butter, dessert, summer treat, creamy drink
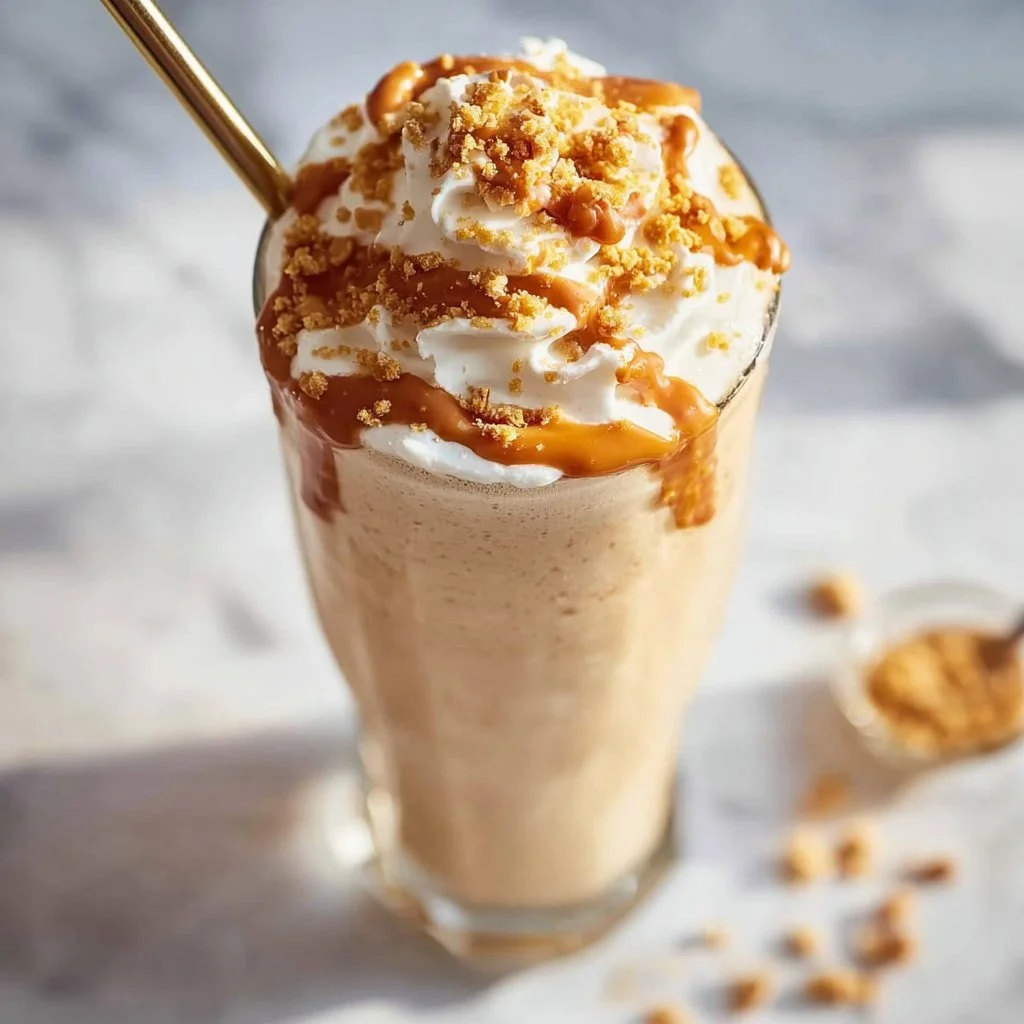
Banana Pudding Milkshakes: The Best Creamy Dessert You’ll Ever Sip
Banana Pudding Milkshakes: The Best Creamy Dessert You’ll Ever Sip
Welcome back to my cozy kitchen, my dear food enthusiasts! Today, we’re going to dive into one of my all-time favorite desserts that’s perfect for any occasion—Banana Pudding Milkshakes! Imagine this: a creamy, luscious shake that combines the comforting essence of banana pudding with the fun of a milkshake. It’s the kind of treat that makes every day feel like a celebration, or better yet, like a flashback to those carefree childhood summers. You know, when the sun was shining, the days felt endless, and every scoop of sweetness brought a smile to your face.
Now, let’s take a moment to appreciate how well this delightful dessert can bring people together. Whether you’re serving it at a casual get-together, a fun-filled BBQ, or simply treating yourself on a cozy evening at home, Banana Pudding Milkshakes are sure to steal the show. They are rich and creamy, with all the nostalgic flavors you adore, while being easy enough for even the busiest of chefs to whip up on a whim.
But wait! Before we jump into the recipe, I want to share a little background about what inspired this delicious creation. After all, every great recipe has a story behind it, right? So sit tight, mix your favorite ingredients, gather your loved ones, and let’s shuffle into a memory lane that will sweeten your day!
Personal Story
Growing up, my family had this tradition of gathering around the table every Sunday for a potluck-style meal. Each week, one family member would take the lead in preparing the main course while everyone else brought their favorite sides. My aunt Clara was famous for her homemade banana pudding, which never failed to steal the spotlight. I still remember the way the warm kitchen would fill with the aroma of vanilla and sweet bananas, drawing everyone in like a moth to a flame. There was always a race to see who could snag the first serving.
One summer, I decided to sneak a taste when no one was looking. Well, let’s just say I never regretted that bold move! I ended up devouring an entire cup of that velvety pudding before even making it to the table. The pure joy of that moment, feeling the balance of soft, creaminess and bites of crunchy Nilla wafers, inspired me to create this Banana Pudding Milkshake. It’s a way for me to honor those cherished memories while also making something whimsical and fun for everyone to enjoy. So gather ’round, my friends! Let’s channel those sunny childhood days with this delightful shake that’s sure to enchant your taste buds and warm your heart.
Ingredients
Here’s what you’ll need to make the ultimate Banana Pudding Milkshake:
-
Bananas
- Ripe, medium bananas work best for sweetness and flavor. If you’re short on ripe bananas, you can opt for frozen pieces for a super creamy consistency.
-
Vanilla Ice Cream
- The base of our shake! You can substitute with a dairy-free alternative or yogurt for a lighter option. Aim for quality ice cream; it truly makes a difference.
-
Milk
- Whole milk adds richness, but feel free to use almond, oat, or any other milk of your choice! Just remember, the consistency you aim for might vary.
-
Instant Vanilla Pudding Mix
- This is the secret ingredient for that classic banana pudding flavor. If you prefer, you could try making your own pudding from scratch.
-
Whipped Cream
- To top it off! Homemade whipped cream is easy to whip up, or go for store-bought for a quicker option.
-
Nilla Wafers
- The signature cookie! If you’re looking for a gluten-free option, check for gluten-free vanilla wafers or even crush up some graham crackers.
-
Salt
- A pinch of salt helps balance the sweetness and enhance all the flavors!
With these ingredients on hand, you’re already halfway to creamy, dreamy bliss!
Step-by-Step Instructions
Now that we have our ingredients ready, it’s time to bring the magic to life. Let’s get shaking!
-
Prep Your Bananas
Start by peeling the bananas and slicing them into smaller chunks. The riper the bananas, the sweeter your shake! If you’re using frozen bananas, skip this step and toss them directly into the blender. -
Blending the Base
Add the sliced bananas into your blender, followed by a generous scoop of vanilla ice cream. You can start with about 2 cups for a thick shake. Now it’s time for the instant vanilla pudding mix—about ½ cup will do. It’s the key to that luscious pudding flavor! -
Adding Milk
Pour in about 1 cup of milk. Depending on how thick or thin you like your shakes, feel free to adjust this amount. Blend the mixture on high until it’s primarily smooth, and please do not forget the taste test at this stage. You might need to add a bit more banana or ice cream—no judgment here! -
Add Texture with Nilla Wafers
Toss in a handful of Nilla Wafers (think about 6-8) and pulse the blender just a couple of times. This will break up the cookies while still leaving some chunks for that classic banana pudding experience. -
Taste and Adjust!
Give it a taste. Do you need a little more sweetness? Maybe a touch of whipped cream or another cookie for pzazz? Adjust according to your like, and blend again briefly if needed. -
Serve It Up!
Grab your favorite tall glasses and pour in the milkshake. Opt for a fun straw or fancy spoon for instant happiness. If you want to, you can even drizzle a little extra whipped cream on top before adding a few crushed Nilla Wafers for decoration—after all, we eat with our eyes first!
Serving Suggestions
These Banana Pudding Milkshakes are phenomenal on their own, but why not serve them with a little flair? You can pair them with homemade cookies, mini banana muffins, or even a scoop of fresh fruit for a refreshing contrast. If you’re hosting a party, consider setting up a shake bar where guests can add their own toppings, like chopped nuts or chocolate shavings, to make it even more personal and fun!
Recipe Variations
-
Chocolate Lover’s Twist
Add 2 tablespoons of chocolate syrup to transform this into a chocolate banana pudding shake. You could even use chocolate ice cream for a rich and indulgent treat! -
Nutty Delight
Introducing a handful of crushed peanuts or almond butter can add a delightful nutty flavor that complements the bananas perfectly. -
Berry Banana Bliss
Toss in a handful of fresh strawberries or blueberries for a vibrant twist full of extra fruity goodness. -
Vegan Version
Swap your regular ice cream for coconut or almond milk ice cream and use a dairy-free milk option. Replace the instant pudding mix with a vegan version or homemade. -
Frozen Banana Surprise
Replace fresh bananas with frozen ones, which will create a wonderfully thick and creamy shake that’s perfect for hot summer days.
Chef’s Notes
Every time I whip up these milkshakes, I’m reminded of those family potluck Sundays. This recipe has evolved over time, inspired by my cravings for nostalgia and comfort. I can’t help but chuckle at how many times I’ve found myself standing by the blender, doing the “just one more scoop” dance! Plus, the joy of sharing a glass with friends is unmatched. Remember, making desserts doesn’t need to be serious—get your kiddos involved, make a mess, and most importantly, have fun!
FAQs and Troubleshooting
1. Why is my milkshake too thick?
If your shake ends up too thick, simply add a bit more milk, blending again until it reaches your desired consistency. It’s always easier to thicken than thin, so add gradually!
2. Can I make this ahead of time?
While I recommend consuming it fresh for the best flavor, you can prepare individual cups and store them in the freezer for short bursts of sweetness. Just be aware that they may take on a slushy texture!
3. What if I don’t have vanilla pudding mix?
You can create your own with cornstarch, sugar, and a dash of vanilla extract or even skip it entirely for a more straight banana flavor! The nostalgia might slightly shift, but it will still be delicious.
4. How long will these last in the fridge?
I generally advise consuming your milkshake right away, but if any leftovers remain, seal them in an airtight container and refrigerate them for a couple of hours. Just give them a quick blend before serving again.
Nutritional Info
- Calories: Approximately 450 (varies based on toppings and substitutions)
- Fat: 18g
- Carbohydrates: 65g
- Protein: 6g
And there you have it! Untangle your mixing bowls and embrace all the creamy goodness that is a Banana Pudding Milkshake. I can’t wait for you to enjoy this batch of nostalgia in a glass, creating sweet memories of your own along the way. Happy shaking!
Print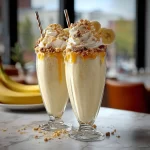
Banana Pudding Milkshakes
- Total Time: 10 minutes
- Yield: 2 servings 1x
- Diet: Vegetarian
Description
A creamy and nostalgic milkshake that combines the flavors of banana pudding with the fun of a refreshing shake.
Ingredients
- 2 ripe medium bananas
- 2 cups vanilla ice cream
- 1 cup whole milk (or dairy-free alternative)
- ½ cup instant vanilla pudding mix
- Whipped cream for topping
- 6–8 Nilla Wafers
- A pinch of salt
Instructions
- Prep your bananas by peeling and slicing them into smaller chunks.
- Add the bananas into your blender along with 2 cups of vanilla ice cream.
- Pour in ½ cup of instant vanilla pudding mix.
- Pour in 1 cup of milk and blend on high until smooth.
- Toss in a handful of Nilla Wafers and pulse a couple of times to add texture.
- Give it a taste and adjust sweetness as needed.
- Grab glasses and pour in the milkshake, topping with whipped cream and crushed Nilla Wafers.
Notes
For a variation, try adding chocolate syrup or fresh berries for an exciting twist!
- Prep Time: 10 minutes
- Cook Time: 0 minutes
- Category: Dessert
- Method: Blending
- Cuisine: American
Nutrition
- Serving Size: 1 glass
- Calories: 450
- Sugar: 35g
- Sodium: 150mg
- Fat: 18g
- Saturated Fat: 11g
- Unsaturated Fat: 7g
- Trans Fat: 0g
- Carbohydrates: 65g
- Fiber: 3g
- Protein: 6g
- Cholesterol: 60mg
Keywords: banana pudding, milkshake, dessert, creamy, nostalgic


