
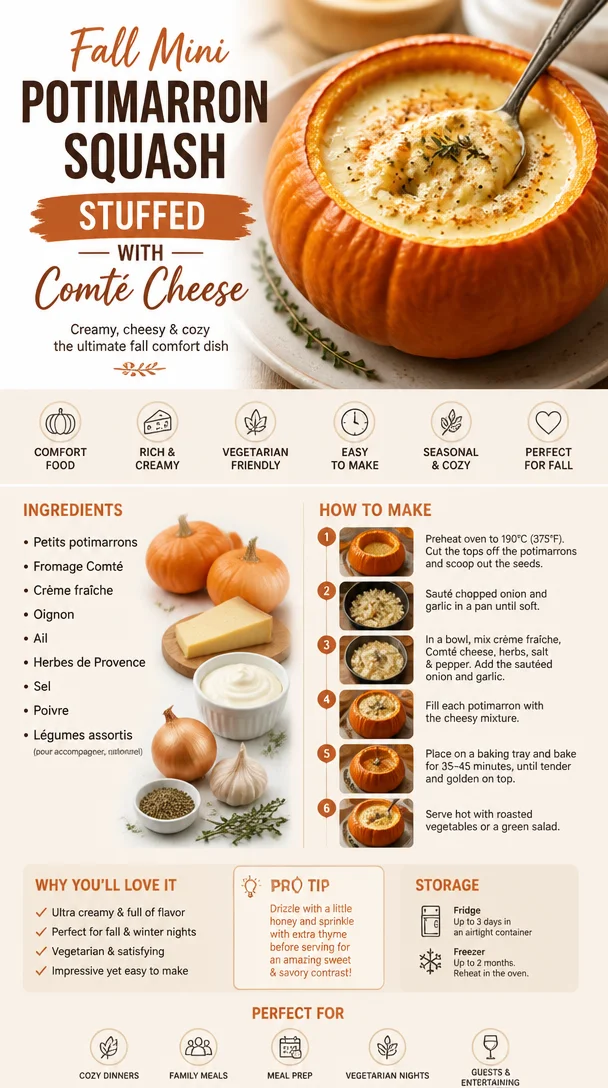
Fall Mini Potimarron Squash Stuffed with Comté Cheese
Petits Potimarrons Farcis au Fromage Comté: A Cozy French Delight
Welcome to my kitchen, friends! Today, we’re diving into a delightful French dish that brings warmth and connection right to your table: Petits Potimarrons Farcis au Fromage Comté. This charming recipe is perfect for any occasion—whether it’s a cozy weeknight dinner or a festive gathering with friends and family. The sweetness of the little potimarron squash combined with the nutty richness of Comté cheese creates a comforting dish that’s as pleasing to the eyes as it is to the palate.
But let’s be real: cooking should be as joyful as it is delicious. That’s why I believe in sharing recipes that are straightforward yet impressive, giving you the confidence to get creative without feeling overwhelmed. So roll up those sleeves, and let’s embark on this culinary adventure together!
Personal Story
Growing up, my family had a tradition of gathering around the dining room table for Sunday dinners. Each week brought a different dish, but there was one particular evening that stood out in my mind: the night my grandma made stuffed squashes. The colorful dishes mixed with laughter and stories made the evening unforgettable. To this day, I can remember the heavenly aroma wafting through the house, enticing everyone to the table.
Years later, as I experimented in my own kitchen, I was inspired to recreate that magical night, but with a twist. Enter Petits Potimarrons Farcis au Fromage Comté! Every time I make this dish, I’m transported back to those cherished gatherings, surrounded by warmth, love, and the encouragement to try something new.
Ingredients
Here’s what you’ll need to whip up these delicious stuffed squashes:
-
Petits Potimarrons (Small Red Kuri Squash)
These small, rich squashes have a sweet, nutty flavor that pairs beautifully with cheese. Can’t find them? Look for acorn squash as a substitute, although it has a more muted flavor. -
Comté Cheese
A semi-hard cheese from the Jura region of France, Comté has a nutty taste that enhances the filling. If it’s hard to find, Gruyère or Emmental can do the trick as well, though the flavor will differ slightly. -
Breadcrumbs
These help bind the filling, giving it texture. If you want a gluten-free option, substitute with ground almond or gluten-free breadcrumbs. -
Fresh Herbs (Thyme and Parsley)
Fresh herbs brighten the dish and add layers of flavor. If you’re in a pinch, feel free to use dried herbs—just reduce the amount since they’re more potent. -
Onion
A base flavor that brings sweetness and depth. If you’re not a fan of onion, shallots or leeks can be a lovely alternative. -
Garlic
Because, let’s face it, garlic makes everything better! If you prefer a milder flavor, roasted garlic can be a delectable substitute. -
Olive Oil
A drizzle of olive oil brings out the natural sweetness of the squash. If you’re feeling adventurous, try using truffle oil for a luxe touch! -
Salt and Pepper
Essential seasonings to enhance the flavors. For a twist, consider adding smoked sea salt for added depth.
Step-by-Step Instructions
Alright, let’s get down to the good stuff! Here’s how to put it all together:
-
Preheat Your Oven
Preheat your oven to 375°F (190°C). This ensures your squashes will roast perfectly, coming out caramelized and tender. -
Prepare the Squash
Cut the tops off the petits potimarrons (like little hats!) and scoop out the insides using a spoon. Set the tops aside—they’ll act as the lids for your fillable vessels. Drizzling the cut edges with a little olive oil helps to enhance the roasting process. -
Roast the Squash
Place the hollowed-out squashes upside down on a baking sheet lined with parchment paper. Roast them for about 15-20 minutes until slightly tender. This step ensures they’ll soften beautifully while baking and avoid being soggy. -
Cook the Aromatics
In a skillet, heat a tablespoon of olive oil over medium heat. Add the diced onion and cook until softened and translucent, about 5 minutes. Toss in the minced garlic and cook for another minute—trust me, your kitchen will smell heavenly! -
Prepare the Filling
In a mixing bowl, combine the cooked onion and garlic with breadcrumbs, chopped fresh herbs, and grated Comté cheese. Season generously with salt and pepper to taste. The mixture should be moist yet hold its shape when pressed together. This is where you can play around; feel free to throw in other veggies or spiced sausage for extra flavor! -
Stuff the Squash
Turn the roasted petits potimarrons back over and fill each one generously with the filling mixture. Don’t be shy—pack it in! Place the tops back on each squash. Drizzle a touch more olive oil over the filled squashes to ensure they remain moist and flavorful as they bake. -
Bake to Perfection
Return the stuffed squashes to the oven and bake for another 20-25 minutes. You want them to be fork-tender and for the tops to be golden brown. Resist the urge to open the oven too often; let them bask in that warm, cozy environment! -
Serve and Enjoy
Take the squashes out of the oven and let them cool for a few minutes. Then, place them on a lovely serving platter and get ready for compliments! This dish is amazing on its own, but you can also serve it alongside a simple green salad for added freshness.
Serving Suggestions
When plating your Petits Potimarrons Farcis au Fromage Comté, I recommend serving them as individual portions to keep things charming and elevated. A sprinkle of fresh herbs on top can add a pop of color and elegance. Pair these delightful stuffed squashes with a crisp green salad dressed in a light vinaigrette to balance the richness of the cheese.
Recipe Variations
Now, let’s spice things up a bit! Here are some fun variations to try:
-
Meaty Twist: Add crumbled sausage or ground beef to the filling for a heartier version.
-
Veggie Delight: Incorporate sautéed mushrooms, spinach, or even roasted red peppers for extra flavor and nutrients.
-
Spicy Kick: Add a pinch of red chili flakes to the filling for a touch of heat.
-
Cheesy Goodness: Mix in different cheeses like feta or blue cheese for added complexity.
-
Nutty Crunch: Toss in some toasted pine nuts or walnuts to the filling for a delightful crunch.
Chef’s Notes
Over the years, this recipe has seen many iterations in my kitchen. What started as a simple stuffed squash has transformed into a canvas for creativity. I was once experimenting with leftovers from a dinner party and discovered that adding cranberry sauce to the filling provided a delightful contrast to the savory cheese. Now, I often serve a small bowl of cranberry sauce on the side—it’s a comforting touch that always surprises and delights!
Always remember: cooking is about exploration and discovery. Don’t hesitate to make this recipe your own!
FAQs and Troubleshooting
-
Can I prepare these in advance?
Absolutely! You can prepare the filling and hollow out the squash a day ahead. Just stuff them and bake when you’re ready! -
What if my squash is too tough to hollow out?
Check to see if they’re ripe. If they’re still hard, they might need a little more time roasting before hollowing. -
Why did my filling turn out dry?
If you find your filling is too dry, it might need a touch more cheese or oil to balance it. Consider incorporating a splash of vegetable broth as well! -
Can I freeze these stuffed squashes?
Yes! Just be sure to wrap them tightly and store in airtight containers. They can last for up to three months in the freezer. Thaw in the fridge overnight before reheating!
Nutritional Info
While specifics may vary based on your ingredient choices, here’s a rough idea of what you can expect (per serving, excluding sides):
- Calories: ~250
- Protein: ~10g
- Carbohydrates: ~30g
- Fats: ~10g
- Fiber: ~5g
So there you have it—a cozy, comforting recipe to warm your heart and satisfy your taste buds! I hope you enjoy making Petits Potimarrons Farcis au Fromage Comté as much as I do, and I can’t wait to hear your stories and variations. Happy cooking!
Print
Petits Potimarrons Farcis au Fromage Comté
- Total Time: 60 minutes
- Yield: 4 servings 1x
- Diet: Vegetarian
Description
Delightful French stuffed squash recipe featuring sweet potimarron and nutty Comté cheese.
Ingredients
- 4 Petits Potimarrons (Small Red Kuri Squash)
- 200g Comté Cheese, grated
- 100g Breadcrumbs (or gluten-free alternative)
- 2 tbsp Fresh Herbs (Thyme and Parsley), chopped
- 1 Onion, diced
- 2 cloves Garlic, minced
- 2 tbsp Olive Oil
- Salt and Pepper, to taste
Instructions
- Preheat your oven to 375°F (190°C).
- Prepare the squashes by cutting the tops off and scooping out the insides.
- Roast the hollowed-out squashes upside down for 15-20 minutes until slightly tender.
- Cook the diced onion in a skillet with olive oil until softened, then add the minced garlic.
- Prepare the filling by mixing cooked onion, garlic, breadcrumbs, herbs, and Comté cheese.
- Stuff each squash generously with the filling mixture.
- Bake for 20-25 minutes until fork-tender and tops are golden brown.
- Serve the squashes on a platter and enjoy!
Notes
Feel free to customize the filling with leftover veggies or spices. Serve with a side of cranberry sauce for a delightful twist.
- Prep Time: 15 minutes
- Cook Time: 45 minutes
- Category: Main Course
- Method: Baking
- Cuisine: French
Nutrition
- Serving Size: 1 squash
- Calories: 250
- Sugar: 6g
- Sodium: 300mg
- Fat: 10g
- Saturated Fat: 4g
- Unsaturated Fat: 5g
- Trans Fat: 0g
- Carbohydrates: 30g
- Fiber: 5g
- Protein: 10g
- Cholesterol: 25mg
Keywords: stuffed squash, French recipe, Comté cheese, vegetarian dish, comfort food

Delicious and Healthy Butternut Squash Mac and Cheese | Mac and cheese with butternut squash, Butternut squash recipes mac and cheese, Creamy butternut squash
Delicious and Healthy Butternut Squash Mac and Cheese
Welcome to my kitchen, fellow food lovers! Today, we’re diving into a creamy, dreamy dish that’s as comforting as a hug and exciting enough to keep your taste buds dancing: Butternut Squash Mac and Cheese! It’s the ultimate comfort food that combines the classic flavors we know and love with the nutritional goodness of butternut squash. Yes, you heard that right! We’re going to take that iconic mac and cheese that brings back fond memories of childhood and give it a healthy twist.
I can still vividly remember those chilly autumn evenings when my mom would whip up a big pot of mac and cheese. The aroma would waft through our home, inviting my siblings and me to gather around the dinner table, our bellies rumbling with anticipation. We’d race to see who could grab the biggest spoonful before it was all gone. Fast forward to today, and I’m thrilled to pass down that same joyous experience in a healthier, vibrant version.
Butternut squash is such a wonderful ingredient to work with; it’s mildly sweet, wonderfully creamy when pureed, and packed with vitamins A, C, and E. Integrating it into your mac and cheese adds depth, color, and nutrition that truly elevates this beloved classic. Plus, the beautiful golden hue of the squash is sure to catch the eyes of even the pickiest eaters. So, whether you’re cooking for your family or hosting a cozy gathering, this dish will surely impress!
This recipe is not just about the food, it’s about the memories and the connections we create around the table. I can’t wait to share all my tips and tricks with you, so let’s roll up our sleeves, put on our aprons, and let’s get cooking!
Personal Story
Let me take you back to my first experience with butternut squash. I was in my early twenties, exploring seasonal produce at a local farmer’s market. The vibrant orange hue of the squashes caught my eye, and something about them just felt warm and inviting. I brought one home, excited to experiment in the kitchen.
As I roasted it, the sweet aroma filled the air, reminding me of my mom’s kitchen – cozy, comforting, and packed with love. I decided to create a macaroni dish that I could share with friends over a cozy dinner party. I vividly remember the laughter, the clinking of glasses, and the joy of everyone digging into my attempt at healthy comfort food. Turns out, my gamble paid off—the creamy butternut squash mac and cheese became a staple at those gatherings. It was an unexpected hit!
That experience taught me the power of using simple, wholesome ingredients to elevate a classic dish. It’s not just mac and cheese; it’s a celebration of flavors and memories. So, grab your butternut squash, and let’s recreate that magic together!
Ingredients
Here’s what you’ll need to make this delicious butternut squash mac and cheese:
-
1 medium butternut squash
The star of the show! Rich in nutrients and flavor, this squash will give our mac a creamy base. If you can’t find butternut squash, sweet potatoes work beautifully as a substitute, too! -
8 oz elbow macaroni
A classic option, but feel free to use whole grain or gluten-free pasta to suit your dietary preferences. Shapes like shells or fusilli hold the cheesy goodness perfectly! -
1 cup sharp cheddar cheese, shredded
Cheddar adds that classic mac and cheese flavor. Mixing in some Gruyère or fontina can create a more gourmet touch if you’re feeling adventurous! -
1/2 cup Parmesan cheese, grated
Parmesan gives a lovely salty kick. If you’re looking for a dairy-free option, nutritional yeast is an excellent substitute for the cheesy flavor! -
1 cup milk (or plant-based milk)
Whole milk helps make the sauce extra creamy, but almond or oat milk are great plant-based alternatives. -
2 tablespoons butter (or olive oil)
For cooking our sauce and adding richness. Feel free to use vegan butter if you’d like a dairy-free version! -
1 teaspoon garlic powder
For a lovely depth of flavor. You can also use fresh minced garlic—about 2 cloves will do the trick! -
Salt and pepper to taste
Essential for enhancing all the flavors in our dish. Always taste as you go! -
1/4 teaspoon nutmeg
It may sound unconventional in mac and cheese, but nutmeg adds a subtle warmth that pairs beautifully with the butternut squash. A little goes a long way!
Step-by-Step Instructions
Ready to get your hands dirty? Here’s how we’ll make the most velvety Butternut Squash Mac and Cheese!
1. Prep the Butternut Squash
First things first, we need to prepare our star ingredient. Preheat your oven to 400°F (200°C). While it heats up, slice your butternut squash in half lengthwise and scoop out the seeds. If you’re worried about cutting it, you can microwave it for a couple of minutes to soften the skin before slicing.
Drizzle a bit of olive oil on the squash halves, sprinkle with salt and pepper, and place them cut-side down on a baking sheet lined with parchment paper. Roast for about 30-40 minutes, or until the squash is fork-tender. The roasting process caramelizes the natural sugars, enhancing its flavor.
Chef Tip: If you have leftover butternut squash, you can easily puree it and freeze it for future recipes. It’s perfect for soups, smoothies, or even baked goods!
2. Cook the Pasta
While your squash is roasting, bring a large pot of salted water to a boil. Add the elbow macaroni and cook according to package instructions until al dente. Remember not to overcook it, as it will continue cooking in the oven later!
Once cooked, drain the pasta and set it aside. You can toss it with a tiny bit of olive oil to prevent sticking while the sauce is being prepared.
3. Make the Sauce
Now let’s make it creamy! In a medium saucepan, melt the butter over medium heat. Stir in the garlic powder, and let it cook for about 30 seconds until fragrant. Slowly whisk in the milk, and bring it to a gentle simmer.
Once it’s steaming, reduce the heat to low and add the roasted butternut squash. Carefully mash it with a fork or use an immersion blender for a smoother texture. Stir in the sharp cheddar and Parmesan cheese until melted and well combined. If the sauce is too thick, add a splash more milk to reach your desired consistency.
Chef Hack: For an extra creamy sauce, stir in a dollop of cream cheese or Greek yogurt!
4. Combine and Bake
Now it’s time to bring everything together! In a large mixing bowl (or the pot you used for pasta), combine the cooked macaroni and the cheese sauce. Stir well until every piece of pasta is coated.
At this point, sprinkle in the nutmeg and add additional salt and pepper to taste. If you want to make it extra decadent, transfer the mac and cheese to a baking dish, top with extra shredded cheese (hello, cheesy goodness), and pop it under the broiler for 2-3 minutes until bubbly and golden brown!
Pro Tip: For a crispy topping, mix some breadcrumbs with melted butter and sprinkle it on top before broiling!
5. Serve and Enjoy!
Once baked, let it cool for a minute before serving. Ladle generous portions into bowls or on plates, garnishing with fresh herbs like parsley or chives for that pop of color and flavor.
Serving Suggestions
This Butternut Squash Mac and Cheese is perfect for cozy family dinners, movie nights, or even as a side dish at holiday gatherings. You can serve it with a crisp green salad, roasted veggies, or even a side of garlic bread to complete the meal.
For an upscale feel, try plating it in individual ramekins or cast-iron skillets for a rustic presentation. You might also consider pairing it with a nice bottle of white wine, like a lightly oaked Chardonnay—trust me, your taste buds will thank you!
Recipe Variations
Now that you have the base recipe down, here are a few fun variations to keep your mac and cheese game exciting!
- Spicy Mac: Add diced jalapeños or a pinch of cayenne pepper for a kick.
- Veggie Boost: Toss in sautéed spinach, kale, or broccoli for extra nutrients.
- Protein Punch: Stir in cooked chicken, turkey, or even crumbled bacon for added flavor and heartiness.
- Herby Twist: Swap in fresh herbs like thyme or sage instead of nutmeg for a different aromatic experience.
- Gourmet Option: Try adding truffle oil or a dollop of pesto to your cheese sauce!
Chef’s Notes
One of the reasons I love this recipe so much is its adaptability. The butternut squash not only gives it that beautiful color but also allows for flexibility in flavors and textures. I’ve been known to experiment by adding different cheeses for unique taste profiles. My favorite combo lately is sharp white cheddar and a sprinkle of gorgonzola—it’s a game-changer!
And let me share a funny moment with you: Once, in my excitement, I added an entire head of garlic into the sauce. Let’s just say, while it was not the typical cheesy mac I envisioned, it sure made an interesting conversation starter at dinner!
FAQs and Troubleshooting
Q: My mac and cheese turned out too dry, what happened?
A: This can occur if the sauce was cooked too long, or if the pasta was overcooked and absorbed too much liquid. Just add a splash of milk when reheating to bring back that creamy texture!
Q: How can I store leftovers?
A: Store leftover mac and cheese in an airtight container in the refrigerator for up to 3 days. For longer storage, consider freezing portions in freezer-safe containers. Just remember, the sauce may thicken after freezing, so adding a bit of milk while reheating helps!
Q: Can I use frozen butternut squash?
A: Absolutely! Just make sure to thaw and drain off any excess moisture before adding it to your sauce.
Q: What if I don’t like butternut squash?
A: No problem! You can replace it with other winter squashes like acorn squash or even roasted pumpkin.
Nutritional Info
This dish not only satisfies your cravings but also packs a nutritional punch! Each serving provides essential vitamins and minerals while keeping calories and unhealthy fats in check compared to conventional mac and cheese recipes.
And there you have it! A deliciously creamy and cozy Butternut Squash Mac and Cheese that’s perfect for any occasion. I hope you enjoy making this dish as much as I enjoyed sharing my kitchen stories with you. Remember, cooking is all about experimenting and finding joy in the process. So get in there, have fun, and don’t forget to share your creations with the ones you love! Happy cooking!
Print
Butternut Squash Mac and Cheese
- Total Time: 55 minutes
- Yield: 4 servings 1x
- Diet: Vegetarian
Description
A creamy and nutritious twist on classic mac and cheese featuring the wholesome goodness of butternut squash.
Ingredients
- 1 medium butternut squash
- 8 oz elbow macaroni
- 1 cup sharp cheddar cheese, shredded
- 1/2 cup Parmesan cheese, grated
- 1 cup milk (or plant-based milk)
- 2 tablespoons butter (or olive oil)
- 1 teaspoon garlic powder
- Salt and pepper to taste
- 1/4 teaspoon nutmeg
Instructions
- Prep the Butternut Squash: Preheat your oven to 400°F (200°C), slice the squash, scoop out seeds, drizzle with oil, and roast for 30-40 minutes until tender.
- Cook the Pasta: Boil salted water and cook elbow macaroni until al dente, then drain.
- Make the Sauce: Melt butter, add garlic powder, whisk in milk, then mix in roasted butternut squash and cheeses until smooth.
- Combine and Bake: Mix the cooked macaroni with the cheese sauce, season, and optionally broil for a crispy topping.
- Serve and Enjoy: Cool slightly, plate, and garnish with fresh herbs.
Notes
Can add diced jalapeños for a spicy kick or mix in veggies like spinach or broccoli for a nutritional boost.
- Prep Time: 15 minutes
- Cook Time: 40 minutes
- Category: Main Course
- Method: Baking
- Cuisine: American
Nutrition
- Serving Size: 1 serving
- Calories: 350
- Sugar: 5g
- Sodium: 400mg
- Fat: 12g
- Saturated Fat: 4g
- Unsaturated Fat: 6g
- Trans Fat: 0g
- Carbohydrates: 45g
- Fiber: 3g
- Protein: 15g
- Cholesterol: 30mg
Keywords: mac and cheese, butternut squash, comfort food, healthy recipes, vegetarian

Crispy 5-Ingredient Butternut Squash Fritters for Weeknights
5-Ingredient Butternut Squash Fritters: A Cozy Kitchen Adventure
Introduction
Hey there, kitchen warriors! I’m Olivia Bennett, your friendly neighborhood cooking enthusiast, and today, we’re diving into a dish that is not only simple to make but will also leave your taste buds dancing with delight: 5-Ingredient Butternut Squash Fritters! These little gems are crispy on the outside, tender on the inside, and absolutely bursting with flavor. If you haven’t yet discovered the joy of cooking with butternut squash, let me tell you — you’re in for a treat.
Butternut squash has been my favorite fall vegetable for years. Its natural sweetness and buttery texture make it a versatile ingredient that can be used in everything from soups to salads. But when I discovered the magic of fritters, it was like a light bulb went off in my kitchen. This recipe is all about highlighting the squash while keeping things easy and approachable — perfect for busy weeknights or a cozy weekend gathering!
Imagine yourself at home, the smell of fritters sizzling away in the skillet, perhaps a podcast playing in the background, or your favorite playlist setting the mood. Fritters are communal by nature — great finger food for sharing and perfect for dipping. Whether you pair them with a spicy yogurt sauce, a vibrant salsa, or keep it classic with some sour cream, these Butternut Squash Fritters are destined to become a staple in your kitchen.
So grab that apron and get ready to unleash your inner chef! Let me walk you through this delightful recipe filled with personal anecdotes, handy tips, and, of course, some good old-fashioned kitchen fun.
Personal Story
I remember the first time I made fritters; it was during my college years, just before a big family gathering. With my family notoriously known for their culinary critiques, I was determined to impress everyone with my newfound cooking skills. I decided to create something special using butternut squash, which was abundant at the farmer’s market that week.
After some trial and error, I landed on these fritters. The first bite was met with silence around the table — the kind of silence that only happens when you’ve hit the jackpot in flavor! My cousin, with a small fry in hand, leaned over and exclaimed, “These taste like fall!” Suddenly, everyone was grabbing seconds, and I felt like a kitchen rock star! It was in that moment that I knew I had a hit on my hands. Ever since, these butternut squash fritters have been a beloved recipe in our family, and I’m excited to share them with you!
Ingredients
Here’s what you’ll need to make these delicious 5-Ingredient Butternut Squash Fritters, along with some nifty tips for each ingredient:
-
1 medium butternut squash (about 2 cups, grated)
- The star of the show! When picking one, look for a squash that feels heavy for its size and has a smooth, tan skin. If you can’t find butternut squash, you can use sweet potatoes or zucchini — just remember to squeeze out any extra moisture from the zucchini!
-
1/2 cup all-purpose flour
- This helps bind the fritters together. If you’re looking for a gluten-free option, quinoa flour or chickpea flour works beautifully as alternatives!
-
1 large egg
- The egg is crucial for binding. If you’re egg-free, try substituting it with a flax egg (1 tablespoon ground flaxseed mixed with 2.5 tablespoons water) or applesauce (1/4 cup works)!
-
1/4 teaspoon salt
- Don’t underestimate salt! It enhances the flavors, making each bite pop. Feel free to adjust the amount to suit your taste.
-
1/4 teaspoon pepper (optional; adjust to taste)
- A little kick adds depth! If you’re feeling adventurous, try adding some smoked paprika or chili powder for an extra flavor boost.
Step-by-Step Instructions
Alright, friends, it’s time to get cooking! Follow these simple steps to whip up your fritters, and remember, cooking is all about having fun and experimenting. Let’s go!
-
Prep the Squash:
- Start by peeling the butternut squash. This can be a bit tough, so make sure to use a sharp vegetable peeler or a sturdy knife. Once peeled, slice it in half lengthwise and scoop out the seeds. Grate the squash using a box grater or the grating attachment of a food processor. You’ll want about 2 cups of grated squash.
Chef Hack: If you have a busy schedule, you can bake the squash whole for about 45-60 minutes at 400°F (204°C) until soft, cool, peel, and then grate. This makes the process a breeze!
-
Mix the Ingredients:
- In a bowl, combine the grated butternut squash, all-purpose flour, egg, salt, and pepper. Stir until well incorporated. You should have a thick batter that holds together nicely.
Tip: Don’t be afraid to get your hands in there! Mixing with your hands can help better combine the ingredients and ensure everything is evenly distributed.
-
Heat the Skillet:
- Heat a medium skillet over medium heat and add a tablespoon of oil (olive oil or vegetable oil works well). You want enough oil to coat the bottom of the pan for frying.
Chef Insight: If you prefer baking, preheat your oven to 375°F (190°C) and line a baking sheet with parchment paper. You can scoop out the fritter mixture and flatten them a bit before popping them in the oven.
-
Form and Fry the Fritters:
- Once the oil is hot, take about 2 tablespoons of the fritter mixture and form them into small patties with your hands. Place them in the skillet, making sure to leave enough space between each fritter. Cook for about 3-4 minutes on one side or until golden brown and crispy. Flip them over carefully and cook for another 3-4 minutes on the other side.
Chef Hack: If you find the fritters falling apart, try adding a touch more flour until the consistency holds together better.
-
Drain and Cool:
- Once cooked, transfer the fritters to a paper towel-lined plate to absorb any excess oil. Let them cool slightly before digging in — they’re perfect while still warm!
Serving Suggestions
Served up hot and delicious, these Butternut Squash Fritters can be plated simply for an elegant touch. Stack fritters high and drizzle with your favorite dipping sauce, possibly a zesty yogurt mix with lemon and herbs, or even serve them with a side of tangy apple chutney. They also pair beautifully with fresh salad greens and a splash of vinaigrette!
Recipe Variations
- Herbed Versions: Add chopped fresh herbs like parsley, cilantro, or chives for an extra burst of freshness.
- Spiced Fritters: Consider folding in some feta cheese and spice it up with cumin or coriander for a Mediterranean twist.
- Vegan Delight: Swap the egg for a flax egg and use chickpea flour instead of all-purpose flour for a vegan take.
- Cheesy Goodness: Add a handful of grated cheese like cheddar or parmesan for an extra savory flavor.
- Baked Not Fried: Prefer a lighter option? Bake them at 375°F (190°C) for about 20-25 minutes, flipping halfway through until golden brown.
Chef’s Notes
These Butternut Squash Fritters hold a special place in my heart as they always remind me of that gathering years ago. As I’ve shared them with friends and family, I’ve witnessed how they can bring people together. The recipe has evolved over time, adapting to the flavors and spices I’ve fallen in love with throughout my cooking journey. There’s something magical about cooking that transcends beyond just feeding people — it creates memories, laughter, and bonds.
FAQs and Troubleshooting
-
Why are my fritters falling apart?
- Ensure you have enough binding agents like flour and eggs. If they’re too wet, adding a bit more flour can help!
-
Can I make these in advance?
- Absolutely! You can prep and form the fritters in advance, just pop them in the fridge until you’re ready to fry. They can also be frozen — fry right from frozen, but increase cooking time.
-
How can I tell when the fritters are done?
- They should be golden brown and crispy on the outside. A quick poke with a fork should show they are tender on the inside without any raw spots.
-
Can I air-fry these fritters?
- Yes! Preheat your air fryer and cook the fritters at 375°F (190°C) for about 15 minutes, flipping halfway through for evenly crisp perfection!
Nutritional Info
(Per fritter, based on the recipe yielding 8 fritters)
- Calories: 120
- Fat: 5g
- Carbohydrates: 15g
- Protein: 2g
And there you have it, friends! Your guide to creating delightful 5-Ingredient Butternut Squash Fritters that are sure to delight your family and friends. Get ready to enjoy the coziness of cooking, the joy of sharing, and the satisfaction of creating something delicious from scratch. Happy cooking!
Print
5-Ingredient Butternut Squash Fritters
- Total Time: 30 minutes
- Yield: 4 servings 1x
- Diet: Vegetarian
Description
Crispy on the outside and tender on the inside, these Butternut Squash Fritters are easy to make and bursting with flavor. Perfect for sharing!
Ingredients
- 1 medium butternut squash (about 2 cups, grated)
- 1/2 cup all-purpose flour
- 1 large egg
- 1/4 teaspoon salt
- 1/4 teaspoon pepper (optional; adjust to taste)
Instructions
- Prep the squash: Peel, halve, seed, and grate the butternut squash to yield about 2 cups.
- Mix the ingredients: Combine grated squash, flour, egg, salt, and pepper in a bowl until well incorporated.
- Heat the skillet: Heat a medium skillet over medium heat with a tablespoon of oil.
- Form and fry the fritters: Shape 2-tablespoon amounts of the mixture into patties and fry until golden brown, about 3-4 minutes per side.
- Drain and cool: Transfer cooked fritters to a paper towel-lined plate to absorb excess oil before serving.
Notes
These fritters can be baked at 375°F (190°C) for a lighter option. You can also make them in advance and freeze for later use.
- Prep Time: 15 minutes
- Cook Time: 15 minutes
- Category: Appetizer
- Method: Frying
- Cuisine: American
Nutrition
- Serving Size: 2 fritters
- Calories: 120
- Sugar: 2g
- Sodium: 200mg
- Fat: 5g
- Saturated Fat: 1g
- Unsaturated Fat: 3g
- Trans Fat: 0g
- Carbohydrates: 15g
- Fiber: 2g
- Protein: 2g
- Cholesterol: 25mg
Keywords: butternut squash, fritters, vegetarian appetizer, fall recipe, easy cooking

Gratin de Courge Butternut au Fromage
Gratin de Courge Butternut au Fromage: A Cozy Culinary Adventure
Welcome to my kitchen, where the aroma of roasted butternut squash fills the air and nostalgia hugs you like a favorite sweater! If you’ve ever found yourself mesmerized by the sight of autumn leaves or the first bite of creamy, cheesy goodness, this gratin is going to become your new go-to dish. Gratin de Courge Butternut au Fromage, or butternut squash gratin with cheese, is not just a meal; it’s a celebration of warmth, comfort, and all things delicious.
On a chilly evening, when the world outside bites with a hint of cold, there’s only one thing on my mind: reaching for vibrant veggies and turning them into something magnificent. This gratin embodies that spirit. Scents of nutmeg dance in the background while layers of sweet and savory mingle, all draped under a cozy blanket of melted cheese. Trust me; this lovely dish brings everyone together!
This recipe is ideal not only for family dinners but also for gatherings with friends. It’s a dish that sparks stories around the table and makes hearts full. Imagine your loved ones lingering over a plate of golden, bubbling gratin, savoring each bite while sharing laughs and tales. It doesn’t get much better than that! Ready to transform your kitchen into a cozy culinary haven? Let’s roll up our sleeves and start this delicious journey together!
A Slice of Personal History
As a child, every autumn, I’d rush to the kitchen to help my grandmother prepare her famous squash gratin. The kitchen would be alive with laughter, and the air would be fragrant with spices and melting cheese. She’d let me pick the herbs from the garden while she taught me the art of layering flavors. Butternut squash, freshly grated nutmeg, and a sprinkle of cheese were all wrapped up in those moments, and I often felt like a magician, transforming humble ingredients into a feast!
Fast forward to today, and although my grandmother is no longer with us, her spirit thrives in the memories we created together. I’ve put my own spin on her classic recipe, not to replace her magic but to carry it forward. Each time I make gratin de courge butternut, I’m reminded of her warm embrace and the carved-out kitchen conversations we cherished. It’s a true testament that food binds us across generations, isn’t it? Now, let’s channel those cozy vibes into creating our own beautiful dish!
Ingredients
Let’s gather our magical ingredients! Here’s what you’ll need to make this delightful gratin:
-
Butternut Squash (3-4 cups, peeled and thinly sliced)
The star of our dish! Butternut squash adds sweetness and creaminess. If you can’t find butternut squash, try acorn squash or sweet potatoes; they bring a similar flavor profile. -
Gruyère Cheese (1.5 cups, grated)
This cheese melts beautifully and has a nutty flavor that elevates the dish. Substitute with Emmental or a sharp cheddar if you’re in a pinch, but keep in mind that the flavor may change slightly. -
Heavy Cream (1 cup)
This will make your gratin rich and luscious. For a lighter option, you can use half-and-half or a non-dairy cream alternative. -
Garlic (2 cloves, minced)
Garlic brings depth and pungency. You can use garlic powder if you’re out, but fresh is always best for flavor. -
Nutmeg (1/4 teaspoon)
A pinch of nutmeg intensifies the warmth of the squash. If you don’t have it, cinnamon can be a delightful alternative for a different yet vibrant twist. -
Thyme (1 teaspoon, dried or fresh)
Thyme pairs beautifully with squash; it’s earthy and aromatic. Substitute with rosemary for a bolder flavor or omit if herbs aren’t your thing. -
Salt and Pepper
Essential for balancing flavors! Use sea salt for a gentler taste and fresh black pepper for a little kick.
This delightful combination is what gives our gratin its rich and inviting flavor profile. Pro tip: Always taste as you go to ensure your dish bursts with flavor!
Step-by-Step Instructions
Now, the best part – let’s cook! Follow these steps, and I promise you a stunning gratin that will impress everyone.
-
Preheat Your Oven
Preheat your oven to 375°F (190°C). Preheating ensures even cooking and that golden crust we all love. -
Prepare the Squash
Peel and slice the butternut squash into thin, even rounds (about 1/4 inch thick). This is vital; uniform slices ensure consistent cooking. Use a sharp knife for easy slicing, or if you’re feeling adventurous, a mandoline works wonders! -
Cook the Garlic
In a medium saucepan over medium heat, melt 2 tablespoons of butter and sauté the minced garlic for about 1 minute, until fragrant (but not browned!). This step infuses the butter with that glorious garlic flavor, creating a savory base for our gratin. -
Make the Creamy Mixture
Add the heavy cream, thyme, nutmeg, salt, and pepper to the garlic butter. Bring it to a gentle simmer and let it cook for about 5 minutes to allow the flavors to meld together beautifully. Remember, this creamy concoction will hug our squash slices like an oven-fresh blanket! -
Layer the Dish
In a greased 9×13 inch baking dish, start by creating a layer of butternut squash. Drizzle about one-third of the creamy mixture over the top. Sprinkle a handful of cheese on top (a bit more is always better!). Repeat this process until all the squash and sauce are used up, finishing with a generous layer of cheese. A little extra cheese on top will result in a beautifully crispy, cheesy crust. -
Bake It to Perfection
Cover the dish with foil and bake in the preheated oven for about 30 minutes. Then, remove the foil and let it bake for an additional 20-25 minutes until the cheese is golden brown and bubbling, and the squash is tender. The foil helps to steam the squash, while the uncovered time ensures that cheese gets that desirable golden hue. -
Cool & Serve
Once the gratin comes out of the oven, let it rest for about 10 minutes (if you don’t mind the wait!). This allows the layers to settle before you dive in, preventing it from falling apart when you serve it.
What’s more, the beauty of this dish is that it stays warm for a good while, making it perfect for those cozy get-togethers.
Serving Suggestions
The beauty of gratin de courge butternut is how it can be served! I love serving it right in the baking dish, family-style. A sprinkle of fresh thyme on top adds a pop of color and a fresh aroma. Pair it with a crisp green salad or some roasted veggies for a well-rounded meal. A drizzle of balsamic reduction over the top before serving can give a zesty kick that complements the creaminess of the gratin beautifully.
Recipe Variations
Feeling adventurous? Here are some creative twists you can try with this gratin:
-
Nutty Crunch: Add a topping of panko breadcrumbs mixed with Parmesan for an extra crunchy topping. You can even include some chopped nuts like walnuts for a delightful flavor boost!
-
Spicy Kick: For those who love a bit of heat, sprinkle in some chili flakes or fresh jalapeños between the layers for a tasty twist!
-
Herby Delight: Experiment with different herbs! Sage, rosemary, or even a bit of basil can add unique flavor profiles that brighten your dish.
-
Cheesy Alternatives: Mix in a variety of cheeses, like blue cheese or feta, for a flavor explosion that everyone will love.
-
Vegan Version: Substitute the heavy cream with coconut milk and use a plant-based cheese for a vegan delight that doesn’t skimp on flavor.
Chef’s Notes
This dish has always been a crowd-pleaser in my home. As a home cook, I find joy in experimenting, whether it’s the flavors or the textures. One time, I had a small disaster with the gratin spilling over in the oven – let’s just say my kitchen was a bit of a cheesy battlefield! But it all came together, and that’s what I love about cooking: embracing the mess and the journey.
Over the years, I’ve played around with different veggies and spices, and each iteration of my gratin brings a smile to my face. This recipe truly has evolved into something so special!
FAQs and Troubleshooting
-
Why is my gratin soupy?
If your gratin is too watery, make sure to let it rest after baking. This allows the layers to settle and thicken. If your squash was particularly watery, you might want to pat it dry with a clean towel before layering it. -
Can I prepare it ahead of time?
Absolutely! You can assemble the gratin a day in advance and store it in the fridge before baking. Just add a little more baking time if it’s cold from the fridge when you pop it in the oven. -
What if my cheese clumps instead of melting?
Make sure to shred your cheese fresh from the block instead of using pre-shredded varieties, as they often contain anti-caking agents that affect melting. -
How can I store leftovers?
Store any leftovers in an airtight container in the fridge for up to 3–4 days. Reheat in the oven or microwave until warmed through. It’s just as delicious as the first day!
Nutritional Info
This gratin makes for a hearty side dish that feeds the soul. Also, it’s packed with nutrients from the butternut squash, which is a fantastic source of vitamins A and C. Combined with the lovely richness of cheese and cream, this dish is comforting and provides a balance of flavors.
So there you have it, my lovely food enthusiasts! A journey through the delicious world of Gratin de Courge Butternut au Fromage. Let this recipe be a hug on a plate, perfect for sharing with those you love. So grab your apron, turn on some soothing music, and let’s create something magical in the kitchen! Happy cooking! 🍽️✨
Print
Gratin de Courge Butternut au Fromage
- Total Time: 70 minutes
- Yield: 6 servings 1x
- Diet: Vegetarian
Description
A cozy and creamy butternut squash gratin layered with cheese and spices, perfect for family gatherings and chilly evenings.
Ingredients
- 3–4 cups Butternut Squash, peeled and thinly sliced
- 1.5 cups Gruyère Cheese, grated
- 1 cup Heavy Cream
- 2 cloves Garlic, minced
- 1/4 teaspoon Nutmeg
- 1 teaspoon Thyme, dried or fresh
- Salt and Pepper, to taste
Instructions
- Preheat your oven to 375°F (190°C).
- Prepare the butternut squash by peeling and slicing it into thin, even rounds.
- Cook the garlic in a medium saucepan with melted butter until fragrant.
- Add the heavy cream, thyme, nutmeg, salt, and pepper to the garlic butter, bringing it to a gentle simmer.
- Layer the dish starting with butternut squash, drizzling the creamy mixture, and sprinkling cheese until all ingredients are used up.
- Bake covered with foil for about 30 minutes, then uncover and bake for an additional 20-25 minutes until golden brown.
- Cool for about 10 minutes before serving.
Notes
For a twist, try adding panko breadcrumbs and nuts on top for crunch or experimenting with different herbs and cheeses.
- Prep Time: 15 minutes
- Cook Time: 55 minutes
- Category: Side Dish
- Method: Baking
- Cuisine: French
Nutrition
- Serving Size: 1 serving
- Calories: 400
- Sugar: 4g
- Sodium: 450mg
- Fat: 25g
- Saturated Fat: 15g
- Unsaturated Fat: 8g
- Trans Fat: 0g
- Carbohydrates: 30g
- Fiber: 5g
- Protein: 10g
- Cholesterol: 60mg
Keywords: butternut squash, gratin, cheesy, comfort food, vegetarian
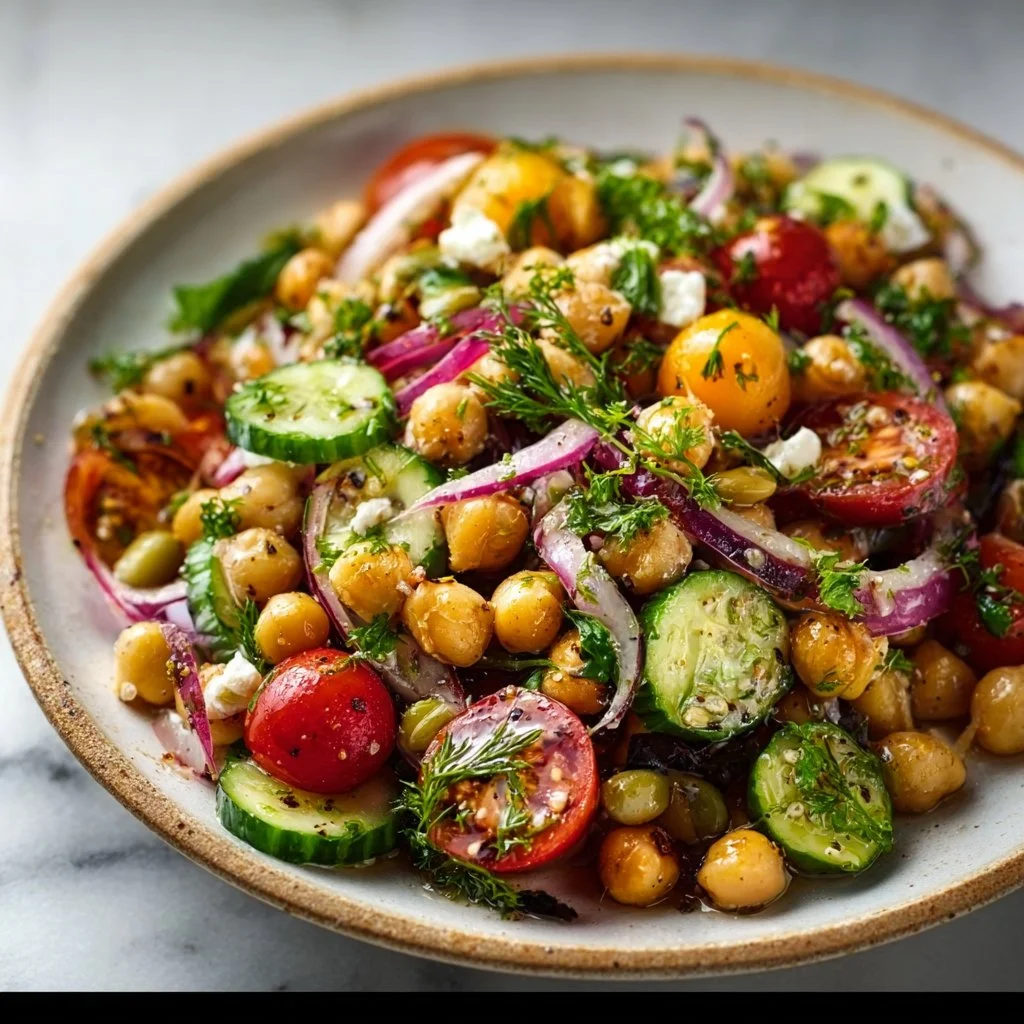
Delicious Chickpea Salad Recipes: Easy Tips For Flavorful Meals
Delicious Chickpea Salad Recipes: Easy Tips for Flavorful Meals
Hello, fellow food lovers! 🌟 Welcome back to my cozy kitchen! Today, we’re diving into the world of chickpea salads—a dish that whispers comfort while packing a powerhouse of flavor. If you’ve ever walked into your kitchen hoping to whip up something fresh, healthy, and oh-so-delicious without spending hours slaving over a hot stove, then this post is for you!
Chickpeas, those little golden nuggets of goodness, are one of my favorite ingredients. Not only are they packed with protein and fiber, but they also take on flavors like a champ, making them a perfect base for salads. Whether you’re looking for a quick lunch, a vibrant side dish for dinner, or just a crunchy snack to munch on while binge-watching your favorite shows, chickpea salads are a hundred percent the way to go!
We’ll chat about why chickpeas are so amazing, share some mouth-watering recipes, and provide you with tips that will elevate your chickpea salad game. Spoiler alert: You don’t need to be a culinary wizard to make these salads sing! Just a sprinkle of creativity and a dash of love is all it takes.
Before we jump into the cooking, I want to share a little story that’s close to my heart. Sit back, grab a cup of tea, and let’s get nostalgic!
Personal Story
Growing up, I was always surrounded by the lovely aromas of my grandmother’s kitchen. Every Sunday, she would host our family for lunch, and the centerpiece of her feast was an ever-changing salad. Her famous “Clean-Out-the-Fridge Chickpea Salad” was a grand tradition that felt both spontaneous and utterly delicious. I remember her bustling around, collecting whatever veggies she could find—crisp bell peppers, tangy tomatoes, a handful of parsley, and a squeeze of lemon to brighten it all up.
That salad was more than just a dish; it was a celebration of family. We’d gather around the table, digging into colorful bowls full of her chickpea creation, laughing and talking about our week. It wasn’t fancy; it was heartfelt. And whenever I make a chickpea salad, I channel that same joy and energy, creating a little piece of home to share with others.
Now, let’s recreate that magic in your own kitchen! Are you ready? Let’s gather our ingredients!
Ingredients
Here’s what you’ll need for my go-to chickpea salad, perfect for potlucks, picnics, or simply a satisfying lunch.
-
2 cans of chickpeas (garbanzo beans)
These little gems are the star of the show. Drained and rinsed, they provide a hearty base. If you prefer fresh, use 1.5 cups of cooked chickpeas instead! -
1 cup cherry tomatoes, halved
Sweet and juicy, these add vibrant color and a burst of flavor. Sub with diced regular tomatoes if you like—they’ll do just fine! -
1 cucumber, diced
Crisp and refreshing! A great alternative is zucchini for a different texture. -
1/2 red onion, finely chopped
Adds a nice crunch and a hint of sharpness. If raw onion isn’t your vibe, try green onions or chives instead. -
1 red bell pepper, diced
Sweet and colorful; feel free to switch to yellow or orange peppers for a different twist. -
1/2 cup fresh parsley, chopped
Brightness in a bowl! If parsley isn’t available, try fresh cilantro or basil for a unique flair. -
1/4 cup feta cheese (optional)
Creamy and tangy, feta adds a delicious punch! For a dairy-free option, skip it or use vegan cheese. -
Juice of 1 lemon
A must for that zing! Lime juice works beautifully too. -
2 tablespoons olive oil
A good-quality olive oil will enhance the flavors. Avocado oil is another great substitute! -
Salt and pepper, to taste
Don’t forget to season! Fresh herbs, garlic powder, or smoked paprika can also add layers of flavor.
Pro Tip:
Use dried chickpeas? Soak them overnight and boil until tender for a fresher taste! Remember: One cup of dried chickpeas gives you about two cans worth.
Step-by-Step Instructions
Ready to dive into the kitchen? Here’s how to whip up this chickpea salad in no time!
-
Prep Your Ingredients
Start by rinsing and draining your chickpeas in a colander. Lay them out on a clean kitchen towel to pat them dry. This step helps them absorb flavors better! -
Chop the Veggies
While the chickpeas dry, the real fun begins! Dice your cucumber, halved tomatoes, red onion, and bell pepper. The more colorful, the better! Remember to use a sharp knife—it makes life easier and keeps those veggies from squishing. -
Call in the Parsley
Chop your fresh parsley and set it aside. This herb brings freshness that’s hard to beat. If you’re feeling adventurous, try adding a pinch of dill or mint for a twist. -
Combine in a Bowl
In a large mixing bowl, combine the chickpeas, cherry tomatoes, cucumber, red onion, bell pepper, and parsley. Give it a gentle toss to mix everything together. This is really where the fun begins! -
Whisk the Dressing
In a small bowl, whisk together the lemon juice, olive oil, salt, and pepper. Taste as you go! You want a balance of zinginess from the lemon and richness from the oil. Add more seasoning if needed. This dressing is your secret weapon! -
Dress It Up
Pour the dressing over the salad and toss gently until it’s all coated in that lovely, zesty goodness. You can let it sit for a few minutes—it gives the flavors time to mingle! -
Add Feta (if using)
If you’re adding feta cheese, crumble it over the top at this stage and give it a last gentle stir. A “totally optional” addition, but oh-so-delicious! -
Taste and Adjust
This is the best step! Grab a fork and take a bite. Does it need more salt? More lemon? Adjust according to your palate. Your salad should sing with flavor! -
Chill (Optional)
For an extra refreshing experience, pop the salad in the fridge for about 30 minutes before serving. This just lets those flavors mingle and deepen!
Pro Tip:
Making this ahead? It can last for up to three days in the fridge! However, consider leaving out the feta until you’re ready to serve to keep it fresh.
Serving Suggestions
To plate your chickpea salad beautifully, scoop a generous portion into a colorful bowl for that rustic, homey feel. Drizzle a little extra olive oil on top and sprinkle some chopped parsley for a lovely presentation. Pair it alongside grilled chicken, or serve it on a bed of crisp greens for extra flair. Don’t forget to have some crusty bread nearby for dipping!
Recipe Variations
Chickpea salads are so versatile! Here are a few creative spins you can try:
-
Mediterranean Twist: Add kalamata olives, artichoke hearts, and a touch of oregano to transport your taste buds straight to the Mediterranean.
-
Spicy Kick: Toss in diced jalapeños, red chili flakes, or a dash of your favorite hot sauce for a sneaky kick.
-
Asian-Inspired: Swap out the lemon for rice vinegar, add some edamame, and finish with sesame oil and seeds for a unique twist.
-
Fruit and Nut Combo: Add diced apple or dried cranberries for sweetness, and throw in some walnuts or pecans for crunch.
-
Curried Chickpea Salad: Mix in curry powder and a spoonful of yogurt for a tangy flavor profile. Toss in raisins for a sweet contrast!
Chef’s Notes
You know, chickpea salads have evolved a lot in my kitchen since my grandmother’s days. What started as a simple toss of whatever was in the fridge has blossomed into a creative outlet where I can experiment with flavors and ingredients. One day, I stumbled upon a spicy mango dressing, and wow, that opened up a whole new world of flavor! In this culinary adventure, I’ve learned not to be afraid of trying new combinations—sometimes the wildest pairings result in the most delightful surprises.
I also remember the first time I made chickpea salad for my then-new friends in college. Being a poor student, chickpeas were my go-to for their affordability. I brought a massive bowl to a potluck, and it was devoured in minutes! I was so proud to have converted them into fellow chickpea enthusiasts.
FAQs and Troubleshooting
1. Can I use dried chickpeas instead of canned?
Absolutely! You’ll want to soak them overnight and then cook them until tender. Just remember—one cup of dried chickpeas equals about two cans!
2. How can I store leftover salad?
Keep it in an airtight container in the fridge for up to three days. Just note that if you’ve added feta, it may lose a bit of its charm in terms of texture.
3. What’s the best way to prevent soggy cucumbers?
If you want to make the salad ahead of time, consider peeling, salting, and draining your cucumbers for 30 minutes before adding them. This helps draw out excess moisture!
4. How can I make this salad more filling?
You can add cooked quinoa, brown rice, or even grilled chicken or tofu to make it a heartier main dish!
Nutritional Info
(Serving Size: 1 cup)
Calories: 200
Protein: 9g
Carbohydrates: 28g
Fat: 6g
Fiber: 7g
(Note: Nutritional values can vary based on specific ingredients and quantities used.)
And there you have it, my friend! A delightful, hearty chickpea salad that comes together with love and some creativity. Remember, cooking is all about having fun, exploring flavors, and connecting with those you love through food. So, roll up those sleeves, wear that apron, and get ready to enjoy every yummy bite!
Happy cooking! 🥗✨
Print
Chickpea Salad
- Total Time: 15 minutes
- Yield: 4 servings 1x
- Diet: Vegetarian
Description
A vibrant and delicious chickpea salad packed with fresh vegetables and bursting with flavor, perfect for potlucks or a satisfying lunch.
Ingredients
- 2 cans of chickpeas (garbanzo beans), drained and rinsed or 1.5 cups cooked fresh chickpeas
- 1 cup cherry tomatoes, halved
- 1 cucumber, diced
- 1/2 red onion, finely chopped
- 1 red bell pepper, diced
- 1/2 cup fresh parsley, chopped
- 1/4 cup feta cheese (optional)
- Juice of 1 lemon
- 2 tablespoons olive oil
- Salt and pepper, to taste
Instructions
- Prep your ingredients by rinsing and draining your chickpeas in a colander.
- Chop the veggies: dice your cucumber, tomatoes, red onion, and bell pepper.
- Call in the parsley and chop it, setting it aside.
- Combine in a large mixing bowl the chickpeas, tomatoes, cucumber, red onion, bell pepper, and parsley.
- Whisk the dressing: mix together lemon juice, olive oil, salt, and pepper.
- Dress the salad by pouring the dressing over it and gently toss to coat.
- Add feta cheese, if using, and stir gently.
- Taste and adjust seasoning as needed.
- Chill in the fridge for about 30 minutes before serving if preferred.
Notes
For a refreshing taste, let the salad chill after preparing it. Use dried chickpeas? Soak them overnight and boil until tender for a fresher taste!
- Prep Time: 15 minutes
- Cook Time: 0 minutes
- Category: Salad
- Method: No Cooking
- Cuisine: Mediterranean
Nutrition
- Serving Size: 1 cup
- Calories: 200
- Sugar: 4g
- Sodium: 350mg
- Fat: 6g
- Saturated Fat: 1g
- Unsaturated Fat: 3g
- Trans Fat: 0g
- Carbohydrates: 28g
- Fiber: 7g
- Protein: 9g
- Cholesterol: 10mg
Keywords: chickpea salad, easy salad recipes, healthy meals, vegetarian recipes, quick lunch

Cheesy Potato Burritos
# Cheesy Potato Burritos: From My Kitchen to Yours

Welcome back, dear foodies! Today, I’m absolutely thrilled to share a beloved recipe with you—Cheesy Potato Burritos. If you’re like me, you know there’s something undeniably cozy about loading up on comforting flavors and wrapping them in a warm tortilla. This dish isn’t just a meal; it’s an experience—one that sparks joy, laughter, and delightful memories around the dining table.

Picture this: a chilly evening, the smell of something delicious wafting through the air, and loved ones gathered together, diving into a platter of cheesy, hearty burritos. With their crispy edges and warm, cheesy centers, these burritos are the culinary equivalent of a loving hug. Whether it’s breakfast, brunch, or dinner, they can make any occasion feel special.

The beauty of these Cheesy Potato Burritos is you don’t need to be a gourmet chef to whip them up—trust me! They come together in just a few steps, and the result is an explosion of cheesy goodness that will leave everyone asking for seconds. So, grab your apron, let’s get cozy in the kitchen, and create a burrito masterpiece together!

## Personal Story: A Cozy Family Tradition

My love for burritos started at a young age. Every Sunday, my family would gather for brunch, and one of my mom’s signature dishes was her cheesy potato burritos. She’d whip them up so effortlessly, the kitchen would fill with that glorious smell of melting cheese, tender potatoes, and spices that made my stomach flutter with anticipation.

I remember sitting at the kitchen counter, my little hands rolling the tortillas and getting as much filling as possible—because, honestly, who wouldn’t want an extra helping of gooey cheese? Those Sunday brunches became a cherished tradition filled with laughter and the delight of sharing food made with love.

Now, taking the helm in my own kitchen, I’ve made this recipe my own while keeping the spirit of those joyful moments alive. It's all about the warmth and the memories we create around the table, and I can’t wait for you to experience it too!

## Ingredients

For these delicious Cheesy Potato Burritos, you’ll need the following ingredients:

- **4 medium-sized Russet potatoes**: Creamy and starchy, these potatoes are the stars of the show. If you prefer, you can substitute with Yukon Gold for a richer flavor.

- **1 cup shredded cheese (cheddar, Monterey Jack, or a blend)**: Use your favorite cheese to elevate the meltiness! For vegan options, try dairy-free cheese shreds.

- **1 small onion, diced**: Sweet and savory, onions add an aromatic foundation. Red or yellow onions work beautifully here.

- **2 cloves garlic, minced**: Garlic enhances the flavor profile. Feel free to use garlic powder as a substitute—about half a teaspoon should do the trick.

- **1 tsp cumin**: This earthy spice brings warmth to the dish. Smoked paprika is a great alternative for added depth.

- **Salt and pepper to taste**: Essential for balancing the flavors. Season as you go for best results!

- **4 large flour tortillas**: Flour tortillas are soft and pliable for stuffing. Corn tortillas can offer a gluten-free option but might require careful handling.

- **Oil for frying**: I love using olive oil for a touch of fruity flavor, but vegetable or canola oil will work just as well.

- **Optional toppings (sour cream, salsa, guacamole)**: Don’t forget these to take your burritos over the top!

## Step-by-Step Instructions

Let’s roll up our sleeves and get to the good stuff! Here’s how you can make these Cheesy Potato Burritos:

1. **Boil the Potatoes**: Start by peeling and dicing your Russet potatoes into cubes, about 1-inch thick. Place them in a large pot, cover with cold water, add a pinch of salt, and bring to a boil. Once boiling, reduce to a simmer for about 15–20 minutes or until fork-tender.

    *Chef’s Tip*: If you want to infuse a bit of flavor, toss in a garlic clove or bay leaf while the potatoes cook.

2. **Saute the Onion and Garlic**: While the potatoes boil, heat a tablespoon of oil in a large skillet over medium heat. Add the diced onion and sauté until it becomes translucent (about 5 minutes). Then, add the minced garlic and cumin, letting everything cook for another minute until fragrant.

    *Commentary*: This combo creates an aromatic base that will beautifully complement the potatoes.

3. **Mash the Potatoes**: Once the potatoes are soft, drain them and return them to the pot. Using a potato masher, mash them up until smooth. Stir in the sautéed onion, garlic, and half of your cheese, seasoning with salt and pepper to taste.

    *Chef Insight*: For a little kick, feel free to add jalapeños or crushed red pepper flakes.

4. **Wrap the Burritos**: Lay out a tortilla on a clean surface and spoon a generous amount of the potato mixture into the center. Fold the sides over the filling and then roll it up tightly. Repeat with remaining tortillas and filling.

    *Little Chef Hack*: If you’re having trouble with your burritos staying closed, a toothpick can help keep them together while frying!

5. **Fry the Burritos**: Heat more oil in the skillet over medium heat. Once hot, place the burritos seam-side down in the pan. Cook for about 3–4 minutes on each side or until crispy and golden brown.

    *Tip*: Don't overcrowd the skillet; give them some space to get that perfect crispy texture!

6. **Melt the Cheese**: After flipping the burritos, sprinkle the remaining cheese on top and cover the skillet with a lid. This will allow the cheese to melt beautifully while the burritos crisp up.

7. **Serve Warm**: Once golden and crunchy, remove them from the skillet and let them rest for a minute. Serve them up with your favorite toppings.

## Serving Suggestions

Presentation is key, right? Arrange the Cheesy Potato Burritos on a platter and serve them with dollops of sour cream, fresh salsa, and guacamole. Garnish with a sprinkle of fresh cilantro or sliced green onions for that pop of color—totally Instagram-worthy!

## Recipe Variations

Feeling adventurous? Here are some fun twists on the classic Cheesy Potato Burrito:

- **Breakfast Burrito**: Add scrambled eggs and cooked bacon or sausage to your filling for a hearty breakfast option.

- **Veggie Delight**: Stir in sautéed bell peppers, spinach, or mushrooms for an extra nutritional punch.

- **Spicy Southwest**: Mix in some diced green chiles or hot sauce with the potatoes for a flavorful kick.

- **Black Bean Addition**: For added protein, mix black beans into your potato filling.

## Chef’s Notes

Over time, I've discovered that this recipe is incredibly flexible. The beauty of cooking lies in creating your variations based on what you have on hand. One time, I unexpectedly ran out of cheese and used a mix of Greek yogurt and herbs instead—it turned out to be a delightful creamy topping! Always feel free to experiment; you might just discover your next favorite flavor combination!

## FAQs and Troubleshooting

**Q: Why did my burritos fall apart?**
A: This can happen if the filling is too watery. Make sure to mash the potatoes well and avoid adding excess cooking liquid.

**Q: Can I make the filling ahead of time?**
A: Absolutely! You can prepare the potato mixture a day ahead and store it in the fridge. Just warm it up before filling the tortillas.

**Q: Are these burritos freezer-friendly?**
A: Yes! You can wrap them tightly in foil and freeze them for up to a month. Just pop them into the oven to reheat!

**Q: Can I bake the burritos instead of frying them?**
A: Of course! Simply brush them with a bit of oil and bake at 400°F (200°C) for about 20-25 minutes until crispy.

## Nutritional Info

This is a cozy comfort dish, and while it's hearty, moderation is key! Each burrito provides a good source of carbohydrates from potatoes and some protein from cheese. Pair with a salad for a balanced meal.

---

I hope you enjoy making these Cheesy Potato Burritos as much as I do! They’re a love letter to comfort food and a reminder that the best moments often happen around the table. So, roll up your sleeves, share them with family or friends, and create memories cooked with love. Happy cooking, friends!

Cheesy Potato Burritos
- Total Time: 45 minutes
- Yield: 4 servings 1x
- Diet: Vegetarian
Description
Deliciously comforting burritos filled with creamy mashed potatoes, cheese, and spices, perfect for any meal.
Ingredients
- 4 medium-sized Russet potatoes
- 1 cup shredded cheese (cheddar, Monterey Jack, or a blend)
- 1 small onion, diced
- 2 cloves garlic, minced
- 1 tsp cumin
- Salt and pepper to taste
- 4 large flour tortillas
- Oil for frying
- Optional toppings (sour cream, salsa, guacamole)
Instructions
- Boil the Potatoes: Start by peeling and dicing your Russet potatoes into cubes, about 1-inch thick. Place them in a large pot, cover with cold water, add a pinch of salt, and bring to a boil. Once boiling, reduce to a simmer for about 15–20 minutes or until fork-tender.
- Saute the Onion and Garlic: While the potatoes boil, heat a tablespoon of oil in a large skillet over medium heat. Add the diced onion and sauté until it becomes translucent (about 5 minutes). Then, add the minced garlic and cumin, letting everything cook for another minute until fragrant.
- Mash the Potatoes: Once the potatoes are soft, drain them and return them to the pot. Using a potato masher, mash them up until smooth. Stir in the sautéed onion, garlic, and half of your cheese, seasoning with salt and pepper to taste.
- Wrap the Burritos: Lay out a tortilla on a clean surface and spoon a generous amount of the potato mixture into the center. Fold the sides over the filling and then roll it up tightly. Repeat with remaining tortillas and filling.
- Fry the Burritos: Heat more oil in the skillet over medium heat. Once hot, place the burritos seam-side down in the pan. Cook for about 3–4 minutes on each side or until crispy and golden brown.
- Melt the Cheese: After flipping the burritos, sprinkle the remaining cheese on top and cover the skillet with a lid. This will allow the cheese to melt beautifully while the burritos crisp up.
- Serve Warm: Once golden and crunchy, remove them from the skillet and let them rest for a minute. Serve them up with your favorite toppings.
Notes
Feel free to experiment with the filling ingredients or toppings to create your own variations.
- Prep Time: 15 minutes
- Cook Time: 30 minutes
- Category: Main Course
- Method: Frying
- Cuisine: Mexican
Nutrition
- Serving Size: 1 burrito
- Calories: 350
- Sugar: 1g
- Sodium: 400mg
- Fat: 12g
- Saturated Fat: 4g
- Unsaturated Fat: 6g
- Trans Fat: 0g
- Carbohydrates: 45g
- Fiber: 3g
- Protein: 15g
- Cholesterol: 30mg
Keywords: burritos, cheesy potatoes, comfort food, vegetarian burritos, Mexican cuisine


