

Minute Italian Antipasto Salad for Easy Meal Prep
The Ultimate Italian Antipasto Salad: A Flavorful Journey for the Senses
Welcome to my kitchen, food lovers! Today we’re diving into one of my absolute favorite dishes: the Italian Antipasto Salad. This vibrant medley of colorful ingredients is the perfect starter or light meal that brings a bit of Italy right to your table. As a home cook who thrives on creating meals that spark connection, you can imagine how excited I am to share this recipe with you!
This salad is more than just a collection of ingredients; it’s a celebration of flavors, textures, and those precious moments we share around the dining table. Whether you’re prepping for a casual dinner, a festive holiday gathering, or just craving something fresh and delightful, this Antipasto Salad is sure to impress. Picture crispy greens tossed with marinated olives, savory meats, and creamy cheese—it’s a feast for the eyes as much as the palate!
Now, let’s talk about what makes this dish special. It’s incredibly versatile! You can customize it with your favorite ingredients or whatever you have on hand. There’s no strict rule here; if it makes your taste buds tingle, toss it in! Plus, it’s a fantastic way to use up those leftover odds and ends from your fridge, so let’s get started!
A Salty, Savory Memory
I still remember the first time I had a true Italian antipasto salad. I was in a small, rustic restaurant in Florence, where the air was thick with the alluring aromas of garlic and herbs. I was there with my family; we’d spent the day exploring the cobblestone streets and marvelling at the architecture. When this beautiful salad landed on our table, my heart skipped a beat. Vibrant red tomatoes, lush green basil, and a mix of rich, savory meats danced together, each bite seemingly singing a different note.
My grandmother, who was a fabulous cook herself, encouraged us to try everything. "Taste the colors," she would say, as she handed me a slice of crisp pepperoni along with a smattering of tangy mozzarella. That meal was more than just food—it was a familial bonding experience that cemented my love for the art of cooking and sharing. Now, I aim to recreate that joyous feeling in my own kitchen by making Antipasto Salad a staple at family gatherings.
Ingredients
Gathering your ingredients is half the fun! Here’s what you’ll need for a delightful Antipasto Salad, along with some tips for substitutions and insights:
-
Mixed Greens: A nice blend of arugula, romaine, and spinach works wonderfully. Feel free to use whatever greens you prefer; kale adds an extra crunch!
-
Cherry Tomatoes: These bite-sized gems add sweetness. Substitute with any halved tomatoes, like grape varieties or even sun-dried for a richer taste.
-
Cured Meats: Classic Italian choices like salami and prosciutto bring that savory, umami punch. You can use turkey or chicken slices for a lighter version, or even go vegetarian with marinated artichokes instead.
-
Cheese: Mozzarella pearls or provolone are traditional, but feta adds a tangy twist. If you’re dairy-free, try a vegan cheese!
-
Olives: A mix of green and black olives offers complexity in flavor. If you’re not a fan, capers or pickled veggies can provide a similar zing.
-
Peppers: Roasted bell peppers add sweetness and color. Jarred, pickled peppers can work in a pinch if fresh ones aren’t available.
-
Artichoke Hearts: Marinated or canned artichoke hearts can elevate the flavor profile. For a twist, you could use caponata (a Sicilian eggplant dish) for depth.
-
Olive Oil: A high-quality extra virgin olive oil will make your dressing shine. You can replace it with avocado oil or even flavored oils for an added twist.
-
Balsamic Vinegar: This brings acidity and balances out the flavors. If you want a sweeter dressing, cherry vinegar works beautifully too.
-
Herbs: Fresh basil or oregano is ideal, but dried herbs will work if that’s what you have on hand.
Now that you have your ingredients ready, it’s time to get cooking!
Step-by-Step Instructions
Let’s whip up this scrumptious salad together! Just follow these simple steps, and I promise you’ll be amazed at how easy it is to create this Italian delight.
-
Prep your greens: Start by washing your mixed greens in cold water. Spin them dry in a salad spinner or gently pat them with a towel. This step is crucial; no one likes a soggy salad!
-
Chop your vegetables: Halve the cherry tomatoes and dice the bell peppers into bite-sized pieces. Make sure you make these pieces uniform for even distribution in your salad.
-
Tear that mozzarella: If you’re using mozzarella balls, simply drain them and toss them in. If you’re using larger blocks, chunk them up generously. The cheese should be in pieces that meld into the salad without overpowering it.
-
Prep the meats: Slice your cured meats into strips or bite-sized pieces. Maybe have a little taste along the way—quality control, right?
-
Mix it up: In a large bowl, combine your greens, cherry tomatoes, bell peppers, olives, meat, cheese, and artichokes. Here’s where you get to be an artist, layering those colors beautifully as you go!
-
Dress it right: In a separate small bowl, whisk together olive oil and balsamic vinegar. A ratio of 3:1 (oil to vinegar) is just right for drizzling flavors throughout. Add minced garlic, salt, and pepper to taste. If you want a bit of sweetness, a teaspoon of honey or maple syrup can enhance this dressing beautifully.
-
Toss and serve: Drizzle your dressing over the salad and gently toss everything together. Be gentle, so you keep the integrity of the ingredients. Serve it on a large platter or in bowls, and watch the wow factor rise!
Tips from the Chef:
- Make your dressing in advance so the flavors can meld together.
- This salad is better after sitting for about 30 minutes, letting the ingredients get to know each other.
- If you have any leftovers, they make a fantastic sandwich filler for lunch the next day!
Serving Suggestions
To serve your Italian Antipasto Salad in style, consider plating it on a large wooden board or a colorful ceramic dish to make the colors pop! Drizzle a bit more olive oil over the top and sprinkle some fresh herbs right before serving for that final touch. Pair this salad with crusty bread, and you’ve got a meal that’s ready to impress!
Recipe Variations
If you feel adventurous, here are some creative twists you might consider:
-
Mediterranean Twist: Swap out the meats for grilled veggies like zucchini and eggplant, and use feta cheese for a Greek vibe.
-
Spicy Kick: Add sliced jalapeños or crushed red pepper flakes to the dressing to bring heat to the party.
-
Citrus Zing: Use citrus juice like lemon or lime instead of balsamic vinegar for a bright, zesty dressing.
-
Whole-Grain Goodness: Add chickpeas or quinoa to amp up the protein and make this salad even more filling.
-
Seasonal Surprise: Incorporate seasonal ingredients, like roasted butternut squash in fall or fresh peas in spring, to keep the salad exciting throughout the year.
Chef’s Notes
This recipe has evolved over the years—and isn’t that the beauty of cooking? I started with a more traditional approach, but I’ve learned to adapt based on what’s fresh and available. I once tried adding grilled chicken and was surprised at how well it paired! Now, I recreate this salad at all sorts of events, and each time, it turns out a bit differently based on new inspirations. Cooking is about experimentation, and this dish speaks to that!
One funny memory comes to mind when I decided to go a bit fancy and use truffle oil instead of olive oil. Let’s just say, that was a little too intense! Cooking is definitely a learning process, and that’s what keeps it fun!
FAQs and Troubleshooting
-
What if I don’t have all the ingredients?
Don’t fret! This recipe is about flexibility. Use whatever you have—be it different greens, meats, or cheeses. This is a salad that embraces creativity! -
Can I make it ahead of time?
Yes! It holds up well for a day in advance. Just keep the dressing separate until ready to serve, as it can make the greens wilt if left too long. -
How do I store leftovers?
Place leftovers in an airtight container in the fridge. Consume within 2 days for the freshest taste! -
Why is my salad soggy?
This could be from too much dressing or not drying your greens fully. Give those greens a good spin or pat them dry!
Nutritional Info
This dish is packed with vitamins and nutrients from the veggies, healthy fats from olive oil, and protein from the cheese and meat, making it both satisfying and nutritious. Each serving boasts a mix of vitamins A, C, and K, along with healthy fats, offering a delightful balance to your diet!
So there you have it—the ultimate Italian Antipasto Salad to brighten your table and warm your heart. Enjoy creating memories as you savor this dish, and remember, cooking is as much about connecting with others as it is about flavor. Happy cooking, friends!
Print
Italian Antipasto Salad
- Total Time: 15 minutes
- Yield: 4 servings
- Diet: Vegetarian
Description
A vibrant medley of colorful ingredients, perfect for a starter or light meal, bringing the flavors of Italy to your table.
Ingredients
- Mixed Greens (arugula, romaine, spinach)
- Cherry Tomatoes (halved)
- Cured Meats (salami, prosciutto)
- Cheese (mozzarella pearls or provolone)
- Olives (mix of green and black)
- Peppers (roasted bell peppers)
- Artichoke Hearts (marinated or canned)
- Olive Oil (extra virgin)
- Balsamic Vinegar
- Fresh Herbs (basil or oregano)
Instructions
- Prep your greens: Wash the mixed greens in cold water and spin them dry.
- Chop your vegetables: Halve the cherry tomatoes and dice the bell peppers into bite-sized pieces.
- Tear that mozzarella: Drain and toss in mozzarella balls or chunk larger blocks.
- Prep the meats: Slice your cured meats into strips or bite-sized pieces.
- Mix it up: Combine your greens, cherry tomatoes, bell peppers, olives, meat, cheese, and artichokes in a large bowl.
- Dress it right: Whisk together olive oil and balsamic vinegar, adding garlic, salt, and pepper to taste.
- Toss and serve: Drizzle dressing over the salad, gently toss, and serve.
Notes
Make your dressing in advance to enhance flavors. This salad is better after sitting for about 30 minutes.
- Prep Time: 15 minutes
- Cook Time: 0 minutes
- Category: Salad
- Method: Mixing
- Cuisine: Italian
Nutrition
- Serving Size: 1 serving
- Calories: 350
- Sugar: 5g
- Sodium: 400mg
- Fat: 20g
- Saturated Fat: 6g
- Unsaturated Fat: 12g
- Trans Fat: 0g
- Carbohydrates: 25g
- Fiber: 5g
- Protein: 10g
- Cholesterol: 30mg
Keywords: Antipasto Salad, Italian Salad, Salad Recipe, Healthy Salad
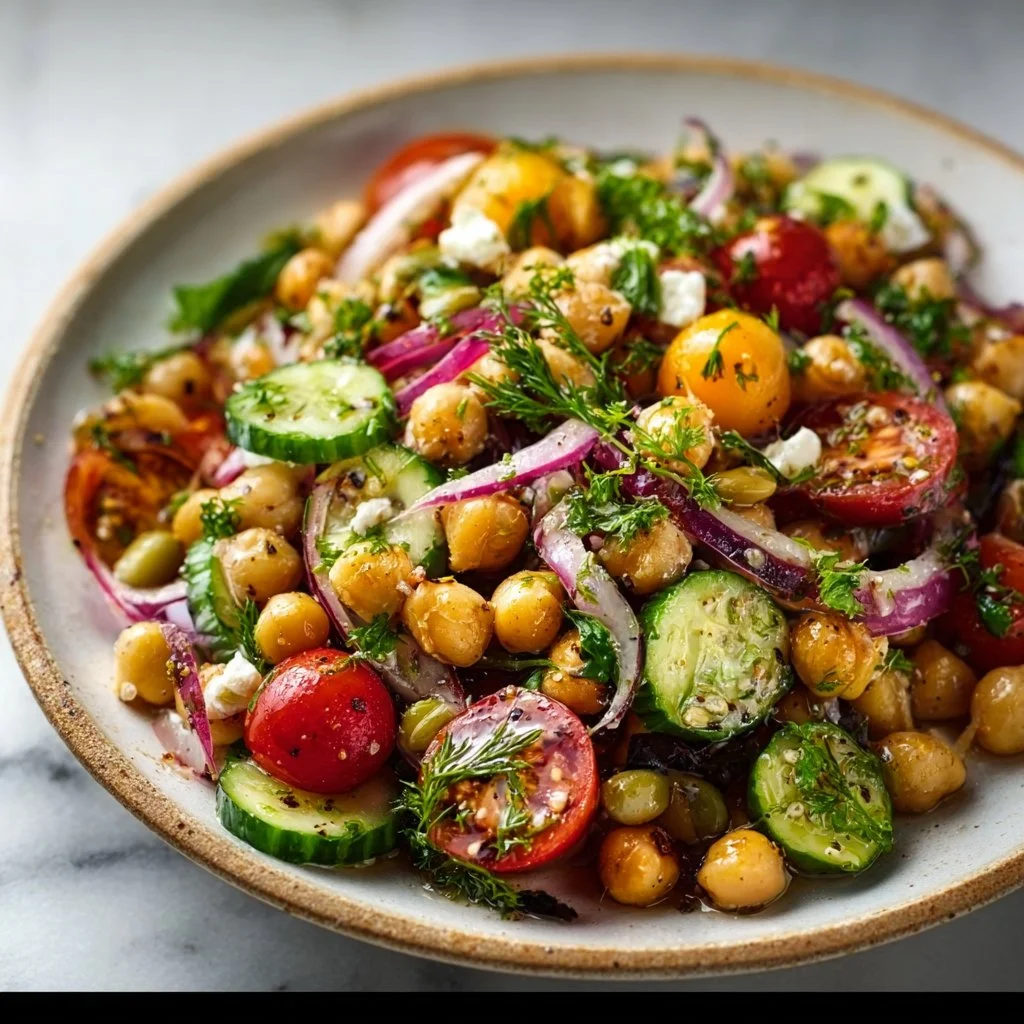
Delicious Chickpea Salad Recipes: Easy Tips For Flavorful Meals
Delicious Chickpea Salad Recipes: Easy Tips for Flavorful Meals
Hello, fellow food lovers! 🌟 Welcome back to my cozy kitchen! Today, we’re diving into the world of chickpea salads—a dish that whispers comfort while packing a powerhouse of flavor. If you’ve ever walked into your kitchen hoping to whip up something fresh, healthy, and oh-so-delicious without spending hours slaving over a hot stove, then this post is for you!
Chickpeas, those little golden nuggets of goodness, are one of my favorite ingredients. Not only are they packed with protein and fiber, but they also take on flavors like a champ, making them a perfect base for salads. Whether you’re looking for a quick lunch, a vibrant side dish for dinner, or just a crunchy snack to munch on while binge-watching your favorite shows, chickpea salads are a hundred percent the way to go!
We’ll chat about why chickpeas are so amazing, share some mouth-watering recipes, and provide you with tips that will elevate your chickpea salad game. Spoiler alert: You don’t need to be a culinary wizard to make these salads sing! Just a sprinkle of creativity and a dash of love is all it takes.
Before we jump into the cooking, I want to share a little story that’s close to my heart. Sit back, grab a cup of tea, and let’s get nostalgic!
Personal Story
Growing up, I was always surrounded by the lovely aromas of my grandmother’s kitchen. Every Sunday, she would host our family for lunch, and the centerpiece of her feast was an ever-changing salad. Her famous “Clean-Out-the-Fridge Chickpea Salad” was a grand tradition that felt both spontaneous and utterly delicious. I remember her bustling around, collecting whatever veggies she could find—crisp bell peppers, tangy tomatoes, a handful of parsley, and a squeeze of lemon to brighten it all up.
That salad was more than just a dish; it was a celebration of family. We’d gather around the table, digging into colorful bowls full of her chickpea creation, laughing and talking about our week. It wasn’t fancy; it was heartfelt. And whenever I make a chickpea salad, I channel that same joy and energy, creating a little piece of home to share with others.
Now, let’s recreate that magic in your own kitchen! Are you ready? Let’s gather our ingredients!
Ingredients
Here’s what you’ll need for my go-to chickpea salad, perfect for potlucks, picnics, or simply a satisfying lunch.
-
2 cans of chickpeas (garbanzo beans)
These little gems are the star of the show. Drained and rinsed, they provide a hearty base. If you prefer fresh, use 1.5 cups of cooked chickpeas instead! -
1 cup cherry tomatoes, halved
Sweet and juicy, these add vibrant color and a burst of flavor. Sub with diced regular tomatoes if you like—they’ll do just fine! -
1 cucumber, diced
Crisp and refreshing! A great alternative is zucchini for a different texture. -
1/2 red onion, finely chopped
Adds a nice crunch and a hint of sharpness. If raw onion isn’t your vibe, try green onions or chives instead. -
1 red bell pepper, diced
Sweet and colorful; feel free to switch to yellow or orange peppers for a different twist. -
1/2 cup fresh parsley, chopped
Brightness in a bowl! If parsley isn’t available, try fresh cilantro or basil for a unique flair. -
1/4 cup feta cheese (optional)
Creamy and tangy, feta adds a delicious punch! For a dairy-free option, skip it or use vegan cheese. -
Juice of 1 lemon
A must for that zing! Lime juice works beautifully too. -
2 tablespoons olive oil
A good-quality olive oil will enhance the flavors. Avocado oil is another great substitute! -
Salt and pepper, to taste
Don’t forget to season! Fresh herbs, garlic powder, or smoked paprika can also add layers of flavor.
Pro Tip:
Use dried chickpeas? Soak them overnight and boil until tender for a fresher taste! Remember: One cup of dried chickpeas gives you about two cans worth.
Step-by-Step Instructions
Ready to dive into the kitchen? Here’s how to whip up this chickpea salad in no time!
-
Prep Your Ingredients
Start by rinsing and draining your chickpeas in a colander. Lay them out on a clean kitchen towel to pat them dry. This step helps them absorb flavors better! -
Chop the Veggies
While the chickpeas dry, the real fun begins! Dice your cucumber, halved tomatoes, red onion, and bell pepper. The more colorful, the better! Remember to use a sharp knife—it makes life easier and keeps those veggies from squishing. -
Call in the Parsley
Chop your fresh parsley and set it aside. This herb brings freshness that’s hard to beat. If you’re feeling adventurous, try adding a pinch of dill or mint for a twist. -
Combine in a Bowl
In a large mixing bowl, combine the chickpeas, cherry tomatoes, cucumber, red onion, bell pepper, and parsley. Give it a gentle toss to mix everything together. This is really where the fun begins! -
Whisk the Dressing
In a small bowl, whisk together the lemon juice, olive oil, salt, and pepper. Taste as you go! You want a balance of zinginess from the lemon and richness from the oil. Add more seasoning if needed. This dressing is your secret weapon! -
Dress It Up
Pour the dressing over the salad and toss gently until it’s all coated in that lovely, zesty goodness. You can let it sit for a few minutes—it gives the flavors time to mingle! -
Add Feta (if using)
If you’re adding feta cheese, crumble it over the top at this stage and give it a last gentle stir. A “totally optional” addition, but oh-so-delicious! -
Taste and Adjust
This is the best step! Grab a fork and take a bite. Does it need more salt? More lemon? Adjust according to your palate. Your salad should sing with flavor! -
Chill (Optional)
For an extra refreshing experience, pop the salad in the fridge for about 30 minutes before serving. This just lets those flavors mingle and deepen!
Pro Tip:
Making this ahead? It can last for up to three days in the fridge! However, consider leaving out the feta until you’re ready to serve to keep it fresh.
Serving Suggestions
To plate your chickpea salad beautifully, scoop a generous portion into a colorful bowl for that rustic, homey feel. Drizzle a little extra olive oil on top and sprinkle some chopped parsley for a lovely presentation. Pair it alongside grilled chicken, or serve it on a bed of crisp greens for extra flair. Don’t forget to have some crusty bread nearby for dipping!
Recipe Variations
Chickpea salads are so versatile! Here are a few creative spins you can try:
-
Mediterranean Twist: Add kalamata olives, artichoke hearts, and a touch of oregano to transport your taste buds straight to the Mediterranean.
-
Spicy Kick: Toss in diced jalapeños, red chili flakes, or a dash of your favorite hot sauce for a sneaky kick.
-
Asian-Inspired: Swap out the lemon for rice vinegar, add some edamame, and finish with sesame oil and seeds for a unique twist.
-
Fruit and Nut Combo: Add diced apple or dried cranberries for sweetness, and throw in some walnuts or pecans for crunch.
-
Curried Chickpea Salad: Mix in curry powder and a spoonful of yogurt for a tangy flavor profile. Toss in raisins for a sweet contrast!
Chef’s Notes
You know, chickpea salads have evolved a lot in my kitchen since my grandmother’s days. What started as a simple toss of whatever was in the fridge has blossomed into a creative outlet where I can experiment with flavors and ingredients. One day, I stumbled upon a spicy mango dressing, and wow, that opened up a whole new world of flavor! In this culinary adventure, I’ve learned not to be afraid of trying new combinations—sometimes the wildest pairings result in the most delightful surprises.
I also remember the first time I made chickpea salad for my then-new friends in college. Being a poor student, chickpeas were my go-to for their affordability. I brought a massive bowl to a potluck, and it was devoured in minutes! I was so proud to have converted them into fellow chickpea enthusiasts.
FAQs and Troubleshooting
1. Can I use dried chickpeas instead of canned?
Absolutely! You’ll want to soak them overnight and then cook them until tender. Just remember—one cup of dried chickpeas equals about two cans!
2. How can I store leftover salad?
Keep it in an airtight container in the fridge for up to three days. Just note that if you’ve added feta, it may lose a bit of its charm in terms of texture.
3. What’s the best way to prevent soggy cucumbers?
If you want to make the salad ahead of time, consider peeling, salting, and draining your cucumbers for 30 minutes before adding them. This helps draw out excess moisture!
4. How can I make this salad more filling?
You can add cooked quinoa, brown rice, or even grilled chicken or tofu to make it a heartier main dish!
Nutritional Info
(Serving Size: 1 cup)
Calories: 200
Protein: 9g
Carbohydrates: 28g
Fat: 6g
Fiber: 7g
(Note: Nutritional values can vary based on specific ingredients and quantities used.)
And there you have it, my friend! A delightful, hearty chickpea salad that comes together with love and some creativity. Remember, cooking is all about having fun, exploring flavors, and connecting with those you love through food. So, roll up those sleeves, wear that apron, and get ready to enjoy every yummy bite!
Happy cooking! 🥗✨
Print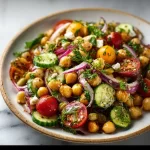
Chickpea Salad
- Total Time: 15 minutes
- Yield: 4 servings 1x
- Diet: Vegetarian
Description
A vibrant and delicious chickpea salad packed with fresh vegetables and bursting with flavor, perfect for potlucks or a satisfying lunch.
Ingredients
- 2 cans of chickpeas (garbanzo beans), drained and rinsed or 1.5 cups cooked fresh chickpeas
- 1 cup cherry tomatoes, halved
- 1 cucumber, diced
- 1/2 red onion, finely chopped
- 1 red bell pepper, diced
- 1/2 cup fresh parsley, chopped
- 1/4 cup feta cheese (optional)
- Juice of 1 lemon
- 2 tablespoons olive oil
- Salt and pepper, to taste
Instructions
- Prep your ingredients by rinsing and draining your chickpeas in a colander.
- Chop the veggies: dice your cucumber, tomatoes, red onion, and bell pepper.
- Call in the parsley and chop it, setting it aside.
- Combine in a large mixing bowl the chickpeas, tomatoes, cucumber, red onion, bell pepper, and parsley.
- Whisk the dressing: mix together lemon juice, olive oil, salt, and pepper.
- Dress the salad by pouring the dressing over it and gently toss to coat.
- Add feta cheese, if using, and stir gently.
- Taste and adjust seasoning as needed.
- Chill in the fridge for about 30 minutes before serving if preferred.
Notes
For a refreshing taste, let the salad chill after preparing it. Use dried chickpeas? Soak them overnight and boil until tender for a fresher taste!
- Prep Time: 15 minutes
- Cook Time: 0 minutes
- Category: Salad
- Method: No Cooking
- Cuisine: Mediterranean
Nutrition
- Serving Size: 1 cup
- Calories: 200
- Sugar: 4g
- Sodium: 350mg
- Fat: 6g
- Saturated Fat: 1g
- Unsaturated Fat: 3g
- Trans Fat: 0g
- Carbohydrates: 28g
- Fiber: 7g
- Protein: 9g
- Cholesterol: 10mg
Keywords: chickpea salad, easy salad recipes, healthy meals, vegetarian recipes, quick lunch
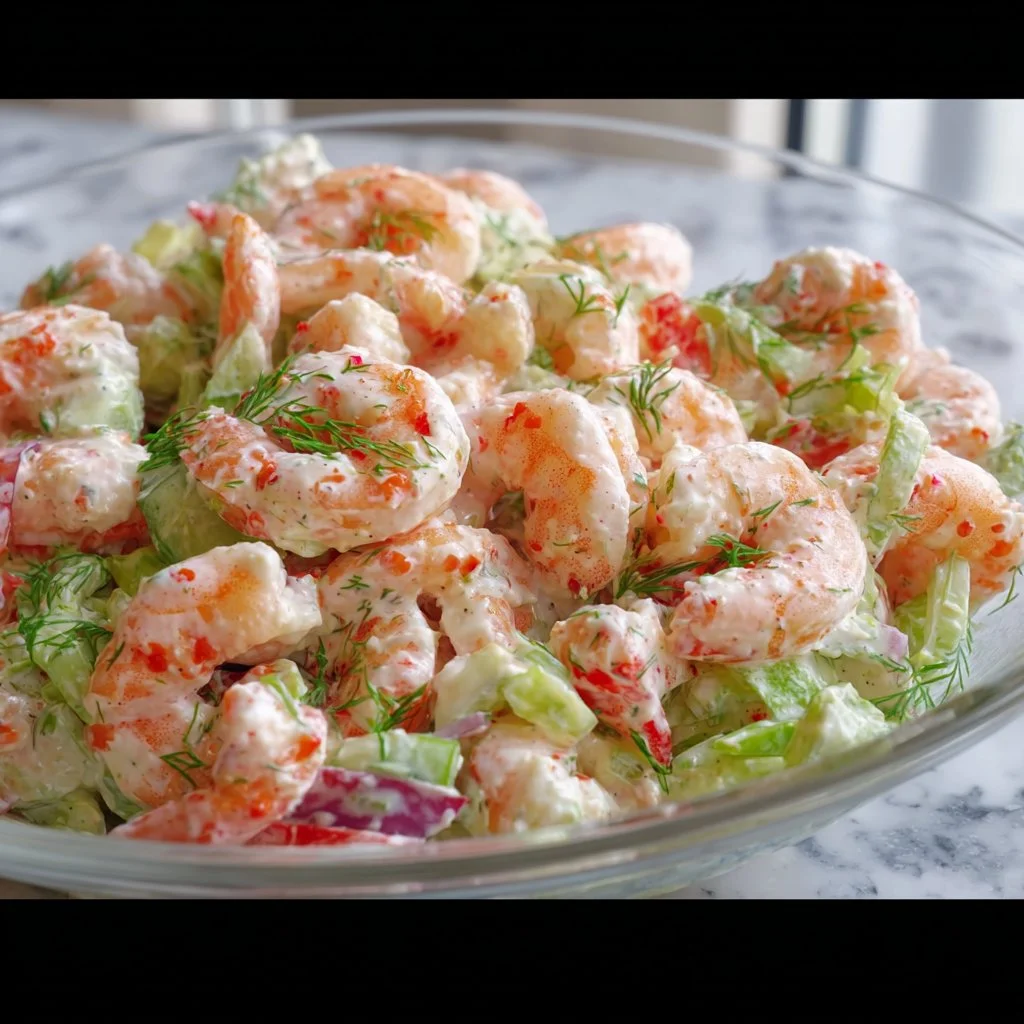
Classic Shrimp Salad
The Ultimate Classic Shrimp Salad Recipe: A Cherished Favorite
Welcome to my kitchen! I’m Olivia Bennett — your friendly guide in the culinary world. Today, I’m bubbling with excitement to share a recipe that’s close to my heart: the Classic Shrimp Salad. Whether you’re hosting a summer barbecue, planning a cozy family dinner, or simply craving something fresh and delicious, this shrimp salad might just become your go-to dish!
Shrimp salad is more than just a meal; it’s a celebration of flavors and textures, sunshine on a plate, and an ode to warm memories spent with loved ones. Each bite bursts with the taste of succulent shrimp, crunchy veggies, and zesty dressing that transports you straight to a sun-drenched picnic by the beach. And trust me, once you get a whiff of that shrimp sizzling in garlic, you’ll be hooked!
Growing up, my family had a tradition every summer: we would gather in our backyard, the grill fired up, and everyone contributing a dish. My mom would often make shrimp salad that was a hit among friends and family alike. The kitchen would fill with laughter and the scent of garlic, lemon, and fresh herbs wafting through the air. It was a simple recipe, yet it seemed to bring together an extraordinary mix of flavors and joy. I can still picture each family member diving into the bowl, eagerly picking at the shrimp and the colorful veggies. Sometimes, I would sneak a few pieces before it hit the serving table—it was just too tempting!
Today, I aim to recreate that bliss in this recipe, with a few tweaks that keep it vibrant and relevant. So roll up those sleeves, grab your apron, and let’s dive into this culinary journey together!
Ingredients
Here’s what you’ll need for this delightful Classic Shrimp Salad. Don’t worry if you don’t have everything; I’ve included substitution tips too!
Ingredients List
-
1 pound of shrimp
Use fresh or frozen! If using frozen, make sure to thaw thoroughly before cooking. You can also swap shrimp for cooked lobster or crab for a luxurious twist. -
2 cups of mixed greens
Any salad green will work—spinach, romaine, or arugula. For a heartier option, try using kale, but massage it with a bit of oil to soften it up beforehand. -
1 cup of cherry tomatoes, halved
These add a sweet burst! Substitute with diced cucumbers for crunch or bell peppers for a pop of color and sweetness. -
½ cup of finely chopped red onion
Adds a zing! If red onion is too strong for you, use green onions or omit them entirely. -
½ cup of diced avocado
Creamy goodness here! If you’re not a fan of avocado, consider adding hard-boiled eggs for richness or replacing it with a dollop of Greek yogurt for creaminess. -
¼ cup of parsley, finely chopped
Fresh herbs elevate the dish! If you don’t have parsley, cilantro or dill would also work beautifully here. -
Juice of 1 lemon
For brightness! Lime juice can be a great substitute for a more tropical flair. -
2 tablespoons of olive oil
Good quality oil is key! Lemon-infused olive oil adds a lovely, zesty kick. If you need a neutral taste, avocado oil works wonders as well. -
Salt and pepper, to taste
Essential for seasoning! Experiment with smoked salt or freshly cracked pepper for enhanced flavor. -
Optional: Dash of hot sauce (like Tabasco or Sriracha)
If you like a little heat, this is a great addition! Feel free to leave this out if spice isn’t your thing.
Step-by-Step Instructions
Now let’s get cooking! Here’s a step-by-step guide to whip up this shrimp salad, along with some of my best kitchen tips:
Step 1: Cook the Shrimp
Start by bringing a medium pot of water to a gentle boil. Add a pinch of salt—this will help flavor the shrimp as they cook. Once the water is boiling, carefully add the shrimp. You’ll know they’re ready when they turn a lovely pink color and curl up slightly, about 2–3 minutes.
Note: Don’t overcook your shrimp. They’ll become tough and rubbery, and we want them juicy and tender!
Step 2: Prepare the Ice Bath
While the shrimp are cooking, prepare an ice bath in a large bowl filled with ice and cold water. Once the shrimp are cooked, transfer them immediately to the ice bath using a slotted spoon. This halts the cooking process and helps them maintain their tender texture.
Step 3: Chop the Veggies
Next, chop your veggies while the shrimp cool down. Dice your cherry tomatoes, finely chop the red onion and parsley, and cube that creamy avocado. Each bite will bring together these vibrant colors, making the salad as visually appealing as it is delicious!
Step 4: Mix the Dressing
In a small bowl, whisk together the lemon juice, olive oil, salt, pepper, and optional hot sauce. This bright dressing will bring all your ingredients to life. Taste and adjust—you can always add a bit more lemon for zing or a pinch of salt!
Step 5: Assemble the Salad
In a large bowl, combine the mixed greens with the chopped veggies, cooled shrimp, and parsley. Drizzle with your dressing and toss gently—just enough to coat everything without bruising the delicate greens.
Step 6: Taste and Adjust
Give the salad a taste and adjust your seasoning as needed. Sometimes, all it takes is a little more fresh lemon juice or a dash of salt to really pull it together.
Serving Suggestions
Now it’s time to serve your masterpiece! I love to present my shrimp salad on a large platter, garnished with extra parsley and lemon wedges. This makes it inviting and shareable—perfect for gatherings. You can also serve it in individual bowls, alongside some crusty bread or pita chips for a delightful crunch.
Recipe Variations
Feel free to get creative! Here are some fun twists on this classic shrimp salad:
-
Tropical Twist: Add diced mango or pineapple for a refreshing,
fruity flavor. The sweetness balances beautifully with the shrimp! -
Mediterranean Style: Incorporate olives, feta cheese, and a sprinkle of oregano for a Mediterranean flair. It’s perfect with the bright lemon dressing!
-
Creamy Version: Swap the olive oil for a creamy dressing, such as ranch or yogurt-based dressing. This adds a rich twist that’s deliciously indulgent.
-
Pasta Salad: Mix in cooked pasta for a hearty dish that can easily serve a crowd. Use farfalle or rotini for a fun shape that’ll hold all those tasty bits!
-
Spicy Cilantro: Replace parsley with chopped cilantro and add diced jalapeño for a refreshing kick!
Chef’s Notes
Cooking is a journey filled with experimentation, and this shrimp salad has evolved over the years. Sometimes, I find myself adding ingredients I have on hand, and you should feel free to do the same! I once made this salad with pear slices and walnuts, and it turned out to be an incredible fall dish. And let’s not forget that kitchen mishap when I reached for hot sauce, only to grab a jar of pickled jalapeños instead—delicious in a whole new way!
Remember, every recipe is only a starting point. Allow this dish to evolve based on your tastes, the seasons, and what you have available. The heart of any great recipe is the joy of cooking and sharing!
FAQs and Troubleshooting
1. What if my shrimp are rubbery?
Avoid overcooking! Keep an eye on them and remove from heat as soon as they turn pink. The ice bath immediately stops the cooking.
2. Can I make this salad ahead of time?
Absolutely! You can prep the veggies and shrimp in advance; store them in the fridge separately until you’re ready to mix them with the dressing. Just keep the avocado for last to prevent browning.
3. What should I do if I don’t like seafood?
No worries! Substitute shrimp with grilled chicken, tofu, or chickpeas for a delicious salad that’s still packed with flavor.
4. Do I have to use fresh ingredients?
While fresh is always best, frozen ingredients can work in a pinch! Just be sure they’re properly thawed and drained.
Nutritional Info
While I don’t usually delve into the numbers, here’s a quick insight:
- Serving Size: 1 cup
- Calories: Approx. 200
- Protein: 22g
- Carbs: 9g
- Fat: 10g
(The precise values will vary based on specific ingredients and serving sizes.)
There you have it—my classic shrimp salad recipe that’s simple, delicious, and filled with memories. I hope you love making and sharing this dish as much as I do! Here’s to flavorful meals that bring us together. Happy cooking, and don’t forget to share your kitchen stories with me!
Print
Classic Shrimp Salad
- Total Time: 20 minutes
- Yield: 4 servings 1x
- Diet: Paleo
Description
A delightful shrimp salad bursting with flavors and textures, perfect for summer barbecues or cozy family dinners.
Ingredients
- 1 pound of shrimp
- 2 cups of mixed greens
- 1 cup of cherry tomatoes, halved
- ½ cup of finely chopped red onion
- ½ cup of diced avocado
- ¼ cup of parsley, finely chopped
- Juice of 1 lemon
- 2 tablespoons of olive oil
- Salt and pepper, to taste
- Optional: Dash of hot sauce (like Tabasco or Sriracha)
Instructions
- Cook the shrimp by bringing a medium pot of water to a gentle boil. Add a pinch of salt and carefully add the shrimp. Cook until they turn pink and curl up, about 2–3 minutes.
- Prepare an ice bath in a large bowl filled with ice and cold water. Transfer the cooked shrimp to the ice bath immediately.
- Chop your veggies: dice cherry tomatoes, finely chop red onion and parsley, and cube avocado.
- Mix the dressing in a small bowl by whisking together lemon juice, olive oil, salt, pepper, and optional hot sauce.
- Assemble the salad by combining mixed greens, chopped veggies, cooled shrimp, and parsley in a large bowl. Drizzle with dressing and toss gently.
- Taste and adjust seasoning as needed before serving.
Notes
Serve on a platter garnished with extra parsley and lemon wedges for an inviting presentation. Feel free to modify the salad with your favorite ingredients.
- Prep Time: 15 minutes
- Cook Time: 5 minutes
- Category: Salad
- Method: Boiling
- Cuisine: American
Nutrition
- Serving Size: 1 cup
- Calories: 200
- Sugar: 3g
- Sodium: 400mg
- Fat: 10g
- Saturated Fat: 2g
- Unsaturated Fat: 8g
- Trans Fat: 0g
- Carbohydrates: 9g
- Fiber: 3g
- Protein: 22g
- Cholesterol: 180mg
Keywords: shrimp salad, summer salad, seafood salad, easy recipes, healthy recipes
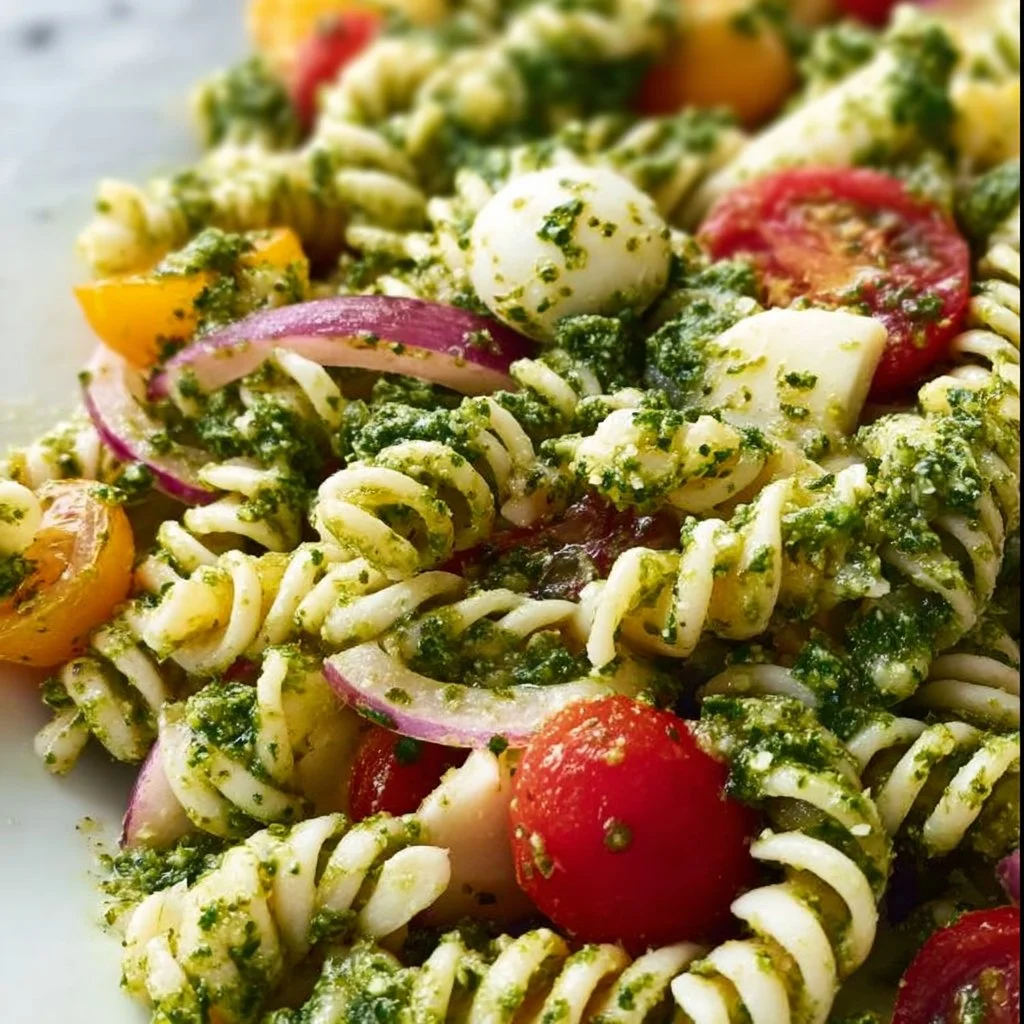
Easy Kale Pesto Pasta Salad
Easy Kale Pesto Pasta Salad: A Deliciously Green Delight!
Hey there, fellow foodies! Welcome back to my cozy corner of the internet where the kitchen is always buzzing with flavor and the air is filled with the delightful aroma of something scrumptious. Today, I’m thrilled to share one of my absolute favorite recipes: Easy Kale Pesto Pasta Salad! This cheeky dish combines the goodness of vibrant greens with the hearty satisfaction of pasta — all tied together with a zesty homemade kale pesto that’s so good, you might just want to slather it on everything.
Now, I understand that life can often feel like a whirlwind, but that doesn’t mean we have to sacrifice taste for convenience. This kale pesto pasta salad is perfect for busy weeknights, leisurely weekend brunches, or even a delightful potluck contribution! It’s filled with fresh, wholesome ingredients and comes together in under 30 minutes. Plus, it can be made ahead of time and stored in the fridge, making it an excellent grab-and-go lunch option.
Whenever I whip up this salad, I’m transported back to those sunny days in my childhood when my mom would take us to local farmer’s markets. We’d come home bursting with excitement, bags filled with crisp greens, juicy tomatoes, and fragrant herbs. Those vibrant colors and earthy smells sparked a love for fresh ingredients that drives my cooking today.
And how about that pesto? Oh boy, it’s a game-changer! When I first made pesto using kale instead of basil on a whim, I couldn’t believe how delicious it was. It’s nutrient-packed, eco-friendly, and adds a delightful twist to the traditional recipe. I can’t wait for you to give it a whirl!
So grab your aprons and let’s dive into this Easy Kale Pesto Pasta Salad together!
Personal Story
Let me take you back to a moment filled with laughter and the sweet echo of childhood memories. Picture this: the sun was shining, and my mom and I were digging through vibrant crates overflowing with fresh produce at our local market. We stumbled across a stall bursting with fresh greens—kale, arugula, and more! It was kale that caught my eye, and I insisted we bring some home.
That weekend, we decided to make homemade pesto, and it turned into a kale-inspired culinary adventure. While my mom expertly chopped and blended, I experimented with flavors by tossing in garlic and pine nuts to the mix. You could feel the excitement in the air as the warm, nutty smell wafted through our kitchen. It was pure magic when we tossed the bright green pesto with our warm pasta, watching the vibrant colors meld together. That first bite was a game-changer—rich, creamy, and just awesomely fresh!
Now, every time I make this kale pesto pasta salad, I’m reminded of those sun-soaked days where simple, fresh ingredients created a feast of flavors and memories. It’s those beautiful moments that inspire me to keep cooking and sharing with all of you. And believe me, once you try this dish, you’ll understand why it holds such a special place in my heart!
Ingredients
Here’s a simple shopping list for everything you’ll need to create your kale pesto pasta salad masterpiece:
-
Pasta (your choice!)
I love using whole wheat or gluten-free pasta for an earthy touch, but any shape works! Penne, fusilli, or even spaghetti are all great options. -
Fresh Kale (about 4 cups, chopped)
Kale packs a nutrient punch and makes the best pesto! You can substitute with spinach or Swiss chard if you prefer a milder taste. -
Garlic (3 cloves)
A must-have for flavor! For a milder pesto, try roasting the garlic first for a sweeter profile. -
Nuts (1/4 cup, pine nuts or walnuts)
Adds creaminess to your pesto! If you’re nut-free, sunflower seeds or hemp seeds are great alternatives! -
Parmesan Cheese (1/2 cup, grated)
This gives it a savory depth. For a vegan option, nutritional yeast can provide a cheesy flavor without dairy. -
Olive Oil (1/3 cup)
Use high-quality extra virgin olive oil for the best flavor! Avocado oil or grapeseed oil can be substituted for a different twist. -
Lemon Juice (from 1 lemon)
A splash of citrus keeps the flavors vibrant! If you’re out of lemons, vinegar can also add a nice zing. -
Salt & Pepper (to taste)
Essential for bringing out the flavors! Don’t skimp here; a pinch can really elevate your dish!
With this lineup of ingredients, your taste buds are in for a treat!
Step-by-Step Instructions
Alright, let’s dive into the nitty-gritty of making this kale pesto pasta salad! Put on some good tunes, and let’s get cooking!
-
Cook Your Pasta
Start by bringing a large pot of salted water to a boil. Toss in your pasta and cook according to the package directions until al dente. Don’t forget to taste! Once cooked, reserve about 1/2 cup of pasta water and then drain the rest. A little pasta water can be the secret weapon for making your pesto cling beautifully to your pasta.Tips: If you’re using a pasta that tends to stick, a drizzle of olive oil in the water can help!
-
Prepare the Kale Pesto
While the pasta is cooking, it’s time to make the star of the show: the kale pesto! In a food processor, combine chopped kale, garlic, nuts, Parmesan cheese, and lemon juice. Pulse until the mixture begins to blend, scraping down the sides as needed.Chef hack: To really amp up the flavor, add a few basil leaves or a sprinkle of chili flakes for a little heat!
-
Incorporate Olive Oil
With the food processor running, slowly drizzle in the olive oil until it reaches a smooth, creamy consistency. If it seems a bit thick, add a tablespoon of that reserved pasta water until it’s just right. Taste and adjust with salt and pepper! -
Combine Pasta and Pesto
In a large bowl, toss the warm pasta with the luscious kale pesto. Mix until the pasta is generously coated, giving it that lovely green hue we all adore. Add more pasta water if it feels too dry!Chef tip: Mixing the pesto with warm pasta helps the flavors meld beautifully!
-
Chill or Serve Immediately
You can enjoy this pasta salad warm, or refrigerate it for about 30 minutes for a refreshing cold dish! If you’re serving it cold, it’s great with an additional squeeze of lemon juice to brighten the flavors. -
Garnish and Enjoy!
Just before serving, give it a final sprinkle of grated Parmesan, a drizzle of olive oil, and a dash of fresh pepper. Yum!
And there you have it—a dazzling bowl of Easy Kale Pesto Pasta Salad ready to be devoured.
Serving Suggestions
Plating this pasta salad is super fun and casual—just how I like it! Grab a large serving bowl and pile your kale pesto pasta salad high, allowing those vibrant green tones to shine through. For extra flair, you can garnish with toasted nuts or a few fresh basil leaves on top. Oh, and don’t forget a wooden serving spoon for that rustic touch! This dish is tasty, pretty, and best enjoyed among good company.
Recipe Variations
Feeling adventurous? Here are some fun variations to switch up your Easy Kale Pesto Pasta Salad:
-
Mediterranean Twist: Add sun-dried tomatoes, olives, and feta cheese for a burst of Mediterranean flavor!
-
Protein Power: Toss in grilled chicken, shrimp, or chickpeas to amp up the protein content!
-
Roasted Veggie Medley: Roast seasonal veggies like bell peppers, zucchini, or broccoli and fold them into your salad for added flavor and nutrients.
-
Creamy Avocado: Fold in diced avocado for a creamy texture that pairs beautifully with the pesto.
-
Spicy Kick: Add diced jalapeños or a sprinkle of red pepper flakes to fire things up!
Chef’s Notes
Now, let’s chat a bit about the evolution of this recipe. When I first experimented with kale in my pestos, I was a bit skeptical. After all, who could compete with the vibrant flavor of basil? But as I tasted each version, I realized that kale has a unique earthiness that offers something new and delightful. Plus, it’s a leafy green powerhouse packed with vitamins A, K, and C—now that’s a win-win!
Over the years, I’ve refined this recipe, swapped out nuts, played with various cheese types, and even experimented with different herbs (the addition of mint is a surprising delight!). Each version is delicious, bringing a little piece of my kitchen adventures right to your table.
FAQs and Troubleshooting
1. What can I do if my pesto is too bitter?
If your pesto tastes a bit bitter, try adding a pinch of salt or a bit more lemon juice. Balancing flavors can be key!
2. Can I use frozen kale or store-bought pesto?
Absolutely! Just be sure to thaw and drain any excess moisture from frozen kale before blending. Store-bought pesto can also be a huge time-saver—just toss in some fresh garlic or lemon for a personal touch!
3. How do I store leftovers?
Store any leftovers in an airtight container in the fridge for up to 3 days. You may want to add a splash of olive oil to keep it fresh and vibrant!
4. Can I make this vegan?
Totally! Replace the Parmesan cheese with nutritional yeast, and use a substitute for pasta that aligns with your dietary needs.
Nutritional Info (optional)
While specific nutritional information can vary, here’s a rough breakdown for one serving (based on 4 servings total):
- Calories: Approx. 350
- Protein: 12g
- Fat: 18g
- Carbohydrates: 40g
- Fiber: 6g
- Sodium: 250mg
And there you have it, my food-loving friends! I hope you give this Easy Kale Pesto Pasta Salad a try and let it spark joy in your kitchen just like it does in mine. Remember, cooking is all about exploration and enjoyment, so don’t be afraid to make it your own! Happy cooking! 🥗✨
Print
Easy Kale Pesto Pasta Salad
- Total Time: 30 minutes
- Yield: 4 servings
- Diet: Vegetarian
Description
A delightful kale pesto pasta salad that’s perfect for busy weeknights or potlucks, combining vibrant greens with hearty pasta.
Ingredients
- Pasta (your choice! Penne, fusilli, or spaghetti)
- Fresh Kale (about 4 cups, chopped)
- Garlic (3 cloves)
- Nuts (1/4 cup, pine nuts or walnuts)
- Parmesan Cheese (1/2 cup, grated)
- Olive Oil (1/3 cup)
- Lemon Juice (from 1 lemon)
- Salt & Pepper (to taste)
Instructions
- Cook your pasta by bringing a large pot of salted water to a boil. Toss in your pasta and cook according to the package directions until al dente, reserving about 1/2 cup of pasta water, then drain.
- Prepare the kale pesto by combining chopped kale, garlic, nuts, Parmesan cheese, and lemon juice in a food processor and pulsing until it starts to blend.
- Incorporate olive oil by drizzling it in while the processor is running until smooth, adjusting with reserved pasta water if too thick.
- Combine the warm pasta with the kale pesto in a large bowl, mixing until the pasta is coated.
- Chill it for about 30 minutes for a refreshing cold dish, or serve immediately.
- Garnish before serving with grated Parmesan, olive oil, and fresh pepper.
Notes
For a vegan option, replace Parmesan with nutritional yeast. Leftovers can be stored in an airtight container for up to 3 days.
- Prep Time: 10 minutes
- Cook Time: 20 minutes
- Category: Salad
- Method: No-Cook
- Cuisine: Italian
Nutrition
- Serving Size: 1 serving
- Calories: 350
- Sugar: 2g
- Sodium: 250mg
- Fat: 18g
- Saturated Fat: 5g
- Unsaturated Fat: 10g
- Trans Fat: 0g
- Carbohydrates: 40g
- Fiber: 6g
- Protein: 12g
- Cholesterol: 20mg
Keywords: pasta salad, kale, pesto, vegetarian, easy recipes
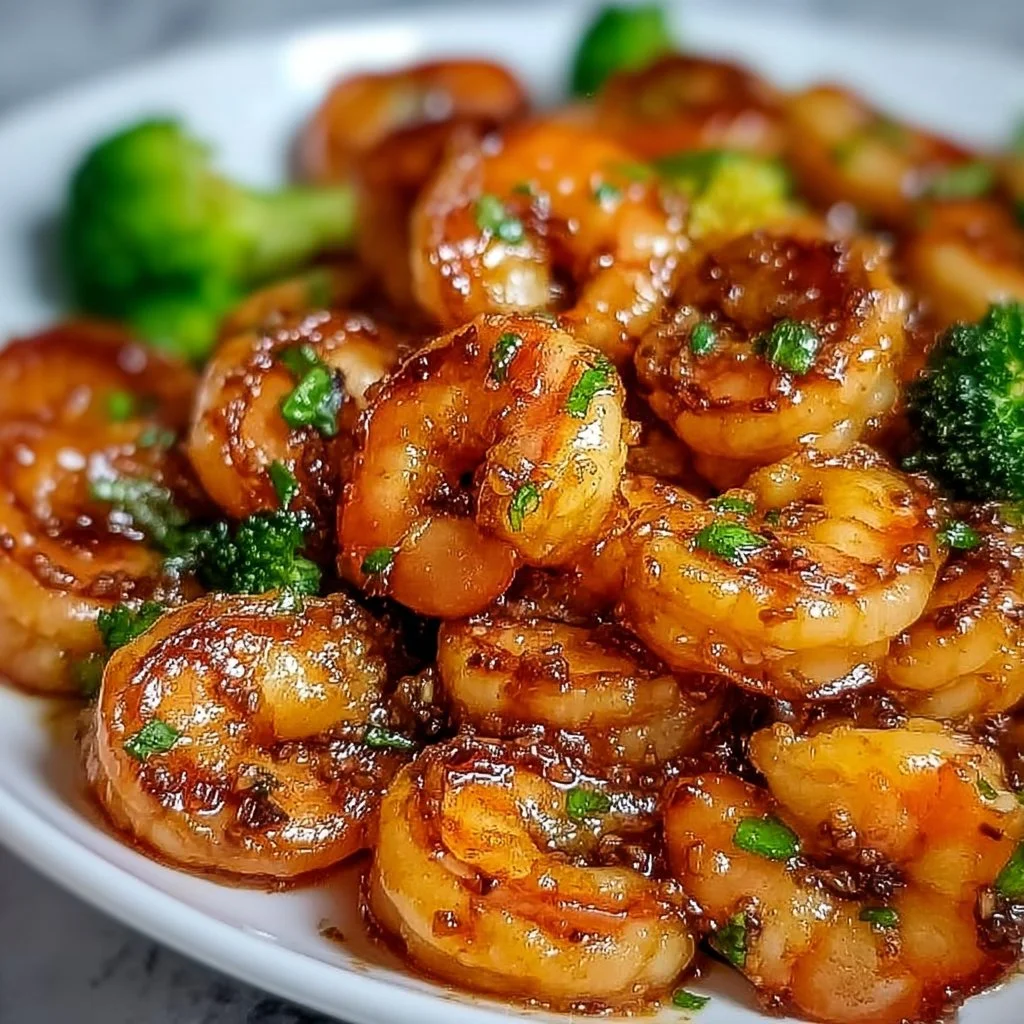
High-Protein Honey Garlic Shrimp
# High-Protein Honey Garlic Shrimp: A Sweet and Savory Celebration

## Introduction

Welcome to my kitchen! Today, we’re diving into a dish that’s not just about fueling our bodies but also about indulging our taste buds—High-Protein Honey Garlic Shrimp. This dish is one of those delightful meals that hit all the right notes. It’s sweet, savory, and absolutely irresistible! Plus, it’s packed with protein, making it an ideal choice for anyone looking to satisfy their hunger while eating something deliciously wholesome.

Imagine the aroma of garlic wafting through your home as you sauté these tender shrimp, coated in a sweet honey garlic glaze. It's a dish that brings together friends and family, igniting chatter and laughter around the dinner table. Whether you're trying to impress guests or just whipping up a quick weeknight meal for yourself, this recipe makes cooking feel special without requiring hours of kitchen prep.

Shrimp is one of those magical ingredients that cooks quickly and easily, perfect for those evenings when you want something yummy but don’t have much time. With just a handful of ingredients, you can create a stunning dish bursting with flavor that’ll make everyone think you’ve been slaving away in the kitchen for hours!

So, grab your apron and let’s get started on this high-protein, sweet, and savory journey. Trust me, your taste buds will thank you!

---

## Personal Story

The first time I made Honey Garlic Shrimp, I was reminiscing about summers spent at my grandmother’s house. Back then, she would take me to the local farmer’s market every Saturday. We'd pick out the freshest ingredients and brainstorm recipe ideas while enjoying samples like tiny cups of honey or freshly caught shrimp. It was a tradition steeped in love and creativity.

One day, we came home with a beautiful batch of shrimp, perfectly pink and waiting to be transformed into something wonderful. After rummaging through her spice cabinet, we decided to make a honey garlic sauce that would become one of our family favorites. I can still hear her laughing as the shrimp danced in the pan, and I’ll never forget how the richness of garlic and sweetness of honey combined to create a sauce that had us licking our plates clean.

Now, whenever I make this dish, I’m transported back in time, surrounded by the joy of sharing good food and better company. My version may have a few tweaks, but the essence and deliciousness remain the same. I’m excited to share this with you, so you can make your own memories around the table!

---

## Ingredients

Here’s what you’ll need for our High-Protein Honey Garlic Shrimp:

- **1 pound large shrimp (peeled and deveined)**
  Shrimp is not only delicious but also an excellent source of high-quality protein, low in calories. If you're not a fan of shrimp, feel free to substitute with chicken breast or firm tofu for a different protein option.

- **4 tablespoons honey**
  Honey brings that irresistible sweetness. It also acts as a natural preservative! If you prefer a vegan option, maple syrup makes a fantastic and tasty alternative.

- **4 cloves garlic (minced)**
  Garlic is the heart of this dish, offering depth and flavor. For convenience, pre-minced garlic is available, but nothing beats the flavor of freshly minced garlic!

- **2 tablespoons soy sauce (or tamari for gluten-free)**
  This adds umami and saltiness that perfectly balances the sweetness of honey. Coconut aminos is a great gluten-free substitute that is also lower in sodium.

- **1 tablespoon olive oil**
  A staple in any kitchen! You can use sesame oil for an extra layer of flavor, as it has a wonderful nutty profile.

- **1/2 teaspoon black pepper**
  Gives a nice kick without overpowering the dish. Feel free to adjust to your spice preference.

- **1/2 teaspoon chili flakes (optional)**
  For those who love spice, a little kick can elevate the dish to the next level. You can skip it altogether if you prefer a milder taste.

- **Chopped green onions (for garnish)**
  These add freshness and a pop of color to the dish. If you don't have green onions, chopped cilantro or parsley works beautifully too.

---

## Step-by-Step Instructions

1. **Prepping the Shrimp**
   Start with your shrimp! If you bought frozen shrimp, make sure to thaw it completely under cold running water or overnight in the fridge. Then, pat them dry with paper towels to remove excess moisture—this helps them get a beautiful sear.

2. **Make the Honey Garlic Sauce**
   In a small bowl, whisk together the honey, minced garlic, soy sauce, olive oil, and chili flakes (if using). This sauce is gonna be the star of the dish, so taste it and adjust to your liking. Add more honey for sweetness or soy sauce for savory!

3. **Cook the Shrimp**
   Heat a large pan over medium-high heat and add a splash of olive oil to coat the pan. Once heated, add the shrimp in a single layer! Give them some space to breathe (and sizzle). Cook the shrimp for about 2-3 minutes on one side until they turn pink and opaque.

4. **Flip and Add Sauce**
   Gently flip the shrimp over to cook for another 1-2 minutes. Just before they’re done, pour in the prepared honey garlic sauce. It’ll bubble and coat the shrimp beautifully—oh, that sweet smell is divine!

5. **Thicken the Sauce**
   Allow the sauce to cook down for a minute or so, ensuring it thickens just enough to cling to the shrimp. Don't overcook them; you want them tender and juicy!

6. **Finish with Black Pepper and Green Onions**
   Remove the pan from heat and give the shrimp a generous sprinkle of black pepper and chopped green onions. These bright flavors will complement the sweetness of the sauce perfectly.

7. **Plate and Serve**
   Serve the shrimp warm, straight from the pan! You can serve it over a bed of fluffy rice, quinoa, or alongside steamed veggies for a complete meal.

---

## Serving Suggestions

To plate your High-Protein Honey Garlic Shrimp, layer a generous scoop of fluffy quinoa or rice on one side of your plate. Then, arrange the shrimp on top, allowing the sauce to drizzle over everything. Garnish with a sprinkle of fresh green onions and, for an extra touch, a few lime wedges on the side. The zesty lime juice when squeezed over the shrimp will brighten all those flavors!

---

## Recipe Variations

- **Citrus Zing**: Add the zest of a lime or lemon to the sauce for a citrusy twist that pairs perfectly with shrimp.

- **Tropical Delight**: Toss in some pineapple chunks towards the end of cooking for a sweet and tangy burst of flavor.

- **Asian Influence**: Enhance the dish with a splash of ginger or sesame oil for an extra layer of depth.

- **Spicy Kick**: Add sliced jalapeños or a dash of Sriracha to the sauce for a fiery version.

- **Mediterranean Fusion**: Replace the honey with balsamic reduction, and serve the shrimp on a bed of couscous mixed with olives and feta.

---

## Chef’s Notes

As with any recipe, feel free to tweak it to your liking. I started making this dish with friends during our reunion dinners, and over time, it evolved. Initially, I followed a stricter recipe, but as I got more comfortable, I started adding my own personal spin. That's the beauty of cooking—experimenting with flavors!

A funny memory I have is when I once mistakenly added way too much garlic. The result? A garlic bomb that had my friends laughing and begging for breath mints! But you know what? It tasted delicious in its own wild way. So don’t be shy—get playful in the kitchen!

---

## FAQs and Troubleshooting

**1. Can I use frozen shrimp?**
Absolutely! Just make sure to fully thaw and dry the shrimp before cooking for the best results.

**2. My shrimp turned rubbery. What did I do wrong?**
Shrimp cook quickly. If they're overcooked, they can become rubbery. Aim for that beautiful pink color and remove them from the heat as soon as they're opaque.

**3. How can I adjust the sweetness if it’s too sweet?**
If it’s too sweet for your taste, add a splash more soy sauce to balance it out and give it that savory kick.

**4. What side dishes pair well with this recipe?**
This dish is lovely with jasmine rice, sautéed greens, or a fresh garden salad. A light, zesty side will balance the richness beautifully!

---

## Nutritional Info (Optional)

**Per Serving (Based on 4 servings)**:
- Calories: 250
- Protein: 30g
- Carbohydrates: 15g
- Fat: 8g

Enjoy your cooking adventure! I can't wait to hear how your High-Protein Honey Garlic Shrimp turns out. Don’t forget to share your kitchen escapades and any fun stories you create while cooking this delightful dish!

High-Protein Honey Garlic Shrimp
- Total Time: 15 minutes
- Yield: 4 servings 1x
- Diet: Paleo
Description
A delightful sweet and savory shrimp dish, packed with protein and flavor, perfect for quick meals or impressing guests.
Ingredients
- 1 pound large shrimp (peeled and deveined)
- 4 tablespoons honey
- 4 cloves garlic (minced)
- 2 tablespoons soy sauce (or tamari for gluten-free)
- 1 tablespoon olive oil
- 1/2 teaspoon black pepper
- 1/2 teaspoon chili flakes (optional)
- Chopped green onions (for garnish)
Instructions
- Start with your shrimp! If you bought frozen shrimp, make sure to thaw it completely under cold running water or overnight in the fridge. Then, pat them dry with paper towels to remove excess moisture.
- In a small bowl, whisk together the honey, minced garlic, soy sauce, olive oil, and chili flakes. Taste it and adjust to your liking.
- Heat a large pan over medium-high heat and add a splash of olive oil. Once heated, add the shrimp in a single layer and cook for about 2-3 minutes on one side until they turn pink and opaque.
- Gently flip the shrimp over and cook for another 1-2 minutes. Just before they’re done, pour in the prepared honey garlic sauce.
- Allow the sauce to cook down for a minute to thicken just enough to cling to the shrimp without overcooking them.
- Remove the pan from heat and sprinkle black pepper and green onions over the shrimp.
- Serve the shrimp warm, over rice or quinoa, and garnish with fresh green onions and lime wedges.
Notes
Feel free to experiment with additional flavors like citrus or spices to customize the dish to your taste.
- Prep Time: 10 minutes
- Cook Time: 5 minutes
- Category: Main Course
- Method: Sautéing
- Cuisine: Asian
Nutrition
- Serving Size: 1 serving
- Calories: 250
- Sugar: 20g
- Sodium: 400mg
- Fat: 8g
- Saturated Fat: 1g
- Unsaturated Fat: 7g
- Trans Fat: 0g
- Carbohydrates: 15g
- Fiber: 0g
- Protein: 30g
- Cholesterol: 200mg
Keywords: shrimp, garlic, honey, protein, quick meal
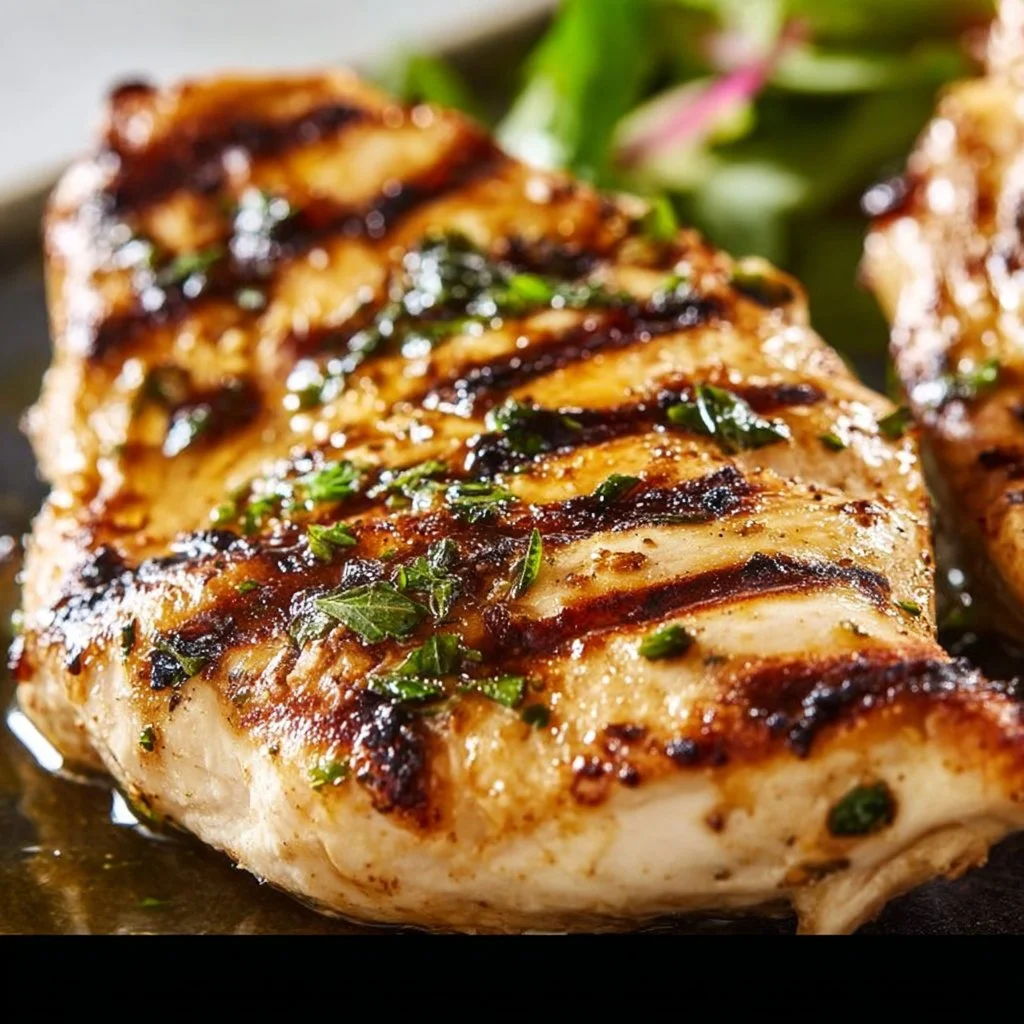
Grilled Chicken Breast
# Grilled Chicken Breast: A Simple Delight to Brighten Your Table

## Introduction

Welcome back to my cozy kitchen, friends! I’m so enthusiastic to share one of my all-time favorite meals with you today: *grilled chicken breast*. There's something utterly satisfying about a perfectly grilled chicken—a juicy interior with a lightly charred, flavorful exterior. Whether it’s sizzling on the grill during a summer barbecue or pan-seared for a weeknight dinner, grilled chicken is like a chameleon; it adapts to any cuisine and flavor profile, ever the avid traveler on your dinner plate!

What I love most about this dish is how customizable it can be. You aren’t just limited to salt and pepper; oh no, my culinary companions! With just a handful of spices, marinades, and techniques, you have the power to transport your taste buds to distant lands—be it Mediterranean, Asian, or good ol’ Southern BBQ.

And let's talk about those magical sharing moments that happen around the grilled chicken. Picture this: warm evenings with laughter ringing out, friends gathered around the grill, plates piled high with vibrant sides, and the tantalizing aroma wafting through the air. I mean, can you smell it? That’s what cooking is all about—uniting people and creating memories that last long after the last bite.

So grab your aprons and let's dive into this delicious adventure! Ready to transform humble chicken breasts into something extraordinary? Let’s do this!

## Personal Story

I remember my very first grilling adventure like it was yesterday. I was in high school, a bit of a culinary novice, when my dad decided it was time for me to step up to the grill while he handled the big boys! We had a beautifully sunny day, the kind that beckons you outside. He showed me the trusty old charcoal grill we had, which smelled faintly of the countless cookouts that preceded my initiation.

With my dad guiding me, we marinated the chicken in olive oil, lemon juice, and a few secret spices. I can still hear his gentle laughter as I fumbled with those tongs for the first time. But the moment those beautiful breast pieces hit the grill, oh boy! The sizzle was music to my ears! The taste—a masterpiece born from the fire—made me realize that I could indeed create joy in the kitchen.

From then on, it became our ritual every summer; we experimented with flavors, swapped recipes, and learned together. Those sunny days at the grill weren’t just about the chicken; they were about connection, laughter, and love being served right alongside our meal.

## Ingredients

To create the best grilled chicken breast, let’s gather our stars of the show! Here’s what you’ll need:

- **Chicken Breasts** (boneless and skinless)
  - Choose organic, free-range if possible for the best flavor and texture. If you prefer, thighs can work in place of breasts for a juicier, richer taste.

- **Olive Oil**
  - A must for marinating and ensuring those grill marks stick! If you don’t have olive oil, melted coconut oil or avocado oil can be great substitutes.

- **Garlic Powder**
  - This adds a lovely depth to your chicken. If you want a fresher note, you could use freshly minced garlic instead—just be cautious, as it can burn faster on the grill.

- **Paprika**
  - This is your secret weapon for color and a hint of smokiness. Smoked paprika packs an extra punch if you’re going for that BBQ vibe!

- **Salt and Pepper**
  - Essential! Sea salt enhances flavors beautifully, while freshly cracked pepper gives a kick. If you’re watching your sodium intake, consider using a lower-sodium sea salt.

- **Herbs (optional)**
  - Fresh or dried thyme, rosemary, or Italian seasoning can elevate your chicken. Feel free to mix and match based on what you have on hand!

- **Lemon Juice**
  - Freshly squeezed lemon juice brings brightness to your marinade. You can substitute it with lime juice for a fun twist.

## Step-by-Step Instructions

Now that we have our ingredients, it’s time for the fun part: cooking! Here’s how to turn those breasts into a grilled masterpiece.

1. **Prep the Chicken:**
   - Begin by trimming any excess fat from your chicken breasts for a cleaner bite. Pat them dry with a paper towel; this ensures better browning when they hit the grill!

2. **Marinate:**
   - In a large bowl, combine ¼ cup olive oil, 1 teaspoon garlic powder, 1 teaspoon paprika, and the juice of one lemon. Whisk those beauties together, then season generously with salt and pepper.
   - Add the chicken breasts, ensuring they're well-coated in the marinade. Cover and let them soak up those flavors for at least 30 minutes in the fridge—ideally, an hour or more if you have time.

3. **Heat the Grill:**
   - Preheat your grill to medium-high heat. This usually takes about 10-15 minutes. If using a charcoal grill, you want to make sure the coals are glowing and covered with ash for perfect temperature to grill.

4. **Grill the Chicken:**
   - Once your grill is hot, lightly oil the grates to prevent sticking. Place the chicken on, spaced apart to allow airflow. Grill for about 6-7 minutes without moving them—this is where those gorgeous grill marks develop.

5. **Flip and Finish:**
   - Using tongs, flip the chicken breasts and grill for another 6-7 minutes on the other side. You’re looking for an internal temperature of 165°F (75°C) for fully cooked chicken, measured with a meat thermometer.

6. **Rest:**
   - Once your chicken is beautifully charred and cooked through, let it rest for about 5 minutes. This little break allows the juices to redistribute so that every bite is succulent and evenly moist.

## Serving Suggestions

Now comes the fun part—serving! Slice your grilled chicken breasts into thick pieces and arrange them on a colorful platter. Pair them with a vibrant, seasonal salad like a cherry tomato and basil caprese or some roasted veggies to compliment that grilled goodness.

Drizzle with a balsamic reduction or serve alongside a zesty yogurt sauce for an added flavor boost. And don’t forget to sprinkle some fresh herbs on top—your chicken deserves the spotlight!

## Recipe Variations

Get ready to mix things up! Here are some creative ways to enjoy your grilled chicken:

- **Mediterranean Twist:** Add oregano and lemon zest to the marinade, and serve with tzatziki sauce for a delightful Greek vibe.

- **Tropical Vibes:** Mix in some pineapple juice and soy sauce for a Hawaiian twist, and add grilled pineapple slices on top before serving.

- **Spicy Kick:** Add chili powder or cayenne pepper to the marinade for heat. You could even glaze the chicken with some sriracha for that extra zing!

- **Honey Mustard Delight:** Swap out the olive oil for equal parts honey and dijon mustard in your marinade for a sweet-and-tangy flavor profile.

- **Herb Medley:** Use a mixture of your favorite fresh herbs; think cilantro, basil, or dill, for a fresher take. These can be thrown directly onto the grill in a foil packet for added smoky flavor.

## Chef's Notes

This grilled chicken recipe has been one of my go-to staples for years, and I continue to adapt it based on the seasons and what’s in my pantry. I remember a time I was experimenting with a new marinade and accidentally added too much salt; a sprinkling of brown sugar helped balance the whole dish. Kitchen blunders can sometimes lead to the most delicious discoveries!

Another thing I love is how versatile this chicken is. It can easily become the star in a salad, wrap, or even atop a comforting grain bowl. If you’re feeling adventurous, try marinating a batch overnight and see how those flavors deepen overnight. You might surprise yourself!

## FAQs and Troubleshooting

**1. My chicken turned out dry. What went wrong?**
   - This is often due to cooking at too high a heat or cooking for too long. Use a meat thermometer, and remember to let it rest before slicing!

**2. How do I know when the chicken is done?**
   - The best way is using a meat thermometer. Once it reaches 165°F (75°C) in the thickest part, it’s good to go!

**3. Can I grill frozen chicken?**
   - It's best to thaw chicken before grilling; frozen chicken cooks unevenly and takes much longer. Always plan ahead!

**4. How can I store leftovers?**
   - Store cooked and cooled chicken in an airtight container in the fridge for up to four days. It also freezes beautifully! Be sure to slice or cube it before freezing for easier use in future meals.

## Nutritional Info (Optional)

**Per serving (4 oz grilled chicken breast):**
- Calories: 165
- Protein: 31g
- Total Fat: 3.5g
- Saturated Fat: 1g
- Carb: 0g
- Fiber: 0g
- Sugar: 0g

Grilled chicken breast is an excellent source of high-quality protein with low fat, making it an ideal choice for a healthy and balanced diet.

---

And there you have it, my friends! A delicious and adaptable grilled chicken breast recipe that’s bound to become a staple in your cooking repertoire. Enjoy bringing family and friends together with the beauty of home-cooked meals. Happy grilling!

Grilled Chicken Breast: A Simple Delight to Brighten Your Table
- Total Time: 30 minutes
- Yield: 4 servings 1x
- Diet: Paleo
Description
A flavorful grilled chicken breast recipe, perfect for summer barbecues or weeknight dinners.
Ingredients
- 4 boneless, skinless chicken breasts
- ¼ cup olive oil (or melted coconut/avocado oil)
- 1 teaspoon garlic powder
- 1 teaspoon paprika (smoked if desired)
- Salt and pepper to taste
- Fresh or dried herbs (optional)
- Juice of 1 lemon (or lime for twist)
Instructions
- Prep the chicken by trimming excess fat and patting dry.
- Marinate by combining olive oil, garlic powder, paprika, lemon juice, salt, and pepper in a bowl.
- Heat the grill to medium-high, about 10-15 minutes.
- Grill the chicken for 6-7 minutes without moving for grill marks.
- Flip the chicken and grill for another 6-7 minutes until it reaches 165°F (75°C).
- Rest for 5 minutes before slicing and serving.
Notes
Marinate for at least 30 minutes, up to overnight for best flavor. Use a meat thermometer for precise cooking.
- Prep Time: 15 minutes
- Cook Time: 15 minutes
- Category: Main Course
- Method: Grilling
- Cuisine: American
Nutrition
- Serving Size: 1 breast
- Calories: 165
- Sugar: 0g
- Sodium: 200mg
- Fat: 3.5g
- Saturated Fat: 1g
- Unsaturated Fat: 2g
- Trans Fat: 0g
- Carbohydrates: 0g
- Fiber: 0g
- Protein: 31g
- Cholesterol: 85mg
Keywords: grilled chicken, chicken breast, easy chicken recipes, summer grilling, healthy meals
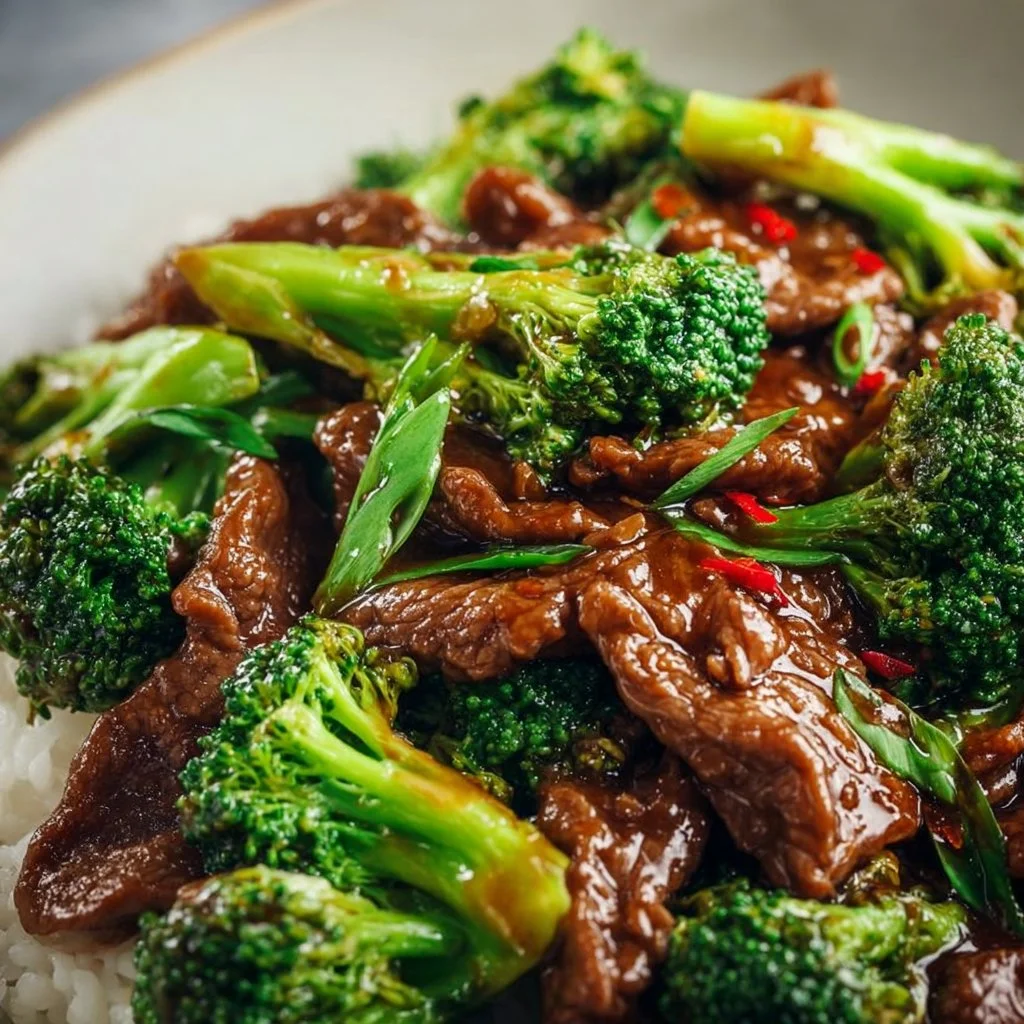
Chinese Beef and Broccoli
Ultimate Chinese Beef and Broccoli: A Cozy Kitchen Classic
Hey there, my fellow flavor lovers! Welcome back to my kitchen, where every pot and pan has a story, and every spatula is ready to whip up something amazing. Today, we’re diving into a dish that holds a special place in my heart: Chinese Beef and Broccoli. If you’ve ever experienced the fragrant aroma of beef marinated in a savory sauce, mingling with crisp broccoli and hints of garlic and ginger, then you know just how comforting and delicious this dish can be!
As I write this, I can’t help but remember the first time I had homemade beef and broccoli. I was about eight years old, and my dad decided to tap into his love for cooking by trying his hand at Asian flavors. The moment that sizzling pan hit the table, my family gathered around, and all chatter came to a hush. We were entranced. With each bite, I was transported to a little corner of my imagination, where chopsticks danced in hand, and laughter echoed through the air. That dinner sparked my lifelong love for simple, hearty meals that bring people together.
In today’s blog post, I’ll not only guide you through the steps to create this culinary experience at home, but I’ll sprinkle in my personal tips, tricks, and stories to make it as enjoyable as possible. Trust me; you don’t need years of experience in the kitchen to create a dish that dazzles! So grab your apron, and let’s have some fun as we explore this classic recipe together!
Personal Story
Growing up, our kitchen was always filled with laughter, secret ingredients, and the mouthwatering aroma of various cuisines. I’ll never forget one memorable family night when we attempted to recreate the local take-out spot’s “best-seller” – a Beef and Broccoli dish that was packed with flavor and charm. My dad, inspired by our favorite restaurant, decided to make it from scratch. I remember bouncing on my toes with excitement as he shared secrets about how to make the beef tender and the broccoli vibrantly green.
With the kitchen buzzing with energy, I held the soy sauce bottle like it was a prized possession and miscalculated the amount a little too liberally. As the rich dark liquid splashed everywhere, we erupted in laughter! Only a sprinkle of that savory seasoning ended up in the bowl, but it made for one memorable evening that taught me a valuable lesson: it’s not just about the food you’re making; it’s about the memories you create along the way.
Ever since then, Beef and Broccoli has become not just a dish but a tradition for us. It’s a recipe that continues to evolve in my kitchen, bringing my loved ones to the table for another kind of adventure.
Ingredients
Let’s gather our dream team of ingredients! Here’s what you’ll need for this delectable dish:
-
Flank Steak (1 lb)
- A lean cut that’s perfect for stir-frying. Look for vibrant red meat with minimal fat. If unavailable, sirloin or skirt steak works well too!
-
Broccoli (2 cups)
- Fresh or frozen, broccoli is your colorful companion here. If you’re using frozen, just let it thaw and drain excess water beforehand.
-
Soy Sauce (¼ cup)
- This salty star ingredient brings umami to your dish. Low-sodium soy sauce can be used if you’re watching your salt intake.
-
Oyster Sauce (2 tablespoons)
- A sweet and savory blend that enhances flavor. If you’re feeling adventurous, try using hoisin sauce for a different sweetness.
-
Garlic (3 cloves, minced)
- No dish is complete without garlic! Fresh minced garlic packs a punch, but garlic powder can serve as an alternative.
-
Ginger (1 tablespoon, minced)
- This zingy root adds warmth and depth. Fresh ginger is preferred for its pungency; dried ginger is a great backup.
-
Cornstarch (1 tablespoon)
- Our secret weapon for silky sauce sauce! Feel free to swap it with arrowroot powder if you’re looking for a gluten-free option.
-
Sesame Oil (1 tablespoon)
- A little drizzle brings a delightful nuttiness to the dish. Olive oil can be used in a pinch, but it won’t provide that signature flavor.
-
Water (½ cup)
- To create that luscious sauce finish.
-
Salt and Pepper to taste
- Always essential for enhancing flavor!
To make sure you have a tasty balance, keep these tips in your back pocket:
- Meat Tenderizer Tip: Marinating flank steak in a little soy sauce for 15-30 minutes can help it become ultra-tender!
- Substitution Insights: You can easily swap out veggies like bell peppers or snap peas if you want to add variety.
- Freshness Matters: Keep your broccoli vibrant and crunchy by opting for the freshest produce available.
Step-by-Step Instructions
Now, let’s roll up our sleeves and get cooking! Follow these simple steps to achieve a scrumptious Beef and Broccoli dish that will have you singing praises.
Step 1: Prepare the Marinade
- In a bowl, whisk together soy sauce, oyster sauce, minced garlic, minced ginger, and cornstarch until smooth. This is your flavor powerhouse! Let your butcher know you’re making a stir-fry, and the beef will be cut properly for you.
Step 2: Marinate the Beef
- Slice your flank steak thinly against the grain, aiming for about 1/4 inch thick. Toss the sliced beef into the marinade, ensuring every piece is well coated. Allow it to marinate for at least 15 minutes; the longer, the better!
Tip: You can prep this ahead of time and let it marinate in the fridge for up to an hour to develop flavor.
Step 3: Prepare the Broccoli
- While your beef is marinating, bring a pot of water to boil. Blanch the broccoli florets for about 2-3 minutes until they turn vibrantly green but remain crisp. Drain and plunge them into ice water to stop the cooking process. This step keeps your broccoli looking fresh!
Step 4: Heat Things Up
- In a large skillet or wok, heat sesame oil over medium-high heat. Once it’s shimmering, toss in the marinated beef in a single layer. Allow it to sear without stirring for about 1-2 minutes to develop a browning effect, then toss everything together until the beef is just cooked through (3–4 minutes total).
Tip: Work in batches for a perfect sear on the beef; too much meat in the pan can cause steaming instead of frying!
Step 5: Cheers to Broccoli
- Add the blanched broccoli to the skillet with the beef. Pour in the water (and a little more soy sauce if desired), and toss everything together, letting it simmer for a couple of minutes. This will help the flavors integrate while keeping everything beautifully coated.
Step 6: Plate it Up
- Once everything is well coated and heated through, taste and adjust seasoning with salt and pepper as needed. Serve it hot over steamed rice or with your favorite noodles for that ultimate comfort dish.
Chef’s Hack: Use a spatula to scoop the beef and broccoli right off the skillet and onto a bed of rice for that Instagram-worthy presentation!
Serving Suggestions
Presentation is key, folks! Serve this vibrant Beef and Broccoli in a wide, colorful bowl over a fluffy mound of jasmine or brown rice. Add a sprinkle of sesame seeds on top for that crunchy finish, and toss in a few slices of green onion for extra flair! Highlight the freshness with a wedge of lime на the side to let your guests spritz some citrus goodness on top.
Recipe Variations
Now, let’s put a creative spin on our classic:
-
Spicy Beef and Broccoli: Add a teaspoon of red pepper flakes to the marinade for a fiery kick or drizzle sesame oil over with the chili oil for extra flavor.
-
Beefless Broccoli: Replace beef with your favorite plant-based protein or tofu for a delightful vegan option!
-
Add More Veggies: Toss in bell peppers, snap peas, or mushrooms for extra color, texture, and nutrition.
-
Sweet and Sour Variation: Swap out oyster sauce for a sweeter sauce like teriyaki if sweet and savory is your style.
-
Cashew Love: Stir in a handful of toasted cashews for that crunchy texture and nutty flavor.
Chef’s Notes
This Beef and Broccoli dish holds a special place in my heart, not only for its amazing taste but also for all the fun, embarrassing kitchen blunders from my childhood. I’ve learned that even mishaps can lead to delicious creations! Over the years, I’ve embraced using whatever veggies I have on hand, allowing this recipe to evolve with the seasons and what’s fresh at the local farmer’s market.
Who knew cooking could create so many memories? Whether you’re gathering the family for dinner or inviting friends over to impress them, I hope this beef and broccoli dish becomes a cherished staple in your home.
FAQs and Troubleshooting
1. Why is my beef not tender?
- If your beef has become tough, it’s likely due to overcooking. Keep an eye on it and aim for medium-rare—the beef will continue to cook off the heat!
2. My broccoli turned mushy; what did I do wrong?
- Overcooking can cause mushiness; ensure you blanch only for a few minutes and scoop them into ice water immediately!
3. Can I make this dish in advance?
- While it’s best to enjoy Beef and Broccoli fresh, you can prep the ingredients ahead of time and cook them right before serving.
4. How can I store leftovers?
- Prepare for the ultimate meal prep by storing leftovers in an airtight container in the fridge for up to 3 days. Reheat gently on the stovetop or in the microwave, stirring to avoid overheating.
Nutritional Info (Optional)
This section is optional, but if you’re interested, here’s a rough estimate for a one-cup serving:
- Calories: 350
- Protein: 32g
- Carbohydrates: 24g
- Fat: 15g
- Fiber: 3g
And there you have it! You now have all the tools to create a delicious, memorable Beef and Broccoli dish in your very own kitchen. Thank you for joining me today and allowing me to share this delightful experience with you. Happy cooking, and may your kitchen be filled with laughter and love!
Print
Ultimate Chinese Beef and Broccoli
- Total Time: 30 minutes
- Yield: 4 servings 1x
- Diet: None
Description
A comforting and flavorful dish of marinated beef and crisp broccoli cooked in a savory sauce.
Ingredients
- 1 lb Flank Steak
- 2 cups Broccoli
- ¼ cup Soy Sauce
- 2 tablespoons Oyster Sauce
- 3 cloves Garlic, minced
- 1 tablespoon Ginger, minced
- 1 tablespoon Cornstarch
- 1 tablespoon Sesame Oil
- ½ cup Water
- Salt and Pepper to taste
Instructions
- Prepare the Marinade: In a bowl, whisk together soy sauce, oyster sauce, minced garlic, minced ginger, and cornstarch until smooth.
- Marinate the Beef: Slice the flank steak thinly against the grain. Toss the sliced beef into the marinade, ensuring every piece is well coated. Allow it to marinate for at least 15 minutes.
- Prepare the Broccoli: Blanch the broccoli florets in boiling water for about 2-3 minutes until vibrantly green. Drain and plunge them into ice water.
- Heat Things Up: In a large skillet or wok, heat sesame oil over medium-high heat. Add the marinated beef in a single layer and sear without stirring for about 1-2 minutes.
- Add the blanched broccoli to the skillet with the beef. Pour in the water and toss everything together.
- Plate it Up: Taste and adjust seasoning with salt and pepper as needed. Serve it hot over rice or noodles.
Notes
For extra flavor, marinate the beef for up to an hour. Use fresh veggies for the best texture.
- Prep Time: 15 minutes
- Cook Time: 15 minutes
- Category: Main Course
- Method: Stir-frying
- Cuisine: Chinese
Nutrition
- Serving Size: 1 serving
- Calories: 350
- Sugar: 5g
- Sodium: 800mg
- Fat: 15g
- Saturated Fat: 3g
- Unsaturated Fat: 8g
- Trans Fat: 0g
- Carbohydrates: 24g
- Fiber: 3g
- Protein: 32g
- Cholesterol: 60mg
Keywords: beef, broccoli, Chinese, stir-fry, comfort food, easy recipe

How To Meal Prep – Korean Beef Bowl
How to Meal Prep: Korean Beef Bowl Recipe
Welcome back to my kitchen, foodie friends! Today, we’re diving into the vibrant, savory world of Korean cuisine with a dish that’s not only mouth-watering but also incredibly easy to meal prep: the Korean Beef Bowl! If you’ve ever craved a delightful mix of tender beef, aromatic garlic, and colorful veggies, then you’re in for a treat. As you know, I’m all about simplifying the cooking process while maximizing flavor and comfort, and this recipe does exactly that.
Korean Beef Bowl is one of those dishes that’s perfect for a busy weeknight or when you want to meal prep for the week ahead. With rich flavors and wholesome ingredients, it satisfies cravings without the hassle. Plus, it’s an absolute crowd-pleaser—whether you’re cooking for the family or bringing dishes to share with friends. Trust me; even the pickiest eaters will devour this!
When I first experimented with this recipe years ago, I was inspired by a cozy evening spent sharing dinner with friends after a long week. The atmosphere was warm; our laughter echoed around the room, and the enticing aroma of bulgogi-style beef filled the air. I remember we had it piled high over fluffy rice, topped with crunchy vegetables and a drizzle of spicy sauce—yes, I’m salivating just thinking about it! That night sparked a love affair with Korean flavors, and since then, I’ve adapted it to fit my meal-prepping lifestyle. Join me on this flavorful journey, and let’s get cooking together!
Personal Story
Ah, the memories! I’ll never forget the first time I tasted Korean beef. It was during a summer trip to visiting a friend in Los Angeles, a foodie hotspot that pulled you in with both charm and flavor. We stumbled upon a tiny little restaurant tucked away in a corner—Asian bits swirling around like a whisper inviting us in. The moment the plate arrived, I was entranced! The marinated beef was sweet and savory, the kind of dish that made your heart sing and your tummy dance. From that point on, I knew I had to recreate that experience at home.
Those summer nights spent cooking and enjoying the fruits of our labor with good friends have always inspired my cooking. That experience pushed me to explore the spices, techniques, and flavors that make Korean cuisine so special. And now, I’m excited to bring that energy back into your kitchen! Each bowl of Korean Beef I prepare is a little nod to those carefree days spent around a dinner table filled with laughter and delicious food. I hope to share the same warm vibes with you as we cook this together!
Ingredients
Let’s gather our ingredients! Here’s what you’ll need to whip up these luscious Korean Beef Bowls. I’ve included quick notes on substitutions and tips to help you out.
For the Beef Marinade:
-
1 pound of flank steak or sirloin
Flank steak is perfect for this recipe for its tenderness and flavor. If you’re looking for a substitute, you can use similar cuts like skirt steak or even ground beef for a quicker version. -
3 tablespoons soy sauce
Soy sauce adds that essential umami flavor. For a gluten-free option, try tamari, which delivers a similar taste without the gluten. -
1 tablespoon brown sugar
Brown sugar brings a delightful sweetness and helps caramelize the beef. White sugar works too, but it will lack some of the rich flavor. -
1 teaspoon sesame oil
This adds a nutty depth to the dish. If you’re in a pinch, you can use a mild olive oil, but it won’t have the same rich flavor. -
2 cloves garlic, minced
Garlic opens up the flavor profiles and adds warmth. Feel free to add more if you’re like me and really love garlic! -
1 teaspoon ground ginger
Ginger provides a lovely zing! Fresh ginger also works wonderfully—just make sure to use about one tablespoon of it instead.
For the Toppings & Bowls:
-
2 cups cooked rice (white or brown)
Brown rice adds more nutrients and fiber, while white rice is more traditional. Quinoa or cauliflower rice are great alternatives for low-carb options! -
1 cup shredded carrots
Colorful and crunchy! You can use store-bought coleslaw mix if you want to save some prep time. -
1 cup cucumber, julienned
Cucumber adds crunch and freshness. Zucchini can be used as a substitute if you’re in the mood for something different. -
2 green onions, chopped
These add a burst of flavor! You can also use chives if that’s what you have on hand. -
Sesame seeds for garnish
These add a nutty crunch! If you can’t find them, crushed peanuts or walnuts will introduce a different but welcomed texture.
Optional Sauce:
- Gochujang (Korean chili paste)
For a spicy kick! Adjust according to your heat preference. It’s brilliant for those who love bold flavors.
Step-by-Step Instructions
Alright, let’s get our hands a little messy and create this delicious masterpiece!
Step 1: Marinate the Beef
In a medium-sized bowl, combine the soy sauce, brown sugar, sesame oil, garlic, and ginger. Mix it together until the sugar dissolves. Now, add the sliced flank steak, tossing it to coat evenly. Cover it with plastic wrap and let it marinate in the fridge for at least 30 minutes—this will help tenderize the meat and infuse it with flavor. If you can let it marinate for a few hours, that’s even better! Just try not to let it sit overnight, as it can get too salty.
Step 2: Cook the Rice
While the beef is marinating, prepare your rice. If you’re using white rice, rinse it under cold water until the water runs clear, then follow the package instructions. For brown rice, enlist more patience—it takes longer but is so worth it! And if you’re using quinoa, it usually takes about 15 minutes to cook up fluffy perfection. Once cooked, set it aside, fluff it with a fork, and keep it warm.
Step 3: Sear the Beef
Heat a large skillet over medium-high heat and add a drizzle of cooking oil. Once it’s shimmering, add the marinated beef (discard the excess marinade). Cook for about 3-4 minutes, stirring occasionally until the beef is browned and cooked through. Remember, we want it juicy, not overcooked! If you see some beautiful bits caramelizing, that’s just adding to the flavor!
Step 4: Assemble the Bowls
Now it’s time to layer on the magic! Scoop a generous portion of warm rice into each serving bowl. Top it with your beautifully seared beef, then add your shredded carrots and cucumber on the side. Sprinkle the chopped green onions and sesame seeds on top for that final flourish. You can also serve the gochujang on the side, so everyone can customize their spice level!
Step 5: Enjoy!
Dig in right away and enjoy the fruits of your kitchen labor! You will feel like a culinary rockstar as you watch everyone devour it. Plus, the best part? You’ve just meal-prepped, making it much easier for the week ahead!
Serving Suggestions
For serving, these Korean Beef Bowls shine best when arranged beautifully—think of it as plating for a food photo! Use shallow bowls for that delightful layered look, and consider adding a sprig of cilantro or a slice of lime next to the beef for a pop of color! They’re stunning on their own, but if you’re feeling fancy, serve with a side of crispy kimchi or pickled vegetables to elevate the whole experience.
Recipe Variations
Feeling adventurous? Try these creative twists on the classic Korean Beef Bowl:
- Bowl Bonanza: Swap out the rice for quinoa, leafy greens, or even sweet potato mash for a different base.
- Spicy Upgrade: Add a tablespoon of gochugaru (Korean chili flakes) to the marinade for an extra kick.
- Veggie Delight: Throw in some sautéed bell peppers, broccoli, or snap peas to up the veggie ante!
- Vegan Version: Swap out the beef for sautéed mushrooms or tofu to make it a plant-based bowl.
- Sweet Treat: Give your sauce a twist by adding a tablespoon of pineapple juice for a hint of sweet and tangy flavor.
Chef’s Notes
I’ll let you in on a little secret: this dish is like a hug in a bowl! It’s one that I make whenever I need a little lift or when friends ask me to bring something to share. Over the years, I’ve experimented with different spices and toppings, and it’s amazing how just a few ingredients can create such a comforting dish.
One of my favorite memories in the kitchen comes from inviting a few close friends over for a Korean Beef Bowl night. Everyone brought their toppings—from seaweed sheets to homemade kimchi—and we had a topping bar right in the middle of the table. It turned into a hilarious game of who could create the most outrageous bowl! This recipe has certainly evolved, but it always brings people together, which is what cooking is all about.
FAQs and Troubleshooting
Q1: The beef turned out tough. What happened?
A1: This could be due to overcooking. Flank steak cooks quickly, so try to get it off the heat as soon as it’s browned. Marinading helps tenderize but don’t let it sit too long, or it can become mushy.
Q2: Can I freeze the Korean Beef?
A2: Absolutely! Just let it cool down and store it in an airtight container. It can last about 3 months in the freezer. Thaw in the fridge overnight before reheating for your meals!
Q3: The marinade is too salty for my taste. What can I do?
A3: If you overdo the soy sauce, don’t hesitate to balance it with a dash of honey or a splash of vinegar for brightness. You can also dilute it with some water if you catch it early!
Q4: Can I meal prep this for the week? How long will it last?
A4: Yes! These bowls are perfect for meal prepping. Store in airtight containers in the fridge for up to 4 days. Just assemble them when you’re ready to eat!
Nutritional Info
For a balanced meal, a serving (including rice and toppings) contains roughly:
- Calories: 450
- Protein: 28g
- Carbohydrates: 56g
- Fat: 14g
- Fiber: 3g
(Nutritional information may vary based on specific brands and products used.)
And there you have it! A warm, flavorful Korean Beef Bowl ready to be savored. It’s more than just a meal; it’s a way to connect, share, and create memories in your kitchen. I can’t wait to hear how yours turns out! Try this recipe out, share the love, and see you back here next time in my cozy kitchen! 🍚🥢
Print
Korean Beef Bowl
- Total Time: 25 minutes
- Yield: 4 servings 1x
- Diet: Paleo
Description
A savory and easy-to-meal-prep Korean Beef Bowl featuring tender beef, aromatic garlic, and colorful veggies.
Ingredients
- 1 pound flank steak or sirloin
- 3 tablespoons soy sauce
- 1 tablespoon brown sugar
- 1 teaspoon sesame oil
- 2 cloves garlic, minced
- 1 teaspoon ground ginger
- 2 cups cooked rice (white or brown)
- 1 cup shredded carrots
- 1 cup cucumber, julienned
- 2 green onions, chopped
- Sesame seeds for garnish
- Gochujang (Korean chili paste), optional
Instructions
- Marinate the beef: In a bowl, combine soy sauce, brown sugar, sesame oil, garlic, and ginger. Mix until sugar dissolves, add flank steak, toss to coat, cover, and refrigerate for at least 30 minutes.
- Cook the rice: Prepare rice according to package instructions and keep warm.
- Sear the beef: Heat a skillet over medium-high, add marinated beef, and cook for 3-4 minutes until browned and cooked through.
- Assemble the bowls: Place rice in bowls, top with beef, shredded carrots, and cucumber. Garnish with green onions and sesame seeds, serve gochujang on the side.
- Enjoy! Dig in and savor your meal prep masterpiece!
Notes
Great for meal prepping; store in airtight containers in the fridge for up to 4 days.
- Prep Time: 10 minutes
- Cook Time: 15 minutes
- Category: Main Course
- Method: Searing
- Cuisine: Korean
Nutrition
- Serving Size: 1 bowl
- Calories: 450
- Sugar: 5g
- Sodium: 800mg
- Fat: 14g
- Saturated Fat: 3g
- Unsaturated Fat: 9g
- Trans Fat: 0g
- Carbohydrates: 56g
- Fiber: 3g
- Protein: 28g
- Cholesterol: 70mg
Keywords: Korean Beef, Meal Prep, Easy Recipe, Bowls, Savory Bowl
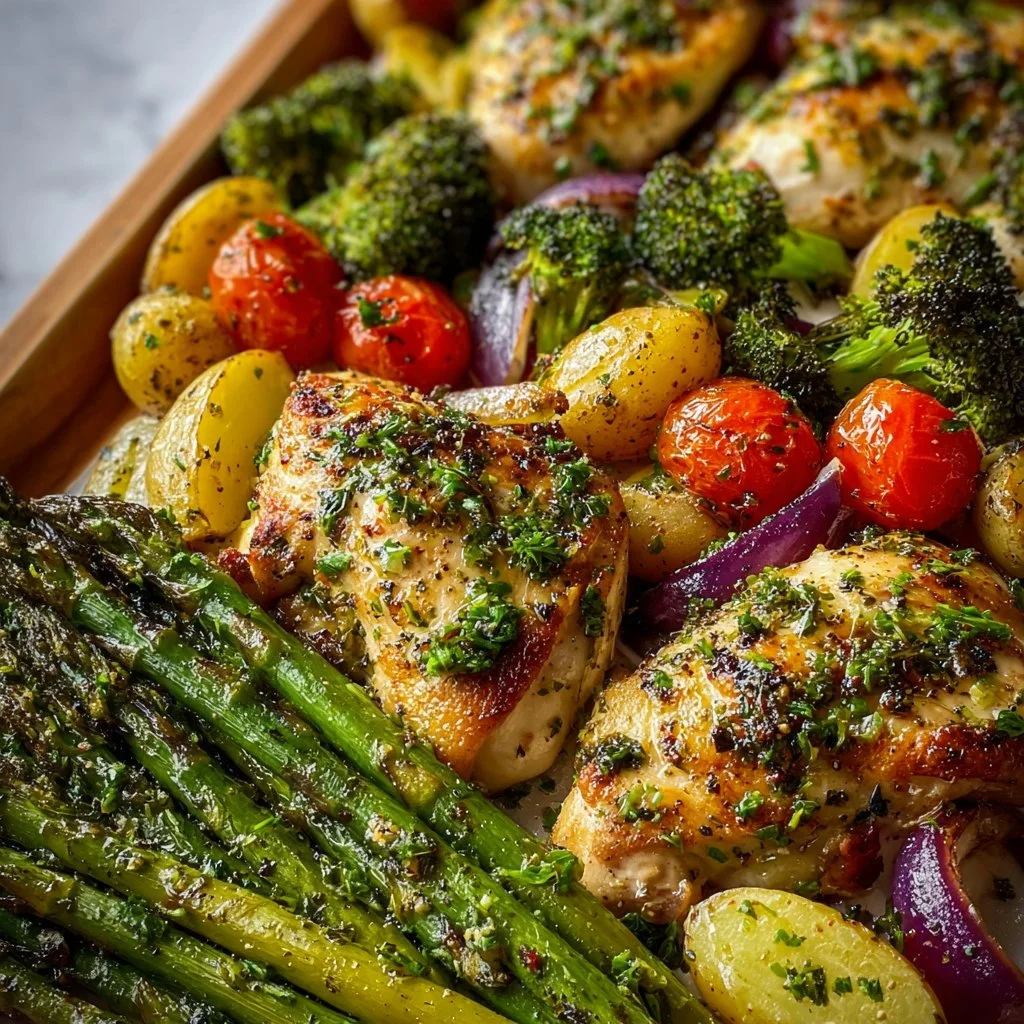
Sheet Pan Garlic Butter Chicken and Veggies
Sheet Pan Garlic Butter Chicken and Veggies: A Simple, Delicious Meal that Brings Joy to Your Table
Welcome back to my cozy kitchen! Today, I’m thrilled to share one of my all-time favorite recipes: Sheet Pan Garlic Butter Chicken and Veggies. If you’re anything like me, you love a meal that’s not only mouthwatering but also simple to prepare and clean up. And let me tell you, this dish checks all those boxes!
What’s not to love about succulent chicken thighs bathed in a rich garlic butter sauce, paired with vibrant seasonal veggies? This meal is perfect for those busy weeknights when you want something delicious without spending hours slaving over the stove. Plus, with everything cooked on a single sheet pan, you’ll have fewer dishes to wash—seriously, a win-win!
Around my kitchen table, food is not just sustenance; it’s love, laughter, and togetherness. I believe that cooking should be fun and approachable! This recipe encapsulates that spirit. You can customize it based on your family’s preferences or whatever you have on hand, making it as versatile as your imagination. So grab your apron and let’s dive into the delightful world of garlic butter chicken!
Personal Story
I still remember the first time I made this dish. It was a chilly autumn evening a few years ago, and I had invited a few friends over for dinner. I wanted to impress them without going too far out of my comfort zone. After scouring my kitchen and rummaging through my pantry, I stumbled upon chicken thighs, a couple of bags of colorful veggies, and a forgotten stick of butter in the fridge.
In that moment, I decided to whip up this Sheet Pan Garlic Butter Chicken. The intoxicating aroma of garlic wafting through my kitchen set the stage for a cozy night filled with warmth and laughter. I’ll never forget the smiles on my friends’ faces as they dug into their plates and savored the first bite. It wasn’t just a meal; it was a shared experience that brought us closer together. Ever since that night, this recipe has become a staple in my household, reminding me that the best memories are often created around the dinner table—no matter how simple the meal.
Ingredients
Here’s what you’ll need to whip up this flavorful dish:
For the Chicken:
- Chicken Thighs: Juicy and flavorful, chicken thighs are ideal for roasting because they stay moist and tender. You can substitute with chicken breasts or drumsticks if preferred, but keep in mind that cooking times may vary.
- Butter: A rich base that provides depth of flavor. For a healthier option, you can use olive oil or ghee for a dairy-free version.
For the Garlic Butter:
- Garlic: Fresh garlic is a must! It gives that delicious, aromatic flavor. If you’re in a pinch, you can use garlic powder, but the fresh stuff packs so much more punch!
- Parsley: Fresh parsley adds a pop of color and freshness. You could substitute with thyme or rosemary for a different herbal note.
For the Veggies:
- Carrots: Sweet and colorful, they add a nice crunch. You can also swap them for sweet potatoes or parsnips for a twist.
- Bell Peppers: These add vibrant color and a hint of sweetness. Feel free to use any color you prefer (red, green, or yellow!).
- Zucchini: Tender and mild, zucchini cooks quickly and absorbs flavors beautifully. You could replace this with asparagus or broccoli, depending on your preference.
Seasoning:
- Salt and Black Pepper: The essentials! Adjust to your taste.
- Paprika: Adds a warm, smoky flavor. You could also try smoked paprika for an extra kick.
Bonus:
- Lemon Juice (optional): A squeeze of lemon at the end brightens the dish and takes it to the next level.
Step-by-Step Instructions
Now that we’ve gathered all our ingredients, let’s get cooking! Follow these simple steps, and you’ll have a delicious dinner on the table in no time.
-
Preheat Your Oven:
Preheat your oven to 425°F (220°C). A hot oven is key for achieving that beautiful, crispy skin on the chicken and caramelization on the veggies. -
Prepare the Veggies:
Chop your veggies into bite-sized pieces for even cooking. This is also a great chance to involve your kids or friends in the prep! When everyone pitches in, it’s not just cooking; it becomes a fun activity. -
Make the Garlic Butter:
In a small saucepan over low heat, melt the butter. Add the minced garlic and cook for about 1-2 minutes until fragrant, making sure not to burn it. The smell will be heavenly! Once fragrant, remove from heat and mix in the chopped parsley, salt, pepper, and paprika. Set aside. -
Season the Chicken:
Pat the chicken thighs dry with paper towels—this helps achieve that lovely crispy skin. Season both sides generously with salt, pepper, and a sprinkle of paprika for that extra oomph. -
Assemble the Sheet Pan:
Line a large baking sheet with parchment paper for easy cleanup (trust me, you’ll thank me later!). Arrange the chicken thighs in the center of the sheet pan and scatter your prepared veggies around them. Drizzle everything with that melt-in-your-mouth garlic butter sauce. Use a brush or spoon to coat the chicken and veggies evenly. -
Roast:
Pop the sheet pan into the preheated oven and roast for 25-30 minutes, or until the chicken is cooked through and reaches an internal temperature of 165°F (75°C) and the veggies are tender and slightly caramelized. You might want to flip the veggies halfway through for even roasting, but it’s not strictly necessary! -
Finishing Touches:
Once cooked, remove the sheet pan from the oven and give everything a good toss. For a burst of freshness, squeeze a bit of lemon juice over the top before serving. Isn’t it amazing how such a simple touch can elevate a dish?
Serving Suggestions
When it comes to serving, the beauty of this dish lies in its rustic, hearty presentation. You can serve it family-style right from the sheet pan—let everyone dig in! For a more refined plate, you could arrange the chicken and veggies on a platter, garnish with fresh parsley, and maybe even add a lemon wedge for that extra touch of elegance. Pair it with some crusty bread or a simple green salad to round out the meal.
Recipe Variations
Feeling adventurous? Here are a few creative twists to make this dish even more exciting:
- Herb Variations: Swap out the fresh parsley for fresh dill or basil for a fresh twist.
- Add Heat: If you love spice, consider adding red pepper flakes to the garlic butter for some heat.
- Different Proteins: Switch the chicken for shrimp or fish. They will cook faster, so keep an eye on them!
- Veggie Medley: Use whatever veggies you have on hand—broccoli, cauliflower, or Brussels sprouts work wonderfully, too!
- Citrus Kick: Try adding orange zest and juice for a bright, citrusy flavor.
Chef’s Notes
One of the things I love most about this recipe is its adaptability. I’ve made it countless times, and every time it comes out delicious—sometimes by design, and other times, purely by accident! One time, I completely forgot to add the garlic butter. Can you believe it? I was in a frenzy trying to get dinner ready and it slipped my mind. Surprisingly, my friends loved the plain roasted chicken and veggies so much that they suggested I offer it as a “light option” in the future. Cooking, after all, is as much about experimenting and having fun as it is about following a recipe!
FAQs and Troubleshooting
1. My chicken skin didn’t crisp up! What happened?
Make sure your oven is fully preheated before putting in the chicken. Pat the chicken dry to remove excess moisture and ensure that the skin crisps up nicely.
2. Can I use frozen chicken?
While you can use frozen chicken, it’s best to thaw it first to ensure even cooking. Planning ahead will yield the best results!
3. What if my veggies are cooking too quickly?
If your veggies are cooking faster than the chicken, you can remove them from the oven earlier and just let the chicken finish roasting.
4. How do I store leftovers?
Store any leftovers in an airtight container in the refrigerator for up to 3 days. Reheat them in the oven for the best results or in the microwave for a quick meal.
Nutritional Info
(If you would like, I can provide an estimated nutritional breakdown, but it varies based on your specific ingredients and serving sizes!)
And there you have it! A delightful and approachable recipe for Sheet Pan Garlic Butter Chicken and Veggies that will surely bring joy to your table. Remember, cooking is not just about the food—it’s about the moments you create and the love you share. Happy cooking, friends! ✨
Print
Sheet Pan Garlic Butter Chicken and Veggies
- Total Time: 45 minutes
- Yield: 4 servings 1x
- Diet: Gluten-Free
Description
A simple and delicious meal featuring succulent chicken thighs bathed in garlic butter sauce, paired with vibrant seasonal vegetables.
Ingredients
- 1.5 lbs Chicken Thighs
- 1 stick Butter
- 4 cloves Garlic, minced
- 1/4 cup Fresh Parsley, chopped
- 2 Carrots, chopped
- 2 Bell Peppers, chopped
- 1 Zucchini, chopped
- 1 tsp Salt
- 1 tsp Black Pepper
- 1 tsp Paprika
- 1 tbsp Lemon Juice (optional)
Instructions
- Preheat your oven to 425°F (220°C).
- Chop your veggies into bite-sized pieces for even cooking.
- In a small saucepan over low heat, melt the butter. Add the minced garlic and cook for about 1-2 minutes until fragrant.
- Pat the chicken thighs dry with paper towels and season both sides with salt, pepper, and paprika.
- Line a large baking sheet with parchment paper and arrange the chicken thighs in the center, scattering the veggies around them.
- Drizzle everything with the garlic butter sauce and coat evenly.
- Pop the sheet pan into the oven and roast for 25-30 minutes, until the chicken is cooked through and the veggies are tender.
- Once cooked, remove from the oven and toss everything. Squeeze lemon juice over before serving.
Notes
You can customize the recipe with your favorite vegetables or protein. Always ensure to pat the chicken dry for crispier skin.
- Prep Time: 15 minutes
- Cook Time: 30 minutes
- Category: Main Course
- Method: Baking
- Cuisine: American
Nutrition
- Serving Size: 1 serving
- Calories: 450
- Sugar: 6g
- Sodium: 420mg
- Fat: 22g
- Saturated Fat: 10g
- Unsaturated Fat: 10g
- Trans Fat: 0g
- Carbohydrates: 30g
- Fiber: 4g
- Protein: 25g
- Cholesterol: 80mg
Keywords: garlic butter chicken, sheet pan dinner, easy chicken recipe, one pan meal, quick dinner

Low Carb Cheesy Garlic Chicken Wraps
Low Carb Cheesy Garlic Chicken Wraps: A Hearty, Flavorful Delight
Hey there, food lovers! Welcome back to my cozy kitchen — where the spices are always at hand, and the oven is my trusted partner in culinary crime. Today, I’m thrilled to share a recipe that is near and dear to my heart: Low Carb Cheesy Garlic Chicken Wraps. If you’ve ever found yourself craving something delicious yet guilt-free, this dish is for you! These wraps are not just low on carbs; they’re bursting with flavors that will make your taste buds sing.
Now, I know what you’re thinking: low carb often means sacrificing flavor, but that is so not the case here! Picture tender chicken enveloped in ooey-gooey cheese, harmoniously blended with aromatic garlic and crispy vegetables, all wrapped up in a delightful low-carb tortilla. It’s comfort food at its finest, and trust me, your family and friends won’t even realize they’re indulging in a healthier option.
Cooking has always been a passion for me, and I find that sharing recipes sparks joy, brings people together, and creates unforgettable memories around the table. Whether you’re a seasoned home cook or just stepping into the kitchen, I promise that this recipe is easy enough for everyone to tackle, and it’ll make you feel like a culinary superstar!
So grab your apron, clear some space on your counter, and let’s dive into the mouthwatering world of cheesy, garlicky goodness. Here’s everything you need to know!
Personal Story
Growing up, weekends in my family were all about cooking together. My mom would whip up delicious dinners, and my siblings and I would hustle around, trying hard to help. One unforgettable Saturday, we decided to make a family favorite: cheesy chicken wraps. The kitchen was filled with laughter and the savory scent of garlic sautéing in olive oil, and I remember my mom saying that the secret ingredient was love. It’s funny how those moments stick with you, isn’t it?
Fast forward a few years, and the family dinners have become family traditions filled with recipes that keep evolving. When I first started experimenting with low carb recipes, I thought of those wraps. Instead of using traditional wraps, I substituted them with low-carb tortillas, creating a dish that honored my childhood but also aligned with a healthier lifestyle. The smiles around the table remained the same, and that’s what fuels my passion—bringing joy and comfort to others through food.
Ingredients
Here’s what you’ll need to whip up these delightful Low Carb Cheesy Garlic Chicken Wraps:
-
2 cups cooked chicken, shredded or diced
- Tip: You can use rotisserie chicken for convenience or cook your chicken breast with a bit of seasoning for added flavor.
-
1 cup shredded cheese (cheddar or mozzarella)
- Substitution: Feel free to mix and match cheeses; pepper jack adds a nice spicy kick!
-
3 cloves garlic, minced
- Insight: Fresh minced garlic adds a wonderful aroma and flavor that garlic powder just can’t match.
-
1 tablespoon olive oil
- Tip: Use extra virgin olive oil for a more robust flavor.
-
1 bell pepper, sliced (any color)
- Substitution: Zucchini or mushrooms can be a great low-carb alternative if you want something different.
-
1 small onion, sliced
- Chef’s Insight: Caramelizing the onion slightly in the olive oil before adding the garlic gives an amazing depth of flavor.
-
Low-carb tortillas (2-4, depending on how hungry you are!)
- Tip: Check labels for the carb count — be sure to choose one that’s made with almond or coconut flour.
-
Salt and pepper to taste
- Quick Note: Always season your dishes; it’s the difference between bland and oh-my-goodness flavor explosion!
-
Optional: Fresh herbs (basil or cilantro) for garnish
- Serving Tip: Fresh herbs brighten up the dish and add visual appeal, making it even more irresistible.
Step-by-Step Instructions
Now that we’ve gathered our ingredients, let’s get cooking! Follow these steps for a cozy, delicious wrap experience:
-
Heat Things Up!
In a large skillet, heat the olive oil over medium heat. Once shimmering, add the sliced onions. Sauté them for about 3–4 minutes until they’re translucent. The aroma? Simply divine. -
Garlic Goodness
Add the minced garlic to the pan with the onions. Sauté for an additional minute until fragrant. Keep your eyes on it; burnt garlic can turn bitter quickly! -
Veggie Time
Toss in the bell peppers and cook for another 3-4 minutes until they soften yet retain a bit of crunch. This balance of textures is key to your wraps! -
Chicken Love
Now, add your shredded chicken to the skillet. Stir everything together and let it heat through, about 2-3 minutes. Season with salt and pepper to taste. -
Cheesy Delight
Sprinkle the shredded cheese over the chicken mixture in the skillet, allowing it to melt slowly. Mix gently to incorporate all those gooey cheese pockets. Oh man, you’re going to want to jump right in! -
Wrap It Up
Lay your low-carb tortilla flat and spoon a generous portion of the cheesy chicken mixture in the center. Fold it over, tucking in the sides, and rolling it up tight. Repeat with the remaining tortillas. -
Final Toast
Wipe down your skillet and return it to the heat, adding a little more olive oil if needed. Place each wrap seam-side down in the skillet, pressing lightly to ensure it sticks together. Cook for 2-3 minutes on each side until golden brown and crispy. -
Slice and Serve
Once they’re perfectly toasted, remove from the skillet and let them cool slightly before slicing in half. This is the moment you’ve been waiting for!
Serving Suggestions
Now that your Low Carb Cheesy Garlic Chicken Wraps are ready, let’s talk presentation! Serve them with a side of fresh salad or slow-simmered gazpacho for a refreshing complement. Drizzle a little extra melted cheese or a dollop of sour cream on the side for dipping. Trust me; the cheesy goodness will take this wrap from good to incredible. Garnish with freshly chopped herbs to add that vibrant pop and impress your guests!
Recipe Variations
Why stop at one delicious version? Here are some fun twists you can try:
- Buffalo Chicken Wraps: Mix in some buffalo sauce for a spicy kick before adding cheese.
- Veggie-Loaded Wraps: Toss in some spinach, zucchini, or even artichokes for a heartier veggie version.
- Italian Flare: Add diced sun-dried tomatoes and Italian seasoning for a twist that screams Mediterranean.
- Creamy Avocado: Spread a layer of mashed avocado on the tortilla before adding the chicken mixture for extra creaminess.
- Tex-Mex Fun: Include taco seasoning and black beans for a south-of-the-border flair.
Chef’s Notes
Cooking is all about experimenting and loving the journey! I initially came up with this recipe as a way to recreate my childhood wraps with a healthier twist. I remember the first time I made them with low-carb tortillas — I was nervous but so eager to impress my family. Watching their faces light up as they bit into those cheesy, flavorful wraps reminded me that cooking is about connection. Plus, I’ve had many laughable kitchen fails along the way — like the time I mistook cinnamon for garlic. Not a great combo! But that’s what makes cooking fun and exciting, right?
FAQs and Troubleshooting
-
Why are my tortillas falling apart?
- Make sure you’re not overstuffing them! And a quick warm-up in the microwave (10-15 seconds) can make them more pliable.
-
Can I freeze these wraps?
- Absolutely! Just wrap them individually in foil and keep in the freezer. When you’re ready to eat, pop them in the oven until heated through.
-
How can I make it dairy-free?
- Use dairy-free cheese alternatives or nutritional yeast for a cheesy flavor without the dairy.
-
What can I do if my chicken turns out dry?
- Try using thighs instead of breasts, as they’re generally juicier. Also, cook them gently and avoid overcooking!
Nutritional Info
(Approximate per wrap)
- Calories: 350
- Protein: 30g
- Fat: 20g
- Carbohydrates: 7g
- Fiber: 4g
And there you have it, my friends! A scrumptious, comforting, and oh-so-delicious recipe that’s bound to impress. Cook from the heart, savor the process, and enjoy every bite! Remember, you’re not just making a meal; you’re creating memories. Happy cooking!
Print
Low Carb Cheesy Garlic Chicken Wraps
- Total Time: 30 minutes
- Yield: 4 servings 1x
- Diet: Low Carb
Description
These Low Carb Cheesy Garlic Chicken Wraps are bursting with flavor, featuring tender chicken, gooey cheese, and aromatic garlic wrapped in a low-carb tortilla.
Ingredients
- 2 cups cooked chicken, shredded or diced
- 1 cup shredded cheese (cheddar or mozzarella)
- 3 cloves garlic, minced
- 1 tablespoon olive oil
- 1 bell pepper, sliced (any color)
- 1 small onion, sliced
- Low-carb tortillas (2-4, depending on how hungry you are!)
- Salt and pepper to taste
- Optional: Fresh herbs (basil or cilantro) for garnish
Instructions
- Heat the olive oil in a large skillet over medium heat. Add the sliced onions and sauté for about 3–4 minutes until they’re translucent.
- Add the minced garlic to the pan and sauté for an additional minute until fragrant.
- Toss in the bell peppers and cook for another 3-4 minutes until they soften yet retain a bit of crunch.
- Add the shredded chicken to the skillet, stir everything together and let it heat through for about 2-3 minutes. Season with salt and pepper to taste.
- Sprinkle the shredded cheese over the chicken mixture, allowing it to melt slowly, and mix gently.
- Lay a low-carb tortilla flat, spoon a generous portion of the cheesy chicken mixture in the center, and fold it over tightly.
- Return the skillet to heat, add more olive oil if needed, and place each wrap seam-side down. Cook for 2-3 minutes on each side until golden brown and crispy.
- Remove the wraps from the skillet, let them cool slightly, and then slice in half.
Notes
Serve with a side of fresh salad or slow-simmered gazpacho. Drizzle melted cheese or a dollop of sour cream for dipping.
- Prep Time: 15 minutes
- Cook Time: 15 minutes
- Category: Main Course
- Method: Skillet
- Cuisine: American
Nutrition
- Serving Size: 1 wrap
- Calories: 350
- Sugar: 2g
- Sodium: 400mg
- Fat: 20g
- Saturated Fat: 8g
- Unsaturated Fat: 12g
- Trans Fat: 0g
- Carbohydrates: 7g
- Fiber: 4g
- Protein: 30g
- Cholesterol: 70mg
Keywords: low carb, chicken wraps, cheesy garlic, healthy recipe, quick meal


