
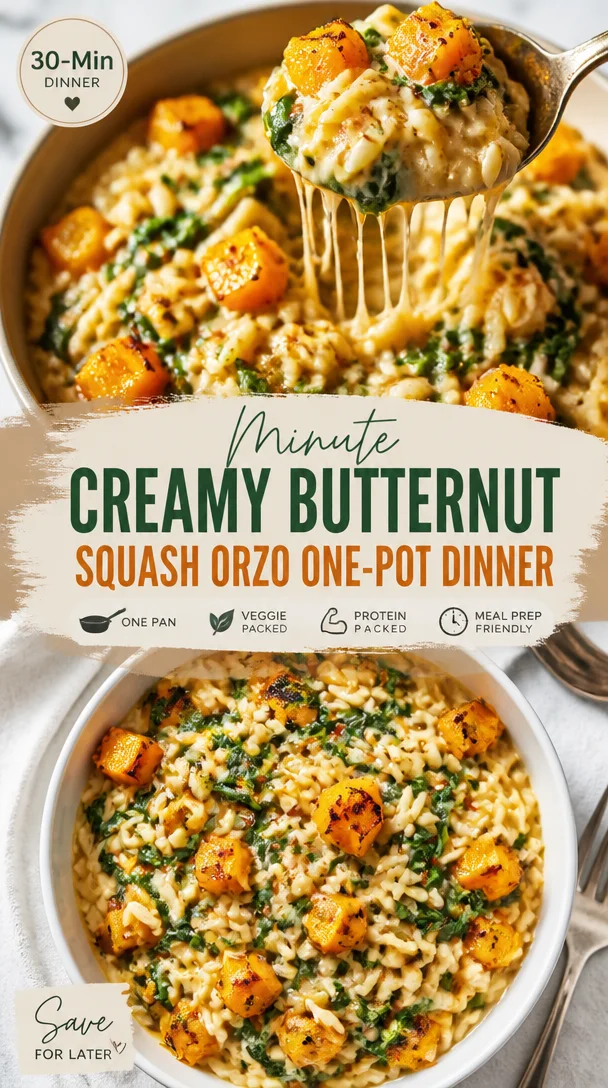
Minute Creamy Butternut Squash Orzo One-Pot Dinner
Creamy Butternut Squash Orzo: A Cozy Comfort Dish
Welcome to my kitchen, dear friends! Today, I’m thrilled to share one of my absolute favorite recipes — Creamy Butternut Squash Orzo. This dish is my chilly-weather staple and is packed full of warmth, flavor, and heart. If you’ve ever had one of those days where a hug in a bowl is exactly what you need, look no further. The creamy texture of the orzo, combined with the sweet, nutty notes of roasted butternut squash, creates a meal that feels like a cozy embrace.
Most days, you’ll find me in my kitchen surrounded by the comforting smells of spices, simmering ingredients, and laughter echoing off the walls. It’s a place where I not only create delicious food but also memories that last a lifetime. And isn’t that what cooking is all about? The joy of sharing with friends and family and creating new culinary adventures together!
As you delve into this creamy delight, remember that cooking is a journey. It doesn’t have to be perfect; it just needs to be made with love, some good tunes on in the background, and maybe a glass of wine to sip on while you cook! Get ready to chop, sauté, and toss your way to an incredible meal that not only fills your stomach but also warms your heart.
A Personal Kitchen Tale
Let me take you back to a chilly autumn evening a few years ago. The snow was beginning to tumble gently outside, painting the world in a soft white layer. I had just returned from the farmers’ market, my arms laden with vibrant, fresh produce, including a plump butternut squash that seemed to call my name.
As I peeled and diced the squash, the sweet, earthy aroma filled my kitchen. My best friend stopped by for a spontaneous dinner catch-up, and that’s when the magic happened! Together we chopped and sautéed, filling the air with the smell of garlic and thyme. We shared stories and laughter, and by the time we sat down to enjoy our creamy creation, we not only had a delicious meal but also memories that would make us chuckle every time.
That evening made me realize how food has an incredible power to bring people closer together. So, grab your apron and let’s whip up some of that magic in your own kitchen!
Ingredients
Here’s what you’ll need for the Creamy Butternut Squash Orzo:
-
Orzo Pasta: This rice-shaped pasta is perfect for absorbing flavors and creates a lovely creamy texture when cooked. If you’re gluten-free, consider using brown rice or quinoa.
-
Butternut Squash: This beauty adds sweetness and depth. Look for one that feels heavy for its size. If you can’t find butternut squash, sweet potato works as a great substitute.
-
Garlic: Fresh garlic brings a wonderful aromatic flavor. You could also opt for garlic powder in a pinch, but fresh is best!
-
Onion: A staple in many dishes, diced yellow onion offers sweetness when caramelized. You could swap in shallots if you’re in the mood for something more delicate.
-
Vegetable Broth: Using broth enhances the depth of flavor. You can use chicken broth if you prefer a non-vegetarian option, or even water in a pinch.
-
Heavy Cream: This is what gives our dish that luscious creaminess. For a lighter option, feel free to use coconut cream or a non-dairy alternative like cashew cream.
-
Parmesan Cheese: Freshly grated, it adds saltiness and depth to the dish. Nutritional yeast is a fantastic dairy-free substitute that still provides a cheesy flavor.
-
Spinach: A handful of fresh spinach adds color and nutrients. You can swap this for kale or Swiss chard if you prefer something heartier.
-
Olive Oil: For sautéing and adding rich flavor. Avocado oil is a nice alternative if you want something with a higher smoke point.
-
Salt and Pepper: Basic but essential! Always season to taste for that perfect punch.
Step-by-Step Instructions
Now, let’s get cooking! Follow these simple steps to make your very own Creamy Butternut Squash Orzo:
-
Prep the Squash: Start by preheating your oven to 400°F (200°C). While it warms up, slice the butternut squash in half lengthwise, scoop out the seeds, and dice both halves into 1-inch cubes. Toss them in a bowl with a drizzle of olive oil, a sprinkle of salt, and cracked black pepper. Spread them on a baking sheet and roast for about 25-30 minutes until they’re tender and caramelized. This step brings out their natural sweetness. (Pro tip: roasting the squash enhances its flavor, so don’t skip this!)
-
Cook the Orzo: In a large pot, bring vegetable broth to a boil. Add the orzo and cook according to package instructions until al dente, usually about 8-10 minutes. Remember to stir occasionally to prevent sticking. Once done, drain and set aside but keep a bit of that broth — you’ll need it later!
-
Sauté the Aromatics: In the same pot, add a splash of olive oil over medium heat. Toss in the diced onion and sauté until translucent — about 5 minutes. Then, add in the minced garlic and cook for another minute until fragrant. The aroma should be heavenly!
-
Combine: Once the onions are golden, add the roasted butternut squash to the pot. Mash some of it lightly with the back of your spoon, leaving some chunks for texture. Add in the cooked orzo, a splash of the reserved vegetable broth, and stir to combine everything.
-
Add Creaminess: Pour in the heavy cream and mix well, allowing everything to be enveloped in that luscious goodness. If it seems too thick, don’t hesitate to add more broth to achieve your desired consistency.
-
Finishing Touch: Stir in the fresh spinach and grated Parmesan cheese (or nutritional yeast). Keep stirring until the spinach wilts and the cheese melts into the dish. Season with salt and pepper to taste.
-
Plate It Up: Serve immediately! I love garnishing my orzo with a little extra Parmesan and a drizzle of olive oil. It makes it look fancy without much fuss!
Serving Suggestions
For a gorgeous presentation, serve your Creamy Butternut Squash Orzo in shallow bowls. Top it with freshly grated Parmesan, and maybe a sprinkle of crushed red pepper flakes for a little heat! A side of crusty bread or a simple arugula salad complements this dish perfectly. Don’t forget a glass of your favorite wine or a warm herbal tea to enhance the experience!
Recipe Variations
Feeling adventurous? Here are a few fun twists you can try:
- Spicy Kick: Add a teaspoon of red pepper flakes or diced jalapeños to the onion and garlic for a hot version.
- Herb Infusion: Stir in fresh herbs like thyme, sage, or rosemary for extra flavor — these pair wonderfully with squash.
- Protein Boost: Toss in grilled chicken, sautéed shrimp, or chickpeas for a heartier meal.
- Nutty Crunch: Top with toasted walnuts or pumpkin seeds for added texture and a nutty flavor.
- Vegan Delight: Swap heavy cream for coconut cream and leave out the cheese for a creamy vegan version.
Chef’s Notes
This recipe has definitely evolved over the years! Initially, it was just a simple pasta dish I threw together with whatever ingredients I had. But after numerous experiments and family feedback, it has morphed into this creamy, cozy treat we all adore. Don’t be surprised if you find yourself getting creative as you make it — that’s the magic of cooking!
FAQs and Troubleshooting
Q: My butternut squash is too hard to peel! Any tips?
A: Try microwaving it for 2-3 minutes to soften it a bit before peeling. Alternatively, you can roast it whole for about 20 minutes to make peeling easier.
Q: Can I use whole grain orzo?
A: Absolutely! It may have a slightly different texture compared to traditional orzo, but it will taste fantastic and add a lovely nutty flavor.
Q: What if my orzo is too sticky?
A: This can happen if it’s overcooked or if it doesn’t have enough liquid. Make sure to stir it gently while cooking and add a splash of broth to loosen it up if needed.
Q: How can I make it ahead of time?
A: You can roast the squash and cook the orzo beforehand, then store them separately in the fridge. When you’re ready to eat, combine and heat everything with the cream fresh, adding spinach just before serving for the best texture.
Nutritional Info
While I encourage everyone to enjoy their food, if you’re counting calories or watching your nutrition, here’s a quick overview (per serving):
- Calories: 400
- Protein: 12g
- Carbohydrates: 50g
- Fat: 16g
- Fiber: 4g
And there you have it! Your very own Creamy Butternut Squash Orzo. I’m so excited for you to make and share this delicious dish. Remember, cooking is about experimenting and finding what YOU love. So get in there, have fun, and savor every bite! Happy cooking!
Print
Creamy Butternut Squash Orzo
- Total Time: 55 minutes
- Yield: 4 servings 1x
- Diet: Vegetarian
Description
A cozy comfort dish featuring creamy orzo pasta and roasted butternut squash, perfect for chilly weather.
Ingredients
- 1 cup Orzo Pasta
- 1 medium Butternut Squash, diced
- 3 cloves Garlic, minced
- 1 medium Onion, diced
- 4 cups Vegetable Broth
- 1 cup Heavy Cream
- 1/2 cup Parmesan Cheese, grated
- 2 cups Fresh Spinach
- 2 tablespoons Olive Oil
- Salt and Pepper, to taste
Instructions
- Prep the Squash: Preheat your oven to 400°F (200°C). Slice the butternut squash in half lengthwise, scoop out the seeds, and dice into 1-inch cubes. Toss with olive oil, salt, and pepper, then roast for 25-30 minutes.
- Cook the Orzo: In a large pot, bring vegetable broth to a boil. Add orzo and cook until al dente, about 8-10 minutes. Drain and reserve some broth.
- Sauté the Aromatics: In the same pot, heat olive oil over medium heat. Add diced onion and sauté until translucent, then add garlic and cook for one more minute.
- Combine</strong: Add roasted butternut squash to the pot, mashing some lightly. Stir in cooked orzo and a splash of reserved broth.
- Add Creaminess: Pour in heavy cream, mixing well. Adjust consistency with more broth if necessary.
- Finishing Touch: Stir in spinach and Parmesan cheese. Season with salt and pepper to taste.
- Plate It Up: Serve immediately, garnishing with extra Parmesan and a drizzle of olive oil.
Notes
Feel free to add spices or proteins as desired. This dish pairs well with a side salad or crusty bread.
- Prep Time: 15 minutes
- Cook Time: 40 minutes
- Category: Main Course
- Method: Baking
- Cuisine: Italian
Nutrition
- Serving Size: 1 serving
- Calories: 400
- Sugar: 5g
- Sodium: 500mg
- Fat: 16g
- Saturated Fat: 9g
- Unsaturated Fat: 5g
- Trans Fat: 0g
- Carbohydrates: 50g
- Fiber: 4g
- Protein: 12g
- Cholesterol: 40mg
Keywords: butternut squash, creamy orzo, comfort food, vegetarian dish
Double This Aroma-Filled Recipe for Easy Weeknight Dinners
When the House Smells Divine: My All-Time Favorite Cozy Bake
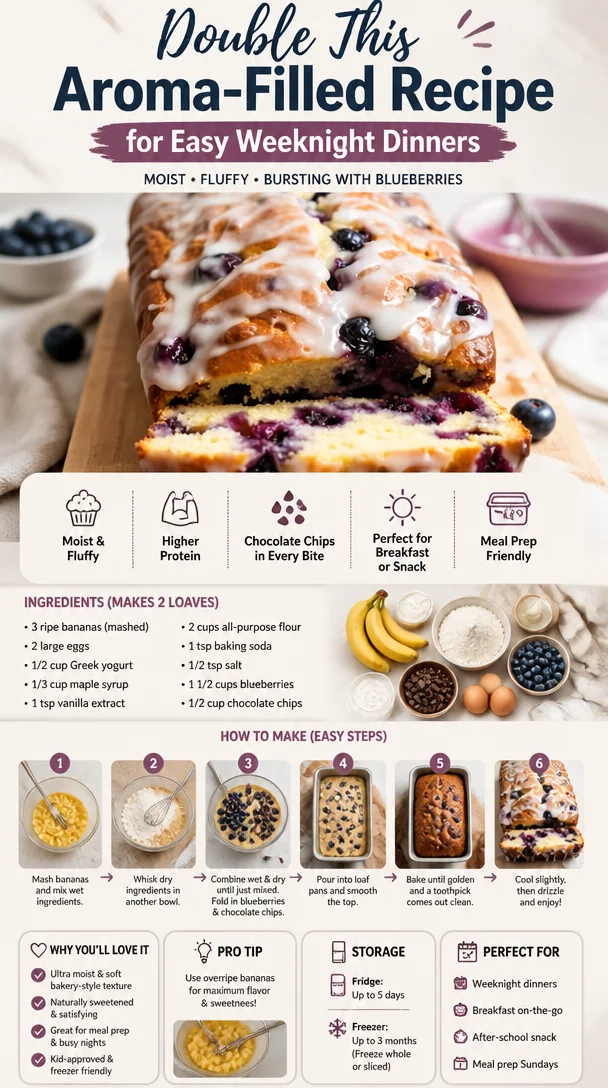
Welcome back to my kitchen, fellow flavor fanatics! Today, I’m beyond excited to share a recipe that brings back floods of nostalgia and makes my house smell like a warm hug on a chilly day. You know those recipes that are so comforting and aromatic that they instantly transport you back to simpler times? For me, that recipe is none other than the timeless and delicious Cinnamon Apple Crisp. Seriously, the aroma wafting through your home will have everyone wandering in, asking what’s cooking and getting those taste buds tingling. Trust me, you’ll want to double the recipe, because this dish is so heartwarming, you’ll have everyone coming back for seconds (and thirds!).
As I take you through this delightful journey of baking, remember, there’s no need for fancy skills here, just a cozy aproned heart ready to whip something special. Whether you’re prepping for a family gathering, cozying up on a rainy afternoon, or simply surprising yourself with a homemade treat, I’ve got you covered!
A Cozy Memory in Every Bite
Growing up, my grandmother’s kitchen was a magical place. It was always filled with rich scents, laughter, and the occasional playful flour fight! One of the most vivid memories I have is when she and I would bake our favorite Cinnamon Apple Crisp together. The sheer joy of peeling apples, the sweet sound of crumbling oats and butter, and the inevitable sprinkling of cinnamon — it was heavenly.
I remember the anticipation as we layered the apples in the baking dish, each piece coated with love and a sprinkle of brown sugar. There was a special moment when we slid the dish into the oven; we’d lean in and catch that first whiff of cinnamon mingling with the tartness of apples. It was an invitation for the entire family to gather and share stories around the table. Every time I make it, I’m transported back to those heartwarming evenings, and I can’t help but smile as I pull the bubbling, golden crisp from the oven.
Let’s Talk Ingredients
Now, let’s dive into what you’ll need for this divine creation! Here’s your shopping list:
-
5-6 medium apples (Granny Smith or Honeycrisp)
Use a mix for a balanced tartness and sweetness! No apples? Pears make for a fabulous swap! -
1 cup brown sugar
This adds a caramelly richness. You can substitute with coconut sugar for a lower glycemic index. -
1 cup rolled oats
Choose gluten-free oats if needed! They’re the hearty soul of our crisp — crunchy and delicious. -
1/2 cup all-purpose flour
Substitute with almond flour for a gluten-free option; just remember it packs a denser punch. -
1 teaspoon ground cinnamon
The star spice! Cardamom or nutmeg can make intriguing alternatives for a unique twist. -
1/2 cup cold unsalted butter
Cut this into small cubes to mix in easily! For a dairy-free version, coconut oil works wonders when chilled. -
A pinch of salt
Enhances all flavors. You can also use sea salt for a little extra flair! -
1 teaspoon vanilla extract
Always use pure for depth of flavor. I often sneak a little extra in my recipe for good measure!
Step-by-Step Instructions
Now that we’ve gathered all our goodies, let’s get baking!
-
Preheat Your Oven
Set that beautiful oven to 350°F (175°C). This ensures your crisp will bake to bubbly perfection. -
Prep the Apples
Peel, core, and slice your apples evenly. You want them about 1/4 inch thick for even cooking. A mix of tart and sweet varieties adds fantastic flavor, so feel free to get creative! -
Toss with Sugar and Spice
In a large bowl, combine the sliced apples with 1/2 cup brown sugar, 1 teaspoon ground cinnamon, and a pinch of salt. Toss well until everything is evenly coated. The sweetness will balance the tart, and trust me, this step infuses it with next-level goodness. -
Layer the Apples
Transfer your apple mixture into a greased 9×13 inch baking dish. Make sure to spread them out evenly to allow for proper cooking. Get all that delicious goodness into one happy little layer! -
Mix Up the Crisp Topping
In another bowl, combine 1 cup rolled oats, 1/2 cup all-purpose flour, and the remaining 1/2 cup brown sugar. Cut in your 1/2 cup cold unsalted butter with a pastry cutter or your fingers until it resembles coarse crumbs. It’s messy but oh-so-fun (let those chef fingers work!). It should feel grainy and ready to crumble over the apples. -
Top and Bake
Evenly spread the oat mixture over the apples. Pop it in that preheated oven for 40-45 minutes, or until the top is golden brown and you can see the apples bubbling beneath! Oh, the smells! -
Cool a Bit, If You Can
Let it cool for at least 10-15 minutes before diving in. This step helps it set up beautifully. I know, I know—it’s hard to wait, but trust me!
Serving Suggestions
Serve your warm Cinnamon Apple Crisp with a generous scoop of vanilla ice cream or a dollop of freshly whipped cream. It creates a delightful contrast between the warm crisp and the cold, creamy topping. You can even sprinkle a bit of cinnamon on top for that extra touch of coziness.
Recipe Variations
Feeling adventurous? Here are a few variations to make this recipe your own:
- Nutty Delight: Add chopped pecans or walnuts to the oat mixture for a satisfying crunch.
- Berry Bliss: Toss in some fresh or frozen berries along with the apples for a delightful berry-apple medley.
- Citrusy Zing: Incorporate the zest of one lemon or orange into your apples for a fresh zing!
- Spice it Up: Experiment with ginger or allspice for a warming depth.
Chef’s Notes
This Cinnamon Apple Crisp recipe has been a favorite in my family for generations. Over the years, I’ve adapted it based on what I’ve had on hand or seasonal ingredients. There was one Thanksgiving when I was so excited to share it that I accidentally used salt instead of sugar in the crisp topping. Let’s just say the taste testers were less than impressed! But every failure taught me something invaluable. Remember, cooking is all about experimenting and learning to tweak things as you go. Don’t be afraid to make it your own!
FAQs and Troubleshooting
-
Why is my crisp soggy?
Ensure your apple slices are balanced in moisture levels. Different varieties release different amounts of juice. Too much liquid might be due to overly ripe apples, so aim for firm ones. -
Can I store leftovers?
Absolutely! Cover your crisp with foil and store it in the fridge for up to 3 days. Reheat in the oven for the best results! -
How do I keep the top from burning?
If your topping is golden but the apples aren’t soft, cover it with foil for the last 15 minutes to prevent over-browning while the apples continue cooking. -
Can I freeze it?
Yes! Assemble and freeze before baking. When ready, bake from frozen, adding 15-20 minutes of baking time.
Nutritional Info
While I believe in indulging in moderation, here’s a general breakdown per serving:
- Calories: ~280
- Fat: 10g
- Carbohydrates: 45g
- Protein: 2g
This delicious Cinnamon Apple Crisp ticks all the boxes for a comforting dessert, and I promise, the delightful smell will keep you smiling long after the last bite. So what are you waiting for? Head to your kitchen and whip up some cozy goodness! Every spoonful is bound to hold a heartwarming story. Enjoy every moment of it, dear friend!
Print
Cinnamon Apple Crisp
- Total Time: 60 minutes
- Yield: 8 servings 1x
- Diet: Vegetarian
Description
A heartwarming dessert that combines the tartness of apples with a sweet, crunchy topping.
Ingredients
- 5–6 medium apples (Granny Smith or Honeycrisp)
- 1 cup brown sugar
- 1 cup rolled oats
- 1/2 cup all-purpose flour
- 1 teaspoon ground cinnamon
- 1/2 cup cold unsalted butter
- A pinch of salt
- 1 teaspoon vanilla extract
Instructions
- Preheat Your Oven: Set that beautiful oven to 350°F (175°C).
- Prep the Apples: Peel, core, and slice your apples evenly.
- Toss with Sugar and Spice: In a large bowl, combine the sliced apples with brown sugar and cinnamon.
- Layer the Apples: Transfer your apple mixture into a greased baking dish.
- Mix Up the Crisp Topping: In another bowl, combine oats, flour, and brown sugar, then cut in the butter.
- Top and Bake: Evenly spread the oat mixture over the apples and bake for 40-45 minutes.
- Cool a Bit, If You Can: Let it cool for at least 10-15 minutes before serving.
Notes
Serve with vanilla ice cream or whipped cream for a delicious contrast.
- Prep Time: 15 minutes
- Cook Time: 45 minutes
- Category: Dessert
- Method: Baking
- Cuisine: American
Nutrition
- Serving Size: 1 serving
- Calories: 280
- Sugar: 15g
- Sodium: 200mg
- Fat: 10g
- Saturated Fat: 6g
- Unsaturated Fat: 4g
- Trans Fat: 0g
- Carbohydrates: 45g
- Fiber: 4g
- Protein: 2g
- Cholesterol: 30mg
Keywords: Cinnamon Apple Crisp, apple dessert, baking, cozy recipes, comfort food
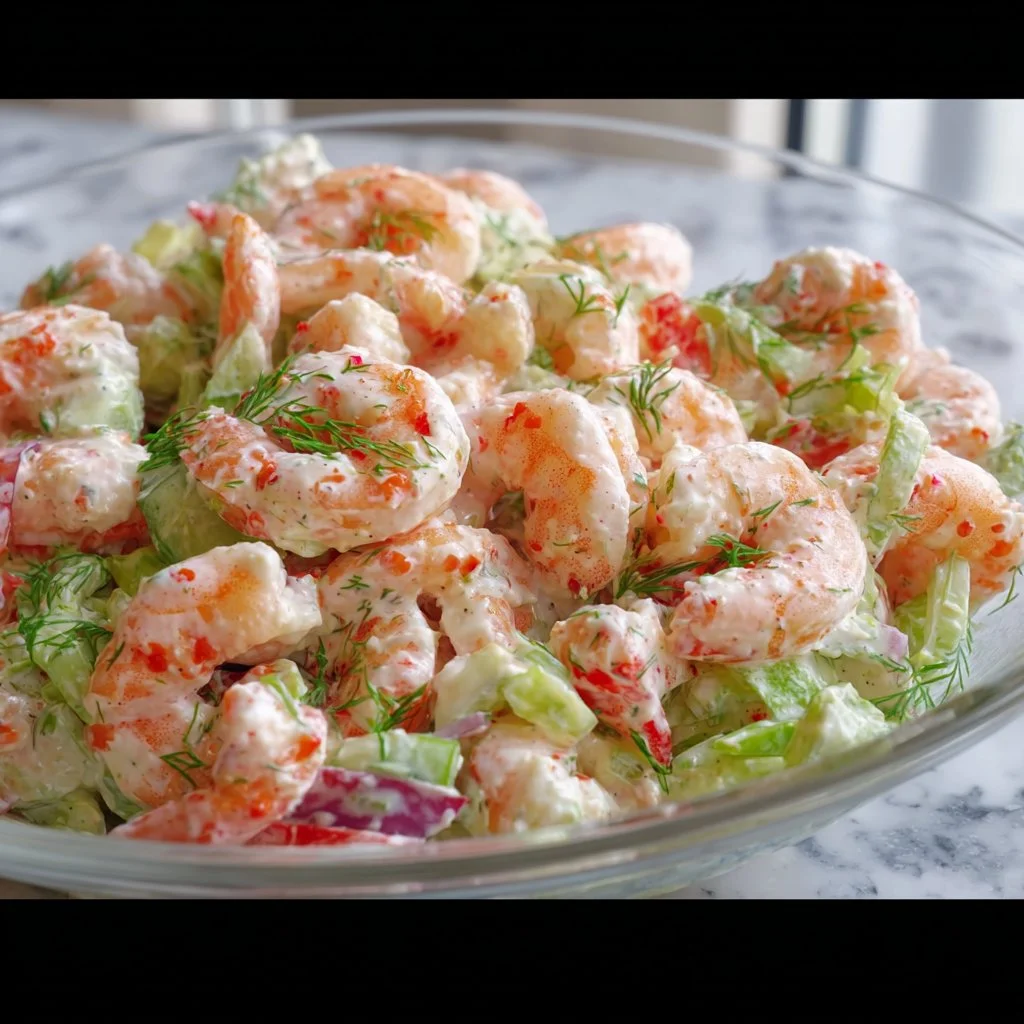
Classic Shrimp Salad
The Ultimate Classic Shrimp Salad Recipe: A Cherished Favorite
Welcome to my kitchen! I’m Olivia Bennett — your friendly guide in the culinary world. Today, I’m bubbling with excitement to share a recipe that’s close to my heart: the Classic Shrimp Salad. Whether you’re hosting a summer barbecue, planning a cozy family dinner, or simply craving something fresh and delicious, this shrimp salad might just become your go-to dish!
Shrimp salad is more than just a meal; it’s a celebration of flavors and textures, sunshine on a plate, and an ode to warm memories spent with loved ones. Each bite bursts with the taste of succulent shrimp, crunchy veggies, and zesty dressing that transports you straight to a sun-drenched picnic by the beach. And trust me, once you get a whiff of that shrimp sizzling in garlic, you’ll be hooked!
Growing up, my family had a tradition every summer: we would gather in our backyard, the grill fired up, and everyone contributing a dish. My mom would often make shrimp salad that was a hit among friends and family alike. The kitchen would fill with laughter and the scent of garlic, lemon, and fresh herbs wafting through the air. It was a simple recipe, yet it seemed to bring together an extraordinary mix of flavors and joy. I can still picture each family member diving into the bowl, eagerly picking at the shrimp and the colorful veggies. Sometimes, I would sneak a few pieces before it hit the serving table—it was just too tempting!
Today, I aim to recreate that bliss in this recipe, with a few tweaks that keep it vibrant and relevant. So roll up those sleeves, grab your apron, and let’s dive into this culinary journey together!
Ingredients
Here’s what you’ll need for this delightful Classic Shrimp Salad. Don’t worry if you don’t have everything; I’ve included substitution tips too!
Ingredients List
-
1 pound of shrimp
Use fresh or frozen! If using frozen, make sure to thaw thoroughly before cooking. You can also swap shrimp for cooked lobster or crab for a luxurious twist. -
2 cups of mixed greens
Any salad green will work—spinach, romaine, or arugula. For a heartier option, try using kale, but massage it with a bit of oil to soften it up beforehand. -
1 cup of cherry tomatoes, halved
These add a sweet burst! Substitute with diced cucumbers for crunch or bell peppers for a pop of color and sweetness. -
½ cup of finely chopped red onion
Adds a zing! If red onion is too strong for you, use green onions or omit them entirely. -
½ cup of diced avocado
Creamy goodness here! If you’re not a fan of avocado, consider adding hard-boiled eggs for richness or replacing it with a dollop of Greek yogurt for creaminess. -
¼ cup of parsley, finely chopped
Fresh herbs elevate the dish! If you don’t have parsley, cilantro or dill would also work beautifully here. -
Juice of 1 lemon
For brightness! Lime juice can be a great substitute for a more tropical flair. -
2 tablespoons of olive oil
Good quality oil is key! Lemon-infused olive oil adds a lovely, zesty kick. If you need a neutral taste, avocado oil works wonders as well. -
Salt and pepper, to taste
Essential for seasoning! Experiment with smoked salt or freshly cracked pepper for enhanced flavor. -
Optional: Dash of hot sauce (like Tabasco or Sriracha)
If you like a little heat, this is a great addition! Feel free to leave this out if spice isn’t your thing.
Step-by-Step Instructions
Now let’s get cooking! Here’s a step-by-step guide to whip up this shrimp salad, along with some of my best kitchen tips:
Step 1: Cook the Shrimp
Start by bringing a medium pot of water to a gentle boil. Add a pinch of salt—this will help flavor the shrimp as they cook. Once the water is boiling, carefully add the shrimp. You’ll know they’re ready when they turn a lovely pink color and curl up slightly, about 2–3 minutes.
Note: Don’t overcook your shrimp. They’ll become tough and rubbery, and we want them juicy and tender!
Step 2: Prepare the Ice Bath
While the shrimp are cooking, prepare an ice bath in a large bowl filled with ice and cold water. Once the shrimp are cooked, transfer them immediately to the ice bath using a slotted spoon. This halts the cooking process and helps them maintain their tender texture.
Step 3: Chop the Veggies
Next, chop your veggies while the shrimp cool down. Dice your cherry tomatoes, finely chop the red onion and parsley, and cube that creamy avocado. Each bite will bring together these vibrant colors, making the salad as visually appealing as it is delicious!
Step 4: Mix the Dressing
In a small bowl, whisk together the lemon juice, olive oil, salt, pepper, and optional hot sauce. This bright dressing will bring all your ingredients to life. Taste and adjust—you can always add a bit more lemon for zing or a pinch of salt!
Step 5: Assemble the Salad
In a large bowl, combine the mixed greens with the chopped veggies, cooled shrimp, and parsley. Drizzle with your dressing and toss gently—just enough to coat everything without bruising the delicate greens.
Step 6: Taste and Adjust
Give the salad a taste and adjust your seasoning as needed. Sometimes, all it takes is a little more fresh lemon juice or a dash of salt to really pull it together.
Serving Suggestions
Now it’s time to serve your masterpiece! I love to present my shrimp salad on a large platter, garnished with extra parsley and lemon wedges. This makes it inviting and shareable—perfect for gatherings. You can also serve it in individual bowls, alongside some crusty bread or pita chips for a delightful crunch.
Recipe Variations
Feel free to get creative! Here are some fun twists on this classic shrimp salad:
-
Tropical Twist: Add diced mango or pineapple for a refreshing,
fruity flavor. The sweetness balances beautifully with the shrimp! -
Mediterranean Style: Incorporate olives, feta cheese, and a sprinkle of oregano for a Mediterranean flair. It’s perfect with the bright lemon dressing!
-
Creamy Version: Swap the olive oil for a creamy dressing, such as ranch or yogurt-based dressing. This adds a rich twist that’s deliciously indulgent.
-
Pasta Salad: Mix in cooked pasta for a hearty dish that can easily serve a crowd. Use farfalle or rotini for a fun shape that’ll hold all those tasty bits!
-
Spicy Cilantro: Replace parsley with chopped cilantro and add diced jalapeño for a refreshing kick!
Chef’s Notes
Cooking is a journey filled with experimentation, and this shrimp salad has evolved over the years. Sometimes, I find myself adding ingredients I have on hand, and you should feel free to do the same! I once made this salad with pear slices and walnuts, and it turned out to be an incredible fall dish. And let’s not forget that kitchen mishap when I reached for hot sauce, only to grab a jar of pickled jalapeños instead—delicious in a whole new way!
Remember, every recipe is only a starting point. Allow this dish to evolve based on your tastes, the seasons, and what you have available. The heart of any great recipe is the joy of cooking and sharing!
FAQs and Troubleshooting
1. What if my shrimp are rubbery?
Avoid overcooking! Keep an eye on them and remove from heat as soon as they turn pink. The ice bath immediately stops the cooking.
2. Can I make this salad ahead of time?
Absolutely! You can prep the veggies and shrimp in advance; store them in the fridge separately until you’re ready to mix them with the dressing. Just keep the avocado for last to prevent browning.
3. What should I do if I don’t like seafood?
No worries! Substitute shrimp with grilled chicken, tofu, or chickpeas for a delicious salad that’s still packed with flavor.
4. Do I have to use fresh ingredients?
While fresh is always best, frozen ingredients can work in a pinch! Just be sure they’re properly thawed and drained.
Nutritional Info
While I don’t usually delve into the numbers, here’s a quick insight:
- Serving Size: 1 cup
- Calories: Approx. 200
- Protein: 22g
- Carbs: 9g
- Fat: 10g
(The precise values will vary based on specific ingredients and serving sizes.)
There you have it—my classic shrimp salad recipe that’s simple, delicious, and filled with memories. I hope you love making and sharing this dish as much as I do! Here’s to flavorful meals that bring us together. Happy cooking, and don’t forget to share your kitchen stories with me!
Print
Classic Shrimp Salad
- Total Time: 20 minutes
- Yield: 4 servings 1x
- Diet: Paleo
Description
A delightful shrimp salad bursting with flavors and textures, perfect for summer barbecues or cozy family dinners.
Ingredients
- 1 pound of shrimp
- 2 cups of mixed greens
- 1 cup of cherry tomatoes, halved
- ½ cup of finely chopped red onion
- ½ cup of diced avocado
- ¼ cup of parsley, finely chopped
- Juice of 1 lemon
- 2 tablespoons of olive oil
- Salt and pepper, to taste
- Optional: Dash of hot sauce (like Tabasco or Sriracha)
Instructions
- Cook the shrimp by bringing a medium pot of water to a gentle boil. Add a pinch of salt and carefully add the shrimp. Cook until they turn pink and curl up, about 2–3 minutes.
- Prepare an ice bath in a large bowl filled with ice and cold water. Transfer the cooked shrimp to the ice bath immediately.
- Chop your veggies: dice cherry tomatoes, finely chop red onion and parsley, and cube avocado.
- Mix the dressing in a small bowl by whisking together lemon juice, olive oil, salt, pepper, and optional hot sauce.
- Assemble the salad by combining mixed greens, chopped veggies, cooled shrimp, and parsley in a large bowl. Drizzle with dressing and toss gently.
- Taste and adjust seasoning as needed before serving.
Notes
Serve on a platter garnished with extra parsley and lemon wedges for an inviting presentation. Feel free to modify the salad with your favorite ingredients.
- Prep Time: 15 minutes
- Cook Time: 5 minutes
- Category: Salad
- Method: Boiling
- Cuisine: American
Nutrition
- Serving Size: 1 cup
- Calories: 200
- Sugar: 3g
- Sodium: 400mg
- Fat: 10g
- Saturated Fat: 2g
- Unsaturated Fat: 8g
- Trans Fat: 0g
- Carbohydrates: 9g
- Fiber: 3g
- Protein: 22g
- Cholesterol: 180mg
Keywords: shrimp salad, summer salad, seafood salad, easy recipes, healthy recipes
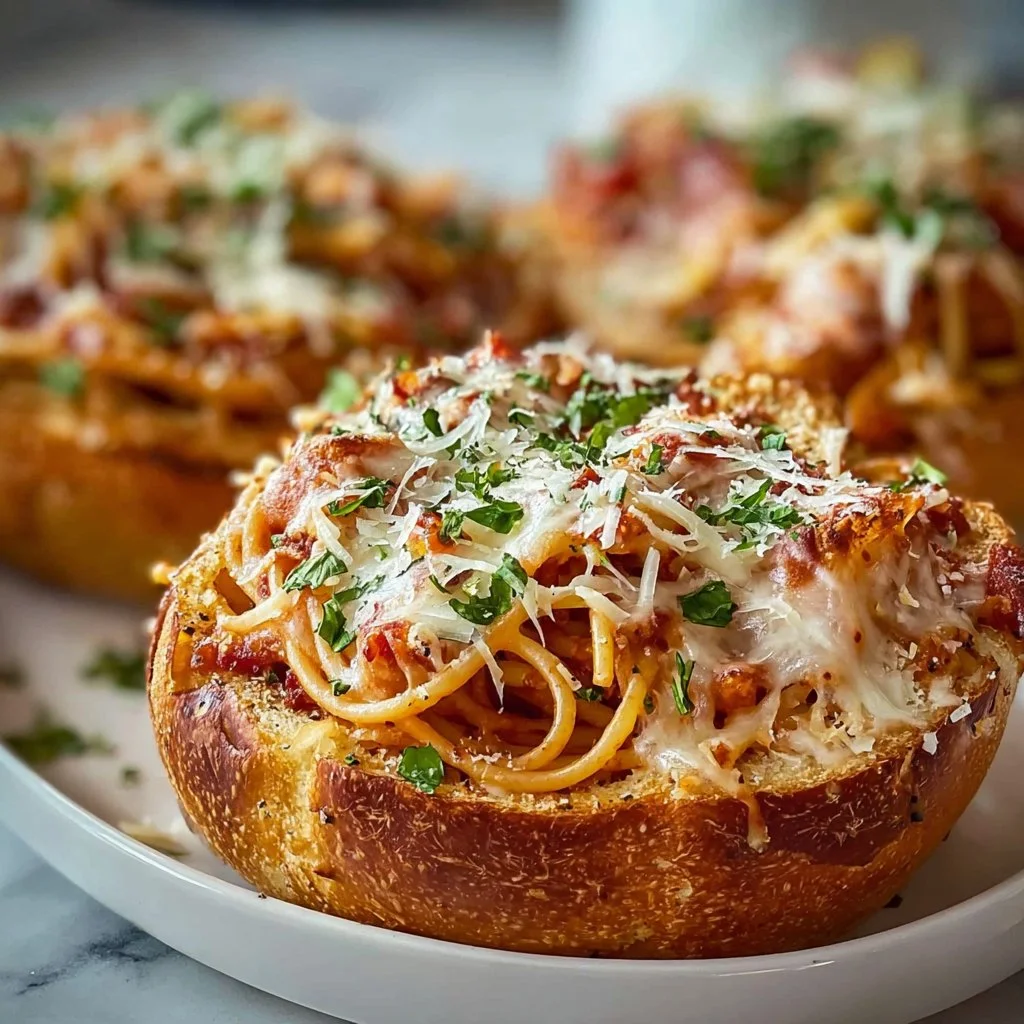
Spaghetti Garlic Bread Bowls
Spaghetti Garlic Bread Bowls: A Cozy Culinary Hug
Welcome back to my kitchen, my fellow foodies! Today, I’m thrilled to share a recipe that marries two of the greatest comfort foods on the planet: pasta and garlic bread. You’re in for a treat with these Spaghetti Garlic Bread Bowls—a delightful innovation that transforms normal spaghetti into a mesmerizing meal experience wrapped in warm, buttery garlic bread.
Picture this: you’re standing in a cozy kitchen, the aroma of toasted bread and roasting garlic filling the air, and a pot of spaghetti bubbling on the stove. Sounds heavenly, right? This dish isn’t just about flavors; it’s about the warmth of home, the joy of cooking, and the memories that come along with it.
This idea sprouted a few autumn evenings ago as I wanted to create a playful and exciting family dinner. My nieces and nephews were over, filled with energy and chaos, so I figured a fun interactive dinner might win me some chef points with them. I envisioned a twirl of spaghetti nestled within a crunchy garlic bread bowl—an edible vessel that would mean fewer dishes. Who doesn’t love that?
As I watched them dive into their creative pasta “bowls,” I realized this dish could easily become a staple in many homes. This recipe is more than just dinner; it’s an invitation to gather around the table, share stories, and savor every delicious bite. So, grab your apron, roll up your sleeves, and let’s get cooking!
Personal Story
Growing up, my Sunday dinners were a time of togetherness, laughter, and, of course, delicious meals. One particularly rainy afternoon, my mom decided to put a twist on our traditional spaghetti and meatballs. With a loaf of slightly stale French bread she had saved, we made garlic bread bowls filled with endless spaghetti and marinara sauce. The kitchen was chaotic: flour flying as I rolled the dough for bread and pots bubbling with sauce everywhere. But amidst all of this, I felt that warm feeling of being together, all of us working in tandem to create something special.
Fast forward to today, and that nostalgic moment has inspired this recipe. It embodies the thrill of creativity, the fun of cooking with loved ones, and the joy of making something new out of the familiar. So, as you attempt this recipe, let every swirl of spaghetti and crunch of garlic bread remind you of those comforting moments shared around the table!
Ingredients
Here’s what you’ll need to create your scrumptious Spaghetti Garlic Bread Bowls:
-
French Bread Loaf: This will form the shell of your garlic bowls. A crusty exterior and fluffy interior work perfectly. If you can’t find French bread, any sturdy loaf can substitute, like ciabatta or sourdough.
-
Spaghetti: Use your favorite spaghetti or substitute with whole wheat or gluten-free options for a healthier twist.
-
Olive Oil: A key flavor component for both the garlic bread and the pasta. You can also use melted butter if you want that classic garlic bread taste.
-
Garlic: Freshly minced garlic infuses the bread with irresistible flavor. If you’re in a pinch, garlic powder can be a quick substitute, but fresh is always best!
-
Parsley: Freshly chopped parsley adds a pop of color and flavor. If you don’t have it, try dried herbs like basil or Italian seasoning.
-
Parmesan Cheese: For that cheesy decadence, freshly grated Parmesan is the way to go! If you’re vegan, nutritional yeast offers a savory alternative.
-
Salt & Pepper: Essential seasonings that bring out the flavors in both the pasta and bread. Feel free to adjust these to your taste!
In this recipe, every ingredient plays its part. Don’t hesitate to get creative with substitutions—we have all been there when that last-minute trip to the store isn’t feasible!
Step-by-Step Instructions
Now that we have our ingredients laid out, let’s dive into the cooking process—your favorite part, right? Here’s how to create these Spaghetti Garlic Bread Bowls step by step:
Step 1: Preheat the Oven
Begin by preheating your oven to 375°F (190°C). This will ensure that our garlic bread is nice and toasty when it’s ready.
Step 2: Prep the Garlic Bread Bowls
- Slice the French bread: Carefully slice your loaf in half lengthwise. Make sure to keep it intact at the bottom—like a little boat!
- Hollow it out: Using your hands or a sharp knife, gently scoop out some of the soft bread from the center to create a little bowl. Don’t take it all out—leave some edges to hold everything in!
Step 3: Make the Garlic Mixture
In a small bowl, mix together:
- 2 tablespoons of olive oil (or melted butter)
- 4 minced garlic cloves
- A pinch of salt and pepper
- Fresh chopped parsley
Stir until combined and fragrant. It’s the moment your kitchen starts smelling divine!
Step 4: Prep the Garlic Bread
Spread the garlic mixture generously onto the cut sides of the bread. Sprinkle a bit of Parmesan cheese on top for added flavor!
Step 5: Bake the Garlic Bread
Place your bread halves on a baking sheet and pop them into your preheated oven for 10-15 minutes, or until the edges are golden and crispy. Keep an eye on them to avoid burning!
Step 6: Cook the Spaghetti
While the garlic bread is baking, bring a pot of salted water to a boil and cook your spaghetti according to package instructions. It’s usually around 8-10 minutes for al dente. Reserve 1/2 cup of pasta water before draining!
Step 7: Create the Sauce
In the same pot you cooked the spaghetti, add a drizzle of olive oil and some more minced garlic. Sauté for about 1 minute before adding in your drained spaghetti.
- Stir in your favorite marinara sauce (I love a homemade version!) and mix well.
- If the sauce seems thick, this is where that reserved pasta water comes in! Add a bit at a time until you reach your desired consistency.
Step 8: Assemble!
Once your garlic bread bowls are out and the spaghetti is perfectly sauced, it’s time for the fun part!
- Fill the bread bowls: Spoon the spaghetti mixture into each garlic bread bowl until it’s overflowing!
- Top with more freshly chopped parsley and a sprinkle of cheese, if you’d like.
Step 9: Serve!
Serve immediately while it’s hot and bubbly! These cheesy, garlicky bowls are perfect for sharing—just don’t forget to grab some napkins!
Serving Suggestions
These Spaghetti Garlic Bread Bowls can easily be the star of your dinner table. I recommend serving them with a fresh garden salad on the side for a nice balance. Pair it with a simple vinaigrette or a classic Caesar dressing to elevate your meal! And of course, a glass of red wine won’t hurt.
Recipe Variations
Want to shake things up? Here are some creative twists to customize your Spaghetti Garlic Bread Bowls:
-
Add Protein: Toss in grilled chicken, shrimp, or meatballs for a heartier meal.
-
Veggie Delight: Incorporate sautéed veggies like bell peppers, spinach, or mushrooms into your sauce for an extra nutrient boost.
-
Cheesy Spin: Experiment with other cheeses! Mozzarella or feta will give it a whole different flavor profile.
-
Herbed Up: Infuse your garlic oil with different herbs like thyme or rosemary for a fragrant lift.
-
Spice it Up: Add a pinch of red pepper flakes to the garlic mixture for a spicy kick.
Chef’s Notes
As I was creating this recipe, I remembered all those antics in the kitchen with my family. One time, my friends and I attempted to stack a mountain of spaghetti in our bread bowls, only to have them collapse spectacularly—what a mess! We laughed until our sides hurt, and it became a running joke every time we made spaghetti.
This dish has evolved from just a fun family recipe into something I love to share with you all. And it keeps evolving! Each time I make it, I think of new creative spins—what will you come up with?
FAQs and Troubleshooting
1. Can I make this dish ahead of time?
Absolutely! You can prepare everything beforehand and simply store your components separately, then bake the bread bowls just before serving.
2. Why is my bread soggy?
A soggy bread bowl can happen if the sauce is too watery or if you let the spaghetti sit in the bowl too long. Ensure your sauce is the right consistency and serve immediately.
3. Can I freeze leftover garlic bread bowls?
While it’s best enjoyed fresh, you can freeze any assembled bowls. Just reheat them in the oven, wrapped in foil, when you’re ready to devour them!
4. How do I prevent the bread from burning?
Keep an eye on your garlic bread bowls while baking. If they start browning too fast, consider lowering the oven temperature slightly!
Nutritional Info
(Per Serving):
- Calories: approx. 400
- Protein: 15g
- Carbohydrates: 60g
- Fiber: 3g
- Total Fat: 12g
Note: Nutritional info may vary based on ingredients used and portion sizes.
I hope you’re as excited as I am to create these Spaghetti Garlic Bread Bowls in your kitchen! Remember, each meal is an opportunity to create memories, so gather your loved ones and prepare for delightful culinary moments. Enjoy every bite, and happy cooking! 🍽️
Print
Spaghetti Garlic Bread Bowls
- Total Time: 45 minutes
- Yield: 4 servings 1x
- Diet: Vegetarian
Description
A delightful innovation that transforms pasta into a mesmerizing meal experience wrapped in warm, buttery garlic bread.
Ingredients
- 1 French Bread Loaf
- 8 oz Spaghetti
- 2 tbsp Olive Oil
- 4 cloves Garlic, minced
- 2 tbsp Fresh Parsley, chopped
- 1/4 cup Parmesan Cheese, grated
- Salt, to taste
- Pepper, to taste
Instructions
- Preheat the oven to 375°F (190°C).
- Slice the French bread in half lengthwise, keeping it intact at the bottom.
- Hollow out some soft bread from the center of each half to create bowls.
- Mix together olive oil, minced garlic, salt, pepper, and parsley in a small bowl until fragrant.
- Spread the garlic mixture onto the cut sides of the bread and sprinkle with Parmesan cheese.
- Bake the bread halves on a baking sheet for 10-15 minutes until golden.
- Cook spaghetti in salted boiling water according to package instructions (about 8-10 minutes).
- Drain spaghetti, reserving 1/2 cup pasta water.
- Sauté more minced garlic in a drizzle of olive oil in the same pot, then add spaghetti and marinara sauce.
- Add reserved pasta water as needed for desired sauce consistency.
- Fill the garlic bread bowls with the spaghetti mixture and top with parsley and cheese.
- Serve immediately while hot and bubbly!
Notes
Feel free to add proteins like chicken or shrimp, or customize with sautéed veggies for a nutritious boost.
- Prep Time: 15 minutes
- Cook Time: 30 minutes
- Category: Main Course
- Method: Baking
- Cuisine: Italian
Nutrition
- Serving Size: 1 serving
- Calories: 400
- Sugar: 4g
- Sodium: 350mg
- Fat: 12g
- Saturated Fat: 4g
- Unsaturated Fat: 6g
- Trans Fat: 0g
- Carbohydrates: 60g
- Fiber: 3g
- Protein: 15g
- Cholesterol: 30mg
Keywords: spaghetti, garlic bread, comfort food, Italian, family dinner
Chicken Garlic Parmesan Pasta
Chicken Garlic Parmesan Pasta: A Cozy Culinary Adventure
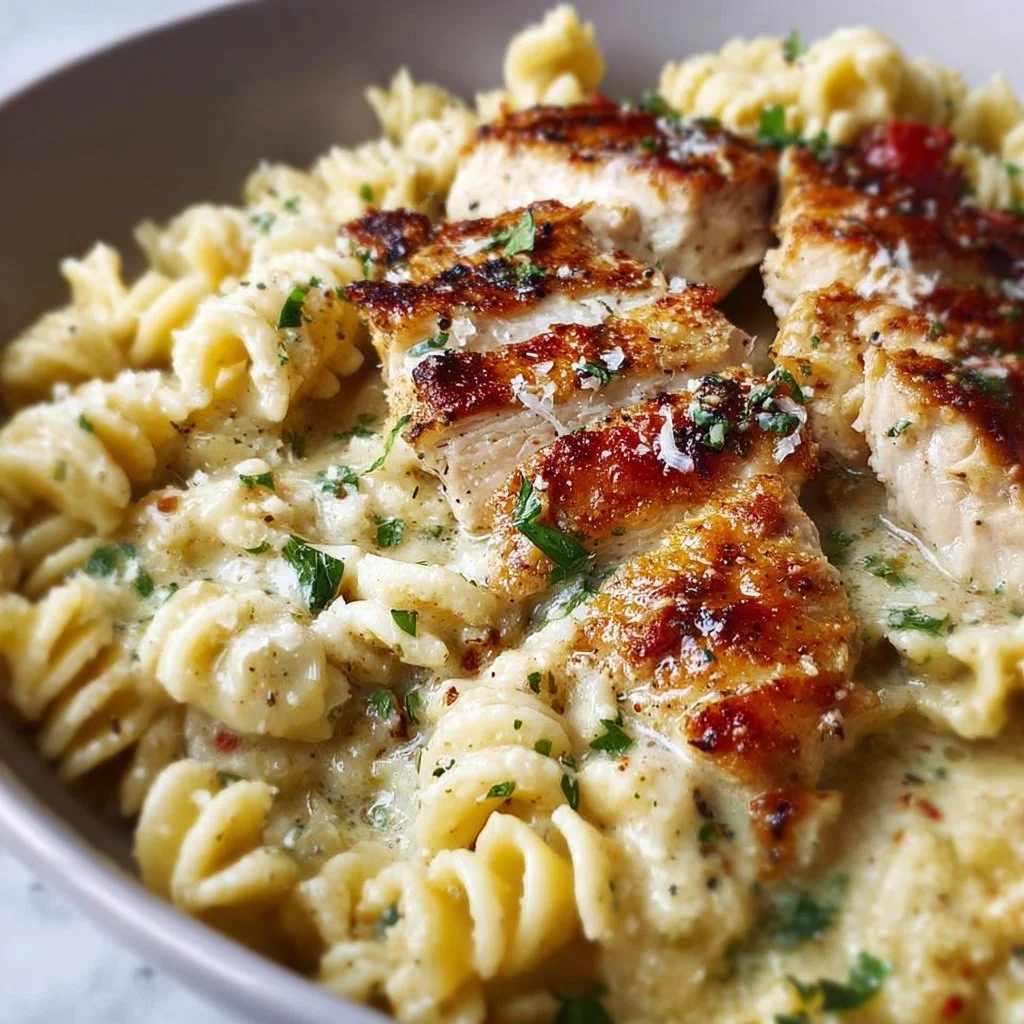
Hey there, fellow food lovers! Welcome to my kitchen, where we’re about to embark on a flavorful journey with a dish that’s as comforting as a warm hug after a long day—Chicken Garlic Parmesan Pasta. If the mere mention of golden-brown chicken tossed with luscious garlic and creamy parmesan gets your taste buds tingling, then stay right here. Let’s mix, mingle, and make some magic happen!
Imagine this: it’s a chilly evening, and you’re cozied up in your kitchen, the warm aroma of sizzling garlic and melting cheese wafting through the air. You can practically hear your family gathering around the table, the sound of laughter mixing with the clatter of forks against plates. Chicken Garlic Parmesan Pasta is not just a recipe; it’s an invitation to create memories that linger long after dinner is over.
I mean, who doesn’t love a dish that combines tender chicken, al dente pasta, and a rich, creamy sauce that makes every bite feel like a celebration? This recipe is perfect for busy weeknights or leisurely weekends spent cooking with loved ones. Plus, it’s versatile enough that you can easily adapt it to what you’ve got on hand. With a few simple steps, we’ll turn simple ingredients into an unforgettable meal. So grab your apron—let’s make some magic happen!
Personal Story
This Chicken Garlic Parmesan Pasta recipe holds a special place in my heart. I’ll never forget the first time I attempted to make it. It was a rainy Saturday afternoon, and I was determined to impress my then-boyfriend (now husband). I had seen a recipe online, but of course, I thought I could wing it! In classic Olivia fashion, I ended up with a garlicky mess that could have rivaled a science experiment gone wrong. But you know what? He loved it anyway—charmingly flawed and all.
We spent the evening laughing, reminiscing, and enjoying what had turned into a rather unorthodox version of pasta, complete with unintentional “extra” garlic. We ended up making it our own over the years, tweaking it with different ingredients and flavors. This dish became a staple for cozy nights in, family gatherings, and even potlucks with friends. It’s funny how the dishes that challenge us can become the most cherished, isn’t it?
Ingredients
Now, let’s gather our ingredients! Here’s what you’ll need for this delicious Chicken Garlic Parmesan Pasta:
-
Pasta: 8 ounces of your favorite (fettuccine, penne, or spaghetti are fantastic choices!)
Tip: Feel free to pick whole wheat or gluten-free pasta for a healthier option. -
Chicken breast: 2 medium-sized, boneless, skinless chicken breasts
Substitution: You can substitute with thighs for a richer flavor or leftover rotisserie chicken for convenience. -
Garlic: 4 cloves, minced
Chef Insight: The fresher the garlic, the better. Even pre-minced garlic will work in a pinch, but nothing beats fresh! -
Heavy cream: 1 cup
Substitution: You can use half-and-half for a lighter sauce or a plant-based cream if you prefer dairy-free. -
Parmesan cheese: 1 cup, grated
Tip: Grate it yourself for the best flavor and texture! -
Olive oil: 2 tablespoons for sautéing
Pro Tip: You can also use butter for a richer flavor, or a blend of both. -
Salt and pepper: to taste
Quick Insight: Seasoning is key, so don’t be shy—taste as you go! -
Fresh parsley: for garnish
Substitution: Fresh basil adds a delightful twist!
Step-by-Step Instructions
Ready to dive into cooking? Let’s get that pasta boiling and chicken sizzling!
-
Cook the Pasta:
Bring a large pot of salted water to a boil. Add your pasta, cooking until al dente (usually about 1-2 minutes less than the package directions). Reserve about a cup of pasta water before draining—trust me, this liquid gold will help your sauce!Chef Hack: Adding a bit of olive oil to the boiling water can help prevent the pasta from sticking.
-
Prep the Chicken:
While your pasta is cooking, season the chicken breasts with salt and pepper. Heat a tablespoon of olive oil in a large skillet over medium-high heat. Add the chicken and cook for about 6-7 minutes per side, or until golden brown and cooked through. Remove the chicken from the skillet and let it rest before slicing.Tip: For extra flavor, marinate your chicken in some garlic, olive oil, and herbs the night before!
-
Sauté the Garlic:
In the same skillet, reduce the heat to medium and add another tablespoon of olive oil. Toss in the minced garlic and sauté for 1-2 minutes until it becomes fragrant but not browned—burnt garlic can be bitter! -
Make the Sauce:
Pour in the heavy cream, stirring to combine it with the garlic. Allow it to simmer gently for about 3-4 minutes, letting it thicken slightly. Don’t forget to scrape up any delicious brown bits from the chicken!Chef’s Insight: If you want an extra cheesy sauce, add in half a cup of parmesan at this stage!
-
Combine Everything:
Slice your cooked chicken and add it back to the skillet along with the drained pasta. Toss everything together gently, ensuring the sauce clings to the pasta. If the sauce seems too thick, add a little reserved pasta water, a tablespoon at a time, until you reach your desired consistency.Tip: This is the time to adjust your seasoning—taste it and see if it needs more salt or pepper!
-
Finishing Touch:
Remove the skillet from heat and sprinkle the remaining parmesan cheese on top, allowing it to melt into the warm pasta.Quick Tip: Fresh herbs like parsley or basil can elevate the dish—just toss them in before serving!
Serving Suggestions
To serve this delightful Chicken Garlic Parmesan Pasta, plate it in warm bowls and garnish with fresh parsley. A sprinkle of extra parmesan on top wouldn’t hurt either! Pair it with a crisp green salad or some garlic bread for a full meal experience. And don’t forget a glass of white wine or sparkling water to wash it all down!
Recipe Variations
While the classic version is always a hit, here are a few fun twists to keep things interesting:
- Add Vegetables: Toss in some sautéed spinach, cherry tomatoes, or asparagus for a pop of color and nutrition.
- Pesto Power: Swap out some cream for a few spoonfuls of pesto for a bright, herbaceous flavor.
- Spicy Kick: Add a pinch of red pepper flakes to the garlic for an exciting kick!
- Mushroom Medley: Include sautéed mushrooms for an earthy flavor addition.
- Zoodles: For a lighter, low-carb option, use spiralized zucchini instead of traditional pasta.
Chef’s Notes
This recipe has been a beloved staple in our home for years. I love how it’s adaptable—some evenings, it’s a simple weeknight dinner, and other nights, I turn it into a fancy affair by adding a glass of wine and dim lighting. I once even served it to the in-laws, and they requested it for every family gathering thereafter! It’s funny how a single dish can hold such a rich tapestry of memories, isn’t it?
FAQs and Troubleshooting
-
What if my sauce is too thick?
If your sauce thickens more than you’d like, just stir in some reserved pasta water a little at a time. This will loosen it up while keeping the flavor intact! -
Can I make this dish in advance?
While it’s best enjoyed fresh, you can prepare the components ahead of time. Just remember that the pasta may absorb the sauce and become mushy over time, so if you make it ahead, store the pasta and sauce separately. -
What can I do if my chicken is dry?
If your chicken turns out dry, try slicing it thinly and tossing it back into the pasta with more sauce. It will help keep the flavors alive and moist! -
Can this be made vegetarian?
Absolutely! Substitute chicken with hearty vegetables like mushrooms and bell peppers, or even chickpeas for added protein.
Nutritional Info
Per serving (based on 4 servings):
- Calories: 620
- Protein: 32g
- Fat: 28g
- Carbohydrates: 60g
- Fiber: 3g
(These values may vary based on ingredient choices and portion sizes.)
And there you have it, my friends! A nested Christmas of flavors, warmth, and all the cozy feelings you can fit in a bowl. I hope you give this Chicken Garlic Parmesan Pasta recipe a try and make it your own. Whether shared around the dining table or enjoyed alone on a quiet night, it’s bound to warm your heart.
Happy cooking, and may your kitchen always smell of garlic and butter! 🍽️✨
Print
Chicken Garlic Parmesan Pasta
- Total Time: 45 minutes
- Yield: 4 servings 1x
- Diet: Non-Vegetarian
Description
A comforting blend of tender chicken, al dente pasta, and a rich creamy garlic parmesan sauce, perfect for cozy nights.
Ingredients
- 8 ounces pasta (fettuccine, penne, or spaghetti)
- 2 medium-sized boneless, skinless chicken breasts
- 4 cloves garlic, minced
- 1 cup heavy cream
- 1 cup grated parmesan cheese
- 2 tablespoons olive oil
- Salt and pepper to taste
- Fresh parsley for garnish
Instructions
- Cook the pasta: Bring a large pot of salted water to a boil, add your pasta, and cook until al dente. Reserve about a cup of pasta water before draining.
- Prep the chicken: Season the chicken with salt and pepper, heat olive oil in a skillet, and cook the chicken until golden brown, about 6-7 minutes per side. Remove and let rest before slicing.
- Sauté the garlic: In the same skillet, add more olive oil and minced garlic, sauté for 1-2 minutes until fragrant.
- Make the sauce: Pour in the heavy cream and let it simmer for about 3-4 minutes. Optionally add half a cup of parmesan for extra creaminess.
- Combine everything: Slice the chicken, add it back to the skillet along with the drained pasta, and toss gently. Adjust consistency with reserved pasta water as needed.
- Finishing touch: Remove from heat and sprinkle remaining parmesan on top before serving.
Notes
For added flavor, marinate the chicken overnight and customize with your favorite veggies or herbs.
- Prep Time: 15 minutes
- Cook Time: 30 minutes
- Category: Main Course
- Method: Sautéing
- Cuisine: Italian
Nutrition
- Serving Size: 1 serving
- Calories: 620
- Sugar: 3g
- Sodium: 600mg
- Fat: 28g
- Saturated Fat: 15g
- Unsaturated Fat: 10g
- Trans Fat: 0g
- Carbohydrates: 60g
- Fiber: 3g
- Protein: 32g
- Cholesterol: 90mg
Keywords: chicken, pasta, garlic, parmesan, comfort food, weeknight dinner

Stuffed Bell Peppers
Cozy Stuffed Bell Peppers: A Flavorful Journey in Every Bite
Hey there, fellow kitchen adventurer! I’m Olivia Bennett, and I’m so excited to have you here in my cozy corner of the culinary world. Today, we’re diving into a dish that warms the heart and feeds the soul: Stuffed Bell Peppers! 🌶️ These vibrant little vessels of flavor are not only delicious but also incredibly versatile, making them a go-to recipe in my home on busy weeknights or when I’m entertaining friends and family.
What’s the magic behind stuffed bell peppers? Just picture it: a juicy bell pepper, bursting with color, cradling a savory filling of rice, meat, and aromatic herbs. When you take that first bite, it’s a delightful explosion of flavors that reminds you of home-cooked meals shared with loved ones. I can practically smell the comforting aroma wafting through the air, inviting everyone to gather around the table.
The best part is that stuffed bell peppers are adaptable and forgiving—perfect for both novice cooks and seasoned chefs alike! You can mix and match ingredients based on what you have on hand or cater them to your dietary preferences. Are you a meat lover? Vegetarian? Gluten-free? I’ve got you covered!
So, tie on your apron (and maybe pour yourself a glass of wine), because we’re about to embark on a flavorful journey that’s sure to inspire joy and creativity in your kitchen. Let’s get those stuffing skills fired up and make some bell peppers that will have your family asking for seconds!
Personal Story
Ah, stuffed bell peppers—they’ve been part of my culinary repertoire for as long as I can remember. I recall one warm summer evening in my childhood home, bustling with laughter and the sounds of sizzling pans. My mom was whipping up her famous stuffed bell peppers as we prepped for a family reunion. The entire kitchen was enveloped in tantalizing aromas—ground beef, spices, and herbs mingling together, while the bell peppers sat expectantly on the counter, their bright colors intensifying my excitement.
As a kid, I loved helping out in the kitchen, even if it meant tearing up from chopping onions or getting a little too enthusiastic with the spice shaker. That evening, I took charge of mixing the filling while my dad turned on the grill for that smoky finish. After assembling the peppers, we popped them into the oven, and I couldn’t wait to dig in!
When the timer finally rang, the bell peppers emerged, golden brown and bubbling, looking like little edible treasures. I remember feeling so proud—we had prepared something together that brought the whole family together at the table. Each bite was a reminder of family love and joy, and even now, I can feel those summer nights in every stuffed pepper I make. Whether it’s the nostalgia of my childhood or the warmth of togetherness, stuffed bell peppers will always hold a special place in my heart—and hopefully in yours, too!
Ingredients
To create our cozy stuffed bell peppers, you’ll need the following ingredients:
-
Bell Peppers:
- Choose vibrant colors like red, yellow, or green! Each has a slightly different flavor profile. Green peppers tend to be more bitter, while red or yellow ones are sweeter. Pro tip: Select peppers that feel heavy for their size with firm skin!
-
Ground Meat (beef, turkey, chicken, or plant-based meat):
- This is the heart of your filling! Substitute with beans or lentils for a vegetarian option. Ground turkey and chicken are lighter alternatives if you’re watching your fat intake.
-
Cooked Rice:
- A common base for your stuffing! Brown or white rice works well. Quinoa or cauliflower rice can be great low-carb substitutes.
-
Onion:
- Adds depth and sweetness. You can substitute with shallots or even leeks for a different flavor twist.
-
Garlic:
- Fresh garlic is ideal, but garlic powder can be a handy substitute if you’re in a pinch.
-
Tomato Sauce:
- This creates a luscious filling with moisture! Use homemade or store-bought, or swap in diced tomatoes for a chunkier texture.
-
Cheese:
- Optional, but who can resist melty cheese? Opt for mozzarella, cheddar, or a vegan cheese alternative.
-
Herbs and Spices:
- The classic combo of Italian seasoning, salt, and pepper cannot be beaten! Get creative with fresh herbs like basil or parsley—or add a touch of cumin for an ethnic twist!
-
Olive Oil:
- Use this to sauté your onions and garlic. It adds richness. Avocado oil or coconut oil can work as substitutes.
Now that we’ve gathered our ingredients, we’re ready to create some stuffed bell pepper magic!
Step-by-Step Instructions
-
Preheat Your Oven:
- Preheat your oven to 375°F (190°C). This is a crucial first step because you want your stuffed peppers to bake evenly and come out sizzling hot!
-
Prepare the Bell Peppers:
- Slice the tops off your bell peppers and remove the seeds. If they don’t stand straight, trim a tiny bit off the bottom—just enough to make them stable! Place the peppers upright in a baking dish, ready to be filled with deliciousness.
-
Sauté the Aromatics:
- In a large skillet, heat a drizzle of olive oil over medium heat. Add chopped onions and sauté until they’re translucent (about 5 minutes). Throw in minced garlic and sauté for an additional minute until fragrant. Chef hack: If you want to elevate the flavor, add a splash of balsamic vinegar to deglaze the skillet—yum!
-
Cook the Meat:
- Add your choice of ground meat to the skillet and season with salt, pepper, and Italian seasoning. Cook until browned, stirring frequently—about 5-7 minutes. Make sure to break up any large chunks. Tip: Using a wooden spoon with a flat edge makes it easier to crumble the meat.
-
Combine the Filling:
- Stir in the cooked rice and tomato sauce until everything is well blended. Let it simmer for about 5 minutes to meld those flavors together. If it gets too thick, add a splash of broth or water to loosen it up.
-
Fill the Peppers:
- Once your filling is ready, generously spoon it into the prepared bell peppers. If you’re adding cheese, feel free to mix it right into the stuffing or sprinkle it on top before baking—either way is delish!
-
Bake:
- Cover the baking dish with foil and bake for 25 minutes. Remove the foil and bake for an additional 10-15 minutes until the peppers are tender and the tops are beautifully browned.
-
Garnish and Serve:
- Once out of the oven, let your stuffed peppers cool for a few minutes. Garnish with fresh herbs or an extra sprinkle of cheese for a lovely finishing touch. Chef note: Pair your peppers with a side salad or some crusty bread to soak up all that delicious sauce!
Serving Suggestions
To serve your stuffed bell peppers, place them upright on a colorful plate, drizzling any extra sauce from the baking dish over the top. You can add a dollop of sour cream or a sprinkle of fresh parsley for that beautiful finishing touch. Set out a side of your favorite green salad for a complete meal, or serve them with roasted vegetables for an extra boost of nutrition. Enjoy every cozy bite!
Recipe Variations
-
Mexican Fiesta: Swap in black beans, corn, and diced tomatoes for the filling, and top with shredded pepper jack cheese. Serve with avocado slices and fresh cilantro.
-
Mediterranean Twist: Use ground lamb or turkey, add feta cheese, olives, and a sprinkle of oregano. Drizzle with tzatziki sauce for added flavor!
-
Vegan Delight: Use lentils or quinoa in place of meat, toss in chopped spinach, chopped walnuts, and spices for a hearty, plant-based meal.
-
Italian Classic: Mix in some Italian sausage for an extra kick, and add chopped mushrooms and zucchini to the filling for more flavor and texture.
-
Breakfast Stuffed Peppers: Swap the meat for scrambled eggs, throw in diced bell peppers, and use breakfast sausage or bacon. Top with shredded cheddar for a delightful breakfast twist!
Chef’s Notes
Stuffed bell peppers are one of those recipes that have totally evolved for me over the years. I started with my mom’s recipe, but the more I cooked, the more I experimented! I’ve added different grains and proteins based on what I had instead of sticking to a strict recipe. The beauty lies in the creativity and freedom you can embrace in the kitchen!
Let’s be honest; there have been times when I’ve accidentally made a filling that’s too spicy or forgot to sauté the onions—oops! But I always remember my key mantra: cooking is about trying, learning, and enjoying the process. Don’t stress if things deviate from ‘the plan’—some of my best culinary adventures have come from those unexpected moments.
FAQs and Troubleshooting
-
Why are my peppers tough?
- If this happens, try roasting your peppers slightly before stuffing them. This will help to soften them more.
-
Can I prep stuffed peppers in advance?
- Absolutely! You can prep the filling and stuff the peppers ahead of time. Just cover and refrigerate until you’re ready to bake.
-
Is there a way to make them lower in calories?
- Yes! Use lean ground turkey or chicken, swap the rice for cauliflower rice, and skip the cheese—these little changes can still deliver delicious flavors!
-
What do I do with extra filling?
- No problem! Bake that extra filling in a small dish alongside your stuffed peppers for a delicious side. The flavors will still meld beautifully.
Nutritional Info (Optional)
For an approximate breakdown per stuffed pepper (with ground beef and rice):
- Calories: 350
- Protein: 22g
- Carbohydrates: 40g
- Fat: 12g
- Fiber: 5g
Remember, nutrition can vary based on the ingredients used! Customize your stuffed peppers to fit your dietary needs and enjoy!
And there you have it! A charming journey into the world of stuffed bell peppers. I hope this recipe inspires you to create something beautiful in your kitchen—from my heart to yours. Happy cooking, and let those bell peppers shine! 🍽️❤️
Print
Cozy Stuffed Bell Peppers
- Total Time: 45 minutes
- Yield: 4 servings 1x
- Diet: Vegetarian or Meat-based options available
Description
A heartwarming recipe for delicious stuffed bell peppers filled with rice, meat, and aromatic herbs, perfect for busy weeknights or entertaining.
Ingredients
- 4 Bell Peppers (red, yellow, or green)
- 1 pound Ground Meat (beef, turkey, chicken, or plant-based meat)
- 1 cup Cooked Rice (brown or white)
- 1 Onion, chopped
- 2 cloves Garlic, minced
- 1 cup Tomato Sauce
- 1 cup Cheese (optional, mozzarella or cheddar)
- 1 tablespoon Italian seasoning
- Salt and pepper to taste
- 2 tablespoons Olive Oil
Instructions
- Preheat your oven to 375°F (190°C).
- Prepare the bell peppers by cutting tops off and removing seeds.
- Sauté the onions in olive oil until translucent, then add minced garlic.
- Cook the ground meat, seasoning with salt, pepper, and Italian seasoning until browned.
- Combine the cooked rice and tomato sauce into the meat mixture.
- Fill the prepared bell peppers with the filling and add cheese if desired.
- Bake covered for 25 minutes, then uncover and bake for an additional 10-15 minutes.
- Garnish with fresh herbs and serve.
Notes
These stuffed bell peppers are customizable; swap ingredients based on your preferences or dietary restrictions. Great served with a side salad or crusty bread.
- Prep Time: 15 minutes
- Cook Time: 30 minutes
- Category: Main Course
- Method: Baking
- Cuisine: Italian
Nutrition
- Serving Size: 1 stuffed bell pepper
- Calories: 350
- Sugar: 5g
- Sodium: 400mg
- Fat: 12g
- Saturated Fat: 4g
- Unsaturated Fat: 6g
- Trans Fat: 0g
- Carbohydrates: 45g
- Fiber: 3g
- Protein: 22g
- Cholesterol: 30mg
Keywords: stuffed bell peppers, comfort food, easy dinner, family meal, Italian recipe
Crispy Parmesan Chicken with Creamy Garlic Sauce
# Crispy Parmesan Chicken with Creamy Garlic Sauce
## Introduction
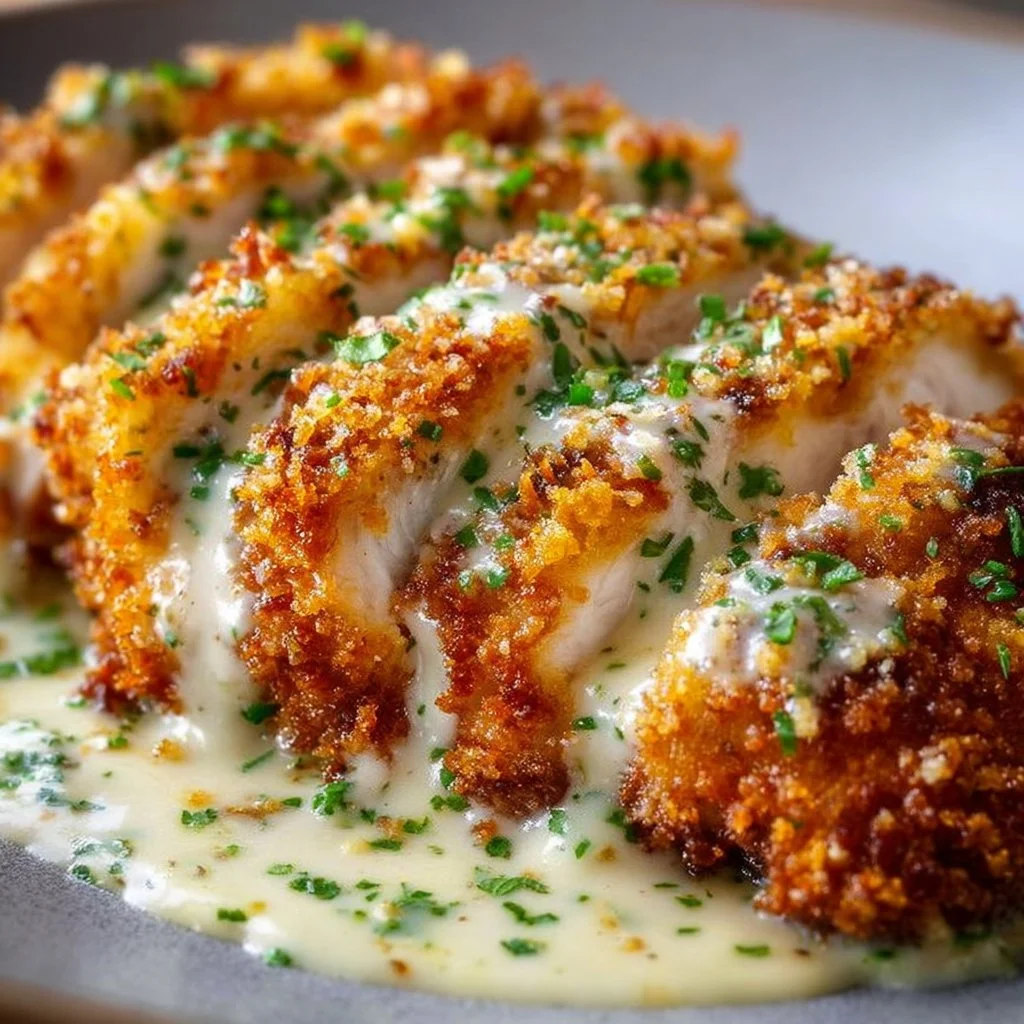
Welcome, dear food lovers! Today in my cozy kitchen, we’re embarking on a culinary adventure that will transform your weeknight dinners. If you’re a fan of crispy textures, rich flavors, and that warm, cozy feeling that comes from homemade meals, then you’re in for a treat. Let’s talk about one of my all-time favorites: **Crispy Parmesan Chicken with Creamy Garlic Sauce**. This dish hits all the right notes and has the power to turn an ordinary evening into something special.
Picture this: tender chicken breasts coated in a golden, crispy Parmesan crust, served alongside a luscious garlic sauce that drapes over the chicken like a warm hug. This dish is not just a meal; it's a journey into flavor town!
When I first discovered the magic of cooking with Parmesan, I became obsessed with finding ways to incorporate it into just about everything. Let me tell you, there’s something about that nutty richness combined with the crunch of breadcrumbs that simply elevates a simple chicken dinner. In fact, this recipe has become a staple in my home and has surely earned its place in the hearts (and bellies!) of my family and friends.
Whether you’re cooking for a small weeknight dinner or prepping a casual weekend get-together, this dish is versatile and sure to impress. Plus, it's surprisingly easy to make! So roll up those sleeves, grab that apron (messy ones are my favorite!), and let’s dive into this crispy delight.
## Personal Story
Let me take you back to a cozy autumn evening a few years ago. It was a chilly day, and I was craving something comforting. I remembered a time from my childhood when my mom would whip up her famous chicken dish, which was always accompanied by a creamy concoction she loved to make. I'll never forget that smell wafting through our house—the aroma of sizzling chicken mixed with garlic made the entire neighborhood's mouth water.
As I brainstormed for that night’s dinner, I recalled my mom's classic dish, but with a twist of my own. Instead of her seasoning, I went bold with Parmesan and breadcrumbs, giving it a crispy edge. The first bite sent me back to those cherished memories of family dinners filled with laughter and love. This Crispy Parmesan Chicken quickly became my way of recreating those beautiful moments, where food is not just nourishment but a connector of souls.
## Ingredients
Let’s get those ingredients lined up! Here's what you'll need to create this delectable dish:
- **Chicken Breasts (4 pieces)**: The star of our show! Choose skinless, boneless chicken breasts for an easy cooking experience. You can substitute with thighs for a juicier option.
- **Parmesan Cheese (1 cup, grated)**: This cheese brings a nutty flavor and promotes that crispy crust. If you’re not a fan of Parmesan, Pecorino Romano or even a blend of your favorite cheeses works well.
- **Breadcrumbs (1 cup)**: These add incredible crunch. I suggest panko breadcrumbs for an extra crispy texture. If you need a gluten-free option, go for gluten-free breadcrumbs or crushed cornflakes.
- **Garlic (4 cloves, minced)**: Garlic is the key aromatic. For a milder flavor, try roasted garlic instead, which adds a lovely sweetness to the sauce.
- **Heavy Cream (1 cup)**: This is what makes our sauce rich and indulgent. If you want a lighter option, you can use half-and-half or a plant-based cream.
- **Butter (2 tablespoons)**: It adds richness to the sauce. For a vegan version, use a plant-based butter alternative.
- **Olive Oil (2 tablespoons)**: Necessary for frying the chicken. Feel free to replace it with avocado oil for a higher smoke point and a subtle flavor.
- **Salt & Pepper (to taste)**: Always season your food—don't skip this vital step! For an extra flavor boost, consider adding Italian seasoning or paprika.
- **Fresh Parsley (for garnish)**: Adds a pop of color and freshness. Chives or basil can be used for a different herbal experience.
## Step-by-Step Instructions
Now that we have our ingredients, let’s dive into the cooking process! Follow along, and I’ll share some little tips along the way to make your chicken perfection achievable.
### Step 1: Prepare the Chicken
Start by patting your chicken breasts dry with paper towels. This helps achieve that wonderful crispiness we’re after. Next, season both sides generously with salt and pepper. It’s amazing how a little seasoning brings out the natural flavors of the chicken!
### Step 2: Dredging Station
Set up your dredging station! You’ll need three shallow bowls: one with the grated Parmesan cheese, another with the breadcrumbs, and the third one with a bit of olive oil mixed in. This oil will help our breadcrumbs to get golden brown and crispy.
### Step 3: Coat the Chicken
Take each marinated chicken breast and first dip it in the Parmesan cheese, making sure to coat it fully. Then, transfer it to the breadcrumb bowl and press down gently, ensuring the crumbs adhere well. Repeat for all the pieces—lay them carefully on a plate once done.
### Step 4: Searing the Chicken
Heat a large skillet over medium-high heat and add in a generous drizzle of olive oil. Once hot, gently add the chicken pieces, making sure to leave space between them—you don’t want overcrowding! Let them cook for about 6-7 minutes per side. You'll know they’re ready to flip when they're golden and crisp.
### Step 5: Making the Creamy Garlic Sauce
While your chicken is searing away, let’s whip up that sauce! In a separate saucepan, melt your butter over medium heat and sauté the minced garlic until fragrant—about 1-2 minutes. Be careful not to let it burn; we want it soft and aromatic!
Now add the heavy cream to the saucepan, stirring continuously to combine. Let it simmer gently while it thickens (~5 minutes). If you like a bit of richness, throw in another pinch of Parmesan! Taste it and add salt and pepper as needed.
### Step 6: Bringing it all together
Once your chicken is done, transfer it to a serving platter and generously drizzle with that creamy garlic sauce. I like to garnish with freshly chopped parsley; it adds a wonderful pop of color and flavor!
## Serving Suggestions
To plate your Crispy Parmesan Chicken, consider serving it with a side of roasted vegetables or a fresh green salad for balance. For a polished look, why not serve it alongside creamy mashed potatoes or garlic bread to complete the cozy vibe? Don’t forget to pour a little extra sauce on the side for dipping!
## Recipe Variations
Feel free to get creative! Here are a few twists you might consider:
1. **Lemon Zest**: Add some grated lemon zest to the breadcrumb mixture for a fresh, zesty kick!
2. **Spicy Chicken**: Incorporate some cayenne pepper into your Parmesan mix for a bit of heat.
3. **Herb-Infused**: Mix in some dried herbs like oregano or thyme into the breadcrumbs for an extra flavor dimension.
4. **Vegetable Medley**: Replace the chicken with eggplant slices or even cauliflower for a delightful meatless option!
5. **Crispy Capers**: Add crispy capers to your creamy sauce for an unexpected salty twist.
## Chef’s Notes
I can’t emphasize enough how versatile this recipe is—over the years, I’ve adapted it countless times based on what I had at home or the season. I’ve swapped chicken for turkey, experimented with different cheeses, and even thrown in seasonal vegetables. One time, I invited friends over and ended up mixing herbs from my garden into the sauce—it was a hit! I always encourage you to make it your own. After all, cooking is about joy, creativity, and a bit of delicious experimentation.
## FAQs and Troubleshooting
**1. Why isn’t the chicken crispy?**
If your chicken isn’t crisping up, check if the oil was hot enough before adding the chicken. A too-low temperature can result in soggy breading.
**2. Can I make the sauce ahead of time?**
Absolutely! The sauce can be made in advance and stored in the fridge. Just reheat it gently over low heat when you’re ready to serve.
**3. How do I know when the chicken is done?**
The best way to determine doneness is by checking the internal temperature. It should reach a minimum of 165°F (75°C). If you don’t have a thermometer, ensure the juices run clear when pierced with a fork.
**4. What should I do if the chicken is dry?**
Don’t let it cook too long! If you find yourself with dry chicken, try serving it sliced in the creamy sauce or add a bit of broth to rehydrate.
## Nutritional Info (Optional)
While this recipe is indulgent and meant for treating yourself, here’s a general breakdown (for one serving):
- Calories: 520
- Protein: 36g
- Fat: 30g
- Carbohydrates: 22g
- Fiber: 1g
## Conclusion
There you have it—my ultimate recipe for Crispy Parmesan Chicken with Creamy Garlic Sauce! I hope you feel inspired to gather your ingredients and create this dish that’s bound to be a crowd-pleaser at the dinner table. Remember, cooking is not just about following a recipe; it’s about making memories, experimenting with flavors, and, most importantly, enjoying the process! I can’t wait to hear about your own kitchen adventures with this recipe. Happy cooking, and may your kitchen always be filled with joy and love!

Crispy Parmesan Chicken with Creamy Garlic Sauce
- Total Time: 45 minutes
- Yield: 4 servings 1x
- Diet: Non-Vegetarian
Description
Tender chicken breasts coated in a golden, crispy Parmesan crust, served with a luscious garlic sauce.
Ingredients
- 4 pieces skinless, boneless Chicken Breasts
- 1 cup grated Parmesan Cheese
- 1 cup Breadcrumbs (preferably panko)
- 4 cloves Garlic (minced)
- 1 cup Heavy Cream
- 2 tablespoons Butter
- 2 tablespoons Olive Oil
- Salt & Pepper (to taste)
- Fresh Parsley (for garnish)
Instructions
- Prepare the chicken by patting dry and seasoning with salt and pepper.
- Set up a dredging station with bowls of Parmesan, breadcrumbs, and olive oil.
- Coat each chicken piece in Parmesan, then in breadcrumbs.
- Heat a skillet over medium-high heat with olive oil and sear chicken for 6-7 minutes per side.
- Make the creamy garlic sauce by sautéing garlic in butter, then adding heavy cream and simmering until thickened.
- Drizzle the cooked chicken with the creamy sauce and garnish with parsley.
Notes
For variations, consider adding lemon zest for freshness or substituting chicken with eggplant for a vegetarian option.
- Prep Time: 15 minutes
- Cook Time: 30 minutes
- Category: Main Course
- Method: Searing
- Cuisine: Italian
Nutrition
- Serving Size: 1 serving
- Calories: 520
- Sugar: 1g
- Sodium: 800mg
- Fat: 30g
- Saturated Fat: 15g
- Unsaturated Fat: 12g
- Trans Fat: 0g
- Carbohydrates: 22g
- Fiber: 1g
- Protein: 36g
- Cholesterol: 100mg
Keywords: chicken, parmesan, garlic, creamy sauce, crispy, dinner recipe
Discover the Best Honey Garlic Chicken and Sweet Potato Recipe for a Quick and Delicious Dinner
Discover the Best Honey Garlic Chicken and Sweet Potato Recipe for a Quick and Delicious Dinner
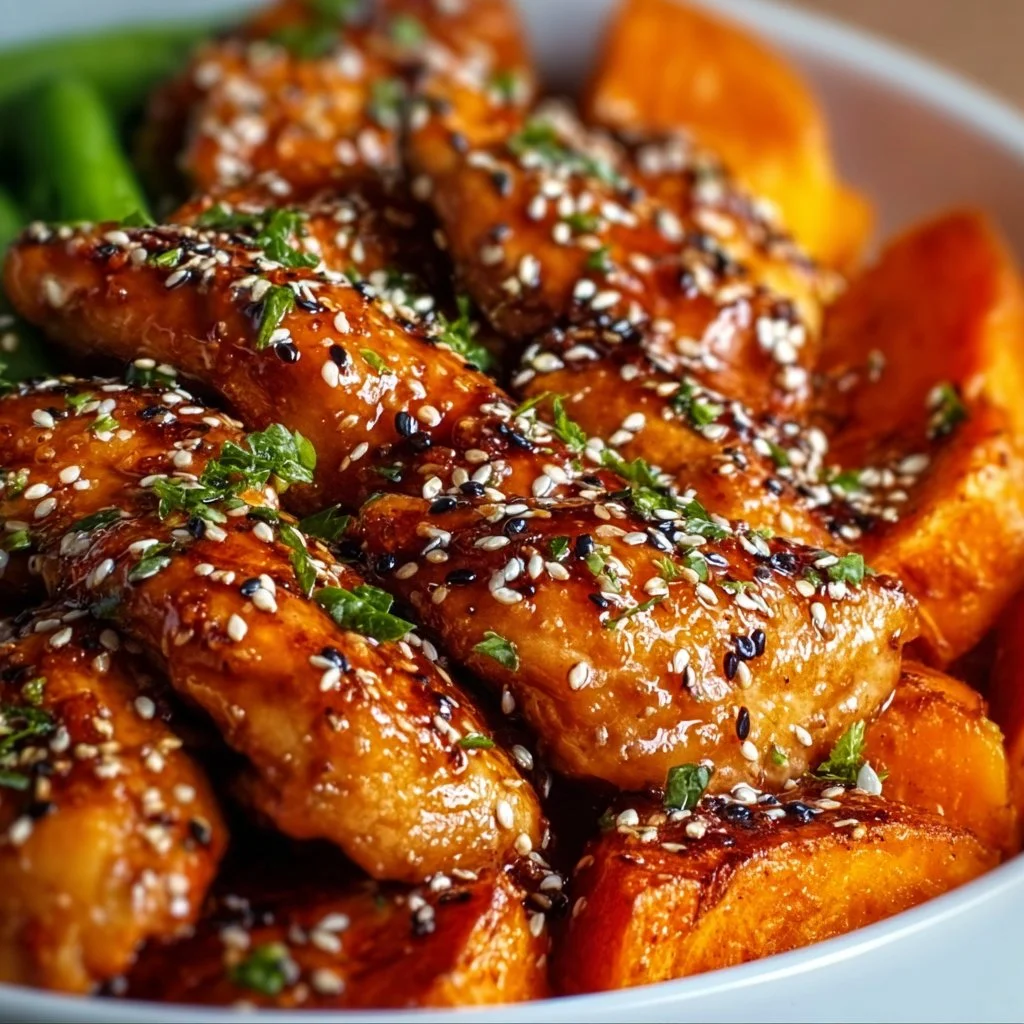
Welcome to my cozy corner of the internet! I’m Olivia Bennett, your passionate home cook and culinary cheerleader. If you’ve ever found yourself giddy at the smell of something baking or felt that warm glow of satisfaction as you feed your loved ones, you’re in the right place. Today, I’m thrilled to share one of my all-time favorite recipes: Honey Garlic Chicken with Sweet Potatoes! This dish embodies everything I adore about cooking—simple ingredients transformed into something memorable with minimal fuss.
As the leaves start changing color and the days grow shorter, there’s nothing like cozying up at the dinner table with hearty, flavor-packed meals. Honey Garlic Chicken is perfect for those busy weekdays when you want something delightful that doesn’t need an army of ingredients or hours of prep. Oh, and did I mention that it’s delicious? Spoiler alert: It’s a weeknight superstar!
Personal Story
This recipe brings back delightful memories of family dinners at my childhood home. I still picture my mom in our sunlit kitchen, whipping up her signature honey garlic chicken on a chilly autumn evening. The sweet and tangy aroma would waft through the house, making our stomachs rumble with anticipation. We’d gather around the table, sharing stories about our days while devouring those tender chicken pieces, each bite a reminder of home and love. It’s incredible how a simple dish can hug your heart, isn’t it? When I make this recipe now, I can’t help but feel those warm memories flooding back. It’s a tradition I carry forward, creating new memories with my friends and family while sharing the love over this meal.
Ingredients
Gather up the tasty goodness—here’s what you’ll need to whip up this heartwarming dish:
-
Chicken Thighs (bone-in or boneless, skin-on or skinless)
- Flavor Insight: Thighs are juicier compared to chicken breasts, making them perfect for this dish. If you’re looking for a leaner option, go for boneless skinless breasts.
-
Sweet Potatoes
- Chef Tip: Sweet potatoes provide a delightful sweetness that complements the savory chicken. You can substitute with butternut squash or even regular potatoes for a twist.
-
Honey
- Substitution: Clover honey or local honey works wonders; for a vegan approach, maple syrup is a great alternative!
-
Garlic (fresh cloves or minced)
- Pro Insight: Fresh garlic packs a punch! For convenience, use jarred minced garlic, but fresh always wins in flavor.
-
Soy Sauce (low sodium)
- Chef’s Choice: This adds umami depth. For gluten-free options, try tamari or coconut aminos.
-
Olive Oil
- Tip: A great all-purpose oil for sautéing, but feel free to use avocado oil for a higher smoke point.
-
Salt and Pepper
- Seasoning Pro: Always taste and adjust as you go. It’s better to start with less and add than to over-season!
-
Fresh Herbs (like parsley or cilantro) for garnish
- Flavors: Fresh herbs brighten up the dish! If you’re looking for a twist, try fresh basil or rosemary.
Step-by-Step Instructions
Now let’s dive into the cooking process, where the magic happens! Here are the steps to create this incredible Honey Garlic Chicken and Sweet Potatoes dish:
-
Preheat the Oven
- Start by preheating your oven to 425°F (220°C). This step ensures that your chicken and sweet potatoes cook evenly and get that lovely golden crispiness!
-
Prepare the Sweet Potatoes
- Peel and chop the sweet potatoes into bite-sized chunks. The uniformity in size helps them cook evenly!
- Toss them in a bowl with a drizzle of olive oil, salt, and pepper. Give them a good mix until they’re well-coated—this will enhance their flavors in the oven.
-
Season the Chicken
- Pat your chicken thighs dry with a paper towel (this helps them crisp up nicely) and season generously with salt and pepper.
- In a separate bowl, mix together the minced garlic, honey, soy sauce, and a hint of olive oil to create a sticky glaze. If you’re feeling adventurous, throw in a pinch of red pepper flakes for some heat!
-
Combine and Bake
- In a large baking dish, arrange the sweet potatoes in a single layer and place the seasoned chicken on top. Spoon the honey garlic mixture evenly over the chicken.
- It’s okay if some of the glaze covers the sweet potatoes; they’ll soak up all that delicious flavor as they cook.
-
Bake to Perfection
- Pop the dish into your preheated oven and bake for about 30-35 minutes (or until the chicken is fully cooked and the sweet potatoes are tender). About halfway through the bake, flip the chicken and give the sweet potatoes a stir to ensure even cooking.
-
Caramelization is Key
- Look for that nice caramelization on the chicken when it’s done. If you want an extra edge of crispiness, you can broil it for the last couple of minutes—keep an eye on it so it doesn’t burn!
-
Final Touches
- Once it’s out of the oven, let it rest for a few moments. This allows the juices to redistribute, making for a moist chicken. Just before serving, garnish with fresh herbs for that burst of color and flavor.
Serving Suggestions
When it comes to serving, presentation is everything! Plate the tender chicken and colorful sweet potatoes on a large, rustic serving platter. Drizzle any remaining honey garlic sauce from the dish directly on top for that extra flavor explosion. Serve with a refreshing green salad on the side or steamed broccoli for a pop of color and texture—your guests (or family!) won’t be able to resist!
Recipe Variations
Here are a few fun twists to make this dish your own:
- Spicy Honey Garlic Chicken: Add chili paste or sriracha to the honey garlic marinade for a spicy kick!
- Lemon Herb Chicken: Replace honey with lemon juice and use rosemary or thyme in place of garlic for a bright flavor.
- Sheet Pan Dinner: Add seasonal vegetables like Brussels sprouts or carrots alongside the chicken and sweet potatoes for a complete one-pan meal.
- BBQ Twist: Substitute the honey for your favorite BBQ sauce for a smoky flavor. Just be careful with the salt as BBQ sauce can be quite salty!
- Coconut Honey Chicken: Use coconut aminos instead of soy sauce and add a can of coconut milk to the dish for a tropical touch.
Chef’s Notes
This recipe has been a staple in my kitchen for years, evolving along with my taste and the seasons. I love the way the honey caramelizes, creating that sticky goodness. Funny enough, this was the dish that won over my husband’s heart! He often jokes that he could eat this every day—no complaints from me either: it’s that good! If you find the sweetness a touch overwhelming, adding a squeeze of lime just before serving can perfectly balance the dish while brightening up all the flavors.
FAQs and Troubleshooting
1. Why isn’t my chicken crispy?
If your chicken isn’t crisping up, make sure it’s dry before seasoning, and don’t overcrowd the baking dish. Air circulation is key to achieving that beautiful crisp!
2. Can I prepare this ahead of time?
Absolutely! You can marinate the chicken up to a day in advance. Just toss everything together and let it soak in those flavors in the fridge.
3. What if I don’t have honey?
You can substitute with maple syrup or agave nectar for a different sweet twist. Both keep that delightful glaze!
4. My sweet potatoes are mushy, what went wrong?
If your sweet potatoes are overcooked, it may be due to their size. Cutting them larger can help them hold their shape and achieve that perfect tender texture.
Nutritional Info
While I typically focus on the love and joy of cooking rather than strict dietary details, here’s a rough estimate of the nutrition in a serving of this dish (including chicken and sweet potatoes):
- Calories: ~450 kcal
- Protein: ~30g
- Carbohydrates: ~50g
- Fat: ~15g
- Fiber: ~6g
Cooking doesn’t have to be a high-stress experience! Even on busy weeknights, this Honey Garlic Chicken and Sweet Potatoes recipe holds a special place on my dinner table, filling both bellies and hearts. I hope you enjoy making it as much as I do. Dive in, get your apron messy, and let the flavors and memories begin to flow. Happy cooking, my friends!
Print
Honey Garlic Chicken with Sweet Potatoes
- Total Time: 50 minutes
- Yield: 4 servings 1x
- Diet: Gluten-Free
Description
A quick and delicious Honey Garlic Chicken dish paired with sweet potatoes, perfect for busy weeknights.
Ingredients
- 4 Chicken Thighs (bone-in or boneless, skin-on or skinless)
- 2 Sweet Potatoes, peeled and chopped
- 1/4 cup Honey
- 4 cloves Garlic, minced
- 1/4 cup Soy Sauce (low sodium)
- 2 tablespoons Olive Oil
- Salt and Pepper, to taste
- Fresh Herbs (like parsley or cilantro) for garnish
Instructions
- Preheat the oven to 425°F (220°C).
- Prepare the sweet potatoes by peeling and chopping them into bite-sized chunks.
- Toss them in a bowl with olive oil, salt, and pepper.
- Pat the chicken thighs dry and season with salt and pepper.
- Mix together the minced garlic, honey, soy sauce, and olive oil in a bowl.
- Arrange the sweet potatoes in a baking dish and place the seasoned chicken on top.
- Spoon the honey garlic mixture over the chicken.
- Bake for about 30-35 minutes, flipping the chicken halfway through.
- Garnish with fresh herbs before serving.
Notes
For a spicy kick, add chili paste or sriracha to the marinade. This dish is also great with a squeeze of lime to balance the sweetness.
- Prep Time: 15 minutes
- Cook Time: 35 minutes
- Category: Main Course
- Method: Baking
- Cuisine: American
Nutrition
- Serving Size: 1 serving
- Calories: 450
- Sugar: 22g
- Sodium: 600mg
- Fat: 15g
- Saturated Fat: 2g
- Unsaturated Fat: 9g
- Trans Fat: 0g
- Carbohydrates: 50g
- Fiber: 6g
- Protein: 30g
- Cholesterol: 80mg
Keywords: Honey Garlic Chicken, Sweet Potatoes, Easy Dinner, Quick Recipe
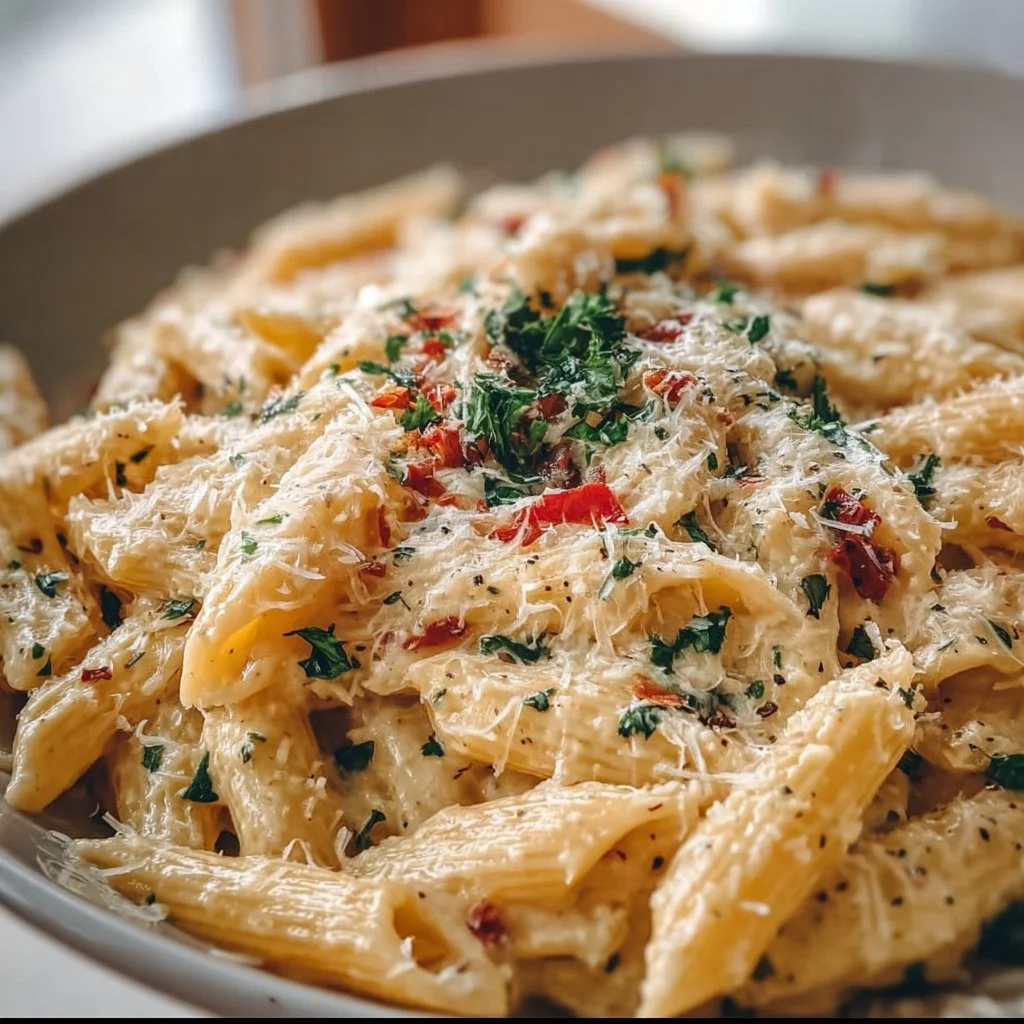
One Pot Creamy Garlic Pasta
One Pot Creamy Garlic Pasta: The Ultimate Comfort Dish!
Welcome to my kitchen! I’m so excited to share one of my all-time favorite recipes with you today: One Pot Creamy Garlic Pasta. This dish is a cozy hug on a plate, perfect for when you need a little comfort food in your life. Whether it’s a rainy day or you’ve had a long week, this creamy pasta will warm your heart in no time. Better yet, it all comes together in one pot, meaning fewer dishes to wash—who doesn’t love that?
Let’s talk about garlic for a second. Ah, garlic. It’s the aromatic hero of the kitchen that can elevate any dish from mundane to marvelous. The moment you sauté those cloves and let the fragrant oil envelop your kitchen, you’ll find your spirits lifting, and I assure you, so will the appetites of everyone around you!
This recipe is all about simplicity and flavor. You’ll see how straightforward it is to make this creamy delight, even on a weeknight when you don’t feel like spending hours at the stove. Anyone can take ingredients you already have and turn them into a sumptuous meal that feels like a fancy restaurant dish—minus the hefty price tag and drive. It’s all about creating a space of comfort and joy in your kitchen, and that’s what cooking is truly about.
So grab your favorite apron, a big pot, and let’s dive into this culinary adventure. With creamy pasta as our canvas, we’re going to turn a handful of ingredients into something truly unforgettable!
A Taste of Nostalgia
I still vividly remember the first time I made this dish. It was a chilly evening, and I was a college student living in a tiny apartment. My cooking skills were pretty basic—think ramen and frozen pizza—until I decided to experiment one night. Armed only with a flurry of garlic, some pasta, and a splash of cream, I whimsically set out to whip up something new. As steam filled my little kitchen, I couldn’t help but giggle at the thought that a mere few ingredients could take me to Italy, at least in spirit!
That first bite was magical. The richness of the cream combined with the savory garlic brought me so much comfort that I knew instantly I’d stumbled upon something special. It quickly became a staple; I’d whip it up for friends during study sessions or cozy movie nights. As we gathered around the table, forks in hand and laughter spilling into the air, I realized that this dish wasn’t just a meal—it was a way to forge connections, create memories, and provide warmth. And now, I’m thrilled to share this beloved recipe with you!
Ingredients
Here’s what you need to create your own creamy garlic pasta masterpiece:
-
Pasta (400g): Any kind will do! I usually prefer fettuccine or penne for their ability to hold onto that luscious sauce. Gluten-free pasta works too—just follow the package instructions.
-
Garlic (6 cloves): Freshly minced garlic is a must for that aromatic flavor. If you’re in a pinch, you can use jarred minced garlic but nothing beats fresh!
-
Olive Oil (2 tablespoons): Good quality olive oil adds a fruity note and richness to the dish. You can substitute it with unsalted butter if you want a more delicate flavor profile.
-
Heavy Cream (1 cup): This is where the magic happens! It gives the sauce its creamy velvety texture. For a lighter version, you can use half-and-half or a dairy-free alternative—coconut milk works wonderfully, but it has a unique flavor!
-
Parmesan Cheese (1 cup, grated): A staple in many Italian dishes, it adds that salty, umami flavor we crave. If you’re looking for a vegan alternative, cashew cheese or nutritional yeast can give a similar effect.
-
Vegetable Broth (2 cups): This helps to flavor the pasta as it cooks. You can substitute it with chicken broth or even water if you’re in a bind, but broth gives extra depth.
-
Salt (to taste): Enhances all the flavors. Remember, go easy if your broth is already salty!
-
Black Pepper (to taste): Freshly cracked is always best! It provides just a hint of heat that balances the richness of the cream.
-
Parsley (for garnish): Optional, but it brightens up the dish—plus, who doesn’t love a pop of color? Fresh basil also works if you have some on hand!
Step-by-Step Instructions
Now that you’ve assembled your ingredients, let’s get cooking! Follow these simple steps to create your own One Pot Creamy Garlic Pasta:
-
Sauté the Garlic: Start by heating the olive oil in a large pot over medium heat. Once hot, add the minced garlic and sauté for about 30 seconds until it’s fragrant but not browned. This is where your kitchen will start smelling divine! Keep an eye on it; burnt garlic can turn bitter quickly.
-
Add the Pasta: Toss in the uncooked pasta, stirring to coat it in the garlic-infused oil. This little step adds flavor right to the pasta itself—such a game-changer!
-
Pour in the Broth: Next, add the vegetable broth. Turn up the heat until it reaches a boil. This will soften the pasta as it cooks, creating a creamy sauce that clings beautifully to every strand.
-
Cook the Pasta: Reduce the heat to a simmer and cover the pot. Let it cook for about 10–12 minutes, stirring occasionally to ensure the pasta cooks evenly and doesn’t stick to the bottom of the pot. If your pasta absorbs too much liquid, feel free to add a splash of water to keep things saucy!
-
Mix in the Cream and Cheese: Once your pasta is cooked to al dente perfection, it’s time to stir in the heavy cream and parmesan cheese. This is where the transformation happens! Stir until the cheese melts, and the sauce thickens. You might notice the pasta becoming glossier and more inviting with every stir—the visual anticipation builds!
-
Season to Taste: This is your moment to shine! Taste the pasta and season with salt and freshly cracked pepper. Remember, some cheeses can be salty, so add salt gradually.
-
Garnish and Serve: Once seasoned, remove from the heat and let it sit for a minute to thicken further before serving. Don’t forget to sprinkle with freshly chopped parsley or basil for that hit of freshness and color!
And voilà! You’ve created a delectable dish bursting with flavors, all in one pot.
Serving Suggestions
When it comes to serving this creamy garlic pasta, I love to present it in a large, colorful bowl, garnished generously with fresh parsley. Serve it alongside a simple green salad with a light vinaigrette to cut through the richness of the pasta. A slice of crusty baguette for sopping up the leftover sauce is non-negotiable in my book! If you’re feeling extra fancy, a sprinkle of extra parmesan on top gives it a nice finish and makes it feel like a restaurant-worthy dish right at your dining table.
Recipe Variations
Now, let’s spark your creativity with some fun twists on this dish:
-
Add Vegetables: Toss in some sautéed spinach, cherry tomatoes, or asparagus for color and nutrition. You can even add roasted veggies for depth!
-
Protein Boost: For a heartier meal, throw in grilled chicken, shrimp, or cooked sausage. Just remember to adjust the cooking time accordingly.
-
Herbs and Spices: Experiment with fresh herbs like thyme or rosemary for a different flavor profile. You can also add a pinch of red pepper flakes for an added kick!
-
Lemon Zest: Brighten things up with a touch of lemon zest or a squeeze of lemon juice just before serving for a fresh zing that balances the cream.
-
Nutty Flavor: Stir in some toasted pine nuts or walnuts for a delightful crunch. This also adds a nutty flavor, giving the dish some unique texture.
Chef’s Notes
As I reminisce about the first time I crafted this dish, I can’t help but chuckle at the memory! One of my friends got a bit too enthusiastic with the garlic, thinking more would equal more flavor. Spoiler alert: it didn’t end well for our taste buds! But, that little kitchen disaster turned into a running inside joke among us. Now, whenever anyone visits, we reference the "garlic incident" with a knowing smile. It just goes to show that even kitchen flops can become cherished memories!
Over the years, I’ve adjusted this recipe, swapping in different cheeses or adding seasonal vegetables. Each variation tells a story, and every dish carries a bit of love into the hearts of those who share it.
FAQs and Troubleshooting
Q1: My sauce is too thick; how do I fix it?
A: No need to worry! If your sauce is thicker than desired, simply stir in a bit more broth or pasta water, little by little, until you reach your desired consistency.
Q2: Can I make this dish in advance?
A: Absolutely! This pasta can be made ahead of time and stored in the fridge for up to three days. Just note that it might thicken as it sits, so adding a splash of cream or broth during reheating can help maintain the creaminess.
Q3: What if I don’t have heavy cream?
A: No problem! Half-and-half or a mixture of milk and Greek yogurt can work as substitutes. Just keep in mind that the texture may be slightly different.
Q4: How do I store leftovers?
A: Store any leftovers in an airtight container in the refrigerator. It can typically last for about 3–4 days. Reheat gently on the stove with a bit of water or broth to bring back the creamy texture.
Nutritional Info (optional)
While I’m all about enjoying food in moderation, I know many of you like to keep track of nutritional data. Here’s a rough breakdown per serving (based on 4 servings):
- Calories: 550
- Protein: 15g
- Fat: 30g
- Carbohydrates: 50g
- Fiber: 3g
Please note, values may vary based on specific ingredient brands and variations made.
Thank you for joining me in this culinary adventure! I hope this One Pot Creamy Garlic Pasta warms your heart and becomes a new favorite in your kitchen as it has in mine. Now, let’s get cooking and create something delicious together! Happy eating! 🍝❤️
Print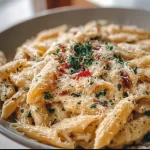
One Pot Creamy Garlic Pasta
- Total Time: 25 minutes
- Yield: 4 servings
- Diet: Vegetarian
Description
A cozy, creamy garlic pasta dish that comes together in one pot, perfect for comfort food cravings.
Ingredients
- Pasta (400g)
- Garlic (6 cloves, minced)
- Olive Oil (2 tablespoons)
- Heavy Cream (1 cup)
- Parmesan Cheese (1 cup, grated)
- Vegetable Broth (2 cups)
- Salt (to taste)
- Black Pepper (to taste)
- Parsley (for garnish)
Instructions
- Sauté the garlic by heating the olive oil in a large pot over medium heat. Add the minced garlic and sauté for about 30 seconds until fragrant.
- Add the uncooked pasta, stirring to coat it in the garlic-infused oil.
- Pour in the vegetable broth and turn up the heat until it reaches a boil.
- Cook the pasta by reducing the heat to a simmer, cover the pot, and let it cook for about 10–12 minutes.
- Mix in the heavy cream and parmesan cheese, stirring until the cheese melts and the sauce thickens.
- Season to taste with salt and freshly cracked pepper.
- Garnish and serve with chopped parsley or basil.
Notes
For variations, consider adding vegetables, proteins, herbs, or lemon zest to enhance the dish.
- Prep Time: 10 minutes
- Cook Time: 15 minutes
- Category: Main Course
- Method: Cooking
- Cuisine: Italian
Nutrition
- Serving Size: 1 serving
- Calories: 550
- Sugar: 5g
- Sodium: 400mg
- Fat: 30g
- Saturated Fat: 15g
- Unsaturated Fat: 10g
- Trans Fat: 0g
- Carbohydrates: 50g
- Fiber: 3g
- Protein: 15g
- Cholesterol: 75mg
Keywords: creamy pasta, garlic pasta, one pot recipes, comfort food
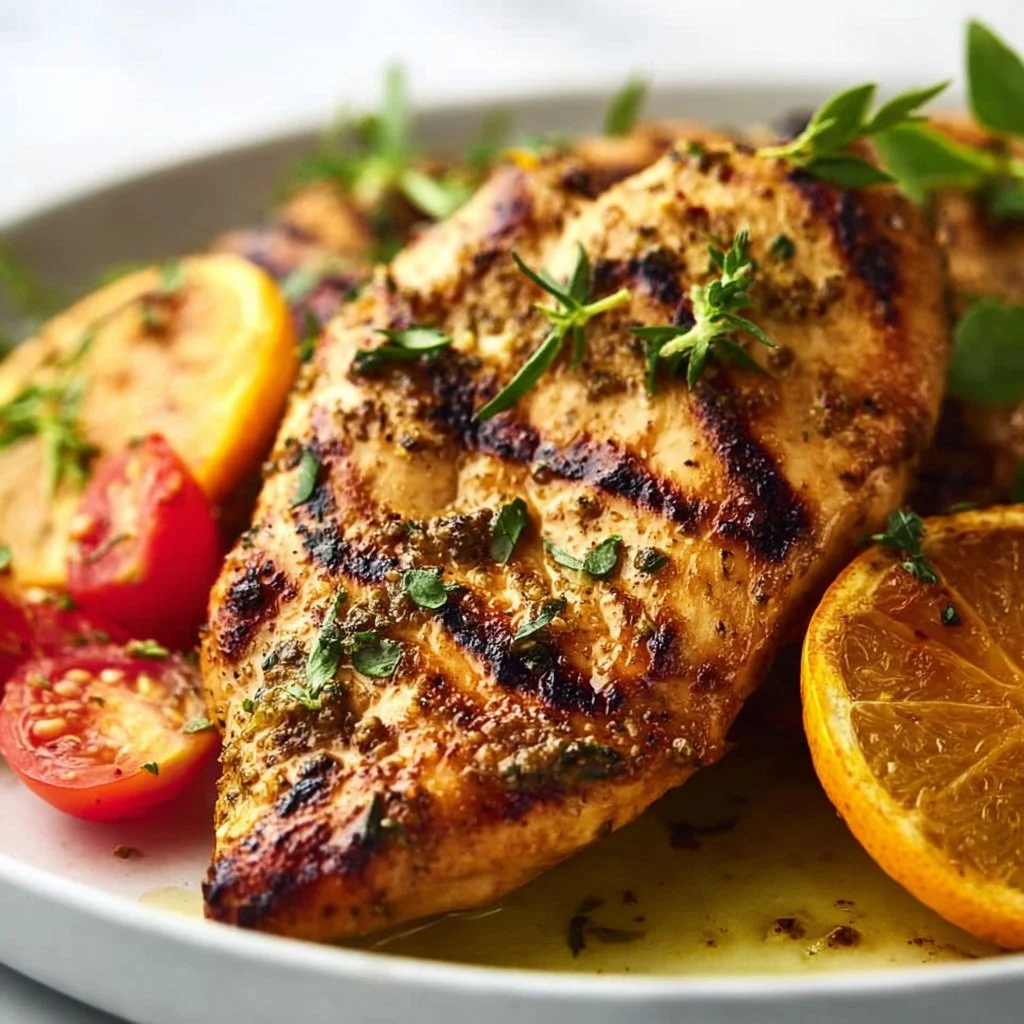
Citrus Dijon Grilled Chicken
Citrus Dijon Grilled Chicken: A Zingy Delight for Your Next Meal!
Hello, culinary adventurers! I’m Olivia Bennett, and today, I’m thrilled to share a recipe that perfectly embodies the spirit of sunshine and good times — Citrus Dijon Grilled Chicken. This dish is not just a feast for your taste buds; it’s a celebration of flavors that can brighten up even the cloudiest days! If you find joy in the thrill of grilling, the aroma of citrus wafting through your kitchen, and the laughter of loved ones gathering around the table, you’re in for a treat.
Imagine this: it’s a warm summer evening, and the sun is slowly setting, casting a golden hue over your backyard. You’ve got a gentle breeze ruffling the leaves of the trees, and the grill is sizzling, emitting that oh-so-familiar sound that makes your mouth water. This Citrus Dijon Grilled Chicken is the star of the show, marrying the zesty brightness of citrus with the rich, tangy kick of Dijon mustard. As it cooks, the scent fills the air, drawing friends and family to the kitchen like moths to a flame. What’s more? You’ll find that this dish is incredibly simple to prepare, making it perfect for both casual dinners and festive gatherings.
Not only is it delicious, but it also allows for some fun creative touches that cater to all palates. So grab your apron, channel your inner chef, and let’s dive into this vibrant recipe together. Whether you’re a seasoned grill master or a novice in the kitchen, I promise you’ll feel confident as we embark on this flavorful journey. So, let’s dust off the grill and get ready to serve up some mouthwatering plates!
Personal Story
Every time I prepare Citrus Dijon Grilled Chicken, it brings me back to those sun-soaked summer weekends spent in my parents’ backyard. My dad was the grill master, and he had this infectious energy each time we fired it up. I remember gathering around, the chatter of family and friends blending seamlessly with the sizzle of meats and veggies, all seasoned to perfection.
One particular moment stands out to me. My family decided to host a mini barbecue for our neighbors, and Dad decided to experiment with a citrus marinade that involved orange juice, lemon zest, and, of course, mustard. As he slathered it all over the chicken, we all had our doubts — would the flavor be too bold? But boy, were we in for a surprise! The first bite was an explosion of flavor. Suddenly, everyone was raving about this “new” dish, and that day, we all learned the magic of citrus combined with Dijon. It became a family favorite, one that I now cherish and love to recreate. Every time I make it, I can still hear echoes of laughter and clinking glasses from that day. And now, I can’t wait for you to create your own memories with this dish!
Ingredients
Here’s what you’ll need to whip up some Citrus Dijon Grilled Chicken. Each ingredient has its unique flair, so let’s break it down a bit:
-
Chicken Breasts (4 boneless, skinless): The star of the show! Chicken breasts are perfect for grilling as they absorb flavors well. If you’re looking for a leaner option, swap them for chicken thighs. They remain juicy even if cooked a tad longer!
-
Dijon Mustard (1/4 cup): This gives that delightful tangy kick. If you’re not a mustard fan, try using a honey mustard for a sweeter touch or even a grainy mustard for some texture.
-
Fresh Orange Juice (1/2 cup): Adds sweetness and acidity. No fresh oranges? Don’t fret! You can use bottled juice — just go for 100% pure juice, no added sugars!
-
Fresh Lemon Juice (2 tablespoons): Brightens up the whole dish! You could substitute with lime juice for a zippier profile, or add a dash of vinegar for an alternative tartness.
-
Garlic (3 cloves, minced): A must-have! For an easier prep, feel free to use pre-minced garlic available at the store or garlic powder (about 1 teaspoon).
-
Olive Oil (1/4 cup): This helps to keep the chicken moist on the grill. If you’re looking to switch it up, avocado oil or even melted coconut oil can work here too!
-
Salt and Pepper (to taste): For seasoning. Use sea salt for a burst of flavor or opt for pink Himalayan salt if you’re feeling fancy.
-
Fresh Herbs (like parsley or thyme, for garnish): Fresh herbs add a beautiful touch to the presentation; however, feel free to use dried herbs if that’s all you have on hand!
Now that we’ve gathered our ingredients, let’s get down to business and bring this dish to life!
Step-by-Step Instructions
Alright, food lovers, it’s game time! Grab your apron (and maybe a glass of your favorite beverage), and let’s start cooking this vibrant Citrus Dijon Grilled Chicken.
Step 1: Marinate the Chicken
In a mixing bowl, combine the Dijon mustard, fresh orange juice, lemon juice, minced garlic, olive oil, salt, and pepper. Whisk it all together until it’s nice and smooth. Chef Tip: The longer you marinate the chicken, the more flavor it absorbs. Ideally, let it marinate at least 30 minutes, but if you can manage 2-4 hours (or even overnight), you’ll thank yourself later!
Step 2: Preheat Your Grill
This is a crucial step. Preheat your grill to medium-high heat (around 375°F to 400°F). For those of you using a gas grill, just turn it on. If you’re working with charcoal, let the coals burn until they’re ashy. Chef Hack: If your grill grates tend to stick, brush them with oil before you start grilling.
Step 3: Grill the Chicken
Once your grill is preheated, take the marinated chicken breasts out of the bowl, allowing any excess marinade to drip off (but don’t discard it!). Place the chicken on the grill. It’s important to give each piece enough space. Pro Tip: Avoid flipping the chicken too soon. Let it cook about 5-7 minutes on one side before you attempt to flip, as this helps to achieve those beautiful grill marks!
Step 4: Flip and Glaze
After about 7 minutes, it’s time to flip those beauties. Brush a little extra marinade on the grilled side (because why not?!) and let them grill for another 5-7 minutes, until the chicken reaches an internal temperature of 165°F. Chef’s Insight: If you have a meat thermometer, you’ll take the guesswork out of cooking chicken. Trust me, no one wants dry chicken!
Step 5: Rest the Chicken
Once cooked, remove the chicken from the grill and let it rest for a few minutes to allow juices to redistribute. This step is essential for tender chicken! You can cover it lightly with aluminum foil during this time.
Step 6: Serve and Garnish!
Slice the juicy chicken breast and serve it up with a sprinkle of freshly chopped herbs for that finishing touch. Presentation Tip: Pair it with grilled veggies or a fresh side salad to make the colors pop on your plate!
Serving Suggestions
When serving your Citrus Dijon Grilled Chicken, a colorful presentation goes a long way. You can serve it atop a bed of mixed greens, drizzled with a citrus vinaigrette. Alternatively, accompanying it with grilled asparagus or seasonal roasted vegetables makes for a visually stunning and nutritious plate. Don’t forget to keep some of that leftover marinade on hand — it’s great as a dipping sauce!
Recipe Variations
Feeling adventurous? Here are some fun twists you can try with the base recipe:
-
Herb-Infused Marinade: Add fresh dill or rosemary to the marinade for an aromatic twist.
-
Spicy Kick: Mix in a teaspoon of red pepper flakes or sriracha for those who love a little heat.
-
Tropical Vibe: Use pineapple juice instead of orange juice for a tropical finish.
-
Honey-Lime Glaze: Replace the orange juice with honey and lime juice for a sweeter, tangy flavor.
-
Grilled Citrus Slices: Toss some orange and lemon slices on the grill alongside your chicken for an extra burst of flavor that’s also super gorgeous on the plate!
Chef’s Notes
As I mentioned, this recipe has transformed over the years. Initially, it was just a quick dinner idea my dad made when guests popped over. Over time, I’ve added different elements to the marinade based on what was in season and what my friends loved. Once, I even added a splash of whiskey during a playful get-together, and it turned out to be a hit! Cooking for me is not just about following a recipe; it’s about creating moments and traditions that last a lifetime. I encourage you to play around with this dish, too. You just might stumble upon your own secret twist that makes it unforgettable!
FAQs and Troubleshooting
FAQ 1: What if my chicken is dry?
Dry chicken can be a result of overcooking. Always use a meat thermometer for accuracy, and ensure you let the chicken rest after grilling.
FAQ 2: Can I bake this chicken instead?
Absolutely! Preheat the oven to 375°F and bake for about 25-30 minutes or until it reaches an internal temperature of 165°F.
FAQ 3: How long can I marinate the chicken?
You can marinate the chicken for anywhere from 30 minutes to 24 hours. Just remember, the longer you marinate, the more flavorful it becomes!
FAQ 4: What sides pair well with the Citrus Dijon Grilled Chicken?
This dish is versatile and pairs beautifully with grilled veggies, roasted potatoes, a fresh salad, or even over rice!
Nutritional Info
While specific nutritional values can vary based on portion sizes and specific ingredients, a typical serving of Citrus Dijon Grilled Chicken comes in around:
- Calories: 250
- Protein: 28g
- Fat: 10g
- Carbohydrates: 3g
This chicken is not only delicious but also a healthy option packed with protein!
There you have it, my friends! A step-by-step guide to making Citrus Dijon Grilled Chicken that’s bound to impress. I’m excited for you to try this recipe and make it your own. Remember, cooking is about creativity, joy, and making memories. So turn up that upbeat music, grab your loved ones, and let’s create something magical in the kitchen together! Happy cooking!
Print
Citrus Dijon Grilled Chicken
- Total Time: 45 minutes
- Yield: 4 servings 1x
- Diet: Poultry
Description
A zesty and flavorful grilled chicken dish with a tangy citrus marinade, perfect for summer gatherings.
Ingredients
- 4 boneless, skinless chicken breasts
- 1/4 cup Dijon mustard
- 1/2 cup fresh orange juice
- 2 tablespoons fresh lemon juice
- 3 cloves garlic, minced
- 1/4 cup olive oil
- Salt and pepper, to taste
- Fresh herbs (like parsley or thyme, for garnish)
Instructions
- Marinate the chicken: In a mixing bowl, combine the Dijon mustard, orange juice, lemon juice, garlic, olive oil, salt, and pepper. Whisk until smooth. Marinade for at least 30 minutes.
- Preheat your grill to medium-high heat (375°F to 400°F).
- Grill the chicken: Remove marinated chicken from the bowl, allowing excess marinade to drip off. Place chicken on the grill, cooking for 5-7 minutes without flipping.
- Flip and glaze: After 7 minutes, flip the chicken. Brush with additional marinade and grill for another 5-7 minutes until the internal temperature reaches 165°F.
- Rest the chicken for a few minutes before slicing.
- Serve and garnish with fresh herbs.
Notes
For added flavor, let the chicken marinate longer (up to 4 hours or overnight). Serve with grilled veggies or a fresh salad.
- Prep Time: 30 minutes
- Cook Time: 15 minutes
- Category: Main Course
- Method: Grilling
- Cuisine: American
Nutrition
- Serving Size: 1 chicken breast
- Calories: 250
- Sugar: 5g
- Sodium: 300mg
- Fat: 10g
- Saturated Fat: 1.5g
- Unsaturated Fat: 8g
- Trans Fat: 0g
- Carbohydrates: 3g
- Fiber: 0g
- Protein: 28g
- Cholesterol: 70mg
Keywords: grilled chicken, citrus chicken, summer recipes, easy grilling, healthy dinner


