
One-Pot Beef Bourguignon: Weeknight Comfort in 60 Minutes
The Ultimate Beef Bourguignon Recipe: A Cozy Culinary Classic
Welcome to my kitchen! I’m thrilled to share a recipe that warms not just the stomach, but the heart: Beef Bourguignon. This French classic is not just a dish; it’s a celebration of flavor, an embrace of comfort, and a nod to slow cooking at its finest. Nothing beats the aroma of tender beef simmering in a rich, red wine sauce, evoking memories of rustic French kitchens and hearty family gatherings. Whether you’re a seasoned chef or a curious beginner, I promise you that making Beef Bourguignon is more achievable than you might think. So grab your apron and let’s dive in!
The magic of Beef Bourguignon lies in its ability to turn simple, humble ingredients into an unforgettable feast. The blend of succulent beef, earthy mushrooms, sweet carrots, and aromatic herbs all coming together in a luscious sauce creates a symphony of flavors that dances on your palate. It’s a dish that brings people together—perfect for cozy dinners, holiday gatherings, or simply a weekend project that fills your kitchen with deliciousness.
As we embark on this culinary adventure, you’ll learn not only how to prepare this dish but also why it’s so special. You’ll hear stories, discover substitutions and variations, and get tips that even the pros use! So, get ready to create some kitchen magic.
A Cozy Memory of Beef Bourguignon
I have a vivid memory that dances in my mind every time I think of Beef Bourguignon. It was a chilly autumn evening, the kind that makes you crave something hearty and warm. My grandmother, an amazing home cook, had invited the whole family over. The kitchen was already filled with the tantalizing scent of beef braising away in red wine, garlic, and herbs.
As I watched her stir the pot, she shared stories of her own grandmother cooking in a tiny Parisian apartment, using whatever was fresh and in season. With each ingredient she added, she reminded me that cooking was not just about the food; it was about love, history, and tradition. I can still hear her gentle laughter mixing with the clinking of pots and the sizzling of onions sautéing away. That evening, we gathered around the table, plates piled high with beef bourguignon, toasted with warm, crusty bread, laughter spilling over just like the wine.
Those moments fueled my passion for cooking, and that’s what I hope to inspire in you too. Let’s create our own memories in the kitchen, one amazing recipe at a time!
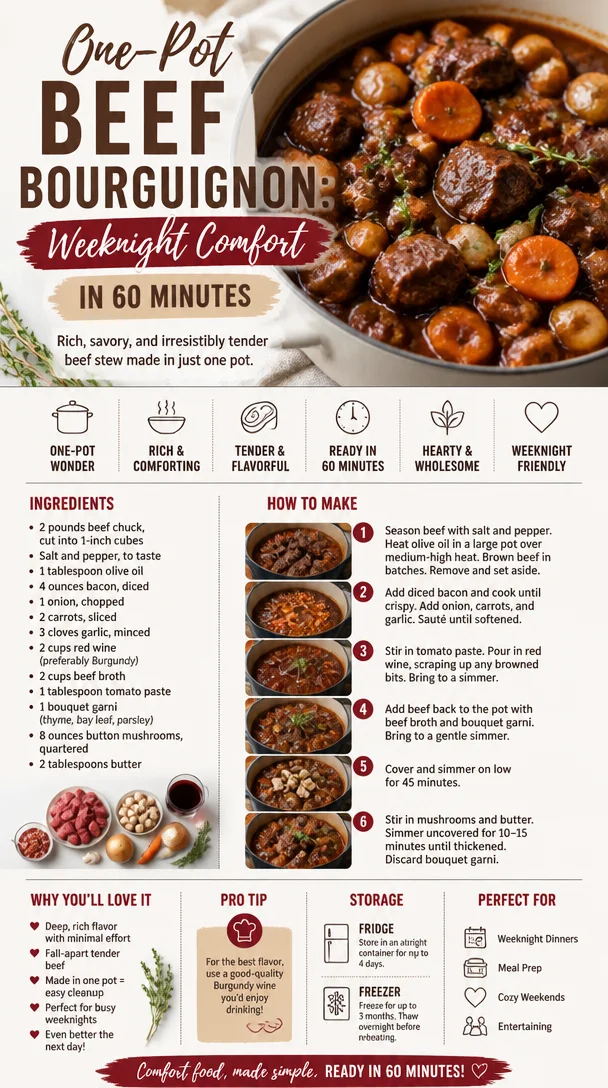
Ingredients
Here’s what you’ll need to make this delicious Beef Bourguignon:
-
2-2.5 lbs beef chuck
A cut that benefits from slow cooking, resulting in tender, flavorful morsels. If you can’t find chuck, you can substitute with brisket or round. -
1 bottle (750 ml) red wine
A dry red wine like Pinot Noir or Cabernet Sauvignon works best. If you prefer to cook without alcohol, you can substitute with beef broth mixed with a splash of vinegar for acidity. -
4 cups beef broth
This will add depth to the sauce. Low-sodium broth allows you to control the salt in the dish. -
3 tablespoons vegetable oil
For searing the beef. Olive oil is a great substitute, but vegetable oil can withstand higher cooking temperatures. -
1 large onion, diced
Onions are the foundation of flavor in this dish. If you want a milder flavor, use shallots instead. -
2-3 cloves garlic, minced
Garlic adds a lovely aroma and depth. Fresh is best, but jarred garlic can be used in a pinch. -
4-6 strips of bacon, chopped
Bacon adds smokiness and richness. If you’re looking for a healthier option, turkey bacon can work, or omit it entirely for a lighter dish. -
4 large carrots, chopped
Sweet carrots balance the dish. For a twist, try parsnips or even bell peppers. -
8 ounces cremini mushrooms, halved
Earthy mushrooms soak up the savory sauce, enhancing the dish. Button mushrooms are a good alternative if cremini isn’t available. -
2 tablespoons flour
This thickens the sauce. For a gluten-free option, use a cornstarch slurry instead. -
2-3 sprigs fresh thyme
Thyme brings out the earthiness of the beef. Dried thyme can be used instead; just remember to adjust the amount, as it’s more concentrated. -
1-2 bay leaves
Bay leaves add a subtle aromatic flavor. Be sure to discard them before serving! -
Salt and pepper to taste
Seasoning is everything! Usher in the flavors by adjusting to your palate.
Step-by-Step Instructions
Now, let’s get our hands in the mix and whip up this fabulous Beef Bourguignon! Follow these steps for success in your kitchen:
-
Preparation: Start by patting the beef dry with paper towels and cutting it into 1.5-inch cubes. Dry beef browns better, so be sure not to skip this step! Season generously with salt and pepper.
-
Sear the beef: In a large Dutch oven or heavy pot, heat 2 tablespoons of vegetable oil over medium-high heat. Once the oil is hot, sear the beef in batches until browned on all sides (about 3-4 minutes per side). Remove beef and set aside. This step creates a flavorful crust!
-
Cook the bacon: In the same pot, add the chopped bacon and cook until crispy (about 5 minutes). The drippings will add a wonderful depth of flavor.
-
Sauté the aromatics: Add the chopped onions to the pot with any leftover fat from the bacon. Cook, stirring occasionally, until softened (about 5-7 minutes). Then toss in the garlic and cook for another minute until fragrant.
-
Build the sauce: Sprinkle flour over the onion mixture and stir for about 2 minutes, allowing the flour to cook a bit. This will help thicken your sauce. Gradually pour in the red wine while scraping up any browned bits from the bottom of the pot (this is where the flavor is!).
-
Add the rest: Return the beef to the pot, then add the beef broth, chopped carrots, mushrooms, thyme, bay leaves, and some more salt and pepper. Give it a good stir!
-
Simmer low and slow: Bring the mixture to a gentle boil. Once boiling, cover and reduce the heat, allowing it to simmer for about 2-3 hours. The longer it cooks, the more tender the beef becomes. Stir it occasionally and make sure it doesn’t stick.
-
Finishing touches: After a few hours, remove the lid and allow the sauce to reduce for about 30 minutes, until it thickens to your liking. Check for seasoning and adjust as necessary. Remove the bay leaves and thyme stems before serving.
Serving Suggestions
Beef Bourguignon is perfect when served over creamy mashed potatoes, buttery egg noodles, or even a hearty crusty baguette to soak up that delicious gravy. Garnish with fresh parsley for a pop of color and a hint of freshness. A glass of the same red wine you used in cooking pairs beautifully with this dish, making the meal cohesive and even more enjoyable!
Recipe Variations
- Vegetarian Twist: Try replacing beef with hearty mushrooms or jackfruit for a plant-based alternative that still delivers on flavor.
- Herbacious Addition: Add a splash of red wine vinegar at the end for an unexpected zing.
- Spicy Kick: Incorporate diced jalapeños or a splash of hot sauce for a spicy version!
- Different Wines: Experiment with different red wines, such as Merlot or Zinfandel, to discover new flavor profiles.
Chef’s Notes
The beauty of Beef Bourguignon is its versatility and ability to evolve. I remember experimenting with adding a splash of orange juice once, inspired by the winter season—and it was a delightful twist that brightened the flavors! Don’t be afraid to let your creativity flourish in the kitchen. Your version might just become a new family favorite!
Cooking can be messy, and let’s face it, life happens. I’ve spilled red wine more times than I care to admit! Embrace your kitchen mishaps—they often lead to happy accidents (and hilarious stories).
FAQs and Troubleshooting
Q: My sauce came out too thin. What can I do?
A: If your sauce isn’t thick enough, make a slurry with cornstarch and water, slowly add it while simmering until you reach your desired consistency.
Q: Can I make Beef Bourguignon in advance?
A: Absolutely! In fact, it tastes even better the next day after the flavors meld together. Just store it in an airtight container and reheat gently.
Q: What can I serve with Beef Bourguignon?
A: Aside from mashed potatoes or crusty bread, consider a fresh green salad or roasted vegetables to balance the richness of the dish.
Q: Can I freeze leftovers?
A: Yes! Beef Bourguignon freezes beautifully. Just allow it to cool completely, then transfer it to labeled freezer-safe containers. Reheat on low on the stovetop or in the microwave.
Nutritional Info
While pleases of comfort food can vary greatly, a standard serving of Beef Bourguignon typically contains approximately 500-600 calories. However, it’s rich in protein and delicious satisfaction!
There you have it – an invitation to create a dish that’s more than just a meal; it’s a connection to family, tradition, and those cozy moments in the kitchen. I can’t wait to hear your stories about making this Beef Bourguignon. Happy cooking!
Print
Beef Bourguignon
- Total Time: 195 minutes
- Yield: 6 servings 1x
- Diet: None
Description
A cozy culinary classic that combines tender beef, earthy mushrooms, and rich red wine sauce, perfect for hearty dinners and family gatherings.
Ingredients
- 2–2.5 lbs beef chuck
- 1 bottle (750 ml) dry red wine (e.g., Pinot Noir or Cabernet Sauvignon)
- 4 cups beef broth
- 3 tablespoons vegetable oil
- 1 large onion, diced
- 2–3 cloves garlic, minced
- 4–6 strips of bacon, chopped
- 4 large carrots, chopped
- 8 ounces cremini mushrooms, halved
- 2 tablespoons flour
- 2–3 sprigs fresh thyme
- 1–2 bay leaves
- Salt and pepper to taste
Instructions
- Preparation: Start by patting the beef dry with paper towels and cutting it into 1.5-inch cubes. Season generously with salt and pepper.
- Sear: In a large Dutch oven, heat 2 tablespoons of vegetable oil over medium-high heat. Sear the beef in batches until browned (about 3-4 minutes per side) and remove.
- Cook: In the same pot, add the chopped bacon and cook until crispy (about 5 minutes).
- Sauté: Add the onions to the pot and cook until softened (about 5-7 minutes). Then add the garlic and cook for another minute.
- Build: Sprinkle flour over the onion mixture and stir for about 2 minutes. Gradually pour in the red wine, scraping the browned bits from the bottom.
- Add: Return the beef to the pot with broth, carrots, mushrooms, thyme, bay leaves, and more salt and pepper. Stir well.
- Simmer: Bring to a gentle boil, then cover and reduce heat to simmer for 2-3 hours.
- Finishing: After 2-3 hours, remove the lid and let the sauce reduce for about 30 minutes. Adjust seasoning and remove bay leaves.
Notes
Beef Bourguignon tastes even better the next day. Can be frozen for later use.
- Prep Time: 15 minutes
- Cook Time: 180 minutes
- Category: Main Course
- Method: Braised
- Cuisine: French
Nutrition
- Serving Size: 1 serving
- Calories: 600
- Sugar: 6g
- Sodium: 700mg
- Fat: 25g
- Saturated Fat: 10g
- Unsaturated Fat: 10g
- Trans Fat: 0g
- Carbohydrates: 45g
- Fiber: 4g
- Protein: 40g
- Cholesterol: 90mg
Keywords: Beef Bourguignon, French cuisine, cozy dinner, comfort food
Traditional Flemish Carbonade Stew: One-Pot Beer-Braised
The Cozy Delight of Carbonade Flamande: A Taste of Tradition
Welcome to my cozy kitchen, fellow food lovers! Today, I’m thrilled to take you on a delightful culinary journey to Belgium with a dish that warms the soul and fills the home with irresistible aromas: Carbonade Flamande, also known as Flemish Beef Stew. If you’ve never experienced the joy of slow-cooked beef simmered in rich beer and accented with sweet onions, then buckle up for a recipe that’s destined to become a cherished part of your cooking repertoire.
Growing up, some of my fondest memories were crafted in the kitchen with my family, where food was always more than just a meal; it was an event, an experience to be savored. I can still recall the first time I tasted Carbonade Flamande. I was probably ten years old and my dad, sporting his favorite apron that read "Kiss the Cook," decided it was time to share his secret recipe with me. The kitchen filled with the smells of caramelizing onions, hearty beef, and a splash of dark beer that instantly transported me to a cozy café nestled in the heart of Brussels, where the stew was a house specialty. Cooking with my dad was not just about following a recipe; it was about bonding, laughing, and sharing stories—a tradition that has woven itself into the fabric of who I am as a chef.
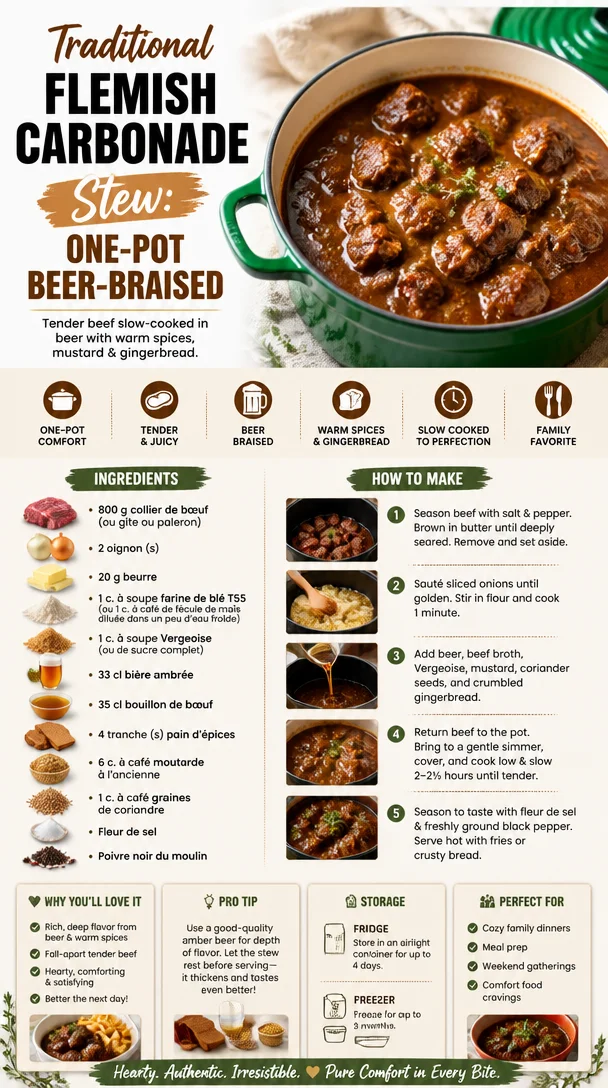
Ingredients
To make this traditional dish come alive, you’ll need the following ingredients:
-
Beef Chuck (2-3 pounds): This cut is perfect for slow cooking; it becomes incredibly tender as it simmers. If you’re looking for a leaner option, you could substitute it with brisket, but be aware that the resulting stew might be less flavorful.
-
Beer (2-3 cups, preferably Belgian ale): The beer is what elevates this dish to gastronomic heights! A fruity amber ale works wonders here. If you’re avoiding alcohol, you can use non-alcoholic beer or beef broth mixed with a tablespoon of vinegar for a similar acidity.
-
Onions (2 large, thinly sliced): Sweet onions caramelize beautifully, adding depth to the stew. If you prefer a sharper bite, go for yellow onions. For a sweeter flavor, you could even use shallots or red onions.
-
Garlic (3 cloves, minced): Essential for adding that aromatic punch! Fresh garlic is best, but in a pinch, garlic powder can be used (1 teaspoon should do the trick).
-
Thyme (1 teaspoon, dried): This herb brings a lovely earthiness to the dish. Fresh thyme is excellent too—just double the amount!
-
Bay Leaves (2): These leaves add subtle flavor depth while the stew cooks; just remember to remove them before serving!
-
Brown Sugar (1 tablespoon): This helps to balance the bitterness of the beer and enhance the overall sweetness of the dish. You could substitute it with honey or maple syrup if you’re feeling adventurous.
-
Mustard (1 tablespoon, preferably Dijon): A touch of mustard ties all flavors together and promises a kick! If Dijon isn’t available, spicy brown mustard works well too.
-
Beef Broth (2 cups): Use low-sodium beef broth to control the salt level in your dish. Chicken broth can be a lighter substitute if necessary.
-
Salt and Pepper: To taste. Always season as you go!
This hearty mix of ingredients is not only comforting, but it makes your kitchen feel like a second home!
Step-by-Step Instructions
-
Prep Your Ingredients: The first step in creating this delightful dish is gathering all your ingredients and preparing them. Slice your onions thinly, mince the garlic, and cut your beef into 1-2 inch chunks. Trust me, taking the time to prep is worth it—your cooking process becomes so much smoother!
-
Brown the Beef: Heat a large Dutch oven or heavy pot over medium-high heat. Add a splash of oil and let it shimmer. In batches, sear the beef until browned on all sides, about 4-5 minutes per batch. Don’t overcrowd the pan, as this can lead to steaming instead of browning. This caramelization is key as it adds layers of flavor!
-
Caramelize the Onions: Remove the beef from the pot and set it aside. In the same pot, add your sliced onions. You might need to add a bit more oil if there’s none left. Cook the onions slowly over medium heat, stirring occasionally, until they turn golden brown and caramelized. This should take about 15-20 minutes. The patience pays off, trust me!
-
Add the Garlic: Once the onions are beautifully caramelized, toss in the minced garlic and cook for another minute, just until fragrant. You want that gorgeous garlicky aroma to fill your kitchen, but be careful not to burn it!
-
Deglaze with Beer: Now comes the fun part! Pour in the beer and use a wooden spoon to scrape up the delicious bits left at the bottom of the pot (this is called deglazing). Let it simmer for about 5 minutes, allowing the alcohol to evaporate a bit while the flavors meld.
-
Add Back the Beef: Return the browned beef to the pot, along with any juices that have collected. Next, stir in the broth, thyme, bay leaves, brown sugar, and mustard. Give it a good stir, and then bring it to a gentle simmer.
-
Slow Cook: Reduce the heat to low, cover, and let your Carbonade Flamande simmer for about 2 to 3 hours. The longer, the better! Stir occasionally and add a bit more broth or water if it looks too thick. You’ll know it’s ready when the beef is fork-tender, tantalizing your taste buds with its heavenly aroma!
-
Final Seasoning: Taste the stew once it’s done cooking; you might want to add a pinch of salt or pepper more. Adjust to your preference before serving.
-
Plate and Serve: Serve your stew hot, over a bed of fluffy mashed potatoes, crusty bread, or steamed rice to soak up every last bit of that delicious sauce.
Serving Suggestions
When it comes to serving Carbonade Flamande, presentation can elevate the experience! Ladle the stew generously into shallow bowls, and make sure to drench it with plenty of that rich sauce. A sprinkle of fresh parsley on top adds a beautiful pop of color. Pair it with a fresh green salad or some roasted vegetables for balance. And don’t forget a good loaf of crusty bread—it’s perfect for that final scoop of sauce!
Recipe Variations
Here are a few creative twists to consider, just in case you want to mix things up:
-
Vegetarian Version: Use robust mushrooms (like shiitake or portobello) and hearty vegetables like carrots and parsnips in place of beef. A good-quality vegetable broth and dark beer will still give a fantastic flavor.
-
Add Spices: Toss in a few peppercorns or a hint of allspice for an extra layer of flavor complexity.
-
Add Vegetables: Experiment with adding diced carrots or celery for a heartier stew.
-
Overnight Flavor: For an even richer flavor, prepare the stew a day in advance. Let it cool, refrigerate it overnight, and then reheat gently on the stovetop—this gives the flavors time to meld.
-
Gluten-Free: Use gluten-free beer and broth to adapt this recipe for those with gluten sensitivities.
Chef’s Notes
Making Carbonade Flamande has been a labor of love in my kitchen for years. I’ve played around with it, trying different types of beer and adjusting it to fit what I have on hand. One time, I made it with a sour beer, and while it was an adventure, let’s just say I learned to stick to traditional dulce choices! What I adore about this dish is that every family has their own twist. Whether it’s serving it with a side of fries or there’s a secret spice that has been passed down, there’s always room for creativity.
Ah, and I must share this funny moment: the first time I attempted this recipe alone, I completely misread ‘bay leaves’ as ‘basil leaves’ and ended up with a very confused stew. After that, I made it a habit to double-check my pantry—who knew herbs could be so tricky?!
FAQs and Troubleshooting
1. My stew turned out too salty. What did I do wrong?
Salt is in many ingredients, including broth and beer. Start with low-sodium broth and add salt gradually during cooking. If your stew is too salty, you can balance it with some sugar or by adding more vegetables to absorb the extra salt.
2. Why is my beef tough?
Braised dishes like this rely on low and slow cooking. If the beef isn’t tender, it may need more time to cook. Don’t rush this process; it can take a couple of hours for the beef to break down and become fork-tender.
3. Can I make this in a slow cooker?
Absolutely! After browning the beef and onions on the stovetop, transfer everything into your slow cooker. Cook on low for about 6-8 hours or on high for 3-4 hours.
4. What’s the best way to store leftovers?
Store any leftovers in an airtight container in the refrigerator for up to 3 days. This dish actually tastes better the next day as the flavors continue to develop. You can also freeze it for up to 3 months; just be sure to let it cool completely before transferring it to freezer bags!
Nutritional Info
This recipe serves approximately 6-8 people. The following information is an estimate based on ingredients and portion sizes:
- Calories: 400-500 per serving
- Protein: 40-45g
- Carbohydrates: 20-25g
- Fat: 15-20g
- Fiber: 2-3g
There you have it, my friends! A warm, hearty bowl of Carbonade Flamande that’s perfect for bringing loved ones together. This dish doesn’t just fill bellies; it fills hearts and creates memories. So gather your ingredients, roll up those sleeves, and let your kitchen be the heart of good food and good times. Happy cooking!
Print
Carbonade Flamande
- Total Time: 210 minutes
- Yield: 6-8 servings
- Diet: Carnivore
Description
A traditional Belgian beef stew slow-cooked in rich beer and sweet onions, perfect for cozy gatherings.
Ingredients
- Beef Chuck (2-3 pounds)
- Beer (2-3 cups, preferably Belgian ale)
- Onions (2 large, thinly sliced)
- Garlic (3 cloves, minced)
- Thyme (1 teaspoon, dried)
- Bay Leaves (2)
- Brown Sugar (1 tablespoon)
- Mustard (1 tablespoon, preferably Dijon)
- Beef Broth (2 cups)
- Salt and Pepper to taste
Instructions
- Prep your ingredients: Slice the onions thinly, mince the garlic, and cut the beef into 1-2 inch chunks.
- Brown the beef: Heat a large Dutch oven over medium-high heat, add oil, and sear the beef until browned, about 4-5 minutes per batch.
- Caramelize the onions: In the same pot, cook the sliced onions until golden brown and caramelized, about 15-20 minutes.
- Add the garlic: Toss in the minced garlic and cook for another minute until fragrant.
- Deglaze with beer: Pour in the beer and scrape up the bits from the bottom of the pot. Simmer for about 5 minutes.
- Add back the beef: Return the browned beef to the pot and stir in the broth, thyme, bay leaves, brown sugar, and mustard.
- Slow cook: Reduce heat to low, cover, and let simmer for 2-3 hours until the beef is fork-tender.
- Final seasoning: Taste and adjust with salt and pepper before serving.
- Plate and serve: Serve hot over mashed potatoes, crusty bread, or steamed rice.
Notes
For added flavor, consider preparing the stew a day in advance to let the flavors meld. This dish pairs beautifully with a fresh green salad or roasted vegetables.
- Prep Time: 30 minutes
- Cook Time: 180 minutes
- Category: Main Course
- Method: Slow Cooking
- Cuisine: Belgian
Nutrition
- Serving Size: 1 serving
- Calories: 450
- Sugar: 5g
- Sodium: 600mg
- Fat: 17g
- Saturated Fat: 6g
- Unsaturated Fat: 9g
- Trans Fat: 0g
- Carbohydrates: 22g
- Fiber: 2g
- Protein: 40g
- Cholesterol: 100mg
Keywords: beef stew, Belgian cuisine, Carbonade Flamande, comfort food, slow cooking
Minute One-Pot Creamy Butternut Squash Weeknight Pasta
Butternut Squash Pasta: A Cozy Bowl of Comfort
Welcome to my kitchen! Today, we’re diving into a dish that warms not just the tummy but also the heart: Butternut Squash Pasta. If you’ve ever walked into a home where something delicious is bubbling away, you know that feeling of comfort and nostalgia it brings. This dish perfectly encapsulates that vibe—creamy, savory, and just a tad sweet, it’s everything a cozy meal should be. Plus, it celebrates the beautiful fall harvest, reminding us of all the warm memories we create around the table.
Butternut squash is one of those seasonal ingredients that turns an ordinary bowl of pasta into something special. It’s adaptable and pairs beautifully with a variety of flavors, from sage to garlic, and even toasted nuts for a little crunch. Trust me; you’re going to want to add this dish to your repertoire. Whether you’re sharing it with friends, family, or just treating yourself to a delicious dinner, this pasta will make you feel all warm and fuzzy inside.
A Dash of Nostalgia
Let me take you back to a chilly autumn evening years ago when I first crafted this Butternut Squash Pasta recipe. I was at my aunt’s cozy home for a family gathering, and the air was filled with laughter—and more importantly, the inviting scent of roasted butternut squash wafting through the kitchen. I vividly remember watching her peel and chop the squash as she chatted about her own fond memories of cooking with her grandmother. The way she stirred that golden puree into a pot of pasta made me realize just how much love could be infused into a meal.
As we gathered around the table, our plates piled high with that rich, creamy pasta, I knew I had to keep this tradition alive. It wasn’t just about the food itself; it was about connection and sharing stories between bites. That evening ignited a passion in me—a desire to create meals that not only nourished bodies but also souls. This Butternut Squash Pasta is my twist on that cherished recipe, and I can’t wait to share it with all of you!
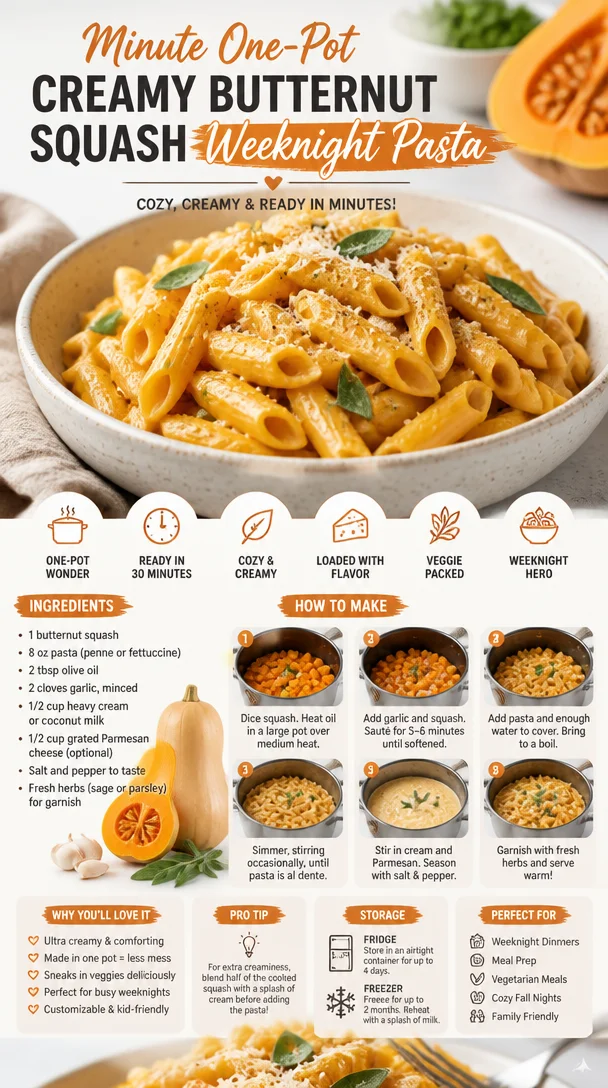
Ingredients
To bring this comforting dish to life, gather the following ingredients:
-
Butternut Squash: This star ingredient is not only sweet and creamy but also packed with vitamins A and C. If butternut squash isn’t available, you can substitute it with pumpkin or acorn squash for a similar flavor profile.
-
Pasta: I recommend using a sturdy pasta like fettuccine, gnocchi, or even whole grain spaghetti. Gluten-free pasta options work wonderfully if you’re looking for a gluten-free meal.
-
Olive Oil: A high-quality extra-virgin olive oil elevates the dish with a rich flavor. You can swap it with avocado oil for a different taste but keep the flavor of olive oil in mind.
-
Garlic: Fresh garlic imparts an aromatic flavor that complements the sweetness of the squash beautifully. If you’re in a pinch, garlic powder can work too, but fresh is always better!
-
Vegetable Broth: This adds depth to the sauce. Homemade is ideal, but you can use store-bought low-sodium broth as a shortcut. For a quick swap, try using white wine for a bit of acidity.
-
Cream (or Non-Dairy Alternative): Heavy cream provides a luxurious texture. For a lighter option, you can use half-and-half, or for a vegan version, coconut cream or cashew cream works brilliantly.
-
Parmesan Cheese (or Nutritional Yeast): Grated Parmesan adds a salty, umami bite. If you’re dairy-free, nutritional yeast provides that cheesy flavor without the dairy.
-
Sage: Fresh sage enhances the dish with an earthy aroma. Dried sage can be used in a pinch, but fresh leaves provide a brighter flavor.
-
Salt and Pepper: To taste, of course! These will help balance the dish.
Step-by-Step Instructions
Now, let’s get cooking! You’ll love how simple this process is.
-
Prepare the Butternut Squash: Start by preheating your oven to 400°F (200°C). Cut the butternut squash in half, scoop out the seeds, and drizzle with olive oil—this allows it to roast beautifully. Sprinkle with salt and pepper, then place it cut-side down on a baking sheet. Roast for about 30-40 minutes until it’s fork-tender. The caramelization will create an amazing depth of flavor.
Chef Hack: To make peeling the squash easier, try microwaving it for 30 seconds before cutting. It softens the skin just enough to make cutting a breeze!
-
Cook the Pasta: While your squash is roasting, bring a large pot of salted water to a boil. Toss in your pasta and cook until al dente according to package instructions. Reserve about a cup of pasta water before draining the pasta.
Tip: Salt your pasta water well! It should taste like the sea for the best flavor.
-
Sauté the Aromatics: In a large skillet, heat a tablespoon of olive oil over medium heat. Add minced garlic and sage leaves. Sauté for 1-2 minutes until fragrant but not browned—burnt garlic can be quite bitter!
Little Chef Secret: If you love a deeper flavor, try adding a pinch of red pepper flakes here for a bit of heat.
-
Make the Sauce: Scoop the roasted butternut squash into the skillet. Add the vegetable broth and cream. Use an immersion blender or a regular blender to purée the mixture until smooth. If you like it chunky, give it a quick mash with a fork instead.
Chef’s Insight: If you want a thicker sauce, let it simmer a bit longer over low heat, allowing it to reduce.
-
Combine Everything: Add the cooked pasta directly into the skillet, along with a splash of the reserved pasta water to loosen things up. Toss everything well until the pasta is fully coated with that creamy butternut squash goodness. If it feels too thick, just keep adding a bit more pasta water until you reach your desired consistency.
Tip: Don’t forget to taste and adjust seasoning with additional salt and pepper as needed!
Serving Suggestions
To serve, plate the Butternut Squash Pasta with a generous sprinkle of grated Parmesan cheese or nutritional yeast for my vegan friends. A few crispy sage leaves on top as a garnish adds a lovely touch and elevates the presentation. Pair with a fresh green salad and, maybe, some crusty bread for a cozy dinner night. You could even enjoy it alongside a glass of white wine; it’s the perfect complement to this rich dish!
Recipe Variations
If you’re feeling adventurous, try these twists on the classic:
-
Add Protein: Toss in some sautéed chicken or shrimp for a heartier meal. Chickpeas or lentils can be an excellent plant-based protein addition, too!
-
Roasted Vegetables: Add roasted Brussels sprouts or kale for an extra nutrient boost and texture.
-
Seasonal Flavors: Swap out sage for thyme or rosemary, or stir in a pinch of nutmeg for a warm, holiday-inspired flavor.
-
Nutty Crunch: Top with toasted pine nuts or walnuts for added crunch and healthy fats.
-
Spicy Kick: Add a dash of cayenne pepper if you crave some spice to contrast the sweetness of the squash.
Chef’s Notes
As with any recipe, this Butternut Squash Pasta has evolved over time. I originally started with just a simple sauce and pasta, but with every iteration, I experimented with different herbs and textures, finding the right balance that made everyone’s taste buds dance. It’s like a warm hug in a bowl—perfect for a cozy night in or a lively dinner party!
Speaking of cozy, I remember one night I tried to impress some friends with a dinner party using this recipe. Everything was going smoothly until I realized I had run out of Parmesan cheese! I used some leftover feta instead, and while it wasn’t the original plan, it turned out delicious and created hilarious stories we still laugh about!
FAQs and Troubleshooting
1. My sauce is too thick. What can I do?
No worries! Just add a bit more reserved pasta water or broth to thin it out. Keep stirring until you reach your desired creamy consistency.
2. Can I make this ahead of time?
Absolutely! You can roast the butternut squash and prepare the sauce ahead of time. Just store it in the fridge, and when you’re ready, reheating it and tossing in the pasta is all you need to do!
3. My sauce is bland. What can I do?
Start by tasting it and adjusting with more salt, pepper, or even a splash of lemon juice for brightness. Fresh herbs can also elevate the flavors.
4. How can I store leftovers?
Store any leftovers in an airtight container in the refrigerator for up to 3 days. Reheat gently on the stove with a splash of water or broth to bring the creaminess back!
Nutritional Info
While nutritional information can vary based on specific brands and ingredients, here’s a general breakdown per serving:
- Calories: 400
- Protein: 12g
- Carbohydrates: 60g
- Fat: 15g
- Fiber: 6g
With these tips and tricks, you’re well on your way to cooking up a delightful Butternut Squash Pasta that will no doubt become an anchor in your recipe collection. So, roll up those sleeves, tighten that apron, and let’s create some kitchen magic together! Enjoy every bite, and remember: cooking is all about love and embracing the joy of sharing good food with great company!
Print
Butternut Squash Pasta
- Total Time: 55 minutes
- Yield: 4 servings 1x
- Diet: Vegetarian
Description
A creamy and savory pasta dish featuring roasted butternut squash, perfect for cozy meals.
Ingredients
- 1 Butternut Squash
- 8 oz Pasta (fettuccine, gnocchi, or whole grain spaghetti)
- 2 tbsp Olive Oil
- 3 cloves Garlic, minced
- 1 cup Vegetable Broth
- 1 cup Cream (or non-dairy alternative)
- 1/2 cup Grated Parmesan Cheese (or nutritional yeast)
- 5–6 Fresh Sage Leaves
- Salt and Pepper, to taste
Instructions
- Preheat your oven to 400°F (200°C). Cut the butternut squash in half, scoop out the seeds, and drizzle with olive oil. Sprinkle with salt and pepper, then place it cut-side down on a baking sheet. Roast for about 30-40 minutes until fork-tender.
- While the squash is roasting, bring a large pot of salted water to a boil. Cook the pasta until al dente according to package instructions, reserving about a cup of pasta water before draining.
- In a large skillet, heat a tablespoon of olive oil over medium heat. Add minced garlic and sage leaves, sautéing for 1-2 minutes until fragrant.
- Scoop the roasted butternut squash into the skillet. Add vegetable broth and cream, then purée the mixture until smooth. Adjust consistency with reserved pasta water if too thick.
- Add the cooked pasta directly into the skillet, tossing until completely coated with the sauce. Season with additional salt and pepper as needed.
Notes
For a vegan option, use coconut cream or cashew cream instead of heavy cream. Store leftovers in an airtight container in the refrigerator for up to 3 days.
- Prep Time: 15 minutes
- Cook Time: 40 minutes
- Category: Main Course
- Method: Baking
- Cuisine: Italian
Nutrition
- Serving Size: 1 serving
- Calories: 400
- Sugar: 6g
- Sodium: 350mg
- Fat: 15g
- Saturated Fat: 8g
- Unsaturated Fat: 7g
- Trans Fat: 0g
- Carbohydrates: 60g
- Fiber: 6g
- Protein: 12g
- Cholesterol: 30mg
Keywords: butternut squash, pasta, vegetarian, cozy meals, fall recipes

Minute Creamy Butternut Squash Orzo One-Pot Dinner
Creamy Butternut Squash Orzo: A Cozy Comfort Dish
Welcome to my kitchen, dear friends! Today, I’m thrilled to share one of my absolute favorite recipes — Creamy Butternut Squash Orzo. This dish is my chilly-weather staple and is packed full of warmth, flavor, and heart. If you’ve ever had one of those days where a hug in a bowl is exactly what you need, look no further. The creamy texture of the orzo, combined with the sweet, nutty notes of roasted butternut squash, creates a meal that feels like a cozy embrace.
Most days, you’ll find me in my kitchen surrounded by the comforting smells of spices, simmering ingredients, and laughter echoing off the walls. It’s a place where I not only create delicious food but also memories that last a lifetime. And isn’t that what cooking is all about? The joy of sharing with friends and family and creating new culinary adventures together!
As you delve into this creamy delight, remember that cooking is a journey. It doesn’t have to be perfect; it just needs to be made with love, some good tunes on in the background, and maybe a glass of wine to sip on while you cook! Get ready to chop, sauté, and toss your way to an incredible meal that not only fills your stomach but also warms your heart.
A Personal Kitchen Tale
Let me take you back to a chilly autumn evening a few years ago. The snow was beginning to tumble gently outside, painting the world in a soft white layer. I had just returned from the farmers’ market, my arms laden with vibrant, fresh produce, including a plump butternut squash that seemed to call my name.
As I peeled and diced the squash, the sweet, earthy aroma filled my kitchen. My best friend stopped by for a spontaneous dinner catch-up, and that’s when the magic happened! Together we chopped and sautéed, filling the air with the smell of garlic and thyme. We shared stories and laughter, and by the time we sat down to enjoy our creamy creation, we not only had a delicious meal but also memories that would make us chuckle every time.
That evening made me realize how food has an incredible power to bring people closer together. So, grab your apron and let’s whip up some of that magic in your own kitchen!
Ingredients
Here’s what you’ll need for the Creamy Butternut Squash Orzo:
-
Orzo Pasta: This rice-shaped pasta is perfect for absorbing flavors and creates a lovely creamy texture when cooked. If you’re gluten-free, consider using brown rice or quinoa.
-
Butternut Squash: This beauty adds sweetness and depth. Look for one that feels heavy for its size. If you can’t find butternut squash, sweet potato works as a great substitute.
-
Garlic: Fresh garlic brings a wonderful aromatic flavor. You could also opt for garlic powder in a pinch, but fresh is best!
-
Onion: A staple in many dishes, diced yellow onion offers sweetness when caramelized. You could swap in shallots if you’re in the mood for something more delicate.
-
Vegetable Broth: Using broth enhances the depth of flavor. You can use chicken broth if you prefer a non-vegetarian option, or even water in a pinch.
-
Heavy Cream: This is what gives our dish that luscious creaminess. For a lighter option, feel free to use coconut cream or a non-dairy alternative like cashew cream.
-
Parmesan Cheese: Freshly grated, it adds saltiness and depth to the dish. Nutritional yeast is a fantastic dairy-free substitute that still provides a cheesy flavor.
-
Spinach: A handful of fresh spinach adds color and nutrients. You can swap this for kale or Swiss chard if you prefer something heartier.
-
Olive Oil: For sautéing and adding rich flavor. Avocado oil is a nice alternative if you want something with a higher smoke point.
-
Salt and Pepper: Basic but essential! Always season to taste for that perfect punch.
Step-by-Step Instructions
Now, let’s get cooking! Follow these simple steps to make your very own Creamy Butternut Squash Orzo:
-
Prep the Squash: Start by preheating your oven to 400°F (200°C). While it warms up, slice the butternut squash in half lengthwise, scoop out the seeds, and dice both halves into 1-inch cubes. Toss them in a bowl with a drizzle of olive oil, a sprinkle of salt, and cracked black pepper. Spread them on a baking sheet and roast for about 25-30 minutes until they’re tender and caramelized. This step brings out their natural sweetness. (Pro tip: roasting the squash enhances its flavor, so don’t skip this!)
-
Cook the Orzo: In a large pot, bring vegetable broth to a boil. Add the orzo and cook according to package instructions until al dente, usually about 8-10 minutes. Remember to stir occasionally to prevent sticking. Once done, drain and set aside but keep a bit of that broth — you’ll need it later!
-
Sauté the Aromatics: In the same pot, add a splash of olive oil over medium heat. Toss in the diced onion and sauté until translucent — about 5 minutes. Then, add in the minced garlic and cook for another minute until fragrant. The aroma should be heavenly!
-
Combine: Once the onions are golden, add the roasted butternut squash to the pot. Mash some of it lightly with the back of your spoon, leaving some chunks for texture. Add in the cooked orzo, a splash of the reserved vegetable broth, and stir to combine everything.
-
Add Creaminess: Pour in the heavy cream and mix well, allowing everything to be enveloped in that luscious goodness. If it seems too thick, don’t hesitate to add more broth to achieve your desired consistency.
-
Finishing Touch: Stir in the fresh spinach and grated Parmesan cheese (or nutritional yeast). Keep stirring until the spinach wilts and the cheese melts into the dish. Season with salt and pepper to taste.
-
Plate It Up: Serve immediately! I love garnishing my orzo with a little extra Parmesan and a drizzle of olive oil. It makes it look fancy without much fuss!
Serving Suggestions
For a gorgeous presentation, serve your Creamy Butternut Squash Orzo in shallow bowls. Top it with freshly grated Parmesan, and maybe a sprinkle of crushed red pepper flakes for a little heat! A side of crusty bread or a simple arugula salad complements this dish perfectly. Don’t forget a glass of your favorite wine or a warm herbal tea to enhance the experience!
Recipe Variations
Feeling adventurous? Here are a few fun twists you can try:
- Spicy Kick: Add a teaspoon of red pepper flakes or diced jalapeños to the onion and garlic for a hot version.
- Herb Infusion: Stir in fresh herbs like thyme, sage, or rosemary for extra flavor — these pair wonderfully with squash.
- Protein Boost: Toss in grilled chicken, sautéed shrimp, or chickpeas for a heartier meal.
- Nutty Crunch: Top with toasted walnuts or pumpkin seeds for added texture and a nutty flavor.
- Vegan Delight: Swap heavy cream for coconut cream and leave out the cheese for a creamy vegan version.
Chef’s Notes
This recipe has definitely evolved over the years! Initially, it was just a simple pasta dish I threw together with whatever ingredients I had. But after numerous experiments and family feedback, it has morphed into this creamy, cozy treat we all adore. Don’t be surprised if you find yourself getting creative as you make it — that’s the magic of cooking!
FAQs and Troubleshooting
Q: My butternut squash is too hard to peel! Any tips?
A: Try microwaving it for 2-3 minutes to soften it a bit before peeling. Alternatively, you can roast it whole for about 20 minutes to make peeling easier.
Q: Can I use whole grain orzo?
A: Absolutely! It may have a slightly different texture compared to traditional orzo, but it will taste fantastic and add a lovely nutty flavor.
Q: What if my orzo is too sticky?
A: This can happen if it’s overcooked or if it doesn’t have enough liquid. Make sure to stir it gently while cooking and add a splash of broth to loosen it up if needed.
Q: How can I make it ahead of time?
A: You can roast the squash and cook the orzo beforehand, then store them separately in the fridge. When you’re ready to eat, combine and heat everything with the cream fresh, adding spinach just before serving for the best texture.
Nutritional Info
While I encourage everyone to enjoy their food, if you’re counting calories or watching your nutrition, here’s a quick overview (per serving):
- Calories: 400
- Protein: 12g
- Carbohydrates: 50g
- Fat: 16g
- Fiber: 4g
And there you have it! Your very own Creamy Butternut Squash Orzo. I’m so excited for you to make and share this delicious dish. Remember, cooking is about experimenting and finding what YOU love. So get in there, have fun, and savor every bite! Happy cooking!
Print
Creamy Butternut Squash Orzo
- Total Time: 55 minutes
- Yield: 4 servings 1x
- Diet: Vegetarian
Description
A cozy comfort dish featuring creamy orzo pasta and roasted butternut squash, perfect for chilly weather.
Ingredients
- 1 cup Orzo Pasta
- 1 medium Butternut Squash, diced
- 3 cloves Garlic, minced
- 1 medium Onion, diced
- 4 cups Vegetable Broth
- 1 cup Heavy Cream
- 1/2 cup Parmesan Cheese, grated
- 2 cups Fresh Spinach
- 2 tablespoons Olive Oil
- Salt and Pepper, to taste
Instructions
- Prep the Squash: Preheat your oven to 400°F (200°C). Slice the butternut squash in half lengthwise, scoop out the seeds, and dice into 1-inch cubes. Toss with olive oil, salt, and pepper, then roast for 25-30 minutes.
- Cook the Orzo: In a large pot, bring vegetable broth to a boil. Add orzo and cook until al dente, about 8-10 minutes. Drain and reserve some broth.
- Sauté the Aromatics: In the same pot, heat olive oil over medium heat. Add diced onion and sauté until translucent, then add garlic and cook for one more minute.
- Combine</strong: Add roasted butternut squash to the pot, mashing some lightly. Stir in cooked orzo and a splash of reserved broth.
- Add Creaminess: Pour in heavy cream, mixing well. Adjust consistency with more broth if necessary.
- Finishing Touch: Stir in spinach and Parmesan cheese. Season with salt and pepper to taste.
- Plate It Up: Serve immediately, garnishing with extra Parmesan and a drizzle of olive oil.
Notes
Feel free to add spices or proteins as desired. This dish pairs well with a side salad or crusty bread.
- Prep Time: 15 minutes
- Cook Time: 40 minutes
- Category: Main Course
- Method: Baking
- Cuisine: Italian
Nutrition
- Serving Size: 1 serving
- Calories: 400
- Sugar: 5g
- Sodium: 500mg
- Fat: 16g
- Saturated Fat: 9g
- Unsaturated Fat: 5g
- Trans Fat: 0g
- Carbohydrates: 50g
- Fiber: 4g
- Protein: 12g
- Cholesterol: 40mg
Keywords: butternut squash, creamy orzo, comfort food, vegetarian dish

One-Pot Thai Butternut Squash Red Curry in 25 Minutes
Whip Up a Warm Embrace: Thai Butternut Squash Red Curry Recipe
Welcome to my kitchen! I’m beyond excited to share one of my absolute favorite recipes with you today — Thai Butternut Squash Red Curry. This dish is like a warm hug on a chilly evening, bursting with flavor, color, and a little bit of spice, making it perfect for cozy nights or when you want to impress your family or friends!
Whenever I breathe in the aroma of coconut milk blending with red curry paste and fresh herbs, I’m instantly transported to those vibrant street stalls in Thailand, filled with laughter and the tantalizing scent of sizzling ingredients wafting through the air. Cooking this curry is more than just a recipe; it’s an experience that invites you to get a little messy and have fun in the kitchen!
This dish is a true testament to how simple ingredients can evolve into something magical when combined with a pinch of love and a sprinkle of creativity. The creamy texture of the butternut squash perfectly complements the rich, spicy flavor of the curry, resulting in a meal that’s guaranteed to warm your heart and soul. So grab your apron and let’s dive into this delightful culinary adventure together!
A Little Kitchen Story: The First Bowl of Curry
Let me take you back to the first time I made Thai Butternut Squash Red Curry. It was one of those rainy days where the world outside felt dreary, and I craved comfort food. I had a butternut squash sitting on my kitchen counter, begging to be transformed into something delicious.
I went to my go-to Thai cookbook, and there it was — a stunning recipe that promised a burst of flavor with every spoonful. Following the recipe felt almost magical as I watched the squash transform from a hard gourd into a silky, fragrant delight. I remember tasting it for the first time, and my heart practically sang! I couldn’t help but invite a few close friends over to share this newfound treasure, and as we sat around the table, spoons clinking and laughter flowing, I realized that food isn’t just about nourishment; it’s about connection.
That night was filled with stories, smiles, and a second round of curry that left us all blissfully stuffed. From then on, this recipe has wrestled its way into being a beloved staple in my kitchen — a dish that brings joy, warmth, and a dose of nostalgia every time I make it.
Key Ingredients for Your Curry Creation
Here’s what you’ll need to whip up this delightful Thai Butternut Squash Red Curry:
-
Butternut Squash:
- The star of the show! It’s sweet, nutty, and softens beautifully when cooked. If you can’t find it, you can also use pumpkin or acorn squash as a substitute.
-
Coconut Milk:
- This provides the creamy base for your curry. Full-fat coconut milk works best for richness, but you can also opt for light coconut milk if you prefer a lighter version (though it may be less creamy).
-
Red Curry Paste:
- This spice blend adds depth and that signature kick! If you’d like to dial down the heat, start with a small amount and add more as you go. You can also use yellow or green curry paste for a different flavor profile.
-
Vegetable Broth:
- Essential for adding extra flavor. Homemade is great, but store-bought works perfectly fine! Just ensure it’s low-sodium.
-
Garlic and Ginger:
- These aromatic ingredients bring a warming, zesty quality. Grate your garlic and ginger for better integration into the dish, or use pre-minced for convenience!
-
Basil:
- Fresh Thai basil adds a fragrant finish to the curry. If unavailable, regular basil or even cilantro can work as a substitute, though the flavor will differ a bit.
-
Lime Juice:
- Always a must! It brightens the dish and adds needed acidity. If you don’t have fresh limes, bottled lime juice can suffice, though fresh gives a better zing.
-
Optional Proteins (Tofu, Chicken, or Shrimp):
- Customize your curry by adding proteins of your choice. If using tofu, make sure to press it to remove excess moisture for better texture. Chicken or shrimp add a nice protein boost too — just adjust the cooking times accordingly!
Step-by-Step Instructions
Now that we have our ingredients ready, let’s create some culinary magic! Here’s how to make this Thai Butternut Squash Red Curry step by step:
-
Prep Your Veggies:
- Start by peeling and dicing your butternut squash into 1-inch cubes. This will ensure they cook evenly. Pro tip: microwave the squash for a couple of minutes to soften it slightly, making it easier to cut!
-
Sauté the Aromatics:
- Heat a tablespoon of oil in a large pot over medium heat. Add minced garlic and grated ginger, stirring for about 1-2 minutes until fragrant but not burnt. This step builds your flavor foundation!
-
Add the Curry Paste:
- Stir in the red curry paste, letting it cook for another minute. This step is crucial as it helps release the flavors from the spices locked in the curry paste. You want to see it bubble up a little!
-
Incorporate the Squash and Liquids:
- Toss in the diced butternut squash, coating it with the paste. Then, pour in the coconut milk and vegetable broth, and give it a good stir. The squash should be mostly submerged in the liquid.
-
Simmer Away:
- Bring the mixture to a gentle boil, then reduce the heat, cover the pot, and let it simmer for 20-25 minutes. This gives the squash enough time to soften and take in all that delicious flavor. Check occasionally to ensure it’s not sticking to the bottom.
-
Texture Check:
- After 20 minutes, check the squash with a fork. It should be tender but still hold its shape. If you’re adding protein, this is the time to stir in cooked chicken, shrimp, or tofu. Let it simmer for another 5-10 minutes to heat everything through.
-
Finish with Freshness:
- Stir in a handful of fresh basil and a squeeze of lime juice right before serving. This step brightens the dish and takes it to the next level!
-
Season to Taste:
- Take a moment to taste your curry. You may want to adjust the salt or add a bit more lime juice for zing!
-
Serve It Up:
- Ladle the warm, comforting curry into bowls, topping each with extra basil if desired!
Plating and Serving Suggestions
Serving this Thai Butternut Squash Red Curry is just as important as cooking it! Here’s how to plate it beautifully:
- Bowls are Best: Serve your curry in deep bowls to showcase its vibrant orange hue.
- Toppings: Add a sprinkle of fresh herbs like cilantro or extra basil leaves for a pop of color. You can also add a slice of lime for guests to add that zing themselves.
- Accompaniments: Serve with warm jasmine rice or quinoa to soak up all the scrumptious sauce. Optionally, you could include crispy coconut chips or crushed peanuts for texture.
Recipe Variations
Feel free to get creative with your Thai Butternut Squash Red Curry! Here are some fun variations to try:
-
Veggie Delight: Add in other vegetables like spinach, kale, or bell peppers for extra nutrition and color.
-
Spicy Twist: For those who love heat, add sliced fresh Thai chilies or a dash of chili flakes to the mix.
-
Sweet & Spicy: Toss in some pineapple chunks for a sweet contrast to the spicy curry, making it a real tropical delight!
-
Creamy Spin: Switch up the base by incorporating a touch of peanut butter or almond butter for a creamier texture with a nutty flavor.
Chef’s Notes
Cooking has always been a journey for me, with each dish telling a story and each scent evoking a memory. This Thai Butternut Squash Red Curry has certainly found its place in my heart! I love the fact that it’s adaptable; I’ve made it countless times, tweaking it here and there based on seasonal ingredients or mood.
Funny enough, one time I got so caught up in creating this dish that I forgot to buy basil. I stole the neighbor’s permission to forage in their herb garden! They laughed when I revealed it was all for curry. That’s the beauty of cooking — it opens doors to creativity and connection.
FAQs and Troubleshooting
Q: Why is my curry not thickening?
A: If your curry is too watery, simply let it simmer uncovered for a few more minutes. The extra heat will evaporate some liquid, thickening it. Alternatively, you can mash a few butternut squash pieces to help create a creamier texture.
Q: Can I freeze leftovers?
A: Absolutely! This curry freezes well. Allow it to cool, then transfer it to an airtight container before freezing. When ready to eat, thaw in the fridge overnight and reheat on the stove or microwave.
Q: How can I make this dish vegan?
A: This recipe is already vegetarian and can easily be made vegan by sticking with vegetables and tofu and ensuring your vegetable broth is plant-based!
Q: What should I do if I find it too spicy?
A: If your curry turns out spicier than desired, you can add a little more coconut milk to mellow the heat or even a tablespoon of sugar to balance the flavors.
Nutritional Info
While I can’t provide exact nutritional values without knowing serving sizes, this dish is generally packed with:
- Vitamins: Loaded with vitamins A and C from the butternut squash.
- Healthy Fats: Coconut milk offers healthy fats, making this dish filling and satisfying.
- Vegetarian Protein: If you add tofu or shrimp, you’ll also boost the protein content!
And there you have it, my friends! A beautiful, heartwarming Thai Butternut Squash Red Curry that will make you feel like a culinary rockstar! Share it with your loved ones, and watch the smiles light up around the table. Happy cooking! 🥣✨
Print
Thai Butternut Squash Red Curry
- Total Time: 45 minutes
- Yield: 4 servings 1x
- Diet: Vegetarian
Description
A warm and comforting Thai butternut squash red curry that is bursting with flavor and perfect for cozy nights.
Ingredients
- 1 large butternut squash, peeled and diced into 1-inch cubes
- 1 can full-fat coconut milk
- 3 tablespoons red curry paste
- 2 cups vegetable broth (low-sodium)
- 4 cloves garlic, minced
- 1 tablespoon ginger, grated
- 1/2 cup fresh Thai basil (plus more for serving)
- 2 tablespoons lime juice
- Optional: Tofu, chicken, or shrimp for protein
Instructions
- Prep your veggies: Start by peeling and dicing your butternut squash into 1-inch cubes.
- Sauté the aromatics: Heat oil in a large pot, add garlic and ginger, stirring for 1-2 minutes.
- Add the curry paste: Stir in red curry paste, cooking for another minute.
- Incorporate the squash and liquids: Toss in the butternut squash, coconut milk, and vegetable broth.
- Simmer away: Bring to a boil, reduce heat, cover, and simmer for 20-25 minutes.
- Texture check: After 20 minutes, ensure the squash is tender; add your protein now.
- Finish with freshness: Stir in basil and lime juice before serving.
- Season to taste: Adjust salt or lime juice as needed.
- Serve it up: Ladle into bowls and top with extra basil.
Notes
Serve with jasmine rice or quinoa for a complete meal. Adjust the spice level of the curry to your taste.
- Prep Time: 15 minutes
- Cook Time: 30 minutes
- Category: Main Course
- Method: Stovetop
- Cuisine: Thai
Nutrition
- Serving Size: 1 serving
- Calories: 350
- Sugar: 8g
- Sodium: 400mg
- Fat: 20g
- Saturated Fat: 14g
- Unsaturated Fat: 4g
- Trans Fat: 0g
- Carbohydrates: 42g
- Fiber: 5g
- Protein: 6g
- Cholesterol: 0mg
Keywords: Thai curry, butternut squash, vegetarian recipe, comfort food, curry recipe, easy recipes
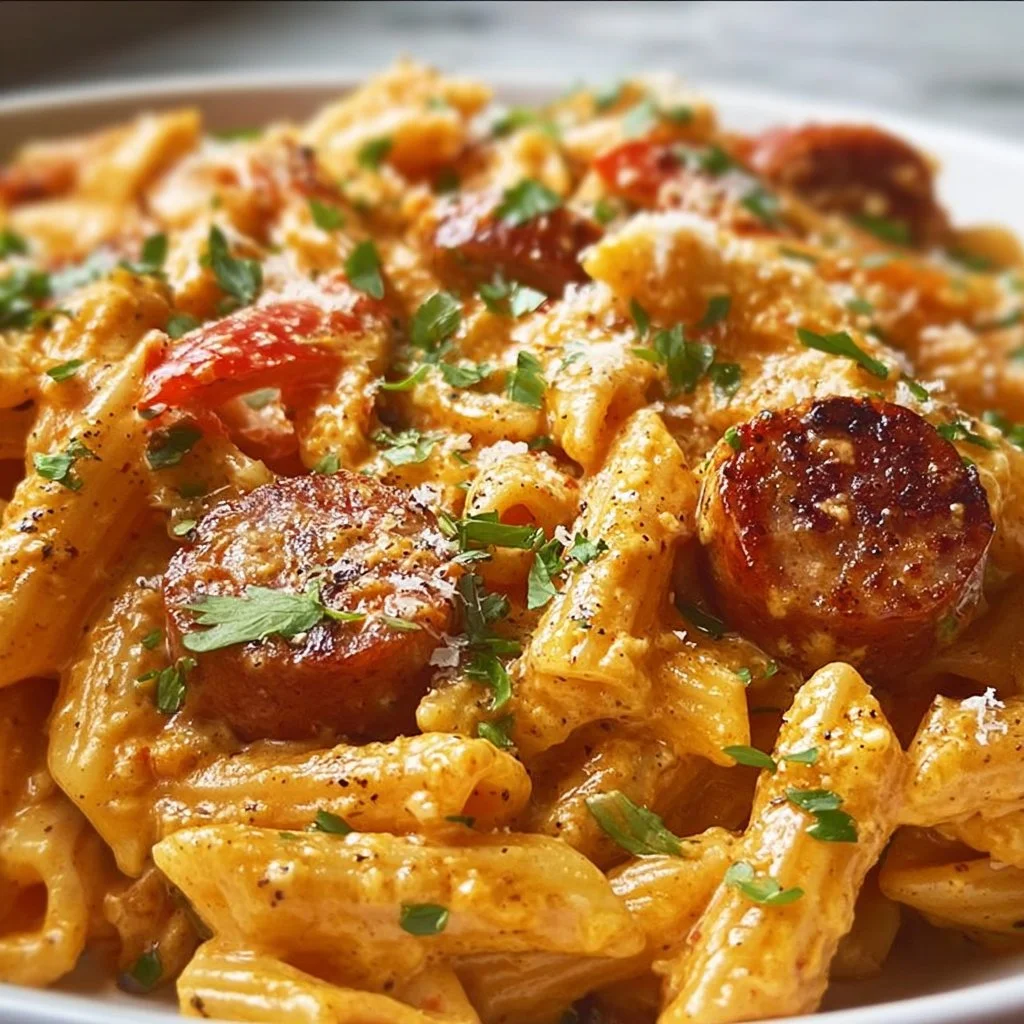
One-Pot Creamy Spicy Cajun Sausage Pasta
One-Pot Creamy Spicy Cajun Sausage Pasta
Hey there, fellow food lovers! Welcome back to my cozy corner of the internet! Today, we’re diving into the delightful world of pasta, where richness meets spice, and comfort collides with excitement. I’m thrilled to share with you my twist on a classic favorite: One-Pot Creamy Spicy Cajun Sausage Pasta!
This dish is an absolute lifesaver for busy weeknights or even a relaxed Sunday dinner when you want something a bit fancy without all the fuss. Not only does it take just around 30 minutes to whip up, but it also requires minimal cleanup because, let’s be honest, ain’t nobody got time for heaps of dishes. You’ll end up with a satisfying bowl of creamy goodness that packs a punch of flavor with a kick of Cajun spice. Oh, yes!
Now, let’s talk about the magic of this dish. Imagine you’re at home, the aroma of spices filling the air while savory sausage sizzles in the pan—just thinking about it makes me smile! This one-pot wonder combines tender pasta with a velvety, spicy sauce that’s just the right amount of creamy. Every bite is packed with flavor, warmth, and a little bit of adventure.
In my kitchen, we believe that every meal should not only feed the body but also the spirit. So gather your ingredients, roll up those sleeves, and join me! We’re not just cooking—we’re creating memories, engaging our senses, and making a meal that will have everyone at the table coming back for seconds. Get ready for some serious yum!
Personal Story
This recipe holds a special place in my heart. I remember the very first time I made it, long ago when I was a still novice in the kitchen. It was a chilly evening, and I wanted to make something cozy for my college roommates who were feeling the stress of exam week.
I had some spicy sausage lying around—thanks to a recent grocery haul—and I suddenly felt inspired! After rummaging through my pantry, I decided to throw together a pasta dish. Without a clue about what I was doing, I started layering flavors: browning the sausage, tossing in some spices, and adding cream. It began to take on a life of its own!
When I finally served it, the look on my roommates’ faces was priceless. We all dug in, and what was meant to be a simple meal turned into a laughter-filled night. The creamy, spicy blend had them all loving life and forgetting about finals, at least for a bit. Since then, this dish has become a staple in my kitchen—a reminder of how food can bring us together, create joy, and transform a regular evening into something memorable.
Ingredients
Here’s what you’ll need to create this delicious One-Pot Creamy Spicy Cajun Sausage Pasta. Each ingredient contributes to the flavorful festivity, and I’ll share some tips along the way!
-
Pasta (Fusilli or Penne):
- I love using fusilli for its ability to catch the sauce in those lovely spirals, but penne works beautifully too! You can also use whole wheat or gluten-free pasta if you’re looking for a healthier option.
-
Smoked Sausage:
- Andouille sausage is traditional and lends a fantastic smoky flavor, but feel free to swap it with your favorite type, like Italian sausage or even plant-based sausage for a vegetarian twist.
-
Olive Oil:
- This bright oil elevates the dish’s flavor. If you’re in a pinch, avocado oil or canola oil will do—just steer clear of extra virgin unless you want that bold taste.
-
Onion:
- A yellow or white onion adds sweetness and depth. Shallots can also be used for a milder flavor.
-
Bell Pepper:
- I usually reach for a red or green bell pepper for color and crunch. You can substitute it with a jalapeño for an extra kick!
-
Garlic:
- Always fresh! When cooking, garlic transforms into a sweet, aromatic wonder. If you’re all out, garlic powder can work in a pinch—just use less than fresh.
-
Cajun Seasoning:
- This spice blend is the star of the show! You can find pre-mixed Cajun seasoning at stores, or make your own with paprika, cayenne pepper, garlic powder, onion powder, thyme, and oregano.
-
Heavy Cream:
- This is what makes our dish so creamy and dreamy! Alternatively, half-and-half or even coconut cream creates a wonderful texture without the heaviness.
-
Parmesan Cheese:
- Freshly grated is best for maximum flavor. Nutritional yeast is a great dairy-free substitute that brings a cheesy essence without the lactose!
-
Green Onions:
- These are for garnish and some brightness. You can replace them with fresh parsley or even cilantro for a different flavor profile.
-
Salt and Pepper:
- Essential for elevating flavors. Always taste as you go to balance them out just right!
Step-by-Step Instructions
Alright, culinary adventurers, let’s roll up those sleeves and get cooking!
Step 1: Sauté the Sausage
Begin by heating up about 1 tablespoon of olive oil in a large pot or Dutch oven over medium heat. Once hot, add your sliced sausage. Let it sizzle! Cook for about 5-7 minutes until it gets all golden and crispy. This browning doesn’t just make the sausage beautiful; it infuses the oil with a delicious flavor bomb! Tip: Avoid overcrowding the pan; sauté in batches if necessary.
Step 2: Build the Flavor Base
Next, toss in the chopped onion and bell pepper. Cooking these veggies will enhance their natural sweetness and create a beautiful contrast to our spicy sausage. Stir them around for about 3-4 minutes until they soften. You’ll start to notice that marvelous aroma filling your kitchen!
Once they’re softened, add minced garlic and your Cajun seasoning. Let the mixture cook for a minute more. The key here is to toast the spices, which will amplify their flavors—don’t let them burn, though!
Step 3: Cook the Pasta
Now it’s time for the main star—pasta! Pour in the uncooked fusilli (or penne) and stir everything together. Immediately add about 3 cups of chicken or vegetable broth (depending on your dietary choice) to the pot. Bring it to a boil! Once boiling, reduce the heat, cover the pot, and let it simmer for about 10-12 minutes, or until the pasta is al dente and has absorbed most of the liquid. Chef Hack: Stir occasionally to prevent sticking!
Step 4: Creamy Goodness
With the pasta cooked to perfection, it’s time to add the heavy cream and half of the grated Parmesan cheese. Stir until everything is beautifully combined and creamy. Give it a taste and season with salt and pepper. If you want it spicier, feel free to sprinkle in a bit more Cajun seasoning or red pepper flakes—bring on the heat!
Step 5: Final Touches
Remove the pot from the heat, and sprinkle the remaining Parmesan on top. Toss in the chopped green onions and mix them in for a fresh pop of flavor. Let it sit for a couple of minutes to thicken up a bit. As a finishing touch, some extra cheese never hurt anyone, so don’t be shy!
Serving Suggestions
Warm weather calls for cozy gatherings! Serve your One-Pot Creamy Spicy Cajun Sausage Pasta directly from the pot into generous bowls. You can add a sprinkle of fresh parsley or more green onions on top for that beautiful presentation. This dish pairs well with crusty bread for mopping up any leftover sauce or with a side salad dressed in zesty vinaigrette for a refreshing contrast.
Recipe Variations
Feeling adventurous? Here are a few creative twists you can try:
-
Seafood Version: Replace sausage with shrimp or a mix of seafood for a delectable seafood Cajun pasta.
-
Vegetarian Delight: Go meatless with sautéed mushrooms, zucchini, or eggplant for a hearty veggie pasta.
-
Extra Veggies: Add spinach or kale for a boost of nutrients and a lovely pop of color.
-
Herby Twist: Swap Cajun seasoning for Italian herb blends for a different flavor profile that’s equally satisfying.
-
Lighter Option: Use half-and-half instead of heavy cream for a lighter sauce without losing the creaminess.
Chef’s Notes
One of the things I love about this recipe is its sheer versatility. Over the years, I’ve played around with ingredients, tweaking things based on what I had in the fridge. It started with just sausage and pasta, but then I got adventurous—adding a splash of wine here, a different veggie there, or experimenting with new spices. What remains consistent is that every time I make this dish, it feels like home.
Oh, and here’s a fun story: One time I decided to bring this dish to a potluck and overestimated how much I needed. Let’s just say my neighbors were extremely well-fed for a week!
FAQs and Troubleshooting
-
What if I don’t have Cajun seasoning?
- You can easily whip up a DIY blend using paprika, cayenne, dried thyme, oregano, and garlic powders—or just use your favorite seasoning blend!
-
My pasta is undercooked! What do I do?
- No worries! Just add a splash more broth or water and return it to heat, cooking for a few extra minutes until tender.
-
Can I make this dish in advance?
- Absolutely! You can prepare it ahead of time and reheat it gently on the stove. It can be slightly drier after refrigeration, so consider adding a splash of cream or broth when reheating.
-
Is it possible to freeze leftovers?
- Yes, you can! Store it in an airtight container in the freezer for up to 2 months. When you’re ready to enjoy, thaw it in the fridge overnight and reheat on the stovetop, adding a little additional cream or broth to revive the sauce.
Nutritional Info
This recipe serves approximately four and contains:
- Calories: 450-500 (per serving, depending on ingredient swaps)
- Protein: 25g
- Carbohydrates: 45g
- Fats: 20g
This nutritional count will vary based on your specific choices of sauces, cheeses, and sausage types used.
And there you have it, folks! A wonderfully creamy, spicy, and utterly comforting one-pot pasta dish that will bring warmth and joy to your dining table. I hope you enjoy cooking this as much as I did! Happy cooking, and don’t forget to share your creations and memories as you gather around the table. Until next time, keep those aprons messy and your hearts full!
Print
One-Pot Creamy Spicy Cajun Sausage Pasta
- Total Time: 30 minutes
- Yield: 4 servings 1x
- Diet: Meat
Description
A creamy and spicy pasta dish that combines the flavors of Cajun sausage with tender pasta in a one-pot preparation for minimal cleanup.
Ingredients
- 8 oz Fusilli or Penne pasta
- 12 oz smoked sausage (Andouille or Italian)
- 1 tbsp olive oil
- 1 onion, chopped
- 1 bell pepper, chopped
- 3 cloves garlic, minced
- 2 tbsp Cajun seasoning
- 3 cups chicken or vegetable broth
- 1 cup heavy cream
- 1/2 cup Parmesan cheese, grated
- 2 green onions, chopped (for garnish)
- Salt and pepper to taste
Instructions
- Heat the olive oil in a large pot or Dutch oven over medium heat. Add sliced sausage and cook for 5-7 minutes until golden and crispy.
- Add the chopped onion and bell pepper, cooking for 3-4 minutes until softened. Stir in garlic and Cajun seasoning, cooking for 1 minute.
- Pour in the pasta and broth, bringing it to a boil. Reduce heat, cover, and simmer for 10-12 minutes until pasta is al dente.
- Add the heavy cream and half of the Parmesan cheese, stirring until creamy. Season with salt and pepper.
- Remove from heat, top with remaining Parmesan and chopped green onions. Let sit for a few minutes before serving.
Notes
Feel free to make substitutions with different sausages or pasta types to suit your dietary preferences. You can also add additional vegetables for more nutrition.
- Prep Time: 10 minutes
- Cook Time: 20 minutes
- Category: Main Course
- Method: One-Pot Cooking
- Cuisine: Cajun
Nutrition
- Serving Size: 1 serving
- Calories: 500
- Sugar: 5g
- Sodium: 900mg
- Fat: 20g
- Saturated Fat: 8g
- Unsaturated Fat: 8g
- Trans Fat: 0g
- Carbohydrates: 45g
- Fiber: 3g
- Protein: 25g
- Cholesterol: 60mg
Keywords: pasta, one-pot meal, Cajun, creamy pasta, sausage recipe


