
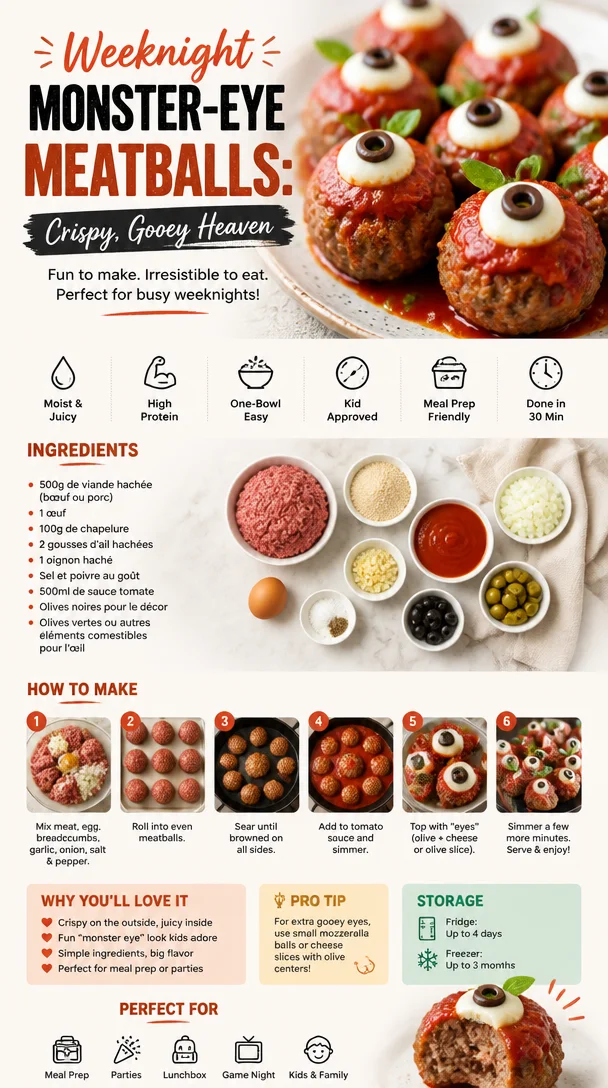
Weeknight Monster-Eye Meatballs: Crispy, Gooey Heaven
Boulettes ‘Œil de Monstre: A Spooky Delight for Your Table
Every year, as the leaves turn vibrant shades of orange and gold, and the air gets that crisp, cool bite, something magical happens—I find myself wandering into the kitchen with a big smile on my face, ready to embrace all the cozy flavors of the season! Fall is more than just a time for pumpkin spice lattes and apple cider; it’s the ultimate time for hearty cooking that warms the soul and invites friends and family into our homes for gatherings filled with laughter, joy, and fantastic food.
One dish that has become a staple in my autumn repertoire is Boulettes ‘Œil de Monstre, or "monster meatballs." Picture this: little beefy or veggie balls that are not only delicious but also have a playful side, looking frightfully fun and charmingly spooky. They are perfect for Halloween gatherings or any festive dinner that calls for a blend of creativity and flavor. Why ‘Œil de Monstre,’ you ask? Well, the fun comes in when you add surprise “eyeballs” in the center—whether they’re cheese for the melty gooeyness or an olive for that fun twist!
As we embark on this culinary journey together, you’ll discover not only how to make these delightful Boulettes but also why they hold a special place in my heart—because to me, cooking is all about crafting memories that linger just as long as the flavors. So put on your favorite apron (mine is a little messy, but that’s part of the charm) and let’s dive into this delightful recipe that combines taste and a touch of whimsy.
A Fond Memory in the Kitchen
The first time I made Boulettes ‘Œil de Monstre was during a particularly colorful Halloween party at my childhood home. I wanted to create a dish that my friends and family would remember—not just for its taste but for its quirky presentation. As a teenager, I was always drawn to concocting dishes that told a story, and this dish was the perfect canvas for my creativity.
With the kitchen dimly lit, transforming into a mini haunted house, we all laughed and joked while rolling meatballs, with some of us giggling too hard and losing a few to the kitchen floor! When the boulette balls came out of the oven with their gooey cheese center, the look on everyone’s faces was priceless. The blend of flavors, the warmth from the oven, and the fun of creating something quirky together became an instant tradition. It’s a memory I cherish, and now, I’m so excited to share this recipe with you to create your own magical moments around the dinner table.
Ingredients
Here’s what you’ll need to create these delightful Boulettes ‘Œil de Monstre:
-
Ground Beef or Ground Turkey (1 lb)
- For a hearty option, I love using ground beef; it delivers the best flavor. If you’re looking for a leaner alternative, ground turkey works just as well without compromising taste.
-
Breadcrumbs (1 cup)
- The binder for your meatballs! I usually prefer Italian-style breadcrumbs for that extra flavor—feel free to use gluten-free breadcrumbs if needed.
-
Ricotta Cheese (½ cup)
- This adds moisture and richness. If you don’t have ricotta on hand, cream cheese can be a delightful substitute.
-
Egg (1 large)
- Acts as a binding agent to hold everything together. If you need a vegan option, a flax egg could do the trick.
-
Garlic, minced (2 cloves)
- Fresh garlic takes these meatballs to another level. If you’re in a pinch for time, garlic powder can work; just use about 1 teaspoon.
-
Onion, finely chopped (½ medium onion)
- Sweetens the boulette mix. For a milder flavor, shallots can also work beautifully here.
-
Worcestershire Sauce (1 tablespoon)
- This adds depth and umami. If you’re avoiding Worcestershire sauce, a dash of soy sauce will add a similar flavor.
-
Italian Seasoning (2 teaspoons)
- A blend of dried herbs to give your meatballs that classic Italian flair—though feel free to sprinkle in your favorite herbs!
-
Mozzarella Cheese or Pimento-stuffed Olives
- For the filling! The gooey mozzarella delivers that delightful “eyeball” effect. Alternatively, using olives makes for a savory punch!
-
Salt and Pepper (to taste)
- Essential for bringing all the flavors together. Always taste and adjust as you go along.
Step-by-Step Instructions
Step 1: Preheat the Oven
Begin by preheating your oven to 375°F (190°C). This ensures that your Boulettes will cook evenly and come out perfectly golden and crispy.
Step 2: Mix the Ingredients
In a large mixing bowl, combine the ground beef (or turkey), breadcrumbs, ricotta cheese, egg, minced garlic, chopped onion, Worcestershire sauce, Italian seasoning, salt, and pepper. Now, here’s a tip: using your hands is the best way to mix! Get in there and gently combine everything until well blended. Don’t overwork the meat; this will keep your meatballs tender!
Step 3: Form the Boulettes
Once everything is mixed, it’s time to form your meatballs. Grab a generous tablespoon of the mixture and flatten it slightly in your palm. Now add a small cube of mozzarella cheese or an olive in the center, then fold the meat around it and roll it into a ball. Repeat until all the mixture is used up.
Step 4: Prepare the Baking Sheet
Line a baking sheet with parchment paper or lightly grease it. This prevents sticking and makes cleanup super easy. Place your formed boulettes on the baking sheet, allowing a bit of space between them to encourage browning.
Step 5: Bake Until Golden
Pop the sheet into the preheated oven and bake for about 20-25 minutes or until the internal temperature reaches 160°F (71°C) for beef and 165°F (74°C) for turkey. The cheese should be melting and oozing out the center when you take them out—yum!
Step 6: Serve them Up
Once baked, let the boulettes cool for a few minutes before serving. This will help the cheese set just a touch, making them easier to serve. Plus, they’ll stay nice and juicy!
Serving Suggestions
When it comes to serving your Boulettes ‘Œil de Monstre, the presentation is half the fun! Consider plating them on a beautiful dish, garnished with fresh parsley for a pop of color. You can also serve them on skewers for a playful twist! A side of marinara sauce for dipping can add a fun, messy aspect to the meal, embodying that cozy vibe I adore. Add in themed decorations, like a spooky tablecloth or Halloween-themed plates, to complete the experience!
Recipe Variations
-
Vegetarian Option: Substitute the ground meat with a mix of finely chopped mushrooms, lentils, and black beans to create a hearty vegetarian version.
-
Spicy Kick: Add crushed red pepper flakes or chopped jalapeños to the mix if you love some heat!
-
Cheese Lovers’ Dream: Use different kinds of cheese for the center—think gouda or sharp cheddar for a unique flavor twist.
-
Herb Variation: Experiment with herbs! Adding fresh basil or parsley to the mixture can elevate the flavor profile.
-
Saucy Delight: After they bake, toss your boulettes in your favorite BBQ or hot sauce for an extra kick!
Chef’s Notes
I have made these Boulettes countless times, and every time, they bring a smile to my face and the faces of those I serve them to. One time, I mistakenly piled too many cheese cubes in the center of a few of them, and instead of being discouraged, I rolled with it! The resulting explosion of cheese was a happy accident that became a staple in my recipe ever since. It’s these little quirks that turn a simple meal into a cherished memory.
Whether you use them in a pasta dish, serve them on their own, or toss them on top of a salad, every way you enjoy these Boulettes enhances their charm!
FAQs and Troubleshooting
-
Why did my boulettes fall apart?
- If they’re falling apart, your mixture might need more binding agents like breadcrumbs or egg. Ensure you’re mixing gently but thoroughly!
-
Can I freeze these boulettes?
- Yes! You can freeze them either raw or cooked. Just be sure to let them cool completely before placing them in a freezer bag. They make for fantastic quick dinners on busy nights!
-
What if the center isn’t gooey?
- If the cheese doesn’t melt as much, it could be because it wasn’t cold enough when you added it to the center. Using cheese at room temperature helps it melt beautifully during baking.
-
How can I make them gluten-free?
- Simply swap regular breadcrumbs with gluten-free options, and ensure any sauces or condiments used are also gluten-free. It’s just that easy!
From cozy family dinners to festive celebrations, Boulettes ‘Œil de Monstre are sure to steal the show. Each bite encapsulates the warmth of the kitchen nostalgia, playful charm, and the delicious mix of flavors. I hope this recipe brings as much joy to you and your loved ones as it has to me. So go ahead, roll up your sleeves, and let’s make some kitchen magic happen! Happy cooking, friends!
Print
Boulettes ‘Œil de Monstre
- Total Time: 40 minutes
- Yield: 4 servings 1x
- Diet: Omnivore
Description
Delightfully spooky monster meatballs perfect for Halloween gatherings, filled with gooey cheese or olives for a fun twist.
Ingredients
- 1 lb Ground Beef or Ground Turkey
- 1 cup Breadcrumbs
- ½ cup Ricotta Cheese
- 1 large Egg
- 2 cloves Garlic, minced
- ½ medium Onion, finely chopped
- 1 tablespoon Worcestershire Sauce
- 2 teaspoons Italian Seasoning
- Salt and Pepper, to taste
- Mozzarella Cheese or Pimento-stuffed Olives (for filling)
Instructions
- Preheat the oven to 375°F (190°C).
- Mix the ground beef (or turkey), breadcrumbs, ricotta cheese, egg, minced garlic, chopped onion, Worcestershire sauce, Italian seasoning, salt, and pepper in a large bowl.
- Form meatballs by flattening the mixture in your hand, adding a cheese cube or olive, then roll into a ball.
- Prepare the baking sheet by lining it with parchment paper.
- Bake for 20-25 minutes until golden and the internal temperature reaches 160°F (71°C) for beef and 165°F (74°C) for turkey.
- Serve the boulettes warm, optionally with marinara sauce for dipping.
Notes
Experiment with cheese types for the center, or try adding spices for a kick.
- Prep Time: 15 minutes
- Cook Time: 25 minutes
- Category: Main Course
- Method: Baking
- Cuisine: American
Nutrition
- Serving Size: 4 boulettes
- Calories: 350
- Sugar: 2g
- Sodium: 600mg
- Fat: 18g
- Saturated Fat: 7g
- Unsaturated Fat: 9g
- Trans Fat: 0g
- Carbohydrates: 30g
- Fiber: 2g
- Protein: 20g
- Cholesterol: 70mg
Keywords: Halloween recipes, meatballs, spooky food, party food, monster meatballs
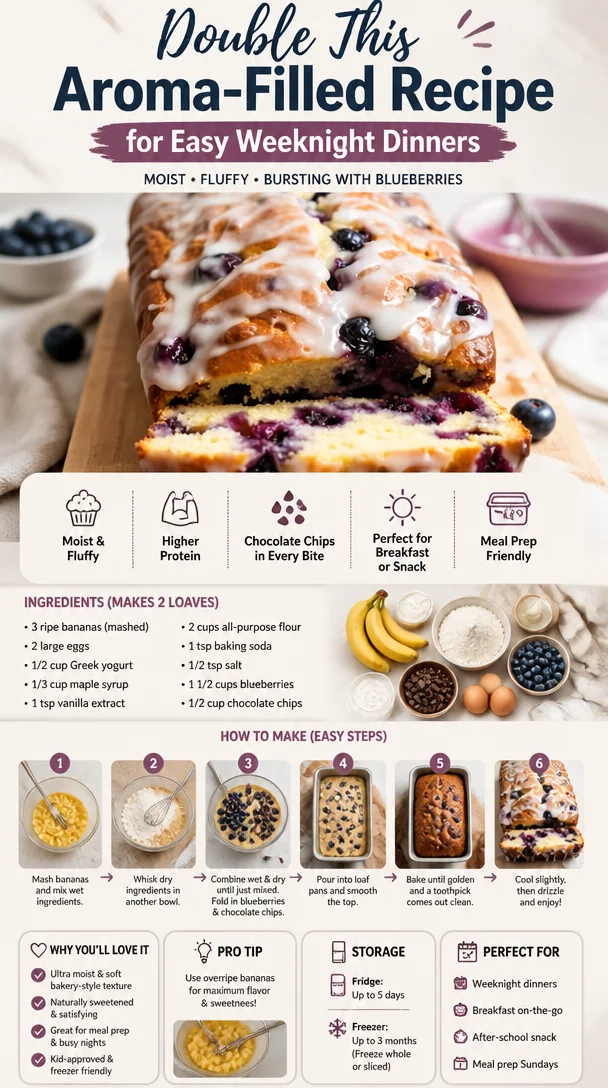
Double This Aroma-Filled Recipe for Easy Weeknight Dinners
When the House Smells Divine: My All-Time Favorite Cozy Bake
Welcome back to my kitchen, fellow flavor fanatics! Today, I’m beyond excited to share a recipe that brings back floods of nostalgia and makes my house smell like a warm hug on a chilly day. You know those recipes that are so comforting and aromatic that they instantly transport you back to simpler times? For me, that recipe is none other than the timeless and delicious Cinnamon Apple Crisp. Seriously, the aroma wafting through your home will have everyone wandering in, asking what’s cooking and getting those taste buds tingling. Trust me, you’ll want to double the recipe, because this dish is so heartwarming, you’ll have everyone coming back for seconds (and thirds!).
As I take you through this delightful journey of baking, remember, there’s no need for fancy skills here, just a cozy aproned heart ready to whip something special. Whether you’re prepping for a family gathering, cozying up on a rainy afternoon, or simply surprising yourself with a homemade treat, I’ve got you covered!
A Cozy Memory in Every Bite
Growing up, my grandmother’s kitchen was a magical place. It was always filled with rich scents, laughter, and the occasional playful flour fight! One of the most vivid memories I have is when she and I would bake our favorite Cinnamon Apple Crisp together. The sheer joy of peeling apples, the sweet sound of crumbling oats and butter, and the inevitable sprinkling of cinnamon — it was heavenly.
I remember the anticipation as we layered the apples in the baking dish, each piece coated with love and a sprinkle of brown sugar. There was a special moment when we slid the dish into the oven; we’d lean in and catch that first whiff of cinnamon mingling with the tartness of apples. It was an invitation for the entire family to gather and share stories around the table. Every time I make it, I’m transported back to those heartwarming evenings, and I can’t help but smile as I pull the bubbling, golden crisp from the oven.
Let’s Talk Ingredients
Now, let’s dive into what you’ll need for this divine creation! Here’s your shopping list:
-
5-6 medium apples (Granny Smith or Honeycrisp)
Use a mix for a balanced tartness and sweetness! No apples? Pears make for a fabulous swap! -
1 cup brown sugar
This adds a caramelly richness. You can substitute with coconut sugar for a lower glycemic index. -
1 cup rolled oats
Choose gluten-free oats if needed! They’re the hearty soul of our crisp — crunchy and delicious. -
1/2 cup all-purpose flour
Substitute with almond flour for a gluten-free option; just remember it packs a denser punch. -
1 teaspoon ground cinnamon
The star spice! Cardamom or nutmeg can make intriguing alternatives for a unique twist. -
1/2 cup cold unsalted butter
Cut this into small cubes to mix in easily! For a dairy-free version, coconut oil works wonders when chilled. -
A pinch of salt
Enhances all flavors. You can also use sea salt for a little extra flair! -
1 teaspoon vanilla extract
Always use pure for depth of flavor. I often sneak a little extra in my recipe for good measure!
Step-by-Step Instructions
Now that we’ve gathered all our goodies, let’s get baking!
-
Preheat Your Oven
Set that beautiful oven to 350°F (175°C). This ensures your crisp will bake to bubbly perfection. -
Prep the Apples
Peel, core, and slice your apples evenly. You want them about 1/4 inch thick for even cooking. A mix of tart and sweet varieties adds fantastic flavor, so feel free to get creative! -
Toss with Sugar and Spice
In a large bowl, combine the sliced apples with 1/2 cup brown sugar, 1 teaspoon ground cinnamon, and a pinch of salt. Toss well until everything is evenly coated. The sweetness will balance the tart, and trust me, this step infuses it with next-level goodness. -
Layer the Apples
Transfer your apple mixture into a greased 9×13 inch baking dish. Make sure to spread them out evenly to allow for proper cooking. Get all that delicious goodness into one happy little layer! -
Mix Up the Crisp Topping
In another bowl, combine 1 cup rolled oats, 1/2 cup all-purpose flour, and the remaining 1/2 cup brown sugar. Cut in your 1/2 cup cold unsalted butter with a pastry cutter or your fingers until it resembles coarse crumbs. It’s messy but oh-so-fun (let those chef fingers work!). It should feel grainy and ready to crumble over the apples. -
Top and Bake
Evenly spread the oat mixture over the apples. Pop it in that preheated oven for 40-45 minutes, or until the top is golden brown and you can see the apples bubbling beneath! Oh, the smells! -
Cool a Bit, If You Can
Let it cool for at least 10-15 minutes before diving in. This step helps it set up beautifully. I know, I know—it’s hard to wait, but trust me!
Serving Suggestions
Serve your warm Cinnamon Apple Crisp with a generous scoop of vanilla ice cream or a dollop of freshly whipped cream. It creates a delightful contrast between the warm crisp and the cold, creamy topping. You can even sprinkle a bit of cinnamon on top for that extra touch of coziness.
Recipe Variations
Feeling adventurous? Here are a few variations to make this recipe your own:
- Nutty Delight: Add chopped pecans or walnuts to the oat mixture for a satisfying crunch.
- Berry Bliss: Toss in some fresh or frozen berries along with the apples for a delightful berry-apple medley.
- Citrusy Zing: Incorporate the zest of one lemon or orange into your apples for a fresh zing!
- Spice it Up: Experiment with ginger or allspice for a warming depth.
Chef’s Notes
This Cinnamon Apple Crisp recipe has been a favorite in my family for generations. Over the years, I’ve adapted it based on what I’ve had on hand or seasonal ingredients. There was one Thanksgiving when I was so excited to share it that I accidentally used salt instead of sugar in the crisp topping. Let’s just say the taste testers were less than impressed! But every failure taught me something invaluable. Remember, cooking is all about experimenting and learning to tweak things as you go. Don’t be afraid to make it your own!
FAQs and Troubleshooting
-
Why is my crisp soggy?
Ensure your apple slices are balanced in moisture levels. Different varieties release different amounts of juice. Too much liquid might be due to overly ripe apples, so aim for firm ones. -
Can I store leftovers?
Absolutely! Cover your crisp with foil and store it in the fridge for up to 3 days. Reheat in the oven for the best results! -
How do I keep the top from burning?
If your topping is golden but the apples aren’t soft, cover it with foil for the last 15 minutes to prevent over-browning while the apples continue cooking. -
Can I freeze it?
Yes! Assemble and freeze before baking. When ready, bake from frozen, adding 15-20 minutes of baking time.
Nutritional Info
While I believe in indulging in moderation, here’s a general breakdown per serving:
- Calories: ~280
- Fat: 10g
- Carbohydrates: 45g
- Protein: 2g
This delicious Cinnamon Apple Crisp ticks all the boxes for a comforting dessert, and I promise, the delightful smell will keep you smiling long after the last bite. So what are you waiting for? Head to your kitchen and whip up some cozy goodness! Every spoonful is bound to hold a heartwarming story. Enjoy every moment of it, dear friend!
Print
Cinnamon Apple Crisp
- Total Time: 60 minutes
- Yield: 8 servings 1x
- Diet: Vegetarian
Description
A heartwarming dessert that combines the tartness of apples with a sweet, crunchy topping.
Ingredients
- 5–6 medium apples (Granny Smith or Honeycrisp)
- 1 cup brown sugar
- 1 cup rolled oats
- 1/2 cup all-purpose flour
- 1 teaspoon ground cinnamon
- 1/2 cup cold unsalted butter
- A pinch of salt
- 1 teaspoon vanilla extract
Instructions
- Preheat Your Oven: Set that beautiful oven to 350°F (175°C).
- Prep the Apples: Peel, core, and slice your apples evenly.
- Toss with Sugar and Spice: In a large bowl, combine the sliced apples with brown sugar and cinnamon.
- Layer the Apples: Transfer your apple mixture into a greased baking dish.
- Mix Up the Crisp Topping: In another bowl, combine oats, flour, and brown sugar, then cut in the butter.
- Top and Bake: Evenly spread the oat mixture over the apples and bake for 40-45 minutes.
- Cool a Bit, If You Can: Let it cool for at least 10-15 minutes before serving.
Notes
Serve with vanilla ice cream or whipped cream for a delicious contrast.
- Prep Time: 15 minutes
- Cook Time: 45 minutes
- Category: Dessert
- Method: Baking
- Cuisine: American
Nutrition
- Serving Size: 1 serving
- Calories: 280
- Sugar: 15g
- Sodium: 200mg
- Fat: 10g
- Saturated Fat: 6g
- Unsaturated Fat: 4g
- Trans Fat: 0g
- Carbohydrates: 45g
- Fiber: 4g
- Protein: 2g
- Cholesterol: 30mg
Keywords: Cinnamon Apple Crisp, apple dessert, baking, cozy recipes, comfort food
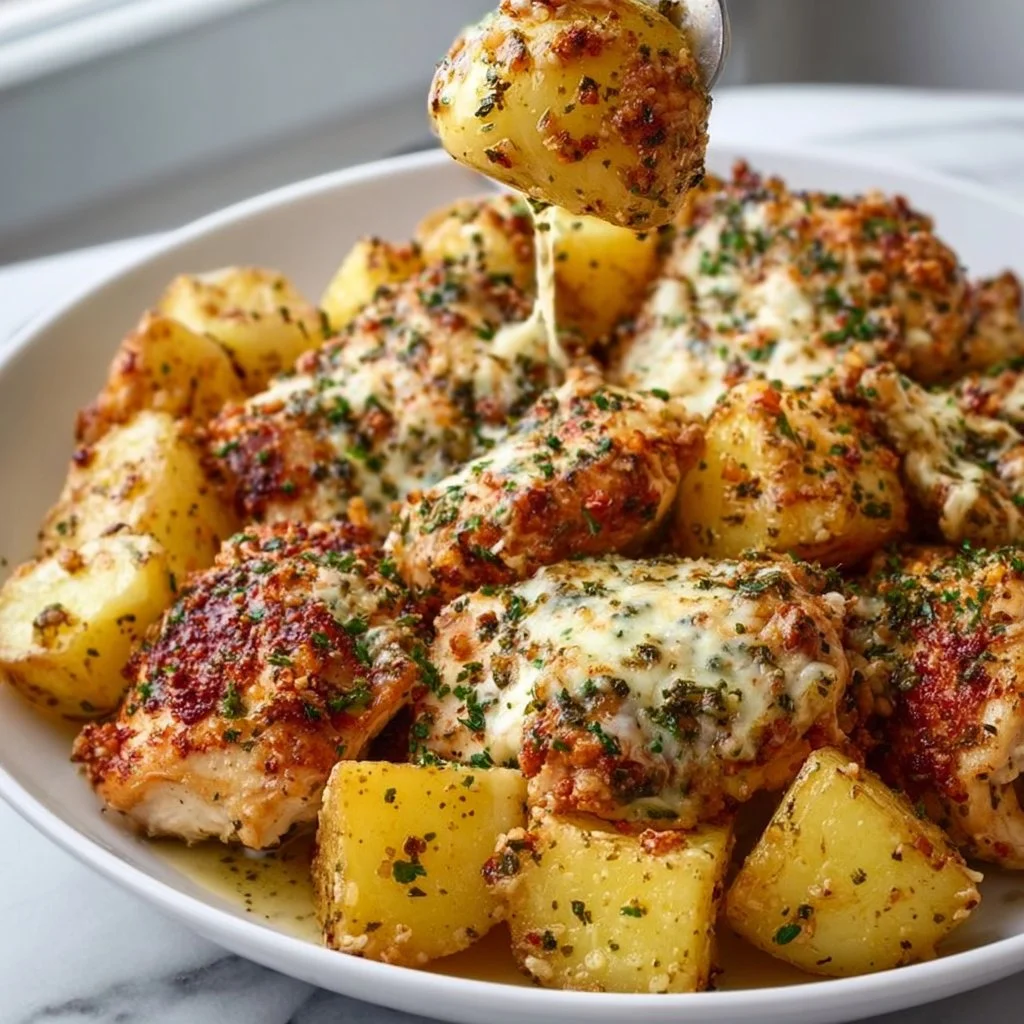
Garlic Parmesan Chicken and Potatoes (One-Pan Dinner) Recipe
# Garlic Parmesan Chicken and Potatoes: The Ultimate One-Pan Dinner Recipe

## Introduction

Welcome back to my cozy corner of the kitchen, where flavors dance and delicious memories are made! Today, we’re diving into a recipe that perfectly marries simplicity and comfort — **Garlic Parmesan Chicken and Potatoes**. This one-pan wonder isn’t just easy to make; it’s a dish that fills the air with an aroma you won’t soon forget. Imagine tender chicken, crispy golden potatoes, seasoned to perfection, all coming together in a symphony of garlic and Parmesan. It’s culinary magic that brings a smile to your face and warmth to your heart.

Now, I don’t know about you, but I’ve always been a sucker for a good one-pan meal. They’re the ultimate time savers, leaving you with minimal cleanup and maximum flavor. Whether it’s a whirlwind Tuesday night after work or a lazy Sunday family gathering, this Garlic Parmesan Chicken and Potatoes recipe fits the bill. Every bite whispers comfort, all while being incredibly versatile.

As we go through this recipe together, I’ll be sharing not just the steps but also the little tips and tricks that will make your experience even better. So, let’s roll up our sleeves, put on our favorite apron (messy is totally allowed), and get cooking!

## Personal Story

This dish brings me back to one of my favorite family traditions — Sunday dinners at my grandparents’ house. My grandma would prepare a delicious feast, always featuring some form of chicken roasting away in the oven. The whole house would smell incredible, a combination of garlic, herbs, and that unmistakable warmth of family love.

One particular Sunday, she decided to try something new, and she made her garlic Parmesan chicken and potatoes. I still remember how the crispy potatoes flirted with the garlicky chicken, forking bits from the plate while we shared stories and laughter around the table. That dinner became a cherished memory, and years later, I started my journey of recreating that beloved meal in my own kitchen. It's funny how food has this magical power to connect us to our past, isn’t it?

## Ingredients

Let’s gather the stars of the show! Here’s what you’ll need for this sumptuous dish:

- **Chicken Thighs (Bone-In, Skin-On)**: Juicy and flavorful, chicken thighs are perfect for this recipe. You can substitute with boneless chicken for quicker cooking, but you may lose some of that delicious juiciness.

- **Baby Potatoes**: These little gems are creamy and cook evenly. Feel free to swap them with fingerling potatoes or even sweet potatoes for a twist.

- **Garlic**: Ah, the heart of flavor! Fresh garlic is a must, but garlic powder can save you if you’re in a pinch.

- **Parmesan Cheese**: This adds a nutty depth. Grated works best, but if you have a block, grate it fresh for enhanced flavor.

- **Olive Oil**: A drizzle of high-quality olive oil brings everything together. You can swap it for melted butter or avocado oil if preferred.

- **Dried Italian Herbs (Oregano, Thyme, Rosemary)**: These herbs amplify the dish. If you’re missing any, feel free to substitute with whatever dried herbs you have on hand.

- **Salt and Pepper**: Simple but essential for enhancing all the flavors.

- **Fresh Parsley (for garnish)**: Adds a pop of color and freshness! You can also swap it with other fresh herbs like basil or chives for a different flair.

## Step-by-Step Instructions

Now, with our ingredients ready, let’s jump into the cooking process! Follow these steps for a delightful experience:

1. **Preheat the Oven**: Preheat your oven to 400°F (200°C). This ensures your chicken and potatoes will roast to golden perfection.

2. **Prepare the Ingredients**: Begin by washing the baby potatoes. If they’re a bit larger, cut them in half to ensure even cooking. Set them aside for now.

3. **Create the Seasoning Mix**: In a large bowl, combine minced garlic (about 4 cloves, depending on your love for garlic), olive oil, dried herbs, salt, and pepper. Whisk it all together. This mixture will be the flavor bomb that binds our dish.

4. **Marinate the Chicken**: Add your chicken thighs to the bowl, ensuring they are generously coated in the seasoning mix. Allow them to sit for about 15 minutes if you have time — it enhances the flavor, but if you’re in a hurry, you can skip this step.

5. **Prep the Baking Dish**: Grab a large oven-safe skillet or baking dish and spread the washed baby potatoes evenly across the bottom. Drizzle with olive oil, sprinkle with salt and pepper, and add a few herbs for good measure.

6. **Nestle the Chicken**: Place the marinated chicken thighs on top of the potatoes, skin-side up. This way, as the chicken cooks, the juices will seep down, flavoring those lovely potatoes.

7. **Grate Parmesan**: Now, for the magic touch! Generously sprinkle grated Parmesan over the chicken and potatoes. This will form a crispy, cheesy crust as it bakes. Yum!

8. **Bake**: Place your skillet or baking dish in the oven and bake for 35-40 minutes. The internal temperature of the chicken should reach 165°F (75°C) when done.

9. **Broil for Extra Crispiness**: If you want that extra crispy edge, switch your oven to broil during the last 2-3 minutes. But keep a close eye on it; we don’t want burnt cheese!

10. **Garnish and Serve**: Once out of the oven, let it rest for about 5 minutes. Then, garnish with fresh parsley before serving. This little addition brightens up the dish both visually and flavor-wise!

## Serving Suggestions

This Garlic Parmesan Chicken and Potatoes can easily stand alone, but if you’d like to elevate your dinner, serve it alongside a fresh garden salad or some steamed green beans tossed in lemon and olive oil. For a cozy night in, pair it with a comforting glass of white wine or a refreshing mocktail. And don’t forget the crusty bread to soak up all those delightful juices!

## Recipe Variations

Feeling adventurous? Here are some creative twists:

1. **Add Vegetables**: Toss in some broccoli, bell peppers, or carrots for a colorful and nutritious touch.

2. **Spicy Kick**: Add red pepper flakes to the garlic mixture for a bit of heat.

3. **Herbaceous Upgrade**: Swap out the dried herbs for fresh herbs like rosemary or thyme for a fresher flavor profile.

4. **Zesty Lemon**: Drizzle fresh lemon juice over the chicken just before serving for a zing that brightens up all those rich flavors.

5. **Creamy Sauce**: After baking, craft a simple cream sauce to drizzle over the chicken and potatoes using heavy cream and more Parmesan.

## Chef’s Notes

Every recipe has a little story, and this one started with my nostalgic Sundays. Over the years, I’ve adapted and tinkered, sometimes adding a twist or focusing on different sides. I once tried making this with honey mustard glaze instead of garlic, and although it went down well, there’s just something timeless about the garlic and Parmesan combo that’s hard to beat!

And here’s a little tip: don’t shy away from using leftovers! The flavor becomes even richer the next day. Reheat it gently, and you’ve got an instant meal that feels like a culinary hug!

## FAQs and Troubleshooting

**1. Why is my chicken not cooking through?**
   Ensure your oven is preheated properly and avoid opening the oven door too much to maintain temperature. If you’re using larger chicken pieces, they may need a bit more time.

**2. Can I use chicken breast instead?**
   Absolutely! Just be aware that chicken breasts can dry out more easily. Keep an eye on the cooking time and ensure they reach 165°F (75°C).

**3. What should I do if my potatoes are not crispy?**
   The potatoes need soaking up the juices of the chicken and the high heat. Make sure they are evenly spaced and check that they weren’t crowded in the pan.

**4. Can I prepare this in advance?**
   Yes! You can marinate the chicken and pre-cut the vegetables a day ahead. Just assemble and bake when you’re ready to enjoy!

## Nutritional Info

(Servings: 4)
- **Calories**: Approximately 450 per serving
- **Protein**: 32g
- **Carbohydrates**: 30g
- **Fat**: 20g

This one-pan Garlic Parmesan Chicken and Potatoes is not just about eating but creating memories and sharing love. I hope this recipe inspires you to cook with joy and share the fruits of your labor with those you hold dear. Now, let’s get cooking — your taste buds will thank you!

Garlic Parmesan Chicken and Potatoes
- Total Time: 55 minutes
- Yield: 4 servings 1x
- Diet: Gluten Free
Description
A delicious one-pan meal featuring tender chicken thighs and crispy baby potatoes, all seasoned with garlic and Parmesan.
Ingredients
- 4 Chicken Thighs (Bone-In, Skin-On)
- 1.5 lbs Baby Potatoes
- 4 cloves Garlic, minced
- 1/2 cup Parmesan Cheese, grated
- 2 tbsp Olive Oil
- 1 tsp Dried Italian Herbs (Oregano, Thyme, Rosemary)
- Salt and Pepper, to taste
- Fresh Parsley, for garnish
Instructions
- Preheat the oven to 400°F (200°C).
- Prepare the baby potatoes by washing them and cutting larger ones in half.
- Create the seasoning mix by combining minced garlic, olive oil, dried herbs, salt, and pepper in a large bowl.
- Marinate the chicken thighs in the seasoning mix for about 15 minutes.
- Prep a large oven-safe skillet by spreading the washed baby potatoes across the bottom, drizzling with olive oil, and seasoning.
- Nestle the marinated chicken thighs on top of the potatoes, skin-side up.
- Grate Parmesan over the chicken and potatoes.
- Bake for 35-40 minutes or until the chicken reaches an internal temperature of 165°F (75°C).
- Broil for an additional 2-3 minutes to achieve extra crispiness.
- Garnish with fresh parsley before serving.
Notes
Feel free to add other vegetables or spices to suit your taste.
- Prep Time: 15 minutes
- Cook Time: 40 minutes
- Category: Main Course
- Method: Baking
- Cuisine: Italian
Nutrition
- Serving Size: 1 serving
- Calories: 450
- Sugar: 2g
- Sodium: 600mg
- Fat: 20g
- Saturated Fat: 6g
- Unsaturated Fat: 10g
- Trans Fat: 0g
- Carbohydrates: 30g
- Fiber: 5g
- Protein: 32g
- Cholesterol: 100mg
Keywords: one-pan meal, garlic, parmesan, chicken, dinner


