
Santa Fe Salad
# Santa Fe Salad: A Flavorful Fiesta in Every Bite!
## Introduction
Welcome to my kitchen, food lovers! Today, we’re diving into a dish that’s as bright and vivacious as the sun-soaked vistas of New Mexico — the Santa Fe Salad. Picture this: the tantalizing aroma of spices wafting through the air, the vibrant colors of fresh veggies adorning your plate, and the undeniable joy of sharing a dish that embodies flavor and freshness.
Now, you might wonder, “What’s so special about a salad?” Well, let me tell you, this isn’t just any ordinary salad. The Santa Fe Salad encapsulates the spirit of community and celebration, where every bite bursts with the warmth of Southwest flavors and the crispness of garden-fresh ingredients. It’s all about that perfect mix of textures and tastes—crunchy, creamy, spicy, and zesty. Whether it’s a sunlit picnic, a cozy family dinner, or a festive gathering with friends, this salad shines as a star attraction on any table.
I’ve always believed that the best meals don’t just fill the belly; they nourish the soul and create connections. I remember the first time I encountered a Santa Fe Salad at a local eatery during my travels in New Mexico. I was immediately drawn in by the colors and aroma that danced in the air. With its lively ingredients, it wasn't just a dish—it was an experience! I knew then that I had to recreate that magic at home, and now, I’m thrilled to share it with you. Join me as we journey through the layers of flavors and memories that make this salad truly special!
## Personal Story
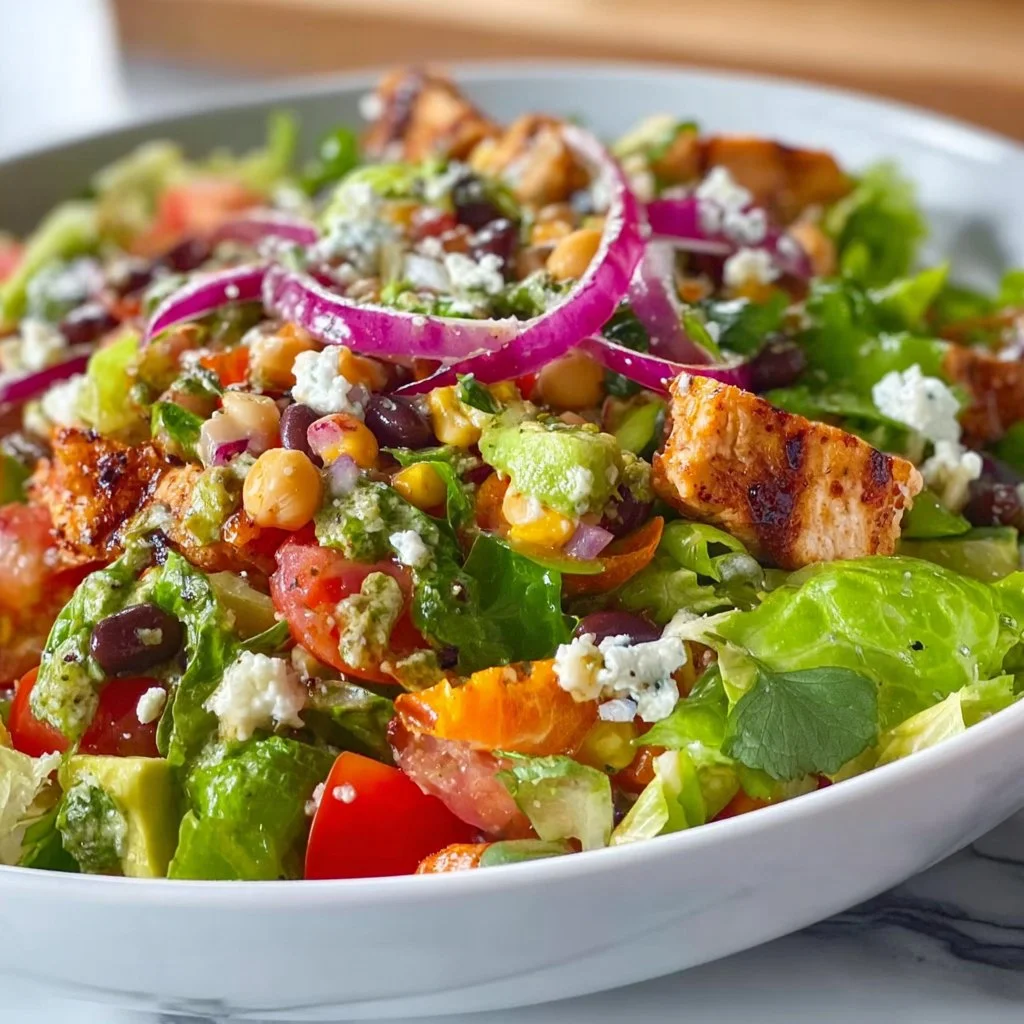
Let me take you back to a summer day in Santa Fe, where the sun is shining brightly, and the air is filled with the scent of roasting green chilies. I was visiting a quaint little café, eager to try something new. When the Santa Fe Salad arrived at my table, I was mesmerized by the burst of colors – bright reds, greens, yellows, and creamy whites all piled high, making it look like an edible work of art.
What caught my attention was not just the beautiful presentation, but the sensation of flavors when I took my first bite. The crispness of the lettuce met the sweetness of ripe corn, complemented by the smoky, spicy notes of black beans and avocados. It was a flavor explosion! I quickly learned that each ingredient played a vital role in crafting the experience. Instantly, I felt inspired. I wanted to recreate this vibrant plate at home, not just for myself, but for everyone I loved and wanted to share the joy of cooking with.
Ever since that day, my Santa Fe Salad has become a favorite dish in my own repertoire. It invites friends around my table, sparks laughter, and creates new memories — making it more than just a salad; it has evolved into a symbol of togetherness and the vibrant spirit of the Southwest.
## Ingredients
Here’s what you’ll need to whip up your very own Santa Fe Salad:
- **Mixed Greens** (e.g., Romaine, spinach, or arugula)
- *Insight*: This is the base of your salad. Feel free to mix and match greens for flavor and texture. For a heartier option, use kale.
- **Black Beans** (canned or cooked)
- *Substitution Tip*: If you’re looking for a different flavor, chickpeas or kidney beans work well too!
- **Corn** (fresh, frozen, or canned)
- *Chef Insight*: Sweet corn adds a lovely crunch and sweetness; if you can, grill it for a smoky twist!
- **Cherry Tomatoes** (halved)
- *Substitution Tip*: Grape tomatoes or heirloom varieties add a personalized touch!
- **Avocado** (diced)
- *Chef Insight*: Always buy avocados that are slightly soft to the touch for a creamy addition. Use lime juice to keep them from browning.
- **Red Onion** (thinly sliced)
- *Suggestion*: If you prefer a milder flavor, soak the slices in cold water for 10 minutes before adding.
- **Cilantro** (fresh, chopped)
- *Substitution Tip*: If cilantro isn’t your thing, try fresh parsley for a different herbaceous flavor.
- **Lime Juice** (freshly squeezed)
- *Chef Insight*: Fresh lime juice brightens everything! It’s worth skipping the bottled stuff for this one.
- **Olive Oil** (extra virgin)
- *Insight*: A high-quality olive oil elevates the salad. Experiment with flavored oils, like garlic or chili-infused.
- **Feta Cheese** (crumbled)
- *Substitution Tip*: For a vegan option, omit cheese or substitute with nutritional yeast for a cheesy flavor.
- **Chili Powder** or **Cumin**
- *Chef Insight*: These spices will link your salad to the essence of Southwest cuisine—don’t hold back!
## Step-by-Step Instructions
### 1. Prepare Your Ingredients
Start by washing and prepping your mixed greens. Tear them into bite-sized pieces (no need to get fancy here; rustic is the name of the game!). Next, rinse the canned black beans and drain the corn. For fresh corn, you’ll want to cook it briefly if you prefer it warm or grill it for a tasty char.
### 2. Dice and Chop
Now it’s time to dice the avocado, chop the cilantro, slice the red onion, and halve those cherry tomatoes. Take your time here. This step is therapeutic, and it’s where the magic starts to come together.
### 3. Assemble the Salad
Grab a large bowl and toss in all your greens first, then layer on the black beans, corn, tomatoes, and avocado—feeling free to toss a little as you go to evenly distribute. Trust me, layering adds that special touch!
### 4. Make the Dressing
In a small bowl, whisk together the lime juice, olive oil, chili powder (or cumin), and a pinch of salt. If you want an added kick, throw in a dash of pepper or some finely minced jalapeño! Once combined, pour it over the salad and mix gently to coat everything evenly.
### 5. Add the Finishing Touches
Sprinkle the crumbled feta cheese and chopped cilantro on top. If you want to impress, save a few sprigs of cilantro for garnish. Presentation matters!
### 6. Serve Immediately
Salads are best enjoyed fresh, so dive in right away. If you’re making this for later, keep the dressing separate until serving to retain that crispness!
## Serving Suggestions
When serving your Santa Fe Salad, consider using large, vibrant bowls to showcase the colorful ingredients. You can also serve it alongside tortilla chips for added crunch or grilled chicken for a more filling option. Drizzling additional lime juice right before serving can brighten it up even more—fabulous!
## Recipe Variations
1. **Spicy Santa Fe Salad**: Add sliced jalapeños or a jalapeño-infused olive oil to bring the heat!
2. **Protein-Packed**: Toss in rotisserie chicken or grilled shrimp for a more hearty option.
3. **Vegan Delight**: Skip the cheese and replace it with marinated tofu or tempeh for a lovely plant-based protein boost.
4. **Seasonal Twist**: Bring in seasonal fruits, like sliced peaches or pomegranate seeds, to keep things fresh and exciting.
5. **Quinoa Addition**: For a tahini twist, mix in cooked quinoa for added texture and health benefits.
## Chef’s Notes
I can’t tell you how many times this recipe has evolved in my kitchen. At first, it was all about gathering random vegetables from my fridge and tossing them together. Over the years, I honed it into something that not only looks great but feels like a warm hug on a plate.
A funny kitchen story: I once mistakenly added a whole cup of chili powder instead of a teaspoon! Let me tell you, that salad was a fiery adventure that left me gasping for milk instead of enjoying the flavors. Remember, always taste as you go, and don’t be afraid to adjust seasonings to your liking!
## FAQs and Troubleshooting
**Q: How do I keep avocado from browning?**
A: The best trick is to toss diced avocado with lime juice. This natural acid helps prevent oxidation.
**Q: My salad isn’t flavorful. What should I do?**
A: Make sure to season properly! A pinch of salt and a squeeze of fresh lime can really elevate and bring out the flavors.
**Q: Can I prepare this salad ahead of time?**
A: You can prep all the ingredients ahead of time, but I recommend storing the dressing separately until right before serving for maximum freshness.
**Q: I don’t like cilantro. What can I use instead?**
A: No problem! Try using parsley or even fresh basil for a completely different flavor profile.
## Nutritional Info
This salad is not only flavorful but also nutritious! Packed with healthy fats, fiber, and a plethora of vitamins, it’s a great addition to any meal.
Calories: ~300 per serving (this will vary based on added ingredients)
Protein: ~10g
Carbohydrates: ~40g
Fat: ~15g
---
And there you have it — the Santa Fe Salad, a celebration of colors and flavors that’s perfect for any occasion! Don’t just take my word for it; roll up those sleeves and get cooking! Be sure to share your creations and let the kitchen adventures begin. Happy cooking!
Santa Fe Salad
- Total Time: 25 minutes
- Yield: 4 servings
- Diet: Vegetarian
Description
A vibrant and flavorful salad packed with fresh vegetables, black beans, and a zesty dressing that embodies the spirit of the Southwest.
Ingredients
- Mixed Greens (e.g., Romaine, spinach, or arugula)
- Black Beans (canned or cooked)
- Corn (fresh, frozen, or canned)
- Cherry Tomatoes (halved)
- Avocado (diced)
- Red Onion (thinly sliced)
- Cilantro (fresh, chopped)
- Lime Juice (freshly squeezed)
- Olive Oil (extra virgin)
- Feta Cheese (crumbled)
- Chili Powder or Cumin
Instructions
- Prepare your ingredients by washing and prepping your mixed greens. Tear them into bite-sized pieces. Rinse the canned black beans and drain the corn.
- Dice the avocado, chop the cilantro, slice the red onion, and halve the cherry tomatoes.
- Assemble the salad by tossing in all your greens first, then layering on the black beans, corn, tomatoes, and avocado.
- Make the dressing by whisking together lime juice, olive oil, chili powder (or cumin), and a pinch of salt in a small bowl.
- Add the crumbled feta cheese and chopped cilantro on top and garnish with sprigs of cilantro.
- Serve immediately for the best freshness.
Notes
For added flavor, consider using flavored olive oils and serving with tortilla chips or grilled chicken.
- Prep Time: 15 minutes
- Cook Time: 10 minutes
- Category: Salad
- Method: Tossing
- Cuisine: Southwestern
Nutrition
- Serving Size: 1 serving
- Calories: 300
- Sugar: 5g
- Sodium: 250mg
- Fat: 15g
- Saturated Fat: 3g
- Unsaturated Fat: 10g
- Trans Fat: 0g
- Carbohydrates: 40g
- Fiber: 12g
- Protein: 10g
- Cholesterol: 15mg
Keywords: salad, Santa Fe, Southwestern, healthy, fresh, vegetarian

Mexican Bean Salad
A Flavorful Journey: Mexican Bean Salad You’ll Love
Welcome, culinary adventurers! Today, I’m excited to share a recipe that not only brightens up your table but also speaks volumes of flavor and color — Mexican Bean Salad. This salad is vibrant, packed to the brim with nutrients, and serves as a delightful accompaniment to any meal or a stand-alone dish that’ll make your taste buds dance.
Picture this: it’s a sunny afternoon, and you’re hosting friends for a casual get-together. You want something that’s easy to make yet breathtakingly delicious. Enter the Mexican Bean Salad! With its medley of colorful ingredients and zesty dressing, this salad is sure to steal the show. It’s simple, it’s fresh, and trust me, it’s bursting with flavor, making it the perfect dish for any season.
But wait, before we jump into the recipe, let’s talk about why this salad is more than just a dish; it’s an experience. When I was a kid, one of my favorite summer activities was helping my grandma in her garden. We would pick fresh tomatoes, vibrant bell peppers, and aromatic herbs. Those moments in the sun gave me a deep appreciation for fresh ingredients, and today, I love recreating that joy in my kitchen. This salad is a tribute to those sun-kissed days, a celebration of wholesome cooking, and a canvas for your culinary creativity.
So grab your apron and let’s embrace the vibrant flavors of Mexico right in your kitchen! Together, we’ll chop, mix, and create a salad that’ll become a staple at your dining table. Let’s get started on this flavorful adventure!
Personal Story
I’ll never forget the first time I made Mexican Bean Salad. It was a scorching summer day, and my friends had decided to host a backyard BBQ. I wanted to bring something that would impress while being easy to prepare. As I rummaged through my pantry, I found a can of black beans and some bell peppers lingering in the fridge. I remembered my grandma’s stories of cooking with fresh ingredients, and I felt inspired.
With a little creativity, I tossed together those ingredients and added lime juice, cilantro, and a pinch of spice. The colors were striking, and the aroma was enchanting. My friends were skeptical at first — "A salad, Liv?" they asked. But once they took the first bite, their expressions changed. Eyes widened, smiles emerged, and just like that, my simple creation turned into the star of the BBQ! From that day on, Mexican Bean Salad has become my go-to dish for gatherings, a simple recipe that packs a hearty punch of flavor and memories.
Ingredients
Here’s what you’ll need for this delightful salad:
-
Canned Black Beans: A great source of protein and fiber. Rinse them well to remove excess sodium. If you’d like, replace them with kidney beans or chickpeas for a twist!
-
Canned Red Kidney Beans: Beautifully complement the black beans with a pop of color. You could swap these for pinto beans if they’re your preference.
-
Red Bell Pepper: Adds sweetness and crunch. If you’re not a fan of red bell peppers, try a yellow or orange one for a different flavor profile.
-
Yellow Bell Pepper: A vibrant addition that enhances the salad’s color palette. You can use zucchini or cucumbers as a fresh alternative.
-
Cherry Tomatoes: Sweetness personified! If you don’t have cherry tomatoes, diced regular tomatoes will work just fine.
-
Red Onion: A bit of sharpness that balances the sweetness of the peppers. You can substitute green onions for a milder flavor or even omit them if you prefer.
-
Fresh Cilantro: This aromatic herb brings vibrancy to the dish. If cilantro isn’t your thing, parsley makes a fantastic substitute.
-
Lime Juice: Brightens all the flavors. Fresh lime juice is best, but bottled juice can be used in a pinch.
-
Olive Oil: A staple in my kitchen! It helps bring all the flavors together. Avocado oil or any neutral oil can be used as alternatives.
-
Cumin: Adds a warm, earthy flavor. If you’re looking for something different, try smoked paprika for a smoky kick!
-
Salt & Pepper: Season to taste. Be mindful with salt if you’re using canned beans that might already be salted.
Step-by-Step Instructions
Step 1: Prepare the Ingredients
Start by gathering and washing all your produce. The fresher, the better! Chop your red and yellow bell peppers into small, bite-sized pieces. Slice the cherry tomatoes in half, and finely dice the red onion. Don’t forget to give your cilantro a good rinse and chop that up too — your kitchen should smell like a garden in no time!
Chef Tip: Use a sharp knife when chopping vegetables to keep them looking neat.
Step 2: Rinse the Beans
Open the cans of black beans and kidney beans, and give them a good rinse under cold water. This not only helps with the excess sodium but also improves the overall taste of the salad.
Step 3: Mix Your Base
In a large mixing bowl, combine the rinsed beans, bell peppers, cherry tomatoes, and red onion. Gently toss them together so the beans don’t mash — you want to keep that lovely texture!
Step 4: Prepare the Dressing
In a separate small bowl, whisk together the lime juice, olive oil, cumin, salt, and pepper. Don’t skip this step; a good dressing is essential for tying all those ingredients together.
Chef Hack: Add the dressing just before serving to keep the salad crisp and fresh!
Step 5: Combine & Garnish
Pour the dressing over your bean and vegetable mix. Toss gently but thoroughly until everything is well-coated with the dressing. Finally, sprinkle your freshly chopped cilantro on top. You can even save a few cilantro leaves to garnish the salad when serving.
Step 6: Chill (Optional)
For an even better flavor, let the salad chill in the fridge for about 30 minutes. This allows the flavors to meld beautifully.
Step 7: Serve & Enjoy
Spoon the salad onto a serving plate or bowl, and watch your friends and family dig in! You might want to have some tortilla chips on the side for added crunch.
Serving Suggestions
Serve this Mexican Bean Salad in a vibrant bowl, garnished with a few extra cilantro leaves for flair. Pair it with grilled meats, tacos, or even on its own with some crunchy tortilla chips for dipping. The color, texture, and flavor will make it the highlight of your dining spread!
Recipe Variations
-
Quinoa Mix-In: Boost the nutritional value by adding cooked quinoa. It makes the salad heartier and satisfying.
-
Spicy Kick: Add diced jalapeños or a sprinkle of red pepper flakes for a bit of heat!
-
Creamy Avocado: Dice up some avocado and gently fold it into the salad just before serving to add creaminess.
-
Feta Cheese: A sprinkle of feta adds a delightful tang and creaminess that complements the flavors perfectly.
-
Pineapple Twist: For a fruity variation, toss in some diced pineapple for sweetness and an exotic flair!
Chef’s Notes
Making this salad is like hitting a reset button in my kitchen! Each time I whip it up, I’m reminded of those glorious summer days spent in my grandma’s garden. She always believed that cooking should be joyful and uncomplicated, a philosophy I carry with me.
Over the years, this recipe has evolved with my own touches — sometimes I’ll throw in some corn or substitute ingredients based on what I have. Each variation is like adding a new chapter to a favorite story, and I encourage you to make it your own. Feel free to get creative; after all, the kitchen is a place for exploration!
FAQs and Troubleshooting
Q: Can I make this salad ahead of time?
A: Absolutely! Make it up to a day in advance and store it in the fridge. Just be sure to add the dressing right before serving to keep everything fresh.
Q: What if my black beans are mushy?
A: Rinsing beans is essential to remove the mushy texture. If you’ve cooked them from scratch, ensure you don’t overcook.
Q: Can I use dried beans?
A: Yes, just make sure to soak and cook them properly before using! Dried beans offer a great texture and flavor when cooked right.
Q: Is this salad suitable for meal prep?
A: Definitely! This salad holds up well in the fridge and makes for a fantastic lunch option throughout the week. Just keep the dressing separate until you’re ready to eat!
Nutritional Info (Optional)
While I’m not diving deep into the exact nutritional details, I can promise you this salad is nutritious! Packed with protein from the beans, fiber, and a variety of vitamins from the colorful veggies, it’s a wholesome boost to any meal.
There you have it, my friends! A vibrant, flavorful journey through the world of Mexican Bean Salad. I hope this recipe brings as much joy and warmth to your kitchen as it has in mine. Remember, cooking is all about having fun and making memories, so don your apron, grab those ingredients, and let’s create something delicious together! Happy cooking! 🍽️
Print
Mexican Bean Salad
- Total Time: 15 minutes
- Yield: 4 servings
- Diet: Vegetarian
Description
A vibrant and flavorful Mexican Bean Salad, packed with nutrients and perfect as a side dish or stand-alone meal.
Ingredients
- Canned Black Beans, rinsed
- Canned Red Kidney Beans, rinsed
- Red Bell Pepper, chopped
- Yellow Bell Pepper, chopped
- Cherry Tomatoes, halved
- Red Onion, finely diced
- Fresh Cilantro, chopped
- Lime Juice
- Olive Oil
- Cumin
- Salt & Pepper, to taste
Instructions
- Prepare the Ingredients: Gather and wash all your produce, chop bell peppers, slice cherry tomatoes, and dice red onion. Chop cilantro.
- Rinse the Beans: Open the black and kidney bean cans and rinse them under cold water.
- Mix Your Base: In a large bowl, combine beans, bell peppers, cherry tomatoes, and red onion. Toss gently.
- Prepare the Dressing: In a small bowl, whisk together lime juice, olive oil, cumin, salt, and pepper.
- Combine & Garnish: Pour dressing over the salad, tossing gently. Top with cilantro.
- Chill (Optional): Let the salad chill in the fridge for 30 minutes to meld flavors.
- Serve & Enjoy: Spoon into a bowl and serve, optionally with tortilla chips.
Notes
For variations, consider adding quinoa, jalapeños, avocado, feta, or pineapple for extra flavor.
- Prep Time: 15 minutes
- Cook Time: 0 minutes
- Category: Salad
- Method: Mixing
- Cuisine: Mexican
Nutrition
- Serving Size: 1 serving
- Calories: 250
- Sugar: 6g
- Sodium: 300mg
- Fat: 9g
- Saturated Fat: 1g
- Unsaturated Fat: 8g
- Trans Fat: 0g
- Carbohydrates: 36g
- Fiber: 10g
- Protein: 11g
- Cholesterol: 0mg
Keywords: salad, Mexican, vegetarian, beans, healthy

Cheesy Potato Burritos
# Cheesy Potato Burritos: From My Kitchen to Yours

Welcome back, dear foodies! Today, I’m absolutely thrilled to share a beloved recipe with you—Cheesy Potato Burritos. If you’re like me, you know there’s something undeniably cozy about loading up on comforting flavors and wrapping them in a warm tortilla. This dish isn’t just a meal; it’s an experience—one that sparks joy, laughter, and delightful memories around the dining table.

Picture this: a chilly evening, the smell of something delicious wafting through the air, and loved ones gathered together, diving into a platter of cheesy, hearty burritos. With their crispy edges and warm, cheesy centers, these burritos are the culinary equivalent of a loving hug. Whether it’s breakfast, brunch, or dinner, they can make any occasion feel special.

The beauty of these Cheesy Potato Burritos is you don’t need to be a gourmet chef to whip them up—trust me! They come together in just a few steps, and the result is an explosion of cheesy goodness that will leave everyone asking for seconds. So, grab your apron, let’s get cozy in the kitchen, and create a burrito masterpiece together!

## Personal Story: A Cozy Family Tradition

My love for burritos started at a young age. Every Sunday, my family would gather for brunch, and one of my mom’s signature dishes was her cheesy potato burritos. She’d whip them up so effortlessly, the kitchen would fill with that glorious smell of melting cheese, tender potatoes, and spices that made my stomach flutter with anticipation.

I remember sitting at the kitchen counter, my little hands rolling the tortillas and getting as much filling as possible—because, honestly, who wouldn’t want an extra helping of gooey cheese? Those Sunday brunches became a cherished tradition filled with laughter and the delight of sharing food made with love.

Now, taking the helm in my own kitchen, I’ve made this recipe my own while keeping the spirit of those joyful moments alive. It's all about the warmth and the memories we create around the table, and I can’t wait for you to experience it too!

## Ingredients

For these delicious Cheesy Potato Burritos, you’ll need the following ingredients:

- **4 medium-sized Russet potatoes**: Creamy and starchy, these potatoes are the stars of the show. If you prefer, you can substitute with Yukon Gold for a richer flavor.

- **1 cup shredded cheese (cheddar, Monterey Jack, or a blend)**: Use your favorite cheese to elevate the meltiness! For vegan options, try dairy-free cheese shreds.

- **1 small onion, diced**: Sweet and savory, onions add an aromatic foundation. Red or yellow onions work beautifully here.

- **2 cloves garlic, minced**: Garlic enhances the flavor profile. Feel free to use garlic powder as a substitute—about half a teaspoon should do the trick.

- **1 tsp cumin**: This earthy spice brings warmth to the dish. Smoked paprika is a great alternative for added depth.

- **Salt and pepper to taste**: Essential for balancing the flavors. Season as you go for best results!

- **4 large flour tortillas**: Flour tortillas are soft and pliable for stuffing. Corn tortillas can offer a gluten-free option but might require careful handling.

- **Oil for frying**: I love using olive oil for a touch of fruity flavor, but vegetable or canola oil will work just as well.

- **Optional toppings (sour cream, salsa, guacamole)**: Don’t forget these to take your burritos over the top!

## Step-by-Step Instructions

Let’s roll up our sleeves and get to the good stuff! Here’s how you can make these Cheesy Potato Burritos:

1. **Boil the Potatoes**: Start by peeling and dicing your Russet potatoes into cubes, about 1-inch thick. Place them in a large pot, cover with cold water, add a pinch of salt, and bring to a boil. Once boiling, reduce to a simmer for about 15–20 minutes or until fork-tender.

    *Chef’s Tip*: If you want to infuse a bit of flavor, toss in a garlic clove or bay leaf while the potatoes cook.

2. **Saute the Onion and Garlic**: While the potatoes boil, heat a tablespoon of oil in a large skillet over medium heat. Add the diced onion and sauté until it becomes translucent (about 5 minutes). Then, add the minced garlic and cumin, letting everything cook for another minute until fragrant.

    *Commentary*: This combo creates an aromatic base that will beautifully complement the potatoes.

3. **Mash the Potatoes**: Once the potatoes are soft, drain them and return them to the pot. Using a potato masher, mash them up until smooth. Stir in the sautéed onion, garlic, and half of your cheese, seasoning with salt and pepper to taste.

    *Chef Insight*: For a little kick, feel free to add jalapeños or crushed red pepper flakes.

4. **Wrap the Burritos**: Lay out a tortilla on a clean surface and spoon a generous amount of the potato mixture into the center. Fold the sides over the filling and then roll it up tightly. Repeat with remaining tortillas and filling.

    *Little Chef Hack*: If you’re having trouble with your burritos staying closed, a toothpick can help keep them together while frying!

5. **Fry the Burritos**: Heat more oil in the skillet over medium heat. Once hot, place the burritos seam-side down in the pan. Cook for about 3–4 minutes on each side or until crispy and golden brown.

    *Tip*: Don't overcrowd the skillet; give them some space to get that perfect crispy texture!

6. **Melt the Cheese**: After flipping the burritos, sprinkle the remaining cheese on top and cover the skillet with a lid. This will allow the cheese to melt beautifully while the burritos crisp up.

7. **Serve Warm**: Once golden and crunchy, remove them from the skillet and let them rest for a minute. Serve them up with your favorite toppings.

## Serving Suggestions

Presentation is key, right? Arrange the Cheesy Potato Burritos on a platter and serve them with dollops of sour cream, fresh salsa, and guacamole. Garnish with a sprinkle of fresh cilantro or sliced green onions for that pop of color—totally Instagram-worthy!

## Recipe Variations

Feeling adventurous? Here are some fun twists on the classic Cheesy Potato Burrito:

- **Breakfast Burrito**: Add scrambled eggs and cooked bacon or sausage to your filling for a hearty breakfast option.

- **Veggie Delight**: Stir in sautéed bell peppers, spinach, or mushrooms for an extra nutritional punch.

- **Spicy Southwest**: Mix in some diced green chiles or hot sauce with the potatoes for a flavorful kick.

- **Black Bean Addition**: For added protein, mix black beans into your potato filling.

## Chef’s Notes

Over time, I've discovered that this recipe is incredibly flexible. The beauty of cooking lies in creating your variations based on what you have on hand. One time, I unexpectedly ran out of cheese and used a mix of Greek yogurt and herbs instead—it turned out to be a delightful creamy topping! Always feel free to experiment; you might just discover your next favorite flavor combination!

## FAQs and Troubleshooting

**Q: Why did my burritos fall apart?**
A: This can happen if the filling is too watery. Make sure to mash the potatoes well and avoid adding excess cooking liquid.

**Q: Can I make the filling ahead of time?**
A: Absolutely! You can prepare the potato mixture a day ahead and store it in the fridge. Just warm it up before filling the tortillas.

**Q: Are these burritos freezer-friendly?**
A: Yes! You can wrap them tightly in foil and freeze them for up to a month. Just pop them into the oven to reheat!

**Q: Can I bake the burritos instead of frying them?**
A: Of course! Simply brush them with a bit of oil and bake at 400°F (200°C) for about 20-25 minutes until crispy.

## Nutritional Info

This is a cozy comfort dish, and while it's hearty, moderation is key! Each burrito provides a good source of carbohydrates from potatoes and some protein from cheese. Pair with a salad for a balanced meal.

---

I hope you enjoy making these Cheesy Potato Burritos as much as I do! They’re a love letter to comfort food and a reminder that the best moments often happen around the table. So, roll up your sleeves, share them with family or friends, and create memories cooked with love. Happy cooking, friends!

Cheesy Potato Burritos
- Total Time: 45 minutes
- Yield: 4 servings 1x
- Diet: Vegetarian
Description
Deliciously comforting burritos filled with creamy mashed potatoes, cheese, and spices, perfect for any meal.
Ingredients
- 4 medium-sized Russet potatoes
- 1 cup shredded cheese (cheddar, Monterey Jack, or a blend)
- 1 small onion, diced
- 2 cloves garlic, minced
- 1 tsp cumin
- Salt and pepper to taste
- 4 large flour tortillas
- Oil for frying
- Optional toppings (sour cream, salsa, guacamole)
Instructions
- Boil the Potatoes: Start by peeling and dicing your Russet potatoes into cubes, about 1-inch thick. Place them in a large pot, cover with cold water, add a pinch of salt, and bring to a boil. Once boiling, reduce to a simmer for about 15–20 minutes or until fork-tender.
- Saute the Onion and Garlic: While the potatoes boil, heat a tablespoon of oil in a large skillet over medium heat. Add the diced onion and sauté until it becomes translucent (about 5 minutes). Then, add the minced garlic and cumin, letting everything cook for another minute until fragrant.
- Mash the Potatoes: Once the potatoes are soft, drain them and return them to the pot. Using a potato masher, mash them up until smooth. Stir in the sautéed onion, garlic, and half of your cheese, seasoning with salt and pepper to taste.
- Wrap the Burritos: Lay out a tortilla on a clean surface and spoon a generous amount of the potato mixture into the center. Fold the sides over the filling and then roll it up tightly. Repeat with remaining tortillas and filling.
- Fry the Burritos: Heat more oil in the skillet over medium heat. Once hot, place the burritos seam-side down in the pan. Cook for about 3–4 minutes on each side or until crispy and golden brown.
- Melt the Cheese: After flipping the burritos, sprinkle the remaining cheese on top and cover the skillet with a lid. This will allow the cheese to melt beautifully while the burritos crisp up.
- Serve Warm: Once golden and crunchy, remove them from the skillet and let them rest for a minute. Serve them up with your favorite toppings.
Notes
Feel free to experiment with the filling ingredients or toppings to create your own variations.
- Prep Time: 15 minutes
- Cook Time: 30 minutes
- Category: Main Course
- Method: Frying
- Cuisine: Mexican
Nutrition
- Serving Size: 1 burrito
- Calories: 350
- Sugar: 1g
- Sodium: 400mg
- Fat: 12g
- Saturated Fat: 4g
- Unsaturated Fat: 6g
- Trans Fat: 0g
- Carbohydrates: 45g
- Fiber: 3g
- Protein: 15g
- Cholesterol: 30mg
Keywords: burritos, cheesy potatoes, comfort food, vegetarian burritos, Mexican cuisine

Chicken Salad Croissant Sandwich
The Ultimate Chicken Salad Croissant Sandwich: A Cozy Classic!
Welcome back to my kitchen, dear friends! Today, we’re diving into the delightful world of sandwiches. But not just any sandwich — we’re talking about the heavenly Chicken Salad Croissant Sandwich that brings comfort and joy with every bite. Picture this: a flaky, buttery croissant filled with a creamy, flavorful chicken salad jazzed up with a medley of crunchy veggies and tangy spices. Whether you’re hosting a brunch, having a cozy picnic, or just craving something delicious for lunch, this charming little creation is sure to steal the spotlight!
In my kitchen, sandwiches are not just food; they’re a celebration of flavors, textures, and memories. Growing up, lunch meant gathering around the table, where each plate was filled with love and laughter. My grandma had a signature chicken salad recipe that took center stage during family gatherings. The aroma of her freshly baked croissants wafted through the air, mingling with the voices of my loved ones. Each bite of the chicken salad croissant was a harmony of nostalgia wrapped in buttery goodness.
This recipe blends that cherished memory with my penchant for convenience and flavor. Chicken salad has endless possibilities, and I’m here to show you how to create a sensational version that’s quick and easy to whip up right at home. Beyond the ingredients, what matters is the love you pour into each step. So grab your apron, roll up your sleeves, and let’s create something magical together!
Personal Story
One of my fondest memories of chicken salad croissants happened during summer vacations at my grandma’s house. She would host weekly picnics in her expansive backyard, complete with colorful blankets spread out on the grass. Me and my cousins would race to the table, our hearts set on her infamous chicken salad croissant sandwiches. They were always served, of course, along with fresh lemonade and her homemade cookies — pure bliss!
I remember the thrill of diving into that buttery croissant, the creamy chicken salad spilling slightly with the first bite, bursting with flavor and crunch. Each mouthful seemed like a warm hug, filled with nostalgia and love. Little did I know that my childhood comfort food would evolve into a cooking passion of my own, inspiring me to recreate those joyous meals and share the magic of home-cooked goodness with others. Now, as I make these sandwiches in my own kitchen, I always smile thinking of sweet summer afternoons with that family, knowing that these simple recipes tie us all together no matter where we are.
Ingredients
Here’s what you’ll need to whip up this mouthwatering chicken salad croissant sandwich:
-
Cooked Chicken Breasts
- About 2 cups, shredded or cubed. You can use rotisserie chicken for a quick hack or poach chicken breasts for a fresher taste.
-
Mayonnaise
- 1/2 cup. This is the creamy base! Greek yogurt can be a lighter substitute if you’re looking to reduce calories.
-
Dijon Mustard
- 1 tablespoon. This adds a nice zing! If you’re not a fan of mustard, a dash of lemon juice can brighten up the flavors.
-
Celery
- 1/2 cup, finely chopped. The crunch is a must! You can swap this for diced apples for a sweeter kick or use cucumber for freshness.
-
Red Onion
- 1/4 cup, finely chopped. This gives a sharp flavor. If raw onion’s too strong for you, give it a quick soak in cold water to mellow it out.
-
Grapes (optional)
- 1/2 cup, halved. They add a sweet touch that elevates the sandwich. If you’re not a grape fan, dried cranberries are a fantastic alternative.
-
Walnuts or Almonds (optional)
- 1/4 cup, chopped. For an added crunch! If you prefer a nut-free option, sunflower seeds work wonderfully.
-
Salt and Pepper
- To taste. Always trust your palate! Start with a pinch and adjust as needed.
-
Croissants
- 4-6, depending on how generous you want to be with the filling! You can use whole wheat or gluten-free options if you have dietary preferences.
Step-by-Step Instructions
Now let’s get cooking! Follow these steps, and I promise that you’ll have yourself some lovely chicken salad croissant sandwiches in no time.
Step 1: Preparing the Chicken
Start by shredding or cubing your cooked chicken breasts into bite-sized pieces. If you’re using rotisserie chicken, ensure to separate it from the skin and bones. If you’re cooking your chicken, boil or poach it for about 15-20 minutes until fully cooked. Allow the chicken to cool before shredding — we don’t want any burnt fingers here!
Chef Tip: For added flavor, feel free to season your chicken while it cooks with some garlic powder, onion powder, or even a splash of chicken broth.
Step 2: Making the Chicken Salad Mixture
In a large bowl, combine the shredded chicken, mayonnaise, Dijon mustard, chopped celery, red onion, and the fruit and nuts if you’re using them. Gently fold the ingredients together until everything is well-coated in that creamy goodness.
Chef Hack: If you like a creamier chicken salad, don’t hesitate to add a bit more mayonnaise or a splash of lemon juice to brighten things up.
Step 3: Seasoning to Perfection
Taste your chicken salad mixture and season with salt and pepper. Adjust based on your personal preference — remember, you’re the boss in your kitchen!
Step 4: Toasting the Croissants
Next, slice the croissants in half and toast them lightly in the oven or on a skillet until they’re golden brown. This step is magic; it adds an extra layer of texture and warmth.
Chef Insight: Optionally, you can spread a little butter on the insides of the croissants before toasting them for an extra indulgent flavor!
Step 5: Assembling the Sandwich
Now for the fun part! Lay out the toasted croissants, and generously fill them with the chicken salad mixture. Don’t be shy; let that filling spill over a little! Top it off with the other half of the croissant.
Step 6: Serving with Love
Serve your chicken salad croissant sandwiches immediately as they’re best enjoyed fresh! You could pair them with a light salad, chips, or even fresh fruit for a delightful meal.
Serving Suggestions
To plate your sandwich, consider cutting it in half for a lovely presentation. Serve with a side of crisp greens or board with colorful fruits for a beautiful contrast. A sprinkle of fresh herbs like parsley or dill on top adds an appealing touch. Gather your loved ones around, crack open a refreshing beverage, and enjoy this culinary gem together!
Recipe Variations
Here are a few creative twists to keep things exciting:
- Curried Chicken Salad: Add curry powder for a warm, exotic flavor. Toss in some raisins or chopped mango for sweetness.
- Mediterranean Style: Swap the mayonnaise for Greek yogurt, and add olives, sun-dried tomatoes, and feta cheese for a Mediterranean flair.
- Spicy Kick: Mix in a dash of sriracha or chopped jalapeños for an extra heat that will take your taste buds on a thrilling ride.
- Herbal Bliss: Experiment with fresh herbs such as dill, parsley, or tarragon for a burst of freshness.
Chef’s Notes
Thinking back on my early cooking days, I can chuckle at a little disaster. Once, I decided to impress my friends with homemade croissants — oh boy, what a fiasco! The dough didn’t rise properly, and instead of flaky, buttery pastries, we ended up with something reminiscent of bricks! Yet, every misstep is a learning opportunity. Now, using store-bought croissants is my go-to, as it leaves more time for enjoying the cooking process and sharing my creations with others.
Over time, this chicken salad recipe has seen many adaptations in my kitchen, from adding spices to experimenting with crunchy elements. The joy of cooking lies in creativity, and I encourage you to make it your own!
FAQs and Troubleshooting
1. Can I make this chicken salad ahead of time?
Absolutely! This chicken salad can be prepared ahead of time and stored in the refrigerator for two to three days. Just hold off on toasting the croissants until you’re ready to serve.
2. My chicken salad is too dry. What can I do?
If your chicken salad feels dry, add more mayonnaise or a drizzle of olive oil to moisten it up. You could also stir in a bit of chicken broth for added flavor and moisture.
3. Is this recipe suitable for meal prep?
Yes! The chicken salad filling itself is great for meal prep. You can package it separately from croissants to keep them fresh until you’re ready to enjoy.
4. How do I store leftover sandwiches?
If you have leftovers, it’s best to separate the filling from the croissants to avoid sogginess. Store the chicken salad in an airtight container in the fridge and enjoy it within two days.
Nutritional Info (Optional)
While I don’t typically focus on numbers, a chicken salad croissant provides protein from chicken, healthy fats from mayonnaise or yogurt, and the necessary crunch from vegetables, making it a delightful choice for lunch. Of course, moderation is key if you’re more health-conscious!
There you have it, my foodie friends! The ultimate Chicken Salad Croissant Sandwich is not just a meal; it’s a manifestation of warmth, love, and creativity that brings people together. So gather your ingredients, relive some memory-making moments in your own kitchen, and enjoy sharing it all with those you love. Happy cooking, and until next time, keep those aprons messy and your hearts full! 🎉🥐
Print
The Ultimate Chicken Salad Croissant Sandwich
- Total Time: 40 minutes
- Yield: 4 servings 1x
- Diet: None
Description
A delightful chicken salad croissant sandwich filled with creamy chicken salad, crunchy veggies, and tangy spices, perfect for lunch or brunch.
Ingredients
- 2 cups cooked chicken breasts, shredded or cubed
- 1/2 cup mayonnaise (or Greek yogurt for a lighter option)
- 1 tablespoon Dijon mustard
- 1/2 cup celery, finely chopped
- 1/4 cup red onion, finely chopped
- 1/2 cup grapes, halved (optional)
- 1/4 cup walnuts or almonds, chopped (optional)
- Salt and pepper, to taste
- 4–6 croissants
Instructions
- Prepare the chicken by shredding or cubing it into bite-sized pieces. If using rotisserie chicken, separate it from the skin and bones.
- Combine the shredded chicken, mayonnaise, Dijon mustard, chopped celery, red onion, and optional fruits and nuts in a large bowl.
- Taste the mixture and season it with salt and pepper to your liking.
- Slice the croissants in half and toast them until golden brown.
- Fill the toasted croissants generously with the chicken salad mixture.
- Serve immediately for the best flavor and freshness.
Notes
For added flavor, season the chicken during cooking. Feel free to get creative with the filling by adding herbs or spices.
- Prep Time: 20 minutes
- Cook Time: 20 minutes
- Category: Lunch
- Method: Mixing, Toasting
- Cuisine: American
Nutrition
- Serving Size: 1 sandwich
- Calories: 400
- Sugar: 6g
- Sodium: 450mg
- Fat: 22g
- Saturated Fat: 4g
- Unsaturated Fat: 15g
- Trans Fat: 0g
- Carbohydrates: 30g
- Fiber: 2g
- Protein: 22g
- Cholesterol: 90mg
Keywords: chicken salad, croissant sandwich, lunch, brunch, easy recipe
Chicken Salad
The Ultimate Chicken Salad: A Recipe to Bring You Joy
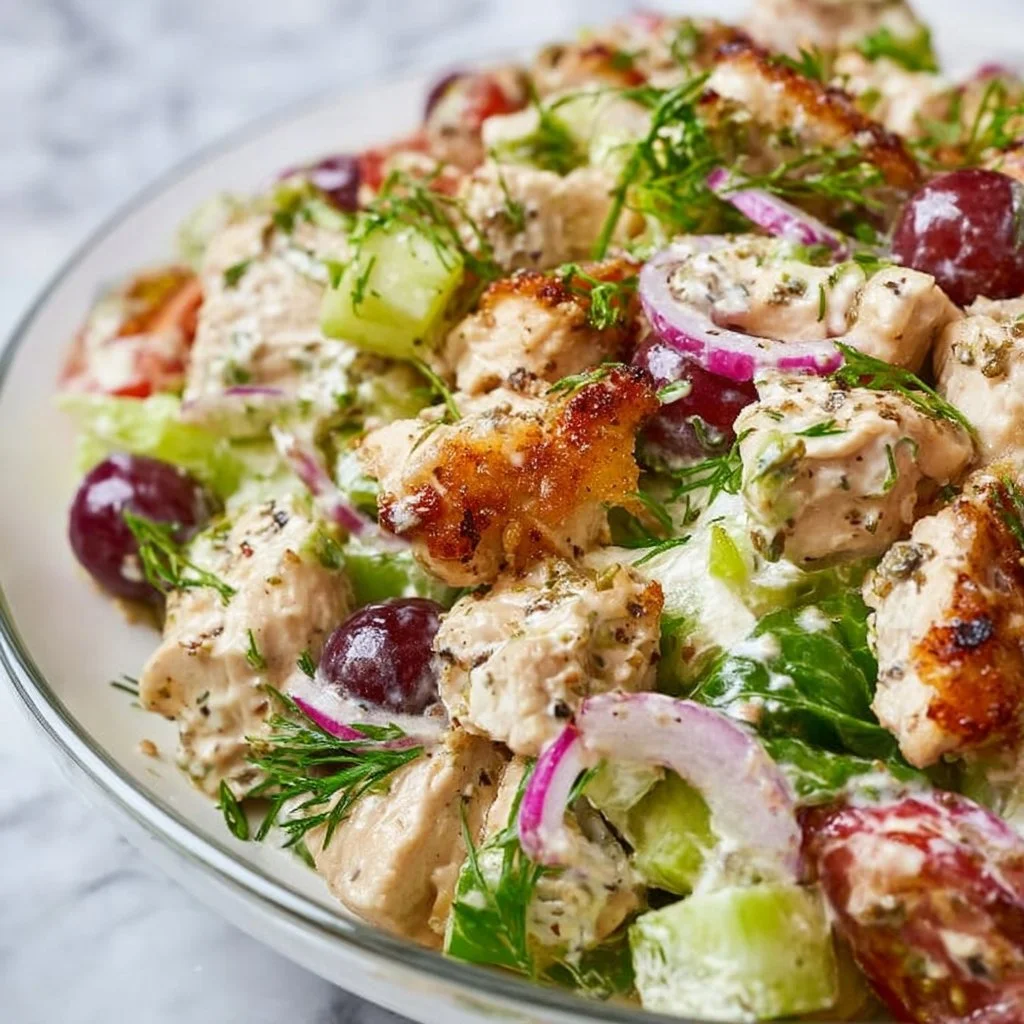
Welcome back to my cozy kitchen! Today, I’m excited to share a recipe that has not only become a staple in my home but has also charmed its way into the hearts of my friends and family: the classic Chicken Salad. This creamy, colorful concoction is so much more than just a dish; it’s a canvas for creativity, a reason to gather, and a mouthwatering reminder of all the delicious moments life has to offer.
Picture this: a warm Saturday afternoon, the sun shining brightly, and the scent of roasted chicken wafting through the air. As I chop, mix, and toss all the ingredients together, I can’t help but feel enveloped in a sense of nostalgia. This is the kind of meal that sparks conversation, laughter, and connection — but most importantly, it brings comfort. Whether served as a light lunch, a picnic treat, or a sophisticated appetizer, my Chicken Salad has truly stood the test of time.
As a self-taught home cook, I’ve had my share of experiments in the kitchen, and I’ve discovered that chicken salad is the ultimate playground for flavors. It’s endlessly customizable and can be dressed up or down depending on the occasion. Today, we’re diving into a straightforward, yet delightful Chicken Salad recipe that will get your taste buds dancing. Grab your apron and let’s embark on a culinary journey filled with scrumptious flavors and heartfelt stories!
Personal Story
Ah, Chicken Salad! It’s not just a recipe; it’s a treasured memory for me. I’ll never forget the summer BBQ gatherings at my grandparents’ house. My grandma would prepare her famous Chicken Salad, whipping it up in a large glass bowl that was older than I was. The sound of her knife slicing through the crunchy celery blended beautifully with the laughter and chatter of family members gathered around.
Every time I took a bite of that salad, I instantly felt wrapped in the warmth of family and love. Grandma’s secret? A splash of lemon juice and just the right amount of seasoning gave the salad a zing that made it unforgettable. From those sunny afternoons spent in the garden to the delightful family dinners that followed, her Chicken Salad became a beloved family tradition. Now, every time I make it, I can’t help but think of her and the love she infused into every dish. I hope this recipe brings you the same joy and connection that it has brought to me!
Ingredients
Here’s what you’ll need to create an incredible Chicken Salad, along with some insider tips:
-
Cooked Chicken (2 cups, shredded or cubed)
- Tip: You can use leftover rotisserie chicken or poach fresh chicken breasts. For quicker cooking, toss the chicken in a slow cooker with your favorite spices.
-
Mayonnaise (1/2 cup)
- Substitution: Greek yogurt works beautifully as a lighter alternative. It adds a creamy texture while boosting the protein!
-
Dijon Mustard (2 tablespoons)
- Chef Insight: This ingredient kicks up the flavor! If you prefer a milder mustard, yellow mustard will do just fine.
-
Celery (1/2 cup, diced)
- Substitution: Crunchy apple or bell pepper can be substituted for added sweetness and color.
-
Red Onion (1/4 cup, finely chopped)
- Tip: Soaking chopped onions in cold water for a few minutes before adding them reduces their pungent flavor.
-
Fresh Herbs (like parsley or dill) (1/4 cup, chopped)
- Variations: Fresh herbs brighten up the dish! Try basil or cilantro for something different or even dried herbs if fresh aren’t available.
-
Salt and Pepper (to taste)
- Chef Insight: Season in layers! Taste as you go to find your perfect balance of flavors.
-
Optional Add-ins: (1/4 cup each)
- Nuts (like almonds or walnuts) – for crunch
- Cranberries or Raisins – for sweetness
- Grapes – for a juicy pop
Step-by-Step Instructions
Alright, let’s jump into the fun part! Here’s how to whip up this fresh Chicken Salad in just a few easy steps:
Step 1: Prep the Chicken
Start by gathering your cooked chicken. If you’re using leftovers or rotisserie chicken, make sure to remove the skin and shred or cube the meat. If you’re starting from scratch, poach your chicken breasts in simmering water seasoned with a bit of salt for about 15-20 minutes until cooked through. Let it cool, then chop it into bite-sized pieces.
Step 2: Chop the Veggies
Next, wash and chop your vegetables! Dice the celery and finely chop the red onion. Remember, chopping is not just about size; it’s also about texture! You want everything to blend seamlessly with the chicken.
Pro tip: Use a sharp knife for cleaner cuts, and always keep your fingers curled under while chopping to avoid any accidents!
Step 3: Mix the Dressing
In a large bowl, combine the mayonnaise and Dijon mustard. Stir until they’re fully blended. This creamy dressing is the heart of your Chicken Salad — it ties everything together! Feel free to adjust the measurements according to your taste; perhaps you prefer it a bit creamier?
Step 4: Combine Everything
Now it’s time to bring everything together! Add the cooked chicken, diced celery, chopped red onion, and fresh herbs to the bowl with the dressing. Gently mix until every piece is coated in that creamy goodness.
Quick Hack: Use a spatula or wooden spoon to fold the mixture instead of stirring vigorously, which can break up the chicken!
Step 5: Season to Perfection
Sprinkle in salt and pepper to taste. The seasoning is where you can really personalize! Taste testers are essential in this step. Adjust the seasoning as needed until you feel that burst of flavor.
Step 6: Chill Out
If you have the patience (and trust me, it’s worth it), cover the bowl with plastic wrap and let it chill in the fridge for at least 30 minutes. This allows the flavors to meld beautifully.
Step 7: Serve and Enjoy!
When you’re ready to serve, give your Chicken Salad a final stir. It can be served as is, on a bed of greens, between fresh bread as a sandwich, or with crackers.
Serving Tip: Garnish with a sprinkle of fresh herbs or a few slices of radishes for that pop of color!
Serving Suggestions
Chicken Salad can be served in a variety of delightful ways! Consider plating a generous scoop on a bed of crisp mixed greens for a light lunch, or heap it into pita pockets or whole wheat wraps for a satisfying and portable meal. For a fun appetizer, scoop the salad into individual cucumber cups or endive leaves. Trust me, your guests will love it!
Recipe Variations
Now, let’s take this Chicken Salad up a notch! Here are a few indulgent variations for you to try:
- Mediterranean Chicken Salad: Toss in Kalamata olives, feta cheese, and sun-dried tomatoes for a flavor-packed twist.
- Curried Chicken Salad: Adding curry powder and diced apples will infuse your salad with an exotic flair.
- Southwestern Chicken Salad: Include black beans, corn, and diced jalapeños for a spicy kick — perfect with tortilla chips!
- Avocado Chicken Salad: Substitute half of the mayonnaise with mashed avocado for a creamy texture that’s bursting with healthy fats.
- Fruit-Infused Chicken Salad: Toss in some pineapple or grapes to balance the savory flavors with sweetness.
Chef’s Notes
Every recipe has its evolution, and the Chicken Salad is no exception. Over the years, I’ve experimented with countless ingredients until I found the perfect balance that reflects my family’s taste. And though it started out simply enough, I love how versatile it is, constantly changing with the seasons and our cravings.
One time, I made a dessert version of Chicken Salad using shredded coconut and a sweet yogurt dressing — let’s just say it never made it to the table! Who knew chicken salad could spark such creativity in the kitchen?
FAQs and Troubleshooting
1. My Chicken Salad is too dry — help!
If your salad turns out too dry, don’t panic! Just add a little more mayo or Greek yogurt to moisten things up. A splash of lemon juice can also help to balance flavors.
2. Can I use leftover grilled chicken?
Absolutely! Grilled chicken adds a wonderful smoky flavor. Just ensure it’s cooked through and shredded or cubed to your liking.
3. How long will my Chicken Salad last in the fridge?
Your Chicken Salad should stay fresh in an airtight container for about 3-4 days. But let’s be honest, it might not last that long because it’s so delicious!
4. What can I do if I don’t have any fresh herbs?
No worries! You can use dried herbs, although I recommend using less since they are more concentrated in flavor. You can also skip them entirely and still have a tasty salad.
Nutritional Info (Optional)
While I believe in enjoying food from the heart, here’s an approximate nutritional breakdown per serving (about 1/2 cup) if you make it traditionally:
- Calories: 250
- Protein: 20g
- Carbohydrates: 4g
- Fat: 18g
- Fiber: 1g
Now that you have this delicious Chicken Salad recipe, it’s time to gather your ingredients and get cooking! I can’t wait to hear how it turns out for you. Remember, cooking is all about having fun and bringing love into everything you do. Happy cooking, friends!
Print
The Ultimate Chicken Salad
- Total Time: 35 minutes
- Yield: 4 servings 1x
- Diet: Gluten-Free
Description
A classic Chicken Salad that’s creamy, colorful, and customizable, perfect for any occasion.
Ingredients
- 2 cups Cooked Chicken, shredded or cubed
- 1/2 cup Mayonnaise
- 2 tablespoons Dijon Mustard
- 1/2 cup Celery, diced
- 1/4 cup Red Onion, finely chopped
- 1/4 cup Fresh Herbs (like parsley or dill), chopped
- Salt and Pepper, to taste
- Optional Add-ins: 1/4 cup each of Nuts (like almonds or walnuts), Cranberries or Raisins, or Grapes
Instructions
- Prep the Chicken: Gather your cooked chicken and either shred or cube it. If starting from scratch, poach chicken breasts in simmering water for 15-20 minutes until cooked. Cool and chop.
- Chop the Veggies: Wash and chop celery and red onion. Aim for cohesive texture in your salad.
- Mix the Dressing: In a large bowl, combine mayonnaise and Dijon mustard until blended.
- Combine Everything: Add the cooked chicken, diced celery, chopped red onion, and fresh herbs to the dressing. Mix gently until coated.
- Season to Perfection: Sprinkle salt and pepper to taste and adjust seasoning as necessary.
- Chill Out: Cover the bowl and refrigerate for at least 30 minutes to meld flavors.
- Serve and Enjoy: Give a final stir before serving. Enjoy on greens, as a sandwich, or with crackers.
Notes
Chilling allows flavors to meld. Optional garnishes include fresh herbs or slices of radishes.
- Prep Time: 15 minutes
- Cook Time: 20 minutes
- Category: Salad
- Method: Mixing
- Cuisine: American
Nutrition
- Serving Size: 1 serving
- Calories: 250
- Sugar: 5g
- Sodium: 400mg
- Fat: 18g
- Saturated Fat: 3g
- Unsaturated Fat: 10g
- Trans Fat: 0g
- Carbohydrates: 4g
- Fiber: 1g
- Protein: 20g
- Cholesterol: 70mg
Keywords: chicken salad, easy recipes, summer recipes, comfort food


