
Croziflette
Croziflette: A Cozy Dish Straight from the Heart of Savoy
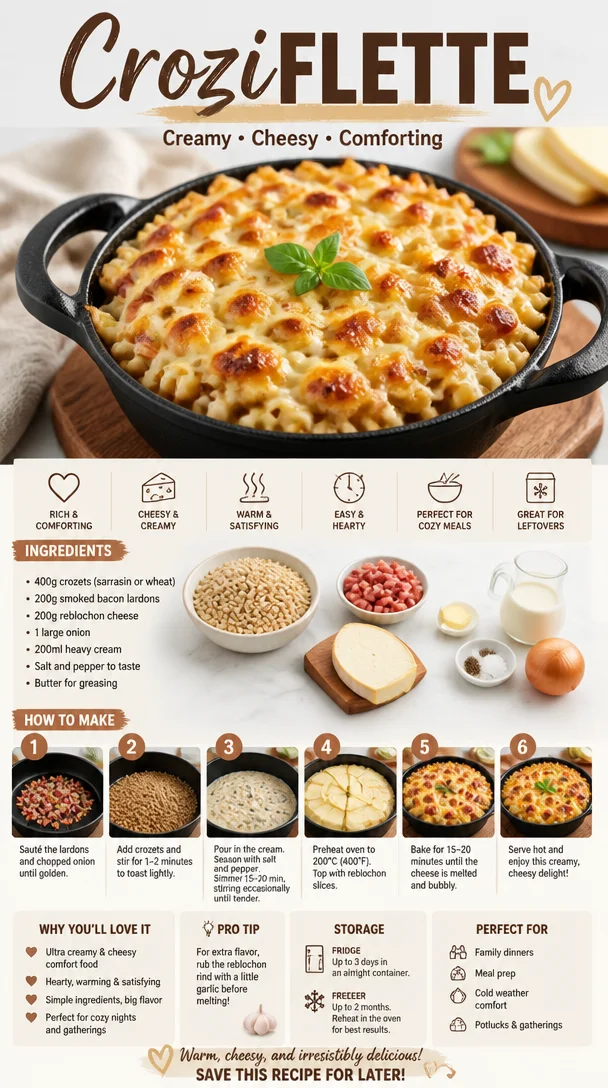
Welcome to my kitchen, fellow food enthusiasts! Today, I’m excited to share one of my favorite dishes that feels like a warm hug on a chilly day—Croziflette. This delightful dish hails from the Savoie region in France, combining the comfort of cheesy pasta with the rich flavors of smoky lardons and creamy crème fraîche. Whether you’re preparing a cozy dinner for your family or hosting a gathering of friends, Croziflette guarantees to bring smiles and satisfaction to the table!
Imagine stepping into your kitchen, and the wonderful aroma of melting cheese mingles with the savory scent of lardons sizzling in a pan. Instantly, it feels like a celebration, doesn’t it? Croziflette perfectly embodies the joy of cooking without the need for elaborate techniques or fancy ingredients. Just straight-up good food that brings people together. So, grab your apron (or your favorite messy kitchen shirt) and let’s dive into the wonderful world of Croziflette!
A Slice of Nostalgia
I remember the first time I tasted Croziflette during a trip to the French Alps. Nestled in a rustic chalet, the snow softly blanketed the town outside while inside, laughter and warmth filled the air. As we huddled around a wooden table, a steaming dish of Croziflette emerged, bubbling with deliciousness. Each bite awakened my taste buds, with creamy textures being enveloped by the savory goodness of pancetta and cheese. Amidst the laughter, stories were shared, and I felt an unmistakable connection to the rich culinary traditions of this region. Inspired by that fleeting moment, I returned home eager to recreate this dish and share it with my loved ones. And thus, my Croziflette journey began!
Ingredients
Here’s what you’ll need to make your very own Croziflette:
-
Crozets (or small pasta): These delightful little pasta squares are the stars of this dish. If you can’t find them, you can substitute with small shells or even orzo.
-
Lardons (or pancetta): These are small strips of pork that add a lovely smokiness. If you’re looking for a vegetarian option, smoked mushrooms or sautéed eggplant can work wonders.
-
Gruyère cheese: The melty, nutty flavor of Gruyère is irreplaceable. Emmental or even mozzarella can be used in a pinch for a different flavor profile.
-
Crème fraîche: This adds a luscious creaminess to the dish. If you’re in a bind, sour cream or Greek yogurt can serve as alternatives. Just remember to add a splash of lemon juice for tang!
-
Onion: Sweet and caramelized, onions bring depth to the dish. Shallots can also be a nice twist if you prefer a milder flavor.
-
Garlic: A classic flavor enhancer that brings everything together. If you’re not a fan of garlic, feel free to omit it or substitute with garlic powder.
-
Nutmeg: Just a pinch enhances the flavors beautifully, making everything taste a bit more complex. If you’re not a nutmeg fan, try freshly cracked black pepper for an added kick.
-
Salt and pepper: Essential for balancing flavors. Always season to taste as each ingredient may have its own level of saltiness.
Step-by-Step Instructions
Ready to whip up some magic? Let’s get started on this delicious Croziflette!
-
Cook the Crozets
Start by bringing a pot of salted water to a boil. Add the Crozets and cook according to package instructions—usually about 10-12 minutes—until al dente. Don’t forget to stir occasionally to prevent sticking! Once cooked, drain the pasta and set it aside. A little tip? Drizzling a touch of olive oil prevents clustering later on! -
Sauté the Lardons
In a large skillet over medium heat, toss in your lardons. Cook until they’re golden brown and crispy. Their smoky aroma will fill your kitchen and instantly transport you to the Alps. If you’re using pork alternatives, sauté them in a bit of oil until they achieve a lovely color. -
Caramelize the Onions and Garlic
Remove the lardons from the skillet, leaving behind the delicious fat. Add diced onions and cook on low until they’re soft and caramelized—this could take about 10-15 minutes. Stir in minced garlic in the last minute of cooking for a fragrant finish. Trust me, your nose will thank you! -
Combine Ingredients
In a large bowl, mix together the cooked Crozets, crispy lardons, caramelized onions, and minced garlic. Add in the crème fraîche, grated Gruyère cheese, a sprinkle of nutmeg, salt, and pepper. This is where the magic happens—mix until everything is beautifully combined! -
Prepare for Baking
Preheat your oven to 400°F (200°C). Transfer the Croziflette mixture into a greased baking dish. Don’t be shy; pile it in high! Top with an additional handful of Gruyère for that melty, golden-brown crust we all crave. -
Bake Until Golden
Pop your dish in the oven and bake for 20-25 minutes or until the top is bubbly and beautifully browned. The smell wafting through your home will be irresistible, so be prepared for some eager taste-testers! -
Cool and Serve
Once out of the oven, let the Croziflette cool for about 5 minutes. This short wait allows it to set up a bit so you can serve perfect portions. Plating can be as simple as scooping out servings into bowls, garnished with a sprinkle of fresh herbs, or fresh cracked pepper on top for a pop of color!
Serving Suggestions
Croziflette is fantastic served straight from the oven, bubbly and golden. Pair it with a fresh green salad tossed in a light vinaigrette to balance out the richness of the dish. For a complete Alpine experience, serve it alongside a glass of white wine or a warm spiced cider. This dish practically screams for cozy evenings with friends—the kind where you reminisce about old memories while savoring new flavors.
Recipe Variations
Feel like getting creative? Here are a few fun twists to make this dish your own:
-
Vegetarian Delight: Swap the lardons for sautéed mushrooms and a sprinkle of smoked paprika for an umami kick.
-
Spicy Kick: Add a pinch of red pepper flakes or diced jalapeños for a hint of heat that plays beautifully with the creamy texture.
-
Herb Infusion: Toss in fresh thyme, rosemary, or parsley for a burst of freshness. Fresh herbs add a lovely nuance that elevates every bite.
-
Cheese Overload: Try using a mix of cheeses like Fontina, Comté, or even blue cheese for a more robust flavor profile.
-
Seasonal Variations: Incorporate seasonal veggies like sautéed spinach, roasted squash, or caramelized Brussels sprouts for added nutrition and taste!
Chef’s Notes
Croziflette has become a staple in my kitchen, a recipe that’s constantly evolving with every new twist I try. I often joke with friends that I might need to open a “Croziflette Bar” because each version offers something special, and the possibilities are endless! One of my fondest memories with this dish was experimenting one late night with leftover veggies from the fridge. What started as a “clean out the fridge” mission turned into a feast that we enjoyed under twinkling fairy lights in my garden.
FAQs and Troubleshooting
-
Can I make Croziflette in advance?
Absolutely! You can prepare the dish up to the baking stage, cover it tightly, and refrigerate. When ready to serve, just pop it in the oven, adding a few extra minutes to the baking time. -
What if I don’t have crème fraîche?
No worries! Sour cream or Greek yogurt works as a substitute. Just make sure to thin it out slightly with a splash of milk or broth for the right consistency. -
How can I make a gluten-free version?
Look for gluten-free pasta alternatives that resemble Crozets, or you could even explore making a cauliflower grain base to keep it hearty yet gluten-free. -
My top layer of cheese didn’t brown nicely. What happened?
Make sure your oven is adequately preheated, and avoid covering the dish with foil while baking—it inhibits browning. If you find the top needs an extra boost, put it under the broiler for 1-2 minutes (but keep a close eye!).
Nutritional Info
While I believe in enjoying comfort food in moderation, here’s a quick glimpse of what a serving of Croziflette entails:
- Calories: Approximately 400-500 (depending on specific ingredients and serving size)
- Protein: 20-25g
- Carbohydrates: 40-50g
- Fats: 20-25g
This dish, layered with flavors, nutrition, and love, celebrates every gathering and insists on cozy nights spent with those we cherish.
So there you have it—your ultimate guide to making and enjoying Croziflette! I hope you feel inspired to gather your ingredients and embark on this deliciously comforting culinary adventure. Remember, cooking is all about joy, creativity, and connection. Here’s to many more happy meals in your kitchen—bon appétit!
Print
Croziflette
- Total Time: 45 minutes
- Yield: 4 servings
- Diet: Vegetarian (substituting lardons for mushrooms)
Description
A comforting dish from the Savoie region of France, combining cheesy pasta with smoky lardons and creamy crème fraîche.
Ingredients
- Crozets (or small pasta)
- Lardons (or pancetta)
- Gruyère cheese
- Crème fraîche
- Onion
- Garlic
- Nutmeg
- Salt and pepper
Instructions
- Cook the Crozets by boiling salted water and cooking according to package instructions (10-12 minutes) until al dente.
- Sauté the lardons in a skillet over medium heat until golden brown and crispy.
- Caramelize the onions in the skillet until soft, then add minced garlic for the last minute.
- Combine cooked Crozets, crispy lardons, caramelized onions, garlic, crème fraîche, grated Gruyère, nutmeg, salt, and pepper in a large bowl.
- Prepare the baking dish by transferring the mixture, topping it with additional Gruyère, and preheating the oven to 400°F (200°C).
- Bake for 20-25 minutes until the top is bubbly and golden brown.
- Cool for 5 minutes before serving.
Notes
Croziflette can be made in advance and refrigerated before baking. Substitute crème fraîche with sour cream or Greek yogurt if needed.
- Prep Time: 15 minutes
- Cook Time: 30 minutes
- Category: Main Course
- Method: Baking
- Cuisine: French
Nutrition
- Serving Size: 1 serving
- Calories: 450
- Sugar: 3g
- Sodium: 700mg
- Fat: 25g
- Saturated Fat: 10g
- Unsaturated Fat: 10g
- Trans Fat: 0g
- Carbohydrates: 45g
- Fiber: 2g
- Protein: 20g
- Cholesterol: 50mg
Keywords: Croziflette, French cuisine, cheesy pasta, comfort food, baking

Gratin de Courge Butternut au Fromage
Gratin de Courge Butternut au Fromage: A Cozy Culinary Adventure
Welcome to my kitchen, where the aroma of roasted butternut squash fills the air and nostalgia hugs you like a favorite sweater! If you’ve ever found yourself mesmerized by the sight of autumn leaves or the first bite of creamy, cheesy goodness, this gratin is going to become your new go-to dish. Gratin de Courge Butternut au Fromage, or butternut squash gratin with cheese, is not just a meal; it’s a celebration of warmth, comfort, and all things delicious.
On a chilly evening, when the world outside bites with a hint of cold, there’s only one thing on my mind: reaching for vibrant veggies and turning them into something magnificent. This gratin embodies that spirit. Scents of nutmeg dance in the background while layers of sweet and savory mingle, all draped under a cozy blanket of melted cheese. Trust me; this lovely dish brings everyone together!
This recipe is ideal not only for family dinners but also for gatherings with friends. It’s a dish that sparks stories around the table and makes hearts full. Imagine your loved ones lingering over a plate of golden, bubbling gratin, savoring each bite while sharing laughs and tales. It doesn’t get much better than that! Ready to transform your kitchen into a cozy culinary haven? Let’s roll up our sleeves and start this delicious journey together!
A Slice of Personal History
As a child, every autumn, I’d rush to the kitchen to help my grandmother prepare her famous squash gratin. The kitchen would be alive with laughter, and the air would be fragrant with spices and melting cheese. She’d let me pick the herbs from the garden while she taught me the art of layering flavors. Butternut squash, freshly grated nutmeg, and a sprinkle of cheese were all wrapped up in those moments, and I often felt like a magician, transforming humble ingredients into a feast!
Fast forward to today, and although my grandmother is no longer with us, her spirit thrives in the memories we created together. I’ve put my own spin on her classic recipe, not to replace her magic but to carry it forward. Each time I make gratin de courge butternut, I’m reminded of her warm embrace and the carved-out kitchen conversations we cherished. It’s a true testament that food binds us across generations, isn’t it? Now, let’s channel those cozy vibes into creating our own beautiful dish!
Ingredients
Let’s gather our magical ingredients! Here’s what you’ll need to make this delightful gratin:
-
Butternut Squash (3-4 cups, peeled and thinly sliced)
The star of our dish! Butternut squash adds sweetness and creaminess. If you can’t find butternut squash, try acorn squash or sweet potatoes; they bring a similar flavor profile. -
Gruyère Cheese (1.5 cups, grated)
This cheese melts beautifully and has a nutty flavor that elevates the dish. Substitute with Emmental or a sharp cheddar if you’re in a pinch, but keep in mind that the flavor may change slightly. -
Heavy Cream (1 cup)
This will make your gratin rich and luscious. For a lighter option, you can use half-and-half or a non-dairy cream alternative. -
Garlic (2 cloves, minced)
Garlic brings depth and pungency. You can use garlic powder if you’re out, but fresh is always best for flavor. -
Nutmeg (1/4 teaspoon)
A pinch of nutmeg intensifies the warmth of the squash. If you don’t have it, cinnamon can be a delightful alternative for a different yet vibrant twist. -
Thyme (1 teaspoon, dried or fresh)
Thyme pairs beautifully with squash; it’s earthy and aromatic. Substitute with rosemary for a bolder flavor or omit if herbs aren’t your thing. -
Salt and Pepper
Essential for balancing flavors! Use sea salt for a gentler taste and fresh black pepper for a little kick.
This delightful combination is what gives our gratin its rich and inviting flavor profile. Pro tip: Always taste as you go to ensure your dish bursts with flavor!
Step-by-Step Instructions
Now, the best part – let’s cook! Follow these steps, and I promise you a stunning gratin that will impress everyone.
-
Preheat Your Oven
Preheat your oven to 375°F (190°C). Preheating ensures even cooking and that golden crust we all love. -
Prepare the Squash
Peel and slice the butternut squash into thin, even rounds (about 1/4 inch thick). This is vital; uniform slices ensure consistent cooking. Use a sharp knife for easy slicing, or if you’re feeling adventurous, a mandoline works wonders! -
Cook the Garlic
In a medium saucepan over medium heat, melt 2 tablespoons of butter and sauté the minced garlic for about 1 minute, until fragrant (but not browned!). This step infuses the butter with that glorious garlic flavor, creating a savory base for our gratin. -
Make the Creamy Mixture
Add the heavy cream, thyme, nutmeg, salt, and pepper to the garlic butter. Bring it to a gentle simmer and let it cook for about 5 minutes to allow the flavors to meld together beautifully. Remember, this creamy concoction will hug our squash slices like an oven-fresh blanket! -
Layer the Dish
In a greased 9×13 inch baking dish, start by creating a layer of butternut squash. Drizzle about one-third of the creamy mixture over the top. Sprinkle a handful of cheese on top (a bit more is always better!). Repeat this process until all the squash and sauce are used up, finishing with a generous layer of cheese. A little extra cheese on top will result in a beautifully crispy, cheesy crust. -
Bake It to Perfection
Cover the dish with foil and bake in the preheated oven for about 30 minutes. Then, remove the foil and let it bake for an additional 20-25 minutes until the cheese is golden brown and bubbling, and the squash is tender. The foil helps to steam the squash, while the uncovered time ensures that cheese gets that desirable golden hue. -
Cool & Serve
Once the gratin comes out of the oven, let it rest for about 10 minutes (if you don’t mind the wait!). This allows the layers to settle before you dive in, preventing it from falling apart when you serve it.
What’s more, the beauty of this dish is that it stays warm for a good while, making it perfect for those cozy get-togethers.
Serving Suggestions
The beauty of gratin de courge butternut is how it can be served! I love serving it right in the baking dish, family-style. A sprinkle of fresh thyme on top adds a pop of color and a fresh aroma. Pair it with a crisp green salad or some roasted veggies for a well-rounded meal. A drizzle of balsamic reduction over the top before serving can give a zesty kick that complements the creaminess of the gratin beautifully.
Recipe Variations
Feeling adventurous? Here are some creative twists you can try with this gratin:
-
Nutty Crunch: Add a topping of panko breadcrumbs mixed with Parmesan for an extra crunchy topping. You can even include some chopped nuts like walnuts for a delightful flavor boost!
-
Spicy Kick: For those who love a bit of heat, sprinkle in some chili flakes or fresh jalapeños between the layers for a tasty twist!
-
Herby Delight: Experiment with different herbs! Sage, rosemary, or even a bit of basil can add unique flavor profiles that brighten your dish.
-
Cheesy Alternatives: Mix in a variety of cheeses, like blue cheese or feta, for a flavor explosion that everyone will love.
-
Vegan Version: Substitute the heavy cream with coconut milk and use a plant-based cheese for a vegan delight that doesn’t skimp on flavor.
Chef’s Notes
This dish has always been a crowd-pleaser in my home. As a home cook, I find joy in experimenting, whether it’s the flavors or the textures. One time, I had a small disaster with the gratin spilling over in the oven – let’s just say my kitchen was a bit of a cheesy battlefield! But it all came together, and that’s what I love about cooking: embracing the mess and the journey.
Over the years, I’ve played around with different veggies and spices, and each iteration of my gratin brings a smile to my face. This recipe truly has evolved into something so special!
FAQs and Troubleshooting
-
Why is my gratin soupy?
If your gratin is too watery, make sure to let it rest after baking. This allows the layers to settle and thicken. If your squash was particularly watery, you might want to pat it dry with a clean towel before layering it. -
Can I prepare it ahead of time?
Absolutely! You can assemble the gratin a day in advance and store it in the fridge before baking. Just add a little more baking time if it’s cold from the fridge when you pop it in the oven. -
What if my cheese clumps instead of melting?
Make sure to shred your cheese fresh from the block instead of using pre-shredded varieties, as they often contain anti-caking agents that affect melting. -
How can I store leftovers?
Store any leftovers in an airtight container in the fridge for up to 3–4 days. Reheat in the oven or microwave until warmed through. It’s just as delicious as the first day!
Nutritional Info
This gratin makes for a hearty side dish that feeds the soul. Also, it’s packed with nutrients from the butternut squash, which is a fantastic source of vitamins A and C. Combined with the lovely richness of cheese and cream, this dish is comforting and provides a balance of flavors.
So there you have it, my lovely food enthusiasts! A journey through the delicious world of Gratin de Courge Butternut au Fromage. Let this recipe be a hug on a plate, perfect for sharing with those you love. So grab your apron, turn on some soothing music, and let’s create something magical in the kitchen! Happy cooking! 🍽️✨
Print
Gratin de Courge Butternut au Fromage
- Total Time: 70 minutes
- Yield: 6 servings 1x
- Diet: Vegetarian
Description
A cozy and creamy butternut squash gratin layered with cheese and spices, perfect for family gatherings and chilly evenings.
Ingredients
- 3–4 cups Butternut Squash, peeled and thinly sliced
- 1.5 cups Gruyère Cheese, grated
- 1 cup Heavy Cream
- 2 cloves Garlic, minced
- 1/4 teaspoon Nutmeg
- 1 teaspoon Thyme, dried or fresh
- Salt and Pepper, to taste
Instructions
- Preheat your oven to 375°F (190°C).
- Prepare the butternut squash by peeling and slicing it into thin, even rounds.
- Cook the garlic in a medium saucepan with melted butter until fragrant.
- Add the heavy cream, thyme, nutmeg, salt, and pepper to the garlic butter, bringing it to a gentle simmer.
- Layer the dish starting with butternut squash, drizzling the creamy mixture, and sprinkling cheese until all ingredients are used up.
- Bake covered with foil for about 30 minutes, then uncover and bake for an additional 20-25 minutes until golden brown.
- Cool for about 10 minutes before serving.
Notes
For a twist, try adding panko breadcrumbs and nuts on top for crunch or experimenting with different herbs and cheeses.
- Prep Time: 15 minutes
- Cook Time: 55 minutes
- Category: Side Dish
- Method: Baking
- Cuisine: French
Nutrition
- Serving Size: 1 serving
- Calories: 400
- Sugar: 4g
- Sodium: 450mg
- Fat: 25g
- Saturated Fat: 15g
- Unsaturated Fat: 8g
- Trans Fat: 0g
- Carbohydrates: 30g
- Fiber: 5g
- Protein: 10g
- Cholesterol: 60mg
Keywords: butternut squash, gratin, cheesy, comfort food, vegetarian

Low Carb Pizza Casserole (Easy, Cheesy & Family-Approved)
Low Carb Pizza Casserole (Easy, Cheesy & Family-Approved)
Introduction
Welcome to my cozy corner of the culinary world! Today, we’ll take a delightful dive into a dish that’s a real crowd-pleaser—Low Carb Pizza Casserole. Now, don’t let the “low carb” scare you; I promise, this casserole delivers all the cheesy, saucy goodness that you crave while hugging that carb count. Picture this: a bubbling, cheesy casserole that’s packed with flavor and makes life on a low-carb diet infinitely more delicious. If you’re anything like me, where the mere mention of ‘pizza’ makes your stomach do a happy dance—then, oh boy, are you in for a treat!
Growing up, pizza night was a sacred ritual in my family. Every Friday, like clockwork, we’d gather around our rickety dining table with a steaming pizza that my dad would whip up from scratch. The aroma of the homemade sauce simmering on the stove combined with the distinctive sound of dough being tossed in the air still brings a nostalgic smile to my face. As I got older and started my own family, I found ways to keep those joyful pizza nights alive—but with a healthy twist. That’s how this Low Carb Pizza Casserole was born!
Imagine layering your favorite pizza toppings in a warm, comforting casserole, perfect for a family dinner, parties with friends, or even a cozy night in, just you and your favorite movie. Trust me, it’s all about satisfying those cravings while keeping it healthy, and I can’t wait to share this recipe with you! So roll up those sleeves, grab that apron, and let’s dive right into this cheesy goodness that’s bound to become a family favorite!
Personal Story
Let me take you back to a chilly fall evening a few years ago. I had just come home after a long day at work, and after a tiring week, all I wanted was the comforting embrace of something cheesy and warm. As I rummaged through the fridge, I came across an assortment of veggies, some leftover cooked chicken, and a half-opened jar of marinara sauce.
I started layering everything in a baking dish—a little cheese here, a sprinkle of herbs there, and before I knew it, I had a bubbling masterpiece in the oven resembling all the flavors of pizza without the guilt of a heavy crust. As my family gathered for dinner, their eyes lit up, and the smell wafting from the oven had them entranced. As we dug in, the jokes and laughter flowed—a reminder that food is truly the heartbeat of our home. That became our first “pizza night” casserole, and it sparked ideas for countless other family meals.
That evening not only gave birth to the Low Carb Pizza Casserole you’re about to learn but also solidified my firm belief that the best recipes often come from a mix of creativity, necessity, and heart!
Ingredients
Here’s what you’ll need to create your very own Low Carb Pizza Casserole, along with some handy insights for each ingredient:
-
1 pound ground beef or Italian sausage
Chef Insight: Feel free to substitute with turkey or chicken for a healthier variant, or even omit it entirely for a vegetarian option. -
½ cup onion, chopped
Substitution Tips: You can use shallots or even green onions for a milder flavor. -
2 cloves garlic, minced
Chef Tip: Fresh garlic packs a punch, but if you’re in a pinch, garlic powder works too—just use about 1/4 teaspoon per clove. -
1 cup marinara sauce
Try This: Store-bought works great, but homemade marinara adds a personal touch, especially on special occasions! -
2 cups chopped cauliflower or zucchini
Swap It Out: If you’re not a fan of cauliflower, chopped bell peppers or mushrooms work wonders too! -
1 teaspoon Italian seasoning
Chef’s Hack: Use fresh herbs like basil or oregano for a vibrant flavor! -
2 cups shredded mozzarella cheese
Cheesy Variations: Swap in your favorite cheese—parmesan, provolone, or pepper jack for an extra kick! -
½ cup pepperoni slices or your favorite pizza toppings
Customization: Try using olives, cooked bacon, or even artichoke hearts to shake things up.
Step-by-Step Instructions
Now, let’s get cooking! Follow these detailed steps to whip up your Low Carb Pizza Casserole.
-
Preheat Your Oven
Preheat your oven to 375°F (190°C). Getting that oven nice and hot gives you the best bubbly, cheesy outcome! -
Brown the Meat
In a large skillet over medium heat, add your ground beef or Italian sausage. Cook, breaking it apart with a spatula until browned—about 5-7 minutes. Don’t forget to drain any excess fat if you’re using fatty meat. -
Sauté the Onion and Garlic
Once the meat is browned, toss in your chopped onion and minced garlic to the skillet. Sauté until the onions are translucent and fragrant, around 3-4 minutes. This is your flavor base! -
Mix in the Marinara Sauce
Stir in your marinara sauce, bringing everything together into a gorgeous mixture. Add your Italian seasoning—smell that? It’s like a warm hug in the kitchen! -
Incorporate the Veggies
Gently fold in the chopped cauliflower or zucchini. This is where the low carb magic happens! Mix until everything is evenly coated in that saucy goodness. -
Transfer to Baking Dish
Pour the meat and veggies mixture into a greased 9×13-inch baking dish. Spread it out evenly to ensure every bite is bursting with flavor. -
Cheesy Topping
Sprinkle the shredded mozzarella cheese generously over the top. You want a good blanket of cheese to melt and form that delicate, gooey layer everyone loves. -
Add Toppings
Don’t forget the pepperoni (or any of your chosen toppings) on top of the cheese. Pile them high, friends! -
Bake in the Oven
Slide the casserole into the oven and bake for 20-25 minutes, or until the cheese is bubbling and golden on top. Keep an eye on it so it doesn’t get too brown! -
Serve and Enjoy
Once out of the oven, let it sit for about 5 minutes (if you can resist!). Serve hot, maybe with a fresh side salad for a delightful dinner.
Serving Suggestions
For presentation, scoop a generous portion onto a plate and drizzle a little extra marinara on the side for dipping. A sprinkle of fresh basil or oregano on top will add a beautiful touch and fragrant aroma.
Recipe Variations
- Pepperoni Lovers: Add extra layers of pepperoni, or use spicy Italian sausage for a pepperoni explosion!
- Veggie Delight: Load up with even more veggies—spinach, olives, or artichokes for those vibrant flavors!
- Buffalo Chicken: Spice things up with buffalo sauce instead of marinara and add shredded chicken for an exciting twist.
- Cheesy Pesto: Instead of marinara, spread a thin layer of pesto and mix mozzarella with Parmesan for that classic pizza flavor.
- Free-from Options: Use vegan cheese and a cauliflower base for an entirely dairy-free and low carb version!
Chef’s Notes
As with every recipe, it’s evolved over time! Initially, I was hesitant about including cauliflower, but it truly adds that hearty bite reminiscent of crust. My kids are now huge fans and often request this casserole with various toppings—they even suggest some wild combinations! Whenever I do make this dish, it’s remarkable how the kitchen erupts with laughter and joy, making every meal a little gathering of love.
FAQs and Troubleshooting
-
Can I prep this casserole ahead of time?
Absolutely! You can prep the casserole, cover it tightly, and refrigerate until you’re ready to bake. Just add a few extra minutes to the baking time if it’s cold from the fridge. -
What if my casserole is too watery?
If you find it watery after baking, it could be due to the veggies releasing excess moisture. Next time, consider sautéing the veggies first to help them release moisture before adding them to the casserole. -
How do I check if it’s done?
Your casserole is ready when the cheese is bubbly and golden brown. You might also want to insert a knife in the center; it should come out hot and the veggies tender! -
Can I freeze leftovers?
Yes! Cool the casserole completely, then transfer to an airtight container. It should keep well in the freezer for up to 2 months. Thaw in the fridge overnight before reheating.
Nutritional Info
This section is optional, but if you’d like the nutritional breakdown of your casserole, please let me know, and I’ll be more than happy to provide it!
So there you have it—the ultimate recipe for a Low Carb Pizza Casserole that’s easy to whip up, downright delicious, and sure to light up your family dinner table. Let the leftovers disappear in a flash and look forward to the smiles and satisfied bellies around your dining table. Happy cooking, friends!
Print
Low Carb Pizza Casserole
- Total Time: 45 minutes
- Yield: 4 servings 1x
- Diet: Low Carb, Gluten-Free
Description
A delicious low carb pizza casserole, packed with flavor and cheesy goodness, perfect for family dinners.
Ingredients
- 1 pound ground beef or Italian sausage
- ½ cup onion, chopped
- 2 cloves garlic, minced
- 1 cup marinara sauce
- 2 cups chopped cauliflower or zucchini
- 1 teaspoon Italian seasoning
- 2 cups shredded mozzarella cheese
- ½ cup pepperoni slices or your favorite pizza toppings
Instructions
- Preheat your oven to 375°F (190°C).
- Brown the meat in a large skillet over medium heat for about 5-7 minutes.
- Sauté the onion and garlic in the skillet until translucent, around 3-4 minutes.
- Mix in the marinara sauce and Italian seasoning.
- Incorporate the chopped cauliflower or zucchini into the mixture.
- Transfer the mixture to a greased 9×13-inch baking dish.
- Sprinkle the shredded mozzarella cheese over the top.
- Add the pepperoni or your favorite toppings on top of the cheese.
- Bake in the oven for 20-25 minutes, until the cheese is bubbling and golden.
- Serve hot and enjoy!
Notes
You can customize this casserole with different toppings or make it vegetarian by omitting the meat.
- Prep Time: 15 minutes
- Cook Time: 30 minutes
- Category: Main Course
- Method: Baking
- Cuisine: Italian
Nutrition
- Serving Size: 1 serving
- Calories: 350
- Sugar: 5g
- Sodium: 400mg
- Fat: 20g
- Saturated Fat: 10g
- Unsaturated Fat: 8g
- Trans Fat: 0g
- Carbohydrates: 10g
- Fiber: 3g
- Protein: 25g
- Cholesterol: 70mg
Keywords: pizza, low carb, casserole, family-friendly, easy recipe


