
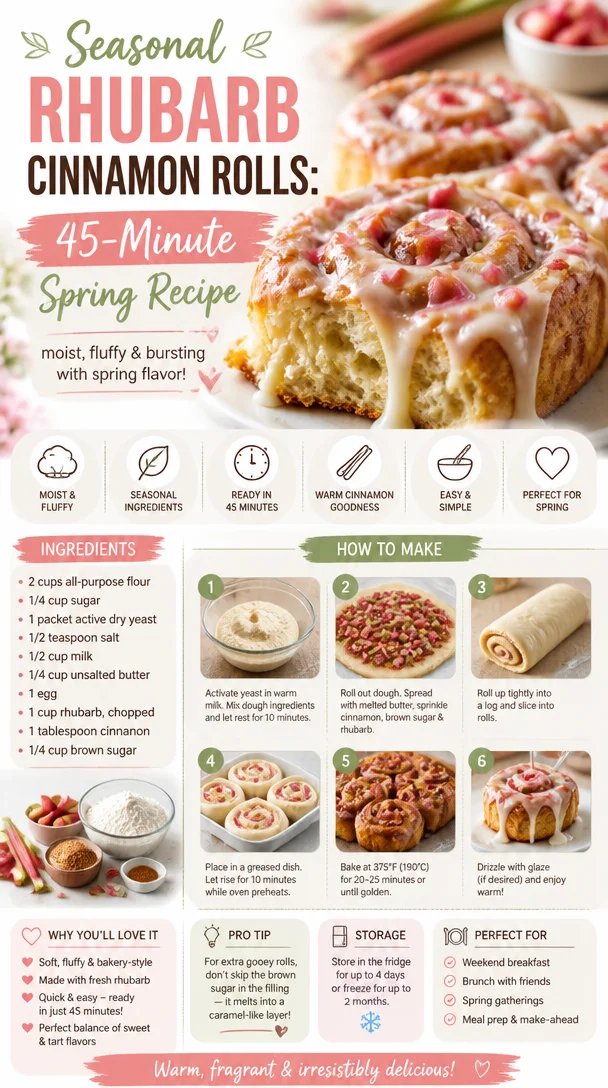
Seasonal Rhubarb Cinnamon Rolls: 45-Minute Spring Recipe
Rhubarb Cinnamon Rolls: A Sweet & Tangy Delight!
Welcome to my kitchen! I’m absolutely giddy to share my favorite recipe with you today: Rhubarb Cinnamon Rolls. Picture this: you wake up on a lazy Sunday morning, the sun peeking through the curtains, and you catch a whiff of something decadent baking in the oven. That, my friends, is the magic of homemade cinnamon rolls—especially when you add the zingy flavor of rhubarb! It’s a perfect combination of sweet and tart, wrapped up in a soft, fluffy roll that is simply irresistible.
Rhubarb might not be the first ingredient that pops into your head when you think of delicious pastries, but trust me, it works wonders! The tartness pairs beautifully with the warm, sweet cinnamon filling, making for a breakfast treat that will leave everyone at the brunch table begging for seconds. It’s like a cozy hug in the form of food, and who doesn’t love that?
Every time I make these, I can’t help but think back to the first time I tried rhubarb in a baked good—my heart and taste buds were forever changed! Growing up, my grandmother had a garden bursting with this glorious, grassy-green stalk. She would whip up the most incredible pies in the summer, and I’d be there, scooping out the filling with an excited grin. Now, I’ve taken that nostalgic flavor and not only made it even more comforting but fun, by rolling it into soft dough and drenching it with the heavenly scents of cinnamon and sugar.
So grab your apron, and let’s dive into the delightful world of Rhubarb Cinnamon Rolls—an experience that’s as joyful to make as it is to share!
A Taste of Nostalgia
Let me take you back to one of my favorite childhood memories. I must have been about eight years old when my grandmother decided to host a pie-making day at her house. The air was alive with laughter, and the kitchen was buzzing with the wonderful aroma of baked goods. It was one of those warm, sticky summer days when every adult had their hands covered in flour, and I was their little helper—more like an excited pest, if we’re being honest!
That day, she chose to showcase her prized rhubarb pie recipe. As we chopped the rhubarb, my grandmother explained that it was her secret weapon—offering a unique twist that turned any dessert into something truly special. I can still feel the anticipation building as we mixed in the sugar and spices. When that pie finally came out of the oven, it was a glorious vision—golden crust, bubbling filling, and an aroma that was pure bliss.
Now, years later, I channel that same spirit of fun and warmth into these Rhubarb Cinnamon Rolls. They carry a bit of my grandma’s magic, and I can’t wait for you to experience this flavor journey!
Ingredients
For the Dough:
- 2 ½ cups all-purpose flour: This is the base of our rolls. For a gluten-free option, you can use a 1:1 gluten-free flour blend.
- ¼ cup sugar: This adds a hint of sweetness to the dough. Feel free to use coconut sugar or honey as a substitute for a more natural option.
- 1 packet (2 ¼ tsp) instant yeast: Instant yeast helps the dough rise quickly without needing long proofs. Active dry yeast works too; just be sure to activate it in warm water first before adding it to your mixture.
- ½ tsp salt: A little salt balances the sweetness. You can swap it for sea salt or Himalayan salt.
- ⅓ cup whole milk: This adds moisture and richness. Almond milk or oat milk are excellent dairy-free alternatives!
- 4 tbsp unsalted butter, melted: Butter adds flavor and tenderness. If you want a vegan version, you can use coconut oil or a vegan butter substitute.
- 1 large egg: Eggs help bind the dough. You can replace them with a flax egg (1 tbsp ground flaxseed mixed with 3 tbsp water) to make it vegan.
For the Filling:
- 1 cup rhubarb, diced: The star ingredient! Rhubarb should be firm and bright in color. If you can’t find rhubarb, strawberries make a delightful substitute.
- ½ cup brown sugar: This adds that beautiful caramel flavor. You can use white sugar, but brown sugar brings more depth.
- 1 tbsp ground cinnamon: A key player in our filling. If you want to spice it up, consider adding a pinch of nutmeg or cardamom!
- 2 tsp vanilla extract: A hint of vanilla takes the flavor to another level. Use pure extract for the best taste!
For the Frosting:
- 4 oz cream cheese, softened: Cream cheese adds that lovely tang to our frosting. For a dairy-free version, try using cashew cream or a vegan cream cheese alternative.
- ¼ cup powdered sugar: This sweetens things up without being overpowering. Adjust to taste!
- 1 tbsp milk: Just enough to reach your desired consistency; dairy-free milk works perfectly here too!
Let’s get cooking!
Step-by-Step Instructions
Step 1: Prepare the Dough
-
Mix Dry Ingredients: In a large mixing bowl, combine the flour, sugar, yeast, and salt. Whisk them together until evenly mixed. Pro tip: Use a whisk to aerate the flour—this helps make your dough lighter!
-
Incorporate Wet Ingredients: Pour in the warm milk, melted butter, and the egg. If you’re using a stand mixer, fit it with the dough hook and mix on medium speed until everything comes together. If you’re doing it by hand, use a spatula until combined before switching to your hands. They’re the best tools for feeling the dough!
-
Knead the Dough: Knead on a floured surface for about 5-7 minutes until it’s smooth and elastic. You want your dough to be tacky but not sticky. If it’s too sticky, sprinkle a little more flour as needed.
-
First Rise: Place the dough in a greased bowl, cover with a kitchen towel, and let it rise in a warm place for about 1 hour or until it doubles in size. This is your cue to relax; enjoy a cup of coffee or tea while the magic happens!
Step 2: Make the Filling
- Prepare Your Rhubarb: While the dough is rising, dice your fresh rhubarb into small pieces—about half an inch each. Toss it in a bowl with brown sugar and cinnamon, letting it sit for a few minutes to soften and release its juices. This will create that gooey filling we all adore!
Step 3: Roll and Fill
-
Roll Out the Dough: After the dough has risen, punch it down to release any air bubbles. Transfer it to a floured surface and roll it out into a rectangle about ¼ inch thick. Don’t stress too much about getting it perfect—it’s going to taste amazing regardless!
-
Spread the Filling: Spread melted butter across the surface of the rolled-out dough. Then, sprinkle the rhubarb filling evenly over the dough, pressing it down slightly to ensure it sticks.
Step 4: Shape the Rolls
-
Roll It Up: Starting from one long end, carefully roll the dough tightly into a log shape. Keep it as tight as you can without squishing it! This will help create those lovely swirls.
-
Cut the Rolls: Using a sharp serrated knife, slice the rolled dough into 1-inch pieces. You should have about 12 rolls. If you want them to be extra pretty, use unscented dental floss to cut them—just slide it under the log and pull to pinch through!
Step 5: Second Rise
- Second Rise: Place the rolls in a greased baking dish or a parchment-lined tray, leaving some space between them. Cover again with a kitchen towel and let them rise for an additional 30 minutes, or until puffy.
Step 6: Bake
- Preheat and Bake: Preheat your oven to 350°F (175°C). Bake the rolls for 20-25 minutes, or until they’re golden brown. The kitchen will smell divine, and you’ll want to keep peeking in!
Step 7: Frosting
-
Make the Frosting: While the rolls are cooling, mix your softened cream cheese, powdered sugar, and milk until smooth and creamy. Adjust the milk as needed to get your desired consistency!
-
Frost the Rolls: Once the rolls are cool enough to touch, spread the frosting generously on top so it gets all melty and deliciously gooey.
Serving Suggestions
To serve, I love to plate these warm rolls right from the oven—they look so inviting! Consider garnishing with a sprinkle of cinnamon or some extra diced rhubarb on top to add a pop of color. They pair wonderfully with a hot cup of coffee or a refreshing glass of iced tea. You can also set up a little brunch spread with fruit, yogurt, and pastries for an extra cozy vibe!
Recipe Variations
- Nutty Addition: Chop up some pecans or walnuts and sprinkle them in the filling for a crunchy twist.
- Berry Delight: Substitute half the rhubarb with fresh strawberries or raspberries for a fruity explosion.
- Vegan Delight: Swap dairy for plant-based ingredients as mentioned earlier, making these rolls a vegan treat for everyone!
- Spiced Up: Try adding a pinch of nutmeg or allspice to the filling for an extra layer of warmth.
- Glazed: For a glossy finish, create a simple icing of powdered sugar and milk and drizzle it over the rolls before serving.
Chef’s Notes
I absolutely adore these Rhubarb Cinnamon Rolls because they combine such joyful memories with a creative twist! Over the years, I’ve played with the balance of rhubarb to sugar, aiming to achieve the perfect sweet-tart harmony. Feeling brave? You can even add chocolate chips for those moments when your sweet tooth strikes!
Every time I make these rolls, I’m reminded that cooking should always be fun and a little messy—embrace it! The kitchen is a place for laughter and love, not perfection.
FAQs and Troubleshooting
1. My dough didn’t rise! What did I do wrong?
- This can usually mean your yeast was expired or the liquid was too hot, killing off the yeast. Always check the expiration date and ensure your liquids are warm but not scalding.
2. My rolls are too dense.
- Over-kneading or not enough rising time can lead to dense rolls. Remember to knead just until smooth and let them rise until doubled in size!
3. Can I make these ahead of time?
- Absolutely! You can prepare the rolls and refrigerate them after shaping but before baking. When you’re ready, simply let them come to room temperature before baking.
4. How do I store leftovers?
- Store any leftovers in an airtight container at room temperature for up to 2 days, or refrigerate for a week. They can also be frozen for a month—just reheat in the oven when you’re ready to enjoy!
Nutritional Info
While I believe in the joy of indulgence, I understand that it’s nice to be mindful of what we eat too. For each roll (without frosting), you’re looking at approximately 250 calories, with around 4g of protein, 8g of fat, and 40g of carbohydrates. You can always adjust the sugar and fat to fit your dietary needs!
So, there you have it—my take on Rhubarb Cinnamon Rolls that is bursting with nostalgic flavors and joy! I hope you love making (and eating) these rolls as much as I do! Remember, cooking is not just about the end result; it’s also about the memories you create along the way. Happy baking!
Print
Rhubarb Cinnamon Rolls
- Total Time: 55 minutes
- Yield: 12 servings 1x
- Diet: Vegetarian
Description
Delicious homemade cinnamon rolls featuring a sweet and tangy rhubarb filling, perfect for a cozy brunch.
Ingredients
- 2 ½ cups all-purpose flour
- ¼ cup sugar
- 1 packet (2 ¼ tsp) instant yeast
- ½ tsp salt
- ⅓ cup whole milk
- 4 tbsp unsalted butter, melted
- 1 large egg
- 1 cup rhubarb, diced
- ½ cup brown sugar
- 1 tbsp ground cinnamon
- 2 tsp vanilla extract
- 4 oz cream cheese, softened
- ¼ cup powdered sugar
- 1 tbsp milk
Instructions
- Mix Dry Ingredients: In a large mixing bowl, combine the flour, sugar, yeast, and salt. Whisk until evenly mixed.
- Incorporate Wet Ingredients: Pour in the warm milk, melted butter, and the egg. Mix until combined.
- Knead the Dough: Knead on a floured surface for about 5-7 minutes until smooth and elastic.
- First Rise: Place the dough in a greased bowl, cover, and let it rise for about 1 hour or until doubled in size.
- Prepare Your Rhubarb: Dice the rhubarb and toss it with brown sugar and cinnamon.
- Roll Out the Dough: Punch the dough down and roll it into a rectangle about ¼ inch thick.
- Spread the Filling: Spread melted butter on the rolled dough, then sprinkle with the rhubarb filling.
- Roll It Up: Starting from one long end, roll the dough tightly into a log shape.
- Cut the Rolls: Slice the dough into 1-inch pieces.
- Second Rise: Place rolls in a greased dish and let rise for another 30 minutes.
- Preheat and Bake: Preheat oven to 350°F and bake for 20-25 minutes until golden brown.
- Make the Frosting: Mix cream cheese, powdered sugar, and milk until smooth.
- Frost the Rolls: Spread frosting on the warm rolls before serving.
Notes
Serve warm with extra cinnamon or diced rhubarb on top. Pairs nicely with coffee or iced tea.
- Prep Time: 30 minutes
- Cook Time: 25 minutes
- Category: Dessert
- Method: Baking
- Cuisine: American
Nutrition
- Serving Size: 1 roll
- Calories: 250
- Sugar: 10g
- Sodium: 200mg
- Fat: 8g
- Saturated Fat: 4g
- Unsaturated Fat: 4g
- Trans Fat: 0g
- Carbohydrates: 40g
- Fiber: 2g
- Protein: 4g
- Cholesterol: 30mg
Keywords: cinnamon rolls, rhubarb, brunch, dessert, sweet rolls

Easy Fluffy Pumpkin Cupcakes with Creamy Buttercream
The Best Buttercream Pumpkin Cupcakes: A Cozy Fall Treat
Welcome to my kitchen, fellow food enthusiasts! Today, we’re diving deep into the cozy world of sweet treats with a recipe that will warm your heart and tantalize your taste buds — Buttercream Pumpkin Cupcakes! These adorable cupcakes are the perfect embodiment of fall, wrapped up in soft, moist cake and topped with a luscious buttercream frosting that’s as dreamy as it is delicious. Whether you’re hosting a gathering, celebrating a birthday, or simply trying to bring a little cheer to a dull day, these cupcakes are here to make everything better.
Fall has a magical way of making us crave those warm flavors and comforting aromas that evoke memories of family gatherings and cozy nights in. With the scent of cinnamon, nutmeg, and of course, pumpkin wafting through the air, you can’t help but feel excited for what’s to come! Like most of my recipes, these cupcakes are not just about the end result but the joy of cooking and sharing with those you love. So, grab your apron, and let’s get whisking!
Imagine walking through a pumpkin patch, the crisp air dancing on your skin, leaves crunching underfoot, and the vibrant orange pumpkins competing with the beautiful fall foliage. One particular memory that warms my heart is when my grandmother would take me to pick pumpkins every October. We’d come home with armfuls of pumpkins, and she would whip up her famous pumpkin bread, filling the kitchen with delightful aromas. It was a time of laughter, warmth, and love, where nothing else mattered except the joy of baking together. Inspired by those moments, I created these Buttercream Pumpkin Cupcakes to recapture that same magic and ensure you create new, delicious memories with your loved ones.
Ingredients
Here’s your shopping list for these delightful Buttercream Pumpkin Cupcakes. Each ingredient plays a key role in creating that scrumptious flavor and texture.
- All-purpose flour (2 cups): The foundation of our cupcakes. For a gluten-free option, you can use a 1:1 gluten-free flour blend.
- Granulated sugar (1 cup): Sweetness is crucial! For a lower-calorie alternative, try coconut sugar or a sugar substitute like Stevia.
- Brown sugar (1/2 cup): Adds depth and moisture. If you’re out of brown sugar, you can make your own by mixing white sugar with a bit of molasses.
- Baking powder (1 teaspoon): This gives our cupcakes a nice rise. Ensure it’s fresh for the best results!
- Baking soda (1 teaspoon): Works hand-in-hand with baking powder for a fluffy texture.
- Salt (1/2 teaspoon): Balances sweetness and enhances flavors.
- Ground cinnamon (1 teaspoon): The aromatic spice that screams fall! Substitute with pumpkin pie spice for an all-in-one approach.
- Ground nutmeg (1/4 teaspoon): Adds warmth; fresh nutmeg is even more potent if you can find it!
- Pumpkin puree (1 cup): The star of the show! Avoid pumpkin pie filling as it contains sugar and spices. You can also use homemade pumpkin puree if you’re feeling adventurous.
- Eggs (2 large): Provides structure and moisture. For a vegan option, use flax eggs (1 tbsp ground flaxseeds + 3 tbsp water per egg).
- Vanilla extract (1 teaspoon): For a lovely fragrance. When possible, opt for pure vanilla extract over imitation.
- Vegetable oil (1/2 cup): Ensures moisture; for a lighter option, you can substitute unsweetened applesauce or Greek yogurt.
Buttercream Frosting Ingredients
- Unsalted butter (1 cup, softened): The base of our frosting. It’s best to allow it to come to room temperature for easy whipping.
- Powdered sugar (3–4 cups): Provides sweetness and gives our frosting the perfect consistency. Sift it for a smooth texture.
- Heavy cream (2 tablespoons): Keeps the frosting creamy. You can substitute with milk, but it won’t be as rich.
- Vanilla extract (1 teaspoon): Again, choose pure for the best flavor.
Step-by-Step Instructions
Let’s transform these ingredients into something magical! Follow along as we navigate through the cupcake process.
Step 1: Preheat and Prep
Preheat your oven to 350°F (175°C). Line a standard muffin pan with cupcake liners — choose festive colors if you like! A little bit of flair never hurt anyone!
Step 2: Mix Dry Ingredients
In a medium bowl, whisk together the flour, granulated sugar, brown sugar, baking powder, baking soda, salt, cinnamon, and nutmeg. Whisking helps combine the ingredients and aerates the mixture. This step can make a difference in the fluffiness of your cupcakes, so don’t skip it!
Step 3: Combine Liquid Ingredients
In a large bowl, combine the pumpkin puree, eggs, vegetable oil, and vanilla extract. Use a hand mixer or whisk vigorously until smooth. If you’re using a stand mixer, this is when you would switch to the paddle attachment!
Step 4: Mix Together
Gradually add the dry ingredients to the wet mixture, mixing just until combined. Overmixing can lead to dense cupcakes — we want light and fluffy! The batter might be a little thick, and that’s perfectly fine.
Step 5: Bake
Spoon the batter into the lined muffin pan, filling each cup about two-thirds full. This allows room for the cupcakes to rise without spilling over. Bake in the preheated oven for about 18–20 minutes or until a toothpick inserted in the center comes out clean. The aroma wafting through your kitchen will be absolutely heavenly!
Step 6: Cool
Remove the cupcakes from the oven and allow them to cool in the pan for about 5 minutes. Then, carefully transfer them to a wire rack to cool completely. It’s tough waiting, but frost on warm cupcakes can lead to a melty mess — and we want that buttercream to shine!
Step 7: Make the Buttercream Frosting
While the cupcakes cool, let’s make the frosting. In a medium bowl, beat the softened unsalted butter on medium speed until creamy, about 2–3 minutes. Gradually add powdered sugar one cup at a time, beating well after each addition. Mix in the heavy cream and vanilla, then increase the mixer speed to high and beat until the frosting is light and fluffy, about 3 minutes.
Step 8: Frosting Time!
Once the cupcakes are completely cool, it’s time for the fun part! Use a piping bag fitted with your desired tip (or a simple spatula) to generously frost each cupcake. No need to be perfect — a little rustic charm makes it even cozier!
Serving Suggestions
These Buttercream Pumpkin Cupcakes are delightful on their own, but you can elevate your presentation even further! Consider arranging them on a pretty platter dusted with a sprinkle of cinnamon or garnished with small pieces of caramel or chopped pecans for that extra nod to fall flavors. Pair them with a warm beverage like chai tea or spiced apple cider for a perfect cozy treat!
Recipe Variations
Feeling adventurous? Here are a few variations to mix things up:
- Chocolate Chip Surprise: Fold in mini chocolate chips into the batter before baking for a gooey, sweet addition.
- Cream Cheese Frosting: Swap the buttercream for a tangy cream cheese frosting for a decadent twist.
- Spice it Up: Add a pinch of cayenne pepper or ginger to your batter for a spicy kick.
- Nutty Crunch: Top the frosting with toasted walnuts or pecans for added texture.
- Vegan Version: Use flax eggs and coconut oil to make this recipe vegan-friendly while keeping the delicious taste!
Chef’s Notes
Oh, I have so many fond memories tied to these cupcakes! The first time I made them, I ended up with flour on my face and a puppy at my feet, eagerly waiting for crumbs. The kitchen was an absolute mess, but it was one of the most joyful experiences. My friends came over for a small gathering, and within minutes, the cupcakes were gone! It’s turned into a tradition, often requested at parties and potlucks. Every time I make them, I feel like I’m honoring the spirit of my grandmother and all the love she instilled in our kitchen.
FAQs and Troubleshooting
1. Why are my cupcakes dense?
Overmixing the batter after adding the dry ingredients can lead to dense cupcakes. Mix until just combined for the best texture.
2. How do I store leftover cupcakes?
Store them in an airtight container at room temperature for up to 3 days or in the fridge for about a week. Just be sure to keep them well-covered!
3. Can I freeze these cupcakes?
Absolutely! Make sure they’re cool, then freeze them in an airtight container. To enjoy, thaw them in the fridge overnight and frost when ready.
4. My frosting is too runny. What should I do?
If your frosting is too runny, gradually add more powdered sugar until you reach your desired consistency. If it’s too thick, a little splash of heavy cream can smooth it out.
Nutritional Info (Optional)
For those curious about the nutritional details, one Buttercream Pumpkin Cupcake (without added decorations) contains approximately 320 calories, with a nice balance of carbs, fats, and proteins to indulge in a delightful treat.
And there you have it — Buttercream Pumpkin Cupcakes that not only taste delicious but also carry a story and warmth of the season! I hope you find joy in making and sharing these delightful treats with your loved ones. Don’t forget to share your own twists and stories as we continue to create mouth-watering memories together! Happy baking! 🍂🧁
Print
Buttercream Pumpkin Cupcakes
- Total Time: 40 minutes
- Yield: 12 servings 1x
- Diet: Vegetarian
Description
Delightful Buttercream Pumpkin Cupcakes that capture the essence of fall with warm flavors and comforting aromas.
Ingredients
- 2 cups All-purpose flour
- 1 cup Granulated sugar
- 1/2 cup Brown sugar
- 1 teaspoon Baking powder
- 1 teaspoon Baking soda
- 1/2 teaspoon Salt
- 1 teaspoon Ground cinnamon
- 1/4 teaspoon Ground nutmeg
- 1 cup Pumpkin puree
- 2 large Eggs
- 1 teaspoon Vanilla extract
- 1/2 cup Vegetable oil
- 1 cup Unsalted butter, softened (for frosting)
- 3–4 cups Powdered sugar (for frosting)
- 2 tablespoons Heavy cream (for frosting)
- 1 teaspoon Vanilla extract (for frosting)
Instructions
- Preheat your oven to 350°F (175°C) and line a standard muffin pan with cupcake liners.
- Whisk together the flour, granulated sugar, brown sugar, baking powder, baking soda, salt, cinnamon, and nutmeg in a medium bowl.
- Combine the pumpkin puree, eggs, vegetable oil, and vanilla extract in a large bowl and mix until smooth.
- Add the dry ingredients to the wet mixture gradually, mixing until just combined.
- Spoon the batter into the lined muffin pan, filling each cup about two-thirds full.
- Bake for about 18–20 minutes or until a toothpick inserted comes out clean.
- Cool the cupcakes in the pan for 5 minutes, then transfer to a wire rack to cool completely.
- Beat the softened butter until creamy, then gradually add powdered sugar, heavy cream, and vanilla extract, beating until fluffy.
- Frost the cooled cupcakes with the buttercream frosting using a piping bag or spatula.
Notes
For variations, consider adding mini chocolate chips, using cream cheese frosting, or adding spices like cayenne pepper for a kick.
- Prep Time: 20 minutes
- Cook Time: 20 minutes
- Category: Dessert
- Method: Baking
- Cuisine: American
Nutrition
- Serving Size: 1 cupcake
- Calories: 350
- Sugar: 30g
- Sodium: 200mg
- Fat: 15g
- Saturated Fat: 8g
- Unsaturated Fat: 5g
- Trans Fat: 0g
- Carbohydrates: 45g
- Fiber: 1g
- Protein: 3g
- Cholesterol: 40mg
Keywords: pumpkin cupcakes, buttercream frosting, fall dessert, cozy treat, baking
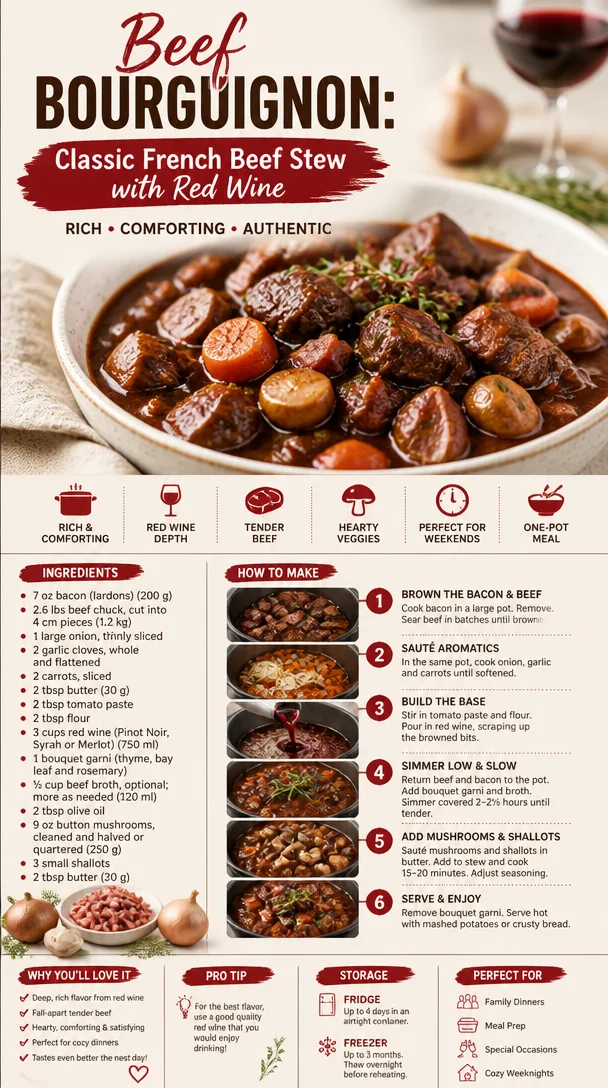
Beef Bourguignon: Classic French Beef Stew with Red Wine
Classic Beef Bourguignon: A Hearty French Stew to Warm Your Soul
Welcome to my cozy corner of the culinary world! Today, we’re diving into the heart and soul of French cooking: Beef Bourguignon. This dish isn’t just a recipe; it’s a comforting embrace on a chilly evening, a nod to a rustic French kitchen, and a celebration of the simple yet profound joys of good home-cooked food. Imagine your kitchen filled with the rich aromas of red wine, tender beef, and fragrant herbs — is there anything better?
Now, let’s talk about why Beef Bourguignon holds a special place in my heart. It all begins with a cherished memory from my childhood. Growing up, every winter, my family would huddle around our kitchen table for Sunday dinner. The highlight of those meals was always my grandmother’s Beef Bourguignon. She had this enchanting way of turning an ordinary gathering into a festive occasion. I remember standing on a stool, eagerly watching her stir the pot, as the deep, rich color of the stew enveloped the ingredients, transforming them into something magical. Her laughter, the clinking of wine glasses, and the warmth of love echoed in every bite we took.
This special dish is so much more than beef and veggies. It tells a story of family, love, and sharing. Today, I want to share this timeless classic with you, ensuring you can create your own cherished memories while cooking together with your friends and loved ones. Trust me; once you serve this hearty stew, your kitchen will be filled with the same kind of magic I experienced growing up!
So, let’s get our aprons on and roll up our sleeves for a delightful culinary journey through Beef Bourguignon.
Personal Story
As I mentioned, my fondest memories of Beef Bourguignon come from my childhood, but there’s one particular story that stands out. During one memorable winter, a heavy snowstorm hit our town just as Sunday dinner approached. My grandmother was determined not to let the weather dampen our spirits. She declared it was the perfect day for her famed stew.
With the wind howling outside, we gathered in the kitchen, bundled in our warm sweaters, and watched as she set to work. She cracked open a bottle of robust red wine (even a little splashed into our glasses!) and taught us her secrets. “The key,” she said, “is patience; give it time to let the flavors meld together.” That evening, we shared stories, sipped our wine, and tasted her incredible creation, which simmered away on the stove, filling every corner of our home with that warm, inviting scent. That meal on that snowy night became a heartwarming tradition we cherished year after year.
Ingredients
Here’s what you’ll need to prepare a classic Beef Bourguignon:
-
Beef chuck roast (2.5-3 pounds): The star of our dish, beef chuck is a tougher cut that becomes incredibly tender after slow cooking. If you’re in a pinch, you can substitute it with brisket or round roast.
-
Red wine (750 ml): Use a full-bodied red, such as Pinot Noir or Cabernet Sauvignon, to add depth. If you prefer to skip the alcohol, you can opt for a non-alcoholic red wine or beef broth (though the flavor will be different).
-
Carrots (3 large): These sweet veggies add color and a hint of sweetness. Feel free to substitute with parsnips for a different flavor profile.
-
Onions (2 medium): Yellow onions work best in this stew, as their sweetness enhances the overall dish. Shallots are a super tasty substitute, too!
-
Garlic (4 cloves): Fresh garlic is essential for flavor! If you’re in a hurry, garlic powder (1 teaspoon for every clove) will do, but fresh is always best.
-
Mushrooms (8 oz, preferably cremini): They lend an earthy flavor and satisfying texture to the stew. If you’re not a fan, you can leave them out or replace them with another vegetable like green beans.
-
Beef broth (2 cups): This provides the liquid base for your stew. Homemade broth adds the best flavor, but store-bought works just fine.
-
Tomato paste (2 tbsp): Adds richness and depth. A tablespoon of crushed tomatoes can work in a pinch, but the paste gives a more concentrated flavor.
-
Thyme (1 tsp): Fresh thyme is amazing, but dried works too! Just remember: use less — about 1/3 of the amount.
-
Bay leaves (2): Don’t skip these; they add a subtle earthy note.
-
Olive oil (3 tbsp): For browning the beef. Canola oil also works if you prefer a more neutral flavor.
-
Salt and pepper to taste: Of course! Seasoning is key to elevating the flavors in this dish.
Step-by-Step Instructions
1. Preheat and Prepare
Start by preheating your oven to 325°F (160°C). Cut the beef into 2-inch cubes, trimming off excess fat. A sharp knife will make this task easier.
2. Sear the Beef
In a heavy, oven-safe pot (like a Dutch oven), heat 2 tablespoons of olive oil over medium-high heat. Don’t overcrowd the pan; sear the beef in batches, giving it time to develop a beautiful brown crust. This caramelization is golden and adds so much flavor to our stew! Transfer the beef to a plate once browned.
3. Sauté the Veggies
In the same pot, add a little more olive oil if needed. Toss in your chopped onions and minced garlic, stirring to absorb all the yummy beefy goodness left behind. Cook for about 5 minutes until they’re soft and fragrant.
4. Add the Carrots and Mushrooms
Now, throw in the sliced carrots and mushrooms. Sauté for another 5-7 minutes until they start to brown a bit. We want to coax out their flavors!
5. Deglaze with Wine
Pour in your red wine, scraping the bottom of the pot to release all those flavorful bits. This is one of my favorite parts! Let it simmer for about 10 minutes, allowing some of the alcohol to cook off and the flavors to concentrate.
6. Mix in the Beef and Broth
Once your wine has reduced slightly, return the beef to the pot along with the beef broth and tomato paste. Toss in the thyme, bay leaves, salt, and pepper. Stir everything together, giving it a good mix.
7. The Magic of Braising
Bring the stew to a light simmer, then cover it with a lid and transfer it to your preheated oven. Let it cook for 2.5 to 3 hours. This slow cooking will allowed the flavors to melt together and the beef to become fork-tender.
8. Finishing Touches
You’ll know it’s done when the beef is melt-in-your-mouth tender. Remove the pot from the oven, and taste! Adjust seasoning as needed, perhaps adding a pinch more salt or pepper.
9. Serve and Smile
Let your Beef Bourguignon cool for a moment, then serve it up! Your kitchen is going to feel like a cozy French bistro.
Serving Suggestions
To plate your Beef Bourguignon, gently ladle it into wide, shallow bowls. Garnish with a sprinkle of fresh parsley for a pop of color. Serve it alongside crusty French bread or creamy mashed potatoes to soak up that delicious sauce. A glass of the same red wine you used in the stew would be a lovely complement too.
Recipe Variations
-
Vegetarian Option: Swap beef for hearty mushrooms or jackfruit. Use vegetable broth instead of beef broth and add a splash of soy sauce for umami.
-
Spicy Twist: Add a teaspoon of smoked paprika or a pinch of red pepper flakes for a warm kick that enhances the stew’s flavor profile.
-
Herbed Variation: Experiment with different herbs like rosemary or oregano for a unique twist. Just be mindful not to overpower the palate.
-
Coconut Milk Creaminess: For a creamy version, stir in a can of coconut milk just before serving.
-
Grain Addition: Serve it over quinoa or couscous for a nutrient boost, making it a fully balanced meal.
Chef’s Notes
One of the beauties of Beef Bourguignon is how it ages like fine wine! If you have leftovers, they’ll taste even better the next day as the flavors have had more time to mingle. Store it in the fridge for up to three days or freeze it for a comforting meal later on. I once made a huge pot for a dinner party, and after tasting the leftovers, my friends insisted that I should always make extra!
As for my cooking style, I’ve learned that a little messiness in the kitchen just means you’re having fun! Embrace it, and remember that cooking is about the experience, not just the outcome.
FAQs and Troubleshooting
1. My stew isn’t thick enough. What do I do?
If you find your stew is too thin, there are a couple of ways to thicken it. You can whisk together a tablespoon of cornstarch with a little cold water, then stir it into the stew and let it simmer until it thickens. Alternatively, simmer the stew uncovered for a bit longer to reduce the liquid.
2. How can I ensure my beef is tender?
Low and slow is the key! Cooking the beef Bourguignon in the oven allows the meat to break down and become incredibly tender. So, don’t rush the process!
3. Can I make this dish in advance?
Absolutely! Beef Bourguignon tastes even better the next day, making it perfect for meal prepping. Just store in an airtight container and reheat on the stovetop when you’re ready to indulge.
4. What can I serve it with?
Aside from the classic crusty bread or buttery mashed potatoes, you can pair it with creamy polenta, artisanal breadsticks, or even a simple green salad for a refreshing contrast.
Nutritional Info
While traditional Beef Bourguignon is hearty and indulgent, it’s packed with protein and good nutrients thanks to the inclusion of hearty vegetables. The beef offers iron and zinc, while the vegetables bring in fiber and vitamins.
In a standard serving, you can expect approximately 450-550 calories, depending on how you serve it and any additions you make. It’s a warm hug on a plate, perfect for sharing with friends and family!
Now that you have this recipe in your culinary repertoire, I can’t wait for you to create and savor your own Beef Bourguignon memories! So grab your apron, gather your ingredients, and embrace the warmth of home cooking. Happy cooking, friends!
Print
Classic Beef Bourguignon
- Total Time: 165 minutes
- Yield: 6 servings
- Diet: None
Description
A hearty French stew filled with tender beef, rich red wine, and vegetables, perfect for cozy evenings.
Ingredients
- Beef chuck roast (2.5-3 pounds)
- Red wine (750 ml)
- Carrots (3 large)
- Onions (2 medium)
- Garlic (4 cloves)
- Mushrooms (8 oz, preferably cremini)
- Beef broth (2 cups)
- Tomato paste (2 tbsp)
- Thyme (1 tsp)
- Bay leaves (2)
- Olive oil (3 tbsp)
- Salt and pepper to taste
Instructions
- Preheat your oven to 325°F (160°C). Cut the beef into 2-inch cubes, trimming off excess fat.
- Sear the beef in a heavy, oven-safe pot with 2 tablespoons of olive oil over medium-high heat. Transfer to a plate once browned.
- Sauté the onions and garlic in the same pot for about 5 minutes until soft.
- Add the sliced carrots and mushrooms, sautéing for another 5-7 minutes.
- Deglaze with red wine, scraping up flavorful bits, and let simmer for about 10 minutes.
- Mix in the browned beef, beef broth, tomato paste, thyme, bay leaves, salt, and pepper.
- Bring to a simmer, cover, and transfer to the oven for 2.5 to 3 hours until tender.
- Adjust seasoning as needed and serve warm.
Notes
Leftovers taste even better the next day, and the dish can be frozen for later enjoyment.
- Prep Time: 15 minutes
- Cook Time: 150 minutes
- Category: Main Course
- Method: Braising
- Cuisine: French
Nutrition
- Serving Size: 1 serving
- Calories: 500
- Sugar: 6g
- Sodium: 800mg
- Fat: 18g
- Saturated Fat: 6g
- Unsaturated Fat: 10g
- Trans Fat: 0g
- Carbohydrates: 25g
- Fiber: 4g
- Protein: 45g
- Cholesterol: 120mg
Keywords: Beef Bourguignon, French stew, hearty meal, comfort food, cozy dinner
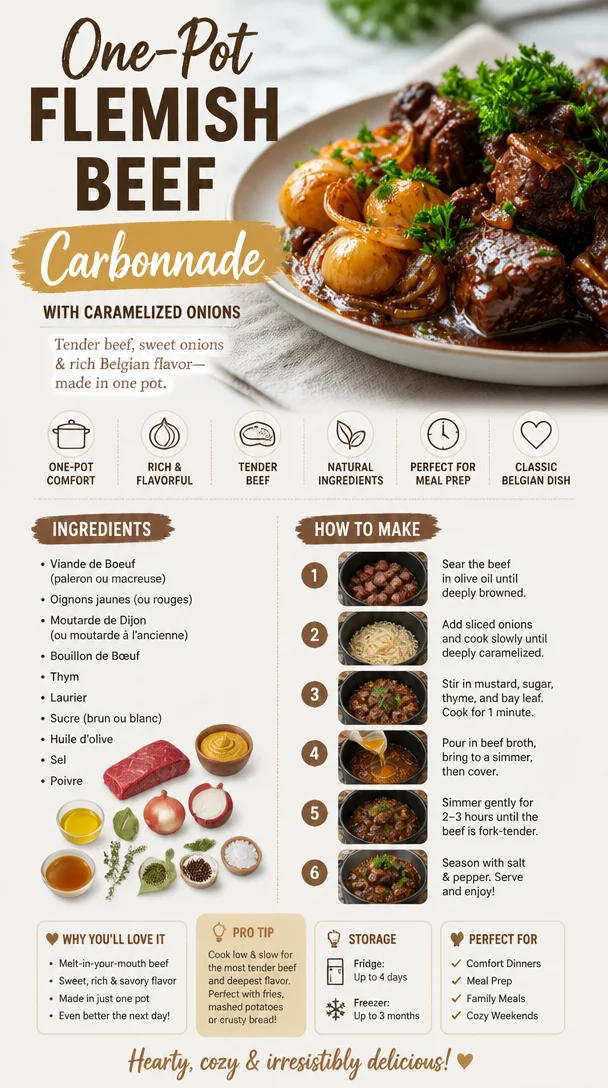
One-Pot Flemish Beef Carbonnade with Caramelized Onions
The Cozy Comfort of Carbonnade Flamande: A Belgian Beef Stew
Welcome to my kitchen! Today, we’re diving into a dish that’s so hearty and flavorful, it practically wraps you in a warm hug. I’m talking about Carbonnade Flamande, a traditional Belgian beef stew that’s so rich and delicious, it has a magical way of commanding attention at the dinner table. Picture this: slow-cooked beef melting into a luscious gravy of caramelized onions, sticky beer, and herbs that dance on your taste buds.
This dish not only celebrates the beauty of simple ingredients but also shares a slice of culinary history, taking us through the cobbled streets of Flanders and into cozy family kitchens. And let me tell you, nothing quite evokes a sense of nostalgia like the smell of a bubbling stew on a chilly evening.
A Personal Connection
Growing up, my grandmother had a special knack for elevating everyday meals into something memorable. One of her signature dishes was an adaptation of Carbonnade Flamande. I can still picture those rainy Sunday afternoons in her kitchen, the air thick with the scent of slowly simmering beef and sweet onions.
My siblings and I would eagerly hover around, sneaking bites of bread dipped in the rich sauce, certain that the ultimate comfort food was being crafted before our eyes. Grandma always said the key was patience, taking your time with the onions to develop their sweetness. Now that I’ve become a home cook, I appreciate her wisdom even more. Cooking really is about savoring those moments, and what better way to share love than through food?
Ingredients
Here’s what you’ll need to create this delightful dish. Keep in mind that each ingredient plays a significant role in bringing flavors together, so let’s break them down:
-
2 lbs beef chuck or brisket: This cut is perfect for stews because it becomes tender and flavorful as it cooks. If you prefer a leaner option, you can substitute it with beef round, but the stew may not be as rich.
-
4 medium onions: Thinly sliced, these are the heart of the dish. Opt for yellow onions for a sweet flavor. If you want a more pungent taste, half red onions can add a beautiful hue as well.
-
2 tablespoons olive oil: For browning the beef and caramelizing the onions. You can substitute avocado oil for a higher smoke point.
-
2 tablespoons butter: Adds a luscious richness to the sauce. If you need a dairy-free alternative, coconut oil can do the trick.
-
3 cups Belgian ale (or stout): This is where the magic happens! Choose a malty beer to enhance the dish’s sweetness. If you’re not a fan of beer, you can replace it with beef broth, but it will slightly alter the flavor profile.
-
2 tablespoons brown sugar: Helps caramelize the onions further and balances flavors. Honey or maple syrup can be great substitutions.
-
2-3 sprigs of fresh thyme: Adds an aromatic earthiness. Feel free to use dried thyme—just use a third of the amount needed.
-
1 bay leaf: Provides depth to the stew. If you’re out, consider using a half teaspoon of dried bay leaf.
-
Salt and pepper to taste: Essential for enhancing flavors. Always taste as you go!
Step-by-Step Instructions
Ready to cook? Let’s get to it!
-
Prep the Ingredients: Start by cutting the beef into 1.5-inch cubes and seasoning them generously with salt and pepper. You want those seasonings to meld beautifully with the beef.
-
Brown the Beef: In a large Dutch oven or heavy pot, heat olive oil over medium to high heat. Once it’s shimmering, work in batches to brown the beef on all sides (4-5 minutes per batch). Don’t overcrowd the pot; this ensures a perfect sear. When done, set the beef aside.
-
Caramelize the Onions: In the same pot, add the butter. Toss in the sliced onions and a pinch of salt, cooking them down slowly over medium heat. Remember, patience is key here. Stir occasionally until they turn golden and caramelized (about 15-20 minutes). This step is crucial as it builds the stew’s foundation.
-
Combine Ingredients: Return the beef to the pot with the caramelized onions. Sprinkle the brown sugar over the top and stir, allowing it to melt and coat the beef. Add the beer, thyme sprigs, and bay leaf. This is where the aromas will start to awaken your kitchen!
-
Simmer Away: Bring the mixture to a gentle simmer. Once bubbling, reduce the heat to low, cover the pot, and let it cook for 2-3 hours. The longer, the better! Stir every now and then and taste for seasoning. If necessary, adjust with more salt or pepper.
-
Thicken the Sauce: After the stew has simmered, you can thicken the sauce if desired. Mix 1 tablespoon of cornstarch with cold water to create a slurry and stir it into the stew, cooking for an additional 5-10 minutes.
-
Finishing Touches: Remove the thyme sprigs and bay leaf before serving. Your Carbonnade Flamande is now ready to shine!
Serving Suggestions
To plate this comforting stew, serve it with a side of hearty crusty bread or over a bed of creamy mashed potatoes. A sprinkle of fresh parsley on top adds a lovely pop of color and freshness to the dish. Pair it with a glass of the same beer used in cooking for an authentic experience!
Recipe Variations
-
Herbed Variation: Add fresh rosemary along with the thyme for a more aromatic twist.
-
Vegetable Boost: Toss in some carrots or mushrooms for added texture and flavor.
-
Spicy Kick: For those who love an extra kick, a pinch of cayenne or chili flakes can enhance the flavors beautifully.
-
Smoky Flavor: Add a bit of smoked paprika for a deep, complex flavor profile.
-
Gluten-Free: Use a gluten-free beer or skip the beer entirely and substitute with high-quality beef broth.
Chef’s Notes
This dish has evolved for me over the years. Each time I make it, I rediscover new flavors and techniques. One memorable experience was when I accidentally added a splash of coffee to the stew—oh, what a delightful surprise that was! It created an even richer depth that I now sometimes replicate.
Don’t worry if things get a little messy in your kitchen; that’s part of the process! Cooking is about experimentation, and sometimes the best dishes come from a little bit of ‘oops’!
FAQs and Troubleshooting
1. My stew seems too thin. What can I do?
If your sauce is too watery, simply create a cornstarch slurry and stir it into the stew. Let it simmer for a few more minutes until thickened.
2. Can I make this in a slow cooker?
Absolutely! After browning the beef and caramelizing the onions, transfer everything into your slow cooker and cook on low for 8 hours or high for 4-5 hours.
3. What’s the best way to store leftovers?
Let any leftovers cool completely before transferring to an airtight container. Store them in the fridge for up to 3 days, or freeze for up to 3 months. To reheat, simply warm on the stove or in the microwave.
4. Can I use a different type of meat?
Definitely! Pork or even lamb can work beautifully in this recipe. Adjust cooking times as necessary since different meats have different tenderness.
Nutritional Info
This dish is packed with protein from the beef and offers a comforting dose of carbohydrates if served with bread or potatoes. Just remember, moderation is key if you’re keeping an eye on caloric intake!
I hope you find joy in cooking this delightful Carbonnade Flamande. It’s the perfect dish to gather your loved ones around the table and share the warmth of home-cooked goodness. Bon appétit!
Print
Carbonnade Flamande
- Total Time: 200 minutes
- Yield: 6 servings 1x
- Diet: None
Description
A traditional Belgian beef stew simmered slowly with caramelized onions and rich Belgian ale for a hearty and flavorful meal.
Ingredients
- 2 lbs beef chuck or brisket
- 4 medium onions, thinly sliced
- 2 tablespoons olive oil
- 2 tablespoons butter
- 3 cups Belgian ale (or stout)
- 2 tablespoons brown sugar
- 2–3 sprigs of fresh thyme
- 1 bay leaf
- Salt and pepper to taste
Instructions
- Prep the ingredients: Start by cutting the beef into 1.5-inch cubes and seasoning them generously with salt and pepper.
- Brown the beef: In a large Dutch oven, heat olive oil over medium to high heat and brown the beef on all sides (4-5 minutes per batch).
- Caramelize the onions: In the same pot, add the butter, toss in the onions, and cook until golden and caramelized (about 15-20 minutes).
- Combine ingredients: Return the beef to the pot, add brown sugar, beer, thyme, and bay leaf.
- Simmer away: Bring to a gentle simmer, cover, and let cook for 2-3 hours, stirring occasionally.
- Thicken the sauce: If desired, mix cornstarch with cold water to create a slurry and stir it into the stew.
- Finishing touches: Remove thyme and bay leaf before serving.
Notes
Serve with crusty bread or creamy mashed potatoes, and pair with the same beer used in cooking.
- Prep Time: 20 minutes
- Cook Time: 180 minutes
- Category: Main Course
- Method: Stovetop
- Cuisine: Belgian
Nutrition
- Serving Size: 1 serving
- Calories: 450
- Sugar: 6g
- Sodium: 500mg
- Fat: 20g
- Saturated Fat: 8g
- Unsaturated Fat: 10g
- Trans Fat: 0g
- Carbohydrates: 35g
- Fiber: 2g
- Protein: 30g
- Cholesterol: 90mg
Keywords: Belgian stew, comfort food, beef recipes, hearty meals, slow-cooked beef
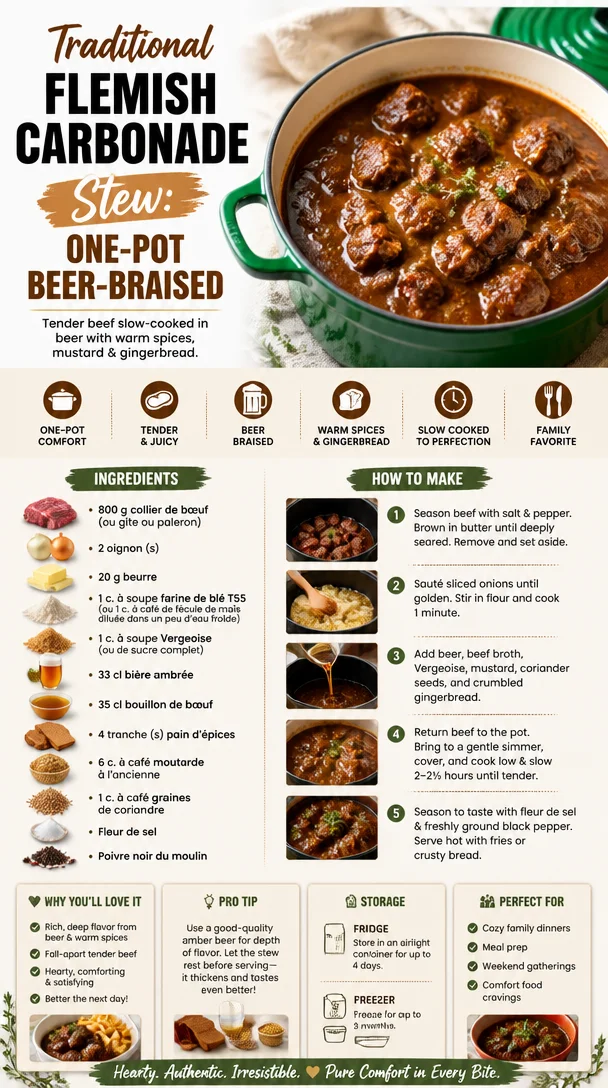
Traditional Flemish Carbonade Stew: One-Pot Beer-Braised
The Cozy Delight of Carbonade Flamande: A Taste of Tradition
Welcome to my cozy kitchen, fellow food lovers! Today, I’m thrilled to take you on a delightful culinary journey to Belgium with a dish that warms the soul and fills the home with irresistible aromas: Carbonade Flamande, also known as Flemish Beef Stew. If you’ve never experienced the joy of slow-cooked beef simmered in rich beer and accented with sweet onions, then buckle up for a recipe that’s destined to become a cherished part of your cooking repertoire.
Growing up, some of my fondest memories were crafted in the kitchen with my family, where food was always more than just a meal; it was an event, an experience to be savored. I can still recall the first time I tasted Carbonade Flamande. I was probably ten years old and my dad, sporting his favorite apron that read "Kiss the Cook," decided it was time to share his secret recipe with me. The kitchen filled with the smells of caramelizing onions, hearty beef, and a splash of dark beer that instantly transported me to a cozy café nestled in the heart of Brussels, where the stew was a house specialty. Cooking with my dad was not just about following a recipe; it was about bonding, laughing, and sharing stories—a tradition that has woven itself into the fabric of who I am as a chef.
Ingredients
To make this traditional dish come alive, you’ll need the following ingredients:
-
Beef Chuck (2-3 pounds): This cut is perfect for slow cooking; it becomes incredibly tender as it simmers. If you’re looking for a leaner option, you could substitute it with brisket, but be aware that the resulting stew might be less flavorful.
-
Beer (2-3 cups, preferably Belgian ale): The beer is what elevates this dish to gastronomic heights! A fruity amber ale works wonders here. If you’re avoiding alcohol, you can use non-alcoholic beer or beef broth mixed with a tablespoon of vinegar for a similar acidity.
-
Onions (2 large, thinly sliced): Sweet onions caramelize beautifully, adding depth to the stew. If you prefer a sharper bite, go for yellow onions. For a sweeter flavor, you could even use shallots or red onions.
-
Garlic (3 cloves, minced): Essential for adding that aromatic punch! Fresh garlic is best, but in a pinch, garlic powder can be used (1 teaspoon should do the trick).
-
Thyme (1 teaspoon, dried): This herb brings a lovely earthiness to the dish. Fresh thyme is excellent too—just double the amount!
-
Bay Leaves (2): These leaves add subtle flavor depth while the stew cooks; just remember to remove them before serving!
-
Brown Sugar (1 tablespoon): This helps to balance the bitterness of the beer and enhance the overall sweetness of the dish. You could substitute it with honey or maple syrup if you’re feeling adventurous.
-
Mustard (1 tablespoon, preferably Dijon): A touch of mustard ties all flavors together and promises a kick! If Dijon isn’t available, spicy brown mustard works well too.
-
Beef Broth (2 cups): Use low-sodium beef broth to control the salt level in your dish. Chicken broth can be a lighter substitute if necessary.
-
Salt and Pepper: To taste. Always season as you go!
This hearty mix of ingredients is not only comforting, but it makes your kitchen feel like a second home!
Step-by-Step Instructions
-
Prep Your Ingredients: The first step in creating this delightful dish is gathering all your ingredients and preparing them. Slice your onions thinly, mince the garlic, and cut your beef into 1-2 inch chunks. Trust me, taking the time to prep is worth it—your cooking process becomes so much smoother!
-
Brown the Beef: Heat a large Dutch oven or heavy pot over medium-high heat. Add a splash of oil and let it shimmer. In batches, sear the beef until browned on all sides, about 4-5 minutes per batch. Don’t overcrowd the pan, as this can lead to steaming instead of browning. This caramelization is key as it adds layers of flavor!
-
Caramelize the Onions: Remove the beef from the pot and set it aside. In the same pot, add your sliced onions. You might need to add a bit more oil if there’s none left. Cook the onions slowly over medium heat, stirring occasionally, until they turn golden brown and caramelized. This should take about 15-20 minutes. The patience pays off, trust me!
-
Add the Garlic: Once the onions are beautifully caramelized, toss in the minced garlic and cook for another minute, just until fragrant. You want that gorgeous garlicky aroma to fill your kitchen, but be careful not to burn it!
-
Deglaze with Beer: Now comes the fun part! Pour in the beer and use a wooden spoon to scrape up the delicious bits left at the bottom of the pot (this is called deglazing). Let it simmer for about 5 minutes, allowing the alcohol to evaporate a bit while the flavors meld.
-
Add Back the Beef: Return the browned beef to the pot, along with any juices that have collected. Next, stir in the broth, thyme, bay leaves, brown sugar, and mustard. Give it a good stir, and then bring it to a gentle simmer.
-
Slow Cook: Reduce the heat to low, cover, and let your Carbonade Flamande simmer for about 2 to 3 hours. The longer, the better! Stir occasionally and add a bit more broth or water if it looks too thick. You’ll know it’s ready when the beef is fork-tender, tantalizing your taste buds with its heavenly aroma!
-
Final Seasoning: Taste the stew once it’s done cooking; you might want to add a pinch of salt or pepper more. Adjust to your preference before serving.
-
Plate and Serve: Serve your stew hot, over a bed of fluffy mashed potatoes, crusty bread, or steamed rice to soak up every last bit of that delicious sauce.
Serving Suggestions
When it comes to serving Carbonade Flamande, presentation can elevate the experience! Ladle the stew generously into shallow bowls, and make sure to drench it with plenty of that rich sauce. A sprinkle of fresh parsley on top adds a beautiful pop of color. Pair it with a fresh green salad or some roasted vegetables for balance. And don’t forget a good loaf of crusty bread—it’s perfect for that final scoop of sauce!
Recipe Variations
Here are a few creative twists to consider, just in case you want to mix things up:
-
Vegetarian Version: Use robust mushrooms (like shiitake or portobello) and hearty vegetables like carrots and parsnips in place of beef. A good-quality vegetable broth and dark beer will still give a fantastic flavor.
-
Add Spices: Toss in a few peppercorns or a hint of allspice for an extra layer of flavor complexity.
-
Add Vegetables: Experiment with adding diced carrots or celery for a heartier stew.
-
Overnight Flavor: For an even richer flavor, prepare the stew a day in advance. Let it cool, refrigerate it overnight, and then reheat gently on the stovetop—this gives the flavors time to meld.
-
Gluten-Free: Use gluten-free beer and broth to adapt this recipe for those with gluten sensitivities.
Chef’s Notes
Making Carbonade Flamande has been a labor of love in my kitchen for years. I’ve played around with it, trying different types of beer and adjusting it to fit what I have on hand. One time, I made it with a sour beer, and while it was an adventure, let’s just say I learned to stick to traditional dulce choices! What I adore about this dish is that every family has their own twist. Whether it’s serving it with a side of fries or there’s a secret spice that has been passed down, there’s always room for creativity.
Ah, and I must share this funny moment: the first time I attempted this recipe alone, I completely misread ‘bay leaves’ as ‘basil leaves’ and ended up with a very confused stew. After that, I made it a habit to double-check my pantry—who knew herbs could be so tricky?!
FAQs and Troubleshooting
1. My stew turned out too salty. What did I do wrong?
Salt is in many ingredients, including broth and beer. Start with low-sodium broth and add salt gradually during cooking. If your stew is too salty, you can balance it with some sugar or by adding more vegetables to absorb the extra salt.
2. Why is my beef tough?
Braised dishes like this rely on low and slow cooking. If the beef isn’t tender, it may need more time to cook. Don’t rush this process; it can take a couple of hours for the beef to break down and become fork-tender.
3. Can I make this in a slow cooker?
Absolutely! After browning the beef and onions on the stovetop, transfer everything into your slow cooker. Cook on low for about 6-8 hours or on high for 3-4 hours.
4. What’s the best way to store leftovers?
Store any leftovers in an airtight container in the refrigerator for up to 3 days. This dish actually tastes better the next day as the flavors continue to develop. You can also freeze it for up to 3 months; just be sure to let it cool completely before transferring it to freezer bags!
Nutritional Info
This recipe serves approximately 6-8 people. The following information is an estimate based on ingredients and portion sizes:
- Calories: 400-500 per serving
- Protein: 40-45g
- Carbohydrates: 20-25g
- Fat: 15-20g
- Fiber: 2-3g
There you have it, my friends! A warm, hearty bowl of Carbonade Flamande that’s perfect for bringing loved ones together. This dish doesn’t just fill bellies; it fills hearts and creates memories. So gather your ingredients, roll up those sleeves, and let your kitchen be the heart of good food and good times. Happy cooking!
Print
Carbonade Flamande
- Total Time: 210 minutes
- Yield: 6-8 servings
- Diet: Carnivore
Description
A traditional Belgian beef stew slow-cooked in rich beer and sweet onions, perfect for cozy gatherings.
Ingredients
- Beef Chuck (2-3 pounds)
- Beer (2-3 cups, preferably Belgian ale)
- Onions (2 large, thinly sliced)
- Garlic (3 cloves, minced)
- Thyme (1 teaspoon, dried)
- Bay Leaves (2)
- Brown Sugar (1 tablespoon)
- Mustard (1 tablespoon, preferably Dijon)
- Beef Broth (2 cups)
- Salt and Pepper to taste
Instructions
- Prep your ingredients: Slice the onions thinly, mince the garlic, and cut the beef into 1-2 inch chunks.
- Brown the beef: Heat a large Dutch oven over medium-high heat, add oil, and sear the beef until browned, about 4-5 minutes per batch.
- Caramelize the onions: In the same pot, cook the sliced onions until golden brown and caramelized, about 15-20 minutes.
- Add the garlic: Toss in the minced garlic and cook for another minute until fragrant.
- Deglaze with beer: Pour in the beer and scrape up the bits from the bottom of the pot. Simmer for about 5 minutes.
- Add back the beef: Return the browned beef to the pot and stir in the broth, thyme, bay leaves, brown sugar, and mustard.
- Slow cook: Reduce heat to low, cover, and let simmer for 2-3 hours until the beef is fork-tender.
- Final seasoning: Taste and adjust with salt and pepper before serving.
- Plate and serve: Serve hot over mashed potatoes, crusty bread, or steamed rice.
Notes
For added flavor, consider preparing the stew a day in advance to let the flavors meld. This dish pairs beautifully with a fresh green salad or roasted vegetables.
- Prep Time: 30 minutes
- Cook Time: 180 minutes
- Category: Main Course
- Method: Slow Cooking
- Cuisine: Belgian
Nutrition
- Serving Size: 1 serving
- Calories: 450
- Sugar: 5g
- Sodium: 600mg
- Fat: 17g
- Saturated Fat: 6g
- Unsaturated Fat: 9g
- Trans Fat: 0g
- Carbohydrates: 22g
- Fiber: 2g
- Protein: 40g
- Cholesterol: 100mg
Keywords: beef stew, Belgian cuisine, Carbonade Flamande, comfort food, slow cooking
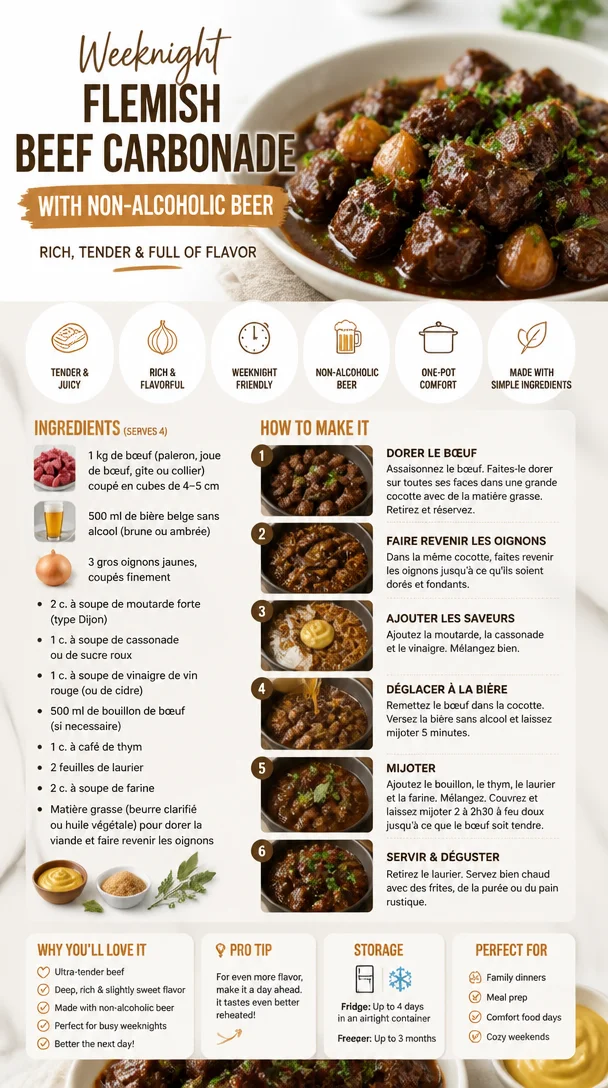
Weeknight Flemish Beef Carbonade with Non-Alcoholic Beer
Succulente Carbonade Flamande au Bœuf et Bière Sans Alcool: A Cozy Dish for Every Occasion
Welcome to my kitchen, friends! Today, we’re diving deep into the heart of European comfort food with a dish that’s not just rich in flavor but also steeped in history. I’m talking about the delightful succulente carbonade flamande, a traditional Belgian beef and beer stew that has been winning hearts for centuries. The twist? We’re making it alcohol-free, proving that sabor doesn’t have to come from booze!
When I first encountered carbonade flamande, it was during a chilly autumn evening at my friend’s family home. We’d all gathered around the table, the faint sound of rain pattering against the windows and the smell of something magical wafting from the kitchen. As soon as the dish was served, you could hear the collective sigh of satisfaction—it was evident that this stew was meant for sharing, for laughter, and for cozy moments. The beef was so tender it practically melted in my mouth, perfectly complemented by the sweet and savory notes that hugged the dish.
As I took my first bite, I knew that this was a recipe I had to make my own, no matter my audience. Fast forward to today, and I’ve crafted my own version where we ditch the alcohol but keep all that deep flavor, making it perfect for family dinners, cozy nights in, or even hosting your best pals for a casual get-together. Let’s roll up our sleeves and get cooking!
Personal Story
I’ll never forget that night at my friend’s house. The table was overflowing with laughter, friends, and good food. We each took turns sharing our most embarrassing cooking experiences, and I, naturally, had to share mine about the time I mistook salt for sugar while trying to impress my date. We all had a good laugh, and as we reminisced, I looked down at my plate in awe of the carbonade flamande. The thick stew was like a warm hug; full of love, memories, and flavors that transported me straight to Belgium.
From that moment on, I knew I wanted to recreate that experience. I wanted to craft a carbonade flamande that was inclusive—one that could be enjoyed by everyone, whether you’re a parent, a friend, or just treating yourself. As I began experimenting in my kitchen, I fell more in love with the process and the history behind the dish. For me, cooking is about connecting—connecting with our roots, with who we cook for, and with each and every ingredient. So, let’s carry on this wonderful tradition together!
Ingredients
Here’s what you’ll need to create this tasty carbonade flamande in your own kitchen:
-
Beef Chuck (2 lbs)
- The star of the show! Choose a well-marbled cut for the best flavor. Chuck tenderizes wonderfully during slow cooking, but if you’re in a pinch, cuts like brisket or round can also work.
-
Onions (2 large, sliced)
- Sweet and savory! The key is to caramelize these properly; they’ll add a deep sweetness to your dish. Vidalia or yellow onions are perfect, but feel free to substitute with shallots for a more refined flavor.
-
Garlic (3 cloves, minced)
- For an aromatic boost! Fresh is always best, but jarred minced garlic can work in a hurry.
-
Beef Broth (4 cups)
- This creates the base of your stew. Homemade broth is ideal, but a good-quality store-bought one works great too. Just avoid low-sodium varieties unless you want to control the seasoning.
-
Non-Alcoholic Beer (2 cups)
- This replaces the traditional beer while keeping that malty flavor alive! Feel free to choose any non-alcoholic brand that appeals to you. If you don’t have any on hand, apple cider or vegetable broth can also do the trick, but expect a flavor twist.
-
Dijon Mustard (2 tablespoons)
- Adds depth and character. If you’re not a fan of mustard, you can cut back to 1 tablespoon or use a smooth grain mustard instead.
-
Balsamic Vinegar (2 tablespoons)
- This adds acidity and sweetness to balance the flavors. Try sherry vinegar for something a bit different!
-
Thyme (1 tablespoon, fresh or 1 teaspoon dried)
- Brings an earthy flavor. In a pinch, tarragon or rosemary can be substituted based on what you have on hand.
-
Bay Leaves (2)
- Don’t skip these! They provide that classic stew aroma. Just remember to fish them out before serving—they’re not meant to be eaten!
-
Olive Oil (2 tablespoons)
- Used for browning your meat and onions. You can substitute with butter if you’re aiming for a richer flavor.
-
Salt and Pepper to taste
- The classic seasoning duo; adjust according to your preference.
These ingredients form the foundation of a dish that’s not only comforting but also incredibly versatile. As you cook, keep in mind that fresh herbs and spices elevate the flavor. So, don’t be shy about tasting along the way!
Step-by-Step Instructions
Let’s bring this dish to life! Follow along with these detailed steps to create your very own succulente carbonade flamande.
-
Prep the Ingredients:
Begin by gathering all your ingredients. Make sure your beef is cut into 1-2 inch pieces to ensure even cooking. Slice your onions thinly and mince the garlic so everything is ready to go. -
Sear the Beef:
In a large Dutch oven or heavy pot, heat 2 tablespoons of olive oil over medium-high heat. When it’s shimmering, add the beef in batches, making sure not to overcrowd the pot. This helps achieve that beautiful golden-brown crust. Sear for about 4-5 minutes on each side until nicely browned. Don’t skip this step—it creates a deep flavor base! -
Add Onions and Garlic:
Once the beef is browned, remove it from the pot and set it aside. In the same pot (don’t clean it!), add your sliced onions. Remember to scrape up those delicious brown bits stuck to the bottom—those are flavor gold! Sauté the onions for about 8-10 minutes until they’re soft and caramelized. Add the minced garlic and cook for another minute until fragrant. -
Deglaze the Pot:
Pour in the non-alcoholic beer and use a wooden spoon to scrape up any remaining bits. This will give your stew an incredible depth of flavor. Let the beer simmer for a few minutes to cook off some of the moisture. -
Combine Everything:
Return the seared beef to the pot. Stir in the beef broth, Dijon mustard, balsamic vinegar, thyme, and bay leaves. Bring the mixture to a gentle boil, then reduce the heat to low and cover the pot. This low-and-slow cooking is essential for tenderizing the beef. -
Let It Simmer:
Allow the stew to simmer for about 1.5 to 2 hours. Stir occasionally and enjoy the heavenly aroma filling your kitchen. The beef should be fork-tender by the end of this process. -
Finalize and Season:
Once the cooking time has passed, remove the bay leaves and adjust the seasoning with salt and pepper. If you want a thicker stew, you can remove the lid for the last 20 minutes of cooking to reduce the liquid. -
Serving Time:
Serve your carbonade flamande warm with some crusty bread or over a bed of creamy mashed potatoes. The combination of the tender beef and flavorful broth is simply irresistible.
Don’t forget to taste it one last time before serving; cooking is as much about personal touch as it is about following recipes!
Serving Suggestions
To serve up your luxurious carbonade flamande, I recommend a beautiful shallow bowl that allows the savory stew to shine. Nestle some fluffy mashed potatoes or crusty bread on the side to soak up every last drop of that mouthwatering sauce. You can also garnish with a sprinkle of fresh thyme for a little burst of color and aroma. Your friends and family won’t be able to resist—trust me!
Recipe Variations
Feeling adventurous? Here are a few ways you can twist up this carbonade flamande recipe:
- Vegetarian Version: Swap the beef for hearty mushrooms or a mix of root vegetables. Use vegetable broth instead to keep it rich and satisfying.
- Spicy Kick: Add a pinch of cayenne pepper or a splash of hot sauce to the mix for those who love a little heat.
- Herb Infusion: Experiment with different herbs like rosemary or oregano instead of thyme for an entirely new flavor profile.
Let your creativity shine in the kitchen!
Chef’s Notes
This recipe has evolved over the years; each time I make it, I find myself adjusting the ingredients or experimenting with flavors. There was an amusing moment when a friend asked if they could add ketchup to the stew for a punch of sweetness. While it seemed bizarre, the spirit of joyful cooking is all about enjoying the process and adapting to individual preferences. We ended up making a mini carbonade martial with both versions, and it turned into a charming cooking competition!
Cooking is a journey, and each time you make a dish, it becomes uniquely yours. So embrace those little changes, and don’t be afraid to laugh at the kitchen mishaps along the way.
FAQs and Troubleshooting
1. What should I do if my stew is too salty?
If your carbonade flamande turns out to be too salty, fear not! Add a peeled potato to the pot and let it simmer for about 20 minutes. The potato will absorb some of the excess salt. Just remember to remove it before serving!
2. Can I prepare this ahead of time?
Absolutely! In fact, the flavors develop even more when the stew sits overnight in the refrigerator. Simply reheat gently on the stove when you’re ready to serve.
3. What should I serve with carbonade flamande?
This dish pairs beautifully with buttery mashed potatoes, hearty bread, or a side salad with a tangy vinaigrette. Think of it as a canvas for your favorite sides!
4. Can I freeze this dish?
Yes, this stew is freezer-friendly! Just allow it to cool completely, and store it in an airtight container. It should stay good for about 3 months. When ready to enjoy, defrost it in the refrigerator and reheat on the stove.
Nutritional Info
(Per Serving, based on 6 servings)
- Calories: 380
- Protein: 34g
- Fat: 15g
- Carbohydrates: 32g
- Fiber: 4g
There you have it—a cozy, heartwarming carbonade flamande that will take you on a culinary journey without leaving your kitchen. Whether it’s a quiet weekday dinner or a lively weekend gathering, this dish is bound to spark joy and connections at your table. So grab that apron, put on some music, and let’s make some memories. Happy cooking!
Print
Succulente Carbonade Flamande au Bœuf et Bière Sans Alcool
- Total Time: 135 minutes
- Yield: 6 servings
- Diet: Non-Vegetarian
Description
A cozy Belgian beef and beer stew, lovingly crafted to be alcohol-free while retaining rich flavors for any occasion.
Ingredients
- Beef Chuck (2 lbs)
- Onions (2 large, sliced)
- Garlic (3 cloves, minced)
- Beef Broth (4 cups)
- Non-Alcoholic Beer (2 cups)
- Dijon Mustard (2 tablespoons)
- Balsamic Vinegar (2 tablespoons)
- Thyme (1 tablespoon fresh or 1 teaspoon dried)
- Bay Leaves (2)
- Olive Oil (2 tablespoons)
- Salt and Pepper to taste
Instructions
- Prep the ingredients by cutting the beef and slicing onions.
- Sear the beef in a large pot with olive oil until browned.
- Add onions and garlic, cooking until the onions are caramelized.
- Deglaze the pot with non-alcoholic beer, scraping up any bits.
- Combine beef, broth, mustard, vinegar, thyme, and bay leaves in the pot.
- Let the stew simmer for 1.5 to 2 hours until the beef is tender.
- Finalize seasoning with salt and pepper before serving.
Notes
Serve warm with crusty bread or creamy mashed potatoes. Adjust ingredients to cater to personal tastes.
- Prep Time: 15 minutes
- Cook Time: 120 minutes
- Category: Main Course
- Method: Braising
- Cuisine: Belgian
Nutrition
- Serving Size: 1 serving
- Calories: 380
- Sugar: 5g
- Sodium: 800mg
- Fat: 15g
- Saturated Fat: 5g
- Unsaturated Fat: 8g
- Trans Fat: 0g
- Carbohydrates: 32g
- Fiber: 4g
- Protein: 34g
- Cholesterol: 70mg
Keywords: carbonade flamande, beef stew, Belgian recipes, cozy meals, alcohol-free cooking
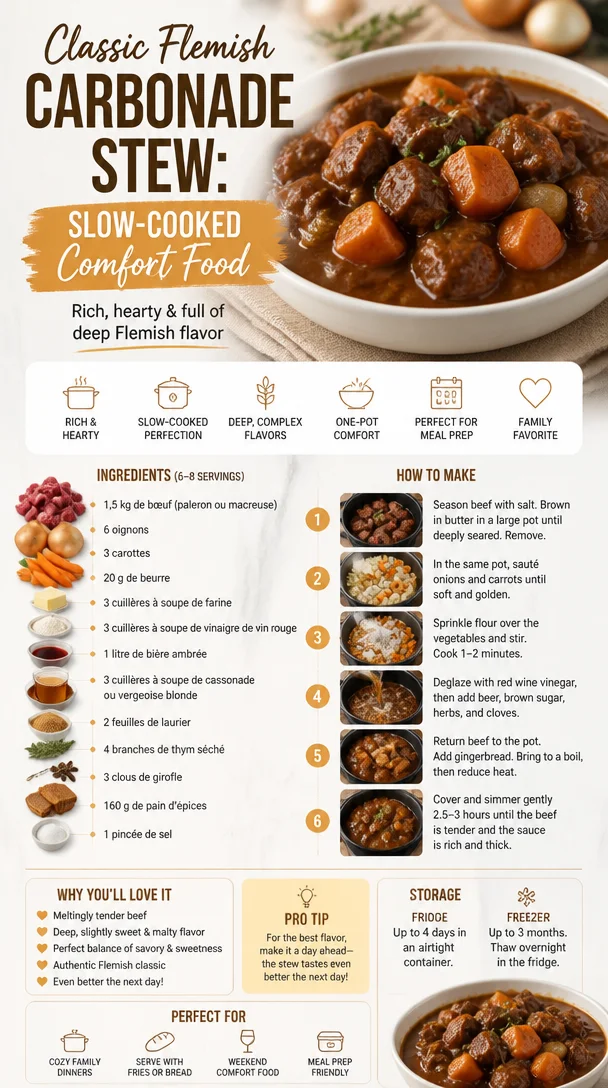
Classic Flemish Carbonade Stew: Slow-Cooked Comfort Food
Carbonade Flamande Traditionnelle: A Taste of Belgium’s Comfort
Welcome to my cozy kitchen, where today we’re diving into the heart of Belgian comfort food with a dish that will make your taste buds sing: Carbonade Flamande Traditionnelle! This savory beef stew, made with tender meat simmered in a rich, aromatic sauce, is perfect for those chilly evenings when all you want is something warm, hearty, and utterly delicious. Trust me, this is not just another stew — it’s a dish that tells a story, and I can’t wait to share it with you!
Let’s talk about why Carbonade Flamande holds a special place in my heart. I remember the first time I tasted it — my friend Sophie, a phenomenal cook with a knack for Belgian cuisine, invited me over on a particularly dreary, rainy day. The air was filled with the enticing aroma of beef slowly simmering, mixed with the sweet notes of caramelized onions and the unmistakable scent of rich beer. As the warmth wrapped around me like a cozy blanket, I knew I was in for something special. Sophie served it with creamy mashed potatoes, and we enjoyed it while reminiscing about our travels and dreams. The flavors were so comforting, so rich that they instantly transported me to a little bistro in Brussels, filled with laughter and love.
That first taste was like a warm hug on a gloomy day, and I’ve been hooked ever since. Now, I want to bring that same warmth to your kitchen. You don’t need to be a gourmet chef to make this dish — just an adventurous spirit and a love for good food! Ready to embark on this culinary journey? Let’s get cooking!
Ingredients
Here’s what you’ll need to create this comforting Carbonade Flamande:
-
2 lbs beef chuck (or brisket)
- Look for well-marbled cuts for the best flavor. If chuck isn’t available, brisket works beautifully too!
-
2 large onions
- Sweet or yellow onions are perfect for caramelizing. You can substitute with shallots for a milder flavor.
-
3 tablespoons unsalted butter
- Adds richness; you can replace with olive oil for a dairy-free option.
-
4 cloves garlic
- Fresh garlic adds depth; jarred minced garlic works in a pinch.
-
2 cups dark beer (like a Belgian ale or stout)
- A good quality brew makes a difference! Use beef broth or a non-alcoholic beer if preferred.
-
2 cups beef broth
- Homemade is best, but store-bought works too. Just watch the sodium content!
-
2 tablespoons brown sugar
- It balances the bitterness of the beer. Substitute with honey or maple syrup if needed.
-
2 tablespoons Dijon mustard
- Adds a tangy kick. Whole grain mustard is a fun twist if you like texture.
-
2 bay leaves
- Essential for flavor infusion—they’re best removed before serving.
-
1 teaspoon dried thyme
- Fresh thyme works too! Use about three times as much for a vibrant touch.
-
Salt and pepper to taste
- Essential for seasoning; always taste as you go!
-
Fresh parsley (for garnish)
- Adds a pop of color and freshness to the dish.
Step-by-Step Instructions
Now, let’s dive into the fun part — cooking!
-
Prep Your Ingredients
- Begin by chopping the onions into thin slices. The key is to get them evenly sliced for perfect caramelization. Mince the garlic, and cut the beef into bite-sized chunks if it isn’t pre-cut. Trust me, this prep makes the cooking process smoother!
-
Brown the Beef
- In a large, heavy-bottomed pot (like a Dutch oven), heat 2 tablespoons of butter over medium-high heat. Once hot, add the beef in batches, ensuring not to overcrowd the pan. Brown the chunks on all sides — this step is critical for developing flavor! Remove the beef, and set it aside.
-
Caramelize the Onions
- In the same pot, add the sliced onions with a pinch of salt. This will help draw out their moisture and encourage caramelization. Stir occasionally and cook them for about 10-15 minutes, until they are golden and soft. Now, toss in the minced garlic and cook for an additional minute, just until fragrant.
-
Deglaze the Pot
- Here comes a fun little chef hack! Pour in about 1 cup of your dark beer, scraping up all those glorious brown bits stuck to the bottom of the pot. This deglazing process adds another layer of flavor to your stew.
-
Bring It All Together
- Return the browned beef to the pot, along with the remaining beer, beef broth, brown sugar, Dijon mustard, bay leaves, thyme, and some salt and pepper. Give it a good stir to combine everything. Bring it to a gentle boil, then reduce the heat, cover, and let it simmer on low for about 2 hours. The longer it cooks, the more tender the beef becomes!
-
Final Touches
- After the two hours, taste for seasoning and adjust as needed. Remove the bay leaves before serving. If you find the sauce too thin, you can thicken it by simmering uncovered until it reduces to your desired consistency.
Serving Suggestions
To serve, ladle generous portions of the Carbonade Flamande into bowls, ensuring everyone gets a good helping of that luscious broth. For the ultimate comfort-food experience, pair it with creamy mashed potatoes or crusty bread to soak up all the amazing sauce. Don’t forget a sprinkle of fresh parsley on top for that vibrant finishing touch!
Recipe Variations
Get creative! Here are a few fun variations to tweak this dish:
- Vegetarian Version: Swap the beef for mushrooms (like portobellos) and use vegetable broth for a comforting plant-based option.
- Spicy Kick: Add a dash of cayenne pepper or a few sliced jalapeños for a spicy twist.
- Add Carrots: Toss in some sliced carrots during the last hour of cooking for a pop of color and sweetness.
- Herb Infusion: Experiment with different herbs like rosemary or sage for a different flavor profile.
- Beer Selection: Try different beers! A fruity Belgian ale will impart a sweetness, while a stout will give a deeper, more robust flavor.
Chef’s Notes
This recipe has evolved in my kitchen over the years, from a cozy Tuesday night meal to a go-to dish for gatherings with friends and family. I remember one chilly autumn evening, hosting a small dinner party — I got a little adventurous and added a splash of balsamic vinegar for a tart contrast, and it was a hit! Every time I make it, I find myself reminiscing about those moments, and it warms my heart just as much as the dish warms my belly.
FAQs and Troubleshooting
-
Why is my beef tough?
- If your beef turns out chewy, it likely needs more time to break down. Let it simmer longer for that tender, melt-in-your-mouth texture.
-
Can I make this ahead of time?
- Absolutely! This dish tastes even better the next day after the flavors have had time to marry. Just reheat gently before serving.
-
How do I fix a too-salty broth?
- If your stew is too salty, add a peeled potato to the pot while it simmers; the potato will absorb some of the salt. Just remember to remove it before serving!
-
What side dishes go well with Carbonade Flamande?
- Besides mashed potatoes, consider serving with buttered noodles or a simple green salad for brightness. Crusty bread for dipping is also a must!
Nutritional Info
While exact nutritional information may vary based on your ingredients, a typical serving of Carbonade Flamande provides a hearty dose of protein and iron, perfect for a filling meal. Serve it with wholesome sides for a balanced dish.
And there you have it! A warm, cozy bowl of Carbonade Flamande Traditionnelle that’s sure to bring smiles to your table. Remember, cooking should be fun and adventurous, so don’t hesitate to put your spin on it. Share your creations and stories with me — I can’t wait to hear how you make this dish your own! Happy cooking, fellow foodies!
Print
Carbonade Flamande Traditionnelle
- Total Time: 135 minutes
- Yield: 6 servings 1x
- Diet: None
Description
A traditional Belgian beef stew simmered in a rich, aromatic sauce, perfect for chilly evenings.
Ingredients
- 2 lbs beef chuck (or brisket)
- 2 large onions
- 3 tablespoons unsalted butter
- 4 cloves garlic
- 2 cups dark beer (like a Belgian ale or stout)
- 2 cups beef broth
- 2 tablespoons brown sugar
- 2 tablespoons Dijon mustard
- 2 bay leaves
- 1 teaspoon dried thyme
- Salt and pepper to taste
- Fresh parsley (for garnish)
Instructions
- Prep your ingredients by chopping the onions into thin slices and mincing the garlic.
- Brown the beef in a large pot over medium-high heat with butter, ensuring not to overcrowd the pan.
- Caramelize the onions in the same pot with a pinch of salt, cooking for about 10-15 minutes until golden.
- Deglaze the pot with 1 cup of dark beer, scraping the brown bits off the bottom.
- Bring it all together by adding the browned beef, remaining beer, broth, sugar, mustard, bay leaves, thyme, salt, and pepper. Stir to combine.
- Cover and simmer on low for 2 hours until the beef is tender.
- Final touches include tasting for seasoning, removing bay leaves, and thickening the sauce if desired.
Notes
This dish is even better the next day after the flavors have melded. Pair with mashed potatoes or crusty bread for a complete meal.
- Prep Time: 15 minutes
- Cook Time: 120 minutes
- Category: Main Course
- Method: Simmering
- Cuisine: Belgian
Nutrition
- Serving Size: 1 serving
- Calories: 450
- Sugar: 6g
- Sodium: 700mg
- Fat: 22g
- Saturated Fat: 10g
- Unsaturated Fat: 10g
- Trans Fat: 0g
- Carbohydrates: 30g
- Fiber: 2g
- Protein: 35g
- Cholesterol: 90mg
Keywords: beef stew, Belgian cuisine, comfort food
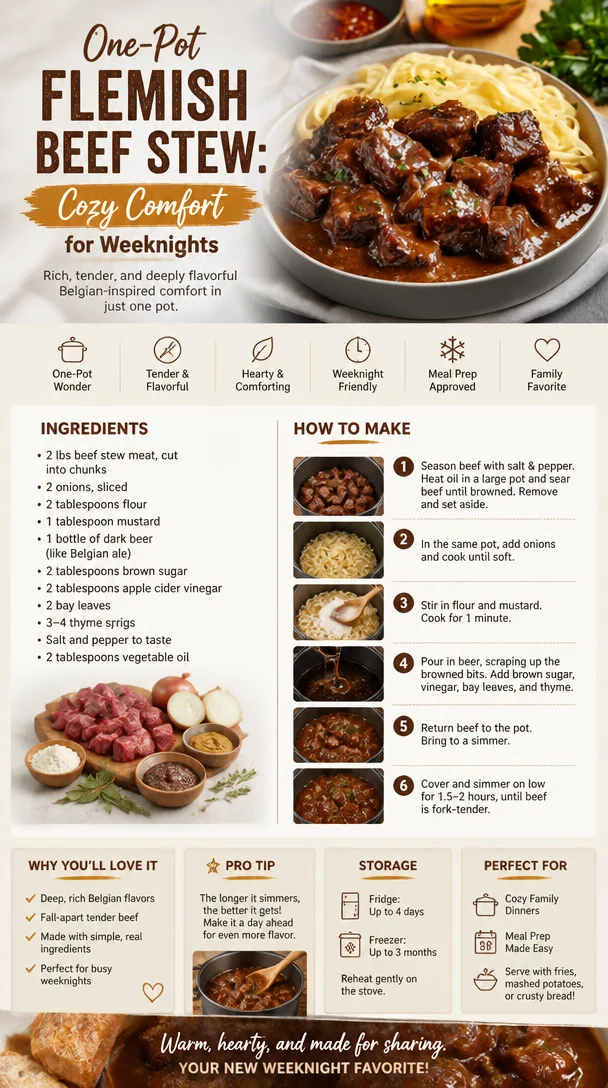
One-Pot Flemish Beef Stew: Cozy Comfort for Weeknights
La Carbonade Flamande: A Cozy Hug in a Bowl
Welcome to my kitchen, dear foodies! Today, we’re diving into the delectable world of La Carbonade Flamande, a classic Belgian beef stew that’s as rich in history as it is in flavor. Picture this: the fragrant aroma of tender beef simmering in a hearty sauce of onions, beer, and subtle spices wafts through the air, and you can’t help but smile. This dish is all about comfort and warmth—a true cozy hug in a bowl that beckons you to gather around the table with family and friends.
When I first tasted La Carbonade Flamande years ago during a chilly autumn trip to Belgium, I was instantly smitten. I remember walking into a quaint little bistro in Bruges, where the atmosphere was charmingly rustic, complete with flickering candlelight and the inviting scent of something delicious brooding away in the kitchen. I ordered the Carbonade Flamande out of curiosity, and as soon as I took that first bite, I felt a wave of warmth. It was a beautiful marriage of rich, savory, and slightly sweet flavors that danced on my palate! I knew in that moment that I had to recreate this comforting dish back at home.
The beauty of La Carbonade Flamande lies not just in its straightforward ingredients but in the love and patience that goes into making it. It’s a dish that tells a story, one that’s meant to be savored and shared. With this recipe, you don’t need to be a culinary wizard to bring this masterpiece to your dinner table; all you need is a little time, the right ingredients, and a sprinkle of enthusiasm. Let’s roll up our sleeves and get cooking!
Personal Story
I vividly recall the first time I attempted to make La Carbonade Flamande in my own kitchen. It was a rainy Sunday afternoon, and I was determined to bring a taste of Belgium to my little home in the suburbs. Armed with my favorite Dutch oven and a recipe I found online, I set out on this stewing adventure.
The scent of onions sizzling in butter filled my kitchen, and I couldn’t help but feel nostalgic, as it reminded me of the grand kitchen at my grandmother’s house. It felt like the universe was conspiring to create an atmosphere of warmth and joy. As the beef browned and the beer simmered, my kitchen transformed into a cozy haven. I invited some friends over, and together we dived into delightful conversation as the Carbonade Flamande braised to perfection. That day wasn’t just about food—it was about connection, laughter, and creating new memories together.
Now, let’s explore how to make this delightful dish right at home. You’ll be amazed at how simple it is to whip up such a masterpiece!
Ingredients
Here’s what you’ll need to create your own La Carbonade Flamande:
- 2 lbs beef chuck roast: Look for well-marbled meat for superior tenderness. If you can’t find chuck, brisket is a nice alternative.
- 2 large onions, thinly sliced: Sweet onions work beautifully, but you can use yellow onions if that’s what you have on hand.
- 3 cloves garlic, minced: Fresh garlic adds a lovely depth of flavor. If you’re in a pinch, garlic powder will work, too—just use about 1 teaspoon.
- 2 cups Belgian ale: A dark ale or a Dubbel works wonders, but any good-quality beer you enjoy drinking will do!
- 2 tablespoons brown sugar: This helps balance the bitterness of the beer. If you prefer, you can substitute honey.
- 2 tablespoons Dijon mustard: This traditional ingredient adds a delightful tang and depth; you can swap it for whole-grain mustard for a different texture.
- 1 teaspoon dried thyme: If fresh thyme is on hand, use about 1 tablespoon for a brighter flavor.
- 2 bay leaves: These add aromatic undertones; just remember to remove them before serving!
- Salt and pepper, to taste: Always essential! You can also experiment with smoked paprika for added depth.
- 2 tablespoons vegetable oil: For searing the beef. You could use olive oil for a richer flavor, but it has a lower smoke point, so keep an eye on it.
- Fresh parsley, for garnish (optional): Adds a pop of color and freshness. You can substitute with chives or thyme.
With these ingredients in your pantry, you’re well on your way to making La Carbonade Flamande that will have everyone asking for seconds!
Step-by-Step Instructions
Let’s get down to business! Here’s how to craft the perfect Carbonade Flamande:
-
Prep Your Ingredients: Start by gathering all your ingredients together. This makes the cooking process feel seamless and enjoyable. Always, always chop your onions and garlic first—onions tend to bring out the tears, so do yourself a favor!
-
Brown the Beef: Heat the vegetable oil in your Dutch oven over medium-high heat. Generously season the beef with salt and pepper. Once the oil is shimmering, add the beef to the pot in batches, making sure not to overcrowd it. Sear each piece until it develops a lovely brown crust on all sides—about 4–5 minutes per side. This caramelization is key; it adds deep flavor to the stew! Once browned, remove the beef from the pot and set it aside.
-
Sauté the Onions: In the same pot, add the sliced onions and a pinch of salt. Reduce the heat to medium and allow the onions to cook slowly until they are soft and golden brown—about 10-15 minutes. This process will enhance their sweetness and provide a fantastic base for the stew. Stir occasionally to avoid sticking.
-
Add Garlic and Deglaze: Once the onions have caramelized, add the minced garlic and sauté for an additional minute until fragrant. Then, pour in the Belgian ale. This is where the magic happens! Use a wooden spoon to scrape up any flavorful little bits stuck to the bottom of the pot—this is called deglazing and really enhances the dish.
-
Combine Ingredients: Add the browned beef back into the pot, along with the brown sugar, Dijon mustard, thyme, bay leaves, and additional salt and pepper to taste. Stir everything together, ensuring the beef is well-coated in that delightful mixture.
-
Simmer: Bring the stew to a gentle boil, then reduce the heat to low, cover with a lid, and let it simmer for about 2–2½ hours. The long, slow cook will tenderize the beef and blend the flavors beautifully!
-
Check and Adjust Seasoning: About 15-20 minutes before it’s done, taste and adjust any seasoning if needed. I often like to add a touch more mustard for extra zing if I’m feeling adventurous!
-
Serve: Once the beef is fork-tender and the sauce is thickened, it’s time to serve!
Serving Suggestions
La Carbonade Flamande is best served with hearty accompaniments that can soak up all that delicious sauce. Consider pairing it with creamy mashed potatoes, crusty bread, or even soft polenta. Don’t forget to sprinkle a bit of freshly chopped parsley on top for that lovely touch of green—after all, we eat with our eyes first!
Recipe Variations
Feeling adventurous? Here are some fun twists to switch things up a bit:
-
Vegetarian Option: Substitute the beef with hearty mushrooms (like portobello or cremini), and use vegetable broth instead of beer. A splash of balsamic vinegar helps to maintain that deep flavor.
-
Spicy Version: Add crushed red pepper flakes or diced jalapeños to the onions for a spicy kick; just be careful to balance the heat with some extra sugar!
-
Sweet and Savory: Toss in some carrots or parsnips for added sweetness and texture—just chop them up and add them alongside the beef.
-
Smoky Flavor: Try adding smoked sausage or pancetta for a delicious smoky element that pairs wonderfully with the stew’s richness.
-
Herb Infusion: Play with fresh herbs like rosemary or oregano for a fresh flavor twist. Just remember to adjust the amount as these herbs can be more potent.
Chef’s Notes
Over the years, I’ve put my own spin on this classic stew numerous times. One delightful evolution was when I decided to incorporate leftover Guinness from a gathering. By doing so, I discovered a hidden depth that made my Carbonade Flamande stand out at dinner parties! Each time, I cherish how this recipe welcomes experimentation and creativity in the kitchen.
A little kitchen tip: if you have any leftovers (which might be a challenge considering how irresistible this dish is), they get even better after a night in the fridge—just reheat and serve. Trust me, that next-day flavor is worth waiting for!
FAQs and Troubleshooting
1. Can I use a slow cooker for this recipe?
Absolutely! After browning your meat and sautéing the onions, simply add everything to your slow cooker. Cook it on low for 6–8 hours, and you’ll have a luscious stew waiting for you by dinner time!
2. What should I do if my sauce is too thin?
If you find the sauce is too thin, you can thicken it by mixing a tablespoon of cornstarch with a little cold water to create a slurry, and then stir it into the stew. Let it simmer for a few minutes until thickened.
3. Can I freeze La Carbonade Flamande?
Yes! This stew freezes beautifully. Allow it to cool completely, then transfer to airtight containers. It can last in the freezer for about 3 months. Just reheat on low, and it’ll taste fantastic!
4. Why does my dish taste bitter?
If you’re finding bitterness, it might be overcooked onions or beer that’s too bitter. Adjust with a bit more sugar or mustard to balance the flavors. Taste as you go, and remember, cooking is all about love and intuition!
Cooking La Carbonade Flamande may just become one of your new favorite kitchen adventures. As you savor each delicious bite, remember that the true essence of this dish goes beyond mere ingredients—it’s about putting your heart into every step and sharing that passion with others. Enjoy the cozy hug in a bowl and the journeys it creates! Happy cooking!
Print
La Carbonade Flamande
- Total Time: 165 minutes
- Yield: 6 servings 1x
- Diet: None
Description
A classic Belgian beef stew simmered in a hearty sauce of onions, beer, and spices, perfect for cozy gatherings.
Ingredients
- 2 lbs beef chuck roast
- 2 large onions, thinly sliced
- 3 cloves garlic, minced
- 2 cups Belgian ale
- 2 tablespoons brown sugar
- 2 tablespoons Dijon mustard
- 1 teaspoon dried thyme
- 2 bay leaves
- Salt and pepper, to taste
- 2 tablespoons vegetable oil
- Fresh parsley, for garnish (optional)
Instructions
- Prep Your Ingredients: Gather all your ingredients together, chop onions and garlic first.
- Brown the Beef: Heat oil in a Dutch oven, season beef, and sear until brown on all sides.
- Sauté the Onions: Cook sliced onions with a pinch of salt until soft and golden brown.
- Add Garlic and Deglaze: Stir in minced garlic and pour in the Belgian ale, scraping up bits from the pot.
- Combine Ingredients: Return beef to pot, add brown sugar, mustard, thyme, bay leaves, salt, and pepper.
- Simmer: Bring to a boil, then cover and let simmer for 120-150 minutes.
- Check and Adjust Seasoning: Taste and adjust seasoning with more mustard if desired.
- Serve: Enjoy once the beef is fork-tender and sauce thickened.
Notes
Serve with mashed potatoes, crusty bread, or soft polenta, and garnish with parsley.
- Prep Time: 15 minutes
- Cook Time: 150 minutes
- Category: Main Course
- Method: Braising
- Cuisine: Belgian
Nutrition
- Serving Size: 1 serving
- Calories: 460
- Sugar: 6g
- Sodium: 450mg
- Fat: 20g
- Saturated Fat: 7g
- Unsaturated Fat: 10g
- Trans Fat: 0g
- Carbohydrates: 36g
- Fiber: 2g
- Protein: 35g
- Cholesterol: 80mg
Keywords: beef stew, Belgian recipe, comfort food, cozy meal

Cinnamon Rolls
The Ultimate Cinnamon Roll Recipe that Will Warm Your Heart
Welcome to my cozy kitchen, where the scent of cinnamon wafts through the air like a warm hug! I’m Olivia Bennett, and today, I’m bursting with excitement to share a cherished recipe that has been a staple in my home for years: my delectable cinnamon rolls. These sweet, fluffy beauties are not just a treat; they’re a delicious memory wrapped in a gooey glaze, ready to bring joy to your family and friends.
There’s something magical about cinnamon rolls. They evoke nostalgia, perhaps because they remind us of lazy Sunday mornings spent lingering over breakfast, the kind that draws everyone to the kitchen with sleepy eyes and hopeful hearts. Picture this: warm coffee brewing, the sun streaming through the window, and the tantalizing aroma of cinnamon swirling through the air. It’s a sensory experience that speaks to the soul, and that’s exactly what I want to recreate for you today.
My love for baking cinnamon rolls started in my childhood, standing on a stool beside my grandmother, who had the knack for creating magic in the kitchen. I remember mixing the dough, sprinkling what felt like an endless mountain of cinnamon sugar, and watching in awe as those rolls blossomed into golden, pillowy clouds in the oven. That anticipation, that sense of warmth and belonging, is what has fueled my passion over the years, and it’s why I’m thrilled to guide you through this journey.
So, grab your apron (and maybe a few extra napkins because things might get sticky), and let’s dive into the world of cinnamon rolls—a place where flour flies, smiles abound, and hearts grow a little fonder with every bite!
A Special Memory: Cinnamon Rolls and Sunday Morning Bliss
Every Sunday during my childhood was carefully marked on the calendar with one simple yet joyous activity: grandma’s cinnamon roll mornings. It wasn’t just about eating; it was an experience filled with laughter, the clink of coffee mugs, and stories that seemed to float through the air like the scent of baking cinnamon.
I vividly recall my grandma’s habit of sneaking a little extra cinnamon and brown sugar into the filling—her secret touch for making them extra special. While we waited for the dough to rise, she would share tales of her own culinary adventures, introducing me to the magic of baking and the happiness it brings.
After what felt like an eternity, the oven timer would ding, a sound that could summon the whole family in an instant. The first bite of those sticky, warm rolls was sheer bliss, a reminder that love is often found in the simplest of pleasures. It was a connection, a way to gather and create memories that have stuck with me through the years.
As I bake these cinnamon rolls today, I channel that same joy and excitement, hoping to share a piece of my past with each person who tries this recipe. Trust me—after just one bite, you’re bound to make your own cherished memories!
Ingredients: What You’ll Need
To make these fluffy cinnamon rolls, gather the following ingredients and let’s create some magic in the kitchen!
-
All-purpose flour (4 cups): This is the base for our dough. It provides structure and fluffiness. If you’re looking for a gluten-free option, you can use a 1:1 gluten-free flour blend.
-
Granulated sugar (½ cup): This sweetens the dough and balances out the spices. For a less sweet option, you can reduce the sugar to ¼ cup.
-
Active dry yeast (2 ¼ teaspoons): This little powerhouse helps the dough rise and become wonderfully fluffy. If you’re using instant yeast, you can use the same amount without needing to activate it in water.
-
Warm milk (1 cup): It activates the yeast and adds richness to the dough. If you’re dairy-free, feel free to use almond milk or oat milk. Just ensure it’s slightly warm, not hot.
-
Unsalted butter (½ cup, melted): Butter brings a lovely flavor and richness to the rolls. You could replace it with coconut oil for a dairy-free version!
-
Large egg (1): This binds the dough together and gives a slight richness. For a vegan alternative, try using a flax egg (1 tablespoon of ground flaxseed mixed with 3 tablespoons of water).
-
Cinnamon (2 tablespoons): The star of our show! It’s warm and aromatic, making these rolls irresistible. If you want a little kick, try adding a pinch of nutmeg or allspice to the mix.
-
Brown sugar (¾ cup): This adds moisture and deep, caramel-like flavor. You can substitute with coconut sugar if preferred.
-
Cream cheese (for frosting): You can’t have cinnamon rolls without icing! Cream cheese gives a tangy sweetness that complements the cinnamon perfectly. For a dairy-free option, try using cashew cream or a non-dairy cream cheese alternative.
Step-by-Step Instructions: How to Make the Perfect Cinnamon Rolls
Ready to roll up those sleeves? Let’s get baking!
Step 1: Prepare the Dough
-
Activate the Yeast: In a small bowl, combine warm milk (about 110°F) with the granulated sugar and yeast. Stir gently and let it sit for about 10 minutes until it’s frothy. This means your yeast is happy and active!
-
Create the Dough: In a large bowl, mix together the flour and a pinch of salt. In a separate bowl, whisk the melted butter, egg, and the bubbly yeast mixture until well combined.
-
Combine Wet and Dry Ingredients: Pour the wet ingredients into the flour mixture, stirring until a shaggy dough forms. Don’t worry about being too precise—this is meant to be a little messy!
Step 2: Knead the Dough
-
Kneading Time: Transfer the dough to a lightly floured surface and knead for about 8-10 minutes. Your dough should be smooth and elastic. If it’s too sticky, sprinkle a little more flour as needed.
-
Let it Rise: Place your kneaded dough in a greased bowl, cover it with a warm towel, and let it rise in a warm spot for about 1-2 hours, or until it has doubled in size. Take this time to sip some coffee and daydream about how amazing these rolls will be!
Step 3: Fill and Roll
-
Prepare your Filling: In a small bowl, mix together the brown sugar and cinnamon. It’s like a sweet spice hug just waiting to be nestled in those rolls!
-
Roll it Out: Once the dough has risen, punch it down gently and turn it out onto a floured surface. Roll it into a rectangle about 1/4-inch thick, aiming for a size of 12×18 inches.
-
Spread the Goodness: Brush the rolled-out dough with melted butter, leaving a small border around the edges. Sprinkle the cinnamon-sugar mixture evenly on top.
Step 4: Shape the Rolls
-
Roll it Up: Starting from the long edge, tightly roll the dough into a log. Pinch the seam to seal it, and keep that delicious filling inside!
-
Slice and Arrange: Cut the log into 12 even slices (you can use dental floss for a clean cut!). Place the rolls in a greased 9×13 inch baking dish, leaving a little space for them to rise, and cover with a towel.
Step 5: Second Rise
- Final Rise: Let those beauties rise for about 30 minutes. Preheat your oven to 350°F (175°C), and take a moment to appreciate the sweet smell wafting through your kitchen.
Step 6: Bake
- Baking Time: After the second rise, pop the rolls in the oven and bake for 20-25 minutes, or until they’re golden brown. Your kitchen will be filled with the irresistible aroma of cinnamon and sweet dough—it’s pure magic!
Step 7: Frost and Enjoy
-
Cream Cheese Frosting: While the rolls are baking, prepare the frosting by mixing softened cream cheese with powdered sugar, a splash of vanilla extract, and a little milk until creamy.
-
Glaze Those Rolls: Once the rolls are out of the oven and slightly cooled, drizzle the creamy frosting over the top. Feel free to go big or go home—there’s no such thing as too much frosting in this house!
Serving Suggestions: The Perfect Way to Enjoy
To serve, simply pull apart the rolls (that’s half the fun!) and place them on a large platter or simply keep them in the baking dish. They’re delicious both warm and at room temperature, so don’t worry if you can’t devour them all at once! And if you’re feeling extra fancy, why not pair them with a steaming cup of coffee or homemade hot chocolate? They’ll elevate your cinnamon roll experience to new heights!
Recipe Variations: Get Creative with Your Rolls
- Nutty Delight: Add chopped nuts (like pecans or walnuts) to the filling for a delicious crunch.
- Fruit-Infused: Incorporate dried fruit, such as raisins or cranberries, for a sweet and tangy twist.
- Spiced Up: Experiment with different spices—try adding cardamom or ginger for a unique flavor profile.
- Dairy-Free: Substitute all dairy products with their non-dairy alternatives to keep things cozy and inclusive.
- Chocolate Chip: Sprinkle chocolate chips into the filling for a gooey, melty treat that’s sure to delight!
Chef’s Notes: Memories and Mischief in the Kitchen
As I bake these cinnamon rolls, I can’t help but recount the times I got a little too eager and accidentally made a flour explosion! It was a mess, but let’s be real—those moments are always the most entertaining. My first batch turned into “cinnamon roll puddles,” but it’s these mishaps that make our kitchen journeys memorable.
Over the years, I’ve tweaked this recipe to perfection, ensuring that every bite is soft, sweet, and gooey. And while I might have thought I was the star chef as a kid, it turns out my grandma was the real genius here!
FAQs and Troubleshooting
Q1: My rolls didn’t rise! What happened?
A: If your yeast is old or the milk was too hot, it might not activate properly. Always check your yeast’s expiration and ensure the milk is just warm to the touch.
Q2: Can I make the dough ahead of time?
A: Absolutely! You can make the dough, let it rise, punch it down, and refrigerate it overnight. Just take it out to warm up before rolling it out.
Q3: How do I store leftovers?
A: Store any leftovers in an airtight container at room temperature for up to 2 days or in the fridge for up to a week. Reheat in the microwave for a few seconds to enjoy that fresh-baked goodness!
Q4: Can I freeze the rolls?
A: Yes! You can freeze unbaked rolls after slicing. Just freeze them on a baking sheet, then transfer to a freezer-safe bag. When you’re ready, let them rise and bake as directed.
Nutritional Information (Optional)
These cinnamon rolls are a delightful treat, but if you’re curious about nutritional content, a single roll (without frosting) contains roughly:
- Calories: 230
- Total Fat: 7g
- Carbohydrates: 36g
- Protein: 4g
Remember, these rolls are about joy, warmth, and sharing, so indulge guilt-free and enjoy every bite!
So there you have it, my dear friends: the ultimate cinnamon roll recipe to fill your kitchen with warmth and your hearts with joy. Whether you’re sharing them with loved ones or savoring them solo, each roll is a little hug that says, “You are loved.” Join me on this delicious journey, and don’t forget to make a few sticky memories along the way! Happy baking!
Print
The Ultimate Cinnamon Roll Recipe that Will Warm Your Heart
- Total Time: 55 minutes
- Yield: 12 servings
- Diet: Vegetarian
Description
Delight in the warmth of homemade cinnamon rolls, filled with sweet, fluffy dough and a gooey glaze, perfect for sharing with family and friends.
Ingredients
- All-purpose flour (4 cups)
- Granulated sugar (½ cup)
- Active dry yeast (2 ¼ teaspoons)
- Warm milk (1 cup)
- Unsalted butter (½ cup, melted)
- Large egg (1)
- Cinnamon (2 tablespoons)
- Brown sugar (¾ cup)
- Cream cheese (for frosting)
Instructions
- Activate the yeast: In a small bowl, combine warm milk with the granulated sugar and yeast. Stir gently and let it sit for about 10 minutes until it’s frothy.
- Create the dough: In a large bowl, mix together the flour and a pinch of salt. In a separate bowl, whisk the melted butter, egg, and the bubbly yeast mixture until well combined.
- Combine wet and dry ingredients: Pour the wet ingredients into the flour mixture, stirring until a shaggy dough forms.
- Knead the dough: Transfer the dough to a lightly floured surface and knead for about 8-10 minutes until smooth and elastic.
- Let it rise: Place your kneaded dough in a greased bowl, cover it with a warm towel, and let it rise for about 1-2 hours until doubled in size.
- Prepare your filling: Mix together the brown sugar and cinnamon in a small bowl.
- Roll it out: Once the dough has risen, punch it down gently and turn it out onto a floured surface. Roll it into a rectangle about 1/4-inch thick.
- Spread the goodness: Brush the rolled-out dough with melted butter and sprinkle the cinnamon-sugar mixture evenly on top.
- Roll it up: Starting from the long edge, tightly roll the dough into a log, pinching the seam to seal it.
- Slice and arrange: Cut the log into 12 even slices and place them in a greased baking dish, covering with a towel.
- Final rise: Let those beauties rise for about 30 minutes and preheat your oven to 350°F.
- Bake: Pop the rolls in the oven and bake for 20-25 minutes until golden brown.
- Prepare the frosting: While the rolls are baking, mix cream cheese with powdered sugar, a splash of vanilla extract, and a little milk until creamy.
- Glaze those rolls: Once baked, drizzle the creamy frosting over the top before serving.
Notes
Feel free to add nuts, dried fruit, or chocolate chips for variation. Make it dairy-free by substituting with non-dairy alternatives.
- Prep Time: 30 minutes
- Cook Time: 25 minutes
- Category: Dessert
- Method: Baking
- Cuisine: American
Nutrition
- Serving Size: 1 roll
- Calories: 350
- Sugar: 10g
- Sodium: 300mg
- Fat: 15g
- Saturated Fat: 8g
- Unsaturated Fat: 5g
- Trans Fat: 0g
- Carbohydrates: 45g
- Fiber: 2g
- Protein: 6g
- Cholesterol: 30mg
Keywords: cinnamon rolls, dessert, baking, sweet rolls, comfort food
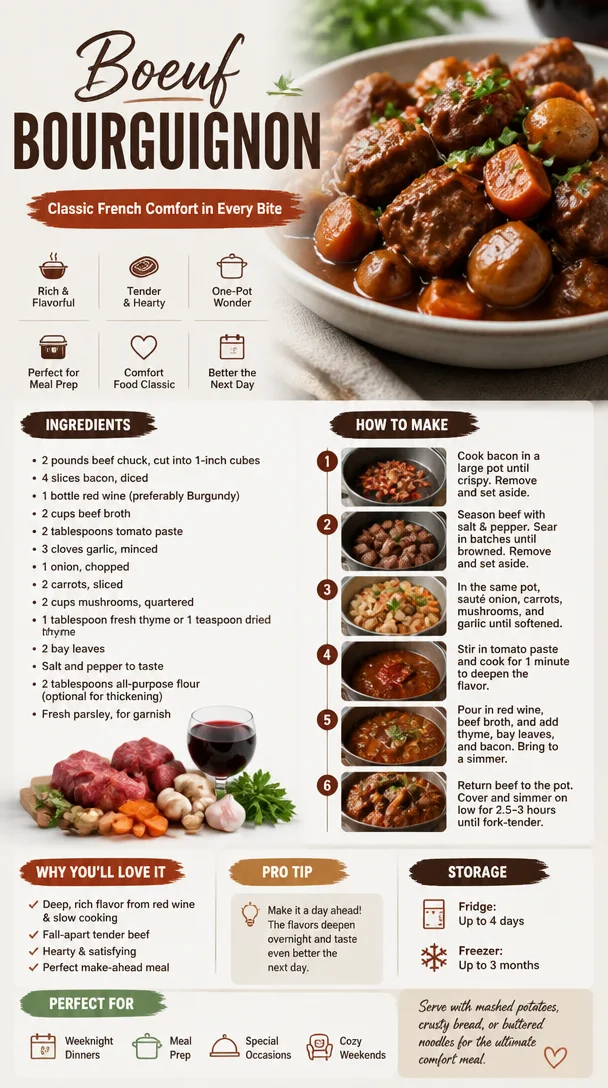
Boeuf Bourguignon
The Comfort of Home: Boeuf Bourguignon Recipe
Welcome to my cozy corner of the culinary world! I’m Olivia Bennett, your friendly neighborhood home cook, and today, I’m thrilled to whisk you away on a delightful journey into the rich and hearty world of Boeuf Bourguignon. This classic French dish, also known as beef Burgundy, is all about layers of flavor, patience, and the magic that happens when you combine tender beef with aromatic herbs and vegetables in a luscious red wine sauce.
Picture this: the aroma of simmering beef wafts through your home, a symphony of garlic, thyme, and onion dancing in the background. As we delve into this recipe, know that it’s more than just a meal; it’s a celebration of togetherness, comfort, and the simple joys of cooking. Whether you’re preparing this for a family gathering or a cozy dinner for two, Boeuf Bourguignon has an innate ability to warm your heart and soul.
Before we roll up our sleeves and get cooking, let’s take a moment to appreciate why this dish holds a special place in kitchens around the world. Originating from the Burgundy region in France, Boeuf Bourguignon has become synonymous with rustic French cuisine. Its sophisticated yet unpretentious nature makes it perfect for celebration or as a humble weeknight dinner with a glass of wine.
A Journey Remembered: My Love Affair with Boeuf Bourguignon
The first time I laid eyes on Boeuf Bourguignon was during a quaint cooking class I took on a whimsical spring evening while on holiday in France. The instructor, a charming local chef named Claude, wore a beret and an infectious smile that drew everyone in. As he expertly browned the beef and poured the wine, the air filled with richness that felt warm and inviting. I was captivated.
Then came the moment when we were tasked with carefully adding ingredients to the pot. As the dish came together, Claude regaled us with stories of his grandmother making Boeuf Bourguignon on Sundays, filling the house with laughter and the irresistible scent of home-cooked love. It struck me how food, especially when shared, can carry so much nostalgia and emotion.
That evening, as I savored my first bite of Boeuf Bourguignon, I was transported back to those warm family gatherings that celebrated cooking and connection. The dish wasn’t just fantastic; it was alive with history, tradition, and the bond we all share over a good meal. From that moment on, Boeuf Bourguignon became a staple in my kitchen — a reminder of that lovely evening in France and a recipe I couldn’t wait to share with you all!
Ingredients for the Perfect Boeuf Bourguignon
Here’s what you’ll need to bring this flavorful dish to life. Remember, quality ingredients lead to quality meals, so choose wisely!
-
2 lbs Beef Chuck
This cut is ideal for slow cooking, ensuring your meat becomes melt-in-your-mouth tender. If you can’t find chuck, you can use brisket or round, but avoid lean cuts. -
4 slices of Bacon
Ah, the magic of bacon! It adds depth and a smoky richness to the sauce. If you’re aiming for a healthier version, use turkey bacon or omit it for a lighter flavor. -
1 large Onion, diced
Sautéing onions creates the perfect aromatic base for your dish. If you’re not a huge onion fan, shallots make a great substitute with a milder flavor. -
2-3 Carrots, sliced
These add sweetness and color to the dish. You can also play around with parsnips or celery for a unique twist. -
3 cloves of Garlic, minced
Garlic delivers a punch of flavor. If fresh isn’t available, you can use 1/2 teaspoon of garlic powder. -
2 cups Red Wine
Choose a good quality, full-bodied wine, like a Burgundy or Cabernet Sauvignon, for depth. If you prefer to skip the alcohol, beef broth works as a substitute, but the flavor will be different. -
2 cups Beef Broth
This will enhance the flavor and help create that rich sauce. Homemade is best, but store-bought is perfectly fine! -
2 tbsp Tomato Paste
This thickens the sauce and adds a touch of sweetness. If you’re in a bind, you could use canned tomatoes — just blend them! -
2 tsp Thyme
Fresh or dried, thyme infuses your dish with earthy, herbal notes. Oregano can be used in a pinch if you don’t have thyme. -
1 Bay Leaf
A subtle flavor enhancer! Remember to remove it before serving, as it’s not edible. -
Salt and Pepper to taste
Essential for bringing out all the flavors in your dish. Feel free to add your favorite spices for a personal touch! -
Fresh Parsley, for garnish
It brightens up the dish and makes for a beautiful presentation.
Step-by-Step Instructions
Ready to create your culinary masterpiece? Here’s how to make Boeuf Bourguignon in a few simple steps. Let’s get those aprons on and get cooking!
-
Prep Your Ingredients: Start by cutting your beef into 1-inch cubes. This ensures even cooking. Pat them dry with paper towels — this helps them brown nicely in the pan. Next, chop and prepare all your vegetables and set aside.
-
Sauté the Bacon: Grab a large Dutch oven or heavy pot and heat it over medium heat. Add the bacon slices and cook until crispy, about 5-7 minutes. Remove the bacon and let it drain on a paper towel, leaving the rendered fat in the pot. This is flavor central!
-
Brown the Beef: In the same pot, brown the beef in batches to avoid steaming. You want a nice caramelization. Each side should take about 3-4 minutes. Once browned, remove the beef and set aside with the bacon. Don’t rush this step; browning adds so much flavor!
-
Sauté the Vegetables: Now, toss in the diced onion and sliced carrots into the pot. Cook until they’re soft and aromatic, about 5 minutes. Stir in the minced garlic and cook for an additional minute. Can you smell that? Heaven!
-
Incorporate the Tomato Paste: Add the tomato paste to the pot, stirring well to coat the vegetables. Allow it to cook for about 2 minutes to deepen its flavor.
-
Deglaze with Wine: Here comes the fun part! Pour in your red wine, scraping the bottom of the pan to release all those flavorful bits. Bring the mixture to a simmer, and let it reduce by half — about 10 minutes.
-
Add the Broth and Spices: Once reduced, add the beef broth, thyme, and bay leaf. Return the bacon and beef to the pot, stirring well. Bring everything to a gentle boil.
-
Simmer and Savor: Reduce the heat to low, cover the pot, and let it simmer for about 2-3 hours. You can either let it cook more on the stovetop or transfer it to a preheated oven at 325°F. The longer you let it simmer, the better the flavor will be!
-
Finish with a Flourish: Once the beef is tender and the flavors have melded beautifully, taste and season with salt and pepper. If the sauce is too thin, remove the lid for the last 30 minutes of cooking to thicken it!
-
Serve and Enjoy: Spoon your Boeuf Bourguignon into bowls. Don’t forget to sprinkle some freshly chopped parsley on top for that burst of color and flavor.
Serving Suggestions
There’s something so comforting about Boeuf Bourguignon—it deserves to be treated well when served! Plate your delicious stew in rustic bowls or deep dishes, and serve it alongside creamy mashed potatoes, crusty bread, or fresh egg noodles to soak up all that wonderful sauce. A sprinkle of fresh parsley on top brings a pop of color, making it even more inviting!
Recipe Variations
Feeling adventurous? Here are a few fun twists to make this dish your own:
-
Mushroom Medley: Add sliced mushrooms to the mix for an earthy flavor boost. They complement the beef beautifully!
-
Red Potatoes: Swap out traditional carbohydrates for halved red potatoes to soak up the sauce while giving a hearty texture.
-
Coconut Milk Twist: For a lighter version, incorporate coconut milk instead of some beef broth. This will create a unique flavor and make it dairy-free.
-
Herb Infusion: Experiment with other herbs like rosemary or tarragon for a fragrant finish.
-
Vegetarian Option: Swap the beef for hearty mushrooms or jackfruit for a vegan twist and use vegetable broth instead.
Chef’s Notes
Boeuf Bourguignon is truly a labor of love, and its evolution has been a journey for me. I remember the first time I made it at home; my kitchen looked like a tornado hit it! I spilled wine everywhere and ended up with flour on my nose. But the pride I felt when I served it to my friends that night made the mess worth it.
Over the years, I’ve played with the recipe, tweaking ingredients and adding my own touches. What’s great about this dish is that it welcomes experimentation. Just remember to savor the process, take your time, and don’t be afraid to make it your own!
FAQs and Troubleshooting
1. Why is my beef tough?
If your beef doesn’t become tender after cooking, it may not have simmered long enough. The key is low and slow — let it cook until it’s fork-tender.
2. The sauce is too thin; what do I do?
If you find your sauce isn’t thickening, you can let it simmer uncovered for the last 30 minutes, or you could mix a bit of cornstarch with water to create a slurry and add it to the pot.
3. Can I make Boeuf Bourguignon ahead of time?
Absolutely! In fact, it tastes even better the next day. Make it a day in advance and store it in the fridge. Reheat on the stove when you’re ready to serve.
4. Can I freeze this dish?
Yes! Boeuf Bourguignon freezes beautifully. Just make sure it’s completely cooled, then store it in an airtight container for up to 3 months.
Nutritional Info
While the nutrition details can vary based on specific ingredients and serving sizes, a standard serving of Boeuf Bourguignon (including vegetables) typically contains:
- Calories: Approximately 500-600
- Protein: 35-40g
- Fat: 25-30g
- Carbohydrates: 30-35g
Remember, these figures are an estimate, and it’s always best to calculate based on your specific ingredients and serving sizes.
Cooking this exquisite dish will create memorable moments in your home, not just around the dinner table, but in the hearts of those you share it with. I can’t wait to see you create your own version of Boeuf Bourguignon! Happy cooking, dear friends!
Print
Boeuf Bourguignon
- Total Time: 210 minutes
- Yield: 6 servings 1x
- Diet: Gluten-Free
Description
Experience the rich, hearty flavors of this classic French dish, Boeuf Bourguignon, made with tender beef and aromatic herbs in a luscious red wine sauce.
Ingredients
- 2 lbs Beef Chuck
- 4 slices of Bacon
- 1 large Onion, diced
- 2–3 Carrots, sliced
- 3 cloves of Garlic, minced
- 2 cups Red Wine
- 2 cups Beef Broth
- 2 tbsp Tomato Paste
- 2 tsp Thyme
- 1 Bay Leaf
- Salt and Pepper to taste
- Fresh Parsley, for garnish
Instructions
- Prep your ingredients: Start by cutting your beef into 1-inch cubes. Pat them dry with paper towels and prepare all your vegetables.
- Sauté the bacon: Heat a large Dutch oven over medium heat, add the bacon, and cook until crispy for about 5-7 minutes.
- Brown the beef: In the same pot, brown the beef in batches, about 3-4 minutes per side, then set aside.
- Sauté the vegetables: Toss in the diced onion and sliced carrots and cook until soft, then add garlic for another minute.
- Incorporate the tomato paste: Add to the pot and stir well, cooking for about 2 minutes.
- Deglaze with wine: Pour in red wine, scraping the bottom of the pan and let it simmer to reduce by half, about 10 minutes.
- Add the broth and spices: Stir in beef broth, thyme, and bay leaf, returning the bacon and beef to the pot.
- Simmer and savor: Cover the pot and let it simmer for about 2-3 hours, until tender.
- Finish with a flourish: Taste and season with salt and pepper. Remove the lid to thicken the sauce if it’s too thin.
- Serve and enjoy: Spoon into bowls and garnish with freshly chopped parsley.
Notes
Boeuf Bourguignon tastes even better the next day and freezes beautifully. Feel free to experiment with the recipe!
- Prep Time: 30 minutes
- Cook Time: 180 minutes
- Category: Main Course
- Method: Braising
- Cuisine: French
Nutrition
- Serving Size: 1 serving
- Calories: 550
- Sugar: 5g
- Sodium: 800mg
- Fat: 28g
- Saturated Fat: 10g
- Unsaturated Fat: 15g
- Trans Fat: 0g
- Carbohydrates: 36g
- Fiber: 4g
- Protein: 38g
- Cholesterol: 95mg
Keywords: Boeuf Bourguignon, French Cuisine, Comfort Food




