
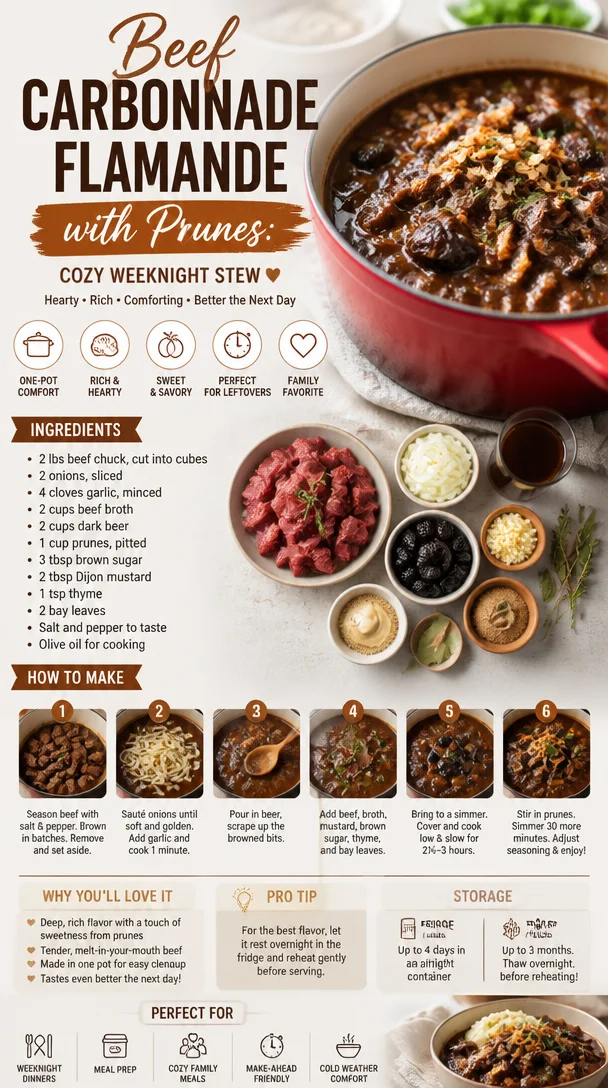
Beef Carbonnade Flamande with Prunes: Cozy Weeknight Stew
Cooking Up Memories: Carbonnade Flamande with Prunes
Welcome to my cozy kitchen! Today, we’re diving into a dish that’s close to my heart, reminding me of wonderful family gatherings and the comfort of good food. If you’re in the mood to indulge in rich, savory flavors, let’s talk about Carbonnade Flamande, a traditional Belgian beef stew that wows the taste buds. Buckle up; it’s going to be a delicious ride!
The Warmth of Home Cooking
There’s something magical about the smell of something simmering on the stove, isn’t there? Each whiff transports me back to my childhood kitchen, where my mom would whip up savory stews that warmed our hearts and bellies after chilly days spent outdoors. Carbonnade Flamande was one of those special recipes that she would make whenever the weather turned brisk, filling our home with an irresistible aroma of caramelized onions, rich beef, and a hint of something sweet — thanks to the prunes. To this day, the thought of this dish makes me feel all warm and fuzzy inside.
Gathering around the dinner table with family, candlelight flickering, laughter echoing, and spoons clinking against bowls — these memories tell the story of what home cooking is all about. It’s not just about feeding people; it’s about connection, sharing, and creating a cozy atmosphere. So, whether you’re cooking this for a weeknight dinner or a weekend gathering, this Carbonnade Flamande will surely make your loved ones feel cherished and satisfied. Let’s dig into the details of this delicious stew, so we can recreate those blissful moments right in our own kitchens!
Ingredients
Here’s what you’ll need to whip up this delightful Carbonnade Flamande:
-
2.5 lbs beef chuck: This cut is ideal for slow-cooking, becoming tender and flavorful. You can substitute it with brisket if you prefer.
-
2 medium onions: Onions add sweetness as they caramelize. For a milder flavor, consider using shallots instead.
-
2 tablespoons olive oil: This oil is perfect for browning the beef. Alternatively, you could use butter for added richness.
-
2 cups beef broth: Homemade is best, but store-bought works just fine. Look for low-sodium versions to control the saltiness.
-
1 cup Belgian ale: This is the magic ingredient that lends a deep, complex flavor. If you’re not into beer, a robust non-alcoholic malt beverage can work in a pinch.
-
1 cup prunes (pitted): They impart a lovely sweetness that balances the dish. If prunes aren’t your thing, you can use dried apricots for a different twist.
-
2 tablespoons brown sugar: Sugar helps develop a rich caramelization. Honey or maple syrup can be great substitutes.
-
4 sprigs fresh thyme: Fresh herbs elevate the flavor profile. If you only have dried thyme, use about a teaspoon.
-
1 teaspoon Dijon mustard: Adds depth and a slight tang. Don’t have any? A bit of yellow mustard can stand in, though the flavor will differ slightly.
-
Salt and pepper to taste: Essential for balancing all the flavors. Always taste as you go!
Step-by-Step Instructions
-
Prepare the Ingredients: Start by cutting your beef into 2-inch cubes, ensuring you’ve got a nice mix of meat and fat for flavor. Peel and slice your onions thinly. Having everything prepped makes cooking a breeze!
-
Brown the Beef: In a heavy-bottomed pot or Dutch oven, heat the olive oil over medium-high heat. Add half of your beef cubes and brown them on all sides. This process develops a lovely crust and deep flavor. Don’t overcrowd the pan; it’s better to do this in batches! Once browned, transfer to a plate and repeat with the remaining beef.
-
Caramelize the Onions: In the same pot, add the sliced onions. Cook them on medium heat, stirring occasionally, until they become soft and golden brown. This should take about 10–15 minutes. Patience is key here! The sweeter the onions, the better the final dish.
-
Deglaze the Pot: Here’s where you can harness all that lovely flavor stuck to the bottom of the pot. Pour in your Belgian ale, scraping the pot with a wooden spoon to loosen those delicious bits. Let it simmer for about 5 minutes, allowing the alcohol to evaporate.
-
Combine Ingredients: Return the browned beef to the pot, followed by the beef broth, prunes, brown sugar, Dijon mustard, and thyme. Stir everything together, and don’t forget to season with salt and pepper. Bring the mixture to a simmer.
-
Slow Cook: Cover the pot and reduce the heat to low. Let it simmer gently for about 2–2.5 hours, or until the beef is fork-tender. You can also transfer everything to a slow cooker at this point if you prefer that method; just set it on low for 6–8 hours.
-
Taste and Adjust: About 30 minutes before serving, taste the stew. Adjust the seasoning with more salt, pepper, or sugar if you like. Feel free to toss in more fresh herbs for that aromatic boost.
Serving Suggestions
Once your Carbonnade Flamande has cooked to perfection, it’s time to serve it up! This dish shines when ladled over a bed of creamy mashed potatoes, buttery egg noodles, or even a mountain of polenta. Garnish with freshly chopped parsley or extra thyme for a pop of color and freshness. Pair it with crusty bread to soak up the rich sauce, and you’ve got a meal that’s sure to impress!
Recipe Variations
-
Vegetarian Version: Swap the beef for hearty mushrooms and use vegetable broth instead. Add some lentils for protein and richness.
-
Additional Veggies: Incorporate root vegetables like carrots or parsnips for added sweetness and nutrition.
-
Spicy Kick: Add a pinch of red pepper flakes or a chopped jalapeño to the stew for a touch of heat.
-
Herb Swap: Experiment with different herbs, such as rosemary or sage, to give your stew a unique flavor profile.
-
Pasta Dish: Transform leftovers into a pasta dish by tossing the Carbonnade with your favorite pasta and a sprinkle of Parmesan cheese.
Chef’s Notes
Cooking is as much about the experience as it is about the food. I remember one time I tried to replicate my mother’s recipe for Carbonnade Flamande, but I accidentally grabbed the cayenne pepper instead of the paprika. Let’s just say there were a few surprised faces around the dinner table that night! But that’s the beauty of cooking — it’s all about learning and growing.
This recipe has evolved over the years. I’ve experimented with various combinations of herbs and even different types of beer, each version telling a new delicious story. Always feel free to make a recipe your own!
FAQs and Troubleshooting
-
Why is my stew tough? If your beef is tough, it likely needs more cooking time. Make sure to simmer on low until it’s fork-tender. Slow cooking is your friend here!
-
Can I freeze leftovers? Absolutely! Carbonnade Flamande freezes beautifully. Just allow it to cool completely, then store it in an airtight container for up to 3 months.
-
What if it’s too sweet? If your stew turns out sweeter than you’d like, balance it out by adding a splash of vinegar or some more broth to tone it down.
-
Can I use a different kind of beer? Certainly! While a Belgian ale is traditional, any rich, dark beer works well; think stouts or porters for a deeper flavor.
Nutritional Info
While I always encourage you to enjoy each bite fully, here’s a little nutritional breakdown if you’re interested:
- Calories: Approximately 450 per serving
- Protein: 40g
- Fat: 25g
- Carbohydrates: 30g
I hope this Carbonnade Flamande brings you as much joy and cozy warmth as it does for me! Remember, cooking is all about love, creativity, and a pinch of fun. So roll up those sleeves, embrace the messiness, and let’s create some memories in the kitchen together! Happy cooking!
Print
Carbonnade Flamande with Prunes
- Total Time: 165 minutes
- Yield: 6 servings 1x
- Diet: None
Description
Indulge in the rich, savory flavors of Carbonnade Flamande, a traditional Belgian beef stew infused with the sweetness of prunes.
Ingredients
- 2.5 lbs beef chuck
- 2 medium onions
- 2 tablespoons olive oil
- 2 cups beef broth
- 1 cup Belgian ale
- 1 cup prunes (pitted)
- 2 tablespoons brown sugar
- 4 sprigs fresh thyme
- 1 teaspoon Dijon mustard
- Salt and pepper to taste
Instructions
- Prepare the Ingredients: Start by cutting your beef into 2-inch cubes and slice your onions thinly.
- Brown the Beef: Heat the olive oil in a pot over medium-high heat and brown half of the beef cubes. Transfer to a plate and repeat.
- Caramelize the Onions: Add sliced onions to the pot and cook until golden brown, about 10–15 minutes.
- Deglaze the Pot: Pour in Belgian ale and scrape the pot to loosen flavors, simmer for 5 minutes.
- Combine Ingredients: Return beef to the pot, add broth, prunes, brown sugar, mustard, and thyme, then season with salt and pepper.
- Slow Cook: Cover the pot and simmer on low for 2–2.5 hours until the beef is fork-tender.
- Taste and Adjust: 30 minutes before serving, adjust the seasoning as needed.
Notes
Serve over creamy mashed potatoes or with crusty bread for a comforting meal.
- Prep Time: 15 minutes
- Cook Time: 150 minutes
- Category: Main Course
- Method: Slow Cooking
- Cuisine: Belgian
Nutrition
- Serving Size: 1 serving
- Calories: 450
- Sugar: 15g
- Sodium: 800mg
- Fat: 25g
- Saturated Fat: 10g
- Unsaturated Fat: 10g
- Trans Fat: 0g
- Carbohydrates: 30g
- Fiber: 4g
- Protein: 40g
- Cholesterol: 90mg
Keywords: beef stew, Belgian cuisine, cozy cooking, family recipes, hearty meals
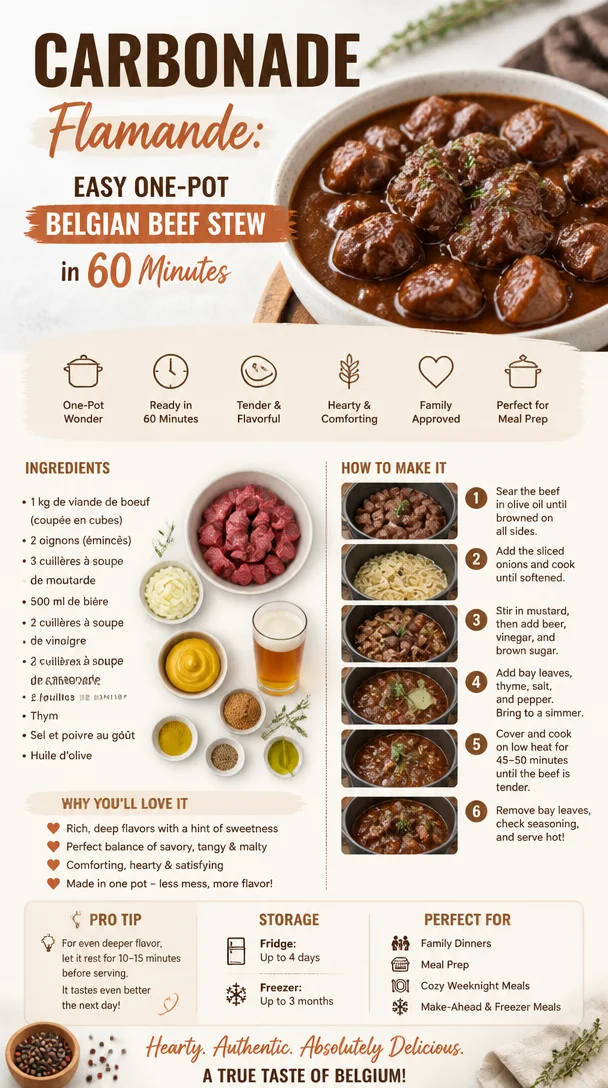
Carbonade Flamande: Easy One-Pot Belgian Beef Stew in 60 Minutes
Discover the Rich Flavors of Carbonade Flamande
Welcome to my kitchen! I’m Olivia Bennett, your friendly culinary companion, and today, we’re diving into a dish that holds a special place in my heart: Carbonade Flamande, or Belgian beef stew. This dish is a delightful mix of tender beef, aromatic spices, and the deep, comforting essence of beer. Trust me; it’s a dish that’ll warm not only your belly but also your soul.
Imagine walking through a quaint Belgian village on a chilly afternoon, the tantalizing scent of rich beef stew wafting from a nearby bistro. Warm breads, hearty stews, and vibrant conversations surround you. This vision, while I might not have experienced it first-hand, encapsulates the feeling this dish evokes for me. When preparing Carbonade Flamande, you play alchemist, transforming simple ingredients into something profound.
Whether you’re hosting a cozy gathering or having a quiet night in, this dish will make you feel like a culinary wizard! It’s perfect for warming your home and gathering around the table, savouring every bite with those you love. So, roll up those sleeves and let’s jump into this recipe that promises laughter, comfort, and unforgettable flavors!
A Taste of Nostalgia
I remember the first time I tried Carbonade Flamande. It was a chilly Saturday afternoon, and I had just moved into my first apartment. My friend Julie, the self-proclaimed Queen of Stews, invited me over, and little did I know, she was about to introduce me to my new favorite dish. As the beef simmered in a dark, malty beer, the aroma filled the room, inviting me to get lost in the moment.
We huddled in her tiny kitchen, sharing stories and laughing as we chopped onions and carrots. With each addition of herbs, Julie danced around the kitchen, pouring a little beer into the pot and a little more into her glass. The warmth of the stew matched the warmth in our hearts. When it was finally ready, we slopped generous portions onto our plates and topped them with a sprinkle of fresh parsley. It was a moment of utter bliss—satisfying, hearty, and joyful. Ever since then, I’ve aimed to recreate that love and laughter in my own kitchen every time I prepare Carbonade Flamande, reminding myself that cooking is not just about food; it’s about connection and creating memories.
Ingredients
-
2 pounds beef chuck (or brisket)
Tender cuts are best for this stew. If you need a leaner option, consider using sirloin, though the flavor may be slightly less rich. -
4 medium onions, sliced
Sweet onions work wonders here; they caramelize beautifully. If you want a sharp punch, try using red onions instead! -
4 cloves garlic, minced
Garlic adds depth. If you adore garlic, feel free to increase the amount! -
3 carrots, sliced
Carrots lend sweetness and texture. You could also toss in parsnips for an earthy twist. -
1/4 cup all-purpose flour
Used for dredging the beef to create a nice crust. Gluten-free flour can serve as a substitution. -
2 cups dark beer
Choose a malty beer like a Belgian Dubbel or a rich stout for extra flavor. You can also use beef broth if you’d rather skip the alcohol. -
1 tablespoon brown sugar
This balances the bitterness of the beer and enhances caramelization. Honey or maple syrup can replace it in a pinch. -
2 bay leaves
These infuse earthy flavors into the stew. Remember to remove them before serving! -
1 tablespoon fresh thyme
If fresh thyme isn’t available, dried thyme will work as a substitute, though you’ll need a little less. -
Salt and pepper to taste
Essential for enhancing all the flavors. Always taste as you go! -
Fresh parsley, chopped (for garnish)
A colorful topping to brighten the dish. You could swap it with chives or even cilantro if you’re feeling adventurous!
Step-by-Step Instructions
1. Prepare the Ingredients
First things first, let’s prep! Start by gathering your ingredients and chopping the onions, carrots, and garlic. Trust me, having everything ready makes cooking much smoother and way less stressful.
2. Sear the Beef
In a large, heavy pot or Dutch oven, heat a splash of oil over medium-high heat. While it’s heating, season your beef chunks generously with salt and pepper, then toss them in the flour, shaking off any excess. When the oil is hot, lay the beef in a single layer and don’t crowd the pan! Sear it on all sides until beautifully browned—about 3-4 minutes per side; this step is crucial as it develops a rich flavor right at the start!
3. Sauté the Aromatics
Once the beef is browned, remove it from the pot and set it aside on a plate. In the same pot, add a little more oil if needed, and toss in the sliced onions. Sauté them over medium heat for about 5-7 minutes, or until they’re soft and starting to caramelize. Chef tip: Use a wooden spoon to scrape up any brown bits from the bottom of the pot; it’s all that flavor you want in your stew!
Now, add the minced garlic and sliced carrots, cooking for an additional 2-3 minutes until everything is fragrant.
4. Combine Everything
Return the seared beef back into the pot, including any juices from the plate. Time to add the magic ingredient—pour in that lovely dark beer! Let it bubble away for a moment, stirring gently and allowing the alcohol to cook off. Add brown sugar, bay leaves, thyme, and a pinch of salt and pepper. Mix it all together like you’re conducting a flavorful orchestra!
5. Simmer to Perfection
Bring the stew to a gentle boil, then reduce the heat to low and cover the pot. Let it simmer for about 1.5 to 2 hours, stirring occasionally. This slow simmering will allow the beef to become meltingly tender and all those beautiful flavors to meld together. Pro tip: Use a timer so you can check in without losing track of time—there’s nothing worse than an overcooked stew!
6. Taste and Adjust
After the stew has been bubbling away, it’s time to taste! Check the seasoning, adding more salt or pepper as needed. You want the flavors to be well-rounded and balanced. If the stew looks a bit thick, you can add a splash of beef broth or water to reach your desired consistency.
7. Serve it Up
Once you’re satisfied with the flavors, it’s time to serve! Remove the bay leaves and ladle the Carbonade Flamande into deep bowls. It’s comforting, hearty, and oh-so delicious!
Serving Suggestions
This dish is best served piping hot, preferably with crusty bread for dipping and soaking up those delicious juices. A simple green salad or some roasted potatoes on the side can round out the meal beautifully. For an extra touch, consider a dollop of mustard on the side—it’s a classic pairing with stews like this!
Recipe Variations
- Vegetarian Twist: Substitute chunks of beef with hearty mushrooms like portobellos for a delicious meat-free variation.
- Spicy Kick: Add a pinch of cayenne pepper or a dash of your favorite hot sauce for some heat!
- Red Wine Alternative: If you want a different but equally rich flavor, try using red wine instead of beer—just be sure to account for the acidity.
- Add More Veggies: Consider throwing in potatoes or parsnips along with the carrots for more texture and nutrition.
- Herb Swaps: Feel free to mix in different herbs such as rosemary or a sprinkle of oregano for a unique herbal twist.
Chef’s Notes
Ah, Carbonade Flamande, a dish that has continuously evolved in my kitchen! I experimented with various beers, herbs, and spices, trying to find that perfect combination that tickles my taste buds just right. It’s funny how each batch manages to come out a bit differently, yet always delicious! Sometimes I’ll even throw in a splash of orange zest for a subtle citrusy hint—it adds a delightful brightness to the rich stew.
And let’s not forget the mess! I’ve had my fair share of flour explosions and spatter marks on my walls from sautéing—just a reminder that cooking is a hands-on experience! Embrace the chaos; it’s all part of the culinary journey.
FAQs and Troubleshooting
1. Can I use a slow cooker instead?
Yes! If you prefer the slow cooker method, sear the beef first, then throw everything into the slow cooker. Cook on low for about 6-8 hours, or until the beef is tender and succulent.
2. My stew is too thick. What do I do?
No worries! If your Carbonade Flamande turns out thicker than you’d like, simply stir in a bit of beef broth or water to achieve the desired consistency. It’ll still be delicious!
3. How do I store leftovers?
Store any leftover stew in an airtight container in the fridge for up to 3-4 days. It also freezes beautifully! If freezing, consider portioning it out for easy reheating later.
4. Can I make it ahead of time?
Absolutely! In fact, it often tastes even better the next day as the flavors continue to meld. Just reheat gently on the stovetop before serving.
Nutritional Info
Please note that nutritional information will greatly vary based on specific ingredients used, portion sizes, and any modifications made. However, traditional Carbonade Flamande is generally hearty and rich in protein, healthy fats, and vegetables.
There you have it, folks! A journey through the wonderful world of Carbonade Flamande, from nostalgic memories to delicious bites. I hope you feel inspired to gather your loved ones, roll up your sleeves, and dive into this rich, comforting dish. Happy cooking, and remember: the kitchen is a place for love, laughter, and of course, lots of great food! Enjoy every delicious moment!
Print
Carbonade Flamande
- Total Time: 135 minutes
- Yield: 4 servings 1x
- Diet: None
Description
A delightful Belgian beef stew that blends tender beef, aromatic spices, and rich beer for a comforting meal.
Ingredients
- 2 pounds beef chuck (or brisket)
- 4 medium onions, sliced
- 4 cloves garlic, minced
- 3 carrots, sliced
- 1/4 cup all-purpose flour
- 2 cups dark beer
- 1 tablespoon brown sugar
- 2 bay leaves
- 1 tablespoon fresh thyme
- Salt and pepper to taste
- Fresh parsley, chopped (for garnish)
Instructions
- Prepare the Ingredients: Start by gathering your ingredients and chopping the onions, carrots, and garlic.
- Sear the Beef: In a large pot, heat oil over medium-high heat. Season beef and dredge in flour, then sear until browned.
- Sauté the Aromatics: Remove beef, add onions, and sauté until soft. Add garlic and carrots, cooking until fragrant.
- Combine Everything: Return beef to the pot, add dark beer, brown sugar, bay leaves, thyme, and seasonings.
- Simmer to Perfection: Bring to a boil, reduce heat, and cover the pot to simmer for 1.5 to 2 hours.
- Taste and Adjust: Season to taste, and add broth if stew is too thick.
- Serve it Up: Remove bay leaves, ladle into bowls, and garnish with parsley.
Notes
Best served with crusty bread and a green salad. It can also be made a day ahead for enhanced flavors.
- Prep Time: 15 minutes
- Cook Time: 120 minutes
- Category: Main Course
- Method: Braising
- Cuisine: Belgian
Nutrition
- Serving Size: 1 serving
- Calories: 450
- Sugar: 6g
- Sodium: 700mg
- Fat: 18g
- Saturated Fat: 7g
- Unsaturated Fat: 8g
- Trans Fat: 0g
- Carbohydrates: 40g
- Fiber: 3g
- Protein: 30g
- Cholesterol: 80mg
Keywords: beef stew, Belgian cuisine, comfort food, hearty meal, Carbonade Flamande
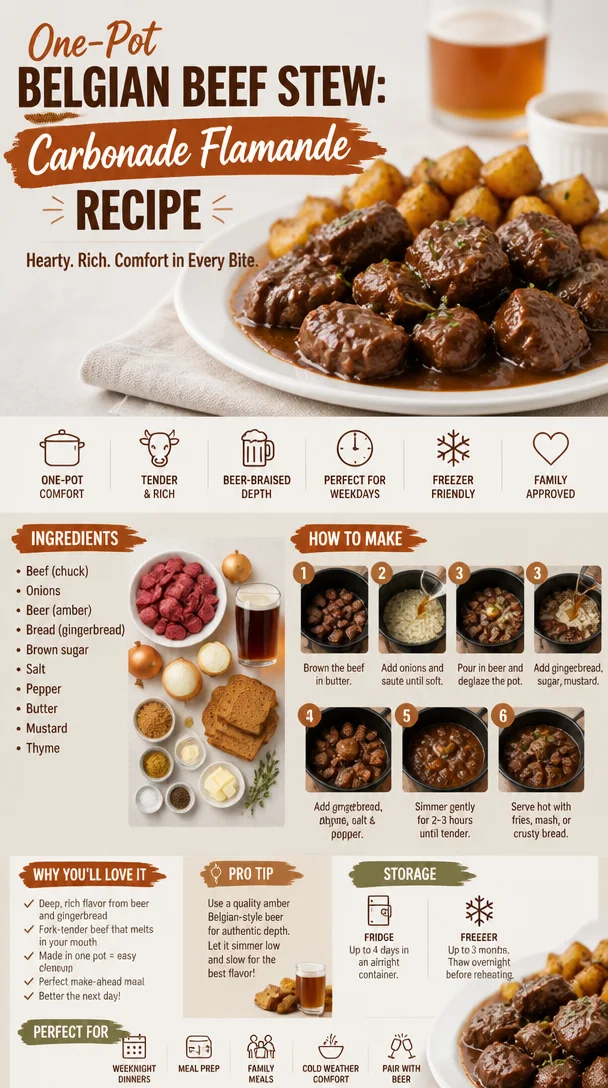
One-Pot Belgian Beef Stew: Carbonade Flamande Recipe
Discovering the Flavors of Carbonade Flamande: A Belgian Delight
Welcome to my kitchen! I’m thrilled to share one of my all-time favorite recipes with you: Carbonade Flamande, a traditional Belgian beef stew that’s deeply flavorful, hearty, and incredibly comforting. Think of it as a warm hug on a plate, perfect for those chilly evenings when you want to curl up and savor something truly special. This dish deserves a spot in your culinary repertoire, and trust me, it will become a beloved go-to for family meals and gatherings.
Picture this: it’s a rainy afternoon, and the scent of seared beef mingles with caramelized onions and the rich aroma of beer wafting through the air. Each bite of this luscious stew is steeped in nostalgia, taking me back to family gatherings in the heart of Brussels, where I was first introduced to this Belgian classic. Cooking this dish is not just about following a recipe; it’s an experience that brings back memories of laughter, stories, and the joy of sharing a table.
What makes Carbonade Flamande so remarkable is its simplicity. With a handful of ingredients and a slow-cooking process, you can create a meal that feels like a celebration. Whether you serve it over creamy mashed potatoes or nestle it beside crusty bread, the flavors meld beautifully, making it a dish that warms the heart and soul. So grab your apron, and let’s dive into the comforting world of Carbonade Flamande!
A Taste of Beloved Memories
When I think of Carbonade Flamande, I can’t help but recall my trip to Belgium. I stumbled upon a small bistro tucked away in a quaint cobblestone alley. The menu was handwritten on a chalkboard, and amid the scribbled offerings, the Carbonade Flamande called out to me. I settled into a cozy corner with a view, the kind of spot where you instantly feel at home.
As the dish arrived, steam wafted up, carrying the enchanting scent of slow-cooked beef and sweet onions. The first bite was a revelation: the richness of the stew mingled perfectly with the tangy notes from the beer. I could feel the love poured into it, and I was transported back to my family kitchen, where my grandmother used to cook similar stews during the colder months. Each mouthful was imbued with memories, and I knew I had to recreate that magic in my own kitchen. That’s what cooking is all about, isn’t it? The way food connects us to our past, evokes feelings of warmth, and brings us together.
Ingredients
To prepare this delightful Carbonade Flamande, you’ll need the following ingredients:
-
2 lbs beef chuck, cut into 1.5-inch cubes
The heart of this stew! Chuck is a wonderfully marbled cut that becomes tender and flavorful through slow cooking. If you’re looking for a leaner option, you could use brisket, but you’ll miss some of that rich flavor. -
3 medium onions, thinly sliced
Onions are essential for a sweet and aromatic base. If you want to switch it up, shallots can add a nice twist, or if you need a milder flavor, go for sweet onions. -
4 cloves garlic, minced
Garlic adds depth and brings in warmth. If you adore garlic, feel free to add more, as it pairs beautifully with beef. -
2 tbsp brown sugar
This balance of sweetness enhances the caramelization of the onions. For a different backdrop, you could substitute with honey or maple syrup. -
2 tbsp apple cider vinegar
A splash of acid to balance the flavors. Red wine vinegar would work well too if that’s what you have on hand! -
2 cups Belgian beer
This is where the magic happens! A dark, malty beer like a Dubbel or a brown ale enriches the stew. If you prefer non-alcoholic options, use beef broth with a splash of vinegar. -
2 cups beef broth
For that lusciousness we all crave, broth gives the stew richness. You can use homemade broth for a deeper flavor, or store-bought if you’ve got a busy day. -
2 tbsp Dijon mustard
A traditional element for a tangy kick, Dijon elevates the entire dish. If you want a milder taste, go for yellow mustard. -
A few sprigs of fresh thyme or 1 teaspoon dried thyme
Thyme complements beef beautifully. Feel free to experiment with other herbs like rosemary or bay leaves for a different vibe. -
Salt and pepper to taste
Essential for seasoning! Don’t be shy—taste as you go to build those layers of flavor.
Step-by-Step Instructions
Now let’s get cooking! Follow these steps for a steaming pot of Carbonade Flamande:
-
Prepare the Beef:
Begin by patting the beef cubes dry with paper towels. This is crucial; it helps them brown better. Now, sprinkle salt and pepper over the beef to season it lightly. You want those flavors to start mingling! -
Brown the Meat:
In a large Dutch oven or pot, heat 2 tablespoons of oil over medium-high heat. Working in batches, add the beef to the pot without overcrowding it. Let it sear without touching it for about 4-5 minutes until a rich brown crust forms. This caramelization adds robust flavor to your stew, so don’t rush this step! Once browned, remove the beef and set it aside. -
Sauté the Onions:
In the same pot, add the sliced onions. Sauté for about 10-12 minutes, stirring frequently until they are golden and beautifully caramelized. If they start to stick, don’t hesitate to deglaze the pot with a splash of beer, scraping up those delicious bits. -
Add the Garlic:
Toss in the minced garlic and cook for another 1-2 minutes until fragrant. Garlic burns easily, so keep an eye on it! -
Combine Remaining Ingredients:
Sprinkle the brown sugar over the onions and add the apple cider vinegar. Allow it to simmer for a minute, stirring to incorporate the sugar. Add the beef back to the pot, along with the beer, beef broth, Dijon mustard, and thyme. Stir everything well, scraping any remaining bits from the bottom. -
Bring to a Simmer:
Turn the heat up slightly and bring the stew to a gentle simmer. Once bubbling, reduce the heat to low, cover the pot, and let it cook for about 2 to 2.5 hours. The key here is low and slow—this is when that magical flavor development occurs! -
Check for Tenderness:
After about 2 hours, take a moment to check the beef. It should be fork-tender, falling apart with minimal effort. If it’s not there yet, continue cooking for another 30 minutes to an hour. -
Final Seasoning:
When it reaches that perfect tenderness, taste the broth and adjust the seasoning with salt and pepper as needed. You can even add a final splash of vinegar if you want a little brightness to cut through the richness.
Serving Suggestions
Plate your Carbonade Flamande in a rustic bowl or a deep dish, allowing that rich sauce to pool beautifully around the tender meat. Serve this hearty stew over a bed of fluffy mashed potatoes, polenta, or with a side of crusty bread for dipping. A sprinkle of fresh parsley or thyme on top can add a lovely pop of color and freshness.
Recipe Variations
Feel free to put your spin on this classic dish with these variations:
-
Vegetarian Option: Substitute beef with a mix of hearty vegetables like mushrooms, eggplant, and carrots, and use vegetable broth instead of beef.
-
Add Root Vegetables: Toss in some diced carrots and parsnips for added sweetness and nutrition at the same time for a heartier dish.
-
Spicy Twist: Add some red pepper flakes or a diced chili for a kick of heat to balance out the sweetness.
-
Mustard Variation: Try whole grain mustard for added texture or go for honey mustard for a sweeter spin.
-
Beer Swap: Experiment with different styles of beer, like a sour ale for a unique flavor experience or even a rich stout for a deeper profile.
Chef’s Notes
This recipe has evolved in my kitchen over the years, adapting to seasonal ingredients and the whims of my family’s taste buds. I can’t tell you how many times I’ve added an extra splash of beer—because why not, right? Every time I make Carbonade Flamande, it’s a little bit different, and that’s part of the charm! I remember one instance where I accidentally grabbed a can of pumpkin ale instead of regular beer. Surprisingly, it added a fall-inspired sweetness that stole the show! Cooking is all about experimentation; embrace the chaos and have fun in your kitchen!
FAQs and Troubleshooting
1. What if my beef gets tough?
This can happen if the beef isn’t cooked long enough. If you find your beef isn’t tendering as expected, simply let it simmer longer. Low and slow is the way to go!
2. Can I make this in a slow cooker?
Absolutely! After browning the beef and sautéing the onions, transfer everything into a slow cooker. Cook on low for 6-8 hours or high for 4-6 hours until the beef is tender.
3. How do I store leftovers?
Store leftover Carbonade Flamande in an airtight container for up to 3-4 days in the refrigerator. It also freezes beautifully, making it perfect for meal prep! Just reheat gently before serving.
4. What can I serve alongside this dish?
Roasted vegetables, a simple green salad, or some fluffy bread are lovely pairings. You want something to soak up that delicious sauce!
Nutritional Info (optional)
This section can be customized beneath the common format.
In conclusion, Carbonade Flamande is more than just a dish; it’s a celebration of flavors and memories that you can share with your loved ones. Whether you enjoy it during a cozy family dinner or a festive holiday gathering, this dish is guaranteed to bring warmth and joy to your table. Happy cooking, and enjoy every delicious bite!
Print
Carbonade Flamande
- Total Time: 165 minutes
- Yield: 6 servings 1x
- Diet: None
Description
A traditional Belgian beef stew that’s deeply flavorful, hearty, and incredibly comforting.
Ingredients
- 2 lbs beef chuck, cut into 1.5-inch cubes
- 3 medium onions, thinly sliced
- 4 cloves garlic, minced
- 2 tbsp brown sugar
- 2 tbsp apple cider vinegar
- 2 cups Belgian beer
- 2 cups beef broth
- 2 tbsp Dijon mustard
- A few sprigs of fresh thyme or 1 teaspoon dried thyme
- Salt and pepper to taste
Instructions
- Prepare the beef: Pat the beef cubes dry with paper towels and season lightly with salt and pepper.
- Brown the meat: In a large Dutch oven, heat oil over medium-high heat. Sear the beef for about 4-5 minutes until browned, then set aside.
- Sauté the onions: In the same pot, cook the onions for 10-12 minutes until golden and caramelized. Deglaze with beer if needed.
- Add the garlic and cook for 1-2 minutes until fragrant.
- Combine remaining ingredients: Mix in brown sugar and apple cider vinegar, then return beef to the pot with beer, broth, mustard, and thyme.
- Bring to a simmer: Increase heat briefly, then cover and cook on low for 2 to 2.5 hours.
- Check for tenderness after 2 hours; continue cooking if needed.
- Final seasoning: Adjust broth seasoning with salt and pepper as desired before serving.
Notes
Serve over mashed potatoes, polenta, or with crusty bread. Garnish with fresh parsley or thyme.
- Prep Time: 15 minutes
- Cook Time: 150 minutes
- Category: Main Course
- Method: Slow Cooking
- Cuisine: Belgian
Nutrition
- Serving Size: 1 serving
- Calories: 400
- Sugar: 8g
- Sodium: 600mg
- Fat: 15g
- Saturated Fat: 5g
- Unsaturated Fat: 8g
- Trans Fat: 0g
- Carbohydrates: 34g
- Fiber: 2g
- Protein: 35g
- Cholesterol: 110mg
Keywords: belgian beef stew, carbonade flamande, comfort food, hearty stew, slow-cooked beef
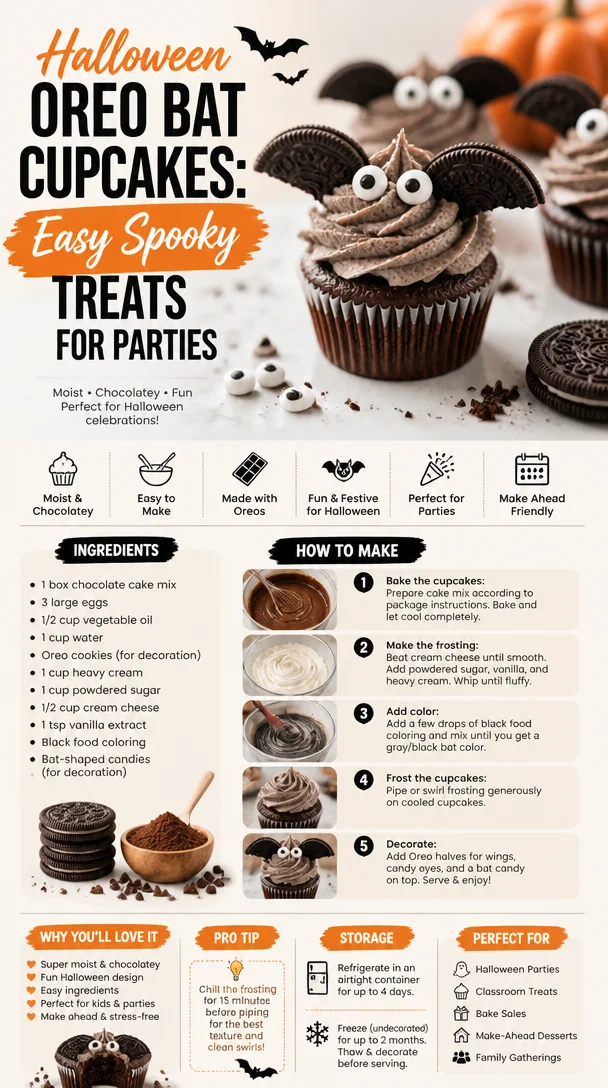
Halloween Oreo Bat Cupcakes: Easy Spooky Treats for Parties
Whip Up Some Magic with Festive Halloween Bats Oreo Cupcakes!
Welcome to my cozy kitchen, my fellow food enthusiasts! 🎃 I’m thrilled you’re here because today, we’re diving into a delightful Halloween treat: Festive Halloween Bats Oreo Cupcakes! Just the thought of these chocolatey wonders topped with cute little bat decorations gets me giddy with excitement. If you love the haunting spirit of Halloween as much as I do, you’re in for a wickedly good time.
Picture this: the sun sets behind the trees, shadows start dancing, and the air is filled with the smell of something sweet baking in the oven. There’s something truly magical about bringing the season’s spooky vibe into our kitchens, especially when it involves gathering friends and family for a frightfully fun feast! These cupcakes are not only delicious but also a whimsical way to celebrate the season, spark conversation, and create sweet memories.
As you treat yourself to these festive delights, let me share a bit of my own Halloween nostalgia. I remember vividly the thrill of choosing the perfect pumpkin each year at the local patch, scooping out its insides, and decorating it to share with friends. And how about those epic Halloween parties filled with themed treats, bubbling cauldrons of punch, and spooky sounds of laughter echoing through the night? Oh, the joy of creating together! Now, I too wanted to craft something memorable — and what better way than with chocolate cupcakes that have a hint of mischief in their design?
So whether you’re gearing up for a Halloween party, a cozy night in, or simply want to delight your loved ones with a touch of sweetness, gather your baking gear, and let’s get ready for some spook-tacular baking! These Oreo Cupcakes are a guaranteed hit, and trust me, they’ll brighten anyone’s day — even if it’s a bit haunted.
A Sweet Memory to Savor
The inspiration for these cupcakes came from my childhood, where Halloween felt like an enchanting fairytale. My family always made sure that we carved pumpkins and baked festive treats together. One year, I remember making some basic chocolate cupcakes for a school Halloween party, but they were missing that wow factor. Fast forward to the following year when I stumbled upon the magical ingredient: Oreos! I snuck a few into the batter and topped each cupcake with a dollop of frosting, an Oreo, and some spooky decorations. I remember the smile on my classmates’ faces as they devoured these treats. It was in that moment I realized how a simple cookie could elevate something so basic into pure joy. Today’s Festive Halloween Bats Oreo Cupcakes are a celebration of that memory and the magic of food that brings us together, just like those childhood celebrations.
Ingredients
Here’s what you’ll need to whip up these enchanting cupcakes:
-
1 box of chocolate cake mix (plus ingredients listed on the box)
- Use your favorite brand — opting for a rich chocolate flavor will bring out the best in these cupcakes.
-
1/2 cup vegetable oil
- This keeps the cupcakes moist and fluffy. You can substitute with melted coconut oil or melted unsalted butter for flavor!
-
3 large eggs
- These bring rich texture. For a vegan option, use flax eggs (1 tbsp flaxseed meal mixed with 2.5 tbsp water per egg).
-
1 cup water or milk
- Milk adds richness, but water will keep them lighter. Try almond milk or oat milk for a dairy-free version!
-
1 package of Oreo cookies
- These are the secret ingredient! Stuff them in the batter and on the top. Swap for gluten-free Oreos if needed.
-
1-2 cups of vanilla frosting (store-bought or homemade)
- The sky’s the limit! A homemade buttercream or cream cheese frosting works wonders, but store-bought saves time.
-
Black food coloring (optional)
- For that dark, spooky vibe! You can also use chocolate frosting for a more natural look.
-
Bat cupcake toppers or decorations
- You can get creative here! Use pre-made bat-shaped cookies, fondant, or even cut-out silhouettes from black paper.
Step-by-Step Instructions
Ready to bring these cupcakes to life? Here’s how you whip up these delicious treats:
-
Preheat Your Oven
- Preheat your oven to 350°F (175°C). This is super important for getting that perfect rise, so don’t skip this step!
-
Prepare Your Cupcake Liners
- Line your muffin tin with Halloween-themed cupcake liners. Whether they’re orange or adorned with spooky designs, they’ll set the tone.
-
Mix the Cake Batter
- In a large mixing bowl, combine the chocolate cake mix, vegetable oil, eggs, and water or milk using a hand mixer until smooth.
- Chef Hack: Don’t overmix! A few lumps are okay; it keeps the cupcakes light and airy.
-
Add in the Oreos
- Gently fold in roughly crushed Oreos — you want to see those delightful pieces!
- Tip: Reserve a few whole Oreos for decorating the tops if you wish.
-
Fill the Liners
- Pour the batter into the lined cupcake tins, filling each cup about 2/3 full.
- Chefs’ Tip: Use a cookie scoop for even distribution and clean hands.
-
Bake
- Pop those beauties into your preheated oven and bake for 18-20 minutes, or until a toothpick comes out clean.
- Pop Quiz: Did you remember to set a timer? No one wants to forget during a haunted baking session!
-
Cool Completely
- Once baked, let the cupcakes cool in the pan for about 5 minutes before transferring them to a wire rack. Allow them to cool completely before frosting.
-
Frosting Time
- If you want to make spooky black frosting, use the black food coloring to tint your frosting. Frost each cupcake generously — let your inner artist shine here!
-
Decorating Like a Pro
- Top each frosted cupcake with a whole Oreo and add bat decorations on top. Feel free to get creative here! Bonus points for using edible glitter or spooky sprinkles!
-
Serve and Enjoy
- Parcels of joy on a plate! Serve them at your Halloween soirée, and watch everyone smile.
Serving Suggestions
Plating these adorable cupcakes is half the fun! Arrange them on a spooky cake stand, sprinkle with edible glitter, or place them in a haunted-themed box. Pair these treats with a glass of chilled pumpkin spice milk or whipped cream to really wow your guests. Enjoy the delightful chaos of Halloween with each bite!
Recipe Variations
Want to mix things up? Here are a few creative twists on these cupcakes:
-
Chocolate Ganache Topping: Create an ooey-gooey experience by drizzling chocolate ganache over your frosting.
-
Pumpkin Spice Cupcakes: Substitute the chocolate cake mix for pumpkin spice cake mix to give a seasonal flair.
-
Batch of Mini Cupcakes: Use a mini muffin tin and adjust baking time for adorable bite-sized treats.
-
Dairy-Free Delight: Use coconut oil, almond milk, and dairy-free Oreos for a delicious dairy-free version.
-
Vegan-friendly Options: Swap heavy egg-based ingredients for flax eggs and enjoy creamy vegan frosting for a guilt-free treat!
Chef’s Notes
Creating these cupcakes takes me back to those days of whimsy and wonder, and I find that each batch is a new adventure. Sometimes I mix up the frosting flavors or even experiment with different cookie bases for a twist! A funny memory for me was once frosting cupcakes while wearing a bat costume. Let’s just say the messy flour-covered apron didn’t quite match the outfit!
These cupcakes have also evolved over the years — originally a simple affair, they became a Halloween staple in my kitchen. The addition of Oreos took them from ordinary to extraordinary!
FAQs and Troubleshooting
-
Why are my cupcakes flat?
- Make sure to check that your baking powder is fresh. Also, avoid overmixing the batter; this can create dense cupcakes.
-
Can I use homemade frosting?
- Absolutely! I often whip up a quick buttercream frosting. Feel free to experiment with flavors like cream cheese or chocolate if you’re feeling adventurous.
-
What if I don’t have black food coloring?
- Don’t worry! You can use dark cocoa powder in your frosting to achieve a darker shade, or simply use traditional white frosting, garnishing with black sprinkles.
-
How do I store leftovers?
- Keep leftover cupcakes in an airtight container at room temperature for up to 3 days. For prolonged freshness, store them in the fridge for about 5-6 days.
Nutritional Info (optional)
While the magical taste is what we care about most, here’s a rough estimate of the nutritional information per cupcake:
- Calories: 290
- Protein: 3g
- Fat: 12g
- Carbohydrates: 44g
- Sugars: 20g
There you have it, my food-loving friends! I hope you’re as excited about the Festive Halloween Bats Oreo Cupcakes as I am. With just a bit of love and creativity, you can make these spook-tastic treats that will have everyone raving. Happy baking, and may your Halloween be filled with laughter, joy, and lots of delectable goodies! 🎉👻🍰
Print
Festive Halloween Bats Oreo Cupcakes
- Total Time: 35 minutes
- Yield: 12 servings 1x
- Diet: Vegetarian
Description
Delight your friends and family with these chocolatey Oreo cupcakes topped with spooky decorations, perfect for Halloween festivities.
Ingredients
- 1 box chocolate cake mix (plus ingredients listed on the box)
- 1/2 cup vegetable oil
- 3 large eggs
- 1 cup water or milk
- 1 package Oreo cookies
- 1–2 cups vanilla frosting (store-bought or homemade)
- Black food coloring (optional)
- Bat cupcake toppers or decorations
Instructions
- Preheat your oven to 350°F (175°C).
- Prepare your muffin tin with Halloween-themed cupcake liners.
- Mix the chocolate cake mix, vegetable oil, eggs, and water or milk until smooth.
- Add in roughly crushed Oreos and fold gently.
- Fill the lined cupcake tins about 2/3 full with the batter.
- Bake for 18-20 minutes or until a toothpick comes out clean.
- Cool for 5 minutes in the pan before transferring to a wire rack.
- Frost each cooled cupcake with your desired frosting.
- Decorate with a whole Oreo and bat decorations on top.
- Serve and enjoy!
Notes
These cupcakes can be made dairy-free and vegan by using appropriate substitutes. Get creative with your decorations for an extra spooky touch!
- Prep Time: 15 minutes
- Cook Time: 20 minutes
- Category: Dessert
- Method: Baking
- Cuisine: American
Nutrition
- Serving Size: 1 cupcake
- Calories: 290
- Sugar: 20g
- Sodium: 200mg
- Fat: 12g
- Saturated Fat: 2g
- Unsaturated Fat: 10g
- Trans Fat: 0g
- Carbohydrates: 44g
- Fiber: 1g
- Protein: 3g
- Cholesterol: 30mg
Keywords: Halloween, cupcakes, Oreo, dessert, festive, chocolate
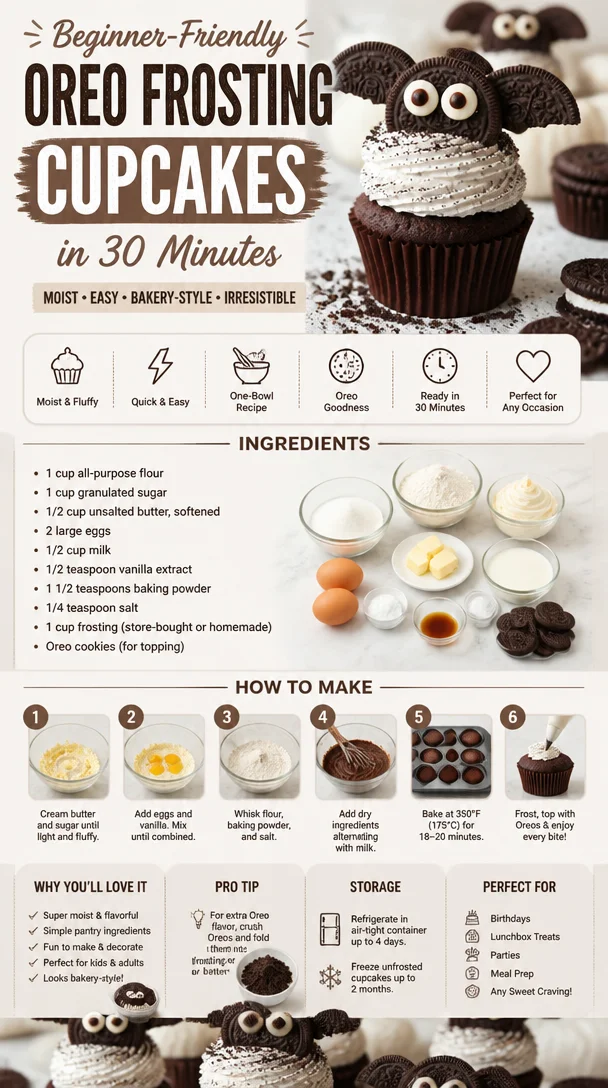
Beginner-Friendly Oreo Frosting Cupcakes in 30 Minutes
Delightfully Decadent Cupcakes with Oreo Frosting
Welcome to my kitchen! Today, we’re diving into a delightful world of sweetness with a recipe that’s as nostalgic as it is indulgent: Cupcakes with Oreo Frosting. If you’ve ever experienced that moment of pure joy when biting into a soft, fluffy cupcake topped with creamy, dreamy frosting, you know just how special this treat can be. Whether you’re celebrating a birthday, an anniversary, or just a Tuesday, these cupcakes are bound to bring smiles and happy dance moves all around!
A Sweet Memory
I still remember the first time I made cupcakes with Oreo frosting. It was a rainy Saturday afternoon, and my younger brother had invited a few of his friends over for a movie marathon. In preparation for their laughter and excitement, I decided to whip up a batch of cupcakes to make the day even sweeter. The kitchen filled with the sweet scent of vanilla and chocolate as I scooped the batter into the cupcake liners, and soon enough, the delightful aroma of freshly baked cupcakes wafted through our home.
Once they were out of the oven and cooled down, I hastily slathered on the Oreo frosting and topped each one with a crushed cookie. My brother and his friends erupted in cheers when they took their first bites—chocolatey bliss paired with the creamy crunch of Oreos. As I watched them relish each sweet morsel, I knew I had not only created a tasty treat but also a cherished memory. Since that day, these cupcakes have become a staple in my kitchen, a tasty reminder of the happiness that comes from baking.
Ingredients
Here’s what you’ll need to get started on these delightful cupcakes:
-
1 ½ cups all-purpose flour
The backbone of our cupcakes! If you need gluten-free options, you can use a 1:1 gluten-free flour substitute. -
1 cup granulated sugar
Sweetness is key! For a bit of a twist, you can opt for brown sugar to enrich the flavor. -
½ cup unsweetened cocoa powder
Cocoa adds that rich chocolate flavor. You could swap it with carob powder if you’re looking for a caffeine-free option. -
1 teaspoon baking powder
This helps our cupcakes rise to fluffy perfection. If you’re out of baking powder, 1/4 teaspoon of baking soda combined with 1/2 teaspoon of cream of tartar can work! -
½ teaspoon baking soda
This contributes to that lovely lift! -
½ teaspoon salt
A little salt enhances all the flavors. Don’t skip it, or your cupcakes might taste a bit flat. -
2 large eggs
These bind the ingredients together and add moisture. Aquafaba (the liquid from a can of chickpeas) can be used as an egg substitute for a vegan version—3 tablespoons per egg. -
½ cup vegetable oil
This will keep your cupcakes moist! You can substitute with melted coconut oil or applesauce for a healthier spin. -
½ cup buttermilk
Buttermilk adds a wonderful tang and enhances the moistness. If you don’t have any, combine regular milk with a teaspoon of vinegar and let it sit for 5 minutes. -
1 teaspoon pure vanilla extract
The secret weapon for flavor! Substitute with almond extract for a nutty twist. -
1 cup crème fraîche or cream cheese (for frosting)
This will allow for a rich base for our Oreo frosting. You can also use mascarpone for an even creamier texture. -
1 cup powdered sugar
To sweeten the frosting. If you’re looking to reduce sugar, you can use a sugar substitute. -
6-8 Oreo cookies (for frosting and decoration)
The star of the show! For a gluten-free version, use gluten-free Oreos.
Step-by-Step Instructions
Let’s get baking! Follow these steps to whip up a batch of delightful cupcakes:
-
Preheat Your Oven
Start by preheating your oven to 350°F (175°C). This is crucial for ensuring your cupcakes bake evenly. -
Prepare Your Pan
Line a 12-cup cupcake pan with fun and vibrant cupcake liners. I always love to mix it up with different colors—it just makes baking even more fun! -
Mix Dry Ingredients
In a large mixing bowl, whisk together the flour, sugar, cocoa powder, baking powder, baking soda, and salt until well combined. This step is important to ensure even flavor distribution throughout your cupcakes. -
Combine Wet Ingredients
In another bowl, beat the eggs, then add in the oil, buttermilk, and vanilla extract. Whisk everything together until smooth. When you pour this into the dry mix, the magic truly begins! -
Combine the Mixtures
Gradually pour the wet mixture into the dry ingredients, stirring gently until just combined. Make sure not to overmix; a few lumps are perfectly okay! -
Scoop and Bake
Using an ice cream scoop or a ladle, fill each cupcake liner about two-thirds full with batter. This gives them just the right amount of space to rise. Bake in the preheated oven for 18–20 minutes, or until a toothpick inserted in the center comes out clean. -
Cool Completely
Once baked, let the cupcakes cool in the pan for about 5 minutes, then transfer them to a wire rack to cool completamente. This is essential before frosting—no one wants melted frosting! -
Frost it Up!
To prepare the Oreo frosting, beat together the crème fraîche (or cream cheese), powdered sugar, and crushed Oreos until smooth and creamy. Again, the key is not to overbeat—just enough to combine perfectly! -
Decorate Your Cupcakes
Once the cupcakes are completely cool, use a piping bag (or a ziplock bag with a corner snipped off) to pipe the Oreo frosting onto each cupcake. Top them off with additional crushed Oreos for that great crunch!
Serving Suggestions
These cupcakes are perfect for parties, family gatherings, or simply enjoyed with a cozy cup of coffee on a quiet afternoon. Serve them on a cute platter—perhaps with a few extra Oreos on the side. A scoop of vanilla ice cream would also make a delightful companion!
Recipe Variations
- Chocolate Chip Surprise: Add mini chocolate chips into the batter for an extra gooey treat.
- Nutty Twist: Fold in crushed almonds or hazelnuts into the batter before baking.
- Vegan Delight: Substitute eggs with flaxseed meal and use a plant-based milk for a vegan-friendly version.
- Mini Cupcakes: Make these cupcakes in mini sizes for bite-sized goodness—just adjust the baking time accordingly.
- Fruity Fun: Add some raspberry or strawberry jam in the center before baking for a fruity explosion!
Chef’s Notes
The beauty of this recipe is its simplicity, which allows for so much personalization and creativity! I remember my first few batches, where I got a bit too adventurous and tossed in a handful of chocolate chips—great idea turned heavenly outcome! Over the years, I’ve experimented, and I still find pleasure in introducing new flavors. Who knew a humble cupcake could bring so much joy? Oh, and if you find frosting everywhere when you’re finished, don’t worry; it’s just a sign of a happy kitchen!
FAQs and Troubleshooting
-
Why are my cupcakes dense?
Dense cupcakes can often be a result of overmixing the batter. Mix until just combined for a lighter texture. -
How can I avoid overbaking?
Keep an eye on your cupcakes during the last few minutes of baking. When a toothpick comes out with just a few moist crumbs, they’re perfect! -
What can I do if my frosting is too runny?
If your frosting is too runny, try adding in a bit more powdered sugar until you reach the desired consistency. -
Can I make these ahead of time?
Absolutely! Bake the cupcakes ahead of time and store them in an airtight container at room temperature for up to 2 days before frosting them.
Nutritional Info (Optional)
For those curious about the nutrition breakdown, here’s a general overview per cupcake (without frosting):
- Calories: Approximately 200
- Total Fat: 8g
- Saturated Fat: 1.5g
- Carbohydrates: 30g
- Sugars: 15g
- Protein: 2g
And there you have it—a delightful recipe for cupcakes with delectable Oreo frosting! I hope this sparks joy in your kitchen as much as it did in mine. Happy baking, fellow foodies!
Print
Delightfully Decadent Cupcakes with Oreo Frosting
- Total Time: 40 minutes
- Yield: 12 servings 1x
- Diet: Vegetarian
Description
Indulge in soft, fluffy cupcakes topped with creamy Oreo frosting for a delightful treat perfect for any occasion.
Ingredients
- 1 ½ cups all-purpose flour
- 1 cup granulated sugar
- ½ cup unsweetened cocoa powder
- 1 teaspoon baking powder
- ½ teaspoon baking soda
- ½ teaspoon salt
- 2 large eggs
- ½ cup vegetable oil
- ½ cup buttermilk
- 1 teaspoon pure vanilla extract
- 1 cup crème fraîche or cream cheese (for frosting)
- 1 cup powdered sugar
- 6–8 Oreo cookies (for frosting and decoration)
Instructions
- Preheat your oven to 350°F (175°C).
- Prepare a 12-cup cupcake pan with cupcake liners.
- Mix together the flour, sugar, cocoa powder, baking powder, baking soda, and salt in a large mixing bowl.
- Combine the eggs, oil, buttermilk, and vanilla in another bowl and whisk until smooth.
- Pour the wet ingredients into the dry ingredients and stir gently until just combined.
- Scoop the batter into the cupcake liners, filling each about two-thirds full.
- Bake for 18–20 minutes, or until a toothpick inserted comes out clean.
- Cool completely on a wire rack before frosting.
- Frost with a mixture of crème fraîche (or cream cheese), powdered sugar, and crushed Oreos.
- Decorate with additional crushed Oreos on top.
Notes
Feel free to experiment with ingredients and toppings for personalized variations!
- Prep Time: 20 minutes
- Cook Time: 20 minutes
- Category: Dessert
- Method: Baking
- Cuisine: American
Nutrition
- Serving Size: 1 cupcake
- Calories: 200
- Sugar: 15g
- Sodium: 210mg
- Fat: 8g
- Saturated Fat: 1.5g
- Unsaturated Fat: 6g
- Trans Fat: 0g
- Carbohydrates: 30g
- Fiber: 1g
- Protein: 2g
- Cholesterol: 30mg
Keywords: cupcakes, Oreo, frosting, dessert, baking
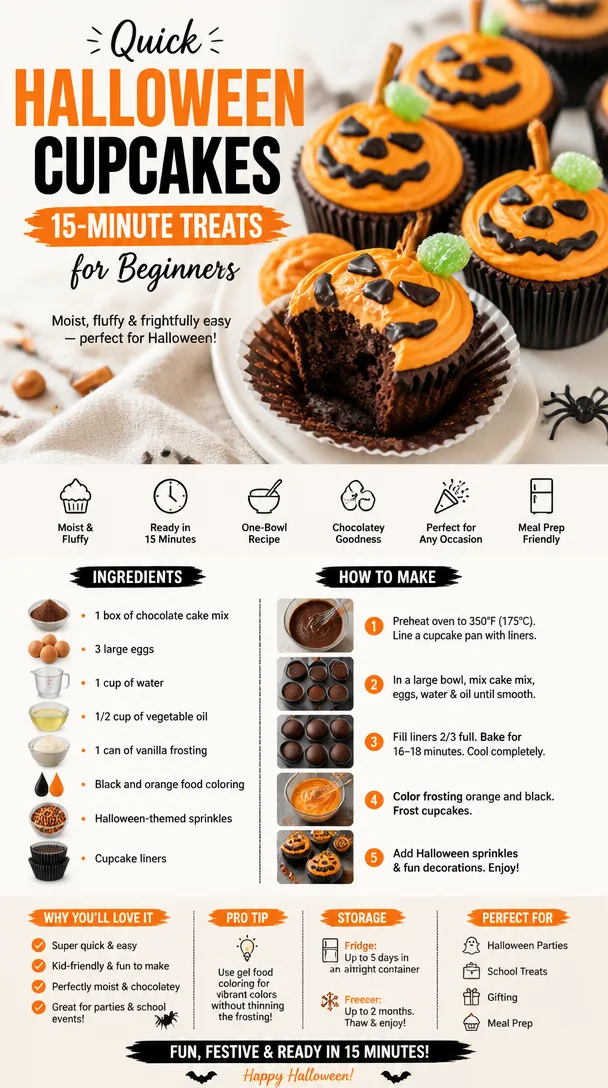
Quick Halloween Cupcakes: 15-Minute Treats for Beginners
Easy Halloween Cupcakes: Spooktacularly Delicious Treats!
Welcome to my cozy kitchen, friends! Halloween is just around the corner, and you know what that means—it’s time to whip up some ghoulish goodies that will delight trick-or-treaters and party guests alike. These easy Halloween cupcakes are not only adorable, but they also pack a punch of flavor that will leave everyone asking for seconds (or thirds!).
Imagine a group of friends gathered around a table, laughter filling the air, as you unveil your batch of these spooktacular cupcakes. The aroma of freshly baked treats wafts through the room, and the anticipation builds as everyone eyes the spooky decorations. Whether you’re an experienced baker or just getting started, this recipe is designed to make you feel confident and excited as you create something fun and festive.
In today’s post, I’ll be guiding you through every step of the process, sharing not just the recipe but also some personal stories and tips to make your Halloween baking a blast! So, grab your apron, preheat that oven, and let’s get started!
A Sweet Blast From the Past
When I think of Halloween, I can’t help but reminisce about my childhood. Growing up, our neighborhood transformed into a whimsical wonderland filled with pumpkins, spooky decorations, and the promise of sweet treats at every door. But one of my fondest memories is from the time I decided to bake my very first batch of Halloween cupcakes for my school’s Halloween party.
Armed with a bright orange apron and a head full of ideas, I eagerly gathered my ingredients. However, my ambitious plans faced a tiny challenge—my kitchen turned into a flour-dusted battleground! With the oven timer ticking away, I hurriedly mixed the batter, trying to avoid the mess while also managing to keep my little brother from "helping" too much (he had a knack for creating chaos).
The cupcakes turned out delightfully; they were frosted with swirls of orange and black icing and topped with candy corn. The pride I felt when my classmates devoured them was immeasurable. It sparked a love for baking in me, especially during the holiday season. Now, I’m thrilled to pass on that love to you with this easy Halloween cupcake recipe!
Ingredients
Here’s what you’ll need for these festive cupcakes:
-
1 ½ cups all-purpose flour
- The foundation of your cupcakes! You can substitute with whole wheat flour for a nutty flavor or gluten-free flour for a gluten-friendly option.
-
1 cup granulated sugar
- This is what gives your cupcakes that sweet, irresistible taste! Brown sugar can be used for a deeper caramel flavor.
-
½ cup unsweetened cocoa powder
- For those who love a rich, chocolatey flavor! If chocolate isn’t your thing, you can omit it and add an extra ½ cup of flour for vanilla cupcakes.
-
2 tsp baking powder
- This helps your cupcakes rise and become fluffy! Be sure to check the expiration date; old baking powder can lead to flat cupcakes.
-
½ tsp baking soda
- Another leavening agent that adds to the fluffiness. If you’re out, you can use an extra teaspoon of baking powder.
-
½ tsp salt
- A pinch of salt intensifies all the other flavors! Sea salt or pink Himalayan salt works wonderfully too for a different hint of flavor.
-
2 large eggs
- The binding agents! If you’re looking for an egg-free option, you can use ½ banana or 1/4 cup of unsweetened applesauce for each egg.
-
½ cup milk
- For moistness and richness. Any milk alternative (like almond or oat milk) will also work here.
-
1/3 cup vegetable oil
- This keeps your cupcakes moist. You can swap this for melted coconut oil for a twist.
-
1 tsp vanilla extract
- The secret ingredient for deepening the flavor! You can also try almond extract for a different flavor profile.
-
Colored frosting (orange, purple, and green)
- Get creative with colors! You can make your own buttercream or grab pre-made frosting for convenience.
-
Halloween-themed sprinkles and candy decorations
- These add that festive touch! Gummy worms, candy corn, or chocolate spiders all work great.
Step-by-Step Instructions
Now, let’s get cooking! Follow these steps to create your spooktacular Halloween cupcakes:
-
Preheat the Oven
Preheat your oven to 350°F (175°C). This is crucial—starting with a hot oven ensures that your cupcakes rise beautifully! -
Prepare Your Cupcake Liners
Line a muffin tin with cute Halloween-themed cupcake liners. This is where the fun begins—pick ones with ghosts, pumpkins, or spooky designs! -
Mix Dry Ingredients
In a large mixing bowl, whisk together the flour, sugar, cocoa powder, baking powder, baking soda, and salt until well combined. This helps to aerate the flour, ensuring a lighter texture. -
Combine Wet Ingredients
In another bowl, whisk together the eggs, milk, oil, and vanilla extract until smooth. You can even use a hand mixer for extra fluff! -
Blend the Mixtures
Pour the wet ingredients into the dry ingredients and mix until just combined. Avoid over-mixing; a few lumps are perfectly fine! Over-mixing can lead to tough cupcakes. -
Fill the Liners
Using a spoon or ice cream scoop, fill each cupcake liner about two-thirds full. This allows room for the cupcakes to rise without overflowing. -
Bake the Cupcakes
Carefully place the muffin tin in the preheated oven and bake for about 18-20 minutes. To check if they’re done, insert a toothpick into the center—if it comes out clean or with a few crumbs, they’re ready! -
Cool Down Time
Once done, remove them from the oven and allow them to cool in the tin for about 5 minutes. Then, transfer them to a wire rack to cool completely. Don’t rush this step; frosting warm cupcakes usually leads to melty messes! -
Frost Away
Once your cupcakes are completely cool, it’s time to unleash your creativity! Use a piping bag to frost your cupcakes with swirling colors. Try a mix of orange, purple, and green for that spooky aesthetic. -
Decorate
Finish off with a sprinkle of your favorite Halloween-themed toppings! The more colorful and fun, the better!
Serving Suggestions
Arrange your Halloween cupcakes on a festive platter, and for an extra spooky touch, consider adding decorative elements like spooky candles or mini pumpkins. You can also place them in whimsical cupcake holders to create a fun centerpiece for your Halloween party. Set out a variety of toppings on the side so everyone can customize their cupcake—who wouldn’t love that?
Recipe Variations
Feeling adventurous? Here are some creative twists to try for your Halloween cupcakes:
- Pumpkin Spice Cupcakes: Swap out the cocoa powder for 1 cup of pumpkin puree and add 1 tsp of pumpkin spice. Perfect for a cozy fall flavor!
- Ghostly Coconut: Top with coconut-flavored frosting and edible googly eyes to create adorable ghost cupcakes.
- Spiced Apple Cupcakes: Add finely chopped apples and cinnamon for a delightful twist on the traditional flavor.
- Vegan Version: Substitute eggs with flaxseed meal (1 tbsp ground flaxseed + 3 tbsp water = 1 egg) and use almond milk and coconut oil to create delicious vegan-friendly treats.
- Chocolate Peanut Butter: Fill the centers with peanut butter and top with chocolate frosting for a rich surprise bite!
Chef’s Notes
Baking is a journey, and every recipe carries personal touches. Over the years, I’ve experimented with countless variations of these Halloween cupcakes. At one point, I even hosted a “decorate your cupcake” night with friends, and the creativity that flowed was astounding! Some made spooky faces while others went for elegant autumn designs.
It’s incredible how something as simple as a cupcake can spark joy, laughter, and connection with friends and family. Plus, don’t be surprised if you find yourself enjoying the leftover frosting straight from the bowl—hey, it happens to the best of us!
FAQs and Troubleshooting
What should I do if my cupcakes sink in the middle?
This can happen for a couple of reasons, such as over-mixing the batter or not baking them long enough. Make sure to mix just until combined and check for doneness using the toothpick method.
How can I ensure my cupcakes are moist?
Using vegetable oil instead of butter can lead to a moister cupcake. Additionally, don’t overbake them—keeping an eye on the time will make a big difference.
Can I make these cupcakes ahead of time?
Absolutely! You can bake and cool them a day in advance. Just store them in an airtight container and frost them the day of your celebration for best results.
What if I don’t have cupcake liners?
You can bake directly in a greased muffin tin; just be sure to really grease them well to avoid sticking.
Nutritional Info (if applicable)
One cupcake (without frosting) typically contains around 200 calories, 8g fat, and 30g carbohydrates. Adjust the calculations based on the frosting and additional toppings you use!
So there you have it! You’re now ready to create your very own batch of easy Halloween cupcakes that not only taste delicious but also look spooktacular. I can’t wait to hear about your baking adventures and all the creative decorations you come up with. Happy Halloween baking—let’s make some magical memories in the kitchen! 🎃🧁
Print
Easy Halloween Cupcakes
- Total Time: 35 minutes
- Yield: 12 servings 1x
- Diet: Vegetarian
Description
Spooktacularly delicious Halloween cupcakes that are easy to make and perfect for festive gatherings.
Ingredients
- 1 ½ cups all-purpose flour
- 1 cup granulated sugar
- ½ cup unsweetened cocoa powder
- 2 tsp baking powder
- ½ tsp baking soda
- ½ tsp salt
- 2 large eggs
- ½ cup milk
- 1/3 cup vegetable oil
- 1 tsp vanilla extract
- Colored frosting (orange, purple, and green)
- Halloween-themed sprinkles and candy decorations
Instructions
- Preheat your oven to 350°F (175°C).
- Line a muffin tin with Halloween-themed cupcake liners.
- Whisk together dry ingredients: flour, sugar, cocoa powder, baking powder, baking soda, and salt.
- Whisk together wet ingredients: eggs, milk, oil, and vanilla extract until smooth.
- Pour the wet ingredients into the dry ingredients and mix until just combined.
- Fill each cupcake liner about two-thirds full.
- Bake for about 18-20 minutes, or until a toothpick comes out clean.
- Allow cooling in the tin for 5 minutes, then transfer to a wire rack to cool completely.
- Frost the cooled cupcakes with creative colored frosting.
- Decorate with Halloween-themed sprinkles and candy.
Notes
Feel free to explore variations such as pumpkin spice or vegan options for a different flavor experience.
- Prep Time: 15 minutes
- Cook Time: 20 minutes
- Category: Dessert
- Method: Baking
- Cuisine: American
Nutrition
- Serving Size: 1 cupcake
- Calories: 200
- Sugar: 15g
- Sodium: 150mg
- Fat: 8g
- Saturated Fat: 1g
- Unsaturated Fat: 7g
- Trans Fat: 0g
- Carbohydrates: 30g
- Fiber: 1g
- Protein: 3g
- Cholesterol: 40mg
Keywords: Halloween, cupcakes, baking, desserts, festive treats
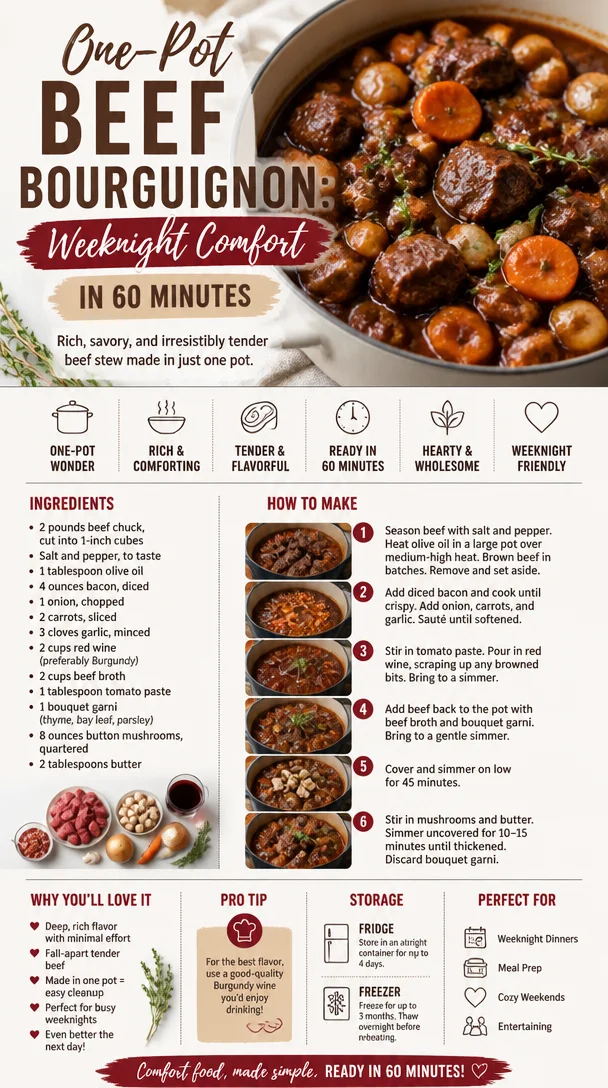
One-Pot Beef Bourguignon: Weeknight Comfort in 60 Minutes
The Ultimate Beef Bourguignon Recipe: A Cozy Culinary Classic
Welcome to my kitchen! I’m thrilled to share a recipe that warms not just the stomach, but the heart: Beef Bourguignon. This French classic is not just a dish; it’s a celebration of flavor, an embrace of comfort, and a nod to slow cooking at its finest. Nothing beats the aroma of tender beef simmering in a rich, red wine sauce, evoking memories of rustic French kitchens and hearty family gatherings. Whether you’re a seasoned chef or a curious beginner, I promise you that making Beef Bourguignon is more achievable than you might think. So grab your apron and let’s dive in!
The magic of Beef Bourguignon lies in its ability to turn simple, humble ingredients into an unforgettable feast. The blend of succulent beef, earthy mushrooms, sweet carrots, and aromatic herbs all coming together in a luscious sauce creates a symphony of flavors that dances on your palate. It’s a dish that brings people together—perfect for cozy dinners, holiday gatherings, or simply a weekend project that fills your kitchen with deliciousness.
As we embark on this culinary adventure, you’ll learn not only how to prepare this dish but also why it’s so special. You’ll hear stories, discover substitutions and variations, and get tips that even the pros use! So, get ready to create some kitchen magic.
A Cozy Memory of Beef Bourguignon
I have a vivid memory that dances in my mind every time I think of Beef Bourguignon. It was a chilly autumn evening, the kind that makes you crave something hearty and warm. My grandmother, an amazing home cook, had invited the whole family over. The kitchen was already filled with the tantalizing scent of beef braising away in red wine, garlic, and herbs.
As I watched her stir the pot, she shared stories of her own grandmother cooking in a tiny Parisian apartment, using whatever was fresh and in season. With each ingredient she added, she reminded me that cooking was not just about the food; it was about love, history, and tradition. I can still hear her gentle laughter mixing with the clinking of pots and the sizzling of onions sautéing away. That evening, we gathered around the table, plates piled high with beef bourguignon, toasted with warm, crusty bread, laughter spilling over just like the wine.
Those moments fueled my passion for cooking, and that’s what I hope to inspire in you too. Let’s create our own memories in the kitchen, one amazing recipe at a time!
Ingredients
Here’s what you’ll need to make this delicious Beef Bourguignon:
-
2-2.5 lbs beef chuck
A cut that benefits from slow cooking, resulting in tender, flavorful morsels. If you can’t find chuck, you can substitute with brisket or round. -
1 bottle (750 ml) red wine
A dry red wine like Pinot Noir or Cabernet Sauvignon works best. If you prefer to cook without alcohol, you can substitute with beef broth mixed with a splash of vinegar for acidity. -
4 cups beef broth
This will add depth to the sauce. Low-sodium broth allows you to control the salt in the dish. -
3 tablespoons vegetable oil
For searing the beef. Olive oil is a great substitute, but vegetable oil can withstand higher cooking temperatures. -
1 large onion, diced
Onions are the foundation of flavor in this dish. If you want a milder flavor, use shallots instead. -
2-3 cloves garlic, minced
Garlic adds a lovely aroma and depth. Fresh is best, but jarred garlic can be used in a pinch. -
4-6 strips of bacon, chopped
Bacon adds smokiness and richness. If you’re looking for a healthier option, turkey bacon can work, or omit it entirely for a lighter dish. -
4 large carrots, chopped
Sweet carrots balance the dish. For a twist, try parsnips or even bell peppers. -
8 ounces cremini mushrooms, halved
Earthy mushrooms soak up the savory sauce, enhancing the dish. Button mushrooms are a good alternative if cremini isn’t available. -
2 tablespoons flour
This thickens the sauce. For a gluten-free option, use a cornstarch slurry instead. -
2-3 sprigs fresh thyme
Thyme brings out the earthiness of the beef. Dried thyme can be used instead; just remember to adjust the amount, as it’s more concentrated. -
1-2 bay leaves
Bay leaves add a subtle aromatic flavor. Be sure to discard them before serving! -
Salt and pepper to taste
Seasoning is everything! Usher in the flavors by adjusting to your palate.
Step-by-Step Instructions
Now, let’s get our hands in the mix and whip up this fabulous Beef Bourguignon! Follow these steps for success in your kitchen:
-
Preparation: Start by patting the beef dry with paper towels and cutting it into 1.5-inch cubes. Dry beef browns better, so be sure not to skip this step! Season generously with salt and pepper.
-
Sear the beef: In a large Dutch oven or heavy pot, heat 2 tablespoons of vegetable oil over medium-high heat. Once the oil is hot, sear the beef in batches until browned on all sides (about 3-4 minutes per side). Remove beef and set aside. This step creates a flavorful crust!
-
Cook the bacon: In the same pot, add the chopped bacon and cook until crispy (about 5 minutes). The drippings will add a wonderful depth of flavor.
-
Sauté the aromatics: Add the chopped onions to the pot with any leftover fat from the bacon. Cook, stirring occasionally, until softened (about 5-7 minutes). Then toss in the garlic and cook for another minute until fragrant.
-
Build the sauce: Sprinkle flour over the onion mixture and stir for about 2 minutes, allowing the flour to cook a bit. This will help thicken your sauce. Gradually pour in the red wine while scraping up any browned bits from the bottom of the pot (this is where the flavor is!).
-
Add the rest: Return the beef to the pot, then add the beef broth, chopped carrots, mushrooms, thyme, bay leaves, and some more salt and pepper. Give it a good stir!
-
Simmer low and slow: Bring the mixture to a gentle boil. Once boiling, cover and reduce the heat, allowing it to simmer for about 2-3 hours. The longer it cooks, the more tender the beef becomes. Stir it occasionally and make sure it doesn’t stick.
-
Finishing touches: After a few hours, remove the lid and allow the sauce to reduce for about 30 minutes, until it thickens to your liking. Check for seasoning and adjust as necessary. Remove the bay leaves and thyme stems before serving.
Serving Suggestions
Beef Bourguignon is perfect when served over creamy mashed potatoes, buttery egg noodles, or even a hearty crusty baguette to soak up that delicious gravy. Garnish with fresh parsley for a pop of color and a hint of freshness. A glass of the same red wine you used in cooking pairs beautifully with this dish, making the meal cohesive and even more enjoyable!
Recipe Variations
- Vegetarian Twist: Try replacing beef with hearty mushrooms or jackfruit for a plant-based alternative that still delivers on flavor.
- Herbacious Addition: Add a splash of red wine vinegar at the end for an unexpected zing.
- Spicy Kick: Incorporate diced jalapeños or a splash of hot sauce for a spicy version!
- Different Wines: Experiment with different red wines, such as Merlot or Zinfandel, to discover new flavor profiles.
Chef’s Notes
The beauty of Beef Bourguignon is its versatility and ability to evolve. I remember experimenting with adding a splash of orange juice once, inspired by the winter season—and it was a delightful twist that brightened the flavors! Don’t be afraid to let your creativity flourish in the kitchen. Your version might just become a new family favorite!
Cooking can be messy, and let’s face it, life happens. I’ve spilled red wine more times than I care to admit! Embrace your kitchen mishaps—they often lead to happy accidents (and hilarious stories).
FAQs and Troubleshooting
Q: My sauce came out too thin. What can I do?
A: If your sauce isn’t thick enough, make a slurry with cornstarch and water, slowly add it while simmering until you reach your desired consistency.
Q: Can I make Beef Bourguignon in advance?
A: Absolutely! In fact, it tastes even better the next day after the flavors meld together. Just store it in an airtight container and reheat gently.
Q: What can I serve with Beef Bourguignon?
A: Aside from mashed potatoes or crusty bread, consider a fresh green salad or roasted vegetables to balance the richness of the dish.
Q: Can I freeze leftovers?
A: Yes! Beef Bourguignon freezes beautifully. Just allow it to cool completely, then transfer it to labeled freezer-safe containers. Reheat on low on the stovetop or in the microwave.
Nutritional Info
While pleases of comfort food can vary greatly, a standard serving of Beef Bourguignon typically contains approximately 500-600 calories. However, it’s rich in protein and delicious satisfaction!
There you have it – an invitation to create a dish that’s more than just a meal; it’s a connection to family, tradition, and those cozy moments in the kitchen. I can’t wait to hear your stories about making this Beef Bourguignon. Happy cooking!
Print
Beef Bourguignon
- Total Time: 195 minutes
- Yield: 6 servings 1x
- Diet: None
Description
A cozy culinary classic that combines tender beef, earthy mushrooms, and rich red wine sauce, perfect for hearty dinners and family gatherings.
Ingredients
- 2–2.5 lbs beef chuck
- 1 bottle (750 ml) dry red wine (e.g., Pinot Noir or Cabernet Sauvignon)
- 4 cups beef broth
- 3 tablespoons vegetable oil
- 1 large onion, diced
- 2–3 cloves garlic, minced
- 4–6 strips of bacon, chopped
- 4 large carrots, chopped
- 8 ounces cremini mushrooms, halved
- 2 tablespoons flour
- 2–3 sprigs fresh thyme
- 1–2 bay leaves
- Salt and pepper to taste
Instructions
- Preparation: Start by patting the beef dry with paper towels and cutting it into 1.5-inch cubes. Season generously with salt and pepper.
- Sear: In a large Dutch oven, heat 2 tablespoons of vegetable oil over medium-high heat. Sear the beef in batches until browned (about 3-4 minutes per side) and remove.
- Cook: In the same pot, add the chopped bacon and cook until crispy (about 5 minutes).
- Sauté: Add the onions to the pot and cook until softened (about 5-7 minutes). Then add the garlic and cook for another minute.
- Build: Sprinkle flour over the onion mixture and stir for about 2 minutes. Gradually pour in the red wine, scraping the browned bits from the bottom.
- Add: Return the beef to the pot with broth, carrots, mushrooms, thyme, bay leaves, and more salt and pepper. Stir well.
- Simmer: Bring to a gentle boil, then cover and reduce heat to simmer for 2-3 hours.
- Finishing: After 2-3 hours, remove the lid and let the sauce reduce for about 30 minutes. Adjust seasoning and remove bay leaves.
Notes
Beef Bourguignon tastes even better the next day. Can be frozen for later use.
- Prep Time: 15 minutes
- Cook Time: 180 minutes
- Category: Main Course
- Method: Braised
- Cuisine: French
Nutrition
- Serving Size: 1 serving
- Calories: 600
- Sugar: 6g
- Sodium: 700mg
- Fat: 25g
- Saturated Fat: 10g
- Unsaturated Fat: 10g
- Trans Fat: 0g
- Carbohydrates: 45g
- Fiber: 4g
- Protein: 40g
- Cholesterol: 90mg
Keywords: Beef Bourguignon, French cuisine, cozy dinner, comfort food
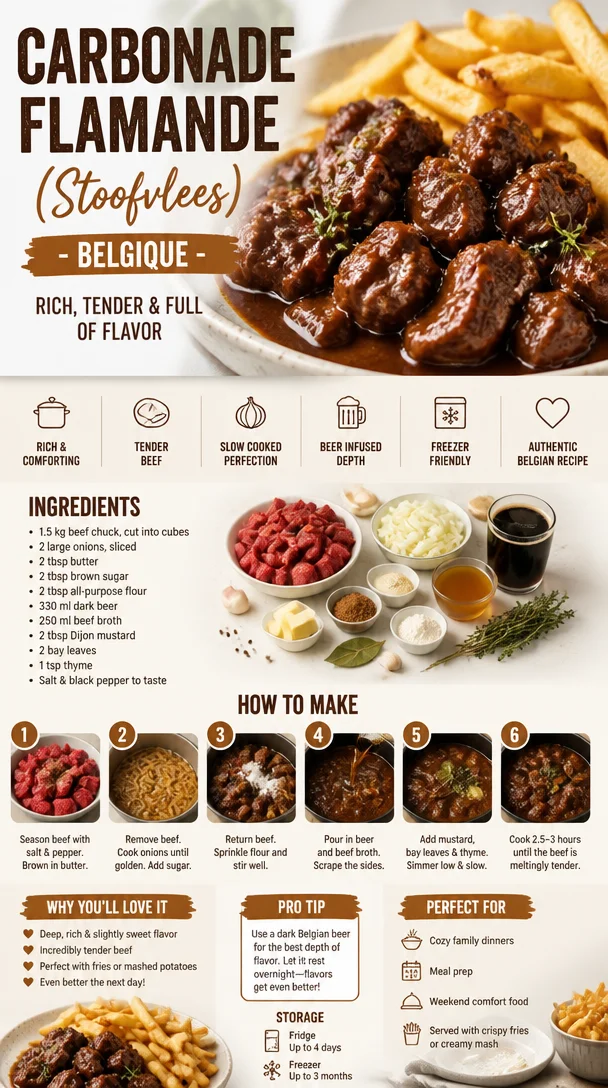
CARBONADE FLAMANDE (STOOFVLEES) – BELGIQUE
Discovering the Comfort of Carbonade Flamande: A Belgian Classic
Welcome to my kitchen! Today, we’re diving into a dish that’s close to my heart and soul—the beloved Carbonade Flamande, or stoofvlees, a traditional Belgian stew that’s as rich in flavor as it is in history. This hearty beef stew is made with tender chunks of beef, slowly braised in a savory blend of dark beer, onions, and aromatic herbs. It’s the kind of dish that warms not just your body, but also your spirit, especially when shared with loved ones. So grab your apron, and let’s get cooking!
A Sweet Nostalgia
The first time I tasted Carbonade Flamande, I was around ten years old, perched on a stool in my grandmother’s cozy kitchen in Belgium. The faint sound of bubbling stew mingled with the warm, inviting aromas that filled the air. My grandmother—a vibrant woman who had a knack for creating magic out of simple ingredients—pulled me close and handed me a wooden spoon, inviting me into her world of flavor.
As she guided me through the process of caramelizing the onions and searing the beef, I soaked in every detail—the way her eyes sparkled when she spoke about each ingredient. It was in that tiny kitchen, with flour dusting the counters and sunlight streaming through the window, that I learned a recipe isn’t just a set of instructions; it’s a love letter to family and friends. This stew wasn’t just about the meal; it was about the stories we shared over dinner, the laughter that echoed in our home, and the warmth of togetherness.
To this day, every time I make Carbonade Flamande, I am transported back to that enchanted kitchen, surrounded by the people I cherish. Trust me, this is not just a meal; it’s a comforting embrace on a plate.
Ingredients
Let’s gather our ingredients! Here’s what you’ll need to create this delightful dish, along with some tips and insights to get you started:
-
2 lbs (900g) beef chuck, cut into 2-inch cubes
- A well-marbled cut will give you the best results. Chuck becomes tender with long cooking times, so don’t skimp here!
-
2 medium onions, thinly sliced
- Onions add sweetness to the dish. You can substitute with shallots for a milder flavor or even leeks for a unique twist.
-
2 tablespoons olive oil
- Extra virgin olive oil is great, but feel free to use canola or vegetable oil if that’s what you have. You need something that can handle high heat.
-
1 tablespoon unsalted butter
- Adds richness, but if you want to keep it dairy-free, omit it or use a plant-based butter.
-
1 tablespoon brown sugar
- This helps caramelize the onions beautifully. Light or dark brown sugar works well; dark will add a deeper flavor profile.
-
4 cups Belgian dark beer
- The star of the dish! Use a rich brown ale or dubbel beer. For a non-alcoholic version, opt for a dark, non-alcoholic beer or beef broth.
-
2 cups beef stock
- Homemade stock is best, but store-bought works in a pinch. Beef stock will enhance the stew’s savory notes.
-
1 tablespoon Dijon mustard
- Adds a subtle tang that balances the sweetness. You can substitute with yellow mustard, but it won’t be quite as refined.
-
4 sprigs thyme
- A beautiful herb to complement the beef. Use dried thyme if fresh isn’t available. About a teaspoon will do.
-
2 bay leaves
- Essential for adding depth of flavor. Fresh or dried will work, but remember to remove them before serving!
-
Salt and pepper, to taste
- Essential to enhance the natural flavors. Use kosher salt for a less salty flavor that still packs a punch.
Step-by-Step Instructions
-
Sear the Beef:
Start by heating the olive oil in a large Dutch oven over medium-high heat. Once the oil is shimmering, add a few pieces of beef at a time (don’t overcrowd the pan!). Sear them until browned on all sides, roughly 5-7 minutes. Remove the beef and set it aside. This step is crucial; it builds flavor through caramelization. -
Caramelize the Onions:
In the same pot, add the butter and sliced onions. Cook them gently, stirring occasionally, for about 10-15 minutes until they become soft and golden. This sweetness is the bedrock of your stew, so don’t rush this process! -
Add Sugar and Beer:
Once your onions are perfectly caramelized, stir in the brown sugar. This will help in creating a wonderful glaze. After it starts to dissolve, slowly pour in the dark beer, scraping up any delicious brown bits from the bottom of the pot—no flavor should go wasted! Allow the mixture to reduce by half, which will concentrate those flavors. -
Combine Ingredients:
Now, reduce the heat to low and add the seared beef back to the pot along with the beef stock, Dijon mustard, thyme, bay leaves, and season with salt and pepper. Stir everything together, ensuring the beef is submerged in the liquid. -
Simmer It Down:
Cover your pot with a lid, leaving it slightly ajar, and let it simmer for 2 to 3 hours. Stir occasionally to prevent sticking. The key here is low and slow—this will make your beef melt-in-your-mouth tender. A tip? If you have an oven-safe pot, you can transfer it to a preheated oven at 325°F (160°C) for more even cooking. -
Check for Doneness:
After a few hours, check the beef for tenderness. It should fall apart easily with a fork. If it’s still a bit tough, give it more time; great flavor takes patience! -
Adjust Seasonings:
Once you’ve achieved the perfect texture, taste the stew and adjust the seasoning if necessary. You might want to add a touch more mustard or sugar to balance it out—every palate is different!
Serving Suggestions
Serve your Carbonade Flamande with creamy mashed potatoes, hearty bread for dipping, or a side of steamed vegetables. You can also garnish with fresh parsley for a pop of color. It’s the perfect dish to be enjoyed around the table with loved ones, sharing stories and laughter.
Recipe Variations
-
Vegetarian Version: Substitute the beef with hearty vegetables like mushrooms, eggplant, and lentils. Use vegetable stock instead of beef stock.
-
Spicy Kick: Add a chopped red chili or a spoonful of paprika for a spicy twist!
-
Herbaceous Boost: Try adding rosemary or a splash of balsamic vinegar for added depth.
-
Beer Alternatives: Use red wine instead of beer for a different flavor profile.
-
Noodle Love: Serve over buttered egg noodles instead of potatoes for a comforting twist!
Chef’s Notes
Over the years, I’ve played around with Carbonade Flamande in ways that make it unique to my family. One memorable instance was when I experimented by adding a hint of orange zest, which brightened the stew beautifully! It’s delightful how a little flair can elevate a classic dish. Embrace the process, and don’t be afraid to make it your own—cooking should be a cozy adventure!
FAQs and Troubleshooting
-
What type of beer should I use?
A rich Belgian beer is ideal, but any dark ale will suffice. Just avoid overly hoppy beers, as they might overpower the flavors. -
How do I thicken the stew if it’s too thin?
If your stew is too watery, remove the lid during the last half hour of cooking to allow it to reduce. Alternatively, mix a tablespoon of cornstarch with two tablespoons of cold water, then stir it into the stew until thickened. -
Can I make this in advance?
Absolutely! In fact, the flavors deepen when made a day ahead. Just reheat gently on the stovetop. -
What can I do with leftovers?
Leftover Carbonade Flamande makes a delicious filling for a pie or can be used as a sandwich filling on crusty bread!
Nutritional Info
This dish is rich and hearty, providing a satisfying meal infused with nutrients from the beef and vegetables. It can be enjoyed as part of a balanced diet, especially on chilly evenings when you need something warming!
So there you have it—my take on Carbonade Flamande! I hope it becomes a beloved recipe in your kitchen, just as it has in mine. Happy cooking!
Print
Carbonade Flamande
- Total Time: 195 minutes
- Yield: 4 servings 1x
- Diet: None
Description
A traditional Belgian stew made with tender beef, dark beer, and aromatic herbs, perfect for warm gatherings.
Ingredients
- 2 lbs (900g) beef chuck, cut into 2-inch cubes
- 2 medium onions, thinly sliced
- 2 tablespoons olive oil
- 1 tablespoon unsalted butter
- 1 tablespoon brown sugar
- 4 cups Belgian dark beer
- 2 cups beef stock
- 1 tablespoon Dijon mustard
- 4 sprigs thyme
- 2 bay leaves
- Salt and pepper, to taste
Instructions
- Sear the beef: Heat the olive oil in a large Dutch oven over medium-high heat. Sear the beef until browned on all sides, about 5-7 minutes, then remove and set aside.
- Caramelize the onions: In the same pot, add the butter and onions, cooking until soft and golden, about 10-15 minutes.
- Add sugar and beer: Stir in the brown sugar, then pour in the dark beer, scraping up brown bits from the pot and allowing the mixture to reduce by half.
- Combine ingredients: Reduce heat to low and add the seared beef back to the pot with beef stock, Dijon mustard, thyme, bay leaves, and seasonings. Stir to combine.
- Simmer it down: Cover and let simmer for 2-3 hours, stirring occasionally, until the beef is tender.
- Check for doneness: The beef should easily fall apart; if not, cook longer.
- Adjust seasonings: Taste and adjust seasonings as needed.
Notes
Serve with creamy mashed potatoes, bread for dipping, or steamed vegetables. Garnish with parsley for added color.
- Prep Time: 15 minutes
- Cook Time: 180 minutes
- Category: Main Course
- Method: Braising
- Cuisine: Belgian
Nutrition
- Serving Size: 1 serving
- Calories: 450
- Sugar: 6g
- Sodium: 600mg
- Fat: 18g
- Saturated Fat: 6g
- Unsaturated Fat: 9g
- Trans Fat: 0g
- Carbohydrates: 40g
- Fiber: 2g
- Protein: 36g
- Cholesterol: 100mg
Keywords: beef stew, Belgian cuisine, comfort food, hearty meals, traditional recipes
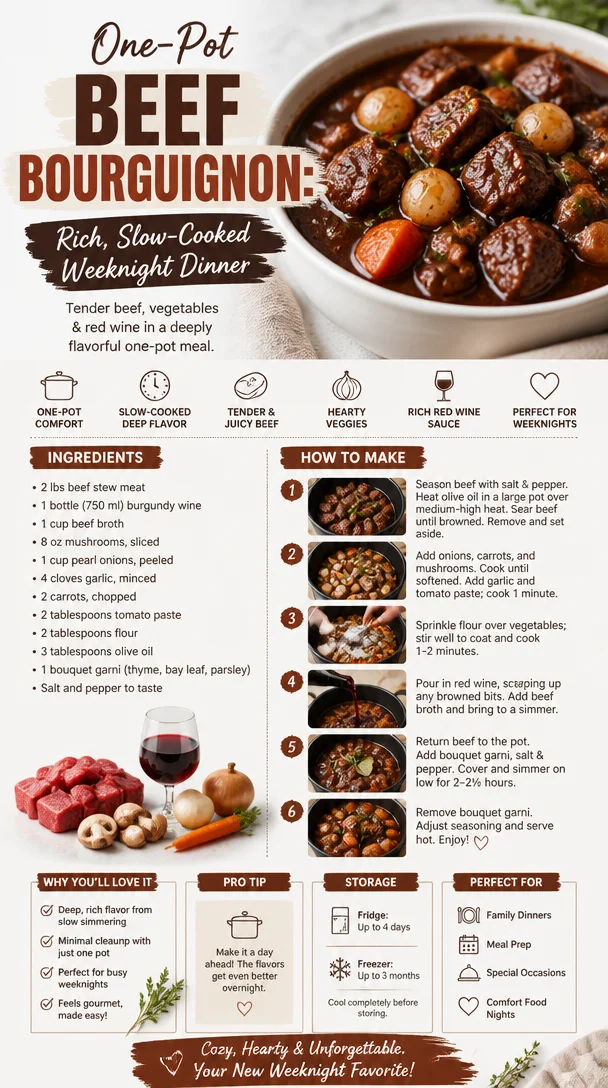
One-Pot Beef Bourguignon: Rich, Slow-Cooked Weeknight Dinner
A Warm Welcome to the Heart of French Cuisine: Beef Bourguignon
Hello, my dear food lovers! Today, we’re diving into a dish that wraps you in its warm embrace, much like your favorite cozy sweater. I’m talking about none other than Beef Bourguignon. This classic French dish isn’t just a meal; it’s an experience—a celebration of rich flavors, aromatic ingredients, and the ultimate comfort food vibe. Perfect for chilly evenings, special occasions, or whenever you simply want to impress, this dish is sure to become a staple in your kitchen.
Before we unfold the magic of this dish, let me take you back in time, to a cozy kitchen where the air was filled with the comforting scent of slow-cooked beef mingling with red wine, garlic, and herbs. It’s a smell that brings back memories of family dinners that turned into evening-long storytelling sessions—passing around bowls of the hearty stew while laughter danced around the table. Seriously, there’s just something about cooking (and eating!) a meal that turns any gathering into a treasured memory.
Ah, magical! Just writing this makes my heart flutter. So, tie on that apron, and let’s get started on a culinary journey that combines rich history, vibrant flavors, and most importantly, love.
A Personal Story to Stir Your Heart
One of my fondest memories involving Beef Bourguignon dates back to a family gathering at my grandparents’ house. My grandmother always had a knack for storytelling, and her kitchen was her stage. I remember the wooden table decked out with bowls of fresh baguette and colorful salads, everyone gathered around, eagerly awaiting her renowned Beef Bourguignon.
As the dish simmered on the stove for what felt like an eternity, it filled the air with intoxicating aromas that promised warmth and comfort. I couldn’t wait to dive into that delicious concoction. When it was finally served, the first bite was pure magic: tender beef melting in my mouth, soaked in a rich, glossy sauce. We spent hours around the table, laughter flowing as freely as the wine, creating unforgettable moments. That’s why I love cooking! It creates connections, stories, and memories that are etched in our hearts forever.
Ingredients
Now that we’ve set the scene, let’s talk about the ingredients that will come together to create your own Beef Bourguignon masterpiece. Each ingredient plays a crucial role in building layers of flavor.
-
2 lbs beef chuck roast: This is the star of the show! Beef chuck has just the right amount of marbling, ensuring it becomes tender and flavorful as it cooks. If chuck isn’t available, brisket or round can work too, but aim for cuts that can stand up to slow cooking.
-
Salt and pepper: Simple yet effective, these seasonings bring out the best in your beef. Don’t forget to season your meat before browning—it’s a game changer!
-
2 tablespoons olive oil: A good cooking fat is essential for browning your beef. Olive oil has a lovely flavor, but you could also use vegetable oil or even unsalted butter for a richer taste.
-
8 ounces bacon or pancetta: This gives the dish a beautiful depth of flavor. Both options add a smoky richness, but if you want to keep it lighter, you can omit it or use turkey bacon.
-
1 medium onion, diced: Onions bring sweetness and depth to your dish. Yellow onions are my go-to, but you could also use shallots for a more delicate onion flavor.
-
2 carrots, sliced: They add sweetness and color to the dish. Feel free to substitute with parsnips if you’re looking for something a little different.
-
2 cloves garlic, minced: Ah, garlic! This little gem adds a fragrant touch. If you’re a garlic lover, throw in an extra clove or two!
-
2 cups red wine (like Burgundy or Pinot Noir): This is the heart of your sauce, infusing the dish with complexity. Always choose a wine that you’d love to drink! For a non-alcoholic option, consider grape juice or beef broth.
-
2 cups beef broth: Extra flavor and moisture—essential for that rich sauce! Homemade is best, but store-bought works just fine.
-
1 tablespoon tomato paste: A little acidity enhances the dish’s flavor. If you don’t have tomato paste, you can use crushed tomatoes, but reduce the amount of liquid accordingly.
-
Bouquet garni (bay leaf, thyme, and parsley tied together): This herb bundle gently flavors your stew. Feel free to use dried herbs if fresh isn’t available, but the flavor won’t be as vibrant!
-
Mushrooms (about 8 ounces, halved): Adding these at the end gives a lovely earthy flavor and adds to the texture. You can use any variety you love—cremini, button, or shiitake work well.
-
Fresh parsley for garnish: A pop of color and freshness to finish your dish.
Step-by-Step Instructions
Ready to make magic? Here’s how to bring your Beef Bourguignon to life, step by step.
Step 1: Prep Your Ingredients
Start by chopping everything up to prevent the dreaded “scramble” once your cooking begins. Dice your onions, slice your carrots, and mince that garlic. Also, cut your beef into 1-2 inch chunks. Nudge a little salt and pepper onto the beef, coating it nicely. This is your first chance to season—don’t skip it!
Step 2: Sear the Beef
In a large, heavy-bottomed pot (like a Dutch oven), heat the olive oil over medium-high heat. Once your oil is shimmering but not smoking, add half of the beef chunks in a single layer. Avoid crowding the pan; you want a good sear, not a steam bath. Cook until browned on all sides (around 5-7 minutes). Use tongs to flip—this is your workout for the day! Remove the beef and repeat with the rest, adding more oil if necessary.
Step 3: Get the Bacon Going
With the beef set aside, toss your bacon into the pot. Don’t scrub it clean—those brown bits are full of flavor! Sauté until crispy (about 4-5 minutes). Let that heavenly aroma fill your kitchen! Remove the bacon, leaving the drippings behind—this is where the magic continues.
Step 4: Sauté the Aromatics
In the same pot, lower the heat to medium and add your onions and carrots. Stir occasionally for 5-7 minutes until they’re softened. Add in the minced garlic, and let it cook for just a minute, until fragrant. The smell will be irresistible, trust me on this!
Step 5: Deglaze with Wine
Now it’s time to add that beautiful red wine. Pour it in and use a wooden spoon to scrape those brown bits from the bottom (this is called deglazing). Let it simmer for about 10 minutes, allowing it to reduce slightly. This liquid is where all the flavors will mingle!
Step 6: Combine and Bring to a Simmer
Return the beef and bacon to the pot. Add in your beef broth, tomato paste, and bouquet garni. Bring everything to a gentle simmer, then cover the pot.
Step 7: Slow Cook to Perfection
Reduce the heat to low and let the magic unfold. Cook for about 2 to 2.5 hours. This is where your patience will be tested, but it’s all worth it. You want the beef to become tender and infused with those gorgeous flavors. Stir occasionally and check if extra liquid is needed.
Step 8: The Final Touch
In the last 30 minutes of cooking, add the mushrooms to the pot. They’ll soak up that luscious sauce and add a delightful texture. If you’re feeling fancy, sauté the mushrooms separately before adding for an extra depth of flavor!
Step 9: Serve and Enjoy
Once everything is tender and aromatic, remove the bouquet garni and adjust seasoning with salt and pepper to taste. Serve it piping hot in bowls, garnished with a sprinkle of fresh parsley for a splash of color.
Serving Suggestions
Beef Bourguignon shines when served atop creamy mashed potatoes or alongside crusty French bread to soak up that irresistible sauce. A nice green salad dressed lightly with vinaigrette can add a fresh contrast, while a glass of the same red wine you used in the dish will complete the experience perfectly. You could also present it in rustic bowlware for a homey touch.
Recipe Variations
Now, let’s spice things up with a few easy variations on this classic:
-
Herb Variations: Try adding rosemary or sage to the bouquet garni for a different herbal twist.
-
Spicy Kick: Toss in a pinch of red pepper flakes for a little heat!
-
Vegetarian Version: Swap the beef for hearty veggies (like eggplant and bell peppers) and use mushrooms and vegetable broth to maintain that depth of flavor.
-
Stout Bourguignon: Replace half the wine with stout beer for a deep, robust flavor.
-
Gluten-Free: Ensure that the wine, broth, and any additives like sauces are gluten-free, and you’re set!
Chef’s Notes
This recipe has evolved beautifully over the years. I remember the first time I attempted it—I was so nervous! Let’s just say some flour ended up in my hair and my kitchen looked like a tornado had passed through. But that’s part of the joy of cooking, right? Embracing the messiness! Since then, I’ve learned to keep things simple and allow the flavors to speak for themselves. Don’t hesitate to play around with it and make it your own!
FAQs and Troubleshooting
1. My beef is tough. What went wrong?
Ensure you’re using the right cut of meat—beef chuck or brisket are best. If it’s still tough, it likely just needs more time to simmer!
2. Can I use a slow cooker?
Absolutely! Just sear the meat and veggies as instructed, then transfer everything into your slow cooker and cook on low for 6-8 hours.
3. How do I thicken my sauce?
If you prefer a thicker sauce, mix a tablespoon of cornstarch with cold water, then stir it into the pot about 15 minutes before you finish cooking.
4. What can I serve with leftovers?
Leftover Beef Bourguignon is fantastic on a hearty sandwich, served over polenta, or even mixed into pasta! A delightful way to enjoy it again.
Nutritional Info (optional)
While I encourage you to enjoy this dish, here’s a quick overview of its nutritional aspects (per serving, about 1.5 cups):
- Calories: 450
- Protein: 35g
- Carbohydrates: 20g
- Fat: 25g
- Fiber: 4g
And there you have it—your very own Beef Bourguignon, infused with warmth, love, and a sprinkle of adventure! Cooking is about more than just food; it’s about creating joy and connection with others. So, gather your loved ones, pour a little wine, and get cooking! Bon appétit!
Print
Beef Bourguignon
- Total Time: 180 minutes
- Yield: 6 servings 1x
- Diet: None
Description
A classic French dish that combines tender beef, rich red wine, and aromatic herbs for the ultimate comfort food experience.
Ingredients
- 2 lbs beef chuck roast, cut into 1–2 inch chunks
- Salt and pepper
- 2 tablespoons olive oil
- 8 ounces bacon or pancetta
- 1 medium onion, diced
- 2 carrots, sliced
- 2 cloves garlic, minced
- 2 cups red wine (like Burgundy or Pinot Noir)
- 2 cups beef broth
- 1 tablespoon tomato paste
- Bouquet garni (bay leaf, thyme, and parsley tied together)
- 8 ounces mushrooms, halved
- Fresh parsley for garnish
Instructions
- Prep your ingredients by chopping all vegetables and cutting the beef into chunks. Season with salt and pepper.
- Sear the beef in a pot with olive oil until browned on all sides, then set aside.
- Get the bacon going in the same pot until crispy, then remove.
- Sauté onions and carrots in the pot until softened, then add garlic and cook until fragrant.
- Deglaze the pot with red wine, scraping up brown bits, and let it simmer to reduce slightly.
- Combine the beef and bacon back in the pot with broth, tomato paste, and bouquet garni. Bring to a simmer.
- Slow cook the mixture on low heat for 2 to 2.5 hours until the beef is tender.
- Add mushrooms in the last 30 minutes of cooking.
- Serve hot, garnished with fresh parsley.
Notes
Beef Bourguignon pairs well with creamy mashed potatoes or crusty French bread. Consider adding herbs or spices for variation.
- Prep Time: 30 minutes
- Cook Time: 150 minutes
- Category: Main Course
- Method: Cooking
- Cuisine: French
Nutrition
- Serving Size: 1.5 cups
- Calories: 450
- Sugar: 3g
- Sodium: 900mg
- Fat: 25g
- Saturated Fat: 8g
- Unsaturated Fat: 15g
- Trans Fat: 0g
- Carbohydrates: 20g
- Fiber: 4g
- Protein: 35g
- Cholesterol: 90mg
Keywords: Beef Bourguignon, French cuisine, comfort food, slow-cooked beef, red wine stew
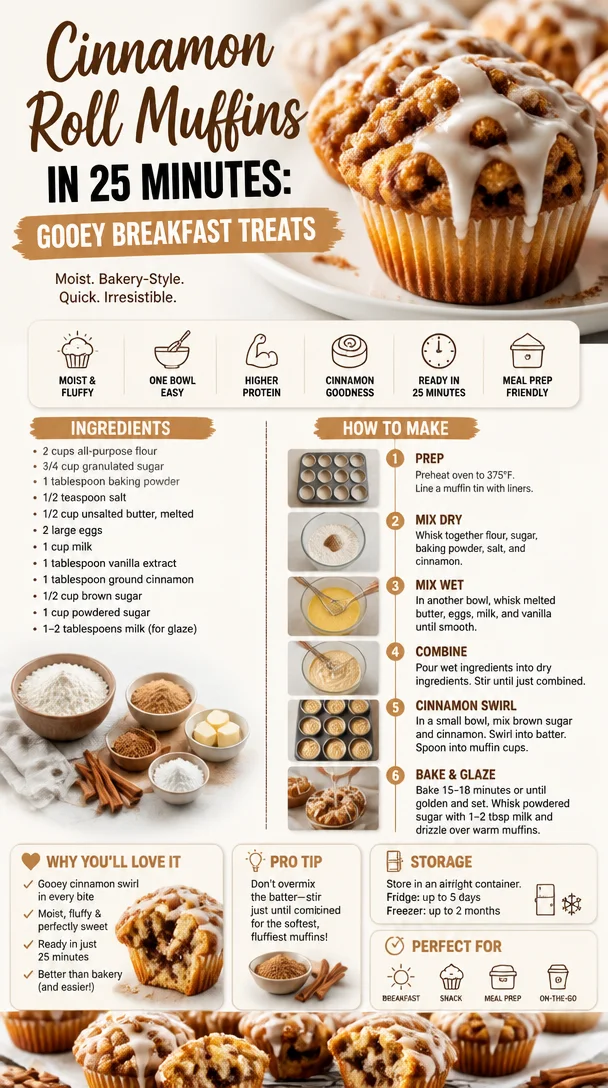
Cinnamon Roll Muffins in 25 Minutes: Gooey Breakfast Treats
Cinnamon Roll Muffins: The Perfect Cozy Treat!
Welcome to my kitchen! I’m so excited to share with you one of my absolute favorite recipes — Cinnamon Roll Muffins. If you’ve ever dreamed about combining the warm, buttery goodness of freshly baked cinnamon rolls with the ease and portability of muffins, then you’re in for a real treat! These muffins have a fluffy texture, a delightful cinnamon swirl, and a sweet glaze that’ll make your mornings feel like a celebration.
Let me set the scene: Picture this—it’s a cozy Sunday morning, sunlight streaming through your kitchen windows, and the comforting aroma of cinnamon and sugar wafting through the air. The whole family is gathered around the table, chatting and sipping on coffee. What could make that morning even better? Freshly baked Cinnamon Roll Muffins, of course! They’re easy to whip up, can be enjoyed warm or at room temperature, and are perfect for brunch gatherings or simply enjoying with a good book.
Now, you might think that making cinnamon rolls requires intricate skills and a lot of time, but these muffins prove otherwise. They’re super simple, and I promise you don’t need to be a baking prodigy to make them! Fluffy and moist, these muffins will have you feeling like a kitchen superstar, even if you just spilled some flour on your shirt (trust me, it happens to the best of us).
So gather your apron (and maybe a cup of coffee), and let’s dive into this delicious recipe and the memories that make it so special!
A Taste of Nostalgia
Growing up, the weekends always meant one thing in our household: homemade breakfast. My mom had a knack for bringing the family together around the breakfast table with warm, gooey cinnamon rolls. I remember waking up to the smell of cinnamon and sugar mixing with the rich buttery aroma sizzling in the oven. No matter how hectic our week was, those Saturday mornings felt like a warm hug, a celebration of family time.
As a kid, I was the little helper, standing on a stool next to her, eagerly stirring the cinnamon-sugar mixture or rolling out the dough. It was the start of insatiable curiosity about cooking! As time passed and my skills blossomed, I found myself wanting to put my spin on the classics. And that’s how the idea for Cinnamon Roll Muffins was born — the ease of muffins combined with the warmth of cinnamon rolls you love!
Ingredients
Here’s the rundown of what you’ll need to create these bakery-style muffins right at home:
-
2 cups all-purpose flour
This forms the base of your muffins. You can substitute with a gluten-free blend if you prefer. -
1 cup granulated sugar
This is for sweetness. Coconut sugar can be a great alternative for a deeper flavor. -
1 tablespoon baking powder
Here’s where the magic happens! It’s crucial for light and fluffy muffins. -
½ teaspoon salt
A pinch of salt enhances flavors and balances the sweetness. -
1 teaspoon ground cinnamon
The star of our recipe! Cinnamon brings that delightful warm flavor. -
1 large egg
Acts as a binding agent. For a vegan option, try flaxseed meal mixed with water. -
1 cup milk
Can be any milk you like! Almond or oat milk are great dairy-free alternatives. -
⅓ cup unsalted butter (melted)
This gives moisture and richness. For a lighter version, use applesauce. -
½ cup brown sugar
For your cinnamon filling. You can use white sugar, but the molasses in brown sugar adds depth. -
2 teaspoons vanilla extract
A hint of vanilla never hurt anybody! You can swap it for almond extract for a different flavor. -
1 tablespoon ground cinnamon
For the filling (yes, we need more!). Feel free to mix it with some nutmeg for an extra kick! -
For the glaze:
-
1 cup powdered sugar
Sweet magic to bring it all together. -
2 tablespoons milk
Adjust to achieve desired consistency.
-
Step-by-Step Instructions
Ready to get baking? Let’s break it down into easy steps, so you’ll be enjoying warm, gooey muffins in no time!
-
Preheat the oven
Preheat your oven to 350°F (175°C) and line a muffin tin with paper liners or grease it with cooking spray. This ensures easy muffin removal! -
Mix the dry ingredients
In a large mixing bowl, whisk together the flour, granulated sugar, baking powder, salt, and ground cinnamon. Make sure they’re well combined for even rising. -
Combine the wet ingredients
In a separate bowl, melt the butter (let it cool slightly), then whisk in the milk, egg, and vanilla extract until it’s nice and smooth. -
Combine dry and wet mixtures
Pour the wet mixture into the dry ingredients. Stir gently until just combined. You don’t want to overmix; a few lumps are perfectly fine! -
Prepare the filling
In a small bowl, combine the brown sugar and additional cinnamon. This will be our sweet swirl. -
Fill the muffin tin
Spoon a generous amount of muffin batter into each cup, filling them about ⅓ full. Sprinkle a layer of the cinnamon-brown sugar mixture on top of the batter. Then, add more batter on top, filling the cups about ¾ full. You should have enough batter for 12 muffins. -
Swirl the filling
Using a toothpick or a knife, gently swirl the filling through the batter. This creates those beautiful cinnamon swirls you’ll see when you bite into the muffin! -
Bake your muffins
Place the muffin tin in the preheated oven and bake for 18-20 minutes, or until the tops are golden and a toothpick inserted comes out clean. -
Cool and glaze
Allow the muffins to cool in the pan for about 10 minutes, then transfer them to a wire rack. Meanwhile, whisk together the powdered sugar and milk for the glaze. Drizzle it generously over the cooled muffins.
And voilà! Your Cinnamon Roll Muffins are ready to be devoured.
Serving Suggestions
To serve these delightful muffins, I recommend arranging them on a cozy platter. Drizzle some extra glaze over the top for that polished bakery look, and provide coffee or hot chocolate for the perfect brunch setup. They’re best enjoyed warm but are also fantastic at room temperature. Maybe add a sprinkle of extra cinnamon on top for a beautiful finishing touch!
Recipe Variations
Want to switch things up a bit? Here are some creative ideas:
-
Nutty Twist: Add chopped pecans or walnuts to the cinnamon filling for a crunchy texture.
-
Fruity Delight: Toss in diced apples or pears for a fruity surprise in every bite.
-
Chocolate Lovers: Throw in chocolate chips to the batter for a decadent chocolate cinnamon explosion.
-
Maple Glaze: Swap out the vanilla extract in the glaze for maple syrup for an autumnal twist.
-
Dairy-Free: Use almond milk and coconut oil instead of butter for a deliciously dairy-free muffin.
Chef’s Notes
Cinnamon Roll Muffins hold a special place in my heart. Over the years, I’ve adjusted the recipe to my liking and sometimes even infuse it with seasonal flavors. During the fall, you might find me adding pumpkin spice for an extra festive feel. And hey, don’t be surprised if a muffin or two mysteriously disappear while you’re waiting for them to cool!
Also, I often involve my kids in the baking process, and every time I hear their giggles and see their happy faces covered in flour, I’m reminded of those mornings with my mom. It’s not just about the muffins; it’s about nourishing love, laughter, and memories.
FAQs and Troubleshooting
Q: Why did my muffins sink in the middle?
A: This can happen if the batter is overmixed or if the oven temperature was too low. Ensure you gently combine your ingredients, and always check your oven’s accuracy with an oven thermometer!
Q: Can I freeze these muffins?
A: Absolutely! These muffins freeze well. Just make sure to cool them completely, then store them in an airtight container or zip-top bag. When you’re ready to enjoy, simply thaw them at room temperature or pop them in the microwave for a quick warm-up!
Q: How can I make these muffins healthier?
A: You can replace half of the all-purpose flour with whole wheat flour and use applesauce in place of some of the butter. Reducing the sugar also works wonders!
Q: My muffins came out dry. What happened?
A: Overbaking is often the culprit. Keep an eye on them during the last few minutes and check for doneness earlier than the recommended time. The toothpick test is your best friend!
Nutritional Info
This recipe yields about 12 muffins, and each muffin has approximately:
- Calories: 220
- Fat: 8g
- Carbohydrates: 35g
- Fiber: 1g
- Protein: 3g
(Note: Nutritional values may vary based on ingredients and portion sizes.)
Thank you for joining me in the kitchen today! I hope you give these Cinnamon Roll Muffins a try — they’re sure to become a family favorite, just like they are in mine. Happy baking!
Print
Cinnamon Roll Muffins
- Total Time: 35 minutes
- Yield: 12 muffins 1x
- Diet: Vegetarian
Description
Deliciously fluffy Cinnamon Roll Muffins combine the warm flavors of cinnamon rolls with the convenience of muffins, perfect for cozy mornings.
Ingredients
- 2 cups all-purpose flour
- 1 cup granulated sugar
- 1 tablespoon baking powder
- ½ teaspoon salt
- 1 teaspoon ground cinnamon
- 1 large egg
- 1 cup milk
- ⅓ cup unsalted butter (melted)
- ½ cup brown sugar
- 2 teaspoons vanilla extract
- 1 tablespoon ground cinnamon (for filling)
- 1 cup powdered sugar (for glaze)
- 2 tablespoons milk (for glaze)
Instructions
- Preheat your oven to 350°F (175°C) and line a muffin tin with paper liners or grease it with cooking spray.
- Mix the dry ingredients in a large mixing bowl: flour, granulated sugar, baking powder, salt, and ground cinnamon.
- Combine the wet ingredients in a separate bowl, whisking together melted butter, milk, egg, and vanilla extract.
- Combine the wet mixture with the dry ingredients, stirring gently until just combined.
- Prepare the filling by mixing together the brown sugar and additional cinnamon in a small bowl.
- Fill each muffin cup about ⅓ full with batter, then add a layer of the cinnamon-brown sugar mixture on top.
- Add more batter to fill the cups about ¾ full and swirl the filling gently through the batter.
- Bake for 18-20 minutes or until golden, and a toothpick inserted comes out clean.
- Cool for about 10 minutes, then whisk together powdered sugar and milk for glaze and drizzle over muffins.
Notes
Enjoy warm or at room temperature. Perfect for brunch gatherings and special family moments!
- Prep Time: 15 minutes
- Cook Time: 20 minutes
- Category: Breakfast
- Method: Baking
- Cuisine: American
Nutrition
- Serving Size: 1 muffin
- Calories: 220
- Sugar: 12g
- Sodium: 200mg
- Fat: 8g
- Saturated Fat: 4g
- Unsaturated Fat: 4g
- Trans Fat: 0g
- Carbohydrates: 35g
- Fiber: 1g
- Protein: 3g
- Cholesterol: 30mg
Keywords: muffins, cinnamon rolls, breakfast, cozy, sweet treats




