
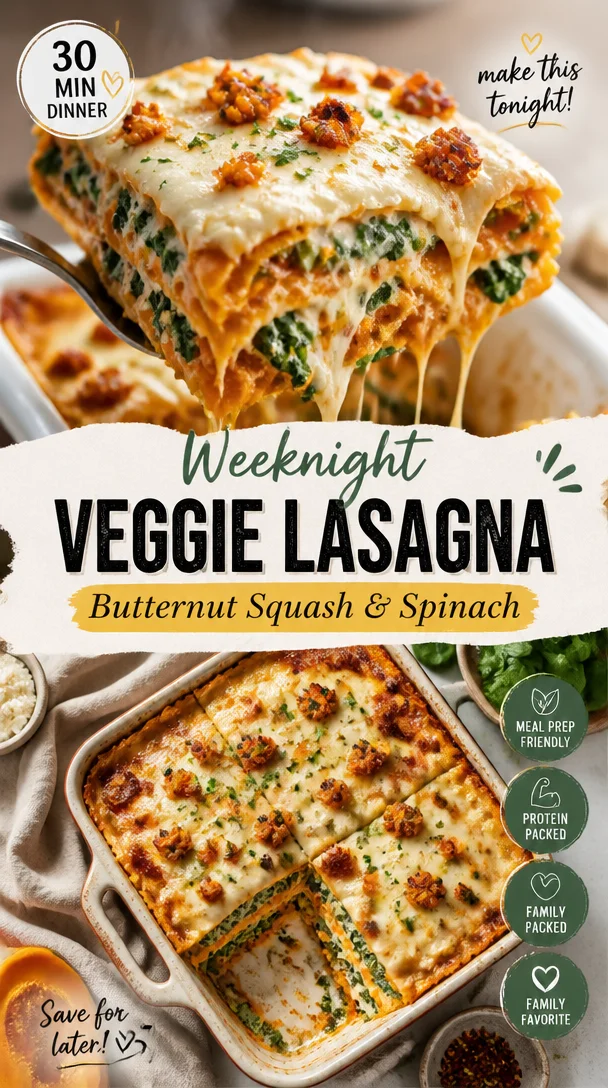
Weeknight Veggie Lasagna: Butternut Squash & Spinach
Butternut Squash and Spinach Lasagna: A Cozy Celebration of Flavors
Welcome to my kitchen, friends! Today, we’re diving into a dish that has become a staple in my home: Butternut Squash and Spinach Lasagna. This recipe is not just another meal; it’s a heartfelt celebration of flavors that embodies everything I love about cooking. There’s something magical about layering warm, cheesy goodness with colorful veggies and silky noodles. It’s the perfect dish for cozy weeknights, festive gatherings, or even a quiet Sunday when you just want to indulge a little.
I love this lasagna because it tells a story — one of family, gatherings, and the joy of preparing something special. Each layer represents a hug from the kitchen, and every bite takes you to a slice of comfort that feels like home. The creamy butternut squash combined with the earthy spinach creates a dance of flavors that’s downright irresistible. Whether you’re a seasoned chef or a novice in the kitchen, this recipe is designed to inspire confidence, creativity, and a little bit of playful messiness.
Join me as we explore the delightful journey of making this Butternut Squash and Spinach Lasagna—a dish fit for any occasion that will have your loved ones asking for seconds. So put on your apron, grab your favorite spatula, and let’s get cooking!
A Brief Dive into Nostalgia
Lasagna has always been a special dish in my family. I remember my grandmother rolling out her pasta on a Friday evening as the sun dipped low in the sky, casting a warm, golden light across the kitchen. The aroma of sautéed garlic and fresh basil filled the air, weaving its way into our hearts. She’d call me over to taste the ricotta mixture, and I’d plunge my spoon in gleefully, expecting a small morsel and inevitably ending up with a heady dollop of cheesy goodness.
But it wasn’t just regular lasagna; it was her version, packed with whatever vegetables were in season. One autumn, she introduced me to butternut squash and spinach, and that was the moment I fell in love with this vibrant, comforting dish. The sweetness of the squash balanced beautifully with the spinach’s earthiness, and looking back, it was that moment that fueled my passion for using fresh ingredients. Now, every time I make Butternut Squash and Spinach Lasagna, I think fondly of those evenings spent with Grandma, and I hope to pass on that love of food to you!
Ingredients
Let’s gather our ingredients! Here’s what you’ll need for this delightful Butternut Squash and Spinach Lasagna:
-
Lasagna Noodles
Choose between traditional or whole grain. You can also opt for no-boil noodles to save time! -
Butternut Squash
This sweet vegetable brings a lovely creaminess to your dish. If squash isn’t available, you can substitute with sweet potatoes or pumpkin. -
Fresh Spinach
Spinach is packed with nutrients and complements the sweetness of the squash perfectly. Frozen spinach works too; just be sure to thaw and drain it well! -
Ricotta Cheese
This creamy cheese adds a rich layer of flavor. If you’d like to lighten it up, use low-fat or even cottage cheese. -
Mozzarella Cheese
The gooey goodness that brings everything together. You can use part-skim mozzarella or even vegan cheese if you prefer. -
Parmesan Cheese
This adds a salty, nutty flavor that elevates the dish. Grated or shredded works well. Nutritional yeast makes a great vegan substitute! -
Eggs
They help bind the ricotta mixture. If you’re avoiding eggs, you can use a flax egg (1 tbsp flaxseed meal mixed with 2.5 tbsp water) as a substitute. -
Garlic
Fresh garlic enhances all the flavors in your dish. If you’re in a pinch, garlic powder can work as an alternative. -
Olive Oil
Use this for sautéing the spinach and garlic. Avocado oil is a great substitute! -
Nutmeg
Just a pinch in the ricotta adds a warm, aromatic touch. It pairs beautifully with squash! -
Salt and Pepper
Essential to bring all the flavors to life. You can also add herbs like Italian seasoning or red pepper flakes for a kick!
Step-by-Step Instructions
Now that we have our ingredients set, it’s time to cook! Let’s get into the nitty-gritty of creating this delicious dish.
Step 1: Prepare the Butternut Squash
First, let’s tackle that butternut squash. Peel, seed, and cube it! This might feel a bit daunting if you’re unfamiliar, but I promise it’s easier than it seems. Consider using a sturdy vegetable peeler and a sharp knife. Place the cubes in a pot of salted water, bringing it to a boil. Cook until the squash is tender, about 10-15 minutes. Drain and set aside. Pro tip: you can roast the squash for an extra depth of flavor—just toss it in olive oil, salt, and pepper before baking!
Step 2: Sauté the Spinach & Garlic
While the squash is cooking, sauté the spinach and garlic. Heat a tablespoon of olive oil in a large skillet over medium heat. Add minced garlic and cook until fragrant, about 1 minute. Toss in the spinach and cook until wilted, which should take about 3-4 minutes. Season lightly with salt and pepper. This step not only enhances the flavors but also reduces the water content in the spinach.
Step 3: Make the Ricotta Mixture
In a mixing bowl, combine the ricotta cheese, egg, a pinch of nutmeg, and a dash of salt and pepper. Mix it up until well combined. The egg is crucial for creating that perfect creamy texture, binding it all together seamlessly!
Step 4: Layer the Lasagna
Now, it’s time to assemble your lasagna! Preheat your oven to 375°F (190°C). In a 9×13 baking dish, start with a layer of the butternut squash. Follow it up with a layer of ricotta mixture, then a layer of sautéed spinach, and a sprinkle of mozzarella. Top with a layer of lasagna noodles. Repeat this layering process until you run out of ingredients, but make sure to finish with a generous layer of mozzarella and a sprinkle of Parmesan cheese on top.
Step 5: Bake to Perfection
Cover the lasagna with foil (to prevent over-browning) and bake in the preheated oven for about 30 minutes. After that, remove the foil and bake for another 15-20 minutes, until the cheese is bubbly and golden. There’s nothing quite like that cheese bubbling over the edges to get your stomach rumbling!
Step 6: Let it Rest
Once it’s out of the oven, allow your lasagna to rest for about 10-15 minutes before slicing. This step is vital as it helps the layers set, making it easier to serve. I know this waiting game can be tough, but your patience will be rewarded!
Serving Suggestions
When it comes to serving your Butternut Squash and Spinach Lasagna, a simple yet beautiful presentation goes a long way. Cut into hearty squares and serve on wide plates. A light drizzle of balsamic glaze or a sprinkle of fresh herbs like basil or parsley can make the dish pop! Pair it with a light salad dressed in lemon vinaigrette for a refreshing contrast.
Recipe Variations
- Add More Veggies: Feel free to sneak in some roasted zucchini or mushrooms for added texture and flavor.
- Spicy Kick: Mix in some crushed red pepper flakes or diced jalapeños if you crave a bit of heat!
- Herb Infusion: Incorporate fresh herbs like thyme or sage in the ricotta mixture for an aromatic twist.
- Vegan Version: Swap ricotta for blended tofu and nutritional yeast, use vegan cheese, and skip the egg.
- Quinoa Layer: Add a layer of cooked quinoa between the squash and spinach for extra protein!
Chef’s Notes
Every time I make this Butternut Squash and Spinach Lasagna, I’m reminded of my grandmother’s joyful kitchen. I’ve made tweaks over the years—like using kale instead of spinach or even adding some caramelized onions because, why not? The best part about cooking is that it’s adaptable to your taste, so don’t hesitate to let your creativity shine!
I often find that this lasagna tastes even better the next day after the flavors have melded overnight. It’s a perfect make-ahead meal, and leftovers (if you have any!) are a delightful lunch to look forward to.
FAQs and Troubleshooting
Q1: Why is my lasagna watery?
A: Watery lasagna can happen when the vegetables release moisture. To avoid this, make sure to drain your cooked spinach well and use less watery vegetables.
Q2: Can I freeze the lasagna?
A: Absolutely! Just make sure to wrap it tightly in foil and store it in an airtight container. Thaw it in the fridge overnight before reheating.
Q3: What do I do if I run out of cheese?
A: You can always substitute with a different type of cheese you have on hand, or reduce the amount on each layer while adding more veggies instead!
Q4: How long will it keep in the fridge?
A: Your lasagna will be good for up to 3-4 days when stored in an airtight container. Just reheat it in the oven or microwave before serving!
Whether you’re looking to impress guests or just enjoy a cozy night in, this Butternut Squash and Spinach Lasagna is a heartwarming dish that embodies everything we love about food. I hope this recipe brings as much joy to your kitchen as it does to mine! Happy cooking, and don’t forget to have fun with it!
Print
Butternut Squash and Spinach Lasagna
- Total Time: 65 minutes
- Yield: 4 servings
- Diet: Vegetarian
Description
A warm, cheesy lasagna layered with butternut squash, spinach, and rich cheeses, perfect for cozy nights.
Ingredients
- Lasagna Noodles
- Butternut Squash
- Fresh Spinach
- Ricotta Cheese
- Mozzarella Cheese
- Parmesan Cheese
- Eggs
- Garlic
- Olive Oil
- Nutmeg
- Salt
- Pepper
Instructions
- Prepare the Butternut Squash: Peel, seed, and cube it. Cook in salted boiling water until tender, about 10-15 minutes. Drain and set aside.
- Sauté the Spinach & Garlic: Heat olive oil in a skillet, add minced garlic, and cook until fragrant. Add spinach and cook until wilted.
- Make the Ricotta Mixture: Combine ricotta cheese, egg, nutmeg, salt, and pepper in a mixing bowl and mix until well combined.
- Layer the Lasagna: In a baking dish, layer butternut squash, ricotta mixture, sautéed spinach, and mozzarella, then repeat layers, finishing with mozzarella and Parmesan on top.
- Bake to Perfection: Cover with foil and bake at 375°F (190°C) for 30 minutes, then remove foil and bake an additional 15-20 minutes.
- Let it Rest: Allow lasagna to rest for 10-15 minutes before slicing.
Notes
This lasagna tastes even better the next day and can be made ahead of time. Great for leftovers and easy to freeze.
- Prep Time: 20 minutes
- Cook Time: 45 minutes
- Category: Main Course
- Method: Baking
- Cuisine: Italian
Nutrition
- Serving Size: 1 serving
- Calories: 380
- Sugar: 6g
- Sodium: 450mg
- Fat: 15g
- Saturated Fat: 6g
- Unsaturated Fat: 7g
- Trans Fat: 0g
- Carbohydrates: 45g
- Fiber: 5g
- Protein: 20g
- Cholesterol: 70mg
Keywords: lasagna, butternut squash, spinach, vegetarian recipes, comfort food
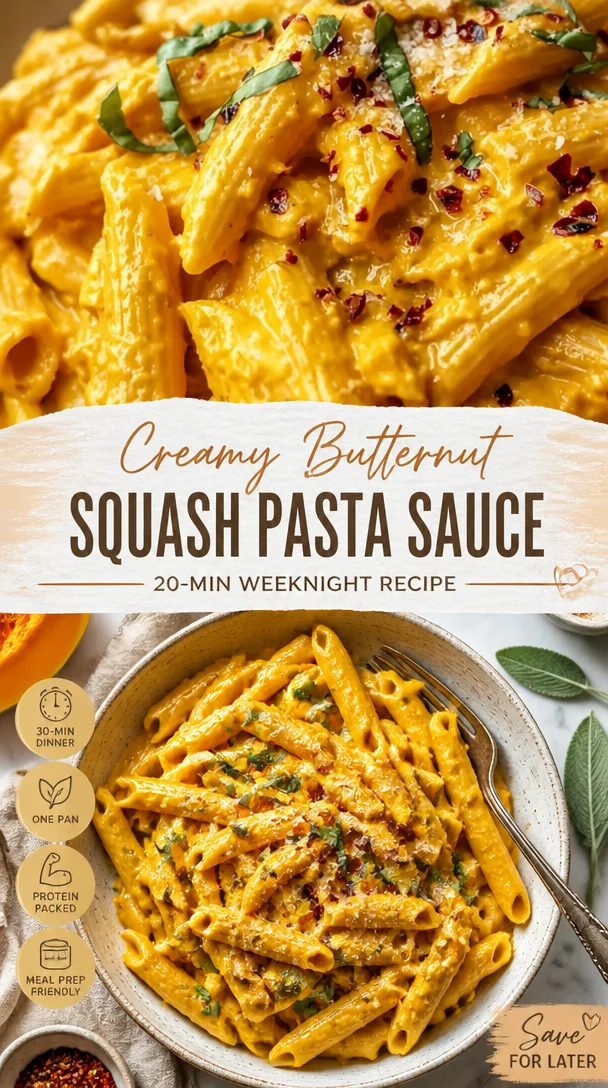
Creamy Butternut Squash Pasta Sauce: 20-Min Weeknight Recipe
Butternut Squash Pasta Sauce: A Cozy Fall Favorite
Welcome to my cozy kitchen, where the autumn air is filled with the sweet aroma of roasted butternut squash! If there’s one dish that truly captures the essence of fall, it’s this creamy, dreamy butternut squash pasta sauce. Every swirl of pasta coated in this rich, orange goodness evokes a feeling of warmth and nostalgia. Ready to cook up some comfort?
As the leaves turn and the days get shorter, I find myself gravitating toward dishes that utilize the seasonal bounty. Butternut squash is one of my all-time favorites — not just for its sweet, nutty flavor, but also for its versatility. Whether roasted in a salad, pureed into soup, or transformed into a luscious pasta sauce, it never fails to make my heart sing (and my taste buds dance).
I’ll never forget the first time I made this dish for my family. It was one of those crisp autumn evenings when the sun dipped below the horizon, painting the sky in hues of orange and purple. I had gone to the local farmer’s market, filled my basket with fresh produce, and brought home a beautiful butternut squash. As the squash roasted in the oven, the house filled with such an irresistible aroma that my kids started sneaking tastes long before it even made it into the sauce pot. The smiles on their faces as they twirled their pasta around their forks tell me everything I need to know: this dish has officially become a family favorite.
Now that I’m sharing this recipe with you, my goal is to help you create those same warm memories with your loved ones. Cooking doesn’t have to be complicated; it’s about sharing love through food. So, let’s get that apron on, roll up those sleeves, and get started!
Personal Story
One of my favorite memories involving butternut squash pasta sauce happened on a chilly November evening. My best friend and I had decided to host a cozy dinner party for our families to celebrate the season. We wanted to create a special dish, something that would leave everyone feeling the warmth of home. After chatting about our favorite flavors, we settled on butternut squash pasta.
As we prepared the sauce, we laughed over stories from our childhoods — how we’d each cook with our moms, and how the kitchen always seemed to be the heart of our homes. We roasted, blended, and tasted, adjusting spices here and there until we created a sauce that was absolutely divine. When our families arrived and took their first bites, you could feel the magic in the air. It became a dish that was not just about flavor but tied us all together, a memory we still cherish today. I hope this sauce brings you as much joy as it has brought me and my loved ones.
Ingredients
Here’s what you’ll need to whip up this fantastic butternut squash pasta sauce:
-
Butternut Squash
The star of the show, butternut squash is sweet and creamy when cooked. For this sauce, I recommend using fresh squash, but you can also find pre-cut options in stores to save time. If you can’t find it, feel free to substitute with pumpkin or sweet potato for a different flavor profile. -
Olive Oil
A good quality olive oil helps enhance the flavor of the squash while it roasts. Don’t have olive oil? You could use avocado oil or melted coconut oil for a different twist. -
Onion
A sweet onion brings depth to the sauce. Yellow or white onions work best, but you can also try shallots for a milder taste. -
Garlic
Because who doesn’t love garlic? It adds an aromatic note that complements the sweetness of the squash. If you prefer, you can use garlic powder in a pinch — about a teaspoon will do. -
Vegetable Broth
This helps thin out the sauce and give it a rich flavor. For a deeper taste, try using homemade broth. If you’re vegetarian or vegan, ensure your broth meets those dietary needs. -
Cream
A splash of heavy cream adds richness and creaminess to the sauce, but you could also use coconut cream for a dairy-free alternative. -
Nutmeg
Just a pinch adds warmth and complexity. If you don’t have nutmeg, try cinnamon for a slightly different flavor. -
Salt & Pepper
Simple seasonings that elevate all the flavors. Use them to taste as you go.
Step-by-Step Instructions
Now that you have your ingredients gathered, let’s get cooking!
-
Preheat the Oven
Preheat your oven to 400°F (200°C). This is the perfect temperature for roasting your butternut squash until it’s tender and caramelized. -
Prepare the Butternut Squash
Cut the butternut squash in half lengthwise and scoop out the seeds. You can save the seeds to roast later for a crunchy snack! Drizzle the cut sides with olive oil, salt, and pepper. Spread them face down on a baking sheet. Pro tip: Lining your baking sheet with parchment paper makes cleanup a breeze! -
Roast the Squash
Place the squash in your preheated oven and roast for about 30-40 minutes, or until tender and lightly browned. You’ll know it’s done when a fork easily pierces the flesh. -
Sauté the Aromatics
While the squash is roasting, chop your onion and garlic. Heat a tablespoon of olive oil in a large skillet over medium heat. Add the chopped onion and sauté until soft and translucent, about 5-7 minutes. Then, add the garlic and cook for another minute until fragrant — but be careful not to burn it! -
Blend the Sauce
Once the squash is cooked and slightly cooled, scoop the flesh into a blender or food processor. Add the sautéed onion and garlic, vegetable broth, cream, nutmeg, salt, and pepper. Blend until smooth and creamy. If your sauce is too thick, add more broth until you reach your desired consistency. Taste and adjust the seasoning as necessary. -
Heat and Combine with Pasta
In a large pot, cook your pasta of choice according to package instructions. Once drained, add the pasta to the sauce and stir to coat well. Let everything cook together for a couple of minutes on low heat, allowing the flavors to meld beautifully. -
Serve & Enjoy
Your butternut squash pasta is ready to be served! I like to top mine with a sprinkle of freshly grated Parmesan and some chopped fresh herbs.
Serving Suggestions
When it comes to plating this dish, presentation is key! Twirl the pasta into nests on your plates, ladle on a generous amount of sauce, and finish it off with a sprinkle of freshly grated Parmesan cheese and a few leaves of fresh basil or parsley. A drizzle of extra virgin olive oil just before serving adds that restaurant-quality shine. Enjoy your dish with a side of crusty bread — it’s perfect for soaking up any leftover sauce!
Recipe Variations
- Add Protein: Toss in sautéed shrimp, grilled chicken, or chickpeas for a protein-packed meal.
- Turn Up the Heat: Add red pepper flakes for a spicy kick that perfectly complements the creamy sauce.
- Herb Infusion: Try using fresh sage or thyme in the sauce for an earthy flavor profile that pairs wonderfully with squash.
- Noodle Swap: Use spiralized zucchini or whole grain pasta for a lighter, healthier option.
- Cheesy Twist: Feel free to mix in different cheeses like feta or goat cheese for a tangy twist.
Chef’s Notes
This recipe has evolved beautifully over the years! Originally, I kept it simple with just butternut squash and garlic, but after experimenting, I started adding cream and spices for more depth. I love how this sauce has become a blank canvas—you can customize it to your heart’s content! Plus, I once made a hilarious mistake by forgetting the cream altogether, and to my surprise, the sauce still turned out deliciously — a happy accident indeed!
FAQs and Troubleshooting
1. How can I store leftovers?
Place any leftover sauce in an airtight container and store it in the fridge for up to 4 days. You can also freeze the sauce for up to 3 months!
2. My sauce is too thick. What can I do?
No worries! You can simply add a splash more of vegetable broth or even a little bit of pasta water to thin it out to your desired consistency.
3. Can I use frozen squash?
Absolutely! Just make sure to thaw and drain any excess water before adding it to the recipe.
4. What kind of pasta works best?
I love using fettuccine for this sauce, as its wide noodles hold onto the creamy sauce beautifully. However, feel free to use any pasta shape you like!
Nutritional Info
(Optional: Feel free to include approximate nutritional values per serving to help your readers make informed choices. This could include calories, protein, carbs, fats, etc.)
And there you have it, my friendly kitchen adventurers! This butternut squash pasta sauce will warm your heart and fill your belly. I can’t wait to see how you put your own spin on it. Don’t forget to tag me if you share your culinary creations — I love connecting with fellow foodies! Happy cooking!
Print
Butternut Squash Pasta Sauce
- Total Time: 55 minutes
- Yield: 4 servings 1x
- Diet: Vegetarian
Description
A creamy, dreamy butternut squash pasta sauce perfect for fall that captures warmth and nostalgia.
Ingredients
- 1 butternut squash
- 2 tablespoons olive oil
- 1 sweet onion
- 2 cloves garlic
- 1 cup vegetable broth
- 1/2 cup heavy cream
- 1/4 teaspoon nutmeg
- Salt & pepper to taste
Instructions
- Preheat your oven to 400°F (200°C).
- Prepare the butternut squash by cutting it in half lengthwise, scooping out the seeds, and drizzling with olive oil, salt, and pepper before spreading face down on a baking sheet.
- Roast the squash for about 30-40 minutes, or until tender and lightly browned.
- Sauté the chopped onion and garlic in a tablespoon of olive oil in a skillet until the onion is soft and translucent, about 5-7 minutes.
- Blend the roasted squash with the sautéed onion and garlic, vegetable broth, cream, nutmeg, salt, and pepper until smooth.
- Heat the sauce and combine with your cooked pasta, stirring to coat well.
- Serve topped with freshly grated Parmesan and fresh herbs.
Notes
This sauce can be customized with protein, herbs, or a different type of pasta. Store leftovers in an airtight container for up to 4 days or freeze for up to 3 months.
- Prep Time: 15 minutes
- Cook Time: 40 minutes
- Category: Main Course
- Method: Baking
- Cuisine: Italian
Nutrition
- Serving Size: 1 serving
- Calories: 350
- Sugar: 5g
- Sodium: 400mg
- Fat: 12g
- Saturated Fat: 4g
- Unsaturated Fat: 6g
- Trans Fat: 0g
- Carbohydrates: 45g
- Fiber: 3g
- Protein: 15g
- Cholesterol: 30mg
Keywords: butternut squash, pasta sauce, fall recipe, vegetarian, cozy, comfort food
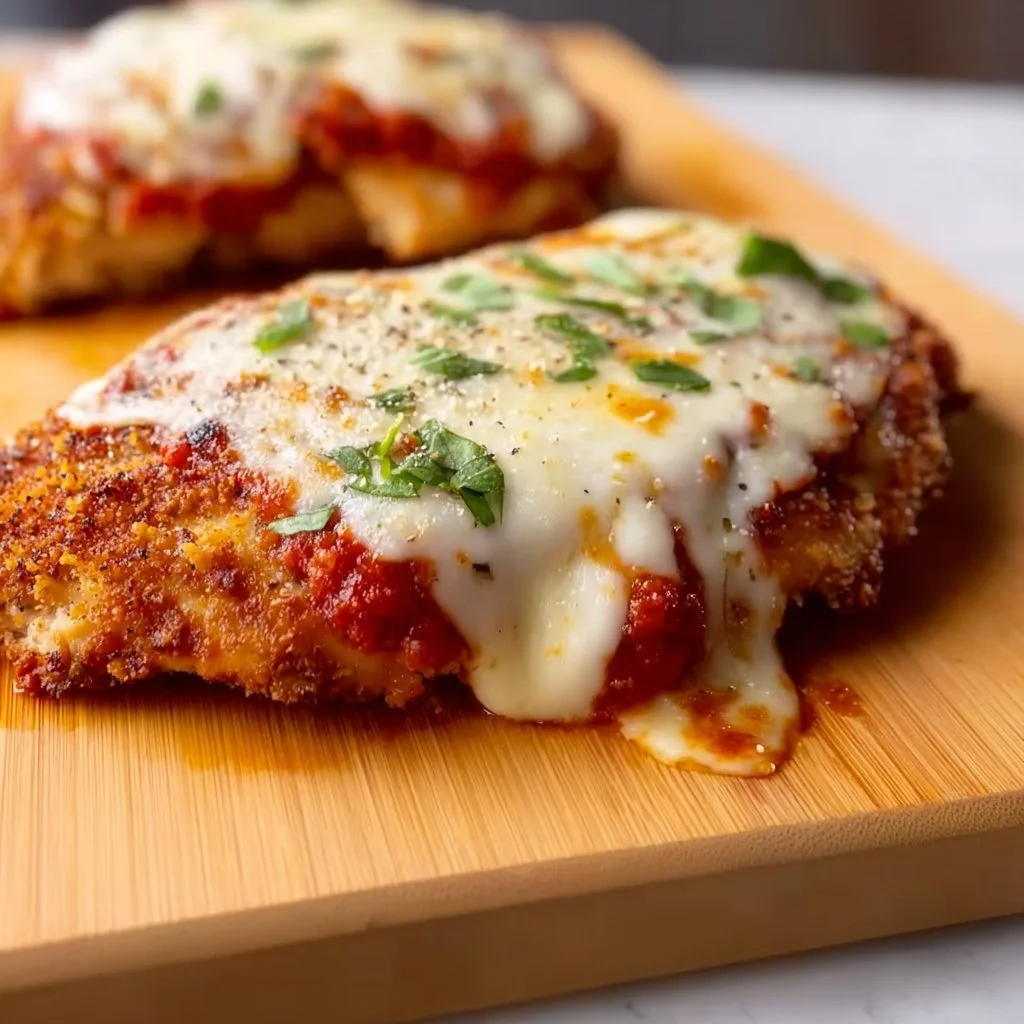
Keto Chicken Parmesan
# Savory Keto Chicken Parmesan: A Delightful Twist on a Classic

## Introduction

Hey there, fellow foodies! Welcome back to my cozy corner of the kitchen. Today, we’re diving into a dish that has always placed my heart right in the center of the dining room—a comforting classic that manages to tickle the taste buds while still keeping our health goals in check: Keto Chicken Parmesan! Now, I know what you might be thinking. “Keto? Chicken Parmesan? How can those two coexist?” Well, my friends, it’s all about making delicious swaps while preserving the essence of a dish that so many of us love.

Picture this: it’s Sunday afternoon, and the smell of marinara sauce bubbling gently on the stove dances through my house, mingling with the rich fragrance of herbs and spices. My dear friends and family gather at the table, laughter echoing through the air as we grab plates piled high with crispy, cheesy goodness, all while delighting in good company. This is more than just food; it’s an experience—a celebration around the dinner table that sparks joy and nourishes the soul.

My journey into the keto lifestyle began out of curiosity but quickly turned into a passion for transforming classic comfort foods while keeping them healthy and satisfying. Chicken Parmesan has always been a part of my culinary repertoire. It’s the kind of dish that brings people together, and I knew that with a few clever twists, I could serve up this Italian favorite without compromising on flavor. So, roll up your sleeves, and let’s make something magical happen in the kitchen!

## Personal Story

Growing up, Sundays were a sacred time in our household. After church, we’d burst through the front door, voices filled with excitement as the scent of my mom's Chicken Parmesan embraced us. I remember reaching for the warm, cheesy pieces, feeling their crunch and ooze blend to create pure bliss. My mom had a knack for taking everyday ingredients and transforming them into something special, and every bite of her Chicken Parmesan left a lasting impression in my heart.

When I started experimenting with keto recipes, I felt an overwhelming urge to recreate that beloved dish. After a few trial runs and endless taste-tests (which, let’s be honest, was the best part), I finally nailed a version that my mom would be proud of—while keeping it keto-friendly. Now, every time I whip up this dish, I'm reminded of those joyful Sundays, surrounded by love, laughter, and the delightful aroma of homemade food.

## Ingredients

Here’s what you’ll need to create this fabulous Keto Chicken Parmesan:

- **Chicken Breasts (4 pieces)**
  Choose thin, boneless, skinless chicken breasts for even cooking. If you're short on time, pre-sliced ones can work just fine.

- **Almond Flour (1 cup)**
  The secret to that crispy coating! Almond flour is low in carbs and is a great gluten-free substitute for traditional breadcrumbs.
  **Tip:** For those who prefer a different flavor profile, crushed pork rinds also work beautifully!

- **Parmesan Cheese (1 cup, grated)**
  Not only does it add a rich flavor to the coating, but it also helps create a delightful crust.
  **Substitution:** Pecorino Romano can also lend a sharp, tangy flavor if you’d like a twist.

- **Eggs (2, beaten)**
  The egg acts as the glue for keeping the almond flour and cheese mix on the chicken. You could also use flax eggs or aquafaba (the chickpea liquid) for a vegan alternative.

- **Marinara Sauce (1 cup, store-bought or homemade)**
  Find a low-carb version at the store or whip up a quick homemade sauce using crushed tomatoes, garlic, and Italian herbs!

- **Mozzarella Cheese (1 cup, shredded)**
  It’s all about that gooey, melty goodness! Use whole-milk mozzarella for the best flavor and texture.
  **Tip:** Swap it for vegan cheese if you’re dairy-free.

- **Olive Oil (2 tablespoons)**
  For a golden-brown finish, I love to use olive oil in this recipe, as it adds an amazing flavor to the chicken.
  **Alternative:** Avocado oil is another fantastic option for high heat cooking.

- **Dried Oregano, Basil, and Garlic Powder (1 teaspoon each)**
  Herbs bring the dish to life! Feel free to mix and match with your favorites—Italian seasoning works great, too.

- **Salt and Pepper (to taste)**
  Essential for bringing out each ingredient's flavors—don’t skimp on this!

## Step-by-Step Instructions

Ready to get cooking? Let’s do this! Here are your steps to whipping up delectable Keto Chicken Parmesan:

1. **Prep Your Chicken:**
   Start by preheating your oven to 400°F (200°C). While it’s warming up, wash and pat dry your chicken breasts. If you have thicker cuts, flatten them using a meat pounder or rolling pin. This ensures even cooking and a delightful texture.

2. **Set Up Your Dipping Station:**
   In one shallow bowl, beat the eggs and add a pinch of salt and pepper. In another bowl, mix together the almond flour, grated Parmesan, dried oregano, basil, and garlic powder. This duo will give your chicken that crave-worthy crust!

3. **Dip, Dip, Baby:**
   Take each chicken breast and dip it into the egg mixture, allowing any excess to drip off. Then, coat it generously in the almond flour mix—make sure you press lightly to ensure it sticks well. Those crispy bits are everything!

4. **Pan-Fry for Perfection:**
   In a large oven-safe skillet, heat olive oil over medium heat. Once hot, add the breaded chicken breasts and cook for about 3-4 minutes on each side, or until golden brown. (Don’t worry if they’re not fully cooked; they’ll finish in the oven!)

5. **Layer the Deliciousness:**
   Once the chicken is golden and gorgeous, remove the skillet from the heat. Spoon marinara sauce over each piece, then top with shredded mozzarella. Go for an extra sprinkle of Parmesan here if you're feeling cheesy!

6. **Bake to Gooey Goodness:**
   Carefully transfer the skillet to the oven and bake for about 20 minutes, or until the chicken reaches an internal temperature of 165°F (74°C) and the cheese is bubbling and slightly golden.

7. **Time to Indulge!**
   Remove from the oven (careful, it’s hot!), and let the Chicken Parmesan sit for a few minutes to settle. Then, serve it up with a side of zoodles (zucchini noodles) or a fresh green salad!

## Serving Suggestions

Once your Keto Chicken Parmesan is out of the oven and looking absolutely divine, here’s how to plate it up for maximum enjoyment:
- Place one piece of Chicken Parmesan on a plate, topping it with a drizzle of extra marinara sauce if you like.
- Garnish with fresh basil leaves or a sprinkle of extra Parmesan for that finished touch.
- Serve with a side of sautéed spinach, garlic roasted broccoli, or my favorite zoodles for a fresh, guilt-free meal that feels indulgent.

## Recipe Variations

Want to switch things up? Here are a few easy variations to enhance your Keto Chicken Parmesan:

1. **Spicy Kick:** Add crushed red pepper flakes to the almond flour mixture for a spicy version.
2. **Stuffed Delight:** Create a stuffed chicken by adding spinach and cream cheese for a creamy center before breading.
3. **Herbaceous Twist:** Swap the traditional dried herbs for fresh basil and oregano for vibrant flavor.
4. **Veggie Power:** Layer some sautéed mushrooms or roasted bell peppers on top before adding mozzarella.

## Chef’s Notes

I can’t deny how many iterations of Keto Chicken Parmesan I’ve gone through to perfect this recipe. Each time I tested a new idea, my kitchen was filled with laughter, spilled marinara, and more than a few mozzarella mishaps! I still vividly remember a particularly chaotic night when I thought I could speed things up by frying too many chicken breasts at once—and that was my cue to serve Margherita pizza instead, because that’s what happens when you don’t respect the crispy process!

This recipe has also evolved to adapt to different family needs and trends, but the love and joy of sharing a hearty meal have remained constant. I truly hope it brings warmth and happiness to your kitchen!

## FAQs and Troubleshooting

### Why is my breading not sticking?
If your breading isn’t adhering properly, make sure you’re properly coating the chicken in egg first and then pressing firmly into the almond flour mixture. A sprinkling of water on the chicken can help enhance adhesion too.

### Can I make this ahead of time?
Absolutely! You can bread the chicken and store it in the fridge for up to 24 hours before cooking. This is a great option for meal prep.

### What if I overcooked my chicken?
If your chicken turns out a bit dry, no worries! A drizzle of olive oil or a splash of marinara sauce can help revive the moisture, making each bite enjoyable.

### How can I adjust the serving size?
This recipe is easily adaptable. Simply halve or double the amounts based on your gathering size!

## Nutritional Info

While exact nutritional values can vary based on specific brands and measurement choices, here’s a general overview of what to expect per serving:

- **Calories:** 450
- **Fat:** 28g
- **Protein:** 40g
- **Total Carbohydrates:** 8g
- **Fiber:** 3g
- **Net Carbs:** 5g

There you have it, my friends! A delicious, cheesy, crispy Keto Chicken Parmesan that is sure to impress your family and friends. I hope you enjoy making and sharing this dish as much as I do. Happy cooking, and remember: good food is all about sharing love and delicious memories!

Savory Keto Chicken Parmesan
- Total Time: 45 minutes
- Yield: 4 servings 1x
- Diet: Keto
Description
A delicious and healthy twist on classic Chicken Parmesan, perfect for those following a keto diet.
Ingredients
- 4 pieces of Chicken Breasts, thin, boneless, skinless
- 1 cup Almond Flour
- 1 cup grated Parmesan Cheese
- 2 Eggs, beaten
- 1 cup Marinara Sauce, store-bought or homemade
- 1 cup shredded Mozzarella Cheese
- 2 tablespoons Olive Oil
- 1 teaspoon Dried Oregano
- 1 teaspoon Dried Basil
- 1 teaspoon Garlic Powder
- Salt and Pepper, to taste
Instructions
- Prep Your Chicken: Preheat your oven to 400°F (200°C). Wash and pat dry your chicken breasts and flatten if needed.
- Set Up Your Dipping Station: Beat the eggs with a pinch of salt and pepper, and mix almond flour with Parmesan and herbs in another bowl.
- Dip, Dip, Baby: Coat each chicken breast in the egg mixture, then in the almond flour mixture, pressing lightly.
- Pan-Fry for Perfection: Heat olive oil in a skillet over medium heat and cook the chicken for 3-4 minutes on each side until golden brown.
- Layer the Deliciousness: Add marinara sauce on each piece, then top with mozzarella.
- Bake to Gooey Goodness: Transfer the skillet to the oven and bake for about 20 minutes until the chicken is cooked through and cheese is bubbly.
- Time to Indulge: Let it sit for a few minutes, then serve with zoodles or a fresh salad.
Notes
Serve with a drizzle of extra marinara and garnish with fresh basil or extra Parmesan.
- Prep Time: 15 minutes
- Cook Time: 30 minutes
- Category: Main Course
- Method: Baking
- Cuisine: Italian
Nutrition
- Serving Size: 1 serving
- Calories: 450
- Sugar: 3g
- Sodium: 600mg
- Fat: 28g
- Saturated Fat: 10g
- Unsaturated Fat: 18g
- Trans Fat: 0g
- Carbohydrates: 8g
- Fiber: 3g
- Protein: 40g
- Cholesterol: 210mg
Keywords: Keto Chicken Parmesan, Healthy Italian Recipe, Low-Carb Dinner

Chinese Chicken and Broccoli
Cozy in the Kitchen: My Take on Chinese Chicken and Broccoli
Welcome back to my kitchen, friends! Today, I’m excited to share a dish that holds a special place in my heart—Chinese Chicken and Broccoli. This classic stir-fry, packed with tender chicken, vibrant broccoli, and a mouthwatering sauce, is more than just a meal; it’s a blend of flavors that brings me back to my childhood. The tantalizing aroma fills the kitchen, and before you know it, you have a colorful dish that looks as good as it tastes. The bright greens and succulent chicken pieces also serve as a perfect reminder of how simple ingredients can come together to create something truly unforgettable.
I remember the first time I tasted this dish at a cozy little Chinese restaurant in my hometown. My family would gather around a round table, the lazy Susan spinning with plates of sizzling goodness. As the steam rose and the clatter of chopsticks filled the air, I felt a sense of belonging. It wasn’t just the food; it was the laughter, the shared stories, and the comforting feeling of home. Nowadays, I bring that same joy to my kitchen when I whip up this recipe, and I want to share that experience with you, dear friends.
So, whether you’re a seasoned home chef or just someone looking to spice up your dinner routine, grab your apron, and let’s dive into making this delightful dish. With a few fresh ingredients, a sprinkle of love, and a dash of excitement, you’ll have a meal that can impress anyone. Let’s get cooking!
Personal Story
Ah, the memories of family dinners—those priceless moments filled with laughter and the aroma of delicious food wafting through the air. I can vividly recall weekends spent at my parents’ house, where my mom would often make her version of Chinese Chicken and Broccoli. I’d happily perch on a barstool in our kitchen, watching her chop fresh vegetables and marinate the chicken in a soothing soy sauce blend, her magic touch transforming simple ingredients into a feast.
One specific evening stands out. The sun had set, and the lights were dim to create a cozy ambiance. My parents had invited a couple of their friends over, and I was buzzing with the excitement of being surrounded by adults—who, by the way, always seemed to find my youthful chatter amusing. Just as the laughter reached its peak, my mom’s creation made its grand entrance. The vibrant greens mingled with tender chicken pieces in a glowing, glossy sauce. As I took my first bite, my eyes widened in delight, and I remember thinking, “How could food taste so good?” That moment solidified my love for cooking and inspired me to gather family and friends around a table, sharing meals and memories just like my family did.
Whenever I make this dish, I close my eyes and am transported back to those warm, laughter-filled nights. Join me in celebrating the joy of cooking and the heartwarming experience of sharing meals with those we love!
Ingredients
To make a fantastic Chinese Chicken and Broccoli, you’ll need the following ingredients:
-
Chicken Breast (1 lb): Tender, juicy chicken is the star of this dish. Ideally, use boneless and skinless chicken breasts for ease. If you want a leaner option, turkey breast works well, too!
-
Broccoli (3 cups, cut into florets): Rich in vitamins and packed with crunch, fresh broccoli adds color and nutrition. If you’re not a fan, feel free to substitute with asparagus or snap peas for a delightful crunch!
-
Soy Sauce (½ cup): A staple in Asian cooking, this salty-sweet sauce will infuse your chicken and broccoli with delicious flavor. For a gluten-free alternative, try tamari or coconut aminos.
-
Garlic (3 cloves, minced): Fresh garlic adds a delightful aroma and depth of flavor. If you’re in a pinch, garlic powder can work, but fresh is always best!
-
Ginger (1 tablespoon, minced): The zesty, peppery notes of ginger elevate the dish. If fresh is hard to get, ground ginger can substitute, but start with half the amount.
-
Cornstarch (2 tablespoons): This acts as a thickening agent for the sauce, giving it that silky texture we love! If you prefer, arrowroot powder can also be used.
-
Chicken Broth (½ cup): For a rich flavor, low-sodium chicken broth keeps everything balanced; vegetable broth works just as well for a lighter option.
-
Sesame Oil (1 tablespoon): This oil imparts a lovely nutty flavor to the dish. You can use regular cooking oil, but sesame oil gives it that authentic taste.
-
Green Onions (for garnish): Chopped green onions add a fresh garnish, bringing the dish to life! Feel free to toss in some chopped nuts for an extra crunch if you like.
Step-by-Step Instructions
Ready to bring this dish to life? Let’s jump right into the cooking process!
-
Prepare Your Chicken:
- Start by cutting your chicken breast into bite-sized pieces. This way, they will cook quickly and make for easy eating. Don’t be afraid to get your hands in there; it’s all part of the fun!
Chef Tip: To tenderize the chicken and infuse it with flavor, marinate it in a mixture of soy sauce and minced ginger for at least 20 minutes. This little trick will elevate your dish and keep the chicken moist.
-
Cut Your Broccoli:
- While the chicken is marinating, prepare your broccoli. Rinse and cut it into florets. If you have thicker stems, peel and slice them to add to the stir-fry for extra texture!
-
Heat the Pan:
- In a wok or large skillet, heat your sesame oil over medium-high heat. Make sure it’s hot before adding the chicken. This will ensure a nice sear!
-
Cook the Chicken:
- Add the marinated chicken pieces to the sizzling pan in a single layer. Let them sear undisturbed for a few minutes until they turn golden brown. (The smell is heavenly!) After about 5-7 minutes, stir it up until cooked through.
Pro Tip: If you want to add a bit more depth of flavor, toss in a little of that minced garlic while the chicken is cooking.
-
Add Broccoli for a Sauté:
- Once the chicken is cooked, add the broccoli to the pan, followed by a splash of chicken broth. Cover the pan with a lid to steam the broccoli for about 3 minutes until bright green and crisp-tender.
-
Prepare the Sauce:
- While the chicken and broccoli are cooking, mix together the remaining soy sauce, minced garlic, ginger, cornstarch, and chicken broth in a bowl. This is your sauce, bringing everything together!
-
Combine the Mixtures:
- Once the broccoli is ready, pour the sauce over the chicken and broccoli. Stir well and cook for another 2-3 minutes until the sauce thickens. The vibrant color and aroma will make your taste buds tingle!
-
Final Touches:
- Give your stir-fry a taste. Need more salt? A dash of soy sauce. Want it spicier? Add a few red pepper flakes. Adjusting seasoning is key to personalizing your dish!
-
Plating Time:
- Serve the Chicken and Broccoli hot, garnished with sliced green onions. You can also drizzle a little sesame oil or sprinkle sesame seeds on top for a beautiful presentation.
Serving Suggestions
To serve your delicious Chinese Chicken and Broccoli, I recommend plating it over a bed of fluffy jasmine rice or alongside a mound of steamed rice noodles. You can sprinkle some sesame seeds for an elegant touch. If you’re feeling fancy, serve it in bowls with chopsticks for a delightful dining experience that transports you straight to a cozy Chinese restaurant!
Recipe Variations
Here are a few exciting ways to give this dish your own twist:
-
Spicy Szechuan Style: Add a splash of Szechuan chili oil or a teaspoon of chili paste for a spicy kick.
-
Lemon Zing: Squeeze fresh lemon juice over the stir-fried chicken before serving for a bright, zesty finish.
-
Added Veggies: Consider adding bell peppers, snap peas, or carrots to the mix for more vibrant color and flavor.
-
Teriyaki Twist: Swap out the soy sauce for teriyaki sauce for a sweeter, caramelized flavor that will awaken your taste buds.
-
Tofu Alternative: For a vegetarian option, replace the chicken with cubed firm tofu. Just make sure to press it to remove excess moisture for better texture.
Chef’s Notes
Every recipe carries its own story, and this one is no different. Over time, I’ve adapted it based on what’s seasonal, what ingredients I have on hand, and, of course, what my family enjoys most. There was one occasion I was rummaging through my pantry and decided to add a splash of orange juice to the sauce. Let me tell you, that little addition took this dish to a whole new level—who knew a burst of citrus could harmonize so beautifully with soy sauce?
Cooking should always be an adventure! Don’t be afraid to play around with flavors and ingredients. You’ll discover your signature twist on this recipe before you know it!
FAQs and Troubleshooting
Q: Can I make this dish ahead of time?
A: Absolutely! You can prepare it a day in advance and store it in the refrigerator. Just reheat gently on the stove. While leftovers are fun, remember that the broccoli might lose its vibrant crunch!
Q: My sauce is too thin. What did I do wrong?
A: If your sauce didn’t thicken up, ensure your cornstarch fully dissolved in the liquid before adding it to the pan. Remember, a vigorous stir can help activate that thickening agent!
Q: How do I store leftovers?
A: Place any leftovers in an airtight container and refrigerate for up to three days. Reheat on the stovetop and add a splash of water to keep it saucy!
Q: Can I freeze this dish?
A: While you can freeze chicken and broccoli stir-fry, it’s best to do so before cooking. For cooked versions, the texture might change, particularly with the broccoli. So, enjoy it fresh whenever possible!
Nutritional Info
(Approximate values per serving, assuming 4 servings):
- Calories: 380
- Protein: 30g
- Carbohydrates: 30g
- Fat: 15g
- Fiber: 5g
And voila! There you have it—my cozy take on Chinese Chicken and Broccoli. I hope this recipe inspires you to gather your loved ones around the table and share a meal filled with laughter and love. Happy cooking, friends, and don’t forget to savor each delicious bite! 🍽️
Print
Chinese Chicken and Broccoli
- Total Time: 35 minutes
- Yield: 4 servings 1x
- Diet: Gluten-Free
Description
A classic stir-fry dish featuring tender chicken, vibrant broccoli, and a mouthwatering soy sauce blend, reminiscent of family gatherings.
Ingredients
- 1 lb Chicken Breast, cut into bite-sized pieces
- 3 cups Broccoli, cut into florets
- ½ cup Soy Sauce
- 3 cloves Garlic, minced
- 1 tablespoon Ginger, minced
- 2 tablespoons Cornstarch
- ½ cup Chicken Broth
- 1 tablespoon Sesame Oil
- Green Onions, for garnish
Instructions
- Prepare your chicken by cutting it into bite-sized pieces.
- Marinate the chicken in a mixture of soy sauce and minced ginger for at least 20 minutes.
- Cut your broccoli into florets and prepare the stems for extra texture.
- Heat sesame oil in a wok or large skillet over medium-high heat.
- Cook the marinated chicken pieces until golden brown, about 5-7 minutes.
- Add broccoli and chicken broth to the pan, cover, and steam for about 3 minutes.
- Mix soy sauce, garlic, ginger, cornstarch, and chicken broth to prepare the sauce.
- Combine everything in the pan and cook for another 2-3 minutes until the sauce thickens.
- Serve hot, garnished with sliced green onions.
Notes
Serve over fluffy jasmine rice or alongside steamed rice noodles for a complete meal.
- Prep Time: 20 minutes
- Cook Time: 15 minutes
- Category: Main Course
- Method: Stir-Frying
- Cuisine: Chinese
Nutrition
- Serving Size: 1 serving
- Calories: 380
- Sugar: 5g
- Sodium: 900mg
- Fat: 15g
- Saturated Fat: 2g
- Unsaturated Fat: 10g
- Trans Fat: 0g
- Carbohydrates: 30g
- Fiber: 5g
- Protein: 30g
- Cholesterol: 90mg
Keywords: Chinese food, chicken stir-fry, broccoli recipe, comfort food, easy dinner


