
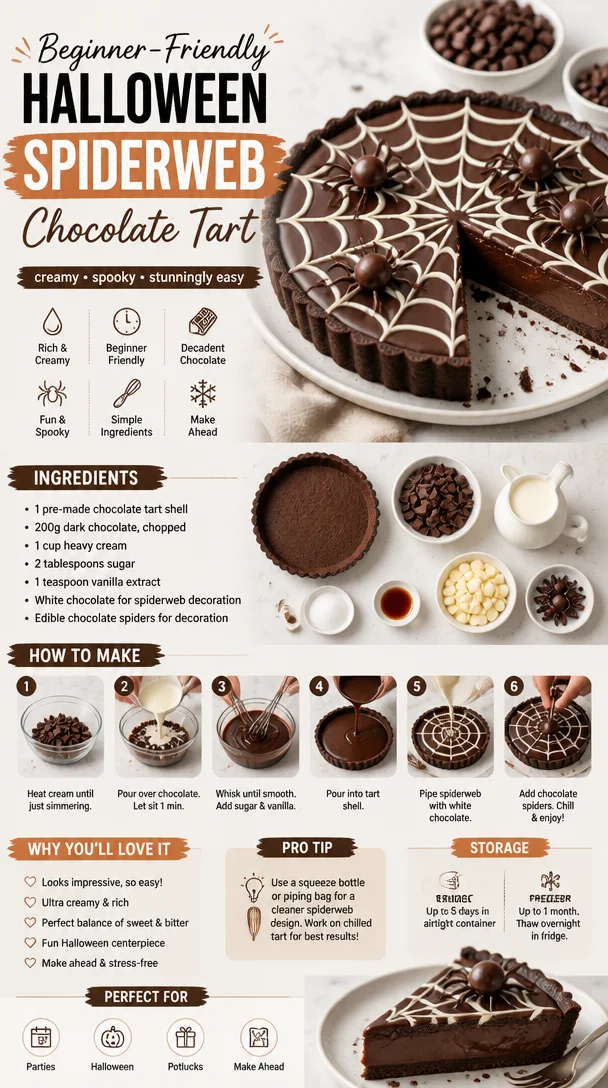
Beginner-Friendly Halloween Spiderweb Chocolate Tart
The Irresistible Spiderweb Chocolate Tart: A Sweet Journey
Welcome to my kitchen, dear friend! Today, we’re diving into a delightful treat that is as decadent as it is stunning: the Spiderweb Chocolate Tart. Picture this: a rich and velvety chocolate filling nestled in a crumbly crust, adorned with a whimsical spiderweb design that’s just begging to be shared. This tart is perfect for gatherings, special occasions, or a cozy evening in with your loved ones.
What makes this dessert even more special is the memories associated with it. Every time I prepare this Spiderweb Chocolate Tart, I’m transported back to my grandma’s kitchen, where I spent countless afternoons experimenting with ingredients and flavors. I remember the thrill of helping her create mouthwatering desserts, all while indulging in her stories of family gatherings and celebrations. Chocolate was always the star of our sweet escapades, and the tart became a staple at our family’s holiday feasts.
Ready to bring a little magic to your kitchen and create something unforgettable? Let’s whip up this showstopper dessert together!
A Sweet Memory of Family and Flavor
Every food enthusiast has that cherished memory that ignites their passion for cooking. Mine undeniably ties back to those cozy afternoons with my grandma. She would invite me into her kitchen, where flour dust danced in the afternoon sunlight and the rich aroma of chocolate filled the air. One afternoon, as the two of us set to work on our favorite dessert—chocolate cake—she suddenly had an idea. “Let’s turn it into a tart,” she said with a smile, and the Spiderweb Chocolate Tart was born!
I watched in awe as she expertly crafted the crust—crumbling flour and butter together until it resembled sand and then filling it with a luscious chocolate mixture. The pièce de résistance? The spiderweb design made with white chocolate. I felt like a little artist in the kitchen, thrilled to create something that was not only delicious but visually stunning. That day sparked a love for tarts and the joy of sharing them with family. Now, as I continue to explore this recipe, each time I bake it, I feel her spirit guiding me. Trust me when I say this chocolate tart is just as magical as it sounds!
Ingredients
Here’s a list of everything you’ll need to whip up this incredible Spiderweb Chocolate Tart. Each ingredient plays a key role in bringing this dish to life.
-
For the crust:
- 1 ½ cups all-purpose flour: The foundation of our tart! It provides structure. For a gluten-free option, you can use almond flour.
- ½ cup unsweetened cocoa powder: This gives the crust its rich chocolate flavor. Dutch-processed cocoa works great here for a deeper color and flavor.
- ½ cup powdered sugar: Sweetness is key! It helps balance the bitterness of the cocoa.
- ½ cup cold unsalted butter, cubed: Butter keeps our crust flaky. If dairy-free, coconut oil can be a lighter substitute.
- 1 large egg yolk: This adds richness. If you want a vegan version, use a flax egg (1 tablespoon ground flaxseed mixed with 2.5 tablespoons water).
-
For the filling:
- 1 cup heavy cream: We’ll use this for making a ganache. For a lighter alternative, use coconut cream.
- 8 ounces semisweet chocolate, chopped: The star of our filling! You can experiment with dark chocolate for a more intense flavor.
- 2 tablespoons sugar: Just a bit more sweetness goes a long way. Adjust based on your chocolate’s sweetness level.
- 1 teaspoon vanilla extract: This adds depth to the flavor. If you’re feeling adventurous, try hazelnut or almond extract instead.
-
For the spiderweb:
- 4 ounces white chocolate, chopped: This will create our beautiful spiderweb. You could substitute with white chocolate chips if that’s all you have!
Step-by-Step Instructions
Now that you’ve gathered all your ingredients, let’s get cooking! Follow these steps, and I promise you’ll have a showstopper dessert that will impress anyone.
1. Prepare the crust.
- Combine dry ingredients: In a large bowl, whisk together the flour, cocoa powder, and powdered sugar until there are no lumps—this is crucial for a smooth crust.
- Incorporate the butter: Add the cold cubed butter. Using your fingertips or a pastry cutter, work the butter into the dry mixture until it resembles coarse crumbs. You can channel your inner child here—messy hands are welcome!
- Add the egg yolk: Mix in the egg yolk using a fork until just combined. If the mixture feels too dry, add a teaspoon of ice water at a time until it holds together but isn’t sticky.
- Chill: Shape the dough into a disk, wrap it in plastic wrap, and refrigerate for about 30 minutes. This step is essential for a flaky crust.
2. Bake the crust.
- Preheat your oven to 350°F (175°C) while the dough chills.
- Roll out the dough: Dust your work surface with flour and roll out the chilled dough into a circle about 1/8-inch thick. Carefully transfer it to a 9-inch tart pan, pressing it gently into the edges. Use a fork to poke holes in the bottom to prevent bubbling.
- Pre-bake: Place parchment paper on top of the crust and fill it with pie weights or dried beans. Bake for 15 minutes, then remove the weights and parchment. Return to the oven for an additional 5–7 minutes until the crust is set. Allow it to cool completely.
3. Make the filling.
- Heat the cream: In a small saucepan, heat the heavy cream over medium heat until it just starts to simmer—don’t let it boil or it’ll spoil our ganache!
- Melt the chocolate: Place the chopped semisweet chocolate in a heatproof bowl. Pour the hot cream over the chocolate and let it sit for about 2 minutes.
- Stir: Gently stir the mixture with a spatula until smooth and glossy. If you need to, put it back over low heat for a minute to help it melt fully. Stir in the sugar and vanilla extract.
4. Assemble the tart.
- Fill the crust: Pour the ganache into the cooled tart shell, gently spreading it into an even layer.
- Chill: Place the tart in the refrigerator for at least 2 hours, or until the filling is set.
Serving Suggestions
Once your Spiderweb Chocolate Tart is set and ready, it’s time to serve! When plating, slice the tart into wedges—presentation is key! Follow these tips:
- Add a dollop of whipped cream on each slice for that extra touch of creaminess.
- Garnish with fresh berries or mint leaves to add a pop of color and freshness.
- Drizzle with a bit of melted white chocolate before serving to accentuate the spiderweb—it’s just as delicious as it sounds!
Recipe Variations
Feel free to get creative with this recipe! Here are a few fun variations:
- Nutty Crunch: Add a layer of crushed nuts (like hazelnuts or almonds) in the ganache for extra texture.
- Mint Chocolate: Incorporate a few drops of peppermint extract into the ganache for a refreshing twist.
- Superfood Boost: Mix in a tablespoon of matcha powder for an earthy flavor and a pop of color.
- Fruit-Infused: Swirl in raspberry puree into the ganache before it sets for a tangy contrast.
Chef’s Notes
As with any recipe, this Spiderweb Chocolate Tart has evolved over the years. I initially started with a simple ganache, but the addition of that creamy white chocolate spiderweb has made it a true masterpiece! And guess what? Every time I bake it, friends and family gather around, engaging in animated conversations about their favorite desserts. It’s not just a tart—it’s a conversation starter, a way to share love, laughter, and those pivotal moments that keep our spirits high! Oh, and if I ever drop some chocolate on the floor, I remind myself to embrace the mess; it’s just part of the kitchen fun!
FAQs and Troubleshooting
1. My ganache didn’t set properly! What went wrong?
This can happen if the chocolate isn’t melted evenly or if there’s too much cream. Ensure the cream is just simmering when you pour it over the chocolate, and if your ganache does seem too runny, you can always gently reheat it and add more chopped chocolate until it thickens.
2. Can I make this tart ahead of time?
Absolutely! This tart can be made a day in advance and refrigerated. Just make sure to cover it well to prevent it from absorbing odors from your fridge.
3. What if I don’t have a tart pan?
No worries! You can use a round cake pan or even a square dish. Just adjust the cooking time as needed. The presentation may differ slightly, but the flavor will be just as divine!
4. Can I use milk chocolate instead of semisweet?
You can! Just remember that it will be sweeter, so you might want to reduce the amount of sugar in the ganache to suit your palate.
Nutritional Info
(Displayed if applicable)
A slice of this Spiderweb Chocolate Tart is a heavenly indulgence, and while it’s rich, each bite brings joy—sometimes that’s just what we need. So, next time you’re looking to impress or share a sweet moment with loved ones, remember this magical recipe. Give it a try, and join the ranks of joyful bakers creating lasting memories, one slice at a time. Happy baking!
Print
Spiderweb Chocolate Tart
- Total Time: 55 minutes
- Yield: 8 servings 1x
- Diet: Vegetarian
Description
A decadent Spiderweb Chocolate Tart with a rich chocolate filling and a whimsical white chocolate design, perfect for any occasion.
Ingredients
- 1 ½ cups all-purpose flour
- ½ cup unsweetened cocoa powder
- ½ cup powdered sugar
- ½ cup cold unsalted butter, cubed
- 1 large egg yolk
- 1 cup heavy cream
- 8 ounces semisweet chocolate, chopped
- 2 tablespoons sugar
- 1 teaspoon vanilla extract
- 4 ounces white chocolate, chopped
Instructions
- Prepare the crust.
- Combine dry ingredients: In a large bowl, whisk together the flour, cocoa powder, and powdered sugar until there are no lumps.
- Incorporate the butter: Add the cold cubed butter and work it into the dry mixture until it resembles coarse crumbs.
- Add the egg yolk: Mix in using a fork until just combined.
- Chill: Shape the dough into a disk, wrap it, and refrigerate for about 30 minutes.
- Bake the crust: Preheat your oven to 350°F (175°C).
- Roll out the dough into a circle about 1/8-inch thick and transfer it to a tart pan.
- Pre-bake: Cover with parchment paper and fill with weights, bake for 15 minutes, then remove weights and bake for an additional 5-7 minutes.
- Make the filling: In a saucepan, heat the heavy cream until it simmers.
- Melt the chocolate: Pour the hot cream over the chopped chocolate and let sit for 2 minutes.
- Stir until smooth, then add sugar and vanilla extract.
- Assemble the tart: Pour the ganache into the cooled crust and chill for at least 2 hours.
Notes
Serve with whipped cream, fresh berries, or a drizzle of melted white chocolate.
- Prep Time: 30 minutes
- Cook Time: 25 minutes
- Category: Dessert
- Method: Baking
- Cuisine: American
Nutrition
- Serving Size: 1 slice
- Calories: 450
- Sugar: 22g
- Sodium: 130mg
- Fat: 28g
- Saturated Fat: 16g
- Unsaturated Fat: 10g
- Trans Fat: 0g
- Carbohydrates: 47g
- Fiber: 3g
- Protein: 6g
- Cholesterol: 40mg
Keywords: chocolate, tart, dessert, holiday, family
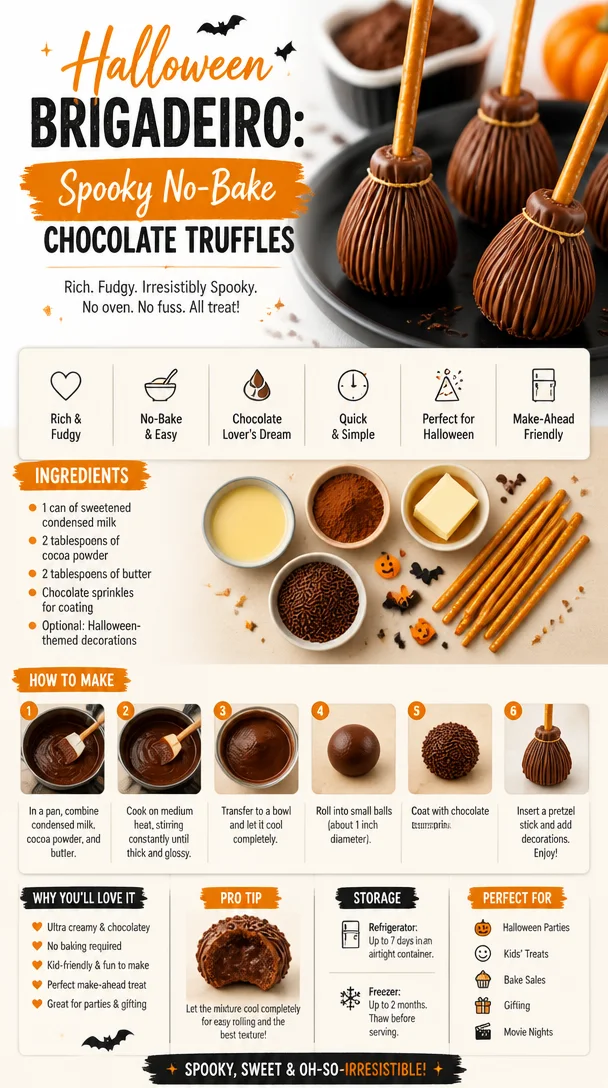
Halloween Brigadeiro: Spooky No-Bake Chocolate Truffles
The Sweet Magic of Chocolate Brigadeiro: A Halloween Treat to Remember
Welcome back to my kitchen! As the leaves turn golden and the crisp autumn air ushers in the season of treats, I can’t help but get excited for Halloween! It’s not just about spooky costumes and haunted houses; it’s also a glorious excuse to indulge in sweet and delectable confections. Speaking of which, have you ever tried Brigadeiro? This delightful Brazilian treat is a chocolate truffle that’s rich, fudgy, and downright addictive. Join me as we turn this classic dessert into the perfect Halloween treat!
Now, picture this – the Halloween season is in full swing, and I recall how vibrant it always was in my childhood home. We would transform our house into a Haunted Mansion, complete with cobwebs, flickering lights, and of course, an over-the-top candy display! I remember the joy of running through the neighborhood in my favorite costume, collecting candies and goodies with my friends, all while my mom would be quietly prepping delicious desserts for the evening. One year, I was lucky enough to have Brigadeiro featured on our kitchen table alongside the candy corn and chocolate bars. Little did I know, these little chocolate balls would forever hold a special place in my heart. Each bite was a joyous explosion of chocolatey goodness, and they were always the first to disappear!
Brigadeiro is easy to make, requires minimal ingredients, and can be shaped into little pumpkin or spider forms for some Halloween flair. There’s something magical about creating these treats and watching your friends and family light up with excitement. I promise you; once you make Brigadeiros, you’ll be swept away by the rhythm of rolling, dipping, and decorating. So, let’s roll up our sleeves and dive into this Halloween-inspired delight!
Ingredients
Before we get started, let’s gather our ingredients. Here’s what you’ll need for these scrumptious Brigadeiros:
-
Sweetened Condensed Milk: The star ingredient! It’s the base for the Brigadeiro, giving it a luscious and creamy texture. If you’re looking for a dairy-free version, coconut condensed milk can be a great alternative!
-
Unsweetened Cocoa Powder: Adds that rich chocolate flavor that we all crave. Unsweetened is key here, as we’ll be sweetening it with the condensed milk. For a fun twist, you could use dark cocoa powder for a deeper chocolatey taste.
-
Unsalted Butter: Just a hint of butter elevates the Brigadeiro and adds a silky mouthfeel. If you’re dairy-free, you can substitute with coconut oil or vegan butter.
-
Chocolate Sprinkles: These will be used to coat your Brigadeiros for that magical finish! You could also consider crushed nuts or edible glitter for a festive touch.
-
A Pinch of Sea Salt: A small amount of salt will enhance the sweetness and richness of the chocolate. If you’re on a low-sodium diet, feel free to skip this step, but don’t underestimate its importance!
Step-by-Step Instructions
-
Prepare Your Ingredients: Before we commence, make sure all ingredients are at hand. Trust me, this makes the cooking process much smoother!
-
Combine Ingredients: In a medium saucepan over medium heat, combine the sweetened condensed milk, cocoa powder, and butter. Stir until everything is mixed nicely. This is where the chocolate magic begins!
-
Cook the Mixture: Stir continuously to prevent sticking. Keep an eye on the mixture as it bubbles away – it should take about 10 minutes to reach a thick, fudgy consistency. You’ll know it’s ready when it pulls away from the sides of the pan, and you can see the bottom when you run your spatula through it.
-
Cooling Time: Once ready, pour the mixture into a buttered dish or a parchment-lined pan and allow it to cool to room temperature. This part is crucial, so you don’t burn your hands while rolling!
-
Roll Into Balls: Once cooled, butter your hands slightly and grab a tablespoon of the chocolate mixture. Roll it into a ball—aim for about the size of a cherry. Keep your hands buttered to make this process easier!
-
Coat Your Brigadeiros: Now comes the fun part! Roll the chocolate balls in chocolate sprinkles until they’re coated all around. If you want to add additional toppings, this is your time to shine!
-
Let Them Set: Place your coated Brigadeiros onto a tray lined with parchment paper and let them set for at least 30 minutes. This step allows them to firm up nicely.
Serving Suggestions
When it comes to serving these Brigadeiros, I love presenting them on a festive plate adorned with Halloween décor—think mini pumpkins, spooky napkins, and maybe even a few flickering LED candles. You can arrange them in a cute pumpkin-shaped bowl for extra charm or leave them on the table for your friends to help themselves. Either way, these gems are bound to steal the show!
Recipe Variations
Looking to get creative with your Brigadeiros? Here are a few ideas to give these treats a spin:
-
Pumpkin Spice Brigadeiros: Mix in some pumpkin puree and a dash of cinnamon into the chocolate mixture for a fall twist.
-
Peanut Butter Brigadeiros: Incorporate creamy peanut butter into the base mixture for a delightful combo.
-
Matcha Brigadeiros: Swap out some cocoa powder for matcha to create a beautiful and unique flavor.
-
Spicy Brigadeiros: Add a pinch of cayenne pepper or chili powder for a sweet and spicy kick.
-
Vegan Delight: Use coconut condensed milk and vegan butter for a dairy-free version everyone can enjoy!
Chef’s Notes
Brigadeiros have evolved since their inception in Brazil in the 1940s. While traditional Brigadeiros are simply chocolate, the versatility of this treat lets your imagination run wild! I fondly remember my first attempt, which resulted in a delightful mess—not only did I end up with chocolate all over my hands, but the entire kitchen looked like a sweet explosion! Embrace those messy moments; they often lead to the best memories and even better food.
FAQs and Troubleshooting
-
Why did my Brigadeiros not firm up? If your Brigadeiro mixture hasn’t thickened enough, it may not have cooked long enough. Just return it to the heat and keep stirring until it reaches the right consistency.
-
How do I keep Brigadeiros from sticking to my hands? Simply keep your hands greased with a bit of butter, and they will roll much more easily.
-
Can I make these ahead of time? Absolutely! Brigadeiros can be made a few days in advance and stored in an airtight container in the fridge.
-
What if I don’t have chocolate sprinkles? No worries! You can roll them in shredded coconut, crushed nuts, or even edible glitter for a festive vibe.
Nutritional Info (if applicable)
While indulgent treats like Brigadeiros are not typically low-calorie, they can be enjoyed in moderation. Each Brigadeiro (approx. 15g) contains around 70 calories, depending on the ingredients used. Remember to enjoy with friends and share the joy!
Happy Halloween, my fellow foodies! As you whip up this delightful Brigadeiro recipe, remember that the magic lies not only in the ingredients but in the love you add. So, whether you’re treating yourself or throwing a Halloween party, I hope these treats bring smiles and sweet memories to your table. Get ready for a fun, tasty adventure—you’re going to love every bite!
Print
Chocolate Brigadeiro
- Total Time: 20 minutes
- Yield: 20 servings 1x
- Diet: Vegetarian
Description
A delightful Brazilian chocolate truffle, perfect for Halloween celebrations.
Ingredients
- 1 can sweetened condensed milk
- 4 tablespoons unsweetened cocoa powder
- 2 tablespoons unsalted butter
- Chocolate sprinkles for coating
- A pinch of sea salt
Instructions
- Prepare your ingredients: Gather all ingredients.
- Combine the sweetened condensed milk, cocoa powder, and butter in a medium saucepan over medium heat.
- Cook the mixture while stirring continuously for about 10 minutes until thick and fudgy.
- Pour the mixture into a buttered dish and let it cool to room temperature.
- Roll the mixture into balls, about the size of a cherry.
- Coat your Brigadeiros in chocolate sprinkles.
- Let them set on a parchment-lined tray for at least 30 minutes.
Notes
Brigadeiros can be made a few days in advance and stored in an airtight container in the fridge.
- Prep Time: 10 minutes
- Cook Time: 10 minutes
- Category: Dessert
- Method: Stovetop
- Cuisine: Brazilian
Nutrition
- Serving Size: 1 Brigadeiro
- Calories: 70
- Sugar: 10g
- Sodium: 40mg
- Fat: 3g
- Saturated Fat: 2g
- Unsaturated Fat: 1g
- Trans Fat: 0g
- Carbohydrates: 9g
- Fiber: 0g
- Protein: 1g
- Cholesterol: 5mg
Keywords: Brigadeiro, Halloween treat, chocolate truffle, Brazilian dessert, easy dessert
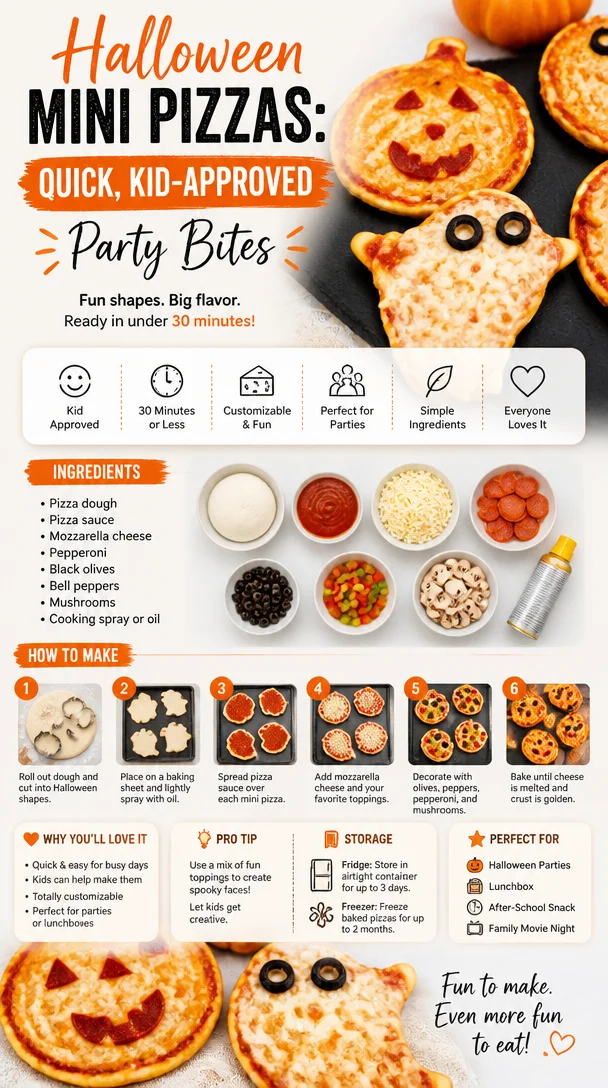
Halloween Mini Pizzas: Quick, Kid-Approved Party Bites
Mini Halloween Pizzas: A Spooktacular Treat for All Ages!
Welcome to my cozy kitchen, where today we’re diving into a fun, festive treat that’s perfect for Halloween: Mini Halloween Pizzas! These little delights are not only delicious but they’re also a blast to make with family or friends. When I think of Halloween, I get all giddy remembering the creative costumes, the crisp autumn air, and of course, the treats. Nothing embodies the spirit of the season quite like a hauntingly good pizza party!
Imagine this: the aroma of warm dough baking in the oven, melted cheese bubbling to perfection, and colorful toppings transforming an ordinary dinner into a spooky feast. This dish is perfect for all ages, and it’s customizable to fit everyone’s tastes—making it a great way to engage the kiddos while keeping the adults smiling too.
I remember hosting my first Halloween celebration in college. We transformed my tiny kitchen into a spooky pizzeria, and instead of the traditional scary snacks, we whipped up mini pizzas topped with all sorts of ghoulish toppings. We had "mummy" pizzas with cheese and pepperoni, spider-web pizzas with black olives, and even a veggie version full of ghostly greens! The laughter and creativity in that tiny kitchen formed memories I’ll cherish forever. That’s why I love sharing these recipes; they’re not just about the food—they’re about creating connections and joy around the dinner table.
So grab your apron, put on your favorite spooky playlist, and let’s make some Mini Halloween Pizzas that will thrill your family and friends!
Ingredients
Here’s a simple list of ingredients you’ll need to conjure up these Mini Halloween Pizzas. Each one is a treasure in its own right!
-
Pizza Dough:
- You can use store-bought dough for convenience or make your own from scratch. For a gluten-free version, try using gluten-free pizza dough available at many grocery stores!
-
Pizza Sauce:
- Classic marinara works beautifully, but you can also spice it up with a homemade version. Swap out traditional tomato sauce with pesto or Alfredo for creative twists!
-
Shredded Mozzarella Cheese:
- This is the go-to cheese for stretchy goodness! If you want to reduce fat, try part-skim mozzarella, or go vegan with a plant-based cheese.
-
Toppings: Choose a mix of toppings to match your Halloween theme:
- Pepperoni Slices: Cut them into spider shapes or use black olives for spiders instead.
- Bell Peppers: Slice into jack-o’-lantern shapes or use green peppers for an eerie vibe.
- Olives: Black olives make great spiders or can add a creepy touch to your pizzas.
- Mushrooms: Slice them thin for a spooky, ghoulish effect.
- Fresh Basil: Adds color and freshness; be sure to place it on top after baking for max flavor!
Step-by-Step Instructions
Now that we have our ingredients ready, let’s dive into making these Mini Halloween Pizzas!
-
Preheat Your Oven:
- Start by preheating your oven to 475°F (245°C). This is crucial for getting a crispy crust. If you’re using a pizza stone, pop that in the oven while preheating!
-
Prepare the Dough:
- Roll out your pizza dough on a floured surface to about 1/4-inch thickness. If you’re using store-bought dough, it usually comes in pre-formed circles—just press it down a bit more for mini pizzas. Use a cookie cutter or a glass to cut out small circles, about 4 inches in diameter.
- Chef Tip: If the dough is too sticky, lightly flour your hands and work surface!
-
Spread the Sauce:
- Place the dough circles on a baking sheet lined with parchment paper (easy cleanup!). Spread a tablespoon of pizza sauce on each mini crust, leaving a little room at the edges. Don’t be afraid to get a bit generous here!
-
Cheesy Goodness:
- Sprinkle shredded mozzarella cheese over the sauce. Don’t skimp on this part—everyone loves a cheesy pizza!
-
Toppings, Assemble:
- Now for the creative part! Channel your inner Halloween artist by placing toppings on each mini pizza to create spooky designs. You can make pepperoni spiders, olive eyeballs, or even a ‘mummy’ look by layering thin strips of cheese over the top. Let your imagination run wild!
-
Bake to Perfection:
- Place your assembled mini pizzas in the oven and bake for about 10-12 minutes or until the cheese is melted and bubbly and the crust edges are golden brown.
- Chef Hack: Keep an eye on them after the 8-minute mark—every oven is a bit different!
-
Finishing Touches:
- Once out of the oven, let them cool for a minute. If you’ve added fresh basil, now is the time to sprinkle those leaves on top.
Serving Suggestions
Serving these Mini Halloween Pizzas is just as fun as making them! Arrange them on a spooky-themed platter—think black and orange or even serve them on a skeleton hand if you’re feeling particularly festive! Pair them with a side of carrot sticks or a fresh salad for a colorful crunch. You could even have a little dipping station with extra pizza sauce, garlic oil, or perhaps a spooky dip like green guacamole (hey, it’s Halloween after all!).
Recipe Variations
- Sweet Treats: Instead of savory toppings, consider creating mini dessert pizzas using Nutella as sauce and topping with banana slices and Halloween sprinkles!
- Vegan Style: Use vegan cheese and veggie toppings for a plant-based twist.
- Spicy Pizzas: Add some jalapeños or spicy sausage for a kick!
- Mini Calzones: Fold the dough over the toppings before baking for a spooky calzone!
Chef’s Notes
Every time I make these Mini Halloween Pizzas, I’m reminded of that fun college night—chaotic laughter, flour-covered faces, and the festive atmosphere created in the kitchen. Over the years, I’ve adapted this recipe to include whatever fresh ingredients I have on hand. One fun addition we’ve made is using “moon” cheese—a mix of cheeses sprinkled to form a crescent moon on cheese pizzas during a full moon! Creativity is the key here.
FAQs and Troubleshooting
-
Q: My dough is too sticky, what should I do?
- A: Lightly flour your hands and surface when rolling out the dough. If it’s too sticky, adding a tad more flour can help, but be careful not to dry it out!
-
Q: How do I keep the pizzas from getting soggy?
- A: Make sure to bake your pizzas on a preheated surface, and don’t overload them with sauce.
-
Q: Can I make the dough ahead of time?
- A: Absolutely! You can prepare and refrigerate the dough for up to 24 hours. Just let it come to room temperature before rolling.
-
Q: What if I don’t have pizza sauce?
- A: You can use tomato paste mixed with a splash of olive oil and Italian herbs as a substitute, or even pesto for a great twist!
Now that you’re armed with this festive recipe for Mini Halloween Pizzas, it’s time to gather your favorite people and start cooking! Embrace the spirit of the season with creativity and lots of laughter. Trust me, these mini pizzas are sure to conjure up delightful memories. Happy cooking, and may your Halloween be filled with delicious treats and friendly frights!
Print
Mini Halloween Pizzas
- Total Time: 27 minutes
- Yield: 4 servings
- Diet: Vegetarian
Description
Fun and festive Mini Halloween Pizzas perfect for all ages, customizable and a great way to engage friends and family.
Ingredients
- Pizza Dough (store-bought or homemade)
- Pizza Sauce (classic marinara, pesto, or Alfredo)
- Shredded Mozzarella Cheese
- Pepperoni Slices
- Bell Peppers
- Olives (black olives for spiders)
- Mushrooms
- Fresh Basil
Instructions
- Preheat your oven to 475°F (245°C).
- Prepare the dough by rolling it out to 1/4-inch thickness and cutting into circles.
- Spread a tablespoon of pizza sauce on each mini crust.
- Sprinkle shredded mozzarella cheese over the sauce.
- Assemble toppings creatively to create spooky designs.
- Bake for 10-12 minutes until cheese is melted and crust is golden brown.
- Finish with fresh basil after cooling for a minute.
Notes
Feel free to customize toppings and sauces to fit your Halloween theme.
- Prep Time: 15 minutes
- Cook Time: 12 minutes
- Category: Snack
- Method: Baking
- Cuisine: American
Nutrition
- Serving Size: 1 pizza
- Calories: 250
- Sugar: 1g
- Sodium: 300mg
- Fat: 10g
- Saturated Fat: 4g
- Unsaturated Fat: 5g
- Trans Fat: 0g
- Carbohydrates: 30g
- Fiber: 2g
- Protein: 8g
- Cholesterol: 15mg
Keywords: Halloween, pizza, mini pizzas, spooky, festive treat
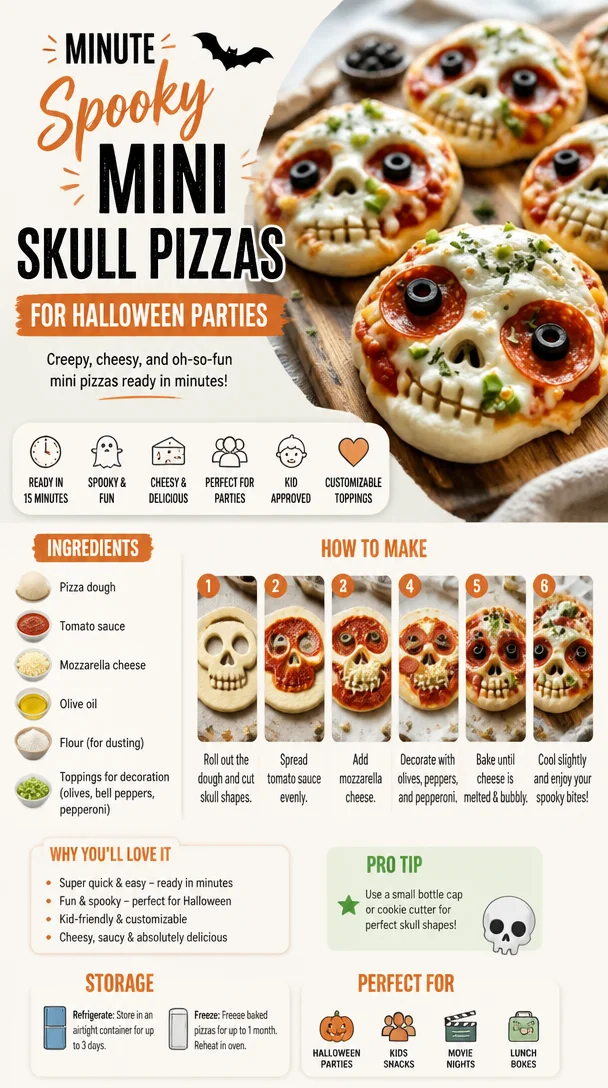
Minute Spooky Mini Skull Pizzas for Halloween Parties
Mini Skull Pizzas: A Spooky Treat for Every Occasion
Welcome to my kitchen! Today, I’m super excited to share a fun and festively whimsical recipe that’s perfect for both Halloween parties and cozy family nights. Yes, we’re diving into the world of Mini Skull Pizzas! Picture this: bite-sized pizza skulls that not only taste amazing but also create an impressive centerpiece for any gathering. These little treats are sure to get everyone in the mood for some spooky fun, and they’re surprisingly easy to whip up—making this a dish that even your little ones can assist with!
Let’s embark on this culinary adventure filled with cheese, toppings, and a bit of creativity. Don’t worry if you feel a little intimidated; my goal is to guide you through the process with joy and excitement. Grab your aprons, and let’s make some delicious skull-shaped pizzas!
A Slice of Nostalgia
When I was a kid, Halloween was one of the highlight events of the year. My family would decorate the house with cobwebs and ghoulish décor while the kitchen filled with the irresistible aroma of pumpkin spice and baking treats. One year, my mom decided to make a special Halloween dinner, and that’s when I first tasted her quirky mini pizza creations. She would shape them into little pumpkins and ghosts, but my favorite was always her skull pizza.
The memory of gathering around the table with my family, laughing and enjoying each other’s company over these cheeky, spooky dinners has stuck with me. Seeing my siblings and friends’ faces light up when they tasted those mini pizzas was magical! From that moment on, I knew that bringing fun into food could create unforgettable memories. Fast forward to many years later, and I’m carrying on that Halloween tradition, but with my twist—these Mini Skull Pizzas!
Ingredients List
To make your Mini Skull Pizzas, you’ll need a handful of simple ingredients. Here’s what you’ll need:
-
Pizza Dough: You can use store-bought dough or make your own from scratch. If you’re short on time, a pre-made dough works beautifully!
-
Pizza Sauce: Choose your favorite brand or make a homemade version with crushed tomatoes, garlic, and herbs. Just be sure it’s packed with flavor!
-
Cheese: Mozzarella is the classic choice, but feel free to mix it up with provolone or gouda for a smoky flavor. Grated cheese melts easier than slices, so keep that in mind!
-
Toppings: Think pepperoni, olives, bell peppers, or any other favorite toppings. Use cut-out shapes for an extra spooky effect! I love using mini pepperonis for eyes.
-
Olive Oil: A touch of olive oil enhances the flavor and ensures a crispy crust. You can use flavored oil (like garlic-infused) for an extra kick!
-
Spices: Italian seasoning (oregano, basil, and thyme) and a pinch of red pepper flakes add flavor depth. You can also sprinkle garlic powder or onion powder for more taste!
-
Flour: For dusting your surface when rolling out the dough. Any all-purpose flour will do the trick.
Choosing quality ingredients is key to the flavor profile of your Mini Skull Pizzas. Don’t hesitate to get creative! If you’re feeling adventurous, try using unique ingredients like arugula, sun-dried tomatoes, or even a drizzle of pesto before serving.
Step-by-Step Instructions
Ready to dive into the kitchen? Let’s make some skull-tacular pizzas together! Here’s a detailed step-by-step guide to whip up these delightful treats:
-
Preheat your Oven:
Preheat your oven to 425°F (220°C). This will ensure your pizzas bake beautifully and get that golden, crispy crust you’ll love! -
Prepare the Dough:
If using store-bought dough, let it sit at room temperature for about 30 minutes—this will make it easier to roll out. If you’re making it from scratch, follow your favorite recipe until it reaches that perfect doughy texture. -
Roll Out the Dough:
Dust a clean surface with a bit of flour. Roll out the dough until it’s about ¼ inch thick. Use a pizza cutter or sharp knife to cut the rolled dough into skull shapes. Don’t worry about making them perfect; the fun is in their quirky designs! -
Shape the Faces:
Use a small knife to carve out eyes, a nose, and a spooky grin on each skull shape. If the dough tears a little, that’s just character; embrace the imperfections! -
Transfer to a Baking Sheet:
Line a baking sheet with parchment paper. Carefully transfer the shaped skulls onto the sheet, giving them enough space to spread out. -
Add Sauce and Cheese:
Spread a small amount of pizza sauce on each skull, leaving the edges free for that lovely crust. Then, sprinkle a generous handful of mozzarella cheese over the sauce. Don’t skimp—c’mon, who doesn’t love extra cheese? -
Toppings Galore:
Now’s the time to play! Add your preferred toppings. A mini pepperoni on each “eye” adds a fun little detail. You can even use black olives for spooky eyeballs! -
Drizzle with Olive Oil:
A light drizzle of olive oil on top of the assembled skull pizzas will help to achieve that crispy finish. -
Bake Away:
Pop the baking sheet into the preheated oven and let the pizzas bake for about 10-12 minutes, or until the cheese is bubbly and deliciously golden. -
Cool and Serve:
Once baked, remove the mini skull pizzas from the oven and let them cool for a few minutes. Serve them warm, and watch the smiles as they crowd around the table!
Serving Suggestions
These Mini Skull Pizzas are not only fabulous on their own, but there are fun ways to serve them as well. Try arranging them on a large platter, garnished with a sprinkle of fresh parsley or basil. You could serve them alongside a vibrant salad or a dipping sauce like ranch or marinara to make it even more enjoyable. Another creative idea is to use a Halloween-themed tablecloth or props to create a festive atmosphere!
Recipe Variations
Get ready to get creative! Here are a few twists you can try with your Mini Skull Pizzas:
-
Veggie Delight: Top your skulls with a mix of cooked spinach, mushrooms, and artichoke hearts for a fun and healthy option.
-
Sweet Treat: For a dessert version, use sweet dough and fill the skulls with chocolate chips or Nutella before baking. Sweet and spooky!
-
Spicy Kick: Add jalapeños, spicy sausage, or sriracha to the sauce to give it that extra heat for those who love a kick.
-
Plant-Based Option: Use vegan cheese and skip the meat toppings to cater to your vegan friends. They’ll still love the skull shape!
-
Breakfast Mini Skull Pizzas: Swap the toppings for scrambled eggs, cheese, and veggies for a breakfast twist!
Chef’s Notes
As with any recipe, the beauty lies in experimentation. One year, I discovered that a splash of balsamic glaze can add an amazing depth of flavor when drizzled over these skulls post-baking. It’s become a go-to finishing touch! I’ve also started to play around with various cheeses—such as gouda or cheddar—where each adds its own unique touch to the flavor profile.
Honestly, every time I make these Mini Skull Pizzas, I’m reminded of the joy of cooking and the memories that food creates. It’s about bringing people together and celebrating good times, no matter how silly they might seem!
FAQs and Troubleshooting
1. My skull pizzas turned out too doughy inside. What went wrong?
This usually happens if the dough is too thick or the oven temperature is too low. Make sure your dough is rolled to ¼ inch thick at most, and keep an eye on your oven temperature—every oven is different!
2. How can I keep the crust crispy?
A drizzle of olive oil before baking can work wonders! Also, baking on a preheated pizza stone or tray helps to create a beautiful, crispy crust.
3. Can I freeze these Mini Skull Pizzas?
Absolutely! You can freeze the shaped, unbaked skulls and add sauce and toppings right before baking. Just add a bit of time to the baking process if cooking from frozen—easy peasy!
4. What if I don’t have skull-shaped cookie cutters?
No worries! Use any cookie cutter shape you like or just freehand the shape using a knife. Cooking is all about creativity!
Nutritional Info
While the nutritional information can vary based on the ingredients selected, a rough estimate per Mini Skull Pizza is:
- Calories: 180
- Protein: 7g
- Carbs: 22g
- Fat: 8g
By incorporating more veggies or using whole wheat dough, you can easily adjust the nutritional profile of your Mini Skull Pizzas!
And there you have it! A fun, flavorful recipe that’s not only delicious but also brings a burst of joy to any gathering. Remember, the best part of cooking is sharing; so gather your loved ones, get into the holiday spirit, and enjoy every cheesy bite of these Mini Skull Pizzas. Happy cooking!
Print
Mini Skull Pizzas
- Total Time: 27 minutes
- Yield: 12 servings
- Diet: Vegetarian
Description
Fun and spooky mini skull-shaped pizzas perfect for Halloween parties or family nights.
Ingredients
- Pizza Dough
- Pizza Sauce
- Cheese (Mozzarella recommended)
- Toppings (pepperoni, olives, bell peppers, etc.)
- Olive Oil
- Spices (Italian seasoning, garlic powder, red pepper flakes)
- Flour (for dusting)
Instructions
- Preheat your oven to 425°F (220°C).
- Prepare the dough by letting it sit at room temperature for about 30 minutes.
- Roll out the dough to about ¼ inch thick and cut into skull shapes.
- Shape the faces using a small knife.
- Transfer the skulls to a baking sheet lined with parchment paper.
- Add a small amount of pizza sauce on each skull.
- Sprinkle mozzarella cheese over the sauce.
- Add your preferred toppings for decoration.
- Drizzle with olive oil for a crispy finish.
- Bake for about 10-12 minutes until golden.
- Cool for a few minutes before serving.
Notes
Experiment with unique toppings or sauces to create diverse flavors. These pizzas can also be made sweet for a dessert version or used for breakfast.
- Prep Time: 15 minutes
- Cook Time: 12 minutes
- Category: Appetizer
- Method: Baking
- Cuisine: American
Nutrition
- Serving Size: 1 pizza
- Calories: 180
- Sugar: 2g
- Sodium: 400mg
- Fat: 8g
- Saturated Fat: 3g
- Unsaturated Fat: 4g
- Trans Fat: 0g
- Carbohydrates: 22g
- Fiber: 1g
- Protein: 7g
- Cholesterol: 15mg
Keywords: skull pizzas, Halloween recipe, spooky appetizers, mini pizzas, fun food
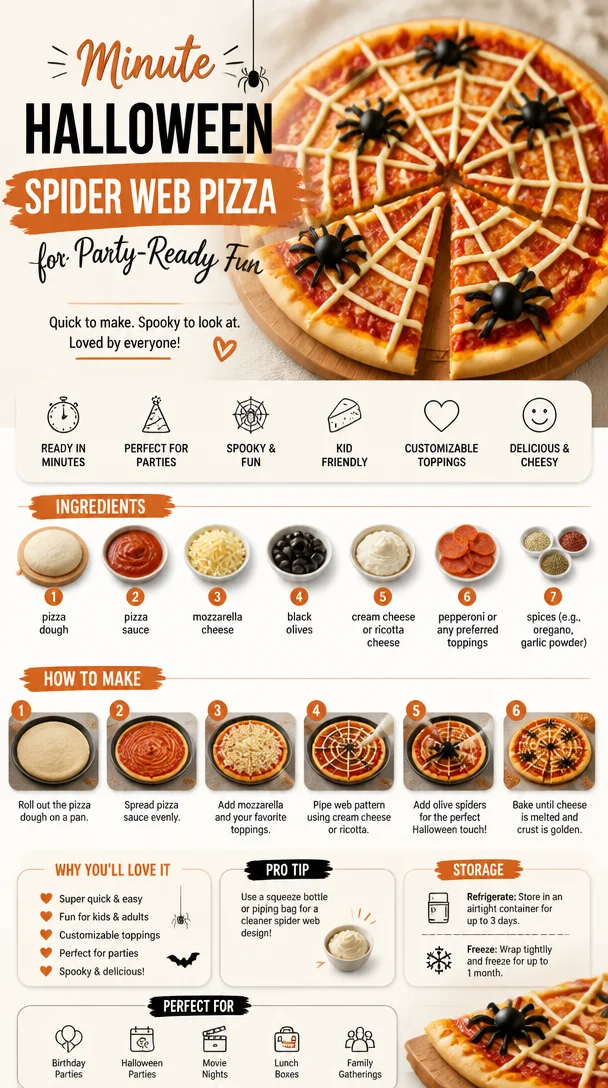
Minute Halloween Spider Web Pizza for Party-Ready Fun
Spider Web Pizza: A Spooktacular Dinner Adventure!
Welcome to my kitchen, my fellow food lovers! Today, we’re going to whip up something delightfully spooky yet irresistibly delicious—Spider Web Pizza! Imagine gathering around with friends or family, sharing laughs, and savoring a slice of pizza that not only tastes incredible but also looks amazing. This dish is perfect for Halloween gatherings, cozy movie nights, or any occasion when you want to add a dash of fun to your meal. And trust me, this pizza is so good, it’ll be a hit even beyond spooky season!
Now, let’s take a step back. The first time I created Spider Web Pizza was during a Halloween party a few years ago. I wanted to keep the atmosphere light-hearted and playful while serving something that everyone would love. So, I decided to give a classic favorite a twist—because what’s more exciting than making a familiar dish a bit more festive?
As I was rolling out the dough and prepping the toppings, the nostalgia kicked in. It took me back to my childhood, where Halloween meant pumpkin carving, silly costume contests, and of course, the great pizza-making adventure with my cousins in the kitchen. We would pile ingredients high, chat about our favorite scary movies, and race to see who could create the creepiest pizza design. Those were such magical moments. This spider web version, in particular, reminded me of how creative cooking could be, transforming ordinary ingredients into a whimsical feast. The laughter, the love, and the delicious food came together to create the perfect party atmosphere—and I can’t wait to share that joy with you today!
Ingredients
Let’s gather what we need for this masterpiece! Here’s a simple breakdown of the ingredients you’ll need to create your Spider Web Pizza:
-
Pizza Dough (store-bought or homemade)
- Tip: If you’re short on time, store-bought dough is a fantastic shortcut. However, making your own from scratch can be an exciting adventure!
-
Pizza Sauce
- Tip: A rich marinara or homemade tomato sauce works best. You can also try using pesto or Alfredo sauce for a unique twist!
-
Shredded Mozzarella Cheese
- Tip: Mozzarella melts beautifully and gives that gooey texture we all love. For a little extra flavor, try adding a blend of Italian cheeses.
-
Black Olives (sliced)
- Tip: These little guys not only add a great flavor but also help form the spiders! If you’re not a fan, consider using pepperoni or even cherry tomatoes.
-
Sliced Bell Peppers
- Tip: Any color will do! They add vibrant color and a sweet crunch. Use them sparingly in the web design to keep the focus on the cheese.
-
Italian Seasoning
- Tip: A sprinkle of basil, oregano, and thyme enhances the flavor. You can switch it up with fresh herbs too!
-
Olive Oil (for brushing)
- Tip: Adds wonderful flavor when brushed on the crust. Extra virgin olive oil is the best choice for drizzling.
-
Black food coloring or activated charcoal (optional for decoration)
- Tip: This can be fun to play with when creating the spider web; just be careful with the quantity!
These ingredients will work their magic together to create a pizza that’s not only show-stopping but utterly delicious!
Step-by-Step Instructions
Alright, friends! Grab your apron (you know, the one that’s probably a little messy like mine), and let’s get cooking!
Step 1: Prepare the Dough
- Begin by preheating your oven to 475°F (245°C). If you’re using stone or steel, place that in the oven to heat up. Prepare your baking sheet or pizza stone as well.
- On a floured surface, roll out your pizza dough to about 12 inches in diameter. Don’t worry about making it perfect; rustic is part of the charm!
Step 2: Sauce It Up!
- Transfer your rolled dough to the baking sheet or hot pizza stone. Now, spread a generous amount of pizza sauce over the dough, leaving about an inch around the edges for the crust.
Step 3: Cheese, Cheese, and More Cheese!
- Sprinkle a hearty layer of shredded mozzarella cheese over your sauce. This is where the magic starts! You want enough cheese to create a deliciously cheesy base.
Step 4: Create the Spider Web Design
- Here comes the fun part! Using either a piping bag or a squeeze bottle, pipe strips of cheese across the pizza, creating a web effect. Start from the center and work your way out, overlapping the strips slightly.
- If you want to make your web darker, you can mix some black food coloring with the mozzarella before piping. Just remember to mix well!
Step 5: Make it Spooky!
- Grab the sliced black olives or your choice of toppings to create spider shapes. Place one or two olives on the pizza, and use additional bell pepper slices to form spider legs. Get creative—there are no wrong designs!
Step 6: Bake!
- Pop your pizza into the oven for about 12-15 minutes, or until the crust is golden and the cheese is bubbly and delicious. Keep an eye on it; every oven is a little different!
Step 7: Finish with Olive Oil
- Once out of the oven, carefully brush the crust with olive oil for extra flavor. It adds a nice sheen and makes it extra tasty!
Serving Suggestions
Now, it’s time to present your magnificent Spider Web Pizza to your guests! Cut it into slices, and if you really want to impress, serve it on a spooky platter. You could even sprinkle a bit of Parmesan cheese over the top for a ghostly effect! Pair it with a side of fresh salad or garlic bread, and you’ll have a complete meal everyone will adore.
Recipe Variations
Just like any good chef, I love experimenting! Here are a few fun ways to switch up the Spider Web Pizza experience:
- Veggie Lovers’ Delight: Load up on various vegetables like mushrooms, zucchini, and artichokes. They add great flavor and color.
- Meat Feast: Want to make it heartier? Add your favorite meats, like pepperoni, sausage, or even bacon bits.
- Gluten-Free Option: Substitute traditional dough with a gluten-free pizza crust. There are amazing pre-made options out there!
- Cheesy Crust: Before baking, stuff the edges of the crust with cheese for a more indulgent version.
Chef’s Notes
I have to admit, Spider Web Pizza has evolved quite a bit since my first attempt! Initially, I let my kids take the lead with toppings, and we ended up with some interesting designs—a mix of creepy and charming! The great part about this recipe is its flexibility; each pizza becomes a unique creation, often reflecting the personality of the maker.
One of my fondest memories was when I stuffed the dough with mozzarella before rolling it out—talk about a gooey surprise! I wish I had a camera to capture the expressions on everyone’s faces when they took that first bite!
FAQs and Troubleshooting
1. My pizza crust didn’t rise; what went wrong?
- It could be due to your yeast being expired or not letting the dough rise in a warm place. Give it enough time to puff up!
2. How do I keep my pizza from getting soggy?
- Pre-bake your crust for about 5 minutes before adding the sauce and toppings. This helps create a barrier and keeps everything crispy!
3. Can I make this pizza ahead of time?
- Absolutely! You can prepare the pizza and store it in the fridge for a few hours before baking. Just remember to let it sit out for about 15 minutes before popping it in the oven.
4. What’s the best way to reheat leftover pizza?
- To revive those flavors, place the pizza slices in a skillet over low heat. Cover it with a lid for a few minutes—it keeps the crust crispy while the cheese melts beautifully.
Nutritional Info
- Approximate Serving: 1 slice (1/8 of pizza)
- Calories: 270
- Protein: 12g
- Fat: 11g
- Carbohydrates: 30g
And there you have it! A fun, family-friendly recipe that adds a creative twist to a beloved dish. I hope this Spider Web Pizza brings warmth, laughter, and delicious moments to your table. Happy cooking, and may your kitchen always be filled with love and flavor! 🍕
Print
Spider Web Pizza
- Total Time: 30 minutes
- Yield: 8 servings
- Diet: Vegetarian
Description
A delightful and spooky pizza perfect for Halloween gatherings, featuring a cheesy spider web design and plenty of tasty toppings.
Ingredients
- Pizza Dough (store-bought or homemade)
- Pizza Sauce
- Shredded Mozzarella Cheese
- Black Olives (sliced)
- Sliced Bell Peppers
- Italian Seasoning
- Olive Oil (for brushing)
- Black food coloring or activated charcoal (optional for decoration)
Instructions
- Preheat your oven to 475°F (245°C) and prepare your baking sheet or pizza stone.
- Roll out your pizza dough to about 12 inches in diameter on a floured surface.
- Transfer the rolled dough to the baking sheet or hot pizza stone, then spread pizza sauce over the dough.
- Sprinkle a hearty layer of shredded mozzarella cheese over your sauce.
- Create the spider web design with cheese strips from the center outward.
- Place sliced black olives and bell peppers to create spider shapes and legs.
- Bake for about 12-15 minutes, until the crust is golden and the cheese is bubbly.
- Brush the crust with olive oil after baking for extra flavor.
Notes
Experiment with various toppings and designs; this pizza can be made to reflect your culinary creativity.
- Prep Time: 15 minutes
- Cook Time: 15 minutes
- Category: Main Course
- Method: Baking
- Cuisine: Italian
Nutrition
- Serving Size: 1 slice
- Calories: 270
- Sugar: 2g
- Sodium: 400mg
- Fat: 11g
- Saturated Fat: 4g
- Unsaturated Fat: 6g
- Trans Fat: 0g
- Carbohydrates: 30g
- Fiber: 2g
- Protein: 12g
- Cholesterol: 20mg
Keywords: Halloween, pizza, family-friendly, spooky recipe
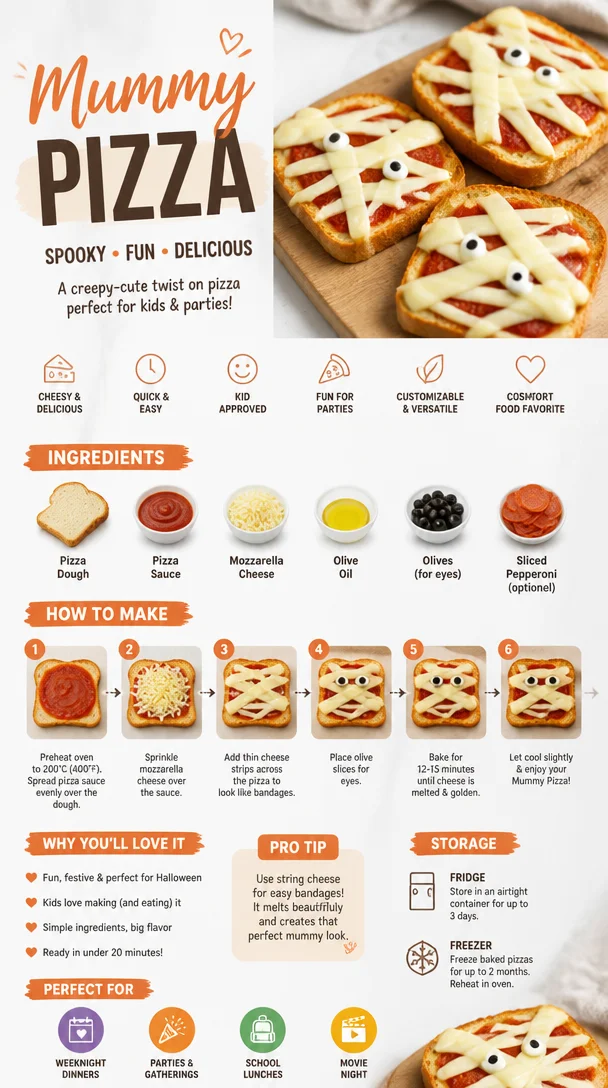
Mummy Pizza
Mummy Pizza: A Deliciously Spooky Treat for Everyone!
Welcome to my cozy kitchen! I’m so excited to share a dish that’s both fun and delicious — Mummy Pizza! As the leaves begin to turn and the weather gets a little crisper, it’s time to gather your friends and family for some spooky season fun. Whether you’re looking for a dish to please kids at a Halloween party or a fun twist for your next family movie night, these Mummy Pizzas are sure to bring smiles all around!
Imagine the laughter as everyone gathers around the table, eyes wide with delight at these whimsical creations. Plus, they are incredibly easy to make! With some simple ingredients, you can whip up a batch in no time. Not only do these Mummy Pizzas look adorable, but they taste absolutely divine, loaded with gooey cheese and your favorite toppings.
Now, you may wonder about the inspiration behind this dish. Growing up, Halloween was a spectacular affair in my house. My parents always went all out with decorations, treats, and, of course, themed food! I remember one particular year when we had a Halloween gathering where my mom surprised us all with her “dead man’s fingers” (which were actually chicken tenders) and ghostly cupcakes. But the showstopper was, without a doubt, her Mummy Pizzas. I didn’t realize back then just how simple they were; I was mesmerized by her creativity.
These Mummy Pizzas bring back those nostalgic memories for me, and I can’t wait for you to experience the same joy. Let’s dive in!
Personal Story
I still remember the year my mom first made Mummy Pizzas. I was around eight years old, and Halloween was my favorite holiday. The excitement in the air was palpable, and my friends were invited over for a spooky movie marathon. My mom decided to add a twist to the usual pizza night by transforming our beloved pies into playful mummies.
As she draped strips of cheese over the dough to create little mummy wrappings, I watched in pure awe. The aroma of baking dough wafted through our home, mingling with the laughter of children — it felt magical! We gathered around the table, eagerly awaiting the oven timer. When the Mummy Pizzas finally emerged, all golden and gooey, we devoured them in seconds!
This memory is super special to me, showcasing how simple food can turn into a heartwarming experience when shared with loved ones. Now, each Halloween, I recreate this tradition with my own twist, and I can’t wait for you to do the same!
Ingredients
Here’s what you’ll need to create these delightful Mummy Pizzas:
-
Pizza Dough: You can use homemade dough or store-bought for convenience. If you’re opting for gluten-free, there are fabulous pre-made gluten-free options available as well!
-
Pizza Sauce: Traditional tomato sauce works well, but feel free to experiment with barbecue sauce or pesto for a unique flavor kick!
-
Shredded Mozzarella Cheese: The gooeyness is essential! If you’re feeling adventurous, try using a blend of mozzarella and provolone for a super creamy texture.
-
Olives: These will serve as the eyes! Black olives work best for their striking color contrast, but green olives could add a fun twist.
-
Toppings of Choice: Get creative! Pepperoni, bell peppers, or mushrooms can add flavor and excitement to your Mummy Pizzas.
-
Olive Oil: Just a drizzle to help your crust get that perfect golden-brown hue.
Each ingredient brings its own charm to the table; mix and match to make it your own!
Step-by-Step Instructions
Now let’s get cooking! Follow these detailed steps, and remember, kitchen magic happens when you approach it with a joyful heart!
-
Preheat the Oven: Start by preheating your oven to 425°F (220°C). This ensures that the crust will bake perfectly and become delightfully crispy.
-
Prepare Your Workspace: Lightly flour your counter or a clean surface. Roll out your pizza dough into small rounds. Aim for about 4-6 inches in diameter — perfect for a pleasing personal pizza!
-
Spread the Pizza Sauce: Using a spoon, spread a generous layer of pizza sauce over each round of dough. Don’t go overboard; you want to leave the edges clear for those glorious mummy wrappings!
-
Get Cheesy: Sprinkle a liberal amount of shredded mozzarella cheese over the sauce. This is the fun part, where more cheese equals more gooeyness!
-
Mummify Your Pizza: Now, it’s time to create the mummy effect! Tear cheese slices into thin strips and lay them across the pizza, leaving gaps where the sauce peeks out like a little face. Play around with the arrangement — no two mummies have to look the same!
-
Add the Eyes: Slice your olives to create two rounds for each mouth — these will represent the spooky eyes staring back at you! Position them strategically among the cheese strips.
-
Drizzle Olive Oil: This step is optional but worth it! A quick drizzle of olive oil over the crust will not only add flavor but also help it brown beautifully.
-
Bake: Carefully transfer your Mummy Pizzas onto a baking sheet lined with parchment paper and place them in the preheated oven. Bake for about 12-15 minutes or until the cheese is bubbling and the crust is golden. Keep a close eye as they cook, as ovens can vary!
-
Cool and Serve: Once baked, pull your Mummy Pizzas out of the oven and let them cool for a few minutes. It’s important to give them a moment so the cheese doesn’t burn your tongue when you take that first delectable bite!
Serving Suggestions
The best way to serve these Mummy Pizzas is hot out of the oven! Arrange them on a spooky-themed platter for that extra flair. Add some fresh basil or a sprinkle of dried oregano on top for a pop of color and flavor. You can also pair them with a fresh side salad or some carrot sticks and celery for a healthy crunch, keeping with the Halloween theme!
Recipe Variations
Feel free to switch things up with these fun variations:
-
Veggie Mummies: Load your Mummy Pizzas with toppings like bell peppers, onions, and spinach to add some seasonal veggies.
-
Meat Lovers: Pile on pepperoni, sausage, and cooked chicken for a hearty feast that will satisfy even the hungriest guests.
-
Gluten-Free Option: Use a gluten-free pizza crust to cater to dietary restrictions without sacrificing the fun!
-
Spicy Twist: Add some jalapeños or a drizzle of hot sauce on top of your finished Mummy Pizzas for a kick!
Chef’s Notes
Delicious recipes evolve over time, just like my Mummy Pizzas! What started as a quick family dinner idea has transformed into a fun tradition for my friends and me. I often experiment with different cheeses, sauces, and toppings — it’s amazing how many flavors you can create with a simple base.
One funny memory that comes to mind is the year I decided to make a “mini” version. I ended up with tiny Mummy Pizzas that were more work than I had anticipated! Let’s just say I learned that big mummies are much easier to assemble.
FAQs and Troubleshooting
-
Can I make Mummy Pizzas ahead of time?
Absolutely! You can prepare the pizzas up to the baking stage, cover them with plastic wrap, and refrigerate. Bake them fresh when you’re ready to eat — they’ll be just as tasty! -
What if my cheese strips melt and blend together?
No worries! Embrace the chaos of the kitchen. If they blend together, it just makes your mummy a little more unique. Aim for some gaps, but if it gets gooey, it’s still going to taste amazing! -
Can I freeze the Mummy Pizzas?
Yes! Just complete the assembling and freeze them before baking. When you’re ready, let them thaw in the fridge overnight, then bake as directed. -
How can I make these healthier?
Choosing whole wheat pizza dough and loading them with veggies can make for a healthier Mummy Pizza. Also, lighten the cheese or go for low-fat options!
Nutritional Info
(If desired, you can insert optional nutritional estimates here, but keep in mind these are variable based on specific ingredients chosen.)
Now you have a full guide on making Mummy Pizzas! I hope these delightful bites not only fill your belly but also gather your loved ones around the table, sharing laughter and memories. Happy cooking, and have a spooktacular Halloween! 🎃
Print
Mummy Pizza
- Total Time: 30 minutes
- Yield: 4 servings
- Diet: Vegetarian
Description
A fun and spooky twist on traditional pizza, perfect for Halloween parties or family movie nights.
Ingredients
- Pizza Dough
- Pizza Sauce
- Shredded Mozzarella Cheese
- Olives
- Toppings of Choice
- Olive Oil
Instructions
- Preheat the oven to 425°F (220°C).
- Prepare your workspace by lightly flouring a clean surface.
- Spread a generous layer of pizza sauce over each pizza dough round.
- Get cheesy by sprinkling shredded mozzarella over the sauce.
- Mummify your pizza with strips of cheese, leaving gaps for sauce to show through.
- Add sliced olives for eyes on each pizza.
- Drizzle a bit of olive oil over the crust.
- Bake for 12-15 minutes until cheese is bubbling and crust is golden.
- Cool for a few minutes before serving.
Notes
Mummy Pizzas can be customized with different toppings or sauces, and they can be made gluten-free.
- Prep Time: 15 minutes
- Cook Time: 15 minutes
- Category: Appetizer
- Method: Baking
- Cuisine: Italian
Nutrition
- Serving Size: 1 pizza
- Calories: 350
- Sugar: 5g
- Sodium: 400mg
- Fat: 12g
- Saturated Fat: 4g
- Unsaturated Fat: 6g
- Trans Fat: 0g
- Carbohydrates: 45g
- Fiber: 3g
- Protein: 15g
- Cholesterol: 30mg
Keywords: Halloween, pizza, spooky food, family meals, fun food
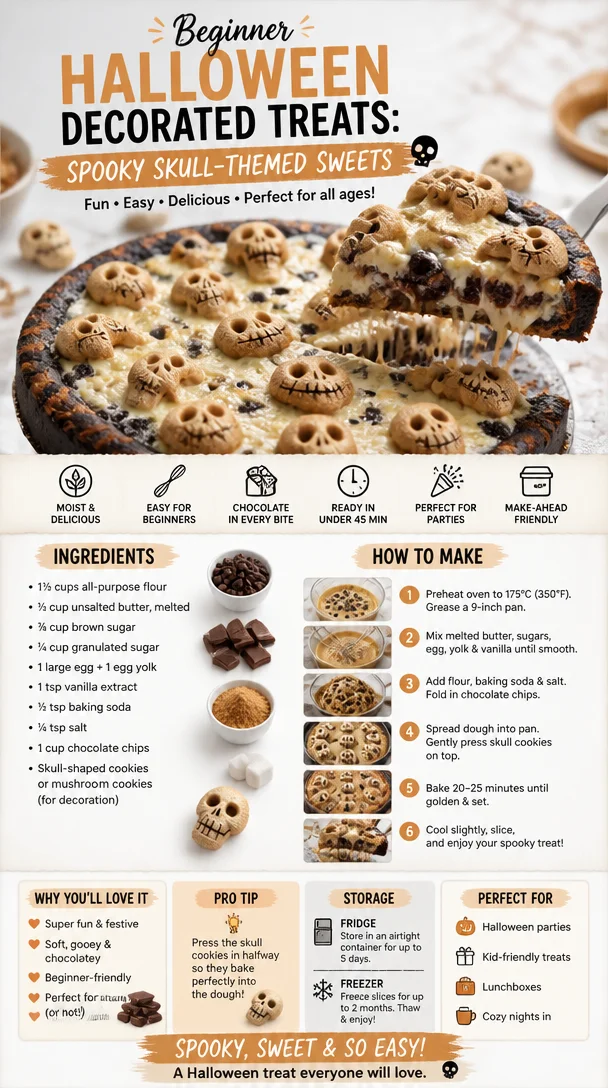
Beginner Halloween Decorated Treats: Spooky Skull-Themed Sweets
Halloween Delights: Skullhead Biscuits for a Spook-tacular Celebration
Welcome to my cozy kitchen, dear friends! As the air turns crisp and the leaves begin to tumble down, I can’t help but feel a sense of excitement for one of the most whimsical times of the year—Halloween! 🎃👻 When I think of this spook-tacular celebration, my heart fills with nostalgia and joy. Halloween isn’t just about scary costumes; it’s also about delicious treats that bring friends and family together. Today, I’m thrilled to share a recipe that not only tastes fantastic but also adds a fun twist to any Halloween gathering: Skullhead Biscuits!
These delightful treats are not just your standard cookies; they are charmingly decorated biscuits shaped like skulls that are perfect for parties, trick-or-treaters, or just indulging your sweet tooth. The blend of buttery biscuits with a hint of sweetness is like a warm hug on a chilly October evening. As you conjure these cute little skulls in your own kitchen, the delightful aroma of freshly baked biscuits will transform your home into a hauntingly beautiful bakery!
In this post, I’ll guide you through each step of making these Skullhead Biscuits, share delightful stories from my kitchen, and sprinkle in tips and tricks that might come in handy. Whether you’re baking with little ones or surprising your friends with a unique treat, these biscuits are sure to be a hit! So grab your apron, and let’s get this Halloween baking party started!
A Halloween Memory Worth Sharing 🍂
Before I delve into the nitty-gritty of the recipe, I want to share a little story that always warms my heart. Growing up, Halloween at my house was a big deal. My siblings and I often spent weeks planning our costumes while secretly plotting the best ways to trick our friends for extra candy! But what I cherished most was the post-trick-or-treat feast my mom prepared—a spread of delightful spooky treats!
One October evening, my mom decided to bake skull-shaped cookies, but they were unlike any I’ve seen before. She gave each skull a unique expression, from goofy grins to spooky frowns. We gathered around the table, giggling and decorating them with colorful icing and sprinkles. As we savored the warm biscuits fresh from the oven, it was not just about their taste but about the love poured into each bite.
This memory inspires me to recreate those joyous feelings—combining creativity, laughter, and deliciousness into my baking. So grab your loved ones, and let’s create memories together while whipping up these delightful Skullhead Biscuits!
Ingredients
Here’s what you’ll need to bring these spooky delights to life:
-
2 ½ cups all-purpose flour
The base of our biscuits! If you’re looking for a gluten-free option, you can substitute this with a 1:1 gluten-free flour blend. -
1 cup unsalted butter, softened
This is essential for that rich, buttery flavor. Make sure it’s at room temperature for best results—nobody wants cold butter in their dough! -
½ cup granulated sugar
Adds sweetness! You could replace half of this with brown sugar for a more caramel-like flavor. -
1 large egg
Acts as a binder. If you’re vegan, you can use a flax egg (1 tablespoon flaxseed meal mixed with 2.5 tablespoons water). -
1 tsp vanilla extract
Brings a warm aroma. Feel free to use almond extract for a unique twist! -
2 tsp baking powder
Helps our skulls rise just enough. Don’t substitute with baking soda; they work differently! -
½ tsp salt
A tiny pinch to balance the sweetness. -
Food coloring
Optional, but fun! Add to your icing for colorful decorations. -
Candy eyes or edible decorations
For that spooky flair! Get creative with other toppings like edible glitter or sprinkles.
This combination of ingredients will yield delightful biscuits that are easy to customize and decorate according to your Halloween whimsy!
Step-by-Step Instructions
Ready to bake? Here’s a step-by-step guide to whipping up those Skullhead Biscuits!
-
Preheat your oven to 350°F (175°C). This step is crucial! You want the oven hot and ready to give those biscuits a perfect bake.
-
In a large mixing bowl, whisk together the flour, baking powder, and salt. This will ensure even distribution of the leavening agent.
-
In another bowl, cream together the softened butter and sugar until it’s light and fluffy—about 3-5 minutes. This aeration is vital for that melt-in-your-mouth texture!
-
Add the egg and vanilla extract into the butter mixture, and beat until well combined. If you’re using a stand mixer, use the paddle attachment; it makes everything easier!
-
Gradually add the dry mixture to the wet ingredients. Mix on low until just combined; overmixing can lead to tough biscuits, and we don’t want that!
-
Chill the dough in the refrigerator for at least 30 minutes. This will make it easier to roll out and help the biscuits to retain their shape during baking.
-
Lightly flour your working surface. Roll out the chilled dough to about ¼-inch thick. Use a skull-shaped cookie cutter to cut out your biscuits.
-
Place the cutouts on a parchment-lined baking sheet. Don’t forget to leave some space between them!
-
Bake in the preheated oven for 10-12 minutes or until the edges are lightly golden. The center should still seem a bit soft, as they’ll continue to firm up outside the oven.
-
Cool the biscuits on the baking sheet for 5 minutes before transferring them to a wire rack to cool completely. Patience is key; warm biscuits are easier to decorate but can be fragile!
-
Decorate with icing and edible decorations once they’re completely cool. Turn on your spooktacular creativity here; go wild with colors and expressions!
Serving Suggestions
When it comes to serving your Skullhead Biscuits, presentation is key! Arrange them on a spooky-themed platter—perhaps with faux spider web decorations or surrounded by mini pumpkins. A sprinkle of powdered sugar can create a “ghostly” touch, or you can serve them alongside a warm cup of cider or hot cocoa to make it extra cozy. Don’t forget to take pictures; these biscuits are as much about fun as they are about taste!
Recipe Variations
Get creative with these skulls! Here are a few ideas to twist this recipe:
-
Chocolate Skullheads: Substitute 1/2 cup of flour with unsweetened cocoa powder for a chocolate version. Yum!
-
Spicy Skullheads: Add a pinch of cinnamon or ginger to the dough for a cozy autumn flavor.
-
Nutty Twist: Mix in some finely chopped nuts or use almond flour for a nutty flavor profile.
-
Gluten-Free Adventure: Use almond flour or a gluten-free baking blend for gluten-free biscuits.
-
Vegan Twist: Swap the egg for a flax egg and use coconut oil for a dairy-free version!
Chef’s Notes
As you embark on this baking adventure, don’t forget that every recipe has a life of its own! Over the years, my Skullhead Biscuit recipe has evolved from simple butter and sugar cookies to these fun, festive treats. I started decorating them with whatever I had at hand—sprinkles, chocolate chips, you name it. One year, I experimented with spooky ghost designs using whipped cream—trust me, it didn’t last long! Cooking should always be playful and adaptable.
My kitchen often reflects the joys of seasonal changes, and each Halloween reminds me to embrace the magic of creativity. So, don’t be afraid to let your imagination run wild, keeping your taste buds in mind!
FAQs and Troubleshooting
1. Why did my biscuits spread too much?
This could be due to the butter being too warm or not enough chilling time. Make sure your dough is chilled well before cutting out shapes.
2. My biscuits turned out tough! What went wrong?
Overmixing the dough is usually the culprit. Mix until just combined, and handle the dough as little as possible.
3. How can I make my icing vibrant for decorating?
Use gel food coloring instead of liquid for more concentrated color without altering the icing’s consistency.
4. Can I freeze the dough?
Absolutely! You can freeze the dough for up to three months. Wrap tightly in plastic wrap and thaw overnight in the fridge before rolling out.
Nutritional Info (if applicable)
Each Skullhead Biscuit contains approximately 150 calories, 7g of fat, 20g of carbohydrates, and 2g of protein. This may vary based on decorations and variations you choose!
Baking these Skullhead Biscuits is a fun-filled journey that not only satisfies your sweet tooth but also creates memories to cherish. So gather your loved ones, decorate to your heart’s delight, and most importantly—enjoy every moment in the kitchen! Happy Halloween, my fellow foodies! 🎃🖤
Print
Skullhead Biscuits
- Total Time: 45 minutes
- Yield: 24 servings 1x
- Diet: Vegetarian
Description
Delightful biscuits shaped like skulls, perfect for Halloween parties and trick-or-treaters.
Ingredients
- 2 ½ cups all-purpose flour
- 1 cup unsalted butter, softened
- ½ cup granulated sugar
- 1 large egg
- 1 tsp vanilla extract
- 2 tsp baking powder
- ½ tsp salt
- Food coloring (optional)
- Candy eyes or edible decorations
Instructions
- Preheat your oven to 350°F (175°C).
- Whisk together the flour, baking powder, and salt in a large mixing bowl.
- Cream together the softened butter and sugar until light and fluffy—about 3-5 minutes.
- Add the egg and vanilla extract into the butter mixture, and beat until well combined.
- Gradually add the dry mixture to the wet ingredients; mix on low until just combined.
- Chill the dough in the refrigerator for at least 30 minutes.
- Roll out the chilled dough to about ¼-inch thick and cut out biscuits using a skull-shaped cookie cutter.
- Place the cutouts on a parchment-lined baking sheet, leaving space between them.
- Bake for 10-12 minutes or until edges are lightly golden.
- Cool the biscuits on the baking sheet for 5 minutes before transferring them to a wire rack.
- Decorate with icing and edible decorations once completely cool.
Notes
You can customize biscuits with various icings and decorations for a unique Halloween touch.
- Prep Time: 15 minutes
- Cook Time: 12 minutes
- Category: Dessert
- Method: Baking
- Cuisine: American
Nutrition
- Serving Size: 1 biscuit
- Calories: 150
- Sugar: 6g
- Sodium: 100mg
- Fat: 7g
- Saturated Fat: 4g
- Unsaturated Fat: 2g
- Trans Fat: 0g
- Carbohydrates: 20g
- Fiber: 0g
- Protein: 2g
- Cholesterol: 30mg
Keywords: Halloween, biscuits, cookies, spooky treats, baking
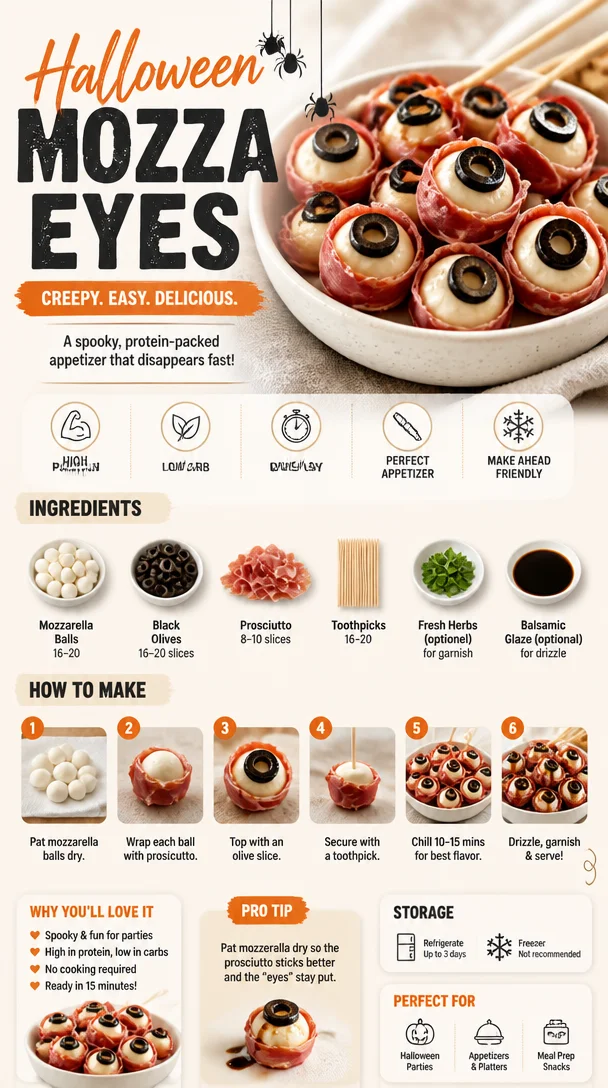
Halloween Mozza Eyes
Spooky and Delicious: Halloween Mozza Eyes
Welcome to my kitchen! I’m Olivia Bennett, your friendly neighborhood food enthusiast, and today we’re diving into a recipe that’s sure to make your Halloween festivities both fun and flavorful: Halloween Mozza Eyes! This playful dish brings a touch of spookiness to the table and will have everyone talking and laughing as they enjoy the hauntingly delicious flavors.
Halloween is one of those magical times of the year when creativity flourishes, and the spirit of gathering with friends and family comes alive. Remember the anticipation as you transformed your home into a haunted wonderland or the thrill of picking out the perfect costume? Now, how about infusing some of that joy into your kitchen? Imagine the laughter and chatter as your loved ones dig into these delightful mozzarella ball “eyes,” served with a side of zesty tomato sauce that’s sure to please even the pickiest of ghosts and goblins.
This recipe is so simple and requires minimalPrep time, allowing you to spend more moments enjoying the company of your guests and less time in the kitchen. With just a handful of ingredients, we’ll create a dish that looks stunning and tastes incredible. Whether you’re hosting a haunted house party, a cozy Halloween dinner, or just an intimate night in with your family, Halloween Mozza Eyes will bring comfort and warmth to your table.
Get ready to illuminate your night with gooey cheese and zesty flavors that captivate the senses. So, roll up your sleeves, grab that apron (the messier, the better!), and let’s conjure up some delicious magic!
A Spooky Snack with a Side of Nostalgia
I can’t help but smile when I recall the Halloween parties of my youth. There was always a sense of excitement in the air, from the spooky decorations to the sweet aroma of baked goods. It was during one of those festive gatherings that I first encountered “eyeball” snacks—think candy or gelatin—but I wanted to take this concept to a savory level.
I remember the laughter that erupted from my friends as they tentatively tried the “eyeball” treats. We embraced the eerie vibes while enjoying delicious food. Inspired by those cherished memories, I decided to create a savory version that would not only be a conversation starter but also a delightful treat that everyone would love.
A few weeks ago, I tested this recipe for the first time, and it took me back to my childhood parties. Watching my daughters dive into these mozzarella creations, just like I had many years ago, was pure bliss. Halloween Mozza Eyes are perfect for creating new traditions while reminiscing about the old ones.
The Ingredients You’ll Need
Here’s what we’ll be using to whip up our Halloween Mozza Eyes. Each ingredient plays a critical role in creating those delightful flavors and spooky aesthetics!
-
Mozzarella Balls (Bocconcini): These little cheese balls are the star of the show! They are creamy and mild, perfect for absorbing flavors while holding together surprisingly well. You can substitute them with larger mozzarella cylinders if bocconcini is unavailable.
-
Black Olives: A classic choice for adding the “pupil” to our mozzarella eyes. They lend a savory, slightly briny taste. If you’re not a fan of olives, cherry tomatoes or capers cut in half can work well as alternatives.
-
Cherry Tomatoes or Red Peppers: These are perfect for the “bloodshot” effect! Slices of cherry tomatoes can add just the right pop of color, while roasted red pepper strips can provide a sweet, smoky flair if you want to get creative.
-
Fresh Basil or Spinach Leaves: For those who enjoy a hint of greenery, fresh basil leaves or spinach can be artfully placed beneath the mozzarella to represent “eyelids.” They also add a lovely freshness to the dish.
-
Tomato Sauce: A tangy dipping sauce not only complements the cheese’s texture but also adds a delightful contrast to our eyes. You can use your favorite store-bought variety or even whip up a quick homemade version with crushed tomatoes, garlic, and herbs.
-
Salt and Pepper: Don’t forget to season! A bit of sea salt and cracked black pepper elevates the flavors and elevates each bite.
Cooking Made Simple: Step-by-Step Instructions
Let’s jump into the magic of creating our Halloween Mozza Eyes! Follow these steps, and let the fun begin.
-
Prep the Ingredients: Start by gathering all your ingredients. First, drain the mozzarella balls and pat them dry with a kitchen towel to remove excess moisture. This helps them hold their shape and gives them a firmer texture for easier assembly.
-
Assemble the Eyeballs:
- Take a mozzarella ball and place it on a serving platter or plate.
- Cut a small piece from a black olive, just enough to form a “pupil.” If using cherry tomatoes or capers, slice them accordingly to fit.
-
Create the Eyelids:
- For adding “eyelids,” tuck a small piece of fresh basil or a spinach leaf directly underneath the mozzarella ball. This not only gives an appealing look but also adds a subtle flavor contradiction against the cheese.
-
Make the Bloodshot Effect:
- Now, place a few slices of cherry tomato around the mozzarella balls. You can create a “bloodshot” effect by slicing them thinly and arranging them artfully. If using red pepper strips, lay them strategically for that extra flair.
-
Seasoning Time:
- Lightly sprinkle salt and pepper over the assembled mozzarella balls. This tiny but essential step heightens the flavors, ensuring your dishes shine like a midnight pumpkin in the moonlight!
-
Serve with Sauce:
- Pour your chosen tomato sauce into a small bowl. Arrange your mozzarella eyes around the sauce or plop them right in the middle for maximum effect. Trust me; no one can resist double-dipping into that tangy goodness!
Cook’s Tips:
- Vary Sizes: You can create a mix of mozzarella ball sizes for an eclectic look!
- Presentation: Use a spooky-themed platter to elevate the vibe. Adding cobwebs or plastic spiders can make the dish even more fun.
- Prep Ahead: These can be assembled a few hours before the party, making them a perfect finger food option!
How to Serve Your Halloween Mozza Eyes
For presentation, think of an inviting yet eerie vibe. Arrange your mozzarella eyeballs artfully around a small bowl of tomato sauce, mimicking a ghoulish platter. You can also serve them on a wooden board for a rustic touch. Add some garnishes like fresh herbs or even edible flowers for a burst of color. Spooky cocktail napkins or themed serving dishes can enhance the overall experience, making these mozzarella treats even more delightful and festive.
Recipe Variations: Get Creative!
Here are some fun twists on the classic Halloween Mozza Eyes. Don’t hesitate to get adventurous!
-
Spicy Mozza Eyes: Add a dash of hot sauce or diced jalapeños to the tomato sauce for a fiery spin.
-
Herbed Eyeballs: Mix fresh herbs (like thyme, oregano, or rosemary) into your sauce for an aromatic touch and extra depth of flavor.
-
Cheesy Eyes: Layer some shredded parmesan or pecorino under the mozzarella for an added cheesy burst!
-
Savory All, No Olives: Swap out the black olives with sunflower seeds for a nutty, crunchy texture while keeping it kid-friendly and allergen-conscious.
-
Sweet Version: Try using fruit balls (like cantaloupe or honeydew) instead of mozzarella for a sweet and colorful spin that’ll be a crowd favorite.
Chef’s Notes
I absolutely love how this dish has evolved over the years! It started as a simple mozzarella appetizer but has turned into a Halloween classic in my household. Each year, we make it a tradition to invite friends over to join in the fun of decorating the mozzarella “eyes,” and I’ve even seen kids get involved in the assembly line—a wonderful bonding experience and a great way to keep little hands busy. Plus, it sparks creativity and laughter as we add our spins!
One year, we went all out and drew faces on the mozzarella using food-safe markers for a lively touch! Just avoid too much detail, or they might lose their academic allure.
A Funny Story:
One Halloween, I had forgotten to buy olives and improvised by using black licorice pieces for the pupils. Let’s just say that my kids were all for the Halloween spirit but were utterly confused when they tasted our savory treat! Don’t make the same mistake; stick to olives for shock value!
FAQs and Troubleshooting
1. Can I make this in advance?
Absolutely! You can assemble the mozzarella eyes several hours before your event. Just keep them refrigerated in an airtight container to maintain freshness. If you’re worried about the olives or tomatoes, add them closer to serving time to prevent sogginess.
2. How do I avoid the mozzarella balls sticking together?
After draining and drying the mozzarella, be sure to space them out well on your serving platter. A light drizzle of olive oil can also help reduce sticking!
3. What if I can’t find bocconcini?
Don’t fret if you can’t get bocconcini! Any fresh mozzarella will work; just cut it into bite-sized pieces. You can even try mozzarella sticks cut into chunks!
4. My sauce turned out too watery. How can I fix that?
If your sauce is too watery, you can simmer it over low heat in a saucepan to thicken it up. A bit of tomato paste can also help intensify flavor and texture.
Nutritional Info (Optional)
Each serving (roughly 2-3 mozzarella eyes) contains approximately:
- Calories: 150
- Protein: 8g
- Fat: 11g
- Carbohydrates: 4g
- Fiber: 1g
Now it’s your turn to whip up these Halloween Mozza Eyes! Enjoy the laughter and joy that fills your kitchen as you create delightful memories. Happy cooking, and may your Halloween be filled with treats as bright and fun as these cheesy delights!
Print
Halloween Mozza Eyes
- Total Time: 15 minutes
- Yield: 4 servings
- Diet: Vegetarian
Description
A spooky and delicious mozzarella snack perfect for Halloween parties, featuring mozzarella balls styled as eyeballs and served with zesty tomato sauce.
Ingredients
- Mozzarella Balls (Bocconcini)
- Black Olives
- Cherry Tomatoes or Red Peppers
- Fresh Basil or Spinach Leaves
- Tomato Sauce
- Salt
- Pepper
Instructions
- Prep the ingredients by draining and drying the mozzarella balls.
- Assemble the eyeballs by placing a mozzarella ball on a serving platter and making a pupil with a piece of black olive.
- Create the eyelids with fresh basil or spinach beneath the mozzarella.
- Make the bloodshot effect by artfully arranging slices of cherry tomato around the mozzarella balls.
- Season lightly with salt and pepper.
- Serve with a bowl of tomato sauce for dipping.
Notes
Feel free to vary the sizes of the mozzarella balls and use a spooky-themed platter for presentation. These can be assembled a few hours ahead of serving.
- Prep Time: 15 minutes
- Cook Time: 0 minutes
- Category: Appetizer
- Method: No-Cook
- Cuisine: Italian
Nutrition
- Serving Size: 3 mozzarella eyes
- Calories: 150
- Sugar: 2g
- Sodium: 300mg
- Fat: 11g
- Saturated Fat: 5g
- Unsaturated Fat: 6g
- Trans Fat: 0g
- Carbohydrates: 4g
- Fiber: 1g
- Protein: 8g
- Cholesterol: 20mg
Keywords: Halloween, mozzarella, spooky snacks, easy recipes, party food, fun food
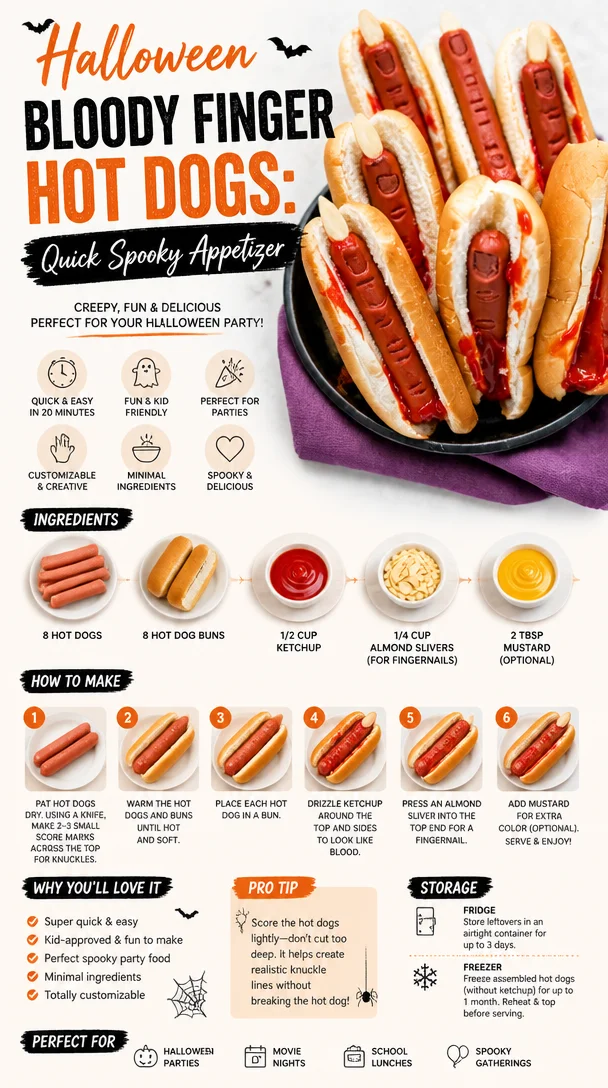
Halloween Bloody Finger Hot Dogs: Quick Spooky Appetizer
Unleashing Halloween Fun in the Kitchen: Bloody Finger Hot Dogs
Halloween is that magical time of the year when spooky costumes, spine-tingling decorations, and edible treats come together to create unforgettable experiences. It’s a time for laughter, joy, and a sprinkle of delightful fright. This year, I’m taking you on a journey to create something that’s sure to be a showstopper at your Halloween gathering: Bloody Finger Hot Dogs! Not only are they adorable and a bit gruesome (in the best way possible), but they also capture that playful spirit of the holiday.
When I think about Halloween, my mind drifts back to my childhood years of trick-or-treating in the neighborhood. The air would be filled with the scent of candy corn, and we would brave the chill with our costumes stuffed and adorned with layers to keep us warm. I remember one year, my mom transformed our kitchen into a concoction of inventive treats, including ghostly cupcakes and witch’s brew. But it was her finger hot dogs that had us giggling and squealing. Little did I know then that such a simple snack could spark so many happy memories.
This dish’s whimsical charm lies in its simplicity. It’s fun, engaging, and surprisingly easy to make, even for novice cooks. As you gather your ingredients and prep your kitchen, throw on some Halloween tunes (I’m partial to “Thriller,” of course!). The best part? They’re not just for kids; adults can join in the fun, too! So let’s dive in and create these spine-chilling yet totally delicious Bloody Finger Hot Dogs that will leave your party guests raving.
Personal Story: A Trip Down Memory Lane
I’ll never forget the first time I made these Bloody Finger Hot Dogs with my niece, Ella. She was no more than six years old, and the combination of her giggles with the eerie aesthetic of the dish made it a Halloween to remember. We donned our ghostly aprons and got started, turning ordinary hot dogs into slender fingers with a few simple cuts. As we sliced and sculpted, Ella’s eyes widened with delight at each transformation.
“Are we really going to eat these?” she asked, her curiosity bubbling over as she observed the hot dogs become something so silly yet strangely appealing.
“Of course!” I replied, trying to contain my laughter. “But only if they’re painted with some creepy ketchup.”
We gathered our ingredients and made messy faces while we crafted each freaky finger, complete with almond slivers for nails. It felt as if we had conjured a new Halloween tradition right there in my cozy kitchen. By the time we were done, the platter of Bloody Finger Hot Dogs looked just eerie enough to induce a few giggles mixed with shrieks. They were an instant hit at our Halloween party, disappearing as fast as Ella finished her pumpkin juice.
Now, every Halloween, it’s become a family tradition to whip up these creepy snacks. It’s a reminder of the joy of cooking together and how food can strengthen our bonds while creating lasting memories.
Ingredients
Let’s gather our ingredients to assemble these horrifyingly tasty Bloody Finger Hot Dogs. Here’s what you’ll need:
-
Hot Dogs (10-12): Go for your favorite type – beef, chicken, turkey, or even plant-based options! If you’re opting for a healthier choice, turkey hot dogs are a great alternative.
-
Slivered Almonds (10-12): These will serve as the "fingernails." If you’re not a fan of almonds or have nut allergies, try using slices of cheese or even small pieces of carrot as alternatives.
-
Ketchup (½ cup): The classic choice for “blood.” You can swap ketchup with a spicy sauce if you want to add a kick, or use BBQ sauce for a different flavor profile.
-
Mustard (optional): For added decoration, dollop mustard to create a “bandage” effect on your fingers.
-
Hot Dog Buns (optional): For serving, though you can skip the buns if you prefer to keep it simple.
-
Food Coloring (optional): If you want to get extra creative, red food coloring can help intensify that blood-red hue!
Now that we have our ingredients prepped, let’s move on to whipping up these deliciously creepy hot dogs!
Step-by-Step Instructions
Step 1: Preheat Your Oven
Preheat your oven to 400°F (200°C). This preheating step ensures that the hot dogs will cook thoroughly and develop a nice texture when we pop them in for that finishing touch.
Step 2: Prepare the Hot Dogs
Grab your hot dogs and start by making a small incision on one end of each hot dog. Carefully slice down about half an inch to create a “finger” shape. As you cut, remember to envision those creepy fingers you see in horror movies—it adds to the fun! The more you can mimic the shape of a finger (with a slight curve for the knuckles), the more real they look.
Chef Hack: If you’re struggling to get a smooth cut, you can warm the hot dogs for a minute or so to soften them slightly. Just ensure they aren’t too hot to handle!
Step 3: Add the Fingernails
Now for the fun part—adding the almond slivers! Stick one slivered almond into the end of each hot dog where you made the cut. Press it down gently to secure it in place. If you’ve chosen a non-nut option, don’t hesitate to let creativity guide you!
Tip: If you find the almonds aren’t staying in, a little dab of ketchup or mustard can act like glue to hold everything in place.
Step 4: Bake the Fingers
Place your prepared hot dogs on a baking sheet lined with parchment paper. Bake them in the preheated oven for about 10-15 minutes or until they’re heated through and starting to crisp. As they cook, the edges will brown slightly, giving them a more authentic look—like real, bloody fingers!
Step 5: The Bloody Effect
Once the hot dogs are fully cooked, remove them from the oven and allow to cool slightly. Drizzle or dip them in ketchup generously to create that iconic bloody effect.
Chef Tip: To get that true Halloween horror look, you can mix a bit of red food coloring with your ketchup for extra vibrancy!
Step 6: Serve Them Up
Now it’s time to plate your horrifying creations! You can use a skeleton platter, a simple white dish, or even serve them in a faux coffin for added drama.
Plating Tip: Arrange the Bloody Finger Hot Dogs neatly, and consider garnishing the plate with some “gore” made from ketchup. If you like, add a few strategically placed pumpkin candies for a splash of color.
Serving Suggestions
These Bloody Finger Hot Dogs are perfect for Halloween parties, school events, or even just an eerie dinner at home. Serve them alongside a bowl of chips or some spooky-themed sides like “witches’ fingers” (celery sticks with almond "fingernails") for a matched horror feast. You can serve them in hot dog buns as usual, but don’t hesitate to get creative with your serving dishes! Think of a bewitching platter with grave-looking decor or even a spooky candlelit setting for that added atmosphere.
Recipe Variations
Let’s spice things up a bit! Here are some variations to keep your Bloody Fingers fresh and exciting:
-
Spicy Fingers: Use spicy sausages or hot dogs for those who dare! Add a spicy ketchup to ramp up the heat.
-
Cheesy Fingers: Make cheese-stuffed hot dogs by inserting cheese sticks inside before proceeding to slice them into fingers.
-
Veggie Delight: Use zucchini or carrot sticks in place of hot dogs for a crunchy, healthy alternative.
-
Ghostly Fingers: Incorporate ghost-shaped cheese slices over the hot dogs for an added spooky effect—think melted cheese ghosts!
-
Themed Dips: Serve with a creamy dip dyed green or orange to pair with the whole spooky theme!
Chef’s Notes
These Bloody Finger Hot Dogs aren’t just a fun dish; they’ve evolved into something my family and friends continue to look forward to every Halloween. I’ve showcased them at gatherings, and they never fail to create conversation—and a few giggles!
When I was crafting this post, I chuckled at the ridiculous scenarios we imagined while cooking. One year, my niece, Ella, dressed as a witch, used a cauldron alongside our hot dog fingers, insisting we concoct a potion to accompany them. It was a mess but in the best way possible!
Every Halloween, I find inspiration in simple food ideas that evoke emotion—whether it’s the nostalgic warmth of the kitchen or the delightful chaos with family. These hot dogs have become a symbol of creativity, laughter, and bonding through food, and I hope they bring that same joy to your kitchen!
FAQs and Troubleshooting
Q: My hot dogs split while baking! What went wrong?
A: If your hot dogs split, it’s often due to cooking them too long or at too high a temperature. Try not to overcook and keep a close eye after 10 minutes or so!
Q: Can I make these fingers in advance?
A: Absolutely! You can prepare the hot dogs ahead of time, slice them, and even insert the almonds. Just cover them and store them in the fridge. Bake them right before serving for optimum freshness.
Q: What if I can’t find slivered almonds?
A: If almonds are unavailable, consider using sunflower seeds or cheese slices as an alternative for the fingernails.
Q: Can I freeze the hot dogs once cooked?
A: Yes! You can freeze the cooked hot dogs for up to three months. Just make sure to wrap them tightly and reheat them directly from frozen when ready to serve!
Nutritional Info
(Per serving – 2 hot dogs with ketchup):
- Calories: 250
- Protein: 10g
- Carbohydrates: 20g
- Total Fat: 15g
Now that you’re all set, it’s time to don your apron and channel your inner spooky chef! Unleash the eerie culinary adventurer in you and make Bloody Finger Hot Dogs for your Halloween party this year. I can’t wait to hear how many laughs they bring to your festive gathering! Happy cooking, and may your Halloween be filled with fun and flavor!
Print
Bloody Finger Hot Dogs
- Total Time: 30 minutes
- Yield: 4 servings
- Diet: Non-Vegetarian
Description
A spooky and fun recipe for Halloween, these Bloody Finger Hot Dogs are sure to delight guests of all ages with their creepy appearance and delicious flavor.
Ingredients
- Hot Dogs (10-12)
- Slivered Almonds (10-12)
- Ketchup (½ cup)
- Mustard (optional)
- Hot Dog Buns (optional)
- Food Coloring (optional)
Instructions
- Preheat your oven to 400°F (200°C).
- Prepare the hot dogs by making an incision on one end of each to create a ‘finger’ shape.
- Add the slivered almonds at the end of each hot dog for fingernails.
- Place the prepared hot dogs on a baking sheet lined with parchment paper.
- Bake in the preheated oven for about 10-15 minutes until heated through and slightly crisp.
- Remove from the oven and drizzle or dip in ketchup for a bloody effect.
- Serve on a spooky platter, garnished creatively.
Notes
Consider using cheese or carrot slices if slivered almonds are not available.
- Prep Time: 15 minutes
- Cook Time: 15 minutes
- Category: Appetizer
- Method: Baking
- Cuisine: American
Nutrition
- Serving Size: 2 hot dogs
- Calories: 250
- Sugar: 10g
- Sodium: 900mg
- Fat: 15g
- Saturated Fat: 3g
- Unsaturated Fat: 12g
- Trans Fat: 0g
- Carbohydrates: 20g
- Fiber: 1g
- Protein: 10g
- Cholesterol: 25mg
Keywords: Halloween, Hot Dogs, Finger Food, Spooky Recipe, Party Snacks
Seasonal Pumpkin Peanut Fondant: Silky Gooey Dessert
Fondant au Potimarron et aux Cacahuètes: A Cozy Autumn Delight
Welcome back to my kitchen, dear friends! Today, I’ve got a special treat that’s perfect for those crisp autumn days when you want to wrap your hands around something warm and comforting. We’re diving headfirst into a delightful, creamy dessert that’s sure to impress: Fondant au Potimarron et aux Cacahuètes, or Pumpkin and Peanut Fondant! This dish is a beautiful combination of sweet and savory, with that luscious texture that makes every bite a melt-in-your-mouth experience. So, grab your apron, and let’s get cooking!
A Slice of Nostalgia
I remember the first time I tried something similar to Fondant au Potimarron et aux Cacahuètes. It was at a little café tucked away in a bustling market in France. The scent of caramelized pumpkin wafted through the air, drawing me in like a moth to a flame. As I took my first bite, the smoothness of the fondant mingled with the crunch of roasted peanuts. It was love at first taste. I felt an instant connection to the dish—not just for the flavors but for the warmth it brought, reminiscent of cozy family gatherings around the table.
That experience ignited my passion for creating desserts that not only taste divine but carry a beautiful story. Since then, I’ve been experimenting with this delightful combination and fine-tuning the recipe to make it just right for sharing with friends and family. So, let me share my version, infused with love, nostalgia, and just the right touch of creativity.
Ingredients
Here’s what you’ll need to whip up this delightful dessert:
-
1 cup pumpkin puree
Tip: You can use store-bought pumpkin puree or roast your own. To roast, simply cut the pumpkin in half, scoop out the seeds, and bake at 350°F (175°C) for about 45 minutes or until tender. Scrape the flesh into a bowl and mash until smooth. -
1/2 cup creamy peanut butter
Chef Insight: Natural peanut butter is best for this recipe as it’s free of added sugars and preservatives. If you’re nut-free, sunflower seed butter works as a great substitute! -
1/2 cup brown sugar
Substitution Tip: If you prefer a healthier option, try coconut sugar. It has a similar caramel flavor but is less processed. -
2 large eggs
Quick Insight: Room temperature eggs will mix more evenly into your batter, helping to create a lovely, even texture in your fondant. -
1/4 cup all-purpose flour
Tip: For a gluten-free option, you can use almond flour or a 1:1 gluten-free flour blend. Just watch the texture, as gluten-free flours can yield different results. -
1 teaspoon vanilla extract
Chef Tip: Always choose pure vanilla extract for a more robust flavor. It makes a world of difference! -
1 teaspoon baking powder
Quick Insight: This ingredient helps to create that fluffy texture, ensuring just the right rise in your fondant. -
1/4 teaspoon salt
Tip: A pinch of salt can enhance the sweetness of the dessert, making the flavors pop! -
Roasted peanuts for garnish
Chef Hack: Lightly crush the peanuts for a crunchy topping that contrasts beautifully with the soft fondant.
Step-by-Step Instructions
Now, let’s get into the fun part—the cooking process! Follow these steps closely for a perfect Fondant au Potimarron et aux Cacahuètes:
-
Preheat the Oven
Begin by preheating your oven to 350°F (175°C). This gets the cooking process underway and ensures your dessert bakes evenly. -
Prepare Your Baking Dish
Grease a 9-inch round cake pan with a little butter or non-stick spray. You can also line the bottom with parchment paper for easier removal later. -
Combine the Wet Ingredients
In a large mixing bowl, combine the pumpkin puree, peanut butter, and brown sugar. Use a hand mixer or whisk to blend them until the mixture is nice and smooth. This will create a beautiful base for your fondant. -
Add Eggs and Vanilla
Crack in those room-temperature eggs and pour in the vanilla extract. Mix until fully incorporated. This is where the magic starts to happen! -
Mix the Dry Ingredients
In a separate bowl, whisk together the flour, baking powder, and salt. Gradually add this mixture to your wet ingredients. Fold everything gently with a spatula until just combined. Be careful not to overmix; you want it to remain light and fluffy. -
Pour into the Baking Dish
Pour the batter into your prepared cake pan, smoothing the top with a spatula. Don’t worry if it looks a bit thick; that’s exactly how it should be! -
Bake to Perfection
Slide your pan into the oven and bake for about 25-30 minutes. Keep an eye on it! The top should be golden brown, and a toothpick inserted into the center should come out clean or with a few moist crumbs. -
Cool and Serve
Once done, remove it from the oven and let it cool in the pan for about 10 minutes. Then, carefully invert it onto a wire rack to cool completely. -
Garnish and Enjoy
Once cool, slice into wedges and top each piece with roasted peanuts for that extra crunch. Drizzle with a little bit of melted chocolate or a dollop of whipped cream if you like—because who doesn’t love a bit of indulgence?
Serving Suggestions
For a beautiful presentation, serve each slice on a rustic wooden board or a delicate dessert plate. You can sprinkle some crushed peanuts on the side, and if you’re feeling extra fancy, a sprig of mint makes a lovely garnish. Pair it with a cup of warm chai tea or a scoop of vanilla ice cream for a sweet treat that feels like a hug in dessert form!
Recipe Variations
Want to take your Fondant au Potimarron et aux Cacahuètes to the next level? Here are some creative variations to consider:
- Spicy Kick: Add a pinch of cinnamon and nutmeg into your batter for a cozy, spiced twist.
- Chocolate Lovers: Mix in some dark chocolate chips for a decadent chocolate-peanut butter combination.
- Fruit Infusion: Toss in some dried cranberries or chopped apples for added texture and flavors.
- Nutty Swirl: Swirl in some chunky peanut butter for an extra peanut punch and lovely visual appeal.
- Vegan Version: Swap the eggs for flaxseed meal (1 tablespoon of flax mixed with 2.5 tablespoons of water) and use a plant-based buttery spread!
Chef’s Notes
This recipe holds a special place in my heart because it’s a reflection of how food can bring us together. I’ve served this fondant at dinner parties and family gatherings, and it never fails to spark conversation and smiles. As you create it in your kitchen, don’t stress the little details; allow the love for your ingredients to shine through. And remember, every time I make this fondant, I feel like I’m inviting a bit of that quaint French café vibe right into my home!
FAQs and Troubleshooting
-
Can I make this in advance?
Absolutely! You can bake the fondant a day ahead. Just store it in an airtight container at room temperature. -
Why did my fondant sink in the middle?
This can happen if the batter is overmixed, or if the oven temperature is too low. Always check to ensure your oven is properly calibrated! -
Can I freeze leftovers?
Yes! Once completely cooled, wrap the slices in plastic wrap and place them in a freezer-safe container. They will last for about a month. -
What if I don’t have pumpkin puree?
Substitute with baked butternut squash puree or even applesauce for a fruity twist!
Nutritional Info
This fondant is rich with flavors and contains healthy fats from the peanut butter and beneficial nutrients from the pumpkin, making it a delightful but nourishing treat. Each serving offers approximately:
- Calories: 200
- Protein: 5g
- Fat: 10g
- Carbohydrates: 24g
- Fiber: 3g
So grab your ingredients and let’s create some kitchen magic together! Remember, cooking is an adventure, and I’m thrilled to share this one with you. Enjoy every rich, velvety bite of your Fondant au Potimarron et aux Cacahuètes!
Print
Fondant au Potimarron et aux Cacahuètes
- Total Time: 45 minutes
- Yield: 8 servings 1x
- Diet: Vegetarian
Description
A cozy autumn dessert combining creamy pumpkin and crunchy peanuts for a delightful treat.
Ingredients
- 1 cup pumpkin puree
- 1/2 cup creamy peanut butter
- 1/2 cup brown sugar
- 2 large eggs
- 1/4 cup all-purpose flour
- 1 teaspoon vanilla extract
- 1 teaspoon baking powder
- 1/4 teaspoon salt
- Roasted peanuts for garnish
Instructions
- Preheat the oven to 350°F (175°C).
- Grease a 9-inch round cake pan.
- Combine pumpkin puree, peanut butter, and brown sugar in a large mixing bowl.
- Add the eggs and vanilla extract, mixing until fully incorporated.
- Mix the flour, baking powder, and salt in a separate bowl, then gradually combine with the wet ingredients.
- Pour the batter into the prepared cake pan.
- Bake for about 25-30 minutes until golden brown.
- Cool for 10 minutes before inverting onto a wire rack.
- Garnish with roasted peanuts and serve.
Notes
Feel free to add chocolate chips or spices for variations. This fondant can be made a day in advance.
- Prep Time: 15 minutes
- Cook Time: 30 minutes
- Category: Dessert
- Method: Baking
- Cuisine: French
Nutrition
- Serving Size: 1 serving
- Calories: 200
- Sugar: 15g
- Sodium: 100mg
- Fat: 10g
- Saturated Fat: 2g
- Unsaturated Fat: 8g
- Trans Fat: 0g
- Carbohydrates: 24g
- Fiber: 3g
- Protein: 5g
- Cholesterol: 30mg
Keywords: pumpkin, peanut butter dessert, fall recipe, cozy dessert, French dessert




