

Crispy Chocolate Pretzel Spider Web Treat in 15 Minutes
Chocolate Pretzel Spider Webs: A Fun and Spooky Treat!
Welcome to my kitchen! I’m so excited to share a delightful and spooky treat that’s perfect for your next gathering or Halloween celebration: Chocolate Pretzel Spider Webs! These fun snacks blend sweet and salty flavors, and best of all, they’re super simple to make. Whether you’re hosting a Halloween party, looking for creative snacks for the kids, or just want to indulge your taste buds, this recipe is bound to become a favorite in your home.
There’s something inherently magical about this chocolate pretzel combination. The crunchy twists of the pretzel, the smooth velvety chocolate, and that hint of whimsy from the spider web design bring together everything that I love about cooking at home—creativity, comfort, and a little bit of nostalgia. Each bite cradles cozy moments and great conversations.
In this blog post, I’ll take you through a journey of crafting these sweet and salty delights, alongside stories from my own kitchen adventures. Together, we’ll whip up a batch of Chocolate Pretzel Spider Webs that’ll have you and your guests squealing in delight!
A Trip Down Memory Lane
One Halloween, I remember going to a local pumpkin patch to pick out the best gourds and apples to bake into pies. Among the stalls, there was a quaint little table run by a friendly family who would always have a selection of homemade baked goods. As kids, my sister and I were always drawn to their table, not just for the cookies but for the creative snacks they showcased. It was on that day I first had something like these chocolate pretzel webs – but instead of spiders, they showcased cute little ghosts made of marshmallows!
We each grabbed one and for some reason, the combination of the crunch and sweetness sent my taste buds into overdrive! That memory has stuck with me, and when I created my version of these spooky pretzel webs, I couldn’t help but reminisce about that Halloween day long ago. It’s funny how food weaves its way into our memories and becomes a thread in our life story, isn’t it?
Ingredients
To get started, here’s what you’ll need for your Chocolate Pretzel Spider Webs:
-
Pretzel Sticks
The foundation of your web! Crunchy and salty, they provide the perfect base. Don’t have pretzel sticks? Use regular pretzels or even breadsticks as a substitute. -
Chocolate Chips (Milk or Dark)
Choose your favorite chocolate—milk for a sweeter touch or dark for a more intense flavor. If you’re feeling adventurous, white chocolate also makes a great base for coloring! -
Black Candy Melts
These will give the perfect look to your spider web. If candy melts aren’t available, you can use chocolate mixed with a little vegetable oil to achieve a similar consistency. -
Confectioners Sugar
Just a sprinkle for sweetness! If you need a sugar-free option, you can find alternative sweeteners that work well, too. -
Edible Eyes
To bring your spiders to life! You can buy edible candy eyes from any baking supply store or make your own with small dollops of icing. -
Parchment Paper
Not an ingredient per se, but crucial for setting your webs and keeping everything tidy!
Step-by-Step Instructions
Let’s dive into crafting these delightful treats! Follow along as we build these Chocolate Pretzel Spider Webs step-by-step.
-
Prepare Your Workspace:
Start by lining a baking sheet with parchment paper. This will be where your completed spider webs will rest and harden. -
Melt the Chocolate:
In a microwave-safe bowl, add your chocolate chips. Heat them in 30-second intervals, stirring in between until completely melted and smooth. This should take about 1-2 minutes depending on your microwave power. Pro tip: Avoid overheating the chocolate, as it can seize up. If that happens, simply stir in a teaspoon of vegetable oil to salvage it. -
Dip the Pretzel Sticks:
Take your pretzel sticks and dip them halfway into the melted chocolate. Let the excess drip off and place them on the parchment paper. I love to make a bunch of these at once—perfect for sharing with family! -
Create the Spider Web:
Using a piping bag or a plastic sandwich bag with the corner snipped off, draw circles and lines over the chocolate-covered pretzel sticks to create the web effect. Start from the center and move outward—this is where creativity shines! Don’t worry if it’s not perfect; your webs will turn out adorable regardless! -
Add the Spiders:
While the chocolate is still soft, place two edible eyes on top of each pretzel stick to make them resemble spiders. The kids will love helping with this part! -
Let It Set:
Place the baking sheet in the refrigerator for about 30 minutes or until the chocolate has completely hardened. You can also leave them out at room temperature for a couple of hours if you prefer. -
Serve and Enjoy:
Once the chocolate is set, gently peel the pretzel webs off the parchment paper. They’re now ready to be devoured!
Serving Suggestions
When serving your Chocolate Pretzel Spider Webs, arrange them on a creepy platter surrounded by faux spider decorations or spooky candles for a charming display. You can even place them in a clear jar adorned with festive ribbons for a cute centerpiece. Pair them with some pumpkin spice dip for a deliciously seasonal treat!
Recipe Variations
Feel free to switch things up! Here are some creative twists to keep things fresh:
- Nut Butter Version: Instead of chocolate, use melted peanut butter or almond butter for a unique flavor!
- Add a Crunch: Mix in crushed nuts or sprinkle some chopped toffee on top before the chocolate hardens for an extra crunch.
- Colorful Treats: Use colored candy melts for different holidays or celebrations—think pastel colors for Easter or bright hues for a birthday!
- Gluten-Free: Swap the pretzel sticks for gluten-free options, like rice cakes or gluten-free pretzels.
- Dairy-Free: Use vegan chocolate chips for a dairy-free version that everyone can enjoy!
Chef’s Notes
There’s always room for creativity in the kitchen! Over the years, I’ve experimented with adding different toppings and flavors to this recipe. One of my favorite stories is when I tried to make mini cupcake versions of the spider webs. Let’s just say, they didn’t quite turn out as planned, but they were a delicious, albeit messy, trial!
With each attempt, I learn something new—whether it’s finding the right chocolate to achieve the glossy finish or discovering new designs for the webs. Cooking is a journey, and I cherish every messy moment along the way.
FAQs and Troubleshooting
Q: What if my chocolate seizes?
A: If your chocolate seizes up while melting, try adding a little vegetable oil and stirring it back to a smooth consistency.
Q: Can I make these in advance?
A: Absolutely! You can prepare them a few days ahead and store them in an airtight container to keep them fresh.
Q: How can I make the webs more defined?
A: Use a piping bag with a thin tip for better control, which will create sharper lines and more defined shapes in your chocolate webs!
Q: What can I substitute if I’m allergic to nuts?
A: You can easily swap the chocolate with carob chips or try using sunflower seed butter for that nut-free alternative!
Nutritional Info (if applicable)
While I always encourage you to indulge in these delightful treats, here’s a rough nutritional breakdown per spider web:
- Calories: 130
- Total Fat: 6g
- Saturated Fat: 3g
- Carbohydrates: 17g
- Sugar: 10g
- Protein: 2g
As always, your nutritional needs may vary depending on the brands used and personal dietary choices.
I can’t wait for you to try making these Chocolate Pretzel Spider Webs! They’re more than just a treat; they’re a wonderful way to celebrate creativity and bring people together. Happy cooking, friends, and don’t forget to enjoy every bite!
Print
Chocolate Pretzel Spider Webs
- Total Time: 45 minutes
- Yield: 20 servings
- Diet: Vegetarian
Description
A fun and spooky treat combining sweet and salty flavors, perfect for Halloween gatherings.
Ingredients
- Pretzel Sticks
- Chocolate Chips (Milk or Dark)
- Black Candy Melts
- Confectioners Sugar
- Edible Eyes
- Parchment Paper
Instructions
- Prepare your workspace by lining a baking sheet with parchment paper.
- Melt the chocolate in a microwave-safe bowl, heating in 30-second intervals until smooth.
- Dip the pretzel sticks halfway into the melted chocolate and place on parchment paper.
- Create the spider web using a piping bag or sandwich bag to draw over the chocolate-covered pretzel sticks.
- Add two edible eyes on each pretzel stick while the chocolate is still soft.
- Let the baking sheet sit in the refrigerator for about 30 minutes until the chocolate hardens.
- Serve and enjoy by gently peeling the pretzel webs off the parchment paper.
Notes
Feel free to get creative with toppings and variations, such as using nut butter or gluten-free pretzels.
- Prep Time: 15 minutes
- Cook Time: 30 minutes
- Category: Snacks
- Method: No-Bake
- Cuisine: American
Nutrition
- Serving Size: 1 spider web
- Calories: 130
- Sugar: 10g
- Sodium: 0mg
- Fat: 6g
- Saturated Fat: 3g
- Unsaturated Fat: 2g
- Trans Fat: 0g
- Carbohydrates: 17g
- Fiber: 0g
- Protein: 2g
- Cholesterol: 0mg
Keywords: Halloween treats, chocolate pretzels, spooky snacks, fun desserts
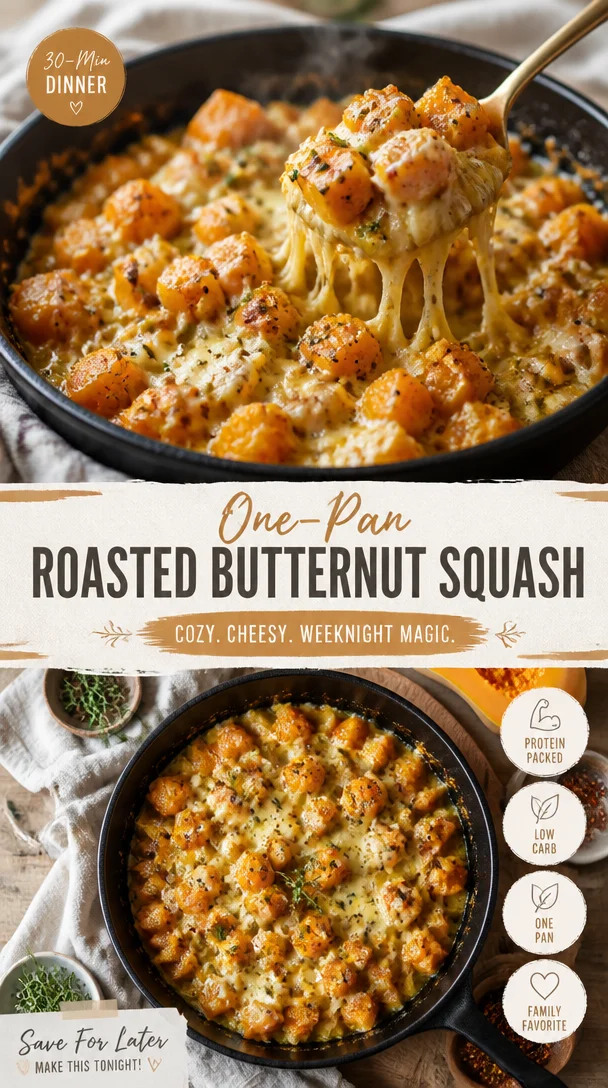
One-Pan Roasted Butternut Squash Recipe for Weeknights
Embrace the Sweetness: A Heartwarming Butternut Squash Recipe
Welcome to my cozy kitchen, food lovers! Today, we’re diving into the delightful world of butternut squash—one of fall’s most beloved ingredients. Whether you’re dodging that winter chill or seeking to impress your friends with your newfound culinary skills, this sweet, nutty gem is a fantastic ingredient to bring warmth and comfort to your table.
Butternut squash isn’t just delicious; it’s also incredibly versatile! You can roast it, mash it, or even blend it into a velvety soup. The possibilities are endless, and today, I want to show you how to create a dish that’s not only easy to make but also packed with flavor and love.
Imagine the scent of roasted butternut squash wafting through your kitchen as you prepare this dish. It’s the kind of aroma that wraps around you like a warm hug, inviting everyone to the table. Cooking for me has always been about sharing moments and creating memories, and there’s something inherently joyful about preparing a meal with love, especially when it comes to a dish as comforting as this.
In this post, we’ll whip up a savory butternut squash and sage risotto that’s bound to become a family favorite. With creamy Arborio rice, roasted squash, and fragrant sage, it’s a dish that bridges the gap between comfort food and gourmet goodness. I promise, once you try this, your loved ones will be singing your praises! So, let’s roll up our sleeves, tie on our aprons, and get cooking!
A Slice of Nostalgia
Growing up, my grandmother would make the best butternut squash soup every autumn. The whole house would fill with the aroma of spices and slow-cooked goodness. I’d watch as she peeled and chopped the squash, her hands moving with a kind of grace that came from years of experience. We’d sit together, her sharing tales from her childhood while we stirred the pot, and it quickly became a tradition I cherished.
Those cozy afternoons inspired my love for cooking, and no dish fills me with nostalgia quite like a butternut squash creation. As I experimented with various recipes over the years, I found a special love for risotto—a creamy, cheesy delight that transforms a simple meal into a memorable feast. This dish feels like a comforting embrace, and I know that with every bite, you’ll be connecting with those same laughs, stories, and cozy moments from your own life.
Ingredients
Here’s what you’ll need to whip up this delightful dish:
-
1 medium butternut squash, peeled and cubed: This serves as the star of the show! Butternut squash is naturally sweet and creamy. If you need a substitute, pumpkin or sweet potato works beautifully.
-
1 cup Arborio rice: This short-grain rice is what gives risotto its signature creaminess. If you’re in a pinch, you can use Carnaroli or even short-grain brown rice, though this will alter the texture slightly.
-
4 cups vegetable broth (or chicken broth): Homemade is ideal, but store-bought works just as well. If you want to lower the salt content, opt for low-sodium broth.
-
1 medium onion, finely chopped: This adds sweetness and depth of flavor. Shallots are great too if you want a subtler flavor.
-
2 cloves garlic, minced: A must-have for any savory dish! Fresh garlic is best, but if you have garlic powder, use about 1/2 teaspoon.
-
2 tablespoons olive oil: For sautéing and drizzling. If you’re looking for a different flavor, consider using avocado oil or even a bit of butter.
-
1/2 cup grated Parmesan cheese: This contributes to the creaminess and a little cheesy goodness. For a dairy-free version, try nutritional yeast.
-
1 tablespoon fresh sage, chopped (or 1 teaspoon dried sage): Sage pairs beautifully with squash, adding an earthy flavor. Thyme or rosemary can also work as tasty substitutes!
-
Salt and pepper to taste: Seasonings are crucial! Freshly cracked pepper adds a lovely kick.
-
Optional: A drizzle of balsamic reduction for garnishing—this adds a touch of acidity and sweetness that elevates the dish.
With these ingredients, you’re all set to prepare a comforting bowl of butternut squash risotto that will have everyone coming back for seconds!
Step-by-Step Instructions
Let’s get down to the delicious part—cooking! Here’s how you can prepare your butternut squash risotto:
-
Prep the Squash: Begin by preheating your oven to 400°F (200°C). While it heats, peel your butternut squash and cut it into 1-inch cubes. Place the cubes on a baking sheet, drizzle with olive oil, and sprinkle with a bit of salt and pepper. Toss to combine. Roast for about 25-30 minutes, or until tender and caramelized around the edges. Chef Tip: Roasting enhances sweetness and depth!
-
Warm the Broth: In a saucepan, heat your vegetable broth and keep it warm over low heat. This will help maintain the temperature when adding it to the rice.
-
Sauté the Aromatics: In a large pot or Dutch oven, heat 2 tablespoons of olive oil over medium heat. Add the chopped onion and sauté for 3-4 minutes, until translucent. Add the minced garlic and fresh sage, cooking for an additional minute until fragrant. Chef Hack: Make sure to keep an eye on the garlic—it browns quickly!
-
Toast the Rice: Stir in the Arborio rice, cooking for 1-2 minutes until it’s lightly toasted. This helps to release the nutty aroma and prepares the rice for absorbing liquids.
-
Add the Broth: Begin adding your warm broth one ladleful at a time, stirring frequently. Allow the rice to absorb most of the liquid before adding more. This will take about 18-20 minutes. Think of it as a labor of love! Tip: This slow, steady process releases the starches, giving risotto its creaminess.
-
Incorporate the Squash: After about 15 minutes of cooking, add your roasted butternut squash pieces into the pot, mixing gently. This will ensure each bite has that delicious squash flavor. Pro Tip: You can reserve a few pieces for garnishing later!
-
Finish With Cheese: Once your risotto is creamy and the rice is al dente, remove it from heat. Stir in the grated Parmesan cheese until melted. Season to taste with salt and pepper. Chef’s Note: If you want that extra creaminess, add a tablespoon of butter!
-
Serve: Your butternut squash risotto is ready! Spoon it into bowls and garnish with the reserved squash, a sprinkle of extra Parmesan, and a drizzle of balsamic reduction if you’re feeling fancy.
Serving Suggestions
For a beautiful presentation, serve your risotto in deep bowls and top with a sprinkle of fresh sage leaves and a light drizzle of olive oil or balsamic reduction. Pair it with a simple arugula salad with lemon vinaigrette to balance out the creamy rice and enrich your dining experience.
Recipe Variations
Feeling adventurous? Here are a few variations to try:
-
Creamy Vegan Version: Substitute Parmesan cheese with nutritional yeast and coconut milk for a creamy base that’s dairy-free.
-
Add Some Protein: Toss in sautéed mushrooms, spinach, or chickpeas for added texture and nutrition—perfect for a hearty meal!
-
Spice It Up: Add a pinch of red pepper flakes to the onions for a hint of heat or stir in some ground nutmeg or cinnamon for a warm spice vibe.
-
Herb Swaps: Don’t have sage? Thyme or even fresh parsley can add a delightful touch! Season according to your pantry.
-
Seasonal Greens: Stir in some kale or Swiss chard at the end of cooking for added vitamins and a colorful presentation.
Chef’s Notes
I have to confess, the first time I made this risotto, I didn’t stir it enough and ended up with a clumpy mess! It was a lesson learned—so trust me when I say that constant stirring is key! Over the years, this dish has evolved from a simple recipe to a celebration of seasonal ingredients, with each rendition evoking a different memory or experience in the kitchen. This risotto has taken me to cozy dinners at home, dinner parties with friends, and even evenings of culinary experimentation. It’s become a beloved staple in my family, and I hope it will become a cherished recipe in yours as well!
FAQs and Troubleshooting
1. Why did my risotto come out too sticky?
If risotto becomes too sticky, it’s often due to either too much stirring or not using enough broth. Remember, slow and steady is key—keep an eye on your rice and add broth gradually.
2. Can I make this risotto ahead of time?
Risotto is best served fresh, but if you have leftovers, you can store them in the refrigerator for 1-2 days. Reheat gently, adding a splash of broth to loosen it up.
3. My risotto is too bland! What can I do?
If your risotto lacks flavor, it may just need more seasoning. Don’t hesitate to add a pinch of salt or more garlic. Also, the quality of your broth matters!
4. What if I don’t have Arborio rice?
If you can’t find Arborio rice, you can use other short-grain varieties like Carnaroli or even sushi rice in a bind. Just keep in mind the texture might change!
Nutritional Info (if applicable)
On average, a serving of butternut squash risotto (without additional toppings) contains approximately:
- Calories: 350
- Protein: 12g
- Carbohydrates: 60g
- Fats: 10g
- Fiber: 4g
Now that you have all the know-how to create this delicious dish, don’t be shy—get cooking! I can’t wait to hear your thoughts and stories as you enjoy this comforting, heartwarming butternut squash risotto. Happy cooking, my friends! 🍂✨
Print
Butternut Squash and Sage Risotto
- Total Time: 45 minutes
- Yield: 4 servings 1x
- Diet: Vegetarian
Description
A comforting and creamy risotto made with roasted butternut squash and fragrant sage, perfect for sharing with loved ones.
Ingredients
- 1 medium butternut squash, peeled and cubed
- 1 cup Arborio rice
- 4 cups vegetable broth (or chicken broth)
- 1 medium onion, finely chopped
- 2 cloves garlic, minced
- 2 tablespoons olive oil
- 1/2 cup grated Parmesan cheese
- 1 tablespoon fresh sage, chopped (or 1 teaspoon dried sage)
- Salt and pepper to taste
- Optional: A drizzle of balsamic reduction for garnishing
Instructions
- Prep the squash: Preheat your oven to 400°F (200°C). Peel the butternut squash and cut it into 1-inch cubes. Place the cubes on a baking sheet, drizzle with olive oil, and sprinkle with salt and pepper. Toss to combine. Roast for about 25-30 minutes until tender and caramelized.
- Warm the broth: In a saucepan, heat the vegetable broth and keep it warm over low heat.
- Sauté the aromatics: In a large pot, heat olive oil over medium heat. Add chopped onion and sauté for 3-4 minutes until translucent. Add minced garlic and fresh sage, cooking for an additional minute until fragrant.
- Toast the rice: Stir in Arborio rice and cook for 1-2 minutes until lightly toasted.
- Add the broth: Begin adding the warm broth one ladle at a time, stirring frequently, until absorbed—this takes about 18-20 minutes.
- Incorporate the squash: After 15 minutes of cooking, add the roasted butternut squash, mixing gently.
- Finish with cheese: Remove from heat and stir in grated Parmesan cheese until melted. Season with salt and pepper.
- Serve: Spoon the risotto into bowls and garnish with reserved squash, extra Parmesan, and balsamic reduction if desired.
Notes
Stir constantly to ensure creamy consistency and avoid clumping. Serve fresh for the best flavor.
- Prep Time: 15 minutes
- Cook Time: 30 minutes
- Category: Main Course
- Method: Stovetop
- Cuisine: Italian
Nutrition
- Serving Size: 1 serving
- Calories: 350
- Sugar: 6g
- Sodium: 400mg
- Fat: 12g
- Saturated Fat: 4g
- Unsaturated Fat: 6g
- Trans Fat: 0g
- Carbohydrates: 45g
- Fiber: 4g
- Protein: 12g
- Cholesterol: 30mg
Keywords: butternut squash, risotto, comfort food, fall recipes, vegetarian

Beginner-Friendly One-Bowl Old-Fashioned Spice Cake
The Cozy Charm of Old Fashioned Spice Cake
Welcome back to my cozy kitchen, dear food friends! Today, I’m thrilled to dive into a recipe that warms the heart and brings nostalgia to the forefront — the delightful Old Fashioned Spice Cake. This cake is more than just a sweet treat; it’s a fragrant hug on a plate that dances with the richness of spices and invites you to slow down and savor life’s simple pleasures.
Imagine walking into your home, greeted by the comforting aroma of cinnamon, nutmeg, and cloves wafting through the air. It’s like wrapping yourself in a warm blanket on a chilly autumn day! Spice cake has a way of evoking those memories, transporting us back to family gatherings, holiday festivities, and the cozy corners of our grandparents’ kitchens.
Through this blog, I want to share not only the recipe for this beautiful cake but also the stories and warmth that come with it. Whether you’re baking for a special occasion or simply indulging in a treat for yourself, my goal is to empower you to create delicious food with love and joy in your heart. So, grab your apron, and let’s embark on this baking adventure together!
A Slice of Memory
Let me take you back to my childhood for a moment. Picture this: a crisp fall afternoon, leaves painting the yard in vibrant shades of orange and gold. I was barely tall enough to see over the counter of my grandmother’s kitchen when she pulled out her well-worn cookbook. With flour dusting the tabletop and a teasing sprinkle of sugar in the air, she set out to make her famous spice cake.
As she measured out the fragrant spices, I was enchanted by each unique scent filling the room — cinnamon, cloves, and ginger. “These spices are like warm hugs for your taste buds,” she would say, a twinkle in her eye. I would watch intently, soaking in every detail as she mixed the batter, gently folding in love and laughter along with the ingredients.
When the cake finally emerged from the oven, golden and puffed, we waited (impatiently) for it to cool before drenching it in cream cheese frosting. There was nothing quite like that first slice, a harmonious blend of sweetness and spice that ignited our taste buds and our hearts. That beloved cake became a staple at family gatherings, and each bite was a sweet reminder of the love and joy that filled our kitchen. Today, I hope to share that same delicious nostalgia with you!
Ingredients
Before we dive into baking, let’s gather our ingredients. Here’s what you’ll need to create this old-fashioned gem:
-
All-purpose flour (2 cups)
- The backbone of our cake, providing structure. Feel free to use a gluten-free blend if you’re looking for a gluten-free option!
-
Granulated sugar (1 1/2 cups)
- This will sweeten our cake beautifully. For a lower glycemic index, consider coconut sugar as a substitute.
-
Baking soda (2 teaspoons)
- Our leavening agent, ensuring the cake rises. Make sure it’s fresh for maximum effectiveness!
-
Ground cinnamon (2 teaspoons)
- The star of our spice show! Cinnamon adds warmth and sweetness. If you prefer a bolder flavor, try Vietnamese cinnamon.
-
Ground ginger (1 teaspoon)
- Adding a zesty kick, ginger complements the sweetness. You can replace it with ground cardamom for a different spin.
-
Ground nutmeg (1 teaspoon)
- Just a pinch can elevate the flavor profile! Freshly grated nutmeg is always a lovely touch.
-
Ground cloves (1/2 teaspoon)
- The secret ingredient that gives spice cake depth. Use sparingly, as it can overpower other flavors.
-
Salt (1/2 teaspoon)
- Balances the sweetness; don’t skip this! A pinch of sea salt can enhance the overall taste.
-
Unsalted butter (1 cup, softened)
- This will keep our cake moist and rich. If you prefer an oil-based cake, avocado oil works wonders too.
-
Large eggs (2)
- Essential for binding and richness. For a vegan option, you can replace them with flax eggs (1 tablespoon ground flaxseed mixed with 2.5 tablespoons water per egg).
-
Buttermilk (1 cup)
- Adds moisture and tang. No buttermilk? Mix regular milk with a tablespoon of lemon juice or vinegar and let it sit for a few minutes!
-
Vanilla extract (1 teaspoon)
- Pure vanilla gives a lovely backdrop flavor. Homemade vanilla extract? Even better!
These ingredients combined will turn into a cake that is as comforting as a cup of hot cocoa on a chilly night. Now, let’s get our hands doughy and throw this cake together!
Step-by-Step Instructions
1. Preheat Your Oven
Before anything else, let’s get that oven warming up! Preheat it to 350°F (175°C). This ensures your cake begins baking at the right temperature for perfectly moist results.
2. Prepare Your Cake Pans
Grease and flour two 9-inch round cake pans. This is crucial to ensure the cakes release effortlessly once baked. You can use a bit of butter or cooking spray, and a light dusting of flour will do the trick.
3. Combine Dry Ingredients
In a medium-sized bowl, whisk together the flour, baking soda, salt, cinnamon, ginger, nutmeg, and cloves. This simple step ensures that the spices and leaveners are evenly distributed throughout your cake, which harmonizes the flavor.
4. Mix the Butter and Sugar
In a large mixing bowl, beat the softened butter and granulated sugar together until it’s light and fluffy. This process takes about 3-5 minutes using an electric mixer. The lightness from the butter and sugar helps to create a tender cake.
5. Add the Eggs and Vanilla
Next, add the eggs one at a time, mixing well after each addition. Let the yolks create that velvety texture! Add the vanilla extract and blend until combined. The batter should be smooth and fluffy.
6. Alternate Adding Dry Ingredients and Buttermilk
Begin incorporating the dry mixture into the butter-sugar mixture gradually, alternating with the buttermilk. Start with a third of the dry ingredients, mix until just combined, add half of the buttermilk, and continue this process until all ingredients are combined. This keeps the batter nice and airy.
7. Pour into Pans
Once your batter is ready, it’s time to pour it into the greased pans. Divide it evenly for uniform cakes and smooth the tops with a spatula.
8. Bake Until Done
Pop the cake pans into the preheated oven and let them bake for about 25-30 minutes or until a toothpick inserted in the center comes out clean. The aroma filling your kitchen will be irresistible!
9. Cool the Cakes
Once baked, remove the cakes from the oven and allow them to cool in the pans for about 10 minutes. Then, gently invert them onto a wire rack to cool completely. Cooling completely is important if you want to frost your cakes without melting your icing!
10. Frosting Time!
Let’s make it pretty! While the cakes cool, you can whip up a luscious cream cheese frosting to slather on top. It’s simple — beat together 8 oz of softened cream cheese, 1/2 cup of softened butter, 2 cups of powdered sugar, and 1 tsp of vanilla extract. Once everything is mixed and creamy, frost the layers generously and stack them together.
Serving Suggestions
To serve, slice the cake into generous wedges and plate them with a sprinkle of cinnamon or a few candied nuts on top for that extra touch of elegance. A scoop of vanilla ice cream by the side makes for a perfect contrast to the spiced cake! This is also a lovely dessert for any gathering or a cozy night in, where you can just enjoy every single bite.
Recipe Variations
- Nutty Spice Cake: Add chopped walnuts or pecans to the batter for an added crunch.
- Fruity Twist: Fold in raisins or chopped apples for an extra layer of flavor and texture.
- Chocolate Lovers: Mix in cocoa powder for a chocolate-spice cake that’s rich and decadent!
- Glazed Alternative: Instead of frosting, drizzle with a simple glaze made of powdered sugar and milk for a lighter option.
- Vegan Makeover: Substitute eggs with flax eggs and use plant-based butter and milk to make this cake vegan-friendly — still delicious!
Chef’s Notes
This Old Fashioned Spice Cake holds a special place in my heart, and over the years, I’ve seen it evolve. I love experimenting with additional spices or tweaking the recipe depending on what I have in my pantry. My version has changed with each family gathering, sometimes incorporating seasonal fruits or daring new flavor experiments. It’s the perfect canvas for creativity!
And let me tell you, if you accidentally overmix the batter or forget an ingredient, it still comes out delicious in its own right. The beauty of home cooking is that it’s a perfect reflection of love, patience, and a sprinkle of imperfection.
FAQs and Troubleshooting
Q: My cake didn’t rise. What went wrong?
A: This can happen for a couple of reasons — check the freshness of your baking soda and make sure your oven is at the right temperature.
Q: Can I bake this in a single pan?
A: Absolutely! If you prefer a single-layer cake, just adjust the baking time and keep an eye on it; it may need a little longer to bake through.
Q: How do I store leftovers?
A: Store the cooled cake in an airtight container at room temperature for up to 3 days. If frosted, keep it in the fridge!
Q: What can I do if the cake is too dry?
A: If you accidentally overbake it, don’t fret! A drizzle of milk or a sprinkle of flavored simple syrup over the top can help soften each slice and revive some moisture.
Nutritional Info
(Note: Please adjust based on specific ingredients used.)
- Serving Size: 1 slice (1/12 of the cake)
- Calories: Approximately 350
- Fat: 15g
- Carbohydrates: 49g
- Protein: 4g
- Sugars: 28g
And there you have it, my lovely friends! This Old Fashioned Spice Cake celebrates that cozy essence of home baking and nourishes not just your body but your soul, too. Give yourself permission to indulge in the process — let the kitchen be a therapeutic space where you can unite with the magic of flavors. I can’t wait to hear about your cake adventures! Happy baking!
Print
Old Fashioned Spice Cake
- Total Time: 45 minutes
- Yield: 12 servings 1x
- Diet: Vegetarian
Description
A delightful old-fashioned spice cake that warms the heart with its fragrant blend of cinnamon, nutmeg, and cloves, perfect for any occasion.
Ingredients
- 2 cups all-purpose flour
- 1 1/2 cups granulated sugar
- 2 teaspoons baking soda
- 2 teaspoons ground cinnamon
- 1 teaspoon ground ginger
- 1 teaspoon ground nutmeg
- 1/2 teaspoon ground cloves
- 1/2 teaspoon salt
- 1 cup unsalted butter, softened
- 2 large eggs
- 1 cup buttermilk
- 1 teaspoon vanilla extract
Instructions
- Preheat your oven to 350°F (175°C).
- Prepare two 9-inch round cake pans by greasing and flouring them.
- Combine the flour, baking soda, salt, cinnamon, ginger, nutmeg, and cloves in a medium bowl.
- Mix the softened butter and sugar until light and fluffy.
- Add the eggs one at a time and mix in the vanilla extract.
- Alternate adding the dry ingredients and buttermilk to the butter mixture, starting and ending with the dry ingredients.
- Pour the batter evenly into the prepared cake pans.
- Bake for 25-30 minutes or until a toothpick comes out clean.
- Cool the cakes in the pans for 10 minutes before inverting them onto a wire rack.
- Frost with cream cheese frosting once cooled.
Notes
Serve with a sprinkle of cinnamon or a scoop of vanilla ice cream for an extra special touch.
- Prep Time: 15 minutes
- Cook Time: 30 minutes
- Category: Dessert
- Method: Baking
- Cuisine: American
Nutrition
- Serving Size: 1 slice
- Calories: 350
- Sugar: 28g
- Sodium: 300mg
- Fat: 15g
- Saturated Fat: 9g
- Unsaturated Fat: 5g
- Trans Fat: 0g
- Carbohydrates: 49g
- Fiber: 1g
- Protein: 4g
- Cholesterol: 60mg
Keywords: spice cake, old fashioned cake, baking, dessert, autumn recipes
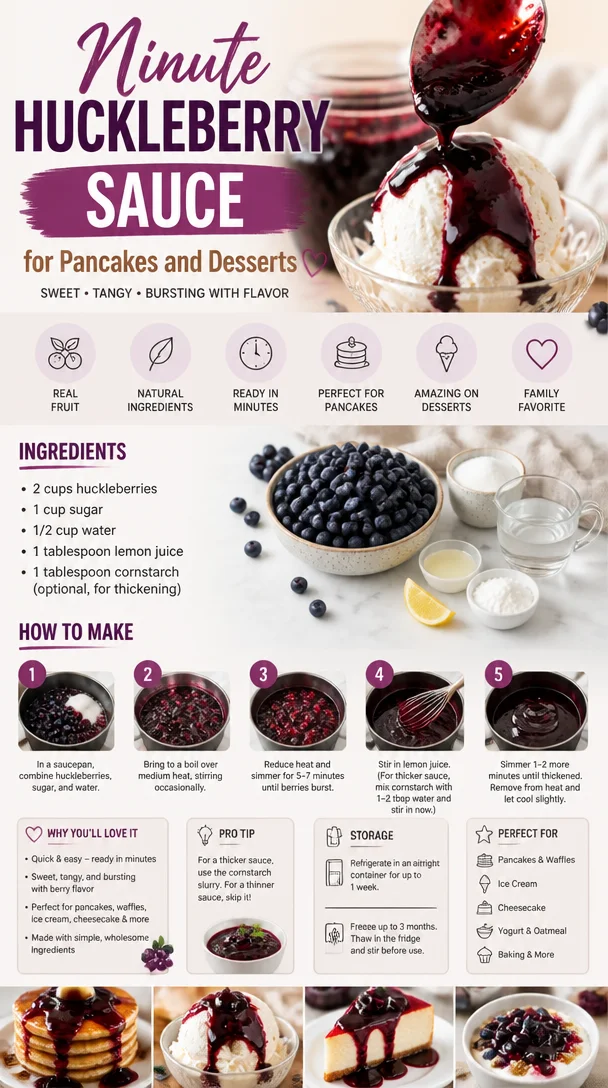
Minute Huckleberry Sauce for Pancakes and Desserts
Easy Homemade Huckleberry Sauce: A Sweet Serenade for Your Taste Buds
Welcome to my kitchen, dear friends! Today, we’re diving into the enchanting world of huckleberries with a simple yet delightful recipe for homemade huckleberry sauce. Oh, the joy of making this sauce! It encapsulates everything I love about cooking: nostalgia, creativity, and, above all, irresistible flavor. Whether drizzled over fluffy pancakes, slathered on a warm slice of bread, or elegantly paired with a dollop of whipped cream on dessert, this sauce opens the door to a host of delicious possibilities.
Imagine it’s a lazy Sunday morning. The sun peeks in through the kitchen window, casting a golden glow onto your countertop. The aroma of freshly brewed coffee wafts through the air, and there’s an undeniable urge to create something special. That’s where this huckleberry sauce comes into play! It’s incredibly easy to make, and it brings an air of sophistication to your brunch table without breaking a sweat.
You might wonder what makes huckleberries so special. These little gems are not only delicious but also showcase a fantastic balance of sweet and tart flavors. If you’re lucky enough to live in a region where huckleberries grow wild — or if you’ve secretly stashed some in your freezer from a summer harvest — you’re in for a treat! Let this sauce whisk you away to blissful memories of berry-picking adventures or those delightful moments spent working alongside loved ones in the kitchen.
By the end of this post, I promise you’ll feel confident and excited to whip up this luscious huckleberry sauce, no matter the occasion. So grab your apron, and let’s get started!
A Walk Down Memory Lane: An Ode to Huckleberries
I’ll never forget my first experience with huckleberries. It was a rainy summer afternoon in my grandmother’s kitchen, where the scent of something sweet was constantly floating through the air. As a child, I loved nothing more than helping her out. We’d wait for the rain to let up, and as soon as we could, we’d toss on our rain jackets and head out to the nearby woods, where we knew of a secret spot filled with wild huckleberries.
With baskets in hand, we’d spend hours searching for those tiny, purple-blue orbs, all the while chatting and laughing. The thrill of finding the perfect berries was always exhilarating! When we returned home, we transformed our huckleberry bounty into a sweet sauce that would adorn everything from pancakes to ice cream. Each spoonful was a reminder of those magical summers spent with my grandmother, and today, I carry that love and memory into my kitchen as I share this recipe with you.
Ingredients: The Key Players in Our Huckleberry Sauce
Here’s what you’ll need to create this vibrant sauce:
-
2 cups fresh or frozen huckleberries
Huckleberries can be a bit elusive, but they’re worth seeking out! If you can’t find them, fresh blueberries make an excellent substitute. Just keep in mind that the flavor profile will slightly change. -
1 cup sugar
This sugar helps balance the tartness of the huckleberries. You can use fewer or opt for a sugar substitute if you’re watching your sugar intake — just keep an eye on the sweetness level. -
1 tablespoon lemon juice
A splash of lemon juice brightens the flavor and enhances the fruitiness. If you’re out of fresh lemons, feel free to use bottled lemon juice. -
1 tablespoon cornstarch
Cornstarch thickens the sauce for that luxurious, syrupy texture. If you’re looking for a gluten-free option, this one’s perfect! You can also swap it out for arrowroot powder if you prefer. -
1/2 cup water
This is just enough to help the huckleberries cook down and release their natural juices. If you’d like a more intense flavor, consider using fruit juice, like apple or even cranberry juice.
Step-by-Step Instructions: Creating Huckleberry Heaven
Now, let’s roll up our sleeves and get cooking! Follow these simple steps for a luscious homemade huckleberry sauce:
-
Prepare Your Ingredients:
Start by rinsing your huckleberries if they’re fresh. Make sure to sort through them, discarding any that are mushy or spoiled. If you’re using frozen huckleberries, there’s no need to thaw them — they work beautifully straight from the freezer! -
Combine Ingredients:
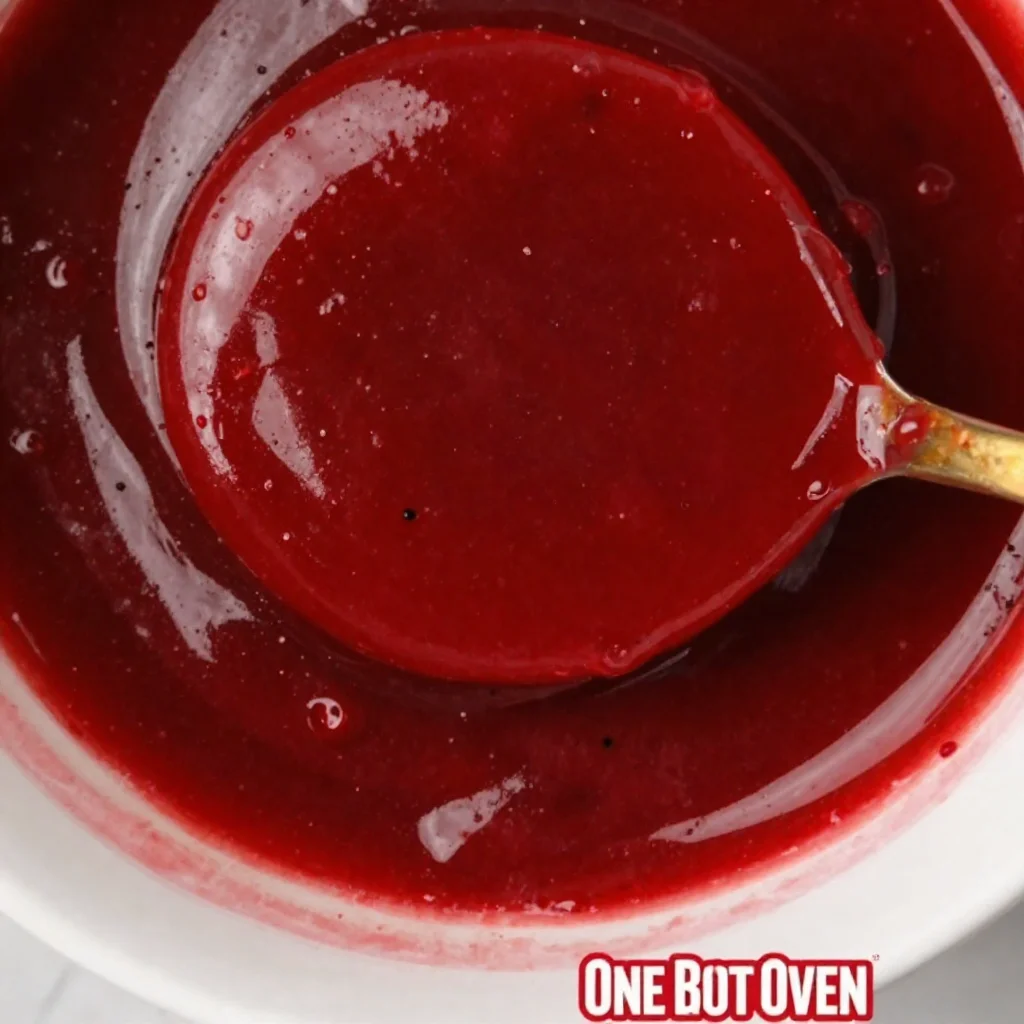
In a medium saucepan, combine the huckleberries, sugar, lemon juice, cornstarch, and water. Gently stir everything together. A little tip: If you want a smoother sauce, you can mash some of the berries slightly with a fork or potato masher at this stage, as it helps to release their juices. -
Cook and Simmer:
Place the saucepan on medium heat and cook while stirring gently. As the mixture heats up, the sugar will dissolve, and the huckleberries will begin to burst and release their natural juices. This might take about 5-7 minutes. Keep an eye on it, and don’t forget to stir occasionally — it prevents sticking and ensures an even cooking process. -
Thicken the Sauce:
Once the mixture starts to bubble beautifully, reduce the heat to low and let it simmer for another 5 minutes. This will allow the sauce to thicken. If you prefer a thicker sauce, feel free to simmer it a bit longer while stirring. Here’s a chef hack: If you find it’s not thickening to your liking, sprinkle in a bit more cornstarch mixed with a couple of teaspoons of water to avoid clumping. -
Cool and Store:
Once your sauce has reached the desired thickness, remove it from the heat and let it cool for a few minutes. Transfer it to a glass jar or an airtight container once cooled. Your huckleberry sauce can store in the fridge for about two weeks, so you can enjoy it throughout the week!
Serving Suggestions: The Final Touch
Now for the fun part — serving the huckleberry sauce! Here are some delightful ways to elevate your dish:
- Pancakes or Waffles: Drizzle the sauce generously over a stack of fluffy pancakes or crispy waffles for a breakfast that feels indulgent.
- Ice Cream: Swirl the huckleberry sauce over a scoop of vanilla or caramel ice cream for a refreshing dessert.
- Cheesecake: Pour it over a slice of creamy cheesecake before serving for an elegant touch.
- Yogurt Parfaits: Layer huckleberry sauce between yogurt and granola in a glass for a delightful brunch treat.
Recipe Variations: Get Creative!
Feeling adventurous? Here are a few fun variations for your huckleberry sauce:
- Spiced Huckleberry Sauce: Add a pinch of cinnamon or nutmeg for a warm, cozy twist.
- Lemon-Huckleberry Sauce: Replace the lemon juice with lime juice for a zesty kick.
- Herbed Huckleberry Sauce: Toss in some finely chopped fresh mint or rosemary for a fresh herbal note.
- Maple-Cinnamon Huckleberry Sauce: Substitute half the sugar with maple syrup for a unique depth of flavor.
Chef’s Notes: A Dash of Inspiration
This huckleberry sauce has become one of my kitchen staples over the years, thanks to its versatility. I’ve used it in everything from breakfast to dessert, and each time, I’m amazed at how it transforms a dish. If you enjoy experimenting, don’t hesitate to add your own unique flair to the recipe! And remember, cooking is all about enjoying the process and making it your own.
I also love to reminisce about the first time I tried making this sauce on my own after countless afternoons spent with my grandmother. I’ll admit, I spilled the sugar all over the counter, and it felt like my huckleberry adventure was off to a rocky start! But that little mishap made everything taste even better, both from the laughter shared and the delicious outcome.
FAQs and Troubleshooting: Your Kitchen Companion
1. Why did my huckleberry sauce turn out too thin?
If your huckleberry sauce is too thin, it might need to cook a bit longer to allow more water to evaporate and thicken up. Alternatively, you can mix a bit more cornstarch with water and stir it in during the simmering phase.
2. Can I use other berries instead?
Absolutely! This recipe works wonderfully with blueberries, raspberries, or even blackberries. Just adjust the sugar level according to the sweetness of the berries you choose.
3. How long can I store the sauce in the fridge?
Your homemade huckleberry sauce will stay fresh for about two weeks in an airtight container in the refrigerator.
4. Can I can this sauce for later use?
Yes, you can! Just ensure that you follow proper canning procedures for fruit preserves to extend its shelf life.
Now you’ve got everything you need to make this easy and delicious homemade huckleberry sauce! With its balancing sweetness, tartness, and vibrant color, it’s a dish that will surely impress your family and friends. So roll up your sleeves, unleash your inner chef, and enjoy crafting a nostalgic moment right in your kitchen. Happy Cooking!
Print
Easy Homemade Huckleberry Sauce
- Total Time: 25 minutes
- Yield: 2 cups 1x
- Diet: Vegetarian
Description
A simple and delightful recipe for homemade huckleberry sauce, perfect for pancakes, desserts, and more.
Ingredients
- 2 cups fresh or frozen huckleberries
- 1 cup sugar
- 1 tablespoon lemon juice
- 1 tablespoon cornstarch
- 1/2 cup water
Instructions
- Prepare your ingredients: Rinse fresh huckleberries and discard any mushy ones.
- Combine ingredients: In a medium saucepan, stir together huckleberries, sugar, lemon juice, cornstarch, and water.
- Cook and simmer: Heat on medium and stir until sugar dissolves and berries burst, about 5-7 minutes.
- Thicken the sauce: Reduce heat to low, simmer for 5 minutes until thickened.
- Cool and store: Let the sauce cool before transferring it to an airtight container.
Notes
This sauce can be enjoyed for up to two weeks in the refrigerator.
- Prep Time: 10 minutes
- Cook Time: 15 minutes
- Category: Sauce
- Method: Cooking
- Cuisine: American
Nutrition
- Serving Size: 2 tablespoons
- Calories: 100
- Sugar: 21g
- Sodium: 2mg
- Fat: 0g
- Saturated Fat: 0g
- Unsaturated Fat: 0g
- Trans Fat: 0g
- Carbohydrates: 25g
- Fiber: 3g
- Protein: 0g
- Cholesterol: 0mg
Keywords: huckleberry sauce, homemade sauce, dessert topping, berry sauce
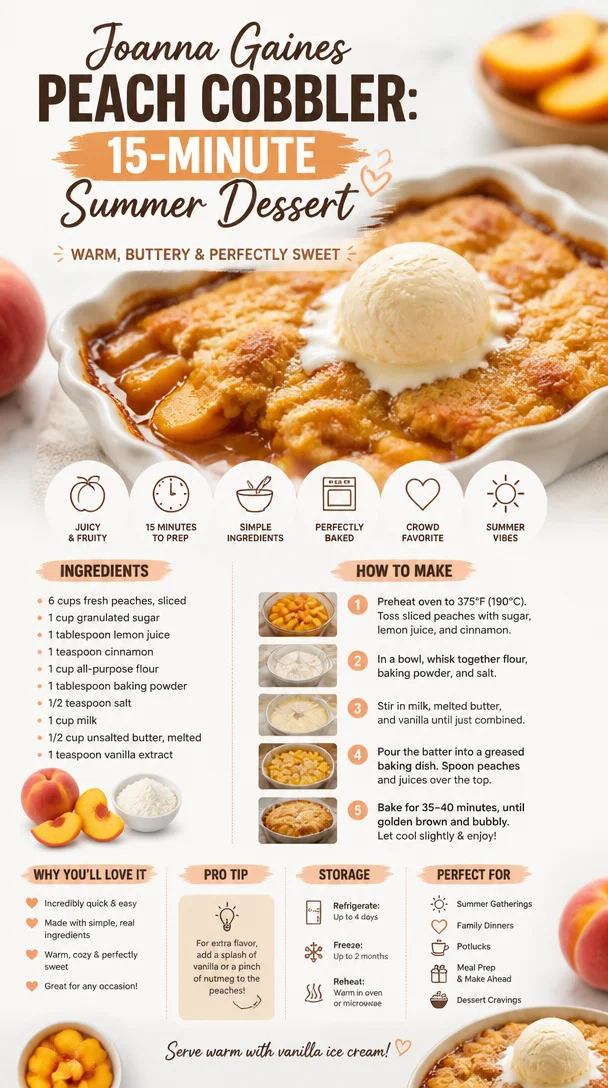
Joanna Gaines Peach Cobbler: 15-Minute Summer Dessert
The Ultimate Joanna Gaines Inspired Peach Cobbler Recipe
Welcome to my kitchen! Today, we’re diving into the world of comfort food with a delightful recipe that embodies warmth and nostalgia: Joanna Gaines’ Peach Cobbler. If there’s anything that brings people together quite like the smell of sweet, caramelized peaches mingling with buttery biscuit topping, it’s this classic dish. This peach cobbler is not just about satisfaction; it’s about creating memories, sharing stories, and, of course, indulging in a well-deserved treat after a long day.
Whether you’re serving it at a family gathering, an afternoon picnic, or for a cozy night in, this cobbler has a way of sparking joy and conversation. As you whip up the batter, you might find yourself reminiscing about summertime visits to grandma’s house or backyard barbecues with friends. Each bite is like a warm hug — light, flaky, and packed with juicy peaches that transport you directly to those sunny memories.
So, grab your apron, pour yourself a cup of something warm, and let’s embark on this peachy adventure together. With summer fruit at its peak, there’s no better time to whip up this easy, delicious dessert that’ll have everyone asking for seconds! Trust me, once you make this cobbler, it’ll become a staple in your home, a dish you return to time and time again.
All set? Let’s get cooking!
A Slice of Nostalgia
I remember the first time I made a peach cobbler. It was a spontaneous decision one summer afternoon when the sun was shining, and the air was thick with warmth. I was rummaging through my kitchen when I stumbled upon a bag of fresh peaches that had been given to me by a neighbor. They were perfectly ripe, just waiting to be transformed into something magical.
Gathering my ingredients, I decided to channel my inner Joanna Gaines — because who doesn’t want to cook like a modern-day culinary queen with a charming farmhouse vibe? As I sliced the peaches, the sweet, fragrant aroma filled my kitchen, almost making me giddy with nostalgia. It transported me back to those lazy summer days at my grandmother’s house, where cobblers simmered in the oven, their scents wafting through the open windows.
I decided to make a simple cobbler recipe I had memorized but with a couple of Joanna’s signature twists. The first bite was pure bliss, and I knew I had struck gold. Friends gathered and laughed as we dug into that cobbler, topped with a scoop of vanilla ice cream, each bite sparking stories and joy. Since that day, I’ve made it countless times, adapting it here and there, but always keeping that first adventurous spirit alive.
Ingredients to Bring This Cobbler to Life
Let’s gather our ingredients! Each component plays a vital role in ensuring our peach cobbler is nothing short of perfection:
-
Fresh Peaches (4-6 cups): The star of our show! Choose ripe, juicy peaches for the best flavor. If peaches aren’t in season, feel free to substitute with canned peaches (be sure to drain them well!).
-
Granulated Sugar (1 cup): To enhance the sweetness of those luscious peaches. You can swap it for brown sugar if you prefer a deeper, caramel flavor.
-
All-Purpose Flour (1 cup): This is the base for our cobbler topping. If you’re looking for gluten-free options, almond flour or a gluten-free flour blend works great too.
-
Baking Powder (1 tablespoon): This will give our cobbler the lift it needs. Make sure your baking powder is fresh for that perfect rise.
-
Salt (1/4 teaspoon): Just a pinch to balance the sweetness and enhance the flavors.
-
Milk (1 cup): Whole milk adds richness, but you can use almond milk or any other non-dairy milk if you’re looking to lighten it up.
-
Butter (1/2 cup, melted): Because everything is better with butter! If you’re in a pinch, coconut oil or a dairy-free alternative can be used here.
-
Ground Cinnamon (1 teaspoon): A warm spice that complements the peaches beautifully. Feel free to add nutmeg for an extra depth of flavor.
These ingredients not only create that gooey, irresistible filling and fluffy topping; they also remind us of simple, wholesome cooking.
Step-by-Step Instructions
Now, let’s roll up our sleeves and get to the fun part! Here’s how to whip up this peach cobbler from scratch:
-
Preheat Your Oven: Start by preheating your oven to 375°F (190°C). This ensures that the cobbler bakes evenly and turns golden brown.
-
Prepare Your Peaches: If you’re using fresh peaches, wash, peel, and slice them. Place the sliced peaches in a large bowl and toss them with half of the sugar (about 1/2 cup) and the ground cinnamon. Let them sit for about 10-15 minutes so that they release their natural juices.
-
Mix the Batter: In a separate bowl, whisk together the flour, baking powder, remaining sugar, and salt. Slowly add the milk and melted butter to this mixture, stirring just until combined. Be careful not to overmix; it’s okay if there are a few lumps!
-
Assemble the Cobbler: Grease a large baking dish (about 9×13 inches) with butter or cooking spray. Pour the batter evenly into the bottom of the dish without stirring (yes, it’s supposed to look a bit awkward, but trust the process). Carefully spoon the peach mixture over the batter. Don’t worry if it looks messy; it will all come together beautifully in the oven!
-
Bake to Perfection: Pop the baking dish in the preheated oven and bake for about 40-45 minutes or until the top is golden brown and the filling is bubbly. You’ll want to keep an eye on it in the last few minutes — the aroma will drive you crazy!
-
Let it Cool: Once golden, take it out and let it cool for at least 10-15 minutes before serving. This allows the cobbler to set, making it easier to slice.
Chef’s Tips:
-
Peeling Peaches: A quick tip for peeling peaches is to blanch them. Simply drop them in boiling water for 30 seconds and then transfer them to an ice bath. The skins will slip off easily!
-
Adjusting Sweetness: Before baking, taste your peaches! If they are a bit tart, don’t hesitate to add more sugar to accentuate the sweetness.
-
Layering Flavors: Feel free to add a teaspoon of vanilla extract to the batter for an aromatic touch.
Serving Suggestions
When it comes to serving your peach cobbler, the sky’s the limit! I love to serve it warm, straight from the oven, garnished with a generous scoop of vanilla ice cream or a dollop of freshly whipped cream. The combination of warm cobbler and cold ice cream creates that perfect balance of temperature and texture that takes it over the top. For an extra touch, sprinkle some ground cinnamon or chopped nuts over the top for added crunch.
Recipe Variations
Feeling adventurous? Here are some fun variations to personalize your peach cobbler:
-
Berry Twist: Add in some fresh blueberries or raspberries along with the peaches for a mixed berry cobbler. The tartness of the berries perfectly complements the sweetness of the peaches.
-
Swap the Peaches: Don’t limit yourself to just peaches! Try using apples, cherries, or even apricots in the same recipe for a unique twist.
-
Add Zest: For an extra burst of flavor, add a teaspoon of lemon or orange zest to the peach mixture. It can brighten up the flavors in a delightful way.
-
Brown Butter: For a nutty flavor, brown the butter before adding it to the batter. This adds a deeper richness and a unique twist that is sure to impress.
Chef’s Notes
This peach cobbler recipe has traveled through my kitchen, evolving with each batch I make. I remember one particularly hilarious mishap where I grabbed a container labeled "sugar" from my pantry — only to realize later it was actually salt! Talk about a salty surprise! Since then, I’ve learned to check my containers. But, every experience in the kitchen is a lesson, and I love that. The best part about making things yourself is how unique each creation can be, just like the stories behind them.
Each summer, I make it a goal to experiment with whatever fruit is in season, and peach cobbler always takes me back to simplicity and joy. Over the years, I’ve shared this recipe with friends, family, and even at potlucks, and it has never failed to delight!
FAQs and Troubleshooting
-
Why is my cobbler too runny?
- If your cobbler is too runny, it could be that the peaches had too much juice or you didn’t use enough flour. Next time, consider adding a tablespoon of cornstarch to the peach mixture to help thicken it up.
-
Can I make this a day in advance?
- Absolutely! You can prepare everything the day before and store it in the fridge. However, for the best results, I recommend baking it fresh on the day you plan to serve it.
-
What can I use if I don’t have baking powder?
- If you don’t have baking powder, you can make a substitute using 1/4 teaspoon of baking soda with 1/2 teaspoon of cream of tartar or simply use self-rising flour in place of all-purpose flour since it contains baking powder.
-
Can I freeze leftover cobbler?
- Yes! Once cooled, wrap it tightly and freeze for up to three months. To reheat, simply thaw overnight in the fridge and bake at 350°F (175°C) until warmed through.
Nutritional Info
For those curious about nutritional information, here’s a rough breakdown per serving (assuming 12 servings):
- Calories: 270
- Fat: 10g
- Carbohydrates: 40g
- Protein: 3g
- Sugar: 14g
(Please note that these values may vary depending on specific ingredients used.)
Whipping up this Joanna Gaines-inspired peach cobbler not only honors tradition and homemade goodness, but it also celebrates the simple joys in life that food brings. I hope you find as much happiness in creating this dish as I do. Now, let’s bake, gather our loved ones, and enjoy the sweet moments together! 🍑✨
Print
Joanna Gaines Inspired Peach Cobbler
- Total Time: 60 minutes
- Yield: 12 servings
- Diet: Vegetarian
Description
A delightful peach cobbler recipe inspired by Joanna Gaines, featuring sweet caramelized peaches and a buttery biscuit topping.
Ingredients
- Fresh Peaches (4-6 cups)
- Granulated Sugar (1 cup)
- All-Purpose Flour (1 cup)
- Baking Powder (1 tablespoon)
- Salt (1/4 teaspoon)
- Milk (1 cup)
- Butter (1/2 cup, melted)
- Ground Cinnamon (1 teaspoon)
Instructions
- Preheat your oven to 375°F (190°C).
- Prepare your peaches by washing, peeling, and slicing them. Toss with half of the sugar and ground cinnamon, and let sit for 10-15 minutes.
- Mix together the flour, baking powder, remaining sugar, and salt in a bowl. Add milk and melted butter, stirring gently until combined.
- Assemble the cobbler by greasing a baking dish and pouring the batter in. Spoon the peach mixture on top without stirring.
- Bake for 40-45 minutes until golden brown and bubbly.
- Let it cool for 10-15 minutes before serving.
Notes
For added flavors, consider adding vanilla extract or experimenting with different fruits.
- Prep Time: 15 minutes
- Cook Time: 45 minutes
- Category: Dessert
- Method: Baking
- Cuisine: American
Nutrition
- Serving Size: 1 serving
- Calories: 270
- Sugar: 14g
- Sodium: 100mg
- Fat: 10g
- Saturated Fat: 6g
- Unsaturated Fat: 4g
- Trans Fat: 0g
- Carbohydrates: 40g
- Fiber: 2g
- Protein: 3g
- Cholesterol: 30mg
Keywords: peach cobbler, dessert, sweet, Joanna Gaines, comfort food, summer recipe
Minute Raspberry Sauce: Fresh, Vibrant & Budget-Friendly
Easy Raspberry Sauce: A Sweet Symphony for Your Taste Buds
Welcome to my kitchen! Today, we’re diving into the vibrant world of Easy Raspberry Sauce. This delightful concoction isn’t just a topping for desserts; it’s a burst of joy that can transform your favorite dishes, whether it’s pancakes drizzled in the morning, a scoop of vanilla ice cream at night, or even a savory twist with roasted meats. I can already hear those delightful raspberry notes singing in harmony with the flavors of your meal.
The beauty of raspberry sauce lies not only in its deliciousness but also in its simplicity. In just a few minutes, you can whip up a sauce that boasts the perfect balance between sweet and tart. It’s like sprinkling a little magic onto your desserts, and trust me, once you’ve made it once, you’ll want to keep a jar in your fridge at all times. So, roll up those sleeves, and let’s embark on this flavorful journey together!
Personal Story
I still remember the first time I made raspberry sauce in my tiny college kitchen. It was exam week, and my friends and I were searching for the ultimate pick-me-up. Armed with a bag of frozen raspberries, I threw caution to the wind. I combined them with sugar, a splash of lemon juice, and then, the pièce de résistance—a sprinkle of love! As I stirred the pot, the sweet aroma filled our cramped space. My friends lounged around, their faces lighting up as they took their first taste. It was as if the stress of finals disappeared for just a moment, replaced by laughter and the sweet-tart magic of raspberries. That day, I realized that cooking is not just about the food; it’s about the memories we create with it.
Ingredients
Here’s what you need for this delectable Easy Raspberry Sauce:
-
Fresh or Frozen Raspberries (2 cups)
Fresh raspberries have a vibrant flavor, but frozen works just as well — just remember to thaw them first! Raspberries are rich in antioxidants and add a delightful tartness. -
Granulated Sugar (½ cup)
This balances the tang of the raspberries. You can adjust the sweetness based on your taste, or swap it with honey or maple syrup for a natural alternative. -
Lemon Juice (1 tablespoon)
Freshly squeezed lemon juice brightens the sauce and enhances the raspberry flavor. If you’re in a pinch, bottled lemon juice can suffice, but fresh is always best! -
Water (¼ cup)
This helps to create the sauce’s desired consistency. If you prefer a thicker sauce, feel free to cut back on the water! -
Cornstarch (1 teaspoon; optional)
If you like your sauce thicker, add this at the end mixed with a little water to form a slurry. It’s a quick kitchen tip for perfecting your sauces!
Step-by-Step Instructions
-
Gather Your Ingredients:
Before you start, make sure you’ve got all your ingredients ready! It’s always easier to whip up a sauce when everything is at your fingertips. -
Combine the Raspberries and Sugar:
In a medium saucepan over medium heat, combine the raspberries and granulated sugar. Stir gently to incorporate the sugar. You’ll hear the berries start to sizzle — that’s the sound of flavor coming to life! -
Add Lemon Juice and Water:
Next, squeeze in the lemon juice and pour in the water, stirring until the mixture begins to bubble. This may take around 2-3 minutes. Don’t rush it; let the heat work its magic as the raspberries break down. -
Simmer:
Lower the heat and let the mixture simmer for about 5 minutes, allowing the raspberries to soften and release their juices. The lovely crimson color will brighten your kitchen! -
Mash and Strain (Optional):
If you want a smoother sauce, use a potato masher to mash the raspberries a bit more, then pour the mixture through a fine-mesh sieve to remove the seeds. This step is optional — I often leave the seeds in for texture and nutrition! -
Thicken (Optional):
If you like your sauce thicker, mix the cornstarch with a tablespoon of water to create a slurry. Gradually add this to the simmering sauce while stirring. It will thicken beautifully in just a minute! -
Cool Down:
Once your sauce has reached your desired consistency, take it off the heat and let it cool. As it cools, it will thicken up a little more. -
Store in Jar:
Transfer the raspberry sauce to an airtight jar and let it chill in the fridge for up to a week. It’s perfect for breakfast, snacks, dessert, or even drizzled over dinner!
Serving Suggestions
Serve your Easy Raspberry Sauce warm or cold, depending on the dish! Drizzle it over pancakes alongside a dollop of whipped cream for a brunch, or serve it with a scoop of vanilla ice cream for a delightful dessert. It also pairs beautifully with grilled meats like chicken or pork, adding a fresh, fruity note to savory dishes. The possibilities are endless!
Recipe Variations
-
Spicy Raspberry Sauce: Add a pinch of cayenne pepper or a dash of chili flakes for a spicy kick that pairs perfectly with savory dishes.
-
Herbed Raspberry Sauce: Mix in some fresh herbs like mint or basil after cooking for a refreshing twist — perfect for summer grilling!
-
Chia Raspberry Sauce: Add a tablespoon of chia seeds for added texture and nutrition. Let it sit to thicken and create a lovely chia pudding texture.
-
Balsamic Raspberry Sauce: Incorporate a splash of balsamic vinegar for a tangy, gourmet feel. This is excellent over grilled meats or salads.
-
Other Berries: Substitute raspberries with strawberries or blueberries for a different flavor profile. You can also mix them for a delightful berry medley!
Chef’s Notes
As I mentioned earlier, this easy raspberry sauce has been a staple in my kitchen for years! I’ve altered the recipe countless times, adding spices or different sweeteners depending on the season or occasion. It truly is a versatile sauce that has evolved in its perfection over time. I even recall a time I accidentally burned the sugar while trying to caramelize it — that tangy, burnt flavor surprisingly took my sauce to a whole new level! That’s what I love about cooking; there’s always room for experimentation and creativity.
FAQs and Troubleshooting
Q: My raspberry sauce turned out too tart. What should I do?
A: If your sauce is too tart, simply add more sugar to taste, heating it gently to dissolve. You can also balance it out with a little more lemon juice or a drizzle of honey.
Q: Can I use other types of berries?
A: Absolutely! This sauce is versatile. Feel free to substitute with strawberries, blueberries, or blackberries — just adjust the sugar depending on their natural sweetness.
Q: How do I store leftover raspberry sauce?
A: Store your sauce in an airtight container in the refrigerator for up to a week. Just give it a stir before using, and feel free to reheat gently on the stove or microwave.
Q: My sauce came out too runny. How can I fix it?
A: No worries! If your sauce is too runny, create a cornstarch slurry (1 teaspoon cornstarch mixed with 1 tablespoon of water) and add it to the sauce while simmering to thicken it up.
Nutritional Info (Optional)
If you’re watching your sugar intake or trying to eat healthier, using alternatives like agave syrup or reducing the sugar can help. This sauce is packed with vitamin C and antioxidants, thanks to the raspberries. Keep in mind, serving size may impact the total calorie count, so enjoy it in moderation!
Thank you for spending time in my kitchen today! I hope this Easy Raspberry Sauce brings as much joy to your table as it has to mine. Happy cooking, and remember: the best meals are the ones filled with love and laughter!
Print
Easy Raspberry Sauce
- Total Time: 20 minutes
- Yield: 1 cup
- Diet: Vegan
Description
A delightful and versatile raspberry sauce that adds a burst of flavor to pancakes, ice cream, and roasted meats.
Ingredients
- Fresh or Frozen Raspberries (2 cups)
- Granulated Sugar (½ cup)
- Lemon Juice (1 tablespoon)
- Water (¼ cup)
- Cornstarch (1 teaspoon; optional)
Instructions
- Gather your ingredients: Make sure you have all your ingredients ready!
- Combine the raspberries and sugar in a saucepan over medium heat.
- Add lemon juice and water, stirring until the mixture bubbles.
- Simmer for about 5 minutes until the raspberries soften.
- Mash and strain (optional) for a smoother sauce.
- Thicken (optional) by adding a cornstarch slurry if desired.
- Cool down and transfer to a jar.
Notes
Serve warm or cold, and try variations like adding spices or using different berries.
- Prep Time: 10 minutes
- Cook Time: 10 minutes
- Category: Sauce
- Method: Stovetop
- Cuisine: American
Nutrition
- Serving Size: 2 tablespoons
- Calories: 50
- Sugar: 10g
- Sodium: 1mg
- Fat: 0g
- Saturated Fat: 0g
- Unsaturated Fat: 0g
- Trans Fat: 0g
- Carbohydrates: 13g
- Fiber: 2g
- Protein: 1g
- Cholesterol: 0mg
Keywords: raspberry sauce, dessert sauce, fruit sauce, easy recipe
Ingredient Raspberry Oatmeal Bars: Quick & Beginner-Friendly
The Easiest Raspberry Oatmeal Bars: A Sweet Adventure in Every Bite!
Welcome to my cozy corner of the internet, where all things delicious and delightful come together! Today, I am thrilled to share a recipe that’s close to my heart and guaranteed to bring a smile to your face. These Easiest Raspberry Oatmeal Bars are not just scrumptious; they’re a blast from the past—packed with nostalgia, flavor, and the charm of home cooking. Whether you’re whipping them up for breakfast, snacking, or dessert, they’re perfect any time of day.
Picture this: the sun is shining through your kitchen window, the smell of baked oats fills the air, and you’re about to dig into the ultimate treat. These bars are a delightful combination of chewy oatmeal, sweet-tart raspberries, and a hint of cinnamon that makes them so irresistibly good. You won’t need hours in the kitchen or fancy equipment. With just a few simple ingredients and a bit of love, you’ll create a batch of oatmeal bars that everyone will rave about!
Now, let me take you back to where it all began. I vividly remember the summer afternoons spent at my grandmother’s house, surrounded by the enticing scent of her delicious baking. One of my favorite memories is the moment when she pulled a pan of her signature oatmeal bars from the oven, golden and bubbling with fresh fruits. I loved the way her kitchen felt; it was warm and inviting, just like these bars! We would devour those treats together while sharing stories and laughter, creating lasting bonds over a simple snack.
Fast forward to today, and I’ve decided to put my own twist on those nostalgic treats. My Easiest Raspberry Oatmeal Bars embody that warmth and joy. Trust me, once you try them, you’ll want to make them over and over again. So, let’s get cooking and make some magical memories in your kitchen!
What You’ll Need: Ingredients
Before we dive into the cooking process, let me lay out the ingredients for these delicious bars. Each component is simple, accessible, and adds its own unique touch.
-
Old-Fashioned Oats (2 cups): These are the backbone of your bars, giving them that lovely chewy texture. You can substitute quick oats if you prefer, but I find the old-fashioned oats create a heartier bar.
-
All-Purpose Flour (1 cup): This helps to bind everything together. If you’re gluten-free, feel free to swap this with almond flour or a gluten-free blend.
-
Brown Sugar (½ cup): For that rich sweetness and a hint of caramel flavor. If you’re looking to cut down on sugar, coconut sugar works well as a substitute.
-
Baking Powder (1 teaspoon): This helps your bars rise and become fluffy rather than dense.
-
Cinnamon (1 teaspoon): A warm spice that enhances the flavors of the oats and raspberries. If cinnamon isn’t your thing, try nutmeg or leave it out altogether.
-
Salt (½ teaspoon): Just a pinch to balance the sweetness.
-
Unsalted Butter (½ cup, melted): Adds richness and helps with the texture. Coconut oil is a great vegan alternative here.
-
Fresh Raspberries (1 cup): The stars of the show! You can swap these with blueberries, strawberries, or even apples if you like.
-
Egg (1 large): Binds everything together. For a vegan option, replace it with a flaxseed egg (1 tablespoon ground flaxseed mix with 3 tablespoons water).
Step-by-Step Instructions
Alright, let’s get to the fun part! Here’s how to bring these Easiest Raspberry Oatmeal Bars to life:
-
Preheat Your Oven: Start by preheating your oven to 350°F (175°C). This step ensures your bars bake evenly and develop a lovely golden color.
-
Prep Your Pan: Grab an 8×8-inch baking pan and line it with parchment paper for easy removal. You could also grease it lightly with butter or oil to prevent sticking.
-
Mix the Dry Ingredients: In a large bowl, combine the old-fashioned oats, flour, brown sugar, baking powder, cinnamon, and salt. Use a whisk to mix them well. This ensures that the baking powder is evenly distributed, which is key to even rising.
-
Incorporate the Wet Ingredients: In a separate bowl, mix the melted butter and egg. If you’re going vegan, make sure you whisk together the flaxseed and water thoroughly before adding. Pour this mixture into the dry ingredients and combine gently. It should be crumbly but hold together when you squeeze it.
-
Fold in the Raspberries: Gently fold in your fresh raspberries, being careful not to break them up too much. You want to maintain those lovely whole berries throughout your bars!
-
Spread the Mixture: Transfer half of the oatmeal mixture into the prepared pan, pressing it down to form an even layer. This base layer is crucial as it will hold all the delicious filling.
-
Add the Topping: Sprinkle the remaining mixture over the top of the raspberries. The texture should be crumbly and add a beautiful, crunchy top to your bars.
-
Bake: Pop the pan in the preheated oven and bake for 25-30 minutes, or until the top is golden and a toothpick inserted into the center comes out clean.
-
Cool and Slice: Allow your oatmeal bars to cool completely in the pan on a wire rack. This step is vital! If you can be patient, cutting them too soon may result in a lovely crumble instead of neat bars. Once cool, slice into squares or rectangles.
-
Enjoy!: Serve your bars warm, or store them in an airtight container at room temperature for up to a week! They also freeze beautifully if you want to enjoy them later.
Serving Suggestions
When it comes to serving your Easiest Raspberry Oatmeal Bars, simplicity is key! You can plate them up plainly, but for an added touch, consider drizzling them with a little warm honey or adding a dollop of yogurt. Pairing them with a cup of tea or coffee creates the perfect afternoon snack, and they’re great for sharing at brunch or a picnic!
Recipe Variations
Now that you’ve mastered the classic version, let’s talk about how you can give these bars your own spin!
-
Nutty Boost: Add ½ cup of chopped nuts (like almonds, walnuts, or pecans) for added crunch and healthy fats.
-
Chocolate Lovers: Stir in some dark chocolate chips or cacao nibs for a delicious chocolate raspberry combo.
-
Seasonal Swaps: In place of raspberries, use seasonal fruits like peaches, apples, or even cranberries for a fall twist.
-
Spice it Up: Mix in different spices like cardamom or ginger for a unique flavor profile.
-
Vegan Delight: Substitute eggs with flaxseed eggs and use maple syrup instead of brown sugar to make it completely plant-based.
Chef’s Notes
These Easiest Raspberry Oatmeal Bars have become a staple in my kitchen. I’ve experimented with so many variations over the years! One time, I had a batch that didn’t set properly because I was too impatient to let them cool down. Instead of tossing them out, I crumbled the bars over my morning yogurt, and it turned into an accidental breakfast favorite! It was the perfect example of how one little mistake can lead to something delightful.
Cooking is all about enjoying the process and embracing those little imperfections, right?
FAQs and Troubleshooting
1. Why did my bars crumble apart?
If your bars are crumbling, they may not have cooled completely before slicing. Make sure you let them cool in the pan entirely for better slicing. Also, check that you used the right proportions of wet to dry ingredients.
2. Can I use frozen raspberries?
Absolutely! If you’re using frozen raspberries, there’s no need to thaw them beforehand. Just be aware that they might create a bit more liquid, but that just makes them more moist and delicious!
3. How do I store these bars?
Store your oatmeal bars in an airtight container at room temperature for up to a week. If you’d like to keep them longer, freeze them in individual portions, and pull one out whenever you need a sweet treat!
4. Can I double the recipe?
Yes, feel free to double the recipe! Just use a larger baking dish (like a 9×13-inch pan) and extend the baking time slightly, checking for doneness.
Nutritional Info (Optional)
Each bar (based on 12 servings):
- Calories: 180
- Protein: 3g
- Carbohydrates: 29g
- Dietary Fiber: 3g
- Sugars: 8g
- Fat: 7g
With these Easiest Raspberry Oatmeal Bars, you’re all set to create a wholesome, delightful treat that brings joy to your kitchen and to the ones you love. Happy baking, friends! Enjoy every sweet moment! 🍓✨
Print
Easiest Raspberry Oatmeal Bars
- Total Time: 40 minutes
- Yield: 12 servings
- Diet: Vegetarian
Description
Deliciously chewy oatmeal bars packed with sweet-tart raspberries and a hint of cinnamon, perfect for breakfast or as a snack.
Ingredients
- Old-Fashioned Oats (2 cups)
- All-Purpose Flour (1 cup)
- Brown Sugar (½ cup)
- Baking Powder (1 teaspoon)
- Cinnamon (1 teaspoon)
- Salt (½ teaspoon)
- Unsalted Butter (½ cup, melted)
- Fresh Raspberries (1 cup)
- Egg (1 large)
Instructions
- Preheat your oven to 350°F (175°C).
- Prep an 8×8-inch baking pan by lining it with parchment paper.
- Mix the dry ingredients: oats, flour, brown sugar, baking powder, cinnamon, and salt in a bowl.
- Incorporate the wet ingredients: melted butter and egg (or flaxseed egg).
- Fold in the fresh raspberries gently.
- Spread half of the mixture into the prepared pan and press down.
- Add the remaining mixture as a topping.
- Bake for 25-30 minutes, until golden and a toothpick comes out clean.
- Cool completely on a wire rack before slicing.
- Enjoy warm or store in an airtight container for up to a week.
Notes
For a vegan option, substitute butter with coconut oil and egg with a flaxseed egg. These bars can be customized with nuts or chocolate chips.
- Prep Time: 10 minutes
- Cook Time: 30 minutes
- Category: Snack
- Method: Baking
- Cuisine: American
Nutrition
- Serving Size: 1 bar
- Calories: 180
- Sugar: 8g
- Sodium: 50mg
- Fat: 7g
- Saturated Fat: 4g
- Unsaturated Fat: 3g
- Trans Fat: 0g
- Carbohydrates: 29g
- Fiber: 3g
- Protein: 3g
- Cholesterol: 30mg
Keywords: raspberry, oatmeal, bars, dessert, snack
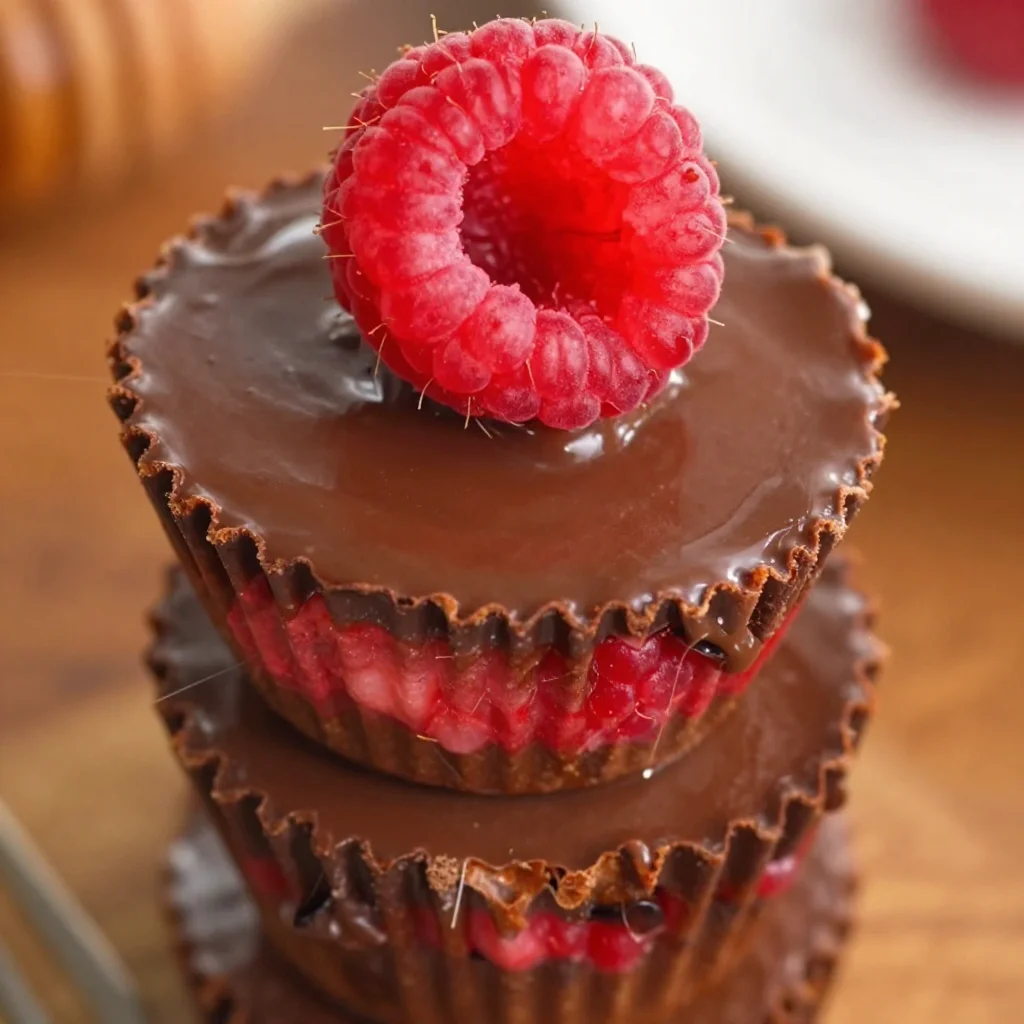
Healthy Chocolate Raspberry Cups: 15-Minute No-Bake Dessert
Indulge Guilt-Free: Healthy Chocolate Raspberry Cups Dessert
Welcome to my cozy kitchen, where the aroma of baking wafts through the air like a warm hug! I’m Olivia Bennett, your friendly culinary companion, and today I’ve got a treat that’s bound to make your taste buds dance. Imagine sinking your teeth into rich, velvety chocolate combined with the bright, tart flavor of fresh raspberries. Sounds heavenly, right? Well, I’m thrilled to share with you my recipe for Healthy Chocolate Raspberry Cups—a delightful dessert that’s not just delicious but also packed with wholesome goodness!
With the hustle and bustle of everyday life, it’s easy to feel overwhelmed when it comes to dessert. We often think of indulgent sweets as being heavy on sugar and calories. But what if I told you that you could satisfy your chocolate cravings without the guilt? These delightful cups bring the best of both worlds together—decadence and health!
Whether you’re hosting a dinner party, celebrating a special occasion, or just craving something sweet at the end of the day, these Healthy Chocolate Raspberry Cups are exactly what you need. They’re simple to make and even easier to enjoy, and I can’t wait for you to dive into this delicious recipe with me.
So, roll up those sleeves, put on your aprons, and let’s get ready to create a delectable dessert that will have everyone talking (and asking for seconds!).
A Sweet Memory
I’ll never forget the summer evenings spent at my grandmother’s house, where the whole family would gather for dinner. There was always laughter, stories, and at the end of every meal, a delicious dessert that brought us together. One of the highlights was when Grandma would whip up her famous chocolate treats—each bite was an explosion of flavor that transported us to a world of sweetness and joy.
I remember one particular evening when she made a raspberry-chocolate mousse. The combination was simply divine! As I savored each spoonful, I realized how powerful food can be; it connects us, evokes memories, and warms our hearts. Inspired by those cherished moments, I wanted to create a dessert that embodies that same joy but with a healthier twist. And thus, the Healthy Chocolate Raspberry Cups were born! With a nod to my grandma’s legacy, these cups are not only delicious but also bring a bit of nostalgia to every bite.
Ingredients
Here’s what you’ll need to whip up these delightful Healthy Chocolate Raspberry Cups:
-
Dark Chocolate (1 cup)
- Look for chocolate that’s at least 70% cocoa for a rich flavor. You can also use dairy-free or vegan chocolate if you prefer. If you’re out of chocolate chips, you can chop a chocolate bar as a great substitute!
-
Coconut Oil (2 tablespoons)
- This adds a nice gloss to your chocolate and enhances the texture. You can use unsalted butter or any neutral oil if you don’t have coconut oil on hand.
-
Greek Yogurt (½ cup)
- Creamy and packed with protein, Greek yogurt gives these treats a delightful texture. For a dairy-free option, try using coconut yogurt!
-
Fresh Raspberries (1 cup)
- These juicy gems bring a burst of flavor and vibrant color. If they aren’t in season, feel free to use frozen raspberries—just thaw and drain excess moisture.
-
Honey or Maple Syrup (2-3 tablespoons)
- For sweetness, these natural sweeteners are simply the best! Adjust according to your taste. You can also use agave nectar or a sugar substitute if you’re looking to cut down on sugar.
-
Vanilla Extract (1 teaspoon)
- This adds depth to the flavor profile. Feel free to use almond extract for a different twist!
-
Pinch of Sea Salt
- This enhances all the flavors, balancing the sweetness.
Chef’s Tip:
Preparation is key! Measure and prep your ingredients before you begin, which will make your cooking process smoother and more enjoyable.
Step-by-Step Instructions
Now, let’s get to the exciting part—preparing these delightful little cups step-by-step.
-
Melt the Chocolate:
Place a heatproof bowl over a pot filled with a couple of inches of simmering water (this is called a double boiler). Add the dark chocolate and coconut oil. Stir slowly until melted and smooth. Remove from heat and let it cool slightly.- Chef’s Hack: If you’re in a hurry, you can also melt the chocolate in the microwave. Just heat it in 20-second bursts, stirring in between to avoid overheating!
-
Prepare the Cups:
Line a muffin tin with cupcake liners (silicone liners work great for easy peeling later). Spoon a tablespoon of the melted chocolate mixture into the bottom of each liner and spread it evenly to form a base.- Tip: Use the back of a spoon to press it flat and create a nice layer!
-
Chill the Base:
Place the muffin tin in the fridge for about 15-20 minutes, or until the chocolate hardens. This ensures a sturdy base for your creamy filling. -
Make the Raspberry Filling:
In a mixing bowl, combine Greek yogurt, honey (or maple syrup), vanilla extract, and a pinch of sea salt. Mix until smooth. Gently fold in the fresh raspberries.- Chef’s Insight: If you want a smoother texture, mash the raspberries a bit before folding them into the yogurt mixture!
-
Fill the Cups:
Once the chocolate base is set, remove the muffin tin from the fridge. Spoon the raspberry yogurt mixture over the hardened chocolate base in each cupcake liner, smoothing out the tops.- Tip: Don’t be afraid to be generous — these cups will be even more delightful with a good amount of filling!
-
Top with More Chocolate:
Drizzle the remaining melted chocolate over the raspberry filling. You’ll want to ensure the filling is covered so everything stays together when you serve!- Pro Tip: If you’d like, sprinkle some crushed nuts or a few whole raspberries on top before the chocolate hardens for some extra flair.
-
Final Chill:
Return the muffin tin to the refrigerator for another 30 minutes to an hour, or until the chocolate is completely firm and set. -
Enjoy:
Carefully peel away the cupcake liners, and voila! You’ve created the most delicious and healthy dessert that’s sure to impress!
Serving Suggestions
For serving, arrange these beautiful Healthy Chocolate Raspberry Cups on a decorative platter or a rustic wooden board. A sprinkle of cocoa powder or a few fresh mint leaves can add a lovely presentation touch. Pair them with a scoop of vanilla ice cream or a dollop of whipped cream (dairy or coconut-based) for an extra treat.
Recipe Variations
-
Nutty Delight: Add chopped nuts (like almonds or hazelnuts) into the chocolate mixture before forming the base for a crunchy texture.
-
Mint Chocolate: Incorporate a few drops of peppermint extract into the chocolate mixture for a refreshing minty twist.
-
Different Berries: If raspberries aren’t your thing, try substituting with blueberries, strawberries, or blackberries for a different flavor!
-
Spicy Kick: Add a pinch of cayenne pepper to the chocolate for a surprising kick that balances the sweetness.
Chef’s Notes
This recipe has evolved over the years, from my grandmother’s chocolate mousse to these delightful cups that fit my healthier lifestyle. I love experimenting with flavors and textures, but I always come back to chocolate and berries as a classic combo. A funny little story: One time I was in a rush and forgot to chill the chocolate base before filling it with yogurt—let’s just say it turned into a bit of a delicious disaster! Even messes can lead to delightful creations in the kitchen!
FAQs and Troubleshooting
1. Why are my cups not setting properly?
Make sure that your chocolate is fully melted and has cooled slightly before adding it to the muffin cups. Also, chilling the cups long enough will ensure they set perfectly.
2. Can I use another type of yogurt?
Absolutely! If you’re not a fan of Greek yogurt, any plain yogurt will work, including non-dairy alternatives like almond or soy yogurt.
3. My chocolate mixture is too thick—what should I do?
If your chocolate is too thick, try adding a small amount of coconut oil or a splash of almond milk to loosen it up before using it in the cups.
4. How long do these healthy cups last?
They should be stored in the refrigerator and will keep well for about a week. However, I doubt they’ll last that long—they’re too delicious!
Nutritional Info (optional)
Each Healthy Chocolate Raspberry Cup contains approximately:
- Calories: 150
- Protein: 4g
- Carbohydrates: 12g
- Fats: 10g
- Fiber: 2g
(Note: Nutritional information may vary based on specific brands and ingredients used.)
And there you have it—my cherished Healthy Chocolate Raspberry Cups Recipe! I hope you enjoy making and indulging in this delightful dessert as much as I do. Each bite is a reminder of love, laughter, and the joy of creating something beautiful in the kitchen. Happy cooking!
Print
Healthy Chocolate Raspberry Cups
- Total Time: 35 minutes
- Yield: 12 servings
- Diet: Vegetarian
Description
A delightful dessert that combines rich chocolate and fresh raspberries in a guilt-free treat.
Ingredients
- Dark Chocolate (1 cup)
- Coconut Oil (2 tablespoons)
- Greek Yogurt (½ cup)
- Fresh Raspberries (1 cup)
- Honey or Maple Syrup (2-3 tablespoons)
- Vanilla Extract (1 teaspoon)
- Pinch of Sea Salt
Instructions
- Melt the chocolate and coconut oil using a double boiler or microwave.
- Prepare the muffin tin with cupcake liners and spoon melted chocolate to form a base.
- Chill the base in the fridge for about 15-20 minutes.
- Make the raspberry filling by combining Greek yogurt, honey, vanilla, and sea salt, then fold in raspberries.
- Fill the cups with the raspberry yogurt mixture over the hardened chocolate base.
- Top with more melted chocolate and optional toppings like crushed nuts.
- Final chill the cups in the refrigerator for 30 minutes to 1 hour.
- Enjoy them once set by peeling away the liners.
Notes
Measure and prep your ingredients beforehand for a smoother cooking process.
- Prep Time: 20 minutes
- Cook Time: 15 minutes
- Category: Dessert
- Method: Chilling
- Cuisine: American
Nutrition
- Serving Size: 1 cup
- Calories: 150
- Sugar: 8g
- Sodium: 50mg
- Fat: 10g
- Saturated Fat: 6g
- Unsaturated Fat: 4g
- Trans Fat: 0g
- Carbohydrates: 12g
- Fiber: 2g
- Protein: 4g
- Cholesterol: 5mg
Keywords: healthy dessert, chocolate raspberry cups, guilt-free treats, summer dessert, easy dessert
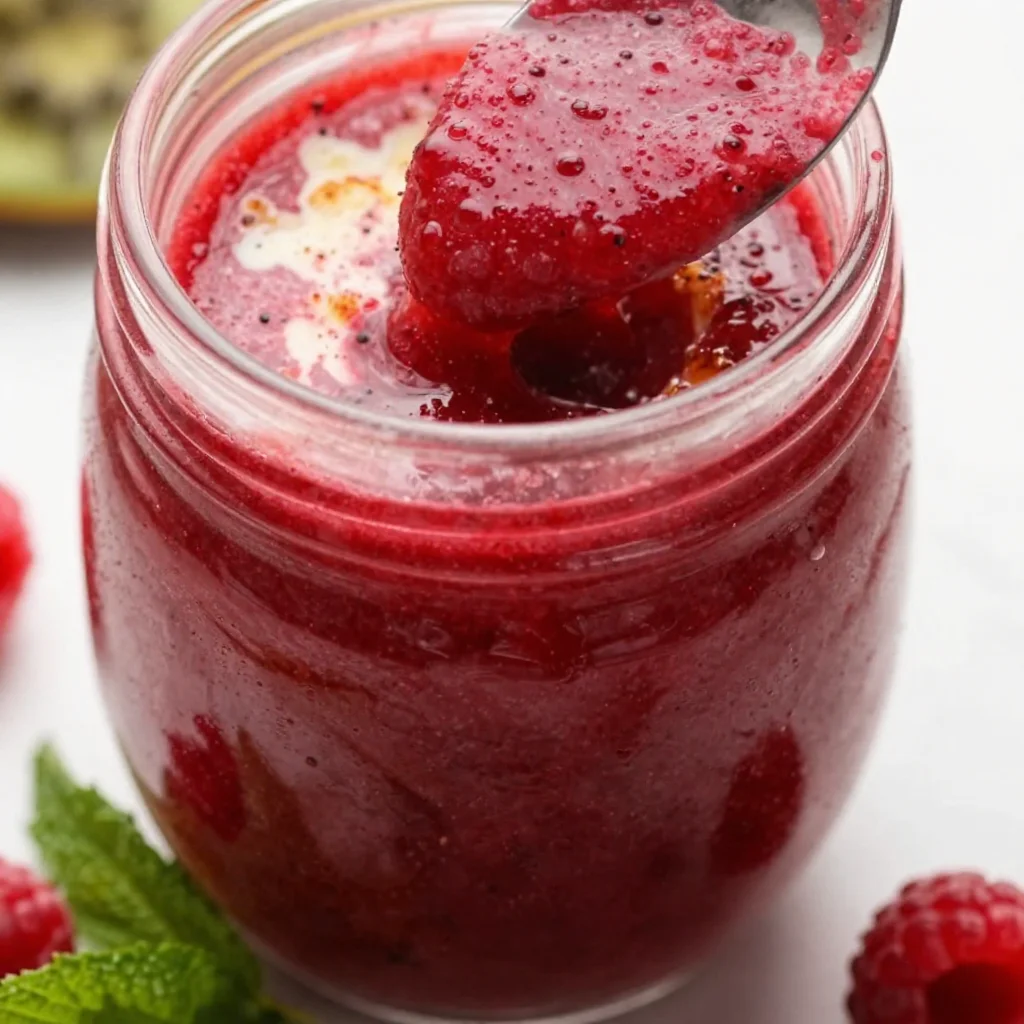
Easy Raspberry Sauce
The Easiest Raspberry Sauce: A Sweet Kitchen Delight
Welcome to my kitchen, dear friends! I’m so thrilled to have you here. Today, we’re diving into one of my absolute favorite recipes: a super simple, utterly delicious Raspberry Sauce. If you’ve ever found yourself with a pint of fresh raspberries and wanted to create something magical, you’re in for a treat. This juicy, vibrant sauce is not only straightforward but also incredibly versatile — perfect for drizzling over pancakes, swirling into yogurt, or even adding a touch of elegance to a baked dessert.
But before we jump into the details, let’s take a moment to appreciate raspberries. These little gems are like nature’s candy — bright, tangy, and bursting with flavor! I remember the first time I tasted a freshly picked raspberry right off the bush. It was like a burst of summer in my mouth, and I’ve been in love ever since. There’s something so nostalgic and delightful about the process of making this sauce; it takes me back to spending lazy afternoons in the kitchen with my grandmother, who would whip up her own version to accompany her famous cheesecake. The sweet and tangy notes of the raspberries paired perfectly with the creamy vanilla.
So, put on your favorite apron (or make a new mess like I do), and let’s create a delightful Raspberry Sauce that will have your friends and family asking for seconds!
A Sweet Memory in Every Bite
Growing up, my grandmother was a culinary wizard; her raspberry sauce was legendary within our family. Every summer, she would gather buckets of fresh raspberries from her garden, and I’d perch beside her, eagerly awaiting the sweet transformations that would unfold. The smell of those bubbling raspberries on the stove was intoxicating, and I can still hear her soft laughter as she tried to keep my sticky little hands from “sampling” too much of the sugary goodness.
Those moments in the kitchen were more than just about cooking; they were filled with stories, laughter, and love. I remember asking her, “Nana, why are raspberries red?” and her playful response was always about them holding the secret to happiness. Little did I know then that each scoop of her raspberry sauce would carry on those cherished memories and brighten future gatherings.
Now, every time I make this sauce, I’m transported back to my grandmother’s cozy kitchen. It serves as a reminder that food isn’t just about taste; it’s about creating connections and weaving memories to share with others. So pull up a chair, and let’s make some more beautiful memories together!
Ingredients
Here’s what you’ll need to whip up this delicious Raspberry Sauce:
-
Fresh raspberries (2 cups)
A star ingredient! Fresh raspberries provide vibrant flavor and color. If you can’t find fresh ones, frozen raspberries work just as well. Just be sure to thaw them first and drain any excess liquid. -
Granulated sugar (3/4 cup)
Sugar is the magic that sweetens the sauce. You can adjust the amount to your taste, or substitute with honey, maple syrup, or a sugar alternative if you’re looking for a lower-sugar option. -
Lemon juice (1 tablespoon)
A splash of lemon juice brightens the flavor and balances the sweetness of the raspberries. Freshly squeezed is best, but bottled lemon juice can work in a pinch. -
Cornstarch (1 tablespoon)
This ingredient helps thicken the sauce, giving it that luscious, syrupy consistency. You can substitute with arrowroot powder if you’re looking for a grain-free option. -
Water (1/4 cup)
This will help dissolve the sugar and create a fluid base for your sauce. If you want more flavor, use raspberry juice if available!
Step-by-Step Instructions
Let’s get cooking, shall we? Follow these simple steps to create your Raspberry Sauce.
-
Prepare the Raspberries
Start by rinsing your fresh raspberries gently under cold water. Place them in a colander and allow them to drain and dry for a few minutes. Make sure to pick out any mushy or discolored berries — we want only the best for our sauce! -
Combine Ingredients
In a medium saucepan, mix together your fresh raspberries, granulated sugar, lemon juice, cornstarch, and water. Swirl it all together gently until the raspberries are mostly intact, as we want some texture in the final product. -
Cook the Mixture
Place the saucepan on medium heat. As the mixture starts to heat up, the raspberries will begin to break down. Stir it occasionally to prevent sticking (and to get that beautiful aroma wafting through your kitchen!). We want to cook it for about 10-15 minutes, or until it starts to bubble vigorously. -
Thickening the Sauce
Once you’ve reached a bubbling stage, reduce the heat to low and let it simmer for an extra 5 minutes. If you prefer a thicker sauce, you can create a slurry by mixing a bit of cornstarch with water before adding it to the sauce, stirring continuously until thickened. -
Strain (if desired)
If you want a smooth sauce, you can strain the mixture through a fine-mesh sieve to remove the seeds. Just push it through with a spoon or spatula for maximum yield. I sometimes choose to keep it chunky for that rustic feel! -
Cool and Store
After cooking, remove the sauce from heat. Let it cool in the saucepan for a bit before transferring it to a jar or airtight container. This sauce can be stored in the refrigerator for up to two weeks — if it lasts that long!
Serving Suggestions
Now that you’ve got your luscious Raspberry Sauce ready, the world is your oyster! Drizzle it over pancakes or waffles for a perfectly sweet breakfast treat. Swirl it into Greek yogurt for a refreshing snack, or use it as a topping for vanilla ice cream to elevate your dessert game. Try it over a slice of cheesecake for a stunning presentation that tastes as good as it looks.
For a fun party idea, serve the sauce alongside a charcuterie board featuring cream cheese, soft cheeses, and crackers. Your guests will be impressed, and it adds a beautiful pop of color!
Recipe Variations
Feel free to get creative! Here are a few variations you can try:
- Minty Raspberry Sauce: Toss in finely chopped mint leaves just as the sauce finishes cooking for a refreshing twist.
- Spicy Raspberry Sauce: Add a pinch of cayenne pepper or crushed red pepper flakes to the mix while cooking for a subtle heat.
- Balsamic Raspberry Sauce: Substitute a tablespoon of balsamic vinegar for the lemon juice to give your sauce a richer, deeper flavor.
- Rum-Infused Raspberry Sauce: Stir in a tablespoons of dark rum once you remove the sauce from the heat for a delightful boozy kick.
- Low-Sugar Option: Replace sugar with a low-calorie sweetener for a guilt-free treat without sacrificing flavor.
Chef’s Notes
As I reflect on this recipe, it’s amazing how something so simple can transform into something truly special. I’ve experimented with this sauce over the years, tweaking the sugar, the tang level, and incorporating different spices. Once, during a summer dinner party, I decided to add some freshly cracked black pepper, and oh my goodness — it took everyone by surprise! They were in awe of the flavor profile and the contrast between the sweet and peppery notes. It’s fun to see how a humble raspberry sauce can evolve and adapt!
And here’s a little secret: the more you make it, the more intuitive you’ll become about your personal preferences. So, don’t be shy; let your kitchen creativity shine!
FAQs and Troubleshooting
Q: Can I use frozen raspberries for this sauce?
A: Absolutely! Frozen raspberries are convenient and work just as well. Just be sure to thaw and drain them first to avoid excess liquid in your sauce.
Q: My sauce turned out too watery. What should I do?
A: If your sauce is too watery, it’s likely that it didn’t simmer long enough. Simply return it to heat and allow it to reduce further until it’s at your desired consistency.
Q: How can I store leftover sauce?
A: Store your Raspberry Sauce in an airtight container in the refrigerator for up to two weeks. You can also freeze it in small portions for up to six months — just thaw in the fridge when you’re ready to use it!
Q: Can I use other berries for this sauce?
A: Yes! Strawberries, blueberries, or blackberries can be swapped in or combined for a mixed berry sauce. Adjust the sweetness according to the berries’ natural flavors.
Nutritional Info
While I won’t go into specific numbers, this Raspberry Sauce is relatively low in calories and can be made even more nutritious by opting for natural sweeteners and reducing sugar.
That’s it, folks! You’ve now mastered a delicious, easy Raspberry Sauce that can elevate a multitude of dishes. I hope my stories and tips inspire you to embrace the joy of cooking and create your unique kitchen memories. Happy cooking, and enjoy every sweet drop of that raspberry goodness!
Print
The Easiest Raspberry Sauce: A Sweet Kitchen Delight
- Total Time: 25 minutes
- Yield: 1 cup of sauce
- Diet: Vegan
Description
A super simple and delicious Raspberry Sauce perfect for drizzling over pancakes, yogurt, or desserts.
Ingredients
- Fresh raspberries (2 cups)
- Granulated sugar (3/4 cup)
- Lemon juice (1 tablespoon)
- Cornstarch (1 tablespoon)
- Water (1/4 cup)
Instructions
- Prepare the raspberries by rinsing them gently under cold water and draining them in a colander.
- Combine ingredients: In a medium saucepan, mix together the raspberries, sugar, lemon juice, cornstarch, and water gently.
- Cook the mixture on medium heat until it starts to break down, stirring occasionally for about 10-15 minutes.
- Thicken the sauce by reducing the heat to low and simmering for an extra 5 minutes.
- Strain if desired, using a fine-mesh sieve to remove seeds for a smooth sauce.
- Cool and store the sauce in an airtight container for up to two weeks.
Notes
Enjoy the sauce over pancakes, yogurt, or desserts. Consider using frozen raspberries if fresh ones are unavailable.
- Prep Time: 10 minutes
- Cook Time: 15 minutes
- Category: Sauce
- Method: Cooking
- Cuisine: American
Nutrition
- Serving Size: 2 tablespoons
- Calories: 50
- Sugar: 10g
- Sodium: 0mg
- Fat: 0g
- Saturated Fat: 0g
- Unsaturated Fat: 0g
- Trans Fat: 0g
- Carbohydrates: 13g
- Fiber: 2g
- Protein: 1g
- Cholesterol: 0mg
Keywords: raspberry sauce, dessert sauce, easy raspberry sauce, fruit sauce, topping
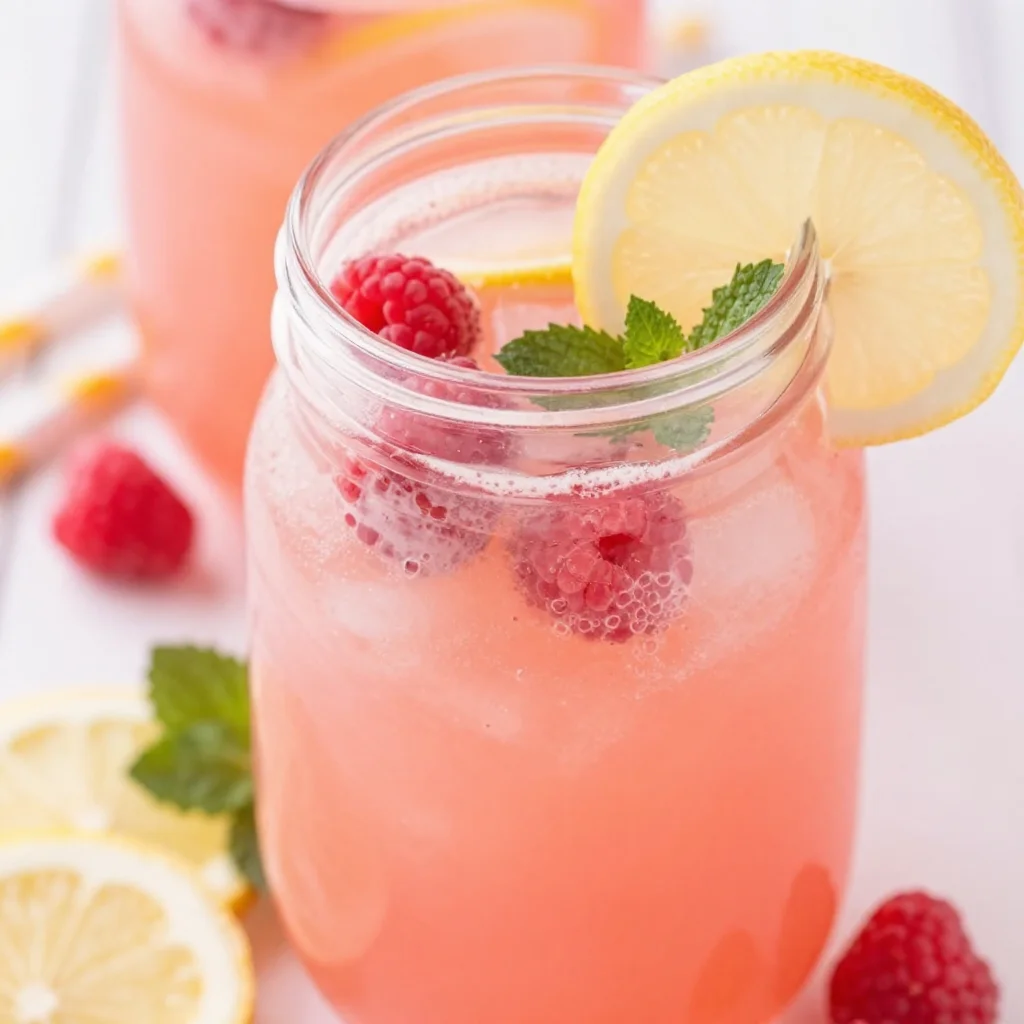
Minute Homemade Raspberry Lemonade (Fresh Summer Sip)
Refreshing Homemade Raspberry Lemonade: A Summer Classic
Welcome to my kitchen, friends! Today, we’re diving into a delightful summertime favorite that is as vibrant and refreshing as a sunny day at the park: homemade raspberry lemonade. Now, if you’re like me, summertime isn’t just about soaking up the sun; it’s also about savoring the delicious, tart, and sweet flavors that fresh fruits have to offer. And there’s really nothing quite like the kick of homemade lemonade, especially when you marry it with the luscious taste of ripe raspberries.
Imagine it: a big glass of ruby-red raspberry lemonade, the ice-cold drink shimmering in the sunlight as you take a sip, and the explosion of flavors dances across your taste buds. It’s the quintessential thirst-quencher and a superb way to impress your friends and family—whether you’re hosting a barbecue, picnicking in the park, or just enjoying a lazy afternoon on your porch.
You don’t need to be a master mixologist to whip this up in your kitchen, and I promise you; it’s simpler than it sounds. In this post, we’ll not only make this vibrant drink together, but I’ll also share some heartwarming stories, helpful tips, and a few creative spins on this classic recipe to keep your summer fun and refreshing! So grab your apron, and let’s get started!
A Little Nostalgia
Before we get into the nitty-gritty of the recipe, let me take you back to my childhood summers. Growing up, my family had a lovely tradition of gathering in our backyard every weekend for a big cookout. The air was filled with laughter, the smell of grilled burgers, and, of course, the occasional splash of water from kids playing in the garden hose. But what stands out most in my memory is my grandmother’s famous lemonade.
She would set up her old wooden table, blending lemons and sugar like a pro while we kids helped her mash fresh fruits from the garden. One summer, we discovered a patch of wild raspberries, and my grandmother had the brilliant idea of adding them into her beloved lemonade recipe. The result? A gloriously sweet and tart drink that quickly became our summer signature!
That buzzy, care-free feeling of sipping on homemade raspberry lemonade while basking in the sun is something I want to share with you today. It’s not just a drink; it’s a memory in a glass!
Ingredients
Let’s gather our ingredients! Here’s what you’ll need to concoct this refreshing homemade raspberry lemonade:
-
Fresh Raspberries (2 cups): Raspberries bring a bright flavor and vibrant color. They’re juicy and sweet with a hint of tartness. If fresh raspberries aren’t available, you can substitute them with frozen ones—just make sure to thaw them before blending.
-
Fresh Lemons (1 cup juice, about 4-6 lemons): The hallmark of any good lemonade is the zesty kick from fresh lemons. If you want to mix it up, try using limes or even some blood oranges for a unique twist!
-
Granulated Sugar (1 cup): This sweetness balances the tartness of the lemons and raspberries. Feel free to adjust the amount depending on your taste. You could also use honey or agave syrup for a natural touch.
-
Water (4 cups): Both for diluting the concentrated lemonade and as a base. You can use sparkling water to add a fun fizz!
-
Ice Cubes: Not exactly an ingredient, but essential for serving cold! You can also freeze some raspberry puree in ice cube trays for a fun twist.
Chef Insight:
Always taste as you go! Every batch of raspberries and lemons may vary in sweetness and acidity, so adjust the sugar according to your preference!
Step-by-Step Instructions
Now, let’s get into the fun part: actually making our luscious raspberry lemonade! Here’s your step-by-step guide:
-
Prepare the Raspberries:
Start by rinsing the fresh raspberries gently under cool water. Place them in a medium saucepan and mash them with the back of a fork or a potato masher until they release their juices. This part is super fun—don’t be shy to get your hands involved! -
Create the Raspberry Syrup:
Add half a cup of water and half a cup of sugar to the saucepan and place it over medium heat. Stir the mixture until the sugar dissolves, allowing the raspberries to steep for about 5-7 minutes. Remove from heat and let it cool. -
Juicing the Lemons:
While your raspberry syrup is cooling, get your lemons juiced! Roll them on the countertop to help release the juice before cutting them in half. Use a citrus juicer to get a full cup of fresh lemon juice. Straining it will help remove seeds and pulp—unless you like the extra texture! -
Mixing Together:
Once your raspberry syrup has cooled down, strain it through a fine-mesh sieve to remove the seeds and pulp, pressing with a spoon to extract as much juice as possible. In a large pitcher, combine the strained raspberry syrup, fresh lemon juice, and the remaining 3.5 cups of cold water. Stir until well mixed. -
Taste Test:
This is a crucial step! Taste the lemonade and adjust the sugar and water according to your preference. Need it sweeter? Add a little more sugar; like it tart? Add more water or lemon juice. -
Chill and Serve:
Add ice cubes to your glass, and pour the raspberry lemonade over to enjoy! You can garnish with fresh raspberries or lemon slices for that Pinterest-ready touch.
Chef Hack:
For an extra burst of flavor, try adding a few mint leaves while you’re mixing up your drink. Not only does it add a refreshing note, but it gives a lovely fragrance to the lemonade too!
Serving Suggestions
When it comes to serving your homemade raspberry lemonade, presentation can make all the difference! I love to pour it into tall, clear glasses filled with ice, garnished with a few whole raspberries, lemon slices, and a sprig of fresh mint. Serve it on a sunny patio table with colorful paper straws, or you can even create a “lemonade stand” vibe for kids’ gatherings. It’s all about the experience of sharing good times with good drinks!
Recipe Variations
Now that you know the classic way to make raspberry lemonade, let’s get creative with some variations!
-
Raspberry-Lemon Basil Refresher: Add fresh basil leaves to your lemonade for a hint of herbal freshness. Muddle them in with the raspberries!
-
Sparkling Raspberry Lemonade: Swap out still water for sparkling water for a fizzy refreshment! Perfect for summer gatherings!
-
Berry Medley Lemonade: Use a mix of berries—strawberries, blueberries, or blackberries—along with raspberries for a colorful twist.
-
Frozen Raspberry Lemonade: Blend the mixture with ice to create a slushy version that’s perfect for keeping cool.
-
Adult Twist: Consider adding a splash of vodka or gin for a delightful adult beverage at your next gathering!
Chef’s Notes
This homemade raspberry lemonade is truly a reflection of summer joy, and I could go on and on about the little tweaks you can make to personalize it! Over the years, I’ve experimented with different fruits and herbs, and every twist adds an unforgettable spin. I once tried a spicy jalapeño version for a friend’s cookout, which brought a surprising kick! If you have stories or experiments of your own, I’d love to hear them—creating in the kitchen is all about fun and community!
FAQs and Troubleshooting
-
Q: My lemonade is too tart; what can I do?
A: It’s all about balance! If your lemonade is too sour, gradually add more sugar until you reach your preferred sweetness. You can also dilute it with more water! -
Q: How long will raspberry lemonade keep in the fridge?
A: Fresh raspberry lemonade is best enjoyed within 3-5 days. Just be sure to give it a good stir before serving, as ingredients may settle. -
Q: Can I use bottled lemon juice?
A: While fresh lemon juice is always preferred for its bright flavor, bottled lemon juice can certainly work in a pinch. Just be aware that the taste might not be as vibrant! -
Q: What can I do with leftover raspberry pulp?
A: Don’t toss it! Use it in yogurt, smoothies, or even as a topping for pancakes or oatmeal. It’s packed with flavor!
Nutritional Info
(Optional section if applicable)
This refreshing homemade raspberry lemonade is a healthier option compared to bottled versions! Here’s a quick idea of the nutrition per serving (based on an 8 oz glass with the above recipe and 1 cup of sugar divided):
- Calories: About 130
- Sugar: 30g
- Carbohydrates: 33g
- Vitamin C: Rich source!
I hope this homemade raspberry lemonade brings sunny vibes and joy into your kitchen this summer! With every sip, remember to share the love and stories that come with your creations. Happy cooking!
Print
Refreshing Homemade Raspberry Lemonade
- Total Time: 25 minutes
- Yield: 4 servings
- Diet: Vegetarian
Description
A vibrant and refreshing summer drink made with fresh raspberries and lemons.
Ingredients
- Fresh Raspberries (2 cups)
- Fresh Lemons (1 cup juice, about 4-6 lemons)
- Granulated Sugar (1 cup)
- Water (4 cups)
- Ice Cubes
Instructions
- Prepare the raspberries: Rinse gently and mash in a saucepan.
- Create the raspberry syrup: Add water and sugar, stirring over medium heat until dissolved.
- Juicing the lemons: Roll, cut, and juice lemons to make a full cup of juice.
- Mixing together: Strain raspberry syrup and combine with lemon juice and remaining cold water.
- Taste test: Adjust sugar and water according to preference.
- Chill and serve: Pour over ice and garnish as desired.
Notes
For an extra twist, add a few mint leaves or try different berry combinations. Serve in tall glasses with colorful straws for a festive touch.
- Prep Time: 15 minutes
- Cook Time: 10 minutes
- Category: Beverage
- Method: Mixing
- Cuisine: American
Nutrition
- Serving Size: 1 serving
- Calories: 130
- Sugar: 30g
- Sodium: 0mg
- Fat: 0g
- Saturated Fat: 0g
- Unsaturated Fat: 0g
- Trans Fat: 0g
- Carbohydrates: 33g
- Fiber: 1g
- Protein: 1g
- Cholesterol: 0mg
Keywords: raspberry lemonade, summer drink, refreshing beverage, homemade lemonade


