
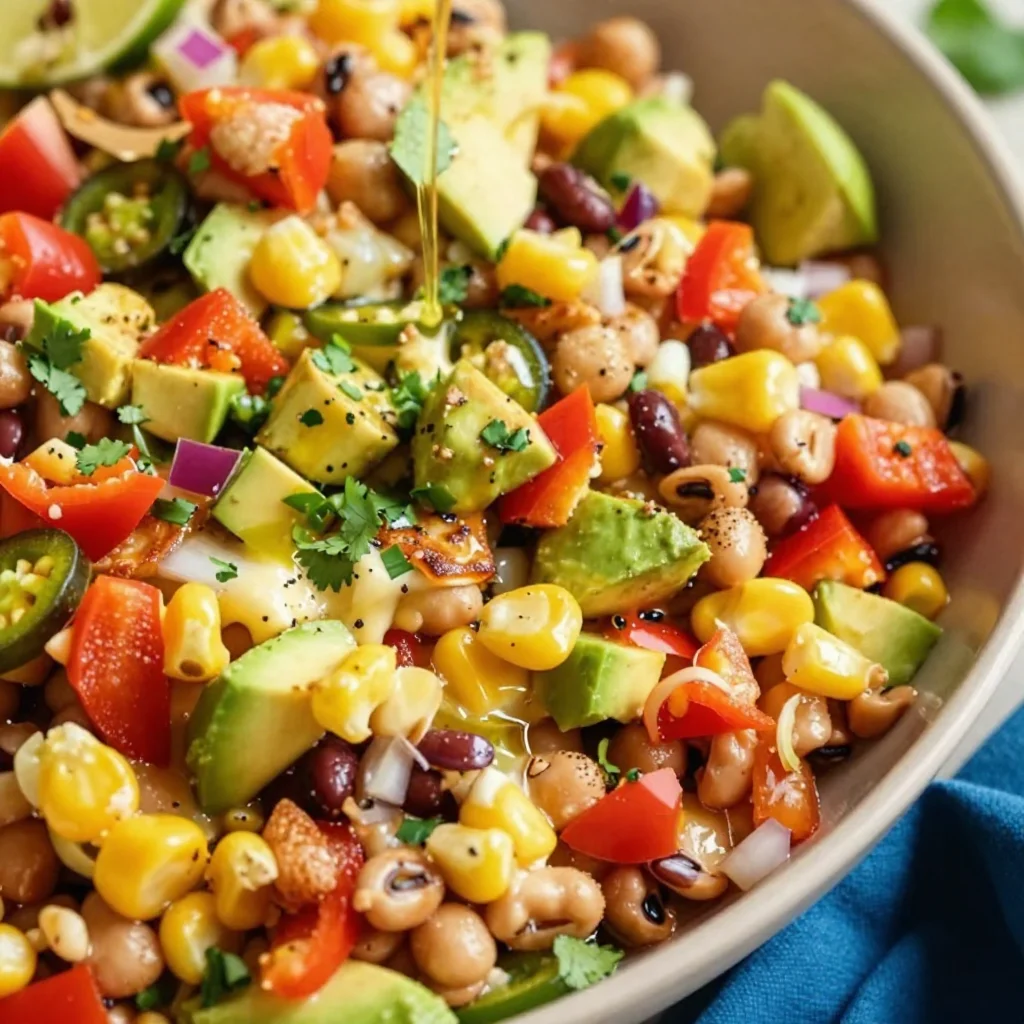
Cowboy Caviar
Cowboy Caviar: A Flavorful Fiesta in a Bowl
Welcome to my kitchen, where flavors dance, and aromas tell delicious stories! Today, we’re diving into a vibrant, hearty dish that has a knack for sparking joy and conversation: Cowboy Caviar. This catchy name might have you imagining a fancy dish straight from a top-end restaurant, but I assure you, this delightful blend of beans, corn, and fresh veggies is all about homey appeal and comfort.
Cowboy Caviar is often served as a dip, a salad, or a side dish, and it’s bursting with flavor and texture in every bite. Perfect for gatherings, BBQs, or simply when you’re craving something fresh and zesty, it’s a dish that invites everyone to dig in and enjoy. What I love most about Cowboy Caviar is how adaptable it is – you can tinker with the ingredients to make it your own!
Why Cowboy Caviar?
I find joy in simple recipes that bring people together. Imagine a warm summer day, friends lounging in the sun, laughter echoing in the air, and you have a big bowl of Cowboy Caviar at the center of the table, inviting everyone to take a scoop. This dish is not just about nourishment; it’s about connection. Each ingredient has a story, a taste that ties us all together.
A Trip Down Memory Lane
Let me take you back to my family’s annual summer cookout. The grill was sizzling, and the air was filled with the scent of marinated chicken and sweet corn on the cob. My Uncle Joe was the star chef in our family, known for his playful personality and knack for bringing people together with food. One summer, he introduced us to Cowboy Caviar, making it as colorful as a painter’s palette.
At first, I was a little skeptical. I mean, what’s up with caviar sounding so fancy? But as I took the first bite, I was instantly hooked. The burst of fresh corn, creamy avocado, and tangy lime was unlike anything I had tasted. Uncle Joe explained that this dish was a favorite in the West, serving as a hearty side or a total showstopper dip. From that moment on, it became a staple in my recipe collection—every time I make it, I’m reminded of those sunny afternoons, surrounded by the people I love.
Ingredients
Let’s gather our ingredients and create this vibrant dish together! Here’s what you’ll need:
-
Black Beans (1 can, drained and rinsed)
Rich in protein and fiber, black beans add a hearty texture. If you prefer, you can substitute with pinto beans or kidney beans. -
Corn (1 cup, fresh or canned)
Sweet corn pops with a delightful crunch. Fresh corn off the cob is best in summer, but canned or frozen works in a pinch. -
Cherry Tomatoes (1 cup, halved)
Juicy cherry tomatoes bring a burst of color and sweetness. Feel free to swap with diced regular tomatoes. -
Red Onion (½, diced)
A hint of sharpness balances the sweetness. You can use scallions for a milder taste. -
Bell Pepper (1, diced)
Choose any color you love—red, yellow, or green! They add great color and sweetness. -
Avocado (1, diced)
Creamy avocado gives a rich texture. Use lime juice to prevent browning or substitute with Greek yogurt for a different twist. -
Cilantro (½ cup, chopped)
Fresh cilantro brings brightness. If you’re not a fan, parsley or basil make great substitutions. -
Lime (2, juiced)
Fresh lime juice brightens the flavors. Lemon juice is a great alternative if you’re out of limes. -
Salt and Pepper (to taste)
Season to your preferences. A dash of smoked paprika can elevate the flavor profile!
These ingredients, combined with your creativity, will make a dish that sings with flavor!
Step-by-Step Instructions
-
Prepare the Ingredients:
Start by washing and prepping all your veggies. Cut the cherry tomatoes in half, dice the red onion and bell pepper, and chop the cilantro. Trust me; having everything ready makes cooking a breeze! -
Mixing the Base:
In a large bowl, combine the black beans, corn, diced cherry tomatoes, red onion, and bell pepper. Use a gentle folding motion to keep those colors intact! This is where the dish starts to come alive with texture. -
Add Avocado:
Gently fold in the diced avocado. This should be done carefully so that the avocado doesn’t mash into the mixture. That creamy texture is what makes Cowboy Caviar irresistible! -
Whisk the Dressing:
In a smaller bowl, combine the lime juice, salt, and pepper. If you want to amplify the flavor, feel free to add a pinch of cumin or a dash of hot sauce! Whisk it until combined, then pour this dressing over the mixed ingredients. -
Toss and Taste:
Carefully toss everything together until the dressing evenly coats the ingredients. Always taste at this stage! You may want to add more salt, lime juice, or a sprinkle of chili powder to kick things up! -
Let it Marinate:
Cover the bowl with plastic wrap or a lid and let it chill in the fridge for about 30 minutes. This time allows the flavors to meld together beautifully. -
Serve it Up:
When you’re ready to eat, give it a gentle toss one last time before serving. Scoop it into a beautiful bowl, and voila! You’re ready to share this crowd-pleaser.
Serving Suggestions
Cowboy Caviar is versatile! Serve it chilled as a dip with tortilla chips, or as a refreshing side on your BBQ platter. You can also use it as a topping for tacos or spooned over grilled chicken or fish for a fresh twist. The goal is to highlight its colorful appearance while inviting everyone to dive in.
Recipe Variations
Feel like getting creative? Here are a few fun twists on Cowboy Caviar:
- Spicy Kick: Add diced jalapeños or a splash of hot sauce for a fiery twist.
- Tropical Vibes: Mix in diced mango or pineapple for a sweet, tropical contrast.
- Zesty Feta: Crumble some feta cheese on top for a creamy, salty counterpoint.
- Quinoa Twist: Mix in cooked quinoa for added protein and a hearty texture.
- Vegan-Friendly: Substitute any dairy products for plant-based alternatives—this dish is naturally vegan!
Chef’s Notes
Cowboy Caviar has been a staple in my kitchen for years, and I love how it can change with the seasons! In the fall, I might add roasted sweet potatoes; in the winter, diced bell peppers are swapped for crunchier vegetables. One time, I even had friends sprinkle crushed tortilla chips over their servings, creating a crunchy topping that was an unexpected delight!
What really keeps this recipe in rotation is its adaptability—perfect for any occasion, and you can make it your own!
FAQs and Troubleshooting
1. Can I make Cowboy Caviar a day ahead?
Absolutely! In fact, letting it sit overnight allows the flavors to infuse even more. Just remember to keep the avocado covered to prevent browning.
2. Why is my Cowboy Caviar too soggy?
Make sure to drain your canned items and not over-mix everything. If it’s too wet, add a few more black beans or corn to balance it out.
3. My Cowboy Caviar tastes bland; what should I do?
Start by adding more lime juice or a bit of salt. Remember, fresh ingredients can sometimes vary in flavor. Always taste as you go!
4. Can I use frozen corn?
Yes! Just thaw and drain it before adding to your bowl; frozen corn can be a convenient option without sacrificing flavor.
Nutritional Info
While nutritional values can vary based on specific ingredients used, a serving of Cowboy Caviar generally contains:
- Calories: Approximately 150 per serving
- Protein: 6g
- Fiber: 8g
- Sugars: 3g
- Fats: 7g (mostly healthy fats from avocado)
This dish is a fantastic way to pack in veggies and nutrients while enjoying all the love of good food!
And there you have it—a vibrant, nourishing, and utterly delightful Cowboy Caviar recipe! Now, gather your ingredients, put on your favorite playlist, and get ready for some culinary fun. Let this creation be a cherished part of your story, just like it is in mine! Happy cooking!
Print
Cowboy Caviar
- Total Time: 45 minutes
- Yield: 4 servings 1x
- Diet: Vegan
Description
A vibrant blend of beans, corn, and fresh veggies, perfect for dips, salads, or side dishes.
Ingredients
- 1 can Black Beans, drained and rinsed
- 1 cup Corn, fresh or canned
- 1 cup Cherry Tomatoes, halved
- ½ Red Onion, diced
- 1 Bell Pepper, diced
- 1 Avocado, diced
- ½ cup Cilantro, chopped
- 2 Limes, juiced
- Salt and Pepper, to taste
Instructions
- Prepare the Ingredients: Start by washing and prepping all your veggies. Cut the cherry tomatoes in half, dice the red onion and bell pepper, and chop the cilantro.
- Mixing the Base: In a large bowl, combine the black beans, corn, diced cherry tomatoes, red onion, and bell pepper.
- Add Avocado: Gently fold in the diced avocado.
- Whisk the Dressing: In a smaller bowl, combine the lime juice, salt, and pepper. Whisk until combined, then pour over the mixed ingredients.
- Toss and Taste: Carefully toss everything until the dressing coats the ingredients.
- Let it Marinate: Cover and chill in the fridge for 30 minutes.
- Serve it Up: Give it a gentle toss before serving in a beautiful bowl.
Notes
Cowboy Caviar can be adapted with seasonal ingredients and pairs well with tortilla chips or as a topping for tacos.
- Prep Time: 15 minutes
- Cook Time: 0 minutes
- Category: Salad
- Method: Mixing
- Cuisine: American
Nutrition
- Serving Size: 1 serving
- Calories: 150
- Sugar: 3g
- Sodium: 180mg
- Fat: 7g
- Saturated Fat: 1g
- Unsaturated Fat: 6g
- Trans Fat: 0g
- Carbohydrates: 25g
- Fiber: 8g
- Protein: 6g
- Cholesterol: 0mg
Keywords: Cowboy Caviar, Dip, Salad, Vegan, Party Food
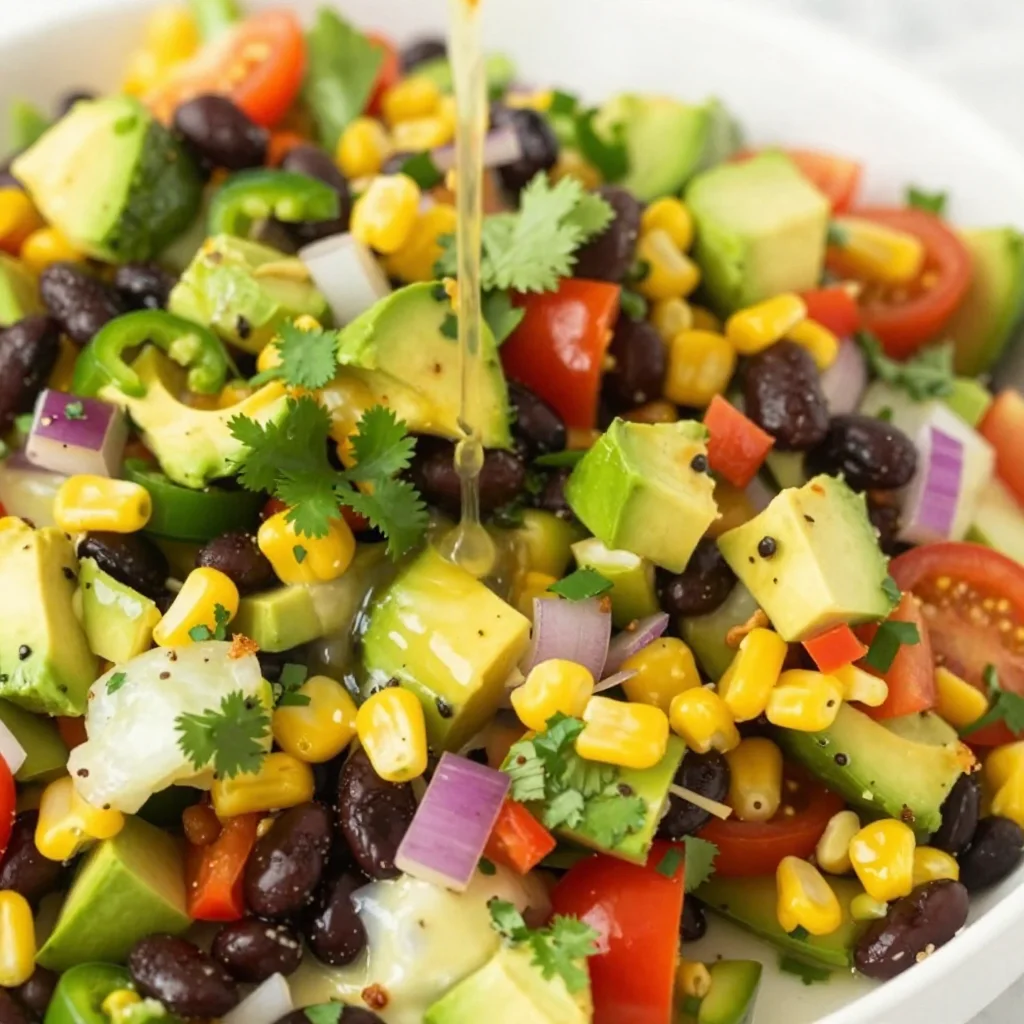
Cowboy Caviar
Cowboy Caviar: A Flavorful Fiesta in a Bowl
Welcome to my kitchen, fellow food enthusiasts! Today, we’re diving into a dish that’s not just a treat for the taste buds but an invitation to gather, laugh, and celebrate the joy of good food. If you’ve never experienced Cowboy Caviar, get ready for a game-changer! This vibrant, colorful dish is packed with flavors, textures, and a whole lot of love, making it perfect for parties, potlucks, or even a cozy night in.
Just imagine this: a warm summer evening, the sun setting, friends gathered around the table, chips in hand, and a big bowl of Cowboy Caviar sitting in the middle, waiting to be devoured. The first crunch of a tortilla chip dipped into that zesty mix of black beans, corn, tomatoes, and spices is pure euphoria. It’s more than just a snack; it’s a celebration!
Cowboy Caviar has its roots in Texas, where it’s often served at gatherings and festivities—like a flavorful little fiesta in a bowl. But it isn’t just Texas pride that makes this dish shine; it’s the way it brings everyone together. The lively colors and fresh ingredients make it not only delicious but also visually stunning. Plus, it’s super easy to whip up, which means more time for chatting and enjoying each other’s company rather than slaving in the kitchen.
So, gather your friends, have your favorite playlist ready, and let’s get cooking! I can’t wait to share this delightful recipe that will undoubtedly make its way into your go-to cooking repertoire.
A Taste of Home: My Cowboy Caviar Memory
Cowboy Caviar holds a special place in my heart, and it’s more than just a beloved recipe—it’s a bridge to cherished memories. One summer weekend, I remember gathering at my Grandma Edna’s house, where each of us would bring a dish for our annual family cookout. Grandma was famous for her dreamy pot roast and homemade pies, but it was her Cowboy Caviar that had everyone lining up.
The moment we walked in, the warmth of the kitchen enveloped us, filled with the sound of laughter and the smell of spices wafting through the air. I still vividly remember Grandma’s infectious laughter as she passed around the bowl, encouraging us to dig in. There’s something magical about the way certain dishes can invoke feelings of nostalgia and comfort, isn’t there? That Cowboy Caviar was a burst of colors and flavors so vibrant that it felt like a party in your mouth!
Years may have passed, but the images of Grandma smiling with her apron on, surrounded by family with chips in hand, remain etched in my memory. It’s those moments that inspire me to recreate this dish. I love sharing it with my friends and my little ones now, making sure they understand just how special food can be in bringing people together.
Ingredients
Here’s what you’ll need to create your own Cowboy Caviar masterpiece. Each of these ingredients contributes something unique, and I’ve included some tips on substitutions and insights to guide you along the way.
-
1 can (15 oz) black beans: Rinsed and drained. Black beans are not only hearty but also packed with protein. You can swap these for pinto beans or chickpeas if you prefer.
-
1 can (15 oz) corn kernels: Rinsed and drained. If you have fresh corn on the cob, feel free to use that as it brings a lovely crunch.
-
1 cup cherry tomatoes: Halved. These little gems add a sweet burst of flavor; grape tomatoes work too if that’s what you have on hand.
-
1 red bell pepper: Diced. Sweet and crunchy, but any color of bell pepper will work, or you could use jalapeños for some heat!
-
1 avocado: Diced. Creamy and luscious, avocados add a nice richness. If you want less fat, you can skip it or use a scoop of Greek yogurt.
-
1/4 red onion: Finely chopped. It gives a great zing! Soak the chopped onion in cold water for 10 minutes to mellow the flavor if you’re sensitive to raw onions.
-
1/4 cup fresh cilantro: Chopped. This herb brings brightness, but if you’re not a fan, parsley makes a good alternative.
-
2 tablespoons olive oil: For richness. A splash of lime or lemon juice can replace some of the oil—and add brightness too!
-
1-2 limes: Juiced. Fresh lime juice is essential for that zesty kick; you can also use lemon if limes are unavailable.
-
1 teaspoon garlic powder: For an extra layer of flavor. If you prefer fresh garlic, one minced clove will do the job!
-
1 teaspoon chili powder: For a touch of heat. You can amp up the spice with smoked paprika or cayenne.
-
Salt and pepper: To taste. Always essential in bringing out the flavors!
Make sure to prep your ingredients before getting started; it makes the cooking process so much smoother.
Step-By-Step Instructions
Ready to bring this dish to life? Grab your ingredients, put on your favorite tunes, and let’s get started!
-
Prep Your Ingredients: Start by rinsing and draining your black beans and corn. Next, chop your tomatoes, bell peppers, onion, and cilantro. Get everything ready to go—this step will make the rest of the cooking process effortless!
-
Mix It Up in a Large Bowl: In a large mixing bowl, combine the black beans, corn, cherry tomatoes, diced bell pepper, avocado, red onion, and cilantro. Just put all those colorful ingredients in there—you might even feel like an artist creating a masterpiece!
-
Prepare the Dressing: In a small bowl, whisk together the olive oil, lime juice, garlic powder, cumin, chili powder, salt, and pepper. This dressing is what brings everything together, so taste it and adjust the seasonings as needed. A little extra lime never hurts!
-
Combine Everything: Pour the dressing over the bean and veggie mixture, tossing everything gently to coat. Avoid mashing the avocado—you want those lovely chunks to shine!
-
Let It Chill: If you have the time, cover your bowl with plastic wrap and let it chill in the fridge for at least 30 minutes. This allows the flavors to mingle and marry, intensifying that Cowboy Caviar goodness. Trust me, it’s worth the wait!
-
Taste Before Serving: Right before serving, take a quick taste test. If it needs more lime, salt, or chili, adjust it now!
-
Serve: Scoop your Cowboy Caviar into a stunning serving bowl, and don’t forget to have a stack of tortilla chips ready for dipping!
Serving Suggestions
This Cowboy Caviar is incredibly versatile when it comes to serving. You can serve it up in a beautiful bowl with a heaping pile of tortilla chips on the side for casual enjoyment. For a more refined presentation, place it in individual cups or small bowls as an appetizer. It also works wonderfully as a topping for grilled fish or chicken, or even spooned onto a bed of greens for a vibrant salad! Don’t forget to garnish with additional cilantro or lime wedges for that extra pop!
Recipe Variations
Feeling creative? Here are some fun variations to put your own spin on this timeless recipe!
-
Spicy Cowboy Caviar: Add diced jalapeños or a dash of hot sauce for an extra kick!
-
Tropical Twist: Mix in some diced mango or pineapple for a sweet surprise.
-
Quinoa Cowboy Caviar: Toss in cooked quinoa for added protein and a heartier texture.
-
Mediterranean Style: Substitute the black beans with chickpeas, add in feta cheese, and a dash of oregano for a Mediterranean flair.
-
Vegan Creaminess: Swap out the avocado for cashew cream to keep it creamy while remaining plant-based.
Chef’s Notes
Cowboy Caviar has evolved over time in my kitchen. I love experimenting with different beans and vegetables based on what’s in season. Sometimes I throw in roasted corn for added sweetness or toss in a few radishes for an extra crunch! Food should always be fun, and cooking is about creating dishes that fit your style and taste.
A little funny story: the first time I made Cowboy Caviar for a BBQ, I was so eager to impress that I accidentally used salt instead of sugar in the dressing. Let’s just say my friends will never let me live that day down! But they loved the new spin, so sometimes even "mistakes" can turn into memorable moments.
FAQs and Troubleshooting
1. Can I make it ahead of time?
Absolutely! Cowboy Caviar tastes even better the next day after sitting in the fridge, so feel free to prep it a day in advance. Just remember to stir gently before serving to redistribute the dressing.
2. How long will it last in the fridge?
If stored in an airtight container, it will last about 3-5 days in the refrigerator. Just keep an eye on the avocado to ensure it doesn’t brown too much!
3. What do I do if it’s too salty?
If you find your Cowboy Caviar has become too salty, adding diced tomatoes or a bit more corn can help balance it out.
4. Can I freeze it?
While it’s not ideal to freeze, you can freeze the bean mixture (without the avocado) for later use. Just let it thaw in the fridge, and add fresh ingredients before serving.
Nutritional Info
(If you’re counting, here’s a brief overview!)
- Serving Size: 1/2 cup
- Calories: Approximately 150-200
- Protein: 6-8g
- Fiber: 5-7g
- Fat: 5-7g
Cowboy Caviar is not only a treat for your taste buds but also a nutritious option packed with fiber and protein.
Now that you have the recipe under your belt, I can’t wait to hear how it goes! Grab those chips and invite your friends over for a flavor explosion that’ll have everyone raving! Happy cooking, and may your kitchen always be filled with warmth and loved ones.
Print
Cowboy Caviar
- Total Time: 45 minutes
- Yield: 4 servings 1x
- Diet: Vegan
Description
A vibrant and flavorful bean and veggie dip perfect for parties and gatherings.
Ingredients
- 1 can (15 oz) black beans, rinsed and drained
- 1 can (15 oz) corn kernels, rinsed and drained
- 1 cup cherry tomatoes, halved
- 1 red bell pepper, diced
- 1 avocado, diced
- 1/4 red onion, finely chopped
- 1/4 cup fresh cilantro, chopped
- 2 tablespoons olive oil
- 1–2 limes, juiced
- 1 teaspoon garlic powder
- 1 teaspoon chili powder
- Salt and pepper, to taste
Instructions
- Prep your ingredients: Rinse and drain the beans and corn. Chop tomatoes, bell peppers, onion, and cilantro.
- Mix it up in a large bowl: Combine beans, corn, tomatoes, bell pepper, avocado, onion, and cilantro in a bowl.
- Prepare the dressing: Whisk olive oil, lime juice, garlic powder, chili powder, salt, and pepper in a small bowl.
- Combine everything: Pour dressing over the mixture and toss gently to coat.
- Let it chill: Cover and refrigerate for at least 30 minutes to allow flavors to meld.
- Taste before serving and adjust seasonings as needed.
- Serve: Enjoy with tortilla chips.
Notes
Can be made ahead of time, and it tastes even better the next day.
- Prep Time: 15 minutes
- Cook Time: 0 minutes
- Category: Appetizer
- Method: Mixing
- Cuisine: Tex-Mex
Nutrition
- Serving Size: 1/2 cup
- Calories: 175
- Sugar: 3g
- Sodium: 150mg
- Fat: 7g
- Saturated Fat: 1g
- Unsaturated Fat: 6g
- Trans Fat: 0g
- Carbohydrates: 25g
- Fiber: 6g
- Protein: 8g
- Cholesterol: 0mg
Keywords: Cowboy Caviar, Tex-Mex dip, bean salad, party appetizer
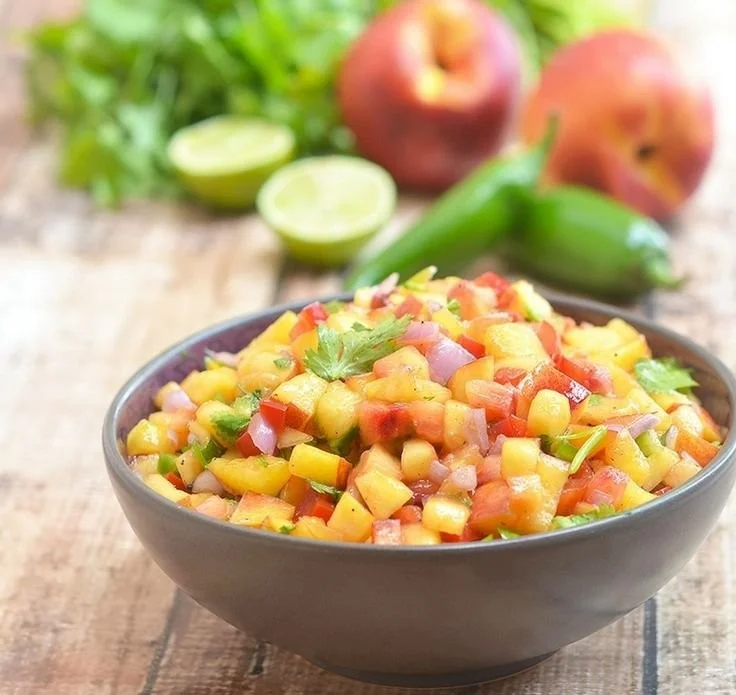
Nectarine Salsa
Nectarine Salsa: A Flavorful Summer Delight
Welcome to my kitchen, friends! I’m so glad you’re here. Today, we’re diving into a vibrant, refreshing dish that really captures the essence of summer: Nectarine Salsa. Picture this: the sun is shining, the grill is sizzling, and the air is filled with the sweet and tangy aromas of fresh ingredients. Nectarines, with their juicy, fragrant nature, are a star in this delightful concoction.
What I love about salsa is that it’s not just a condiment; it’s a celebration of flavors and textures. Whether you’re enjoying a backyard barbecue, hosting a picnic, or simply wanting to elevate your taco night, this Nectarine Salsa will bring smiles to your table. With a perfect balance of sweet, savory, and zesty notes, it’s a fantastic way to highlight seasonal produce and surprise your taste buds!
Now, let’s get our hands a little messy and create something special. You won’t need any fancy tools or hours in the kitchen; just some fresh ingredients and a dash of love!
A Nostalgic Memory
Growing up, summer meant family gatherings at my Aunt Molly’s house. Her backyard was a paradise, adorned with twinkling lights and the sweet scent of flowers. But the highlight of every gathering was her legendary salsa. While she often leaned on traditional ingredients like tomatoes and cilantro, one summer, she let me experiment with peaches and nectarines. I remember slicing the fuzzy fruits on her old wooden table, the juices running down my fingers as we laughed and danced to the music playing in the background.
That batch of nectarines and herbs sparked something magical. It was the perfect blend of textures and flavors, and my family devoured it in no time. I remember my uncle declaring it the "best salsa” he’d ever had, topped off with a crunchy tortilla chip. From that day on, nectarines became my go-to for salsa. They added a twist that made everyone smile. So, let’s recreate that magic today with my Nectarine Salsa recipe!
Ingredients
To whip up this delightful Nectarine Salsa, you’ll need the following ingredients:
-
4 ripe nectarines
Choose nectarines that yield slightly to pressure; they should be fragrant and vibrant in color! If you can’t find nectarines, peaches make a wonderful substitute, too—same flavor, slightly different texture. -
1 small red onion
This adds a bit of crunch and sharpness. If you prefer a milder flavor, try using green onions or shallots instead. -
1 jalapeño pepper (seeded and minced)
This adds just the right amount of heat. If heat isn’t your thing, feel free to omit it or use a green bell pepper for a sweeter version. -
1/4 cup fresh cilantro (chopped)
Cilantro adds a fresh burst of flavor. If you’re not a fan, basil or parsley can also work nicely! -
Juice of 1 lime
The acidity of lime juice brightens all the flavors. Lemon juice can be used in a pinch if you’re out of lime. -
Salt and pepper (to taste)
Don’t forget this! It’s essential to balance the sweetness. A sprinkle of smoked salt can add an interesting twist. -
Optional: 1/2 cup diced tomatoes
For those who want a more traditional salsa vibe, adding tomatoes creates a nice contrast in texture and flavor.
Step-by-Step Instructions
Now that we have our ingredients ready, it’s time to bring this salsa to life!
-
Prep Your Ingredients: Start by washing the nectarines thoroughly. Dry them and then cut them in half to remove the pit. Dice the nectarines into small, bite-sized pieces. You want them to be about the size of a grape—easy to scoop but still substantial enough to enjoy.
-
Dice the Red Onion: Peel your small red onion and chop it into tiny pieces. The finer the chop, the more integrated the flavor will be in the salsa. If you find you’re tearing up a bit while chopping onions, don’t worry; this is a common kitchen occurrence! You could chill the onion before chopping or even cut it under running water to help lessen the tear factor.
-
Mince the Jalapeño: If you’re using jalapeño, cut off the stem and slice it in half lengthwise. Use a spoon to scrape out the seeds (that’s where the heat lives!). Mince the pepper finely, and be sure to wash your hands after handling it—nobody wants jalapeño fingers!
-
Combine Ingredients: In a medium mixing bowl, add your diced nectarines, chopped red onion, minced jalapeño, and freshly chopped cilantro. Give this a gentle mix with a spatula—no need to over-mix, you want those nectarines to hold their integrity!
-
Season: Squeeze the juice of one lime over the mixture, and sprinkle with salt and pepper to taste. Here’s a little chef tip: start with a small amount of salt; you can always add more, but it’s hard to fix an over-salted dish!
-
Taste and Adjust: Before serving, taste your salsa. This is where you can get creative! If you like it a little spicier, throw in more jalapeño. Prefer it sweeter? Add an extra diced nectarine! Mix it up until it’s just right for your palate.
-
Let it Marinate: Allow the salsa to sit at room temperature for about 20-30 minutes. This helps all the flavors marry together beautifully—trust me, it’s worth the wait!
Serving Suggestions
Once your Nectarine Salsa is ready, you can serve it in various ways! I recommend plating it in a charming bowl surrounded by crispy tortilla chips for dipping. You could also use it as a vibrant topping for grilled chicken or fish. Feeling adventurous? Spoon it onto tacos or even a fresh salad for that extra zing. The color and aroma will wow your guests and make your meal feel extra festive!
Recipe Variations
Let your creativity shine with some fabulous variations on this delicious salsa:
-
Roasted Nectarine Salsa: Roast the nectarines briefly on a hot grill for a smoky flavor that adds depth to the salsa.
-
Tropical Twist: Add diced mango or pineapple for a tropical flair that pairs beautifully with everything from chips to grilled shrimp.
-
Mediterranean Style: Incorporate feta cheese and olives for a delicious Mediterranean twist that’s perfect on pita chips.
-
Spicy Kick: Add a dash of cayenne or crushed red pepper flakes for an extra jolt of heat.
-
Cucumber Salsa: Mix in chopped cucumbers for extra crunch and a refreshing finish.
Chef’s Notes
I absolutely love how this recipe has evolved over the years! Initially, I stuck to simple recipes based on what was available. But every summer, as I experiment with different fruits and spices, I find a new twist that makes me fall in love all over again. One memorable time, I added a splash of agave syrup to enhance the sweetness, and it completely changed the game! Cooking is all about exploration and adaptation. So, don’t hesitate to test your ideas; you might stumble upon your next favorite dish!
FAQs and Troubleshooting
1. Why is my salsa too watery?
Sometimes, nectarines can release too much juice, making your salsa watery. To fix this, strain the salsa with a fine mesh sieve or add some diced bell pepper to absorb moisture.
2. How can I store nectarines before using them?
If your nectarines are firm, store them at room temperature until they ripen. Once ripe, you can refrigerate them for a couple of days, but remember, they’re best enjoyed fresh!
3. Can I make this salsa in advance?
Yes! You can prepare the salsa a few hours ahead of time. However, for the best flavor, I recommend mixing in the cilantro and lime juice just before serving to keep things fresh and vibrant.
4. What if I don’t like cilantro?
No problem! Substitute cilantro for chopped mint, parsley, or even a sprinkle of dill, depending on your taste preferences. Each will give your salsa a distinct and fresh twist!
Nutritional Info
While exact nutritional values can vary, a serving of this Nectarine Salsa is typically low in calories, loaded with vitamins, and brimming with healthy ingredients. Feel free to adjust based on your ingredients for the healthiest options!
And there you have it—a delightful recipe for Nectarine Salsa that will brighten your meals and bring a splash of summer to your table year-round. Remember, cooking is all about love, experimentation, and joy. Don’t be afraid to make it your own! Happy cooking, friends!
Print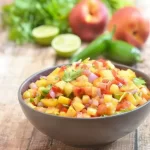
Nectarine Salsa
- Total Time: 30 minutes
- Yield: 4 servings 1x
- Diet: Vegan
Description
A vibrant and refreshing Nectarine Salsa, perfect for summer gatherings and elevating your meals.
Ingredients
- 4 ripe nectarines, diced
- 1 small red onion, finely chopped
- 1 jalapeño pepper, seeded and minced
- 1/4 cup fresh cilantro, chopped
- Juice of 1 lime
- Salt and pepper, to taste
- Optional: 1/2 cup diced tomatoes
Instructions
- Prep your ingredients by washing the nectarines thoroughly, drying them, and cutting them in half to remove the pit. Dice them into small pieces.
- Dice the small red onion into tiny pieces.
- Mince the jalapeño, removing the seeds to reduce heat if desired.
- Combine the diced nectarines, chopped red onion, minced jalapeño, and cilantro in a medium bowl.
- Season with lime juice, salt, and pepper to taste.
- Taste and adjust seasoning if necessary.
- Let it marinate at room temperature for 20-30 minutes before serving.
Notes
For a more traditional salsa vibe, add diced tomatoes. Experiment with different fruits and spices to find your favorite variation!
- Prep Time: 10 minutes
- Cook Time: 0 minutes
- Category: Side Dish
- Method: No Cook
- Cuisine: Mexican
Nutrition
- Serving Size: 1 serving
- Calories: 80
- Sugar: 8g
- Sodium: 5mg
- Fat: 0g
- Saturated Fat: 0g
- Unsaturated Fat: 0g
- Trans Fat: 0g
- Carbohydrates: 18g
- Fiber: 2g
- Protein: 1g
- Cholesterol: 0mg
Keywords: nectarine, salsa, summer, refreshing, easy recipe
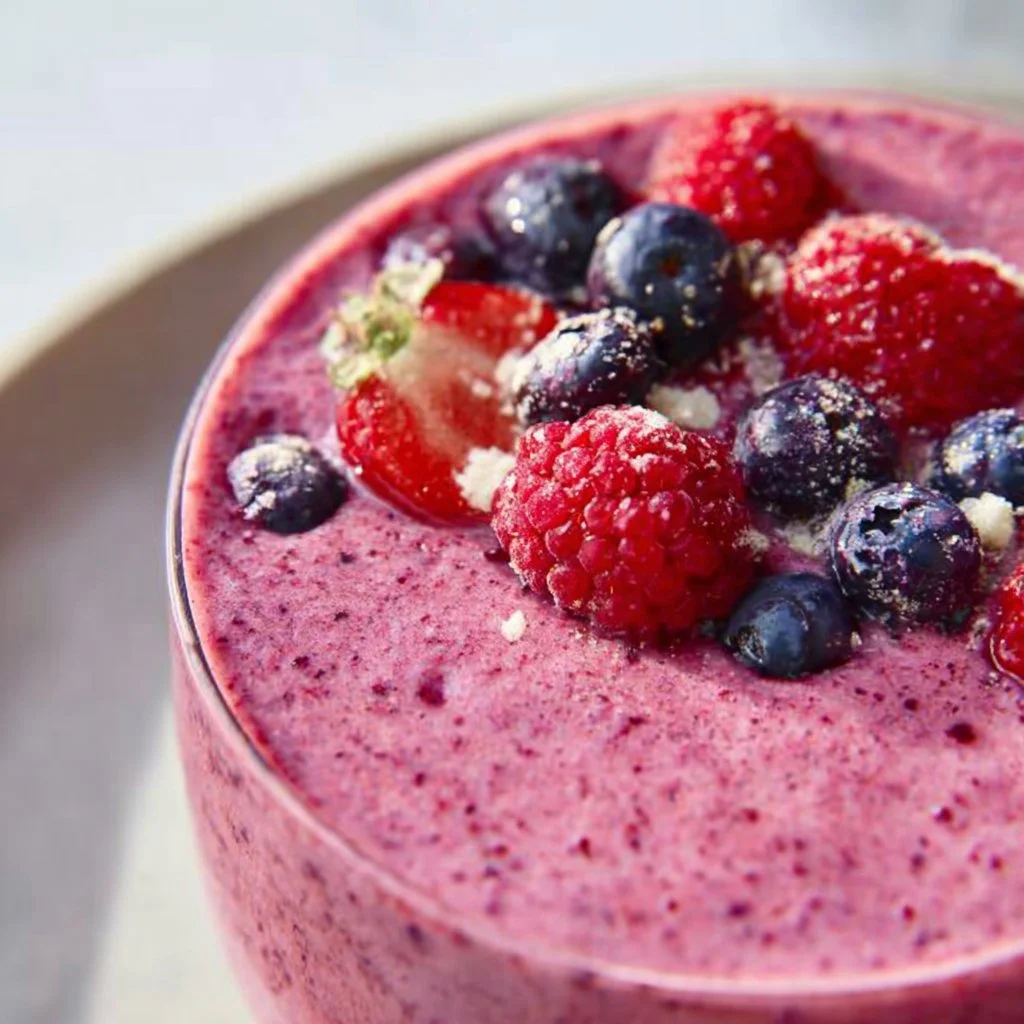
Berry Smoothie
Berry Smoothie: A Tasty Tribute to Simple Joys
Welcome to my kitchen, friends! Today, we’re diving into a refreshing treat that’s perfect for any time of day: the glorious berry smoothie! This vibrant blend of fruits is not only delicious but also packs in a nutritious punch—ideal for breakfast, a quick snack, or even a post-workout rejuvenator. Berries are like nature’s candy, bursting with flavor and color, and I can’t wait to share with you my favorite way to whip them up!
A Little Blast from the Past
Let me take you back to a sunny afternoon when I was about ten years old. It was the kind of day that whispered "summertime" with every gentle breeze. My mom was in the kitchen, blending up something special. The smell of ripe strawberries and tart blueberries wafted through the house, and I was instantly intrigued. She always had a knack for turning simple ingredients into magic, and this occasion was no different.
I watched in awe as she tossed fresh berries into her old, trusted blender—something that had probably seen better days, but still worked like a charm. With a quick flick of the switch, the blender roared to life, and soon the kitchen was filled with the delightful sound of rattling berries and smooth whirls of yogurt. I remember the excitement bubbling inside me; those little seeds of anticipation for the moment we would finally taste the colorful creation.
When she served the smoothie in our favorite glasses, decorated with funny farm animals, it was almost like a celebration. We topped them with a sprinkle of granola and a few whole berries for good measure. I took that first sip, and wow! It was like summer on my tongue—sweet, refreshing, and utterly delightful. Even now, I recreate that moment whenever I whip up a berry smoothie, filled with nostalgia and joy as I offer it to the people I love.
So, let’s get blending, shall we?
Ingredients
Here’s what you’ll need to create your berry smoothie masterpiece:
-
1 cup of mixed berries (frozen or fresh): Berries like strawberries, blueberries, blackberries, and raspberries all work wonderfully! Use frozen for that frosty texture, or fresh if they’re in season. Feel free to mix and match based on what you have available.
-
1 banana: The banana adds natural sweetness and creaminess. If you’re not a fan of bananas, you can substitute with half an avocado for a creamy texture without the banana flavor.
-
1 cup of Greek yogurt: Full of protein and probiotic goodness, Greek yogurt gives the smoothie thickness. If you’re lactose intolerant, try coconut yogurt or almond yogurt instead for a dairy-free alternative.
-
½ cup of milk (dairy or plant-based): This is your liquid base. Almond milk, oat milk, or even coconut water can replace regular milk for a delightful twist.
-
1 tablespoon of honey or maple syrup (optional): Depending on your sweetness preference, this can enhance the flavors. If you’re trying to keep it sugar-free, just skip this or add a Medjool date for natural sweetness.
-
A handful of spinach (optional): Want to sneak in some greens? Spinach is a fantastic way to boost the nutritional value without altering the taste too much.
With these ingredients on hand, you’re well on your way to creating a refreshing berry smoothie that will have everyone coming back for seconds!
Step-by-Step Instructions
-
Gather Your Tools: First things first, make sure you have all your ingredients and a high-speed blender on the counter. A good blender will efficiently break down the berries and banana, creating that velvety texture we all love.
-
Add First Ingredients: Start by placing your mixed berries into the blender. If you’re using fresh berries, give them a quick rinse beforehand. If they’re frozen, there’s no need to thaw—just toss them in!
-
In with the Banana: Next, peel the banana (your hands will thank you for this!). Break it into smaller pieces and add it to the blender. The smaller pieces will blend better and mix more evenly into your smoothie.
-
Add the Yogurt: Scoop out your Greek yogurt and plop that creamy goodness right into the mix. You can use flavored yogurt if you want some added zing, but plain Greek yogurt is a great go-to for versatility.
-
Pour in the Milk: Measure out your milk of choice and pour it over your smoothie base. Remember, you can adjust this to make your smoothie thicker or thinner—add more milk for a lighter smoothie or less for a thicker one.
-
Sweeten It Up: Add your honey or maple syrup if you like your smoothie on the sweeter side. Give it a little taste test—this is your creation, after all!
-
Spinach Boost (optional): If you’re adding spinach, toss it in now. This is a fantastic way to sneak in some greens without losing the berry flavor.
-
Blend, Baby, Blend: Secure the lid on your blender and pulse until you see a vertiginous whirl of colors! Blend for about 30 seconds to a minute, until your mixture is smooth and creamy. If you notice it getting stuck, stop and use a spatula to give it a little mix.
-
Taste and Adjust: Give it a little taste! Does it need more sweetness? A splash more milk? Adjust as needed until you find that perfect balance.
-
Serve and Enjoy: Once you’re happy with your mixture, pour it into your favorite glass—don’t forget to have a straw ready! If you’re feeling fancy, you can add a few whole berries or a sprinkle of granola on top for a cute garnish.
Serving Suggestions
There’s something so satisfying about a beautifully presented smoothie. Try serving it in clear glasses so that stunning, vibrant colors are on display. You could even add a few whole berries on top for decoration, or a dollop of yogurt for extra creaminess. Pair it with a light breakfast, like avocado toast or a slice of whole-grain bread topped with your favorite spreads, for a well-rounded meal.
Recipe Variations
Feeling a bit adventurous? Here are some twists and turns you can take to spice up your berry smoothie:
-
Tropical Twist: Add some pineapple or mango for a tropical vibe. It’ll give your smoothie a sunny, sweet kick!
-
Nutty Flavor: Incorporate a spoonful of almond or peanut butter for a protein boost and a delicious nutty flavor.
-
Chocolate Lover’s Dream: Toss in a tablespoon of cocoa powder or a scoop of chocolate protein powder for a decadent treat that doesn’t compromise nutrition.
-
Oats for Staying Power: Add in some rolled oats to keep you full longer. This is particularly good for a breakfast smoothie!
-
Chia Seed Power: Add a tablespoon of chia seeds for extra fiber and omega-3 fatty acids, perfect for that nourishing touch.
Chef’s Notes
Over the years, I’ve played with this recipe so much; it feels like an old friend who always surprises you! I remember a time when I attempted to make this smoothie for a brunch gathering, and I accidentally used sour yogurt. Let me tell you, that was a flavor adventure I never wanted to repeat!
This recipe has evolved to not just suit my taste but offer something for everyone. Feel free to make it your own! I love hearing about the little tweaks and changes you make to fit your family’s palate. That’s what cooking is all about: experimenting, laughing at the mishaps, and finding joy in the process.
FAQs and Troubleshooting
-
Why is my smoothie too thick?
If your smoothie is thicker than you’d like, simply add more milk a tablespoon at a time until you reach your desired consistency. Just remember, if you’re pouring it into a straw, you’ll want it sippable! -
Can I make this smoothie ahead of time?
Absolutely! You can prep the ingredients the night before and store them in the fridge. Then, in the morning, just blend and go! Alternatively, you can pour it into a mason jar and keep it in the fridge for later (just remember to give it a good shake before drinking!). -
What can I do with leftover smoothie?
If you have any leftover smoothie (which is a rarity in my house!), pour it into ice cube trays and freeze. Those cubes make a great addition to future smoothies or can be used to cool down beverages. -
Can I use other fruits?
Of course! While berries are the star here, you can easily substitute them with whatever fruit you have on hand—just adjust the other ingredients to keep the flavors balanced.
Nutritional Info (per serving, approx.)
- Calories: 250
- Protein: 12g
- Carbohydrates: 40g
- Dietary Fiber: 5g
- Sugars: 18g
- Fats: 4g
And there you have it—your guide to crafting the perfect berry smoothie. I hope you enjoy this as much as I do! Share your own twists in the comments below, and let’s keep this flavorful journey going together. Happy blending!
Print
Berry Smoothie
- Total Time: 10 minutes
- Yield: 2 servings 1x
- Diet: Vegetarian
Description
A refreshing berry smoothie, perfect for breakfast or a snack, packed with flavor and nutrition.
Ingredients
- 1 cup mixed berries (frozen or fresh)
- 1 banana
- 1 cup Greek yogurt
- ½ cup milk (dairy or plant-based)
- 1 tablespoon honey or maple syrup (optional)
- A handful of spinach (optional)
Instructions
- Gather your tools: Make sure you have all your ingredients and a high-speed blender on the counter.
- Add the mixed berries into the blender.
- In with the banana: Peel and break it into smaller pieces before adding it to the blender.
- Add the yogurt and pour in the milk of choice.
- Sweeten it up with honey or maple syrup if desired.
- Toss in the spinach if using.
- Blend until the mixture is smooth and creamy.
- Taste and adjust for sweetness or consistency as needed.
- Serve: Pour into glasses and enjoy, garnishing as desired.
Notes
You can prep ingredients ahead of time and store them in the fridge. Freeze leftover smoothie in ice cube trays for later use.
- Prep Time: 10 minutes
- Cook Time: 0 minutes
- Category: Snack
- Method: Blending
- Cuisine: American
Nutrition
- Serving Size: 1 serving
- Calories: 250
- Sugar: 18g
- Sodium: 80mg
- Fat: 4g
- Saturated Fat: 2g
- Unsaturated Fat: 2g
- Trans Fat: 0g
- Carbohydrates: 40g
- Fiber: 5g
- Protein: 12g
- Cholesterol: 10mg
Keywords: smoothie, berry, healthy snack, breakfast, refreshing drink
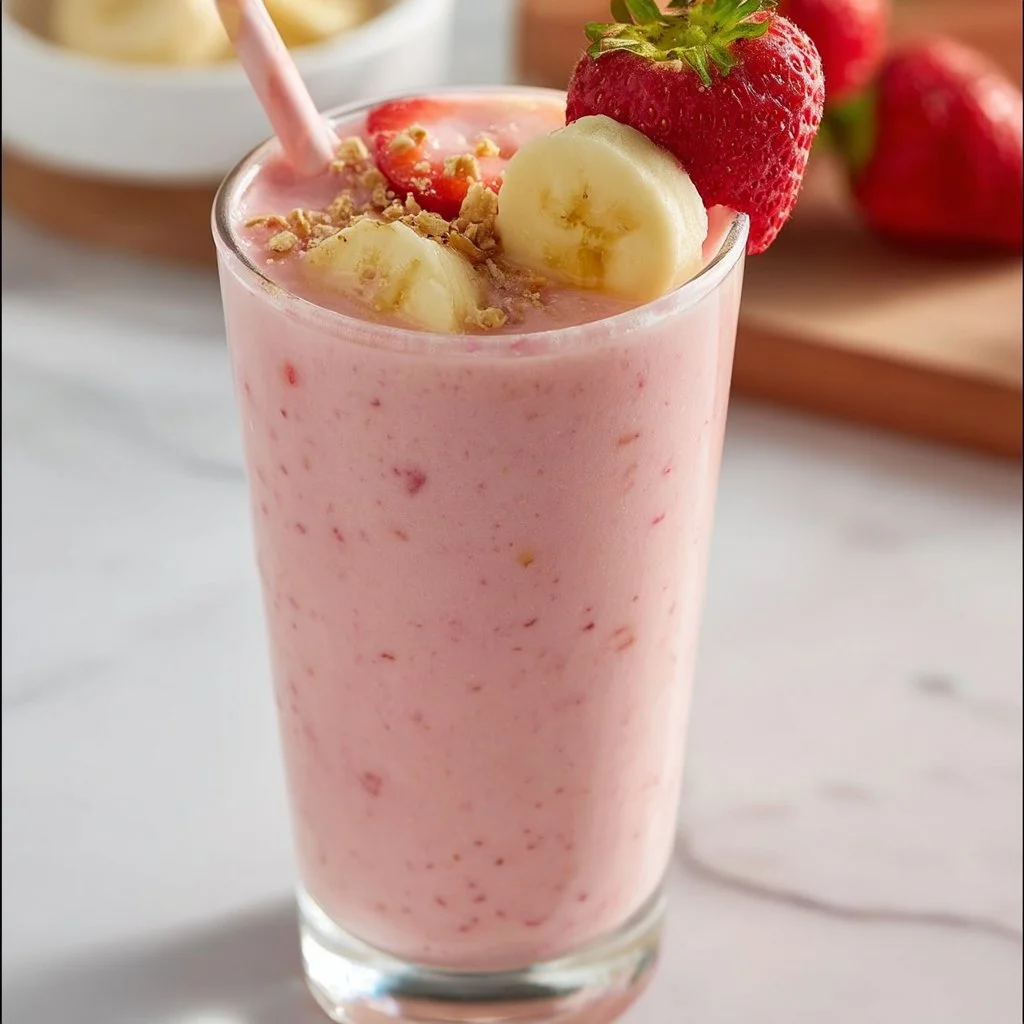
Strawberry Banana Smoothie
The Perfect Strawberry Banana Smoothie: A Tasty Escape
Welcome to my kitchen, friends! I’m Olivia Bennett, your go-to home cook and flavor enthusiast. Today, we’re diving into an irresistible classic: the Strawberry Banana Smoothie. This delicious drink is not just a treat for your taste buds; it’s like a sip of sunshine, perfect for breakfast, a snack, or a quick pick-me-up any time of the day.
Now, I don’t know about you, but I get a thrill from the vibrant colors and fresh fragrance of ripe strawberries and bananas. Whenever I blend these two together, I’m reminded of summer mornings spent in my grandmother’s kitchen, where we would whip up smoothies to cool off after long days of playing outside. Combining the sweetness of strawberries with the creaminess of bananas creates a smoothie that’s simply unforgettable.
In this post, I’ll guide you through the process of making the perfect Strawberry Banana Smoothie, complete with my favorite tips, tricks, and variations. Whether you’re a seasoned pro or a kitchen newbie, I guarantee you’ll feel confident and excited to blend this up in just a few minutes. Are you ready? Let’s get started!
A Tasty Memory from My Childhood
One of my fondest memories involves those lazy summer mornings spent at my grandmother’s house. She would awaken us to the sound of the blender whirring in the kitchen, a magical noise that promised something delicious was on the way. My siblings and I would rush to the kitchen, drawn by the mouthwatering aroma of strawberries that somehow danced through the air.
“Today’s treat is special,” she would say with a wink. It was her famous Strawberry Banana Smoothie. As soon as the bright pink concoction appeared in our glasses, we would gather around the table, eager to sip and savor.
Not only was this smoothie refreshing and delightful, but it also became a sweet ritual that united our family. Each slurp reminded us to appreciate the little moments, plus the tangled conversations shared between us. Even now, when I whip up a batch of this smoothie, I can almost hear her laughter ringing in my ears. It’s a sip of joy, nostalgia, and love.
Ingredients You’ll Need
To create this delightful beverage, gather the following ingredients:
- Fresh Strawberries (1 cup): The stars of the show! Look for plump, red berries. If they’re out of season, frozen strawberries work as an alternative.
- Banana (1 medium): A perfect creamy base for your smoothie. Choose a ripe banana for maximum sweetness. Feeling adventurous? Substitute with frozen banana slices for a thicker texture.
- Greek Yogurt (½ cup): Adds creaminess and a protein boost. If you prefer a non-dairy option, use coconut or almond yogurt.
- Milk (1 cup): Choose your favorite—dairy, almond, oat, or soy. For a tropical touch, try coconut milk!
- Honey or Maple Syrup (1-2 tablespoons): Sweeten to taste. Agave syrup or even a pitted date can also work if you’re looking for a healthier alternative.
- Ice (1 cup): For that refreshing chill and thick texture. Use crushed ice for a smoother blend.
Step-by-Step Instructions
Step 1: First, Gather Your Tools
Before you start blending, assemble your tools! You’ll need a blender, measuring cups, and a spatula for scraping down the sides. Make sure your blender is clean and ready for action.
Step 2: Prepare Your Ingredients
Start by washing the strawberries thoroughly and removing their stems. If you’re using frozen strawberries, you can skip this step; just toss them straight into the blender! Next, peel the banana and break it into chunks for easier blending.
Step 3: Load the Blender
Now it’s time to add all your ingredients to the blender. Layer them in this order:
- Start with the Greek yogurt at the bottom; this helps create a smoother consistency.
- Next, toss in the banana chunks.
- Follow with the fresh strawberries.
- Pour in the milk of your choice.
- Add honey or maple syrup, and finish with the ice.
Step 4: Blend It Up
Cover your blender with the lid, ensuring it’s secure—trust me, you don’t want a smoothie explosion! Start blending on low speed, gradually increasing to high until your mixture is creamy and smooth. If you find it too thick, add a splash more milk to reach your desired consistency.
Step 5: Taste and Adjust
Once blended, give your smoothie a taste! This is the moment to adjust sweetness or thickness. Feel free to add more honey or some extra ice if needed. Blend again briefly to combine any additions.
Step 6: Serve and Enjoy!
Pour your dazzling Strawberry Banana Smoothie into tall glasses. You can garnish with an extra strawberry or a sprinkle of granola on top for added texture. Don’t forget to share it with loved ones; smoothies are best enjoyed together!
Serving Suggestions
To make your smoothie an even more delightful experience, serve it with a colorful straw and a slice of fresh fruit on the glass. You could also pair it with whole-grain toast topped with almond butter or a handful of nuts for a balanced breakfast.
Recipe Variations
Feeling adventurous? Here are a few variations to customize your Strawberry Banana Smoothie:
- Green Power Smoothie: Add a handful of spinach or kale for an extra nutrient boost without altering the flavor much.
- Chocolate Delight Smoothie: Blend in a tablespoon of cocoa powder or a scoop of chocolate protein powder for a chocolatey twist.
- Nutty Banana Bliss: Include a tablespoon of peanut or almond butter for a rich, nutty flavor.
- Berry Blast: Mix in a handful of other berries like blueberries or raspberries for a mixed berry experience.
Chef’s Notes
Over the years, I’ve played around with this recipe, adding different ingredients based on what’s in season or what I have on hand. One of the funniest moments was when I decided to toss in some kale—let’s just say, I wasn’t prepared for the vibrant green smoothie that greeted me! It took some getting used to, but hey, life is all about experimenting, right?
Nutrition Info (Optional)
For those curious about the nutrition, a standard serving of this smoothie provides roughly:
- Calories: 250-300
- Protein: 8-10g
- Fiber: 4-5g
- Calcium: 15% of the daily value
FAQs and Troubleshooting
Here are some common questions and their answers to help you perfect your Strawberry Banana Smoothie:
Q1: Why is my smoothie too thick?
Answer: If your smoothie is too thick, you can easily thin it out by adding more milk, a little at a time, until it reaches your desired consistency.
Q2: Can I use frozen fruit instead of fresh?
Answer: Absolutely! Frozen strawberries and bananas work great and can make your smoothie thicker and colder, perfect for those hot summer days.
Q3: How do I store leftover smoothie?
Answer: For any leftover smoothie, pour it into a jar and refrigerate. However, keep in mind it’s best enjoyed fresh! If it separates, just give it a good shake or blend it again.
Q4: What if I don’t have a blender?
Answer: If you’re missing a blender, a handheld immersion blender (stick blender) can work in a pinch, or you can mash the banana and strawberries together thoroughly before stirring in the other ingredients.
Now that you have your guide to making the most refreshing Strawberry Banana Smoothie, it’s time to gather your ingredients and whip this up! Remember, cooking is all about enjoyment, creativity, and connecting with each other. So, grab someone you love, and let’s make some smoothie magic together! Happy blending!
Print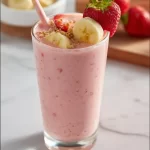
The Perfect Strawberry Banana Smoothie
- Total Time: 5 minutes
- Yield: 2 servings 1x
- Diet: Vegetarian
Description
A refreshing Strawberry Banana Smoothie that’s perfect for breakfast or a quick pick-me-up, blending the sweetness of strawberries with the creaminess of bananas.
Ingredients
- 1 cup Fresh Strawberries
- 1 medium Banana
- ½ cup Greek Yogurt
- 1 cup Milk
- 1–2 tablespoons Honey or Maple Syrup
- 1 cup Ice
Instructions
- Gather Your Tools: Assemble your blender, measuring cups, and a spatula.
- Prepare Your Ingredients: Wash strawberries and remove the stems; peel and chunk the banana.
- Load the Blender: Layer yogurt, banana, strawberries, milk, sweetener, and ice.
- Blend It Up: Secure the lid and blend from low to high speed until creamy.
- Taste and Adjust: Test the mixture and add sweetener or ice as needed.
- Serve and Enjoy: Pour into glasses and garnish as desired.
Notes
Feel free to customize with spinach for a nutrient boost, add cocoa powder for a chocolate flavor, or mix in other berries.
- Prep Time: 5 minutes
- Cook Time: 0 minutes
- Category: Beverage
- Method: Blending
- Cuisine: American
Nutrition
- Serving Size: 1 serving
- Calories: 275
- Sugar: 20g
- Sodium: 100mg
- Fat: 5g
- Saturated Fat: 2g
- Unsaturated Fat: 2g
- Trans Fat: 0g
- Carbohydrates: 49g
- Fiber: 5g
- Protein: 10g
- Cholesterol: 10mg
Keywords: smoothie, strawberry banana smoothie, healthy drink
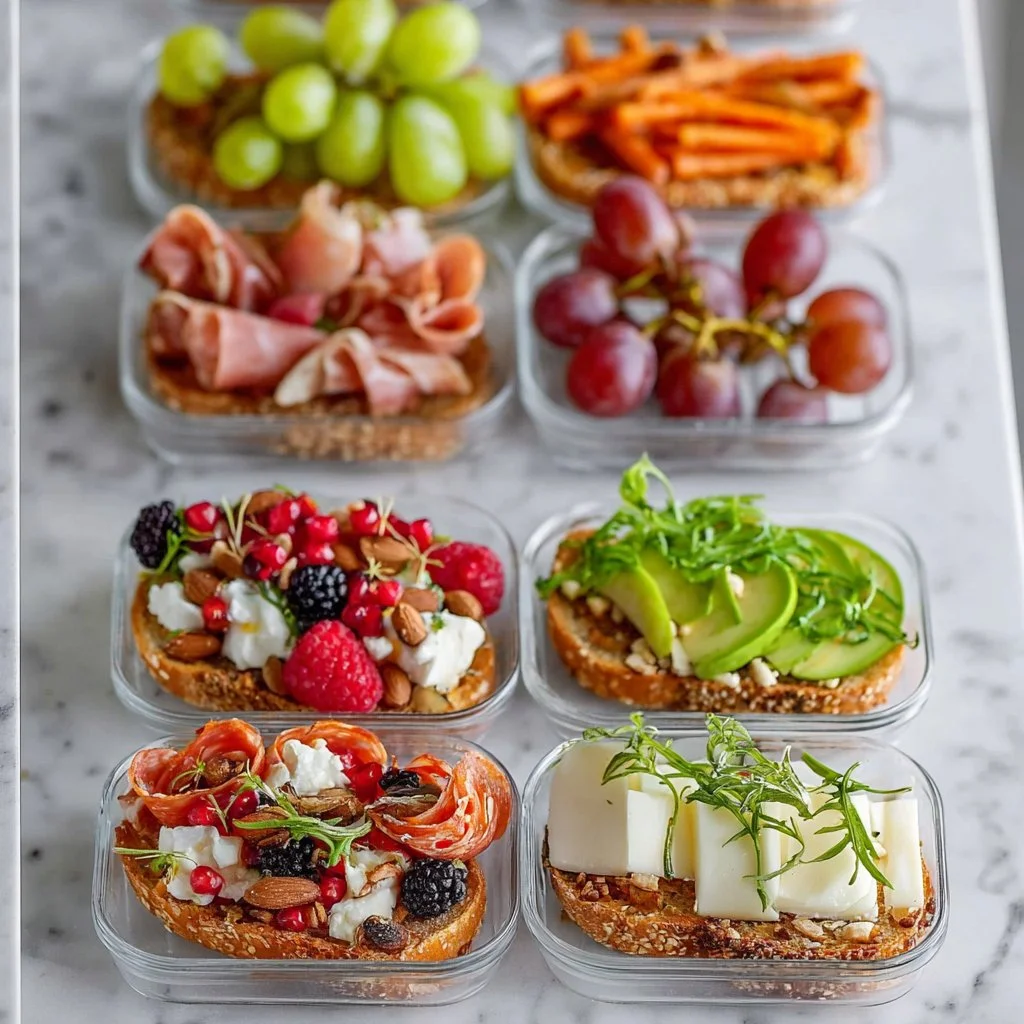
Healthy Meal Prep Snack Ideas
Healthy Meal Prep Snack Ideas for a Wholesome Life
Welcome back, my culinary friends! I’m Olivia Bennett, and I’m here to sprinkle a little joy into your kitchen adventures. If you’re like me and your love for good food is only rivaled by your desire to eat healthy, then you’re in for a treat today! We’re diving into the glorious world of healthy meal prep snack ideas that are as nourishing as they are delicious.
Let’s face it—snacking can sometimes feel like a guilty pleasure, but it doesn’t have to be! With a few healthful ingredients and some creative inspiration, you can whip up snacks that serve as both fuel and fun. Imagine crunching on homemade nut bars or dipping fresh veggies in a dreamy hummus while binge-watching your favorite show. Picture making snack time something to look forward to instead of a last-minute grab of whatever is lying around!
Meal prepping is a game-changer, especially for those of us juggling busy schedules. It allows you to fill your fridge with delicious snacks, so you can say goodbye to reach-for-the-chips moments. The key is to make snacks that not only fulfill your cravings but also provide essential nutrients to keep your energy levels soaring.
In this post, I’ll share my favorite healthy snack ideas that you can prep ahead of time, including tips, tricks, and personal stories to inspire you to get creative in the kitchen. So grab your apron (and maybe a snack!), and let’s get cooking!
Personal Story
Ah, the memories of my childhood kitchen come rushing back when I think about making snacks. I remember my mom whipping up a big batch of energy balls for our post-school treat, which didn’t just satisfy our sweet tooth but also kept us fueled for playtime. She’d let my little fingers roll the mixture into perfect balls, while I couldn’t help but sneak bites of dough along the way. It was a time for laughter, a bit of messiness, and a whole lot of flavor.
Fast forward a couple of decades, and here I am, still whipping up energy balls! I’ve refined the recipe over time, adding new flavors, but the essence remains the same: wholesome ingredients, a sweet kick, and a way to spark joy. Those cherished moments of cooking alongside my mom inspired my passion for creating snacks that are healthy and fun. Now, I’m passing this tradition on to you, hoping to inspire new kitchen adventures for you and loved ones alike.
Ingredients
Let’s gather our friendly ingredients! Here’s what you’ll need to create some scrumptious, healthy meal prep snacks:
-
Oats:
- What They Do: They serve as the base for countless snacks, providing fiber and keeping you full.
- Tip: Use rolled oats for better texture; you can also swap with quinoa flakes for a gluten-free option.
-
Nut Butter (peanut, almond, etc.):
- What They Do: Brings creaminess and healthy fats into the mix—perfect for energy and flavor.
- Tip: You can swap out for sunflower seed butter for a nut-free alternative, perfect for schools.
-
Honey or Maple Syrup:
- What They Do: Acts as a natural sweetener, binding everything together.
- Tip: Use agave syrup for a lower-glycemic option, or skip the sweetener for a no-sugar-added option!
-
Chia Seeds:
- What They Do: These little powerhouses add omega-3s and help to bind ingredients.
- Tip: Flax seeds can be a great substitute and add a nutritional punch too!
-
Dark Chocolate Chips or Dried Fruits:
- What They Do: Adds sweetness and indulgence, because hey, balance is key!
- Tip: Use cacao nibs for a healthier treat or try unsweetened coconut flakes for a tropical twist.
-
Nuts and Seeds:
- What They Do: Provide crunch and protein—and who doesn’t love a good bite?
- Tip: Feel free to use whatever you have on hand—walnuts, pumpkin seeds, or pecans—all work wonders!
Step-by-Step Instructions
Alright, now that we have our delicious ingredients lined up, let’s dive into the fun part—actually making our snacks! I’m excited to share my energy ball recipe that’s perfect for meal prep. Let’s get started:
-
Gather Your Ingredients:
- First thing’s first, measure out 2 cups of oats, ½ cup of nut butter, ½ cup of honey, and a ½ cup of add-ins like chocolate chips or dried fruit.
-
Mix the Base:
- In a large bowl, combine the oats and nut butter. Use a spatula to mix these until they’re well incorporated. You’ll notice it getting sticky—this is where the magic starts. Chef’s Tip: A little arm workout never hurt, but if you’re feeling fancy, use a stand mixer for a quick blend!
-
Add Sweetness:
- Drizzle in that honey (or maple syrup) and mix until combined. This is where you can decide if you want it sweeter—taste a little! Adjust if needed. Chef’s Tip: If it feels too dry, add more nut butter or a splash of plant-based milk.
-
Toss in the Extras:
- Now for the best part: stir in your chia seeds, nuts, and any add-ins like chocolate chips or dried fruits. Make sure everything is evenly distributed. Tip: Use your hands! It’s messy, but it’s part of the fun.
-
Chill Out:
- Once everything’s mixed, cover the bowl and let it chill in the fridge for about 30 minutes. This helps the mixture firm up, making it easier to roll into balls.
-
Roll the Energy Balls:
- After chilling, take out the mixture and roll it into 1-inch balls. They don’t have to be perfect; remember, we’re going for homemade vibes! Chef’s Tip: If they’re sticking to your hands, wet them slightly with water.
-
Store Your Snacks:
- Place the rolled energy balls in an airtight container; they can last in the fridge for up to a week, or you can freeze them for a month. Tip: Label your containers—nothing like a surprise snack from the freezer!
Serving Suggestions
These tasty energy balls can be served as a quick on-the-go snack, a yummy addition to your lunchbox, or even as a light dessert after dinner. For some flair, you can plate them beautifully on a colorful serving dish, dust them with shredded coconut, or even drizzle a little extra dark chocolate on top. Just remember to have fun with it!
Recipe Variations
Here are a few delightful twists you can try to make these snacks uniquely yours:
-
Tropical Bliss: Add chopped pineapple and coconut flakes for a sweet, island-inspired treat.
-
Spicy Chocolate: Mix in a pinch of cinnamon and a dash of cayenne for a zesty chocolate kick.
-
Protein-Packed: Toss in your favorite protein powder to transform these snacks into a post-workout pick-me-up.
-
Oatless Option: Substitute oats with ground nuts for a lower-carb version while packing in extra protein.
-
Fruit and Nut Medley: Get adventurous by using old-school trail mix—just mix in your favorite combinations!
Chef’s Notes
Cooking is all about experimenting! I’ve taken this energy ball recipe and made countless variations over the years. Some may say it’s a simple dish, but to me, it’s a canvas. You can mix in what you have, based on the seasons or cravings, and it will still be delicious. I once added leftover granola to a batch, which turned out surprisingly delightful! These moments in the kitchen are what keep my passion alive.
FAQs and Troubleshooting
Q1: My mixture is too dry; what do I do?
A: If your mixture feels too dry and isn’t coming together, simply add a splash of plant-based milk or an extra tablespoon of nut butter to help it bind.
Q2: Can I make these energy balls nut-free?
A: Absolutely! Use sunflower seed butter or even tahini for a wonderful, nut-free alternative. You can also increase the amount of seeds to keep the protein content high.
Q3: What can I use instead of honey?
A: Maple syrup works great as a vegan alternative! You can also try date syrup if you want to keep it all-natural.
Q4: Can I add fresh fruit?
A: I recommend sticking to dried fruits for this recipe. Fresh fruit might make the mixture mushy due to moisture. Save those for a separate snack!
Nutritional Info
While precise nutritional information can vary based on specific ingredients used, these energy balls generally offer a balanced mix of protein, healthy fats, and carbs. A typical serving (about 2 balls) provides roughly 150 calories, 6g protein, 10g fat, and 15g carbohydrates.
And there you have it! A wholesome journey through the world of healthy meal prep snacks. I hope you feel inspired to get creative in your kitchen. Remember, cooking is about joy and connection—share these snacks with loved ones, and let the good times roll. Happy cooking, everyone!
Print
Healthy Meal Prep Energy Balls
- Total Time: 15 minutes
- Yield: 24 servings 1x
- Diet: Vegetarian
Description
Delicious and nutritious energy balls perfect for meal prep and snacking.
Ingredients
- 2 cups rolled oats
- ½ cup nut butter (peanut, almond, or sunflower seed)
- ½ cup honey or maple syrup
- ½ cup chia seeds
- ½ cup dark chocolate chips or dried fruits
- Nuts and seeds (walnuts, pumpkin seeds, or pecans) to taste
Instructions
- Gather your ingredients.
- Mix the base: combine oats and nut butter in a large bowl.
- Add sweetness by drizzling in honey and mixing until combined.
- Toss in the extras: stir in chia seeds, nuts, and add-ins.
- Chill the mixture in the fridge for about 30 minutes.
- Roll the chilled mixture into 1-inch balls.
- Store the energy balls in an airtight container.
Notes
These energy balls can last in the fridge for up to a week or be frozen for a month.
- Prep Time: 15 minutes
- Cook Time: 0 minutes
- Category: Snack
- Method: No-Cook
- Cuisine: American
Nutrition
- Serving Size: 1 ball
- Calories: 150
- Sugar: 8g
- Sodium: 5mg
- Fat: 10g
- Saturated Fat: 1g
- Unsaturated Fat: 8g
- Trans Fat: 0g
- Carbohydrates: 15g
- Fiber: 3g
- Protein: 6g
- Cholesterol: 0mg
Keywords: energy balls, healthy snacks, meal prep, vegetarian snacks, no-bake snacks
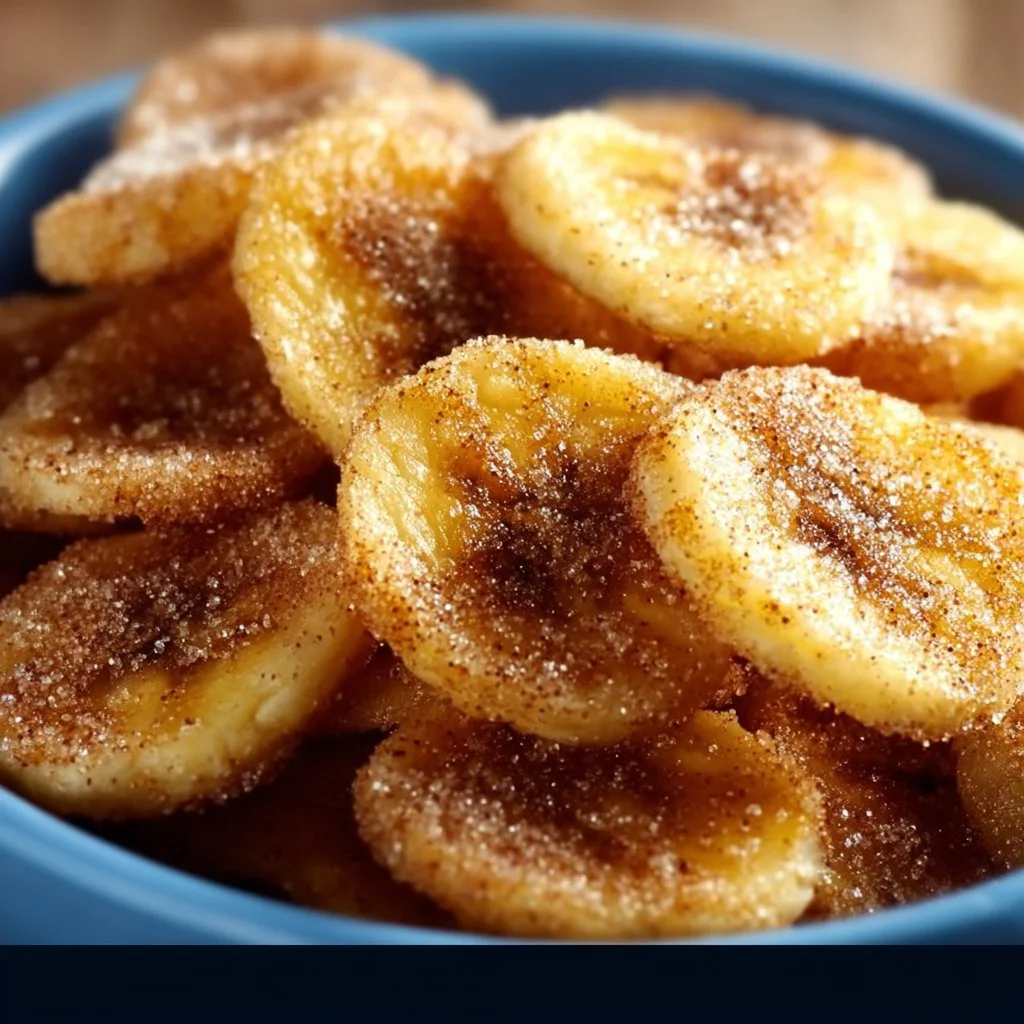
Cinnamon-Sugar Air Fryer Banana Chips
# Cinnamon-Sugar Air Fryer Banana Chips: A Sweet Treat for Every Occasion

## Introduction

Welcome to my cozy little corner of the internet! I’m Olivia Bennett, your friendly, neighborhood kitchen enthusiast ready to share one of my absolute favorite snacks: Cinnamon-Sugar Air Fryer Banana Chips. If you're anything like me—someone who finds pure bliss in the aroma of something delicious wafting through the air—you'll love how quick and easy it is to whip up this delightful treat.

These banana chips are crispy, crunchy, and just the right balance of sweet and spicy. Plus, they’re made right in your air fryer, which means minimal mess and maximum flavor. It’s like a hug for your taste buds! The best part? They’re a healthier alternative to traditional potato chips, so you can enjoy them guilt-free. Whether you're snacking solo or entertaining friends and family, these banana chips are sure to satisfy and spark conversations about your kitchen adventures!

As the seasons change and the days get busier, it’s essential to find those quick yet rewarding recipes to keep us grounded in the kitchen. Making your own snacks has a sense of nostalgia and creativity. Remember when we used to gather around the kitchen table, sharing stories and munching on homemade goodies? That’s the vibe we’re going for! So grab your apron, and let’s dive into the world of air fryer banana chips!

---

## Personal Story

I still remember the first time I made these banana chips. It was a lazy Sunday afternoon, and I had a handful of overripe bananas sitting on the counter—those beauties that definitely weren’t getting eaten raw anymore. I knew I wanted to create something special with them, but I didn’t have hours to spend in the kitchen. That’s when the air fryer came to my rescue!

With a little experimentation and plenty of joy, I sliced those bananas, sprinkled them with cinnamon and sugar, then popped them into the air fryer. I was beyond excited—would they turn out crunchy? Would they taste heavenly? Fast forward to the moment I opened the air fryer, and the sweet aroma enveloped me. The first bite was a revelation! They were perfectly crisp with just the right amount of sweetness, and I found myself daydreaming about all the fun ways I could enjoy them. From that day on, they became a staple in my home, and I couldn’t wait to share the recipe with everyone.

---

## Ingredients

Before we dive into the cooking process, let's gather our ingredients! Here's what you'll need:

- **Bananas**: Choose ripe bananas for the best sweetness and flavor. If you prefer, green bananas will work too; they’ll just be less sweet.
- **Cinnamon**: This warm spice not only adds flavor but also brings a delightful aroma. It's a staple in my spice cabinet, and you can easily swap it out for nutmeg or pumpkin spice if you're looking for a unique twist!
- **Sugar**: I use granulated sugar for that classic sweetness, but feel free to use coconut sugar, brown sugar, or even a sugar substitute if you’re following a particular diet.
- **Oil (optional)**: A light spray of coconut oil or canola oil helps to make the chips crispier, but you can also skip this if you prefer a lighter option.

### Quick Chef Insights
- **Banana Rips**: Look for bananas with a few brown spots; they’re at their sweetest.
- **Cinnamon Variety**: There are two main types of cinnamon: Ceylon (true cinnamon) and Cassia (more common). Ceylon is sweeter and more aromatic, but either will work wonderfully.
- **Sweetness Level**: Adjust the sugar based on your preference. If you're making these for kids, a little extra sweetness goes a long way!

---

## Step-by-Step Instructions

Ready to make some magic happen in your air fryer? Let’s get started with these easy-peasy steps!

### Step 1: Prep the Bananas
Peel your bananas and slice them into even rounds, about 1/4-inch thick. The important thing here is to keep those slices consistent. Thicker slices will be chewy, while thinner ones will crisp up nicely. Trust me; a little uniformity goes a long way!

### Step 2: Season the Slices
In a mixing bowl, combine your banana rounds with cinnamon and sugar. Use a tablespoon of sugar for every teaspoon of cinnamon (but feel free to adjust based on your taste preferences!). Toss gently to ensure all the banana slices are coated. **Chef Hack**: For extra crunch, you can dust some cornstarch along with your sugar and cinnamon mix.

### Step 3: Preheat the Air Fryer
This little gem works best when preheated! Set your air fryer to 350°F (175°C) and let it warm up for about 3 minutes. This step is crucial because it ensures your chips will crisp up perfectly.

### Step 4: Arrange the Bananas
Place your banana slices in the air fryer basket in a single layer. Try not to overcrowd them so they can cook evenly. If you have a small air fryer, you may need to do this in batches.

### Step 5: Air Fry Those Chips
Cook for about 10 to 15 minutes, flipping midway. Keep an eye on them so they don’t burn—yes, I speak from experience! They should come out golden brown and crispy.

**Tip**: Check around the 8-minute mark—every air fryer is a little different.

### Step 6: Cool and Crisp
Once the chips are done, carefully transfer them to a wire rack to cool. They will crisp up even more as they cool down, making it hard to resist sneaking one before they hit the serving platter!

---

## Serving Suggestions

Now that your Cinnamon-Sugar Air Fryer Banana Chips are all done and cooling, here’s how I like to serve them up! Arrange them in a fun, rustic bowl or on a colorful platter—the presentation makes all the difference. Pair them with a scoop of yogurt or serve them alongside a dipping sauce like peanut butter or even a drizzle of chocolate for that decadent feel. Fancy, right?

---

## Recipe Variations

Here are a few fun twists to take your banana chips to the next level:

- **Chocolate-Dipped Bliss**: Melt dark or white chocolate and dip half of the banana chips for an indulgent treat.
- **Nutty Bananas**: Sprinkle finely chopped nuts like almonds or pecans over your banana slices before air-frying. The crunch is phenomenal!
- **Spicy Kick**: Add a pinch of cayenne pepper for a sweet and spicy combination.
- **Coconut Delight**: Toss in some unsweetened shredded coconut for a tropical twist.

---

## Chef’s Notes

As I reflect on my journey of creating the perfect air fryer banana chips, I have to chuckle at my early attempts. The first batch turned out more like little banana pancakes than chips! However, with time and a few happy accidents, these chips became a staple around my home. They’re not just a tasty snack; they’ve transformed into fond memories of laughter and experimentation in the kitchen.

The beauty of cooking is that it’s always evolving. These banana chips are perfect as is, but they can also be the base for countless creative twists. Don’t be afraid to experiment!

---

## FAQs and Troubleshooting

### Q1: Why are my banana chips soggy?
A1: Make sure your banana slices are evenly cut and not too thick. Also, ensure that you're flipping them halfway through to allow even crisping.

### Q2: Can I use frozen bananas?
A2: Yes, but keep in mind that frozen bananas tend to be a bit mushier. Thaw them before slicing and seasoning.

### Q3: How can I store leftover banana chips?
A3: Store in an airtight container at room temperature for up to a week. However, I bet they won’t last that long!

### Q4: My chips browned too quickly. What happened?
A4: Air fryers can vary in temperature. If they brown too fast, try reducing the temperature to 325°F (160°C) and cooking a bit longer.

---

## Nutritional Info

While exact values can vary, here’s a rough estimate per serving (about 1 ounce):

- Calories: 150
- Carbohydrates: 35g
- Fiber: 3g
- Sugars: 12g
- Protein: 1g
- Fat: 0.5g

---

And there you have it! Your very own Cinnamon-Sugar Air Fryer Banana Chips that are perfect for snacking anytime. I hope this recipe inspires you to step into the kitchen and create something delightful! Remember to share your kitchen adventures—tag me on social media, and let’s keep this food community thriving. Happy cooking!

Cinnamon-Sugar Air Fryer Banana Chips
- Total Time: 25 minutes
- Yield: 2 servings 1x
- Diet: Vegan
Description
Crispy, sweet, and a healthier alternative to traditional snacks, these air fryer banana chips bring joy without the guilt.
Ingredients
- 2 ripe bananas
- 1 teaspoon cinnamon
- 1 tablespoon granulated sugar
- A light spray of oil (optional)
Instructions
- Peel your bananas and slice them into even rounds, about 1/4-inch thick.
- Combine your banana rounds with cinnamon and sugar in a mixing bowl.
- Preheat your air fryer to 350°F (175°C) for about 3 minutes.
- Place banana slices in a single layer in the air fryer basket.
- Cook for about 10 to 15 minutes, flipping midway.
- Transfer the chips to a wire rack to cool, allowing them to crisp up.
Notes
For extra crunch, dust some cornstarch along with your sugar and cinnamon mix. Store leftovers in an airtight container at room temperature for up to a week.
- Prep Time: 10 minutes
- Cook Time: 15 minutes
- Category: Snack
- Method: Air Frying
- Cuisine: American
Nutrition
- Serving Size: 1 ounce
- Calories: 150
- Sugar: 12g
- Sodium: 1mg
- Fat: 0.5g
- Saturated Fat: 0g
- Unsaturated Fat: 0g
- Trans Fat: 0g
- Carbohydrates: 35g
- Fiber: 3g
- Protein: 1g
- Cholesterol: 0mg
Keywords: air fryer snacks, banana chips, healthy snacks, cinnamon sugar, easy recipes
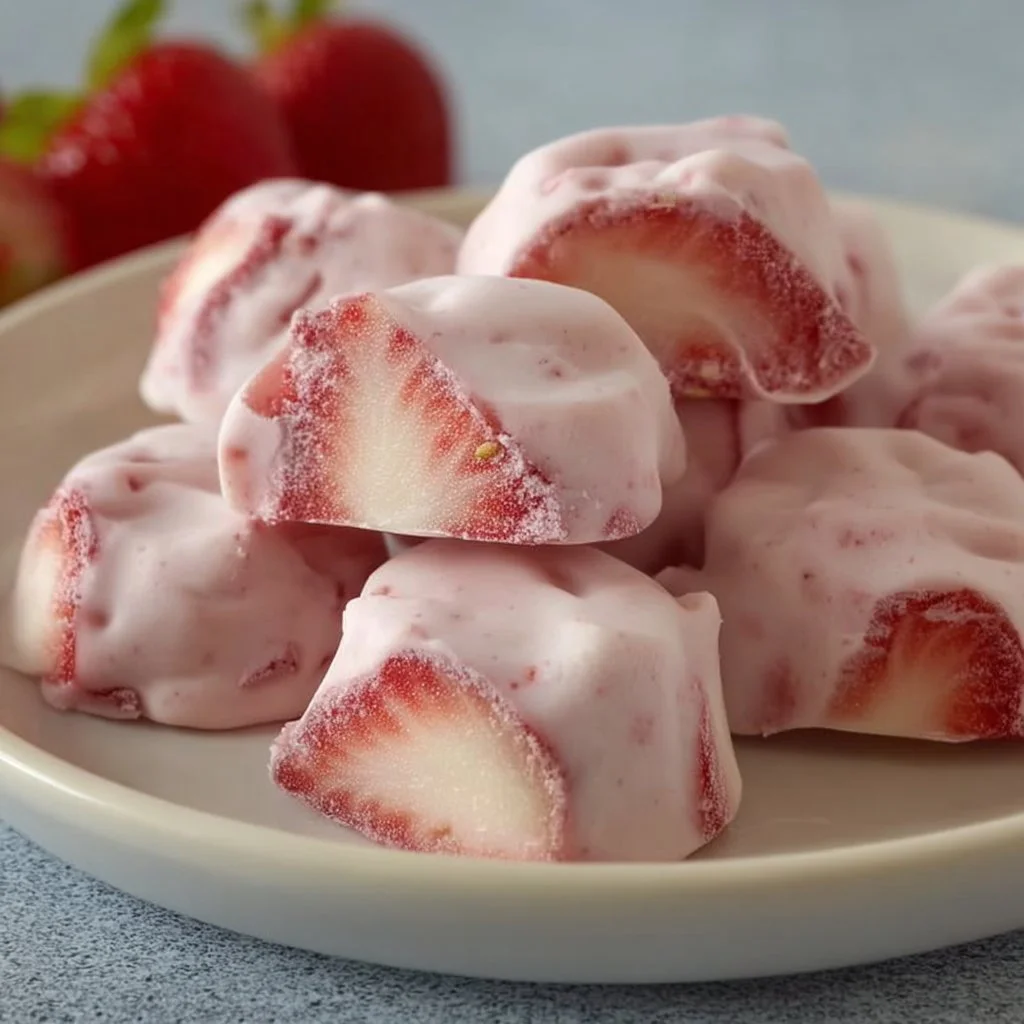
Strawberry High Protein Yogurt Bites
Strawberry High Protein Yogurt Bites
Welcome to my kitchen! I’m so excited to share one of my all-time favorite recipes with you today: Strawberry High Protein Yogurt Bites! There’s something about these little bites of joy that just makes my heart sing. Not only are they delicious, but they’re also packed with protein and nutrients, making them an adorable snack that you can feel good about indulging in.
We all know the struggle of finding delicious, healthy snacks. Sometimes it feels like a tall order. But fear not, delightful foodies! These Strawberry Yogurt Bites are here to save the day. Imagine biting into a creamy, tangy yogurt exterior with the sweetness of fresh strawberries nestled inside. The best part? They’re super simple to make, and you can whip them up in no time, making them perfect for breakfast on the go, an afternoon pick-me-up, or even a fun treat for your next gathering.
A Little Kitchen Slice of Nostalgia
Growing up, my mom was a big proponent of healthy snacking. She always had a fresh fruit bowl at the center of our kitchen table, and we would often pluck strawberries straight from it. One summer, while I was home from college, we decided to have a little fun with those strawberries. Armed with a tub of Greek yogurt and a sprinkle of granola, we began dipping the fresh strawberries, then freezing them. What started out as a simple experiment turned into a delightful family tradition.
Those strawberry bites became a staple in our household—always requested at gatherings and often found in my lunchbox between slices of bread. The joy of sharing those fun little bites with friends is why I want to pass along this recipe to you. It’s a blend of nostalgia, health, and simply delicious flavor that brings back so many fond memories.
Ingredients
Here’s what you’ll need to whip up your own Strawberry High Protein Yogurt Bites:
-
Fresh Strawberries
These delightful fruits serve as the star ingredient. Look for bright red, ripe strawberries for the sweetest flavor. Substitute with raspberries or blueberries if desired for a twist! -
Greek Yogurt
Opt for plain Greek yogurt for a creamy, protein-packed base. You can swap with any yogurt of your choice, including non-dairy options like coconut or almond yogurt for a vegan version. -
Honey or Maple Syrup
A drizzle of honey or maple syrup balances the tartness of the yogurt. Feel free to adjust the sweetness according to your taste, or try agave nectar for a vegan sweetener. -
Vanilla Extract
A splash of vanilla elevates the flavor. Look for pure vanilla extract for the best results. If you want to experiment, try almond extract for a nutty twist! -
Granola or Nuts (optional)
For a delightful crunch, sprinkle granola or crushed nuts on top before freezing. This step adds texture, but you can skip it if you prefer a smooth finish.
Step-by-Step Instructions
Now let’s get down to the fun part! Here’s how to create these Strawberry High Protein Yogurt Bites:
-
Prep the Strawberries
Rinse your fresh strawberries under cool water, then gently pat them dry with a clean towel. Cut off the green tops (the leafy caps) and create a small "X" cut at the bottom of each berry. This weird little hack helps the yogurt adhere better while freezing. Isn’t kitchen science fascinating? -
Make the Yogurt Mixture
In a small mixing bowl, combine 1 cup of Greek yogurt with 1-2 tablespoons of honey (or maple syrup) and a teaspoon of vanilla extract. Use a whisk to blend them until smooth and creamy. This is your yogurt base—feel free to taste it for sweetness! If you like it sweeter, add a bit more honey. -
Fill the Strawberries
Using a small spoon or piping bag, carefully fill each strawberry with the yogurt mixture. Aim to overfill them a bit so there’s a lovely dollop peeking out. This is where you can get creative! Use a different colored piping bag or a ziplock with a hole cut in the corner for a fun presentation. -
Sprinkle with Toppings
If you’re adding granola or nuts for crunch, sprinkle a small amount on top of each filled strawberry. Enjoy the colorful contrast that creates between the lovely pink yogurt and bright green granola. -
Freeze Time!
Place the filled strawberries on a parchment-lined baking sheet, ensuring they’re not touching. Pop them in the freezer for about an hour or until they are completely solid. This allows them to be easy to grab as a snack later! -
Storage
Once frozen, transfer the Strawberry Yogurt Bites to an airtight container or a zip-lock bag. Store them in the freezer for up to a month (if they last that long!). Trust me, they’ll disappear before you know it!
Serving Suggestions
When it’s time to serve these Strawberry High Protein Yogurt Bites, pull a few from the freezer and let them sit out for a couple of minutes. This allows them to soften just enough for a blissful bite. You can arrange them on a vibrant plate with a drizzle of honey on the side for dipping, or even pair them with a refreshing beverage like iced tea or sparkling water for a lovely afternoon treat!
Recipe Variations
Feel free to mix things up! Here are some fun variations to consider:
-
Berry Medley: Use a mix of strawberries, blueberries, and raspberries for an exciting flavor combination.
-
Cocoa Twist: Add a tablespoon of cocoa powder to the yogurt for a delightful chocolate flavor.
-
Nutty Delight: Incorporate finely crushed nuts into the yogurt mix for a nutritious touch.
-
Citrus Zing: Add a squeeze of lime or lemon juice to the yogurt for a refreshing twist on flavor.
-
Choco-Fruit Burst: Dip the strawberry-filled yogurt bites halfway in melted dark chocolate before freezing for a decadent dessert.
Chef’s Notes
These Strawberry High Protein Yogurt Bites have been a staple in my kitchen for years. I love how versatile they are! I started off using just Greek yogurt and strawberries, but with each attempt, the recipe evolved as I began adding my personal touch. One time, I even got experimental by tossing in fruit puree! The outcome was mind-blowing.
One of the best parts? Kids love these bites! They’re great for packing in lunches and are an excellent way to sneak in some nutrition. I once had a kitchen disaster (the blender went rogue), and my kids helped me make a new batch, giggling about how our yogurt mixture had turned into a smoothie surprise!
FAQs and Troubleshooting
-
Can I use frozen strawberries?
While fresh strawberries work best for this recipe, if you choose to use frozen, remember to thaw them and pat them dry to avoid excess moisture which could make the yogurt runny. -
What if the yogurt doesn’t stick?
If the yogurt doesn’t adhere well to the strawberries, try coating the strawberries with a light layer of honey first; it helps with sticking! -
Can I use flavored yogurt?
Absolutely! If you prefer flavored yogurt, feel free to use strawberry, vanilla, or any other flavor you love. Just keep in mind that sweetness might vary. -
How long do they last in the freezer?
Strawberry Yogurt Bites can be stored for about a month in an airtight container. However, they’re so tasty that they might not even last that long!
Nutritional Info (Optional)
Each Strawberry High Protein Yogurt Bite contains approximately:
- Calories: 30
- Protein: 2g
- Carbohydrates: 6g
- Fats: 0.5g
Now you’re ready to head into the kitchen and create your own batch of Strawberry High Protein Yogurt Bites! I hope you enjoy every sweet, tangy bite as much as I do. Remember, cooking is about having fun and experimenting, so let your creativity shine. Happy cooking, my fellow foodies!
Print
Strawberry High Protein Yogurt Bites
- Total Time: 75 minutes
- Yield: 4 servings 1x
- Diet: Vegetarian
Description
Delicious and nutritious Strawberry High Protein Yogurt Bites made with fresh strawberries and creamy Greek yogurt.
Ingredients
- Fresh Strawberries
- 1 cup Greek Yogurt
- 1–2 tablespoons Honey or Maple Syrup
- 1 teaspoon Vanilla Extract
- Granola or Nuts (optional)
Instructions
- Prep the strawberries by rinsing them, patting them dry, and cutting off the green tops.
- Make the yogurt mixture by combining Greek yogurt, honey or maple syrup, and vanilla extract in a bowl and whisk until smooth.
- Fill each strawberry with the yogurt mixture using a spoon or piping bag.
- Sprinkle optional granola or nuts on top if desired.
- Freeze the filled strawberries on a parchment-lined baking sheet for about an hour until solid.
- Store the frozen bites in an airtight container or zip-lock bag for up to a month.
Notes
Perfect for a healthy snack or dessert. Kids love them!
- Prep Time: 15 minutes
- Cook Time: 60 minutes
- Category: Snack
- Method: Freezing
- Cuisine: American
Nutrition
- Serving Size: 1 serving
- Calories: 30
- Sugar: 5g
- Sodium: 5mg
- Fat: 0.5g
- Saturated Fat: 0g
- Unsaturated Fat: 0g
- Trans Fat: 0g
- Carbohydrates: 6g
- Fiber: 1g
- Protein: 2g
- Cholesterol: 5mg
Keywords: snack, healthy, yogurt, strawberries, protein, dessert
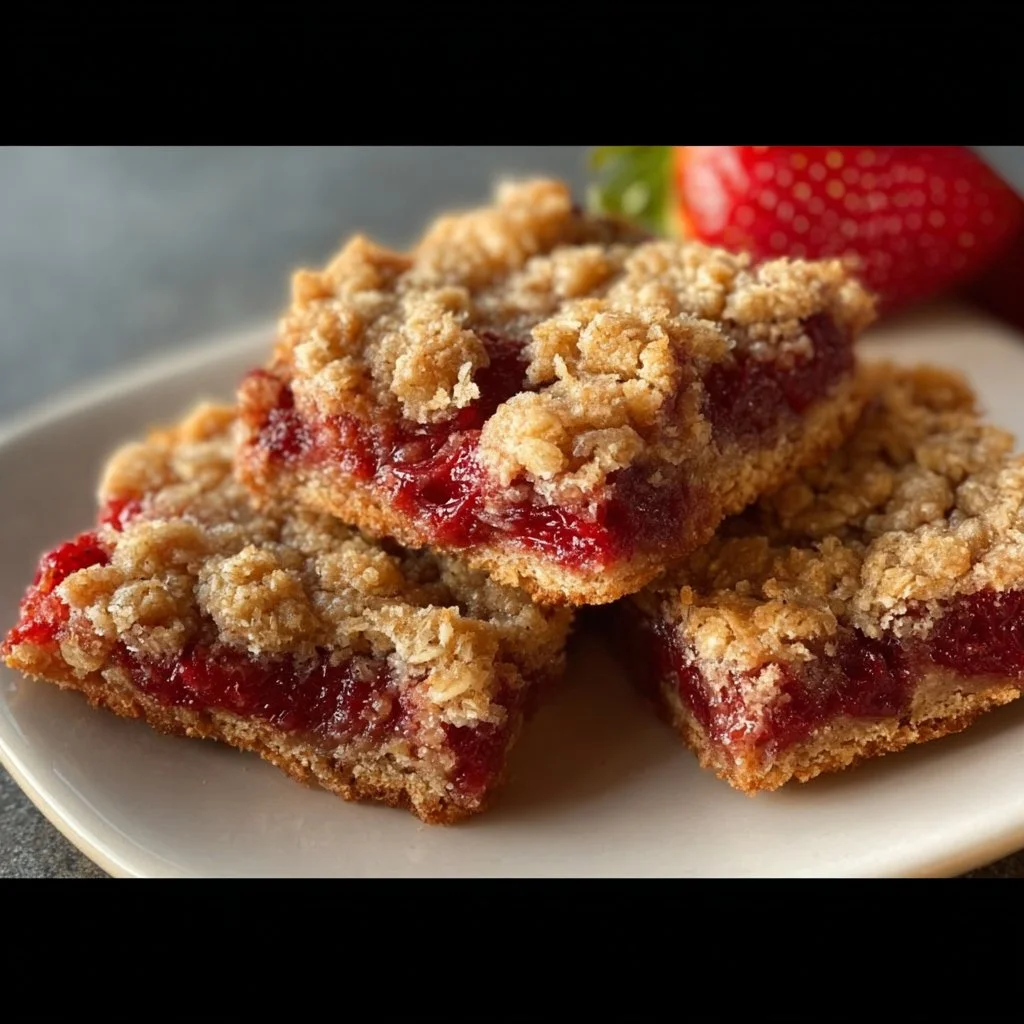
Strawberry Oatmeal Bars
Strawberry Oatmeal Bars: A Delicious Adventure in Your Kitchen
Welcome back to my cozy corner of culinary delights! Today, we’re going to dive into a recipe that is not just a treat for your taste buds, but also a joy to make. I’m talking about Strawberry Oatmeal Bars—the perfect blend of sweet, fruity goodness tucked between layers of oat perfection. These bars are like a hug in dessert form, combining the nostalgic flavors of childhood with a healthy twist. Trust me, once you take a bite, you’ll be transported to sunny picnics and warm family gatherings, all while feeling good about what you’re eating!
The beauty of these bars lies in their versatility. They’re great for breakfast on-the-go, a delightful snack, or even a sweet ending to your day. Packed with wholesome oats and fresh strawberries, they strike the perfect balance between nourishing and indulgent. Here’s the best part: you don’t need to be a master chef to whip these up! With just a few simple steps, you’ll create a dish that not only tastes amazing but also makes your kitchen smell like a bakery.
As we journey through this recipe together, I’ll share some of my favorite tips and personal stories to make your cooking experience as delightful as the bars themselves. So, grab your apron, and let’s create something beautiful to savor!
Personal Story
Ah, the memories of summer! One of my fondest recollections is from when I was a little girl, proudly watching my grandmother bake in her sun-filled kitchen. She had this magical ability to transform the most humble ingredients into something divine. One of her specialties was a similar version of today’s recipe—strawberry crumble bars. I remember sitting on the counter, legs swinging, as she handed me strawberries to wash, teaching me the importance of paying attention to detail.
She would tell me stories about her summers spent picking strawberries at the local farm, her eyes sparkling with joy. There was something so enchanting about sharing those moments—the sounds of our laughter and the delightful aroma of strawberries mingling with butter and oats. It was during those times that my love for cooking truly blossomed. In her kitchen, I not only learned about flavors but also about the warmth and love that food could bring to each gathering.
As we prepare these Strawberry Oatmeal Bars, I can’t help but think of those sunlit afternoons, the joy of creation, and the importance of sharing delicious food with the people we love.
Ingredients
Here’s what you’ll need to create these scrumptious Strawberry Oatmeal Bars:
-
Rolled oats (2 cups): These are the backbone of our bars, giving them that chewy texture we all adore! If you’re in a pinch, quick oats can work too but steer clear of instant oats as they might turn mushy.
-
All-purpose flour (1 cup): Helps bind the ingredients together. For a gluten-free option, you can substitute with almond flour or a gluten-free baking mix.
-
Brown sugar (1/2 cup): Adds a lovely depth of sweetness and a hint of caramel flavor. If you prefer a less sugary version, coconut sugar or a sugar substitute can work beautifully.
-
Baking powder (1 teaspoon): This will give your bars just the right lift. Don’t skip it—otherwise, they might end up a little dense!
-
Salt (1/2 teaspoon): A pinch of salt enhances all the flavors. Trust me, you can’t skip this!
-
Unsalted butter (1/2 cup, melted): Richness in a bar! If you need a dairy-free alternative, coconut oil would be a great substitute.
-
Honey or maple syrup (1/4 cup): We’ll use this to add liquid sweetness. Either works well, but don’t mix them—choose one for a consistent flavor profile.
-
Fresh strawberries (2 cups, hulled and sliced): The star ingredient! Feel free to substitute with other berries like blueberries or raspberries for a fun twist.
-
Lemon juice (1 tablespoon): Brightens the strawberry flavor. If you’re out of lemons, a splash of apple cider vinegar can also do the trick.
Step-by-Step Instructions
Now, let’s bring our ingredients together and create some magic! Here’s how to make these delightful Strawberry Oatmeal Bars:
-
Preheat your oven: Set it to 350°F (175°C). This step is crucial because starting with a hot oven will help your bars rise and get that delightful golden hue.
-
Prepare your baking pan: Grease a 9×9-inch square baking pan with butter or line it with parchment paper. Parchment paper makes it easy to lift out the bars later, so consider it a lifesaver!
-
Mix the dry ingredients: In a large bowl, combine the rolled oats, flour, brown sugar, baking powder, and salt. Stir well to ensure all the dry ingredients are evenly distributed.
-
Incorporate the wet ingredients: In another bowl, whisk together the melted butter, honey (or maple syrup), and lemon juice. Pour this mixture into your dry ingredients. Grab a spatula and gently fold them together until combined. You want a crumbly texture—sort of like damp sand—so avoid overmixing.
-
Set aside some mixture: Take about 1 cup of the crumbly dough mixture and place it in a small bowl. This will be our topping later! The rest will form the bottom layer.
-
Press the base into the pan: Pour the larger portion of the oat mixture into the prepared pan and press it down firmly to create an even layer. This will serve as the sturdy base for our strawberries.
-
Layer the strawberries: Spread the sliced strawberries evenly over the base. Be generous! If you love fruit, don’t hold back.
-
Top it off: Crumble the reserved oat mixture over the strawberries, ensuring an even coverage. This creates that wonderful crunchy topping we all love.
-
Bake: Place the pan in the preheated oven and bake for 25-30 minutes, or until the top is golden brown and the fruit is bubbly. The aroma? Oh, it will be divine!
-
Cool and slice: Once baked, remove from the oven and let it cool in the pan for about 10-15 minutes, then lift it out (if using parchment) and let it cool completely on a wire rack before slicing into squares. This patience will pay off with clean, beautiful edges!
Serving Suggestions
These Strawberry Oatmeal Bars are delicious on their own, but if you want to elevate the experience, consider serving them with a dollop of Greek yogurt or a scoop of vanilla ice cream. They’re also delightful with a sprinkle of powdered sugar on top or served alongside a warm cup of tea or coffee. Feel free to pack them up for a picnic or a lunchbox treat—we all know they’re the perfect companion for any outing!
Recipe Variations
-
Berry Medley: Mix in a variety of your favorite berries. A combination of blueberries, raspberries, and strawberries would take these bars to the next fruity level!
-
Nutty Crunch: Add in half a cup of chopped nuts like walnuts or almonds for a delightful crunch and added nutrition.
-
Spiced Up: Spice things up with a dash of cinnamon or nutmeg in the oat mixture for a warm flavor twist.
-
Coconut Delight: Incorporate shredded coconut for a tropical flair—it pairs beautifully with strawberries!
-
Reduce Sugar: For a healthier option, reduce the sugar and replace it with mashed ripe bananas for sweetness and moisture.
Chef’s Notes
These Strawberry Oatmeal Bars have been a family favorite for years, with countless variations tested and approved! I remember one time I decided to throw in some leftover dark chocolate chips for an indulgent treat. Let’s just say, those bars vanished in a matter of minutes at our family gathering!
Over time, I’ve also figured out that they make for an excellent breakfast option when you pair them with yogurt and fresh fruit. Soaking them overnight in a bit of almond milk makes them even more decadent.
Cooking should be fun, so don’t hesitate to experiment with textures and flavors. After all, every time you step into the kitchen is an opportunity for adventure!
FAQs and Troubleshooting
Q: My bars are too crumbly. What did I do wrong?
A: If your bars are too crumbly, it might be because the ratio of dry ingredients to wet ingredients is off—make sure to measure correctly. You can also press the mixture more firmly into the pan before baking to help it hold together.
Q: Can I use frozen strawberries instead?
A: Yes! Frozen strawberries can work, but be sure to thaw and drain them well to avoid excess moisture in your bars. This might slightly alter the texture but will still taste delicious.
Q: How do I store leftover bars?
A: Store your Strawberry Oatmeal Bars in an airtight container at room temperature for up to three days. For longer storage, keep them in the fridge for a week or freeze them for up to three months.
Q: Why did my bars not set properly?
A: If your bars didn’t set, they might not have baked long enough or the oven temperature could be off. Always trust your nose—if they smell good and look golden, they’re likely close to done.
Nutritional Info
While I usually focus on the joy of cooking and the wonderful flavors, here’s a quick look at the estimated nutritional breakdown for one bar (assuming you cut the recipe into 12 bars):
- Calories: 180
- Protein: 3g
- Carbohydrates: 28g
- Dietary Fiber: 3g
- Sugars: 6g
- Fats: 7g
Of course, these numbers can vary based on ingredient choices, but it gives you a great idea of how to balance this treat with your daily meals.
And there you have it! Your very own Strawberry Oatmeal Bars recipe—a journey through flavors and memories. I hope you enjoy making (and sharing) these bars as much as I do! Happy baking, and don’t forget to sprinkle a little love in every bite! 🍓
Print
Strawberry Oatmeal Bars
- Total Time: 45 minutes
- Yield: 12 servings
- Diet: Vegetarian
Description
Delicious strawberry oatmeal bars that blend sweet fruity goodness with wholesome oats.
Ingredients
- Rolled oats (2 cups)
- All-purpose flour (1 cup)
- Brown sugar (1/2 cup)
- Baking powder (1 teaspoon)
- Salt (1/2 teaspoon)
- Unsalted butter (1/2 cup, melted)
- Honey or maple syrup (1/4 cup)
- Fresh strawberries (2 cups, hulled and sliced)
- Lemon juice (1 tablespoon)
Instructions
- Preheat your oven to 350°F (175°C).
- Prepare a 9×9-inch square baking pan by greasing it with butter or lining it with parchment paper.
- Mix the dry ingredients in a bowl: rolled oats, flour, brown sugar, baking powder, and salt.
- Incorporate the wet ingredients in another bowl: whisk together melted butter, honey (or maple syrup), and lemon juice. Pour into the dry mix and fold gently.
- Set aside about 1 cup of the mixture for topping.
- Press the remaining mixture into the prepared pan to create an even layer.
- Layer the sliced strawberries evenly over the base.
- Top with the reserved mixture, crumbling evenly over the strawberries.
- Bake for 25-30 minutes until golden brown and bubbly.
- Cool in the pan for 10-15 minutes before moving to a wire rack to cool completely. Slice into squares.
Notes
Serve warm or at room temperature. These bars are excellent with Greek yogurt or vanilla ice cream.
- Prep Time: 15 minutes
- Cook Time: 30 minutes
- Category: Dessert
- Method: Baking
- Cuisine: American
Nutrition
- Serving Size: 1 bar
- Calories: 180
- Sugar: 6g
- Sodium: 150mg
- Fat: 7g
- Saturated Fat: 4g
- Unsaturated Fat: 2g
- Trans Fat: 0g
- Carbohydrates: 28g
- Fiber: 3g
- Protein: 3g
- Cholesterol: 15mg
Keywords: Strawberry, Oatmeal, Bars, Dessert, Healthy Snack

Frozen Yogurt Granola Power Cups
Frozen Yogurt Granola Power Cups: A Joyful Treat to Energize Your Day!
Hey there, fellow food lovers! 🌟 Welcome back to my cozy kitchen! Today, we’re diving into a delightful recipe that’s just as fun to make as it is to devour — Frozen Yogurt Granola Power Cups. Picture this: creamy yogurt paired with crunchy granola, sweet fruits, and a drizzle of honey. They’re bite-sized bundles of joy that will fuel your day and satisfy your craving for something sweet yet wholesome.
Now, I know what you’re thinking. "Frozen yogurt? Granola? This sounds like a fancy café treat!" But let me assure you, these power cups are super easy to whip up at home, and you don’t need any culinary degree to impress with them. Just a love for delicious food and a few ingredients from your pantry. Whether you’re prepping for breakfast, a snack on the go, or a fun dessert to share with friends, these cups come to the rescue!
As we journey through this recipe, I’ll share a little bit of my backstory and highlight some tips and tricks along the way. So grab your favorite apron (mine has flour stains that tell stories of countless baking adventures), and let’s get started on making these flavorful cups that are perfect for any occasion!
Personal Story
I’ll never forget the first time I attempted to create my own frozen yogurt treats. It was a summer afternoon, and the sun was blaring down on our backyard. My cousin and I were looking for a way to beat the heat, so we headed to the kitchen to concoct something refreshing. We didn’t have much in the fridge, but we had plain yogurt, some leftover granola from breakfast, and a few frozen berries hiding in the freezer.
With laughter echoing through the kitchen, we mixed everything together haphazardly, packed the mixture into muffin tins, and shoved them into the freezer without much thought. After a couple of hours, we dove into our newfound creation — it was a glorious mess of creamy, fruity goodness! From that day on, frozen yogurt cups have held a special place in my heart. They remind me of sunny days, giggles, and a happy sense of freedom in the kitchen. Now, I’m passing on that joy to you!
Ingredients
Here’s what you’ll need to create your own Frozen Yogurt Granola Power Cups:
-
Greek Yogurt: The star of this recipe! Greek yogurt is creamy, tangy, and loaded with protein. If you’re looking for a lighter option, you can substitute it with low-fat yogurt or dairy-free yogurt alternatives, like coconut yogurt.
-
Granola: A crunchy topper that adds texture and flavor. Look for a granola that isn’t overly sweet, or make your own! You can easily swap this with puffed rice or crushed nuts for a gluten-free option.
-
Honey or Maple Syrup: A natural sweetener that brings everything together. If you prefer a vegan option, maple syrup works beautifully here. Need it sugar-free? Try using stevia or another natural sweetener.
-
Fresh or Frozen Fruits: Berries, bananas, or even apples — the possibilities are endless! Fresh fruits give a vibrant color and flavor, while frozen fruits can add a refreshing touch. You can also swap them for dried fruits like raisins or cranberries for different textures.
-
Nut Butter (optional): To give your cups an extra boost, consider adding a spoonful of almond or peanut butter. This will not only enhance the flavor but also add more healthy fats to keep you satisfied.
-
Chia Seeds (optional): If you’re looking to up the nutritional profile, add some chia seeds. They’re a fantastic source of omega-3 fatty acids and fiber. No chia? No problem! You can skip this ingredient without compromising the recipe.
Step-by-Step Instructions
Let’s get cooking! Here’s how you create these delicious Frozen Yogurt Granola Power Cups:
-
Prepare Your Molds: Grab a muffin tin or silicone cupcake tray. I love using silicone because it makes removing the cups a breeze! If you’re using a metal muffin tin, consider putting paper liners in for easier serving.
-
Combine the Yogurt and Sweetener: In a mixing bowl, add 2 cups of Greek yogurt and a generous drizzle of honey or maple syrup (about 2-3 tablespoons). Stir well until the mixture is smooth and creamy. The sweetness is all about personal preference, so taste it as you mix and adjust accordingly!
-
Add Nut Butter: If you decided to use nut butter, now’s the time to mix in ¼ cup of your favorite nut butter. This will enrich the flavor and texture. Make sure to fold it in gently so you keep that beautiful, creamy yogurt base.
-
Layer Your Ingredients: Spoon a layer of your yogurt mixture into each muffin tin compartment, filling them about halfway. Then grab your granola — about a tablespoon per cup — and sprinkle it on top of the yogurt. Press it gently so it sticks and creates a nice layer.
-
Top with Fruits: Now it’s time for the fun part! Add your fresh or frozen fruit on top of the granola layer. If you’re using frozen fruit, try to break it into smaller pieces so they fit well in the cups.
-
Complete the Layers: Spoon a little more yogurt on top of the fruits until you reach the top of each cup. Give a little tap on the counter to settle everything down — it ensures the yogurt fills in any gaps.
-
Final Touches: If you’d like, you can sprinkle a few more granola bits on the top for added crunch and garnish. This is also where you can sprinkle chia seeds if you’re using them.
-
Freeze: Cover the muffin tin with plastic wrap or foil and pop it in the freezer for at least 4 hours, or until the power cups are frozen solid.
-
Serve: Once they’re nicely frozen, carefully pop the cups out of the molds. If it’s a bit tricky, run a little warm water over the bottom of the muffin tin to help release them.
-
Enjoy: Serve as a delicious snack or a sweet breakfast treat! They can stay in the freezer for weeks, so feel free to batch-make them and always have some on hand. Enjoy every delightful bite!
Serving Suggestions
For serving, I like to arrange the Frozen Yogurt Granola Power Cups on a lovely platter, garnished with a sprinkle of fresh mint or edible flowers for a pop of color. They’re perfect for summer parties, breakfast on-the-go, or just as a cozy treat in the evening. Pair them with a cup of coffee or a refreshing iced tea, and you’ve got a winning combination that’s sure to impress!
Recipe Variations
Feeling creative? Here are a few fun twists you can try with your Frozen Yogurt Granola Power Cups:
-
Chocolate Lovers: Add a spoonful of cocoa powder to the yogurt mix for a chocolatey trend, or drizzle melted dark chocolate over the top before freezing. Yum!
-
Tropical Escape: Replace the berries with diced mango and pineapple, and use coconut yogurt for a refreshing tropical twist.
-
Peanut Butter & Jelly: Layer your favorite fruit jam or jelly between the yogurt and granola layers for a nostalgic flavor.
-
Autumn Vibes: Mix in some pumpkin puree and pumpkin pie spice into the yogurt for a fall-inspired treat, and top with chopped pecans.
-
Protein Power: Stir a scoop of your favorite protein powder into the yogurt for an extra boost, making these perfect post-workout snacks!
Chef’s Notes
Oh, the memories these cups bring! I often whip them up when I’m having a busy week. They’re fantastic for breakfast on rushed mornings or as a mid-afternoon pick-me-up that keeps my energy levels up while I tackle my to-do list. This recipe has evolved over the years, influenced by friends and family. I still remember hosting a brunch where I served these alongside pancakes, and everyone raved about how refreshing they were. It’s all about sharing delicious memories through food, right?
Every time I make them, I like to change things up a bit, tossing in whatever fruits I have hanging around or whatever nut butter is in the pantry. The only consistent factor is the joy it brings to everyone who bites into them.
FAQs and Troubleshooting
Q: Can I use flavored yogurt instead of plain?
A: Yes, you can absolutely use flavored yogurt! Just keep an eye on the sweetness, as it may be sweeter than plain yogurt. This can add extra flavors to your cups!
Q: How can I prevent the cups from sticking to the molds?
A: Using silicone molds works wonders for easy removal. If you’re using metal, oiling the cups lightly with cooking spray before filling can help.
Q: Can I make these ahead of time?
A: Yes! These power cups freeze beautifully. Just make sure to store them in an airtight container or keep them covered in the muffin tin after they’re frozen. They’ll stay good for up to a month!
Q: My yogurt cups are too hard to bite into! What can I do?
A: Sometimes, they might freeze a little too solid. Let them sit at room temperature for a few minutes before serving, so they soften up a bit.
Nutritional Info (if applicable):
Each Frozen Yogurt Granola Power Cup (made with Greek yogurt, granola, and fruits) is approximately:
- Calories: 120
- Protein: 6g
- Carbohydrates: 15g
- Fats: 4g
- Fiber: 2g
- Sugar: 5g
(Note: Nutritional values will vary based on specific ingredients used.)
And there you have it! A straightforward, delicious, and versatile recipe for Frozen Yogurt Granola Power Cups. I can’t wait for you to try these! Remember to have fun while creating in the kitchen and make sure to share your creations with family and friends. Happy cooking! 🍽️✨
Print
Frozen Yogurt Granola Power Cups
- Total Time: 255 minutes
- Yield: 12 servings 1x
- Diet: Vegetarian
Description
Delightful bite-sized Frozen Yogurt Granola Power Cups filled with creamy yogurt, crunchy granola, and sweet fruits — a perfect energizing treat for any occasion!
Ingredients
- 2 cups Greek yogurt
- 2–3 tablespoons honey or maple syrup
- ¼ cup nut butter (optional)
- Granola, about 1 tablespoon per cup
- Fresh or frozen fruits (berries, bananas, apples, etc.)
- Chia seeds (optional)
Instructions
- Prepare your molds: Grab a muffin tin or silicone cupcake tray.
- Combine the yogurt and sweetener in a mixing bowl until smooth.
- Add nut butter if using, folding in gently.
- Layer yogurt mixture into muffin tin, filling halfway.
- Top with granola, pressing gently to stick.
- Add fruits on top of the granola layer.
- Complete with more yogurt until cups are full.
- Freeze for at least 4 hours until solid.
- Serve by popping the cups out of the molds and enjoy!
Notes
These cups can stay in the freezer for weeks, making them a convenient snack to have on hand. Feel free to customize with different fruits or nut butters.
- Prep Time: 15 minutes
- Cook Time: 240 minutes
- Category: Snack
- Method: Freezing
- Cuisine: American
Nutrition
- Serving Size: 1 cup
- Calories: 120
- Sugar: 5g
- Sodium: 50mg
- Fat: 4g
- Saturated Fat: 1g
- Unsaturated Fat: 3g
- Trans Fat: 0g
- Carbohydrates: 15g
- Fiber: 2g
- Protein: 6g
- Cholesterol: 10mg
Keywords: frozen yogurt, granola cups, healthy snack, meal prep, easy dessert, vegetarian


