
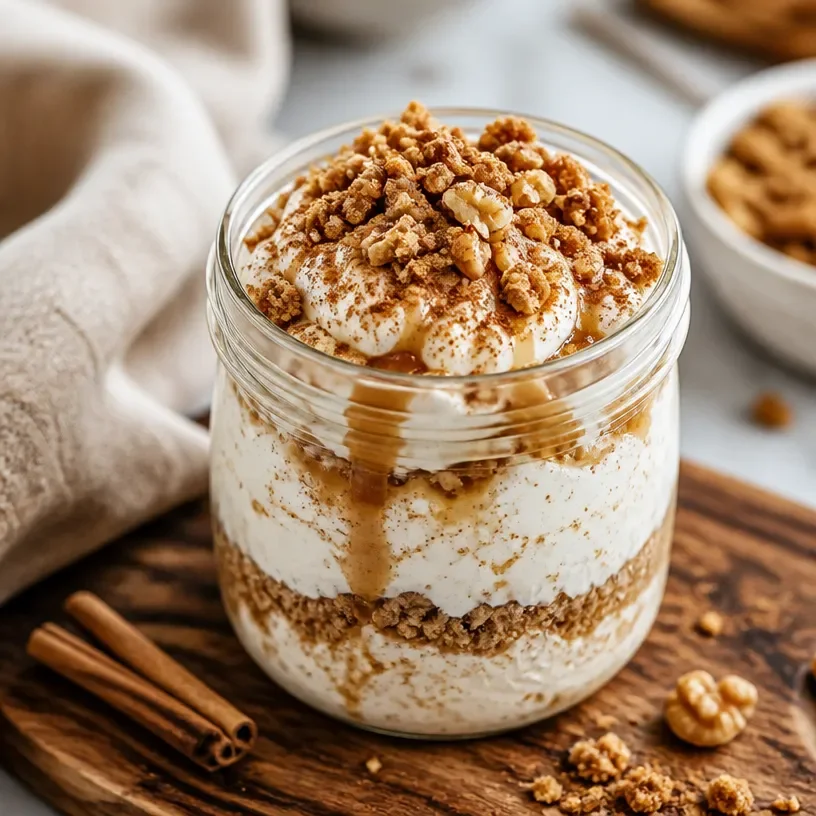
Protein Coffee Cake Jar: 5-Minute Breakfast Meal-Prep
Protein Coffee Cake Jar: A Cozy Culinary Adventure
Welcome to my kitchen, my fellow flavor enthusiasts! I’m Olivia Bennett, and today we’re diving into a cozy yet nutritious treat that combines my love for baking with a healthy twist—Protein Coffee Cake Jars! If the mere thought of rich, spiced coffee cake makes your heart flutter, then you’re in for a delightful journey. Imagine layers of moist coffee cake, swirls of cinnamon, and a touch of protein goodness, all packed into a convenient jar. Whether you’re rushing out the door in the morning or indulging in a guilt-free afternoon snack, these little jars of joy are the perfect solution!
Introduction: Coffee Cake with a Twist
Coffee cake has a soft spot in my heart. Growing up, our kitchen was always filled with the warm scent of freshly baked goods. Mornings were magical; family gathered around the table, laughter flying over mugs of steaming coffee and slices of Mom’s beloved coffee cake. She had a secret ingredient—a touch of love—that made every bite melt in your mouth. However, as an adult, I found myself craving that same warmth but with a modern, health-conscious twist.
Enter the Protein Coffee Cake Jars! This recipe is everything I loved about coffee cake, elevated with protein to fuel our busy days. It’s a meal prep dream! You can make a batch and store them in the fridge, ready to grab and go. Each jar is a celebration of flavor and nostalgia, offering a hearty dose of protein to kickstart your morning or replenish your energy post-workout. Just think of it as a delicious hug in a jar!
Now, grab your apron, and let’s get started on this cozy culinary adventure! I promise, making these Protein Coffee Cake Jars is as much fun as eating them!
Personal Story: A Slice of Nostalgia
Oh, how I fondly remember those chilly autumn mornings! I would wake up to the sound of my mom humming in the kitchen, preparing our breakfast. One of my favorite memories is when she surprised us with her famous coffee cake for our school lunches. We would race to the countertop, fighting over the first slice, not caring about crumbs scattered everywhere. There was something magical about those moments—family gathered over a shared love for food, laughter echoing through the house.
Years later, when I started my health journey, I missed those sweet memories. I wanted to reminisce about that homely comfort but with a nutritious flair. After countless experiments, I crafted this protein-packed version that reminds me of my childhood yet supports my adult lifestyle. It brings that same sense of warmth and togetherness, all while ensuring you can feel good about what you’re eating.
Ingredients: What You’ll Need
Here’s the lineup of ingredients for our Protein Coffee Cake Jars! Each item plays a crucial role in creating this delightful treat.
-
Protein Powder (Vanilla or Chocolate): This is the star of the show! Use a whey or plant-based protein powder to gain that satisfying boost. If you’re not keen on protein powder, you can simply use more flour, but it will alter the nutritional profile.
-
Almond Flour: Adds moisture and a nutty flavor. You can substitute it with oat flour or whole-wheat flour if needed.
-
Coconut Sugar: A lower glycemic index sweetener that adds depth and richness. Brown sugar is a great alternative, but expect a slightly different flavor.
-
Cinnamon: This warm spice brings back memories of cozy kitchens. Feel free to use nutmeg or pumpkin spice for a creative twist!
-
Greek Yogurt: Adds moisture and a protein punch. You can use regular yogurt or even applesauce for a dairy-free alternative.
-
Eggs: For binding and richness. Flax eggs (1 tbsp ground flaxseed + 2.5 tbsp water, let sit to thicken) are a great vegan alternative.
-
Milk (Dairy or Non-Dairy): Keeps the batter smooth. Any milk will do, so choose what you prefer.
-
Baking Powder: Essential for that fluffy texture. Make sure it’s fresh for the best rise!
-
Salt: Just a pinch to enhance all the flavors.
-
Nuts or Chocolate Chips (optional): For that extra crunch and decadence. I love walnuts or dark chocolate, but feel free to leave them out if you want a lighter treat!
Step-by-Step Instructions: Making the Magic Happen
Let’s bring this delicious creation to life! Here’s your step-by-step guide to make these Protein Coffee Cake Jars. Ready? Let’s do this!
-
Preheat Your Oven: Set your oven to 350°F (175°C). Just like the anticipation of that first whiff of coffee in the morning, preheating gets you excited for the magic that’s about to happen!
-
Mix Dry Ingredients: In a large mixing bowl, whisk together the protein powder, almond flour, coconut sugar, cinnamon, baking powder, and salt. This step is essential to ensure that all your dry ingredients incorporate evenly. It also gives you a moment to enjoy the wonderful warm aroma!
-
Combine Wet Ingredients: In another bowl, mix the Greek yogurt, eggs, and milk until it’s smooth and creamy. This is where the magic of moisture happens! The yogurt is going to be your secret weapon for a luscious, cake-like texture.
-
Combine Dry and Wet Mixtures: Gradually add the wet mixture to the dry ingredients, stirring until just combined. Avoid overmixing—this is a common baker’s mistake! A few lumps are okay; they’ll just add to the character of your coffee cake.
-
Prepare Your Jars: Grease your mason jars with a little oil or cooking spray. I find that 8-ounce jars work perfectly for individual servings! You could also use a baking dish if you want a more traditional approach.
-
Layer it Up: Start layering! Fill each jar about halfway with the batter, add a sprinkle of nuts or chocolate chips if you like, and then top with more batter until it’s about three-quarters full. Think of it as creating little flavor-packed layers that’ll surprise you with each bite.
-
Bake: Place the jars on a baking sheet and bake for 20-25 minutes, until the tops are golden brown and a toothpick comes out clean. I know this is the hardest part—your home will smell absolutely divine!
-
Cool and Serve: Once they’re out of the oven, let them cool for a few minutes. These jars can be enjoyed warm or at room temperature, right out of the jar or inverted onto a plate, whichever you prefer!
Serving Suggestions
These delightful Protein Coffee Cake Jars are super versatile! For serving, I love to crown each jar with a dollop of Greek yogurt and a sprinkle of cinnamon. If you want to elevate it even further, drizzle a little maple syrup or honey over the top for that sweet finishing touch. You can serve them straight from the jar for a casual approach, or unmold them onto a plate for a fancier feel—perfect for a brunch gathering!
Recipe Variations
Get creative with these Protein Coffee Cake Jars! Here are a few variations that might tickle your taste buds:
- Pumpkin Spice: Replace half of the yogurt with pure pumpkin puree and add a dash of pumpkin spice for a seasonal twist.
- Blueberry Bliss: Fold in fresh or frozen blueberries for a burst of color and tangy flavor.
- Chocolate Lovers: Use chocolate protein powder and add chocolate chips for an even more decadent treat!
- Nutty Delight: Swap out almond flour for hazelnut flour for a delightful nuttiness.
- Vegan Version: Use flax eggs and a dairy-free yogurt to create an entirely plant-based option!
Chef’s Notes
Every time I make these Protein Coffee Cake Jars, it takes me back to those bustling mornings with my family. I’ll never forget the time I experimented with adding espresso powder for an extra caffeine kick. It didn’t turn out quite as I planned, but it did lead to a hilarious kitchen cleanup session and taught me a valuable lesson: Every misstep is just another opportunity to create something new! These jars can change with the seasons, and I love to switch it up depending on what flavors inspire me.
FAQs and Troubleshooting
-
My coffee cake jars overflowed! What did I do wrong?
This usually means the jars were too full or the baking soda was too potent. Ensure you fill them no more than three-quarters to allow for rising. -
Can I make these ahead of time?
Absolutely! These jars store well in the fridge for up to a week. Just reheat them for a quick breakfast or snack! -
Why is my coffee cake dry?
Overbaking is often the culprit. Keep an eye on them towards the end of baking, and do the toothpick test to check for doneness. -
Can I freeze these jars?
Yes! Just ensure they are entirely cool and store them in the freezer. They make a fantastic meal prep option!
Nutritional Info (Optional)
While the nutritional specifics can change based on ingredient choices, it’s roughly about 200 calories per jar, with a good balance of protein and healthy fats to keep you satisfied!
I hope this recipe brings you as much joy and comfort as it has brought me. Get in your kitchen, put on your favorite tunes, and let’s get baking! Bon appétit! ✨
Print
Protein Coffee Cake Jar
- Total Time: 40 minutes
- Yield: 4 servings 1x
- Diet: High-Protein
Description
Delightful protein-packed coffee cake layered in jars for a cozy and nutritious treat.
Ingredients
- 1 cup Protein Powder (Vanilla or Chocolate)
- 1 cup Almond Flour
- 1/2 cup Coconut Sugar
- 1 tsp Cinnamon
- 1 cup Greek Yogurt
- 2 large Eggs
- 1/2 cup Milk (Dairy or Non-Dairy)
- 1 tsp Baking Powder
- 1/4 tsp Salt
- Nuts or Chocolate Chips (optional)
Instructions
- Preheat your oven to 350°F (175°C).
- Mix dry ingredients in a bowl: protein powder, almond flour, coconut sugar, cinnamon, baking powder, and salt.
- Combine wet ingredients in another bowl: Greek yogurt, eggs, and milk until smooth.
- Combine the wet and dry mixtures together, stirring until just combined.
- Prepare mason jars by greasing them lightly with oil or cooking spray.
- Layer the batter in the jars, filling halfway, adding nuts or chocolate chips if desired.
- Bake for 20-25 minutes until tops are golden and a toothpick comes out clean.
- Cool slightly before serving, enjoy either warm or at room temperature.
Notes
Serve with a dollop of Greek yogurt and a drizzle of maple syrup for added sweetness.
- Prep Time: 15 minutes
- Cook Time: 25 minutes
- Category: Dessert
- Method: Baking
- Cuisine: American
Nutrition
- Serving Size: 1 jar
- Calories: 200
- Sugar: 10g
- Sodium: 200mg
- Fat: 8g
- Saturated Fat: 1g
- Unsaturated Fat: 7g
- Trans Fat: 0g
- Carbohydrates: 20g
- Fiber: 3g
- Protein: 12g
- Cholesterol: 100mg
Keywords: coffee cake, protein, healthy dessert, meal prep, cozy treat
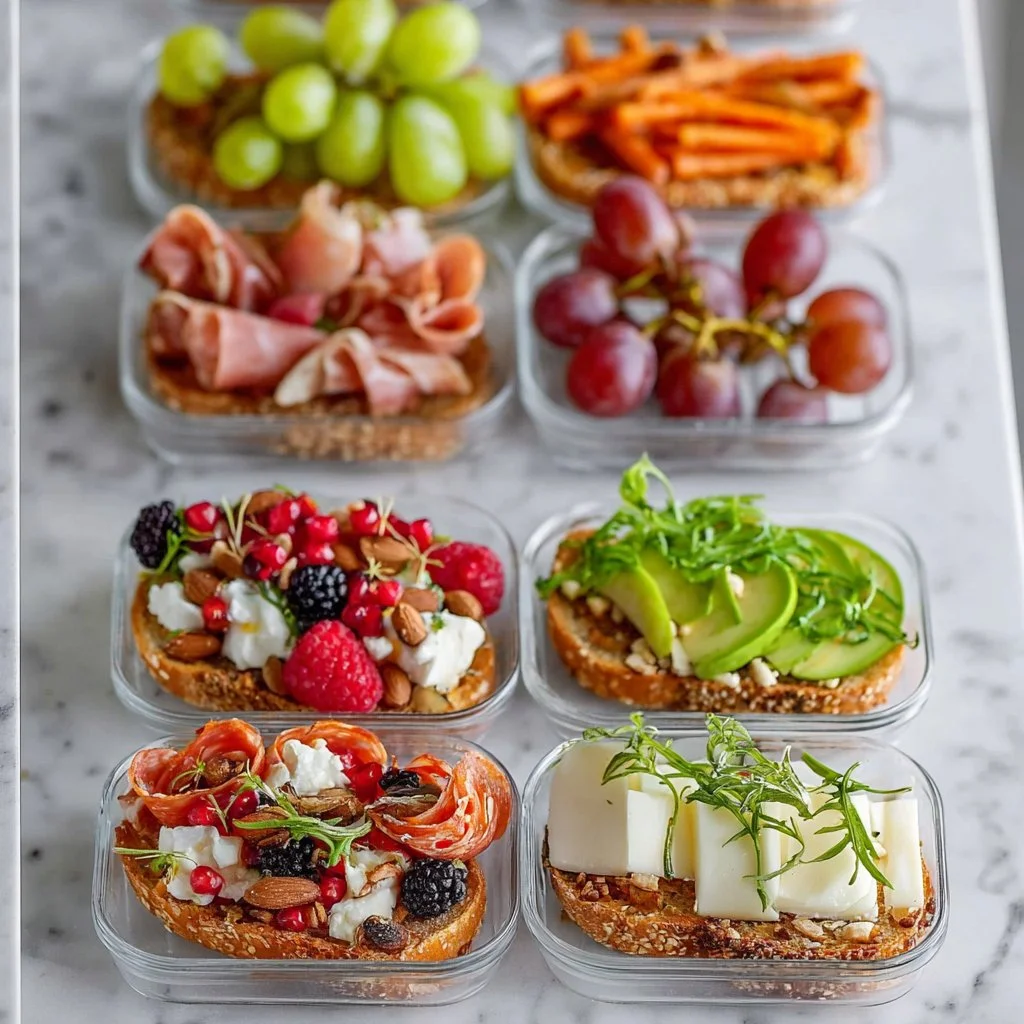
Healthy Meal Prep Snack Ideas
Healthy Meal Prep Snack Ideas for a Wholesome Life
Welcome back, my culinary friends! I’m Olivia Bennett, and I’m here to sprinkle a little joy into your kitchen adventures. If you’re like me and your love for good food is only rivaled by your desire to eat healthy, then you’re in for a treat today! We’re diving into the glorious world of healthy meal prep snack ideas that are as nourishing as they are delicious.
Let’s face it—snacking can sometimes feel like a guilty pleasure, but it doesn’t have to be! With a few healthful ingredients and some creative inspiration, you can whip up snacks that serve as both fuel and fun. Imagine crunching on homemade nut bars or dipping fresh veggies in a dreamy hummus while binge-watching your favorite show. Picture making snack time something to look forward to instead of a last-minute grab of whatever is lying around!
Meal prepping is a game-changer, especially for those of us juggling busy schedules. It allows you to fill your fridge with delicious snacks, so you can say goodbye to reach-for-the-chips moments. The key is to make snacks that not only fulfill your cravings but also provide essential nutrients to keep your energy levels soaring.
In this post, I’ll share my favorite healthy snack ideas that you can prep ahead of time, including tips, tricks, and personal stories to inspire you to get creative in the kitchen. So grab your apron (and maybe a snack!), and let’s get cooking!
Personal Story
Ah, the memories of my childhood kitchen come rushing back when I think about making snacks. I remember my mom whipping up a big batch of energy balls for our post-school treat, which didn’t just satisfy our sweet tooth but also kept us fueled for playtime. She’d let my little fingers roll the mixture into perfect balls, while I couldn’t help but sneak bites of dough along the way. It was a time for laughter, a bit of messiness, and a whole lot of flavor.
Fast forward a couple of decades, and here I am, still whipping up energy balls! I’ve refined the recipe over time, adding new flavors, but the essence remains the same: wholesome ingredients, a sweet kick, and a way to spark joy. Those cherished moments of cooking alongside my mom inspired my passion for creating snacks that are healthy and fun. Now, I’m passing this tradition on to you, hoping to inspire new kitchen adventures for you and loved ones alike.
Ingredients
Let’s gather our friendly ingredients! Here’s what you’ll need to create some scrumptious, healthy meal prep snacks:
-
Oats:
- What They Do: They serve as the base for countless snacks, providing fiber and keeping you full.
- Tip: Use rolled oats for better texture; you can also swap with quinoa flakes for a gluten-free option.
-
Nut Butter (peanut, almond, etc.):
- What They Do: Brings creaminess and healthy fats into the mix—perfect for energy and flavor.
- Tip: You can swap out for sunflower seed butter for a nut-free alternative, perfect for schools.
-
Honey or Maple Syrup:
- What They Do: Acts as a natural sweetener, binding everything together.
- Tip: Use agave syrup for a lower-glycemic option, or skip the sweetener for a no-sugar-added option!
-
Chia Seeds:
- What They Do: These little powerhouses add omega-3s and help to bind ingredients.
- Tip: Flax seeds can be a great substitute and add a nutritional punch too!
-
Dark Chocolate Chips or Dried Fruits:
- What They Do: Adds sweetness and indulgence, because hey, balance is key!
- Tip: Use cacao nibs for a healthier treat or try unsweetened coconut flakes for a tropical twist.
-
Nuts and Seeds:
- What They Do: Provide crunch and protein—and who doesn’t love a good bite?
- Tip: Feel free to use whatever you have on hand—walnuts, pumpkin seeds, or pecans—all work wonders!
Step-by-Step Instructions
Alright, now that we have our delicious ingredients lined up, let’s dive into the fun part—actually making our snacks! I’m excited to share my energy ball recipe that’s perfect for meal prep. Let’s get started:
-
Gather Your Ingredients:
- First thing’s first, measure out 2 cups of oats, ½ cup of nut butter, ½ cup of honey, and a ½ cup of add-ins like chocolate chips or dried fruit.
-
Mix the Base:
- In a large bowl, combine the oats and nut butter. Use a spatula to mix these until they’re well incorporated. You’ll notice it getting sticky—this is where the magic starts. Chef’s Tip: A little arm workout never hurt, but if you’re feeling fancy, use a stand mixer for a quick blend!
-
Add Sweetness:
- Drizzle in that honey (or maple syrup) and mix until combined. This is where you can decide if you want it sweeter—taste a little! Adjust if needed. Chef’s Tip: If it feels too dry, add more nut butter or a splash of plant-based milk.
-
Toss in the Extras:
- Now for the best part: stir in your chia seeds, nuts, and any add-ins like chocolate chips or dried fruits. Make sure everything is evenly distributed. Tip: Use your hands! It’s messy, but it’s part of the fun.
-
Chill Out:
- Once everything’s mixed, cover the bowl and let it chill in the fridge for about 30 minutes. This helps the mixture firm up, making it easier to roll into balls.
-
Roll the Energy Balls:
- After chilling, take out the mixture and roll it into 1-inch balls. They don’t have to be perfect; remember, we’re going for homemade vibes! Chef’s Tip: If they’re sticking to your hands, wet them slightly with water.
-
Store Your Snacks:
- Place the rolled energy balls in an airtight container; they can last in the fridge for up to a week, or you can freeze them for a month. Tip: Label your containers—nothing like a surprise snack from the freezer!
Serving Suggestions
These tasty energy balls can be served as a quick on-the-go snack, a yummy addition to your lunchbox, or even as a light dessert after dinner. For some flair, you can plate them beautifully on a colorful serving dish, dust them with shredded coconut, or even drizzle a little extra dark chocolate on top. Just remember to have fun with it!
Recipe Variations
Here are a few delightful twists you can try to make these snacks uniquely yours:
-
Tropical Bliss: Add chopped pineapple and coconut flakes for a sweet, island-inspired treat.
-
Spicy Chocolate: Mix in a pinch of cinnamon and a dash of cayenne for a zesty chocolate kick.
-
Protein-Packed: Toss in your favorite protein powder to transform these snacks into a post-workout pick-me-up.
-
Oatless Option: Substitute oats with ground nuts for a lower-carb version while packing in extra protein.
-
Fruit and Nut Medley: Get adventurous by using old-school trail mix—just mix in your favorite combinations!
Chef’s Notes
Cooking is all about experimenting! I’ve taken this energy ball recipe and made countless variations over the years. Some may say it’s a simple dish, but to me, it’s a canvas. You can mix in what you have, based on the seasons or cravings, and it will still be delicious. I once added leftover granola to a batch, which turned out surprisingly delightful! These moments in the kitchen are what keep my passion alive.
FAQs and Troubleshooting
Q1: My mixture is too dry; what do I do?
A: If your mixture feels too dry and isn’t coming together, simply add a splash of plant-based milk or an extra tablespoon of nut butter to help it bind.
Q2: Can I make these energy balls nut-free?
A: Absolutely! Use sunflower seed butter or even tahini for a wonderful, nut-free alternative. You can also increase the amount of seeds to keep the protein content high.
Q3: What can I use instead of honey?
A: Maple syrup works great as a vegan alternative! You can also try date syrup if you want to keep it all-natural.
Q4: Can I add fresh fruit?
A: I recommend sticking to dried fruits for this recipe. Fresh fruit might make the mixture mushy due to moisture. Save those for a separate snack!
Nutritional Info
While precise nutritional information can vary based on specific ingredients used, these energy balls generally offer a balanced mix of protein, healthy fats, and carbs. A typical serving (about 2 balls) provides roughly 150 calories, 6g protein, 10g fat, and 15g carbohydrates.
And there you have it! A wholesome journey through the world of healthy meal prep snacks. I hope you feel inspired to get creative in your kitchen. Remember, cooking is about joy and connection—share these snacks with loved ones, and let the good times roll. Happy cooking, everyone!
Print
Healthy Meal Prep Energy Balls
- Total Time: 15 minutes
- Yield: 24 servings 1x
- Diet: Vegetarian
Description
Delicious and nutritious energy balls perfect for meal prep and snacking.
Ingredients
- 2 cups rolled oats
- ½ cup nut butter (peanut, almond, or sunflower seed)
- ½ cup honey or maple syrup
- ½ cup chia seeds
- ½ cup dark chocolate chips or dried fruits
- Nuts and seeds (walnuts, pumpkin seeds, or pecans) to taste
Instructions
- Gather your ingredients.
- Mix the base: combine oats and nut butter in a large bowl.
- Add sweetness by drizzling in honey and mixing until combined.
- Toss in the extras: stir in chia seeds, nuts, and add-ins.
- Chill the mixture in the fridge for about 30 minutes.
- Roll the chilled mixture into 1-inch balls.
- Store the energy balls in an airtight container.
Notes
These energy balls can last in the fridge for up to a week or be frozen for a month.
- Prep Time: 15 minutes
- Cook Time: 0 minutes
- Category: Snack
- Method: No-Cook
- Cuisine: American
Nutrition
- Serving Size: 1 ball
- Calories: 150
- Sugar: 8g
- Sodium: 5mg
- Fat: 10g
- Saturated Fat: 1g
- Unsaturated Fat: 8g
- Trans Fat: 0g
- Carbohydrates: 15g
- Fiber: 3g
- Protein: 6g
- Cholesterol: 0mg
Keywords: energy balls, healthy snacks, meal prep, vegetarian snacks, no-bake snacks
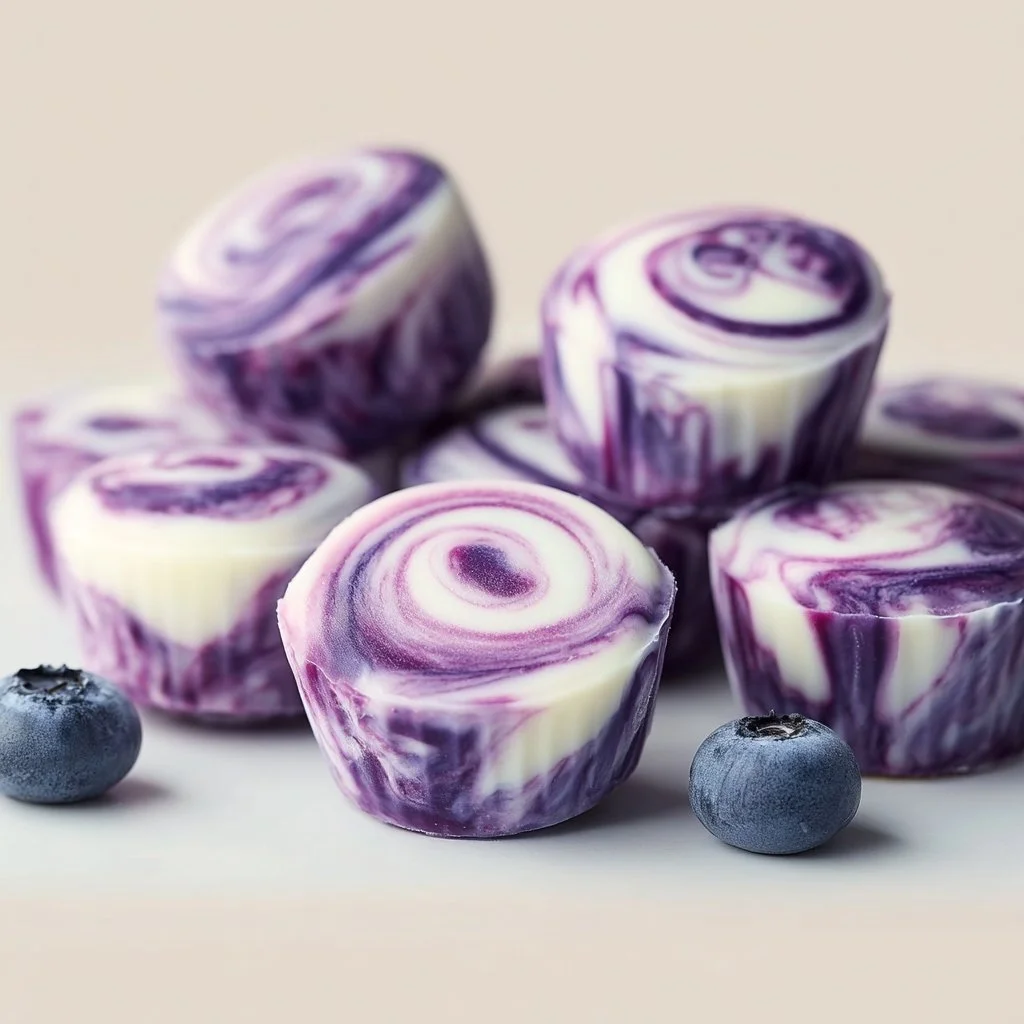
Blueberry Swirl Yogurt Bites
Blueberry Swirl Yogurt Bites: A Delightful Treat for Every Occasion
Hey there, fellow foodies! I’m Olivia, and today we’re diving into a recipe that’s not only delicious but also bursting with nostalgia—Blueberry Swirl Yogurt Bites! If you’re anything like me, there’s nothing better than creating a refreshing, sweet snack that you can enjoy anytime. Whether you’re looking for a midday pick-me-up, an after-school treat for the kids, or an elegant addition to your next brunch, these yogurt bites are the perfect answer.
Just thinking about those juicy blueberries swirled into creamy yogurt makes my taste buds dance! The best part? They’re simple to make and feel like a little gourmet treat that you can whip up in no time. I still remember the first time I experimented with yogurt bites; it was a warm summer afternoon, and my kids were running around the house, asking for something to beat the heat. I wanted something that was both fun and healthy, so I grabbed a tub of yogurt and a basket of fresh blueberries. The result was a hit, and we’ve been making them ever since!
Plus, this recipe is packed with benefits. Greek yogurt gives you that protein punch while blueberries are full of antioxidants and vitamins. So, not only are we indulging our taste buds, but we’re also popping in a bit of goodness. Are you ready to create something that will wow your friends and family? Let’s roll up our sleeves, grab our aprons, and let’s make these irresistible Blueberry Swirl Yogurt Bites together!
Personal Story
Thinking back to my childhood, one of the fondest memories I have is of summer mornings at my grandmother’s house. We’d wake up to the sound of birds chirping and the delightful smell of fresh pancakes wafting through the air. But what really made those mornings shine was my grandma’s famous blueberry pancake recipe. Each plate was piled high with fluffy pancakes topped with sweet, juicy blueberries that she’d always insist we pick together from her backyard.
We’d spend hours together, laughing and savoring the taste of the season while her garden was bursting with vibrant fruits. Inspired by those memories, I wanted to evoke that feeling of happiness and sunshine in these Blueberry Swirl Yogurt Bites. Just like Grandma’s pancakes, these bites bring a special kind of warmth and joy, and they’re a lovely way to include the taste of fresh blueberries in a fun, refreshing snack!
Ingredients
Here’s what you’ll need for these delightful Blueberry Swirl Yogurt Bites:
-
2 cups Greek yogurt: The heart of our bites! Greek yogurt is thick and creamy, giving a luscious texture. You can substitute with regular yogurt, but it will be a tad runnier.
-
1 cup fresh blueberries: Bursting with flavor! Fresh blueberries are best, but if you’re out of season, frozen works, too—just be sure to thaw and drain excess liquid.
-
2-3 tablespoons honey or maple syrup: For sweetness! You can adjust the sweetness based on your preference. Use agave syrup or a sugar substitute if you need to keep it lower-calorie or vegan.
-
1 teaspoon vanilla extract: Adds warmth and depth to the yogurt. Feel free to use almond extract for a different flavor twist!
-
Optional toppings: Granola, coconut flakes, or chopped nuts add crunch if you like some texture.
With this list, you’re all set to create a delicious, no-fuss snack that’s not only simple but also super flexible. Feel free to experiment—there’s no wrong way to make these bites your own!
Step-by-Step Instructions
Step 1: Make the Blueberry Swirl
-
Wash Your Blueberries: Start by rinsing the blueberries under cool water. Pat them dry with a paper towel. If you’re using frozen ones, thaw them until soft.
-
Blend the Berries: In a small blender (or you can use a fork!), blend about half of the blueberries until you form a chunky puree. Chef’s tip: If you want a bit of texture, don’t over-blend—leave some small bits for bursts of flavor!
-
Sweeten the Puree: Taste your blueberry puree. If desired, add a splash of honey or maple syrup to sweeten it. Set aside.
Step 2: Mix the Yogurt Base
-
Combine Yogurt and Add-Ins: In a mixing bowl, combine the Greek yogurt, honey (or maple syrup), and vanilla extract. Stir until everything is smooth and well-combined. Chef’s insight: Use a whisk for a fluffier texture!
-
Taste Test: Give it a quick taste and adjust sweetness if necessary. Remember, the blueberry swirl will add sweetness too!
Step 3: Assemble the Bites
-
Prepare Your Mold: Grab a silicone ice cube tray or muffin tin. If you’re using a metal tray, lightly grease it with non-stick spray.
-
Layer the Yogurt: Spoon some yogurt into each cavity, filling it about halfway. Use a tablespoon to create an even layer.
-
Add the Blueberry Swirl: Drop a small spoonful of your blueberry puree into each yogurt-filled cavity. With a toothpick or skewer, gently swirl the puree into the yogurt to create pretty marbled patterns. Chef’s hack: Don’t overmix! You want those lovely swirls to show.
Step 4: Freeze
- Freeze the Bites: Pop the tray into the freezer for about 3-4 hours until they’re completely solid. Bonus tip: For easier removal, leave them in the freezer overnight!
Step 5: Enjoy!
- Unmold and Serve: Once frozen, gently pop out the yogurt bites. Enjoy them immediately or store them in a glass container for later. They can be kept frozen for up to a month (but trust me, they won’t last that long!).
Serving Suggestions
These Blueberry Swirl Yogurt Bites are not just a snack; they’re a versatile addition to any gathering! Serve them on a cute platter for guests at brunch, pop them in a bowl for a fun treat at your next picnic, or enjoy them straight from the freezer during a hot summer day. Pair them with fresh mint leaves for a lovely pop of color—a feast for the eyes and the taste buds!
Recipe Variations
-
Berry Bliss: Swap the blueberries for other berries like raspberries, strawberries, or blackberries for a colorful twist!
-
Yogurt Flavor Fusion: Use flavored yogurt (like vanilla or berry) for a different depth of flavor.
-
Nutty Delight: Mix in some chopped almonds or walnuts directly into the yogurt for added crunch.
-
Chocolate Drizzle: Drizzle melted dark chocolate over the frozen bites for a decadent finish.
-
Dairy-Free Option: Use coconut yogurt or almond yogurt for a dairy-free alternative!
Chef’s Notes
Oh, how this recipe has evolved over the years! I remember using whatever fruits were on hand—peaches, strawberries, you name it. Each batch taught me something new! When I had my friends over, we’d host a “Yogurt Bite Day,” where we’d experiment with different toppings and flavors. One of my friends once tried adding a sprinkle of cinnamon, and we were hooked! Most importantly, I’ve had so much fun watching my kids get creative with their toppings. The best part is that no matter how they look, they always taste divine! Embrace the messiness; cooking should always be a joyful experience!
FAQs and Troubleshooting
-
Q: What if my yogurt isn’t stiff enough?
- A: If your yogurt isn’t thick enough, try using full-fat Greek yogurt, or let it drain in a cheesecloth for a couple of hours to get that perfect texture.
-
Q: Can I use other fruits besides blueberries?
- A: Absolutely! Experiment with any berries or fruits you love—just be aware that some fruits may require adjustments in sweetness or pairing.
-
Q: How do I store leftovers?
- A: Keep them in an airtight container in the freezer. Just be sure to separate them with parchment paper if you crowd them together, so they don’t freeze into one big lump!
-
Q: Can I make them vegan?
- A: Yes! Substitute Greek yogurt with coconut or almond yogurt and switch out honey for maple syrup.
Nutritional Info
These Blueberry Swirl Yogurt Bites are not only delicious but also nutritious. Here’s an approximate breakdown per serving (assuming the recipe yields 12 bites):
- Calories: 60
- Protein: 4g
- Total Fat: 1.5g
- Carbohydrates: 9g
- Sugar: 3.5g
- Fiber: 1g
(Note: Nutritional info will vary based on specific ingredients used.)
So there you have it, lovely friends—a fierce yet simple recipe for Blueberry Swirl Yogurt Bites that brings a sprinkle of joy to your day! Whether you’re indulging solo or sharing with others, these bites are sure to bring smiles and delicious moments all around. Happy cooking!
Print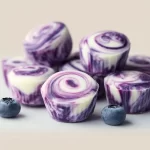
Blueberry Swirl Yogurt Bites
- Total Time: 240 minutes
- Yield: 12 bites 1x
- Diet: Vegetarian
Description
A delightful treat that combines creamy Greek yogurt with fresh blueberries, these yogurt bites are perfect for snacking any time of the day.
Ingredients
- 2 cups Greek yogurt
- 1 cup fresh blueberries
- 2–3 tablespoons honey or maple syrup
- 1 teaspoon vanilla extract
- Optional toppings: Granola, coconut flakes, or chopped nuts
Instructions
- Wash the blueberries under cool water and pat dry.
- Blend half of the blueberries to make a chunky puree.
- Sweeten the puree with honey or maple syrup to taste.
- Combine the Greek yogurt, honey (or maple syrup), and vanilla extract in a mixing bowl.
- Taste the yogurt mixture and adjust sweetness if necessary.
- Prepare your silicone ice cube tray or muffin tin.
- Layer yogurt into each cavity, filling them halfway.
- Add a spoonful of blueberry puree to each yogurt cavity and swirl gently.
- Freeze for 3-4 hours or until solid.
- Unmold the yogurt bites and enjoy immediately or store in a glass container.
Notes
These bites can be stored in the freezer for up to a month. Feel free to experiment with different fruits and toppings.
- Prep Time: 15 minutes
- Cook Time: 0 minutes
- Category: Snack
- Method: Freezing
- Cuisine: American
Nutrition
- Serving Size: 1 serving
- Calories: 60
- Sugar: 3.5g
- Sodium: 50mg
- Fat: 1.5g
- Saturated Fat: 0.5g
- Unsaturated Fat: 1g
- Trans Fat: 0g
- Carbohydrates: 9g
- Fiber: 1g
- Protein: 4g
- Cholesterol: 5mg
Keywords: yogurt bites, blueberry snack, healthy treat, frozen yogurt, kids snacks


