
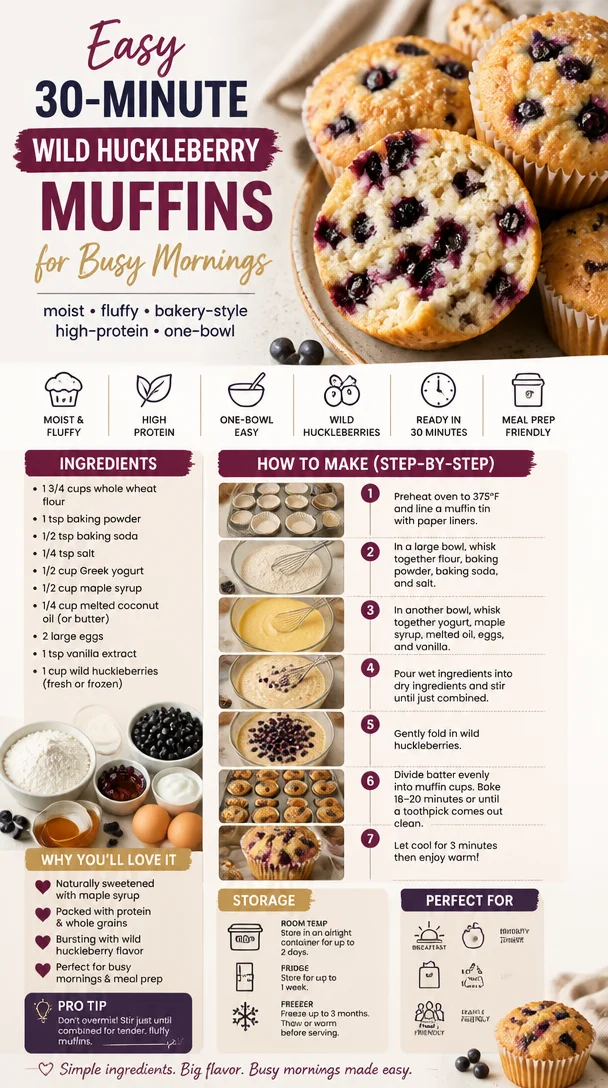
Easy 30-Minute Wild Huckleberry Muffins for Busy Mornings
Wild Huckleberry Muffins: Your New Favorite Morning Treat
Welcome to my cozy kitchen! Today, I’m thrilled to be sharing one of my all-time favorite recipes: Wild Huckleberry Muffins. There’s something absolutely magical about these little treats—they’re vibrant, bursting with flavor, and perfect for breakfast, brunch, or even as a delightful afternoon snack. If you’ve ever wandered through a lush forest, come across a huckleberry bush, and plucked those little gems for yourself, you’ll understand why these muffins hold such a special place in my heart.
I still remember the first time I tasted a huckleberry muffin. I was on a road trip through the Pacific Northwest, where huckleberries reign supreme. Stopping at a quaint café nestled by a sparkling lake, I ordered a warm huckleberry muffin, expecting something delicious but unremarkable. But, oh my goodness! The first bite was like a burst of summer sweetness mixed with a hint of tartness. The texture was perfectly fluffy, and the edges were just the right amount of crisp. I was instantly hooked and knew I needed to recreate that experience in my own kitchen.
Huckleberries, with their deep indigo color, not only add a pop of brightness to your breakfast plate but are also packed with antioxidants and vitamins. You can typically find them in the wild during late summer, but if you can’t get your hands on fresh ones, don’t worry! The beauty of this recipe is in its flexibility—frozen huckleberries (or even blueberries) can easily step in to create delicious results.
Gather your ingredients, and let’s get ready to bring a little bit of that forest magic into your home. You don’t need to be a fancy chef; just bring your love for cozy cooking and a sprinkle of creativity, and you’ll be on your way!
Personal Story
Growing up, weekends in my house were always a culinary adventure. My mom, an avid baker, had a knack for transforming our kitchen into a wonderland of flour and sugar. One of my favorite memories is waking up to that irresistible smell of something sweet in the oven while the sun peeked through our kitchen window. One particular summer, my parents took us berry picking at a local farm. We came home with buckets overflowing with wild huckleberries, and my mom immediately decided to capitalize on our bounty by baking a batch of muffins. We all crowded in the kitchen, each of us taking turns mixing, pouring, and, of course, taste-testing. Those muffins were fluffy and bursting with berry goodness, a family creation made with love.
The joy those huckleberry muffins brought to our home sparked my own passion for cooking and baking. Every bite transported me back to those lazy, sunlit mornings filled with laughter, family, and a whole lot of huckleberries. Every time I make these muffins, I’m reminded of those cherished moments. And I can’t wait for you to create your own memories with this recipe!
Ingredients
Here’s what you’ll need to whip up a batch of Wild Huckleberry Muffins:
-
2 cups all-purpose flour
- Your classic muffin staple! You can use whole wheat flour for a heartier texture or a gluten-free blend if you’re avoiding gluten.
-
1 cup granulated sugar
- This sweetener provides just the right amount of sweetness. You can substitute it with honey or maple syrup for a natural twist.
-
1 tablespoon baking powder
- Essential for that lovely rise! Make sure it’s fresh—expired baking powder won’t give your muffins the lift they need.
-
1/2 teaspoon baking soda
- This works in tandem with the baking powder for extra fluffiness. If you’re out, just increase the baking powder slightly.
-
1/2 teaspoon salt
- Salt enhances all the flavors. If you’re watching your sodium intake, you can cut back here without losing too much flavor.
-
1 large egg
- Eggs help bind everything together and create richness. For a vegan option, use a flaxseed egg (1 tablespoon ground flaxseed mixed with 3 tablespoons water).
-
1 cup buttermilk
- Gives the muffins a delightful tanginess and soft texture. No buttermilk? No problem! Just mix one tablespoon of vinegar or lemon juice into a cup of milk and let it sit for about 5 minutes.
-
1/2 cup unsalted butter, melted
- This adds a lovely richness to the muffins. If you’re looking for a dairy-free option, coconut oil or applesauce works nicely.
-
1 ½ cups fresh or frozen huckleberries
- Obviously, the star of the show! If you can’t find huckleberries, blueberries or raspberries are great substitutes. Just remember: frozen ones may need a few extra minutes to bake.
Step-by-Step Instructions
Alright, let’s dive into the fun part! Here’s how to bring your Wild Huckleberry Muffins to life:
-
Preheat your oven to 375°F (190°C): This step is super important. A properly preheated oven ensures your muffins rise beautifully and get that golden-brown crust.
-
Prepare your muffin tin: Grease a 12-cup muffin tin with a little butter or cooking spray. For extra ease, you can use paper liners—perfect for when you want to serve these muffins at a gathering!
-
Combine the dry ingredients: In a large mixing bowl, whisk together the flour, sugar, baking powder, baking soda, and salt. This helps evenly distribute the leavening agents and ensures a fluffy texture.
-
Mix the wet ingredients: In another bowl, beat the egg and then stir in the buttermilk and melted butter. Combine these until smooth, and prepare to mix this with the dry ingredients.
-
Combine the mixtures: Pour the wet ingredients into the dry ingredients. Gently mix with a spatula until just combined—don’t overmix, or you’ll end up with dense muffins. A few lumps are perfectly okay!
-
Fold in the huckleberries: Now comes the fun part! Gently fold in those beautiful huckleberries, making sure they’re evenly distributed but taking care not to squish them.
-
Scoop the batter into the tin: Using a cookie scoop or spoon, fill each muffin cup about ¾ full. This way, you’ll have a nice dome top without overflowing.
-
Bake: Pop those beauties into your preheated oven and bake for 18–20 minutes, or until the tops are golden brown and a toothpick inserted into the center comes out clean.
-
Cool: Let the muffins cool in the tin for about 5 minutes before transferring them to a wire rack. This step allows them to firm up a little and makes them easier to remove!
-
Enjoy: Serve them warm with a dab of butter or a drizzle of honey. Trust me, they taste even better fresh out of the oven!
Serving Suggestions
These Wild Huckleberry Muffins are perfect for brunch gatherings, cozy breakfasts, or even a sweet afternoon pick-me-up. To elevate your serving game, plate them on a vibrant platter, garnish with fresh huckleberries or berries of your choice, and sprinkle a little powdered sugar on top for a touch of elegance. They’re great served alongside a steaming cup of coffee or tea!
Recipe Variations
-
Lemon Huckleberry Muffins: Add the zest of one lemon to the batter for a refreshing citrus twist.
-
Huckleberry Walnut Muffins: Toss in some chopped walnuts or pecans for a delightful crunch and extra flavor.
-
Huckleberry Oat Muffins: Substitute ½ cup of flour with oats for a heartier muffin, perfect for breakfast on the go!
-
Chocolate Chip Huckleberry Muffins: Mix in a handful of semi-sweet chocolate chips for that sweet and tart combination that’s impossible to resist.
-
Veggie-Loaded Huckleberry Muffins: Try adding grated zucchini or carrots to the batter for a twist that also boosts nutrition!
Chef’s Notes
This recipe has been a beloved staple in my home for years now. I first started making these muffins after my huckleberry-picking adventure, and each batch has its own story—sometimes I add a pinch of nutmeg for warmth or some cinnamon when I’m feeling cozy. One time, I accidentally sprinkled in some cayenne pepper thinking it was cinnamon—it was a spicy surprise that turned out to be a favorite among my friends!
These muffins have evolved to adapt to seasons as well; I love swapping in whatever is fresh and available. The best part is seeing the smiles on the faces of those I share them with. So if you’re making these, don’t forget to share the love!
FAQs and Troubleshooting
Q: My muffins came out dense. What did I do wrong?
A: Dense muffins often happen from overmixing the batter. Mix just until combined! Also, ensure your baking powder is fresh.
Q: Can I use frozen huckleberries?
A: Absolutely! Just fold them in gently while they’re still frozen, and they may take a couple of extra minutes to bake through.
Q: Can I make these muffins ahead of time?
A: Yes! They store well in an airtight container for 3 days at room temperature or can be frozen for up to 3 months. Just pop them in the microwave for a few seconds to revive their fluffy texture!
Q: How can I make these muffins gluten-free?
A: Substitute the all-purpose flour with a gluten-free blend that measures 1:1. It works like a charm!
Nutritional Info (if applicable)
While I love indulging in these muffins, it’s good to be mindful of nutrition, especially if you’re serving guests or trying to balance your meals. Each muffin (based on the recipe provided) weighs in roughly around 200 calories, including healthy fats from butter and protein from the egg. Of course, this can vary depending on your choice of substitutions!
With your ingredients ready and instructions at hand, it’s time to create some kitchen magic. I can’t wait for you to experience the joy of Wild Huckleberry Muffins as I have—happy baking!
Print
Wild Huckleberry Muffins
- Total Time: 35 minutes
- Yield: 12 servings 1x
- Diet: Vegetarian
Description
Delicious Wild Huckleberry Muffins bursting with flavor, perfect for breakfast or snacks.
Ingredients
- 2 cups all-purpose flour
- 1 cup granulated sugar
- 1 tablespoon baking powder
- 1/2 teaspoon baking soda
- 1/2 teaspoon salt
- 1 large egg
- 1 cup buttermilk
- 1/2 cup unsalted butter, melted
- 1 ½ cups fresh or frozen huckleberries
Instructions
- Preheat your oven to 375°F (190°C).
- Prepare your muffin tin: Grease a 12-cup muffin tin or use paper liners.
- Combine the dry ingredients: In a mixing bowl, whisk together the flour, sugar, baking powder, baking soda, and salt.
- Mix the wet ingredients: In another bowl, beat the egg and stir in the buttermilk and melted butter until smooth.
- Combine the mixtures: Pour wet ingredients into dry ingredients and mix gently until just combined.
- Fold in the huckleberries without squishing them.
- Scoop the batter into the tin, filling each cup about ¾ full.
- Bake for 18–20 minutes, or until a toothpick comes out clean.
- Cool in the tin for 5 minutes, then transfer to a wire rack.
- Enjoy warm with butter or honey!
Notes
These muffins can be made with frozen berries. Storage: Airtight for 3 days at room temperature or frozen for 3 months.
- Prep Time: 15 minutes
- Cook Time: 20 minutes
- Category: Breakfast
- Method: Baking
- Cuisine: American
Nutrition
- Serving Size: 1 muffin
- Calories: 200
- Sugar: 12g
- Sodium: 200mg
- Fat: 8g
- Saturated Fat: 4g
- Unsaturated Fat: 4g
- Trans Fat: 0g
- Carbohydrates: 30g
- Fiber: 2g
- Protein: 3g
- Cholesterol: 30mg
Keywords: muffins, breakfast, huckleberry, baking, easy recipes
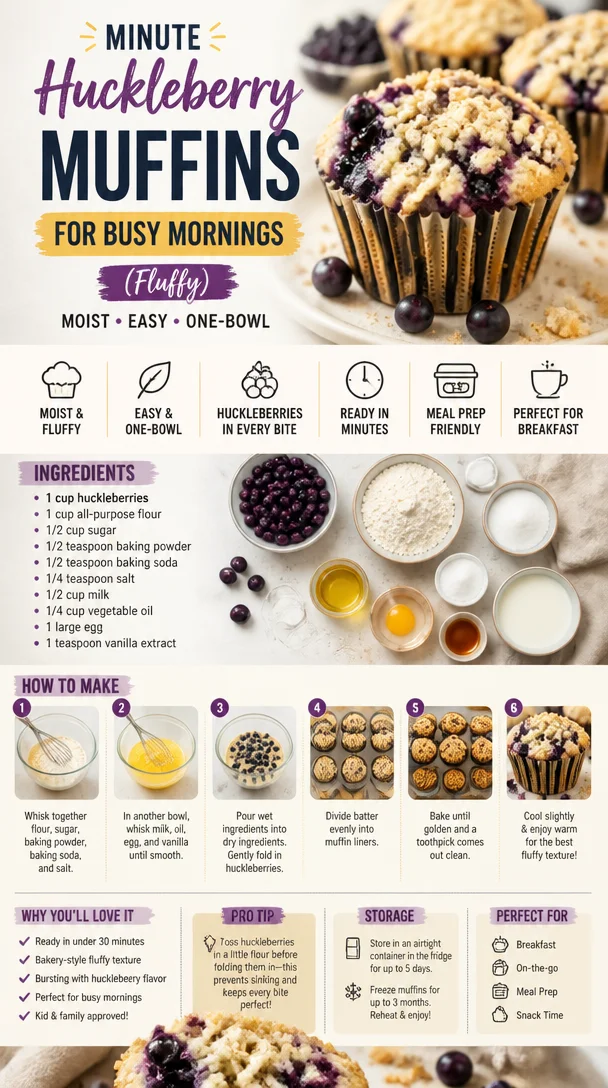
Minute Huckleberry Muffins for Busy Mornings (Fluffy)
Easy Huckleberry Muffin Recipe: A Cozy Kitchen Adventure
Welcome back to my kitchen! I’m so thrilled you’re here, and I can’t wait to share one of my favorite recipes with you today: huckleberry muffins. These delightful little morsels are the perfect blend of sweet and slightly tart, creating a burst of flavor that will have your taste buds dancing with joy. Whether you’re looking for a lazy Sunday brunch treat or a quick snack to enjoy during the week, these muffins are easy to whip up, and they fill your home with the most delightful aromas!
Huckleberries are those tiny, juicy berries that can often be overlooked for their more popular cousins like blueberries. But let me tell you, if you ever get the chance to pick them fresh, it’s an experience you won’t want to miss! I remember the first time I went huckleberry picking with my dear friend Sarah in her grandmother’s backyard. The sun was shining, and we spent hours plucking these precious little gems from the bushes. It turned into a sweet little adventure where we laughed, shared stories, and, of course, sampled a few berries straight from the bushes. When we got home, we decided to bake muffins, and the simple joy of cooking together made those muffins taste even better.
Now, every time I bake huckleberry muffins, I’m transported back to that sunlit afternoon, filled with the laughter of good friends and the warmth of cherished memories. So, are you ready to create some delightful huckleberry muffins that will not only satisfy your cravings but also bring a little sunshine into your home? Let’s dive right in!
Ingredients
To make these scrumptious huckleberry muffins, you’ll need the following ingredients:
-
1 ½ cups all-purpose flour
This is the base for your muffins. For a gluten-free option, you can use a 1:1 gluten-free flour mix. -
½ cup granulated sugar
This adds just the right amount of sweetness. You can substitute with brown sugar for a richer flavor or coconut sugar for a healthier alternative. -
½ teaspoon baking powder
A crucial ingredient that helps your muffins rise and become fluffy. If you don’t have baking powder, you can use baking soda but be sure to adjust the acidity with a bit of vinegar or lemon juice. -
½ teaspoon baking soda
Works in tandem with baking powder. If you’re short on baking soda, you can increase the amount of baking powder slightly for a boost in leavening. -
½ teaspoon salt
Salt enhances all the flavors in your muffins. If you’re watching your sodium intake, you can reduce this to ¼ teaspoon. -
1 large egg
Eggs help bind the ingredients together and give moisture. For a vegan option, you can use a flaxseed egg (1 tablespoon of flaxseed meal mixed with 2.5 tablespoons of water). -
½ cup milk
Adds moisture to the muffins. You can use any milk you like—dairy or plant-based (almond, oat, or soy milk work great!). -
¼ cup vegetable oil
This provides richness and helps keep the muffins moist. You can easily substitute with melted butter or even applesauce for a healthier twist. -
1 cup huckleberries
The star of the show! If huckleberries are hard to find, blueberries will work wonderfully in this recipe. -
1 teaspoon vanilla extract
For that warm, comforting flavor. You can use almond extract for a different twist.
With these ingredients ready, let’s jump into the process of creating these mouthwatering huckleberry muffins!
Step-by-Step Instructions
-
Preheat your oven:
Start by preheating your oven to 375°F (190°C) and line a muffin tin with paper liners or grease them lightly with oil. This will ensure your muffins come out easily, and cleanup is a breeze! -
Mix dry ingredients:
In a large bowl, whisk together the flour, sugar, baking powder, baking soda, and salt until well combined. This is an essential step to ensure that the leavening agents are evenly distributed throughout the flour. Pro tip: If you want an extra tender muffin, gently sift the flour before mixing. -
Combine wet ingredients:
In another bowl, beat the egg and then add in the milk, vegetable oil, and vanilla extract. Mix until smooth and homogenous. This step is crucial because combining the wet ingredients separately prevents overmixing when you combine them with the dry ingredients. -
Add wet to dry:
Pour your wet mixture into the dry ingredients, and mix until just combined. Don’t overmix; a few lumps are totally okay! Overmixing can lead to tough muffins, and we want them to be light and fluffy. -
Fold in huckleberries:
Gently fold in the huckleberries using a spatula or a wooden spoon. This is where the magic happens! If you’re using frozen huckleberries, there’s no need to thaw them first, but be gentle so they don’t burst and turn your batter purple. -
Fill muffin tin:
Divide the batter evenly among the prepared muffin cups, filling each about ⅔ full. If you love a crispy top, you can sprinkle a bit of sugar on top before baking. It’s a simple yet delicious addition! -
Bake:
Pop the muffin tin into your preheated oven and bake for 18-22 minutes or until a toothpick inserted into the center comes out clean. Keep an eye on them; every oven is different, and you don’t want to overbake them! -
Cool and enjoy:
Once baked, remove the muffins from the oven and let them sit in the tin for about 5 minutes. After that, transfer them to a wire rack to cool completely. The aroma will have your family and friends wandering towards the kitchen, so be prepared for some muffin love!
Serving Suggestions
These huckleberry muffins are best enjoyed warm, lightly buttered, or even with a drizzle of honey. You can serve them with a side of fresh fruit or a dollop of yogurt for a delightful breakfast or snack. They also make great additions to a brunch spread alongside your favorite coffees or teas.
Recipe Variations
-
Huckleberry Lemon Muffins:
Add the zest of one lemon to the batter for a refreshing citrus twist that complements the huckleberries beautifully. -
Huckleberry Oat Muffins:
Replace ½ cup of all-purpose flour with rolled oats for a heartier texture. -
Chocolate Chip Huckleberry Muffins:
Mix in a half cup of chocolate chips for a delightful sweet contrast to the tart huckleberries! -
Nutty Huckleberry Muffins:
Stir in some chopped nuts like walnuts or pecans for added crunch and nutty flavor. -
Vegan Huckleberry Muffins:
Substitute all eggs and dairy with plant-based equivalents, such as flaxseed eggs and almond milk, for a delicious vegan option.
Chef’s Notes
One of my favorite things about baking is how it’s an evolving art. Each time I make these huckleberry muffins, I try something new based on what I have available in the pantry. Sometimes I make them extra indulgent with chocolate chips, or I toss in leftover nuts from previous baking adventures. My huckleberry muffins have become a canvas for creativity, and I hope you feel inspired to do the same! Remember that kitchen adventures are all about experimenting, having fun, and enjoying the process with those you love.
FAQs and Troubleshooting
1. My muffins didn’t rise! What went wrong?
Be sure that your baking powder and baking soda are fresh; old leavening agents can cause your muffins to be dense.
2. Can I use frozen huckleberries?
Absolutely! Just fold them in directly from the freezer without thawing. This will prevent them from getting mushy.
3. How do I store leftover muffins?
Store them in an airtight container at room temperature for up to two days, or refrigerate them for up to a week. They also freeze beautifully for up to three months!
4. Why are my muffins dry?
Overbaking or using too much flour can lead to dry muffins. Make sure to measure your flour correctly—spoon it into the measuring cup and level it off for accuracy.
Nutritional Info
While I love to focus on the joy of cooking and sharing, I understand that nutritional information can be helpful. A standard huckleberry muffin (without toppings) contains approximately:
- Calories: 180
- Protein: 3g
- Fat: 7g
- Carbohydrates: 26g
- Fiber: 1g
- Sugar: 9g
Remember, these numbers can vary based on the specific ingredients you choose to use.
And there you have it, my lovely foodie friends! An easy, scrumptious huckleberry muffin recipe that’s packed with love and warmth. I hope you take this recipe and create your own cozy kitchen memories, just as I did. Happy Baking!
Print
Easy Huckleberry Muffins
- Total Time: 30 minutes
- Yield: 12 servings 1x
- Diet: Vegetarian
Description
Delightful huckleberry muffins that are sweet and slightly tart, perfect for brunch or a quick snack.
Ingredients
- 1 ½ cups all-purpose flour
- ½ cup granulated sugar
- ½ teaspoon baking powder
- ½ teaspoon baking soda
- ½ teaspoon salt
- 1 large egg
- ½ cup milk
- ¼ cup vegetable oil
- 1 cup huckleberries
- 1 teaspoon vanilla extract
Instructions
- Preheat your oven to 375°F (190°C) and line a muffin tin with paper liners.
- Mix the flour, sugar, baking powder, baking soda, and salt in a large bowl until well combined.
- Combine in another bowl the egg, milk, vegetable oil, and vanilla extract until smooth.
- Add the wet mixture into the dry ingredients and mix until just combined.
- Fold in the huckleberries gently using a spatula.
- Fill each muffin cup about ⅔ full with batter.
- Bake for 18-22 minutes or until a toothpick inserted into the center comes out clean.
- Cool the muffins for 5 minutes in the tin before transferring them to a wire rack to cool completely.
Notes
These muffins are best enjoyed warm, lightly buttered or with honey. They also freeze beautifully for up to three months!
- Prep Time: 10 minutes
- Cook Time: 20 minutes
- Category: Snack
- Method: Baking
- Cuisine: American
Nutrition
- Serving Size: 1 muffin
- Calories: 180
- Sugar: 9g
- Sodium: 250mg
- Fat: 7g
- Saturated Fat: 1g
- Unsaturated Fat: 6g
- Trans Fat: 0g
- Carbohydrates: 26g
- Fiber: 1g
- Protein: 3g
- Cholesterol: 30mg
Keywords: huckleberry muffins, easy muffins, baking, sweet snacks, brunch recipes

Minute Low-Calorie Breakfast Sandwiches for Busy Mornings
Low Calorie Breakfast Sandwiches: A Delicious Way to Start Your Day
Welcome to my kitchen, fellow food enthusiast! I’m Olivia Bennett, and today we’re diving into the wonderful world of breakfast sandwiches—those glorious creations that bring comfort and joy to our mornings. If you’re anything like me, the smell of freshly toasted bread and sizzling eggs in the morning is enough to make you want to dance around the kitchen!
Breakfast is often called the most important meal of the day, and rightly so. However, as we kick off our mornings with flair, it’s important to keep things light, fresh, and nourishing. That’s why I’m excited to share my recipe for Low Calorie Breakfast Sandwiches that will leave you feeling satisfied without the guilt! Grab your apron, and let’s get cooking!
A Personal Slice of Breakfast History
As a kid, my mornings were a special time, filled with the sounds of my mom bustling in the kitchen and the smell of something delicious cooking. I remember the way she would whip up breakfast sandwiches for my brother and me before school, using whatever leftovers she had in the fridge. Those sandwiches were an adventure, hiding surprises in every bite—a little cheese here, a slice of avocado there!
One of my favorite memories involves a particularly hilarious morning when my brother accidentally grabbed the jar of mayonnaise instead of the mustard. Let’s just say that his breakfast sandwich turned into a mysterious concoction only a child could appreciate. That day sparked a realization: breakfast sandwiches are not just food; they are love, laughter, and a little bit of chaos. So let’s embrace that spirit as we make our own, healthier, and lighter breakfast sandwiches that will fill our hearts (and stomachs) with happiness!
Ingredients
For our Low Calorie Breakfast Sandwiches, you’ll need the following ingredients:
-
Whole Wheat English Muffins (or any whole grain bread)
A light and wholesome choice that adds fiber to your breakfast. Feel free to swap for gluten-free options if needed! -
Eggs (or egg whites)
The star of our sandwich! Eggs are packed with protein, but for a lower calorie count, you can use egg whites or a cholesterol-free egg substitute. -
Avocado
Creamy and rich, avocados bring healthy fats to the table. If avocados are too expensive or out of season, you can use hummus as a spread instead. -
Spinach (or other greens)
Fresh greens add color and nutrition. You can also substitute with kale or sautéed mushrooms for a twist. -
Low-Fat Cheese (or nutritional yeast)
A sprinkle of cheese adds flavor! If you’re dairy-free, try nutritional yeast for a cheesy taste without the calories. -
Tomato Slices
Juicy and refreshing, tomatoes add a burst of flavor. You could also use roasted red peppers or sliced cucumbers for variety. -
Herbs and Spices (salt, pepper, and optional chili flakes)
Hero ingredients that elevate flavors! Customize your spice levels based on your palate.
Step-by-Step Instructions
Now that we have our ingredients prepped, let’s dive into the cooking process! Follow these steps to create your delicious Low Calorie Breakfast Sandwiches:
-
Preheat your grill or skillet.
A medium heat is perfect for toasting the muffins while cooking the eggs without burning them. Just a couple of minutes will do! -
Toast the English muffins.
Place the muffin halves cut-side down on the grill or skillet. Toast them until they’re golden and crispy (about 3-5 minutes). This creates a sturdy base for your sandwich! -
Cook the eggs.
Whisk your eggs or egg whites in a bowl, adding a pinch of salt and pepper. Pour them into the skillet. Stir gently with a spatula until they’re fluffy and just set. This typically takes around 3 minutes for scrambled eggs. Pro tip: For soft and creamy eggs, remove them from heat just before they look fully cooked; they’ll continue to cook off the heat! -
Assemble the sandwich.
On the bottom half of each toasted muffin, layer the cooked eggs, a slice of avocado, a handful of fresh spinach, a slice of tomato, and a sprinkle of low-fat cheese. Top it with the other muffin half. -
Heat the assembled sandwich (optional).
If you want your cheese melted, you can place the entire sandwich back on the skillet for an additional minute, covered with a lid. This helps create that gooey, dreamy layer of cheese. -
Serve and Enjoy!
Cut your sandwiches in half for a pretty presentation, and serve them immediately. Don’t forget to whisk up a little hot sauce or salsa if you’re feeling adventurous!
Serving Suggestions
These Low Calorie Breakfast Sandwiches are perfect for starting your day off right! Serve them alongside fresh fruit, yogurt, or even a small smoothie for a complete breakfast. They also make for a great snack or light lunch!
Recipe Variations
- Mediterranean Twist: Swap spinach for arugula, add feta cheese, and top with sun-dried tomatoes.
- Southwestern Kick: Mix in diced jalapeños, cilantro, and swap tomatoes for fresh avocado salsa!
- Sweet & Savory: Use a whole grain bagel, layer with almond butter, sliced bananas, and a sprinkle of cinnamon for a sweeter breakfast.
- Vegan Delight: Replace eggs with tofu scramble, and add nutritional yeast for a cheesy flavor without the dairy.
Chef’s Notes
These Low Calorie Breakfast Sandwiches are a staple in my kitchen, and I love how they can adapt to your pantry. Over the years, I’ve experimented with countless fillings, and I can honestly say it never gets boring! I remember the time I hosted a brunch for friends and turned these sandwiches into a DIY station. Everyone could customize their sandwiches, and we laughed and shared while we created delicious combinations—definitely a morning I’ll cherish forever!
FAQs and Troubleshooting
1. How can I ensure my eggs aren’t rubbery?
To avoid rubbery eggs, cook them on low heat and remove them from the pan just before they’re fully set. The residual heat will continue to cook them to perfection.
2. Can I make these sandwiches ahead of time?
Absolutely! You can prepare the ingredients in advance and store them separately. When you’re ready to eat, just assemble and toast!
3. What should I do if I don’t have an English muffin?
No problem! You can use any bread you have on hand—whole grain or sourdough works beautifully. Even a tortilla can become a delicious wrap!
4. How many calories are in one sandwich?
Depending on the specific ingredients you choose, one sandwich can range from 250 to 350 calories, making them a balanced and satisfying breakfast option.
Nutritional Info (Optional)
Although this can vary based on specific ingredients, each sandwich is typically around 300 calories, with 20 grams of protein and high fiber content. These numbers depend on your choices, so feel free to swap ingredients to fit your dietary needs!
Now that you’ve discovered the joy and ease of making Low Calorie Breakfast Sandwiches, you can start embracing those cozy cooking moments in your kitchen. Remember, cooking is all about creativity, and there’s no right or wrong way to enjoy breakfast! Feel free to experiment, share your variations, and of course—make lots of delicious memories along the way. Happy cooking!
Print
Low Calorie Breakfast Sandwiches
- Total Time: 20 minutes
- Yield: 2 servings
- Diet: Vegetarian
Description
Low calorie breakfast sandwiches that are satisfying and nourish your mornings without the guilt.
Ingredients
- Whole Wheat English Muffins (or any whole grain bread)
- Eggs (or egg whites)
- Avocado
- Spinach (or other greens)
- Low-Fat Cheese (or nutritional yeast)
- Tomato Slices
- Herbs and Spices (salt, pepper, and optional chili flakes)
Instructions
- Preheat your grill or skillet.
- Toast the English muffins until golden and crispy (about 3-5 minutes).
- Cook the eggs or egg whites until fluffy, about 3 minutes.
- Assemble the sandwich with eggs, avocado, spinach, tomato, and cheese on the toasted muffin.
- Heat the assembled sandwich on the skillet for an additional minute if you want melted cheese.
- Serve and enjoy immediately!
Notes
These sandwiches can be made ahead of time and customized to fit any dietary preferences. Try swapping the ingredients for variations!
- Prep Time: 10 minutes
- Cook Time: 10 minutes
- Category: Breakfast
- Method: Grilling
- Cuisine: American
Nutrition
- Serving Size: 1 sandwich
- Calories: 300
- Sugar: 2g
- Sodium: 300mg
- Fat: 10g
- Saturated Fat: 2g
- Unsaturated Fat: 8g
- Trans Fat: 0g
- Carbohydrates: 36g
- Fiber: 6g
- Protein: 20g
- Cholesterol: 200mg
Keywords: breakfast, low calorie, sandwich, healthy, quick meal, vegetarian

Minute High-Protein Cottage Cheese Avocado Breakfast Wrap
Easy High-Protein Breakfast Wrap with Cottage Cheese and Avocado
Welcome to my cozy kitchen! I’m Olivia Bennett, your friendly guide to creating delicious, heartwarming meals that are as easy as pie. Today, we’re diving into one of my favorite ways to kickstart the day: the Easy High-Protein Breakfast Wrap with Cottage Cheese and Avocado. If you’re looking for a breakfast that’s not only nutritious but also bursting with flavor, you’ve clicked on the right recipe!
I believe that breakfast is more than just a meal; it’s a moment to pause and savor, to fuel up for the day ahead. Whether you’re rushing out the door or enjoying a leisurely morning, this wrap is the perfect combination of creamy, savory, and satisfying. Cottage cheese offers a fantastic protein boost, while avocado brings that buttery richness we all crave. Tuck it all into a warm tortilla, and you have a breakfast that feels indulgent yet healthy. Let’s explore this scrumptious dish that combines both nutrition and taste—trust me, it’s a game-changer!
A Nostalgic Kitchen Memory
Growing up, my mornings were filled with the joyful chaos of my family bustling around the kitchen. My mom was a wizard at concocting quick meals that kept us energized for the day ahead. I still remember one particular Saturday when we woke up to the smell of her famous breakfast burritos wafting through the house. Those magical wraps, filled to the brim with eggs, cheese, and the occasional surprise ingredient, were the highlight of my childhood.
One day, we experimented with cottage cheese and avocado, two ingredients that were always around but rarely played the starring role. As we served them up, my siblings and I couldn’t believe how deliciously creamy they were together! What started as a kitchen experiment became a cherished family recipe and a fun routine. I still whip it out on busy mornings, and sometimes I’ll even make it for friends or family. It’s a little nostalgic secret that brings back those meaningful moments of laughter and love at the table. Now, let’s get cooking!
Ingredients
Here’s what you’ll need to craft your Easy High-Protein Breakfast Wrap:
-
Whole Wheat Tortilla
Great for wrapping everything up while keeping it nutritious. For a gluten-free option, use a brown rice or corn tortilla for that perfect hand-held experience! -
Cottage Cheese (1 cup)
Packed with protein and calcium, it adds a creamy texture. Prefer Greek yogurt for a tangy twist, or silken tofu for a dairy-free alternative! -
Avocado (1 medium)
This nutrient-dense superstar provides healthy fats and a lovely creaminess. If they’re out of season, mashed banana can work in a pinch, though I must admit, it’s not quite the same! -
Spinach (1 cup, fresh)
A handful of greens adds vital vitamins and minerals. Swap in kale or any leafy greens you have available to keep that nutrition diverse! -
Cherry Tomatoes (½ cup, halved)
These little bursts of juiciness brightens your wrap with flavors and colors! You can substitute with bell pepper or cucumbers for a crunch. -
Salt and Pepper (to taste)
Perfect for enhancing flavors. Experiment with spices like paprika or cumin if you’re feeling adventurous! -
Hot Sauce (optional)
A dash of your favorite hot sauce will add an exciting kick. If you want something milder, try a sprinkle of chili powder instead.
Step-by-Step Instructions
Now that you have your ingredients ready, let’s put this breakfast wrap together!
-
Prepare Your Ingredients:
Start by gathering everything on your kitchen counter. Measure out the cottage cheese and dice the avocado. Having everything at hand makes cooking a delight! -
Season the Cottage Cheese:
In a bowl, take your cottage cheese and sprinkle in some salt and pepper. This is a simple step, but trust me, it makes all the difference in elevating the flavor. If you’re feeling adventurous, add a pinch of garlic powder for an extra zing! -
Warm the Tortilla:
Take your tortilla and heat it in a dry skillet over medium heat for about 30 seconds on each side until it’s warm and pliable. This helps it wrap without tearing and brings out that delicious toasted flavor! -
Assemble the Wrap:
On the warmed tortilla, spread a generous layer of the seasoned cottage cheese. Next, pile on the spinach, followed by the halved cherry tomatoes and avocado slices. Feel free to arrange it prettily; after all, we eat with our eyes first! -
Wrap It Up:
To wrap, fold in the sides of the tortilla and then roll the bottom over the filling. Tuck it snugly, so nothing spills out. If you’re unsure, check out some online tutorials for visual guides, but trust me, it’s easier than it sounds! -
Heat to Perfection:
For an extra crispy wrap, place it seam-side down in the skillet and cook for another 2 minutes on medium heat until golden brown. Flip and repeat! This step adds texture and makes everything melt together beautifully. -
Slice and Serve:
Once crispy, take it out and let it cool for a moment. Slice it in half, and serve it up with some extra hot sauce on the side for dipping if you like!
Serving Suggestions
Presentation can elevate any meal, even a simple breakfast wrap. I like to serve this wrap on a colorful plate to brighten up my morning. A side of fresh fruit—like sliced strawberries, blueberries, or orange segments—adds a splash of color and natural sweetness. Don’t forget some freshly brewed coffee or your favorite tea to sip alongside your creation!
Recipe Variations
Want to switch things up a bit? Here are a few fun variations to try:
-
Southwestern Twist: Add black beans and corn to the filling for a southwestern vibe. Toss in a sprinkle of cumin for extra flavor!
-
Mediterranean Style: Swap the cottage cheese for feta and the avocado for hummus. Throw in some black olives or sun-dried tomatoes for that over-the-top Mediterranean flavor!
-
Breakfast Burrito: Stir in a couple of scrambled eggs to your filling for an even more heartening option.
-
Sweet and Savory: For a sweet version, use ricotta cheese, sliced strawberries, and a drizzle of honey!
-
Herb Infusion: Add fresh herbs like dill or cilantro to your cottage cheese for an aromatic boost.
Chef’s Notes
This wrap has been my go-to for busy mornings or impromptu brunch with friends. I love how adaptable it is and how it can change with the seasons or what you have on hand. There was that one time when I accidentally used expired cottage cheese (oops!), but it turned out to be a funny story rather than a disaster. It also inspired me to ensure I always check my ingredients before diving in!
On lazy weekends, I sometimes serve these wraps alongside a fresh green smoothie, making for a vibrant, health-packed breakfast that feels amazing and energizes you for the day ahead. It’s truly a versatile dish that’s evolved over time but always brought joy into my kitchen!
FAQs and Troubleshooting
-
Can I make this wrap ahead of time?
Absolutely! Prepare the filling, wrap it up, and refrigerate it. Just be aware that the wrap might get a little soggy. I recommend enjoying it fresh for the best texture. -
What if I don’t like cottage cheese?
No problem! Greek yogurt or cream cheese can work as a substitute, keeping that creamy content. -
How do I prevent my avocado from browning?
Brush the slices with a little lemon juice, and they’ll stay fresh and vibrant for longer! -
Why did my wrap fall apart?
If the filling is too wet, it can cause the wrap to tear. Ensure you drain any excess moisture from ingredients like tomatoes before layering.
Nutritional Info (Optional)
Each wrap serves as a nutrient powerhouse, providing a great balance of protein, healthy fats, and fiber to keep you satisfied until lunchtime. Plus, it’s low in refined sugars, making it a fantastic choice for a fulfilling breakfast.
And there you have it! Your Easy High-Protein Breakfast Wrap is ready to be devoured. It’s the kind of recipe that fills your kitchen with warmth and excitement, just like my memories of cooking with my family. Enjoy every bite and the moment, and remember, cooking is all about joy, exploration, and sharing with those you love. Happy cooking, friends!
Print
Easy High-Protein Breakfast Wrap with Cottage Cheese and Avocado
- Total Time: 15 minutes
- Yield: 1 serving 1x
- Diet: Vegetarian
Description
A nutritious and flavorful breakfast wrap featuring cottage cheese, avocado, and fresh vegetables, perfect for a quick meal.
Ingredients
- 1 Whole Wheat Tortilla
- 1 cup Cottage Cheese
- 1 medium Avocado
- 1 cup fresh Spinach
- ½ cup Cherry Tomatoes, halved
- Salt and Pepper, to taste
- Hot Sauce, optional
Instructions
- Prepare Your Ingredients: Start by gathering everything on your kitchen counter. Measure out the cottage cheese and dice the avocado.
- Season the Cottage Cheese: In a bowl, take your cottage cheese and sprinkle in some salt and pepper. Add a pinch of garlic powder for extra flavor if desired.
- Warm the Tortilla: Heat your tortilla in a dry skillet over medium heat for about 30 seconds on each side until it’s warm and pliable.
- Assemble the Wrap: On the warmed tortilla, spread a generous layer of the seasoned cottage cheese, followed by spinach, cherry tomatoes, and avocado slices.
- Wrap It Up: Fold in the sides of the tortilla and roll the bottom over the filling, tucking it snugly.
- Heat to Perfection: Place the wrap seam-side down in the skillet and cook for another 2 minutes on medium heat until golden brown. Flip and repeat.
- Slice and Serve: Once crispy, slice the wrap in half and serve with extra hot sauce on the side if desired.
Notes
This wrap is versatile; feel free to add fresh herbs, scrambled eggs, or swap ingredients based on your preference.
- Prep Time: 10 minutes
- Cook Time: 5 minutes
- Category: Breakfast
- Method: Wrapping
- Cuisine: American
Nutrition
- Serving Size: 1 wrap
- Calories: 350
- Sugar: 3g
- Sodium: 350mg
- Fat: 15g
- Saturated Fat: 2g
- Unsaturated Fat: 12g
- Trans Fat: 0g
- Carbohydrates: 40g
- Fiber: 7g
- Protein: 20g
- Cholesterol: 10mg
Keywords: breakfast wrap, high-protein, cottage cheese, avocado, healthy breakfast


