

Minute Low-Calorie Breakfast Sandwiches for Busy Mornings
Low Calorie Breakfast Sandwiches: A Delicious Way to Start Your Day
Welcome to my kitchen, fellow food enthusiast! I’m Olivia Bennett, and today we’re diving into the wonderful world of breakfast sandwiches—those glorious creations that bring comfort and joy to our mornings. If you’re anything like me, the smell of freshly toasted bread and sizzling eggs in the morning is enough to make you want to dance around the kitchen!
Breakfast is often called the most important meal of the day, and rightly so. However, as we kick off our mornings with flair, it’s important to keep things light, fresh, and nourishing. That’s why I’m excited to share my recipe for Low Calorie Breakfast Sandwiches that will leave you feeling satisfied without the guilt! Grab your apron, and let’s get cooking!
A Personal Slice of Breakfast History
As a kid, my mornings were a special time, filled with the sounds of my mom bustling in the kitchen and the smell of something delicious cooking. I remember the way she would whip up breakfast sandwiches for my brother and me before school, using whatever leftovers she had in the fridge. Those sandwiches were an adventure, hiding surprises in every bite—a little cheese here, a slice of avocado there!
One of my favorite memories involves a particularly hilarious morning when my brother accidentally grabbed the jar of mayonnaise instead of the mustard. Let’s just say that his breakfast sandwich turned into a mysterious concoction only a child could appreciate. That day sparked a realization: breakfast sandwiches are not just food; they are love, laughter, and a little bit of chaos. So let’s embrace that spirit as we make our own, healthier, and lighter breakfast sandwiches that will fill our hearts (and stomachs) with happiness!
Ingredients
For our Low Calorie Breakfast Sandwiches, you’ll need the following ingredients:
-
Whole Wheat English Muffins (or any whole grain bread)
A light and wholesome choice that adds fiber to your breakfast. Feel free to swap for gluten-free options if needed! -
Eggs (or egg whites)
The star of our sandwich! Eggs are packed with protein, but for a lower calorie count, you can use egg whites or a cholesterol-free egg substitute. -
Avocado
Creamy and rich, avocados bring healthy fats to the table. If avocados are too expensive or out of season, you can use hummus as a spread instead. -
Spinach (or other greens)
Fresh greens add color and nutrition. You can also substitute with kale or sautéed mushrooms for a twist. -
Low-Fat Cheese (or nutritional yeast)
A sprinkle of cheese adds flavor! If you’re dairy-free, try nutritional yeast for a cheesy taste without the calories. -
Tomato Slices
Juicy and refreshing, tomatoes add a burst of flavor. You could also use roasted red peppers or sliced cucumbers for variety. -
Herbs and Spices (salt, pepper, and optional chili flakes)
Hero ingredients that elevate flavors! Customize your spice levels based on your palate.
Step-by-Step Instructions
Now that we have our ingredients prepped, let’s dive into the cooking process! Follow these steps to create your delicious Low Calorie Breakfast Sandwiches:
-
Preheat your grill or skillet.
A medium heat is perfect for toasting the muffins while cooking the eggs without burning them. Just a couple of minutes will do! -
Toast the English muffins.
Place the muffin halves cut-side down on the grill or skillet. Toast them until they’re golden and crispy (about 3-5 minutes). This creates a sturdy base for your sandwich! -
Cook the eggs.
Whisk your eggs or egg whites in a bowl, adding a pinch of salt and pepper. Pour them into the skillet. Stir gently with a spatula until they’re fluffy and just set. This typically takes around 3 minutes for scrambled eggs. Pro tip: For soft and creamy eggs, remove them from heat just before they look fully cooked; they’ll continue to cook off the heat! -
Assemble the sandwich.
On the bottom half of each toasted muffin, layer the cooked eggs, a slice of avocado, a handful of fresh spinach, a slice of tomato, and a sprinkle of low-fat cheese. Top it with the other muffin half. -
Heat the assembled sandwich (optional).
If you want your cheese melted, you can place the entire sandwich back on the skillet for an additional minute, covered with a lid. This helps create that gooey, dreamy layer of cheese. -
Serve and Enjoy!
Cut your sandwiches in half for a pretty presentation, and serve them immediately. Don’t forget to whisk up a little hot sauce or salsa if you’re feeling adventurous!
Serving Suggestions
These Low Calorie Breakfast Sandwiches are perfect for starting your day off right! Serve them alongside fresh fruit, yogurt, or even a small smoothie for a complete breakfast. They also make for a great snack or light lunch!
Recipe Variations
- Mediterranean Twist: Swap spinach for arugula, add feta cheese, and top with sun-dried tomatoes.
- Southwestern Kick: Mix in diced jalapeños, cilantro, and swap tomatoes for fresh avocado salsa!
- Sweet & Savory: Use a whole grain bagel, layer with almond butter, sliced bananas, and a sprinkle of cinnamon for a sweeter breakfast.
- Vegan Delight: Replace eggs with tofu scramble, and add nutritional yeast for a cheesy flavor without the dairy.
Chef’s Notes
These Low Calorie Breakfast Sandwiches are a staple in my kitchen, and I love how they can adapt to your pantry. Over the years, I’ve experimented with countless fillings, and I can honestly say it never gets boring! I remember the time I hosted a brunch for friends and turned these sandwiches into a DIY station. Everyone could customize their sandwiches, and we laughed and shared while we created delicious combinations—definitely a morning I’ll cherish forever!
FAQs and Troubleshooting
1. How can I ensure my eggs aren’t rubbery?
To avoid rubbery eggs, cook them on low heat and remove them from the pan just before they’re fully set. The residual heat will continue to cook them to perfection.
2. Can I make these sandwiches ahead of time?
Absolutely! You can prepare the ingredients in advance and store them separately. When you’re ready to eat, just assemble and toast!
3. What should I do if I don’t have an English muffin?
No problem! You can use any bread you have on hand—whole grain or sourdough works beautifully. Even a tortilla can become a delicious wrap!
4. How many calories are in one sandwich?
Depending on the specific ingredients you choose, one sandwich can range from 250 to 350 calories, making them a balanced and satisfying breakfast option.
Nutritional Info (Optional)
Although this can vary based on specific ingredients, each sandwich is typically around 300 calories, with 20 grams of protein and high fiber content. These numbers depend on your choices, so feel free to swap ingredients to fit your dietary needs!
Now that you’ve discovered the joy and ease of making Low Calorie Breakfast Sandwiches, you can start embracing those cozy cooking moments in your kitchen. Remember, cooking is all about creativity, and there’s no right or wrong way to enjoy breakfast! Feel free to experiment, share your variations, and of course—make lots of delicious memories along the way. Happy cooking!
Print
Low Calorie Breakfast Sandwiches
- Total Time: 20 minutes
- Yield: 2 servings
- Diet: Vegetarian
Description
Low calorie breakfast sandwiches that are satisfying and nourish your mornings without the guilt.
Ingredients
- Whole Wheat English Muffins (or any whole grain bread)
- Eggs (or egg whites)
- Avocado
- Spinach (or other greens)
- Low-Fat Cheese (or nutritional yeast)
- Tomato Slices
- Herbs and Spices (salt, pepper, and optional chili flakes)
Instructions
- Preheat your grill or skillet.
- Toast the English muffins until golden and crispy (about 3-5 minutes).
- Cook the eggs or egg whites until fluffy, about 3 minutes.
- Assemble the sandwich with eggs, avocado, spinach, tomato, and cheese on the toasted muffin.
- Heat the assembled sandwich on the skillet for an additional minute if you want melted cheese.
- Serve and enjoy immediately!
Notes
These sandwiches can be made ahead of time and customized to fit any dietary preferences. Try swapping the ingredients for variations!
- Prep Time: 10 minutes
- Cook Time: 10 minutes
- Category: Breakfast
- Method: Grilling
- Cuisine: American
Nutrition
- Serving Size: 1 sandwich
- Calories: 300
- Sugar: 2g
- Sodium: 300mg
- Fat: 10g
- Saturated Fat: 2g
- Unsaturated Fat: 8g
- Trans Fat: 0g
- Carbohydrates: 36g
- Fiber: 6g
- Protein: 20g
- Cholesterol: 200mg
Keywords: breakfast, low calorie, sandwich, healthy, quick meal, vegetarian

Healthy Korean Fried Chicken
A Crispy, Healthy Twist on Korean Fried Chicken
Welcome back to my cozy kitchen, dear foodies! Today, we’re diving into one of my all-time favorite dishes that brings a zing of flavor and a delightful crunch to the table: Healthy Korean Fried Chicken. Now, before you start imagining heavy batter and deep frying, let me reassure you — this isn’t your typical oil-soaked feast! We’re giving this classic dish a vibrant, health-conscious makeover while keeping that unmistakable umami flavor intact.
Korean Fried Chicken (or KFC for short, but we’ll stick to Korean Fried Chicken to avoid confusion with the other KFC) is beloved for its crispy exterior and juicy meat, often coated in a sticky, spicy sauce that dances on your taste buds. I remember the first time I tried it at a small food truck in the heart of Seoul. The sun was setting, the streets were bustling, and every bite felt like a warm hug on a chilly evening. The crunch was unlike anything I’d ever experienced! Since then, I’ve made it my mission to recreate that nostalgia right here at home, blending authentic traditions with healthier alternatives.
So, roll up those sleeves and let’s get cooking! Whether you’re whipping this up for a cozy night in or impressing guests at your next gathering, this dish is bound to be a showstopper. Get ready for tons of juicy flavor without the heavy guilt — your taste buds and your waistline will thank you!
Personal Story
One of my most cherished food memories is the time I traveled to Seoul with my best friend, Mia. We were on a culinary adventure, determined to taste every dish we could find. After a day of exploring ancient temples and vibrant markets, we stumbled upon a food stall selling Korean Fried Chicken. The aroma wafting through the air was simply irresistible. We ordered a couple of portions — one spicy and one sweet — and found a little corner to dig in.
The moment we took our first bites, it was like fireworks in our mouths! The crunch, the spice, the sweet glaze bursting with flavor—it was everything we had hoped for and more. We laughed, relished every morsel, and made a pact to recreate that magic at home. That journey sparked my love for Korean cuisine and solidified my belief that food isn’t just about nourishment; it’s about connection, memories, and joy.
Now, I’m excited to bring that vibrant experience to you all with a twist — making it healthier without sacrificing any of that finger-licking goodness!
Ingredients
Here’s what you’ll need to make this delectable Healthy Korean Fried Chicken:
For Chicken Marinade:
-
Chicken thighs (boneless, skinless): 1.5 lbs
- Chef’s Tip: Thighs are juicy and forgiving compared to chicken breasts. You can substitute with chicken breasts or wings if you prefer, but make sure to adjust your cooking time!
-
Soy sauce: ¼ cup
- Substitution: Use coconut aminos for a gluten-free or soy-free version.
-
Rice vinegar: 2 tablespoons
- Insight: Adds a subtle tanginess. If you don’t have it, apple cider vinegar works well too!
-
Garlic (minced): 3 cloves
- Quick Hack: Fresh garlic is best, but powdered garlic can be used in a pinch; just halve the amount.
-
Ginger (grated): 1 tablespoon
- Chef’s Insight: Fresh ginger adds warmth and spice, but ground ginger works in this marinade too!
For Breading:
-
Almond flour: 1 cup
- Substitution: For a nut-free option, use oat flour or breadcrumbs.
-
Cornstarch: ½ cup
- Chef’s Tip: This is key for achieving that ultra-crispy texture! You can use tapioca starch if you’re avoiding corn.
-
Egg (beaten): 1 large
- Insight: Acts as a binder for the breading. If egg-free, try a flaxseed egg (1 tbsp flaxseed meal + 2.5 tbsp water)!
For the Sauce:
-
Korean chili paste (Gochujang): 3 tablespoons
- Substitution: If you find it too spicy, use sriracha or reduce the amount.
-
Honey: 2 tablespoons
- Tip: Swap with maple syrup for a vegan option.
-
Sesame oil: 1 tablespoon
- Insight: Provides a nutty flavor. You can replace it with olive oil in moderation.
-
Sesame seeds: For garnish
- Quick Tip: Use toasted sesame seeds to enhance the flavor!
Step-by-Step Instructions
Now that we have our ingredients prepped, let’s dive into the step-by-step journey of making this delightful dish!
Step 1: Marinate the Chicken
- In a large bowl, combine the soy sauce, rice vinegar, minced garlic, and grated ginger. Add in the chicken thighs, ensuring each piece is well-coated. Cover with plastic wrap or put it in a resealable bag and let it marinate in the fridge for at least 30 minutes. The longer, the better; I usually aim for a couple of hours if time allows! This really lets those flavors soak in.
Step 2: Prepare the Breading Station
- In one shallow dish, prepare the almond flour and cornstarch in equal parts. In another dish, beat the egg. This is where the fun begins! Make sure to set up a little assembly line—marinated chicken first, egg wash second, and then into the flour mixture. Pro tip: Keep one hand for wet (egg) and one for dry (flour) to avoid a gooey mess!
Step 3: Coat the Chicken
- Take each piece of marinated chicken, dip it into the beaten egg, letting the excess drip off, and then dredge it into the almond flour mixture, pressing gently to ensure a good coating. Place the coated chicken on a wire rack to let it rest as you preheat your oven!
Step 4: Bake the Chicken
- Preheat your oven to 425°F (220°C). Line a baking sheet with parchment paper and lightly spray it with cooking oil. This helps in achieving that perfect crisp! Arrange the coated chicken in a single layer, making sure they’re not overcrowded (give them room to breathe and crisp up!). Bake for about 25-30 minutes until the internal temperature reaches 165°F and the chicken is golden brown. Halfway through, flip them for an even bake.
Step 5: Make the Sauce
- While the chicken is baking, let’s whip up the sauce! In a small saucepan, combine the Gochujang, honey, and sesame oil over low heat. Stir gently until everything is well mixed and heated through. You can adjust the sweetness or heat by adding more honey or Gochujang based on your preference.
Step 6: Toss and Serve!
- Once your chicken is out of the oven, place it in a large mixing bowl. Pour the sauce over the hot chicken and toss it gently until every piece is beautifully coated. Get excited; you’re almost there!
Serving Suggestions
For a beautiful presentation, serve the Healthy Korean Fried Chicken on a large platter, garnishing with a sprinkle of sesame seeds and some sliced green onions for a pop of color. Pair it with a side of cucumber salad or steamed broccoli for a fresh crunch. It’s perfect for sharing, but trust me, you’ll want to keep it all to yourself!
Recipe Variations
Get creative with your Healthy Korean Fried Chicken! Here are a few fun variations to consider:
- Spicy Garlic Version: Add minced garlic to the sauce for an extra punch; perfect for garlic lovers!
- Sweet and Sour Twist: Mix in a little pineapple juice with the sauce for a sweet, tangy kick.
- Vegetarian Option: Use cauliflower or tofu as a substitute for chicken, following the same marinade and breading methods for a delightful veggie dish.
- Make It a Bowl: Serve the chicken over cooked rice or quinoa, topped with pickled veggies for a complete meal.
Chef’s Notes
As with any recipe, this Healthy Korean Fried Chicken has evolved over time in my kitchen. The first attempt turned out a bit too soggy, but with practice, I learned the importance of letting the chicken rest after breading and ensuring it’s fully dry before baking. I also experimented with different flours and spices until I landed on this winning combination. Honestly, I can’t remember how many batches I made, but every “failed” attempt was a delicious lesson! Cooking should be playful and experimenting is half the fun.
FAQs and Troubleshooting
Q1: Why is my chicken not crispy?
A: Ensure you’ve set your oven to the right temperature and gave the breadcrumbs a chance to stick by not overcrowding the pan. If they seem soggy, try baking for a little longer!
Q2: Can I make this ahead of time?
A: Absolutely! You can marinate the chicken the night before or make the sauce ahead of time. Just reheat the sauce before adding it to your chicken!
Q3: What if I don’t have Gochujang?
A: No worries! You can use sriracha or even a mix of chili powder and a little sugar as an alternative.
Q4: How can I store leftovers?
A: Store any leftover chicken in an airtight container in the fridge for up to three days. Reheat in the oven to maintain that crispy texture!
Nutritional Info (Optional)
Though the precise nutritional breakdown can depend on specific ingredients used, one serving of this Healthy Korean Fried Chicken may include:
- Calories: ~250
- Protein: ~25g
- Carbohydrates: ~15g
- Fat: ~10g
- Fiber: ~3g
So there you have it—a heartwarming adventure into the world of Healthy Korean Fried Chicken that’s just waiting for you to recreate in your kitchen. I can’t wait to hear your stories, so let me know how yours turns out! Happy cooking, friends!
Print
Healthy Korean Fried Chicken
- Total Time: 1 hour
- Yield: 4 servings 1x
- Diet: Gluten-Free, Dairy-Free
Description
A healthy twist on the classic Korean Fried Chicken, offering a crispy exterior and juicy meat without the guilt.
Ingredients
- 1.5 lbs boneless, skinless chicken thighs
- ¼ cup soy sauce
- 2 tablespoons rice vinegar
- 3 cloves garlic, minced
- 1 tablespoon ginger, grated
- 1 cup almond flour
- ½ cup cornstarch
- 1 large egg, beaten
- 3 tablespoons Korean chili paste (Gochujang)
- 2 tablespoons honey
- 1 tablespoon sesame oil
- Sesame seeds for garnish
Instructions
- Marinate the chicken: In a large bowl, combine the soy sauce, rice vinegar, minced garlic, and grated ginger. Add the chicken thighs, ensuring each piece is coated. Cover and let marinate for at least 30 minutes.
- Prepare the breading station: In one dish, mix almond flour and cornstarch. In another, beat the egg. Set up an assembly line.
- Coat the chicken: Dip each piece into the beaten egg, letting excess drip off, then dredge in the almond flour mixture. Place on a wire rack.
- Bake the chicken: Preheat oven to 425°F (220°C). Line a baking sheet with parchment and arrange the chicken in a single layer. Bake for 25-30 minutes until golden brown and cooked through.
- Make the sauce: In a small saucepan, combine Gochujang, honey, and sesame oil over low heat, stirring until mixed. Adjust sweetness or heat as needed.
- Toss and serve: Place the baked chicken in a bowl, pour the sauce over, and toss until coated. Garnish with sesame seeds and serve.
Notes
For added flavor, pair with a side of cucumber salad or steamed broccoli.
- Prep Time: 30 minutes
- Cook Time: 30 minutes
- Category: Main Course
- Method: Baking
- Cuisine: Korean
Nutrition
- Serving Size: 1 serving
- Calories: 250
- Sugar: 8g
- Sodium: 800mg
- Fat: 10g
- Saturated Fat: 1g
- Unsaturated Fat: 4g
- Trans Fat: 0g
- Carbohydrates: 15g
- Fiber: 3g
- Protein: 25g
- Cholesterol: 70mg
Keywords: Korean Fried Chicken, Healthy Recipe, Comfort Food, Chicken Dish, Gluten-Free
High Protein Low Calorie Garlic Butter Steak & Creamy Mashed Potato Meal Prep
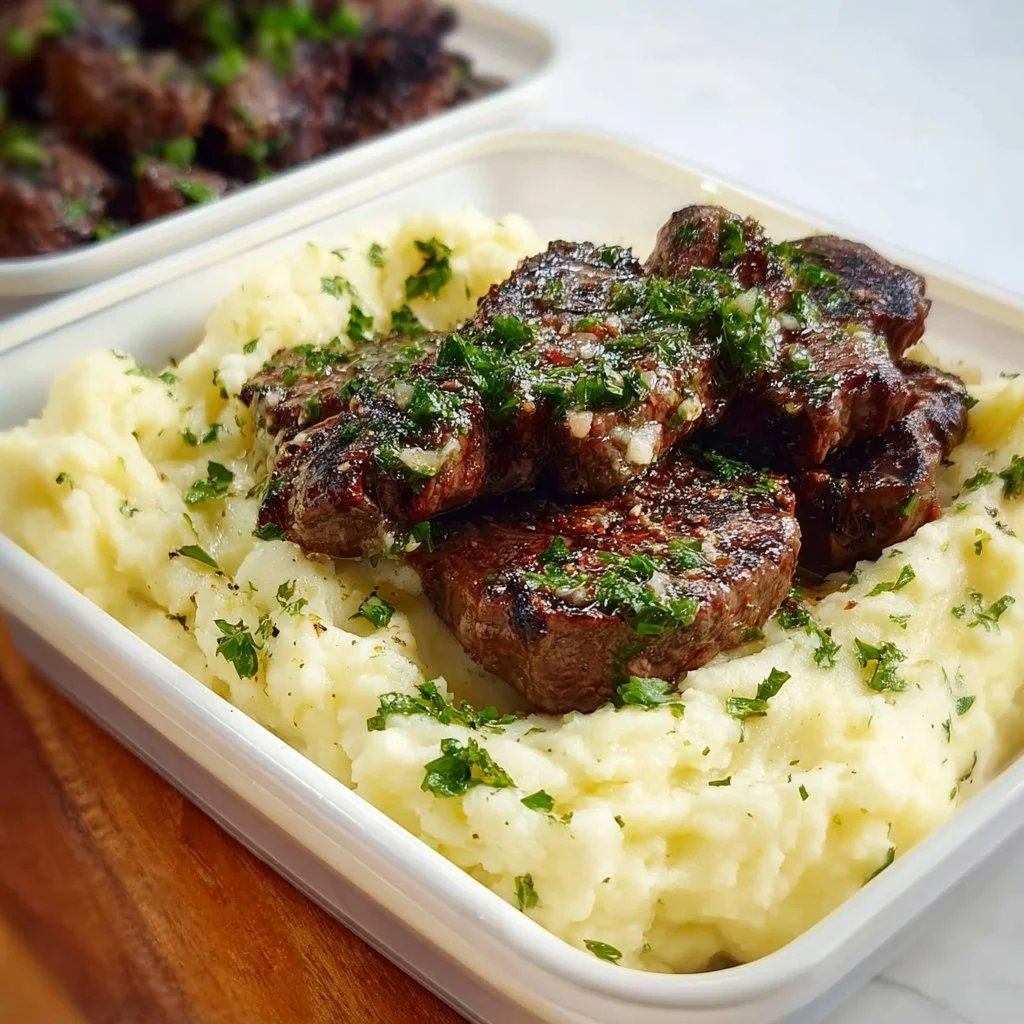
High Protein Low-Calorie Garlic Butter Steak & Creamy Mashed Potato Meal Prep
Welcome back, foodies! I’m so glad you’re here. I can just smell the savory aroma wafting through my kitchen as we dive into today’s delightful meal prep recipe: a high-protein, low-calorie garlic butter steak accompanied by a side of creamy mashed potatoes. Who says you can’t indulge while being mindful of your nutritional goals?
Cooking has always been my love language, and there’s something immensely satisfying about transforming simple ingredients into a meal that not only fuels our bodies but nourishes our souls. Whether you’re prepping for a busy week ahead or looking to impress friends at a dinner party, this dish is bursting with flavors that tell a story. Picture this: juicy, tender steak, bathed in rich garlic butter, with fluffy mashed potatoes so creamy they make you feel like you’re indulging in comfort food heaven!
But wait, we’re not just whipping up a meal; we’re creating an experience. I remember when I first tackled steak and mashed potatoes—my family gathered around the table, and the joy of feeding them was just as fulfilling as the flavors bursting in my mouth. This isn’t just about dinner; it’s about sharing moments, laughter, and love. And trust me, if I can master this dish, so can you!
So roll up those sleeves and grab your apron! We’re embarking on a culinary adventure that will leave your taste buds dancing and your friends begging for seconds. Let’s get started!
Personal Story
I’ll never forget the first time I made steak and mashed potatoes for my family. I was just a teenager, trying to impress my parents while they were out on a Saturday night. I knew I wanted to serve something that screamed “real meal,” so I decided on the classic combo. My dad was a steak lover, and my mom loved anything creamy.
I can picture myself in the kitchen, apron on, a curious mix of confidence and anxiety coursing through me. The sizzle of the steak on the hot skillet was music to my ears, and the smell of garlic wafting up filled my heart with joy. I still remember that moment—my parents came home and were greeted by a feast that filled the whole house with warmth. They were so impressed that they declared me the “Queen of Dinner,” a title I still cherish.
That night wasn’t just about the food; it was about the love shown through a home-cooked meal. It sparked my passion for cooking, and whenever I whip up this garlic butter steak and creamy mashed potatoes, it takes me back to that beautifully chaotic night in the kitchen. It reminds me that cooking is about connection, and that’s what I want to share with you today.
Ingredients
Here’s what you’ll need for our high-protein, low-calorie garlic butter steak and creamy mashed potatoes. Each ingredient contributes to this dish’s flavor profile and nutritional integrity.
For the Steak:
- Steak (Sirloin or Flank): Opt for lean cuts to keep the calories down while still packing in the protein. Sirloin is flavorful and tender, while flank can be marinated for extra zest.
- Garlic: Freshly minced garlic gives that punch of flavor. You can use garlic powder in a pinch but trust me—the fresh stuff is worth it!
- Butter: A tablespoon of unsalted butter adds richness. For a lower calorie option, you can substitute with olive oil.
- Salt & Pepper: Essential for enhancing all the flavors. Feel free to play with spices like paprika or cayenne for an extra kick.
- Fresh Herbs (optional): Rosemary or thyme can elevate the steak’s flavor profile. Use fresh herbs if you have them; dried will also work in a pinch!
For the Mashed Potatoes:
- Potatoes (Yukon Gold or Russet): Yukon Golds provide a creamy texture, while Russets are fluffy. Use whichever you prefer!
- Low-Calorie Cream Cheese: This gives the mashed potatoes that creamy texture without loading up on calories.
- Chicken or Vegetable Broth: Instead of cream, use broth to keep it light but flavorful. You can use homemade or store-bought.
- Salt & Pepper: Again, these basics are key for seasoning your dish right.
- Chives or Green Onions (for garnish): Sprinkle some on top for color and a mild onion flavor!
Substitution Tips:
If you’re looking for some swaps, here are a few ideas:
- For the steak, use chicken breast for a different high-protein approach.
- Swap out the potatoes for cauliflower if you’re looking for a low-carb option; it’ll give you a similar creamy consistency in your mash!
- Instead of butter, try using ghee for a rich flavor with lactose-free benefits.
Step-by-Step Instructions
Alright, let’s get this culinary adventure started with some clear, easy-to-follow steps!
Step 1: Prep the Steak
- Choose Your Cut: Select your steak (sirloin or flank) and allow it to come to room temperature for about 30 minutes.
- Season Generously: Sprinkle both sides of the steak with salt and pepper, along with minced garlic. The idea is to coat it evenly for balanced flavor. Don’t hold back; this is essential for a tasty steak!
Step 2: Make Garlic Butter
- Melt the Butter: In a small skillet over medium heat, melt the unsalted butter. Once it’s just melted, add a clove or two of minced garlic.
- Let it Sizzle: Stir it for about a minute until fragrant, but keep an eye on it; we don’t want it to brown. Once it’s ready, set aside.
Step 3: Cook the Steak
- Heat the Skillet: Use a cast-iron skillet if you have one—it’s perfect for searing! Add a drizzle of olive oil and get it hot.
- Sear the Steak: Once the oil is shimmering, add the steak. For a medium-rare steak, cook for about 4-5 minutes on each side. Remember, don’t move it around too much; we want that beautiful crust to form!
- Baste with Garlic Butter: In the last minute of cooking, spoon the garlic butter over the steak as it finishes cooking. This infuses it with rich flavor and keeps it moist.
Step 4: Prepare the Mashed Potatoes
- Boil the Potatoes: While the steak is cooking, peel and chop your potatoes into equally sized chunks. Toss them in a pot of salted water and bring to a boil. Cook until tender (about 15-20 minutes).
- Mash it Up: Drain the potatoes and return them to the pot. Add in the low-calorie cream cheese and broth, mashing until smooth and creamy. Season with salt and pepper to taste. If you want extra flavor, mix in some minced garlic from the steak for a garlic mashed potato twist!
Step 5: Assemble the Dish
- Slice, Plate, and Garnish: Once the steak is done, let it rest for a few minutes before slicing. This keeps the juices intact. Serve with a generous scoop of creamy mashed potatoes and sprinkle chives or green onions for that fresh finish.
Serving Suggestions
Now that everything is beautifully plated, here’s a lovely way to present your dish: Slice the steak against the grain for maximum tenderness, and serve it atop a generous mound of creamy mashed potatoes. Drizzle any remaining garlic butter from the skillet over the top for that lingering flavor. A sprig of fresh rosemary or thyme on the plate adds a lovely touch!
Recipe Variations
Here are a few fun twists you can try:
- Steak Marinade: Before cooking, marinate your steak in a mixture of soy sauce, honey, and crushed garlic for an Asian-inspired flavor.
- Herbed Mashed Potatoes: Stir in some fresh herbs like dill or parsley for a fresh spin on the classic mashed potatoes.
- Spicy Garlic Butter: Add crushed red pepper flakes to the garlic butter for a spicy kick that pairs beautifully with the steak.
- Cauliflower Mash: Swap those potatoes for steamed cauliflower and blend it with garlic and broth for a lower-carb version that’s just as satisfying.
Chef’s Notes
This recipe is one of those beautiful dishes that keeps evolving in my kitchen. I remember experimenting with different flavors and accompaniments; sometimes I’d toss in sautéed mushrooms or pan-fried asparagus alongside the steak to brighten things up. And let’s not forget the time I mistakenly used too much garlic—it turned into a delightful accident that my friends still talk about!
Cooking is all about experimenting and finding what works for you. So don’t hesitate to play with flavors and ingredients until you create your version of this dish!
FAQs and Troubleshooting
1. What’s the best way to ensure my steak is tender?
Always let your steak rest for 5-10 minutes after cooking. This allows the juices to redistribute, making for a more tender bite.
2. Can I make the mashed potatoes ahead of time?
Absolutely! You can prepare the mashed potatoes in advance. Just keep them in an airtight container in the fridge, and before serving, reheat gently in a pot, adding a splash of broth to restore creaminess.
3. How do I know when my steak is done?
Using a meat thermometer is the most reliable way! For medium-rare, you want an internal temperature of about 135°F (57°C).
4. My mashed potatoes are lumpy; what should I do?
If your potatoes are lumpy, be sure to mash them long enough. If they stubbornly remain lumpy, you can always use a potato ricer or a food mill for a super-smooth consistency.
Nutritional Info (Optional)
While I won’t dive too deep into numbers, this meal packs a protein punch with lean steak and creamy mashed potatoes, all while keeping it low-calorie with smart ingredient choices. Each serving is roughly 300-400 calories based on portion sizes, making it a satisfying yet wholesome option for meal prep!
And there you have it! An inviting high-protein low-calorie garlic butter steak and creamy mashed potato meal prep that will not only fill your belly but also warm your heart. Thank you for being part of this journey in my cozy kitchen! Remember, cooking is about joy, exploration, and sharing love. So go ahead, get your hands messy, and create some delicious memories! Happy cooking!
Print
High Protein Low-Calorie Garlic Butter Steak & Creamy Mashed Potatoes
- Total Time: 55 minutes
- Yield: 4 servings 1x
- Diet: Protein-rich, Low-calorie
Description
A delicious high-protein, low-calorie garlic butter steak served with creamy mashed potatoes, perfect for meal prep.
Ingredients
- Steak (Sirloin or Flank)
- 2 cloves of Garlic, minced
- 1 tbsp Unsalted Butter (or Olive Oil for lighter option)
- Salt & Pepper, to taste
- Fresh Herbs (optional, such as Rosemary or Thyme)
- Potatoes (Yukon Gold or Russet)
- 2 oz Low-Calorie Cream Cheese
- 1 cup Chicken or Vegetable Broth
- Chives or Green Onions, for garnish
Instructions
- Choose your cut: Select your steak and allow it to come to room temperature for about 30 minutes.
- Season generously: Sprinkle both sides of the steak with salt and pepper, along with minced garlic.
- Melt the butter: In a small skillet, melt the unsalted butter and add minced garlic.
- Stir it for about a minute until fragrant.
- Heat the skillet: Use a cast-iron skillet and add a drizzle of olive oil.
- Sear the steak: Cook for about 4-5 minutes on each side for medium-rare.
- Baste with garlic butter: Spoon the garlic butter over the steak in the last minute of cooking.
- Boil the potatoes: Peel and chop your potatoes, then cook until tender.
- Mash it up: Drain the potatoes and mash with cream cheese and broth until smooth.
- Slice the steak: Let it rest before slicing, then serve with mashed potatoes and garnish with chives.
Notes
You can substitute chicken breast for steak or use cauliflower for a low-carb version.
- Prep Time: 30 minutes
- Cook Time: 25 minutes
- Category: Main Course
- Method: Pan-searing and Boiling
- Cuisine: American
Nutrition
- Serving Size: 1 serving
- Calories: 350
- Sugar: 3g
- Sodium: 450mg
- Fat: 15g
- Saturated Fat: 5g
- Unsaturated Fat: 8g
- Trans Fat: 0g
- Carbohydrates: 40g
- Fiber: 4g
- Protein: 28g
- Cholesterol: 80mg
Keywords: steak, mashed potatoes, meal prep, high protein, low calorie


