
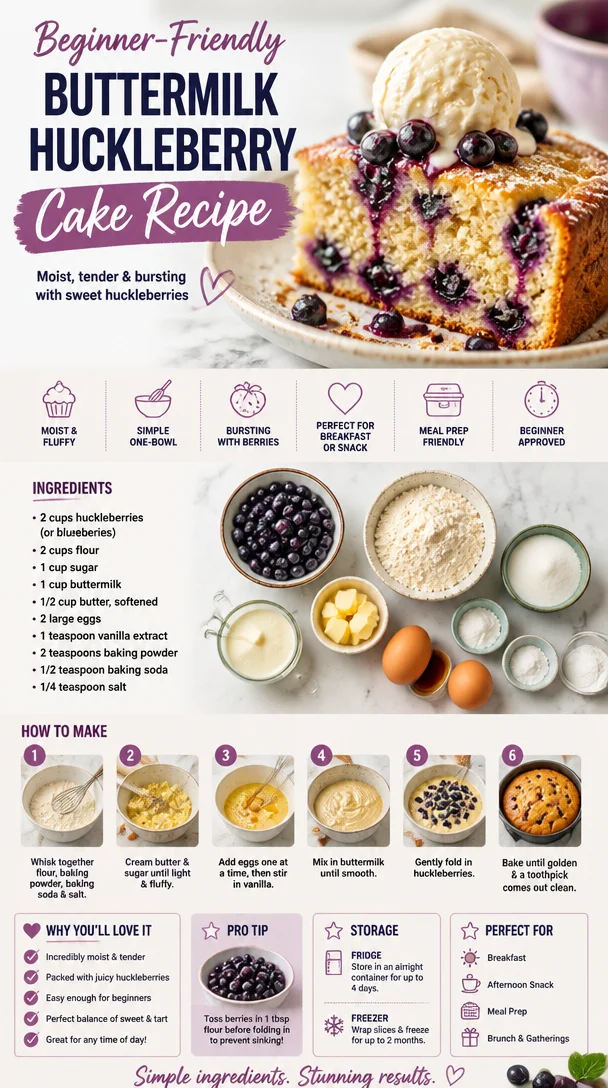
Beginner-Friendly Buttermilk Huckleberry Cake Recipe
Buttermilk Huckleberry Cake: A Slice of Happiness
Welcome to my kitchen! I’m so glad you’re here, and I can’t wait to share a delicious recipe that’s truly close to my heart: Buttermilk Huckleberry Cake. This cake is not just a dessert; it’s a celebration of summer, family gatherings, and sweet nostalgia. With its moist, tender crumb and the burst of juicy huckleberries, this cake makes for the perfect centerpiece at any occasion—from Sunday brunch to cozy family dinners.
Picture this: the sun is shining, and the air is warm with the sweet scent of wild berries. As a child, I spent countless afternoons in the woods behind my grandmother’s house, foraging for huckleberries. Those charming little blue-black gems were always a delight to find, hiding among the leaves, waiting to be picked. I remember my grandmother’s laugh as she whisked up her famous huckleberry pancakes in the mornings, reminding us of the timeless connection between food and memories.
One beautiful summer day, she decided to surprise us all with something special—a huckleberry cake! That day in her cozy kitchen, filled with the sounds of whisking and laughter, ignited my love for baking and the sheer joy of sharing food with those I love. Now, every time I whip up this Buttermilk Huckleberry Cake, I’m reminded of those precious moments spent with her, and I hope this recipe brings as much joy to your kitchen as it has to mine.
Let’s dive into the ingredients and get cooking!
Ingredients
-
2 cups all-purpose flour
Perfect for creating a light and tender cake. You can substitute with whole wheat flour for a nuttier flavor, but keep in mind that it might make the cake denser. -
1 cup granulated sugar
This adds the right amount of sweetness. For a lower-calorie option, consider using coconut sugar or a sugar substitute; just remember to adjust the quantity according to the substitution guidelines. -
1/2 teaspoon baking powder
A vital ingredient that helps your cake rise and prevents it from being too dense. -
1 teaspoon baking soda
This interacts with the acidity of buttermilk to create a wonderfully fluffy texture. -
1/2 teaspoon salt
Balances the sweetness and enhances the flavors of the cake. -
1 cup buttermilk
Adds moisture and a slight tang. If you don’t have buttermilk on hand, you can make your own by mixing one cup of milk with a tablespoon of vinegar or lemon juice and letting it sit for about 10 minutes. -
1/2 cup vegetable oil
Keeps the cake moist and tender. Melted butter can also be used for a richer flavor. -
2 large eggs
Essential for binding the ingredients together and adding a bit of richness. Flaxseed eggs (1 tablespoon flaxseed meal mixed with 2.5 tablespoons water) could be a great vegan substitute. -
1 ½ cups fresh huckleberries
Deliciously sweet and tart—they make this cake sing! If you can’t find huckleberries, blueberries work beautifully as well. -
1 teaspoon vanilla extract
Adds warmth and rounds out the flavors. Use pure vanilla extract for the best results.
Ready to embark on your baking adventure? Let’s mix up this delicious Buttermilk Huckleberry Cake together!
Step-by-Step Instructions
-
Preheat Your Oven
Start by preheating your oven to 350°F (175°C). This ensures that your cake will bake evenly and create that perfect golden crust. -
Prepare Your Cake Pan
Grease a 9×13-inch baking dish (or two 8-inch round pans, if you prefer layers) with butter or cooking spray. For an extra non-stick guarantee, you can also dust the pan with a bit of flour—this helps the cake slide right out. -
Combine Dry Ingredients
In a large mixing bowl, whisk together the flour, sugar, baking powder, baking soda, and salt. This is where we bring together all those dry ingredients, ensuring they’re well-mixed for even flavor and texture. -
Mix Wet Ingredients
In a separate bowl, whisk together the buttermilk, vegetable oil, eggs, and vanilla extract until thoroughly combined. You want these ingredients to blend smoothly—don’t be afraid to put some elbow grease into it! -
Combine Wet and Dry Ingredients
Pour the wet mixture into the dry ingredients, and stir gently until just combined. Be careful not to overmix; this will keep your cake light and fluffy. You might see some lumps, and that’s perfectly fine! -
Fold in the Huckleberries
Now for the star of the show! Gently fold in the huckleberries, taking care not to break them apart too much—they should remain intact to create those lovely bursts of fruit in every slice. -
Transfer to the Pan
Pour the batter into your prepared baking dish, spreading it evenly. If you want a little extra flair, you can save a handful of huckleberries to sprinkle on top before baking! -
Bake the Cake
Place the cake in your preheated oven and bake for about 30-35 minutes. You’ll know it’s done when a toothpick inserted in the center comes out clean or with just a few moist crumbs clinging to it. -
Cooling Time
Once baked, remove the cake from the oven and allow it to cool in the pan for about 10 minutes. Then, transfer it to a wire rack to cool completely. This step is crucial as it helps set the cake and prevents it from becoming soggy. -
Slice and Serve!
Once the cake has cooled, it’s time for the best part—enjoying a slice (or two) of your Buttermilk Huckleberry Cake. Feel free to serve it plain, dusted with powdered sugar, or topped with a dollop of whipped cream for an extra indulgence!
Serving Suggestions
To serve your Buttermilk Huckleberry Cake, slice it into generous squares and place them on colorful dessert plates. A light dusting of powdered sugar makes for an appealing presentation, or add fresh huckleberries and mint leaves for that extra pop of color. If you’re feeling fancy, serve it alongside a scoop of vanilla ice cream or a drizzle of cream cheese frosting—trust me, you can’t go wrong with that!
Recipe Variations
Looking to switch things up? Here are a few ideas:
-
Lemon Zest: Add a tablespoon of lemon zest to the batter for a refreshing citrus twist.
-
Spices: Incorporate cinnamon or nutmeg for a warm spice profile, perfect for those cozy autumn days.
-
Coconut Flakes: Stir in some sweetened coconut flakes for an exotic flair and added texture.
-
Nuts: Chopped walnuts or pecans could add a delightful crunch and a nutty flavor contrast.
-
Gluten-Free Option: Substitute in a 1:1 gluten-free flour blend to make it gluten-free without sacrificing flavor.
Chef’s Notes
Every time I make this cake, it takes me back to my grandmother’s kitchen. I often find myself reminiscing about those carefree summer afternoons spent berry-picking and the laughter shared over delicious food. The beauty of this recipe is in its simplicity; it’s a canvas for your creativity! Over the years, I’ve tried different flavors and variations. One fun memory is when I surprised my grandmother with a ‘Huckleberry Lemon Cheesecake’ for her birthday, inspired by this very cake. She took one bite and it was like I had transported her back to her own childhood. That’s the magic of cooking—it connects generations and creates a tapestry of memories.
FAQs and Troubleshooting
1. My cake turned out too dense; what did I do wrong?
This could be due to overmixing the batter or using too much flour. Be gentle when combining wet and dry ingredients and measure flour accurately (spoon it into your measuring cup and level it off!).
2. I can’t find huckleberries; how can I substitute?
You can use fresh or frozen blueberries, blackberries, or even raspberries. Just adjust the quantity if the substitute is more or less sweet.
3. Can I make this cake ahead of time?
Absolutely! This cake stores well. Just make sure to keep it wrapped in an airtight container at room temperature for up to 3 days (or refrigerate for longer freshness).
4. How can I make the cake gluten-free?
Simply substitute the all-purpose flour with a gluten-free 1:1 flour blend. Make sure to check that other ingredients (like baking powder) are gluten-free too.
Nutritional Info
While this cake is definitely a treat, here’s a quick glance at the estimated nutritional info per slice (based on 12 slices per cake):
- Calories: 220
- Protein: 3g
- Total Fat: 10g
- Saturated Fat: 1g
- Dietary Fiber: 1g
- Total Sugars: 12g
As always, adjust based on your serving size and ingredients used, and enjoy every delicious bite guilt-free!
There you have it: my beloved Buttermilk Huckleberry Cake recipe, filled with love, memories, and loads of flavor! I hope you find as much joy in baking it as I do. Happy baking, and may your kitchen always be filled with warmth and laughter!
Print
Buttermilk Huckleberry Cake
- Total Time: 50 minutes
- Yield: 12 servings 1x
- Diet: Vegetarian
Description
A delightful cake celebrating summer with juicy huckleberries and a tender crumb, perfect for family gatherings.
Ingredients
- 2 cups all-purpose flour
- 1 cup granulated sugar
- 1/2 teaspoon baking powder
- 1 teaspoon baking soda
- 1/2 teaspoon salt
- 1 cup buttermilk
- 1/2 cup vegetable oil
- 2 large eggs
- 1 ½ cups fresh huckleberries
- 1 teaspoon vanilla extract
Instructions
- Preheat your oven to 350°F (175°C).
- Grease a 9×13-inch baking dish with butter or cooking spray.
- Combine the flour, sugar, baking powder, baking soda, and salt in a large bowl.
- Mix the buttermilk, vegetable oil, eggs, and vanilla extract in another bowl until blended.
- Pour the wet mixture into the dry ingredients and stir gently until just combined.
- Fold in the huckleberries carefully.
- Transfer the batter to your prepared pan, spreading it evenly.
- Bake for about 30-35 minutes, until a toothpick comes out clean.
- Cool in the pan for 10 minutes, then transfer to a wire rack.
- Slice and serve with powdered sugar or whipped cream.
Notes
This cake can be made ahead of time and stored in an airtight container for up to 3 days. You can substitute various fruits if huckleberries are unavailable.
- Prep Time: 15 minutes
- Cook Time: 35 minutes
- Category: Dessert
- Method: Baking
- Cuisine: American
Nutrition
- Serving Size: 1 slice
- Calories: 220
- Sugar: 12g
- Sodium: 200mg
- Fat: 10g
- Saturated Fat: 1g
- Unsaturated Fat: 9g
- Trans Fat: 0g
- Carbohydrates: 32g
- Fiber: 1g
- Protein: 3g
- Cholesterol: 35mg
Keywords: cake, huckleberry, dessert, summer, baking, family
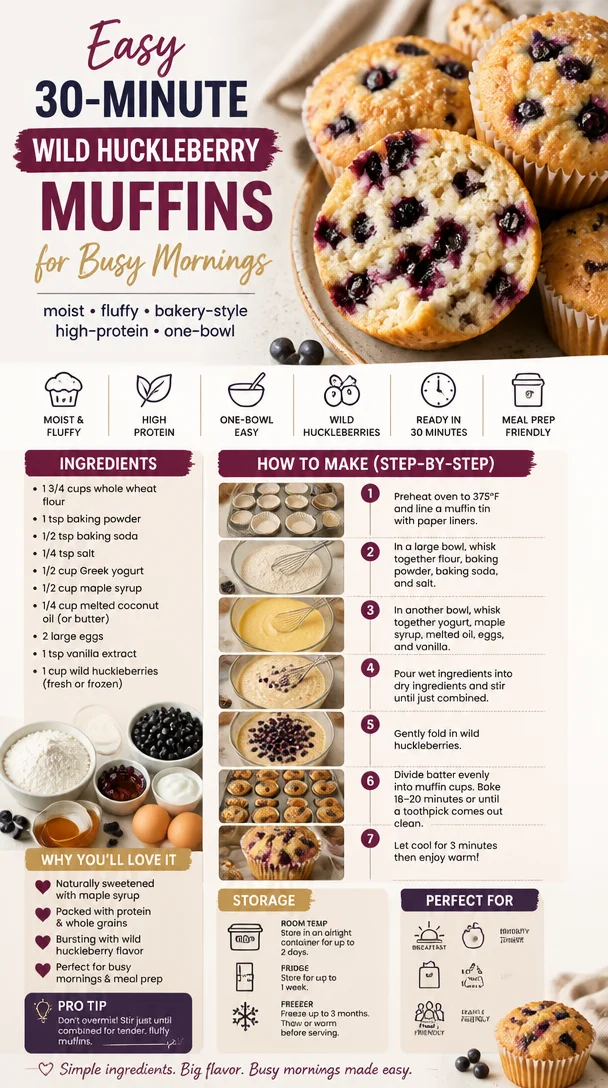
Easy 30-Minute Wild Huckleberry Muffins for Busy Mornings
Wild Huckleberry Muffins: Your New Favorite Morning Treat
Welcome to my cozy kitchen! Today, I’m thrilled to be sharing one of my all-time favorite recipes: Wild Huckleberry Muffins. There’s something absolutely magical about these little treats—they’re vibrant, bursting with flavor, and perfect for breakfast, brunch, or even as a delightful afternoon snack. If you’ve ever wandered through a lush forest, come across a huckleberry bush, and plucked those little gems for yourself, you’ll understand why these muffins hold such a special place in my heart.
I still remember the first time I tasted a huckleberry muffin. I was on a road trip through the Pacific Northwest, where huckleberries reign supreme. Stopping at a quaint café nestled by a sparkling lake, I ordered a warm huckleberry muffin, expecting something delicious but unremarkable. But, oh my goodness! The first bite was like a burst of summer sweetness mixed with a hint of tartness. The texture was perfectly fluffy, and the edges were just the right amount of crisp. I was instantly hooked and knew I needed to recreate that experience in my own kitchen.
Huckleberries, with their deep indigo color, not only add a pop of brightness to your breakfast plate but are also packed with antioxidants and vitamins. You can typically find them in the wild during late summer, but if you can’t get your hands on fresh ones, don’t worry! The beauty of this recipe is in its flexibility—frozen huckleberries (or even blueberries) can easily step in to create delicious results.
Gather your ingredients, and let’s get ready to bring a little bit of that forest magic into your home. You don’t need to be a fancy chef; just bring your love for cozy cooking and a sprinkle of creativity, and you’ll be on your way!
Personal Story
Growing up, weekends in my house were always a culinary adventure. My mom, an avid baker, had a knack for transforming our kitchen into a wonderland of flour and sugar. One of my favorite memories is waking up to that irresistible smell of something sweet in the oven while the sun peeked through our kitchen window. One particular summer, my parents took us berry picking at a local farm. We came home with buckets overflowing with wild huckleberries, and my mom immediately decided to capitalize on our bounty by baking a batch of muffins. We all crowded in the kitchen, each of us taking turns mixing, pouring, and, of course, taste-testing. Those muffins were fluffy and bursting with berry goodness, a family creation made with love.
The joy those huckleberry muffins brought to our home sparked my own passion for cooking and baking. Every bite transported me back to those lazy, sunlit mornings filled with laughter, family, and a whole lot of huckleberries. Every time I make these muffins, I’m reminded of those cherished moments. And I can’t wait for you to create your own memories with this recipe!
Ingredients
Here’s what you’ll need to whip up a batch of Wild Huckleberry Muffins:
-
2 cups all-purpose flour
- Your classic muffin staple! You can use whole wheat flour for a heartier texture or a gluten-free blend if you’re avoiding gluten.
-
1 cup granulated sugar
- This sweetener provides just the right amount of sweetness. You can substitute it with honey or maple syrup for a natural twist.
-
1 tablespoon baking powder
- Essential for that lovely rise! Make sure it’s fresh—expired baking powder won’t give your muffins the lift they need.
-
1/2 teaspoon baking soda
- This works in tandem with the baking powder for extra fluffiness. If you’re out, just increase the baking powder slightly.
-
1/2 teaspoon salt
- Salt enhances all the flavors. If you’re watching your sodium intake, you can cut back here without losing too much flavor.
-
1 large egg
- Eggs help bind everything together and create richness. For a vegan option, use a flaxseed egg (1 tablespoon ground flaxseed mixed with 3 tablespoons water).
-
1 cup buttermilk
- Gives the muffins a delightful tanginess and soft texture. No buttermilk? No problem! Just mix one tablespoon of vinegar or lemon juice into a cup of milk and let it sit for about 5 minutes.
-
1/2 cup unsalted butter, melted
- This adds a lovely richness to the muffins. If you’re looking for a dairy-free option, coconut oil or applesauce works nicely.
-
1 ½ cups fresh or frozen huckleberries
- Obviously, the star of the show! If you can’t find huckleberries, blueberries or raspberries are great substitutes. Just remember: frozen ones may need a few extra minutes to bake.
Step-by-Step Instructions
Alright, let’s dive into the fun part! Here’s how to bring your Wild Huckleberry Muffins to life:
-
Preheat your oven to 375°F (190°C): This step is super important. A properly preheated oven ensures your muffins rise beautifully and get that golden-brown crust.
-
Prepare your muffin tin: Grease a 12-cup muffin tin with a little butter or cooking spray. For extra ease, you can use paper liners—perfect for when you want to serve these muffins at a gathering!
-
Combine the dry ingredients: In a large mixing bowl, whisk together the flour, sugar, baking powder, baking soda, and salt. This helps evenly distribute the leavening agents and ensures a fluffy texture.
-
Mix the wet ingredients: In another bowl, beat the egg and then stir in the buttermilk and melted butter. Combine these until smooth, and prepare to mix this with the dry ingredients.
-
Combine the mixtures: Pour the wet ingredients into the dry ingredients. Gently mix with a spatula until just combined—don’t overmix, or you’ll end up with dense muffins. A few lumps are perfectly okay!
-
Fold in the huckleberries: Now comes the fun part! Gently fold in those beautiful huckleberries, making sure they’re evenly distributed but taking care not to squish them.
-
Scoop the batter into the tin: Using a cookie scoop or spoon, fill each muffin cup about ¾ full. This way, you’ll have a nice dome top without overflowing.
-
Bake: Pop those beauties into your preheated oven and bake for 18–20 minutes, or until the tops are golden brown and a toothpick inserted into the center comes out clean.
-
Cool: Let the muffins cool in the tin for about 5 minutes before transferring them to a wire rack. This step allows them to firm up a little and makes them easier to remove!
-
Enjoy: Serve them warm with a dab of butter or a drizzle of honey. Trust me, they taste even better fresh out of the oven!
Serving Suggestions
These Wild Huckleberry Muffins are perfect for brunch gatherings, cozy breakfasts, or even a sweet afternoon pick-me-up. To elevate your serving game, plate them on a vibrant platter, garnish with fresh huckleberries or berries of your choice, and sprinkle a little powdered sugar on top for a touch of elegance. They’re great served alongside a steaming cup of coffee or tea!
Recipe Variations
-
Lemon Huckleberry Muffins: Add the zest of one lemon to the batter for a refreshing citrus twist.
-
Huckleberry Walnut Muffins: Toss in some chopped walnuts or pecans for a delightful crunch and extra flavor.
-
Huckleberry Oat Muffins: Substitute ½ cup of flour with oats for a heartier muffin, perfect for breakfast on the go!
-
Chocolate Chip Huckleberry Muffins: Mix in a handful of semi-sweet chocolate chips for that sweet and tart combination that’s impossible to resist.
-
Veggie-Loaded Huckleberry Muffins: Try adding grated zucchini or carrots to the batter for a twist that also boosts nutrition!
Chef’s Notes
This recipe has been a beloved staple in my home for years now. I first started making these muffins after my huckleberry-picking adventure, and each batch has its own story—sometimes I add a pinch of nutmeg for warmth or some cinnamon when I’m feeling cozy. One time, I accidentally sprinkled in some cayenne pepper thinking it was cinnamon—it was a spicy surprise that turned out to be a favorite among my friends!
These muffins have evolved to adapt to seasons as well; I love swapping in whatever is fresh and available. The best part is seeing the smiles on the faces of those I share them with. So if you’re making these, don’t forget to share the love!
FAQs and Troubleshooting
Q: My muffins came out dense. What did I do wrong?
A: Dense muffins often happen from overmixing the batter. Mix just until combined! Also, ensure your baking powder is fresh.
Q: Can I use frozen huckleberries?
A: Absolutely! Just fold them in gently while they’re still frozen, and they may take a couple of extra minutes to bake through.
Q: Can I make these muffins ahead of time?
A: Yes! They store well in an airtight container for 3 days at room temperature or can be frozen for up to 3 months. Just pop them in the microwave for a few seconds to revive their fluffy texture!
Q: How can I make these muffins gluten-free?
A: Substitute the all-purpose flour with a gluten-free blend that measures 1:1. It works like a charm!
Nutritional Info (if applicable)
While I love indulging in these muffins, it’s good to be mindful of nutrition, especially if you’re serving guests or trying to balance your meals. Each muffin (based on the recipe provided) weighs in roughly around 200 calories, including healthy fats from butter and protein from the egg. Of course, this can vary depending on your choice of substitutions!
With your ingredients ready and instructions at hand, it’s time to create some kitchen magic. I can’t wait for you to experience the joy of Wild Huckleberry Muffins as I have—happy baking!
Print
Wild Huckleberry Muffins
- Total Time: 35 minutes
- Yield: 12 servings 1x
- Diet: Vegetarian
Description
Delicious Wild Huckleberry Muffins bursting with flavor, perfect for breakfast or snacks.
Ingredients
- 2 cups all-purpose flour
- 1 cup granulated sugar
- 1 tablespoon baking powder
- 1/2 teaspoon baking soda
- 1/2 teaspoon salt
- 1 large egg
- 1 cup buttermilk
- 1/2 cup unsalted butter, melted
- 1 ½ cups fresh or frozen huckleberries
Instructions
- Preheat your oven to 375°F (190°C).
- Prepare your muffin tin: Grease a 12-cup muffin tin or use paper liners.
- Combine the dry ingredients: In a mixing bowl, whisk together the flour, sugar, baking powder, baking soda, and salt.
- Mix the wet ingredients: In another bowl, beat the egg and stir in the buttermilk and melted butter until smooth.
- Combine the mixtures: Pour wet ingredients into dry ingredients and mix gently until just combined.
- Fold in the huckleberries without squishing them.
- Scoop the batter into the tin, filling each cup about ¾ full.
- Bake for 18–20 minutes, or until a toothpick comes out clean.
- Cool in the tin for 5 minutes, then transfer to a wire rack.
- Enjoy warm with butter or honey!
Notes
These muffins can be made with frozen berries. Storage: Airtight for 3 days at room temperature or frozen for 3 months.
- Prep Time: 15 minutes
- Cook Time: 20 minutes
- Category: Breakfast
- Method: Baking
- Cuisine: American
Nutrition
- Serving Size: 1 muffin
- Calories: 200
- Sugar: 12g
- Sodium: 200mg
- Fat: 8g
- Saturated Fat: 4g
- Unsaturated Fat: 4g
- Trans Fat: 0g
- Carbohydrates: 30g
- Fiber: 2g
- Protein: 3g
- Cholesterol: 30mg
Keywords: muffins, breakfast, huckleberry, baking, easy recipes
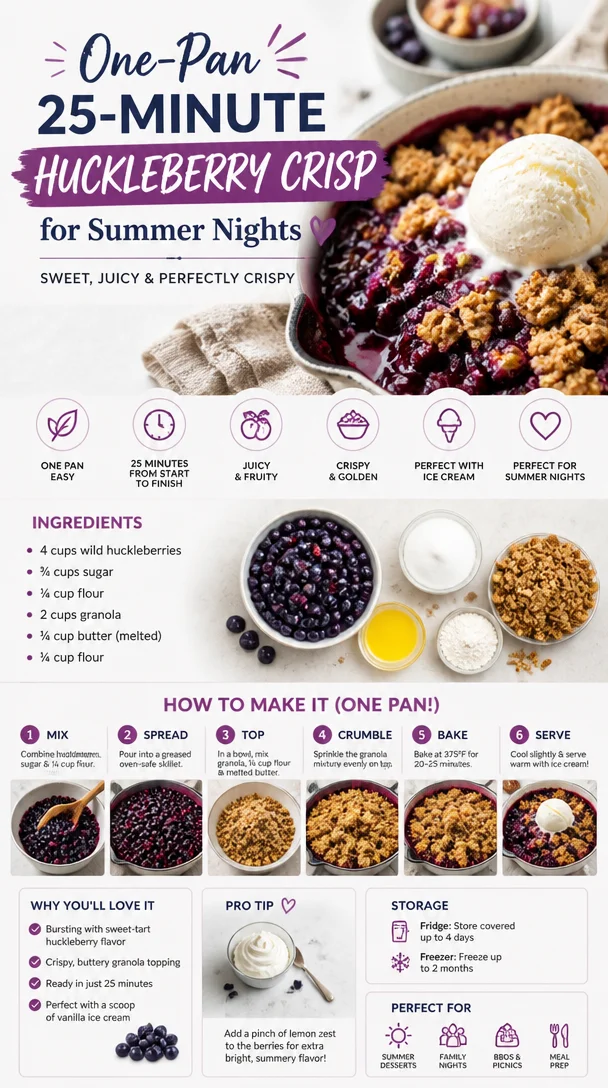
One-Pan 25-Minute Huckleberry Crisp for Summer Nights
Huckleberry Crisp Recipe: A Sweet Slice of Nature
Welcome to my kitchen, fellow food lovers! Today, we’re diving into a delightful dessert that sings with the flavors of summer and whispers nostalgic tales of foraging adventures — Huckleberry Crisp. If you’ve never tasted the juicy burst of huckleberries nestled under a crunchy topping, you are in for a real treat! This dish is more than just a dessert; it’s a warm embrace, a sweet reminder of lazy afternoons spent outdoors, and a delicious bridge connecting nature’s bounty to your kitchen table.
Imagine biting into a steaming bowl of huckleberry crisp, the tart berries mingling with a caramelized, buttery topping, served with a scoop of vanilla ice cream melting slowly on top. Are you getting cozy just thinking about it? I am! The best part? This crisp requires minimal effort and uses simple, seasonal ingredients with the kind of heartwarming magic that is sure to impress your family and friends. So, grab your apron, turn up your favorite tunes, and let’s whip up some Huckleberry Crisp together!
A Berry Memorable Moment
Growing up, there was a special summer tradition in my family: we would venture into the nearby woods, armed with buckets and excitement, searching for huckleberries. There was always something so magical about those little blue-purple gems hidden beneath the bushes. My siblings and I would race to find the biggest bunches, and there were moments when it felt like we were rich treasure hunters — each berry unique, each bite brimming with the essence of summer.
Once we gathered our haul, we would return home, our cheeks streaked with berry stains, and my mom would turn those precious fruits into jars of jam or, if we were lucky, a bubbling huckleberry crisp. The crispy topping, with its crunchy oats and the sweet aroma wafting through the air, was an irresistible invitation for everyone to come to the kitchen. Standing around the table, spooning out portions and fighting over the last bits of topping was a joyful ritual, filled with laughter and happily shared stories about the day’s berry hunt. This huckleberry crisp, a simple but classic dessert, is more than just a recipe; it’s a piece of my childhood I love to recreate and share with you today.
Ingredients
Here’s what you’ll need for your Huckleberry Crisp:
-
Huckleberries (4 cups)
The star of the show! Fresh huckleberries are best, but if you can’t find them, you can substitute with blueberries or blackberries for a different twist. -
Granulated Sugar (1 cup)
This adds sweetness to our crisp. You can adjust the amount based on your tartness preference or swap for coconut sugar for a deeper flavor. -
All-Purpose Flour (1/2 cup)
Helps to bind the filling together. If you want to go gluten-free, almond flour or oat flour can work beautifully. -
Lemon Juice (2 tbsp)
A splash of acidity to brighten the flavors. Feel free to use lime juice if you’re looking for a different zing! -
Rolled Oats (1 cup)
Adds texture and a delightful chewiness to the topping. Quick oats will work, but avoid instant oats as they’ll turn mushy. -
Brown Sugar (1/2 cup)
This contributes a rich caramel flavor. If you’re aiming for a lower-calorie option, try using a sugar alternative like monk fruit sweetener. -
Butter (1/2 cup, cold and diced)
For that irresistible crisp topping! Vegan butter or coconut oil can be convenient substitutes if you’re going dairy-free. -
Cinnamon (1 tsp)
A warm spice that enhances the berry flavors. Feel free to experiment with nutmeg or cardamom for an adventurous twist!
Step-by-Step Instructions
1. Preheat Your Oven
Preheat your oven to 350°F (175°C) so it’s ready to embrace that crisp as soon as it’s assembled. In the meantime, we have a delicious creation to whip up!
2. Prepare the Huckleberries
In a large mixing bowl, toss the huckleberries with granulated sugar, lemon juice, and flour. The flour will help absorb some of the liquid released during baking, thickening up the filling beautifully. If you’re using frozen huckleberries, there’s no need to thaw them beforehand — just add a bit more flour!
3. Assemble the Berry Filling
Once well combined, pour the berry mixture into a greased 9-inch baking dish, spreading it evenly. I love using glass dishes for baking; they help in browning the edges and give you that perfect presentation!
4. Make the Crisp Topping
In another bowl, combine the rolled oats, brown sugar, flour, cinnamon, and diced cold butter. Using a pastry cutter (or your fingers, which is what I prefer for a rustic feel!), blend the mixture until it resembles coarse crumbs. Little butter peeking through is what we’re after for that crunchy topping!
5. Top It Off
Sprinkle the oat topping generously over the huckleberry mixture. Don’t be shy; embrace that lovely layer of crunchy goodness!
6. Bake It Up
Slide your creations into the preheated oven and bake for about 30-35 minutes, or until the topping is golden brown and the berries are bubbling joyfully through the sides. It’s such a treat to see the magic happen!
7. Cool and Serve
Allow the crisp to cool for at least 10 minutes before serving. This allows the juices to thicken slightly, making it easier to scoop. If you want to get truly decadent, serve it warm with a scoop of vanilla ice cream or a dollop of whipped cream!
Serving Suggestions
Plating your Huckleberry Crisp can be just as fun as making it! Serve warm in rustic bowls with a scoop of ice cream melting on top, and sprinkle some fresh mint or huckleberries for a pop of color. You could also drizzle a bit of honey or a sprinkle of powdered sugar to elevate the visual appeal — and the flavor!
Recipe Variations
- Crisp Fruit Mix: Combine huckleberries with raspberries or strawberries for a vibrant fruit mix that’s equally delicious!
- Nutty Twist: Add chopped nuts such as pecans or walnuts to the topping for an extra crunchy bite.
- Coconut Crisp: Substitute some of the oats for unsweetened shredded coconut for a tropical twist.
- Spiced Up: Add a pinch of ginger or cardamom to the berry filling for a warm, aromatic flavor.
- Vegan Delight: Use a vegan butter substitute and replace sugar with coconut sugar for a plant-based option.
Chef’s Notes
Huckleberry Crisp has been a staple in my household for as long as I can remember. Each time I make it, nostalgia washes over me; it brings back those summer days spent hunting for berries and the sweet memories made around our family table. Over the years, I’ve tweaked the recipe slightly, adding a little more lemon juice for brightness or testing different types of oats. And yes, there’s been plenty of accidental spills and some overly adventurous attempts at adding too much cinnamon! But those mishaps make the experience more personal and memorable, a lesson in the beautiful, messy art of cooking.
FAQs and Troubleshooting
1. What can I use if I can’t find huckleberries?
If huckleberries are elusive, blueberries, blackberries, or even raspberries can work as tasty substitutes. Adjust the sugar based on the sweetness of your chosen fruit.
2. My topping is too crumbly. What did I do wrong?
If your topping crumbles too much, it might need a bit more moisture in the form of melted butter or oil. You want it to hold together but still be crumbly!
3. How do I store leftovers?
Cover and store any leftovers in the refrigerator for up to three days. Reheating in the oven or microwave is recommended for that fresh-out-of-the-oven taste!
4. Can I freeze the huckleberry crisp?
Absolutely! Be sure to cool it completely before wrapping it tightly in plastic wrap and storing it in an airtight container. It can stay in the freezer for up to three months!
Nutritional Info
(Servings: 8 | Calories per serving: 240)
- Total Fat: 10g
- Carbohydrates: 36g
- Protein: 2g
- Fiber: 4g
And that’s it! A wholesome, heartwarming Huckleberry Crisp that’s easy to whip up and perfect for cozy gatherings or quiet evenings at home. I hope this recipe brings joy to your kitchen as it has to mine. Happy baking, my foodie friends!
Print
Huckleberry Crisp
- Total Time: 50 minutes
- Yield: 8 servings
- Diet: Vegetarian
Description
A delicious dessert featuring juicy huckleberries under a crunchy topping, perfect for summer gatherings.
Ingredients
- Huckleberries (4 cups)
- Granulated Sugar (1 cup)
- All-Purpose Flour (1/2 cup)
- Lemon Juice (2 tbsp)
- Rolled Oats (1 cup)
- Brown Sugar (1/2 cup)
- Butter (1/2 cup, cold and diced)
- Cinnamon (1 tsp)
Instructions
- Preheat your oven to 350°F (175°C).
- Toss the huckleberries with granulated sugar, lemon juice, and flour in a large bowl.
- Pour the berry mixture into a greased 9-inch baking dish.
- Combine rolled oats, brown sugar, flour, cinnamon, and diced cold butter in another bowl.
- Blend the mixture until it resembles coarse crumbs.
- Sprinkle the oat topping over the huckleberry mixture.
- Bake for 30-35 minutes, until golden brown and bubbling.
- Cool for at least 10 minutes before serving.
Notes
Serve warm with a scoop of vanilla ice cream or a dollop of whipped cream for a delicious treat.
- Prep Time: 15 minutes
- Cook Time: 35 minutes
- Category: Dessert
- Method: Baking
- Cuisine: American
Nutrition
- Serving Size: 1 serving
- Calories: 240
- Sugar: 16g
- Sodium: 200mg
- Fat: 10g
- Saturated Fat: 6g
- Unsaturated Fat: 4g
- Trans Fat: 0g
- Carbohydrates: 36g
- Fiber: 4g
- Protein: 2g
- Cholesterol: 30mg
Keywords: huckleberry crisp, dessert, summer dessert, baking, berry crisp
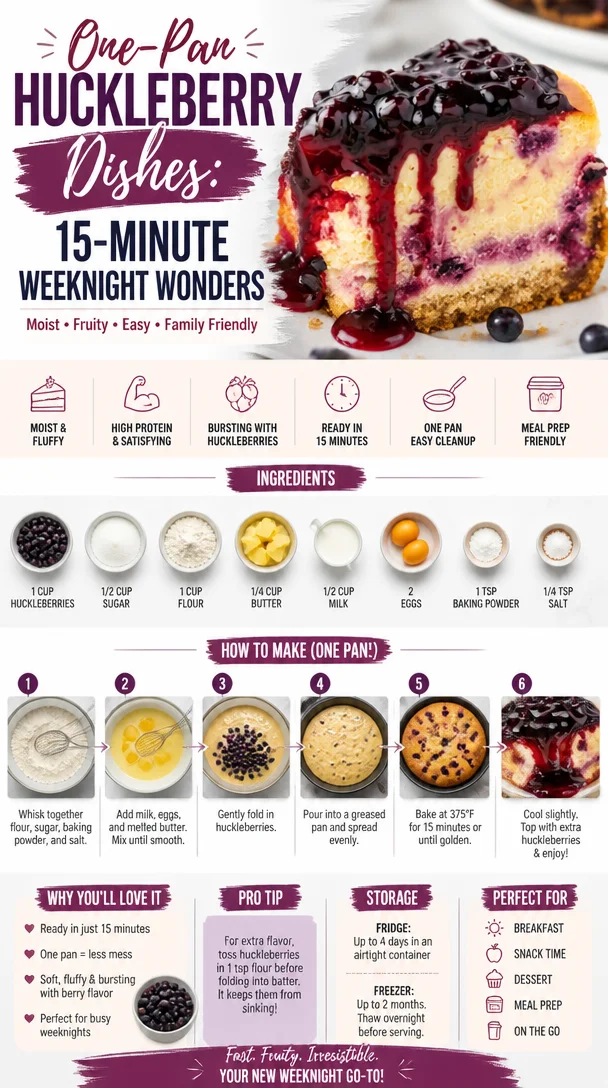
One-Pan Huckleberry Dishes: 15-Minute Weeknight Wonders
Huckleberry Heaven: A Culinary Journey with a Twist of Nostalgia
Welcome to my kitchen! Today, we’re diving into the delicious world of huckleberries—a tiny fruit that packs a punch in flavor and nostalgia. Whether you’ve foraged them in the wild or stumbled upon them at your local farmers’ market, huckleberries bring a unique sweetness and a burst of color that can elevate any dish. They remind me of my childhood summers spent in the mountains, where the skies were as blue as the juicy berries we would pick. So grab your apron, and let’s embark on this flavorful adventure together!
Huckleberries, depending on the variety, can range in color from vibrant purple to deep blue, and their flavor is often compared to that of blueberries but with a little extra sass—a tartness that dances on your palate. Their adaptability means they can be used in everything from sweet desserts to savory sauces, which is exactly why I can’t get enough of them!
In this post, I’ll guide you through one of my absolute favorite huckleberry recipes: Huckleberry Crumble. This dish is not only cozy and comforting but also incredibly simple to make. It brings back memories of cozy family gatherings where laughter and the smell of baked goods filled the air. Trust me, once you try this, you’ll find any excuse to whip it up—be it a weekend brunch with friends or an indulgent weekday dessert.
A Bit of Personal Flavor
I’ll never forget the first time I picked huckleberries. My family and I went on an adventure to the nearby mountains, armed with baskets and a sense of wonder. The thrill of spotting these plump little berries amongst the leaves was exhilarating! We all raced each other, laughing and singing as the sun danced through the trees. When we finally returned home, we turned our loot into pie, a recipe passed down from my grandmother. As we shared slices around the dinner table, the sweet-tart flavor and crumbly topping created a symphony of happiness that still warms my heart.
That love of huckleberries has evolved into many recipes over the years, and today, I am excited to show you how to capture that nostalgic flavor in this Huckleberry Crumble recipe!
Ingredients
To make our delightful Huckleberry Crumble, you’ll need the following ingredients:
-
Fresh or Frozen Huckleberries (4 cups)
Ah, the star of our show! Fresh huckleberries are ideal, but if they’re not in season (or if you just can’t find them), frozen huckleberries work perfectly as a substitution. Just ensure they’re thawed and drained before using! -
Granulated Sugar (½ cup)
This will enhance the sweetness of the huckleberries. If you prefer a lower-calorie option, feel free to use coconut sugar or a sugar substitute like Stevia, adjusting the quantity according to taste. -
Lemon Juice (2 tablespoons)
A splash of acidity will brighten up the flavors and balance the sweetness. If you’re out of lemons, lime juice is a fabulous alternative! -
All-Purpose Flour (1 cup)
This forms the base of our crumble. For a gluten-free option, substitute with almond flour or a 1:1 gluten-free baking mix. -
Old-Fashioned Rolled Oats (1 cup)
These give our crumble its wonderful texture and heartiness. If you need a gluten-free option, simply grab certified gluten-free oats. -
Brown Sugar (½ cup)
This adds depth and a touch of caramel flavor. You can also use maple syrup or agave syrup for a different sweetness that complements the berries beautifully. -
Unsalted Butter (½ cup, melted)
Butter binds everything together and gives a rich flavor to the crumble. You can substitute with coconut oil for a dairy-free variant. -
Ground Cinnamon (1 teaspoon)
A warm spice that pairs beautifully with the sweet and tart huckleberries. For a twist, try nutmeg instead!
These ingredients come together in a glorious harmony that creates a magnificent dish. Now that we’ve gathered our ingredients, let’s get cooking!
Step-by-Step Instructions
-
Preheat the Oven
Preheat your oven to 350°F (175°C). This step is crucial for achieving that perfectly crispy crumble topping. -
Prepare the Huckleberries
In a mixing bowl, combine the huckleberries with granulated sugar and lemon juice. Toss gently to coat. Allow them to sit for about 10 minutes, which allows the juices to flow out and create a natural syrup. This will add to the overall flavor and richness of the crumble. -
Mix the Crumble Topping
In another bowl, mix together the flour, rolled oats, brown sugar, and cinnamon. This is where the magic happens! As you combine the dry ingredients, you’ll want to use your fingers or a fork to break up any clumps. -
Add Butter
Pour the melted butter into the dry ingredients. Mix well until the mixture is crumbly and resembles wet sand. This step is essential; the butter ensures that each bite has that luscious crumble! -
Layer the Dish
Grease a 9×9-inch baking dish with a bit of cooking spray or butter. Pour the huckleberry mixture into the bottom of the dish, distributing it evenly. Then, sprinkle the crumble topping generously over the huckleberries. Don’t worry about making it perfect; a rustic look is what we’re aiming for here! -
Bake to Perfection
Place the baking dish in the oven and bake for 35–40 minutes, or until the top is golden brown and the huckleberries are bubbling up from the edges. My favorite part is when that heavenly aroma fills the kitchen! -
Cool Down
Once baked, remove the crumble from the oven and allow it to cool for at least 15 minutes. This cooling time is crucial; it helps to set the huckleberries and makes serving easier!
Serving Suggestions
You can serve your Huckleberry Crumble warm, right from the oven, or after it’s cooled a bit. A scoop of vanilla ice cream or a dollop of freshly whipped cream on top elevates this dish to another level of deliciousness! For extra flair, sprinkle a bit of cinnamon or fresh mint on top for presentation. Trust me; your guests will rave about this dish!
Recipe Variations
Want to add a twist to your huckleberry experience? Here are some fun ideas:
- Mixed Berry Crumble: Combine huckleberries with other berries like raspberries or blackberries for a vibrant medley of flavors.
- Nutty Crumble: Add ½ cup of chopped pecans or almonds into your crumble topping for a lovely crunch.
- Citrusy Zing: Infuse some orange zest into the huckleberry mixture for an extra layer of flavor.
- Vegan Delight: Swap out the butter for coconut oil and use flaxseed meal mixed with water as an egg substitute to make this crumble completely plant-based.
- Spiced Crumble: Mix in a pinch of ginger or cardamom into the topping for a warm, spiced aroma that blends beautifully with the huckleberries.
Chef’s Notes
Every time I bake this Huckleberry Crumble, I’m reminded of those special summer days spent in nature with family, picking berries until our fingers turned purple. Cooking really is a way to connect with our past and share our love with others. Over the years, I’ve adjusted this recipe to keep it fresh, experimenting with different spices and fruits depending on what I have on hand. I hope you feel the freedom to make this dish your own and add your personal touch!
FAQ and Troubleshooting
-
What if my huckleberries are too tart?
If you find the huckleberries too tart for your taste, don’t hesitate to add a bit more sugar to the filling. Taste as you go! -
My crumble topping isn’t browning. What do I do?
If you notice the topping isn’t browning after the recommended baking time, you can broil it for a couple of minutes. Keep a close eye on it, as it can burn quickly! -
Can I prepare this ahead of time?
Absolutely! You can prepare the huckleberry filling and crumble topping separately, refrigerate them, and then assemble and bake them when you’re ready to serve. -
Why does my crumble feel soggy?
The layer of huckleberries can release a lot of juices during baking. Ensure you let it cool adequately before serving. This will help the juices to thicken slightly!
Nutritional Info
While I believe balance is key, here’s a rough estimate per serving (for a 9×9 dish serving 8):
- Calories: 240
- Total Fat: 10g
- Carbohydrates: 34g
- Fiber: 3g
- Protein: 4g
There you have it! Your ultimate guide to creating a memorable Huckleberry Crumble that’s sure to become a staple in your kitchen. I hope you reminisce on sweet moments as you share this dish with family and friends. Let’s get cooking — can’t wait to hear about your creations! Happy cooking!
Print
Huckleberry Crumble
- Total Time: 55 minutes
- Yield: 8 servings
- Diet: Vegetarian
Description
A cozy and comforting dessert featuring sweet-tart huckleberries topped with a crumbly mixture.
Ingredients
- Fresh or Frozen Huckleberries (4 cups)
- Granulated Sugar (½ cup)
- Lemon Juice (2 tablespoons)
- All-Purpose Flour (1 cup)
- Old-Fashioned Rolled Oats (1 cup)
- Brown Sugar (½ cup)
- Unsalted Butter (½ cup, melted)
- Ground Cinnamon (1 teaspoon)
Instructions
- Preheat your oven to 350°F (175°C).
- Combine the huckleberries with granulated sugar and lemon juice in a mixing bowl. Toss gently to coat.
- Allow the mixture to sit for about 10 minutes to let the juices flow out.
- Mix together the flour, rolled oats, brown sugar, and cinnamon in another bowl.
- Pour the melted butter into the dry ingredients and mix until crumbly.
- Grease a 9×9-inch baking dish and pour the huckleberry mixture in.
- Sprinkle the crumble topping over the huckleberries.
- Bake in the oven for 35–40 minutes, until golden brown.
- Cool for at least 15 minutes before serving.
Notes
Serve warm with vanilla ice cream or whipped cream for an elevated experience.
- Prep Time: 15 minutes
- Cook Time: 40 minutes
- Category: Dessert
- Method: Baking
- Cuisine: American
Nutrition
- Serving Size: 1 serving
- Calories: 240
- Sugar: 12g
- Sodium: 150mg
- Fat: 10g
- Saturated Fat: 6g
- Unsaturated Fat: 4g
- Trans Fat: 0g
- Carbohydrates: 34g
- Fiber: 3g
- Protein: 4g
- Cholesterol: 30mg
Keywords: huckleberry crumble, dessert recipe, summer berries, baking
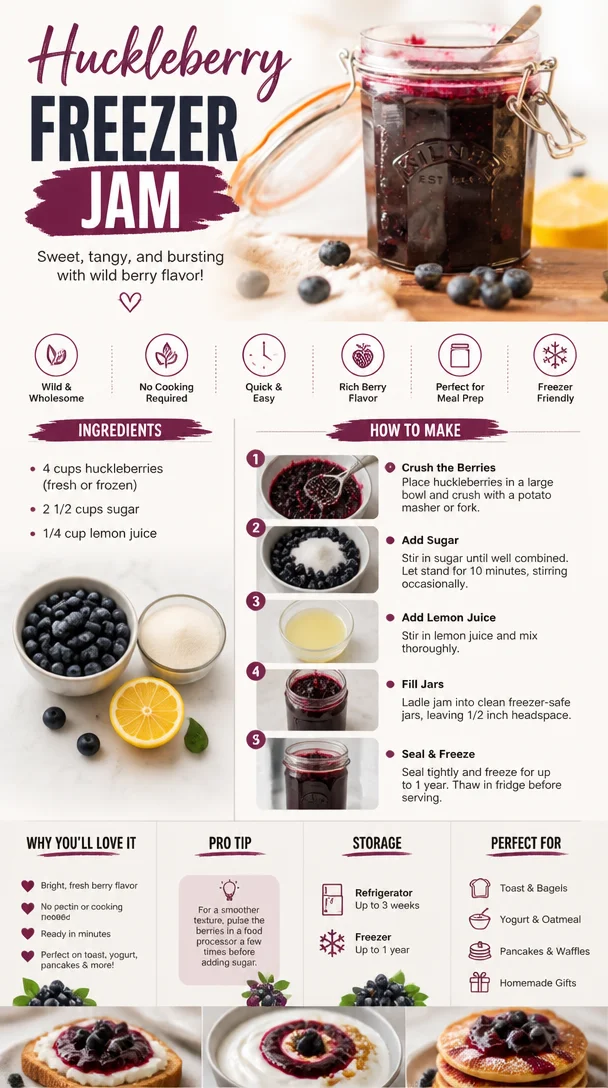
Huckleberry Freezer Jam
The Sweet Embrace of Huckleberry Freezer Jam
Welcome back to my cozy corner of the kitchen, dear friends! Today, we’re diving into a delightful, sweet adventure that perfectly captures the spirit of summertime — Huckleberry Freezer Jam. If you’ve ever indulged in the delightfully tart sweetness of huckleberries, you know just how magical they can be. This recipe is not just about preserving summer’s bounty; it’s about capturing memories, flavors, and the joy of sharing something homemade with the people you love.
So, why freezer jam, you ask? Freezer jam is a fantastic way to preserve fruit without all the fuss of canning. It’s fruity, fresh, and boasts vibrant colors that remind you of sunny days spent in the great outdoors, surrounded by nature’s wonders. Plus, it’s incredibly easy to make, and requires no special equipment beyond some good-quality freezer containers. Whether you enjoy it slathered on a warm piece of toast in the morning, drizzled over vanilla ice cream, or swirled into yogurt, this jam is sure to impress!
As we go through this sweet journey together, I’ll sprinkle in some stories and tips that will not only boost your confidence in the kitchen but will also make the process feel special and personal. So slip on that apron (don’t worry; we all know it’ll get messy) and let’s get started on creating a jar of summer sunshine that you can savor all year long!
A Dip into Nostalgia
I’ve always had a soft spot for huckleberries. Growing up in the Pacific Northwest, my family would often take weekend trips to the mountains, where the air was crisp and the trails lined with sweet, plump huckleberries just waiting to be picked. There’s something incredibly special about foraging for your own ingredients, and I vividly remember those days spent hand-picking the juicy gems with my family. We’d leave with our buckets overflowing, our fingers stained a lovely deep purple, and our hearts full.
One summer, I decided I wanted to turn our berry haul into something special, rather than just tossing them into pancakes or my mouth (let’s be real; I did plenty of that too!). That’s when I first attempted making huckleberry jam. With my mom’s guidance, I discovered a world beyond store-bought options. The vibrant color, the explosion of flavor — it was pure magic! Our little kitchen turned into a whirlwind of laughter and sticky fingers as I tried to measure ingredients, giggling the whole time as I accidentally dropped some berries on the floor.
That batch of jam holds a treasured place in my heart, as it symbolizes a time spent in nature, with family by my side, enjoying one of life’s simple pleasures. I’ve continued that tradition, and now, each summer, I seek out those huckleberries, savoring every moment that leads to creating this delightful jam.
Ingredients
To make your very own Huckleberry Freezer Jam, here’s what you’ll need:
-
Fresh Huckleberries (2 cups): The star of our show! These small berries have a sweet-tart flavor profile. If you can’t find huckleberries locally, blueberries can be a great substitute, though the taste will be a bit sweeter and less tangy.
-
Granulated Sugar (1 ½ cups): Sugar helps to preserve the fruit and balance out the tartness. You could substitute with a no-calorie sweetener, but ensure you check the package for proper ratios, as they can vary!
-
Lemon Juice (2 tablespoons): This adds acidity, which brightens the flavor of the jam. Freshly squeezed lemon juice is best, but bottled juice will work in a pinch.
-
Pectin (2 tablespoons): Pectin is the magic ingredient that helps the jam set. You can find low-sugar versions if you’d like to make a lower-sugar jam. If you’re looking for a natural option, consider looking into options like chia seeds or agar-agar.
-
Water (1/4 cup): This helps dissolve the pectin and creates a smoother texture. Ensure it’s warm to help with the dissolving process.
Each of these ingredients plays an essential role, making this jam both delicious and uniquely capture the essence of huckleberries.
Step-by-Step Instructions
Now that you have your ingredients ready, let’s jump into the joy of making Huckleberry Freezer Jam!
-
Prepare Your Berries: First, rinse your fresh huckleberries under cold water to remove any dirt. Remove any stems or leaves. It’s time to celebrate the beauty of these tiny fruits! You can even give them a gentle mash with a fork or a potato masher to release some of that luscious juice, adding a bit of texture.
-
Make the Pectin Mixture: In a small saucepan, combine the water and pectin. Stir it over medium heat until it comes to a gentle boil. Keep stirring for about 1-2 minutes until it is fully dissolved. This step is crucial because it activates the pectin, ensuring your jam will set correctly.
-
Mix Berries & Sugar: In a large bowl, combine the huckleberries, sugar, and lemon juice. Stir well and let it sit for about 10 minutes. This allows the sugar to draw out the natural juices from the berries, which helps dissolve the sugar completely. If you love a chunkier jam, you can use a potato masher to break down some of the berries while keeping some whole.
-
Combine Mixtures: After the 10 minutes are up, pour the dissolved pectin mixture into the berry-sugar mix. Stir quickly to fully combine, making sure there are no clumps of pectin remaining. You’ll notice the mixture starting to thicken slightly; this is the wonderful pectin working its magic!
-
Fill Your Containers: Pour the jam mixture into your pre-prepared freezer-safe containers, leaving about half an inch of space at the top (the jam will expand while freezing). This part is so satisfying — you’ll marvel at the vibrant colors!
-
Set and Freeze: Allow the jam to set at room temperature for about 30 minutes. After that, transfer it to the freezer. Your kitchen is about to be filled with the sweet aroma of summer!
-
Thawing for Enjoyment: When you’re ready to enjoy your jam, simply move it from the freezer to the fridge a few hours before serving. Once thawed, it will keep in your refrigerator for up to 3 weeks.
Serving Suggestions
Huckleberry freezer jam is as versatile as it is delightful! A simple spread over morning toast or warm biscuits is a classic way to enjoy it. I love topping a bowl of creamy Greek yogurt with a dollop of jam and some granola for a delicious breakfast or snack. On a warm summer evening, try it as a topping for ice cream. The tartness of the huckleberry pairs beautifully with creamy vanilla!
Additionally, if you’re feeling adventurous, swirl a few spoonfuls of jam into your favorite cake batter or pancake mix for a burst of flavor!
Recipe Variations
-
Honey Sweetened Huckleberry Jam: Substitute granulated sugar with an equal amount of honey for a naturally sweet option.
-
Spicy Huckleberry Jam: Add a pinch of cayenne pepper or finely chopped jalapeño for a spicy twist that’s perfect for cheese boards!
-
Chia Seed Jam: For a healthier version, add 1/4 cup of chia seeds instead of pectin. Let the mix sit for about an hour so the seeds can soak up the liquid and create a gel-like texture.
-
Mixed Berry Jam: Incorporate other summer berries, like blueberries or raspberries, for a delightful mixed berry jam experience.
Chef’s Notes
As I’ve experimented with huckleberry jam over the years, I’ve discovered that every batch can tell a story! Sometimes, if I’m feeling particularly nostalgic, I’ll add a splash of homemade vanilla extract for that extra kick of flavor. One time, I accidentally grabbed the cayenne and ended up with a spontaneous spicy version that shocked my taste buds but thrilled my friends during a brunch gathering!
Jams have this incredible way of evolving based on what’s available in the kitchen and the creativity you bring to it. Just don’t forget to enjoy the process!
FAQs and Troubleshooting
-
Q: Why did my jam not set?
A: The most common reason for jam not setting is not using enough pectin or not mixing it properly. Make sure to follow the instructions accurately and give it enough time for the pectin to activate. -
Q: Can I use frozen huckleberries?
A: Absolutely! Just be sure to thaw them first and drain any excess liquid before mixing with sugar. -
Q: How long does the jam last in the freezer?
A: If stored properly, huckleberry freezer jam can last for up to a year in the freezer. Just remember to label your jars! -
Q: Is this recipe adaptable for other fruits?
A: Yes! You can use just about any berry or fruit. Always remember to adjust the sugar and pectin based on the sweetness and firmness of the fruit you’re using.
Nutritional Info
While the nutritional stats can vary based on ingredient choices and serving sizes, here’s a rough breakdown per tablespoon of Huckleberry Freezer Jam:
- Calories: 50
- Total Fat: 0g
- Carbohydrates: 13g
- Sugars: 12g
- Protein: 0g
Now you’re equipped with everything you need to create a jar (or several!) of lovely huckleberry freezer jam! I can’t wait for you to savor the taste of summer all year long. So, grab your huckleberries, summon your inner chef, and let’s make some joyful memories in the kitchen together! Happy jamming!
Print
Huckleberry Freezer Jam
- Total Time: 15 minutes
- Yield: 2 cups
- Diet: Vegan
Description
A delightful and easy recipe for preserving summer’s sweet-tart huckleberries in a no-cook freezer jam.
Ingredients
- Fresh Huckleberries (2 cups)
- Granulated Sugar (1 ½ cups)
- Lemon Juice (2 tablespoons)
- Pectin (2 tablespoons)
- Water (1/4 cup)
Instructions
- Prepare Your Berries: Rinse your fresh huckleberries under cold water and remove stems or leaves.
- Make the Pectin Mixture: In a small saucepan, combine the water and pectin, stirring over medium heat until it boils and dissolves.
- Mix Berries & Sugar: In a large bowl, combine huckleberries, sugar, and lemon juice, letting it sit for about 10 minutes.
- Combine Mixtures: Pour the dissolved pectin mixture into the berry-sugar mix and stir quickly to combine.
- Fill Your Containers: Pour the jam mixture into freezer-safe containers, leaving space at the top.
- Set and Freeze: Allow the jam to set at room temperature for about 30 minutes, then transfer to the freezer.
- Thawing for Enjoyment: Move the jam from the freezer to the fridge a few hours before serving.
Notes
Allowing the jam to set properly is crucial for achieving the right consistency.
- Prep Time: 10 minutes
- Cook Time: 5 minutes
- Category: Condiment
- Method: Freezing
- Cuisine: American
Nutrition
- Serving Size: 1 tablespoon
- Calories: 50
- Sugar: 12g
- Sodium: 0mg
- Fat: 0g
- Saturated Fat: 0g
- Unsaturated Fat: 0g
- Trans Fat: 0g
- Carbohydrates: 13g
- Fiber: 0g
- Protein: 0g
- Cholesterol: 0mg
Keywords: huckleberry, jam, freezer jam, preserves, summer
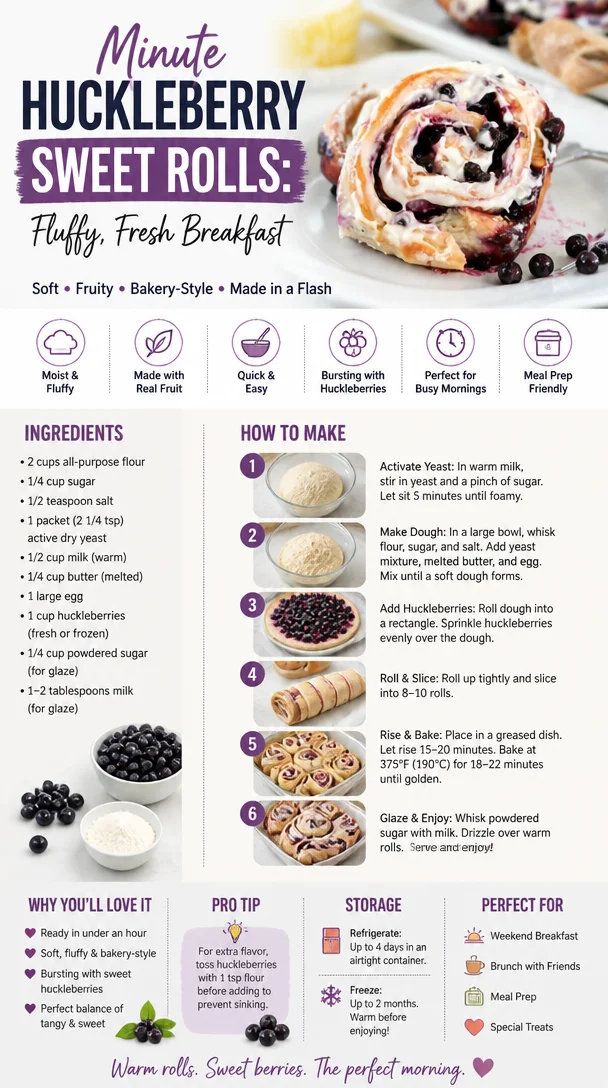
Minute Huckleberry Sweet Rolls: Fluffy, Fresh Breakfast
Huckleberry Sweet Rolls: A Cozy Adventure in Every Bite
Welcome back to my kitchen, dear friends! Today, I’m absolutely thrilled to take you on an exciting flavorful journey with my beloved Huckleberry Sweet Rolls. They might just be the sweetest and coziest addition to your baking repertoire. Imagine fluffy rolls, dripping with fresh huckleberry goodness, each one promising a comforting hug wrapped in dough. Are you drooling yet? I know I am!
Now, if you’ve been following my blog, you know I have a deep passion for creating dishes that not only fill your belly but also warm your heart. Huckleberries remind me of carefree summer days spent hiking in the mountains, the juicy, tart berries staining our fingers as we picked them fresh from the bushes. Those were some magical moments, and each bite of these rolls captures that nostalgia.
Baking these luscious Huckleberry Sweet Rolls is not just about the sweet reward at the end; it’s about the process, the creativity, and above all, the enjoyment of sharing with the people you love. So, if you’re ready to make magic in your kitchen and create aromas that will have everyone wandering in to see what’s cooking, let’s jump right in!
A Sweet Memory in Every Bite
Growing up, my family had a tradition of picking huckleberries every summer in the nearby mountains. My siblings and I would race to see who could fill their buckets up the fastest, with the promise of sweet rewards waiting at home. One year, my grandmother decided to turn our harvest into sweet rolls. I remember the kitchen filled with laughter, flour dusting our noses, and that incredible smell of dough rising.
As we waited for the rolls to bake, the anticipation was almost unbearable. I can still hear my grandma’s gentle voice, teaching me how to knead the dough just right, the sense of community in the kitchen wrapping around us like a warm blanket. Those rolls were the highlight of every summer get-together, served fresh and warm with a drizzle of glaze. To this day, they’re a cherished family tradition that I’ve carried into my adult life, finding joy in recreating those beautiful moments with my loved ones.
Ingredients
To whip up these delightful Huckleberry Sweet Rolls, you’ll need the following ingredients:
-
All-purpose flour
The backbone of any good roll! All-purpose flour works beautifully, but feel free to use bread flour for a chewier texture. -
Active dry yeast
This little magic maker is responsible for making your rolls fluffy. If you want a quicker rise, instant yeast works wonders, too! -
Sugar
A mix of granulated and brown sugar not only sweetens but adds a nice depth of flavor and helps with browning. -
Salt
A pinch of salt is crucial! It enhances the sweetness and balances all the flavors, making it a necessity in any baked good. -
Milk
Whole milk is my go-to, but any milk will do. For a dairy-free version, try almond or oat milk; just ensure it’s unsweetened. -
Butter
We use unsalted butter for optimal control of flavor, and don’t skip melting it—those rolls need all that love! -
Eggs
Eggs help bind everything together and add richness. If you’re going egg-free, you can substitute with flax or chia eggs—just mix 1 tablespoon of ground flaxseed or chia seeds with 2.5 tablespoons of water for each egg. -
Huckleberries
Fresh, frozen, or dried will work! If huckleberries aren’t available, blueberries make a fantastic substitute and will still give you those delightful sweet bursts. -
Powdered sugar
To make a simple glaze to drizzle over the rolls at the end. Feel free to add a splash of vanilla for extra flavor!
Let’s not forget the love and energy you’ll pour into your creation — that’s the vital ingredient that makes everything taste better!
Step-by-Step Instructions
1. Prepare the Dough
In a small bowl, combine 1 cup of warm milk (around 110°F) with 2 tablespoons of sugar and your yeast. Let it sit for 5-10 minutes until it’s bubbly and foamy. This bubbling is your yeast coming to life — it’s like a party in a bowl!
2. Mix the Dry Ingredients
In a large mixing bowl, whisk together 4 cups of all-purpose flour, 1 teaspoon of salt, and the remaining 2 tablespoons of sugar. When you combine them, envision all the deliciousness that’s going to happen next.
3. Combine Wet and Dry
Once your yeast is ready, pour it into the flour mix along with 1 melted stick of butter and 2 beaten eggs. Use a spatula or wooden spoon to combine everything together until it forms a shaggy dough.
4. Knead the Dough
Transfer the dough onto a floured surface and knead for about 8-10 minutes until it’s smooth and elastic. This is where you can let out any frustrations! If you find the dough too sticky, sprinkle on little bits of flour — but be careful not to over-flour.
5. First Rise
Place the dough into a greased bowl, cover it with a kitchen towel, and let it rise in a warm spot for an hour or until it doubles in size. While it’s rising, think about all the scrumptious things you can do with huckleberries — maybe even grab a few for snacking!
6. Prepare the Filling
While the dough is rising, mix together 1 cup of huckleberries, 1/2 cup of brown sugar, and a sprinkling of cinnamon in a bowl for the filling. The sweetness of the sugar complements the tartness of the huckleberries beautifully.
7. Roll It Out
Once the dough has risen, punch it down to release the air. Roll the dough out into a rectangle about 1/4 inch thick. Think of this as your canvas for the flavor masterpiece!
8. Spread the Filling
Spread melted butter over the rolled-out dough, then sprinkle the huckleberry mixture across the top. You want to cover every inch to guarantee each bite is bursting with flavor!
9. Roll and Slice
Starting from the long edge, roll the dough tightly into a log. Pinch the seam to seal it, then slice the log into 12 equal pieces. Place them cut-side up in a greased baking dish, leaving space between them to rise again.
10. Second Rise
Cover the rolls with a kitchen towel and let them rise for another 30-40 minutes until they puff up beautifully. It’s like watching a magic trick unfold right in your kitchen!
11. Bake
Preheat your oven to 350°F (175°C). When they’re all fluffy and cozy, pop those rolls into the oven and bake for 20-25 minutes or until golden brown. Your kitchen is about to fill with that indescribable smell of baking that makes you want to dance!
12. Glaze and Serve!
While the rolls are baking, whip up the glaze by combining 1 cup of powdered sugar and 2 tablespoons of milk. Drizzle it over the warm rolls once they come out of the oven for that extra touch of sweetness that makes them irresistible!
Serving Suggestions
To serve these delightful Huckleberry Sweet Rolls, I recommend plating them on a beautiful serving dish, drizzling extra glaze on top, and garnishing with a few fresh huckleberries or mint leaves. Not only does this make for a stunning presentation, but it also invites everyone to dig in and enjoy a cozy treat. Perfect for breakfast, brunch, or as an afternoon snack with a cup of tea!
Recipe Variations
- Mixed Berry Sweet Rolls: Add a mix of blueberries, raspberries, or blackberries for a berry medley twist!
- Vegan Sweet Rolls: Swap out milk for almond milk, butter for coconut oil, and use flax eggs to make these rolls completely dairy-free.
- Spiced Sweet Rolls: Incorporate some nutmeg or cardamom in the filling for a warming, spiced flavor.
- Chocolate-Huckleberry Rolls: Add chocolate chips to the filling for a decadent treat that combines huckleberries and rich chocolate.
- Savory Version: Try using cream cheese and herbs for a savory roll, perfect for brunch or as a side dish!
Chef’s Notes
Oh, where do I even begin? Baking these Huckleberry Sweet Rolls brings back so many beautiful memories. My grandma always insisted on letting the dough rise in the sun through our kitchen window — it truly felt like we were bringing the warmth of the summer into our hearts! The recipe has evolved with each passing year, and I love experimenting with new flavors and techniques, but the nostalgia remains the same.
I once got a bit too adventurous and tried adding lemon zest to the filling; let me tell you, it was oddly refreshing, but nothing beats the classic huckleberry flavor! Don’t be afraid to embrace your creativity, as every kitchen mistake can lead to something unexpectedly wonderful!
FAQs and Troubleshooting
1. My dough isn’t rising. What did I do wrong?
If your dough isn’t rising, it might be due to inactive yeast. Make sure your yeast is fresh and the liquid was warm, not hot. If you’re unsure, do the “float test” with a little sugar and warm water before starting.
2. Why did my sweet rolls come out dense?
If your rolls are dense, it may be due to overworking the dough or using too much flour. Remember to avoid adding too much flour during kneading; it should be soft and slightly tacky.
3. Can I make the rolls ahead of time?
Absolutely! You can prepare the rolls, place them unbaked in the refrigerator overnight, and then bake them fresh in the morning. Just allow them to come to room temperature before baking.
4. How can I store leftovers?
Store leftover rolls in an airtight container at room temperature for 2-3 days. If you want to keep them longer, pop them in the freezer. Just be sure to wrap them tightly to prevent freezer burn!
Nutritional Info
(Sample nutritional info per roll—adjust based on your specific ingredients)
- Calories: 220
- Total Fat: 9g
- Saturated Fat: 5g
- Cholesterol: 40mg
- Sodium: 150mg
- Carbohydrates: 31g
- Fiber: 2g
- Sugars: 7g
- Protein: 3g
And there you have it, friends! A warm, hearty, and delightful recipe for Huckleberry Sweet Rolls that are sure to steal your heart. They are more than just a recipe; they’re an opportunity to create cherished memories and share love through food. So, gather your loved ones, roll up those sleeves, and let’s bake something beautiful together! Happy cooking!
Print
Huckleberry Sweet Rolls
- Total Time: 70 minutes
- Yield: 12 servings 1x
- Diet: Vegetarian
Description
Fluffy rolls filled with fresh huckleberries, perfect for breakfast or a cozy snack.
Ingredients
- 4 cups all-purpose flour
- 2 tablespoons active dry yeast
- 2 tablespoons granulated sugar
- 1/2 cup brown sugar
- 1 teaspoon salt
- 1 cup whole milk
- 1 stick unsalted butter, melted
- 2 large eggs
- 1 cup huckleberries (fresh, frozen, or dried)
- 1 cup powdered sugar (for glaze)
- 2 tablespoons milk (for glaze)
Instructions
- Prepare the Dough: In a small bowl, combine warm milk with 2 tablespoons of sugar and yeast. Let it sit for 5-10 minutes until bubbly.
- Mix the Dry Ingredients: In a large bowl, whisk together flour, salt, and remaining sugar.
- Combine Wet and Dry: Once yeast is ready, pour it into the flour mix along with melted butter and beaten eggs. Mix until shaggy dough forms.
- Knead the Dough: Transfer dough onto a floured surface, knead for 8-10 minutes until smooth and elastic.
- First Rise: Place dough in a greased bowl, cover, and let it rise for an hour until doubled in size.
- Prepare the Filling: Mix huckleberries, brown sugar, and cinnamon in a bowl.
- Roll It Out: Punch down the dough and roll it out to a rectangle about 1/4 inch thick.
- Spread the Filling: Spread melted butter over the dough, top with huckleberry mixture.
- Roll and Slice: Roll tightly from the long edge, slice into 12 pieces, and place cut-side up in a greased dish.
- Second Rise: Cover rolls and let them rise for another 30-40 minutes.
- Bake: Preheat oven to 350°F (175°C). Bake rolls for 20-25 minutes until golden brown.
- Glaze and Serve: Mix powdered sugar and milk for glaze and drizzle over warm rolls.
Notes
For a vegan option, substitute milk with almond milk and butter with coconut oil.
- Prep Time: 20 minutes
- Cook Time: 25 minutes
- Category: Dessert
- Method: Baking
- Cuisine: American
Nutrition
- Serving Size: 1 roll
- Calories: 220
- Sugar: 7g
- Sodium: 150mg
- Fat: 9g
- Saturated Fat: 5g
- Unsaturated Fat: 4g
- Trans Fat: 0g
- Carbohydrates: 31g
- Fiber: 2g
- Protein: 3g
- Cholesterol: 40mg
Keywords: sweet rolls, huckleberry, dessert, baking, breakfast
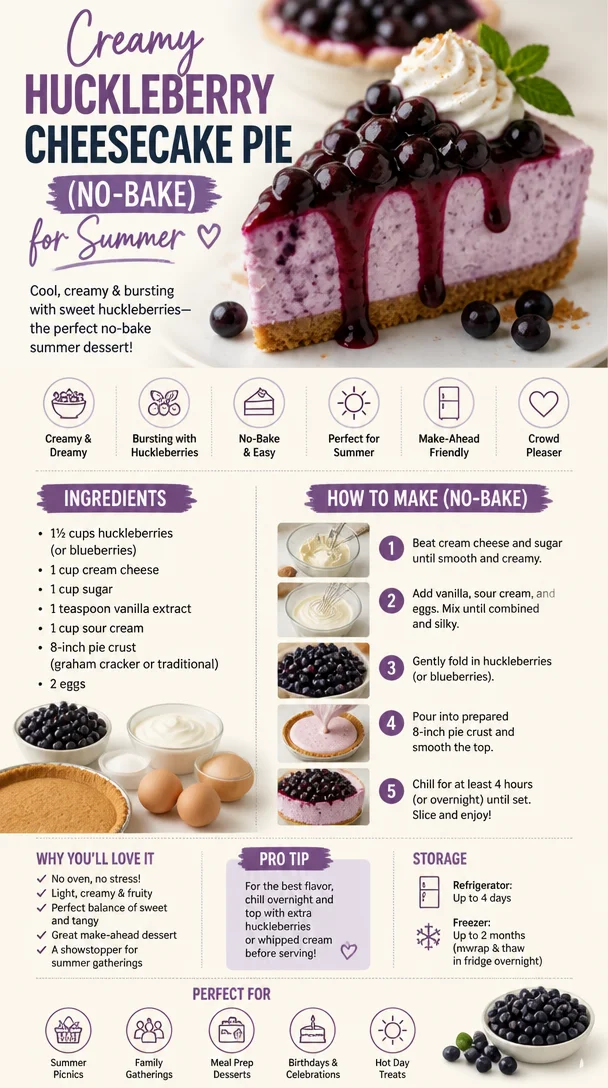
Creamy Huckleberry Cheesecake Pie (No-Bake) for Summer
Huckleberry Cheesecake Pie: A Slice of Summer
Welcome to my kitchen! Today, we’re diving into a pie that’s not just a dessert but a celebration of flavors that feels like summer on a plate: the Huckleberry Cheesecake Pie. If you’ve never experienced the delight that is huckleberries, let me tell you—these tiny berries pack a punch of sweet-tart goodness that will have you rethinking every other fruit out there. Picture this: you take a bite and the flavor bursts in your mouth, transporting you to sun-drenched berry-picking adventures in the mountains. Isn’t that what cooking is all about?
There’s something magical about pies—especially creamy ones like this cheesecake pie. They not only tantalize your taste buds but also create moments. Whether it’s a backyard barbecue, a cozy family dinner, or simply a chill night in with your favorite people, nothing beats the joy of sharing a homemade dessert. Plus, huckleberries have a nostalgic charm; they remind me of warm summer days spent gathering wild berries with my family, laughing, and savoring the sweetness of life.
In this blog post, I’m going to take you through the entire process of making a Huckleberry Cheesecake Pie, from the dreamy ingredients to the last bite of velvety goodness. You don’t need to be a culinary wizard to whip this up; just some good vibes and a pinch of enthusiasm! Let’s get cooking, shall we?
A Sweet Memory
Every time I make this pie, I can’t help but think back to that one summer when my family decided to hit the road and explore the mountainous landscapes of Idaho. We were on the hunt for those elusive huckleberries that everyone raved about. I remember the scent of pine in the air and the thrill of seeing those tiny purple gems nestled among the leaves. My mom was quick to fill a basket, while my dad teased us about our “berry strategy.”
When we finally returned home, we decided to mix those fragrant huckleberries into my grandmother’s cheesecake recipe. It was like magic—each bite was a sweet reminder of that day in the mountains. We all gathered around the table, forks in hand, and the laughter filled the kitchen as we savored every creamy, fruity morsel. That pie was more than just a dessert; it was a symbol of our family unity and adventure. I still use that same recipe today, adding a twist of my own with a touch of creativity.
Ingredients
Here’s what you’ll need to create this scrumptious Huckleberry Cheesecake Pie:
-
Huckleberries (2 cups): The star of this dish! These tiny berries are packed with flavor and have a sweet-tart profile. If you can’t find huckleberries, blueberries are a great substitute, though you may need to adjust the sugar slightly.
-
Cream Cheese (16 oz, softened): This base adds that rich, creamy texture we love in cheesecake. Make sure it’s room temperature for easy mixing. For a lighter version, you can substitute with Greek yogurt.
-
Granulated Sugar (1 cup): This sweetens your filling. You can use coconut sugar or a sugar substitute, but it might alter the final taste a bit.
-
Sour Cream (1 cup): This adds a delightful tanginess and creaminess. For a non-dairy option, try using non-dairy sour cream or coconut cream.
-
Vanilla Extract (2 teaspoons): Adds warmth and depth. Make sure to use pure vanilla extract for the best flavor!
-
Eggs (2 large): These provide structure and richness. If you’re looking for a vegan option, try flax eggs (1 tablespoon of ground flaxseed mixed with 2.5 tablespoons of water per egg).
-
Graham Cracker Crust (store-bought or homemade): You can’t have cheesecake pie without this crust! Use a store-bought option for convenience or whip up a quick homemade version with crushed graham crackers, sugar, and melted butter.
-
Butter (1/2 cup, melted): This binds the crust together and gives it that wonderful flavor. If you’re making a gluten-free version, you can use gluten-free graham crackers.
Step-by-Step Instructions
Step 1: Prepare Your Crust
-
Mix the crust ingredients: In a mixing bowl, combine 1 ½ cups of crushed graham crackers, 1/3 cup of sugar, and 1/2 cup of melted butter. Give it a good stir until it resembles wet sand.
- Chef Tip: If you want a little extra flavor, consider adding a pinch of cinnamon or a tablespoon of cocoa powder to the crust.
-
Press and bake: Firmly press the mixture into the bottom and up the sides of a 9-inch pie pan. Bake at 350°F (175°C) for about 10 minutes or until golden brown. Once it’s done, remove it from the oven and let it cool.
- Commentary: A well-baked crust holds everything in place and adds a lovely crunch to your creamy filling—don’t skip this step!
Step 2: Make the Filling
-
Blend the cream cheese: In a large mixing bowl, beat the softened cream cheese until smooth and creamy.
- Chef Hack: Make sure there aren’t any lumps. A whisk or handheld mixer works wonders here!
-
Add sugar and sour cream: Gradually mix in the granulated sugar and sour cream until well combined. Then add in the vanilla extract.
- Pro Tip: Tasting the filling at this stage is crucial—adjust the sweetness if necessary to suit your taste!
-
Incorporate the eggs: Beat in the eggs, one at a time, mixing just until combined. Overmixing can lead to cracks during baking.
- Insider Info: If you’re making this pie for an event, beat the eggs in separately. This adds air and creates a fluffier texture in the final pie.
-
Fold in huckleberries: Gently fold in your fresh or frozen huckleberries with a spatula. You want to keep them intact for that burst of flavor in every bite!
- Little Joy: If using frozen huckleberries, there’s no need to thaw them first.
Step 3: Assemble and Bake
-
Pour into crust: Carefully pour the cheesecake filling into your cooled crust, smoothing the top with a spatula.
- Tip: To avoid bubbles, tap the pie pan on the counter a few times to release any air pockets.
-
Bake the pie: Bake in a preheated oven at 325°F (160°C) for about 50-60 minutes, or until the center is just set but still has a slight jiggle.
- Watch Out: Overbaking can lead to cracks! To prevent this, you can place a pan of water below the pie in the oven to create steam.
-
Cool and chill: Turn off the oven and crack the door open. Let the pie slowly cool down for about 1 hour before transferring it to the fridge to chill for at least four hours, preferably overnight.
- Classic Chef Note: Cooling slowly helps prevent the dreaded cracks.
Serving Suggestions
Once your pie has chilled and is ready to be savored, slice it up and serve it on a pretty plate. A dollop of whipped cream on top never hurt anyone! To elevate your presentation, consider garnishing with a sprig of mint or additional huckleberries. Trust me, the vibrant colors will make it Instagram-ready!
Recipe Variations
- Berry Medley: Swap huckleberries for a mix of your favorite berries like blueberries, raspberries, and strawberries for a mixed berry cheesecake pie.
- Chocolate Drizzle: Drizzle some melted dark chocolate over the cooled pie for an indulgent twist.
- Crunchy Topping: Add a crumble topping made from oats, nuts, and brown sugar for a textural contrast.
- Lemon Zest: Add a teaspoon of lemon zest to the filling for a refreshing tang that balances the sweetness.
- Vegan Version: Substitute cream cheese with a cashew cream or vegan cream cheese for a delicious dairy-free option.
Chef’s Notes
This recipe has traveled with me through years of experimentation, and I love how it always brings people together. One memorable mistake I made was forgetting to add the sugar once—let’s just say it was an unforgettable experience! Everybody found it hilarious, and it turned into a running joke in our family about a “diet cheesecake.”
Every time I revisit this recipe, I play with the balance of ingredients, and while I’m always perfecting it, the essence of that summer road trip is my guiding star. Feel free to put your own spin on it!
FAQs and Troubleshooting
1. Why did my cheesecake crack?
Cracks often form from overmixing eggs or baking at too high a temperature. Ensure you mix just until combined and bake slowly.
2. Can I use frozen huckleberries?
Absolutely! Frozen huckleberries work perfectly—just toss them directly into the batter without thawing.
3. How do I store leftovers?
Store your Huckleberry Cheesecake Pie in an airtight container in the fridge for up to 5 days. You can also freeze slices wrapped tightly for up to 2 months.
4. My pie isn’t setting properly—what went wrong?
If the filling remains too jiggly after baking, it may need more time in the oven. Check on it every 5-10 minutes until it firms up but still jiggles slightly in the center.
Nutritional Info
While loving dessert is important, it’s good to know what you’re indulging in! A slice of Huckleberry Cheesecake Pie is approximately:
- Calories: 320
- Protein: 6g
- Carbs: 40g
- Fat: 15g
(Note: Nutritional values may vary depending on the exact ingredients used and portion sizes.)
Thank you for joining me in my kitchen today! I hope this Huckleberry Cheesecake Pie recipe inspires you to create sweet memories in your own home. Remember, every slice is an opportunity to share love, laughter, and a taste of nostalgia. Happy baking!
Print
Huckleberry Cheesecake Pie
- Total Time: 85 minutes
- Yield: 8 servings
- Diet: Vegetarian
Description
A creamy pie filled with sweet-tart huckleberries, perfect for summer gatherings.
Ingredients
- Huckleberries (2 cups)
- Cream Cheese (16 oz, softened)
- Granulated Sugar (1 cup)
- Sour Cream (1 cup)
- Vanilla Extract (2 teaspoons)
- Eggs (2 large)
- Graham Cracker Crust (store-bought or homemade)
- Butter (1/2 cup, melted)
Instructions
- Mix the crust ingredients: In a mixing bowl, combine 1 ½ cups of crushed graham crackers, 1/3 cup of sugar, and 1/2 cup of melted butter. Give it a good stir until it resembles wet sand.
- Press the mixture into the bottom and up the sides of a 9-inch pie pan. Bake at 350°F (175°C) for about 10 minutes or until golden brown. Let it cool.
- Blend the cream cheese: In a large mixing bowl, beat the softened cream cheese until smooth and creamy.
- Add sugar and sour cream: Gradually mix in the granulated sugar and sour cream until well combined. Then add in the vanilla extract.
- Incorporate the eggs: Beat in the eggs, one at a time, mixing just until combined.
- Fold in huckleberries: Gently fold in the fresh or frozen huckleberries with a spatula.
- Pour the cheesecake filling into your cooled crust, smoothing the top with a spatula.
- Bake in a preheated oven at 325°F (160°C) for about 50-60 minutes, or until the center is just set but still has a slight jiggle.
- Cool and chill: Let the pie cool for about 1 hour before transferring it to the fridge to chill for at least four hours, preferably overnight.
Notes
Serve with whipped cream and garnish with a sprig of mint or additional huckleberries for a beautiful presentation.
- Prep Time: 15 minutes
- Cook Time: 70 minutes
- Category: Dessert
- Method: Baking
- Cuisine: American
Nutrition
- Serving Size: 1 slice
- Calories: 320
- Sugar: 20g
- Sodium: 120mg
- Fat: 15g
- Saturated Fat: 9g
- Unsaturated Fat: 6g
- Trans Fat: 0g
- Carbohydrates: 40g
- Fiber: 3g
- Protein: 6g
- Cholesterol: 80mg
Keywords: huckleberry, cheesecake, summer dessert, pie, creamy dessert
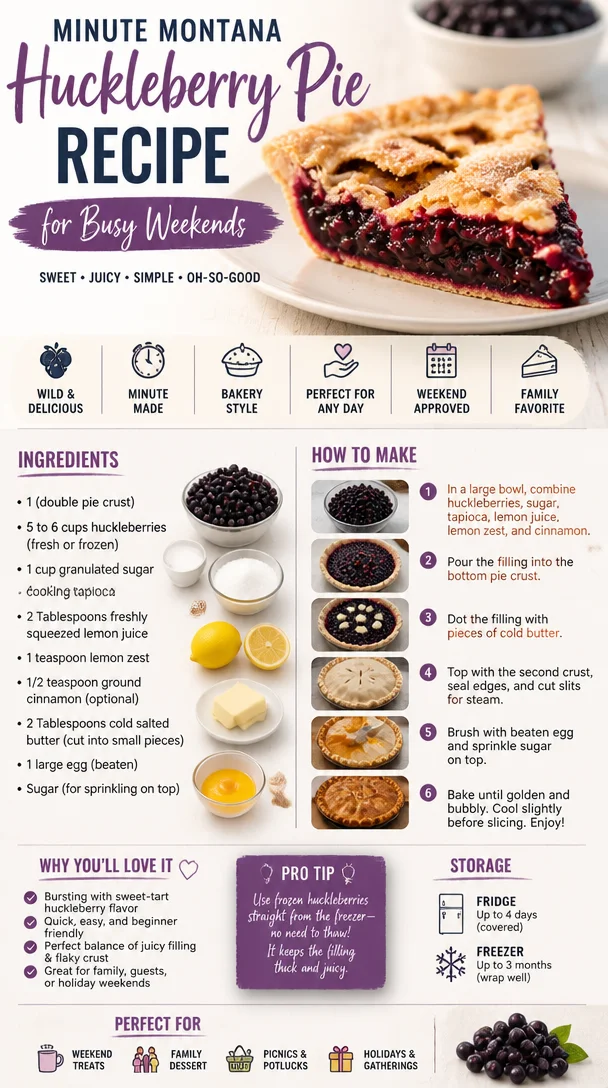
Minute Montana Huckleberry Pie Recipe for Busy Weekends
The Sweetest Slice of Montana: Huckleberry Pie Recipe
Welcome to my kitchen, friends! Today, we’re taking a delicious detour to the breathtaking landscapes of Montana with a recipe that captures all the charm and sweetness of this beautiful state: Huckleberry Pie. If you’ve ever sampled one of these treats, you know there’s something truly magical about the experience. And if you haven’t, buckle up because we’re about to embark on a culinary adventure that’s bursting with flavor, nostalgia, and—let’s be honest—pure joy!
Huckleberries are small, juicy berries that thrive in the mountainous forests of the Northwest. With their distinctive flavor—a delightful blend of blueberries, raspberries, and something entirely their own—they are a forager’s dream. These little gems make for an outstanding pie that not only tastes divine but also tells the story of long sunny days in the wilderness, picking berries with family and friends.
Picture this: You’re in a sun-dappled clearing, surrounded by towering pines, laughter ringing out as berries are plucked from their branches. The sweet and slightly tart notes waft through the trees, making your mouth water with anticipation. And the best part? At the end of the day, you get to take home a basket full of huckleberries, ready to be transformed into something magical in your kitchen.
This pie is not just food; it’s a slice of summer memories, a celebration of nature’s bounty, and a chance to bring a little piece of Montana right to your table. Whether you’re entertaining on a warm evening or simply indulging in a cozy dessert with those you love, this Huckleberry Pie will surely create lasting memories, just like the ones I cherish. Let’s get those aprons on—I’m so excited to share this recipe with you!
A Fond Memory
My love affair with huckleberry pie began on a family camping trip deep in the heart of the Beartooth Mountains. My grandmother, the culinary wizard of our family, had all of us tasked with gathering as many huckleberries as we could find. Armed with berry buckets and an unyielding sense of competition, my cousins and I sprinted through the woods, giggling in delight each time we filled our buckets.
At the end of the day, with our hands stained purple and bellies full of trail mix, we returned to our campsite. Grandma took the berries and began her magic—mixing, rolling, and baking. The intoxicating aroma of pie filling the air is a scent that I can still conjure up to this day. And the first slice of that pie? Pure bliss! The way the sweet-tart huckleberries mingled with the buttery, flaky crust—well, let’s just say I was hooked. Ever since that afternoon, huckleberry pie has held a special place in my heart—and my kitchen.
Ingredients
Here’s what you’ll need for your Montana Huckleberry Pie:
-
2 cups fresh huckleberries
- Look for plump, firm berries, and make sure to wash them gently. If you can’t find huckleberries, you can substitute with blueberries for a similar taste, but the huckleberries’ unique flavor is worth seeking out!
-
3/4 cup granulated sugar
- This balances the tartness of the berries. For a healthier option, you could swap half the sugar for honey or maple syrup—just note that this may change the texture slightly.
-
1 tablespoon cornstarch
- This acts as a thickener for the filling, ensuring that your pie is not too runny. You can also use tapioca starch if that’s what you have on hand.
-
1 tablespoon lemon juice
- Freshly squeezed is always best, adding brightness to the flavors. This helps enhance the darkness of the huckleberries and balances the flavors beautifully.
-
1 teaspoon vanilla extract
- Because everything is better with vanilla! If you prefer, you can use almond extract for a different flavor profile.
-
1/2 teaspoon cinnamon
- A warm spice that complements the berries and adds depth. Feel free to experiment with nutmeg or allspice for a twist.
-
1 package pie crust (homemade or store-bought)
- Making your own pie crust is rewarding, but store-bought is a lifesaver on busy days. Just make sure it’s deep-dish for all that huckleberry goodness!
-
1 tablespoon butter
- A few pat pieces of butter go on top of the filling before baking, adding richness and flavor. You can also use vegan butter for a dairy-free option.
These ingredients come together to create a pie that’s perfect for sharing, and most importantly, it tells a story—a story rich with flavors and fond memories.
Step-by-Step Instructions
Now that we’ve gathered our ingredients, let’s dive into the delightful process of making this Huckleberry Pie!
-
Prepare the Pie Crust
- If you’re using store-bought crust, simply unroll it and fit it into your pie pan. If you’re going for homemade, combine 2 1/2 cups flour with 1 cup butter and a pinch of salt until crumbly. Slowly add 6-8 tablespoons of ice water, kneading gently until dough forms.
- Tip: Chill your dough for at least 30 minutes before rolling out to ensure a flaky crust.
-
Preheat Your Oven
- Set that oven to 425°F (220°C)! A hot oven is key to a perfectly baked pie.
-
Mix the Filling
- In a large mixing bowl, combine the huckleberries, sugar, cornstarch, lemon juice, vanilla, and cinnamon. Stir gently to coat the berries.
- Pro Chef Hack: Let the mixture sit for about 10 minutes. This draws out the juices and makes for a delicious filling!
-
Assemble the Pie
- Pour the huckleberry filling into the prepared pie crust, being careful not to overfill. Dot the top with small pieces of butter.
- Cover with the top crust, crimping the edges to seal. Make a few slits in the top crust to allow steam to escape.
- Fun Tip: If you want, use cookie cutters to add fun shapes in the top crust for a decorative flair!
-
Bake It Up
- Place your pie on a baking sheet (to catch any drips) and bake for 30-35 minutes, or until the crust is golden brown and the filling is bubbling.
- Keep an eye on the pie about 20 minutes in. If the crust edges are browning too fast, cover them with foil to prevent burning.
-
Cool and Serve
- Allow your pie to cool for at least 2 hours to let the filling set. The hardest part? Waiting! But trust me; it’s worth it.
- Serve with a scoop of vanilla ice cream or a dollop of freshly whipped cream for the ultimate indulgence!
Serving Suggestions
Once your pie is beautifully baked and cooled, slice it into wedges and serve it warm, room temperature, or cold—no judgment here! Place a slice on a vibrant plate with a drizzle of cream or a generous scoop of ice cream on the side. For an added touch of elegance, sprinkle a bit of powdered sugar on top or add a fresh huckleberry garnish. Everything is about bringing out those stunning purple hues—it’s as much about the presentation as it is about the taste!
Recipe Variations
Want to put a spin on this classic dessert? Here are some fun ideas to get those creative juices flowing:
-
Huckleberry Crisp: Replace the pie crust with a crumbly topping made of oats, flour, brown sugar, and butter—perfect for a different texture!
-
Mixed Berry Pie: Combine huckleberries with other berries like strawberries or raspberries for a colorful medley.
-
Spiced Huckleberry Pie: Add a pinch of nutmeg or ginger to the filling for a warm, spicy kick.
-
Zesty Twist: Include freshly grated lemon or orange zest in the filling for a citrus pop.
-
Gluten-Free Option: Swap out traditional flour for a gluten-free blend for a delightful alternative!
Chef’s Notes
Huckleberry Pie has a special place in my kitchen, and there’s a little backstory to it! Over the years, I’ve tweaked this recipe to suit my family’s tastes—adding more spices here, swapping out sweeteners there. I’ve even experimented with using a crumb topping instead of a top crust, which works beautifully too!
One of my funniest kitchen moments came when I made this pie for the first time alone. I was so excited about those juicy berries that I didn’t realize how loose my filling was. You can guess what happened next—a huckleberry river slowly trickling out when I cut my first slice! It’s all part of the learning process, right?
FAQs and Troubleshooting
Q: What if I can’t find fresh huckleberries?
A: While fresh huckleberries are the star of this pie, you can substitute with blueberries or even frozen huckleberries if that’s all available. Just remember that frozen berries may release a bit more liquid; you might want to up your cornstarch a tad to compensate!
Q: How do I know when my pie is done baking?
A: Look for a golden-brown crust and bubbling juices in the filling. The aroma filling your kitchen will also be a big giveaway!
Q: The filling oozed out during baking. What happened?
A: This is likely due to too much juice in the filling. Make sure to mix in the cornstarch properly, and allow it some time to rest after mixing to let the juices develop.
Q: Can I make the pie ahead of time?
A: Absolutely! You can assemble the pie, freeze it and bake it when you need it, or even bake it a day ahead and keep it refrigerated. Just remember to reheat if serving warm.
Nutritional Info
Note: Nutritional information varies based on specific ingredients and serving sizes but here’s a rough estimate per slice (1/8 of pie):
- Calories: 220
- Total Fat: 9g
- Saturated Fat: 4g
- Carbohydrates: 34g
- Protein: 2g
There you have it, my beautiful friends—your guide to creating an unforgettable Montana Huckleberry Pie! I hope this recipe brings you as much joy in the kitchen as it brings to my table. Gather the ingredients, share the memories, and enjoy the process. Happy baking!
Print
Montana Huckleberry Pie
- Total Time: 65 minutes
- Yield: 8 servings 1x
- Diet: Vegetarian
Description
A delightful dessert capturing the charm and sweetness of Montana with fresh huckleberries, perfect for sharing and creating lasting memories.
Ingredients
- 2 cups fresh huckleberries
- 3/4 cup granulated sugar
- 1 tablespoon cornstarch
- 1 tablespoon lemon juice
- 1 teaspoon vanilla extract
- 1/2 teaspoon cinnamon
- 1 package pie crust (homemade or store-bought)
- 1 tablespoon butter
Instructions
- Prepare the Pie Crust by fitting it into your pie pan or making a homemade crust.
- Preheat your oven to 425°F (220°C).
- Mix the filling by combining huckleberries, sugar, cornstarch, lemon juice, vanilla, and cinnamon.
- Assemble the pie by pouring the filling into the pie crust and dotting with butter.
- Bake for 30-35 minutes until the crust is golden brown and filling bubbles.
- Cool the pie for at least 2 hours before serving.
Notes
Serve with vanilla ice cream or whipped cream for an indulgent treat. Feel free to experiment with spices and toppings.
- Prep Time: 30 minutes
- Cook Time: 35 minutes
- Category: Dessert
- Method: Baking
- Cuisine: American
Nutrition
- Serving Size: 1 slice
- Calories: 220
- Sugar: 14g
- Sodium: 150mg
- Fat: 9g
- Saturated Fat: 4g
- Unsaturated Fat: 5g
- Trans Fat: 0g
- Carbohydrates: 34g
- Fiber: 2g
- Protein: 2g
- Cholesterol: 30mg
Keywords: huckleberry pie, dessert, Montana, baking, summer recipes
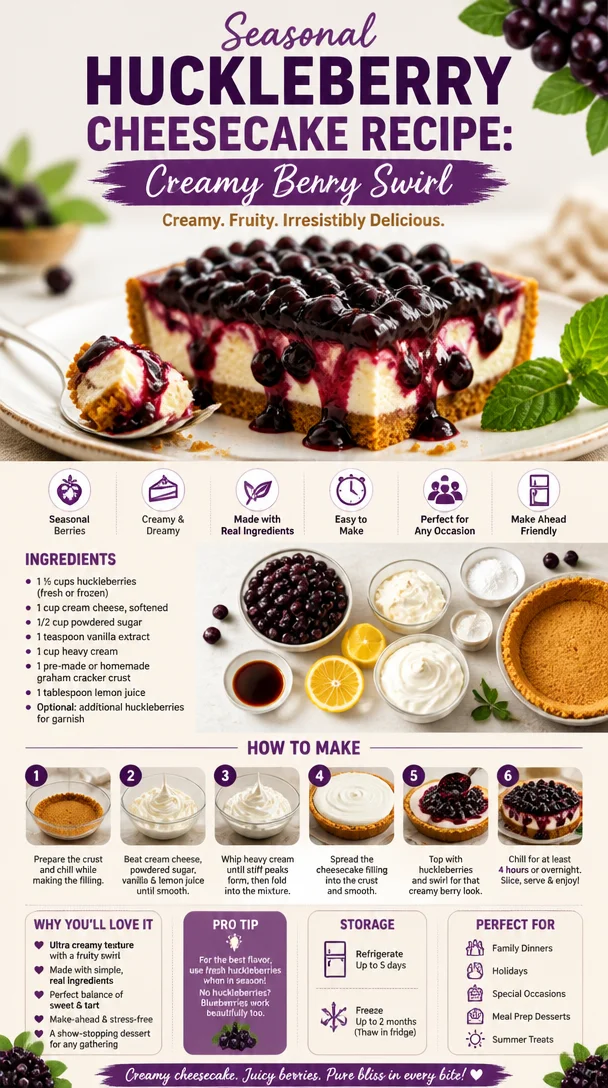
Seasonal Huckleberry Cheesecake Recipe: Creamy Berry Swirl
The Creamy Delight of Huckleberry Cheesecake: A Slice of Sweet Nostalgia
Welcome to my cozy little corner of the culinary world! Today, we’re diving into a dessert that not only delights the taste buds but also stirs up warm memories—the luscious Huckleberry Cheesecake. This dessert combines the creamy richness of cheesecake with the vibrant, slightly tangy flavor of huckleberries, creating a heavenly experience in every bite.
For me, cheesecake has always held a special place in my heart. It’s not just a dessert; it’s a celebration of family gatherings, summer picnics, and holidays filled with laughter and love. And when huckleberries—the little gems of the forest—are thrown into the mix, everything feels just a bit more magical. So grab a comfy seat, a cup of coffee, and let’s embark on a sweet journey together!
A Slice of Memory
Growing up, my summers were always filled with adventures in the wild. One of my favorite activities was berry picking with my grandmother. We would rise early in the morning, armed with buckets and excitement, heading into the woods to find the sweetest huckleberries. The thrill of spotting those dark purple berries among the green bushes was exhilarating!
After hours spent in the sun, we’d return home with our treasures. My grandmother would whip up the most delightful huckleberry cheesecake that I’ve ever tasted. It wasn’t just about the flavors, it was about the love and laughter shared in her kitchen. I remember her saying, “Cooking is about making memories as much as it is about the food.” Now, every time I make this Huckleberry Cheesecake, I can still hear her laughter and the sound of us reminiscing about our berry-picking adventures. It’s a dish that connects generations and fills the kitchen with warmth.
Ingredients
Let’s gather our ingredients for this dreamy Huckleberry Cheesecake. Each plays a key role in creating that perfect balance of creamy and fruity:
-
Huckleberries (2 cups)
Fresh or frozen will work! If you can’t find huckleberries, blueberries or blackberries make great substitutes. -
Cream Cheese (16 oz)
Make sure it’s softened for easy blending! Neufchâtel cheese can be a lighter alternative. -
Granulated Sugar (1 cup)
Sweetness is adjustable! Feel free to use coconut sugar or a sugar substitute for a healthier choice. -
Sour Cream (1 cup)
This adds richness and a delightful tang. Greek yogurt is a great substitute if you’d like a lighter version. -
Eggs (3 large)
They bind everything together. For a vegan option, consider using a flaxseed meal or aquafaba. -
Vanilla Extract (1 tablespoon)
The star seasoning! Use pure vanilla extract for the best flavor, or experiment with almond extract for a unique twist. -
Graham Cracker Crumbs (1 ½ cups)
This will be the base! If you want gluten-free, graham crackers made from almond flour are a fine alternative. -
Butter (½ cup, melted)
This is crucial for binding those crumbs. Coconut oil can be an excellent dairy-free replacement.
Step-by-Step Instructions
Now, let’s roll up our sleeves and make this scrumptious Huckleberry Cheesecake! Don’t worry; I’ll guide you through every step with a few tips and tricks along the way.
-
Preheat the Oven
Start by preheating your oven to 325°F (160°C). A preheated oven ensures an even baking process, crucial for that creamy texture! -
Make the Crust
In a bowl, combine your graham cracker crumbs and melted butter. Mix until the crumbs are evenly coated. Press the mixture into the bottom of a springform pan to create a solid base. Tip: Use the bottom of a measuring cup to pack it down tightly for a sturdy crust! -
Prepare the Filling
In a large mixing bowl, beat the softened cream cheese until it’s smooth and creamy. Gradually add in the sugar while continuing to mix until well combined. Add sour cream, vanilla extract, and eggs one at a time, blending after each addition until completely incorporated. Quick hack: Scrape down the sides of the bowl regularly to ensure everything gets mixed evenly! -
Fold in the Huckleberries
Gently fold in your huckleberries, being careful not to crush them too much. The goal is to maintain their shape and the burst of flavor they bring! Tip: If using frozen huckleberries, do not thaw them beforehand to prevent bleeding into the cheesecake. -
Pour and Bake
Pour the filling over your prepared crust, smoothing out the top. Bake in the preheated oven for about 50-60 minutes, or until the edges are set and the center has a slight jiggle. Keep an eye on it in the last few minutes to avoid overbaking! -
Cool and Chill
Once baked, turn off the oven and let the cheesecake cool inside for about an hour. This helps prevent cracking. After that, refrigerate for at least 4 hours (or overnight for the best flavor) until fully chilled and set. Pro tip: Cheesecake is even better the next day!
Serving Suggestions
When serving your Huckleberry Cheesecake, consider a few fun touches to enhance its presentation:
-
Fresh Huckleberries: Scatter a handful of fresh huckleberries on top for that vibrant, picturesque look.
-
Whipped Cream: A dollop of lightly sweetened whipped cream adds a lightness that perfectly complements the rich cheesecake.
-
Mint Leaves: A few sprigs of fresh mint can elevate your dish, adding a pop of color and freshness.
Recipe Variations
Here are some creative spins if you’re in the mood to mix things up:
-
Chocolate Huckleberry: Add a cup of melted dark chocolate to the cheesecake filling for a rich chocolatey flavor.
-
Lemon Zing: Incorporate the zest of one lemon for a bright, citrusy note that complements the huckleberries beautifully.
-
Nutty Add-In: Mix in some chopped pecans or walnuts into the crust for added crunch and flavor.
-
Gluten-Free Option: Swap out the graham crackers for gluten-free cookies or almond flour for the crust.
Chef’s Notes
You know, the best part about this recipe is its flexibility. If you have leftover berries from your last adventure, toss them in! I remember one summer, we had an abundance of huckleberries, and I ended up making huckleberry jam, huckleberry muffins, and of course, this cheesecake multiple times. It became a ritual every Sunday afternoon—a little slice of heaven to share with family.
Also, don’t fret if your cheesecake cracks! It’s still going to taste fantastic, and those cracks will be covered by whipped cream and huckleberries anyway! Just remember, love is the secret ingredient in cooking.
FAQs and Troubleshooting
-
Why did my cheesecake crack?
Cheesecakes can crack if they bake too long or at too high of a temperature. To avoid this, keep an eye on it and use a water bath for moist baking. -
How do I know when my cheesecake is done?
The edges should look set, yet the center will have a slight jiggle. It’ll firm up as it cools! -
Can I make this ahead of time?
Absolutely! In fact, cheesecake often tastes better the next day. Just store it in the fridge, and you’re good to go. -
How should I store leftovers?
Cover tightly and store in the refrigerator for up to a week. It can also be frozen for up to a month—just make sure to thaw it overnight in the fridge before enjoying!
Nutritional Info
While it’s best to enjoy desserts like this in moderation, here’s a general idea of what you’re serving up (per slice)**:
- Calories: 350
- Carbohydrates: 32g
- Protein: 6g
- Fat: 24g
- Sugar: 22g
So there you have it! A delightful, nostalgic journey into the heart of my favorite Huckleberry Cheesecake. Whether you’re serving it at your next gathering or simply indulging yourself (I won’t tell!), it’s bound to become a cherished recipe in your kitchen as it is in mine. Happy baking, dear friends, and may your kitchen be filled with laughter and love!
Print
Huckleberry Cheesecake
- Total Time: 80 minutes
- Yield: 8 servings
- Diet: Vegetarian
Description
A luscious cheesecake with creamy richness and vibrant huckleberry flavor, evoking sweet memories of family gatherings and berry picking.
Ingredients
- Huckleberries (2 cups)
- Cream Cheese (16 oz, softened)
- Granulated Sugar (1 cup)
- Sour Cream (1 cup)
- Eggs (3 large)
- Vanilla Extract (1 tablespoon)
- Graham Cracker Crumbs (1 ½ cups)
- Butter (½ cup, melted)
Instructions
- Preheat the oven to 325°F (160°C).
- Combine graham cracker crumbs and melted butter in a bowl.
- Press the mixture into the bottom of a springform pan to create a solid base.
- Beat the softened cream cheese in a large mixing bowl until smooth.
- Gradually add sugar and mix until well combined.
- Add sour cream, vanilla extract, and eggs one at a time, blending after each addition.
- Fold in the huckleberries gently.
- Pour the filling over the prepared crust and smooth out the top.
- Bake for about 50-60 minutes until edges are set and center has a slight jiggle.
- Cool in the oven for one hour before refrigerating for at least 4 hours.
Notes
For a vegan option, use flaxseed meal or aquafaba instead of eggs. If using frozen huckleberries, do not thaw before adding to the filling.
- Prep Time: 20 minutes
- Cook Time: 60 minutes
- Category: Dessert
- Method: Baking
- Cuisine: American
Nutrition
- Serving Size: 1 slice
- Calories: 350
- Sugar: 22g
- Sodium: 300mg
- Fat: 24g
- Saturated Fat: 12g
- Unsaturated Fat: 8g
- Trans Fat: 0g
- Carbohydrates: 32g
- Fiber: 1g
- Protein: 6g
- Cholesterol: 80mg
Keywords: cheesecake, huckleberry dessert, nostalgic recipe, family recipe, American dessert
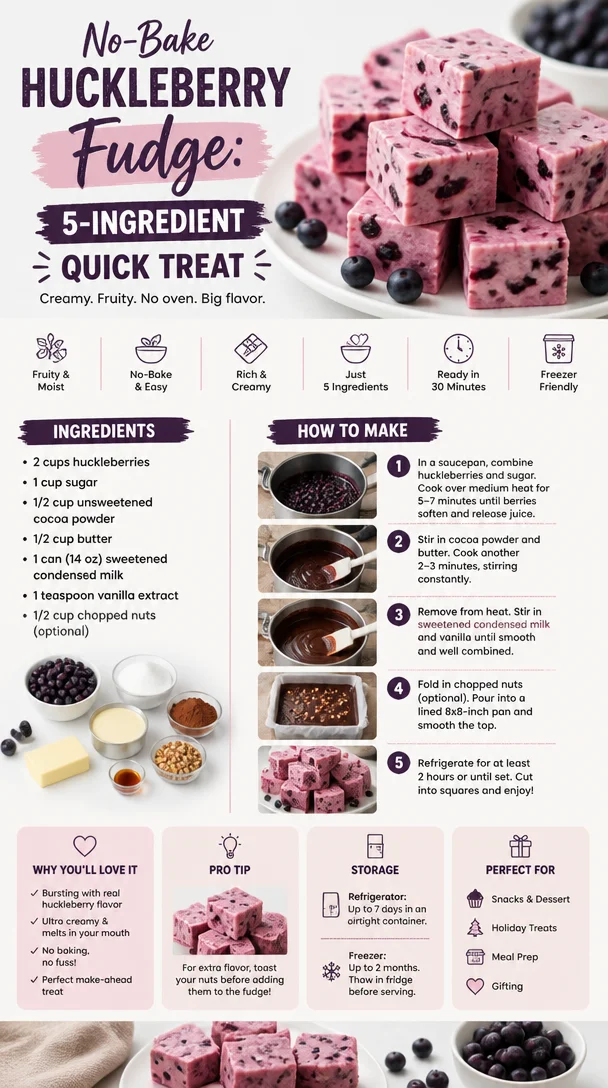
No-Bake Huckleberry Fudge: 5-Ingredient Quick Treat
Huckleberry Fudge: A Cozy Treat with a Personal Touch
Welcome to my kitchen, dear friends! Today, I’d love to share a delightful treat that’s as rich in flavor as it is in sentiment—Huckleberry Fudge. If you’re a lover of sweet desserts and bright, fruity flavors, this recipe embraces all that and more. There’s something so satisfying about picking berries bursting with flavor and crafting them into a luscious piece of fudge that melts in your mouth. Every bite is a wave of nostalgia, taking you back to sun-filled afternoons spent in the great outdoors.
When I think of huckleberries, I remember those long summer days exploring the wild, fragrant woods behind my childhood home. My family would gear up with buckets and head out to gather the tiny, sweet berries, all the while delighting in the mix of laughter, the occasional silly argument over the biggest berry found, and the soothing sounds of nature. After our adventures, we’d return home with our treasures and create all sorts of delicious delights, but this fudge always stood out as a favorite. It was our sweet reward for a successful day, and my mom’s recipe has become a treasured family tradition.
The beauty of Huckleberry Fudge is that it brings together the richness of chocolate and the tartness of huckleberries, creating a harmony that dances on your palate. Plus, it’s a treat you can easily whip up at home, even in a messy apron—just like any dish I love to share! So, roll up your sleeves, grab a pot, and let’s dive into the wonderful world of huckleberries and chocolate.
Personal Story
As I mentioned, my journey with huckleberries started way back when I was a kid. My family used to embark on berry-picking adventures, and each trip felt like embarking on a grand expedition. I vividly recall the pure joy that came with plucking those ripe, dark purple berries off the bushes, careful not to squish them in our excitement. Inevitably, there would be a small family competition on who could gather the most berries. My younger brother would always manage to outdo us all, but it didn’t matter; the thrill was in sharing those moments together.
After gathering all those huckleberries, we would come home, wash them, and decide how best to devour them. Most of the time, we would go classic and make pies or jams, but one summer, my mom decided to whip up some huckleberry fudge. I can still remember the first bite of that fudge—decadent chocolate with vibrant bursts of huckleberry flavor that made my taste buds dance! That summer set the stage for many fudge-making sessions in our family, and now, years later, I still find so much joy in making this sweet treat, reminiscing about those simple yet profound moments spent in the great outdoors with my loved ones.
Ingredients
Let’s gather our ingredients to make this delicious Huckleberry Fudge! Here’s what you’ll need for a batch that will serve about 12 people (or yourself, no judgment here!):
-
2 cups huckleberries: These sweet little gems bring a delightful tart flavor. If you can’t find huckleberries, feel free to substitute them with blueberries or blackberries—both work fantastically.
-
2 cups granulated sugar: A must for sweetness! You can replace granulated sugar with coconut sugar for a deeper flavor. Just keep in mind that it might alter the color of your fudge a bit.
-
3/4 cup unsweetened cocoa powder: This is where the chocolatey goodness comes from! Look for high-quality cocoa powder for a richer taste. Carob powder can be a good alternative for those avoiding chocolate.
-
1/2 cup unsalted butter: Adds a creamy texture to our fudge. If you’re looking for a dairy-free option, you can substitute with coconut oil.
-
1 can (14 oz) sweetened condensed milk: This ingredient provides the right creaminess and sweetness. If you prefer a vegan option, look for coconut-based sweetened condensed milk or make your own at home.
-
1 tsp vanilla extract: Enhances the overall flavor of the fudge. Use pure vanilla extract rather than imitation for the best aroma and taste.
-
A pinch of salt: Balances out the sweetness perfectly. You may use sea salt or Himalayan salt; both will do the trick!
Ready to transform these ingredients into delightful fudge? Grab your apron, and let’s get to cooking!
Step-by-Step Instructions
Now, the best part—cooking! Here are the step-by-step instructions to make Huckleberry Fudge:
-
Gather Your Supplies: Start by getting out a medium saucepan, a wooden spoon, and an 8×8-inch baking dish. Line the baking dish with parchment paper (this makes for easier removal later) and set it aside.
-
Prepare the Huckleberries: Rinse your huckleberries in cold water. Gently pat them dry with a paper towel. If they’re large, you can give them a little mash with a fork to release some juices, but be careful not to turn them into huckleberry mush!
-
Melt the Butter: In your medium saucepan over medium heat, add in the unsalted butter. Let it melt slowly, swirling occasionally to ensure it doesn’t brown. This step is essential as browned butter will alter the flavor profile of our fudge (great for some recipes, but not this one).
-
Mix in Sugar and Cocoa Powder: Once the butter is melted, add the granulated sugar and cocoa powder. Stir vigorously to combine until you form a semi-smooth mixture. This may take a minute or two—don’t rush it!
-
Add Sweetened Condensed Milk: Slowly pour in the sweetened condensed milk while continuing to stir. It will feel thick and luxurious—let it warm up through. Cook for about 5-7 minutes until the mixture starts to bubble gently. Keep stirring to prevent any burning. This is where the magic happens, my friends!
-
Incorporate Vanilla and Salt: Once you see those lovely bubbles, remove the saucepan from heat. Add the vanilla extract and pinch of salt, giving it another good stir. The aroma will be incredible at this point!
-
Fold in Huckleberries: Now for the star of the show—gently fold in the huckleberries. This is your chance to be a little whimsical; some berries might burst and infuse the fudge with lovely purple swirls while some stay intact for juicy bites.
-
Pour Into the Baking Dish: Carefully pour the fudge mixture into your prepared baking dish. Use a spatula to smooth the top evenly. Let it chill at room temperature for about 2-3 hours or until set. If you’re in a hurry (I get it!), you can speed things up by putting it in the fridge.
-
Cutting and Enjoying: Once the fudge is set, lift it out of the pan using the parchment paper. Place it on a cutting board and slice into squares.
-
Celebrate the Fudge: Grab a piece and celebrate your masterpiece! Every bite will remind you of those berry-picking days and warm memories in the kitchen.
Serving Suggestions
Huckleberry fudge is divine on its own, but there are a few ways to elevate your serving game! For an elegant touch, plate the squares on a beautiful serving platter and dust with a bit of cocoa powder or powdered sugar. You can also pair the fudge with a scoop of vanilla ice cream for a heavenly combination. If you’re feeling extra, drizzle some chocolate sauce or caramel over the top. Either way, your loved ones will be impressed!
Recipe Variations
Feeling adventurous? Here are some creative twists you can try with this Huckleberry Fudge recipe:
-
Nutty Fudge: Add some chopped walnuts or almonds for a crunchy texture and a flavor contrast that complements the chocolate.
-
Swirled Fudge: Swirl in some peanut butter or almond butter for a rich and nutty taste.
-
Spiced Fudge: Sprinkle in some cinnamon or a pinch of chili powder for an unexpected flavor kick.
-
Harvest Fudge: For a fall-inspired treat, add in chopped dried apples or pecans alongside your huckleberries.
-
Citrus Zest: A hint of lemon or orange zest can provide a refreshing brightness to your fudge!
Chef’s Notes
This recipe has come a long way since my childhood kitchen adventures. Initially, I used whatever berries we had on hand, and it was always a bit of a surprise how different each batch turned out! Over time, I perfected the balance between the chocolate and berry flavors, and it became a winter favorite as well.
Once, I tried substituting the huckleberries with some intense cherry preserves on a whim, and lo and behold, I ended up with Cherry Chocolate Fudge! It was a hit as well. The joy in cooking always lies in experimentation and creativity; don’t be afraid to try new things.
FAQs and Troubleshooting
1. My fudge didn’t set! What went wrong?
If your fudge remains soft after cooling, it might be due to not cooking it long enough to reach the right temperature. Next time, ensure it bubbles gently for at least 5 minutes to allow enough moisture to evaporate.
2. Can I use frozen huckleberries?
Absolutely! Just make sure to thaw and drain excess moisture before adding them to your fudge. This will help maintain the right consistency.
3. How can I store leftover fudge?
Place the fudge squares in an airtight container at room temperature for up to a week. For longer storage, you can refrigerate it or freeze it. Just remember to layer parchment paper between the squares to avoid sticking!
4. What if I want to give this as a gift?
Great idea! Cut the fudge into squares and package them in a lovely box with a ribbon. Don’t forget to include a little note sharing the story behind the recipe—it’s a sweet personal touch.
Nutritional Info
While I believe desserts are all about enjoying indulgent moments, it’s good to know what you’re enjoying! Each piece of huckleberry fudge has approximately:
- Calories: 160
- Fat: 6g
- Carbohydrates: 25g
- Fiber: 1g
- Sugars: 20g
Remember, moderation is key, and sharing is always encouraged!
As we wrap up our huckleberry adventure, I hope this recipe brings joy, warmth, and delicious memories to you and your loved ones, just as it has in my family. Happy cooking! 🍫💜
Print
Huckleberry Fudge
- Total Time: 120 minutes
- Yield: 12 servings 1x
- Diet: Vegetarian
Description
Rich and fruity Huckleberry Fudge that melts in your mouth, capturing the nostalgic essence of outdoor berry-picking adventures.
Ingredients
- 2 cups huckleberries
- 2 cups granulated sugar
- 3/4 cup unsweetened cocoa powder
- 1/2 cup unsalted butter
- 1 can (14 oz) sweetened condensed milk
- 1 tsp vanilla extract
- A pinch of salt
Instructions
- Gather your supplies: medium saucepan, wooden spoon, and an 8×8-inch baking dish lined with parchment paper.
- Prepare the huckleberries by rinsing them in cold water and patting them dry.
- Melt the butter in the saucepan over medium heat, stirring occasionally.
- Mix in sugar and cocoa powder, stirring until combined.
- Add sweetened condensed milk, cooking for about 5-7 minutes until the mixture bubbles.
- Incorporate vanilla extract and salt, stirring well.
- Fold in huckleberries gently, then pour the mixture into the prepared baking dish.
- Let it chill at room temperature for 2-3 hours until set.
- Cut the fudge into squares and enjoy!
Notes
For a dairy-free option, replace unsalted butter with coconut oil and use coconut-based sweetened condensed milk.
- Prep Time: 15 minutes
- Cook Time: 20 minutes
- Category: Dessert
- Method: No-Bake
- Cuisine: American
Nutrition
- Serving Size: 1 piece
- Calories: 160
- Sugar: 20g
- Sodium: 40mg
- Fat: 6g
- Saturated Fat: 3g
- Unsaturated Fat: 2g
- Trans Fat: 0g
- Carbohydrates: 25g
- Fiber: 1g
- Protein: 2g
- Cholesterol: 15mg
Keywords: huckleberry, fudge, dessert, chocolate, homemade candy




