
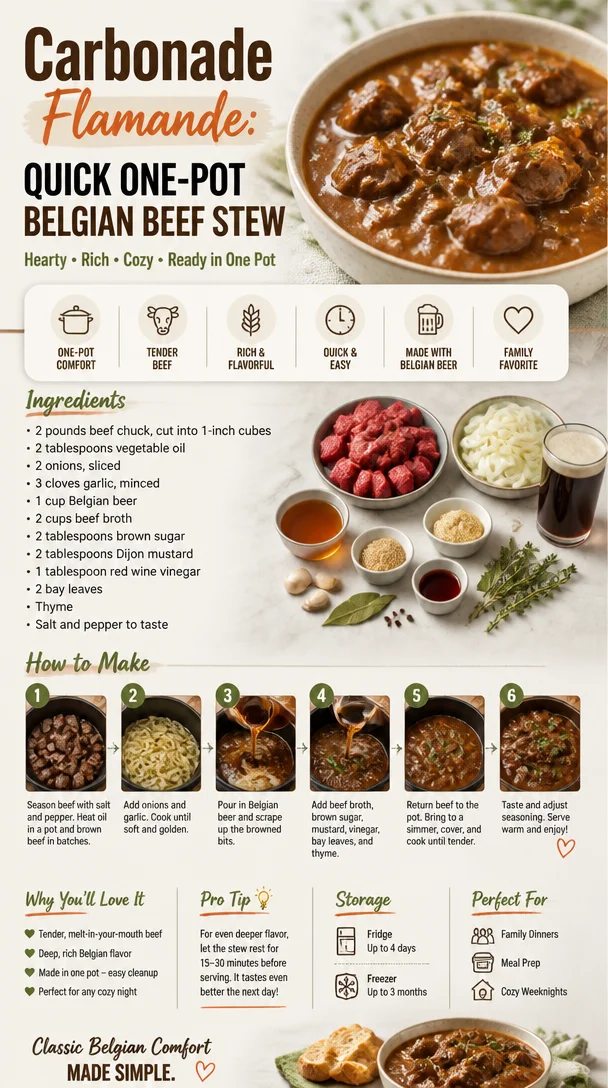
Carbonade Flamande: Quick One-Pot Belgian Beef Stew
Discovering the Heart of Belgium: A Cozy Take on Carbonade Flamande
Welcome to my kitchen! Today, we’re diving into a dish that warms not only the belly but also the soul: Carbonade Flamande, Belgium’s renowned beef stew. This hug-in-a-bowl is a quintessential comfort food that marries tender beef with rich, sweet, and tangy flavors, thanks to the magical pairing of dark beer and onions. It’s perfect for chilly evenings or when you want to impress friends and family without spending all day in the kitchen.
Have you ever wandered into a French bistro, inhaled an intoxicating mix of flavors, and thought, "I need to recreate this at home"? That’s how I felt the first time I tasted Carbonade Flamande. The deep, caramelized notes of beer, balanced by the sweetness of onions and a touch of mustard, left a lasting impression on my palate. Spoiler alert: I went home and immediately attempted to replicate this dish, leading to a beautiful mess of spills and splatters, accompanied by an abundance of laughter.
In this blog post, I’ll guide you through the steps of making Carbonade Flamande, share my personal connection to this dish, and sprinkle in some tips along the way to make your cooking experience enjoyable and stress-free. So grab your apron, and let’s cozy up to a recipe that has a story to tell!
A Memory Wrapped in Flavor
Let me take you back to a cozy evening several years ago. I was at a charming little Belgian café with some of my closest friends, nestled in a quiet corner, surrounded by rustic wooden tables and twinkling fairy lights. As I took my first bite of Carbonade Flamande, I transported to the cobblestone streets of Brussels. The beef was melt-in-your-mouth tender, and the gravy was thick and comforting, reminding me of my grandmother’s kitchen during the winter months.
I vividly remember how we lingered at the table, relishing this dish and, of course, sharing stories. Each bite prompted laughter, nostalgia, and new memories that would last a lifetime. That experience ignited my passion for recreating dishes that could bring people together — and the Carbonade Flamande became a staple in my cooking repertoire. Now, I’m sharing that love with you!
Ingredients for Carbonade Flamande
Here’s what you’ll need to whip up this delicious stew:
-
2 pounds beef chuck (or brisket): This cut is perfect for slow cooking, yielding tender results. For a leaner alternative, try sirloin—just adjust the cooking time since it cooks faster.
-
4 medium onions: Yellow or sweet onions work beautifully for this recipe. You can substitute shallots for a more refined flavor if you prefer.
-
3 cups dark Belgian beer: This is where the magic happens! A rich, malty beer will add depth. If you want non-alcoholic, you can use beef broth with a splash of vinegar for tanginess.
-
3 tablespoons brown sugar: This will balance the bitterness of the beer and enhance the sweetness of the onions. Coconut sugar is a great substitute if you’re aiming for a healthier option.
-
2 tablespoons Dijon mustard: Adds a touch of sharpness. For a spicier note, you can substitute with whole grain mustard.
-
3 cloves garlic: Because what’s stew without garlic? Feel free to use roasted garlic for a sweeter profile.
-
3 tablespoons olive oil: For browning the meat and sautéing the onions. Avocado oil can be a fantastic alternative with a high smoke point.
-
2 cups beef stock: Homemade is best, but store-bought works just fine! You can use vegetable broth if you want a vegetarian twist.
-
2 bay leaves: Brings aromatic depth. If you’re out, feel free to omit them.
-
Fresh thyme (for garnish): Use dried if fresh isn’t available, just reduce the amount since it’s more concentrated.
These simple ingredients come together to create a dish that feels rustic yet elegant. Ready to get cooking?
Step-by-Step Instructions for Carbonade Flamande
Step 1: Prepare the Ingredients
Start by cutting the beef into large, bite-sized chunks (around 2 inches) to ensure even cooking. Season generously with salt and pepper. While I recommend letting your beef sit at room temperature for about 30 minutes before cooking; this helps it brown better!
Step 2: Brown the Beef
In a large Dutch oven or heavy-bottomed pot, heat 2 tablespoons of olive oil over medium-high heat. When the oil is hot, add half the beef chunks, taking care not to overcrowd the pot. Brown the beef on all sides until it forms a golden crust — about 5 minutes per side. Remember, a good sear locks in the flavors! Once browned, remove the beef and repeat with the second batch, adding more oil as needed. Remove and set aside.
Step 3: Sauté the Onions
In the same pot, reduce the heat to medium and toss in your chopped onions. Stir occasionally for about 10 minutes or until they are soft and translucent. You’ll want lovely caramelization here, so don’t rush this step! Add in your minced garlic during the last couple of minutes to avoid burning it.
Step 4: Create the Base
Once the onions are beautifully caramelized, sprinkle in the brown sugar and cook for another minute to allow it to dissolve. Stir in the Dijon mustard, making sure it’s well integrated into the onions. Now, pour in the dark beer, using a wooden spoon to scrape up any browned bits from the bottom of the pot — that’s pure flavor gold!
Step 5: Combine and Simmer
Return the browned beef to the pot along with any juices that have accumulated. Add the beef stock, bay leaves, and thyme. Bring the mixture to a gentle simmer. Now, let’s talk about patience: cover the pot slightly ajar and let it simmer on low heat for about 2 to 3 hours. The goal is to have the beef tender and enveloped in a thick, luscious sauce.
Step 6: Adjust Seasonings
About 20 minutes before you’re ready to serve, taste the stew and adjust with salt, pepper, or any additional mustard or sugar according to your taste. It’s the time for love — and don’t be afraid to sneak a spoonful!
Serving Suggestions
When it comes to serving Carbonade Flamande, presentation can elevate the experience. Ladle the thick stew into wide, shallow bowls for a rustic touch. Top with a sprinkle of fresh thyme for that pop of color and aroma. Serve alongside buttery mashed potatoes or a crusty loaf of bread to soak up every heavenly drop of the sauce. Trust me; it’s a must!
Recipe Variations
Feel free to inject your personality into this dish! Here are a few fun variations you might want to try:
-
Vegetarian Version: Substitute beef with hearty vegetables like mushrooms, carrots, and potatoes. Use vegetable stock and dark non-alcoholic beer for the liquid.
-
Spicy Kick: Add diced jalapeños or a pinch of cayenne pepper for a zesty twist.
-
Comfort Twist: Toss in halved baby potatoes or even parsnips for added texture and flavor.
-
Herbal Notes: Experiment with rosemary or sage for an aromatic change!
-
Gourmet Touch: Serve over polenta instead of potatoes for a deliciously creamy base.
Chef’s Notes
Cooking Carbonade Flamande has been a delightful journey for me over the years. I often reminisce about the first time I invited friends for a dinner party. The room filled with laughter and the unmistakable scent of simmering stew. It prompted stories, rich discussions, and encouraged everyone to share their experiences. I think that’s what cooking is all about — creating memories together.
Don’t fret about the details; cooking is as much about intuition as it is about following recipes. Each time I make this dish, I add a little twist or tweak a step to make it my own again. That’s the beauty of home cooking!
FAQs and Troubleshooting
1. Why is my stew too watery?
If your stew turns out too watery, don’t panic! Remove the lid and let it simmer uncovered for a bit to reduce. You can also mash a bit of the beef against the side of the pot to thicken it up.
2. Can I use a slow cooker for this recipe?
Absolutely! Follow the initial searing steps on the stovetop, then transfer everything to a slow cooker. Cook on low for 6-8 hours for beautifully tender beef!
3. Can I freeze Carbonade Flamande?
You sure can! Portion it into airtight containers, and it can last in the freezer for up to 3 months. Just reheat gently on the stove over low heat for the best results.
4. How do I adjust the cooking time for a different cut of beef?
If using a leaner cut, like sirloin, reduce the cooking time to about 1.5 hours — the key is to watch for that tender texture!
Nutritional Info
While I always encourage enjoying home-cooked meals in moderation, here’s a quick breakdown of what you can expect per serving (without sides):
- Calories: Approximately 450
- Protein: 35g
- Carbohydrates: 22g
- Fat: 25g
There’s something so heartwarming about sharing a bowl of Carbonade Flamande with loved ones. As we savor each bite, we not only fuel our bodies but also nourish our connections. I hope you enjoy making and sharing this delightful dish as much as I do! Happy cooking!
Print
Carbonade Flamande
- Total Time: 210 minutes
- Yield: 6 servings 1x
- Diet: None
Description
A cozy Belgian beef stew featuring tender beef, dark beer, and caramelized onions—perfect for chilly evenings.
Ingredients
- 2 pounds beef chuck (or brisket)
- 4 medium onions
- 3 cups dark Belgian beer
- 3 tablespoons brown sugar
- 2 tablespoons Dijon mustard
- 3 cloves garlic
- 3 tablespoons olive oil
- 2 cups beef stock
- 2 bay leaves
- Fresh thyme (for garnish)
Instructions
- Prepare the ingredients: Cut the beef into large chunks and season with salt and pepper.
- Brown the beef in a large pot over medium-high heat until golden crusted.
- Sauté the onions in the same pot until soft and translucent; add garlic later to avoid burning.
- Create the base by dissolving brown sugar, integrating mustard, and adding beer to scrape up flavors.
- Combine the beef, stock, bay leaves, and thyme, then simmer on low for 2 to 3 hours.
- Adjust seasonings just before serving to taste.
Notes
Serve with buttery mashed potatoes or crusty bread to soak up the sauce.
- Prep Time: 30 minutes
- Cook Time: 180 minutes
- Category: Main Course
- Method: Stovetop
- Cuisine: Belgian
Nutrition
- Serving Size: 1 serving
- Calories: 450
- Sugar: 10g
- Sodium: 800mg
- Fat: 25g
- Saturated Fat: 8g
- Unsaturated Fat: 12g
- Trans Fat: 0g
- Carbohydrates: 22g
- Fiber: 2g
- Protein: 35g
- Cholesterol: 90mg
Keywords: beef stew, Belgian recipe, comfort food, Carbonade Flamande, hearty meal
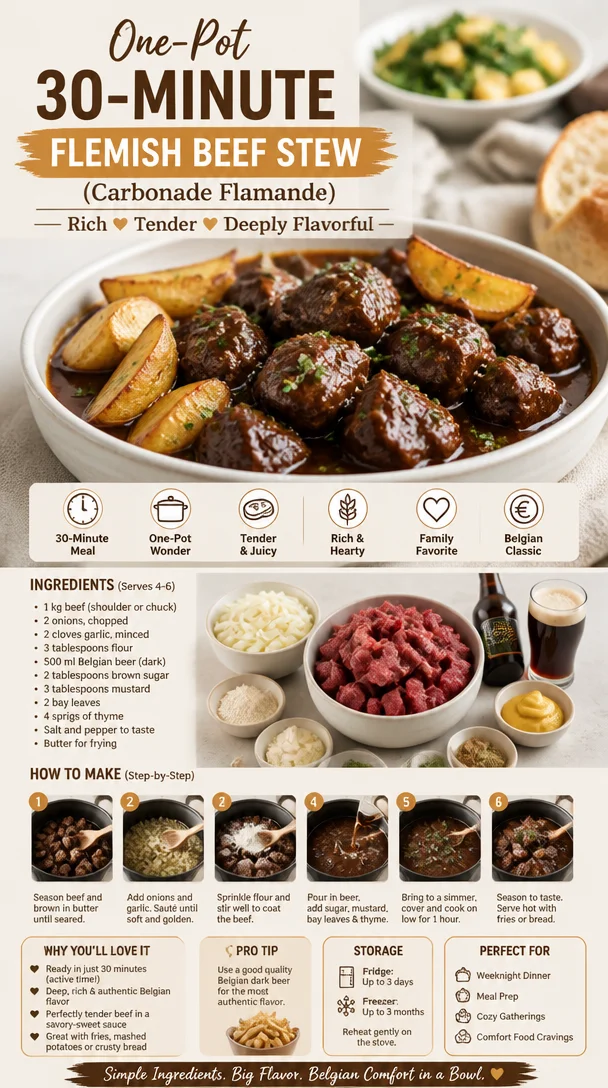
One-Pot 30-Minute Flemish Beef Stew (Carbonade Flamande)
Discovering the Heart and Soul of La Carbonade Flamande
Welcome to my kitchen, dear food lovers! Today, I’m excited to share a dish that warms both the heart and soul—La Carbonade Flamande. This Belgian beef stew is a classic that beautifully marries tender beef with the rich flavors of dark beer, onions, and a hint of sweetness. If you’re anything like me, you probably find immense joy in the aroma of something delicious simmering away on the stove. So, let’s dive into a comforting recipe that’s as delightful to make as it is to eat!
A Taste of Home: My Personal Connection to La Carbonade Flamande
I still remember the first time I tasted La Carbonade Flamande. I must have been about ten years old, perched on a stool in my grandmother’s kitchen, watching in awe as she stirred a bubbling pot of this savory stew. The kitchen was filled with that magical aroma of caramelized onions and deep, malty beer, and as a little one, my fascination with cooking truly ignited. Every Sunday, we would gather around the table, my entire family stuffed and ready to feast, with the dish taking center stage.
There was something so special about seeing my grandmother pour love not just into the ingredients but also into the company that gathered at her table. As we dug into the hearty stew, her laughter blended with our chatter, reinforcing that strong sentiment of togetherness and warmth. It was moments like these that taught me how food could connect people, creating lasting memories, and that’s precisely what I want to share with you today—my heartwarming version of La Carbonade Flamande!
Ingredients That Sing
Let’s gather our ingredients! Here’s what you’ll need to create this delightful stew. Each element plays a vital role in building depth and flavor!
-
2 lbs beef chuck or brisket: This cut is perfect for slow cooking, resulting in tender, melt-in-your-mouth pieces of beef. If you want a leaner option, you can use top round, but you might lose some of that rich flavor.
-
2 tablespoons olive oil: This is our trusty cooking fat. Feel free to swap it with vegetable oil or even butter if you prefer a creamier taste.
-
4 large onions, thinly sliced: Onions add sweetness and depth. Try using yellow onions for a milder taste or red onions for a slightly sharper flavor.
-
3 cloves garlic, minced: Garlic gives the stew that lovely aromatic touch. You can use garlic powder in a pinch; substitute approx. ½ teaspoon for fresh garlic.
-
2 tablespoons brown sugar: This will help caramelize the onions and balance the flavors. If you’re in a bind, you can use honey or maple syrup for a similar level of sweetness.
-
12 oz dark beer: A good, hearty Belgian ale or stout enhances the flavors. Don’t fret if you’re not a beer fan! You can substitute with beef broth mixed with apple cider vinegar for acidity!
-
1 tablespoon Dijon mustard: This adds a dash of tang. If you’re out, yellow mustard can work as a substitute, but it’ll change the flavor slightly.
-
2 bay leaves: These add a subtle earthiness. If you don’t have any, feel free to use a teaspoon of dried herbs like thyme or Italian seasoning as a quick replacement.
-
Salt and pepper to taste: Essential for elevating all the flavors in your dish!
Step-by-Step Cooking Instructions
Alright, let’s roll up our sleeves and get cooking! Follow these steps to create your delicious La Carbonade Flamande.
-
Sear the Beef:
In a large Dutch oven, heat the olive oil over medium-high heat. Pat the beef dry with paper towels (this helps it sear better) and sprinkle generously with salt and pepper. Once the oil is hot, add the beef and sear it on all sides until beautifully browned (about 5-6 minutes per side). This step locks in those wonderful juices! -
Cook the Onions:
After removing the beef, add the sliced onions to the pot. Let them caramelize, stirring frequently, for about 10-15 minutes. You want them golden brown and sweet. If they start sticking, don’t hesitate to add a splash of beer to deglaze the pan—this creates a delectable fond! -
Add Garlic and Sugar:
Once the onions are lovely and caramelized, stir in the minced garlic and brown sugar. Let them cook for an additional 2 minutes, just until the garlic becomes fragrant. -
Deglaze with Beer:
Pour in the dark beer! Scrape up all those flavorful bits stuck to the pot. Allow it to simmer gently for about 5 minutes; this will help intensify the flavors and reduce the alcohol content. -
Combine Everything:
Return the beef to the pot, then mix in the Dijon mustard and bay leaves. Stir well to coat the beef in that delicious onion-beer mixture. -
Timing is Key:
Bring your stew to a gentle boil, then reduce the heat to low. Cover the pot and let it simmer for 2-3 hours, or until the beef is fork-tender. If you want to take a break, you can pop it in the oven at 325°F (165°C) for the same timeframe.
Serving Suggestions
La Carbonade Flamande is best savored with friends and family around the table. To serve, ladle the hearty stew into bowls and garnish with fresh parsley for a burst of color. You can also pair it with warm, crusty bread to soak up all that beautiful sauce; trust me, it’s heavenly!
Recipe Variations
Want to switch things up a bit? Here are a few variations to make this dish your own:
- Add spices: A sprinkle of smoked paprika can infuse a subtle smokiness.
- Vegetarian twist: Substitute the beef for mushrooms (like portobello) and vegetable broth to create a delicious vegetarian version.
- Sweeten the deal: Try adding a splash of orange juice to brighten up the flavors.
- Herb-it up: Experiment with fresh thyme or rosemary for an aromatic flavor profile.
- Spicy kick: Toss in a pinch of chili flakes for a bit of warmth.
Chef’s Notes
This dish has evolved in my cooking journey, and I love how it can adapt based on what you have in your kitchen. One time, I made it using leftover roast beef, and it turned out just as wonderful! Cooking is all about creativity, so don’t be afraid to play around! And remember, the best part is enjoying the process while sharing it with loved ones.
FAQs and Troubleshooting
-
Can I use a slow cooker for this recipe?
Absolutely! Sear the meat on the stovetop, add all the ingredients to your slow cooker, and let it cook on low for about 6-8 hours or until the beef is tender. -
What if my stew is too thick?
If your stew thickens too much, simply add a splash of beef or vegetable broth to reach your desired consistency. -
How can I store leftovers?
Cool the stew completely then store in the refrigerator in an airtight container for up to 3 days. It actually gets better the next day! -
Can I freeze La Carbonade Flamande?
Yes! Just allow it to cool completely, then portion it into freezer-safe containers. It can be frozen for up to 3 months—just thaw and reheat when you’re ready to enjoy again!
Nutritional Info (if applicable)
(For those interested, note that information can vary based on the specific ingredients used, but generally, this dish is a hearty source of protein and iron thanks to the beef.)
And there you have it! La Carbonade Flamande is not just a dish; it’s an experience that brings warmth and connection to your kitchen. I hope you enjoy making this recipe as much as I do. Happy cooking!
Print
La Carbonade Flamande
- Total Time: 195 minutes
- Yield: 6 servings 1x
- Diet: Carnivore
Description
A comforting Belgian beef stew that combines tender beef with rich flavors of dark beer and caramelized onions.
Ingredients
- 2 lbs beef chuck or brisket
- 2 tablespoons olive oil
- 4 large onions, thinly sliced
- 3 cloves garlic, minced
- 2 tablespoons brown sugar
- 12 oz dark beer
- 1 tablespoon Dijon mustard
- 2 bay leaves
- Salt and pepper to taste
Instructions
- Sear the Beef: In a large Dutch oven, heat the olive oil over medium-high heat. Pat the beef dry and sprinkle generously with salt and pepper. Once the oil is hot, add the beef and sear it on all sides until beautifully browned (about 5-6 minutes per side).
- Cook the Onions: After removing the beef, add the sliced onions to the pot. Let them caramelize, stirring frequently, for about 10-15 minutes until golden brown.
- Add Garlic and Sugar: Stir in the minced garlic and brown sugar, and let them cook for an additional 2 minutes.
- Deglaze with Beer: Pour in the dark beer and scrape up all the flavorful bits stuck to the pot. Allow it to simmer gently for about 5 minutes.
- Combine Everything: Return the beef to the pot, mix in the Dijon mustard and bay leaves, and stir well.
- Timing is Key: Bring the stew to a gentle boil, then reduce the heat to low and cover. Let it simmer for 120-180 minutes, or until the beef is fork-tender.
Notes
Serve with fresh parsley and crusty bread to soak up the sauce. Can be adapted for slow cooker use.
- Prep Time: 15 minutes
- Cook Time: 180 minutes
- Category: Main Course
- Method: Slow Cooking
- Cuisine: Belgian
Nutrition
- Serving Size: 1 serving
- Calories: 480
- Sugar: 6g
- Sodium: 500mg
- Fat: 20g
- Saturated Fat: 7g
- Unsaturated Fat: 10g
- Trans Fat: 0g
- Carbohydrates: 30g
- Fiber: 2g
- Protein: 40g
- Cholesterol: 100mg
Keywords: beef stew, Belgian cuisine, comfort food, hearty recipes
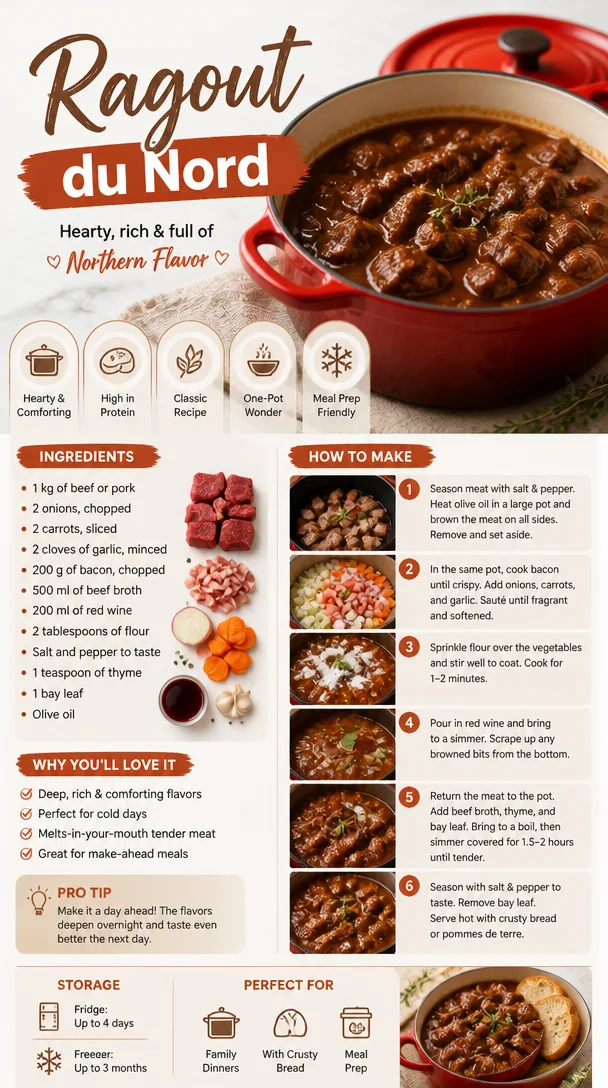
Ragout du Nord
Discover the Comfort of Ragout du Nord: A Cozy French Classic
Welcome to my kitchen! Today, we’re whipping up a dish that’s not just a meal but a warm embrace in a bowl—Ragout du Nord. This scrumptious French masterpiece hails from the northern region of France, a place where hearty meals are a way of life. Just the thought of it brings back memories of savoring tender meat, perfectly cooked vegetables, and that wonderfully rich sauce, all adorned with a sprinkle of fresh herbs.
Ragout du Nord is one of those recipes that holds the power to bridge generations and bring families together. I remember the first time I tasted this dish. I was visiting my grandmother in her quaint little home filled with the aroma of simmering goodness. She always had a knack for making every meal feel special, but there was something about this ragout—it felt like a celebration of flavors and warmth. I’d sit at her wooden table, munching away as she shared stories of her own childhood, wrapped in the cozy comfort of love and home-cooked meals.
As I cook today, I aim to recreate that feeling, to capture the very essence of togetherness and pleasure that only a homemade meal can offer. So roll up your sleeves and get ready to turn those simple ingredients into something unforgettable. Whether you’re inviting friends over for dinner or just indulging in a night in with a good book, Ragout du Nord is guaranteed to make your kitchen feel like a home.
Personal Story: A Moment in Grandma’s Kitchen
One of my most cherished memories relates to my grandmother and her infamous Ragout du Nord. It was a chilly Saturday afternoon in January, and I remember the snow gently falling outside as we huddled inside, the warmth of the kitchen wrapping around us like a cozy blanket. She always said, “Cooking is a form of love.” As we chopped vegetables together, her hands guiding mine, she shared stories about her own grandmother, who first taught her this recipe.
The dish was cooking away on the stove, filling the air with a combination of simmering meats and earthy vegetables, and I could hardly wait to dig in. When the ragout finally made its way to the table, it was like magic. We laughed, we talked, and every bite was a reminder of the love that had gone into it. That’s the beauty of cooking—it’s not just about nourishing our bodies; it’s about feeding our souls.
When I recreate this dish, I can feel her presence—her laughter, her wisdom, and that unmatchable warmth. I hope to inspire you to create your own memories in the kitchen, filled with love and laughter.
Ingredients
Here’s everything you need to create your very own Ragout du Nord:
- Beef (Chuck or Brisket): The star of this dish! Use cuts that are great for slow cooking. Chuck is well-marbled and tender after hours of simmering. If you’re looking for a leaner option, brisket works wonderfully too!
- Lardons (or Bacon): These little gems add a smoky depth to the dish. If you prefer a healthier alternative, turkey bacon can do the trick without sacrificing too much flavor.
- Onions: Sweet and aromatic, onions are a foundational flavor-building block. If you’re not a fan, shallots can offer a milder, more delicate taste.
- Carrots: They bring sweetness to the ragout. You can substitute with parsnips for a slightly different flavor or even use sweet potatoes!
- Garlic: Just a few cloves will infuse the dish with warmth. Depending on your preference, you could also use garlic powder, but fresh is always better!
- Tomato Paste: This gives the ragout its rich color and depth. If you’re looking for a lighter option, consider using a fresh tomato chopped finely.
- Red Wine: A splash of red wine enhances the complexity of flavors. For a non-alcoholic version, you can substitute with grape juice mixed with a bit of vinegar.
- Beef Broth: This is the base of our beautiful sauce. If you’re short on time, low-sodium store-bought broth can work just as well.
- Fresh Herbs (Thyme and Bay Leaves): They add lovely fragrance and flavor. In a pinch, dried herbs can work, but fresh herbs bring the dish to life!
- Salt and Pepper: These are essential for seasoning. Remember to taste as you go, adjusting to suit your preferences!
Step-by-Step Instructions
Now that you have your ingredients ready, let’s get cooking! Here’s how to bring your Ragout du Nord to life:
-
Prep Your Ingredients: Start by chopping your onions, carrots, and garlic. Aim for a consistent size so they cook evenly. This way, every spoonful is a perfect balance of flavors. Pro tip: if you’re chopping onions and tend to tear up, try wearing glasses—it might just help!
-
Brown the Meat: In a heavy-bottomed pot or Dutch oven, heat a few tablespoons of oil over medium-high heat. Add your beef, making sure to brown it on all sides. This step is crucial, as it seals in flavors. Don’t rush it—let it caramelize beautifully! Once browned, set the meat aside.
-
Cook the Lardons: In the same pot, throw in the lardons and cook until crispy. The fat from the bacon will partially cook, adding an incredible flavor to your ragout. Allow the lardons to brown and then catch all those delicious bits stuck to the pot (the fond!).
-
Sauté the Vegetables: Toss in the onions, carrots, and garlic. Sauté until the veggies are soft and fragrant, about 5-7 minutes. Fun fact: sautéing at this stage will develop those sweet caramelized flavors that make the dish irresistible!
-
Incorporate Tomato Paste: It’s time to add the tomato paste. Stir it in with the veggies, letting it cook for a couple of minutes. This helps to deepen the flavor profile, bringing out its natural sweetness.
-
Pour in the Wine: Deglaze the pot with red wine, scraping up any flavorful bits clinging to the bottom. Let the wine simmer for 5 minutes, allowing the alcohol to cook off. The richness you’ll get from this step is truly remarkable—your kitchen will smell divine!
-
Combine Everything: Return the browned beef to the pot, along with any juices that have collected. Add the beef broth, thyme, bay leaves, salt, and pepper. Bring everything up to a gentle simmer.
-
Slow Cook: Cover the pot and let it simmer on low for about 2 to 2.5 hours, or until the beef is tender and the flavors have melded beautifully. If possible, check in occasionally—give it a stir and an affectionate little taste!
-
Finishing Touches: Once the meat is fork-tender, taste the ragout and adjust seasoning if needed. Remove the bay leaves and thyme sprigs before serving.
-
Let It Rest: If you have time, let the ragout sit for a bit to cool down and develop even richer flavors—just like good wine!
Serving Suggestions
Plate up your Ragout du Nord with a generous portion of creamy mashed potatoes or fluffy bread to soak up that luscious sauce. Garnish with a sprinkle of fresh parsley for a pop of color and freshness. Don’t forget to pour yourself a glass of the same red wine you used for cooking—it adds a lovely touch to the dining experience!
Recipe Variations
- Vegetarian Ragout: Swap the beef for hearty mushrooms and add lentils for protein. Use vegetable stock and add even more colorful veggies like zucchini or bell peppers.
- Spicy Kick: Add a pinch of red pepper flakes or a diced jalapeño while sautéing the vegetables for a touch of heat.
- Herb Variation: Experiment with herbs like rosemary or oregano for a different flavor profile. They can give the dish an Italian twist if you’re feeling adventurous!
- Smoky Flavor: Use smoked paprika along with your regular spices for a deeper, smokier taste throughout the dish.
Chef’s Notes
Ragout du Nord has evolved so much since the first time I made it. I’ve tried countless variations, from adding different types of wines to experimenting with fresh herbs. One time, I even threw in some dark chocolate! It sounds strange, but it enhances the dish’s richness beautifully. Cooking should always be fun and creative—don’t be afraid to put your own spin on it!
Occasionally, I’ll overhear family and friends reminiscing about their own experiences with ragout, telling tales like mine. It’s heartwarming to see how a single recipe can inspire such variations in flavor and fond memories.
FAQs and Troubleshooting
1. My ragout turned out too salty. What should I do?
If you find yourself in this situation, try adding a splash of vinegar or citrus juice to brighten the flavors. You can also add a little water or broth to dilute the saltiness.
2. The beef is chewy instead of tender. What went wrong?
It’s essential to cook the beef low and slow for sufficient time. If it’s still chewy, give it more time on the stove—an hour or so more shouldn’t hurt!
3. Can I prepare this dish in advance?
Absolutely! Ragout du Nord actually tastes even better the next day after the flavors have melded overnight in the fridge. Just reheat gently on the stove before serving.
4. How can I store leftovers?
Let the ragout cool completely and then store it in an airtight container. It will keep well in the fridge for about 3-4 days, or you can freeze it for up to 3 months. Just secure it tightly in a freezer-safe container!
Nutritional Info
Ragout du Nord is a hearty meal packed with proteins and nutrients from the beef and vegetables. While I encourage you to enjoy this dish as an indulgence, it does provide essential vitamins and minerals, along with satisfying your comfort food cravings!
I hope this article inspires you to whip up your own Ragout du Nord! Cooking is about love, creativity, and the joy of sharing with others. So gather your ingredients, channel your inner chef, and let’s make cuisine that warms the heart and home! Happy cooking!
Print
Ragout du Nord
- Total Time: 170 minutes
- Yield: 6 servings 1x
- Diet: Carnivore
Description
A cozy French classic, Ragout du Nord combines tender beef, flavorful vegetables, and a rich sauce for a heartwarming meal.
Ingredients
- 2 lbs Beef (Chuck or Brisket)
- 4 oz Lardons (or Bacon)
- 2 Onions, chopped
- 3 Carrots, chopped
- 4 cloves Garlic, minced
- 2 tbsp Tomato Paste
- 1 cup Red Wine
- 4 cups Beef Broth
- 2 sprigs Fresh Thyme
- 2 Bay Leaves
- Salt and Pepper to taste
Instructions
- Prep your ingredients: Chop the onions, carrots, and garlic.
- Brown the meat in a heavy-bottomed pot over medium-high heat.
- Cook the lardons until crispy in the same pot.
- Sauté the onions, carrots, and garlic until soft.
- Incorporate the tomato paste and cook for a couple of minutes.
- Pour in the red wine and simmer for 5 minutes.
- Combine everything back into the pot with herbs and broth.
- Slow cook for 120 to 150 minutes until beef is tender.
- Finishing touches: Taste and adjust seasoning, then remove herbs before serving.
- Let it rest before serving for flavor development.
Notes
Serve with creamy mashed potatoes or bread to soak up the sauce. Enhance with fresh parsley.
- Prep Time: 20 minutes
- Cook Time: 150 minutes
- Category: Main Course
- Method: Slow Cooking
- Cuisine: French
Nutrition
- Serving Size: 1 bowl
- Calories: 480
- Sugar: 4g
- Sodium: 600mg
- Fat: 20g
- Saturated Fat: 8g
- Unsaturated Fat: 10g
- Trans Fat: 0g
- Carbohydrates: 29g
- Fiber: 4g
- Protein: 35g
- Cholesterol: 100mg
Keywords: Ragout du Nord, French cuisine, comfort food, beef stew, family recipe
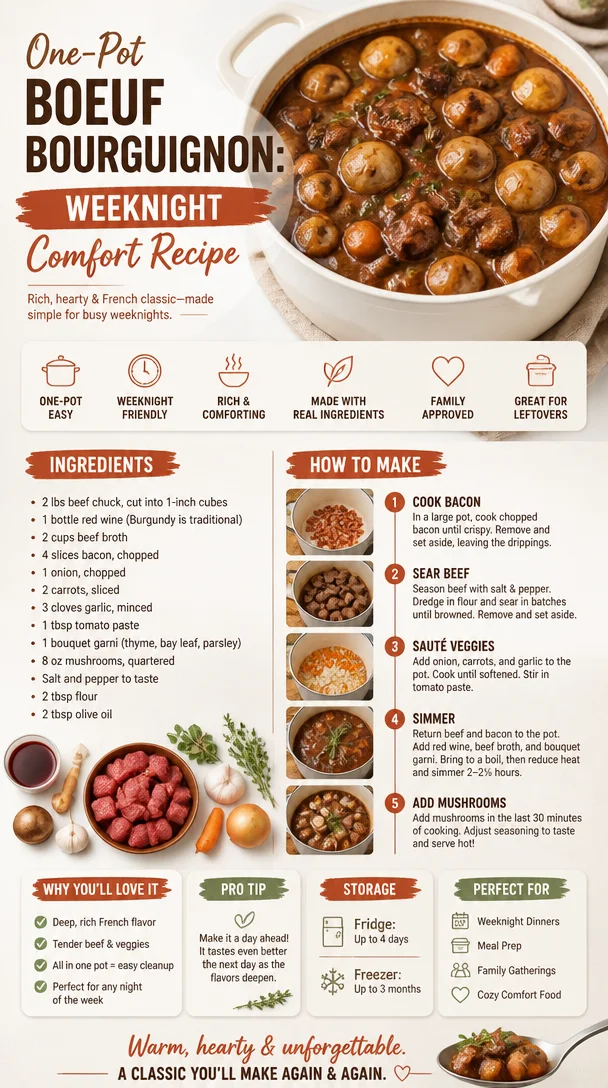
One-Pot Boeuf Bourguignon: Weeknight Comfort Recipe
Boeuf Bourguignon: A Heartwarming French Classic
Welcome to my cozy corner of the kitchen! Today, we’re diving into a dish that’s not just a meal; it’s a celebration of flavors, tradition, and the joy of cooking. I’m thrilled to share my version of classic Boeuf Bourguignon — a rich and hearty beef stew that hails from the beautiful Burgundy region of France. This dish is perfect for gatherings with friends and family, cozy winter nights, or when you simply want to indulge in something that warms your soul!
The Magic of Boeuf Bourguignon
Ah, Boeuf Bourguignon. Just the sound of it brings back fond memories and a warm nostalgia. I remember the first time I made this dish. I was a young cook, filled with ambition and a bit of trepidation, in my tiny kitchen with flour dusting every surface. I’d watched Julia Child whip up this iconic French dish countless times on television, and the way she spoke about it—what a symphony of flavors, she’d say—sparked a sense of excitement in me.
One chilly evening, I decided to tackle this culinary masterpiece. As I seared the beef, the sizzle filled the kitchen, and the smell alone was enough to make my heart race. Each step felt important, almost ritualistic. I remember stirring the aromatic veggies and herbs, feeling like I was channeling the French countryside. Hours later, my family gathered around the table, the warmth of the stew enveloping us as we dug in. The flavors danced on our tongues, and it turned out to be one of those meals that solidified my passion for home cooking.
It’s incredible how food brings us together, creating vivid memories with every bite! So grab your favorite apron, maybe pour yourself a glass of red wine, and let’s get started on this culinary adventure!
Ingredients You’ll Need
Here’s what you’ll need for this classic Boeuf Bourguignon. I promise it’s worth every ingredient!
-
2 lbs beef chuck: This is the star of the show! Look for well-marbled cuts for extra flavor. If you prefer, brisket or round can work as substitutes too.
-
1 bottle of red wine (preferably Burgundy): A dry red wine is crucial for depth of flavor. If you can’t find Burgundy, a Bordeaux or even a hearty Pinot Noir will do the trick!
-
2 cups beef broth: Homemade is best, but store-bought can save time. Just opt for low-sodium if possible.
-
4 oz bacon or pancetta: This adds a smoky, delicious undertone. Can’t eat pork? Try turkey bacon or omit it entirely for a lighter version.
-
2 carrots: These add sweetness and color. Feel free to use parsnips for a twist!
-
1 onion: A yellow onion works beautifully, but shallots can bring a lovely subtle flavor.
-
3 cloves garlic: Minced, to infuse the stew with that heavenly aroma.
-
1 bouquet garni (parsley, bay leaf, and thyme tied together): This neat little bundle of herbs adds aromatic flair. Use loose dried herbs if fresh isn’t available.
-
2 tbsp tomato paste: A must for umami richness. If you’re out, you can use ketchup in a pinch, but just a teaspoon!
-
1 cup pearl onions: These little gems give great texture. If you can’t find them, chopped regular onions work too.
-
2 cups mushrooms (button or cremini): Sautéed to earthy perfection, they’re a must! These can be replaced with other firm, meaty mushrooms like shiitake.
Step-by-Step Instructions
Now that we have everything, let’s channel our inner chef and get cooking!
-
Prep your ingredients: Start by cutting your beef into 2-inch cubes. Not only does this make for a stunning presentation, but it ensures even cooking. Pat the meat dry with paper towels to get a gorgeous sear.
-
Sear the bacon: In a large Dutch oven, cook the bacon over medium heat until crispy, about 5-7 minutes. Use a slotted spoon to remove it, leaving the drippings. This smoky flavor will be the essence of your stew!
-
Brown the beef: Increase the heat to medium-high and add the beef in batches so they don’t steam. Brown on all sides for about 8-10 minutes. A good sear creates that incredible depth of flavor! Don’t rush this step.
-
Add aromatics: Toss in the diced onion, carrots, and garlic. Cook until the onions are translucent, about 5 minutes. This builds the foundation of flavor for your dish.
-
Stir in the tomato paste: After about a minute, add tomato paste and stir to combine. Cook it until it turns a slightly darker color, increasing the richness.
-
Add the wine and broth: Pour in the wine and scrape the bottom to deglaze the pot, getting all those delicious brown bits! Then add the beef broth. Bring it to a gentle simmer.
-
In goes the bouquet garni: Toss in your wrapped herbs and let them steep in the warming stew. The fragrance will make your kitchen smell divine!
-
Simmer away: Reduce the heat and let that gorgeous pot bubble away for about 2.5 to 3 hours. This slow cooking process makes the beef tender and flavorful. Stir occasionally and feel free to add water or broth if it gets too thick!
-
Sauté the mushrooms: While the beef simmers, heat a bit of olive oil in a skillet over medium-high heat. Toss in the mushrooms and sauté until golden brown, about 5-7 minutes. Then set them aside.
-
Finish the stew with veggies: After the stew has simmered to perfection, add in those pearl onions and mushrooms. Allow everything to cook together for an additional 30 minutes.
-
Taste and adjust: This is the magic moment! Taste your creation and add salt, pepper, or even more herbs as needed.
-
Serve it up: Ladle the Boeuf Bourguignon into bowls or on a platter, and enjoy with rustic bread or buttery mashed potatoes.
Serving Suggestions
Plating your Boeuf Bourguignon is all about the presentation. I love to serve it in wide, shallow bowls, garnished with a sprinkle of fresh parsley for that pop of color. Pair it with crusty French bread for dipping, or serve it over creamy mashed potatoes or buttered egg noodles to soak up every delicious drop of sauce. If you’re feeling fancy, a touch of parmesan or a drizzle of high-quality olive oil can elevate the experience even more!
Recipe Variations
Feeling adventurous? Here are a few creative twists to put your unique spin on Boeuf Bourguignon:
- Herb Infusion: Instead of a traditional bouquet garni, try using fresh herbs like rosemary or sage for a different aromatic profile.
- Vegetarian Version: Swap the beef for hearty mushrooms and use vegetable broth for a delightful vegan twist.
- Spicy Kick: Add a glimmer of red pepper flakes or a splash of hot sauce to give it a warm heat that plays beautifully with the rich flavors.
- Mustard Zing: Stir in a tablespoon of Dijon mustard before serving for an unexpected tang that brightens the dish.
- Red Wine Reduction: Instead of just simmering, finish your stew under the broiler for a few minutes to create a thick, caramelized layer on top.
Chef’s Notes
You know what I love about cooking? It’s a journey, not a race! My Boeuf Bourguignon recipe has evolved over the years. When I first started out, I stuck to the traditional methods strictly. But as I grew more comfortable, I began to experiment — adding unexpected twists and substitutions to suit my taste and the ingredients I had on hand. Every time I make it, I’m reminded that the kitchen is a space for creativity and joy. If one batch doesn’t turn out perfectly, don’t worry! Each mistake is just another recipe in the making.
FAQs and Troubleshooting
-
Why is my beef tough?
- The secret to tender beef is cooking low and slow. If you boil instead of simmering, you’ll lose that tender texture. Patience is key!
-
Can I use white wine instead?
- While a great idea for a twist, remember that the depth of flavor may change, as white wine tends to be lighter. Stick to full-bodied ones for a beef dish.
-
How can I thicken my stew?
- If your stew turns out too thin, you can make a slurry with a teaspoon of cornstarch and cold water, then stir it in and cook until thickened.
-
What do I serve with Boeuf Bourguignon?
- Traditional sides include crusty French bread, creamy mashed potatoes, or buttered egg noodles. A simple green salad completes the meal beautifully!
Nutritional Info
While Boeuf Bourguignon is a comforting and satisfying dish, here’s a rough breakdown of a serving (about 1 cup):
- Calories: 500-600
- Protein: 45g
- Fat: 30g (mostly from the beef and bacon)
- Carbohydrates: 20g
- Fiber: 2g
It’s rich and hearty, so a little goes a long way!
Thank you for sharing this journey with me as we explored the comforting world of Boeuf Bourguignon. I hope you feel inspired to create this dish, delivering warmth and joy to your loved ones (and yourself!). As always, let your kitchen become a space of experimentation, laughter, and delicious memories! Happy cooking! 🍽️❤️
Print
Boeuf Bourguignon
- Total Time: 210 minutes
- Yield: 6 servings 1x
- Diet: None
Description
A rich and hearty French beef stew from Burgundy, perfect for gatherings and cozy nights.
Ingredients
- 2 lbs beef chuck, cut into 2-inch cubes
- 1 bottle red wine (preferably Burgundy)
- 2 cups beef broth
- 4 oz bacon or pancetta
- 2 carrots, diced
- 1 onion, diced
- 3 cloves garlic, minced
- 1 bouquet garni (parsley, bay leaf, and thyme tied together)
- 2 tbsp tomato paste
- 1 cup pearl onions
- 2 cups mushrooms (button or cremini), sautéed
Instructions
- Prep your ingredients by cutting beef into 2-inch cubes and patting dry.
- Sear the bacon in a large Dutch oven over medium heat until crispy, about 5-7 minutes.
- Brown the beef in batches over medium-high heat for 8-10 minutes until well-seared.
- Add the diced onion, carrots, and garlic, cooking until onions are translucent, about 5 minutes.
- Stir in the tomato paste and cook until darkened slightly.
- Add the red wine and beef broth, bring to a gentle simmer.
- In goes the bouquet garni, letting it steep in the stew.
- Simmer for 2.5 to 3 hours for tender beef.
- Sauté the mushrooms in olive oil until golden brown, about 5-7 minutes.
- Finish the stew by adding pearl onions and mushrooms, cooking for another 30 minutes.
- Taste and adjust seasonings as needed.
- Serve in bowls, garnished with parsley and accompanied by rustic bread or mashed potatoes.
Notes
Feel free to experiment with herbs or create a vegetarian version with mushrooms and vegetable broth.
- Prep Time: 30 minutes
- Cook Time: 180 minutes
- Category: Main Course
- Method: Braising
- Cuisine: French
Nutrition
- Serving Size: 1 serving
- Calories: 550
- Sugar: 4g
- Sodium: 800mg
- Fat: 35g
- Saturated Fat: 12g
- Unsaturated Fat: 18g
- Trans Fat: 0g
- Carbohydrates: 20g
- Fiber: 3g
- Protein: 45g
- Cholesterol: 90mg
Keywords: Boeuf Bourguignon, French stew, beef stew, comfort food, Burgundy recipe
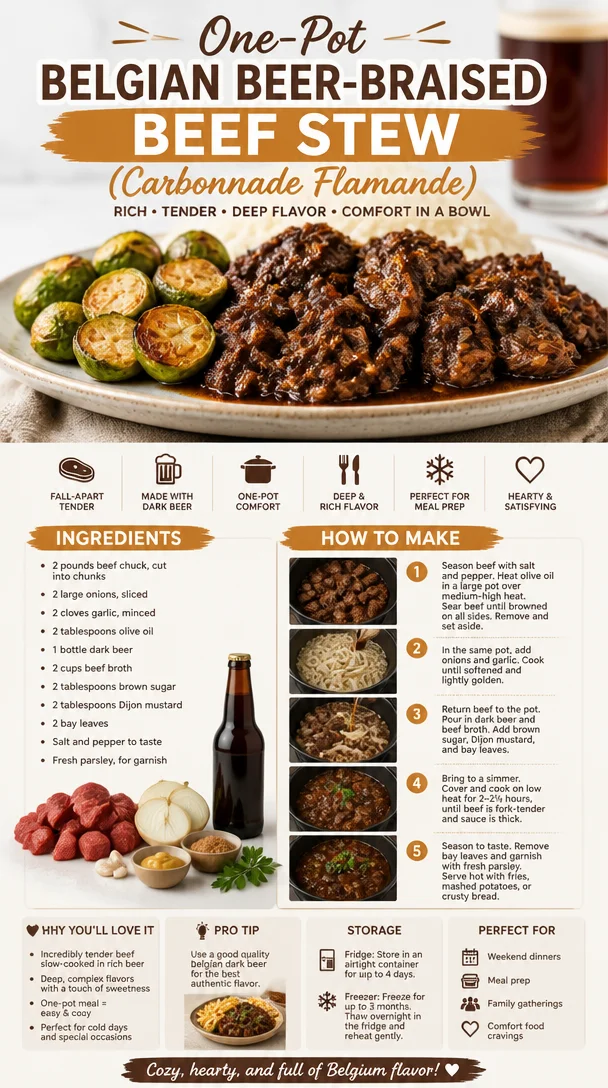
One-Pot Belgian Beer-Braised Beef Stew (Carbonnade Flamande)
Beef and Beer Belgian Stew: A Cozy Culinary Adventure
Welcome to my kitchen, dear foodies! Today, we’re diving into a dish that’s as rich in flavor as it is in history—Beef and Beer Belgian Stew, or, as the locals call it, Carbonnades a la Flamande. This stew is the ultimate comfort food, perfect for cozy nights and gatherings with your loved ones. The combination of tender beef, aromatic herbs, and, of course, rich Belgian beer creates a warming masterpiece that will have everyone asking for seconds.
Picture this: It’s a chilly autumn evening, and the smell of something hearty is wafting through your home. Family and friends gather around the table, laughter filling the room, spoons clinking against bowls, and stories shared over a warm dish. That’s the magic of this stew—it brings people together, nourishes souls, and creates memories. So let’s roll up our sleeves and get cooking!
Personal Story
For me, the first time I tasted Carbonnades a la Flamande was on a family trip to Belgium. We were in a cozy bistro tucked away in a cobblestone alley, and the walls were adorned with vintage beer posters. The air buzzed with conversations in various languages and the clinking of glasses. When our bowls arrived, filled to the brim with golden-brown stew, garnished with a sprinkle of fresh parsley—it was love at first bite. The flavors exploded in my mouth: the tenderness of the beef melting against the slightly sweet and bitter notes of the beer. It was a symphony of taste that transported me right to the heart of Belgium. From that day on, I’ve made it my mission to recreate that experience in my own kitchen, adapting it for friends and family. Each simmering pot is a reminder of that magical evening and a promise of the warmth it brings.
Ingredients
Here’s what you’ll need to create this delicious Beef and Beer Belgian Stew:
-
2 pounds beef chuck roast
This cut is perfect for stews as it becomes beautifully tender when cooked low and slow. If you can’t find chuck roast, you can substitute brisket or even a leaner cut like round, but remember to adjust cooking times for tenderness. -
2 tablespoons olive oil
For sautéing the beef and vegetables. You can swap this with canola or vegetable oil if you prefer, but the flavor of olive oil adds a lovely depth to the dish. -
2 onions, sliced
Sweet and fragrant, onions are crucial for building flavor. If sweet onions are not available, yellow onions will do, or try leeks for a gentler onion flavor. -
3 cloves garlic, minced
Garlic brings a delightful aroma and depth. If fresh isn’t available, you can use ½ teaspoon of garlic powder instead. -
1 tablespoon tomato paste
This enhances the stew’s richness. Feel free to omit it if you want a lighter version, or use sun-dried tomato paste for a twist. -
1 tablespoon brown sugar
To balance the bitterness of the beer. You can substitute with maple syrup or honey for a similar effect. -
2 cups Belgian beer (preferably a brown ale)
This is the star of the show! The depth of flavors from the beer (a nice brown ale or even a stout works beautifully) is crucial. If you prefer a non-alcoholic option, use beef broth, but it won’t have the same complex flavor. -
3 cups beef broth
To keep everything juicy and flavorful. If you’re low on beef broth, you can substitute with vegetable broth. -
2 bay leaves
For aromatic goodness. If you don’t have bay leaves, you can use dried thyme for a different flavor profile. -
1 tablespoon Dijon mustard
To add a tangy depth to the sauce. Spicy brown mustard can be a great alternative. -
2 tablespoons fresh parsley, chopped (for garnish)
This is all about freshness! If you’re in a pinch, dried parsley can work, but fresh is infinitely better.
Step-by-Step Instructions
Now that we have our ingredients, let’s bring this stew to life! Follow these steps for a dish that will impress:
-
Sear the Beef
Heat the olive oil in a large Dutch oven or heavy pot over medium-high heat. While the oil heats up, cut the beef into 2-inch cubes. Season them generously with salt and pepper, then add them in batches to the pot. Don’t overcrowd! You want a nice brown sear for flavor. This should take about 4-5 minutes per batch. When done, remove the beef and set it aside.Chef’s tip: Make sure your pot is hot enough before adding the beef—this helps develop that beautiful brown crust that enhances the flavor!
-
Sauté the Onions and Garlic
In the same pot, lower the heat to medium and toss in the sliced onions. Cook until they are softened and starting to brown (about 5-7 minutes). Add the minced garlic and sauté for an additional minute. Your kitchen should smell amazing by now!Little hack: If you want extra caramelization, add a pinch of salt to the onions—this helps draw out moisture, allowing them to cook down faster!
-
Add the Tomato Paste and Sugar
Stir in the tomato paste and brown sugar! Cook for about 2 minutes—this caramelizes the paste and helps deepen the stew’s flavor. -
Pour in the Beer
It’s time for the beer! Pour it into the pot, scraping up any brown bits stuck to the bottom (these are flavor gold!). Let it simmer for 3-5 minutes to allow some of the alcohol to cook off while releasing the flavors.Chef Insight: Choose a beer you love to drink! The flavor will intensify during cooking, so pick one that you enjoy.
-
Add the Broth and Beef
Now, it’s time to return the beef to the pot, along with the beef broth, bay leaves, and Dijon mustard. Bring it to a gentle simmer, then cover the pot and reduce the heat to low.Tip: The longer you let it simmer, the better the flavors meld together. A minimum of 1.5 to 2 hours is ideal, but it can simmer for up to 4 hours if you have the time!
-
Finish with Fresh Parsley
Once your stew is done simmering and the beef is melt-in-your-mouth tender, remove it from heat. Discard the bay leaves and stir in chopped fresh parsley for that vibrant pop of color and flavor.Serving hint: The color contrast with the parsley makes the dish visually appealing and refreshing!
Serving Suggestions
Plate your Carbonnades a la Flamande with a generous scoop over creamy mashed potatoes, buttered noodles, or rustic crusty bread. Top with a sprinkle of fresh parsley for that final flourish. This stew is perfect for a gathering, with everyone coming back for seconds, or even cozy evenings in, just you and your favorite blanket!
Recipe Variations
Feeling adventurous? Here are some variations:
-
Add Vegetables: Toss in some carrots and parsnips during the simmering phase for added sweetness and nutrition.
-
Spicy Kick: For those who love heat, consider adding a pinch of red pepper flakes or cayenne pepper.
-
Herb Swap: Swap bay leaves for fresh thyme or rosemary for a different aromatic profile.
-
Non-Beef Option: Substitute beef with lamb or chicken for a unique twist. Just adjust the cooking time to ensure tenderness.
Chef’s Notes
Over the years, this recipe has evolved into a family favorite. My brother now insists we make it on every birthday—even if it’s July! What started as a simple craving became a tradition, and each iteration adds its own flair thanks to the creativity of everyone who helps in the kitchen. And yes, there have been times I’ve had to call in backup when it turned into an epic kitchen disaster. But hey, that’s part of the journey, right?
FAQs and Troubleshooting
1. My stew turned out too salty; what can I do?
If your Carbonnades a la Flamande is too salty, add a peeled potato to it during cooking. The potato will absorb some of the excess salt. Remove it before serving!
2. The beef didn’t get tender; what did I do wrong?
Probably the cooking time or heat was too high. Make sure you’re simmering gently, not boiling. Low and slow is key for tender beef!
3. Can I make this ahead of time?
Absolutely! This stew tastes even better the next day. Just store it in the fridge after it has cooled, and reheat when you’re ready to serve.
4. How do I store leftovers?
Keep the leftovers in an airtight container in the refrigerator for up to 3 days, or freeze them for up to 3 months. Just make sure to cool it completely before freezing.
Nutritional Info
Note: Nutritional information may vary based on specific ingredients used. On average, a 1-cup serving has about 350 calories, 28g of protein, 20g of fat, and 8g of carbohydrates.
So there you have it—a warm and hearty Beef and Beer Belgian Stew that you can easily whip up at home. I hope you enjoy this culinary adventure as much as I do. Remember, cooking is all about love, laughter, and a sprinkle of creativity—so don’t be afraid to make it your own! Happy cooking, friends!
Print
Beef and Beer Belgian Stew
- Total Time: 140 minutes
- Yield: 6 servings 1x
- Diet: Beef
Description
A rich and flavorful beef stew enlivened with Belgian beer, perfect for cozy evenings.
Ingredients
- 2 pounds beef chuck roast
- 2 tablespoons olive oil
- 2 onions, sliced
- 3 cloves garlic, minced
- 1 tablespoon tomato paste
- 1 tablespoon brown sugar
- 2 cups Belgian beer (preferably a brown ale)
- 3 cups beef broth
- 2 bay leaves
- 1 tablespoon Dijon mustard
- 2 tablespoons fresh parsley, chopped (for garnish)
Instructions
- Heat the olive oil in a large Dutch oven or heavy pot over medium-high heat. Prepare beef by cutting it into 2-inch cubes, seasoning with salt and pepper, and searing it in batches until browned. Remove and set aside.
- Lower the heat and add the sliced onions, cooking until softened and starting to brown (about 5-7 minutes). Add minced garlic and sauté for an additional minute.
- Stir in the tomato paste and brown sugar, cooking for about 2 minutes to caramelize.
- Pour in the beer, scraping up any brown bits from the bottom. Simmer for 3-5 minutes.
- Add the beef back to the pot with beef broth, bay leaves, and Dijon mustard. Bring to a gentle simmer, cover, and reduce heat to low.
- Simmer for 1.5 to 4 hours depending on tenderness desired.
- Remove from heat, discard bay leaves, and stir in chopped parsley before serving.
Notes
Serve with mashed potatoes, buttered noodles, or crusty bread. This dish improves in flavor if made a day in advance.
- Prep Time: 20 minutes
- Cook Time: 120 minutes
- Category: Main Course
- Method: Simmering
- Cuisine: Belgian
Nutrition
- Serving Size: 1 serving
- Calories: 350
- Sugar: 8g
- Sodium: 500mg
- Fat: 20g
- Saturated Fat: 8g
- Unsaturated Fat: 10g
- Trans Fat: 0g
- Carbohydrates: 8g
- Fiber: 1g
- Protein: 28g
- Cholesterol: 80mg
Keywords: beef stew, Belgian stew, comfort food, carbonnades a la flamande
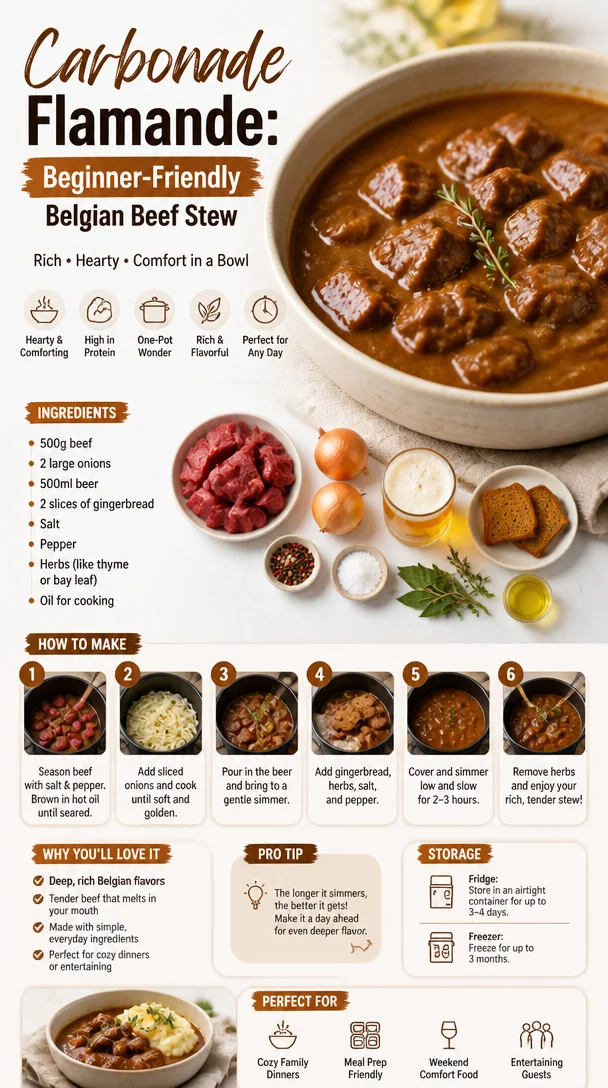
Carbonade Flamande: Beginner-Friendly Belgian Beef Stew
The Heartwarming Tradition of Carbonade Flamande: A Cozy Belgian Stew
Welcome, fellow food lovers! Today, we’re diving into the rich and comforting world of Belgian cuisine with a dish that warms the heart and soul: Carbonade Flamande, also known as Flemish beef stew. I can almost smell the aromatic blend of caramelized onions and robust beer wafting through the air — can you? This traditional stew is not just a meal; it’s a celebration of flavors that have been passed down through generations, perfect for chilly evenings or cozy gatherings.
A Taste of Nostalgia: My Carbonade Flamande Journey
Let me take you on a little stroll down memory lane. The first time I tasted Carbonade Flamande was during a family trip to Bruges. I was just a teenager, and our charming little hotel served it with such pride. As the rich, dark stew arrived at our table, I could hardly contain my excitement. The tender beef seemed to melt in my mouth, beautifully balanced by the slight sweetness of onions and the deep, malty flavor of the beer.
It was more than just a meal; it was an experience. Each bite told a story, each flavor intensified by the laughter and warmth of my family gathered around the table. We swapped stories, teased one another, and created memories that still bring a smile to my face. Ever since that trip, I’ve been on a quest to perfect my own version of this dish, bringing a taste of Belgium into my kitchen. It’s a recipe that not only nourishes the stomach but also the soul, making you feel right at home, no matter where you are.
Ingredients
To create this delightful Carbonade Flamande, you’ll need the following ingredients:
-
2 pounds beef chuck roast (or brisket)
- This cut is perfect for stewing as it’s both flavorful and tender when cooked low and slow. If you’re in a pinch, you can also use round steak or even beef short ribs for a deeper flavor.
-
2 tablespoons olive oil
- For sautéing that beautiful beef and onions. If you prefer, you can also use butter for a richer flavor.
-
3 large onions, sliced
- These bring sweetness and depth to your stew. Yellow onions are your best bet, but feel free to substitute with shallots or even red onions for a different taste.
-
3 cloves garlic, minced
- Garlic adds a punch of flavor. You can also use garlic powder in a pinch, but fresh is always best!
-
2 tablespoons brown sugar
- This is a secret ingredient that enhances the caramelization of the onions. If you’re watching your sugar intake, honey or maple syrup can be a fantastic substitute.
-
2 cups Belgian ale (or stout)
- The star of the dish! A dark beer complements the meat and adds a rich, malty flavor. If you don’t have beer, try beef broth with a splash of vinegar for acidity.
-
1 cup beef broth
- Additional moisture for the stew. Homemade broth is ideal, but store-bought works too.
-
2 tablespoons Dijon mustard
- For a subtle tang. If you’re out of Dijon, spicy brown mustard can do the trick!
-
2 bay leaves
- These add an aromatic depth to the stew. If you don’t have bay leaves, a sprig of fresh thyme can be an excellent alternative.
-
Salt and pepper to taste
- Essential for elevating all those flavors. Feel free to experiment with smoked salt for an extra kick.
Step-by-Step Instructions
Ready to get cooking? Let’s dive into making this comforting stew!
-
Prep the Beef: Start by cutting your beef into 2-inch cubes. Pat them dry with a paper towel — this helps achieve that beautiful brown crust. Season generously with salt and pepper. A well-seasoned beef is the backbone of this dish!
-
Sear the beef: In a large, heavy-bottomed pot (like a Dutch oven), heat the olive oil over medium-high heat. Add the beef in batches, ensuring not to crowd the pot. Brown all sides, which should take about 5-7 minutes. This caramelization is where the flavor magic happens, so don’t rush it!
-
Cook the onions: Once all the beef is browned, remove it from the pot and set it aside. In the same pot, add the sliced onions and a pinch of salt. Lower the heat to medium and stir often, letting the onions soften and caramelize — about 10-15 minutes. If they start to stick, you can deglaze the pan with a splash of beer!
-
Add garlic and sugar: When the onions are beautifully golden, add the minced garlic and brown sugar. Stir well, and let them cook for another 2-3 minutes until the garlic is fragrant and the sugar has dissolved. This is what makes the stew sweet and irresistible!
-
Deglaze the pot: Time to bring it all together! Pour in the Belgian ale, scraping up any brown bits stuck to the bottom of the pot. This adds even more flavor to your stew. Bring it to a simmer.
-
Return the beef: Add the seared beef back into the pot, along with the beef broth, Dijon mustard, bay leaves, and additional salt and pepper if needed. Return to a simmer, then cover and reduce the heat to low. Let it gently bubble away for about 2-3 hours. The longer, the better! Your house will smell incredible.
-
Taste and adjust: Once the beef is fork-tender, taste your stew and adjust any seasonings. Feel free to add more mustard or a sprinkle of fresh herbs for brightness.
-
Serve it up: Remove the bay leaves (they’ve done their job!) and let the stew rest for a few minutes. You can serve Carbonade Flamande over creamy mashed potatoes, egg noodles, or a simple side of crusty bread to soak up all that delicious sauce.
Serving Suggestions
When it’s finally time to serve your Carbonade Flamande, consider presenting it in rustic bowls for a cozy vibe. A sprinkle of freshly chopped parsley adds a delightful pop of color and freshness. For a complete meal, pair it with a side salad tossed in a light vinaigrette to balance out the richness of the stew. And don’t forget a hunk of crusty bread!
Recipe Variations
Now, let’s talk about some fun variations to keep things exciting:
-
Vegetarian Twist: Substitute the beef with hearty mushrooms and root vegetables like carrots and parsnips; use vegetable broth instead of beef broth.
-
Spicy Kick: Add a teaspoon of smoked paprika or a pinch of chili flakes for a delightful heat that contrasts the rich flavors.
-
Herb Infusion: Experiment by adding fresh thyme or rosemary during the cooking process for an aromatic twist.
-
Beer Swap: If you’re not a fan of beer, try a blend of apple cider and beef broth for a slightly sweet and tangy flavor.
-
Comforting Creaminess: Stir in a dollop of sour cream or crème fraîche just before serving for a luxurious finish.
Chef’s Notes
You know, Carbonade Flamande is a dish that gets better with time. I often make a double batch and freeze half for those busy weeks when cooking feels like a chore. I’ve also learned that every cook has their signature touch, and this stew is no exception. I’ve played around with different types of beers and found that each variation brings its own unique twist. It’s a comforting reminder that cooking is all about exploration — take your time and have fun with it!
Oh, and speaking of messes: the first time I made this, I spilled half of the beer on the counter. As frustrating as it was, it turned into a great kitchen laugh with my family – we still joke about it every time we enjoy the dish.
FAQs and Troubleshooting
Q1: Why is my stew tough?
A: If your beef isn’t tender, it’s likely not cooked long enough. Allow it to simmer longer and make sure you’re cooking it on low heat for a good 2-3 hours.
Q2: My stew is too salty! What can I do?
A: If you accidentally oversalt, try adding a peeled potato to the pot while it simmers. It will absorb some of the saltiness. Just remember to remove it before serving!
Q3: Can I make this in a slow cooker?
A: Absolutely! Follow the same steps for browning the beef and onions, then transfer everything to your slow cooker. Cook on low for 6-8 hours.
Q4: What’s the best way to store leftovers?
A: Store any leftovers in an airtight container in the fridge for up to 3 days. It can also be frozen for up to 3 months. Just remember to let it cool before freezing.
Nutritional Info
While I’m all about enjoying the flavors in a dish, here’s a rough breakdown of the nutritional info per serving (assuming a 6 serving yield), which you can adjust based on your ingredients:
- Calories: 450
- Protein: 30g
- Carbohydrates: 22g
- Fat: 25g
- Fiber: 1g
Wrapping It Up
And there you have it! A comforting bowl of Carbonade Flamande, perfect for sharing and bringing warmth to your table. Cooking is a journey, and I hope this recipe inspires you to create your own cozy memories in the kitchen. Remember, it’s not just about the food; it’s about the love and laughter that come with it. Happy cooking, and be sure to stop by again for more kitchen adventures!
Print
Carbonade Flamande
- Total Time: 150 minutes
- Yield: 6 servings 1x
- Diet: none
Description
A rich and comforting Belgian beef stew infused with caramelized onions and Belgian ale, perfect for chilly evenings.
Ingredients
- 2 pounds beef chuck roast (or brisket)
- 2 tablespoons olive oil
- 3 large onions, sliced
- 3 cloves garlic, minced
- 2 tablespoons brown sugar
- 2 cups Belgian ale (or stout)
- 1 cup beef broth
- 2 tablespoons Dijon mustard
- 2 bay leaves
- Salt and pepper to taste
Instructions
- Prep the Beef: Start by cutting your beef into 2-inch cubes. Pat them dry with a paper towel. Season generously with salt and pepper.
- Sear the beef: In a large pot, heat olive oil over medium-high heat. Add the beef in batches and brown all sides, about 5-7 minutes.
- Cook the onions: Remove the beef, add sliced onions and a pinch of salt to the pot. Lower the heat and stir often, caramelizing for 10-15 minutes.
- Add garlic and sugar: Stir in minced garlic and brown sugar. Cook for 2-3 minutes until garlic is fragrant and sugar dissolves.
- Deglaze the pot: Pour in the Belgian ale, scraping any brown bits. Bring to a simmer.
- Return the beef: Add the seared beef, beef broth, Dijon mustard, bay leaves, and more salt and pepper as needed. Simmer, cover, and reduce heat to low. Cook for 2-3 hours.
- Taste and adjust: Once beef is tender, taste and adjust any seasonings.
- Serve it up: Remove bay leaves. Serve Carbonade Flamande over mashed potatoes, egg noodles, or with crusty bread.
Notes
The stew gets better with time; make a double batch and freeze half for busy weeks. Feel free to experiment with different beers for unique flavors.
- Prep Time: 30 minutes
- Cook Time: 120 minutes
- Category: Main Course
- Method: Braising
- Cuisine: Belgian
Nutrition
- Serving Size: 1 serving
- Calories: 450
- Sugar: 7g
- Sodium: 800mg
- Fat: 25g
- Saturated Fat: 10g
- Unsaturated Fat: 15g
- Trans Fat: 0g
- Carbohydrates: 22g
- Fiber: 1g
- Protein: 30g
- Cholesterol: 90mg
Keywords: Belgian stew, comfort food, Carbonade Flamande, beef stew, hearty meal
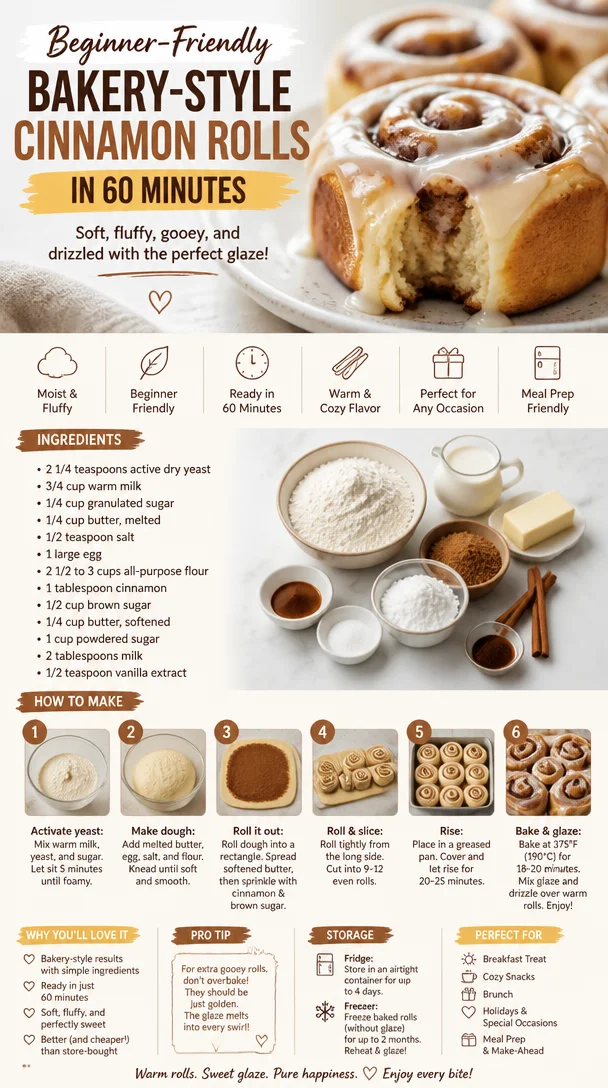
Beginner-Friendly Bakery-Style Cinnamon Rolls in 60 Minutes
Bakery-Style Cinnamon Rolls: The Ultimate Comfort Food
Welcome to my kitchen! If you’ve never experienced the intoxicating aroma of freshly baked cinnamon rolls wafting through your home, you’re in for a real treat. There’s something undeniably magical about these soft, gooey spirals of sweetness that can uplift the mood of anyone walking through your door. So, roll up your sleeves, put on your favorite apron (the messier, the better!), and let’s dive into the world of bakery-style cinnamon rolls.
Imagine a cozy Sunday morning. The sun is just peeking through the kitchen window, and you’re surrounded by the warmth of your loved ones. As you pull a tray of golden-brown cinnamon rolls from the oven, the world feels a little brighter. Each roll, a masterpiece of fluffy dough, rich cinnamon, and buttery sweetness, is perfect for sharing over a strong cup of coffee or a frothy hot chocolate. The best part? You get to savor every gooey bite together, turning a simple meal into an unforgettable family experience.
While these rolls might seem intimidating at first, I promise they are super approachable! My goal is always to inspire you to bake with confidence, even if you think you’re just a “dabbler” in the kitchen. The magic of cinnamon rolls lies in their simplicity and the joy they bring to the table. Let’s roll up our sleeves and get baking; I promise you, it’ll be worth every second!
A Memory to Savor
One of my fondest memories is baking cinnamon rolls with my grandmother every holiday season. She had this incredible way of turning the kitchen into a cozy, aromatic haven filled with laughter and stories. I can still recall how she’d give me the "dough" to knead, her gentle hands guiding mine as we added flour to prevent sticking. As we waited for the dough to rise, we’d talk about everything from family traditions to secret ingredients—just the two of us in our little world.
Those moments were special, and they linger in my heart long after the last roll has been devoured. Each time I make cinnamon rolls, I’m transported back to that warm kitchen filled with love and the sweet scent of cinnamon. It’s not just about the rolls; it’s about creating memories that stay with you long after the oven timer dings.
Ingredients
Here’s what you’ll need to create these dreamy cinnamon rolls:
- All-Purpose Flour: The backbone of your dough. You can substitute with bread flour for a chewier texture.
- Granulated Sugar: Adds sweetness and helps the dough rise. For a deeper flavor, try using brown sugar.
- Salt: Enhances flavor and balances the sweetness. Don’t skip this—it’s crucial!
- Instant Yeast: Helps the dough rise quickly. Active dry yeast can work, but give it a little extra time to bubble up.
- Milk: Provides moisture and richness. Whole milk is best; if you’re dairy-free, try almond milk or oat milk.
- Butter: Creates a tender, flavorful roll. Unsalted is preferred, but you can use margarine or coconut oil if needed.
- Egg: Binds the dough and creates a lovely texture. Replace with a flax egg (1 tbsp flaxseed meal + 2.5 tbsp water) for a vegan option.
- Brown Sugar: For the filling! It caramelizes nicely for a gooey inside.
- Ground Cinnamon: The star of the show! Try adding cardamom or nutmeg for a unique twist.
- Cream Cheese: For the frosting! You can substitute with ricotta or a dairy-free cream cheese for a lighter version.
Step-by-Step Instructions
Step 1: Prepare the Dough
-
Warm the Milk: In a small saucepan, warm 1 cup of milk to about 110°F (44°C). It should feel warm to the touch but not hot enough to burn. This will help activate the yeast.
Chef Tip: Check the temperature with your finger. If it’s comfortable, it’s perfect for the yeast!
-
Activate the Yeast: In a mixing bowl, combine 2 ¼ teaspoons of instant yeast with the warm milk and ¼ cup of granulated sugar. Let it sit for about 5-10 minutes until it’s frothy.
Chef Insight: If your mixture doesn’t foam, it might be due to expired yeast. Just grab a new packet!
-
Mix in the Ingredients: Add 4 cups of all-purpose flour, 1 teaspoon of salt, 1 egg, and ½ cup of melted unsalted butter to the yeast mixture.
Chef Hack: Use a dough hook if you have a stand mixer to save elbow grease!
-
Knead the Dough: Mix until a shaggy dough forms, then knead by hand for about 6-8 minutes until it’s smooth and elastic. If it’s too sticky, add a little flour—just remember, the dough should be soft and tacky.
Step 2: First Rise
-
Let it Rise: Place the dough in a lightly greased bowl, cover it with a clean kitchen towel or plastic wrap, and let it rise in a warm place until it doubles in size, about 1 hour.
Little Chef Note: Preheat your oven to the lowest setting for a few minutes, then turn it off and place the dough inside. It creates the perfect warm spot for rising!
Step 3: Prepare the Filling
-
Mix the Filling: While the dough is rising, prepare the filling by combining ¾ cup of packed brown sugar, 2 tablespoons of ground cinnamon, and ¼ cup of softened butter in a bowl. Mix until it forms a paste.
Chef Tip: Feel free to throw in some chopped nuts or raisins for an extra texture!
Step 4: Shape the Rolls
-
Roll Out the Dough: Once the dough has risen, punch it down gently to release the air. Roll it out on a floured surface into a rectangle, about 16×12 inches.
-
Spread the Filling: Evenly spread the cinnamon-sugar mixture over the rolled-out dough, leaving a small border around the edges.
-
Roll It Up: Starting from one long edge, roll the dough tightly into a log. Pinch the seam to seal it.
Chef Hack: Think of it like tucking in a cozy blanket!
Step 5: Slice the Rolls
-
Cut the Rolls: Using a sharp knife or dental floss (yes, really!), slice the log into 12 equal pieces.
Chef Insight: Floss is great for cutting dough neatly without squishing it!
-
Place in a Pan: Arrange the slices in a greased baking dish, leaving some space between them for expansion. Cover and let the rolls rise again for about 30 minutes.
Step 6: Bake
-
Preheat and Bake: Preheat your oven to 350°F (175°C). Bake the rolls for 25-30 minutes or until golden brown.
Little Chef Note: If the tops are browning too quickly, loosely cover them with aluminum foil halfway through baking.
Step 7: Frost and Serve
-
Frost the Rolls: While the rolls cool slightly, whip up the frosting by mixing 4 oz of cream cheese, 1 cup of powdered sugar, 2 tablespoons of milk, and a splash of vanilla extract until smooth.
-
Spread the Frosting: Slather it over the warm rolls and let the icing melt into all those nooks and crannies.
Serving Suggestions
Serve your cinnamon rolls warm, drizzled generously with cream cheese frosting. Pair them with a hot cup of coffee or tea for an indulgent breakfast or sweet treat. They also make a lovely addition to a brunch spread alongside fruits and pastries.
To make it extra special, garnish with a sprinkle of chopped pecans or a dusting of powdered sugar. Trust me; it adds just the right touch!
Recipe Variations
- Chocolate Cinnamon Rolls: Add mini chocolate chips to the filling for a decadent twist!
- Maple Pecan Rolls: Replace the brown sugar with maple syrup and toss in some chopped pecans.
- Pumpkin Spice Rolls: Stir in some pumpkin puree and pumpkin spice into the dough for a fall-inspired treat.
- Vegan Cinnamon Rolls: Substitute the milk with almond milk, the butter with coconut oil, and the egg with a flax egg.
Chef’s Notes
This recipe has been a cherished part of my baking repertoire for years and has evolved over time. I remember the first time I attempted to make these—it was a rainy afternoon, and my grandma called me to lend a hand. We had flour everywhere, and I accidentally used way too much cinnamon! The rolls turned out a bit bolder than intended, but you know what? They were still delicious!
The beauty of cinnamon rolls is that they’re forgiving. Whether you grow excited and add your favorite twist or stay true to the classic recipe, they always come out beautifully. Plus, nothing beats the satisfaction of savoring something you made from scratch.
FAQs and Troubleshooting
1. My dough isn’t rising. What’s wrong?
This could be due to expired yeast or too cold of an environment. Make sure your yeast is fresh and try placing it in a warm area.
2. Why are my rolls dense?
They might have been over-kneaded or you added too much flour. Aim for a soft, tacky dough.
3. Can I make these ahead of time?
Absolutely! You can assemble the rolls, refrigerate them overnight, and bake them fresh in the morning. Just allow them to rise for a bit before baking.
4. How do I store leftovers?
Keep the rolls in an airtight container at room temperature for 2-3 days. For longer storage, freeze them in an airtight bag, and reheat as needed.
Nutritional Info (if applicable)
While exact nutrition will depend on serving size and specific ingredients, a typical cinnamon roll (with frosting) can be around 300-400 calories each. Modifications can easily adjust this number, so you can enjoy these tasty treats guilt-free!
And there you have it! A cozy, delicious journey into the world of bakery-style cinnamon rolls. I hope this recipe inspires you to get in the kitchen, whip up a batch of your own, and create some lovely memories along the way. Happy baking!
Print
Bakery-Style Cinnamon Rolls
- Total Time: 45 minutes
- Yield: 12 servings 1x
- Diet: Vegetarian
Description
Delicious, soft, and gooey cinnamon rolls perfect for cozy mornings and family gatherings.
Ingredients
- 4 cups all-purpose flour
- ¼ cup granulated sugar
- 1 teaspoon salt
- 2 ¼ teaspoons instant yeast
- 1 cup milk (whole preferred)
- ½ cup unsalted butter (melted)
- 1 egg
- ¾ cup packed brown sugar (for filling)
- 2 tablespoons ground cinnamon
- ¼ cup softened butter (for filling)
- 4 oz cream cheese (for frosting)
- 1 cup powdered sugar (for frosting)
- 2 tablespoons milk (for frosting)
- Vanilla extract (for frosting)
Instructions
- Warm the milk to about 110°F (44°C) in a saucepan.
- Activate the yeast with warm milk and sugar; let sit until frothy.
- Mix in the flour, salt, egg, and melted butter.
- Knead the dough until smooth, about 6-8 minutes.
- Let it rise in a warm place until doubled, about 1 hour.
- Mix the filling ingredients into a paste.
- Roll out the dough into a rectangle.
- Spread the cinnamon-sugar mixture over the dough.
- Roll the dough tightly into a log and slice into 12 pieces.
- Arrange slices in a greased pan and let rise again for 30 minutes.
- Preheat your oven to 350°F (175°C) and bake for 25-30 minutes.
- Frost the cooled rolls with the cream cheese frosting.
Notes
Serve warm with coffee or tea. Can be made ahead and refrigerated overnight.
- Prep Time: 15 minutes
- Cook Time: 30 minutes
- Category: Breakfast
- Method: Baking
- Cuisine: American
Nutrition
- Serving Size: 1 roll
- Calories: 350
- Sugar: 16g
- Sodium: 400mg
- Fat: 12g
- Saturated Fat: 7g
- Unsaturated Fat: 5g
- Trans Fat: 0g
- Carbohydrates: 50g
- Fiber: 2g
- Protein: 6g
- Cholesterol: 30mg
Keywords: cinnamon rolls, breakfast, baking, comfort food
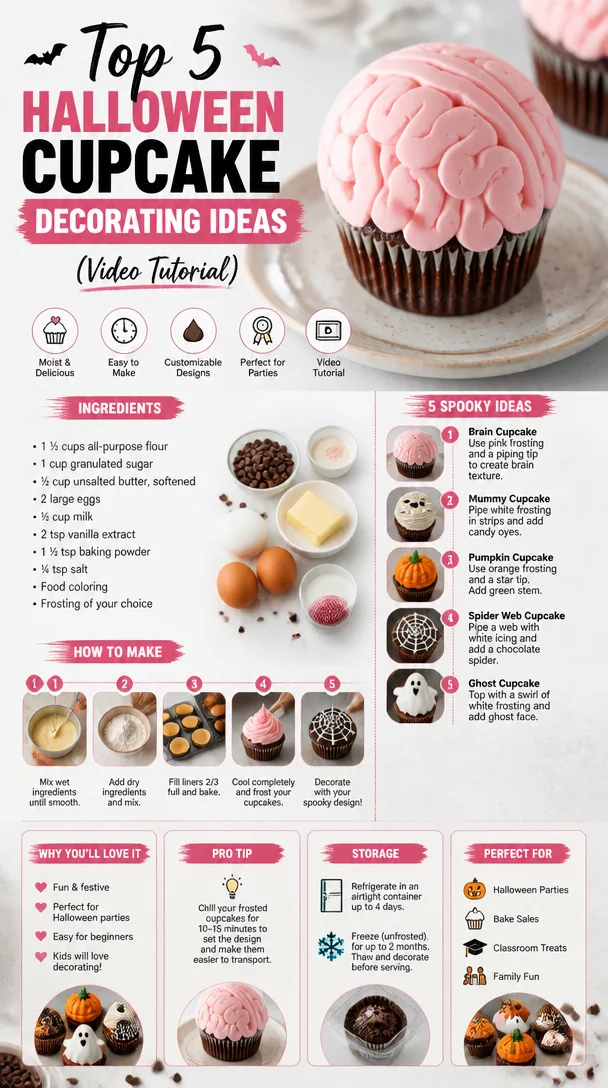
Top 5 Halloween Cupcake Decorating Ideas (Video Tutorial)
Spook-tacular Halloween Cupcake Decorating Ideas: 5 Fan Favorites from Last Year
Welcome to the haunted side of baking, my fellow food lovers! As the autumn leaves start to turn and the days get shorter, there’s a special thrill in the air. Halloween is upon us, and what better way to celebrate than by creating some wickedly delightful cupcakes? This year, I want to share five of my most popular Halloween cupcake designs from last year that’ll enchant both the young and the young-at-heart. Whether you’re hosting a ghoulish gathering, attending a spooky soirée, or just looking to brighten up your month with some festive baking, keep reading for mouthwatering flavors, fun decorating tips, and plenty of memories!
Cupcakes have that magical ability to bring people together. I reminisce about the time my best friend Jess and I baked our first batch of Halloween cupcakes during high school. Armed with silly costumes, a stack of food coloring, and the thrill of creativity, we spent hours transforming simple vanilla cupcakes into a spooky graveyard scene. We had more fun giggling and decorating than I ever thought possible! Those cupcakes became a cherished memory, a reminder of how cooking can create lasting friendships and joyous moments. Now, I want to instill that same festive spirit in you as we dive into this delectable journey!
Ingredients
Let’s gather our supplies! Here’s what you’ll need for each of these tempting cupcake designs. Don’t worry if you can’t find something; I’ve included substitution tips that will help keep your baking on track!
For the Basic Vanilla Cupcake
-
All-Purpose Flour (2 cups)
The backbone of your cupcakes. If you need a gluten-free option, use a 1:1 gluten-free flour blend! -
Granulated Sugar (1 ½ cups)
Adds sweetness and helps with moisture. For a healthier twist, you can replace half with coconut sugar. -
Butter (1 cup, softened)
Richness in flavor! If you want to lighten it up, swap in applesauce (1/2 cup) or use vegan butter. -
Baking Powder (1 tablespoon)
The magic leavening agent! Make sure it’s fresh—check the expiration date. Otherwise, swap with baking soda (use 1 teaspoon instead). -
Large Eggs (3)
They provide structure and moisture. For an egg-free option, swap with flaxseed meal mixed with water (1 tablespoon flax + 3 tablespoons water equals 1 egg). -
Vanilla Extract (2 teaspoons)
Enhances the sweetness. Homemade vanilla extract can take your cupcakes to the next level! -
Milk (1 cup)
Keeps the batter moist. You can use any type of milk you have on hand, including almond or oat milk.
Step-by-Step Instructions
Let’s bring these spooky delights to life! Here’s a detailed guide on how to make your cupcakes and bring your Halloween dreams to fruition.
-
Preheat the Oven:
Set your oven to 350°F (175°C). This is a crucial first step—an oven that’s set right from the start ensures even baking. -
Prepare Your Muffin Tin:
Line your muffin tin with Halloween-themed paper liners for that festive touch! You can find spooky designs like skeletons, ghosts, and pumpkins that can elevate your cupcakes. -
Mix the Dry Ingredients:
In a large bowl, whisk together the flour, sugar, baking powder, and a pinch of salt. This helps evenly distribute the baking powder for perfect rising every time! -
Cream the Butter:
In a separate bowl, beat the softened butter until it’s fluffy (about 2-3 minutes). A little trick? Let the butter sit out at room temperature beforehand to soften evenly. -
Add the Eggs and Vanilla:
Gradually add in the eggs, one at a time, mixing well after each addition. Then add the vanilla extract and stir until combined. Your mixture should be smooth and creamy—just like a spooky potion! -
Blend in the Dry Ingredients and Milk:
Alternate adding the flour mixture and milk to the butter mixture. Start and finish with the flour mixture for best results! Mix until just combined—overmixing can result in dense cupcakes, and we want light and fluffy! -
Fill and Bake:
Spoon the batter into your cupcake liners, filling them about two-thirds full. Bake for 18-20 minutes, or until a toothpick inserted in the center comes out clean. Pro tip: Rotate the pan halfway through baking for even results! -
Let Cool:
Once out of the oven, let the cupcakes cool in the pan for about 5 minutes, then transfer them to a wire rack to cool completely. This step is crucial to keep the frosting from melting when it’s time to decorate!
Serving Suggestions
Now that you have perfectly baked vanilla cupcakes, it’s time to channel your inner artist. Each cupcake can be a canvas for a spine-chilling masterpiece! Here are my five popular Halloween designs to inspire your creativity:
-
Ghostly Cupcakes: Top your cupcakes with white buttercream frosting, using a piping bag fitted with a round tip. Add mini chocolate chips for eyes—instant ghostly charm!
-
Pumpkin Patch Cupcakes: Using orange-tinted buttercream, swirl it on top and finish with a cute green fondant leaf. Feeling ambitious? You can even create mini edible pumpkins for an added effect!
-
Spider Web Treats: Frost your cupcakes with a base layer of white icing, then pipe black icing in a web pattern. Add a plastic spider on top, and watch your guests shriek with delight!
-
Witch’s Hat Wonders: Create a cone out of chocolate wafer cookies and place it upside down on a frosted cupcake, then add a ribbon of icing around the bottom.
-
Graveyard Cupcakes: Crumble up chocolate cookies to create “dirt” on top of your cupcakes, then insert gummy worms and mini tombstone cookies for that creepy vibe!
Recipe Variations
Looking to shake things up? Here are some creative twists on these Halloween cupcakes:
- Flavor Options: Consider infusing your cupcakes with spices like cinnamon or nutmeg to create a pumpkin or spice cake flavor that resonates with the season.
- Healthier Swaps: Swap out the all-purpose flour for almond flour or whole wheat flour for a nutritious spin.
- Vegan Fun: Replace eggs with flaxseed meal and butter with coconut oil or any plant-based option to make delicious, vegan-friendly cupcakes!
- Different Frosting Styles: Try cream cheese frosting for a tangy twist or chocolate ganache to give a rich, devilish finish.
Chef’s Notes
These Halloween cupcakes hold a special place in my heart—not just for the flavor but for the tradition they’ve become! The act of decorating each one sparks joy and creativity that is boundless. I remember once, during a friend’s Halloween party, I made cupcakes until 2 AM, fueled by sugar and enthusiasm. Though I had a light scare when the frosting exploded everywhere, they turned out to be the hit of the night! Each year, I find new ways to make them more whimsical and spooky.
FAQs and Troubleshooting
You might be wondering a few things as you embark on your cupcake journey. Here are some common questions and answers:
-
Why are my cupcakes flat?
This could be because your baking powder is old, your oven wasn’t at the right temperature, or you didn’t fill the liners enough. Make sure to check those factors! -
How do I keep my cupcakes moist?
Don’t overmix your batter, and try to enjoy them fresh. If they cool too long, consider placing them in an airtight container to lock in moisture. -
What can I do if my frosting is too runny?
If your frosting is too thin, add more powdered sugar to thicken it. You could also chill it in the fridge for a bit to firm it up. -
Can I make these cupcakes ahead of time?
Absolutely! You can bake them a day in advance and store them in an airtight container. Frost them just before serving to keep that fresh look!
Nutritional Info (Optional)
While I won’t dive too deep into the nutritional sea, each cupcake is made to be enjoyed in moderation. You can estimate that each basic vanilla cupcake (without extravagant toppings) is around 200 calories—perfect for a little treat during the chilly October nights.
I hope this guide inspires you to dive into the world of Halloween cupcake decorating! Remember, cooking is all about having fun, getting a little messy, and creating lasting memories. So grab those ingredients and utensils, and customize your spooky masterpieces. Happy Halloween baking, friends! 🎃
Print
Spook-tacular Halloween Cupcakes
- Total Time: 35 minutes
- Yield: 12 servings 1x
- Diet: Vegetarian
Description
Delightful Halloween-themed vanilla cupcakes that are sure to enchant everyone at your spooky gathering.
Ingredients
- 2 cups All-Purpose Flour
- 1 ½ cups Granulated Sugar
- 1 cup Butter, softened
- 1 tablespoon Baking Powder
- 3 Large Eggs
- 2 teaspoons Vanilla Extract
- 1 cup Milk
Instructions
- Preheat the oven to 350°F (175°C).
- Prepare your muffin tin with Halloween-themed paper liners.
- Mix the flour, sugar, baking powder, and a pinch of salt in a large bowl.
- Cream the softened butter until fluffy in a separate bowl.
- Add the eggs and vanilla, mixing until smooth.
- Blend in the dry ingredients and milk alternately.
- Fill the cupcake liners two-thirds full and bake for 18-20 minutes.
- Let cool in the pan for 5 minutes, then transfer to wire racks.
Notes
Feel free to customize your cupcakes with various toppings and frosting styles to add a spooky touch!
- Prep Time: 15 minutes
- Cook Time: 20 minutes
- Category: Dessert
- Method: Baking
- Cuisine: American
Nutrition
- Serving Size: 1 cupcake
- Calories: 200
- Sugar: 15g
- Sodium: 200mg
- Fat: 10g
- Saturated Fat: 6g
- Unsaturated Fat: 3g
- Trans Fat: 0g
- Carbohydrates: 25g
- Fiber: 1g
- Protein: 3g
- Cholesterol: 50mg
Keywords: Halloween cupcakes, spooky desserts, festive baking, vanilla cupcakes, cupcake decorating
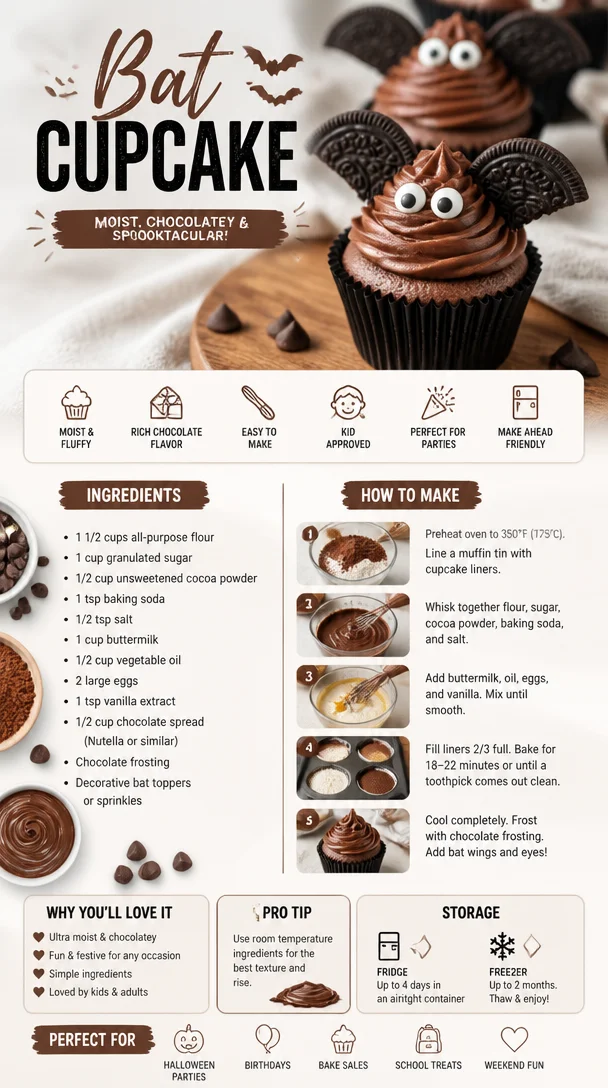
Bat Cupcake
Bat Cupcakes: A Spooktacular Treat for Any Occasion
Welcome, fellow food lovers! I’m thrilled to have you join me in this cozy corner of my kitchen, where today we’re going to whip up something that’s not only delicious but also a little spooky — Bat Cupcakes! Whether you’re planning a Halloween bash, a themed birthday party, or simply want to surprise your family with a fun treat, these cupcakes will undoubtedly bring smiles and delight. So, put on your apron (preferably with a little flour splatter) and let’s embark on this sweet adventure!
A Sweet Memory
As a child, Halloween was always one of my favorite times of the year. Pumpkins on the porch, the crispness in the air, and the exciting thrill of dressing up as my favorite character. But above all, it was the treats that made it unforgettable. I remember the first time my mom and I decided to bake something special for the neighborhood trick-or-treaters. We made spooky spider cookies, but the real treat was the moment we decided to experiment with cupcakes. Brought together by laughter and a dash of fright, we transformed ordinary chocolate cupcakes into little work-of-art bats! I still cherish those memories of not just the taste but the joy of creating something magical together.
Ingredients
Here’s what you’ll need to make these adorable Bat Cupcakes:
-
For the Cupcakes:
- 1 ¾ cups all-purpose flour
- Substitution Tip: You can use a gluten-free all-purpose mix if you want to make them gluten-free.
- 1 ½ teaspoons baking powder
- ½ teaspoon baking soda
- ½ teaspoon salt
- ¾ cup unsweetened cocoa powder
- Chef’s Insight: Use high-quality cocoa powder for a richer flavor!
- 1 cup granulated sugar
- ½ cup brown sugar
- Substitution Tip: You can use coconut sugar for a more natural sweetener.
- 2 large eggs
- 1 cup buttermilk
- Substitution Tip: You can mix one cup of milk with one tablespoon of vinegar and let sit for five minutes to create a make-shift buttermilk.
- ½ cup vegetable oil
- 2 teaspoons vanilla extract
- 1 ¾ cups all-purpose flour
-
For the Frosting:
- 1 cup unsalted butter, softened
- 3-4 cups powdered sugar
- Chef’s Insight: Start with three cups and add more if you want a thicker consistency.
- ½ cup unsweetened cocoa powder
- 2 tablespoons milk
- 1 teaspoon vanilla extract
-
For the Decorations:
- Mini chocolate chips (for eyes)
- Black fondant or chocolate bat decorations (optional)
Step-by-Step Instructions
Let’s get to baking these delightful Bat Cupcakes! Follow these steps, and soon enough, your kitchen will smell heavenly.
-
Preheat Your Oven
- Preheat your oven to 350°F (175°C). This step is crucial; it helps your cupcakes rise perfectly while they bake!
-
Prep Your Cupcake Pans
- Line your cupcake tin with paper liners. I love picking fun designs that fit the occasion — after all, we eat with our eyes first!
-
Mix the Dry Ingredients
- In a large mixing bowl, whisk together the flour, baking powder, baking soda, salt, cocoa powder, granulated sugar, and brown sugar. This is your base; take a moment to enjoy the rich, chocolate aroma wafting up!
-
Combine the Wet Ingredients
- In a separate bowl, beat the eggs, buttermilk, vegetable oil, and vanilla extract together until well-blended. It’s okay if it’s a little frothy; this means it’s mixed well!
-
Bring It All Together
- Slowly add the wet mixture to the dry ingredients, stirring gently until just combined. Be careful not to overmix; a little lumpy batter is perfectly okay when it comes to cupcakes.
-
Fill Your Liners
- Using a cookie scoop or measuring cup, fill each cupcake liner about ⅔ full with batter. This ensures they have enough space to rise without overflowing.
-
Bake Away
- Pop those cupcakes in the oven and bake for 18-20 minutes. To test doneness, insert a toothpick into the center; if it comes out clean, they’re ready!
-
Cool Time
- Once baked, let the cupcakes cool in the pan for about 5 minutes, then transfer them to a wire rack to cool completely. Patience is key — frosting warm cupcakes can lead to melty disaster!
-
Frosting Time
- While the cupcakes cool, let’s make our frosting! Beat the softened butter until creamy, then gradually add powdered sugar, cocoa powder, milk, and vanilla. Adjust the thickness to your liking!
-
Frost and Decorate
- Once cooled completely, generously frost each cupcake and set the mini chocolate chips for the eyes. Use your sweet decorations to create adorable bat features!
Serving Suggestions
These Bat Cupcakes are as delightful to display as they are to eat! Consider arranging them on a spooky-themed cake stand, draping some cobwebs around for atmosphere, or placing them in clear cellophane bags for party favors. They make a fantastic centerpiece for any gathering, inviting smiles and excitement.
Recipe Variations
- Vegan Option: Substitute eggs with flax eggs (1 tablespoon flaxseed meal + 2.5 tablespoons water per egg) and use plant-based milk and egg replacers for the frosting.
- Chocolate Mint Bats: Add a teaspoon of peppermint extract to the frosting for a refreshing minty flavor!
- Different Flavors: Try vanilla or pumpkin spice cupcakes instead of chocolate for a seasonal twist!
- Funfetti Style: Add colorful sprinkles into the batter for confetti cupcakes that pop with joy.
Chef’s Notes
I can’t tell you how many times this recipe has evolved! What started as a simple chocolate cupcake recipe became my canvas for culinary creativity. I remember an unexpected kitchen accident while testing a new frosting — I added way too much cocoa powder and my poor cupcakes ended up looking like little burnt marshmallows! But as is often the case in the kitchen, the best ideas come from mistakes. That day, bat cupcakes were born!
FAQs and Troubleshooting
1. My cupcakes came out dry! What happened?
- Overmixing the batter or baking them too long can lead to dryness. Make sure to check them a couple of minutes before the suggested time.
2. My frosting is too thin; how can I thicken it?
- Simply add more powdered sugar gradually until you achieve your desired thickness. If it’s too thick, mix in a little more milk!
3. Can I make these ahead of time?
- Absolutely! You can bake the cupcakes a day or two in advance, store them in an airtight container, and frost them just before serving.
4. How do I store leftovers?
- Store any leftovers in an airtight container at room temperature for a couple of days. If you want to keep them longer, refrigerate for up to a week or freeze them for up to three months!
Nutritional Info (optional)
For those watching their nutritional intake, here’s a rough estimate per cupcake (without frosting):
- Calories: ~200
- Fat: 8g
- Carbohydrates: 30g
- Protein: 3g
But remember, each delightful bite is worth every calorie when shared with loved ones!
So there you have it, my dear foodies! These Bat Cupcakes are not just a treat; they’re a delicious canvas for creativity, joy, and memories waiting to be made. I can’t wait for you to try this recipe and share your spooky delights. Remember to embrace the process, let your kitchen flourish with laughter, and, most importantly, have fun! Happy baking!
Print
Bat Cupcakes
- Total Time: 35 minutes
- Yield: 12 servings 1x
- Diet: Vegetarian
Description
Delicious and spooky bat-themed cupcakes perfect for Halloween and other festive occasions.
Ingredients
- 1 ¾ cups all-purpose flour
- 1 ½ teaspoons baking powder
- ½ teaspoon baking soda
- ½ teaspoon salt
- ¾ cup unsweetened cocoa powder
- 1 cup granulated sugar
- ½ cup brown sugar
- 2 large eggs
- 1 cup buttermilk
- ½ cup vegetable oil
- 2 teaspoons vanilla extract
- 1 cup unsalted butter, softened
- 3–4 cups powdered sugar
- ½ cup unsweetened cocoa powder (for frosting)
- 2 tablespoons milk
- 1 teaspoon vanilla extract (for frosting)
- Mini chocolate chips (for eyes)
- Black fondant or chocolate bat decorations (optional)
Instructions
- Preheat your oven to 350°F (175°C).
- Line your cupcake tin with paper liners.
- Mix the flour, baking powder, baking soda, salt, cocoa powder, granulated sugar, and brown sugar in a large mixing bowl.
- Combine the eggs, buttermilk, vegetable oil, and vanilla extract in a separate bowl.
- Bring the wet mixture to the dry ingredients, stirring gently until just combined.
- Fill each cupcake liner about ⅔ full with batter.
- Bake for 18-20 minutes, then test doneness with a toothpick.
- Cool in the pan for about 5 minutes, then transfer to a wire rack.
- Frost the cupcakes with the buttercream frosting made from butter, powdered sugar, cocoa powder, milk, and vanilla.
- Decorate with mini chocolate chips and other decorations.
Notes
These cupcakes can be made ahead of time and stored in an airtight container.
- Prep Time: 15 minutes
- Cook Time: 20 minutes
- Category: Dessert
- Method: Baking
- Cuisine: American
Nutrition
- Serving Size: 1 cupcake
- Calories: 200
- Sugar: 15g
- Sodium: 200mg
- Fat: 8g
- Saturated Fat: 5g
- Unsaturated Fat: 2g
- Trans Fat: 0g
- Carbohydrates: 30g
- Fiber: 2g
- Protein: 3g
- Cholesterol: 30mg
Keywords: bat cupcakes, Halloween treats, spooky desserts, chocolate cupcakes, fun baking
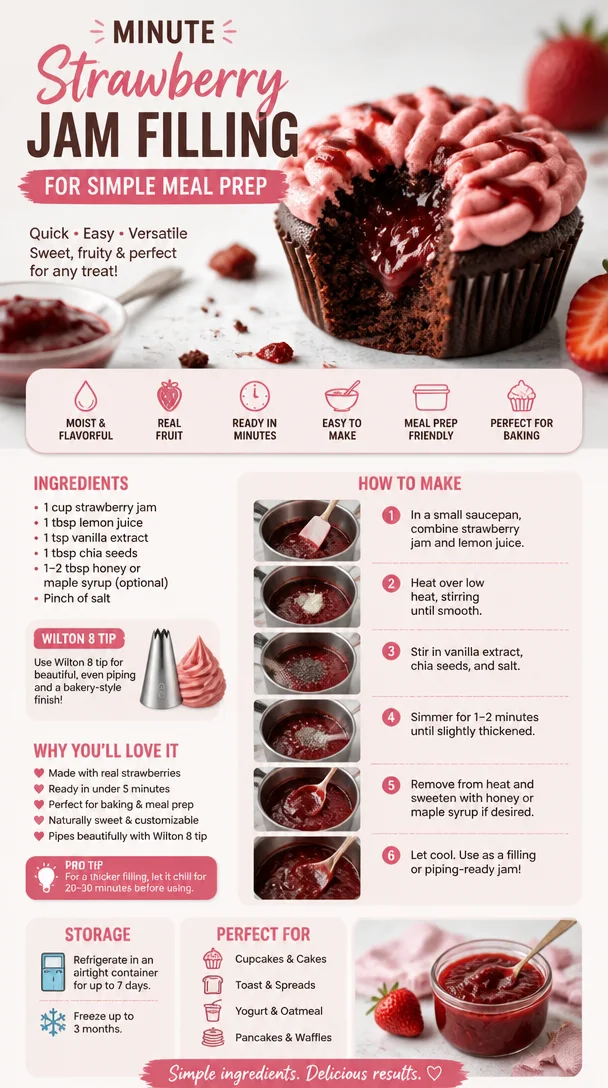
Minute Strawberry Jam Filling for Simple Meal Prep
The Sweetness of Homemade Strawberry Jam Filling: A Heartfelt Guide
Welcome back to my cozy kitchen! It’s Olivia Bennett here, guiding you through a delightful culinary journey that celebrates one of my favorite treats—homemade strawberry jam filling. There’s nothing quite like the joy of spreading freshly made jam on a warm scone, a slice of toasted bread, or even dolloping it atop a luscious cake—yum! Today, we’ll explore not only how to make this delicious filling from scratch but also why it’s a beloved tradition in many homes (including mine).
The scent of strawberries simmering on the stove reminds me of lazy summer afternoons spent in my grandmother’s kitchen. As a child, I would watch her work with a twinkle in her eye, guiding me through each step with love and laughter. "The secret," she would say, "is to use the ripest strawberries you can find. They’re nature’s candy!" The sweet, sticky mixture bubbling away would fill the room with a fragrance that made my mouth water, and I couldn’t wait to taste the final product.
Today, let’s keep that nostalgia alive as we create a vibrant strawberry jam filling that’s sure to become a treasured recipe in your home as well. Not only does it make for a fantastic addition to pastries, desserts, and breakfast items, but it also carries that personal touch that store-bought versions simply can’t compete with. Grab your apron, and let’s get cooking!
A Taste of Nostalgia: My Strawberry Jam Story
Growing up, summer meant strawberry picking with my family. My siblings and I would race each other through the rows of berry-laden plants, eager to fill our baskets with plump, juicy strawberries. It was a tradition that brought us closer, filled our afternoons with sunshine, and rewarded us with the sweetest of treats.
Once we had our bounty, we’d head home, sweaty and giggly, only to dive into my grandmother’s kitchen, where the magic happened. I recall the excitement of watching her cook the strawberries down with sugar, their color deepening into a ruby red as the sweet scent enveloped us. Every spoonful of that warm strawberry jam seemed to hold the essence of our summer adventures, and each jar we sealed was a treasure that would last through the year.
Today, I still make strawberry jam using the same recipe, infused with those delightful memories, and I can’t wait for you to create your own unforgettable experiences with this filling!
Ingredients
Here’s what you’ll need to whip up this luscious strawberry jam filling:
- 2 pounds fresh strawberries: The stars of the show! Look for ripe, sweet strawberries for the best flavor. If strawberries aren’t in season, you can substitute with frozen, thawed strawberries, but ensure they retain some natural sweetness.
- 1 cup granulated sugar: This sweetness balances the tartness of the strawberries. Feel free to use less sugar or sugar substitutes like honey or maple syrup if you prefer.
- 1 tablespoon lemon juice: This adds brightness and helps preserve the color of the strawberries. Freshly squeezed lemon juice is best, but bottled lemon juice works too.
- 1 teaspoon vanilla extract (optional): A touch of vanilla enhances the flavors! You can even use almond extract for a slightly different twist.
- 1 packet fruit pectin: Pectin helps the jam set perfectly. You can use either powdered or liquid based on your preference, and some brands even come low-sugar options.
Step-by-Step Instructions
Step 1: Prepare the Strawberries
Start by washing the strawberries thoroughly under cold water. Remove the green tops and hull the strawberries—this means cutting away the stem and the white part just beneath it. You can slice them in half for quicker cooking, or if you prefer a chunkier texture, leave them intact.
Chef’s Tip: Use a paring knife to hull the strawberries easily, creating a nice, clean cut without wasting fruit!
Step 2: Macerate the Strawberries
Place your cleaned strawberries in a large mixing bowl. Sprinkle the cup of granulated sugar over them, and add the tablespoon of lemon juice. Gently toss the strawberries until they’re all coated in sugar. Let them sit for about 30 minutes. This step draws out the natural juices from the fruit and creates a syrupy mixture that is bursting with flavor!
Chef’s Insight: This process of maceration not only enhances the strawberry flavors but also allows the sugar to dissolve, leading to a smoother jam.
Step 3: Cook the Mixture
Transfer the macerated strawberries into a large saucepan over medium heat. Bring the mixture to a gentle boil, stirring frequently to prevent sticking. Once boiling, add the pectin packet, mixing well to incorporate it into the strawberries effectively.
Chef Hack: If you prefer a smoother consistency, consider using an immersion blender to purée the strawberries to your desired texture!
Step 4: Let it Simmer
Allow the mixture to simmer for about 15-20 minutes, continuing to stir frequently. You’ll notice the mixture thickening and bubbling up like magic. Keep an eye on it to avoid any sticking or burning.
Pro Tip: To check if your jam is ready, place a small amount on a chilled plate. If it holds its shape after a minute, it’s time to turn off the heat!
Step 5: Bottle It Up
Once your jam has reached the desired consistency, carefully ladle it into sterilized jars. Leave a little headspace at the top. Seal the jars with lids while the jam is still hot, and invert them for a few minutes to help create a vacuum seal.
Chef’s Note: Proper sealing will help preserve the freshness of your jam for longer, and these little jars make for lovely gifts!
Step 6: Cool and Store
Let your jars cool completely at room temperature before storing them in the fridge or pantry. Your homemade strawberry jam filling is now ready to shine in all your favorite recipes!
Serving Suggestions
When it comes to serving your homemade strawberry jam filling, the possibilities are endless! Spread it generously on toast, use it as a layer in sponge cakes, or fill pastries for a dessert that will have everyone returning for seconds. You can also swirl it into yogurt or oatmeal for a splash of fruity goodness. If you’re feeling adventurous, try it in savory dishes, like glazing grilled chicken or pork to add a sweet twist!
Recipe Variations
Here are a few fun variations to make your strawberry jam uniquely yours:
- Strawberry Lemon Jam: Add an extra zing by increasing the lemon juice to 2 tablespoons.
- Balsamic Strawberry Jam: Stir in a splash of balsamic vinegar for a sophisticated touch that pairs beautifully with cheese.
- Spiced Strawberry Jam: Infuse with spices like cinnamon or ginger for a warm flavor profile—perfect for fall!
- Strawberry-Basil Jam: Fold in a handful of fresh basil leaves at the end of cooking for a fragrant herbaceous twist.
Chef’s Notes
Every time I make this strawberry jam filling, it’s a warm reminder of love, family, and tradition. Some days, I can hear my grandmother’s voice in my head, guiding me through the steps while I craft this rich blend of flavors. Over the years, I’ve tweaked this recipe to suit my preferences—adding a hint of vanilla one day or tossing in a few raspberries on another for fun.
Cooking is about creativity and exploration, so don’t hesitate to make it your own!Each jar of jam captures not just flavors but also sweet moments, waiting to be shared with those you love.
FAQs and Troubleshooting
-
Why didn’t my jam set?
If your jam is too runny, you may need to cook it a little longer, letting it reach a higher temperature for more evaporation. If using pectin, make sure you followed the quantity correctly! -
Can I use frozen strawberries?
Yes, frozen strawberries are a great option! Just thaw them completely and drain any excess liquid before following the normal steps. -
How long does this jam last?
Properly sealed and stored in a cool place, your homemade strawberry jam can last up to a year in the pantry and a few months in the fridge after opening. -
Is it safe to use jars that don’t seal?
If a jar doesn’t seal, it’s best to refrigerate it and use it within a few weeks. You can also reprocess the jam into a new jar with a new lid for better sealing.
Nutritional Info
Though I haven’t provided specific nutritional information, homemade strawberry jam is generally light and can be enjoyed in moderation. It provides a good dose of vitamin C from the fresh strawberries, with sugar adding sweetness to your meals.
With this guide, you’re now equipped to bring the sweetness of homemade strawberry jam filling into your kitchen. I hope you recreate these cherished memories and make it a family tradition of your own. Happy cooking, my fellow foodies! 🍓💖
Print
Homemade Strawberry Jam Filling
- Total Time: 50 minutes
- Yield: 4 cups 1x
- Diet: Vegetarian
Description
A delightful homemade strawberry jam filling, perfect for spreading on toast or using in desserts, capturing the essence of summer in every jar.
Ingredients
- 2 pounds fresh strawberries
- 1 cup granulated sugar
- 1 tablespoon lemon juice
- 1 teaspoon vanilla extract (optional)
- 1 packet fruit pectin
Instructions
- Prepare the strawberries by washing them and removing the green tops.
- Macerate the strawberries with sugar and lemon juice, then let sit for 30 minutes.
- Cook the strawberries over medium heat until boiling, then add the pectin.
- Let the mixture simmer for 15-20 minutes, stirring frequently.
- Bottle the jam into sterilized jars, leaving headspace.
- Cool the jars at room temperature before storing them.
Notes
For variations, consider adding more lemon juice, balsamic vinegar, or spices for unique flavors.
- Prep Time: 30 minutes
- Cook Time: 20 minutes
- Category: Spread
- Method: Canning
- Cuisine: American
Nutrition
- Serving Size: 2 tablespoons
- Calories: 50
- Sugar: 12g
- Sodium: 1mg
- Fat: 0g
- Saturated Fat: 0g
- Unsaturated Fat: 0g
- Trans Fat: 0g
- Carbohydrates: 13g
- Fiber: 1g
- Protein: 0g
- Cholesterol: 0mg
Keywords: strawberry jam, homemade jam, jam filling, preserves, summer recipes




