
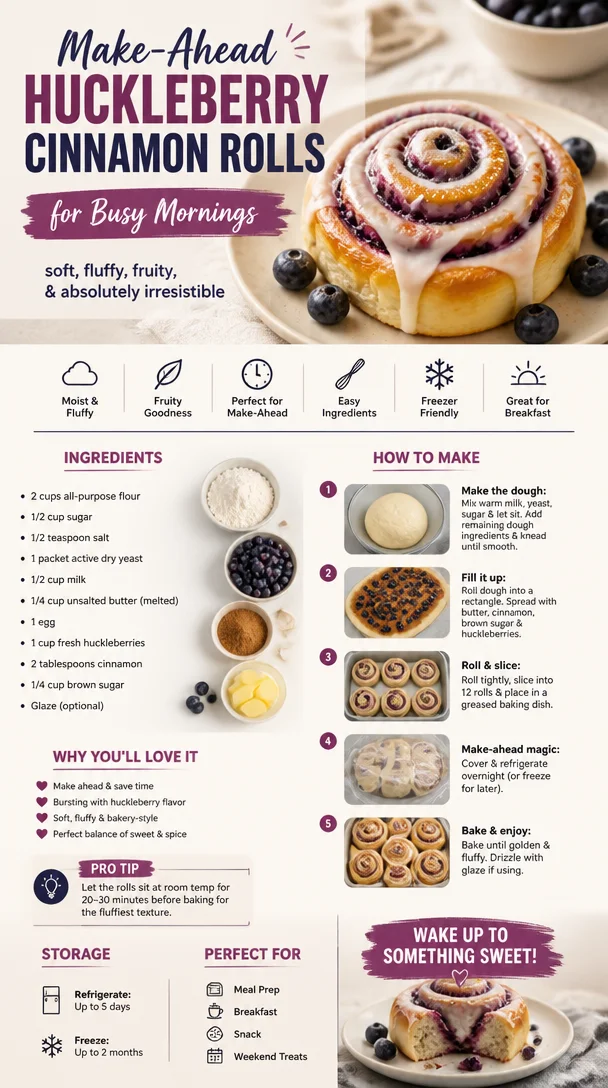
Make-Ahead Huckleberry Cinnamon Rolls for Busy Mornings
Huckleberry Cinnamon Rolls: A Cozy Kitchen Adventure
Welcome to my kitchen! Today, I’m beyond excited to share one of my all-time favorite recipes: huckleberry cinnamon rolls. If you’ve never had the pleasure of sinking your teeth into a warm, gooey cinnamon roll loaded with juicy huckleberries, you’re in for a delightful treat. The combination of sweet, fragrant cinnamon with the tartness of huckleberries creates a symphony of flavors that will have you coming back for seconds (and thirds!).
Now, let’s take a step back for a moment. Picture this: It’s a brisk autumn morning, and the air is crisp. You’ve just come in from a lovely hike in the mountains, your pockets filled with little treasures of huckleberries picked fresh from the wild. You head to the kitchen, and the thought of transforming these beautiful berries into a cozy, warm breakfast fills you with anticipation. The smell of cinnamon wafts through the air, drawing in everyone around you like bees to honey.
I’ll never forget the first time I made huckleberry cinnamon rolls. I was hosting a gathering for friends, and I wanted to whip up something special. With just a few basic ingredients and some creativity, I crafted rolls that not only looked stunning but also tasted like a hug in pastry form. The best part? Watching my friends marvel at the sight of those bubbling rolls and then devour them with smiles on their faces. It was a memory etched in my heart, and I hope to inspire you to create your own delicious moments!
So grab your apron, preheat the oven, and let’s roll up our sleeves to make these scrumptious huckleberry cinnamon rolls together!
Ingredients
Here’s what you’ll need to create these delightful treats:
-
2 cups all-purpose flour: The backbone of our dough. If you’re looking for a gluten-free alternative, consider using a 1:1 gluten-free flour blend.
-
1/2 cup granulated sugar: This adds sweetness to the dough and filling. For a healthier option, substitute with coconut sugar or a sugar alternative like stevia.
-
1 teaspoon instant yeast: This magical ingredient helps our rolls rise beautifully. If using active dry yeast, allow it to bloom in warm water before mixing!
-
1/2 teaspoon salt: A pinch of salt enhances all the flavors in your rolls. Don’t skip it!
-
1/2 cup whole milk: This brings moisture and richness to our dough. Almond milk or oat milk are excellent dairy-free substitutes.
-
1 large egg: Adding an egg enriches the dough. For a vegan twist, use a flax egg (1 tablespoon ground flaxseed mixed with 2.5 tablespoons of water).
-
1/4 cup unsalted butter (melted): This creates a tender roll. Coconut oil or vegan butter can be used if you want a non-dairy option.
-
1 cup huckleberries (fresh or frozen): These little gems are the stars of our show! If you can’t find huckleberries, blueberries can step in as a fantastic substitute.
-
1 tablespoon ground cinnamon: This gives that warm, inviting flavor we all love in cinnamon rolls. Feel free to mix it up with some nutmeg for extra spice!
-
1/4 cup brown sugar: For the filling, this provides that rich sweetness and caramel-like flavor. You can also make a cinnamon-sugar blend using white sugar if you’re out of brown.
-
1/2 cup powdered sugar (optional for icing): This adds a sweet finishing touch if you’re feeling fancy!
Step-by-Step Instructions
Now that we’ve gathered our ingredients, let’s dive into the fun part — making those huckleberry cinnamon rolls!
Step 1: Create the Dough
In a large mixing bowl, combine the flour, granulated sugar, instant yeast, and salt. Mix these dry ingredients together, ensuring everything is evenly distributed. It’s so satisfying to see the flour amalgamating with the sugar. The aroma already starts to hint at the cozy dish to come!
In another bowl, whisk together the whole milk, melted butter, and egg until well combined. Gradually pour this mixture into the dry ingredients, stirring until a dough forms. This is early-stage magic!
Step 2: Knead the Dough
Transfer the dough onto a lightly floured surface and knead it for about 5 to 7 minutes. It should become smooth and elastic. If it feels too sticky, don’t be afraid to sprinkle a little more flour as you knead! Think of this as giving your dough a nice, little workout. It deserves it!
Step 3: Let It Rise
Form the dough into a ball and place it in a greased bowl. Cover it with a clean kitchen towel and let it rise in a warm spot for about an hour, or until it’s doubled in size. This is a great time to catch up on your favorite podcast or prep your coffee!
Step 4: Prepare the Filling
While the dough is rising, let’s make our filling! In a small bowl, mix together the brown sugar and ground cinnamon. When the dough has finished rising, roll it out on a floured surface into a rectangle (about 1/4 inch thick). This is where the fun begins!
Step 5: Spread and Sprinkle
Spread the cinnamon-sugar mixture over the rolled-out dough evenly. Then, sprinkle the huckleberries gently across the surface. You want them to be nestled in the filling but not crowded. It’s all about balance, my friends.
Step 6: Roll It Up
Starting from the long edge, carefully roll the dough into a tight log. You may need to apply a little pressure to make sure those huckleberries don’t escape! Once rolled, pinch the seams to seal.
Step 7: Cut the Rolls
With a sharp knife or a bench scraper, slice the rolled dough into 12 equal pieces. Place these charming little spirals in a greased baking dish or on a parchment-lined tray. If you’ve got some extra huckleberries, feel free to toss them on top for decoration.
Step 8: Second Rise
Cover your rolls with that trusty kitchen towel again and let them rise for another half-hour. This is your time to shine — preheat your oven to 350°F (175°C) while you wait!
Step 9: Bake to Perfection
Once the rolls have risen, pop them in the oven and let them bake for 25-30 minutes or until they’re golden brown and your kitchen is filled with aromas that will make everyone’s mouth water. Don’t rush this part; the smells alone are worth waiting for!
Step 10: Icing and Serve
If you’re feeling extra special, you can whip up a simple icing while they cool for about 10 minutes. Just mix powdered sugar with a tablespoon of milk until you reach your desired consistency. Drizzle it over your cinnamon rolls and watch as they transform into a glorious masterpiece.
Serving Suggestions
To serve, I love to place a piping hot cinnamon roll on a cozy plate, drizzle it with icing, and perhaps add a few fresh huckleberries or a sprinkle of cinnamon on top for that final touch. You can even serve them with a dollop of whipped cream or a scoop of vanilla ice cream on the side — it’s the perfect pairing, especially for brunch gatherings!
Recipe Variations
Feeling creative? Here are some variations to switch things up:
- Cream Cheese Filling: Swap the cinnamon filling for a sweet cream cheese filling and place the huckleberries on top for a tangy twist.
- Lemon Zest: Add a tablespoon of lemon zest to brighten up your filling for a refreshing citrus note.
- Nutty Crunch: Mix in some chopped pecans or walnuts with the huckleberries for added texture and flavor.
- Choco-Huckleberry Rolls: Incorporate mini chocolate chips along with the huckleberries for an indulgent treat!
- Gluten-Free: Use a gluten-free flour blend to cater to dietary needs without sacrificing taste.
Chef’s Notes
I must say, the journey of perfecting my huckleberry cinnamon rolls has been nothing short of memorable. I still remember the first batch that turned out a little too flat because I forgot to give the dough a good second rise! But you know what? Those “flat rolls” still tasted amazing, and my friends devoured them anyway. Cooking is all about experimenting and embracing those little kitchen mishaps.
Over time, I’ve tweaked this recipe to adapt to the seasons, using whatever fresh berries are available or even throwing in some seasonal spices. Every time I make them, it feels like a celebration of flavors and memories, and I hope it brings you the same joy!
FAQs and Troubleshooting
-
Why did my cinnamon rolls turn out dense?
Dense rolls can happen if the dough wasn’t kneaded enough or the yeast wasn’t activated properly. Make sure to knead it until it’s smooth and stretchy. -
Can I make these rolls ahead of time?
Absolutely! You can prepare the rolls up to the second rise stage and then refrigerate them overnight. Just let them come to room temperature for about an hour before baking! -
What if I don’t have huckleberries?
No worries! You can easily swap them for blueberries, raspberries, or even cranberries for a tart twist. -
How do I store leftover rolls?
These cinnamon rolls can be stored in an airtight container for up to three days. If they last that long, you can reheat them in the microwave or oven to bring them back to life!
Nutritional Info
These huckleberry cinnamon rolls are a delightful treat and should be enjoyed in moderation. Each roll contains roughly 200-250 calories, depending on your serving size and if you decide to add icing.
So there you have it! I hope you enjoy making these huckleberry cinnamon rolls as much as I do. There’s truly something magical about the way food brings us together, and I can’t wait for you to experience the joy of sharing these warm, loving treats with your family and friends. Happy baking!
Print
Huckleberry Cinnamon Rolls
- Total Time: 1 hour 30 minutes
- Yield: 12 servings 1x
- Diet: Vegetarian
Description
Delicious huckleberry cinnamon rolls filled with sweet cinnamon sugar and fresh berries, perfect for chilly mornings.
Ingredients
- 2 cups all-purpose flour
- 1/2 cup granulated sugar
- 1 teaspoon instant yeast
- 1/2 teaspoon salt
- 1/2 cup whole milk
- 1 large egg
- 1/4 cup unsalted butter (melted)
- 1 cup huckleberries (fresh or frozen)
- 1 tablespoon ground cinnamon
- 1/4 cup brown sugar
- 1/2 cup powdered sugar (optional for icing)
Instructions
- Combine the flour, granulated sugar, instant yeast, and salt in a bowl.
- Whisk together the milk, melted butter, and egg in another bowl.
- Pour the wet mixture into the dry ingredients, stirring until a dough forms.
- Knead the dough on a lightly floured surface for 5 to 7 minutes until smooth and elastic.
- Form the dough into a ball, place it in a greased bowl, cover with a towel, and let it rise for about 1 hour.
- Mix together the brown sugar and ground cinnamon for the filling.
- Roll the dough into a rectangle and spread the cinnamon-sugar mixture over it.
- Sprinkle the huckleberries evenly across the surface.
- Roll the dough tightly from the long edge to form a log.
- Cut the log into 12 equal pieces and place them in a greased baking dish.
- Let the rolls rise for another half-hour while preheating the oven to 350°F (175°C).
- Bake for 25-30 minutes until golden brown and aromatic.
- Mix powdered sugar with a tablespoon of milk for icing, then drizzle it over the rolls once cooled for 10 minutes.
Notes
These rolls can be prepared ahead of time and refrigerated overnight before baking.
- Prep Time: 30 minutes
- Cook Time: 30 minutes
- Category: Breakfast
- Method: Baking
- Cuisine: American
Nutrition
- Serving Size: 1 roll
- Calories: 250
- Sugar: 8g
- Sodium: 100mg
- Fat: 10g
- Saturated Fat: 6g
- Unsaturated Fat: 4g
- Trans Fat: 0g
- Carbohydrates: 37g
- Fiber: 1g
- Protein: 3g
- Cholesterol: 25mg
Keywords: cinnamon rolls, huckleberry, breakfast, baking, dessert
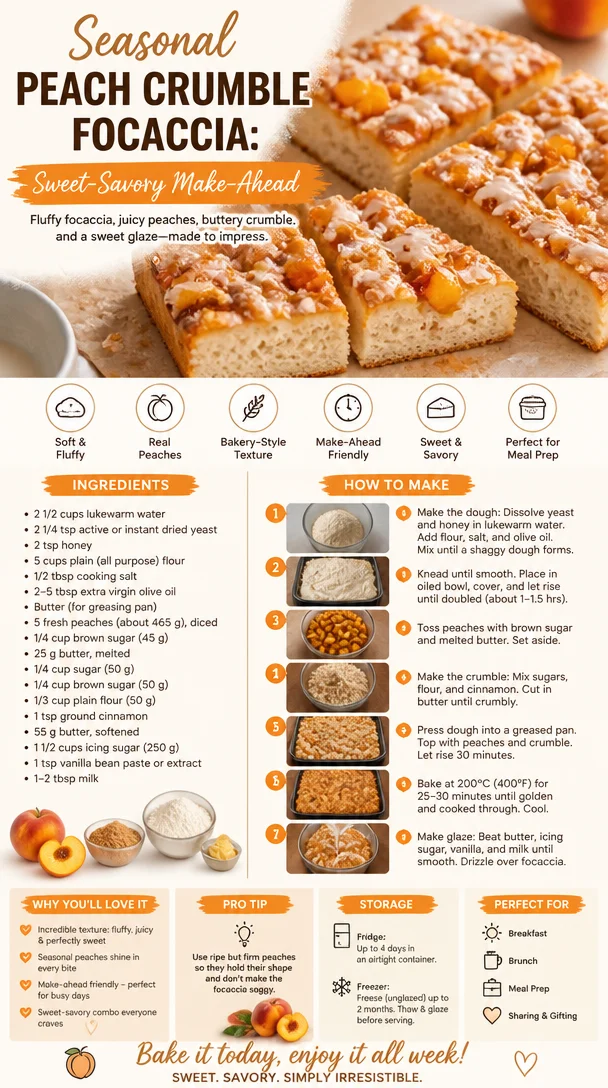
Seasonal Peach Crumble Focaccia: Sweet-Savory Make-Ahead
Peach Crumble Focaccia: An Ode to Summer’s Sweetest Fruit
Welcome, fellow food lovers! I’m thrilled to have you here in my cozy kitchen, where the aroma of baked goods always dances in the air, and laughter seems to echo off the walls. Today, we’re diving into a delightful twist on two delightful classics: focaccia and peach crumble. Think soft, pillowy bread topped with luscious, juicy peaches and a buttery crumble that will make your taste buds sing!
Imagine taking a walk in the summertime, with sun-kissed skin and the sweet scent of ripe peaches wafting through the air. That’s the kind of vibe this dish brings to the table. Picture sharing it with friends or serving it up at a family gathering, where every bite feels like a warm hug and a conversation starter.
Peach Crumble Focaccia takes the best of both worlds—savory bread and a sweet, fruity topping—and transforms them into an elegant treat. Whether it’s dessert or an indulgent breakfast, this delicious recipe creates those golden moments we treasure. So, roll up your sleeves and let’s get this peach party started!
A Personal Peachy Memory
Growing up in a tight-knit family, summer meant one thing—peach season! My grandmother had a little orchard, and it was our summer haven. Every year, we’d spend the afternoons picking juicy, sun-ripened peaches, giggling and racing to see who could find the biggest one. After loading up our baskets, we’d return to her kitchen, where the real magic happened.
I can still hear the sound of her trusty old mixer whirring as she whipped up the most delicious peach cobblers and crumbles. The kitchen would fill with the intoxicating aroma of melted butter and brown sugar mingling with fresh peaches. One afternoon, she introduced me to focaccia, explaining the art of kneading dough before we topped it with those wonderful peaches, creating a unique dessert that became an instant family favorite. That memory always brings a smile to my face, and I hope this recipe can evoke the same warmth and joy in your kitchen!
Ingredients
Here’s what you need to make this scrumptious Peach Crumble Focaccia:
-
For the Focaccia:
- 3 cups all-purpose flour: The foundation of our focaccia. You can swap with whole wheat flour for a heartier texture.
- 1 packet (2 ¼ teaspoons) instant yeast: For that magical rise! If you only have active dry yeast, just dissolve it in warm water first.
- 1 teaspoon salt: Balances the sweetness and enhances flavors.
- 1 cup warm water: This is the secret to fluffy bread. Ideally, it should be about 110°F (43°C).
- 2 tablespoons olive oil: Adds richness. You can replace it with melted butter for a different flavor.
-
For the Peach Topping:
- 3-4 ripe peaches: The star of the show! Choose peaches that are flavorful and slightly firm. If peaches aren’t in season, nectarines or plums can be great substitutes.
- 2 tablespoons brown sugar: This caramelizes beautifully when baked. You can use coconut sugar for a lighter option.
- 1 teaspoon cinnamon: Adds a touch of warmth. Feel free to adjust according to your taste preference.
-
For the Crumble Topping:
- 1 cup rolled oats: Provides a lovely texture. If you want gluten-free, be sure to use certified gluten-free oats.
- ½ cup all-purpose flour: Helps bind the crumble. You can try almond flour for a nutty flavor.
- ½ cup unsalted butter (cold, diced): Brings richness and allows for that perfect crumble. Vegan butter works here too.
- ½ cup brown sugar: Sweetness overload! You can also mix in some white sugar to balance flavors.
Step-by-Step Instructions
Now, let’s get our hands dirty! Follow these steps to create your perfect Peach Crumble Focaccia:
-
Prepare the Dough: In a large mixing bowl, combine the flour, salt, and instant yeast. Stir to mix them thoroughly. Gradually add the warm water and olive oil. Mix until a shaggy dough forms. Don’t be alarmed—it’s supposed to be sticky!
Chef’s Tip: Using a wooden spoon is easiest here. If you have a stand mixer with a dough hook, go for it! You’ll save time and get that dough nice and elastic.
-
Knead the Dough: Turn the dough onto a floured surface. Knead for about 8-10 minutes until it’s smooth and elastic. If it’s too sticky, sprinkle in more flour, but be careful not to overdo it!
Chef’s Note: This part is especially fun and therapeutic—you can even imagine you’re kneading out all the stresses of your day!
-
First Rise: Place the kneaded dough in a greased bowl, cover it with a kitchen towel, and let it rise in a warm spot for 1-2 hours or until doubled in size.
Fun Fact: If you’re short on time, you can let it rise in a turned-off oven with the light on for a little warmth.
-
Prepare the Peaches: While the dough rises, slice the peaches into wedges. Toss them with the brown sugar and cinnamon in a bowl. Set aside to let those flavors meld.
Flavor Tip: Feel free to get creative! Adding a splash of vanilla extract or lemon juice also works wonders here.
-
Make the Crumble: In another bowl, mix rolled oats, flour, cold diced butter, and brown sugar. Using your fingers, work the butter into the mixture until it resembles coarse crumbs.
Chef Hack: If you find it’s not crumbly enough, toss in a bit more flour or oats, adjusting until it’s just right.
-
Shape the Focaccia: Once your dough has risen, punch it down gently to release the air. Transfer it to a lined baking sheet and spread it out with your fingers to about ½ inch thick.
Baker’s Touch: If you’re feeling fancy, create dimples in the dough with your fingers for texture and an inviting look.
-
Topping Time: Place the marinated peach slices on top of the dough, artfully arranging them as you prefer. Don’t be shy—load it up! Sprinkle the crumble topping generously over the peaches.
Presentation Tip: Imagine how wonderful this will look fresh from the oven; it’s all about making it visually tempting!
-
Second Rise: Cover the focaccia again with the towel and let it rise for another 30 minutes while you preheat the oven to 375°F (190°C).
Baker’s Secret: This second rise helps achieve that beautifully airy focaccia texture.
-
Bake: Pop the focaccia into the oven and bake for 25-30 minutes until the top is golden brown and the peaches are bubbly. Your kitchen will smell divine!
Watch Out: Every oven is different, so check it a few minutes early to ensure it doesn’t overbake.
-
Cool and Slice: Once baked, allow it to cool slightly on a wire rack before slicing. This step is key to letting the flavors settle.
Slicing Tip: Try slicing it into squares or wedges for just the right portion to share—or keep it all for yourself!
Serving Suggestions
Serve your Peach Crumble Focaccia warm or at room temperature, and don’t forget to add a scoop of vanilla ice cream or a dollop of whipped cream on the side. You can also drizzle some honey or a sprinkle of icing sugar over the top for an extra touch of sweetness. Trust me; your friends and family will think they’ve entered dessert heaven!
Recipe Variations
Here are some fun variations to keep your Peach Crumble Focaccia exciting:
- Berry Delight: Swap half of the peaches for fresh blueberries or raspberries for a delightful twist.
- Maple Pecan: Add chopped pecans to the crumble mixture for a nutty flavor and a crunchy texture.
- Herb Infusion: Include a sprinkle of fresh thyme or rosemary on the focaccia dough before adding the peaches for an aromatic touch.
- Spiced Up: Mix in a pinch of nutmeg or ginger to the peach mixture for a more robust flavor profile.
- Vegan Alternative: Substitute the butter in the crumble with coconut oil and the dairy in the focaccia with almond or oat milk.
Chef’s Notes
Peach Crumble Focaccia started as a happy accident in my kitchen. I had some peaches on their very last legs and figured, why not combine the best of both worlds? The joy I felt crafting this recipe makes it very dear to me. It’s now become a staple at gatherings, an easy yet impressive addition that leaves everyone craving seconds!
Feel free to make it your own! Part of the fun of cooking is experimenting with flavors and techniques until you find what warms your heart.
FAQs and Troubleshooting
Q: My focaccia didn’t rise as much as I’d hoped. What went wrong?
A: There are a few possibilities. Ensure your yeast is fresh. It’s also possible that the warmth in your kitchen wasn’t enough for rising. Try wearing your beloved sweater next time, and let that warm vibe help your dough peak!
Q: Can I use frozen peaches for this recipe?
A: Absolutely! Just ensure they’re thawed and well-drained to avoid excess moisture in your focaccia.
Q: What’s the best way to store leftover focaccia?
A: Keep it in an airtight container at room temperature for up to two days. You can pop it into the oven for a few minutes to warm it back up before serving or enjoy it cold!
Q: Is there a gluten-free option?
A: Definitely! You can use a gluten-free all-purpose baking mix instead of regular flour for both the focaccia and the crumble. Just be sure to adjust the liquid content as needed.
Nutritional Info
While I don’t usually focus on dietary information (after all, we’re here for the joy of cooking!), if you’re interested, I’d be happy to help you calculate the nutritional breakdown based on your specific ingredient choices!
So there you have it! A heartwarming recipe for Peach Crumble Focaccia that not only delights the taste buds but also holds the nostalgia of summer memories. As you make this recipe, know that every bite is an ode to those beautiful, sun-soaked afternoons spent in the kitchen with family and friends. Now go bake up something special — and share the love! 🍑💖
Print
Peach Crumble Focaccia
- Total Time: 45 minutes
- Yield: 8 servings 1x
- Diet: Vegetarian
Description
A delightful twist on focaccia topped with juicy peaches and a buttery crumble, perfect for summer gatherings.
Ingredients
- 3 cups all-purpose flour
- 1 packet (2 ¼ teaspoons) instant yeast
- 1 teaspoon salt
- 1 cup warm water
- 2 tablespoons olive oil
- 3–4 ripe peaches, sliced
- 2 tablespoons brown sugar
- 1 teaspoon cinnamon
- 1 cup rolled oats
- ½ cup all-purpose flour
- ½ cup unsalted butter, cold and diced
- ½ cup brown sugar
Instructions
- Prepare the Dough: In a large mixing bowl, combine the flour, salt, and instant yeast. Gradually add the warm water and olive oil. Mix until a shaggy dough forms.
- Knead the Dough: Turn the dough onto a floured surface. Knead for about 8-10 minutes until it’s smooth and elastic.
- First Rise: Place the kneaded dough in a greased bowl, cover it with a towel, and let it rise for 1-2 hours.
- Prepare the Peaches: Slice the peaches and toss them with brown sugar and cinnamon.
- Make the Crumble: Mix rolled oats, flour, cold diced butter, and brown sugar until it resembles coarse crumbs.
- Shape the Focaccia: Transfer dough to a lined baking sheet and spread it out to ½ inch thick.
- Topping Time: Arrange marinated peach slices on the dough and sprinkle the crumble topping over the peaches.
- Second Rise: Cover the focaccia and let it rise for another 30 minutes.
- Bake: Bake at 375°F (190°C) for 25-30 minutes until golden brown.
- Cool and Slice: Allow to cool slightly before slicing.
Notes
Serve warm or at room temperature with vanilla ice cream or whipped cream.
- Prep Time: 15 minutes
- Cook Time: 30 minutes
- Category: Dessert
- Method: Baking
- Cuisine: Italian
Nutrition
- Serving Size: 1 slice
- Calories: 350
- Sugar: 15g
- Sodium: 400mg
- Fat: 15g
- Saturated Fat: 8g
- Unsaturated Fat: 5g
- Trans Fat: 0g
- Carbohydrates: 50g
- Fiber: 4g
- Protein: 6g
- Cholesterol: 30mg
Keywords: peach, crumble, focaccia, dessert, summer, baking
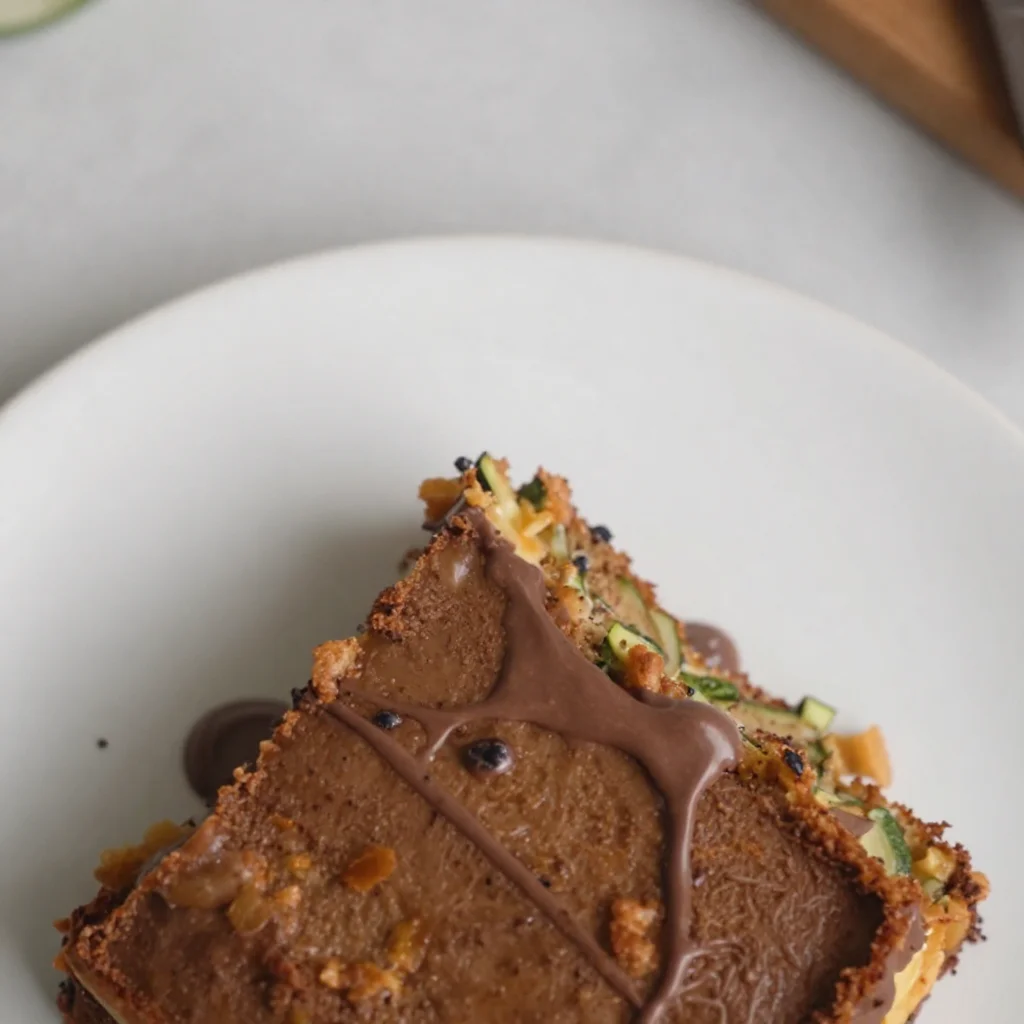
One-Pan Chocolate Zucchini Sheet Cake (Easy Make-Ahead)
The Ultimate Chocolate Zucchini Sheet Cake Recipe: A Slice of Heaven
Welcome to my kitchen, dear friends! Today, we’re diving into a recipe that combines two unlikely heroes: chocolate and zucchini. Before you raise an eyebrow, let me tell you, this Chocolate Zucchini Sheet Cake is nothing short of a culinary masterpiece that even the pickiest eaters won’t be able to resist. Think rich, moist chocolate cake with the unexpected twist of tender zucchini hidden within.
If you’re anything like me, you love the thrill of a surprise ingredient. It adds character to the dish and spices up the cooking experience. Trust me, no one will ever suspect there’s a green vegetable lurking in this indulgent slice of heaven — and that’s the beauty of it! This cake is perfect for everything from potlucks to birthday parties or just a cozy night at home.
It was on a sunny autumn afternoon in my grandmother’s kitchen when I first laid eyes (and taste buds) on a chocolate zucchini cake. The aroma of cocoa and something utterly delightful wafted through the air, and I was instantly intrigued. As my grandmother whipped up this rich dessert, she told me how zucchini helped to keep the cake moist. I watched in awe as she sprinkled the batter with mini chocolate chips and popped it into the oven. The moment we pulled that cake out, the entire family gathered around, ready to dig in. That day marked my love affair with chocolate zucchini cake, and I’ve been making my own versions ever since.
Ingredients You’ll Need
To make this beautiful creation, you’ll need the following simple ingredients:
-
Zucchini (about 2 cups, grated): The star ingredient! Zucchini adds moisture and a subtle flavor without overpowering the chocolate. It’s best to use young zucchini for this recipe as they have a milder taste and smaller seeds. No zucchini? No problem! You can substitute with grated carrots for a similar texture.
-
All-Purpose Flour (1 ¾ cups): This is the backbone of your cake. For a gluten-free version, feel free to use a 1:1 gluten-free flour blend.
-
Granulated Sugar (1 ½ cups): To balance the chocolate flavor. You could replace some of this with coconut sugar for a deeper flavor and lower glycemic index.
-
Unsweetened Cocoa Powder (½ cup): The heart and soul of your cake. Sift it before using to ensure there are no lumps! Want to skip the cocoa? You can opt for carob powder, though the flavor will differ.
-
Baking Soda (1 tsp): This is your leavening agent, ensuring the cake rises beautifully.
-
Baking Powder (1 tsp): Works alongside the baking soda for extra lift. They’re a dynamic duo!
-
Salt (½ tsp): Don’t skip this! Salt enhances all the flavors in the cake.
-
Large Eggs (2): Eggs bind the ingredients and give structure to your cake. You can substitute with flaxseed meal mixed with water for a vegan version (1 tablespoon of flax + 2.5 tablespoons of water per egg).
-
Vegetable Oil (¾ cup): This keeps your cake moist and tender. You can switch to melted coconut oil for a subtly sweet flavor.
-
Vanilla Extract (2 tsp): For that warm, inviting flavor. You can also use almond extract for a different twist.
-
Chocolate Chips (1 cup): A delightful addition that melts in your mouth! Use dark chocolate chips for a richer flavor or white chocolate for a sweeter contrast.
Step-by-Step Instructions
-
Prep Your Oven and Pan: Preheat your oven to 350°F (175°C). Grab a 9×13-inch baking dish and grease it lightly with oil or use parchment paper for easy removal.
-
Grate that Zucchini: Rinse your zucchini and grab the grater. No need to peel! Just grate them using the coarse side of the grater. Don’t forget to squeeze out the excess moisture using a clean kitchen towel or cheesecloth — we want a moist cake, but we don’t need it swimming!
-
Mix Your Dry Ingredients: In a large bowl, whisk together the flour, cocoa powder, baking soda, baking powder, and salt until well combined. Your cocoa may want to form clumps, so give it some extra love with that whisk!
-
Blend the Wet Ingredients: In another bowl, beat the eggs and sugar together until light and fluffy (about 2–3 minutes using an electric mixer). This step is key because it incorporates air, resulting in a lighter cake. Add in the oil and vanilla extract, and mix until combined.
-
Combine Dry and Wet Mixtures: Gradually add the dry ingredients into the wet mixture. Fold gently using a spatula — be careful not to overmix, or your cake will end up tough. Just mix until the flour is incorporated.
-
Stir in the Zucchini and Chocolate Chips: Gently fold in the grated zucchini and chocolate chips until evenly distributed throughout the batter. Taste test a bit of that batter — yum!
-
Pour and Bake: Transfer the batter to your prepared baking dish, spreading it evenly. Bake for 30-35 minutes or until a toothpick inserted in the center comes out clean. Don’t let it overbake; a little gooeyness is desirable!
-
Cool Down: Allow the cake to cool in the pan for about 10 minutes, then transfer it to a wire rack to cool completely. You could frost it while it’s still slightly warm, but I like to wait for the fun of layering!
Serving Suggestions
Now that you’ve created this scrumptious Chocolate Zucchini Cake, it’s time to indulge! Serve it warm, dusted with powdered sugar, or go all out and slather on some rich chocolate frosting for a dessert that’s totally show-stopping. Paired with a scoop of vanilla ice cream or whipped cream? Pure bliss! Don’t forget to grab a slice for yourself before someone else snatches the last piece!
Recipe Variations
- Spiced Zucchini Cake: Add a teaspoon of cinnamon and a pinch of nutmeg for a warm, spiced version.
- Nutty Delight: Fold in a half cup of toasted walnuts or pecans for a delightful crunch.
- Fruity Twist: Add some mashed bananas or applesauce if you want to pack in extra flavor and moisture.
- Gluten-Free Option: Swap out the all-purpose flour for almond flour or a gluten-free flour blend.
- Double Chocolate: Use chocolate cake mix instead of flour and replace half the oil with unsweetened applesauce to make it even fudgier.
Chef’s Notes
Every time I whip up this Chocolate Zucchini Sheet Cake, I can’t help but reminisce about those sweet afternoons in my grandmother’s kitchen. There’s something so comforting about the smell of chocolate and the warmth of family gathered around the table. Over the years, I’ve played with this recipe, and it’s evolved from my grandma’s classic to a modern delight with my own twists. Each time, it brings smiles and happy memories with every slice!
FAQs and Troubleshooting
1. My cake came out dry! What happened?
Don’t fret! If the cake is dry, it’s likely overbaked. Make sure to check it towards the end of the baking time and rely on the toothpick test — moist crumb is okay!
2. Can I make this ahead of time?
Absolutely! This cake stays moist for several days, making it perfect for meal prep or entertaining. Just store it covered at room temperature or in the fridge for longer freshness.
3. Can I freeze this cake?
Yes, you can! Once the cake has completely cooled, wrap it tightly in plastic wrap, followed by aluminum foil, and store it in the freezer for up to three months. Thaw in the fridge overnight before serving.
4. How do I know if my zucchini is fresh?
Fresh zucchini should be firm, with smooth skin and vibrant color. Avoid any that feel soft or show signs of wrinkles!
Nutritional Info
Note: Nutritional values may vary based on ingredient brands and specific measurements used in the recipe. Always consult a nutritionist for personalized dietary advice.
Now that you have the full scoop on creating this Chocolate Zucchini Sheet Cake, get ready to impress your friends and family. Remember, cooking is all about fun and creativity — so don’t be afraid to make it your own! Happy baking and enjoy every delicious bite!
Print
Ultimate Chocolate Zucchini Sheet Cake
- Total Time: 50 minutes
- Yield: 12 servings 1x
- Diet: Vegetarian
Description
Indulge in a moist chocolate cake with a twist of zucchini that’s perfect for any occasion.
Ingredients
- 2 cups Zucchini, grated
- 1 ¾ cups All-Purpose Flour
- 1 ½ cups Granulated Sugar
- ½ cup Unsweetened Cocoa Powder
- 1 tsp Baking Soda
- 1 tsp Baking Powder
- ½ tsp Salt
- 2 Large Eggs
- ¾ cup Vegetable Oil
- 2 tsp Vanilla Extract
- 1 cup Chocolate Chips
Instructions
- Preheat your oven to 350°F (175°C). Grease a 9×13-inch baking dish.
- Grate the zucchini using the coarse side of a grater, then squeeze out excess moisture.
- Whisk together flour, cocoa powder, baking soda, baking powder, and salt in a large bowl.
- Beat eggs and sugar in another bowl until light and fluffy, then mix in oil and vanilla.
- Fold the dry ingredients into the wet mixture until just combined.
- Gently fold in grated zucchini and chocolate chips.
- Pour the batter into the prepared baking dish and spread evenly.
- Bake for 30-35 minutes, or until a toothpick comes out clean.
- Cool in the pan for about 10 minutes, then transfer to a wire rack.
Notes
Serve warm or with chocolate frosting and vanilla ice cream for a delightful treat.
- Prep Time: 15 minutes
- Cook Time: 35 minutes
- Category: Dessert
- Method: Baking
- Cuisine: American
Nutrition
- Serving Size: 1 slice
- Calories: 350
- Sugar: 22g
- Sodium: 370mg
- Fat: 15g
- Saturated Fat: 2g
- Unsaturated Fat: 10g
- Trans Fat: 0g
- Carbohydrates: 49g
- Fiber: 2g
- Protein: 4g
- Cholesterol: 60mg
Keywords: chocolate cake, zucchini cake, desserts, baking, sweet treats




