
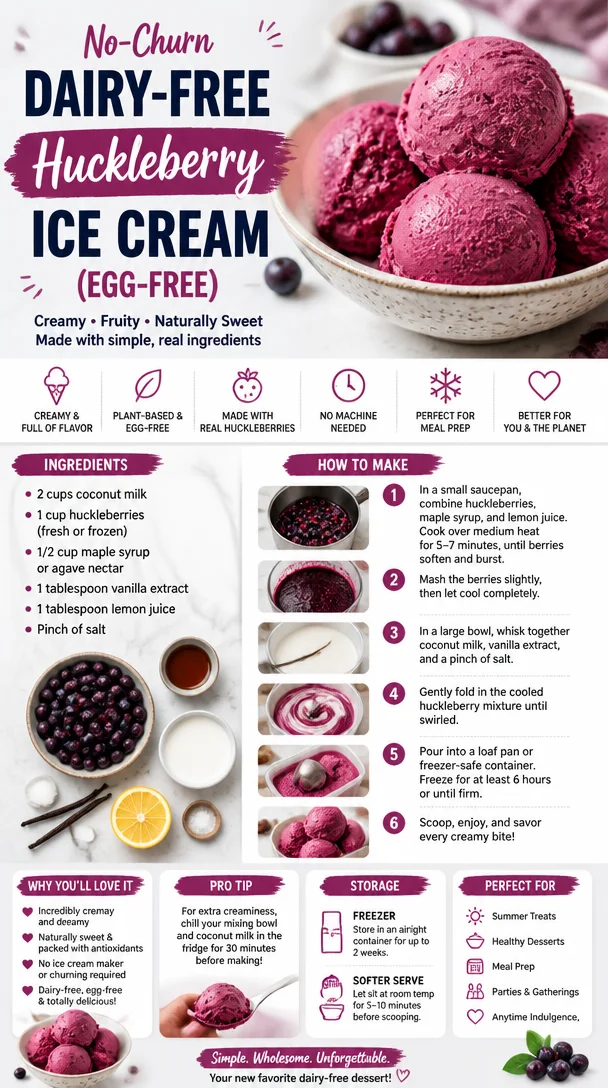
No-Churn Dairy-Free Huckleberry Ice Cream (Egg-Free)
Dairy-Free Huckleberry Ice Cream: A Refreshing Summer Delight
Welcome to my kitchen, my foodie friends! Today, we’re diving into a delightful treat that will make your taste buds sing — Dairy-Free Huckleberry Ice Cream. If you’ve ever tasted the essence of summer cradled within a scoop of cold, creamy goodness, you know how magical ice cream can be. Now, imagine that same delightful experience, but with a twist that embraces a dairy-free lifestyle!
Whether you’re lactose intolerant, following a vegan diet, or simply looking to create something a bit healthier, this easy yet indulgent recipe will help you enjoy the sweet bounty of huckleberries, making it a perfect treat for hot summer days. Picture this: a warm afternoon, a blanket spread out on the grass, and a bowl of this luscious ice cream — doesn’t it sound heavenly?
But before we jump into the recipe, let me share a little personal story that makes this dish even more special.
A Berry Special Memory
Growing up in a small mountain town, huckleberries were more than just a summer fruit — they were an annual adventure! Every year, my family would embark on a huckleberry-picking expedition. Armed with buckets and our best strategies for spotting the ripest berries, we’d scour the bushes, and the excitement was palpable. My grandmother always had the best recipes that highlighted our foraged treasures, but perhaps none was as cherished as her homemade huckleberry ice cream.
I remember the vibrant purple stains left on our fingers and faces from our delicious harvest, and the way my grandma would giggle at our attempts to not sample too many berries before we got home. When we finally churned that ice cream, the sweet, tangy flavor combining with the creamy base was pure bliss. With every scoop, we forged memories, shared stories, and enjoyed each other’s company. It was more than just ice cream; it was a celebration of summer, family, and the wonders of nature.
Now, let’s create that same experience together, in a dairy-free, egg-free way!
Ingredients
To make our Dairy-Free Huckleberry Ice Cream, you’ll need a few simple ingredients. Each one plays a vital role, and I’ll share some tips and insights along the way:
-
Huckleberries (2 cups): Fresh or frozen, these little gems give the ice cream its vibrant color and sweet-tart flavor. If you can’t find huckleberries, you can substitute them with blueberries or blackberries for a similar taste.
-
Coconut Milk (2 cans, full-fat): This is our creamy base that brings richness without the dairy. I always opt for full-fat for that ultra-creamy texture, but you can use light coconut milk if you’re looking to reduce fat.
-
Maple Syrup (1/2 cup): A natural sweetener that adds warmth and depth. You can swap it for agave syrup, honey (if not strictly vegan), or any other sweetener of your choice — just adjust to taste.
-
Vanilla Extract (2 teaspoons): This adds a lovely aromatic note. Go for pure vanilla extract for the best flavor, or try using vanilla bean paste for an extra gourmet touch.
-
Lemon Juice (1 tablespoon): Just a splash to brighten the flavors. Freshly squeezed is always best, but bottled lemon juice works in a pinch.
-
Salt (a pinch): It enhances the flavors beautifully, rounding everything out perfectly. Don’t skip this step!
Step-by-Step Instructions
Now that we’ve gathered our ingredients, let’s roll up our sleeves and make some ice cream magic! Follow these detailed steps to ensure a smooth, creamy outcome.
-
Prepare the Huckleberries:
If you’re using fresh huckleberries, give them a good rinse under cold water and sort through them to remove any stems or leaves. For frozen huckleberries, just toss them in a bowl to thaw slightly while you work on the base. I like to mash a handful with a fork for a more robust flavor in the ice cream, but feel free to keep some whole for that delightful berry surprise in every scoop. -
Blend the Base:
In a blender or food processor, add the full-fat coconut milk, maple syrup, vanilla extract, lemon juice, and a pinch of salt. Blend until everything is perfectly combined and smooth. Taste the mixture and adjust the sweetness if you prefer it a bit sweeter — it’s all about your preference! -
Mix in the Huckleberries:
Once your base is blended smooth, transfer it to a mixing bowl. Gently fold in the mashed and whole huckleberries, being careful not to overmix. This way, you maintain that beautiful swirl of berry throughout without completely breaking them down. -
Chill the Mixture:
Cover your bowl with plastic wrap and refrigerate the mixture for at least an hour. This step allows the flavors to meld wonderfully and ensures the mixture is cold before churning, which leads to a creamier ice cream. -
Churn the Ice Cream:
Now for the fun part! Pour your mixture into an ice cream maker and churn according to the manufacturer’s instructions. It usually takes about 20 to 25 minutes to reach soft-serve consistency. If you don’t have an ice cream maker, don’t fret! You can use a shallow container and stir it every 30 minutes until it reaches a creamy texture — just a little more labor-intensive. -
Freeze to Firm Up:
Once churned to creamy perfection, transfer the ice cream to an airtight freezer-safe container. Press a piece of parchment paper directly on the surface to prevent ice crystals from forming, then seal with a lid. Freeze for at least 4 hours or overnight for a firmer texture.
Serving Suggestions
When it’s time to serve, scoop out generous portions of your huckleberry ice cream into bowls or cones. For an extra special touch, garnish with fresh huckleberries, a drizzle of maple syrup, or a sprinkle of crushed nuts for some crunch. Serve it up on a warm summer evening, and watch the smiles spread!
Recipe Variations
Now, let’s get creative! Here are a few ideas to put a unique spin on your huckleberry ice cream:
-
Berry Bliss: Mix in other berries like strawberries or raspberries for a mixed-berry version.
-
Nuts About Huckleberries: Swirl in some crushed pecans or walnuts for added crunch and flavor.
-
Chocolate Swirls: Melt some dairy-free dark chocolate and drizzle it into the churned ice cream for a deliciously decadent treat.
-
Minty Fresh: Add a sprinkle of fresh mint leaves into the mixture while blending for a refreshing twist.
-
Creamy Avocado: For an even richer texture, add a ripe avocado to the blender with the coconut milk for a hidden veggie boost.
Chef’s Notes
This recipe holds a special place in my heart, and it has evolved over time. Initially, it began as a sweet summer indulgence that I’d make to beat the heat. Now, it’s a family tradition that brings us together, whether during berry-picking escapades or casual backyard gatherings. When I taste that rich creaminess balanced by the tang of huckleberries, it takes me right back to those summer afternoons with my grandma.
One cheeky kitchen story I have to share is the time I accidentally grabbed a can of coconut milk that had been in my pantry for too long. Let’s just say that ice cream was not winning any flavor awards! Lesson learned: always check the expiration date, even on pantry staples!
FAQs and Troubleshooting
Q: Can I make this ice cream without an ice cream maker?
Absolutely! Just follow the stirring method mentioned in step 5. It requires a bit more effort, but it’s entirely possible!
Q: What if my ice cream is too hard after freezing?
If your ice cream is too hard, let it sit at room temperature for about 10 minutes before scooping. That will soften it up, making it much easier to serve.
Q: Can I use other types of milk for this recipe?
While coconut milk gives the best texture and flavor, you can substitute almond milk or oat milk. Just keep in mind that they may not yield the same rich creaminess.
Q: How long can I store this ice cream?
In an airtight container, your huckleberry ice cream can be stored in the freezer for up to 2 weeks. It might become a bit icy over time, so it’s best enjoyed fresh!
Nutritional Info
While I encourage you to enjoy this treat in moderation, here’s a general idea of the nutritional breakdown per serving (based on approximately 10 servings):
- Calories: 180
- Fat: 10g
- Carbohydrates: 22g
- Sugar: 12g
- Protein: 2g
And there you have it — a lovely, creamy, and bright Dairy-Free Huckleberry Ice Cream sure to delight anyone’s palate. It’s perfect for those hot summer days, family gatherings, or a cozy night in. Remember, cooking is all about love and creativity, so don’t hesitate to put your spin on this recipe. Happy scooping!
Print
Dairy-Free Huckleberry Ice Cream
- Total Time: 280 minutes
- Yield: 10 servings 1x
- Diet: Vegan
Description
A refreshing and creamy dairy-free ice cream made with huckleberries, perfect for summer days.
Ingredients
- 2 cups Huckleberries (fresh or frozen)
- 2 cans full-fat Coconut Milk
- 1/2 cup Maple Syrup
- 2 teaspoons Vanilla Extract
- 1 tablespoon Lemon Juice
- a pinch of Salt
Instructions
- Prepare the huckleberries by rinsing and sorting through them.
- Blend the coconut milk, maple syrup, vanilla, lemon juice, and salt until smooth.
- Mix in the huckleberries, folding gently to maintain texture.
- Chill the mixture in the refrigerator for at least an hour.
- Churn the mixture in an ice cream maker according to the manufacturer’s instructions.
- Freeze the churned ice cream in an airtight container for at least 4 hours.
Notes
For variations, consider mixing in other berries, nuts, or chocolate swirls.
- Prep Time: 15 minutes
- Cook Time: 25 minutes
- Category: Dessert
- Method: Churning
- Cuisine: American
Nutrition
- Serving Size: 1 serving
- Calories: 180
- Sugar: 12g
- Sodium: 100mg
- Fat: 10g
- Saturated Fat: 9g
- Unsaturated Fat: 1g
- Trans Fat: 0g
- Carbohydrates: 22g
- Fiber: 2g
- Protein: 2g
- Cholesterol: 0mg
Keywords: dairy-free, huckleberry, ice cream, vegan dessert, summer treat

Vegan Oreo Milkshake
Decadent Vegan Oreo Milkshake Recipe: Indulge Without Compromise!
Welcome to my kitchen! Today, we’re diving into a delightfully nostalgic treat that embraces the joy of indulgence without compromising on our values. Yes, I’m talking about the heavenly Vegan Oreo Milkshake! If you know me, you’ll know that I’m all about creating delicious, heartwarming dishes that bring people together and leave you swooning with every sip. This milkshake is not just a recipe; it’s a little piece of happiness in a glass!
Imagine this: a thick, creamy, and utterly delicious milkshake that not only tickles your taste buds but also gives you a delightful blast of nostalgia. Who doesn’t love the classic combo of rich chocolate and creamy vanilla? This milkshake is vegan, plant-based, and incredibly easy to whip up—perfect for a midnight treat, a special occasion, or just because you deserve it!
What I love most about this recipe is how it marries the creamy richness of dairy-free ice cream with the crunchy goodness of Oreos. You can indulge guilt-free, knowing that it’s all made with nourishing, plant-based ingredients. I remember the first time I made this for my friends during a cozy movie night—everyone’s eyes lit up with pure joy as we sipped these delicious shakes while laughing over our favorite comedies. It’s a memory I treasure, and I can’t wait for you to create your own cherished moments with this milkshake!
So, grab your blender, and let’s get mixing!
A Nostalgic Journey: My First Milkshake Memory
I think back to my childhood and those hot summer days spent at the local ice cream parlor with my family. The sound of the blender whirling, the vibrant colors of ice cream displayed behind the counter, and the smell of freshly made waffle cones fill my mind. My favorite treat, without a doubt, was the classic cookies-and-cream milkshake. It was everything a kid could dream of—sweet, creamy, and just so darn good!
Fast forward a few years, and when I transitioned to a plant-based lifestyle, I thought those dreamy shakes were left behind in the past. But one rainy afternoon, while trying to replicate that nostalgia in my kitchen, the Vegan Oreo Milkshake was born! I can’t tell you how often I’ve whipped up batches of this drink since then, feeling just like I did back in that ice cream shop, but with the added bonus of knowing each ingredient is plant-based and healthy.
I knew I’d hit the jackpot when my friends lifted their glasses to toast, reveling in the freedom of enjoying a tasty treat without the guilt. There’s something magical about reimagining a classic dish that not only satisfies our cravings but also makes us feel good inside. Let’s recreate that magic together!
Ingredients for Your Vegan Oreo Milkshake
Before we start blending, let’s gather our ingredients! Here’s what you’ll need to whip up this deliciously dreamy vegan shake. I’ve included some insights and substitution tips for each ingredient so you can customize this divine creation just to your taste.
-
Vegan Vanilla Ice Cream (2 cups): This will be your shake’s base, providing creaminess and sweetness. When in doubt, go for a brand made with coconut or almond milk for a great texture! If you’re avoiding sugar, look for a no-sugar-added variety.
-
Plant-Based Milk (1 cup): Almond milk, coconut milk, soy milk… you name it! Each type lends its unique flavor, so choose one that you love. If you want something ultra-creamy, opt for full-fat coconut milk.
-
Oreo Cookies (4-6 pieces): The star of our show! These classic cookies add that delightful crunch and rich chocolate flavor. If you’re looking for an alternative, there are also various vegan cookie options available, or you could try chocolate sandwich cookies from your favorite health food store.
-
Vegan Whipped Cream (for topping): It’s optional, but let’s be honest—it adds that extra touch! You can usually find this at grocery stores or make your own with coconut cream. No shame in splurging on the beautiful topping!
-
Chocolate Syrup (for drizzling): A splash of indulgence! Drizzle some chocolate syrup inside your glass before pouring in the shake for an extra visual treat. Opt for a dairy-free variety, or make your own using cacao powder, maple syrup, and a touch of water.
-
A pinch of Sea Salt: It enhances all the flavors! If you’re going for a sweet-and-salty twist, don’t skip this step.
Step-by-Step Instructions to Create Your Milkshake
Alright, let’s get down to business! Follow these steps, and you’ll have a luscious Vegan Oreo Milkshake in no time.
-
Prep Your Glasses: Before anything else, for that Instagram-worthy touch, drizzle chocolate syrup inside your serving glasses. Just take a spoon and swirl it around the sides of the glass. This is a fun step that also makes the shake look super inviting!
-
Blend the Base: In your blender, combine the vegan vanilla ice cream and the plant-based milk. The ratio might vary depending on how thick you’d like your shake. For a thicker shake, use less milk; for a slushy consistency, add a bit more!
Chef Tip: If you want a lighter milkshake, you can throw in a banana for natural sweetness and creaminess. Just peel and chop it before blending.
-
Add in the Oreos: Time for the fun part! Toss in the Oreo cookies and blend again until they’re coarsely chopped. You want some bits of cookie to remain for texture, so don’t over-blend!
-
Taste Test: After blending, grab a spoon and taste your mix. Feel free to add more cookies or a touch of sweetener if you desire! You can balance it out with a tiny pinch of sea salt, which enhances the sweet flavors wonderfully.
-
Blend One Last Time: Give it another quick blend to incorporate any additions and get everything smooth and creamy. Then, pour your glorious shake into the prepared glasses.
-
Top It Off: Now, it’s time for that vegan whipped cream! Generously dollop it on top, and add a sprinkle of crushed Oreos for an extra touch. You can go ahead and add a fun straw or a fancy cocktail umbrella to complete the look!
Chef Hack: If you want to make it a full meal replacement, throw in a couple of tablespoons of your favorite nut butter for added protein and flavor!
Serving Suggestions
This Vegan Oreo Milkshake makes for a fantastic treat! Serve it chilled in your drool-worthy drizzled glasses, topped with a crown of whipped cream and more crushed Oreos. It’s a perfect addition to movie nights, summer parties, or a cozy afternoon treat with friends. Pair it with a homemade vegan cookie for the ultimate sweet experience!
Recipe Variations
Feeling adventurous? Here are some creative twists to mix things up with your Vegan Oreo Milkshake:
-
Mint Chocolate Oreo Shake: Add a few drops of peppermint extract for a delightful minty twist.
-
Banana Oreo Shake: Toss in a ripe banana to give it extra creaminess and natural sweetness.
-
Peanut Butter Oreo Shake: A couple of tablespoons of creamy peanut butter take this shake to a whole new level of deliciousness!
-
Mocha Crunch Shake: Brew a shot of espresso and blend it in for a coffee-flavored milkshake; it’s perfect for a delightful pick-me-up!
-
Frozen Berry Oreo Shake: Add a handful of frozen blueberries or strawberries for a fruity twist that’s sure to surprise your taste buds.
Chef’s Notes
This vegan milkshake has come a long way since my first attempt! Originally, I added tons of sugar and thought I needed that to bring out the sweetness, but I soon realized that the Oreos and ice cream already contained plenty of sugary goodness. An important lesson learned in the kitchen!
What I love most is seeing how people customize it—whether it’s a family treat or a cheeky date night dessert, it always brings joy to the table. Plus, every time I make this, it brings me right back to those sunny days at the ice cream parlor, reminding me of the joy in simple pleasures.
FAQs and Troubleshooting
1. Can I make this shake without ice cream?
Absolutely! You can use frozen bananas for a creamy base or make a blend using frozen coconut cream. It should still yield a creamy texture.
2. What if my shake is too thick?
Don’t worry! Just add a little more plant-based milk and blend until you reach your desired consistency.
3. I’m gluten-free. Can I still enjoy this shake?
Yes! Look for gluten-free Oreo varieties or any gluten-free chocolate sandwich cookies as a substitute.
4. How do I store leftover milkshake?
If you have any leftover shake (which is unlikely!), store it in the freezer for about an hour. Give it a quick blend before enjoying it again, as it may become too thick overnight.
Nutritional Info (if applicable)
Serving Size: 1 shake
Calories: Approximately 350-400 per serving, depending on the ingredients used.
Protein: 5-10g (if adding nut butter or using higher protein dairy alternatives).
Fat: 15-20g (healthy fats, of course!).
There you have it! Your very own Vegan Oreo Milkshake that’s rich, creamy, and bound to be a hit. Whip this up, share it with your loved ones, and bask in the joy of good food and great company. Cheers to you and your delicious creations!
Print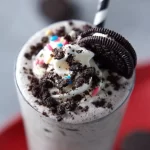
Vegan Oreo Milkshake
- Total Time: 10 minutes
- Yield: 2 servings 1x
- Diet: Vegan
Description
A thick, creamy, and utterly delicious vegan milkshake made with rich chocolate Oreo cookies and dairy-free ice cream, perfect for indulgence without compromise.
Ingredients
- 2 cups Vegan Vanilla Ice Cream
- 1 cup Plant-Based Milk (almond, coconut, or soy)
- 4–6 Oreo Cookies
- Vegan Whipped Cream (for topping)
- Chocolate Syrup (for drizzling)
- A pinch of Sea Salt
Instructions
- Prep your glasses by drizzling chocolate syrup inside.
- Blend the vegan vanilla ice cream and the plant-based milk until smooth.
- Add in the Oreo cookies and blend until coarsely chopped.
- Taste the mixture and add more cookies or sweetener if desired.
- Blend one last time to get a smooth and creamy consistency.
- Pour the shake into the prepared glasses.
- Top it off with vegan whipped cream and crushed Oreos.
Notes
For a thicker shake, use less plant-based milk. Try adding a banana or nut butter for additional flavor and nutrition.
- Prep Time: 10 minutes
- Cook Time: 0 minutes
- Category: Dessert
- Method: Blending
- Cuisine: American
Nutrition
- Serving Size: 1 serving
- Calories: 375
- Sugar: 30g
- Sodium: 150mg
- Fat: 20g
- Saturated Fat: 10g
- Unsaturated Fat: 8g
- Trans Fat: 0g
- Carbohydrates: 49g
- Fiber: 2g
- Protein: 5g
- Cholesterol: 0mg
Keywords: vegan milkshake, Oreo shake, dessert, plant-based, indulgent treat


