
Huckleberry Jam
The Sweet Adventure: Huckleberry Jam Made with Love
Welcome to my kitchen, fellow food lovers! Today, we’re diving headfirst into a deliciously delightful project that’s all about capturing the essence of summer in a jar: Huckleberry Jam. If you’ve ever had the pleasure of tasting this vibrant, sweet-tart spread, you know it’s a treat that instantly brings a smile to your face. Imagine slathering it on warm toast, dolloping it on yogurt, or using it as a filling for pastries—need I say more? So, roll up your sleeves and let’s embark on this tasty adventure together!
Over the years, I’ve developed quite the affection for huckleberries. These small, jewel-like berries are a special treat, often found in the wild or at local farmers’ markets during the peak of summer. They are reminiscent of blueberries but with a touch of sass in their flavor profile—slightly tangy, sweet, and downright addictive. If you have a soft spot for homemade goodies and a knack for simple, heartfelt cooking, you’re in for a real treat!
This recipe is not just about making a jar of jam; it’s about creating memories, savoring seasonal produce, and connecting with the traditions of homemade preserves. There’s something undeniably satisfying about taking fruit that was picked, either by your own hands or sourced from your favorite vendor, and transforming it into a delectable spread that can brighten up breakfast, elevate desserts, and make any simple snack feel gourmet.
So, grab your favorite apron and let’s get cooking! I promise you’ll be transported back to carefree days spent in the kitchen, with the warm scent of boiling jam filling the air and laughter echoing around you.
A Taste of Nostalgia
One of my fondest memories revolves around my grandmother and her legendary huckleberry jam. Every summer, she’d take my siblings and me on berry-picking excursions in the forest, armed with nothing but a couple of buckets and the thrill of adventure. We’d race to find the juiciest, plumpest berries, and the laughter of our family echoed among the trees. Those were magical moments!
Upon returning home, we’d gather around her bright, sun-drenched kitchen, where scents of sugar, citrus, and sweet berries would mingle as she carefully stirred the bubbling pot. My grandmother was not just a cook; she was a magician—turning foraged fruits into jars full of summer memories! She always had a story to tell while stirring the pot, passing on her wisdom and love for cooking. Little did I know then that these experiences would spark my lifelong passion for crafting my own culinary delights.
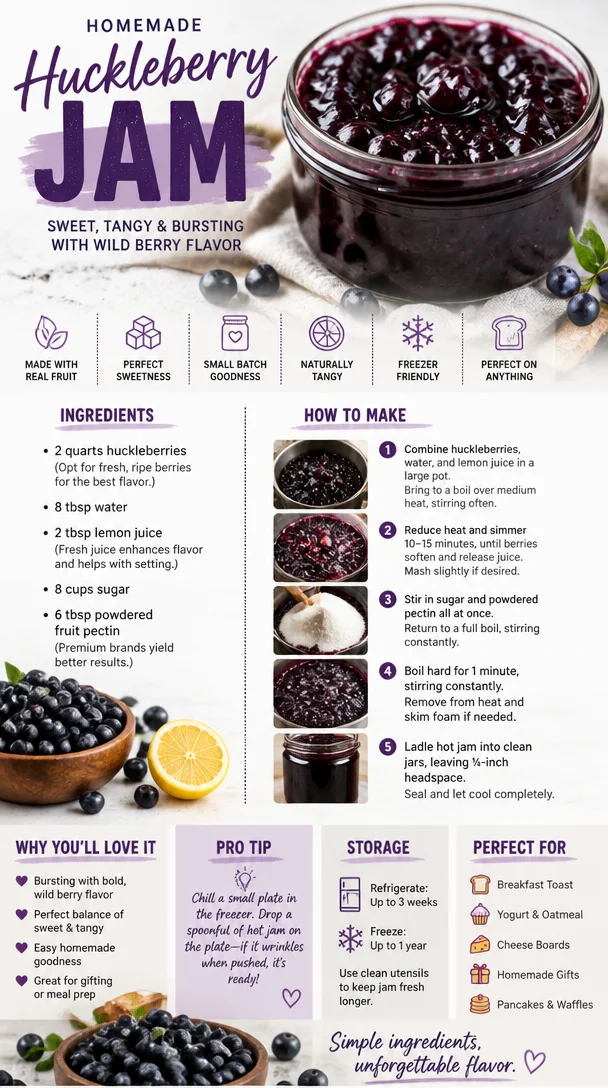
Ingredients
Here’s what you’ll need to whip up a delightful batch of huckleberry jam:
-
Fresh Huckleberries (4 cups)
- These beautiful little berries are the star of our show! If you can’t find huckleberries, blueberries work as a substitute, although they might alter the authentic flavor a bit.
-
Granulated Sugar (2 cups)
- This is not just for sweetness; it acts as a preservative to help your jam keep. If you’re looking for a lower-sugar option, consider using a sugar substitute designed for canning.
-
Lemon Juice (1/4 cup)
- Freshly squeezed lemon juice enhances flavor and helps acidity levels, which is essential for good preservation. If you don’t have fresh lemons handy, bottled lemon juice can do the trick, but fresh is always best!
-
Pectin (1 packet or 1.75 oz)
- Pectin is what thickens the jam. If you prefer making a low-sugar jam, you can opt for low-sugar pectin or even experiment with chia seeds as a natural thickener!
-
Water (1/4 cup)
- A little liquid helps to simmer down the berries and sugar into a syrupy goodness. If you prefer, you could use orange juice or another fruit juice to add more flavor.
These ingredients are simple and can be easily swapped based on your preferences or what’s available. The heart of this recipe lies in its flexibility and your creative flair!
Step-by-Step Instructions
Let’s dive into the exciting part—making huckleberry jam! Follow these easy steps to capture the summer essence in a jar:
-
Prepare Your Ingredients:
- Start by thoroughly rinsing your huckleberries under cool running water. Drain them well and remove any stems or leaves. It’s important to have clean berries for the best flavors!
-
Macerate the Berries:
- In a large mixing bowl, combine the huckleberries with 1 cup of sugar. Gently toss them together and let them sit for about 15-30 minutes. This process draws out the juices, which is essential for a delicious jam.
-
Cook the Mixture:
- In a large saucepan over medium heat, pour the macerated huckleberries (and any juices released) along with the lemon juice, water, and the remaining sugar. Stir to combine.
- As the mixture heats, bring it to a boil, stirring often. This is where the magic starts to happen! You’ll notice the berries breaking down and releasing their vibrant color—so beautiful.
-
Add Pectin:
- Once your mixture is bubbling and the sugar has dissolved, sprinkle in the pectin. Stir it constantly for about 2-3 minutes until it’s completely dissolved. This is where we create our gel!
-
Boil:
- Let the mixture reach a rolling boil—this is when the bubbles keep rising even when stirred. Keep it boiling for about 10 minutes. You can use a candy thermometer if you’d like to check for the right temperature (220°F is ideal for canning).
-
Check the Consistency:
- To ensure your jam has the right consistency, drop a spoonful of the hot mixture onto a cold plate and put it in the freezer for a minute. Run your finger through it; if it holds its shape without running too much, you’re good to go!
-
Jar It Up:
- Carefully ladle your hot jam into sterilized jars, leaving about 1/4 inch of headspace. Wipe the rims of the jars with a clean, damp cloth to remove any residue. Secure the lids on tightly.
-
Process for Preservation (optional):
- If you’re planning to store your jam long-term without refrigeration, you can process the jars in a boiling water bath for about 10 minutes. This step ensures your jam stays fresh for months!
-
Chill and Store:
- Allow the jars to cool at room temperature. Once cooled, store them in a cool, dark place. Trust me; the longer you wait to taste your creation, the better the flavors will meld together!
Serving Suggestions
Huckleberry jam is not just for toast! It can add a delightful twist to your meals. Serve it alongside a charcuterie board, drizzle it over a warm cheese like Brie, or pair it with scones and clotted cream for a proper afternoon tea. You can even use it as a filling for cakes, cookies, or pastries, making it a versatile treat for any occasion.
Recipe Variations
Looking to shake things up? Here are a few tasty variations you can try:
-
Huckleberry-Lavender Jam: Add a teaspoon of dried culinary lavender during the cooking process for an aromatic twist.
-
Spiced Huckleberry Jam: Stir in a pinch of cinnamon or nutmeg for a warm, comforting flavor.
-
Huckleberry Citrus Jam: Combine huckleberries with orange or grapefruit zest for a zesty kick.
-
Vegan-Friendly: Swap the granulated sugar for coconut sugar or agave syrup, and use agar-agar instead of pectin for a plant-based version.
-
Huckleberry BBQ Sauce: Blend the final jam into a homemade BBQ sauce by adding some vinegar and spices for a sweet and tangy grilling sauce.
Chef’s Notes
This huckleberry jam recipe has evolved over the years. Initially, I was terrified of making jam! But with each batch, I learned something new and discovered that the process is forgiving and fun. I remember the first time I made a big batch and had friends over—the kitchen was a lively hub of chatter and laughter as we tasted the bubbling mixture. Now, it’s become a beloved tradition, and I love sharing these little jars of joy with family and friends!
FAQs and Troubleshooting
1. Why did my jam not set properly?
- If your jam is runny, it could be that it didn’t reach the right temperature during boiling or that the fruit didn’t have enough natural pectin. Ensure you follow the instructions for boiling and testing for the right consistency.
2. Can I use frozen huckleberries?
- Absolutely! Just ensure they’re completely thawed and drained before using them in the recipe. You might need a little extra pectin since frozen berries tend to release more moisture.
3. How long does homemade huckleberry jam last?
- When properly sealed and canned, your jam can last up to a year in a cool, dark space. Once opened, store it in the fridge and use it within a month.
4. What do I do if my jars didn’t seal?
- Don’t fret! If your jars didn’t seal properly, you can refrigerate the jam and use it quickly or reprocess the jars. Just make sure to use new lids for a second run.
Now that you have all the tips and tricks, you’re ready to whip up a batch of huckleberry jam that’ll impress your friends and family! Happy cooking and remember, the best meals are made with love and shared with those you cherish. Let’s bring a taste of summer to your kitchen today!
Print
Huckleberry Jam Made with Love
- Total Time: 45 minutes
- Yield: 4 servings 1x
- Diet: Vegan
Description
Capture the essence of summer with this delightful huckleberry jam that’s perfect for toasts, pastries, and more.
Ingredients
- 4 cups Fresh Huckleberries
- 2 cups Granulated Sugar
- 1/4 cup Lemon Juice
- 1 packet Pectin (or 1.75 oz)
- 1/4 cup Water
Instructions
- Prepare Your Ingredients: Rinse huckleberries under cool running water, drain, and remove stems.
- Macerate the Berries: Combine huckleberries with 1 cup of sugar in a bowl and let sit for 15-30 minutes.
- Cook the Mixture: In a saucepan, combine macerated huckleberries with lemon juice, water, and remaining sugar; bring to a boil.
- Add Pectin: Sprinkle in pectin and stir constantly until dissolved, about 2-3 minutes.
- Boil: Achieve a rolling boil and keep boiling for about 10 minutes.
- Check the Consistency: Drop a spoonful on a cold plate; if it holds shape, it’s ready.
- Jar It Up: Ladle hot jam into sterilized jars, leaving 1/4 inch headspace, and secure lids tightly.
- Process for Preservation (optional): Process jars in boiling water bath for about 10 minutes.
- Chill and Store: Cool jars at room temperature and store in a cool, dark place.
Notes
For a lower-sugar option, consider a sugar substitute designed for canning. Ensure proper sealing of jars for long-term storage.
- Prep Time: 15 minutes
- Cook Time: 30 minutes
- Category: Preserves
- Method: Canning
- Cuisine: American
Nutrition
- Serving Size: 1 tablespoon
- Calories: 50
- Sugar: 10g
- Sodium: 0mg
- Fat: 0g
- Saturated Fat: 0g
- Unsaturated Fat: 0g
- Trans Fat: 0g
- Carbohydrates: 13g
- Fiber: 0g
- Protein: 0g
- Cholesterol: 0mg
Keywords: huckleberry jam, fruit preserves, summer recipes
Ingredient Nectarine Jam (No Pectin) for Busy Mornings
3 Ingredient Nectarine Jam Without Pectin: A Sweet Summer Delight
Welcome to my kitchen! If you’re anything like me, the mere thought of juicy nectarines instantly conjures a sense of warmth and nostalgia. There’s a certain bliss that comes from transforming those ripe, sun-kissed fruits into something delicious that can be enjoyed all year round. Today, I’m thrilled to share with you a simple yet utterly delightful recipe for 3 Ingredient Nectarine Jam Without Pectin.
Picture this: it’s a warm summer afternoon, and the sun is gently filtering through the kitchen window. The air is filled with the sweet aroma of nectarines simmering away on the stove, turning into a luscious jam that captures the essence of sunny days. This jam is not just a condiment; it’s a hug in a jar! Just imagine spreading it on warm toast, adding it to yogurt, or even dolloping it over ice cream. What’s not to love?
The beauty of this recipe lies in its simplicity. With just three ingredients, you may initially think it can’t yield that much flavor. But oh, let me assure you, the combination of fresh nectarines, sugar, and lemon juice works magic together! You’ll find yourself not wanting to share it, and trust me, once you taste it, you’ll understand why.
So, whether you’re gearing up for a summer picnic, preparing a cozy brunch, or simply wanting something sweet for your breakfast, this nectar jam will completely elevate your spread. Let’s dive into this delightful journey of making nectar jam together. I promise it will be a fun and rewarding experience!
A Sweet Memory
I can still vividly recall the first time I made jam. I was a wide-eyed teenager, standing in the kitchen beside my grandmother, a true jam-making aficionado. Every summer, she would gather her fresh fruit haul and perform her culinary magic. I remember the colorful array of fruits she’d lay out on the counter, but it was her fragrant nectarine jam that truly stole my heart.
One particular afternoon, as we sliced through plump nectarines, she shared stories of her summer visits to the local orchard, the same place where her mother had taken her as a child. That sense of tradition, blending flavors and stories, felt like an unspoken bond between generations. Watching the nectarines bubble in the pot, gauging the perfect sweetness as we sampled along the way, made it not just cooking, but an enchanting experience filled with laughter and love. Since then, every time I make nectar jam, I’m reminded of those blissful afternoons spent in my grandmother’s kitchen, which makes it even more special.
Ingredients
Gather these ingredients to create your own jar of nectar jam:
-
Fresh Nectarines (about 2 pounds): The star of our jam! Choose ripe nectarines for the best flavor. If you can’t find fresh, you can use frozen nectarines—just thaw them and drain any excess liquid before using.
-
Sugar (1 cup): This helps to sweeten and thicken our jam naturally. If you want to reduce sugar, you might experiment with honey or agave syrup, but those will slightly change the flavor profile.
-
Fresh Lemon Juice (2 tablespoons): The acidity from lemon juice not only brightens the flavor but also helps with the preservation of the jam. If you’re in a pinch, bottled lemon juice will work, but freshly squeezed is always best!
Putting together these simple, fresh ingredients, you’re already on your way to whipping up something extraordinary. Don’t worry; it’s not as complicated as it sounds!
Step-by-Step Instructions
Now let’s get into the cooking! Follow these steps, and you’ll have a batch of delightful nectar jam in no time.
-
Prep the Nectarines: Start by washing your nectarines thoroughly. There’s something lovely about seeing all that sunshine-soaked fruit glistening! Slice them in half, remove the pits, and chop them into small pieces (about 1-inch chunks). Leave the skin on for added texture and vibrant color.
-
Mix Ingredients: In a large, heavy-bottomed pot, combine the chopped nectarines, sugar, and fresh lemon juice. Stir everything together gently to coat the nectarines in the sugar. Let this sit for about 30 minutes to allow the fruit to macerate and release its juices. This step is crucial as it sets the stage for the perfect consistency!
-
Cook the Jam: Place your pot over medium heat and bring the mixture to a gentle simmer. You will start to see the sugar dissolve as the nectarines become soft. Stir occasionally to prevent sticking and ensure even cooking. It will take about 20-30 minutes to reach a thick, jam-like consistency.
Chef’s Tip: To check if your jam has thickened properly, do the "plate test." Scoop a spoonful of jam and place it on a chilled plate. Let it sit for a minute, then run your finger through the middle. If it holds its shape and doesn’t immediately flood back together, it’s perfect!
-
Cool and Store: Once you’re happy with the consistency, remove the pot from the heat. Let the jam cool for about 10-15 minutes before transferring it to clean, sterilized jars. You can store the jam in the refrigerator for up to 3 weeks or process it in a water bath to preserve it for longer.
Congratulations—your very own nectar jam is ready!
Serving Suggestions
This nectar jam is so versatile and can be enjoyed in numerous ways. Spread it on warm toast or croissants for a delicious breakfast treat. It’s also delightful drizzled over pancakes or waffles. For a simple but elegant dessert, spoon it atop vanilla yogurt or ice cream for an indulgent treat. You can even stir it into oatmeal for a little flavor boost.
Recipe Variations
Don’t be afraid to play with flavors! Here are some creative twists to experiment with:
-
Spiced Nectarine Jam: Add a pinch of cinnamon or nutmeg for a warm, spiced flavor.
-
Zesty Citrus: Mix in the zest of an orange for a bright, citrusy kick that complements the nectarines beautifully.
-
Herb-Infused: Experiment with adding some fresh herbs like basil or mint for a delightful twist.
-
Mixed Fruit Jam: Combine nectarines with other summer fruits like peaches, apricots, or berries for a more complex flavor profile.
These variations will make each batch unique, and they can be delightful surprises for your family and friends!
Chef’s Notes
Making nectar jam takes me back to those summers spent with my grandmother. Over the years, I’ve simplified the process to make it more accessible. I initially tried adding pectin, but found that it didn’t need it at all. The natural pectin in the nectarines combined with the sugar and lemon juice yield a wonderfully satisfying consistency. This recipe is all about celebrating the fruit and keeping it as simple and natural as possible.
And trust me, the joy on my family’s faces whenever they taste this jam makes the whole kitchen adventure worthwhile. It may not always be perfect—sometimes it’s too thick, sometimes a bit loose—but that’s all part of the fun!
FAQs and Troubleshooting
1. What if my jam is too runny?
If your jam didn’t set up as you’d hoped, you can return it to the pot and cook it for a little longer until it thickens up. Just remember to stir often to prevent burning!
2. Can I use frozen nectarines?
Absolutely! Frozen nectarines work perfectly for this recipe. Just make sure to thaw them and drain any excess moisture before using.
3. How do I store my jam?
Store your nectar jam in clean, sterilized jars. Keep it in the fridge if you plan to use it within a few weeks. For longer storage, process the jars in a boiling water bath to seal them.
4. Can I reduce the sugar?
You can try reducing the sugar, but keep in mind that it helps with both sweetness and preservation. If you choose to use less, the jam might have a different consistency.
Nutritional Info
Each serving of this delightful nectar jam is not only a sweet treat but also contributes to your daily fruit intake. While I don’t usually calculate exact values, you can expect it to be a low-calorie option compared to many commercial jams, and it’s free from preservatives!
So, there you have it—a delightful, easy, and nostalgic 3-Ingredient Nectarine Jam without pectin! I hope you enjoy making this recipe as much as I do. Happy cooking, and may your kitchen always be filled with love and laughter!
Print
3 Ingredient Nectarine Jam Without Pectin
- Total Time: 45
- Yield: 4 servings
- Diet: Vegetarian
Description
A simple and delightful nectar jam made with fresh nectarines, sugar, and lemon juice, perfect for spreading on toast or drizzling over desserts.
Ingredients
- Fresh Nectarines (about 2 pounds)
- Sugar (1 cup)
- Fresh Lemon Juice (2 tablespoons)
Instructions
- Prep the nectarines: Wash, slice in half, remove the pits, and chop into small pieces, leaving the skin on.
- Mix ingredients: In a large pot, combine nectarines, sugar, and lemon juice. Stir gently and let sit for 30 minutes.
- Cook the jam: Over medium heat, bring to a simmer, stirring occasionally for about 20-30 minutes until thickened.
- Cool and store: Remove from heat, cool for 10-15 minutes, then transfer to sterilized jars.
Notes
For best results, use fresh nectarines. You can experiment with flavors by adding spices or other fruits.
- Prep Time: 15
- Cook Time: 30
- Category: Condiment
- Method: Cooking
- Cuisine: American
Nutrition
- Serving Size: 1 tablespoon
- Calories: 50
- Sugar: 10g
- Sodium: 0mg
- Fat: 0g
- Saturated Fat: 0g
- Unsaturated Fat: 0g
- Trans Fat: 0g
- Carbohydrates: 13g
- Fiber: 1g
- Protein: 0g
- Cholesterol: 0mg
Keywords: nectarine jam, summer recipes, fruit preserves


