
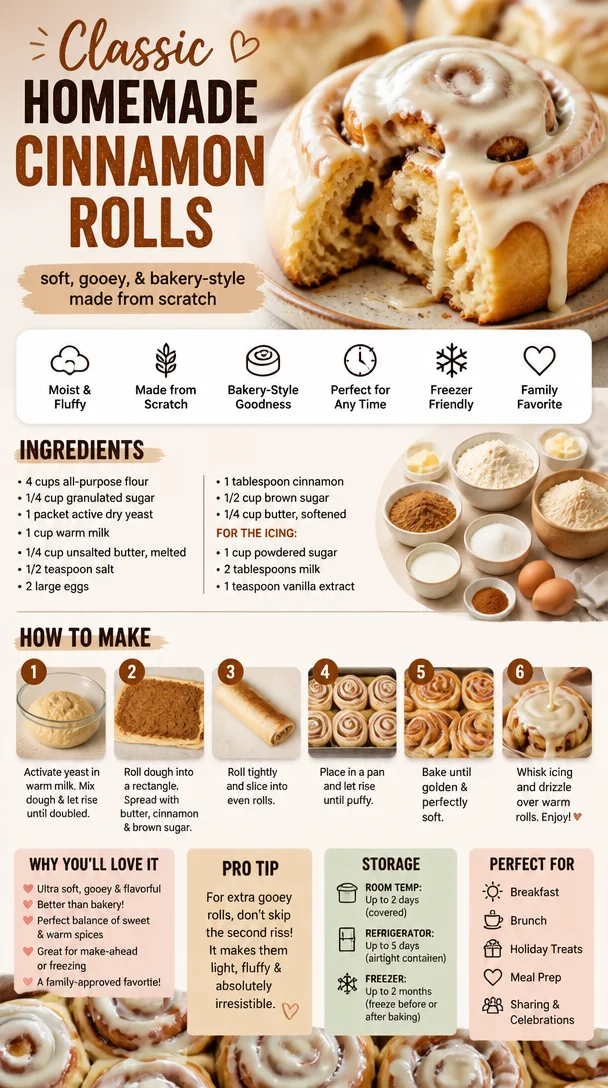
Classic Homemade Cinnamon Rolls
The Ultimate Guide to Classic Homemade Cinnamon Rolls
Welcome to my kitchen! Today, we’re diving into something incredibly cozy and indulgent: classic homemade cinnamon rolls. There’s something magical about the aroma of cinnamon wafting through your home as these delightful rolls bake in the oven. Trust me, it’s a scent that invites warmth and joy into any space, making it one of my favorite experiences in the kitchen.
As the seasons change and the air cools, I often think about the simple pleasures that bring us all together. Whether it’s a leisurely Sunday morning or a casual weekend brunch with friends, warm cinnamon rolls are the ultimate sweet treat that can turn any moment into a celebration. I promise you, this recipe won’t just fill your belly — it’ll fill your heart too.
Now, before we roll up our sleeves and get started on this delicious adventure, let me share a special memory that highlights just how much these cinnamon rolls mean to me.
A Sweet Symphony of Nostalgia
Growing up, my family had a tradition of making cinnamon rolls every Sunday morning. My mom always awakened each of us with the smell of fresh coffee and the promise of gooey rolls rising in the oven. I have vivid memories of my siblings and me fighting our way into the kitchen, trying to sneak a sample of that warm dough before it was even baked!
I can still hear the sound of laughter as we rolled out the dough and sprinkled it generously with cinnamon and sugar. There was something so exciting about waiting near the oven, peeking through the glass, and watching those rolls puff up like little clouds of happiness. And when they finally came out, we topped them with a sweet, creamy glaze that we’d artfully drizzle as we huddled around the table, jaws ready for the first bite.
Those rolls weren’t just a breakfast item; they were a symbol of love, warmth, and family bonding. Today, I’m thrilled to share this treasured recipe with you, hoping you create your own lasting memories with those you love.
Ingredients
Before we dive into the cooking process, let’s gather our ingredients. Here’s what you’ll need to create these delightful homemade cinnamon rolls:
-
All-Purpose Flour (4 cups): The backbone of our dough! You can substitute with bread flour for a chewier texture.
-
Granulated Sugar (½ cup + 1 tbsp): This sweetens both the dough and filling. Feel free to use brown sugar in the filling for a deeper flavor.
-
Active Dry Yeast (2 ¼ tsp, or 1 packet): The magic worker that makes your rolls fluffy. Be sure it’s fresh; if it foams when mixed with warm water, you’re good to go!
-
Milk (1 cup): Provides moisture and richness. Use whole milk for extra creaminess or substitute with almond milk for a dairy-free version.
-
Unsalted Butter (½ cup, melted): Adds flavor and moisture to the dough. Use the same for the filling to keep things simple.
-
Large Eggs (2): Help bind the dough. If you’re vegan, you can use flax eggs (1 tbsp ground flaxseed mixed with 2.5 tbsp water = 1 egg).
-
Cinnamon (2 tbsp): The star of our show! Feel free to experiment with other spices, like nutmeg or cardamom, if you’re feeling adventurous.
-
Brown Sugar (⅓ cup): Perfect for the filling, adding delicious caramel notes. You can substitute white sugar if needed.
-
Salt (1 tsp): Balances sweetness and enhances flavor. Don’t skip this — it’s a crucial ingredient!
-
Powdered Sugar (for glazing, optional): If you want that classic creamy glaze, you’ll want this on hand. You can also skip it for a lighter finish.
Step-by-Step Instructions
Now that we’ve got our ingredients lined up, let’s roll into the fun part — actually making these cinnamon rolls! Follow these steps for a guaranteed success:
Step 1: Activate the Yeast
In a small bowl, combine ½ cup of warm milk (make sure it’s about 110°F — just warm to the touch, not hot). Add 1 tablespoon of sugar and sprinkle the active dry yeast over the top. Let it sit for about 5-10 minutes until it becomes frothy. This means your yeast is alive and kicking!
Step 2: Create the Dough
In a large mixing bowl, combine 4 cups of all-purpose flour and 1 teaspoon of salt. Pour in the yeast mixture, melted butter, 2 eggs, and the rest of the milk. Mix everything together using a wooden spoon or your hands until a shaggy dough forms. Don’t worry about it being perfect — it’s supposed to be a bit messy at this point!
Step 3: Knead the Dough
Transfer your dough to a lightly floured surface and knead it for about 5-7 minutes until it’s smooth and elastic. This is where the magic happens! If the dough is too sticky, sprinkle in a bit more flour, but be careful not to overdo it. Once done, form it into a ball and place it in a greased bowl, turning it so it’s coated in oil. Cover it with a clean kitchen towel and let it rise in a warm spot for 1-2 hours or until it doubles in size.
Step 4: Roll Out the Dough
After your dough has puffed up, punch it down to release the air and turn it out onto a floured surface. Use a rolling pin to roll it into a rectangle, about 16×24 inches. Aim for about ½ inch thick. Don’t fret if your rectangle isn’t perfect; it’ll still taste divine!
Step 5: Add the Filling
Spread ½ cup of melted butter over the rolled dough. In a small bowl, combine ½ cup of brown sugar and 2 tablespoons of cinnamon, then sprinkle this heavenly mixture evenly over the buttered dough. Feel free to get creative here — if you want nuts or raisins, this is the time to toss them in!
Step 6: Roll It Up
Starting from the long edge, gently roll the dough away from you into a tight log. Make sure to keep it snug but not so tight that the filling spills out. Once it’s rolled, pinch the seam closed to seal it.
Step 7: Slice the Rolls
Using a sharp knife or dental floss (yes, you heard that right – no squishing here!), slice the roll into 12 even pieces. Each slice should be about 1.5 inches wide. Place the rolls, cut side up, into a greased 9×13 inch baking dish.
Step 8: Second Rise
Cover the dish with a towel and allow the rolls to rise again for about 30-45 minutes. Preheat your oven to 350°F while you wait.
Step 9: Bake
Once the rolls have puffed up nicely, pop them in the oven and bake for 25-30 minutes until golden brown. The smell will be absolutely intoxicating, and if you have an air vent in your house, it’ll become your neighbor’s envy!
Step 10: Glaze
While the rolls are baking, you can prepare the glaze (if you want!). In a bowl, mix 1 cup of powdered sugar with a few tablespoons of milk until you reach your desired consistency. Drizzle it over the warm rolls as soon as they come out of the oven for that ultimate finishing touch!
Serving Suggestions
When it comes to serving these classic cinnamon rolls, presentation is key! Arrange your warm rolls on a large plate or cake stand, drizzling with your luscious glaze. You can add a sprinkle of chopped nuts or a dusting of extra cinnamon on top for visual flair. To take it a step further, serve with a side of fresh fruit or a warm cup of coffee or tea. Enjoy them fresh out of the oven for the best experience!
Recipe Variations
Now, let’s get creative! Here are a few fun variations you can try with this classic recipe:
-
Maple Pecan Twist: Swap out some cinnamon for maple syrup in the filling and toss in chopped pecans for a delightful crunch.
-
Pumpkin Spice Rolls: In the dough, add 1 cup of pumpkin puree and a mix of pumpkin spices (nutmeg, ginger, allspice) for a seasonal twist.
-
Cream Cheese Filling: Instead of butter and cinnamon, mix softened cream cheese with sugar and a touch of vanilla for a rich, creamy filling.
-
Vegan Cinnamon Rolls: For a plant-based version, replace the milk with almond milk, use coconut oil instead of butter, and substitute flax eggs for traditional eggs.
Chef’s Notes
Making cinnamon rolls is like storytelling in a kitchen! Over the years, I’ve experimented with different fillings and toppings, but my heart always returns to this classic. I have witnessed my friends and family come together over these rolls, sharing laughter, stories, and, of course, second helpings.
Oh, and here’s a little secret: If you have some rolls left over (though that’s rare!), they’re fantastic reheated in the microwave for a few seconds or toasted in a pan with a tad of butter for that fresh-out-of-the-oven taste!
FAQs and Troubleshooting
Q: What if my dough doesn’t rise?
A: If your dough doesn’t rise, your yeast may have been expired or the water may have been too hot or too cold. Ensure it’s around the perfect warm temperature (110°F) and give it time!
Q: Can I make these ahead of time?
A: Absolutely! You can prep the rolls a day in advance, cover them tightly, and place them in the fridge after the first rise. Just take them out to come to room temperature before baking.
Q: Why are my cinnamon rolls dense?
A: If your rolls are too dense, be mindful of your flour measurements. Use a spoon to fluff up your flour before scooping it into your measuring cup.
Q: How do I store leftover cinnamon rolls?
A: Store any leftovers in an airtight container at room temperature for up to 2 days, or in the fridge for about a week. You can also freeze them (without glaze) for up to three months!
Nutritional Info
If you’re curious about the nutrition, here’s a general estimate for one classic cinnamon roll (without glaze):
- Calories: 300
- Protein: 4g
- Carbs: 45g
- Fat: 10g
- Sugar: 10g
Remember, these figures can vary based on ingredient choices and portion sizes, so consider them approximate!
Now that you have everything you need, it’s time to roll up those sleeves and dive into the wonderful world of cinnamon rolls! I can’t wait for you to enjoy these treats as much as I do. Happy baking, friends!
Print
Classic Homemade Cinnamon Rolls
- Total Time: 60 minutes
- Yield: 12 servings 1x
- Diet: Vegetarian
Description
Indulge in the cozy aroma and delightful taste of homemade cinnamon rolls, perfect for any gathering or leisurely morning.
Ingredients
- 4 cups All-Purpose Flour
- ½ cup + 1 tbsp Granulated Sugar
- 2 ¼ tsp Active Dry Yeast
- 1 cup Milk
- ½ cup Unsalted Butter, melted
- 2 Large Eggs
- 2 tbsp Cinnamon
- ⅓ cup Brown Sugar
- 1 tsp Salt
- Powdered Sugar (for glazing, optional)
Instructions
- Activate the yeast by combining warm milk, sugar, and yeast in a bowl, letting it sit until frothy.
- Create the dough by mixing flour, salt, yeast mixture, melted butter, eggs, and remaining milk.
- Knead the dough on a floured surface for 5-7 minutes until smooth.
- Roll out the dough into a 16×24 inch rectangle.
- Add melted butter and sprinkle the cinnamon and brown sugar mixture over the dough.
- Roll the dough into a tight log and pinch the seam closed.
- Slice the roll into 12 even pieces and place them in a greased baking dish.
- Second rise for 30-45 minutes while preheating the oven to 350°F.
- Bake for 25-30 minutes until golden brown.
- Glaze the rolls with a mixture of powdered sugar and milk after baking.
Notes
These rolls can be made ahead of time. Store leftovers in an airtight container for up to 2 days or freeze for up to three months.
- Prep Time: 30 minutes
- Cook Time: 30 minutes
- Category: Dessert
- Method: Baking
- Cuisine: American
Nutrition
- Serving Size: 1 roll
- Calories: 300
- Sugar: 10g
- Sodium: 400mg
- Fat: 10g
- Saturated Fat: 4g
- Unsaturated Fat: 4g
- Trans Fat: 0g
- Carbohydrates: 45g
- Fiber: 1g
- Protein: 4g
- Cholesterol: 30mg
Keywords: cinnamon rolls, sweet rolls, baking, breakfast, dessert
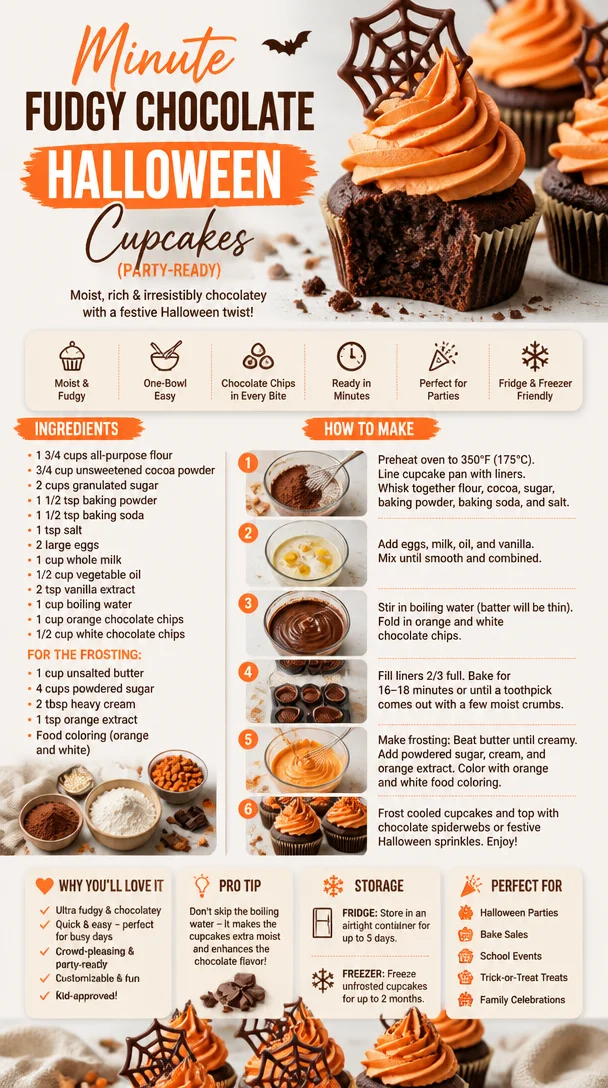
Minute Fudgy Chocolate Halloween Cupcakes (Party-Ready)
The Spooktacular Delight of Chocolate Halloween Cupcakes
Welcome back to my cozy kitchen! As the leaves turn that beautiful shade of amber and the air gets a hint of chill, I can’t help but get excited about one of my favorite holidays—Halloween! It’s a delightful time when we can embrace all things spooky, playful, and, of course, delicious. And what better way to celebrate than with a batch of rich, chocolate Halloween cupcakes? These little treats aren’t just tasty; they’re a canvas for creativity, allowing you to unleash your inner artist and celebrate the season in style.
Picture this: You smell the warm, comforting aroma of chocolate wafting through your home, pulling you into the kitchen like a friendly ghost. You grab your mixing bowl, toss in your ingredients, and dance to your favorite Halloween playlist while whisking it all together. Whether you’re whipping these up for a spooky soirée, a school bake sale, or just to indulge in some festive fun, these cupcakes are perfect for spreading joy and chills alike.
These cupcakes are wonderfully moist and decadent, offering a sumptuous chocolate flavor that’s totally irresistible. Topped with fluffy, orange-tinged frosting and adorned with eerie sprinkles, they not only taste heavenly but also look hauntingly adorable! So, let’s dive into this spooky culinary adventure together and make some memories—because nothing brings people together like a homemade treat (especially one filled with chocolate goodness!). Grab your apron, tie it on, and let’s get baking!
A Sweet Memory from My Childhood
As a young girl, Halloween was always a magical time in our household. I remember eagerly anticipating the moment when my mom would bring out her collection of spooky-themed recipes. The front of our kitchen would transform into a miniature bakery, and I’d often steal bites of cookie dough, doused in semi-sweet chocolate chips, as I helped her prepare for our neighborhood Halloween party.
One year, we decided to host a ‘witches and wizards’ theme, complete with flying broomsticks and floating ghosts hanging from the ceiling. My mom made her famous chocolate cupcakes and turned them into mummies with white frosting and chocolate chip eyes. It was a huge hit, and the joy on the kids’ faces as they devoured the treats is a memory I cherish to this day. That experience sparked my love for baking and the idea that food can ignite joy and connection. Now, every time I make chocolate cupcakes, I’m taken back to those thrilling Halloween nights, excited laughter, and treats that brought us all together.
Ingredients
To create these scrumptious chocolate Halloween cupcakes, you’re going to need the following ingredients:
-
1 cup all-purpose flour
A staple in most desserts! This gives the cupcakes their structure. You can substitute with gluten-free flour if needed. -
1 cup granulated sugar
This lends sweetness and helps the cupcakes rise beautifully. Feel free to use coconut sugar for a less refined option. -
1/2 cup unsweetened cocoa powder
The star of the show! Use the highest quality you can find for rich, chocolatey goodness. Dutch-processed cocoa gives a deeper flavor if you like. -
1 teaspoon baking powder
This helps your cupcakes rise and become fluffy. Ensure it’s fresh for the best results. -
1/2 teaspoon baking soda
Works in conjunction with the baking powder for a perfectly aerated cupcake. -
1/4 teaspoon salt
A pinch of salt enhances the sweetness and balances the chocolate flavor. -
2 large eggs
Eggs add moisture and richness. For a vegan version, try flaxseed eggs (1 tbsp ground flaxseed + 2.5 tbsp water = 1 egg). -
1/2 cup vegetable oil
Keeps the cupcakes moist and flavorful. Substitute with melted coconut oil or applesauce for a lighter version. -
1 teaspoon vanilla extract
Adds a delightful aroma and depth of flavor. Use pure vanilla for the best quality. -
1/2 cup milk
This helps to brighten the chocolate flavor. You can use almond milk or oat milk as a dairy-free alternative. -
1/4 cup boiling water
This may seem odd, but it intensifies the cocoa flavor and creates a moist texture. -
Orange food coloring (optional)
To give your frosting that festive Halloween hue! -
Sprinkles or decorations
Get creative with spooky sprinkles, edible eyes, or gummy worms to top your cupcakes and bring them to life (or death!).
Step-by-Step Instructions
Alright, let’s roll up those sleeves and get mixing! Follow these steps for baking your delectable Halloween cupcakes:
-
Preheat the Oven
First things first—preheat your oven to 350°F (175°C). This ensures your cupcakes bake evenly and rise perfectly. -
Line the Cupcake Tin
Prepare a 12-cup muffin tin by lining it with festive cupcake liners. I often go for orange and black to get into the Halloween spirit! -
Mix the Dry Ingredients
In a large mixing bowl, whisk together the flour, sugar, cocoa powder, baking powder, baking soda, and salt. This blending of dry ingredients ensures an even distribution of those flavors. -
Combine the Wet Ingredients
In a separate bowl, combine the eggs, vegetable oil, milk, and vanilla extract. Whisk them until nice and smooth. This is where you can add a drop or two of orange food coloring for a vibrant splash. -
Create the Batter
Gradually pour the wet mixture into the dry mixture and whisk until well combined. Careful not to overmix! A few lumps are okay—you want those cupcakes to be tender, not tough. -
Boiling Water Magic
Stir in the boiling water slowly. This may make your batter seem more runny, but trust me, it’s going to yield some moist, delectable cupcakes. -
Fill the Liners
Use a spoon or an ice cream scoop to fill each liner about two-thirds full. This helps to give them room to rise without overflowing. -
Bake Away!
Pop your cupcake tin into the preheated oven and bake for 18-20 minutes, or until a toothpick inserted in the center comes out clean. The smell will be incredible—prepare for the “ooohs” and “aaahs” from anyone within sniffing distance! -
Cool Down
Once baked, let the cupcakes cool in the tin for about 5 minutes before transferring them to a wire rack to cool completely. They need to be cool for frosting—otherwise, it’ll melt! -
Frost and Decorate
Now comes the fun part! Use a piping bag to swirl your favorite cupcake frosting on top (I suggest a classic buttercream dyed orange) and finish with spooky decorations. Get creative!
Serving Suggestions
When it comes to serving these delightful treats, presentation is key! Place your frosted Halloween cupcakes on a fun, themed platter—think spiderweb designs or pumpkin motifs. Add some additional decorations to your serving area, perhaps miniature pumpkins or spooky props, to really set the atmosphere. If you’re handing them out as treats, consider placing each cupcake in its own little clear cellophane bag, tied with a cute Halloween ribbon.
Recipe Variations
-
Pumpkin Chocolate Swirl: Add a layer of pumpkin purée to your batter for a delicious swirl and a touch of fall spice.
-
Minty Monster Cupcakes: Swap out the vanilla for peppermint extract in the frosting for a refreshing twist!
-
Spider Web Frosting: Use a piping bag to drizzle white frosting over the orange icing to create a spooky spider web design.
-
Nutty Crunch: Fold in some chopped walnuts or pecans into the batter for a crunchy texture throughout.
-
Gluten-Free Delight: Simply swap the all-purpose flour for a gluten-free blend, and you’re all set for those with gluten sensitivities!
Chef’s Notes
Making these chocolate Halloween cupcakes always feels like an adventure! They’ve evolved from a simple recipe I first learned to a canvas for creativity and seasonal delight. I’ve tried them with various toppings, from edible glitter to more advanced fondant decorations, and each iteration brings back those warm memories of baking in the kitchen with my mom. One of the funniest moments involved our family cat sneaking onto the counter and pawing at the frosting—yes, that didn’t end well! Remember to guard your creations from eager paws or curious hands!
FAQs and Troubleshooting
1. My cupcakes didn’t rise! What went wrong?
This could be due to using expired baking powder or baking soda. Always check the expiration dates—fresh leavening agents are essential for fluffy cupcakes!
2. Why are my cupcakes dry?
Overmixing the batter or baking them for too long can lead to dryness. Be gentle when mixing, and keep an eye on the timer!
3. How can I store leftovers?
Store any uneaten cupcakes in an airtight container at room temperature for up to 3 days. If you want to preserve them longer, freeze them without frosting and thaw when you’re ready to serve.
4. Can I make these ahead of time?
Absolutely! You can bake the cupcakes a day in advance. Just frost them the day of your event to keep the frosting fresh and fluffy.
With this easy-to-follow recipe, you’re ready to bake the most delightful chocolate Halloween cupcakes that will make everyone’s taste buds dance. So gather your ingredients, channel your inner culinary spirit, and let’s create something truly spooktacular together! Happy baking and enjoy every bite!
Print
Chocolate Halloween Cupcakes
- Total Time: 40 minutes
- Yield: 12 servings 1x
- Diet: Vegetarian
Description
Delightful and moist chocolate cupcakes topped with fluffy orange frosting, perfect for Halloween celebrations.
Ingredients
- 1 cup all-purpose flour
- 1 cup granulated sugar
- 1/2 cup unsweetened cocoa powder
- 1 teaspoon baking powder
- 1/2 teaspoon baking soda
- 1/4 teaspoon salt
- 2 large eggs
- 1/2 cup vegetable oil
- 1 teaspoon vanilla extract
- 1/2 cup milk
- 1/4 cup boiling water
- Orange food coloring (optional)
- Sprinkles or decorations
Instructions
- Preheat the oven to 350°F (175°C).
- Line a 12-cup muffin tin with festive cupcake liners.
- Mix the flour, sugar, cocoa powder, baking powder, baking soda, and salt in a large mixing bowl.
- Combine the eggs, vegetable oil, milk, and vanilla extract in a separate bowl.
- Create the batter by gradually pouring the wet mixture into the dry mixture and whisk until well combined.
- Stir in the boiling water slowly.
- Fill each liner about two-thirds full with batter.
- Bake for 18-20 minutes, or until a toothpick inserted in the center comes out clean.
- Cool in the tin for about 5 minutes before transferring to a wire rack to cool completely.
- Frost with your favorite cupcake frosting and decorate as desired.
Notes
Enjoy decorating your cupcakes with spooky sprinkles or themed decorations to enhance the Halloween spirit.
- Prep Time: 20 minutes
- Cook Time: 20 minutes
- Category: Dessert
- Method: Baking
- Cuisine: American
Nutrition
- Serving Size: 1 cupcake
- Calories: 280
- Sugar: 22g
- Sodium: 220mg
- Fat: 10g
- Saturated Fat: 1g
- Unsaturated Fat: 8g
- Trans Fat: 0g
- Carbohydrates: 42g
- Fiber: 2g
- Protein: 3g
- Cholesterol: 40mg
Keywords: Halloween, chocolate cupcakes, festive baking, dessert recipes, spooky decorations
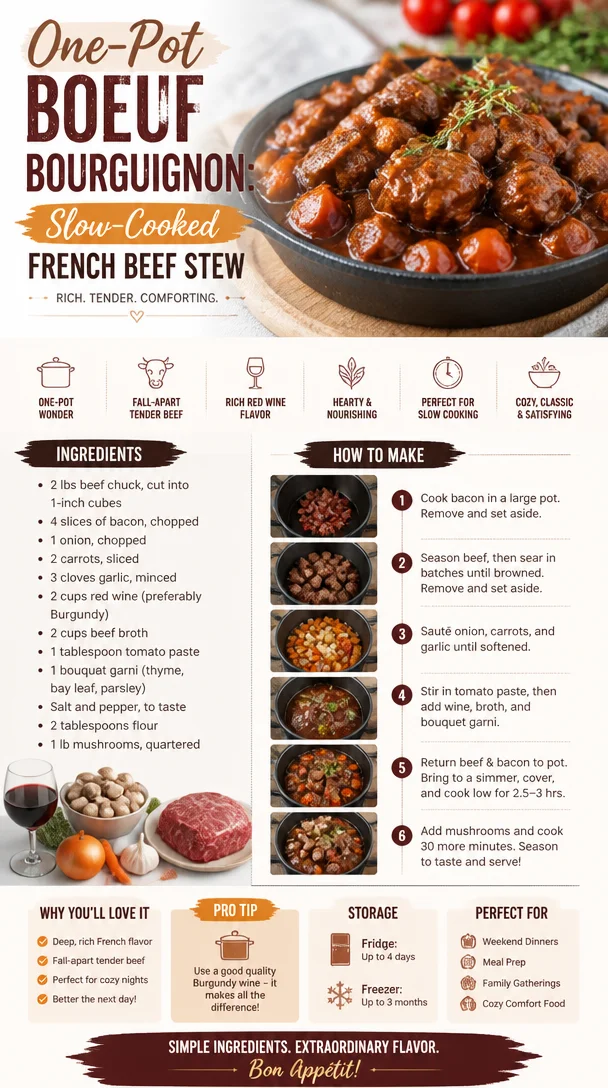
One-Pot Boeuf Bourguignon: Slow-Cooked French Beef Stew
The Heart of Home Cooking: Boeuf Bourguignon
Welcome back to my cozy corner of the kitchen! Today, we’re diving into a beloved classic that embodies everything I adore about cooking: the art of simplicity, the magic of depth in flavor, and the joy of gathering around the table. Yes, I’m talking about Boeuf Bourguignon — a rich, hearty stew that’s perfect for any occasion or simply a chilly weekend evening at home.
Whenever I hear the term "Boeuf Bourguignon," I can’t help but smile. It’s more than just a dish; it’s a warm embrace, a flavorful jacket on a cold winter night, and a nod to my childhood. My first experience making it was during my summer evenings in my grandmother’s kitchen, where she would regale me with stories of her French ancestry while expertly melding together robust flavors. The scent of browning beef and herbs simmering on the stove was intoxicating, and I was instantly captivated.
As time passed, I’ve made this dish countless times, each prep laced with nostalgic memories and a sprinkling of new culinary experiments. And let me tell you, every time I make Boeuf Bourguignon, I feel like I’m cooking with my grandmother again, sharing her lessons and love of food with everyone at my table. Oh, the stories and laughter that unfold over a pot of this delightful stew! So grab your apron, gather your ingredients, and let’s embark on a culinary journey inspired by tradition and love.
Ingredients
To make a traditional Boeuf Bourguignon, you’ll need the following ingredients. Each plays a vital role, adding its unique touch to the final dish.
-
2-3 pounds beef chuck: Look for well-marbled beef, as the fat will render down, making your stew tender and juicy. If you’re in a pinch, you can substitute with brisket or round, but they might not be as flavorful.
-
1 bottle of red wine: A good quality dry red wine, like Pinot Noir or Burgundy, is essential. It’s okay to use a less expensive bottle as long as it’s something you’d enjoy drinking! If you’re avoiding alcohol, some beef broth with a splash of vinegar can work in a pinch.
-
4-6 slices of bacon or lardons: This adds a smoky undertone to the dish. If you’re looking for a leaner option, turkey bacon works, but it will change the flavor profile a bit.
-
2 cups beef broth: Homemade is best if you have it! Store-bought is perfectly acceptable; just stick to low-sodium versions. For a lighter touch, vegetable broth works too, but you’ll miss that rich flavor.
-
1 tablespoon tomato paste: This helps develop a wonderful depth of flavor. You can also use sun-dried tomato paste for a twist!
-
2-3 carrots, chopped: These contribute natural sweetness and texture. You can swap them out for parsnips for an interesting flavor change!
-
1 large onion, sliced: Yellow onions are perfect here, but shallots can add a subtler sweetness if you prefer.
-
2-3 cloves garlic, minced: A crucial flavor ingredient; you can use garlic powder if you’re in a pinch, but fresh is always best.
-
2-3 sprigs fresh thyme: Thyme adds warmth and aroma to the dish. Dried thyme can be substituted, but use about a third of the amount since dried is more potent.
-
2 bay leaves: They impart a wonderful complexity! They should be removed before serving, as they can be quite tough.
-
Salt and pepper to taste: Freshly cracked black pepper is ideal, but table salt will also do the job!
Step-by-Step Instructions
Now that we have everything lined up, it’s time to create our masterpiece. Follow these steps, and your kitchen will be filled with the heavenly aroma of Boeuf Bourguignon.
-
Prep the Ingredients: Start by cutting the beef into 2-inch cubes. Make sure to pat them dry with paper towels to achieve that glorious brown crust when seared. Next, chop your onions and carrots, and mince your garlic. Good prep makes the cooking process a breeze!
-
Brown the Bacon: In a large Dutch oven, cook the bacon over medium heat until it’s crispy. This will take about 5-7 minutes. The rendered fat is essential for browning the beef and adds incredible flavor to the stew. Remove the bacon and set it aside, but keep that beautiful fat in the pot!
-
Brown the Beef: In the same pot, increase the heat to medium-high. Add the beef in batches, ensuring not to overcrowd the pan. Brown all sides, about 3-4 minutes per side, and don’t rush this. The caramelization is key to depth of flavor! Set the beef aside with the bacon when done.
-
Sauté the Vegetables: Lower the heat slightly and add your onions and carrots to the pot. Cook until the onions are translucent, about 5 minutes. Stir in the minced garlic for another minute, letting the aroma fill your kitchen with goodness.
-
Deglaze with Wine: Pour in the red wine, scraping the bottom of the pot to release all those delicious bits stuck to the bottom. Bring to a simmer and reduce the wine by about half — this amplifies the flavors!
-
Introducing the Broth: Once the wine has reduced, stir in the beef broth, tomato paste, thyme, bay leaves, and the reserved beef and bacon. It should be a glorious, deep red color! Bring the mixture to a gentle simmer.
-
Slow Cook the Magic: Cover the pot and let it gently simmer for 2-3 hours, stirring occasionally. Alternatively, you can transfer everything to a preheated oven at 350°F (175°C) for the same amount of time. Whichever method, the low and slow cooking is what transforms this into a comforting masterpiece!
-
Final Touch: About 15-30 minutes before serving, taste and season with salt and pepper. If you want to thicken the sauce, you can whisk together a tablespoon of cornstarch with a little water, then stir it into the stew.
Serving Suggestions
When ready to serve, ladle your Boeuf Bourguignon into bowls, and garnish with a sprinkle of fresh parsley for a pop of color. It’s magnificent on its own paired with buttery mashed potatoes or a crusty baguette to soak up the rich sauce.
Recipe Variations
While the classic Boeuf Bourguignon is hard to beat, here are a few flavorful variations to keep it exciting!
-
Mushroom Lover’s: Add 8 ounces of baby bella mushrooms in the last hour of cooking for an earthy flavor boost.
-
Herb Infusion: Try adding rosemary or a touch of that herby delight — fresh marjoram adds wonderful warmth.
-
Vegetarian Option: Swap the beef for hearty vegetables like mushrooms, eggplant, or a mix of lentils for a filling plant-based alternative.
-
Spicy Kick: If you like a bit of heat, toss in a pinch of red pepper flakes when cooking the garlic.
-
A Touch of Sweetness: Consider adding a tablespoon of dark chocolate or a splash of balsamic vinegar for an unexpected depth.
Chef’s Notes
This Boeuf Bourguignon recipe has become a staple in my household over the years. Initially, I struggled with getting the perfect balance of flavors, but after experimenting with ratios and different simmering times, I’ve created a version that feels just right to me. I can still hear my grandmother chuckle as I frantically tried to keep track of where I put the bay leaves — a constant battle in my kitchen! Every time I make this dish, it feels like I’m sprinkling a little bit of love from her into each bowl.
FAQs and Troubleshooting
Q: Can I make Boeuf Bourguignon a day in advance?
A: Absolutely! In fact, it tastes even better the next day as the flavors continue to meld. Just reheat gently on the stove, adding a splash of wine or broth if it thickens too much.
Q: What if the sauce is too thin?
A: No worries! You can thicken the sauce by making a slurry with cornstarch and water, or simply let it simmer uncovered for a bit longer until it thickens to your desired consistency.
Q: Is there a specific wine I should use?
A: You want a dry red wine with good acidity; Pinot Noir or Burgundy are fantastic choices. However, if you’re in a bind, choose any red that you would enjoy drinking.
Q: Can I freeze Boeuf Bourguignon?
A: Yes! It freezes wonderfully for up to three months. Just make sure to cool it completely before transferring it into airtight containers.
Nutritional Info
While I believe the joy of cooking comes before any calorie count, a generous serving of Boeuf Bourguignon (approximately 1.5 cups) generally has:
- Calories: 540
- Protein: 45g
- Fat: 25g
- Carbohydrates: 27g
- Fiber: 3g
Feel free to adjust the portions to fit your dietary needs!
There you have it—your cozy invitation to create a delightful Boeuf Bourguignon! I can’t wait to hear your stories and how this traditional dish brings warmth to your kitchen. Happy cooking, friends!
Print
Boeuf Bourguignon
- Total Time: 210 minutes
- Yield: 6 servings 1x
- Diet: None
Description
A rich, hearty stew that embodies the art of simplicity and depth of flavor, perfect for gatherings or cozy evenings.
Ingredients
- 2–3 pounds beef chuck
- 1 bottle of dry red wine (e.g., Pinot Noir or Burgundy)
- 4–6 slices of bacon or lardons
- 2 cups beef broth
- 1 tablespoon tomato paste
- 2–3 carrots, chopped
- 1 large onion, sliced
- 2–3 cloves garlic, minced
- 2–3 sprigs fresh thyme
- 2 bay leaves
- Salt and pepper to taste
Instructions
- Prep the ingredients: Cut the beef into 2-inch cubes and pat dry. Chop onions and carrots, and mince garlic.
- Brown the bacon: In a large Dutch oven, cook bacon over medium heat until crispy, about 5-7 minutes. Remove and set aside.
- Brown the beef: In the same pot, increase heat to medium-high and brown beef in batches, about 3-4 minutes per side. Set aside with the bacon.
- Sauté the vegetables: Lower heat and add onions and carrots. Cook until onions are translucent, about 5 minutes. Add minced garlic for another minute.
- Deglaze with wine: Pour in red wine, scrape the bottom of the pot, and bring to a simmer. Reduce wine by half.
- Introduce the broth: Stir in beef broth, tomato paste, thyme, bay leaves, beef, and bacon. Bring to a gentle simmer.
- Slow cook the magic: Cover and let simmer for 2-3 hours or transfer to a preheated oven at 350°F (175°C) for the same time.
- Final touch: About 15-30 minutes before serving, taste and season with salt and pepper. Thicken sauce if desired.
Notes
Boeuf Bourguignon tastes better the next day as flavors meld. Can be frozen for up to three months.
- Prep Time: 30 minutes
- Cook Time: 180 minutes
- Category: Main Course
- Method: Slow Cooking
- Cuisine: French
Nutrition
- Serving Size: 1 serving
- Calories: 540
- Sugar: 4g
- Sodium: 800mg
- Fat: 25g
- Saturated Fat: 8g
- Unsaturated Fat: 15g
- Trans Fat: 0g
- Carbohydrates: 27g
- Fiber: 3g
- Protein: 45g
- Cholesterol: 100mg
Keywords: Boeuf Bourguignon, French stew, hearty dinner, winter recipe
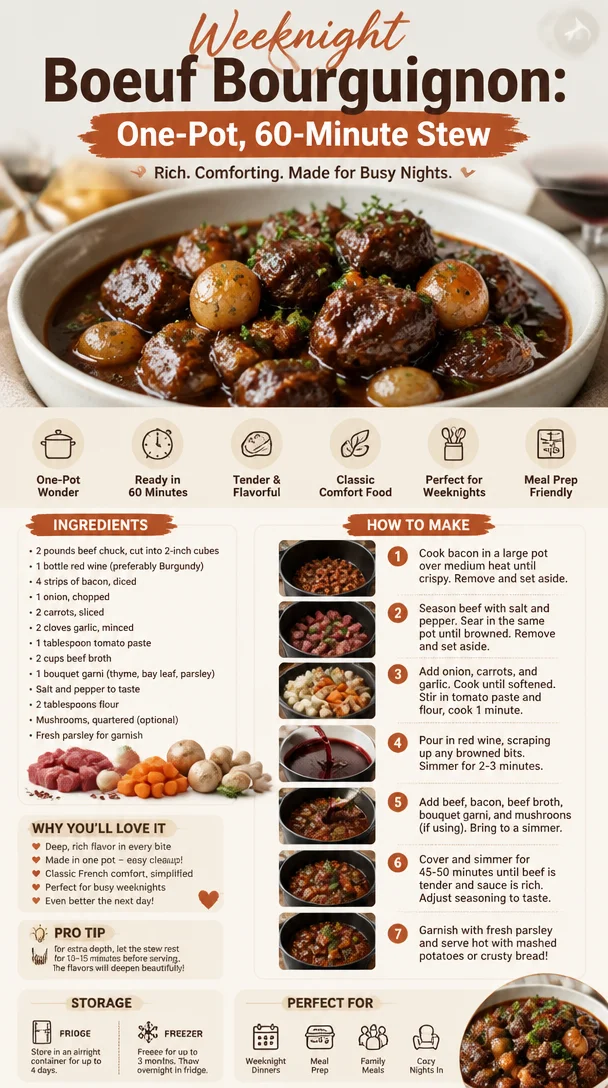
Weeknight Boeuf Bourguignon: One-Pot, 60-Minute Stew
Discovering the Soul of French Cooking: My Take on Boeuf Bourguignon
Welcome to the warm and inviting world of home cooking! I’m Olivia Bennett, your friendly neighborhood chef, always ready to roll up my sleeves and dive into the magic that happens in the kitchen. Today, we’re embracing the cozy charm of a classic French dish that’s sure to become a heartwarming staple in your culinary repertoire: Boeuf Bourguignon.
Ah, Boeuf Bourguignon! Just saying it stirs up dreams of rustic French bistros and nights spent around long tables filled with friends and laughter. This dish beautifully combines tender beef, rich red wine, and a medley of vegetables, resulting in a savory delight that warms the heart and soul. It’s the kind of recipe that begs to be shared, not just with your taste buds but also with people you care about. Whether you’re a cooking novice or a seasoned pro, I promise you can master this dish and impress your loved ones.
As we embark on this culinary journey, remember that cooking is about joy — about the aromas that dance around your kitchen and the little bits of happiness that emerge from simple ingredients. So, grab your apron, pour yourself a glass of that lovely red wine you’ll use for the stew (yes, you can sip while you stir!), and let’s get cooking!
A Taste of Nostalgia: My First Encounter with Boeuf Bourguignon
Years ago, I was a bright-eyed culinary student with much to learn and excitement bubbling under my skin. One chilly winter afternoon, I stepped into the bustling kitchen of a renowned culinary school in Paris for the first time. The air was thick with the scent of herbs and sautéing garlic, but it was the wafting aroma of Boeuf Bourguignon that truly captivated my senses.
Our instructor, Chef Pierre, a jovial man with a flair for storytelling, shared tales of how this dish had fed families through generations. He spoke of intimate gatherings around the family table, of laughter, and stories shared over a steaming pot of simmering beef. Under his watchful eye, I diced vegetables and marinated beef, each step infused with the warmth of tradition. By the end of the lesson, we sat down together to enjoy the fruits of our labor, and with each bite, I felt a connection to the heart of French cuisine.
That day wasn’t just about learning a recipe; it was about understanding the spirit of cooking as a form of love and connection. Now, every time I prepare Boeuf Bourguignon, I’m transported back to that cozy kitchen in Paris, surrounded by laughter and good food. I want to share that magic with you, so let’s gather our ingredients and get started!
Ingredients: What You’ll Need for the Perfect Boeuf Bourguignon
Here’s a handy list of ingredients you’ll need to bring your Boeuf Bourguignon to life. Each component plays a vital role in crafting the deep, savory flavors that make this dish so special.
-
2 pounds of beef chuck (or stew meat): The star of the show! Chuck is ideal for slow cooking due to its rich marbling, which makes for tender meat. If you prefer, you can substitute with brisket or round, but avoid lean cuts, as they won’t provide the same level of richness.
-
4 ounces of pancetta (or bacon): This adds a delightful smokiness and depth of flavor. If you’re looking for a leaner option, turkey bacon can work as a substitute, but it will alter the flavor a bit.
-
1 bottle (750 ml) of dry red wine: A must! Use a Burgundy (if you want to keep it traditional), but any good dry red wine will do. You can also use a non-alcoholic red wine or grape juice diluted with a bit of vinegar if you’re avoiding alcohol.
-
2 cups of beef stock (homemade, if possible): For the luscious sauce texture. Low-sodium store-bought broth works fine, but homemade stock will elevate your dish to heavenly levels.
-
2 tablespoons of tomato paste: This will deepen the sauce’s flavor. You can use ketchup in a pinch, but the sauce won’t have that rich undertone.
-
1 tablespoon of flour: For thickening the sauce slightly. If you’re gluten-free, substitute with cornstarch or a gluten-free flour blend.
-
3-4 cloves of garlic: Adds an aroma that will make your kitchen feel like a French bistro. Fresh is best; however, jarred minced garlic can work in a pinch.
-
1 large onion (yellow or pearl): Sweet and savory, onions build flavor. Shallots can be a great substitute for a more delicate taste.
-
4–5 carrots: For sweetness and color. Baby carrots can also work if you’re short on time.
-
8 ounces of button mushrooms (or your mushroom of choice): Earthy goodness! Cremini or shiitake mushrooms will add even more flavor.
-
Fresh or dried thyme: About 1–2 teaspoons. Fresh thyme elevates the dish, but dried works just fine too.
-
1-2 bay leaves: Essential for that herbal depth. Don’t include them when serving; remember to take them out!
-
Salt and pepper: Essential for seasoning! Always taste along the way and adjust according to your preference.
Now that we have our ingredients ready, let’s dive into the cooking process!
Step-by-Step Instructions: Crafting Your Boeuf Bourguignon
-
Prep Work: Start by trimming excess fat from the beef and cutting it into 1–2 inch cubes. Make sure to season the pieces liberally with salt and pepper. This step is crucial! Proper seasoning will enhance the flavors of the meat as it cooks.
-
Sear the Pancetta: In a large Dutch oven or heavy pot, cook the pancetta (or bacon) over medium heat until crispy, about 5–7 minutes. Remove the pancetta from the pot, leaving the lovely drippings behind; that’s liquid gold, my friend!
-
Brown the Beef: Add a bit of oil if the pot looks dry, then in batches, sear the beef until browned on all sides. Don’t crowd the pot; this will ensure you get a beautiful crust. Remove the beef and set it aside with the pancetta.
-
Sauté the Aromatics: In the same pot, throw in the diced onion, garlic, and carrots. Sauté for about 5 minutes until they soften, scraping up any brown bits from the bottom of the pot — that’s where the flavor lives!
-
Add the Flour: Sprinkle the flour over the vegetables and cook for another 2 minutes, stirring constantly. This will help thicken the sauce later; it’s one of those little kitchen hacks that make a big difference!
-
Deglaze with Wine: Pour in the red wine, making sure to scrape the bottom of the pot to incorporate those delicious browned bits. Allow the mixture to bubble and reduce for about 5–10 minutes.
-
Bring It All Together: Add the beef back into the pot along with the pancetta. Pour in the beef stock, tomato paste, thyme, and bay leaves. Stir well to combine; it’s starting to come together beautifully already!
-
Slow Cook: Bring the stew to a gentle simmer. Cover the pot and reduce the heat to low. Let it cook for 1.5 to 2 hours, stirring occasionally. The longer it simmers, the more flavor it develops, and the meat will become meltingly tender.
-
Mushroom Madness: About 30 minutes before serving, stir in the mushrooms. They’ll soak up all that savory goodness and contribute their earthy flavor.
-
Final Seasoning: Before serving, taste your stew and adjust the seasonings with more salt and pepper as needed. Remove the bay leaves; they’ve done their job!
Serving Suggestions: Plating Your Boeuf Bourguignon
Now comes the best part: plating! Serve your Boeuf Bourguignon in cozy bowls, allowing the rich color of the stew to shine. A sprinkle of fresh parsley on top adds a lovely pop of color and freshness. Pair it with creamy mashed potatoes, a crusty baguette, or egg noodles to soak up that delicious sauce. Your friends and family will be swooning, I promise!
Recipe Variations: Make It Your Own!
Let’s get creative! Here are a few fun twists on this classic dish:
-
Vegetable Twist: Swap out beef for hearty vegetables like mushrooms, eggplant, and zucchini for a delightful vegetarian take.
-
Spicy Kick: Add a touch of smoked paprika or a pinch of red pepper flakes for a mild heat that balances the rich flavors.
-
Herb Infusion: Add fresh rosemary or a few sprigs of fresh basil while it simmers for a fragrant variation.
-
Guinness Swap: Try using a dark stout beer instead of red wine for a rich flavor twist!
-
Slow Cooker Ease: You can make this recipe in a slow cooker! Just follow the steps for searing and sautéing, then transfer everything to the slow cooker and cook on low for 6–8 hours.
Chef’s Notes: The Evolution of My Boeuf Bourguignon
Every time I prepare this dish, I’m reminded of how cooking brings people together. Over the years, I’ve played with this recipe, making it my own, but the essence remains the same: comfort and warmth. There was one memorable dinner where my friends and I gathered, bottle after bottle of wine in hand, crafting our own “Boeuf Taste Test.” We tried a traditional version, then one with all sorts of wild twists. It was a night of culinary exploration, laughter, and a little bit of friendly competition.
Cooking is all about expressing love and sharing experiences, and while the recipe may evolve, the heart behind it never changes. So, when you make your Boeuf Bourguignon, put your own spin on it, add your favorite seasonings, and don’t be afraid to experiment a little!
FAQs and Troubleshooting: Your Cooking Questions Answered
-
Why is my beef tough?
Tough beef usually means it hasn’t cooked long enough. Make sure to simmer it for at least 1.5 to 2 hours on low heat to ensure maximum tenderness. -
Can I make it a day ahead?
Yes! In fact, Boeuf Bourguignon often tastes even better the next day after the flavors have had time to meld. Just reheat gently before serving. -
What if I don’t have red wine?
You can substitute with beef broth or a mix of grape juice and vinegar. While the flavor won’t be exactly the same, you can still achieve a delicious dish! -
How do I store leftovers?
Allow your Boeuf Bourguignon to cool completely before transferring it to an airtight container. Refrigerate for up to 3 days or freeze for longer storage.
Nutritional Info (Optional)
While I usually focus on the joy of cooking, let’s be mindful of nutrition too. A single serving of Boeuf Bourguignon (using the above ingredients) typically contains:
- Calories: Approx. 450
- Protein: 35g
- Fat: 25g
- Carbohydrates: 20g
- Fiber: 3g
(Keep in mind, this will vary based on specific ingredient choices and portion sizes!)
And there you have it! A delicious journey into the heart and soul of Boeuf Bourguignon. This dish is sure to fill your home with warmth and your heart with joy. So gather your loved ones around, savor the evening, and create memories that will last beyond just the meal. Happy cooking!
Print
Boeuf Bourguignon
- Total Time: 150 minutes
- Yield: 6 servings 1x
- Diet: Carnivore
Description
A heartwarming classic French dish combining tender beef, rich red wine, and a medley of vegetables.
Ingredients
- 2 pounds of beef chuck (or stew meat)
- 4 ounces of pancetta (or bacon)
- 1 bottle (750 ml) of dry red wine
- 2 cups of beef stock
- 2 tablespoons of tomato paste
- 1 tablespoon of flour
- 3–4 cloves of garlic
- 1 large onion (yellow or pearl)
- 4–5 carrots
- 8 ounces of button mushrooms
- 1–2 teaspoons of fresh or dried thyme
- 1–2 bay leaves
- Salt and pepper to taste
Instructions
- Prep work: Trim excess fat from the beef and cut it into 1–2 inch cubes. Season liberally with salt and pepper.
- Sear the pancetta in a large Dutch oven over medium heat until crispy, about 5–7 minutes. Remove and set aside.
- Brown the beef in batches until browned on all sides, then remove and set aside.
- Sauté the diced onion, garlic, and carrots for about 5 minutes until softened.
- Add the flour and cook for another 2 minutes, stirring constantly.
- Deglaze with red wine, scraping the bottom of the pot. Allow to bubble for 5–10 minutes.
- Bring everything together: Add the beef, pancetta, beef stock, tomato paste, thyme, and bay leaves.
- Slow cook for 1.5 to 2 hours on low heat.
- Add mushrooms about 30 minutes before serving.
- Final seasoning: Taste and adjust with salt and pepper as needed before serving.
Notes
This dish tastes even better the next day after the flavors have melded.
- Prep Time: 30 minutes
- Cook Time: 120 minutes
- Category: Main Course
- Method: Slow Cooking
- Cuisine: French
Nutrition
- Serving Size: 1 serving
- Calories: 450
- Sugar: 4g
- Sodium: 800mg
- Fat: 25g
- Saturated Fat: 8g
- Unsaturated Fat: 15g
- Trans Fat: 0g
- Carbohydrates: 20g
- Fiber: 3g
- Protein: 35g
- Cholesterol: 90mg
Keywords: Boeuf Bourguignon, French cooking, hearty stew, comfort food
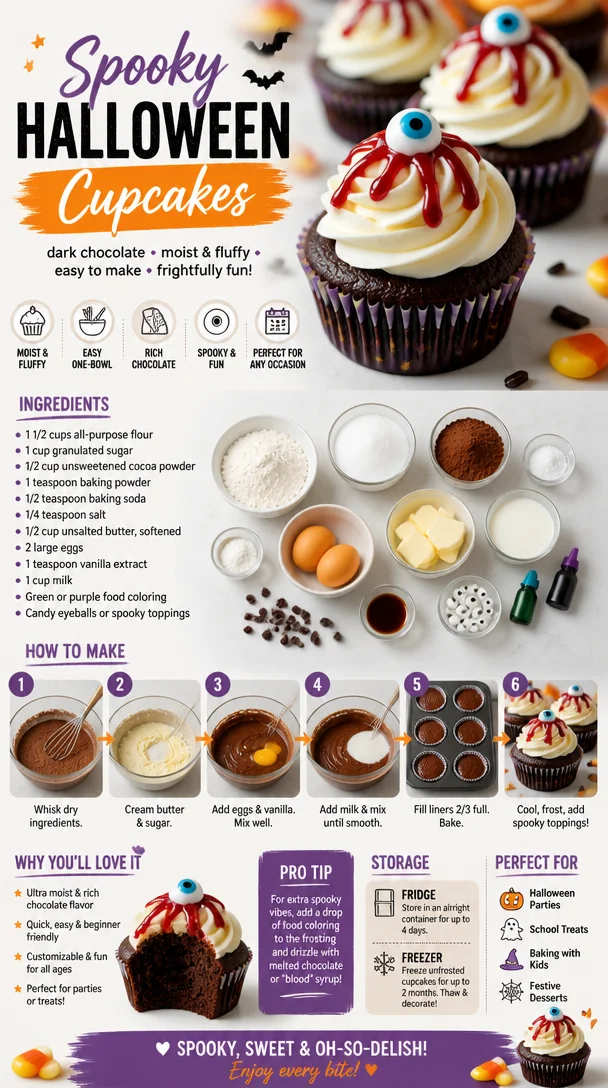
Spooky Halloween Cupcakes
Spooky Halloween Cupcakes: A Sweet & Frightful Treat
Welcome to my kitchen, dear friends! It’s that time of year again when the leaves turn crisp, the days get shorter, and the magic of Halloween fills the air. There’s something so exciting about this season, don’t you think? The decorations, the costumes, and of course, the treats! One of my absolute favorite ways to celebrate is by whipping up a batch of spooky Halloween cupcakes. Not only are they delicious, but they also bring out the inner child in all of us!
Cupcakes are the perfect canvas for creativity, and Halloween gives us a chance to get a little wild with our frosting and toppings. Whether you’re hosting a Halloween party, looking to surprise the kids after school, or simply indulging your own sweet tooth, these cupcakes are sure to be a hit!
Imagine walking into your kitchen, the aroma of baking batter wafting through the air. You pull out a tray of freshly baked cupcakes and transform them into little monsters, ghosts, or pumpkins. It’s not just about the final result; it’s about the joy of cooking, the laughter you share with others, and the memories created along the way.
So, grab your favorite apron (mine’s slightly haunted but still cozy!), and let’s embark on this delightful baking adventure together!
A Sweet Memory
Growing up, Halloween was an event my family did not take lightly. My mom had this tradition where we would bake spooky treats together every Halloween weekend. I can still picture the kitchen bustling with excitement as we whipped up batches of ooey-gooey caramel popcorn, monster cookies, and of course, the cupcakes.
One year, we decided to go all out with decorations. I remember the moment my mom unveiled a stash of edible googly eyes and neon food colorings. Our kitchen transformed into a creepy confectionary lab, complete with music from “Thriller” playing in the background. With icing tubes in hand, we turned cupcakes into mummies, witches, and the occasional adorable pumpkin. The best part? We’d invite my friends over for a cupcake decorating contest. The laughter that filled our home was worth more than any ghoulish prize.
So, every time I make Halloween cupcakes, it takes me back to those cozy moments spent with my mom. Now, I love passing on that tradition, encouraging others to create their own spooky masterpieces in the kitchen!
Ingredients
Here’s what you’ll need for these spooktacular cupcakes:
-
1 ½ cups all-purpose flour
- This is your staple ingredient. For a gluten-free version, you can swap in a gluten-free all-purpose flour blend.
-
1 cup granulated sugar
- It sweetens the batter beautifully. If you want a lower-calorie option, consider using coconut sugar or a sugar substitute, though the texture may vary slightly.
-
1 ½ teaspoons baking powder
- This helps your cupcakes rise and gives them that fluffy texture. Make sure it’s fresh for the best results!
-
½ teaspoon baking soda
- A little bit goes a long way in making your cupcakes light and airy.
-
½ teaspoon salt
- Balances out the sweetness. Don’t skip it; a pinch of salt can elevate flavors wonderfully!
-
½ cup unsalted butter, softened
- Butter adds richness. You can use vegetable oil for a dairy-free version; just remember it might yield a denser cupcake.
-
2 large eggs
- Eggs help bind everything together and add moisture. For a vegan version, you can use flax eggs or applesauce, but the texture may change a bit.
-
1 teaspoon vanilla extract
- Pure vanilla extract adds a lovely aroma and flavor. Avoid imitation vanilla for the best taste!
-
½ cup milk (or non-dairy milk)
- This keeps your batter moist. Almond milk or oat milk works beautifully if you’re avoiding dairy.
-
Black and orange food coloring
- For that spooky vibe! You can use natural alternatives, like beet juice for orange, but the colors may be more muted.
-
Edible decorations (like googly eyes, sprinkles, and fondant)
- Get creative! These are essential for ghostly facades and all kinds of creepy creatures.
Step-by-Step Instructions
Now that we have our ingredients ready, let’s get to baking! This part is so much fun, and I’ll guide you through each step.
-
Preheat your oven to 350°F (175°C).
- This helps ensure your cupcakes rise evenly. I always forget this step in my excitement—don’t be like me!
-
Line your muffin tin with cupcake liners.
- Choose festive designs to amp up the Halloween spirit! If you can’t find any, plain colors work too.
-
In a large mixing bowl, combine the flour, baking powder, baking soda, and salt.
- Whisk these ingredients together until they’re well-blended. This step ensures your leavening agents are evenly distributed.
-
In another bowl, beat the softened butter and sugar together until light and fluffy.
- Use an electric mixer for the best results, or a whisk and some elbow grease will do the job! This process incorporates air, making your cupcakes fluffy.
-
Add in the eggs, one at a time, mixing well after each addition.
- Scrape down the sides of the bowl to get all the buttery goodness mixed in!
-
Stir in the vanilla extract.
- Pure joy in liquid form!
-
Alternate adding the dry ingredients and the milk to the butter mixture.
- Start with dry, then wet, and mix until just combined. Don’t over-mix; this helps keep your cupcakes tender!
-
Now comes the fun part—divide the batter.
- Split it into two bowls. Add a few drops of black food coloring to one bowl and orange to the other. Swirl them together or layer them in the cupcake liners for a cute marbled effect!
-
Scoop the batter into the cupcake liners, filling each about 2/3 full.
- A cookie scoop is perfect for this job!
-
Bake for 18-20 minutes, or until a toothpick inserted in the center comes out clean.
- Try not to open the oven door too often; this can cause them to sink!
-
Once baked, remove from the oven and let cool in the pan for 5 minutes.
- Then transfer to a wire rack to cool completely. Waiting is the hardest part, but it’s crucial for frosting!
-
Get your frosting ready!
- You can use store-bought or make your own buttercream. To decorate, use piping bags and get creative with spooky shapes!
Serving Suggestions
These cupcakes are delightful on any Halloween-themed platter. Add a sprinkle of edible glitter for an enchanting glow, or create a “graveyard” display by using crushed chocolate cookies as “dirt” and adding gummy worms for extra fright! You could even use a cupcake stand to display them beautifully at a party.
Serve them up with a rich hot chocolate or a spooky punch for a complete Halloween treat. Your guests will love the combination—and the atmosphere you create!
Recipe Variations
Looking for ways to switch things up? Here are a few ideas:
-
Shockingly Good S’mores Cupcakes: Add graham cracker crumbs to the batter and top with toasted marshmallows and chocolate ganache for a gooey surprise!
-
Vampire Blood Velvet: Swap out food coloring for cocoa powder in the batter for a spooky chocolate twist, and use raspberry jam to create a “bloody” filling.
-
Pumpkin Spice Delight: Replace some of the flour with canned pumpkin puree and add pumpkin spice for a fall flavor infusion.
-
Witch’s Brew: Make a mint chocolate version with a hint of peppermint extract in the frosting, resembling a green witch’s potion!
Chef’s Notes
Every time I bake these cupcakes, I am reminded of the joy Halloween brings—both in the kitchen and out in the world. Over the years, this recipe has morphed and grown. I used to stick strictly to vanilla but have since learned the beauty of mixing flavors and textures.
One particularly memorable Halloween, I accidentally added too much food coloring, and instead of a festive orange, my cupcakes turned a neon shade of pumpkin. Surprisingly, everyone loved them and declared them “witch’s brew!” Now, it’s a staple in my Halloween celebrations. Remember, even mishaps can lead to the sweetest memories in the kitchen!
FAQs and Troubleshooting
Q: What should I do if my cupcakes dome too much?
A: This usually happens if the oven temperature is too high or the batter is over-mixed. Make sure to preheat your oven properly and mix just until combined to avoid excessive air in the batter.
Q: Can I make the batter ahead of time?
A: Absolutely! You can prepare the batter and store it in the fridge for up to a day. Just remember to bring it to room temperature before baking.
Q: How can I store leftover cupcakes?
A: Keep them in an airtight container at room temperature for up to three days. For longer storage, freeze them without frosting for up to three months. Just thaw and decorate when you’re ready to enjoy!
Q: Is icing necessary?
A: While it’s a lovely addition, if you’re looking for a lighter option, you can enjoy them plain or dusted with powdered sugar instead. No one’s judging if you choose simplicity!
Nutritional Info
While I don’t typically focus on nutrition, it’s good to be informed! Each spooky cupcake (without frosting) contains approximately 180 calories, with about 7 grams of fat and 25 grams of carbohydrates. Remember, it’s all about balance, and indulging on a festive occasion is part of the fun!
So, now that you’re armed with this spooky Halloween cupcake recipe and all my best secrets, it’s time to get into that kitchen! Let the sweet scents fill your home and enjoy the laughter that comes with creating something special. Can’t wait to hear about your spooky creations! Happy baking, my culinary friends!
Print
Spooky Halloween Cupcakes
- Total Time: 35 minutes
- Yield: 12 servings 1x
- Diet: Vegetarian
Description
Delicious and creative Halloween cupcakes perfect for parties or family gatherings.
Ingredients
- 1 ½ cups all-purpose flour
- 1 cup granulated sugar
- 1 ½ teaspoons baking powder
- ½ teaspoon baking soda
- ½ teaspoon salt
- ½ cup unsalted butter, softened
- 2 large eggs
- 1 teaspoon vanilla extract
- ½ cup milk (or non-dairy milk)
- Black and orange food coloring
- Edible decorations (like googly eyes, sprinkles, and fondant)
Instructions
- Preheat your oven to 350°F (175°C).
- Line your muffin tin with cupcake liners.
- In a large mixing bowl, combine the flour, baking powder, baking soda, and salt.
- In another bowl, beat the softened butter and sugar together until light and fluffy.
- Add in the eggs, one at a time, mixing well after each addition.
- Stir in the vanilla extract.
- Alternate adding the dry ingredients and the milk to the butter mixture.
- Divide the batter into two bowls and add food coloring.
- Scoop the batter into the cupcake liners, filling each about 2/3 full.
- Bake for 18-20 minutes, or until a toothpick comes out clean.
- Remove from the oven and let cool for 5 minutes before transferring to a wire rack.
- Get your frosting ready for decorating!
Notes
Consider using different festive decorations to make your cupcakes extra spooky!
- Prep Time: 15 minutes
- Cook Time: 20 minutes
- Category: Dessert
- Method: Baking
- Cuisine: American
Nutrition
- Serving Size: 1 cupcake
- Calories: 180
- Sugar: 15g
- Sodium: 200mg
- Fat: 7g
- Saturated Fat: 4g
- Unsaturated Fat: 3g
- Trans Fat: 0g
- Carbohydrates: 25g
- Fiber: 1g
- Protein: 2g
- Cholesterol: 30mg
Keywords: Halloween cupcakes, spooky treats, party dessert
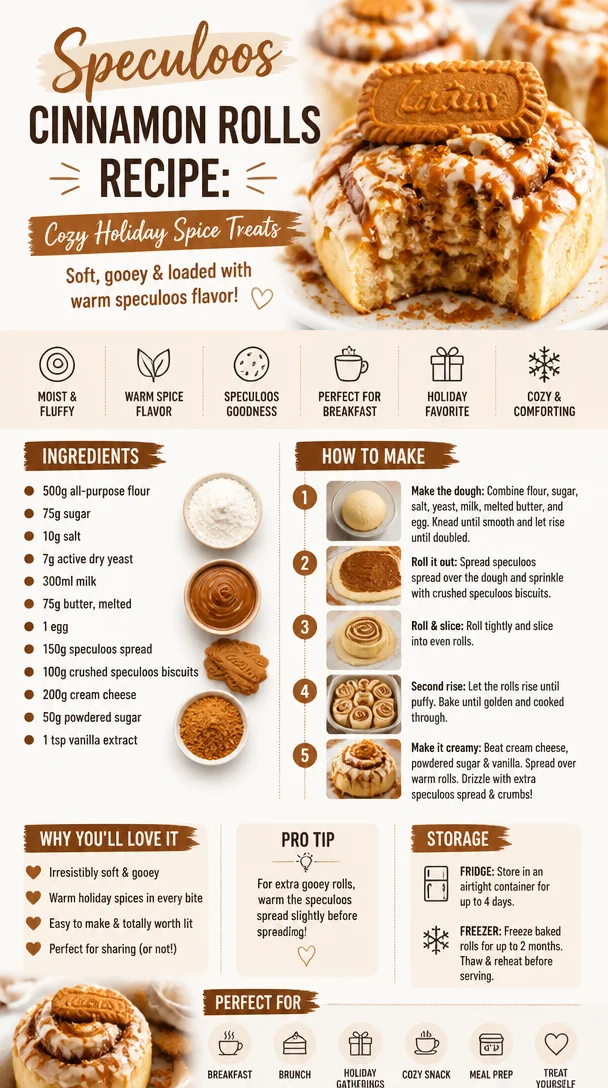
Speculoos Cinnamon Rolls Recipe: Cozy Holiday Spice Treats
Indulge in Bliss: Cinnamon Rolls au Spéculoos
Welcome to my kitchen, dear food lovers! Today, we’re diving into a recipe that’s bound to wrap you in warm, cozy vibes—the buttery, heavenly Cinnamon Rolls au Spéculoos. Picture this: you wake up on a lazy weekend morning, the sun is shining, and the tantalizing aroma of cinnamon and speculoos fills your home. There’s something incredibly magical about the scent of freshly baked cinnamon rolls; it can turn an ordinary day into something unforgettable. Trust me, your loved ones will be lining up at the kitchen door when they get a whiff of these scrumptious rolls!
These delightful rolls are a twist on the classic cinnamon roll, featuring the beloved spiced biscuit spread known as speculoos, which brings a unique depth and sweetness to every bite. If you haven’t yet discovered speculoos, think gingerbread meets caramel—an irresistible combination that makes these cinnamon rolls anything but ordinary. Whether you’re a seasoned baker or just starting to explore the wondrous world of home cooking, this recipe will guide you every step of the way. So, turn up that music you love, grab your favorite apron (yes, let’s embrace the messiness of creativity), and join me on this delicious journey!
Are you ready to create a batch of cinnamon rolls that will have everyone begging for seconds? Let’s roll up our sleeves and get started!
A Whiff of Nostalgia
Growing up in my family, Sunday mornings were sacred. It was the day we all gathered in the kitchen, laughing, sharing stories, and most importantly, indulging in something sweet. My grandmother, the queen of our kitchen, had an endless repertoire of delicious recipes, but nothing quite compared to her cinnamon rolls. The way she would expertly knead the dough, season it with generous pinches of cinnamon, and top it off with a luscious cream cheese frosting created a symphony of flavors that danced on our tongues.
One especially joyful Sunday, my grandma handed me a spoonful of speculoos spread and said, “Let’s mix things up a bit today.” I was hesitant at first—after all, these rolls had enough traditions tied to them! But as we experimented together, layering the speculoos with that warm comforting cinnamon, I immediately saw the potential for something magical. When the rolls emerged from the oven, golden-brown and bubbling with flavor, I knew we’d created something unique. Though my grandma is no longer with us, her spirit lives on each time I stir that speculoos into the dough, making this recipe a cherished part of my own cooking journey.
Ingredients
To make these luscious Cinnamon Rolls au Spéculoos, gather the following ingredients:
-
All-Purpose Flour (4 cups): This is your base. If you want a whole-grain option, you can use whole wheat flour, but the texture will be denser.
-
Granulated Sugar (1/4 cup): A touch of sweetness in the dough. Brown sugar can also work for a deeper flavor.
-
Salt (1 tsp): Enhances all the flavors—don’t skip it!
-
Instant Yeast (2 1/4 tsp): You’ll need instant yeast for a quick rise. If using active dry yeast, be sure to proof it in warm water first.
-
Milk (1 cup): Warm it up to about 110°F before mixing—it helps activate the yeast. You can use almond or oat milk for a dairy-free version.
-
Unsalted Butter (1/3 cup, softened): Adds richness to the dough. For a dairy-free option, you can substitute with coconut oil.
-
Eggs (2 large): These add structure and richness to the rolls. For a vegan alternative, try using flax eggs (1 tablespoon of ground flaxseed mixed with 2.5 tablespoons of water and let it sit for 5 minutes).
-
Ground Cinnamon (2 tbsp): The classic spice we all know and love—feel free to adjust based on your cinnamon obsession.
-
Speculoos Spread (1/2 cup): This is the showstopper! Look for brands like Biscoff or cookie butter, but any spiced cookie spread will work.
-
Powdered Sugar (1 cup): For the icing that will top your rolls. Leave it out if you prefer a more straightforward option.
-
Cream Cheese (4 oz, softened): Adds creaminess to your glaze, making it delectable. For a non-dairy version, use cashew cream.
Step-by-Step Instructions
-
Prepare the Dough: In a large mixing bowl, combine 4 cups of all-purpose flour, 1/4 cup granulated sugar, salt, and instant yeast. Mix well to ensure even distribution of the dry ingredients. Then, add 1 cup of warm milk, 1/3 cup softened unsalted butter, and 2 large eggs. Mix until the dough starts to come together.
Tip: If you have a stand mixer, this is an excellent time to use it with the dough hook attachment for a smooth result!
-
Knead the Dough: Transfer the dough to a lightly floured surface. Knead for about 8-10 minutes until smooth and elastic. A good trick to know if your dough is ready? It should spring back when poked lightly.
-
First Rise: Place your kneaded dough in a greased bowl, cover it with a kitchen towel, and let it rise in a warm, draft-free area for about 1 hour or until it has doubled in size.
Chef Hack: If you’re short on time, you can place your covered dough in the oven (turned off) with just the light on—this creates a cozy little haven for your dough to rise.
-
Roll It Out: Once your dough has risen, punch it down gently to release the air. Turn it out onto a floured surface and roll it into a rectangle, approximately 12×18 inches.
-
Spread the Speculoos: Take your 1/2 cup of speculoos spread and heat it slightly so it becomes spreadable. Evenly slather it across the surface of the dough, leaving a 1-inch border.
-
Sprinkle the Cinnamon: In a small bowl, mix together 2 tablespoons of cinnamon with a bit of sugar (if desired). Sprinkle the cinnamon mixture all over the speculoos layer and get ready for some sweetness!
-
Roll It Up: Starting from one edge, tightly roll the dough into a log. Make sure to keep it nice and tight to avoid any filling leakage when baking.
-
Cut Into Rolls: Using a sharp knife or string (my favorite hack!), slice the log into 12 equal pieces. If you want big, gooey rolls, you can cut a bit larger!
-
Second Rise: Place your rolls into a greased baking dish, leaving some space between them for expansion. Cover and let them rise for another 30 minutes.
-
Bake: Preheat your oven to 350°F (175°C). Once the rolls have puffed up, pop them in the oven and bake for 25-30 minutes, or until they are golden brown and irresistible.
-
Make the Glaze: While your rolls are baking, prepare the cream cheese glaze! In a bowl, beat together 4 oz of softened cream cheese, 1 cup powdered sugar, and a splash of milk until smooth and creamy. Adjust for your desired consistency.
-
Glaze and Serve: As soon as your rolls come out of the oven, drizzle the glaze generously over the warm cinnamon rolls. Allow them to cool slightly before serving (if you can resist!).
Serving Suggestions
These Cinnamon Rolls au Spéculoos are best served warm and freshly glazed. You can plate them individually or keep them in the baking dish for a rustic presentation. Add a sprinkle of crushed speculoos cookies on top for an extra touch of flair! Pair them with a robust cup of coffee or a chai latte for that cozy vibe. Trust me, this duo will get your mornings off to a delightful start!
Recipe Variations
-
Nutty Delight: Add chopped walnuts or pecans to the filling for a crunchy twist!
-
Fruity Fun: Mix in some diced apples or pears for a fresh fruit kick.
-
Choco-Licious: Add chocolate chips into the dough or sprinkle some on top of the glaze for a chocolatey indulgence.
-
Spices Galore: Experiment with additional spices like nutmeg or cardamom for a unique flavor profile.
-
Vegan Rolls: Swap the butter with coconut oil, use nut milk, and replace the eggs with flax eggs for a delightful vegan version!
Chef’s Notes
This recipe is one of my personal favorites because it blends nostalgia with creativity. Not only does it remind me of time spent with my grandma, but it’s also a wonderful canvas for experimentation! I remember the first time I made these for a brunch with friends—there was one roll that didn’t quite make it to the dish, as I couldn’t resist snagging the ooey-gooey center. It was a hit! Plus, I loved seeing everyone’s faces light up with joy as they had their first bite. These cinnamon rolls are bound to become a staple in your kitchen, just as they are in mine.
FAQs and Troubleshooting
1. My dough didn’t rise. What went wrong?
It’s possible your yeast was expired or the milk was too hot or too cold. Ensure your milk is at the right temperature (around 110°F) to activate the yeast. Next time, try proofing your yeast beforehand in warm water with a pinch of sugar.
2. Can I make the dough ahead of time?
Absolutely! You can prepare the dough up to the first rise, then cover it tightly and refrigerate for up to overnight. Let it come back to room temperature and finish the second rise before baking.
3. My rolls turned out dense. Why?
This could be due to overworking the dough or not enough rising time. Knead just until smooth, and give the dough ample time to rise. Patience is key to light and fluffy rolls.
4. How to store leftovers?
Store any leftover rolls in an airtight container at room temperature for 2-3 days. You can reheat them in the microwave for about 10-15 seconds before serving.
Nutritional Info
(This section can be adjusted based on specific dietary considerations or omitted if not relevant to the audience.)
Each roll, sans glaze, contains approximately:
- Calories: 250
- Fat: 9g
- Carbohydrates: 36g
- Protein: 4g
- Fiber: 1g
Enjoy your baking adventure and share your results! I can’t wait to hear how your Cinnamon Rolls au Spéculoos turn out! Remember, cooking is all about having fun. Let the delicious aromas, laughter, and love fill your kitchen! Happy baking!
Print
Cinnamon Rolls au Spéculoos
- Total Time: 45 minutes
- Yield: 12 servings 1x
- Diet: Vegetarian
Description
Indulge in buttery, heavenly cinnamon rolls infused with a unique speculoos twist, perfect for a cozy morning.
Ingredients
- 4 cups All-Purpose Flour
- 1/4 cup Granulated Sugar
- 1 tsp Salt
- 2 1/4 tsp Instant Yeast
- 1 cup Milk (warmed to 110°F)
- 1/3 cup Unsalted Butter (softened)
- 2 large Eggs
- 2 tbsp Ground Cinnamon
- 1/2 cup Speculoos Spread
- 1 cup Powdered Sugar
- 4 oz Cream Cheese (softened)
Instructions
- Prepare the Dough: In a large bowl, combine all-purpose flour, granulated sugar, salt, and instant yeast. Mix well, then add warmed milk, softened butter, and eggs. Mix until combined.
- Knead the Dough: Transfer to a floured surface and knead for about 8-10 minutes until smooth and elastic.
- First Rise: Place dough in a greased bowl, cover, and let it rise for about 1 hour until doubled.
- Roll It Out: Punch down the dough, then roll it into a rectangle about 12×18 inches.
- Spread the Speculoos: Heat the speculoos spread and spread it evenly on the dough.
- Sprinkle the Cinnamon: Mix cinnamon with sugar and sprinkle over the speculoos layer.
- Roll It Up: Tightly roll the dough into a log.
- Cut Into Rolls: Slice the log into 12 equal pieces.
- Second Rise: Place rolls in a greased baking dish, cover, and let them rise for 30 minutes.
- Bake: Preheat oven to 350°F (175°C) and bake for 25-30 minutes until golden brown.
- Make the Glaze: Beat together cream cheese, powdered sugar, and a splash of milk until smooth.
- Glaze and Serve: Drizzle the glaze over the warm rolls and serve immediately.
Notes
Best served warm; can be stored in an airtight container for 2-3 days.
- Prep Time: 15 minutes
- Cook Time: 30 minutes
- Category: Dessert
- Method: Baking
- Cuisine: American
Nutrition
- Serving Size: 1 roll
- Calories: 250
- Sugar: 15g
- Sodium: 300mg
- Fat: 9g
- Saturated Fat: 4g
- Unsaturated Fat: 3g
- Trans Fat: 0g
- Carbohydrates: 36g
- Fiber: 1g
- Protein: 4g
- Cholesterol: 30mg
Keywords: cinnamon rolls, speculoos, dessert, sweet rolls, baking
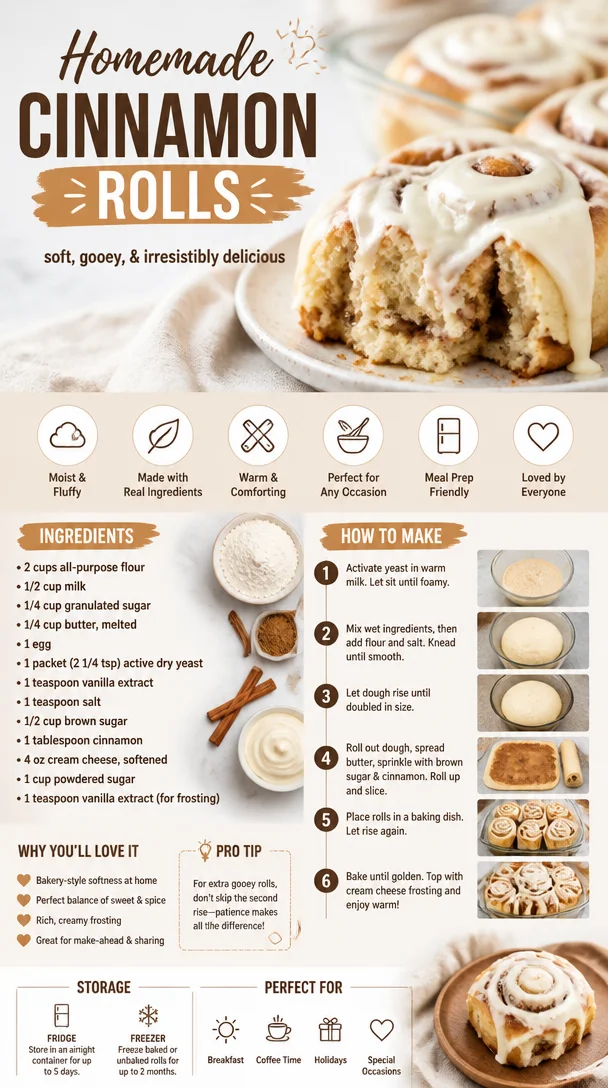
Homemade Cinnamon Rolls
The Ultimate Homemade Cinnamon Rolls Recipe: A Sweet Escape to Comfort
Welcome to my kitchen, my friends! Today, we’re diving into a deliciously cozy world filled with warmth, sweetness, and, yes, the irresistible aroma of homemade cinnamon rolls. There’s something truly magical about the scent of cinnamon swirling through your home, transporting you to a cozy café or a beloved family kitchen. Whether you’re a seasoned baker or just starting out, this recipe is all about inviting that bliss into your life.
Let’s face it, who doesn’t love a warm, gooey cinnamon roll with a cup of coffee in hand? This dish, a glorious combination of fluffy dough, cinnamon, sugar, and buttery goodness, can lift our spirits, spark joyful memories, and create moments we can savor for years to come. And trust me, once you try these homemade beauties, store-bought versions will never be the same!
A Whiff of Nostalgia
Growing up, Saturday mornings were sacred in my household. My siblings and I would eagerly rise, barely remembering to brush our teeth, the tantalizing scent of cinnamon wafting through the halls. My mom had this old, battered recipe book filled with handwritten notes and flour smudges from her many baking adventures. One Saturday, she decided to try her hand at homemade cinnamon rolls. In my young eyes, it was pure magic. The dough was sticky and challenging to work with, but my mom’s infectious enthusiasm turned every mishap into a reason to laugh. I remember eagerly rolling out the dough, pouring the cinnamon-sugar mixture, and attempting to keep my mess to a minimum (spoiler: I failed!).
After what felt like hours of anticipation, the rolls finally emerged from the oven—golden brown and smelling divine. With fingers sticky from frosting, we would devour them still warm, pausing between bites to share stories, laughter, and lots of cream cheese frosting. Those mornings were more than just about the food; they were about connection, family, and joy. Today, as I recreate these rolls in my own kitchen, I carry that memory with me, hoping to create the same sense of love and warmth for you and your loved ones.
Ingredients
To create these stellar cinnamon rolls, you’ll need:
-
All-purpose flour (4 cups)
This is the backbone of your dough! You can substitute with bread flour for extra fluffiness, or even gluten-free flour blends if you’re avoiding gluten. -
Sugar (1/2 cup)
This sweetens the dough and enhances the flavor of the cinnamon. For a healthier twist, consider using coconut sugar or maple sugar. -
Baking powder (1 tablespoon)
This is your leavening hero! Ensure it’s fresh for that perfect rise. You can also use baking soda in a pinch, just remember to adjust other acidic components accordingly. -
Salt (1 teaspoon)
Balances the sweetness and enhances flavors. Experiment with flavored salts (like Himalayan or sea salt) for a gourmet touch. -
Whole milk (1 cup)
Adds richness and moisture to your rolls. For a dairy-free option, try almond or oat milk. Just ensure it’s warm, not hot, when adding yeast. -
Unsalted butter (1/2 cup, melted)
A must for flavor and moisture! You can substitute with coconut oil for a dairy-free version, but keep in mind it may alter the taste slightly. -
Active dry yeast (2 1/4 teaspoons)
This is what makes your dough rise! Make sure your yeast is fresh. If you only have instant yeast, you can use that too without proofing. -
Cinnamon (2 tablespoons)
The star of the show! Use quality ground cinnamon for maximum flavor. Feel free to experiment with other spices like nutmeg or cardamom. -
Brown sugar (1/2 cup)
For that perfect caramelized filling. You can use white sugar if you don’t have brown, though the deeper flavor won’t be quite the same. -
Cream cheese (for frosting; optional)
Adds a tangy twist to your icing. You can switch it with mascarpone for a sweeter version, or even yogurt for lower calories.
Step-by-Step Instructions
Let’s get down to the details! Making homemade cinnamon rolls is all about patience and love. Follow these steps, and you’ll have a batch of divine rolls ready to share (or keep all to yourself—we won’t tell!).
-
Activate the yeast: In a small bowl, mix the warm milk (around 110°F or just above body temperature), sugar, and yeast. Let it sit for about 5-10 minutes until it’s all frothy. This shows that your yeast is active and ready to help your dough rise!
-
Mix the dry ingredients: In a large mixing bowl, combine the flour, baking powder, and salt. Whisk them together until fully combined—this helps to aerate the mixture and ensures even distribution.
-
Combine wet and dry: Pour the activated yeast mixture and melted butter into the flour mix. Stir with a wooden spoon or rubber spatula until a shaggy dough forms. It should be slightly sticky at this point. Don’t worry if it seems too sticky; we’ll fix that!
-
Knead the dough: Turn the dough out onto a floured surface and knead for about 8-10 minutes. You’re looking for a soft, elastic dough that’s not too tacky to the touch. If it’s still sticky, add a bit more flour gradually.
-
First rise: Place the kneaded dough in a greased bowl, cover it with a clean kitchen towel or plastic wrap, and leave it in a warm spot for about 1-2 hours. The dough should double in size—this is the beauty of patience!
-
Prep the filling: In a separate bowl, mix the brown sugar and cinnamon. This heavenly combination is the key to our gooey filling. Set it aside while the dough rises.
-
Roll out the dough: Once risen, punch down the dough to release any air. On a floured surface, roll it out into a rectangle about 1/4-inch thick. Aim for roughly 18×12 inches—don’t stress if it’s not perfect!
-
Spread some love: Brush the rolled-out dough with softened butter (about 3-4 tablespoons), leaving a small margin around the edges. Then, sprinkle the cinnamon-sugar mixture evenly over the buttered surface. Can you smell it already?
-
Roll it up: Starting from one of the long edges, tightly roll the dough towards the other edge to form a log. Pinch the seam together to secure it. Use a sharp knife to slice the dough into 12 even rolls—about an inch thick is perfect.
-
Second rise: Arrange the rolls in a greased baking dish, leaving a little space between them, and cover them again for another 30-45 minutes. This is where they get that delightful fluffiness!
-
Preheat the oven: As the rolls rise, preheat your oven to 350°F (175°C). The perfect warm setting for baking these beauties!
-
Bake: Place the rolls in your preheated oven and bake for 25-30 minutes or until golden brown. Keep an eye on them—if they start browning too quickly, cover with aluminum foil.
-
Make the frosting: While the rolls are baking, whip up a simple frosting. Beat together 1 cup of cream cheese, 1/4 cup of softened butter, 1 cup of powdered sugar, and a dash of vanilla extract until smooth and creamy.
-
Frost and serve: Once the rolls are out of the oven, let them cool for about 10 minutes before generously spreading the frosting over top. The warm rolls will help it melt into every nook and cranny!
Serving Suggestions
Serve those luscious cinnamon rolls warm, right out of the oven, on a rustic wooden platter. Pair them with fresh fruit, a side of crispy bacon, or perhaps a lovely cup of coffee or tea for that perfect breakfast or brunch spread. They also make for an irresistible dessert, so make sure you have a few extra on hand—your guests will definitely be coming back for seconds!
Recipe Variations
- Nutty delight: Add some chopped walnuts or pecans into the filling for a delightful crunch.
- Fruity twist: Incorporate some raisins or dried cranberries for a fruity flavor explosion.
- Chocolate lover: Sprinkle in some mini chocolate chips for an indulgent twist.
- Pumpkin spice: Swap in pumpkin puree for part of the butter and add pumpkin pie spice into the mix during the fall.
- Lemon glaze: Instead of cream cheese frosting, whisk together powdered sugar and lemon juice for a zesty finish.
Chef’s Notes
These cinnamon rolls have been a staple in my kitchen for years, and over time, I’ve played with the recipe to fit my personal tastes. The joy of cooking is in the experimenting—don’t be afraid to make this recipe your own! Once, I even added a touch of bourbon to the frosting for an adult treat; the results were divine. Remember that your kitchen should be a place of joy and creativity, so embrace those happy accidents!
FAQs and Troubleshooting
Q: My dough didn’t rise! What happened?
A: Ensure your yeast is fresh and that your milk was warm—if it’s too hot, it may kill the yeast. A cold kitchen can also slow down rising, so find a warm spot!
Q: My rolls turned out dense. What did I do wrong?
A: This can be a result of overworking the dough or adding too much flour. Aim for a soft, slightly tacky consistency before and after the first rise!
Q: Can I make these ahead of time?
A: Absolutely! You can prep the rolls and place them in the fridge overnight before baking. Just remember to let them come to room temperature and rise again before popping them into the oven.
Q: How do I store leftovers?
A: If there are any leftovers (which is rare!), store them in an airtight container at room temperature for 1-2 days or refrigerate for about a week. You can also freeze them, wrapping tightly in plastic wrap and then in aluminum foil. Just thaw and warm them before serving!
Nutritional Info
Each homemade cinnamon roll (without frosting) contains approximately:
- Calories: 240
- Fat: 8g
- Carbohydrates: 36g
- Protein: 4g
Keep in mind that toppings and fillings will adjust these numbers. For a decadent treat, it’s all worth it in my book!
So there you have it, friends! Your guide to making the best homemade cinnamon rolls that are sure to fill your home with warmth, love, and immense flavor. I can’t wait for you to dive in and create your own memories with these soft, gooey delights. Happy baking!
Print
The Ultimate Homemade Cinnamon Rolls
- Total Time: 90 minutes
- Yield: 12 servings
- Diet: Vegetarian
Description
Delicious homemade cinnamon rolls that fill your kitchen with the irresistible aroma of cinnamon and sweetness, perfect for breakfast or a cozy treat.
Ingredients
- All-purpose flour (4 cups)
- Sugar (1/2 cup)
- Baking powder (1 tablespoon)
- Salt (1 teaspoon)
- Whole milk (1 cup)
- Unsalted butter (1/2 cup, melted)
- Active dry yeast (2 1/4 teaspoons)
- Cinnamon (2 tablespoons)
- Brown sugar (1/2 cup)
- Cream cheese (for frosting; optional)
Instructions
- Activate the yeast: In a small bowl, mix the warm milk, sugar, and yeast. Let it sit for about 5-10 minutes until it’s frothy.
- Mix the dry ingredients: In a large mixing bowl, combine the flour, baking powder, and salt. Whisk them together.
- Combine wet and dry: Pour the activated yeast mixture and melted butter into the flour mix. Stir until a shaggy dough forms.
- Knead the dough: Turn the dough out onto a floured surface and knead for about 8-10 minutes.
- First rise: Place the kneaded dough in a greased bowl, cover, and let it rise in a warm spot for about 1-2 hours.
- Prep the filling: Mix the brown sugar and cinnamon in a separate bowl.
- Roll out the dough: Once risen, punch down the dough and roll it out into a rectangle about 1/4-inch thick.
- Spread some love: Brush the rolled-out dough with softened butter and sprinkle the cinnamon-sugar mixture over it.
- Roll it up: Starting from one edge, tightly roll the dough to form a log and slice into 12 rolls.
- Second rise: Arrange the rolls in a greased baking dish, cover, and let them rise for another 30-45 minutes.
- Preheat the oven to 350°F (175°C).
- Bake: Place the rolls in the oven and bake for 25-30 minutes until golden brown.
- Make the frosting: Beat together cream cheese, softened butter, powdered sugar, and vanilla extract until smooth.
- Frost and serve: Let the rolls cool for 10 minutes before frosting and serving.
Notes
Enjoy warm and serve with coffee or tea. Feel free to incorporate nuts or fruits into the filling for added flavor.
- Prep Time: 30 minutes
- Cook Time: 30 minutes
- Category: Dessert
- Method: Baking
- Cuisine: American
Nutrition
- Serving Size: 1 roll
- Calories: 300
- Sugar: 10g
- Sodium: 200mg
- Fat: 10g
- Saturated Fat: 5g
- Unsaturated Fat: 4g
- Trans Fat: 0g
- Carbohydrates: 45g
- Fiber: 1g
- Protein: 5g
- Cholesterol: 30mg
Keywords: cinnamon rolls, homemade cinnamon rolls, comfort food, baking, dessert
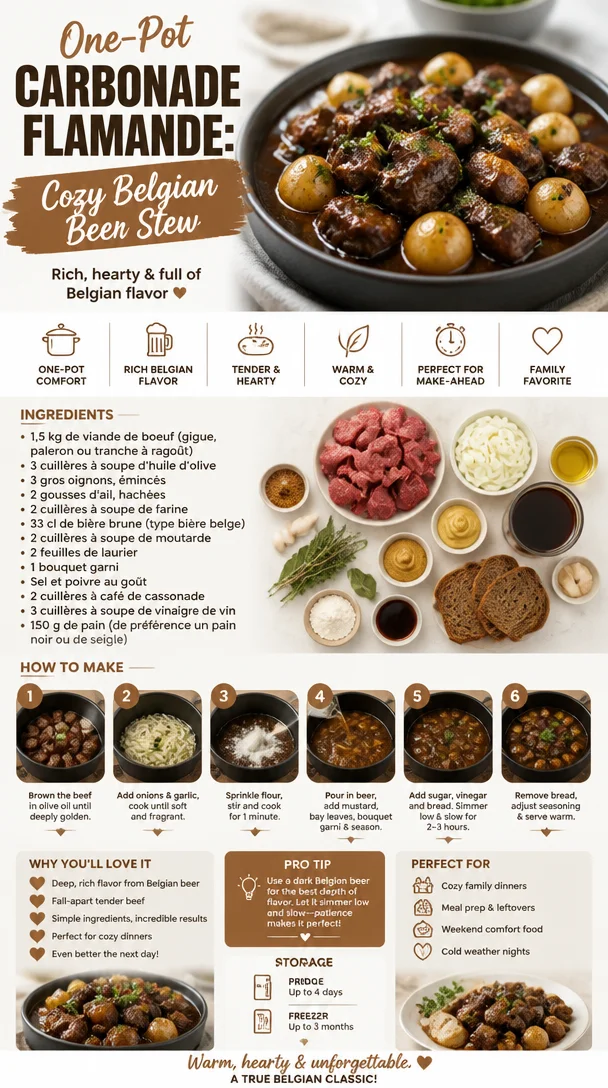
One-Pot Carbonade Flamande: Cozy Belgian Beer Stew
Carbonade Flamande: An Incredible Ultimate Recipe
Welcome to my cozy corner of the culinary world! Today, I’m excited to share with you a dish that’s got all the heart and soul of comforting home cooking. Let me introduce you to Carbonade Flamande, a delightful Belgian beef stew that’s not only rich in flavor but also steeped in history. Imagine tender beef simmering in a sweet and savory sauce, infused with the depth of dark ale and aromatic herbs. It’s the kind of meal that wraps you in a warm hug as you savor each bite.
Cooking isn’t just about feeding ourselves; it’s about creating lasting memories and sharing joy with the ones we love. Growing up, my grandmother would whip up her version of Carbonade Flamande on chilly Sunday afternoons, the warmth of the kitchen filling every nook and cranny of our home. The incredible aroma—sweet, malty, and slightly caramelized—would drift through the air, beckoning everyone to gather around the kitchen table. As the stew simmered, we shared stories of our week, laughter mingling with the delicious scent, creating a cozy atmosphere that I can still feel today.
So, grab your apron and let’s dive into this incredible recipe that’s perfect for family dinners, special occasions, or even just a nurturing meal for yourself. Together, we’ll explore the flavors, the ingredients, and the process that makes Carbonade Flamande a dish worth celebrating.
Personal Story
I remember the first time I attempted to recreate my grandmother’s Carbonade Flamande. It was a rainy evening, and I had invited a few friends over for dinner. I wanted to impress them, and the thought of serving a dish steeped in nostalgia felt just right. As I chopped onions and sautéed beef, I was transported back to her kitchen, where she’d lovingly guide me through her cooking secrets.
The laughter and chatter of my friends filled my small apartment as they eagerly awaited the meal. When I finally served the stew, the moment felt magical. They took their first bites, and the room fell into a comfortable silence, punctuated only by the sounds of satisfied “Mmm” and “Wow!” It was then I realized that food has an incredible power to connect us, to create memories, and to share moments that stay with us forever.
Ingredients
Let’s talk about what you’ll need to create this mouthwatering Carbonade Flamande. Here’s a list of ingredients and their roles in our delicious adventure:
-
2 pounds chuck roast (or beef stew meat)
This cut is perfect for braising—it’s tough but becomes tender and flavorful after slow cooking. You can substitute with brisket or even pork if you prefer. -
2 large onions, thinly sliced
These add sweetness and depth. If you’re in a pinch, shallots or leeks can work well too! -
3 cloves garlic, minced
Garlic brings a wonderful aroma to the dish. Fresh is best, but garlic powder can be used in a squeeze. -
3 tablespoons olive oil
A key for browning the beef. If you want a butter flavor, feel free to swap in unsalted butter. -
2 tablespoons flour
This helps thicken our sauce—make sure to use it to dust the beef before browning. Gluten-free flour works as a great alternative! -
1 ½ cups Belgian beer (Brouwerij beer is ideal)
This is the star of our main flavor profile! You can use a dark ale or a malty beer if you prefer a non-Belgian option. -
1 cup beef broth
Adds richness. Homemade is always a treat, but store-bought will do just fine. -
2 tablespoons brown sugar
This helps to balance the acidity and brings out sweetness. You could also use maple syrup or honey for a fun twist. -
2 tablespoons Dijon mustard
The tangy and spicy kick from mustard is a classic in this dish. You can replace it with whole grain mustard for added texture. -
1 bay leaf
A staple in many stews for a deeper flavor. If you lack bay leaves, a few sprigs of fresh thyme can do wonders. -
2-3 sprigs fresh thyme (or 1 teaspoon dried thyme)
It complements the earthy flavor of the beef perfectly. Feel free to include additional herbs like rosemary or parsley for extra depth! -
Salt and pepper to taste
Essential for bringing out the flavors. Remember to season throughout the cooking process for the best results.
Step-by-Step Instructions
Now that we’ve gathered our ingredients, let’s dive into the cooking process with these detailed steps. Trust me, you’ll want to savor the journey as much as the destination!
-
Prep the Beef
Start by cutting the chuck roast into 2-inch pieces. This allows for even cooking. Pat the beef dry with paper towels—this ensures a nice sear when you brown it. Season generously with salt and pepper. -
Sear the Meat
In a large Dutch oven or heavy pot, heat the olive oil over medium-high heat. Working in batches, add the beef to the pot, ensuring not to overcrowd it, which would steam rather than sear. Brown the beef on all sides for about 5-7 minutes, getting that delicious caramelization. When browned, transfer it to a plate and repeat with the remaining meat. -
Sauté Onions
In the same pot, reduce the heat to medium and toss in the sliced onions. Stir frequently for about 7-10 minutes until they’re softened and beginning to caramelize. If the pot gets too brown, add a splash of beer to deglaze it, scraping up those tasty browned bits at the bottom. -
Add Garlic and Flour
Stir in the minced garlic, cooking for just a minute until fragrant. Then sprinkle the flour over the onions and garlic. Stir well and cook for another 2 minutes. This creates a flavorful base and is key to thickening the stew later. -
Deglaze with Beer
Now for the fun part! Pour in the Belgian beer, scraping the bottom of the pot as you go. Bring it to a gentle simmer, allowing the alcohol to cook off slightly while mixing in that glorious flavor. -
Introduce Broth and Seasonings
Add in the beef broth, then return the seared beef to the pot. Stir in the brown sugar, mustard, bay leaf, and thyme (fresh or dried). Bring everything to a gentle simmer. -
Slow Cook the Stew
Once simmering, reduce the heat to low, cover the pot, and let it cook for at least 1.5 to 2 hours. If you want to build even more flavor, consider slow-cooking it for up to 4 hours on low. Stir occasionally and keep an eye on it! -
Final Seasoning
Near the end of cooking, taste the stew and adjust seasoning with more salt, pepper, or even a splash more of beer or mustard if desired. Remove the bay leaf and thyme sprigs.
Serving Suggestions
When it comes to serving Carbonade Flamande, the sky’s the limit! I love ladling the stew into shallow bowls, garnishing with fresh parsley for a pop of color. A side of crusty bread is essential for dipping and soaking up all that rich sauce. You could also serve it over creamy mashed potatoes or buttery noodles for a heartier meal. Don’t forget a nice glass of Belgian beer on the side to truly embrace the spirit of this dish!
Recipe Variations
-
Add Vegetables
Feel free to throw in some sliced carrots or parsnips during the cooking process for added flavor and nutrition! -
Mushroom Lovers
Incorporating mushrooms can add an earthy note to the stew. Just sauté them in with the onions. -
Sweeten the Deal
Want a slightly sweeter version? Add sliced apples or raisins for a fun twist. -
Herb Swap
Experiment with different herbs like rosemary or oregano to give a new take on the classic recipe. -
Gluten-Free Version
Use gluten-free flour and a gluten-free beer to adapt for those with dietary restrictions—it’s possible to enjoy this classic dish safely!
Chef’s Notes
Every time I make Carbonade Flamande, I think of my grandmother guiding me in her kitchen, her hands deftly working while sharing stories of family traditions. With each batch I make, I find a way to make it my own—sometimes I add a dash more beer, or I might try a different side. The beauty of this recipe is its adaptability. Food, after all, is ever-evolving, much like the cook who prepares it. Sharing it with friends and family always brings a smile to my face, and I hope it does the same for you!
FAQs and Troubleshooting
-
Why is my stew tough?
This usually means it needs more cooking time. Tough cuts of meat require slow, low cooking to become tender. Make sure it simmers long enough! -
Can I make this recipe ahead of time?
Absolutely! It even tastes better the next day as the flavors meld. Just store it in an airtight container in the fridge. -
What should I do if my sauce is too thick?
If the stew is thicker than you’d like, simply add a bit more beef broth or water and stir until the desired consistency is reached. -
Can I make this in a slow cooker?
Yes! After searing the meat and sautéing the onions and garlic, simply transfer everything to a slow cooker and cook on low for 6-8 hours.
Nutritional Info
While I believe in enjoying every bite of our meals, here’s a general overview of the nutritional info per serving (based on six servings, with bread excluded):
- Calories: Approximately 500
- Protein: 38g
- Carbs: 30g
- Fat: 25g
Remember, you can adjust the ingredients to suit your dietary needs or preferences!
Thank you for joining me on this delightful culinary adventure! Now, go ahead and get cooking. I can’t wait for you to taste this warm, flavorful hug in a bowl. If you try this Carbonade Flamande recipe, drop me a comment and let me know how it turned out. Until next time, happy cooking!
Print
Carbonade Flamande
- Total Time: 150 minutes
- Yield: 6 servings 1x
- Diet: None
Description
A delightful Belgian beef stew rich in flavor, steeped in history, and perfect for family dinners.
Ingredients
- 2 pounds chuck roast (or beef stew meat)
- 2 large onions, thinly sliced
- 3 cloves garlic, minced
- 3 tablespoons olive oil
- 2 tablespoons flour
- 1 ½ cups Belgian beer (Brouwerij beer is ideal)
- 1 cup beef broth
- 2 tablespoons brown sugar
- 2 tablespoons Dijon mustard
- 1 bay leaf
- 2–3 sprigs fresh thyme (or 1 teaspoon dried thyme)
- Salt and pepper to taste
Instructions
- Start by cutting the chuck roast into 2-inch pieces and patting it dry. Season generously with salt and pepper.
- In a large Dutch oven, heat the olive oil over medium-high heat. Add the beef in batches and brown on all sides for about 5-7 minutes. Transfer to a plate.
- Reduce the heat to medium and add the sliced onions. Stir frequently for about 7-10 minutes until softened.
- Add the minced garlic and cook for a minute. Sprinkle the flour over the onions and garlic, stir well and cook for another 2 minutes.
- Pour in the Belgian beer, scraping the bottom of the pot as you go. Allow to simmer slightly.
- Add the beef broth, return the seared beef to the pot, and stir in the brown sugar, mustard, bay leaf, and thyme. Bring to a gentle simmer.
- Once simmering, reduce the heat to low, cover and cook for at least 90 to 120 minutes, stirring occasionally.
- Taste near the end and adjust seasoning with salt, pepper, or even a splash more beer or mustard if desired.
- Remove the bay leaf and thyme sprigs before serving.
Notes
Serve with crusty bread for dipping or over creamy mashed potatoes for a hearty meal. This stew tastes even better the next day.
- Prep Time: 30 minutes
- Cook Time: 120 minutes
- Category: Main Course
- Method: Slow Cooking
- Cuisine: Belgian
Nutrition
- Serving Size: 1 serving
- Calories: 500
- Sugar: 6g
- Sodium: 600mg
- Fat: 25g
- Saturated Fat: 10g
- Unsaturated Fat: 15g
- Trans Fat: 0g
- Carbohydrates: 30g
- Fiber: 2g
- Protein: 38g
- Cholesterol: 95mg
Keywords: stew, beef, Belgian, comfort food, family meal, hearty dish
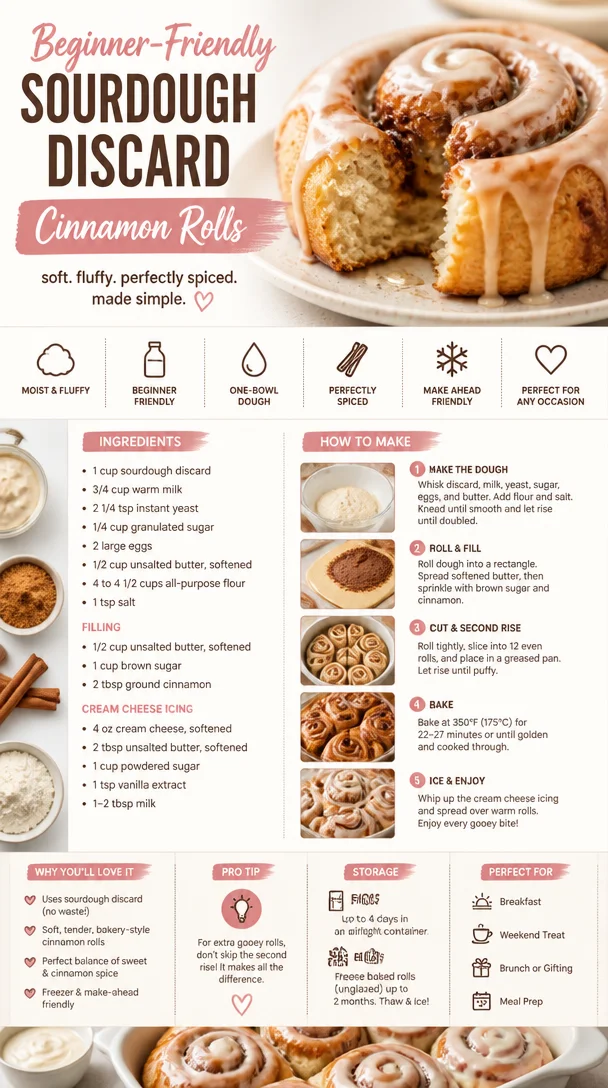
Beginner-Friendly Sourdough Discard Cinnamon Rolls
Sourdough Discard Cinnamon Rolls: The Sweet Way to Reduce Waste
Welcome back to my kitchen, fellow foodies! Today, we’re diving into a delicious way to not just indulge in sweet, fluffy cinnamon rolls but also make the most of your sourdough starter. Yes, you heard me right! If you’ve ever found yourself staring at that excess sourdough discard after feeding your starter, I’ve got the perfect solution. Let’s transform that potential kitchen waste into something scrumptious that everyone will love.
Cinnamon rolls have a nostalgic hold on my heart. I remember the first time my grandmother let me help her roll out the dough, cheekily sneaking bites of cinnamon sugar while attempting to create the perfect swirl. The smell of cinnamon wafting through the air, combined with the warmth of the kitchen, created a cozy atmosphere that I still strive to replicate today. Baking cinnamon rolls isn’t just a recipe; it’s a full-on hug for your taste buds and a great way to gather those you love around the table.
Today, I’m sharing my go-to recipe for Sourdough Discard Cinnamon Rolls. With this recipe, you’ll not only minimize waste, but you’ll also create soft, fluffy rolls that are indulgently filled with a rich cinnamon-sugar mixture. So, grab that apron, and let’s get started!
Personal Story
Let me take you back in time to my childhood kitchen, where flour dusted the countertops and laughter danced in the air. I can vividly recall Saturday mornings spent with my grandmother, our trusty stand mixer whirring away as we crafted batches of her famous cinnamon rolls. I’d always stand on my tiptoes, peeking over the counter, totally entranced by the way she coaxed the dough into the perfect texture.
One morning, she turned to me with a twinkle in her eye and said, “Olivia, the secret ingredient in these rolls is love.” I took that message to heart, and it became a core belief in my cooking journey. While my rolls may not always turn out perfectly—sometimes they rise too high, other times they get a bit too gooey—the joy in baking and sharing them with friends and family remains unmatched. It’s the stories we share and the memories we create over a warm plate of cinnamon rolls that keep bringing us back to the kitchen.
Ingredients
Here’s what you’ll need to whip up these delightful Sourdough Discard Cinnamon Rolls:
-
Sourdough Discard (1 cup): This is the heart of the recipe! Using discard helps create a unique flavor profile. If you don’t have discard, you can substitute with all-purpose flour and water, but you’ll miss that tangy sourdough goodness.
-
All-Purpose Flour (3 cups): Essential for structure, the flour will help create a fluffy exterior. If you prefer a healthier option, whole wheat flour works too, but you may need to add a bit more liquid.
-
Instant Yeast (2 teaspoons): This helps in the rising process. If you only have active dry yeast, simply activate it in warm water with a touch of sugar before using.
-
Milk (1 cup): Adds richness to the dough. Feel free to use almond milk, oat milk, or any plant-based milk for a dairy-free version.
-
Egg (1 large): Acts as a binder and adds moisture. If you’re looking for an egg-free alternative, ground flaxseed mixed with water can do wonders!
-
Butter (1/3 cup, softened): This provides a deliciously rich flavor to the rolls. If you’d like to keep it dairy-free, coconut oil is a great substitute!
-
Brown Sugar (1/2 cup): This sweetens the cinnamon filling and adds a lovely caramel flavor. Light brown sugar works, but dark brown sugar will give you a deeper taste.
-
Cinnamon (2 tablespoons): The star of the filling, adding that warm, comforting taste we all crave. You can play around with other spices like nutmeg or cardamom for a different twist.
-
Vanilla Extract (1 teaspoon): A hint of vanilla enhances all the sweet flavors. If you want to elevate this even more, try almond extract!
-
Salt (1 teaspoon): Balances the sweetness and enhances the overall flavor of the rolls.
Tips & Insights
Every ingredient plays a role in creating that perfect cinnamon roll. Don’t skip out on the butter; it’s essential for achieving that soft, tender crumb. Additionally, feel free to get creative and customize your filling or glaze—maybe throw in some nuts or dried fruit!
Step-by-Step Instructions
Alright, let’s get those little beauties baking! Here’s how to bring this recipe to life:
-
Mix the Dough:
In a large mixing bowl, combine the sourdough discard, warm milk, softened butter, and sugar. Stir until well blended. Add in the egg and mix until fully incorporated. Now it’s time to bring in the flour! Gradually add the all-purpose flour and salt. Mix until a rough dough forms. -
Knead the Dough:
Turn the dough out onto a floured surface. Knead it for about 5-7 minutes until it’s smooth and elastic. If the dough feels sticky, sprinkle a little extra flour—but don’t go overboard; we want those rolls to be soft and pillowy! -
First Rise:
Place the kneaded dough in a lightly greased bowl, cover it with a clean kitchen towel, and let it rise in a warm spot for about 1-2 hours, or until it doubles in size. This is my favorite part—smelling the gentle fermentation of that sourdough. -
Prepare the Filling:
While the dough rises, mix together the brown sugar, cinnamon, and a pinch of salt in a bowl. This glorious mixture will create that sweet, spiraled filling. Set it aside! -
Roll Out the Dough:
After the dough has risen, punch it down to release the air. On a floured surface, roll out the dough into a large rectangle (about 12” x 18”). Aim for an even thickness; we want our rolls to be nice and uniform. -
Add the Filling:
Spread a generous layer of softened butter across the rolled-out dough, leaving a small border on the edges. Then, sprinkle your cinnamon-sugar mixture evenly across the buttery dough. Don’t hold back; the more the merrier! -
Roll It Up:
Starting from the long end of the rectangle, carefully roll the dough tightly into a log. Gently pinch the seam to seal it. If you encounter any resistance, take a moment to relax and don’t force it—let’s keep that dough happy! -
Slice the Rolls:
Using a sharp knife or dental floss (seriously, it works wonders!), cut the log into about 12 slices. They should be about 1.5 inches thick. Arrange them in a greased baking dish, giving them some room to expand on their second rise. -
Second Rise:
Cover the rolls with a kitchen towel and allow them to rise for another 30-45 minutes. During this time, they’ll puff up beautifully. Preheat your oven to 350°F (175°C) so it’s nice and hot for baking! -
Bake:
Pop those rolls in the oven and let them bake for 20-25 minutes, or until they’re golden-brown and your kitchen is filled with the intoxicating aroma of cinnamon. Keep an eye on them after the 20-minute mark to avoid over-baking. -
Glaze and Enjoy:
To make the glaze, simply whisk together powdered sugar, a splash of milk, and vanilla extract until creamy and smooth. Drizzle it over the warm rolls right out of the oven, and watch them shine.
Serving Suggestions
These cinnamon rolls are meant for sharing, so don’t be shy! Serve them warm on a festive platter, drizzled with glaze. Pair them with a steaming cup of coffee or your favorite herbal tea. For an extra cozy touch, add a dollop of whipped cream cheese or a scoop of vanilla ice cream for a delightful dessert twist.
Recipe Variations
-
Nutty Addition: Add chopped walnuts or pecans to the cinnamon-sugar filling for a delightful crunch.
-
Dried Fruit: Incorporate raisins or dried cranberries for an added layer of texture and sweetness.
-
Maple Glaze: Swap the vanilla glaze for a maple syrup glaze for an extra burst of flavor that complements the cinnamon beautifully.
-
Chocolate Chip: Mix in some chocolate chips to the filling for a sweet surprise in every bite.
-
Spiced Twist: Experiment with spices! A pinch of cardamom or nutmeg in the filling could elevate the flavor to a whole new level.
Chef’s Notes
I must confess, my first few attempts at perfecting cinnamon rolls didn’t go as planned. I remember baking a batch for a family brunch, and they ended up being more like cinnamon bricks than fluffy rolls. After some trial and error—and a few lessons learned about dough hydration and sugar ratios—I finally nailed it!
The beauty of baking is that it’s always a journey. Sometimes a little distraction leads to something wonderfully unexpected, so don’t sweat the small stuff! Embrace the process, and remember that every little mishap is just another story to share when you gather around the table.
FAQs and Troubleshooting
1. My rolls didn’t rise! What went wrong?
There are a few culprits here. Your yeast might be expired, or the environment wasn’t warm enough for rising. Always check the expiration date on your yeast and create a cozy spot for your dough to rise.
2. The dough is too sticky! What should I do?
If your dough feels overly sticky, try adding a small amount of flour, but be careful not to add too much; you want to keep that soft texture.
3. What can I do with leftover icing?
Leftover icing can be stored in an airtight container in the fridge for up to a week. It’s great as a dip for fruit or drizzled over pancakes!
4. Can I freeze these rolls?
Absolutely! You can freeze the unbaked, sliced rolls. Just pop them into a greased pan, cover, and freeze. When you’re ready to bake them, let them thaw and rise before baking as usual.
Nutritional Info (per roll, approx.)
- Calories: 250
- Total Fat: 9g
- Saturated Fat: 5g
- Cholesterol: 50mg
- Sodium: 150mg
- Total Carbohydrates: 38g
- Dietary Fiber: 1g
- Sugars: 10g
- Protein: 4g
And there you have it! Sourdough Discard Cinnamon Rolls that are not only a delicious treat but a fantastic way to utilize every bit of your sourdough starter to its fullest potential. I can’t wait to hear how your rolls turn out! Happy baking, and remember—keep it cozy in the kitchen!
Print
Sourdough Discard Cinnamon Rolls
- Total Time: 45 minutes
- Yield: 12 servings 1x
- Diet: Vegetarian
Description
Delicious cinnamon rolls that make the most of your sourdough starter, transforming kitchen waste into a scrumptious treat.
Ingredients
- 1 cup Sourdough Discard
- 3 cups All-Purpose Flour
- 2 teaspoons Instant Yeast
- 1 cup Milk
- 1 large Egg
- 1/3 cup Butter (softened)
- 1/2 cup Brown Sugar
- 2 tablespoons Cinnamon
- 1 teaspoon Vanilla Extract
- 1 teaspoon Salt
Instructions
- Mix the Dough: In a large mixing bowl, combine the sourdough discard, warm milk, softened butter, and sugar. Stir until well blended. Add in the egg and mix until fully incorporated. Gradually add the all-purpose flour and salt. Mix until a rough dough forms.
- Knead the Dough: Turn the dough out onto a floured surface. Knead it for about 5-7 minutes until it’s smooth and elastic. If the dough feels sticky, sprinkle a little extra flour.
- Place the kneaded dough in a lightly greased bowl, cover it with a clean kitchen towel, and let it rise in a warm spot for about 60-120 minutes, or until it doubles in size.
- Mix the Filling: While the dough rises, mix together the brown sugar, cinnamon, and a pinch of salt in a bowl.
- Roll Out the Dough: After the dough has risen, punch it down to release the air. Roll out the dough into a large rectangle (about 12” x 18”).
- Spread softened butter across the rolled-out dough, leaving a small border on the edges. Then, sprinkle your cinnamon-sugar mixture evenly across the buttery dough.
- Roll it Up: Starting from the long end of the rectangle, carefully roll the dough tightly into a log. Pinch the seam to seal it.
- Slice the Rolls: Cut the log into about 12 slices (1.5 inches thick). Arrange them in a greased baking dish.
- Cover the rolls with a kitchen towel and allow them to rise for another 30-45 minutes. Preheat your oven to 350°F (175°C).
- Bake: Bake the rolls for 20-25 minutes until golden-brown.
- Make the Glaze: Whisk together powdered sugar, a splash of milk, and vanilla extract until creamy. Drizzle over warm rolls.
Notes
Serve warm, and feel free to customize with nuts or dried fruits. Perfect to pair with coffee or tea.
- Prep Time: 15 minutes
- Cook Time: 30 minutes
- Category: Dessert
- Method: Baking
- Cuisine: American
Nutrition
- Serving Size: 1 roll
- Calories: 250
- Sugar: 10g
- Sodium: 150mg
- Fat: 9g
- Saturated Fat: 5g
- Unsaturated Fat: 3g
- Trans Fat: 0g
- Carbohydrates: 38g
- Fiber: 1g
- Protein: 4g
- Cholesterol: 50mg
Keywords: sourdough, cinnamon rolls, baking, sweet, dessert
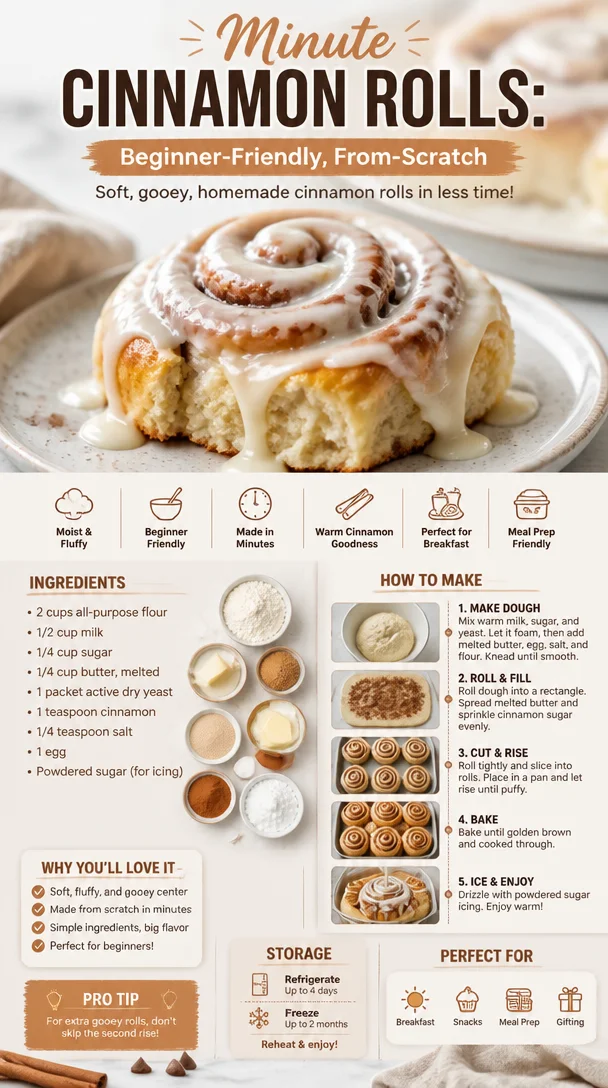
Minute Cinnamon Rolls: Beginner-Friendly, From-Scratch
Easy Homemade Cinnamon Rolls Recipe
Welcome to my cozy kitchen! I’m Olivia Bennett, and today I’m inviting you to roll up your sleeves and indulge in the wonderful world of homemade cinnamon rolls. There’s something magical about the scent of cinnamon wafting through your home as these delightful rolls rise in the oven—warm, gooey, and utterly irresistible. Whether you’re gearing up for a lazy Sunday brunch, a festive holiday gathering, or simply want to treat yourself and your loved ones to a sweet surprise, these cinnamon rolls are bound to steal the show.
There was a time when I thought homemade cinnamon rolls were only for the pros or those with endless time on their hands. But let me tell you a little secret: making cinnamon rolls from scratch is one of the most rewarding kitchen experiences you can have. The joy of transforming simple ingredients into something so scrumptious is unparalleled. I still remember my first attempt at these delightful treats. It was a chilly autumn morning, and I wanted to surprise my family with breakfast. I dusted off my grandma’s recipe, rolled up my sleeves, and got started. The kitchen was filled with the warm, inviting smell of cinnamon and sugar, and when I finally pulled those rolls out of the oven, I felt like a kitchen superhero!
Are you ready to embark on your own cinnamon roll journey? Brace yourself for the fluffiest, most decadent rolls you’ve ever made—the kind that hugs you back with every bite. Let’s dive into the magic!
Ingredients
Here’s what you’ll need to make these heavenly cinnamon rolls:
-
2 ¼ teaspoons active dry yeast: This little powerhouse is what makes your rolls rise! If you don’t have active dry yeast, you can use instant yeast at the same ratio.
-
¾ cup warm milk (about 110°F/43°C): Warm milk activates the yeast. If you’re looking for a dairy-free option, almond milk or oat milk work well too!
-
¼ cup granulated sugar: Sweetness is essential! You can substitute brown sugar for a deeper, caramel-like flavor.
-
1 egg: This binds everything together and adds richness. For an egg substitute, try ¼ cup unsweetened applesauce or a flax egg (1 tablespoon ground flaxseed mixed with 2.5 tablespoons of water).
-
3 ½ to 4 cups all-purpose flour: Flour provides structure. If you want a lighter roll, consider using bread flour instead—it has a higher protein content.
-
½ teaspoon salt: Balances out the sweetness and enhances the flavor of the rolls.
-
⅓ cup unsalted butter, softened: Butter makes everything better! You can swap for coconut oil for a dairy-free version.
Filling
-
½ cup brown sugar, packed: This caramelizes delightfully as the rolls bake. Feel free to use coconut sugar if you prefer a less processed option!
-
2 tablespoons ground cinnamon: The star of our show! Try experimenting with spices like nutmeg or cardamom for a unique spin.
-
¼ cup unsalted butter, softened: This is layered into the rolls for maximum gooeyness!
Frosting (optional but highly recommended)
-
1 cup powdered sugar: This adds a sweet, creamy finish.
-
2 tablespoons unsalted butter, softened: For that rich buttery flavor. Again, coconut oil can work here!
-
1 tablespoon cream cheese, softened: For a tangy kick, but this is optional. You could also use vegan cream cheese!
-
1 teaspoon vanilla extract: The aromatic essence that ties everything together.
-
1-2 tablespoons milk: Adjust the consistency of your frosting.
Step-by-Step Instructions
Ready to get baking? Let’s turn those ingredients into baked bliss!
-
Activate the Yeast: In a small bowl, combine the warm milk and active dry yeast. Add the sugar and whisk gently. Let it sit for about 5–10 minutes until frothy. This means your yeast is alive and ready to work its magic!
-
Mix it Up: In a large mixing bowl, whisk together 2 ½ cups of flour and salt. After your yeast mixture is frothy, add the egg and melted butter to the bowl, mixing until just combined.
-
Knead to Perfection: Gradually add the remaining flour, ½ cup at a time, until your dough comes together. Turn it out onto a floured surface and knead for about 5-7 minutes until smooth and elastic. This is a great arm workout too!
-
Let it Rise: Place the dough in a greased bowl, cover it with a clean cloth, and let it rise in a warm place for about an hour, or until it doubles in size. This is a great time to clean up and prepare the filling!
-
Prepare the Filling: In a small bowl, mix together the brown sugar and cinnamon. Once your dough has risen, punch it down gently (that feels good, right?) and roll it out on a floured surface into a rectangle, about ¼ inch thick.
-
Spread the Butter: Smear the softened butter all over the rolled-out dough, leaving a little border around the edges for easy rolling.
-
Sprinkle and Roll: Evenly sprinkle the cinnamon-sugar mixture over the butter. Starting from one long end, roll the dough tightly into a log. Use a sharp knife to slice the log into 12 equal rolls.
-
Second Rise: Place the rolls in a greased baking dish, cover them again, and let them rise for another 30 minutes. Preheat your oven to 350°F (175°C) while you wait!
-
Bake: Bake the rolls for 25-30 minutes until golden brown. If you want the tops to be extra golden, brush a bit of melted butter on them halfway through baking.
-
Frost: While the rolls are cooling slightly, beat together the frosting ingredients until smooth. Drizzle it generously over the warm rolls and enjoy!
Serving Suggestions
These cinnamon rolls are best enjoyed fresh out of the oven, but they’re just as delicious the next day (if they last that long!). Serve them warm with a side of coffee or hot cocoa for a cozy treat. For an extra special presentation, you might even want to add some chopped nuts or a sprinkle of sea salt on the frosting just before serving.
Recipe Variations
Feeling adventurous? Here are a few scrumptious twists you could try:
-
Chocolate Chip Cinnamon Rolls: Add a handful of chocolate chips to the filling for a sweet surprise in every bite.
-
Maple Pecan Rolls: Swap out the brown sugar for maple sugar and toss in some chopped pecans for added crunch.
-
Vegan Cinnamon Rolls: Use plant-based milk, coconut oil, and vegan cream cheese to create a dairy-free delightful treat.
-
Savory Cinnamon Rolls: Change the filling to include cheese, herbs, and garlic for a unique dinner roll twist!
-
Pumpkin Spice Rolls: Replace ¼ cup of flour with pumpkin puree and add pumpkin pie spice to the filling for a fall-inspired delight!
Chef’s Notes
Cinnamon rolls have a special spot in my heart. I even remember my first baking mishap: I forgot to add the sugar to the dough, and I ended up offering my family “cinnamon rolls” that were more like sad little bread logs. Thankfully, they were so kind and ate them anyway! Over the years, my technique has matured (as have my roll skills), and I’ve mastered the art of sprinkling joy into every roll!
FAQs and Troubleshooting
1. My rolls didn’t rise! What went wrong?
There could be a few reasons. Make sure your yeast is fresh and active—if it doesn’t froth up when mixed with milk, it’s best to start over. The dough’s environment also matters, so it should be warm and draft-free during the rise.
2. The dough was too sticky to handle!
Use additional flour sparingly when kneading the dough. Remember, a slightly sticky dough results in softer rolls, so be mindful not to add too much flour.
3. Can I make these ahead of time?
Absolutely! You can prepare the rolls up to the second rise stage, cover them, and refrigerate overnight. In the morning, let them sit at room temperature for 30 minutes before baking.
4. How do I store leftover rolls?
Seal any unused rolls in an airtight container at room temperature for up to two days. For longer storage, freeze them (unfrosted) for up to three months. Just thaw and reheat before indulging!
Nutritional Info
While indulging in these cinnamon rolls, keep in mind that they are a treat! Each roll is approximately 300 calories, depending on the size and frosting quantity. Enjoy them in moderation alongside a balanced diet.
Happy baking, friends! Remember, the best part of making homemade cinnamon rolls is the love you put into them. So gather your ingredients, let the sweet fragrance fill your home, and enjoy every delicious bite!
Print
Easy Homemade Cinnamon Rolls
- Total Time: 50 minutes
- Yield: 12 servings 1x
- Diet: Vegetarian
Description
Indulge in the delightful world of homemade cinnamon rolls, warm and gooey, perfect for any occasion.
Ingredients
- 2 ¼ teaspoons active dry yeast
- ¾ cup warm milk (about 110°F/43°C)
- ¼ cup granulated sugar
- 1 egg
- 3 ½ to 4 cups all-purpose flour
- ½ teaspoon salt
- ⅓ cup unsalted butter, softened
- ½ cup brown sugar, packed
- 2 tablespoons ground cinnamon
- ¼ cup unsalted butter, softened (for filling)
- 1 cup powdered sugar (for frosting)
- 2 tablespoons unsalted butter, softened (for frosting)
- 1 tablespoon cream cheese, softened (optional for frosting)
- 1 teaspoon vanilla extract
- 1–2 tablespoons milk (for frosting)
Instructions
- Activate the yeast: In a small bowl, combine the warm milk and active dry yeast. Add the sugar and whisk gently. Let it sit for about 5–10 minutes until frothy.
- Mix it up: In a large mixing bowl, whisk together 2 ½ cups of flour and salt. After your yeast mixture is frothy, add the egg and melted butter to the bowl, mixing until just combined.
- Knead to perfection: Gradually add the remaining flour, ½ cup at a time, until your dough comes together. Turn it out onto a floured surface and knead for about 5-7 minutes until smooth and elastic.
- Let it rise: Place the dough in a greased bowl, cover it with a clean cloth, and let it rise in a warm place for about an hour, or until it doubles in size.
- Prepare the filling: In a small bowl, mix together the brown sugar and cinnamon. Roll out the risen dough on a floured surface into a rectangle, about ¼ inch thick.
- Spread the butter: Smear the softened butter all over the rolled-out dough.
- Sprinkle and roll: Evenly sprinkle the cinnamon-sugar mixture over the butter. Roll the dough tightly into a log and slice into 12 equal rolls.
- Second rise: Place the rolls in a greased baking dish, cover them again, and let them rise for another 30 minutes.
- Bake: Bake the rolls at 350°F (175°C) for 25-30 minutes until golden brown.
- Frost: Beat together the frosting ingredients until smooth, drizzle over warm rolls, and enjoy!
Notes
These rolls are best enjoyed fresh, but they can be stored in an airtight container for up to two days or frozen for longer storage.
- Prep Time: 20 minutes
- Cook Time: 30 minutes
- Category: Dessert
- Method: Baking
- Cuisine: American
Nutrition
- Serving Size: 1 roll
- Calories: 300
- Sugar: 20g
- Sodium: 200mg
- Fat: 10g
- Saturated Fat: 5g
- Unsaturated Fat: 5g
- Trans Fat: 0g
- Carbohydrates: 40g
- Fiber: 1g
- Protein: 4g
- Cholesterol: 25mg
Keywords: cinnamon rolls, homemade, dessert, baking




