
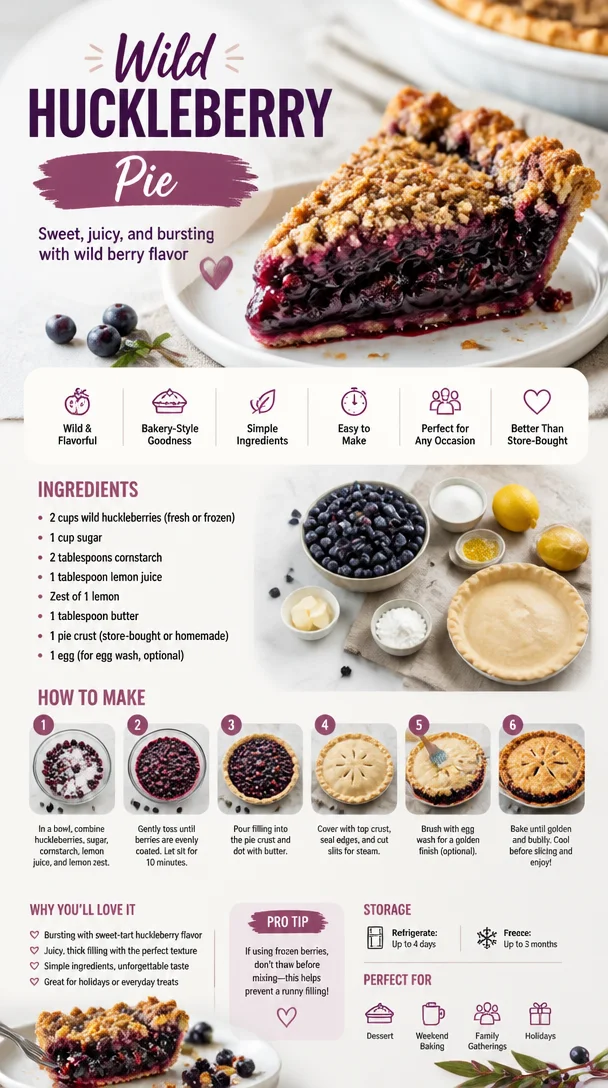
Wild Huckleberry Pie
The Joy of Wild Huckleberry Pie: A Slice of Nostalgia
Welcome to my kitchen! Today, we’re diving into one of my all-time favorites: Wild Huckleberry Pie. There’s something truly magical about this dessert that not only tantalizes your taste buds but also stirs up warm, loving memories of summers spent in nature’s embrace. Picture this: plump, juicy huckleberries, vibrant in color, bursting with sweet-tart goodness, and enveloped by a flaky, buttery crust. It’s like a hug in dessert form, and I can’t wait to share my love of this pie with you.
Let’s rewind to the summer I turned ten years old. My family decided to escape the hustle and bustle of city life for a week in the woods. My parents packed the car with camping gear, and my siblings and I packed our excitement. Little did I know, this adventure would kick off my lifelong obsession with huckleberries. Nestled near our campsite was a hidden patch of dark purple berries, and with my mother’s guidance, I learned to spot the ripest ones. Eventually, we returned to our campsite with buckets overflowing with huckleberries, our hands stained with juice, our laughter echoing through the trees.
That night, we baked our first pie outdoors over a campfire. With the smell of that sweet aroma wafting through the air, we gathered around the flickering flames, sharing stories and making memories that still bring a smile to my face. As we dove into that pie, I could see the joy on everyone’s faces; it was a simple symbol of togetherness, a bond forged in the kitchen and warmed by the spirit of family.
Now that I’ve recounted this delightful memory, let’s roll up our sleeves and jump into this recipe! I promise it’s easy and rewarding, perfect for any occasion, whether you’re in search of a simple weeknight dessert or looking to impress your friends at a summer gathering.
Ingredients
Before we start, let’s gather our ingredients. Here’s what you’ll need to make this delicious Wild Huckleberry Pie:
-
2 cups fresh wild huckleberries
These little gems are the star of the show! If you can’t find wild huckleberries, blueberries make a fantastic substitute. Just remember to adjust the sugar slightly, as blueberries tend to be sweeter. -
1 cup granulated sugar
This will sweeten our filling. You can use coconut sugar or honey for a healthier alternative. If you enjoy less sweetness, feel free to scale back on the sugar. -
1 tablespoon cornstarch
This acts as a thickener, ensuring your pie filling has that perfect luscious texture. If you prefer a gluten-free option, tapioca starch does the trick beautifully. -
1 teaspoon lemon juice
A splash of acidity balances the sweetness of the berries. Fresh lemon juice is ideal, but bottled juice will work if you’re in a pinch! -
1 teaspoon vanilla extract
Vanilla adds a warm depth to the flavor. You can switch it up with almond extract for a different nutty twist or skip it entirely if you want to keep it simple. -
1 tablespoon butter (for dotting)
Just a little pat of butter adds richness to the filling. You can use margarine if you’re looking for a dairy-free option. -
1 homemade or store-bought pie crust
I usually go for a homemade, flaky pie crust. But if time is short, don’t shy away from the convenience of pre-made crusts! -
Egg wash (1 egg beaten with a tablespoon of water)
This is optional but gives your pie that beautiful golden finish.
Step-by-Step Instructions
Now, let’s get to the fun part! Here’s a detailed guide on how to make your Wild Huckleberry Pie:
-
Preheat Your Oven:
Start by preheating your oven to 425°F (220°C). A hot oven ensures that your crust will be flaky and perfectly cooked. Trust me, a well-preheated oven is the key to baking success! -
Prepare the Filling:
In a large mixing bowl, combine your huckleberries, sugar, cornstarch, lemon juice, and vanilla extract. Gently toss to coat the berries and let them sit for about 15 minutes. This step allows the juices to be released and helps the flavors meld together beautifully. I love taking this moment to reminisce about that camping trip while I wait! -
Roll Out the Pie Crust:
Whether you’re using store-bought or homemade crust, roll it out on a lightly floured surface to about 1/8-inch thick. Carefully transfer it to your pie dish, pressing gently to fit into the corners. If using store-bought dough, follow the package instructions for thawing and placement. -
Fill the Pie:
Pour the huckleberry mixture into the prepared crust, making sure it fills all the nooks and crannies. Dot the filling with little bits of butter for added richness—trust me, it’s worth it! -
Top with Another Crust:
If you love a double-crust pie, roll out your second dough and place it over the filling. Cut slits in the top to allow steam to escape. This is where you can get creative: make a lattice pattern or cut out shapes for fun! -
Brush with Egg Wash:
If you’re feeling fancy, brush the crust with the egg wash. This will give it a glorious golden sheen. Not only does it make your pie look professional, but it also adds a slight richness when you bite into it. -
Bake the Pie:
Place your pie on a baking sheet (to catch any drips) and slide it into the oven. Bake for 15 minutes at 425°F (220°C), then reduce the temperature to 350°F (175°C) and continue baking for 30–35 minutes, or until the crust is golden brown and the filling is bubbling beautifully. -
Cool and Enjoy:
Once baked to perfection, remove your pie from the oven and let it cool for at least an hour before slicing. This allows the filling to set. Plus, it gives you a moment to enjoy that incredible aroma filling your kitchen!
Serving Suggestions
When it comes to serving your Wild Huckleberry Pie, let your creativity shine! A generous scoop of vanilla ice cream or a dollop of whipped cream on the side adds a delightful creamy contrast to the tartness of the berries. For a seasonal twist, top it with a sprinkle of fresh mint or powdered sugar for a pop of color and flavor.
Recipe Variations
-
Huckleberry Blueberry Mix: Combine huckleberries and blueberries for a fun flavor twist! The blueberries will naturally sweeten the pie.
-
Lemon Huckleberry: Enhance the filling with extra zest from a lemon for a more pronounced citrus flavor that brightens up the berries!
-
Spiced Huckleberry: Add a pinch of cinnamon or nutmeg to the filling for a warm, cozy flavor that’s perfect for fall gatherings.
-
Gluten-Free Crust: Use a gluten-free pie crust or a mixture of almond flour and coconut flour for a deliciously different base.
-
Vegan Twist: Substitute butter with coconut oil and the egg wash with a mixture of almond milk and maple syrup for a scrumptious vegan pie.
Chef’s Notes
Huckleberry pie holds a special place in my heart, and I’ve tinkered with this recipe over the years. Your instincts as a cook will guide you. If you taste the filling and think it needs a little more sweetness, feel free to adjust! And here’s a funny kitchen story for you: the first time I made this pie solo, I forgot to dot the filling with butter. I ended up with a delicious yet slightly dry pie! It was a great reminder that every misstep in the kitchen is an opportunity to learn and evolve. Feel free to put your own twist on this pie and make it your own!
FAQs and Troubleshooting
-
Why is my pie filling runny?
Runny filling can happen if you undercooked the cornstarch or didn’t allow the pie to cool before serving. Ensure you mix the cornstarch thoroughly with the berries, and patience is key—let it cool properly! -
How can I prevent my crust from getting soggy?
For a flakier crust, you can blind bake it for about 10 minutes before adding the filling! This helps seal off the bottom and ensures it stays crisp. -
What should I do if I can’t find huckleberries?
Blueberries, blackberries, or even cranberries can serve as excellent alternatives. Each brings its own unique flavor that will still create a delightful dessert! -
How do I store leftover pie?
Cover your pie loosely with plastic wrap or aluminum foil and store it in the fridge for up to 3 days. You can also freeze slices for up to 3 months—just make sure they’re well-wrapped to avoid freezer burn.
Remember, cooking is all about enjoyment, exploration, and sharing with others. I hope you’ll be inspired to try this Wild Huckleberry Pie recipe, whether it’s for yourself or to share with loved ones. Happy baking, and may your kitchen always be filled with laughter and delightful aromas!
Print
Wild Huckleberry Pie
- Total Time: 1 hour 5 minutes
- Yield: 8 servings 1x
- Diet: Vegetarian
Description
A delightful Wild Huckleberry Pie recipe that evokes nostalgic summer memories, featuring sweet-tart huckleberries in a flaky buttery crust.
Ingredients
- 2 cups fresh wild huckleberries
- 1 cup granulated sugar
- 1 tablespoon cornstarch
- 1 teaspoon lemon juice
- 1 teaspoon vanilla extract
- 1 tablespoon butter (for dotting)
- 1 homemade or store-bought pie crust
- 1 egg beaten with a tablespoon of water (for egg wash)
Instructions
- Preheat your oven to 425°F (220°C).
- Combine huckleberries, sugar, cornstarch, lemon juice, and vanilla extract in a large mixing bowl. Let sit for 15 minutes.
- Roll out the pie crust to about 1/8-inch thick and transfer it to your pie dish.
- Pour the huckleberry mixture into the prepared crust and dot with butter.
- Top with another crust, cutting slits for steam to escape.
- Brush with egg wash for a golden finish.
- Bake for 15 minutes at 425°F, then reduce to 350°F (175°C) and bake for 30–35 minutes.
- Cool for at least an hour before slicing.
Notes
Serve with a scoop of vanilla ice cream or whipped cream for a delightful contrast. Consider variations like a Huckleberry Blueberry mix or a spiced version with cinnamon.
- Prep Time: 20 minutes
- Cook Time: 45 minutes
- Category: Dessert
- Method: Baking
- Cuisine: American
Nutrition
- Serving Size: 1 slice
- Calories: 300
- Sugar: 24g
- Sodium: 200mg
- Fat: 14g
- Saturated Fat: 7g
- Unsaturated Fat: 6g
- Trans Fat: 0g
- Carbohydrates: 40g
- Fiber: 3g
- Protein: 3g
- Cholesterol: 70mg
Keywords: huckleberry, pie, dessert, summer, baking
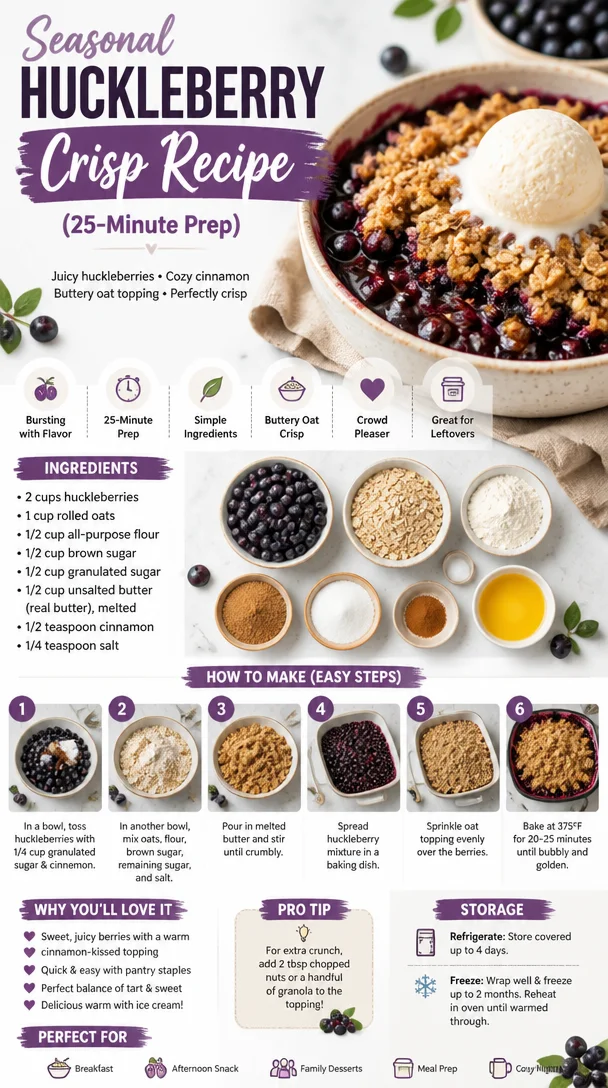
Seasonal Huckleberry Crisp Recipe (25-Minute Prep)
Huckleberry Crisp: A Touch of Sweet Nostalgia
Welcome back to my cozy kitchen, food lovers! Today, I’m excited to share a recipe that’s dear to my heart: Huckleberry Crisp. If you’re one of those people who hits the brakes when you spot a roadside stand bursting with fresh berries, or if the thought of a warm dessert topped with a scoop of vanilla ice cream sends you into a blissful dream, you’re in for a treat.
Huckleberries, often dubbed as nature’s candy, are tiny, sweet, and slightly tart gems that are a delight to work with. They bring an element of whimsy and joy to any dish, but in a crisp, they reach a whole new level of perfection! Picture this: a delectable combination of huckleberries bubbling away, mingling with oats, brown sugar, and buttery goodness—what could be better than that?
I remember the first time I made this crisp. It was a crisp fall evening, and my best friend and I decided to go berry-picking in the woods. With baskets in hand, laughter in the air, and a hint of autumn chill, we ventured into the wild. We stumbled upon a secret spot where huckleberries grew freely. We picked and sampled until we could hardly hold another berry, and by the end of the day, our fingers were stained purple, but our spirits were soaring.
Fast forward a few hours, and we turned our treasure haul into that warming, fruity crisp—the aroma wafting through my home filled us with pure joy as we dug into our creation. It was the perfect way to savor the fruits of our labor, and it sparked an enduring love for cooking with fresh huckleberries. Now, every time I whip up this Huckleberry Crisp, it transports me back to that beautiful day in nature, sharing laughter and love with friends.
Ingredients
Here’s a list of ingredients you’ll need to create your very own Huckleberry Crisp:
-
Huckleberries (4 cups): These beauties are the star of the show! Their sweet-tart flavor is a perfect match for the buttery crisp topping. If you can’t find huckleberries, blueberries or blackberries are great substitutes.
-
Granulated Sugar (1/2 cup): This helps to sweeten the huckleberries and balance their natural tartness. You can also use coconut sugar for a lower-glycemic option.
-
Lemon Juice (2 tablespoons): A splash of lemon juice brightens the flavor and complements the huckleberries beautifully. If you’re out of fresh lemons, bottled lemon juice works too.
-
Cornstarch (2 tablespoons): This is your thickener, helping to create that perfect, gooey berry filling. You can swap it with arrowroot powder for a gluten-free version.
-
Oats (1 cup): Rolled oats create a lovely chewy texture in the crisp topping. Quick oats can be used in a pinch, but they won’t give you that heartiness.
-
Brown Sugar (1/2 cup): It adds a hint of molasses flavor and moisture to the crisp topping, making it irresistible. For a lighter version, use light brown sugar or granulated sugar.
-
All-Purpose Flour (1/2 cup): Flour helps bind the topping together while adding a nice crunch. If you’re avoiding gluten, almond flour or oat flour can be great alternatives.
-
Butter (1/2 cup or 1 stick, softened): Butter provides that rich, decadent flavor. If you’d like to make it dairy-free, coconut oil or vegan butter works wonderfully.
-
Cinnamon (1 teaspoon): A sprinkle of cinnamon will warm your flavor profile and remind you of cozy days. If you’re a spice fan, add a pinch of nutmeg too!
Step-by-Step Instructions
Ready to get your hands a little messy? Let’s dive into the steps for making this delightful Huckleberry Crisp!
-
Preheat Your Oven: Start by preheating your oven to 350°F (175°C). This ensures that the crisp bakes evenly and gets that golden brown topping we all love.
-
Prepare the Huckleberries: In a large mixing bowl, combine your huckleberries, sugar, lemon juice, and cornstarch. Gently toss them together until the huckleberries are well coated. This step is crucial! The sugar and cornstarch will create a syrupy filling while baking.
-
Transfer to a Baking Dish: Pour the huckleberry mixture into a greased 9×9-inch baking dish. Use a wooden spoon to spread the mixture evenly—these berries deserve a good home!
-
Make the Topping: In another bowl, mix together the oats, brown sugar, flour, cinnamon, and softened butter. Using your fingers or a pastry cutter, work the butter into the dry ingredients until it resembles coarse crumbs. This is the fun part—get in there and feel the textures change, leaning into the creative process!
-
Assemble the Crisp: Evenly distribute the crumbly topping over the huckleberry mixture. Don’t worry about covering it perfectly. The uneven topping gives it that homemade charm!
-
Bake: Place the baking dish in the preheated oven and bake for 30-35 minutes, or until the top is golden brown and the huckleberries are bubbling away. Keep an eye on it after the 25-minute mark to avoid burning those precious oats.
-
Cool and Serve: Once you take it out of the oven, let the crisp cool for about 10 minutes. This step allows the juices to thicken up a bit more. It’s tough to resist, but trust me, the wait is worth it!
Serving Suggestions
When it comes to serving your Huckleberry Crisp, a scoop of vanilla ice cream on top is non-negotiable! The cold creaminess perfectly complements the warm, fruity goodness beneath. Plus, it adds a delightful contrast in temperatures. You can also serve it with a dollop of fresh whipped cream, or if you’re feeling adventurous, try a sprinkle of chopped nuts for that extra crunch.
Recipe Variations
Let’s get a little creative, shall we? Here are a few fun ideas to switch things up with your Huckleberry Crisp:
-
Add Some Spice: Mixing in a bit of ginger or nutmeg can add a lovely warmth and depth.
-
Nutty Topping: Add 1/2 cup of chopped nuts such as walnuts or pecans to the crisp topping for added texture.
-
Mix Berries: Pair huckleberries with raspberries or strawberries for a berry medley that packs a flavor punch.
-
Coconut Crisp: Swap some flour for shredded coconut in the topping for a tropical twist.
-
Vegan Version: Use plant-based butter and maple syrup instead of sugar to make this crisp vegan-friendly!
Chef’s Notes
This Huckleberry Crisp recipe has evolved over the years, influenced by the seasons and whatever I have on hand. Once, I made it using coconut oil and added a handful of walnuts to the topping—it was a game-changer! My friends raved about the crunchy texture.
Also, it’s worth mentioning just how forgiving this recipe is! If you find you have a bit too many huckleberries or not quite enough, it’s very adaptable. Just get those juicy berries into that dish and let the oven do the magic!
FAQs and Troubleshooting
-
Can I use frozen huckleberries?
Absolutely! Frozen huckleberries are a great option. Just be sure to thaw and drain excess moisture before mixing with other ingredients. -
Why did my topping turn out soggy?
If your topping became soggy, it might have had too much moisture or not enough oats. Make sure to use the right proportions for the ingredients, and try letting it bake a little longer. -
How can I make this gluten-free?
Swap out regular flour for gluten-free all-purpose flour and ensure your oats are certified gluten-free. -
Can I make this ahead of time?
Yes! You can prepare the huckleberry filling and the topping separately ahead of time. Just store them in the refrigerator until you’re ready to bake.
Nutritional Info (If Applicable)
Note: Nutritional info may vary based on brands and measurements used. Here’s a rough estimate per serving:
- Calories: 250
- Total Fat: 10g
- Saturated Fat: 5g
- Carbohydrates: 40g
- Sugars: 15g
- Protein: 2g
And there you have it, my friends—a warm, inviting Huckleberry Crisp that will not only fill your belly but also your heart with cherished memories. Remember, the kitchen is a place for exploration, creativity, and connecting with those you love, so don’t hesitate to make this recipe your own! Happy baking, and as always, I can’t wait to hear your stories!
Print
Huckleberry Crisp
- Total Time: 50 minutes
- Yield: 8 servings
- Diet: Vegetarian
Description
A warm, inviting Huckleberry Crisp that blends sweet-tart huckleberries with a buttery, crunchy topping, perfect for a cozy dessert.
Ingredients
- Huckleberries (4 cups)
- Granulated Sugar (1/2 cup)
- Lemon Juice (2 tablespoons)
- Cornstarch (2 tablespoons)
- Oats (1 cup)
- Brown Sugar (1/2 cup)
- All-Purpose Flour (1/2 cup)
- Butter (1/2 cup, softened)
- Cinnamon (1 teaspoon)
Instructions
- Preheat your oven to 350°F (175°C).
- Prepare the huckleberries by combining them with sugar, lemon juice, and cornstarch in a large mixing bowl.
- Transfer the huckleberry mixture into a greased 9×9-inch baking dish.
- Make the topping by mixing oats, brown sugar, flour, cinnamon, and softened butter in another bowl until crumbly.
- Assemble the crisp by spreading the crumbly topping over the huckleberry mixture.
- Bake in the preheated oven for 30-35 minutes until the top is golden brown and the huckleberries are bubbling.
- Cool for about 10 minutes before serving.
Notes
Serve warm with a scoop of vanilla ice cream or a dollop of whipped cream.
- Prep Time: 15 minutes
- Cook Time: 35 minutes
- Category: Dessert
- Method: Baking
- Cuisine: American
Nutrition
- Serving Size: 1 serving
- Calories: 250
- Sugar: 15g
- Sodium: 50mg
- Fat: 10g
- Saturated Fat: 5g
- Unsaturated Fat: 5g
- Trans Fat: 0g
- Carbohydrates: 40g
- Fiber: 3g
- Protein: 2g
- Cholesterol: 30mg
Keywords: huckleberry, dessert, fruit crisp, warm dessert, baking
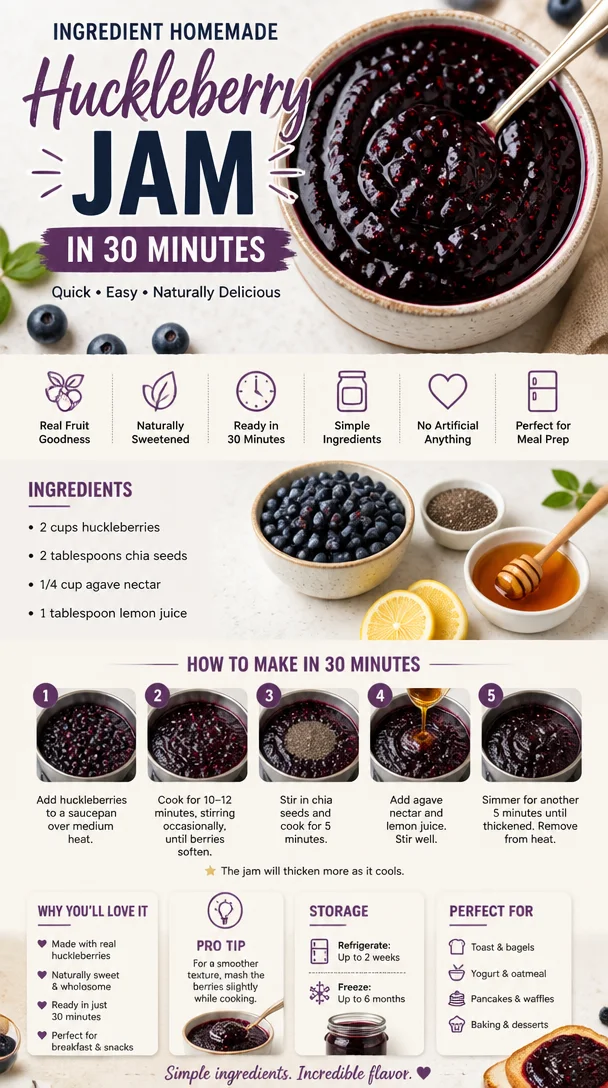
Ingredient Homemade Huckleberry Jam in 30 Minutes
Homemade Huckleberry Jam: A Sweet Little Jar of Joy
Welcome to my kitchen! Today, we are diving headfirst into one of my absolute favorite recipes: homemade huckleberry jam. There’s something magical about spreading a sweet, tangy jam over buttered toast or fluffy pancakes, and when it’s homemade, every bite is filled with love and nostalgia. Huckleberries are like little bursts of sunshine, and their vibrant flavor makes them the perfect star for this jam.
Imagine waking up on a lazy Sunday morning, sunlight streaming through the kitchen window as you pull out a jar of huckleberry jam from the fridge. You can almost smell the sweet aroma wafting through the air already, can’t you? Whether you’re new to canning or an old pro, making homemade jam is not just about preserving fruit—it’s about creating cherished memories and sharing something truly special with your loved ones.
So, why huckleberries? Growing up, my family would go picking for these gems in the wilds of the Pacific Northwest. I’ll never forget the thrill of finding a bush full of plump, juicy huckleberries shining like little treasures under the sun. We’d spend hours filling our baskets, our fingers stained with the inky juice, and laughter echoing through the trees. Those summer days spent outdoors are some of my happiest memories, and now, I can recreate that joy in each jar of jam.
In this post, I’ll guide you step-by-step on how to make your very own huckleberry jam, share some kitchen tips, and sprinkle in a few personal stories along the way. So, grab your spoon, put on your favorite apron (mine’s always a bit messy), and let’s get cooking!
A Memory Worth Preserving
As I mentioned, my love for huckleberries started in childhood. My grandmother, the queen of jams and jellies, would gather the whole family for our annual berry-picking adventures. I remember one summer in particular—the sun was shining, and the berries were abundant. My little cousin and I were so engrossed in our hunt that we completely lost track of time. Suddenly, we were called back to the picnic blanket for lunch, and I was convinced we had the most huckleberries picked. My grandmother’s legendary huckleberry jam was the reward for our hard work, and as we spooned it onto buttermilk biscuits, I remember thinking that life couldn’t be sweeter.
Cooking for me is deeply intertwined with those beautiful moments of connection—sharing a meal, a story, or a simple jar of jam. Now, every time I scoop huckleberry jam from my fridge, it transports me back to those carefree childhood days, sharing laughter and sweet treats with loved ones. I want to help you create those same memories for you and your family!
Ingredients
Before we dive into the recipe, here’s what you’ll need to make your huckleberry jam:
-
Huckleberries (4 cups): Look for ripe, plump huckleberries. If you can’t find them, blueberries can work as a substitute; they’ll yield a slightly different flavor but still delicious!
-
Sugar (2 cups): Regular granulated sugar works best, helping to balance the tangy flavor of the berries. You can reduce the sugar if you prefer it less sweet or use a sugar substitute (be sure to check the package for equivalent ratios).
-
Lemon juice (1/4 cup): Freshly squeezed lemon juice adds brightness to the jam and helps preserve it. If you don’t have fresh lemons, bottled juice will work as well; just aim for the organic kind, if possible.
-
Pectin (1 box): This is critical for helping your jam set. There are low-sugar pectins available if you want to cut down on the sugars. Just follow the instructions on the box for quantities.
-
Water (1/4 cup): Used to help simmer the fruit at the beginning.
Step-by-Step Instructions
Now that we’ve gathered our ingredients, let’s roll up our sleeves and get started!
-
Prepare Your Jars: First things first, let’s sanitize our jars. Begin by washing your jars and lids in hot, soapy water, then rinse well. You can sterilize them further by boiling them in water for 10 minutes. This step ensures your jam stays fresh longer!
-
Wash the Huckleberries: Rinse your huckleberries gently under cold running water. This step removes any dirt while keeping those precious berries intact. Drain well and set aside.
-
Cook the Berries: In a large pot, combine the huckleberries, sugar, lemon juice, and water. Stir everything together and bring it to a gentle boil over medium heat. Cook for about 10-15 minutes, stirring frequently to prevent sticking (I know it’s tempting to keep a spoon in there to taste the delightful mixture!).
-
Check for Consistency: This is where your jam magic happens! Using a ladle, take a small amount of the jam and spoon it onto a plate. Let it cool for a minute, then run your finger through it. If it holds its shape and wrinkles slightly, it’s ready for pectin. If not, continue cooking for another few minutes and test again.
-
Add the Pectin: Stir in the pectin according to the package instructions. Bring the mixture back to a boil for another minute, stirring constantly. It should start to thicken up beautifully!
-
Fill Your Jars: Carefully pour your hot jam into the sterilized jars, leaving about 1/4 inch of space at the top. Wipe the rims with a clean cloth to remove any sticky residue before sealing with the lids.
-
Process the Jars: To ensure a good seal and to keep your jam fresh, you can process the jars in a boiling water bath. Place them in a pot of boiling water and let them bath for 10-15 minutes. Once done, carefully remove the jars and allow them to cool on a clean kitchen towel. You should hear the satisfying "pop" of the lids sealing!
-
Cool and Store: Leave your huckleberry jam at room temperature for 24 hours. Make sure the lids are sealed properly (they should not flex when pressed). Store your jars in a cool, dark place for up to a year (if they last that long!).
Serving Suggestions
There’s no better way to enjoy your homemade huckleberry jam than by slathering it on warm, buttered toast! It also pairs beautifully with creamy yogurt, drizzled on top of pancakes or waffles, or even as a filling for pastries. I love it on a charcuterie board, served alongside cheeses and crackers. The tangy-sweet flavor complements many savory items perfectly!
Recipe Variations
Feeling adventurous? Here are a few creative twists to try with your huckleberry jam:
-
Spicy Twist: Add a pinch of cinnamon or a dash of cayenne pepper to the mix for some warming spice that will tickle your taste buds!
-
Herb Infusion: For a unique flavor, try adding fresh herbs like rosemary or thyme while the jam simmers. Just strain them out before jarring.
-
Tropical Blend: Mix in crushed pineapple or a bit of mango puree for a huckleberry-pineapple jam that brings a fun, tropical twist.
-
Chia Jam: Replace the pectin with chia seeds! They create a gel-like consistency and boost the nutritional value, plus it has a fabulous crunch.
-
Sugar-Free Version: Use a sugar substitute like erythritol or monk fruit sweetener if you’re looking for a low-sugar jam.
Chef’s Notes
As with any recipe, this huckleberry jam has evolved over the years in my kitchen. I’ve experimented with everything from adding spices to mixing fruits, and I love how versatile it is. I remember one time, I must have been in a creative mood, and I decided to throw in some fresh ginger. The results were delightful, and I was pleasantly surprised by how that little kick complemented the huckleberries!
Also, don’t be discouraged if your jam doesn’t set the very first time. There’s always a learning curve when you’re canning! Just know that your efforts are worth it; there’s nothing like the satisfaction of seeing rows of homemade jam lining your pantry shelves.
FAQs and Troubleshooting
-
Why didn’t my jam set?
If your jam didn’t set, it could be due to not enough pectin or cooking time. Make sure to boil long enough for the pectin to activate and dissolve fully. You can also reheat the jam and add more pectin if needed! -
How long does homemade huckleberry jam last?
If processed and sealed properly, it can last up to a year in a cool, dark place. Once opened, store in the fridge and consume within a month for freshness. -
Can I use frozen huckleberries?
Absolutely! Just thaw and drain excess liquid before using. Frozen berries are a great option when fresh ones aren’t in season. -
What do I do if my jam is too sweet?
If your jam turns out too sweet, try mixing in a bit of lemon juice or adding some tangy fruit like cranberries during cooking next time. A touch more acidity can balance out sweetness beautifully.
Nutritional Info
(Note: nutritionally, this will vary depending on the amount of sugar and fruit used):
- Serving Size: 1 tablespoon
- Calories: 50
- Total Fat: 0g
- Sugars: 12g
- Protein: 0g
Now, my kitchen friend, you have all the tools you need to create your own batch of huckleberry jam! I can’t wait for you to experience the same joy and nostalgia that fills my heart when I make it. Let me know how it turns out, and share your kitchen stories. Happy cooking!
Print
Homemade Huckleberry Jam
- Total Time: 55 minutes
- Yield: 4 cups
- Diet: Vegetarian
Description
A delightful homemade huckleberry jam that’s sweet, tangy, and perfect for spreading on toast or pancakes.
Ingredients
- Huckleberries (4 cups)
- Sugar (2 cups)
- Lemon juice (1/4 cup)
- Pectin (1 box)
- Water (1/4 cup)
Instructions
- Prepare your jars: Wash and sterilize the jars and lids in hot, soapy water or boil them for 10 minutes.
- Wash the huckleberries: Rinse them gently under cold running water and drain well.
- Cook the berries: Combine huckleberries, sugar, lemon juice, and water in a large pot and bring to a gentle boil over medium heat. Cook for 10-15 minutes.
- Check for consistency: Test the jam on a cooled plate to see if it holds its shape.
- Add the pectin: Stir in pectin according to package instructions and boil for another minute.
- Fill your jars: Pour hot jam into sterilized jars, leaving 1/4 inch space at the top.
- Process the jars: Process in a boiling water bath for 10-15 minutes to seal.
- Cool and store: Let jars sit at room temperature for 24 hours to ensure they are sealed.
Notes
If your jam doesn’t set, reheat and add more pectin. Store opened jars in the fridge and consume within a month.
- Prep Time: 30 minutes
- Cook Time: 25 minutes
- Category: Preserves
- Method: Canning
- Cuisine: American
Nutrition
- Serving Size: 1 tablespoon
- Calories: 50
- Sugar: 12g
- Sodium: 0mg
- Fat: 0g
- Saturated Fat: 0g
- Unsaturated Fat: 0g
- Trans Fat: 0g
- Carbohydrates: 13g
- Fiber: 0g
- Protein: 0g
- Cholesterol: 0mg
Keywords: huckleberry jam, homemade jam, preserves, sweet spread, canning, fruit jam
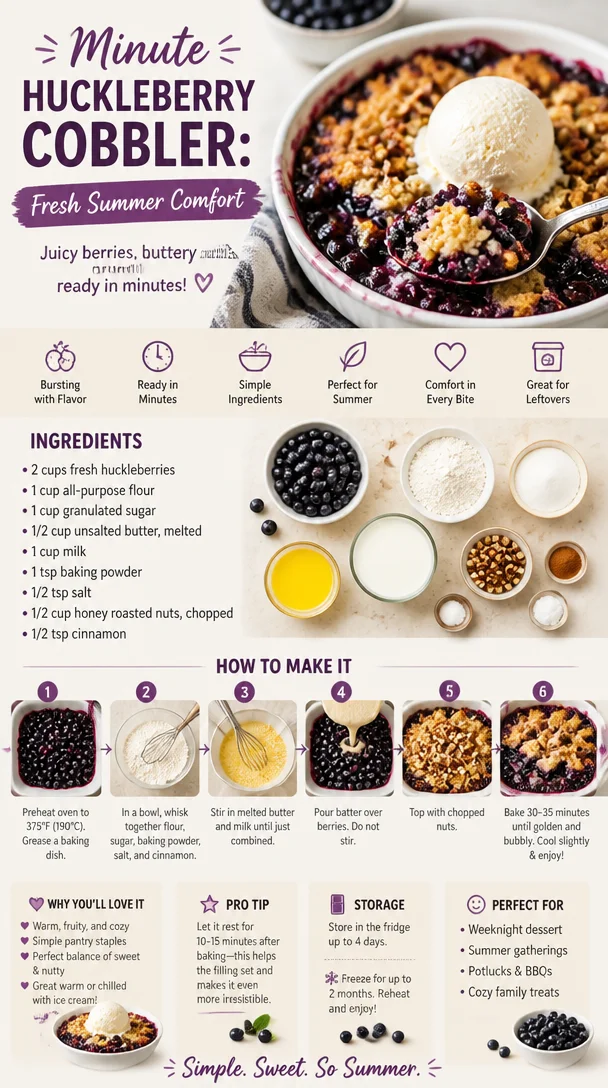
Minute Huckleberry Cobbler: Fresh Summer Comfort
Easy Fresh Huckleberry Cobbler: A Sweet Slice of Nostalgia
Welcome to my cozy corner of the kitchen, where we’re embracing the delightful world of home-cooked treats! Today, I’m over the moon to share one of my absolute favorite desserts: Easy Fresh Huckleberry Cobbler. Trust me, this recipe is like a warm hug on a plate, perfect for gatherings, family dinners, or just those moments when you need a little sweetness in your life.
Huckleberries are truly special – those vibrant little gems burst with flavor and nostalgia. Growing up, we had a patch of wild huckleberries near our family cabin. Every summer, my family would trek into the woods, buckets in hand, on a little adventure to gather these sweet treats. The excitement of picking those plump berries, the chatter among my siblings, and the joy of creating something delicious with them brings back such fond memories. It’s not just about the berries; it’s about the times spent together – the sun warming our backs, the sweet scent of the forest, and the laughter shared over a simple, homemade dessert.
This Easy Fresh Huckleberry Cobbler is my go-to recipe for those cherished moments. The combination of the juicy, tart berries with a luscious, buttery topping creates a symphony of flavors that’s sure to dazzle and bring smiles around the table. Plus, it’s wonderfully straightforward; even novice bakers can whip up this delightful dish without breaking a sweat!
So, grab your apron and let’s dive into making this enchanting huckleberry cobbler that will not only taste amazing but also fill your kitchen with sweet, comforting aromas.
Ingredients
-
Fresh Huckleberries (4 cups)
These beautiful berries are the stars of the show! Their tangy flavor adds depth to the cobbler. If you can’t find huckleberries, blueberries or blackberries make excellent substitutes. -
Granulated Sugar (1 cup)
Sweeten the deal with sugar! It balances the tartness of the huckleberries. For a lower-calorie option, consider using honey or coconut sugar. -
All-Purpose Flour (1 cup)
The backbone of your cobbler topping! It creates the delightful, fluffy layer. Need a gluten-free option? Swap it with almond flour or a gluten-free baking blend. -
Baking Powder (2 teaspoons)
This key ingredient helps the cobbler rise, giving it a light and fluffy texture. Always check the expiration date for best results! -
Salt (½ teaspoon)
A pinch of salt enhances sweetness and balances flavors. You can use sea salt or kosher salt for a slightly different taste. -
Whole Milk (1 cup)
Adds richness to the cobbler topping. If you’re looking for a dairy-free alternative, any plant-based milk like almond or oat milk works just fine. -
Butter (½ cup, melted)
Butter adds moisture and flavor to our topping, creating that sought-after buttery crust. For a vegan option, try melted coconut oil or vegan butter.
Step-by-Step Instructions
-
Preheat the Oven
Preheat your oven to 350°F (175°C). This ensures a consistent bake, giving your cobbler that perfect golden crust right from the get-go. Sticking with this step creates the perfect environment for our cobbler magic! -
Prepare the Huckleberries
Rinse the huckleberries gently under cold water and pat them dry. In a large mixing bowl, combine the huckleberries with ½ cup of granulated sugar. Let them sit for about 10 minutes. This step allows the berries to release their natural juices, creating a delightful syrup that will soak into the cobbler. -
Make the Topping
In another large bowl, whisk together the flour, baking powder, salt, and remaining ½ cup of sugar. Add the melted butter and milk, stirring until the mixture is just combined. Don’t overmix; a few lumps are perfectly fine. This will keep our topping light and airy! -
Combine and Layer
Pour the huckleberries into a greased 9×13-inch baking dish, spreading them out evenly. Spoon the batter over the huckleberries, carefully trying to cover as much of the berries as possible. Don’t worry about perfect coverage – rustic is the name of the game here! -
Bake to Perfection
Pop the dish into the preheated oven and bake for 40-45 minutes, or until the topping is golden brown and a toothpick inserted into the center comes out clean. Around the halfway point, you’ll start to smell an incredible aroma wafting through your kitchen. That’s the magic of baking! -
Cool and Serve
Once out of the oven, let the cobbler cool for about 10-15 minutes. This allows the juices to settle, making it easier to serve. If you can wait, that is! It’ll be a challenge, I get it.
Serving Suggestions
To plate your Easy Fresh Huckleberry Cobbler, scoop a generous portion into a bowl or on a plate. Serve it warm with a scoop of vanilla ice cream or a dollop of freshly whipped cream on top for delightful contrast. Drizzle a bit of the huckleberry juices over the ice cream for a sweet touch. Trust me, this combination is simply heavenly!
Recipe Variations
- Mixed Berry Cobbler: Swap out some of the huckleberries for strawberries, raspberries, or blackberries for a berry medley.
- Nutty Addition: Add ½ cup of chopped pecans or walnuts to the topping mixture for a crunchy texture.
- Spiced Up: Sprinkle in some cinnamon or nutmeg to the dry ingredients for a warming spice that compliments the berries beautifully.
- Lemon Zest: Mix in a teaspoon of lemon zest to the batter for a refreshing zing that brightens the flavor profile.
- Chia Seed Jam: Toss in a tablespoon of chia seeds with the huckleberries for added texture and healthy benefits!
Chef’s Notes
This huckleberry cobbler recipe holds a special place in my heart. Over the years, I’ve made countless variations, swapping berries and adding different spices based on what I had on hand, but the classic version always brings me back to those childhood days chasing after huckleberries in the woods. The laughter, the mess, and sometimes even the berry-stained smiles remind me of what cooking is all about: celebrating the moments that bring us together.
FAQs and Troubleshooting
1. What if my cobbler is too runny?
If your cobbler turns out a bit too runny, it might be due to excessive juice from the berries. Make sure to let it cool for a bit before serving; the juices will thicken as it sits. You can also add a tablespoon of cornstarch to the berries before baking to help thicken them up.
2. Can I use frozen huckleberries?
Absolutely! If using frozen, there’s no need to thaw them beforehand. Just toss them in the sugar and follow the recipe as instructed. You may need to add an extra 5-10 minutes to the baking time since they’ll release more moisture.
3. How do I store leftovers?
Store any leftover cobbler in an airtight container in the refrigerator for up to 3 days. You can also reheat individual portions in the microwave or pop them back in the oven to warm through.
4. Can I double this recipe?
Totally! To double the recipe, use a larger baking dish and adjust the baking time accordingly. Keep an eye on it, and test for doneness with a toothpick.
Nutritional Info
(Per serving, based on 8 servings)
- Calories: 250
- Protein: 3g
- Carbohydrates: 42g
- Fat: 10g
- Fiber: 2g
- Sugar: 15g
So there you have it, my friends! An Easy Fresh Huckleberry Cobbler that’s not just delicious but also comes with a side of beautiful memories and the promise of new stories to create in your own kitchen. Give it a try and share the love! I can’t wait to hear about your experiences baking this delightful dish. Happy cooking!
Print
Easy Fresh Huckleberry Cobbler
- Total Time: 60 minutes
- Yield: 8 servings
- Diet: Vegetarian
Description
A delightful dessert featuring juicy huckleberries and a buttery topping, perfect for gatherings and sweet moments.
Ingredients
- Fresh Huckleberries (4 cups)
- Granulated Sugar (1 cup)
- All-Purpose Flour (1 cup)
- Baking Powder (2 teaspoons)
- Salt (½ teaspoon)
- Whole Milk (1 cup)
- Butter (½ cup, melted)
Instructions
- Preheat the oven to 350°F (175°C).
- Rinse the huckleberries gently under cold water and pat them dry.
- Combine the huckleberries with ½ cup of granulated sugar in a large mixing bowl and let sit for about 10 minutes.
- Whisk together flour, baking powder, salt, and remaining ½ cup of sugar in another large bowl.
- Add melted butter and milk, stirring until just combined.
- Pour the huckleberries into a greased 9×13-inch baking dish and spoon the batter over them.
- Bake for 40-45 minutes or until golden brown.
- Let cool for about 10-15 minutes before serving.
Notes
Serve warm with vanilla ice cream or whipped cream for extra delight.
- Prep Time: 15 minutes
- Cook Time: 45 minutes
- Category: Dessert
- Method: Baking
- Cuisine: American
Nutrition
- Serving Size: 1 serving
- Calories: 250
- Sugar: 15g
- Sodium: 200mg
- Fat: 10g
- Saturated Fat: 6g
- Unsaturated Fat: 3g
- Trans Fat: 0g
- Carbohydrates: 42g
- Fiber: 2g
- Protein: 3g
- Cholesterol: 20mg
Keywords: cobbler, huckleberry, dessert, easy recipe, baking
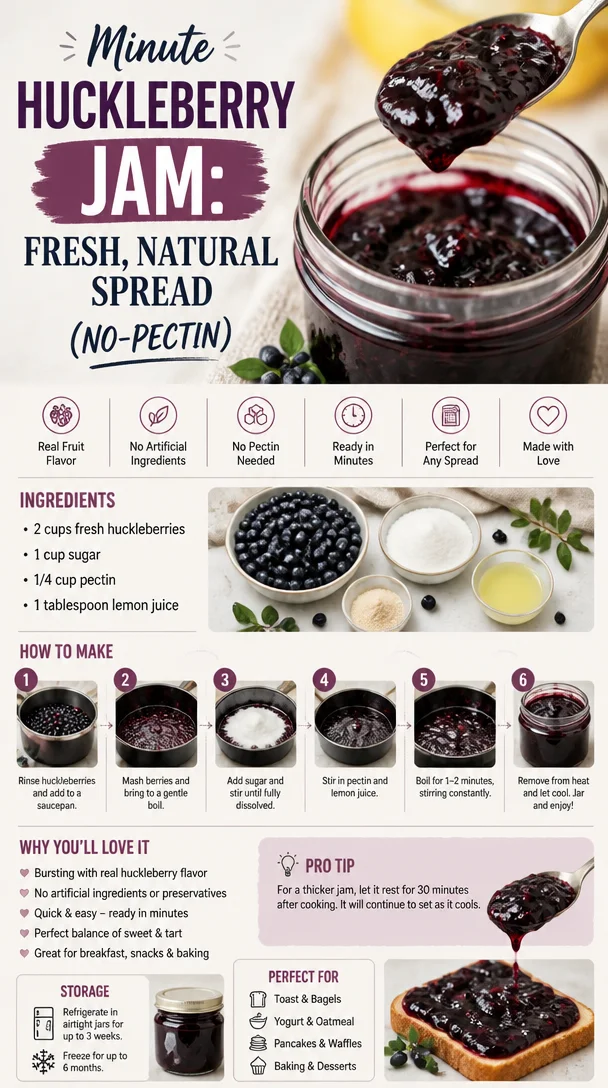
Minute Huckleberry Jam: Fresh, Natural Spread (No-Pectin)
Homemade Huckleberry Jam: A Sweet Journey of Flavor and Memories
Welcome to my kitchen, my fellow food enthusiasts! Today, we’re diving into a recipe that not only bursts with flavor but also stirs up delightful memories — homemade huckleberry jam. There’s something truly magical about jam-making, isn’t there? It’s like capturing the essence of summer in a jar, preserving those juicy, sweet notes for colder days ahead. So, if you’ve got some huckleberries (or blueberries, if you need to substitute), roll up your sleeves and get ready for a delicious adventure that’s sure to warm your heart.
Personal Story: A Huckleberry Memory
Let me take you back to a sunny summer day when I was a child, plucking ripe huckleberries with my grandmother in the dense woods near our home. We’d set out early, armed with our small buckets and an insatiable appetite for adventure. My grandmother had a knack for discovering the juiciest spots, and with every handful of huckleberries we gathered, my excitement grew. The taste was out of this world — a mixture of sweet and tart that danced on my tongue, a reminder of childhood bliss.
Once we returned home, the real fun began. My grandmother would transform our treasured berries into the most mouthwatering huckleberry jam, filling the kitchen with the scent of sweetness simmering on the stovetop. That summer ritual wasn’t just about the jam; it was about connecting, sharing stories, and laughing until our bellies hurt. Now, every time I make huckleberry jam, I feel that same joy. It reminds me to savor the moment and celebrate the simple ingredients and the love that goes into them.
Ingredients
Here’s what you’ll need to whip up your own delightful huckleberry jam:
-
Huckleberries (4 cups)
Fresh is best! Huckleberries are small, juicy, and filled with flavor; they grow wild in many regions, especially in the Northwest. If you can’t find huckleberries, blueberries make an excellent substitute. -
Granulated sugar (2 cups)
This sweetener helps balance the tartness of the huckleberries, creating a lovely flavor harmony. If you prefer a lower-sugar option, you can use a sugar alternative or decrease the amount to your taste. -
Lemon juice (1/4 cup)
Freshly squeezed lemon juice brightens the flavor of the jam and helps preserve its vibrant color. If you don’t have lemons, a splash of vinegar can also work, but it will change the flavor profile slightly. -
Pectin (1 packet, approximately 1.75 oz)
Pectin is crucial for achieving that perfect jam consistency. If you prefer a natural thickener, you can look for low-sugar or no-sugar pectin. -
Water (1/4 cup)
This will help dissolve the sugar and combine all the flavors beautifully.
Step-by-Step Instructions
Now that you have your ingredients ready, let’s get to the good part: making the jam!
-
Prepare Your Equipment
Start by sterilizing your canning jars. You can either wash them in hot soapy water and rinse them thoroughly or place them in a hot dishwasher cycle. It’s essential to ensure that your jars are clean to avoid any undesired bacteria in your delicious jam. -
Wash the Huckleberries
Rinse your huckleberries under cool running water, then gently pat them dry with a paper towel. Remember, you want to treat these little gems gently — no squishing! -
Heat Those Berries
In a large saucepan, combine the huckleberries, water, and lemon juice over medium heat. Stir gently to break down the berries as they heat up. This process usually takes about 5 minutes. The berries will release their juices, and the aroma will fill your kitchen — pure bliss! -
Add Sugar and Pectin
Once the huckleberries are bubbling and juicy, it’s time to add the granulated sugar and pectin. Stir them in quickly, ensuring everything is well incorporated. Continue stirring until the mixture reaches a full rolling boil, which can maintain its bubble even when stirred. -
Boil and Check for Thickness
Let the mixture boil for about 10-15 minutes while stirring occasionally. To know if your jam is ready, you can perform the “plate test.” Spoon a little jam onto a chilled plate; let it sit for a minute, then push it with your finger. If it wrinkles and stays put, it’s time to jar it up! -
Fill Your Jars
Using a ladle, carefully fill your sterilized jars with the hot jam, leaving about 1/4-inch headspace at the top. Wipe the rims of the jars with a clean cloth to remove any sticky residue, then top with sterilized lids. -
Process the Jars
If you’re wanting to store your jam for a long time, you’ll want to process it in a water bath. Place the jars in a large pot of boiling water, ensuring they’re covered by at least an inch of water. Process for about 10 minutes, then remove and let them cool completely. You’ll know they’re sealed when the lid pops down after cooling!
Serving Suggestions
Once your huckleberry jam is ready, there are so many delicious ways to enjoy it! Spread it generously on warm buttered toast, swirl it into yogurt for a delightful breakfast, or serve it alongside a cheese platter for a beautiful appetizer. It’s also fantastic as a filling for cakes, pastries, or drizzled over pancakes and waffles for an extra special breakfast treat.
Recipe Variations
Feeling adventurous? Here are a few creative twists to try with your huckleberry jam:
- Spiced Huckleberry Jam: Add a pinch of cinnamon or nutmeg to the mixture while it’s cooking for a warm, cozy flavor.
- Huckleberry-Chili Jam: For a little heat, incorporate some finely chopped jalapeños or crushed red pepper flakes.
- Lavender Infusion: Toss in a few sprigs of fresh lavender while cooking for a beautifully aromatic jam.
- Citrus Twist: Mix in some orange or lime zest for an extra tangy pop!
- Berry Medley: Combine huckleberries with strawberries or raspberries for a lovely mixed berry jam.
Chef’s Notes
As I’ve evolved as a cook, this huckleberry jam recipe has been a staple in my kitchen — a delicious way to relive those gorgeous summer days. One of my favorite moments was when I tried incorporating a splash of bourbon into the mix after a friend suggested it during a fun cooking session. It added a rich depth that transformed the jam into a truly adult treat!
Remember, cooking is all about experimenting and evolving your recipes. Don’t worry if things don’t go perfectly; some of my biggest kitchen blunders have turned into delicious surprises.
FAQs and Troubleshooting
1. Can I use frozen huckleberries?
Absolutely! Frozen huckleberries work just as well. Just be sure to thaw and drain any excess water before you begin.
2. What if my jam doesn’t thicken?
Don’t fret! If your jam is too runny, you can return it to the pot, add a bit more pectin, and reheat it. Make sure to boil for a few minutes to activate the pectin.
3. How long will my jam last?
If properly sealed and stored in a cool, dark place, your huckleberry jam can last for up to a year. However, once opened, it’s best to enjoy it within a few weeks — though I doubt it will last that long!
4. Can I use this recipe for other berries?
Yes! Feel free to swap in different berries like blueberries, raspberries, or blackberries, adjusting the sugar and acidity slightly to account for their varying sweetness.
Nutritional Info
While I love indulging in this sweet treat, it’s good to be mindful of consumption. A standard tablespoon of huckleberry jam is roughly around 50 calories, primarily from sugar and natural fruit sugars. However, it offers a lovely dose of antioxidants and vitamins from the huckleberries, making it a delightful addition to your meals in moderation.
So there you have it! A lovely journey of flavors with nostalgic memories baked right in. I hope you feel inspired to make your own batch of homemade huckleberry jam. It’s not just about preserving fruit; it’s about creating memories and enjoying every moment in the kitchen. Happy cooking!
Print
Homemade Huckleberry Jam
- Total Time: 45 minutes
- Yield: 4 servings 1x
- Diet: Vegetarian
Description
Capture the essence of summer with this delightful homemade huckleberry jam, a perfect blend of sweet and tart flavors.
Ingredients
- 4 cups Huckleberries
- 2 cups Granulated sugar
- 1/4 cup Lemon juice
- 1 packet Pectin (approximately 1.75 oz)
- 1/4 cup Water
Instructions
- Prepare your canning jars by sterilizing them.
- Wash the huckleberries under cool running water and pat them dry.
- Heat the huckleberries, water, and lemon juice in a large saucepan over medium heat.
- Add the granulated sugar and pectin once the huckleberries are bubbling.
- Boil the mixture for about 10-15 minutes until it thickens.
- Fill the sterilized jars with the hot jam, leaving about 1/4-inch headspace.
- Process the jars in a boiling water bath for about 10 minutes.
Notes
Feel free to experiment with different berry combinations or add spices for a unique twist.
- Prep Time: 15 minutes
- Cook Time: 30 minutes
- Category: Preserves
- Method: Canning
- Cuisine: American
Nutrition
- Serving Size: 1 tablespoon
- Calories: 50
- Sugar: 10g
- Sodium: 0mg
- Fat: 0g
- Saturated Fat: 0g
- Unsaturated Fat: 0g
- Trans Fat: 0g
- Carbohydrates: 13g
- Fiber: 1g
- Protein: 0g
- Cholesterol: 0mg
Keywords: huckleberry, jam, preserves, summer recipes, canning
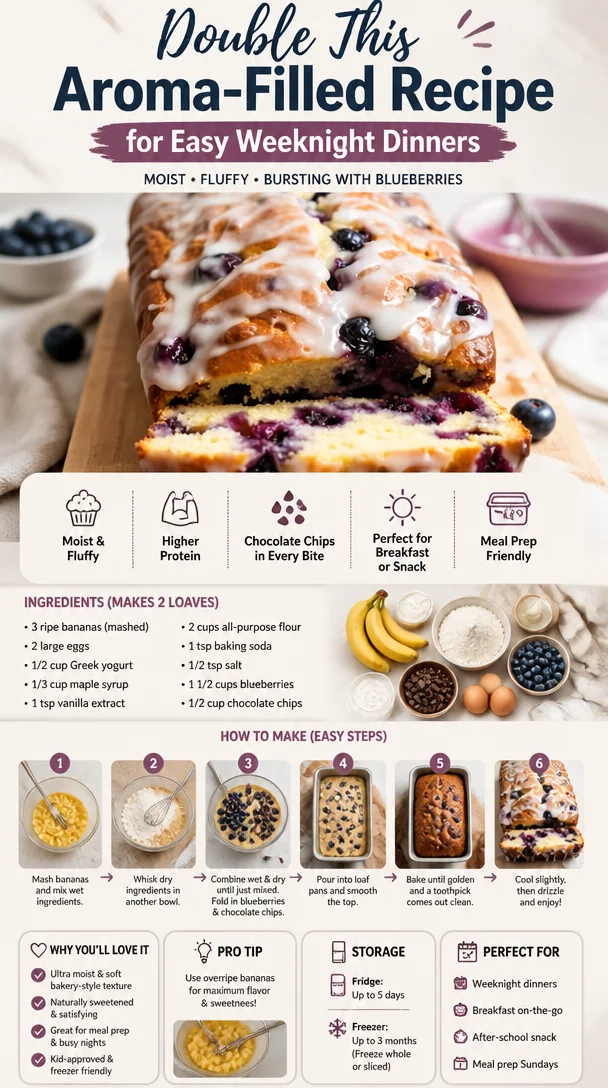
Double This Aroma-Filled Recipe for Easy Weeknight Dinners
When the House Smells Divine: My All-Time Favorite Cozy Bake
Welcome back to my kitchen, fellow flavor fanatics! Today, I’m beyond excited to share a recipe that brings back floods of nostalgia and makes my house smell like a warm hug on a chilly day. You know those recipes that are so comforting and aromatic that they instantly transport you back to simpler times? For me, that recipe is none other than the timeless and delicious Cinnamon Apple Crisp. Seriously, the aroma wafting through your home will have everyone wandering in, asking what’s cooking and getting those taste buds tingling. Trust me, you’ll want to double the recipe, because this dish is so heartwarming, you’ll have everyone coming back for seconds (and thirds!).
As I take you through this delightful journey of baking, remember, there’s no need for fancy skills here, just a cozy aproned heart ready to whip something special. Whether you’re prepping for a family gathering, cozying up on a rainy afternoon, or simply surprising yourself with a homemade treat, I’ve got you covered!
A Cozy Memory in Every Bite
Growing up, my grandmother’s kitchen was a magical place. It was always filled with rich scents, laughter, and the occasional playful flour fight! One of the most vivid memories I have is when she and I would bake our favorite Cinnamon Apple Crisp together. The sheer joy of peeling apples, the sweet sound of crumbling oats and butter, and the inevitable sprinkling of cinnamon — it was heavenly.
I remember the anticipation as we layered the apples in the baking dish, each piece coated with love and a sprinkle of brown sugar. There was a special moment when we slid the dish into the oven; we’d lean in and catch that first whiff of cinnamon mingling with the tartness of apples. It was an invitation for the entire family to gather and share stories around the table. Every time I make it, I’m transported back to those heartwarming evenings, and I can’t help but smile as I pull the bubbling, golden crisp from the oven.
Let’s Talk Ingredients
Now, let’s dive into what you’ll need for this divine creation! Here’s your shopping list:
-
5-6 medium apples (Granny Smith or Honeycrisp)
Use a mix for a balanced tartness and sweetness! No apples? Pears make for a fabulous swap! -
1 cup brown sugar
This adds a caramelly richness. You can substitute with coconut sugar for a lower glycemic index. -
1 cup rolled oats
Choose gluten-free oats if needed! They’re the hearty soul of our crisp — crunchy and delicious. -
1/2 cup all-purpose flour
Substitute with almond flour for a gluten-free option; just remember it packs a denser punch. -
1 teaspoon ground cinnamon
The star spice! Cardamom or nutmeg can make intriguing alternatives for a unique twist. -
1/2 cup cold unsalted butter
Cut this into small cubes to mix in easily! For a dairy-free version, coconut oil works wonders when chilled. -
A pinch of salt
Enhances all flavors. You can also use sea salt for a little extra flair! -
1 teaspoon vanilla extract
Always use pure for depth of flavor. I often sneak a little extra in my recipe for good measure!
Step-by-Step Instructions
Now that we’ve gathered all our goodies, let’s get baking!
-
Preheat Your Oven
Set that beautiful oven to 350°F (175°C). This ensures your crisp will bake to bubbly perfection. -
Prep the Apples
Peel, core, and slice your apples evenly. You want them about 1/4 inch thick for even cooking. A mix of tart and sweet varieties adds fantastic flavor, so feel free to get creative! -
Toss with Sugar and Spice
In a large bowl, combine the sliced apples with 1/2 cup brown sugar, 1 teaspoon ground cinnamon, and a pinch of salt. Toss well until everything is evenly coated. The sweetness will balance the tart, and trust me, this step infuses it with next-level goodness. -
Layer the Apples
Transfer your apple mixture into a greased 9×13 inch baking dish. Make sure to spread them out evenly to allow for proper cooking. Get all that delicious goodness into one happy little layer! -
Mix Up the Crisp Topping
In another bowl, combine 1 cup rolled oats, 1/2 cup all-purpose flour, and the remaining 1/2 cup brown sugar. Cut in your 1/2 cup cold unsalted butter with a pastry cutter or your fingers until it resembles coarse crumbs. It’s messy but oh-so-fun (let those chef fingers work!). It should feel grainy and ready to crumble over the apples. -
Top and Bake
Evenly spread the oat mixture over the apples. Pop it in that preheated oven for 40-45 minutes, or until the top is golden brown and you can see the apples bubbling beneath! Oh, the smells! -
Cool a Bit, If You Can
Let it cool for at least 10-15 minutes before diving in. This step helps it set up beautifully. I know, I know—it’s hard to wait, but trust me!
Serving Suggestions
Serve your warm Cinnamon Apple Crisp with a generous scoop of vanilla ice cream or a dollop of freshly whipped cream. It creates a delightful contrast between the warm crisp and the cold, creamy topping. You can even sprinkle a bit of cinnamon on top for that extra touch of coziness.
Recipe Variations
Feeling adventurous? Here are a few variations to make this recipe your own:
- Nutty Delight: Add chopped pecans or walnuts to the oat mixture for a satisfying crunch.
- Berry Bliss: Toss in some fresh or frozen berries along with the apples for a delightful berry-apple medley.
- Citrusy Zing: Incorporate the zest of one lemon or orange into your apples for a fresh zing!
- Spice it Up: Experiment with ginger or allspice for a warming depth.
Chef’s Notes
This Cinnamon Apple Crisp recipe has been a favorite in my family for generations. Over the years, I’ve adapted it based on what I’ve had on hand or seasonal ingredients. There was one Thanksgiving when I was so excited to share it that I accidentally used salt instead of sugar in the crisp topping. Let’s just say the taste testers were less than impressed! But every failure taught me something invaluable. Remember, cooking is all about experimenting and learning to tweak things as you go. Don’t be afraid to make it your own!
FAQs and Troubleshooting
-
Why is my crisp soggy?
Ensure your apple slices are balanced in moisture levels. Different varieties release different amounts of juice. Too much liquid might be due to overly ripe apples, so aim for firm ones. -
Can I store leftovers?
Absolutely! Cover your crisp with foil and store it in the fridge for up to 3 days. Reheat in the oven for the best results! -
How do I keep the top from burning?
If your topping is golden but the apples aren’t soft, cover it with foil for the last 15 minutes to prevent over-browning while the apples continue cooking. -
Can I freeze it?
Yes! Assemble and freeze before baking. When ready, bake from frozen, adding 15-20 minutes of baking time.
Nutritional Info
While I believe in indulging in moderation, here’s a general breakdown per serving:
- Calories: ~280
- Fat: 10g
- Carbohydrates: 45g
- Protein: 2g
This delicious Cinnamon Apple Crisp ticks all the boxes for a comforting dessert, and I promise, the delightful smell will keep you smiling long after the last bite. So what are you waiting for? Head to your kitchen and whip up some cozy goodness! Every spoonful is bound to hold a heartwarming story. Enjoy every moment of it, dear friend!
Print
Cinnamon Apple Crisp
- Total Time: 60 minutes
- Yield: 8 servings 1x
- Diet: Vegetarian
Description
A heartwarming dessert that combines the tartness of apples with a sweet, crunchy topping.
Ingredients
- 5–6 medium apples (Granny Smith or Honeycrisp)
- 1 cup brown sugar
- 1 cup rolled oats
- 1/2 cup all-purpose flour
- 1 teaspoon ground cinnamon
- 1/2 cup cold unsalted butter
- A pinch of salt
- 1 teaspoon vanilla extract
Instructions
- Preheat Your Oven: Set that beautiful oven to 350°F (175°C).
- Prep the Apples: Peel, core, and slice your apples evenly.
- Toss with Sugar and Spice: In a large bowl, combine the sliced apples with brown sugar and cinnamon.
- Layer the Apples: Transfer your apple mixture into a greased baking dish.
- Mix Up the Crisp Topping: In another bowl, combine oats, flour, and brown sugar, then cut in the butter.
- Top and Bake: Evenly spread the oat mixture over the apples and bake for 40-45 minutes.
- Cool a Bit, If You Can: Let it cool for at least 10-15 minutes before serving.
Notes
Serve with vanilla ice cream or whipped cream for a delicious contrast.
- Prep Time: 15 minutes
- Cook Time: 45 minutes
- Category: Dessert
- Method: Baking
- Cuisine: American
Nutrition
- Serving Size: 1 serving
- Calories: 280
- Sugar: 15g
- Sodium: 200mg
- Fat: 10g
- Saturated Fat: 6g
- Unsaturated Fat: 4g
- Trans Fat: 0g
- Carbohydrates: 45g
- Fiber: 4g
- Protein: 2g
- Cholesterol: 30mg
Keywords: Cinnamon Apple Crisp, apple dessert, baking, cozy recipes, comfort food
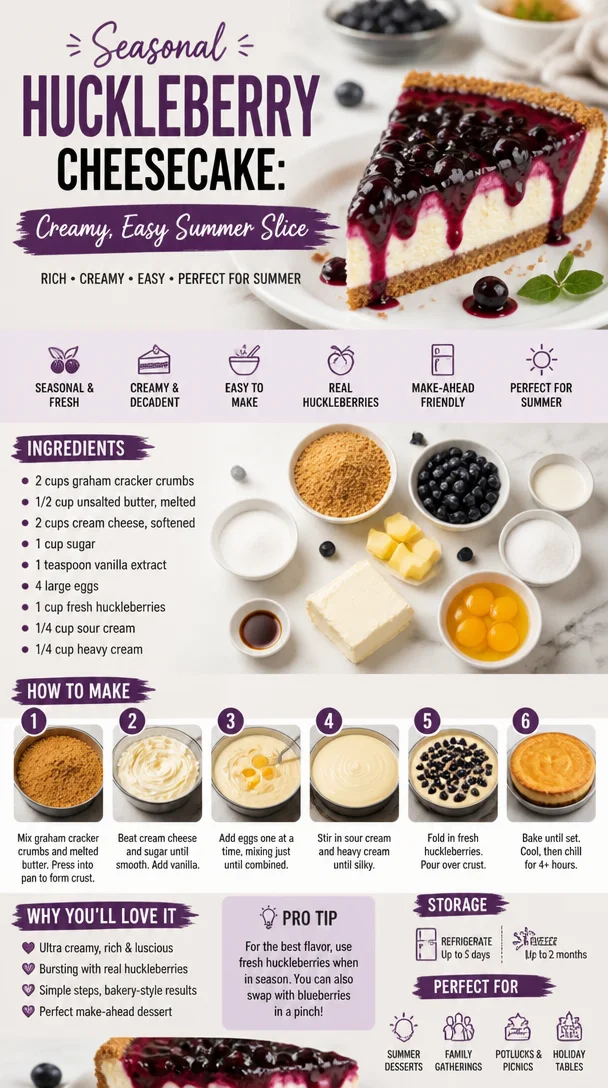
Seasonal Huckleberry Cheesecake: Creamy, Easy Summer Slice
Huckleberry Cheesecake: A Slice of Heaven
Welcome back to my cozy kitchen, where the magic of cooking unfolds with each whisk and sprinkle! Today, I’m thrilled to take you on a flavorful journey through one of my absolute favorite desserts: Huckleberry Cheesecake. If you’ve never tasted huckleberries, they’re like nature’s little jewels—sweet, tangy, and bursting with flavor. Combine that with the creamy richness of cheesecake, and you have a match made in dessert heaven!
This recipe holds a special place in my heart. It reminds me of sunny afternoons spent berry-picking with my family in the lush hills of the Pacific Northwest. There’s something undeniably joyful about wandering through nature, basket in hand, as you search for those plump little huckleberries hiding among the leaves. The best part? Coming home and transforming our haul into something delicious. Cheesecake became our go-to treat, a celebration of simplicity and the great outdoors.
As I share this recipe with you, I hope you too will treasure these little moments in the kitchen. Remember, you don’t need to be a pastry chef to whip up something delightful! Let’s get our hands floury and dive right into this dreamy huckleberry cheesecake recipe.
A Taste from My Past
The first time I made huckleberry cheesecake was during a family reunion, where we were reunited after years apart. My Aunt Clara, the family’s unofficial dessert queen, sparked the idea with her stories about foraging for huckleberries. Inspired, I decided I would give it a go myself. Armed with nothing but enthusiasm and a trusty old recipe book, I headed to the nearest berry-picking spot.
The thrill of picking huckleberries under the warm sun and chatting away with my cousins is a memory I cherish. We came home with baskets overflowing with berries, and the moment I transformed those little gems into a silky cheesecake, everyone was smitten! There’s something magical that happens when you share food made from the heart—the way laughter fills the air and everyone’s face lights up with joy. That day, huckleberry cheesecake became our family’s dessert legacy, and now, I can’t wait to share this treasured recipe with you.
Ingredients
Let’s gather our ingredients for this luscious huckleberry cheesecake. Here’s what you’ll need:
-
Huckleberries (2 cups)
- Fresh huckleberries are divine; however, if you can’t find them, blueberries make a fantastic substitute. Frozen huckleberries work too; just thaw and drain excess moisture.
-
Cream Cheese (24 oz, softened)
- The heart of any cheesecake! Make sure it’s at room temperature to ensure a smooth filling. If you want a healthier cream cheese alternative, look for Greek yogurt or a dairy-free cream cheese.
-
Granulated Sugar (1 cup)
- Sweetness is key, but you can use coconut sugar or a sugar alternative if you’re looking to cut back on refined sugars.
-
Eggs (3 large)
- Eggs help bind the cheesecake and give it that rich texture. If you’re vegan, try using flax eggs (1 tablespoon ground flaxseed mixed with 3 tablespoons water = 1 egg).
-
Sour Cream (1 cup)
- Adds a creamy tanginess that balances the sweetness. You can swap it with Greek yogurt for a healthier spin.
-
Vanilla Extract (1 teaspoon)
- A splash of vanilla elevates the flavors perfectly. Homemade vanilla extract adds an extra touch of warmth.
-
Graham Cracker Crumbs (1 ½ cups)
- For the crust! You can also use crushed Oreos or gluten-free graham crackers for a dietary twist.
-
Butter (½ cup, melted)
- Holds the crust together; substitute with coconut oil for a dairy-free option.
-
Salt (1/4 teaspoon)
- A pinch of salt enhances the overall flavor, even in sweet dishes.
With these ingredients in hand, you’re all set to create a delicious huckleberry cheesecake that’s bound to impress.
Step-by-Step Instructions
Now that we’ve gathered everything, let’s begin our delicious adventure! Follow these steps to craft your huckleberry cheesecake:
-
Preheat the Oven: Start by preheating your oven to 325°F (163°C). This ensures your cheesecake bakes evenly.
-
Make the Crust:
- In a mixing bowl, combine the graham cracker crumbs, melted butter, and a pinch of salt.
- Mix until well combined. The mixture should feel like wet sand. Press it down tightly into the bottom of a 9-inch springform pan. Use the bottom of a measuring cup to make it compact.
- Bake the crust for about 10 minutes, just until it’s golden and fragrant. This is the perfect time to take a whiff of yummy goodness!
-
Prepare the Filling:
- In a large mixing bowl, beat the softened cream cheese with an electric mixer until it’s smooth and fluffy. Keep the speed moderate to avoid too much air, which can lead to cracks.
- Gradually add in the granulated sugar, mixing until combined. Scrape down the sides to ensure everything is well blended.
- Add in the eggs one at a time, mixing gently. Follow up with the sour cream and vanilla extract. This will create a creamy, rich filling.
-
Add the Huckleberries:
- Gently fold in the huckleberries using a spatula. You want them to remain somewhat whole for that gorgeous burst of flavor in every slice.
-
Bake the Cheesecake:
- Pour the cheesecake filling over the pre-baked crust. Smooth the top with the spatula.
- Bake for about 50-60 minutes, or until the center is set but still slightly wobbly. Remember, it will firm up as it cools.
-
Cool Down:
- Once done, turn off the oven and crack the oven door open, letting the cheesecake cool slowly. This can help prevent cracks from forming.
- After about an hour, transfer it to the fridge to chill for at least four hours (or overnight for best results).
-
Serve with Love:
- Once chilled, carefully run a knife around the edge of the pan before releasing the sides of the springform.
Cheesecakes are best served with a fresh huckleberry compote on the side, enhancing the flavor and adding an extra layer of sweetness!
Serving Suggestions
To present your huckleberry cheesecake beautifully, slice it into generous wedges and drizzle some of that fresh huckleberry compote over the top. Garnish with a dollop of whipped cream and a sprig of mint. You can even serve it alongside a hot cup of coffee or a refreshing berry smoothie. Perfect for a summer gathering or a cozy dinner with your loved ones!
Recipe Variations
Here are a few creative twists you can try with this huckleberry cheesecake recipe:
- Chocolate Huckleberry Swirl: Add some melted dark chocolate swirl to the batter for a rich chocolatey flavor.
- Zesty Lemon Huckleberry: Add the zest of one lemon to the cream cheese filling for a refreshing citrus kick.
- Nutty Crust: Incorporate crushed nuts like pecans or almonds into the graham cracker crust for extra crunch and flavor.
- Huckleberry AND Blueberry: Mix in fresh blueberries to complement the huckleberries for a berry explosion!
- Mini Cheesecakes: Bake individual cheesecakes in muffin tins for cute and shareable servings.
Chef’s Notes
As I reflect on my journey with this huckleberry cheesecake, I can’t help but chuckle at the first time I attempted it. I was definitely more ambitious than experienced and misjudged the baking time. Let’s just say a quick panic ensued when I checked the oven to find a wobbly, semi-set "cheesecake." But what emerged was a deliciously soft, custardy filling that has since become my signature style. I now embrace the joy of imperfections in the kitchen; that’s where the best flavors often reside!
Over the years, this recipe has evolved, drawing inspiration from both traditional and contemporary cheesecake. Each iteration brings new memories, laughter, and, of course, delicious bites!
FAQs and Troubleshooting
-
Why is my cheesecake cracking?
- Cracking happens when the cheesecake is overbaked or if it cools too quickly. Make sure to gradually cool it by leaving it in the oven after baking, and avoid beating too much air into the batter.
-
How can I tell when my cheesecake is done?
- The edges should look set, while the center will remain slightly jiggly. Trust me, it will firm up as it chills in the fridge!
-
Can I make this cheesecake ahead of time?
- Absolutely! Cheesecake tastes even better the day after it’s made, so feel free to prepare it a day in advance.
-
What should I do if I don’t have huckleberries?
- No problem! You can easily swap them for blueberries or even raspberries, which will give you that same delightful tart-and-sweet balance.
Nutritional Info
While I love to indulge in decadent desserts, I believe in balance. Each slice of huckleberry cheesecake packs a complex mix of flavors and textures while providing energy from carbohydrates and protein from the cream cheese. Remember to enjoy it in moderation, and share it with friends for that ultimate cozy experience!
There you have it! A delightful journey into the world of huckleberry cheesecake! I hope you feel inspired to whip up this delicious dessert and create some lovely memories of your own. Bake it with love, share it with joy, and let the flavors speak for themselves! Happy baking!
Print
Huckleberry Cheesecake
- Total Time: 80 minutes
- Yield: 10 servings
- Diet: Vegetarian
Description
A creamy and luscious huckleberry cheesecake that captures the essence of a summer day and family memories.
Ingredients
- Huckleberries (2 cups)
- Cream Cheese (24 oz, softened)
- Granulated Sugar (1 cup)
- Eggs (3 large)
- Sour Cream (1 cup)
- Vanilla Extract (1 teaspoon)
- Graham Cracker Crumbs (1 ½ cups)
- Butter (½ cup, melted)
- Salt (1/4 teaspoon)
Instructions
- Preheat the Oven: Start by preheating your oven to 325°F (163°C).
- Make the Crust: In a mixing bowl, combine the graham cracker crumbs, melted butter, and a pinch of salt. Mix until well combined and press into a 9-inch springform pan. Bake for about 10 minutes.
- Prepare the Filling: In a large mixing bowl, beat the cream cheese until smooth. Gradually add in sugar, then eggs one at a time, followed by sour cream and vanilla extract.
- Add the Huckleberries: Gently fold in the huckleberries.
- Bake the Cheesecake: Pour the filling over the crust and bake for 50-60 minutes.
- Cool Down: Let it cool in the oven, then chill in the fridge for at least four hours.
- Serve with Love: Slice and serve with huckleberry compote and whipped cream.
Notes
Cheesecakes are best served chilled and can be made a day in advance for enhanced flavor.
- Prep Time: 20 minutes
- Cook Time: 60 minutes
- Category: Dessert
- Method: Baking
- Cuisine: American
Nutrition
- Serving Size: 1 slice
- Calories: 350
- Sugar: 28g
- Sodium: 250mg
- Fat: 22g
- Saturated Fat: 12g
- Unsaturated Fat: 8g
- Trans Fat: 0g
- Carbohydrates: 34g
- Fiber: 1g
- Protein: 5g
- Cholesterol: 120mg
Keywords: huckleberry, cheesecake, dessert, berry dessert, creamy cheesecake
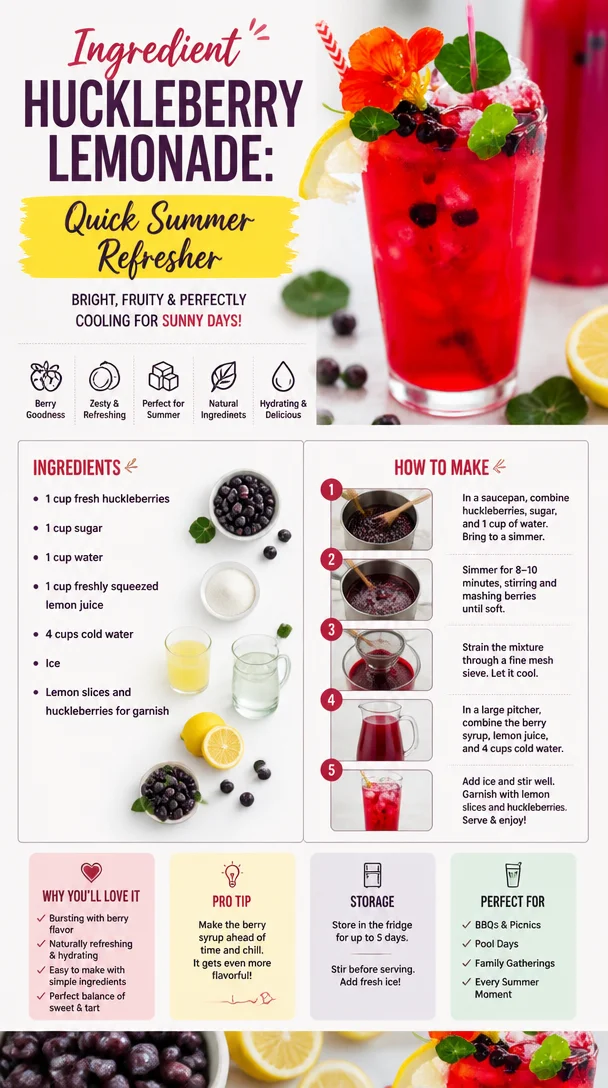
Ingredient Huckleberry Lemonade: Quick Summer Refresher
Huckleberry Lemonade: A Refreshing Summer Delight
Welcome to my kitchen, dear friends! Today, we’re diving into a recipe that just screams summer: Huckleberry Lemonade. Imagine basking in the sun, laughter filling the air, and the tangy sweetness of freshly made lemonade dancing on your taste buds. Huckleberry lemonade is that perfect drink that ties all these beautiful moments together.
Let me take you on a little journey that inspired this delightful drink. It all began on a warm August afternoon, where the air was vibrant, and the sweet scents of nature enveloped me. My family and I would venture out to the nearby hills to forage for huckleberries, those little jewels of the wild. Picking berries together, sun-kissed and carefree, created a tapestry of memories—each one tied to the taste of summer.
After a fruitful day of foraging, we’d return home, hands stained with juice, ready to transform our bounty into something magical. It was this tradition that ignited my love for exploring the flavors of summer, and what could be better than crafting a refreshing lemonade using our foraged treasures? Each sip carried the essence of those sunny days, making every glass feel like a warm hug.
Are you ready to make your very own Huckleberry Lemonade? This thirst-quenching drink is not only vibrant and refreshing but also easy to make! With just a handful of ingredients, you can impress your family and friends—whether it’s for a summer barbecue, a picnic, or just a cozy afternoon at home. With my step-by-step guide and a few chef secrets, you’ll be mixing up this delightful beverage in no time!
A Nostalgic Memory
I still vividly remember that first summer of making huckleberry lemonade. My brother and I ventured into the woods with our small buckets, fueled by excitement and the promise of sweet, juicy berries. The sun streamed through the trees, the smell of wildflowers danced in the air, and our giggles echoed as we raced to find the biggest, ripest huckleberries. Our little hands were soon stained by the purple-blue juices of our harvest.
Once home, my mom gathered us in the kitchen, filling it with warmth and the sound of laughter. As she cooked, the aroma of freshly squeezed lemons mingled with the sweet scent of huckleberries. It was a joyful chaos as we blended the fruits, muddled ice, and guzzled down the vibrant beverage, cooled by the summer breeze.
This recipe comes with a sprinkle of nostalgia and a dash of joy, ready to be shared with loved ones just like it was in my childhood.
Ingredients
Here’s what you need to create your own Huckleberry Lemonade:
-
Fresh Huckleberries (2 cups)
These little gems pack a punch of flavor! They’re sweet, tart, and vibrant. If you can’t find huckleberries, blueberries make a great substitute. -
Fresh Lemons (1 cup, juiced)
Nothing beats fresh lemon juice! It adds that essential tang. If you’re in a pinch, bottled lemon juice can work, but fresh is always best! -
Water (4 cups)
Use filtered water for the best taste! This will dilute the strong flavors and make the drink refreshing. -
Sugar (3/4 cup, adjust to taste)
This balances the tartness from the lemons and huckleberries. For a healthier alternative, you could try using honey, agave syrup, or a sugar substitute. -
Ice (for serving)
A must for a cold, refreshing drink! Don’t forget to add more huckleberries on top for garnish.
Step-by-Step Instructions
Ready to whip up your Huckleberry Lemonade? Let’s get started!
-
Prepare the Huckleberries
In a medium saucepan, add your fresh huckleberries along with 1 cup of water. Bring it to a gentle boil over medium heat, stirring occasionally until the berries break down (about 5 minutes). Tip: This is your moment—smell that beautiful aroma! You can even mash some berries with a fork to release more juice. -
Strain the Mixture
Once the huckleberries have burst and the liquid has turned a beautiful maroon, strain the mixture through a fine mesh sieve into a bowl or pitcher, pressing down to get all the juice out. You should have about 1 cup of huckleberry juice. Chef hack: Save the crushed huckleberries for smoothies or add them to oatmeal! -
Juice the Lemons
While your huckleberry mixture cools, juice those fresh lemons until you have about 1 cup of juice. Be sure to strain out the seeds! Pro tip: Roll the lemons on the countertop before cutting them to maximize juice extraction. -
Combine the Ingredients
In a large pitcher, combine the huckleberry juice, lemon juice, and remaining 3 cups of water. Stir in the sugar until dissolved. Taste and adjust the sweetness as necessary—it should be a nice balance between the tartness of the lemons and the sweetness of the huckleberries. -
Chill and Serve
Refrigerate your lemonade for at least an hour to chill it down. When you’re ready to serve, fill a glass with ice, pour over the lemonade, and garnish with a few fresh huckleberries and a lemon slice. Tip: You can also add some mint for extra freshness and a pop of color!
Serving Suggestions
Serve your Huckleberry Lemonade in clear, tall glasses to showcase that gorgeous color! For a twist, you can rim the glass with sugar or salt before pouring in the lemonade. Pair it with light snacks, like simple appetizers, fresh fruit, or a charcuterie board for a delightful summer gathering.
Recipe Variations
Here are a few fun twists you can try on this classic lemonade:
- Sparkling Huckleberry Lemonade: Substitute half of the water with sparkling water for a fizzy kick!
- Herbal Twist: Infuse your lemonade with herbs like rosemary or basil. Simply muddle a few leaves in the pitcher for a fresh herbal taste.
- Add a Splash of Alcohol: Turn this into a summer cocktail by adding vodka or gin for an adult soirée.
- Huckleberry Lemonade Popsicles: Pour the lemonade into molds and freeze for refreshing popsicles on a hot day.
- Sugar-Free Option: Use a sugar alternative, such as stevia or erythritol, to make a low-calorie version.
Chef’s Notes
This recipe has become a staple in my kitchen, especially when summer rolls around! Over the years, I’ve experimented with different fruits and flavors, but there’s something about huckleberries that holds a special place in my heart. They remind me of childhood, adventure, and good old family time. Plus, they’re a bit of a hidden gem—when I share my huckleberry lemonade with friends, they’re always pleasantly surprised at the unique taste!
One time, I decided to add in some fresh mint, and it transformed the drink into a refreshing herbal lemonade! It’s these little adjustments that keep the cooking journey exciting and vibrant.
FAQs and Troubleshooting
Here are a few common questions and troubleshooting tips for your Huckleberry Lemonade:
-
Q: What if I can’t find huckleberries?
A: Not to worry! Blueberries, blackberries, or even raspberries can work wonderfully in this recipe. -
Q: My lemonade turned out too tart. What can I do?
A: Simply add more sugar or a bit of honey to balance it out! Remember to taste until you reach your perfect sweetness. -
Q: Can I freeze leftover lemonade?
A: Absolutely! It freezes beautifully. Just remember to leave some headspace in the container, as the liquid will expand when frozen. -
Q: How can I store any leftover lemonade?
Store it in an airtight container in the fridge for up to 3 days. It’s best enjoyed fresh, but it will last!
Nutritional Info
While this recipe is more about enjoyment than strict nutritional guidelines, here’s a rough estimate per serving (based on eight servings):
- Calories: 90
- Total Fat: 0g
- Carbohydrates: 22g
- Sugars: 19g
- Protein: 0g
There you have it—a refreshing and nostalgic recipe for Huckleberry Lemonade to enjoy throughout the summer! I hope you make it a tradition to gather your loved ones and create sweet memories around this vibrant drink. Happy cooking, and cheers to summer!
Print
Huckleberry Lemonade
- Total Time: 20 minutes
- Yield: 4 servings
- Diet: Vegetarian
Description
A refreshing and vibrant lemonade made with fresh huckleberries, perfect for summer gatherings.
Ingredients
- Fresh Huckleberries (2 cups)
- Fresh Lemons (1 cup, juiced)
- Water (4 cups)
- Sugar (3/4 cup, adjust to taste)
- Ice (for serving)
Instructions
- Prepare the huckleberries: In a medium saucepan, add your fresh huckleberries along with 1 cup of water. Bring to a gentle boil over medium heat, stirring occasionally until the berries break down (about 5 minutes).
- Strain the mixture: Once the huckleberries have burst and the liquid has turned a beautiful maroon, strain the mixture through a fine mesh sieve into a bowl or pitcher, pressing down to get all the juice out.
- Juice the lemons: While your huckleberry mixture cools, juice those fresh lemons until you have about 1 cup of juice. Be sure to strain out the seeds!
- Combine the ingredients: In a large pitcher, combine the huckleberry juice, lemon juice, and remaining 3 cups of water. Stir in the sugar until dissolved. Adjust sweetness as necessary.
- Chill and serve: Refrigerate your lemonade for at least an hour to chill. Serve in a glass with ice, garnished with fresh huckleberries and a lemon slice.
Notes
Feel free to adjust sugar to taste. You can also experiment with adding mint or using sparkling water for a fizzy version.
- Prep Time: 15 minutes
- Cook Time: 5 minutes
- Category: Beverage
- Method: Mixing
- Cuisine: American
Nutrition
- Serving Size: 1 serving
- Calories: 90
- Sugar: 19g
- Sodium: 0mg
- Fat: 0g
- Saturated Fat: 0g
- Unsaturated Fat: 0g
- Trans Fat: 0g
- Carbohydrates: 22g
- Fiber: 0g
- Protein: 0g
- Cholesterol: 0mg
Keywords: huckleberry, lemonade, summer drink, refreshing beverage, family recipe
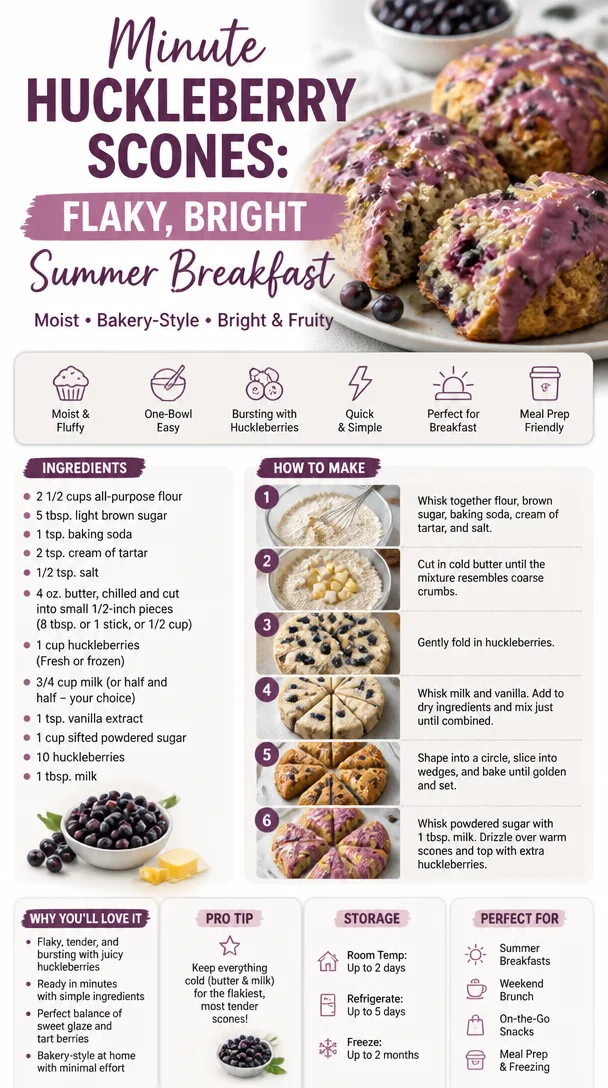
Minute Huckleberry Scones: Flaky, Bright Summer Breakfast
Huckleberry Scones: A Cozy Culinary Adventure
Welcome to my kitchen, dear friends! Today, we’re diving into the delightful world of huckleberry scones—a treat that perfectly embodies everything I love about home cooking. Picture this: the aroma of freshly baked goods wafting through the air, the cozy ambiance of your kitchen, and the warmth that comes from sharing something delicious with the people you adore. If you’re anything like me, just the thought of biting into a warm, fluffy scone bursting with juicy huckleberries is enough to make your heart do a little happy dance.
Huckleberries are those little gems of the berry world—sweet, tart, and oh-so-full of flavor. They grow in the wild and have a charm and character that makes them a fantastic addition to baked goods. When you incorporate them into a scone, you’re not just adding flavor; you’re adding a piece of nature’s artistry. Whether you’re whipping up a batch for breakfast, tea time, or just because you want something cozy to nibble on, huckleberry scones are sure to impress.
And don’t worry if you’ve never made scones before! This recipe is approachable, and I promise you’ll walk away feeling like a baking superstar. So roll up your sleeves, put on that apron (trust me, you’ll need it), and let’s bake some magic together!
The Memory That Inspired These Scones
As I sit here reminiscing about what inspired me to create these huckleberry scones, I can’t help but think back to my childhood summers spent in the mountains of Idaho. My family would head out to the hills every July, armed with buckets and a whole lot of enthusiasm. The wild huckleberries were ripe for the picking, and there was nothing quite like the joy of foraging with loved ones, laughing and chatting as we searched for those elusive little berries.
One afternoon, after our scavenger hunt, my grandmother gathered us in her cozy kitchen, the walls lined with cherished family photos and the scent of something magical in the air. She was whipping up her famous huckleberry scones! I still remember the way the dough looked—so buttery and rich, speckled with those vibrant purple berries. We savored every bite, blissfully unaware that we were creating memories that would last a lifetime.
That day taught me that food isn’t just about sustenance; it’s about the connections we create and the love we share. Whenever I make huckleberry scones, I’m reminded of those precious moments, and I hope to share that same warmth and joy with you.
Ingredients You’ll Need
Now that we’re all warmed up and ready to bake, let’s gather our ingredients! Here’s what you’ll need:
-
2 cups all-purpose flour
The backbone of the scone, it gives structure. You can also use a gluten-free flour blend if you’re looking for a gluten-free option. -
1/3 cup granulated sugar
Adds sweetness and helps achieve that delightful golden crust. For a healthier option, you can substitute coconut sugar. -
1 tablespoon baking powder
This is what gives our scones that lovely lift! Make sure it’s fresh for the best results. -
1/2 teaspoon salt
A little pinch of salt enhances the sweetness and brings all the flavors together. -
1/2 cup unsalted butter, cold and cubed
Cold butter is crucial for flaky scones. Make sure to keep it chilled until you mix it in. (Pro tip: you can freeze it for easier grating!) -
2/3 cup buttermilk
This adds moisture and gives our scones a tender crumb. You can easily make a substitute by adding a tablespoon of vinegar or lemon juice to regular milk and letting it sit for 5 minutes. -
1 cup fresh or frozen huckleberries
The star of the show! If huckleberries aren’t available, blueberries make a great substitute. -
1 teaspoon vanilla extract
Boosts the flavor deliciously! If you want to get really creative, you can swap it out for almond extract. -
1 egg (optional, for egg wash)
Gives the scones a beautiful golden finish. You can omit this if you’re keeping it vegan.
Each ingredient in this recipe is chosen with care, and while I’ve provided some substitution insights, remember that cooking is all about experimentation and making it your own!
Step-by-Step Instructions
Alright, it’s time to roll up our sleeves and get baking! Follow these simple steps, and I promise you’ll end up with scones that are flaky, buttery, and bursting with berry goodness.
-
Preheat Your Oven
Preheat your oven to 400°F (200°C). This will ensure your scones bake evenly and thoroughly. While the oven is warming up, prep your baking sheet by lining it with parchment paper. This step saves you from a sticky situation! -
Mix Dry Ingredients
In a large mixing bowl, whisk together the flour, sugar, baking powder, and salt. Combine these ingredients well to ensure that everything is evenly distributed. This step is vital for achieving uniformity in flavor and texture. -
Cut in the Butter
Now, let’s introduce the cold, cubed butter. Using a pastry cutter or your fingers (your hands will work beautifully here!), cut the butter into the dry ingredients until the mixture resembles coarse crumbs. You don’t want the butter completely blended; small pea-sized chunks are perfect. This step is key to achieving a flaky texture! -
Stir in the Huckleberries
Gently fold in the huckleberries into the butter-flour mixture. If you’re using frozen huckleberries, don’t thaw them beforehand, as this can make the dough too wet. Just fold them in gently to avoid smashing them! -
Add Wet Ingredients
In a separate bowl, mix together the buttermilk and vanilla extract. Pour this mixture into the dry ingredients, using a spatula to fold everything together until just combined. Be careful not to overmix; we want tender scones, not hockey pucks! -
Form the Dough
Turn the dough out onto a lightly floured surface. With floured hands, gently knead the dough a couple of times until it comes together. Shape it into a 1-inch thick disk. Don’t worry if it looks a little rustic; that’s part of the charm! -
Cut Your Scones
Using a sharp knife or a pizza cutter, slice the disk into 8 equal wedges. Alternatively, you can use a round biscuit cutter for perfectly shaped scones. Just remember to avoid twisting the cutter, as that can seal the edges and prevent them from rising properly! -
Prepare for Baking
Place the scones on the prepared baking sheet, spacing them a few inches apart. If you want that gorgeous golden look, brush the tops with a beaten egg. This step is optional but highly recommended for presentation. -
Bake to Perfection
Pop those beauties into the preheated oven and bake for about 15-20 minutes, or until they are lightly golden on top. The aroma wafting through your kitchen will be pure bliss! -
Cool and Enjoy
Remove the scones from the oven and let them cool for a few minutes on a wire rack before serving. Trust me, the wait will be worth it as the buttery goodness and the sweet-tart huckleberries meld together in perfect harmony.
Serving Suggestions
Now that your huckleberry scones are baked to perfection, let’s talk about how to serve them! They’re delightful on their own, but why not elevate the experience a notch? Grab a plate, slice the scones in half, and spread a generous dollop of clotted cream or a smear of butter on each half. For an extra touch, drizzle a bit of honey or sprinkle some powdered sugar on top for sweetness and presentation. Don’t forget your favorite cup of tea or a rich coffee to pair alongside!
Recipe Variations
Looking to switch things up and get creative in the kitchen? Here are a few fun variations to try:
-
Lemon Zest: Add the zest of one lemon to the dough for a bright citrusy twist that pairs beautifully with the huckleberries.
-
Oatmeal Huckleberry Scones: Substitute 1/2 cup of the flour for rolled oats for a heartier scone.
-
Nutty Crunch: Add 1/3 cup chopped walnuts or pecans for a delightful crunch.
-
Chocolate Chip: Mix in dark chocolate chips with the huckleberries for a delicious sweet and tart combo.
-
Vegan Version: Replace the butter with coconut oil and the buttermilk with a plant-based milk combined with a tablespoon of vinegar for a dairy-free treat.
Feel free to mix and match these ideas to create your very own signature scone recipe!
Chef’s Notes
I love how versatile this huckleberry scone recipe is! It’s one of those base recipes that I’ve tinkered with over the years. From adding different flavors to experimenting with presentation, each batch brings back fond memories of baking with family. My sister even started a tradition of making “scone Sundays” after she learned how to whip these up, and now it’s a staple in her home!
One of my funniest kitchen mishaps occurred during one of those Sundays. I mistook baking soda for baking powder and watched in horror as my scones erupted like little volcanic craters in the oven! While the result was comical, it taught me the importance of measuring ingredients accurately. Now, I always have a little note on my fridge: "Check for baking powder first!"
FAQs and Troubleshooting
Q: My scones didn’t rise! What went wrong?
A: The most common culprits here are old baking powder or overmixing the dough. Ensure your baking powder is fresh and remember to mix gently.
Q: Can I freeze the dough?
A: Absolutely! You can freeze the unbaked scones. Just freeze them individually on a baking sheet, then transfer to a freezer bag. When you’re ready to bake, no need to thaw—just pop them in the oven and add an extra few minutes to the baking time.
Q: Why are my scones tough?
A: This usually happens when the dough is overmixed. Gentle hands are key! Remember, the less you handle the dough, the crumbly, tender your scones will be.
Q: Can I make these with frozen huckleberries?
A: Yes! Just fold them in straight from the freezer without thawing, and you’ll still get a delicious result.
Whether you’re a seasoned baker or a budding home cook, I hope you give these huckleberry scones a try. Each bite is filled with joy, nostalgia, and the love of sharing good food. So gather your friends and family, make a pot of coffee or tea, and enjoy a slice of cozy goodness from my kitchen to yours! Happy baking!
Print
Huckleberry Scones
- Total Time: 35 minutes
- Yield: 8 servings 1x
- Diet: Vegetarian
Description
Delightful huckleberry scones that are flaky, buttery, and bursting with berry goodness, perfect for breakfast or tea time.
Ingredients
- 2 cups all-purpose flour
- 1/3 cup granulated sugar
- 1 tablespoon baking powder
- 1/2 teaspoon salt
- 1/2 cup unsalted butter, cold and cubed
- 2/3 cup buttermilk
- 1 cup fresh or frozen huckleberries
- 1 teaspoon vanilla extract
- 1 egg (optional, for egg wash)
Instructions
- Preheat your oven to 400°F (200°C) and line a baking sheet with parchment paper.
- Mix dry ingredients: In a large mixing bowl, whisk together flour, sugar, baking powder, and salt.
- Cut in the cold, cubed butter until the mixture resembles coarse crumbs.
- Stir in the huckleberries gently without smashing them.
- Add wet ingredients: In a separate bowl, mix buttermilk and vanilla, then pour into dry ingredients and fold until just combined.
- Form the dough into a 1-inch thick disk on a floured surface.
- Cut the disk into 8 equal wedges or use a biscuit cutter.
- Prepare for baking by placing scones on the baking sheet and optionally brushing the tops with beaten egg.
- Bake for 15-20 minutes, or until lightly golden.
- Cool on a wire rack before serving.
Notes
Serve with clotted cream or butter, and pair with tea or coffee for a perfect treat.
- Prep Time: 15 minutes
- Cook Time: 20 minutes
- Category: Breakfast
- Method: Baking
- Cuisine: American
Nutrition
- Serving Size: 1 scone
- Calories: 250
- Sugar: 10g
- Sodium: 200mg
- Fat: 10g
- Saturated Fat: 6g
- Unsaturated Fat: 4g
- Trans Fat: 0g
- Carbohydrates: 34g
- Fiber: 1g
- Protein: 4g
- Cholesterol: 30mg
Keywords: scones, huckleberry, breakfast, baking, cozy, berry desserts
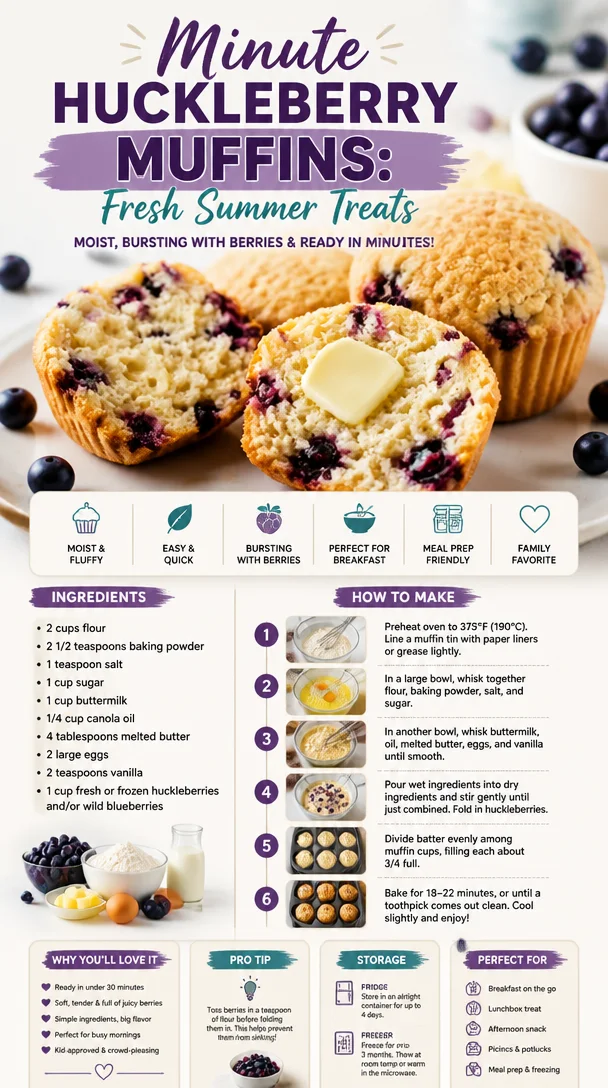
Minute Huckleberry Muffins: Fresh Summer Treats
Huckleberry Muffins: A Sweet Journey Back to Simpler Times
Welcome, fellow food enthusiasts! I’m thrilled that you’ve joined me today in this cozy corner of my culinary universe. Honestly, is there anything more heartwarming than the scent of freshly baked muffins wafting through your kitchen? The mere thought of it sends me into a nostalgic whirl, whisking me back to sun-drenched summer days spent picking huckleberries with my dear grandmother. Today, we’ll dive deep into the world of huckleberry muffins—sweet, tangy, and downright delightful bites that carry with them a piece of my heart and many cherished memories.
Growing up, my grandmother had this ritual every summer. Armed with her trusty basket and a sun hat, we’d venture into the nearby woods, where the bushes bloomed with the small but vibrant huckleberries. There was something magical about those mornings; the thrill of the hunt made it a delightful adventure. Once we returned home, her kitchen would transform into a hub of laughter and warmth as she turned our gathered bounty into delicious treats. Her signature huckleberry muffins were the stars of those afternoons—a fluffy, tender crumb that housed bursts of tangy sweetness.
These muffins aren’t just delectable; they’re a reminder of family bonding and the beauty of simple ingredients. The huckleberries would add this delightful pop of flavor, a tangy sweetness that paired perfectly with the buttery richness of the muffin base. As we sample one right out of the oven, slathered with a bit of butter (or my favorite—honey), you can just taste the love that went into making them.
In this blog post, I’m excited to share my version of these cherished huckleberry muffins with you, along with a sprinkle of my personal anecdotes, cooking tips, and serving suggestions. Let’s step into the kitchen together and create a batch that will not only tantalize your taste buds but also warm your soul.
A Nostalgic Yarn: The Huckleberry Adventure
One summer afternoon, I remember the excitement in the air as my grandmother announced our annual huckleberry picking adventure. We packed a picnic basket—a vibrant quilt to sit on, a thermos of iced tea, and a few homemade goodies for our outing. As we strolled through the wooded trails, my grandmother would share stories about her childhood, her voice blending harmoniously with the rustling leaves.
When we finally reached our favorite patch, the bushes were ripe with plump, indigo berries, glistening under the sun. With each handful we picked, I could feel the anticipation build. Those berries weren’t just food; they were the promised sweetness of the muffins we would soon create together.
Later, back in her warm kitchen, flour dust floated in the air like tiny memories, and the whir of the mixer became the soundtrack to our afternoon. I helped measure, pour, and mix, my little hands covered in flour and berry juice. The best part? Watching those muffins rise in the oven, the sweet aroma wrapping around us like a warm hug. Each bite melted in my mouth, and suddenly, sitting at her farmhouse table, we weren’t just eating; we were celebrating those moments of connection.
Ingredients
Ready to whip up your own batch of huckleberry muffins? Here’s what you’ll need:
-
1 cup huckleberries
These little gems are the star of the show! Fresh or frozen work well. If you can’t find huckleberries, blueberries are a great substitute. -
2 cups all-purpose flour
Provides structure to the muffins. You can use whole wheat flour if you’d like a heartier texture or a gluten-free blend for a gluten-free option. -
1 cup granulated sugar
For sweetness! If you prefer less sugar, consider using maple syrup or coconut sugar instead. -
½ cup unsalted butter, melted
Brings richness and moisture. You can swap it for vegetable oil or almond butter if you’re looking for a dairy-free alternative. -
2 large eggs
These provide binding and structure. For a vegan option, try ½ a mashed banana or ¼ cup unsweetened applesauce for each egg. -
1 cup buttermilk
Adds moisture and a slight tang. You can make a quick substitute with regular milk and a tablespoon of vinegar or lemon juice. -
1 tablespoon baking powder
This is the magic ingredient that helps your muffins rise. Make sure it’s fresh for the best results! -
1 teaspoon vanilla extract
For warm, aromatic flavor! If you want to get creative, almond extract can also add a nice twist. -
½ teaspoon salt
Enhances all the flavors in your muffins. Trust me; don’t skip it!
These ingredients are super straightforward, and I love that they usually hang out in most pantries. It feels good to create something delicious with simple elements!
Step-by-Step Instructions
Let’s get those muffins in the oven, shall we? Follow along with these detailed steps, and I’ll share some tips that will have you baking like a pro.
-
Preheat Your Oven
Preheat your oven to 350°F (175°C). This step is crucial—starting with a hot oven helps your muffins rise beautifully. -
Prepare Your Muffin Pan
Line a 12-cup muffin tin with paper liners or grease it with non-stick spray. This ensures your muffins pop out easily after they cool! If you’re feeling fancy, a sprinkle of flour after greasing can help prevent sticking too. -
Mix Dry Ingredients
In a large mixing bowl, whisk together the flour, sugar, baking powder, and salt. A good whisking here will aerate the flour, ensuring your muffins have that oh-so-fluffy texture. Pro tip: if you see any lumps in your flour, sift it first for the smoothest batter. -
Combine Wet Ingredients
In another bowl, whisk together the melted butter, eggs, buttermilk, and vanilla extract until well combined. This is where the magic happens—the butter adds richness, while the buttermilk makes the muffins tender. -
Combine Wet and Dry Ingredients
Gradually pour the wet ingredients into the dry ingredients, mixing until just combined. Remember, don’t overmix! A few lumps are okay. Overmixing can lead to dense muffins. Fold in those huckleberries gently—you want to keep their shape. -
Scoop & Fill
Using an ice cream scoop or a ¼ cup measuring cup, fill each muffin tin slot about 2/3 full. This allows room for them to rise without overflowing. -
Bake
Pop your muffin tin into the preheated oven and bake for 18-22 minutes, or until a toothpick inserted in the center comes out clean. The aroma that fills your kitchen during this time is simply heavenly—seriously, I could bottle that up! -
Cool & Enjoy
Once baked, let the muffins cool in the pan for about five minutes before transferring them to a wire rack to cool completely. This helps them set without getting soggy. Don’t forget to sneak a warm one while you’re at it!
Serving Suggestions
Huckleberry muffins are delightful on their own, but let’s jazz them up a bit! Serve them warm with a dollop of whipped cream or a drizzle of honey for an extra touch of sweetness. For brunch gatherings, pair them alongside fresh fruit and a cold brew coffee—perfect for a lazy Sunday morning! A side of yogurt or a fruit salad will also complement these muffins beautifully.
Recipe Variations
Feeling adventurous? Here are a few fun twists on the classic huckleberry muffin:
-
Lemon Zest: Add the zest of one lemon to give your muffins a refreshing zing alongside those huckleberries.
-
Nutty Crunch: Fold in ½ cup of chopped walnuts or pecans for added texture and a nutty flavor.
-
Cinnamon Swirl: Mix a teaspoon of ground cinnamon into the dry ingredients for a warm, comforting spice element.
-
Chocoholic Treat: Add chocolate chips to give your muffins a decadent twist. Just toss them in gently with the huckleberries!
-
Vegan Twist: Substitute all animal products with plant-based alternatives, using flaxseed meal mixed with water instead of eggs and dairy-free milk!
Chef’s Notes
These huckleberry muffins have been my go-to comfort food for years, and I’ve loved watching them evolve. Initially, they were a simple way to use up an abundance of huckleberries, but over time, I’ve played around with countless flavors and twists. One time, I tried swirling a cream cheese mixture into the batter—heavenly!
Remember, cooking is about your creativity and love for food. Don’t hesitate to make this recipe your own; that’s where the magic truly happens!
FAQs and Troubleshooting
-
Why are my muffins dense?: Denseness usually comes from overmixing the batter or too much flour. Measure flour accurately by spooning it into your measuring cup, then leveling off, instead of dipping the cup into the flour.
-
My muffins are not rising!: Make sure your baking powder is fresh! An old leavening agent can prevent your muffins from rising properly.
-
Can I freeze these muffins?: Absolutely! Once cooled, wrap them individually in plastic wrap and freeze. When you’re ready to enjoy, simply pop one in the microwave for a few seconds or let it thaw room temperature.
-
What’s the best way to store leftovers?: Keep your muffins in an airtight container at room temperature for 2-3 days. For longer storage, freeze them as mentioned earlier!
Nutritional Info
While I am all about enjoying these delicious treats mindfully, if you’re keen on the numbers, here’s a rough estimate per muffin (without extra toppings):
- Calories: 200
- Total Fat: 9g
- Saturated Fat: 4g
- Carbohydrates: 30g
- Protein: 3g
- Sugar: 10g
I hope you enjoy making these huckleberry muffins as much as I do! They’re not just a treat; they’re a slice of my heart and a taste of beautiful memories. Grab a friend or family member, whip up a batch together, and let the laughter and stories flow. Happy baking! 🌼
Print
Huckleberry Muffins
- Total Time: 37 minutes
- Yield: 12 muffins 1x
- Diet: Vegetarian
Description
Delightful huckleberry muffins that are sweet, tangy, and perfect for any occasion.
Ingredients
- 1 cup huckleberries (fresh or frozen)
- 2 cups all-purpose flour
- 1 cup granulated sugar
- ½ cup unsalted butter, melted
- 2 large eggs
- 1 cup buttermilk
- 1 tablespoon baking powder
- 1 teaspoon vanilla extract
- ½ teaspoon salt
Instructions
- Preheat your oven to 350°F (175°C).
- Prepare a 12-cup muffin tin with paper liners or grease with non-stick spray.
- Mix dry ingredients in a large bowl: flour, sugar, baking powder, and salt.
- Combine wet ingredients in another bowl: whisk melted butter, eggs, buttermilk, and vanilla extract.
- Pour the wet ingredients into the dry ingredients, mixing until just combined.
- Fold in the huckleberries gently.
- Fill each muffin tin slot about 2/3 full with batter.
- Bake for 18-22 minutes, or until a toothpick comes out clean.
- Cool in the pan for 5 minutes, then transfer to a wire rack.
Notes
Serve warm with butter or honey. Try adding lemon zest, nuts, cinnamon, or chocolate chips for variations!
- Prep Time: 15 minutes
- Cook Time: 22 minutes
- Category: Breakfast
- Method: Baking
- Cuisine: American
Nutrition
- Serving Size: 1 muffin
- Calories: 200
- Sugar: 10g
- Sodium: 150mg
- Fat: 9g
- Saturated Fat: 4g
- Unsaturated Fat: 5g
- Trans Fat: 0g
- Carbohydrates: 30g
- Fiber: 1g
- Protein: 3g
- Cholesterol: 30mg
Keywords: huckleberry muffins, baked goods, breakfast, nostalgic recipes, easy muffins




