
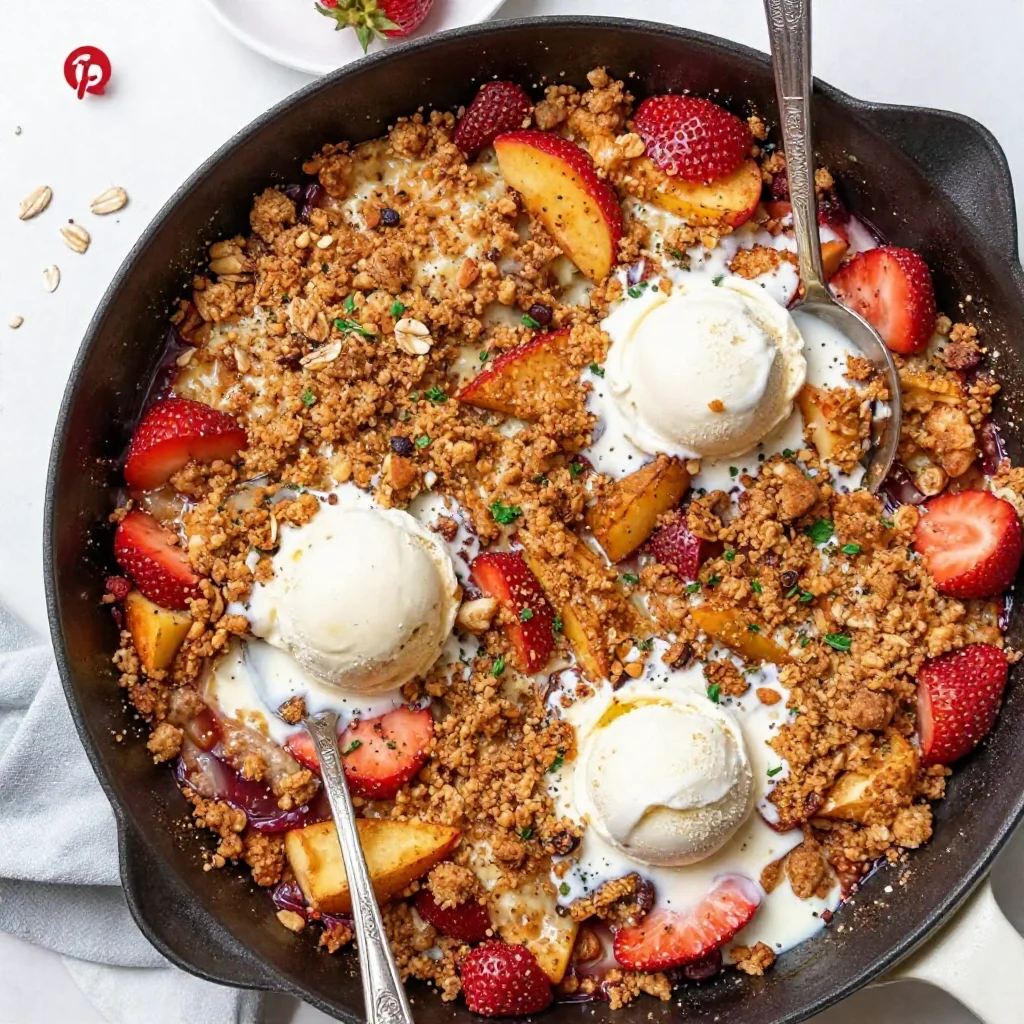
Easy Summer Strawberry-Nectarine Crisp with Ginger Streusel
Strawberry-Nectarine Fruit Crisp with Ginger Streusel
Welcome to my kitchen, dear friends! Today, I’m excited to share a recipe that perfectly captures the vibrant flavors of summer: Strawberry-Nectarine Fruit Crisp with Ginger Streusel. This is one of those dishes that brings a smile to your face as it bakes in the oven, filling your home with a warm, fragrant embrace. There’s something magical about the combination of juicy strawberries and sweet nectarines, topped with a buttery, spiced streusel that makes it irresistible!
A Flavorful Memory
Growing up, my summer afternoons were often spent in my grandmother’s sun-soaked kitchen, bursting with the colorful produce from her garden. One of my fondest memories is picking strawberries and nectarines with her. We would giggle as we inspected each piece of fruit, searching for the ripest ones, knowing they would transform into something special.
One day, we decided to experiment (as grandmas often do) with a fruit crisp because we had more fruit than we could handle. The result was a glorious mess of flavors that danced together in perfect harmony. That first bite was pure bliss—the sweetness of the fruit, the crunch of the streusel, and a hint of cinnamon! It wasn’t just dessert; it was a celebration of the seasons and a reminder of how simple ingredients can come together to create something beautiful. Today, when I make this strawberry-nectarine crisp, I’m transported back to that kitchen filled with laughter and love.
Ingredients You’ll Need
To recreate this delightful dessert, gather the following ingredients:
-
Strawberries: About 4 cups, hulled and sliced. Fresh strawberries offer the best flavor, but you can also use frozen if you can’t find fresh. Just make sure to thaw and drain them well.
-
Nectarines: Roughly 3 cups, pitted and sliced. If nectarines aren’t available, peaches make a fantastic substitute!
-
Granulated Sugar: About ¾ cup, divided. This will sweeten your fruit and the streusel. You could use coconut sugar for a deeper flavor profile.
-
Lemon Juice: 2 tablespoons. Fresh lemon juice enhances the fruit’s natural acidity and complements the sweetness. If you’re out of lemons, a splash of apple cider vinegar works too!
-
All-Purpose Flour: 1 cup. This is essential for both the fruit mixture and streusel. You can also use whole wheat flour for a nuttier taste.
-
Oats: 1 cup of rolled oats. They add a lovely chewy texture. If you’re gluten-free, make sure to use certified gluten-free oats.
-
Brown Sugar: ½ cup, packed. This will deepen the flavor of the streusel. If you’re out, white sugar can work in a pinch.
-
Butter: ½ cup, melted. Use unsalted butter for the best control over salt content. Coconut oil can be used as a dairy-free alternative.
-
Ground Ginger: 1 teaspoon. This adds a delightful warmth to the streusel. You can substitute it with ground cinnamon or nutmeg for a different twist.
-
Cinnamon: 1 teaspoon. A classic spice that pairs beautifully with fruit. Try a pinch of cardamom for something unique!
Step-by-Step Instructions
Now, let’s dive into the cooking!
-
Preheat Your Oven: Start by preheating your oven to 350°F (175°C). This ensures that your crisp gets that lovely golden brown crust as soon as it goes in.
-
Prepare the Fruit: In a large mixing bowl, combine your sliced strawberries and nectarines. Add ½ cup of granulated sugar and the lemon juice, tossing everything together gently until the fruit is well coated. Let this sit for about 10 minutes so the juices can mingle. (Oh, that smell is heavenly already!)
-
Make the Streusel: In another bowl, mix together the flour, oats, brown sugar, ground ginger, cinnamon, and a pinch of salt. Drizzle in the melted butter, and using your fingertips, mix until the mixture resembles coarse crumbs. This streusel should be crumbly but still hold together when pressed.
-
Layer the Fruit and Streusel: Spread the fruit mixture evenly in a greased 9×13 baking dish (or something similar). Now, sprinkle the streusel evenly on top. Make sure to cover the fruit well because that’s where the magic happens!
-
Bake: Slide the baking dish into the preheated oven and bake for about 35-40 minutes, or until the topping is golden and the fruit is bubbling. You might want to turn on the broiler for the last 2-3 minutes to get that crisp extra crispy—just keep a close eye on it!
-
Cool and Serve: Once out of the oven, let the crisp cool for about 10-15 minutes. This helps set the juices a bit (though I admit, it’s hard to wait!).
Serving Suggestions
Now, let’s talk about how to serve this beautiful dish! I love scooping generous portions into bowls while the crisp is still warm. A dollop of freshly whipped cream or a scoop of vanilla ice cream takes it to the next level. You can even drizzle a little bit of honey on top for extra sweetness!
Recipe Variations
Feeling creative? Here are some fun variations to try:
-
Berry Bliss: Substitute half of the strawberries with blueberries or raspberries for a mixed berry crisp.
-
Nutty Goodness: Add chopped nuts like pecans or walnuts to the streusel for an added crunch. Toast them lightly beforehand for an extra flavor boost.
-
Tropical Twist: Replace the nectarines with mangoes and add a splash of coconut milk in the fruit mixture for a beachy vibe.
-
Spicy Sweet: Add a pinch of cayenne pepper to the streusel for a surprising kick!
-
Vegan Delight: Swap the butter for coconut oil and replace the granulated sugar with maple syrup or a granular sugar substitute.
Chef’s Notes
Oh, where do I begin? This recipe has evolved over the years. Initially, I started with classic apple crisp and thought, "Why limit myself?!" I love using fruits that are in season and experimenting with spices. I once added crushed gingersnap cookies to the streusel for a holiday twist—seriously unforgettable! Cooking should be a playground for your palate, so don’t be afraid to make it your own.
One funny story: I once spilled an entire container of cinnamon into the streusel in my excitement. It certainly packed a punch! We jokingly called it “spicy crisp” for the rest of the family gathering. Even with the mishap, it ultimately turned into a hit—cooking is all about adapting and enjoying the journey!
FAQs and Troubleshooting
1. My streusel is too crumbly! What did I do wrong?
If your streusel is too dry, it could be that you didn’t add enough butter. Make sure it’s well combined but not overly moist.
2. How do I store leftovers?
Cover the crisp tightly with plastic wrap or transfer it to an airtight container. It will last in the fridge for about 3-4 days. Reheat portions in the microwave or oven.
3. Can I make this ahead of time?
Absolutely! You can prepare the fruit mixture and the streusel separately a day in advance. Just assemble and bake when you’re ready to serve!
4. My fruit mixture isn’t bubbling! What can I do?
If your fruit isn’t bubbling, it may just need a bit more time in the oven. Every oven behaves a bit differently, so don’t be afraid to give it some extra love!
Nutritional Info
While I typically focus on flavor and enjoyment in my cooking, I know many of you are curious about nutrition! A typical serving of this fruit crisp (1/4 cup) has approximately:
- Calories: 250
- Fat: 12g
- Carbohydrates: 38g
- Fiber: 3g
- Sugar: 12g
- Protein: 3g
Total values can vary based on exact ingredients and portion sizes, but hey—remember, this is a dessert to be enjoyed, so dig in without guilt!
So there you go, my friends! Now you’re armed with a scrumptious recipe for a Strawberry-Nectarine Fruit Crisp with a zing of ginger that will elevate your dessert game. I hope you find as much joy in making it as I do. Happy baking, and may your kitchen always be filled with delightful aromas and heartwarming memories! 🍓✨
Print
Strawberry-Nectarine Fruit Crisp with Ginger Streusel
- Total Time: 55 minutes
- Yield: 8 servings
- Diet: Vegetarian
Description
A delightful summer dessert combining juicy strawberries and sweet nectarines, topped with a buttery, spiced ginger streusel.
Ingredients
- Strawberries: About 4 cups, hulled and sliced
- Nectarines: Roughly 3 cups, pitted and sliced
- Granulated Sugar: About ¾ cup, divided
- Lemon Juice: 2 tablespoons
- All-Purpose Flour: 1 cup
- Oats: 1 cup of rolled oats
- Brown Sugar: ½ cup, packed
- Butter: ½ cup, melted
- Ground Ginger: 1 teaspoon
- Cinnamon: 1 teaspoon
Instructions
- Preheat your oven to 350°F (175°C).
- Prepare the fruit by combining sliced strawberries and nectarines with ½ cup of granulated sugar and lemon juice.
- Make the streusel by mixing flour, oats, brown sugar, ground ginger, cinnamon, and melted butter.
- Layer the fruit mixture in a greased 9×13 baking dish and sprinkle the streusel on top.
- Bake in the preheated oven for about 35-40 minutes until golden brown and bubbly.
- Cool for 10-15 minutes before serving.
Notes
Serving suggestions include topping with whipped cream or vanilla ice cream.
- Prep Time: 15 minutes
- Cook Time: 40 minutes
- Category: Dessert
- Method: Baking
- Cuisine: American
Nutrition
- Serving Size: 1 serving
- Calories: 250
- Sugar: 12g
- Sodium: 50mg
- Fat: 12g
- Saturated Fat: 7g
- Unsaturated Fat: 5g
- Trans Fat: 0g
- Carbohydrates: 38g
- Fiber: 3g
- Protein: 3g
- Cholesterol: 20mg
Keywords: fruit crisp, strawberry dessert, summer dessert, ginger streusel
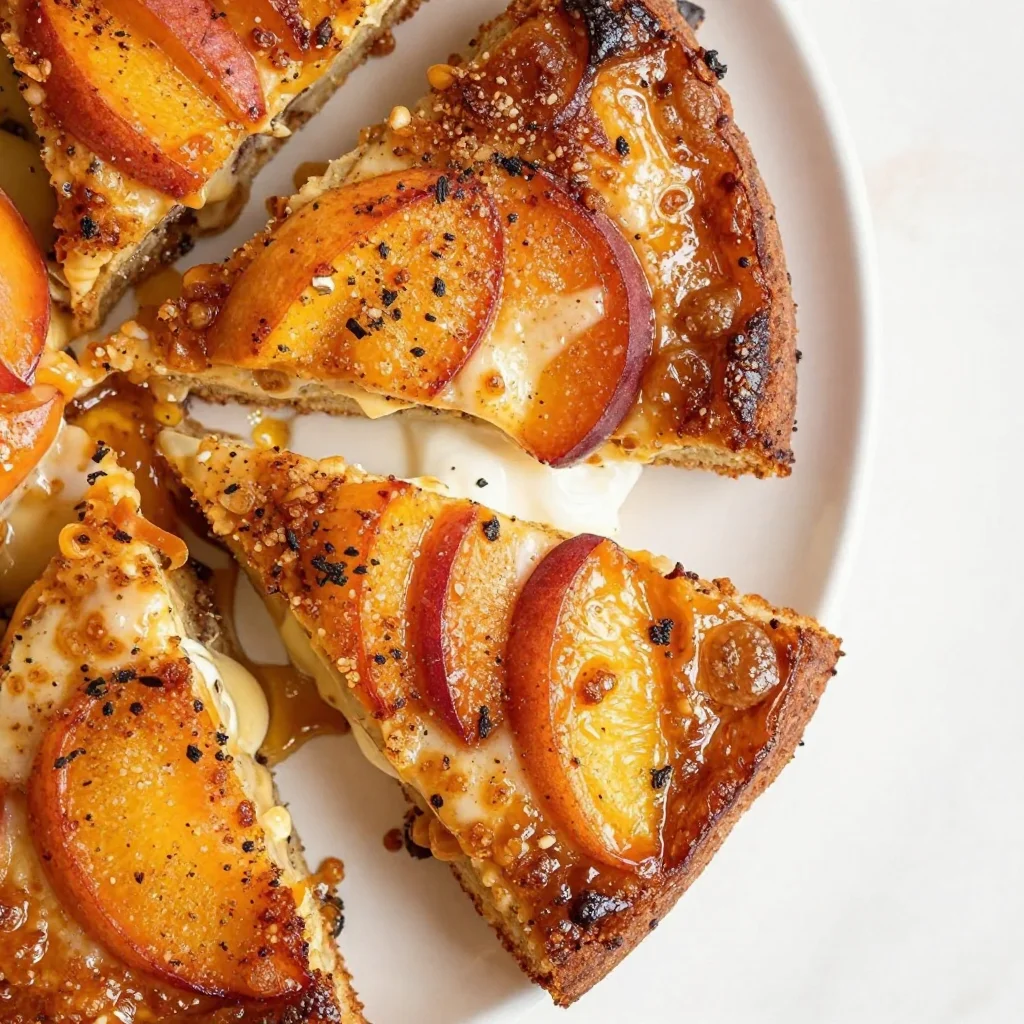
Quick Summer Peach Upside-Down Cake with Browned Butter
Browned Butter Peach Upside Down Cake: A Slice of Summer Serenity
Welcome back to my cozy kitchen! If you’ve ever wanted to bring a taste of summer inside and indulge in something that will remind you of lazy afternoons spent under the sun, then you’re in for a treat. Today, we’re baking a luscious Browned Butter Peach Upside Down Cake—a dish that encapsulates the essence of summer, wrapped in warm, buttery goodness.
Imagine this: the sweet aroma of peaches mixing with the nutty scent of browned butter is enough to make any home feel like a comforting embrace. When you flip this cake over and reveal the golden, caramelized peaches glistening in their sugary glory, you’re not just serving dessert; you’re sharing a piece of your heart. This cake is perfect for everything from a summer picnic to a cozy family dinner, and trust me, it will have everyone asking for seconds!
Now, let’s dive into the journey of making this delightful cake, where I’ll share a personal story, and the joys of cooking along the way.
A Slice of Nostalgia
Growing up, summer meant my grandmother’s kitchen bustling with activity. On weekends, we would gather as a family, chatting and laughing while she whipped up her famous peach cobbler. I can still hear the sound of the oven timer reminding us that something extraordinary was on the way. I remember trying to sneak a taste of the juicy peaches and sugary syrup before they made it into the oven, a feat that often ended with a playful slap on the hand.
One particularly sunny Saturday, grandma introduced me to the magic of caramelizing butter. The nutty aroma erupted as she explained how browned butter could transform an ordinary dish into something extraordinary. As we layered the peaches in the pan, I felt the excitement of creating something special alongside her. That moment sparked a lifelong love for not just baking, but for the memories and togetherness that come with sharing food. Now, I keep that spirit alive in my kitchen by creating dishes that not only taste good but also bring people together—just like my grandmother did.
Ingredients
To create your Browned Butter Peach Upside Down Cake, you’ll need the following ingredients. Each one has a purpose, and I’ll share some insights and substitutions to elevate your baking game!
-
Peaches (4-5 medium): Fresh, ripe peaches are best as they provide sweetness and juiciness. If peaches aren’t in season, feel free to use canned peaches (drained) or substitute with nectarines for a similar flavor profile.
-
Unsalted Butter (1/2 cup): We’re browning this butter to create depth and flavor. If you’re dairy-free, switch to coconut oil for a slightly different but delicious flavor.
-
Brown Sugar (3/4 cup): A must for that rich caramelized flavor. You can swap it for coconut sugar for a healthier option, though it may alter the taste slightly.
-
Granulated Sugar (1/2 cup): This sweetens the cake batter itself. If you prefer a low-calorie option, consider a sugar substitute, but keep in mind it may affect the texture.
-
All-Purpose Flour (1 ½ cups): This provides the structure for our cake. Whole wheat flour can be used for a nuttier flavor, or if you’re gluten-free, almond or oat flour can be great alternatives.
-
Baking Powder (2 teaspoons): Essential for helping our cake rise. Always check your baking powder’s expiration date to ensure the cake rises beautifully.
-
Salt (1/4 teaspoon): A pinch enhances the flavors. If you’re on a low-sodium diet, use sea salt as a substitute.
-
Eggs (2 large): Eggs bind the ingredients and provide moisture. For a vegan version, you can use flax eggs (1 tbsp flaxseed meal + 2.5 tbsp water per egg, let sit until gel-like).
-
Vanilla Extract (1 teaspoon): This elevates the flavor profile of the cake. Feel free to use almond extract for an aromatic twist.
Step-by-Step Instructions
Let’s get cooking! Follow these steps to make your own Browned Butter Peach Upside Down Cake. Don’t worry—I’ll sprinkle in some handy tips along the way!
-
Preheat the Oven: Begin by preheating your oven to 350°F (175°C). This ensures a consistent baking temperature from the moment your cake goes in.
-
Brown the Butter: In a medium saucepan over medium heat, melt the butter. Stir frequently until it begins to foam. Keep an eye on it, as it can turn quickly; you’re aiming for a golden brown color with a nutty aroma. Remove it from heat and let it cool.
-
Prepare the Peaches: While your butter cools, slice your peaches. If you’re using fresh ones, cut them into wedges. If using canned, remember to drain them.
-
Caramelize the Peaches: In a 9-inch round cake pan, pour in the brown sugar and the browned butter (reserving about 2 tablespoons of the butter for the cake batter). Spread it evenly and arrange the sliced peaches on top in a circular pattern. Set this aside while you make the batter.
-
Make the Batter: In a mixing bowl, whisk together the flour, baking powder, and salt. In another bowl, beat the eggs with the remaining granulated sugar until light and fluffy—about 2-3 minutes. Mix in the reserved browned butter and vanilla extract until well combined. Gradually add the flour mixture, mixing until just combined (be careful not to overmix!).
-
Combine and Bake: Pour the batter over the arranged peach slices in the pan, smoothing out the top with a spatula. Bake in your preheated oven for about 30-35 minutes or until a toothpick comes out clean from the center.
-
Cool and Flip: Once baked, let the cake cool in the pan for about 10 minutes. Carefully run a knife around the edges and flip the pan onto a serving plate. The peaches should be beautifully caramelized and glistening—how beautiful is that?
-
Serve: Serve warm or at room temperature with a scoop of vanilla ice cream or a dollop of whipped cream for an extra layer of indulgence. Trust me, this cake is heavenly just as it is, but ice cream takes it up a notch!
Serving Suggestions
To serve your Browned Butter Peach Upside Down Cake, simply slice it into wedges, revealing the beautiful golden peaches on top. You can dress it up by dusting it with powdered sugar or adding a scoop of vanilla ice cream or a dollop of freshly whipped cream on the side. Garnishing with fresh mint leaves can add a lovely touch of color and freshness, making it spring and summer-ready!
Recipe Variations
Here are a few fun twists to keep your Browned Butter Peach Upside Down Cake exciting:
-
Spiced Version: Add a teaspoon of ground cinnamon or nutmeg to the batter for a warm, spiced flavor.
-
Seasonal Swap: Try swapping peaches for plums, cherries, or even apples in the fall for a seasonal treat.
-
Nutty Crunch: Incorporate chopped pecans or walnuts into the batter for some added crunch and richness.
-
Coconut Twist: Substitute half the all-purpose flour with coconut flour for a tropical flair that pairs beautifully with the peaches.
-
Lemon Zest: Add the zest of one lemon to the batter for a fresh, tangy brightness that balances the sweetness of the peaches perfectly.
Chef’s Notes
As I dive into this recipe, it brings back so many wonderful memories of summer with my grandmother—especially the time I entered a baking contest with this very cake! I was nervous, hovering around the oven, hoping that it would turn out perfectly. It didn’t just win over the judges; it won the hearts of everyone at the picnic!
This cake has been through many variations over the years, from adding blueberries for an extra fruity punch to experimenting with different spices. Each version holds a special memory, and that’s the beauty of cooking—recipes evolve as we do, filled with stories, laughter, and love.
FAQs and Troubleshooting
Q: My cake didn’t rise as much as I expected. What happened?
A: First, check that your baking powder isn’t expired; old leavening agents can prevent the cake from rising. Also, ensure you don’t overmix the batter, as this can create a dense texture.
Q: My peaches were mushy. How can I prevent this?
A: Use ripe but firm peaches to ensure they hold their shape during baking. If using canned peaches, drain them well to prevent excess moisture.
Q: Can I prepare this cake in advance?
A: Yes! You can bake the cake a day ahead. Just cover it tightly and store it at room temperature. When ready to serve, gently warm it in the oven.
Q: How can I keep this cake moist?
A: Be careful not to overbake it, as this can lead to a dry cake. Check it a few minutes before the recommended baking time. For added moisture, you can also brush a sugar syrup over the cake after baking.
Nutritional Info
While I love indulging in a sweet treat every now and then, it’s good to be mindful of portions. Here’s a rough estimate of the nutritional value per slice, based on 12 slices:
- Calories: 220
- Total Fat: 9g
- Saturated Fat: 5g
- Cholesterol: 40mg
- Sodium: 150mg
- Total Carbohydrates: 34g
- Dietary Fiber: 1g
- Sugars: 17g
- Protein: 3g
Note: Nutritional values may vary based on ingredient substitutes and portion sizes.
And there you have it—a journey through the delightful world of Browned Butter Peach Upside Down Cake! I hope this recipe brings as much joy and warmth to your kitchen as it has to mine. So gather your loved ones, indulge in some sweet nostalgia, and celebrate the joy of home cooking. Happy baking!
Print
Browned Butter Peach Upside Down Cake
- Total Time: 50 minutes
- Yield: 12 servings
- Diet: Vegetarian
Description
A delightful Browned Butter Peach Upside Down Cake that captures the essence of summer with caramelized peaches and nutty butter flavor.
Ingredients
- Peaches (4-5 medium)
- Unsalted Butter (1/2 cup)
- Brown Sugar (3/4 cup)
- Granulated Sugar (1/2 cup)
- All-Purpose Flour (1 ½ cups)
- Baking Powder (2 teaspoons)
- Salt (1/4 teaspoon)
- Eggs (2 large)
- Vanilla Extract (1 teaspoon)
Instructions
- Preheat the oven to 350°F (175°C).
- Brown the butter in a medium saucepan over medium heat until golden brown with a nutty aroma, then let it cool.
- Prepare the peaches by slicing them into wedges.
- Caramelize the peaches by combining brown sugar and browned butter in a cake pan and layering the peach slices on top.
- Make the batter by whisking flour, baking powder, and salt, then mixing in beaten eggs, granulated sugar, reserved butter, and vanilla.
- Combine the batter with the peaches and bake for 30-35 minutes until a toothpick comes out clean.
- Cool the cake for 10 minutes, then flip onto a serving plate to reveal the caramelized peaches.
- Serve warm with vanilla ice cream or whipped cream.
Notes
This cake is best served warm and can be made a day in advance; warm before serving.
- Prep Time: 15 minutes
- Cook Time: 35 minutes
- Category: Dessert
- Method: Baking
- Cuisine: American
Nutrition
- Serving Size: 1 slice
- Calories: 220
- Sugar: 17g
- Sodium: 150mg
- Fat: 9g
- Saturated Fat: 5g
- Unsaturated Fat: 3g
- Trans Fat: 0g
- Carbohydrates: 34g
- Fiber: 1g
- Protein: 3g
- Cholesterol: 40mg
Keywords: Peach Cake, Upside Down Cake, Summer Dessert, Browned Butter
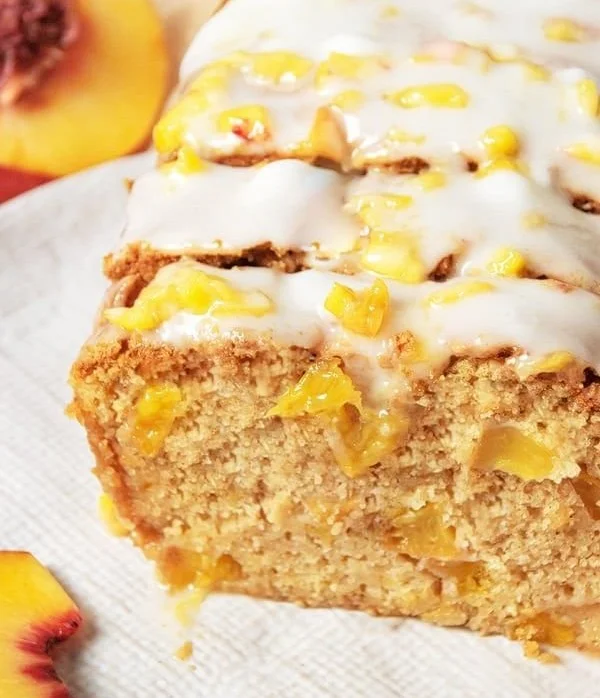
Seasonal Nectarine Bread: Beginner-Friendly Summer Recipe
Homemade Nectarine Bread: A Slice of Summer Magic
Welcome to my kitchen, dear foodies! Today, we’re diving into something truly special: Homemade Nectarine Bread. Now, if you haven’t tasted this delightful creation, let me tell you—it’s like taking a sunny vacation with every bite! There’s something wonderfully comforting about a loaf of bread packed with juicy nectarines that not only fills your kitchen with a heavenly aroma, but also warms your heart.
There’s an almost poetic quality to baking, don’t you think? The way flour, sugar, butter, and fresh fruits come together creates something so much greater than the sum of its parts. Nectarine bread is the lovechild of traditional quick breads, bursting with the essence of seasonal sweetness, perfect for breakfast, brunch, or a cozy afternoon snack.
Every time I whip up a loaf of nectarines, I’m transported back to my grandmother’s kitchen. She used to make a similar fruit bread when the stone fruits were in season, and the memories of her bustling around the kitchen, flour dusting her apron, still make me smile. It was a time filled with laughter, stories, and a whole lot of love—exactly what I hope to recreate with you today.
So grab your mixing bowl and preheat your oven! This is more than just a recipe; it’s an invitation to celebrate the joys of cooking, community, and of course, fabulous food. Let’s get started!
A Sweet Memory in Every Slice
There’s something incredibly nostalgic about baking bread, especially when it’s infused with such vibrant fruits like nectarines. I vividly remember being a child, standing on a stool beside my grandmother as she whisked and stirred in her sunlit kitchen. Her nectarines were always plump and sweet, and I was tasked with the job of peeling and pitting them—a messy chore that came with the promise of tasting the fresh nectarines afterwards, straight from the bowl!
One summer, she decided to surprise us with her specialty nectarines bread. I can still recall the excitement rolling through my stomach as I watched her mix the batter. When it finally came out of the oven, golden brown and drizzled with a sugary glaze, the world seemed to pause for just a moment. The smell wafted through the entire house, drawing us all into the kitchen for a slice of heaven. In that moment, it wasn’t just the bread I loved; it was the memories we created around it—the stories, the laughter, and the feeling of togetherness.
Now, whenever I bake nectarines bread, I try to channel that same warm comfort and joy my grandmother brought to our family kitchen, hoping to create those lasting memories for those I feed today. Let’s fill our kitchens with love as we recreate this beloved recipe together!
Ingredients You’ll Need
-
2 cups ripe nectarines (chopped)
Fresh nectarines are the star of the show here! The juiciness and sweetness they bring is unmatched. If you can’t find nectarines, peaches or apricots offer a lovely substitution. -
1/2 cup unsalted butter (melted)
Butter adds richness and depth to the bread. If you’re looking for a dairy-free option, coconut oil or a plant-based butter would work beautifully! -
1 cup granulated sugar
Sweetness is essential, but you can substitute with brown sugar for a hint of molasses flavor or use coconut sugar for a healthier twist. -
2 large eggs
Eggs act as a binding agent, helping your loaf rise and stay together. For a vegan option, try using flaxseed meal; mix 1 tablespoon of it with 2.5 tablespoons of water and let it sit for a few minutes until it becomes gelatinous. -
1 teaspoon vanilla extract
This simple ingredient elevates the flavor of the bread. Homemade vanilla extract is a real treat if you have it! -
2 cups all-purpose flour
The base of our bread! You can swap out 1 cup for whole wheat flour for added fiber. -
1 teaspoon baking soda
This is the magic leavening agent that helps our bread rise. Make sure it’s fresh for the best results! -
1/2 teaspoon baking powder
Just a little boost to ensure a fluffy texture. -
1/2 teaspoon salt
Salt helps balance the sweetness and enhances the flavors. Don’t skip it! -
1 teaspoon cinnamon (optional)
A sprinkle of cinnamon brings warmth and depth; feel free to add more or mix it up with spices like nutmeg or cardamom!
Step-by-Step Instructions to Nectarine Perfection
Now that we have everything ready, it’s time to jump into the cooking process! Baking is a delightful rhythm of actions, so let’s get into the groove.
-
Preheat Your Oven: Start by preheating your oven to 350°F (175°C). This is crucial for ensuring that your bread bakes evenly.
-
Prepare Your Loaf Pan: Grease a 9×5-inch loaf pan with butter or cooking spray, and set it aside. This helps the bread release easily after baking, which is key for that impressive slice!
-
Chop Your Nectarines: Grab those luscious nectarines! Wash them well, then slice them in half, remove the pits, and chop them into bite-sized pieces. You can leave the skin on for added color and nutrients.
-
Mix Wet Ingredients: In a large mixing bowl, combine the melted butter and sugar, mixing until well combined. This may take a minute or two, but it’s worth it to fully incorporate the sugar! Then, beat in the eggs, followed by the vanilla extract.
-
Combine Dry Ingredients: In another bowl, whisk together the flour, baking soda, baking powder, cinnamon, and salt. If you want a spoonful of flavor, you might want to go for a deeper spice profile with this step. Adjust to your taste!
-
Combine Wet and Dry: Gradually fold the dry ingredients into the wet mixture. Subtlety is key here—mix just until combined. Overmixing can lead to a dense loaf, and we want a light, airy slice!
-
Fold in Nectarines: Gently fold your chopped nectarines into the batter. It’s like tucking them into a cozy bread blanket! Optional: you might reserve a few pieces to sprinkle on top for a beautiful baked finish.
-
Transfer to Loaf Pan: Pour the batter into your greased loaf pan. Smooth the top gently with a spatula to make it even.
-
Bake: Pop the bread into the oven and let it bake for 50–60 minutes or until a toothpick inserted into the center comes out clean. Keep an eye on it; ovens can vary!
-
Cool & Glaze: Once baked, let the bread cool in the pan for about 10 minutes, then carefully transfer it to a wire rack to cool completely. If you’d like a sweet glaze, combine powdered sugar and a bit of milk (or lemon juice) to drizzle over the top once cooled.
Perfect Serving Suggestions
Slice your homemade nectarines bread and serve it warm or at room temperature on a beautiful cake stand to make it pop! You can enjoy it plain, or for a touch of indulgence, slather on some cream cheese or butter. Pair it with a cup of freshly brewed coffee or a refreshing herbal tea—this treat is perfect for breakfast, brunch, or an afternoon pick-me-up!
Recipe Variations to Try
-
Nutty Variation: Toss in some chopped walnuts, pecans, or almonds for a delightful crunch and added nutrition.
-
Chocolate Lovers’ Twist: Add in some chocolate chips for a sweet surprise. Dark chocolate pairs incredibly well with nectarines!
-
Citrus Zing: For a refreshing addition, consider zesting a lemon or orange into the batter. It brightens up the flavors beautifully!
-
Dried Fruit Delight: Substitute some of the nectarines for dried fruits like cranberries or apricots for a different texture and flavor!
-
Gluten-Free Option: Use almond flour or a gluten-free all-purpose blend to make this bread suitable for gluten-sensitive eaters.
Chef’s Notes
This recipe has a special place in my heart because it embodies the spirit of creativity in cooking. It’s evolved over the years—originally, it was a simple way to use overripe nectarines, but it has transformed into a beloved staple in my kitchen. Sometimes, I’ll switch around the spices or the sweeteners based on what I have on hand, and each iteration brings a new layer of joy.
Once, I had a friend over while I was making this, and we accidentally added way too much cinnamon! Instead of tossing it out, we called it “cinnamon explosion bread,” and it turned out to be a hit at our little get-together. So remember, baking is a journey, and sometimes the unexpected can lead to delicious results!
FAQs and Troubleshooting
1. My bread didn’t rise—what happened?
Make sure your baking soda and baking powder are fresh, as their effectiveness diminishes over time. Also, double-check that you didn’t overmix your batter, as that can create a dense loaf.
2. Can I use frozen nectarines?
Absolutely! Just make sure to thaw and drain any excess moisture before adding them to the batter. Frozen fruits can sometimes release more water during baking, so keep that in mind.
3. How do I store leftover nectarines bread?
Wrap it tightly in plastic wrap or aluminum foil and store it at room temperature for up to 3 days. You can also freeze slices for later enjoyment—just let them cool completely, wrap individually, and store them in an airtight container.
4. Can I add other fruits?
Of course! Apples, pears, or even berries can be swapped in, but keep in mind that the amount of moisture they contain might alter the final result. Adjust accordingly and have fun with it!
Nutritional Info
Serving Size: 1 slice (about 50g)
Calories: 180
Total Fat: 7g
Saturated Fat: 4g
Cholesterol: 35mg
Sodium: 150mg
Total Carbohydrates: 25g
Dietary Fiber: 1g
Sugars: 10g
Protein: 2g
Well, dear friends, I hope you enjoyed this journey through the creation of homemade nectarines bread! Remember, cooking is more than just making a meal; it’s about creating memories and enjoying every messy, beautiful moment. I can’t wait to hear your comments, tips, or stories related to this delightful recipe. Let’s bake together and ensure that love remains at the heart of our kitchens! Happy baking!
Print
Homemade Nectarine Bread
- Total Time: 75 minutes
- Yield: 8 servings 1x
- Diet: Vegetarian
Description
A delightful quick bread filled with juicy nectarines, perfect for breakfast or a cozy afternoon snack.
Ingredients
- 2 cups ripe nectarines (chopped)
- 1/2 cup unsalted butter (melted)
- 1 cup granulated sugar
- 2 large eggs
- 1 teaspoon vanilla extract
- 2 cups all-purpose flour
- 1 teaspoon baking soda
- 1/2 teaspoon baking powder
- 1/2 teaspoon salt
- 1 teaspoon cinnamon (optional)
Instructions
- Preheat your oven to 350°F (175°C).
- Grease a 9×5-inch loaf pan with butter or cooking spray.
- Chop your nectarines into bite-sized pieces.
- Combine the melted butter and sugar in a large mixing bowl.
- Beat in the eggs and vanilla extract.
- Whisk together the flour, baking soda, baking powder, cinnamon, and salt in another bowl.
- Fold the dry ingredients into the wet mixture just until combined.
- Gently fold in your chopped nectarines.
- Pour the batter into the greased loaf pan.
- Bake for 50–60 minutes or until a toothpick inserted comes out clean.
- Cool in the pan for 10 minutes before transferring to a wire rack.
- Glaze with powdered sugar and milk or lemon juice if desired.
Notes
For a nutty crunch, consider adding walnuts or pecans. Substitute nectarines with other fruits like peaches or berries for variation.
- Prep Time: 15 minutes
- Cook Time: 60 minutes
- Category: Bread
- Method: Baking
- Cuisine: American
Nutrition
- Serving Size: 1 slice
- Calories: 180
- Sugar: 10g
- Sodium: 150mg
- Fat: 7g
- Saturated Fat: 4g
- Unsaturated Fat: 3g
- Trans Fat: 0g
- Carbohydrates: 25g
- Fiber: 1g
- Protein: 2g
- Cholesterol: 35mg
Keywords: nectarine bread, fruit bread, quick bread, summer baking, homemade bread
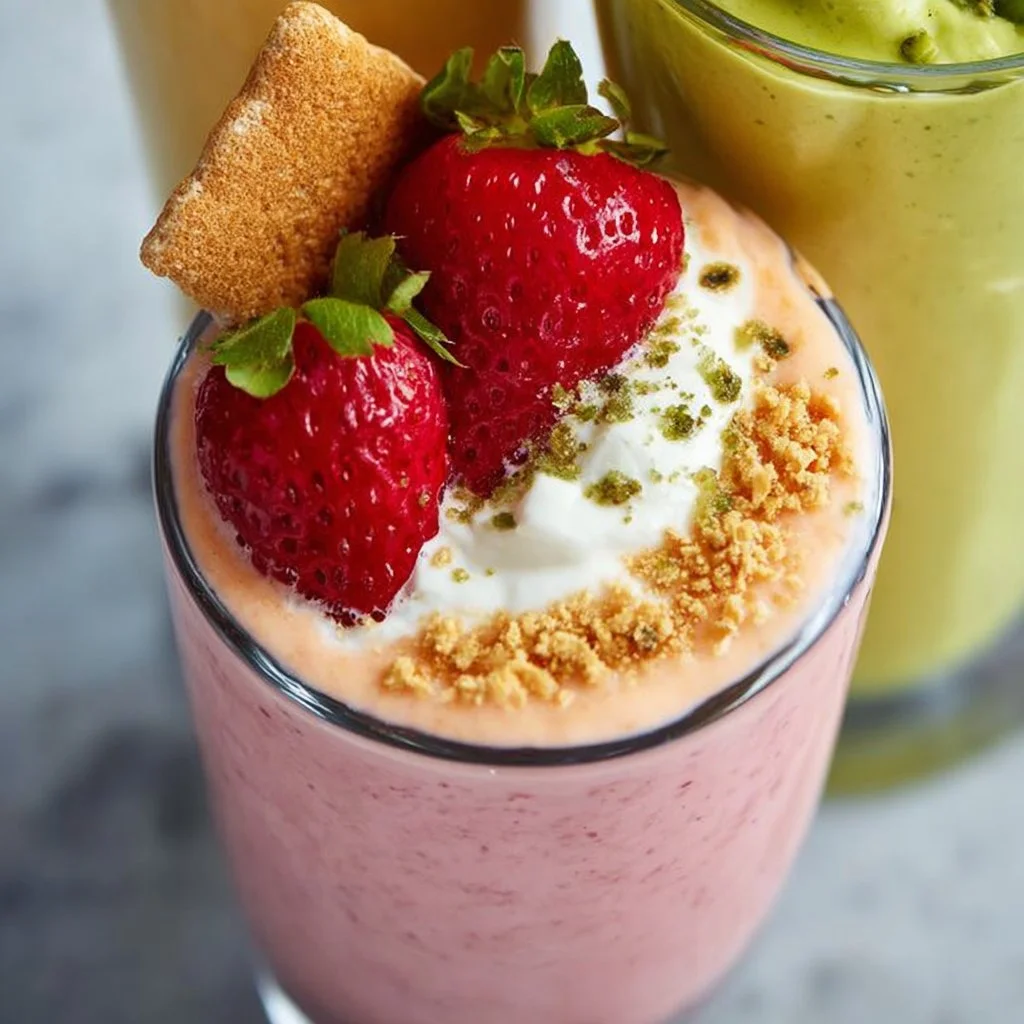
Refreshing and Delicious Spring and Summer Protein Smoothies {3 Recipes}
Refreshing and Delicious Spring and Summer Protein Smoothies: 3 Recipes to Energize Your Days
Welcome to another delightful culinary adventure in my kitchen! As the seasons shift and the weather warms up, there’s nothing quite like sipping on a refreshing protein smoothie that not only fuels your day but also tantalizes your taste buds. Whether you’re heading out to enjoy a sunny afternoon or just want a quick breakfast option, these smoothies are your go-to for vibrant flavors and nourishment.
Smoothies have become a staple in my kitchen, and for good reason! They are versatile, packed with nutrients, and can be whipped up in minutes. When spring blooms and summer starts to sizzle, I find myself reaching for the freshest fruits and greens, crafting smoothies that celebrate the season. Biting into a ripe peach or sipping a cool mango smoothie instantly transports me to sun-drenched days when time seems to drift away. Plus, the best part? You don’t need to be a kitchen whiz to make them! Just throw some ingredients into your blender, press a button, and voilà—you’ve got a delicious, health-boosting drink!
In today’s post, I’ll share three of my favorite protein-packed smoothie recipes that are both refreshing and delicious. We’ll explore a tropical mango delight, a luscious berry blend, and a green powerhouse smoothie that’s sure to become a staple in your routine. So grab your blender, and let’s get mixing!
Personal Story
Every summer as a kid, one of my fondest memories was visiting my grandparents’ house. My Grandma Alice would take me into her kitchen, where her trusty blender always sat proudly on the counter. Whether it was hot or cool, we would whip up a batch of smoothies together—always experimenting with whatever fruits were in season. I remember the way her face would light up when we’d unlock the magical combination of sweet strawberries, tart yogurt, and a splash of orange juice.
One particularly sunny afternoon, we made a batch of peach smoothies that were so creamy and perfectly sweet; I can still taste the sunshine in each sip! We packed them in jars and headed outside to enjoy them on the porch, the sweet aroma of freshly baked cookies wafting through the air. Those simple moments and delightful flavors have stayed with me and shaped my love for smoothies. It’s that same joy I hope to inspire in each of you through these recipes!
Ingredients
Here’s what you’ll need for each of the refreshing smoothies, along with some tips for making the most of your ingredient choices:
1. Tropical Mango Protein Smoothie
- 1 ripe mango: The star of the show! Choose a mango that gives slightly to pressure for sweetness. If fresh mangos aren’t available, try frozen mango chunks for a chillier version.
- 1 banana: Creamy and sweet! It’s rich in potassium and can be substituted with ripe avocado for a unique twist.
- 1 cup coconut milk: For a tropical vibe! Use almond milk or regular milk if coconut isn’t your thing—ingredients that add vitamins but retain creaminess.
- 1 scoop vanilla protein powder: Perfect for boosting your protein intake! Any protein powder will do; try pea protein for a vegan option.
2. Berry Blast Protein Smoothie
- 1 cup mixed berries (strawberries, blueberries, raspberries): Burst of flavor and antioxidants! Use a mix, or just choose your favorites. Fresh, frozen, or even dried berries work.
- 1 cup spinach: A nutritional powerhouse! Adding spinach increases your vitamin intake and it blends right in. If you’re not a fan of greens, sneak in kale instead.
- 1/2 cup Greek yogurt: This adds creaminess and a protein boost! For a dairy-free option, try coconut yogurt or a banana to add creaminess.
- 1-2 tablespoons honey or agave syrup (optional): Great for sweetness! Adjust to preference depending on your berry mix’s tanginess.
3. Green Powerhouse Smoothie
- 1 cup kale or spinach: Leafy greens are nutrient-dense! Spinach is milder in flavor, making it perfect for smoothies. Substituting with romaine lettuce gives a different twist.
- 1/2 avocado: Adds creaminess while being heart-healthy! Swap with a handful of soaked cashews if you’re avoiding avocados.
- 1 pear: Provides natural sweetness! If pears are out of season, apples or peaches work just as well.
- 1 cup almond milk or coconut water: This hydrates and binds the ingredients together. Feel free to use regular milk or just plain water if you need a lighter option.
Let’s gather these ingredients, and then we’ll dive into the blissful smoothie-making process!
Step-by-Step Instructions
Whipping up these smoothies is simple and fun! Here’s how to make each one:
Tropical Mango Protein Smoothie
- Prepare Your Ingredients: Peel and pit the mango, then chop it into chunks. Peel the banana. Simple prep saves time!
- Blend It Up: In your blender, toss in the mango, banana, coconut milk, and protein powder. Blend until smooth and creamy. Tip: If it’s too thick, gradually add more coconut milk until you reach your desired consistency.
- Taste Test: After blending, give it a little taste. Adjust sweetness with honey if desired! Smoothies should be a delightful balance of flavors.
- Serve: Pour into a tall glass and garnish with a slice of fresh mango and a sprinkle of shredded coconut to make it look extra tropical!
Berry Blast Protein Smoothie
- Prep Your Greens: If using fresh spinach, make sure it’s washed and includes no gritty bits. Fresh is always best!
- Layer the Blend: Place mixed berries, spinach, Greek yogurt, and honey in the blender. Start with small amounts of honey; you can always add more if needed!
- Let It Whirl: Blend until you achieve a smooth consistency—around 30-60 seconds. Hack: If your smoothie gets stuck, pause and use a spatula to stir it gently. Just blend again to incorporate everything.
- Taste and Serve: Pour your smoothie into a bowl or glass. Top with extra berries, a dollop of yogurt, and a drizzle of honey for that extra touch!
Green Powerhouse Smoothie
- Green Goodness Prep: Wash your leafy greens thoroughly. Chop the pear and avocado for easier blending.
- Combine in Blender: Add the greens, pear, avocado, and almond milk into the blender. There’s freshness in every bite!
- Blend It Up: Like the others, this will go in for 30-60 seconds. You want it to be creamy and thoroughly combined. Tip: If you’re feeling fancy, sprinkle some chia seeds for added nutrition!
- Pour and Enjoy: Pour your smoothie into your favorite glass or bowl. Garnish with slices of pear or a sprinkle of hemp seeds to get those nutrients in style!
Serving Suggestions
Presentation matters, even for smoothies! Use clear glasses to showcase the beautiful colors or serve them in mason jars for that rustic feel. Add a colorful straw or rim the glass with shredded coconut or crushed nuts to enhance the look. You can also accompany these smoothies with a side of whole-grain toast or a handful of nuts for a balanced and wholesome breakfast outside.
Recipe Variations
Feel free to get creative with these base recipes! Here are a few twists you might enjoy:
- Tropical Mango Variant: Add a handful of spinach for an added nutrient kick without compromising flavor.
- Berry Blast Remix: Swap out berries for stone fruits when in season—peaches and nectarines blend beautifully!
- Green Smoothie Upgrade: Toss in a tablespoon of nut butter for added richness and protein!
- Vegan Options: Replace dairy ingredients with their non-dairy counterparts, like coconut yogurt and almond milk.
Chef’s Notes
Smoothies are such an adaptable canvas—you’ll often find me throwing in whatever I have on hand. A handful of nuts, a spoonful of nut butter, or a scoop of oats can elevate your smoothie game even higher! My early trials in the kitchen were filled with hilarious blending mishaps, including a smoothie explosion from overstuffing the blender—I’ll never forget the kitchen floor that day!
Always feel free to experiment and trust your taste buds. While it’s essential to follow a recipe, creativity is the secret ingredient that makes your smoothies uniquely yours.
FAQs and Troubleshooting
-
What if my smoothie is too thick?
- Don’t worry! Just add a bit more liquid—water, juice, or milk—and blend again until smooth.
-
How can I make my smoothies sweeter without added sugar?
- Try using ripe fruits like bananas or dates. These natural sweeteners provide a lovely flavor without being overwhelming!
-
Can I prep smoothies ahead of time?
- Absolutely! Blend up your smoothies and store them in an airtight container in the fridge for up to 24 hours. Just give them a shake before drinking!
-
Are there ways to make smoothies more filling?
- Yes! Add ingredients like oats, nut butter, or protein powder to enhance satiety and keep you fuller for longer.
Nutritional Info
Serving Size: 1 Smoothie
Tropical Mango Protein Smoothie
- Calories: Approx. 300
- Protein: 20g
- Fat: 5g
- Carbohydrates: 50g
Berry Blast Protein Smoothie
- Calories: Approx. 250
- Protein: 18g
- Fat: 3g
- Carbohydrates: 35g
Green Powerhouse Smoothie
- Calories: Approx. 270
- Protein: 15g
- Fat: 10g
- Carbohydrates: 30g
Now, it’s time to bring those blender blades to life! I invite you to try out these delightful smoothies, bask in their refreshing goodness, and create joyful moments just like I did with my family. Cheers to a season full of vibrant flavors and nourishing experiences! Enjoy!
Print
Refreshing Spring and Summer Protein Smoothies
- Total Time: 10 minutes
- Yield: 3 servings 1x
- Diet: Vegan
Description
Three refreshing and energizing protein smoothie recipes perfect for spring and summer.
Ingredients
- 1 ripe mango
- 1 banana
- 1 cup coconut milk
- 1 scoop vanilla protein powder
- 1 cup mixed berries (strawberries, blueberries, raspberries)
- 1 cup spinach
- 1/2 cup Greek yogurt
- 1–2 tablespoons honey or agave syrup (optional)
- 1 cup kale or spinach
- 1/2 avocado
- 1 pear
- 1 cup almond milk or coconut water
Instructions
- Prepare Your Ingredients: Peel and pit the mango, then chop it into chunks. Peel the banana.
- Blend It Up: In your blender, toss in the mango, banana, coconut milk, and protein powder. Blend until smooth and creamy.
- Taste Test: Adjust sweetness with honey if desired.
- Serve: Pour into a tall glass and garnish with a slice of fresh mango.
Notes
Smoothies can be customized with various fruits and add-ins.
- Prep Time: 10 minutes
- Cook Time: 0 minutes
- Category: Beverage
- Method: Blending
- Cuisine: American
Nutrition
- Serving Size: 1 serving
- Calories: 300
- Sugar: 30g
- Sodium: 50mg
- Fat: 5g
- Saturated Fat: 4g
- Unsaturated Fat: 1g
- Trans Fat: 0g
- Carbohydrates: 50g
- Fiber: 5g
- Protein: 20g
- Cholesterol: 0mg
Keywords: smoothie, protein shake, healthy recipes, summer drinks, quick breakfast

Refreshing Recipes
Refreshing Recipes: The Art of Bringing Flavor to Your Table
Welcome to my cozy corner of the culinary world! I’m Olivia Bennett, and today, we’re diving into the vibrantly fresh recipes that not only tingle your taste buds but also provide a much-needed break from the heavy winter meals we often indulge in. As the seasons begin to change, our plates deserve a refresh just as much as our wardrobes. There’s something truly magical about ingredients that burst with color and flavor, transforming your kitchen into a bright, welcoming haven.
When I think about refreshing recipes, I imagine sunshine-filled afternoons, laughter shared with friends, and those simple yet fantastic delights that bring everyone together. Whether it’s a light citrus salad that sings with brightness or a rejuvenating smoothie that can power you through your day, these recipes are a celebration of the bounty that nature offers. So, let’s roll up our sleeves, put on our favorite apron (yes, the one with some flour on it—shows you actually cook!), and create something beautiful!
Each recipe I’m sharing today not only evokes my memories of summer picnics and late-night cooking adventures but also hopes to inspire you to create your own kitchen stories. The best part? You don’t need to be a master chef or have hours to spare in the kitchen; you just need a little love for cooking and adventure! Ready to eat your way to refreshment? Let’s get cooking!
Personal Story
I can still remember the summer I spent with my grandmother at her little lake cabin. We would wake up early and head out to her garden to pick the ripest tomatoes, cucumbers, and herbs, our hands stained with dirt and our hearts full of joy. Cooking with her was magic—her laughter would fill the air as she tried to teach me how to make the most refreshing tomato and cucumber salad. The taste was incredible, but the memories of us chopping, mixing, and, of course, sneaking tastes along the way, are what I cherish most.
To this day, every time I make that salad or a variation of it, I’m transported back to those carefree summer days. It reminds me that cooking is not just about feeding yourself or others; it’s about creating precious moments, bridging generations, and enjoying the simple pleasures in life. From that summer, I’ve learned how to play with flavors and textures, turning the ordinary into something unforgettable—and I can’t wait to share those secrets with you!
Ingredients
Here’s what you’ll need for one of my favorite refreshing dishes—a Summer Tomato and Cucumber Salad—and some insights to help you along the way!
Ingredients List:
-
Ripe Tomatoes
(Use heirloom, cherry, or beefsteak—whichever you find at your local market! Substitute with bell peppers for a sweeter flavor.) -
Cucumbers
(English cucumbers are long and less bitter, but feel free to use any variety! For a twist, use zucchini.) -
Red Onion
(Adds a nice bite! If raw onion is too much for you, soak it in cold water for 10 minutes to mellow the flavor.) -
Fresh Herbs (Basil, Mint, or Dill)
(Herbs elevate this salad! If fresh isn’t available, dried can work but be sure to use much less.) -
Olive Oil
(A high-quality extra virgin olive oil brings richness—consider substituting with avocado oil for a different flavor profile.) -
Red Wine Vinegar
(This brightens the dish; white vinegar works too but opt for lemon juice for a zestier twist!) -
Salt and Pepper
(Your basic seasoning can make a huge difference! Try sea salt for a more intense flavor or freshly cracked pepper for heat.)
Step-by-Step Instructions
Now, let’s jump into the heart of the matter—making that delicious salad! Here are the detailed steps to guide you through it:
-
Gather Your Ingredients
Gather everything in a spacious, clean area on your kitchen counter. It keeps things organized and helps prevent any surprise ingredients from shocking you midway through. (No one wants to discover they’re out of cucumbers halfway through!) -
Chop the Vegetables
Start by dicing the tomatoes into bite-sized pieces; they should still hold some structure. Next, slice the cucumbers. If using a standard cucumber, peel alternating strips for a cute striped look. You can remove some seeds if you prefer not to have excess moisture in your salad.Chef Tip: A serrated knife works wonders on tomatoes—no more squished fruit!
-
Slice the Onions
Thinly slice the red onion. For an even more refreshing vibe, try soaking the slices in cold water for a few minutes; it mellows the sharpness and keeps the salad light. -
Chop the Fresh Herbs
Roughly chop your chosen fresh herbs. Don’t be shy; a generous handful of basil or mint can take this salad over the top! -
Combine the Ingredients
In a large mixing bowl, toss together the chopped tomatoes, cucumbers, onions, and herbs until combined. Feel free to get your hands in there—it’s the best way to ensure everything evenly mingles! -
Make the Dressing
In a small bowl, whisk together your olive oil, red wine vinegar, a pinch of salt, and freshly cracked pepper. If you’re feeling adventurous, add a drizzle of honey or a dash of Dijon mustard for extra depth! -
Dress the Salad
Pour the dressing over your salad, and toss everything once again to ensure every piece is coated. It’s like giving your salad a little shower of flavor! -
Let It Rest
For the best flavor, let your salad sit for about 10-15 minutes at room temperature. This allows all the ingredients to get chummy and enhances the overall taste. -
Taste and Adjust
Before serving, scoop a little out and taste! This is your chance to adjust seasoning as needed—don’t be afraid to add a little more salt or vinegar! -
Serve
Serve in your favorite bowl, perhaps with a side of crusty bread to soak up that delicious dressing. This salad is best enjoyed fresh but works great as leftovers for a day!
Serving Suggestions
Presentation is key when it comes to refreshing recipes! Serve this vibrant salad in a large bowl, allowing the colors to shine. You might consider garnishing with extra herb sprigs or a sprinkle of flaky sea salt for that gourmet touch. Pair it with grilled fish or chicken for a complete meal, or enjoy it on its own as a light lunch in the summer sun!
Recipe Variations
Looking to shake things up? Here are a few variations to keep your salads exciting:
- Add Avocado: Creamy avocado cubes add richness and balance the acidity of the dressing.
- Quinoa Boost: Toss in some cooked quinoa for added protein—it’s deliciously filling!
- Feta Cheese: Crumbled feta or goat cheese gives a salty tang that works beautifully with the fresh ingredients.
- Spicy Kick: Sprinkle in some red pepper flakes or diced jalapeños for a bit of heat!
- Fruit Twist: Add berries or diced peaches for a sweet contrast—think summer in a bowl!
Chef’s Notes
Creating this salad has become a rite of summertime for me! I often find myself experimenting with whatever herbs or produce I have on hand—everything from cilantro to seasonal stone fruits. It’s a testament to the art of cooking; a recipe can evolve based on inspiration and experimentation. Plus, my friends and family love it, which makes me smile every time I bring it to a gathering. Every salad is a new opportunity to create lovely memories and share joy through food!
FAQs and Troubleshooting
-
Why did my dressing separate?
Don’t worry! It’s normal for oil and vinegar to separate. Just give it a good shake or stir right before using. -
What if my salad is too salty?
Rinse your salad lightly under cold water to remove some saltiness, or balance it out with a little more cucumber or fresh herbs. -
Can I make this salad in advance?
It’s best enjoyed fresh, but you can prep the veggies and store them in the fridge. Just add dressing right before serving! -
How do I keep my salad crisp?
Make sure to keep wet ingredients (like tomatoes and cucumbers) separate from the dressing until just before serving. This keeps everything crunchy!
Nutritional Info
As you indulge in this refreshing tomato and cucumber salad, you’re also treating yourself to a bounty of vitamins and minerals. A typical serving is low in calories and high in antioxidants from the fresh veggies, while healthy fats from the olive oil help nourish your body.
This salad is perfect for anyone seeking a lighter meal option, whether you’re watching your intake or just looking for something to brighten up your culinary repertoire.
So there you have it! A fresh, easy-to-make recipe that’s packed with flavor and brings a bright spot to your table. Cooking should be about joy, laughter, and creating memories—and I hope that this refreshing salad brings all that and more into your life. So roll up your sleeves and get cooking; your kitchen awaits!
Print
Summer Tomato and Cucumber Salad
- Total Time: 15 minutes
- Yield: 4 servings
- Diet: Vegetarian
Description
A refreshing salad bursting with the flavors of summer, combining ripe tomatoes, crunchy cucumbers, and fresh herbs.
Ingredients
- Ripe Tomatoes (heirloom, cherry, or beefsteak)
- Cucumbers (English or standard)
- Red Onion
- Fresh Herbs (Basil, Mint, or Dill)
- Olive Oil
- Red Wine Vinegar
- Salt and Pepper
Instructions
- Gather your ingredients in a spacious, clean area on your kitchen counter.
- Chop the tomatoes into bite-sized pieces and slice the cucumbers.
- Slice the red onion thinly; consider soaking it in cold water for a milder flavor.
- Chop your fresh herbs generously.
- Combine the chopped tomatoes, cucumbers, onions, and herbs in a large bowl.
- Make the dressing by whisking together olive oil, red wine vinegar, salt, and pepper.
- Dress the salad by pouring the dressing over the mix and tossing to coat.
- Let the salad rest for 10-15 minutes to enhance flavors.
- Taste and adjust seasoning before serving.
- Serve in a beautiful bowl, optionally with crusty bread.
Notes
Experiment with different herbs or add ingredients like avocado, quinoa, or feta cheese for variations.
- Prep Time: 15 minutes
- Cook Time: 0 minutes
- Category: Salad
- Method: Mixing
- Cuisine: Mediterranean
Nutrition
- Serving Size: 1 serving
- Calories: 150
- Sugar: 4g
- Sodium: 300mg
- Fat: 10g
- Saturated Fat: 1.5g
- Unsaturated Fat: 8.5g
- Trans Fat: 0g
- Carbohydrates: 12g
- Fiber: 2g
- Protein: 3g
- Cholesterol: 0mg
Keywords: salad, fresh, summer, tomatoes, cucumbers

Mango-Mozzarella Salad
Refreshing Mango-Mozzarella Salad: A Burst of Flavors in Every Bite
Welcome back, my lovely food enthusiasts! Today, I’m excited to share a delightful recipe that will transport your taste buds straight to a sunny tropical paradise—Mango-Mozzarella Salad. Imagine this: ripe, juicy mangoes that drip with sweetness, perfectly paired with the creamy freshness of mozzarella, and balanced with vibrant herbs and a zesty dressing. It’s a harmony of flavors that feels like a sun-soaked picnic in your mouth!
This salad is one of those dishes that reminds me of carefree summer days spent outdoors, soaking in the sunshine and snacking on something light and refreshing. Whether you’re preparing a laid-back barbecue, a backyard gathering, or a light lunch, this Mango-Mozzarella Salad perfectly captures the essence of joy in cooking and sharing meals with loved ones.
Why is this recipe special to me? Well, it all started one summer afternoon when my dear friend Sarah and I decided to host a spontaneous picnic at the park. With a limited budget and a bit of creativity, we made this salad, using fresh produce from our local farmer’s market. The laughter, stories, and sandwiches we shared that day were dramatically enhanced by the sweet and savory notes of the salad. Ever since then, it’s been one of my go-to recipes for gatherings and potlucks.
So, grab your apron and let’s dive into this vibrant recipe that’s so easy to whip up, you might just find yourself making it every week!
Personal Story
I can still hear the sound of the birds chirping and the rustling leaves in the gentle breeze from that unforgettable summer day with Sarah. We had zero plans, but as true food lovers, we can never resist a trip to the farmer’s market. We filled our baskets with whatever caught our eyes—colorful bell peppers, fragrant herbs, and, of course, the most heavenly ripe mangoes we had ever laid our eyes on.
Back at my place, with only a few kitchen essentials, we decided to combine our treasures into a salad. As we sliced into the mango, the juicy aroma was intoxicating. We tossed together our offerings, and that first bite? Pure delight! The creaminess of mozzarella blending with the bursting sweetness of mango took me straight back to every joyful summer I had ever lived. It was a lightbulb moment; simplicity truly is the star of great cooking! Now, every time I make this salad, I’m reminded of that day, a celebration of friendship and the joy of home-cooked goodness.
Ingredients
Let’s get to the fun part—gathering our ingredients! Here’s what you’ll need to create this vibrant Mango-Mozzarella Salad:
-
2 ripe mangoes
Tip: Choose mangoes that yield slightly to gentle pressure; that means they’re ripe and juicy! If you can’t find ripe mangoes, you can substitute with peaches or nectarines. -
1 ball of fresh mozzarella
Chef Insight: Fresh mozzarella is soft, creamy, and a million times better than the pre-shredded kind. You can also use burrata for extra creaminess! -
1 cup cherry tomatoes
Substitution Tip: Feel free to use heirloom tomatoes or even sun-dried tomatoes if you’re in a pinch! -
1 small red onion
Chef Insight: Soak sliced onions in cold water for 10 minutes to mellow their flavor if they’re too pungent for your taste! -
Fresh basil leaves (about ¼ cup)
Recommendation: Use Thai basil for a slightly different flavor profile, or substitute with mint for a refreshing twist! -
Juice of 1 lime
Chef Hack: If you want more zing, add some lime zest too! -
3 tablespoons extra virgin olive oil
Tip: Choose a good quality olive oil—it makes a difference in flavor! -
Salt and pepper to taste
Suggestion: Sea salt or fleur de sel offers a delightful crunch—and don’t be shy with the pepper!
Step-by-Step Instructions
Let’s roll up those sleeves and get started on this mouthwatering salad! Follow these steps, and we’ll have a bowl of colorful flavor to enjoy in no time.
Step 1: Prepare the Mangoes
- Begin with your ripe mangoes. Stand each mango upright on a cutting board and carefully slice down the sides of the pit.
- Use a paring knife to score the flesh in a crisscross pattern, then scoop out the cube-shaped mango pieces with a spoon.
- Add the mango to a large mixing bowl, and let its juices mingle!
Tip: Rinse your hands after cutting mangoes to avoid sticky fingers!
Step 2: Slice the Cherry Tomatoes
- Grab your cherry tomatoes; slice them in half or quarters if they are on the larger side.
- Add those to the mixing bowl, allowing the juices from the tomatoes to play with the mango.
Chef Hack: If possible, choose a mix of colored cherry tomatoes for a stunning visual effect!
Step 3: Cut the Mozzarella
- Take your ball of fresh mozzarella and slice it into small bite-sized pieces or tear it into chunks for a rustic touch.
- Toss these delightful cheese bites into the bowl.
Pro Tip: Don’t throw away any of the liquid from the mozzarella! It’s delicious, so spoon it in for extra flavor!
Step 4: Red Onion Magic
- Slice the red onion thinly, as thick slices can overwhelm the salad.
- If you find the onion too pungent, soak the slices in cold water for about 10 minutes before adding them to the salad.
Tip: Methodically layering flavors is key! Add the onion right after the tomatoes to lock in flavors.
Step 5: Add Fresh Herbs
- Tear the fresh basil leaves and sprinkle them over the salad.
- Basil loves mango; trust me on this one!
Step 6: Dress It Up
- In a small bowl, whisk together the lime juice, olive oil, salt, and pepper until combined.
- Pour the dressing lovingly over the salad, ensuring everything gets a good, juicy bath.
Chef Hack: If you want an extra kick, add a pinch of chili flakes to the dressing for a subtle heat!
Step 7: Gently Toss and Serve
- Using a spatula, gently fold the mixture together to combine all those beautiful flavors.
- Serve immediately or let it sit for a few minutes to allow the ingredients to marinate!
Chef Note: If serving later, wait to dress the salad until just before serving to keep the ingredients fresh!
Serving Suggestions
This Mango-Mozzarella Salad is a splendid side dish for grilled meats or fish, or it can shine as a light main course. To plate, consider layering the salad ingredients in a clear serving bowl, showcasing the stunning colors. A light drizzle of balsamic reduction on top adds an elegant touch, and a sprinkle of additional basil can elevate the presentation. Don’t forget some crusty bread or tortilla chips for dipping!
Recipe Variations
Here are some creative twists to keep your Mango-Mozzarella Salad fresh and exciting:
- Add Avocado: For extra creaminess, toss in some ripe avocado cubes!
- Grill the Ingredients: Slightly char the mango and tomatoes on a grill for a smoky flair.
- Quinoa Base: To make it heartier, serve the salad over a mound of fluffy quinoa!
- Fiesta Style: Add black beans and corn for a fun South-of-the-Border vibe!
- Vegan Option: Substitute mozzarella with tofu or cashew cheese for a delicious plant-based version.
Chef’s Notes
Oh, the memories this salad brings back! I’ve experimented over the years, adding different ingredients to suit seasonal produce or my guests’ preferences. Sometimes, I even serve it with a spicy avocado dressing for a little twist! Cooking is about evolution; let your creativity run wild! And if a mess occurs, consider it a badge of honor—one of my favorite kitchen stories involved a mango explosion that had us giggling for days.
FAQs and Troubleshooting
-
How do I choose the perfect mango?
Look for mangoes that give slightly when you press them. They should have a fruity aroma near the stem area. If they’re overly firm, they may not be ripe yet. -
Can I make the salad ahead of time?
While the salad can be prepped in advance, I recommend adding the dressing just before serving to keep the freshness of the ingredients intact. -
What do I do if my mangoes are not sweet enough?
Drizzle a little honey or agave syrup over the salad to elevate the sweetness. You could also add a pinch of sugar to the dressing! -
How can I store leftovers?
Keep any leftover salad in an airtight container in the fridge for up to a day. Be aware that the ingredients may lose some texture, but the flavors will still be delicious!
Nutritional Info (Optional)
This Mango-Mozzarella Salad is not only delicious but offers nutritional benefits too! You’ll get:
- Rich vitamins from mangoes (Vitamin C, Vitamin A)
- Protein and calcium from mozzarella
- Healthy fats from olive oil
- Antioxidants and fiber from fresh vegetables
So there you have it: a refreshing Mango-Mozzarella Salad bursting with flavor and perfect for any occasion! I hope you enjoy making it as much as I do. Happy cooking, and let’s raise a toast to the simple joys of kitchen adventures! 🍽️
Print
Refreshing Mango-Mozzarella Salad
- Total Time: 15 minutes
- Yield: 4 servings 1x
- Diet: Vegetarian
Description
A delightful salad combining ripe mangoes and creamy mozzarella, perfect for summer gatherings.
Ingredients
- 2 ripe mangoes
- 1 ball of fresh mozzarella
- 1 cup cherry tomatoes
- 1 small red onion
- Fresh basil leaves (about ¼ cup)
- Juice of 1 lime
- 3 tablespoons extra virgin olive oil
- Salt and pepper to taste
Instructions
- Prepare the mangoes by slicing down the sides of the pit and scooping out cubes.
- Slice the cherry tomatoes in half and add them to the mixing bowl.
- Cut the fresh mozzarella into small bite-sized pieces and add them into the bowl.
- Slice the red onion thinly and soak in cold water if too pungent, then add to the salad.
- Add the fresh basil leaves over the salad.
- Dress the salad by whisking together lime juice, olive oil, salt, and pepper, then pour over the salad.
- Gently toss the mixture together to combine all the flavors.
Notes
Add avocado for creaminess, grill the ingredients for a smoky flavor, or serve over quinoa for a heartier dish.
- Prep Time: 15 minutes
- Cook Time: 0 minutes
- Category: Salad
- Method: Mixing
- Cuisine: Fusion
Nutrition
- Serving Size: 1 serving
- Calories: 250
- Sugar: 14g
- Sodium: 150mg
- Fat: 16g
- Saturated Fat: 4g
- Unsaturated Fat: 10g
- Trans Fat: 0g
- Carbohydrates: 24g
- Fiber: 3g
- Protein: 6g
- Cholesterol: 15mg
Keywords: mango, mozzarella, salad, summer recipe, vegetarian dish

Pineapple Cucumber Salad
Pineapple Cucumber Salad: A Refreshing Twist on Summer Classics
Hey there, kitchen enthusiasts! Welcome back to my cozy corner of culinary creations. Today, we’re diving into a delightful dish that dances on your taste buds: Pineapple Cucumber Salad. As we embrace the sunny days of summer, this salad is the perfect companion for picnics, barbecues, or just a light, refreshing snack at home. With the crisp crunch of cucumber, the juicy sweetness of pineapple, and a zesty dressing, this salad is a celebration of flavors and textures.
What I love most about this recipe is its simplicity and vibrancy. It’s a dish that reminds me of lazy summer afternoons spent with family and friends, where laughter fills the air, and every bite brings a smile. Plus, it’s super versatile and easy to whip up in no time! Whether you’re a culinary whiz or a newbie in the kitchen, this recipe will have you feeling like a pro.
I still remember the first time I made this salad. It was a balmy August evening, and I was hosting a get-together for my closest pals. As I mixed the cucumbers and pineapple in a bowl, the colors were so bright and beautiful that they practically glowed against the backdrop of my kitchen. The moment everyone took their first bite, I was met with a chorus of “Wow!” and “This is amazing!” It reminded me that sometimes, the simplest ingredients can create the most unforgettable dishes.
So grab your apron, and let’s get chopping! This Pineapple Cucumber Salad is not just a recipe; it’s a ticket to a sunny escape right in your own home.
Personal Story
One of my favorite memories connected to this dish takes me back to last summer when I hosted a little gathering for my friends. We all decided to embrace the tropical vibe with a beach-themed party. I had just come back from a trip to the farmers’ market, where the cucumbers were crisp and vibrant, and the pineapples were juicy and sweet — just waiting to be transformed into something magical.
As I prepped the salad, my kitchen was filled with laughter, music, and the delightful aroma of fresh produce. When it was time to serve, my friends dove into the bowl like kids on Christmas morning, eagerly mixing and tasting. The joy on their faces as they savored that first bite is something I’ll never forget. The combination of flavors came together perfectly, and we spent the entire evening chatting, eating, and basking in the fun summer atmosphere. That night solidified my love for this salad and the way it brings people together. Every time I make it, I’m reminded of that pure joy and the importance of sharing meals with those we love.
Ingredients
Ready to gather your ingredients? Here’s what you’ll need for this fabulous Pineapple Cucumber Salad, complete with tips and insight from your friendly kitchen companion.
-
1 medium cucumber: Choose a firm, fresh cucumber for that satisfying crunch. If English cucumbers aren’t available, you can use regular ones. Remove the seeds for an even crunchier texture.
-
2 cups fresh pineapple, diced: Fresh is best for this salad, but canned pineapple works too (just drain it well to avoid excess liquid). The natural sweetness of the pineapple adds a lovely tropical flair.
-
1 bell pepper (red, yellow, or orange): This adds a pop of color and extra flavor. Feel free to substitute with chopped tomatoes or avocado for a creamier texture!
-
1/4 red onion, finely chopped: Red onions offer a milder taste compared to white onions. If you’re sensitive to raw onions, soak them in cold water before adding them to the salad.
-
1/4 cup fresh cilantro, chopped: This herb enhances the tropical vibe of the dish. Not a cilantro fan? Try fresh mint or basil instead for a different twist!
-
Juice of one lime: Lime juice brightens the flavors and adds that zing we all love. If limes are hard to come by, lemon juice can serve as a great substitute.
-
1-2 tablespoons olive oil: This brings everything together. For a different flavor, try avocado oil or even coconut oil for a slight tropical note.
-
Salt and pepper to taste: Simple seasonings make all the difference! Feel free to experiment with spices like chili powder or cumin for an extra kick.
Step-by-Step Instructions
Now that we have our ingredients ready, let’s get cooking! Follow these easy steps to whip up your Pineapple Cucumber Salad.
Step 1: Prep the Ingredients
Start by washing all your fresh produce thoroughly. Clean cucumbers, bell peppers, and cilantro under cold water. For the pineapple, you’ll want to cut away the skin and the eyes and then dice it into bite-sized pieces.
Step 2: Slice the Cucumber
Using a sharp knife, slice your cucumber in half lengthwise, then cut into half-moons. This shape adds great texture to the salad. Remember, if you’re using regular cucumbers, feel free to peel them if you prefer. Chef tip: Keep the skin for added nutrients!
Step 3: Dice the Pineapple
Take your fresh pineapple and cut it into small cubes. If your tropical fruit is a bit stubborn, sit it in the fridge for about 30 minutes before cutting – it will firm up, making it easier to handle!
Step 4: Chop the Bell Pepper and Onion
Dice your bell pepper and finely chop the red onion. For a more even distribution of flavor, try to keep the pieces about the same size as your cucumber and pineapple.
Step 5: Gather the Salad
In a large mixing bowl, combine the cucumber, pineapple, bell pepper, red onion, and cilantro. At this moment, your bowl will look like a vibrant rainbow of colors!
Step 6: Dress the Salad
In a small bowl, whisk together the lime juice and olive oil (add salt and pepper to taste). This dressing is the key to tying all the flavors together. Pour it over your salad mixture and toss gently to combine. Go easy on the stirring; you want to keep those lovely pineapple and cucumber pieces intact.
Step 7: Taste and Adjust
Here’s a little chef hack: always taste your dish as you go. Adjust the seasoning with extra lime juice, salt, or pepper according to your preference. This ensures that every bite is perfect!
Step 8: Chill (Optional)
For the best flavor, refrigerate the salad for about 30 minutes before serving. This allows the flavors to meld and brings a refreshing chill to the dish.
Serving Suggestions
When it comes time to serve, scoop generous portions of your Pineapple Cucumber Salad into colorful bowls or on individual plates. Garnish with extra cilantro or a slice of lime for a fun touch. This salad pairs beautifully with grilled meats, fish tacos, or can be enjoyed on its own as a light lunch. Trust me, it’s not only a feast for the taste buds but also a treat for the eyes!
Recipe Variations
Here are a few creative twists to keep things interesting:
-
Spicy Pineapple Cucumber Salad: Add chopped jalapeños for a little heat. It complements the sweetness of the pineapple beautifully!
-
Tropical Avocado Twist: Substitute half of the cucumbers with diced avocados for a creamy texture.
-
Coconut-Curry Flavor: Mix in a tablespoon of coconut milk and a dash of curry powder for a unique flavor profile.
-
Add Nuts: Toss in some toasted almonds or cashews for an extra crunch and a nutty flavor.
-
Quinoa Booster: Serve this salad over a bed of cooked quinoa for a heartier, protein-packed meal.
Chef’s Notes
This Pineapple Cucumber Salad has become a staple in my kitchen and among friends. Over time, I’ve discovered that the key to its success lies in the fresh ingredients—so I always try to use what’s in season. Plus, it’s been fun to witness the different variations my friends have created over the years, each adding a little personal touch. The memories are what truly make each recipe special!
And let’s be honest—the first time a friend tried to add watermelon to the mix, I was skeptical. But when it turned out to be a hit, I learned never to say never in the kitchen!
FAQs and Troubleshooting
Q1: What can I do if my salad is too soggy?
If your salad ends up too watery, try draining the excess liquid before serving. You can also:
- Add more cucumbers or use a thicker dressing to balance it out.
- Toss in some crushed nuts for extra crunch.
Q2: How can I store leftovers?
Store any leftovers in an airtight container in the refrigerator. It’s best enjoyed within 2 days. Just know that the cucumbers may release more water over time, so give it a quick stir when you’re ready to eat!
Q3: Can I use frozen pineapple?
While fresh is ideal, you can certainly use frozen pineapple – just let it thaw completely and drain any excess liquid before adding it to the salad.
Q4: What to do if I don’t like cilantro?
No problem! You can simply omit cilantro and replace it with fresh parsley or mint for a different herbaceous flavor.
Nutritional Info
While the exact nutritional info will depend on specific ingredient brands and amounts, here’s a general idea of what you might expect per serving (assuming 4 servings):
- Calories: 150
- Protein: 2g
- Fat: 7g
- Carbohydrates: 22g
- Fiber: 3g
- Sugar: 8g
And there you have it, food lovers! A refreshing, vibrant, and undeniably delicious Pineapple Cucumber Salad. I hope this recipe fills your kitchen with joy and inspires you to gather the people you love. Happy cooking! 🍍🥒
Print
Pineapple Cucumber Salad
- Total Time: 15 minutes
- Yield: 4 servings 1x
- Diet: Vegetarian
Description
A refreshing and vibrant salad combining the crispness of cucumber and the sweetness of pineapple, perfect for summer picnics and gatherings.
Ingredients
- 1 medium cucumber
- 2 cups fresh pineapple, diced
- 1 bell pepper (red, yellow, or orange)
- 1/4 red onion, finely chopped
- 1/4 cup fresh cilantro, chopped
- Juice of one lime
- 1–2 tablespoons olive oil
- Salt and pepper to taste
Instructions
- Prep the Ingredients: Wash all fresh produce thoroughly.
- Slice the Cucumber: Cut into half-moons for great texture.
- Dice the Pineapple: Cut into small cubes.
- Chop the Bell Pepper and Onion: Keep pieces similar in size.
- Gather the Salad: Combine all ingredients in a large mixing bowl.
- Dress the Salad: Whisk together lime juice and olive oil, add to salad and toss gently.
- Taste and Adjust: Modify seasoning as desired.
- Chill (Optional): Refrigerate for about 30 minutes before serving.
Notes
For added flavor, refrigerate the salad before serving to meld the flavors.
- Prep Time: 15 minutes
- Cook Time: 0 minutes
- Category: Salad
- Method: Mixing
- Cuisine: Tropical
Nutrition
- Serving Size: 1 serving
- Calories: 150
- Sugar: 8g
- Sodium: 150mg
- Fat: 7g
- Saturated Fat: 1g
- Unsaturated Fat: 5g
- Trans Fat: 0g
- Carbohydrates: 22g
- Fiber: 3g
- Protein: 2g
- Cholesterol: 0mg
Keywords: salad, pineapple, cucumber, summer, refreshing, healthy
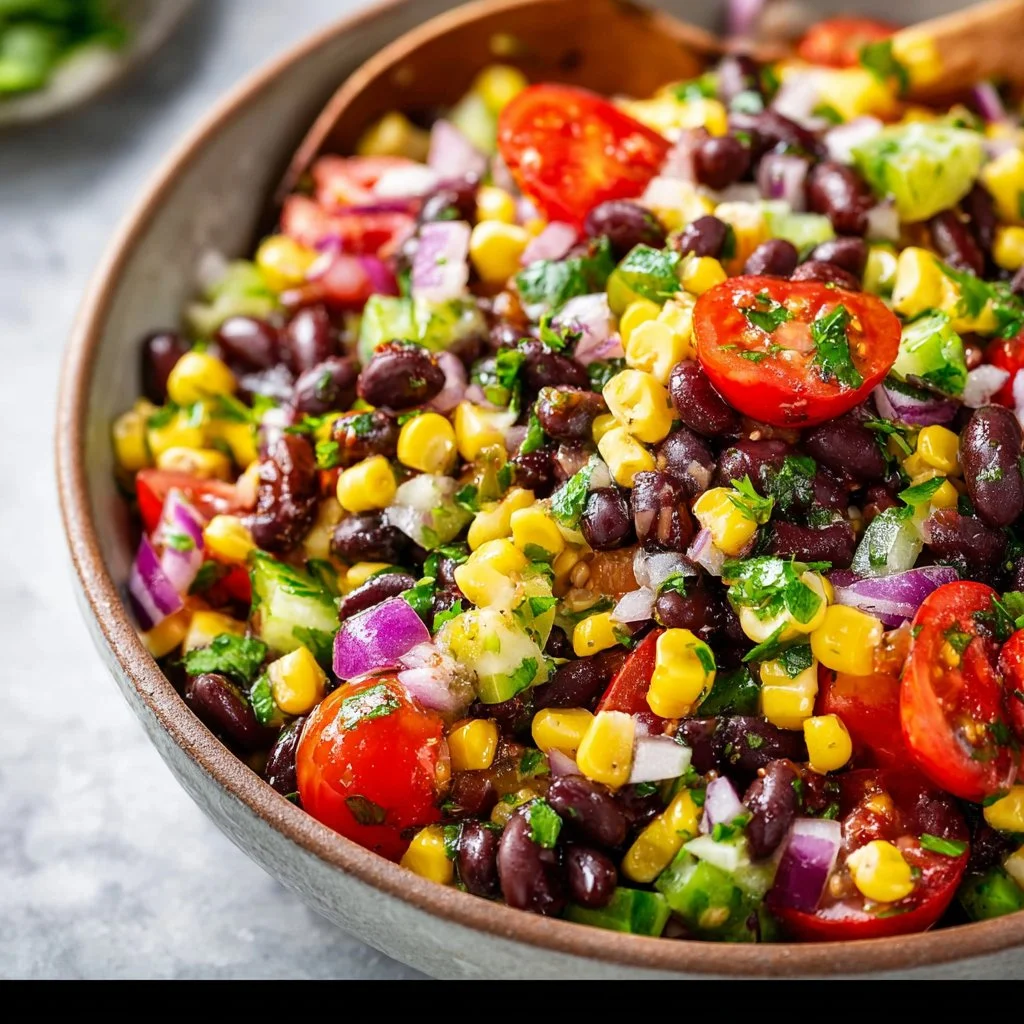
Black Bean and Corn Salsa Salad
Black Bean and Corn Salsa Salad: A Colorful Celebration of Flavor
Introduction
Welcome back to my kitchen! I’m so excited to share one of my favorite dishes with you today—Black Bean and Corn Salsa Salad. This vibrant, flavorful salad is not only a feast for the eyes but also a delightful burst of freshness in every bite. It’s the perfect side dish for summer barbecues, a fabulous topping for tacos, or a light lunch on a warm day. The best part? It’s super easy to whip up in no time!
I remember the first time I made this dish—a sun-drenched afternoon, the air filled with laughter, and the scent of freshly grilled chicken wafting in from the patio. I wanted something refreshing that could balance out the savory flavors of the grilled meats while adding a pop of color to our spread. After rummaging through my pantry and fridge, I stumbled upon some canned black beans, frozen corn, fresh cilantro, tomatoes, and a squeeze of lime. Just like that, the Black Bean and Corn Salsa Salad was born!
With its delightful medley of flavors and textures—crunchy bell peppers, sweet corn, hearty black beans, and zesty lime—this salad embodies everything I love about cooking: simplicity, nourishment, and connection. So, gather your ingredients and get ready to experience the joy of creating something delicious that your family and friends will absolutely adore!
Now, let’s dive into the story behind this delicious recipe, the ingredients, and how to make your very own Black Bean and Corn Salsa Salad.
Personal Story
Growing up, summer evenings at my grandparents’ house were nothing short of magical. My grandmother, the queen of backyard barbecues, had this uncanny ability to gather everyone around the grill, filling the air with the aroma of sizzling meats and vegetables. But amidst the smoky goodness, her signature Black Bean and Corn Salsa always stole the show.
I loved sneaking spoonfuls of the salad while it rested on the kitchen counter, impatiently waiting for it to be served. The vibrant colors glistened under the light, and each bite was a refreshing explosion of flavor. It wasn’t just a salad; it was a canvas for creativity and love.
Today, every time I whip up this recipe, I can’t help but reminisce about those carefree summer nights, the laughter surrounding me, and the feeling of being connected to my family through food. This dish is not just a salad; it’s a tribute to my family traditions and a reminder that the simplest recipes often carry the richest memories.
Ingredients
Let’s gather everything you need to create this colorful salsa salad. Here’s what you’ll need:
-
1 can (15 oz) black beans
- Packed with protein and fiber, black beans are a fantastic base for this salad. Make sure to rinse them well before adding to get rid of the excess sodium. If you’re looking for a substitute, kidney beans work beautifully too!
-
1 cup corn (fresh, frozen, or canned)
- Sweet corn adds a crunchy texture to the dish. If using fresh corn, just boil or grill it briefly to soften it up. For a twist, consider using roasted corn for a deeper flavor!
-
1 red bell pepper, diced
- This vibrant veggie adds sweetness and a lovely crunch. Feel free to swap it with a yellow or orange pepper for a different color palette, or even jalapeño for some extra heat if you’re feeling spicy!
-
1 cup cherry tomatoes, halved
- Bursting with flavor and juiciness, cherry tomatoes are my go-to choice. They’re easier to eat and add a pop of color. You can also use grape tomatoes or any ripe heirloom variety for unique flavors.
-
1/2 red onion, finely chopped
- Red onions bring a sharp bite that complements the sweetness of the corn. If you prefer a milder taste, soaking the onion in cold water for a few minutes can take the edge off!
-
1 cup fresh cilantro, chopped
- Cilantro adds a bright, herbaceous note that ties all the flavors together. If you’re not a fan, consider fresh parsley as a substitute or even a sprinkle of fresh oregano for something different.
-
Juice of 1 lime
- The acidity from lime juice is essential to brighten up the salad. You can use lemon juice in a pinch, but the lime really gives it that zesty kick we crave!
-
Salt and pepper, to taste
- Simple seasonings can make or break a dish! Start with a pinch of each, then taste and adjust as needed. I always remind my friends that it’s better to start small and add more if needed.
Step-by-Step Instructions
Now that we have our ingredients lined up, let’s make this vibrant salad! Follow these easy steps:
-
Prep the Beans and Corn
- If you’re using canned black beans, drain and rinse them under cold water until the water runs clear. This will wash away any excess sodium and improve the final flavor. For frozen corn, microwave it per the package instructions, then cool it down quickly in a bowl of ice water to stop the cooking process. This ensures your corn stays sweet and crunchy!
-
Chop the Veggies
- Dice your red bell pepper and red onion, and halve the cherry tomatoes. I like to keep the veggies pretty uniform in size so they blend well together, creating a beautiful mosaic! For the onion, remember to use a sharp knife—it helps to prevent the release of those tear-inducing compounds!
-
Mix It Up
- In a large mixing bowl, combine the black beans, corn, diced bell pepper, halved cherry tomatoes, and chopped red onion. Mix everything gently with a spatula or wooden spoon, being careful not to mash the beans!
-
Add Fresh Herbs and Lime Juice
- Toss in the chopped cilantro and squeeze the juice of one lime over the mixture. Toss everything again until well combined. The lime juice not only adds flavor but also helps marry all the ingredients together. Plus, who doesn’t love the smell of fresh lime in their kitchen?
-
Season to Taste
- Finally, sprinkle the salad with salt and pepper, mixing until evenly distributed. Now’s the time to give it a taste! If you want it zestier, feel free to add more lime juice.
-
Chill (Optional)
- Although you can serve it immediately, allowing the salad to chill in the fridge for about 30 minutes enhances the flavors as they mingle. It’s perfect for making ahead for parties!
Serving Suggestions
This Black Bean and Corn Salsa Salad can be served in various ways! You can present it in a large bowl for family-style sharing, or portion it out in individual cups for a fun, casual presentation. Garnish with additional cilantro for extra flair! Serve alongside grilled meats for a tasty contrast, scoop it up with tortilla chips for a add it as a topping for tacos, or enjoy it as a standalone dish on a hot day!
Recipe Variations
-
Add Avocado: For a creamy twist, dice up an avocado and gently fold it into the salad just before serving for added richness.
-
Spicy Kick: Chop up 1-2 jalapeño peppers (with or without seeds depending on your heat preference!) and toss them in for a fiery bite.
-
Quinoa Power: For extra protein and texture, mix in some cooked quinoa—it’s a great way to turn this salad into a more filling main dish.
-
Southwestern Flair: Sprinkle some crumbled feta or cotija cheese on top for a salty, creamy contrast. You can even use a dressing made from olive oil, cumin, and chili powder for added flavor.
-
Herb Swap: Try substituting fresh basil for cilantro, or add a handful of arugula for peppery notes that complement the sweet corn.
Chef’s Notes
This recipe has been a staple in my kitchen for years, and it has evolved with me! I’ve made it during countless summer gatherings, family picnics, and even as a light lunch when I want something refreshing. The beauty of salad is its adaptability; you can change the ingredients based on what’s in season or what flavors you’re craving.
I once had a friend add diced mango, and it was a game changer! The sweet and savory combination was incredible. There’s a certain joy in experimenting with this dish, so don’t be afraid to put your own spin on it!
FAQs and Troubleshooting
1. Can I make this salad ahead of time?
Yes! This salad can be made ahead, making it perfect for meal prepping or parties. The flavors get even better as they marinate together. Just keep it in an airtight container in the refrigerator.
2. How do I store leftover salad?
Any leftovers can be stored in an airtight container in the fridge for up to 3 days. However, if you’ve added avocado, it may brown a bit quicker. Just squeeze some extra lime juice on top before sealing!
3. Can I use dried beans instead of canned?
Absolutely! If you prefer dried beans, make sure to soak and cook them ahead of time. Just ensure they are thoroughly cooled before mixing them into your salad.
4. Why did my salad turn watery after storing?
This can happen if you’ve added ingredients that release moisture, like tomatoes. To avoid this, you can remove the seeds of the tomatoes or serve them on the side.
Nutritional Information
(Optional, as this might vary based on specific brands and quantities used. If you want, you can include an estimated breakdown based on one serving size).
And there you have it—my beloved Black Bean and Corn Salsa Salad! I hope you find as much joy in making and sharing this dish as I do. It’s not just a salad; it’s a celebration of flavors, colors, and memories waiting to be made. Happy cooking, and enjoy every bite!
Print
Black Bean and Corn Salsa Salad
- Total Time: 20 minutes
- Yield: 4 servings 1x
- Diet: Vegetarian
Description
A vibrant and flavorful salad featuring black beans, sweet corn, and fresh vegetables, perfect for summer gatherings or as a light meal.
Ingredients
- 1 can (15 oz) black beans, rinsed
- 1 cup corn (fresh, frozen, or canned)
- 1 red bell pepper, diced
- 1 cup cherry tomatoes, halved
- 1/2 red onion, finely chopped
- 1 cup fresh cilantro, chopped
- Juice of 1 lime
- Salt and pepper, to taste
Instructions
- Prep the beans and corn by draining and rinsing the black beans, and cooking the corn if needed.
- Chop the red bell pepper and red onion, and halve the cherry tomatoes.
- Mix the black beans, corn, diced bell pepper, halved cherry tomatoes, and chopped red onion in a large bowl.
- Add the chopped cilantro and lime juice to the mixture and toss to combine.
- Season with salt and pepper to taste.
- Chill in the fridge for 30 minutes or serve immediately.
Notes
This salad can be customized with avocado, jalapeños, or quinoa for added flavor and nutrition.
- Prep Time: 15 minutes
- Cook Time: 5 minutes
- Category: Salad
- Method: Mixing
- Cuisine: Mexican
Nutrition
- Serving Size: 1 serving
- Calories: 250
- Sugar: 6g
- Sodium: 300mg
- Fat: 5g
- Saturated Fat: 0.5g
- Unsaturated Fat: 4g
- Trans Fat: 0g
- Carbohydrates: 45g
- Fiber: 10g
- Protein: 12g
- Cholesterol: 0mg
Keywords: black bean salad, corn salsa, summer salad, vegetarian recipes

Potato Salad Recipe
The Ultimate Potato Salad Recipe That Brings Everyone Together
Introduction
Hello, food friends! Welcome back to my cozy kitchen. I’m so excited to share one of my absolute favorite recipes with you today: the Ultimate Potato Salad! This isn’t your everyday potato salad; we’re talking about a dish that’s been elevated to a party centerpiece, a summer BBQ staple, and even a comforting side for that cozy family gathering. You know the one—that dish that brings everyone to the table and sparks laughter and stories? Yep, that’s this potato salad.
I remember my first experience with potato salad. It was a hot summer day, the sun was shining, and we had a big family barbecue in the backyard. Grandma was at the helm, armed with her trusty mixing bowl and a smile that could warm your soul. As she whipped up her infamous potato salad, it was like watching a culinary magician. The aroma of fresh herbs, crisp veggies, and vibrant mustard filled the air, and I was hooked. Each bite was creamy, tangy, and had just the right amount of crunch. Fast forward to today, and I’ve put my own twist on it, creating a recipe that combines nostalgia with modern flavors.
This potato salad is simple enough for a weeknight dinner yet fancy enough for your holiday table. We’ll be using fresh ingredients and a few unexpected surprises that will make your taste buds sing. So, whether you’re a kitchen novice or a seasoned pro, let’s roll up our sleeves and dive into this delicious, heart-warming adventure together!
Personal Story
You know, I often think about the stories behind the meals that mean the most to us, and for me, potato salad is wrapped up in family bonding moments. One summer, we had an epic potluck with all the relatives—shouting cousins and giggling aunts everywhere. Grandma insisted on bringing her potato salad, and she was determined to win the "Best Dish" contest. The pressure was on!
As we gathered around the table, I watched everyone’s eyes light up when they saw Grandma’s creation. It was this beautiful blend of Yukon gold potatoes, fresh herbs, and a touch of her whimsical ingredient—a secret dash of dill pickles! As people savored her dish, laughter erupted, and stories started flying around the table like confetti. I’ll never forget how that potato salad broke the ice and brought everyone closer, reminding us all that food is truly a bridge that connects hearts. Every family has a version of this dish, and now, I can’t wait for you to create lasting memories with your loved ones using my take on Grandma’s delightful recipe!
Ingredients
Here’s what you’ll need for the Ultimate Potato Salad:
-
Yukon Gold Potatoes: These creamy spuds are my go-to for potato salad. Their buttery flavor and smooth texture make this dish irresistible. Plus, they hold up well, ensuring no mushy mess! Substitute with red potatoes for a slightly firmer bite.
-
Mayonnaise: The creamy star of the show! Use a good quality mayo for the best flavor. If you’re looking for a lighter option, Greek yogurt or a vegan mayo can make a delicious substitute.
-
Dijon Mustard: This adds a nice tang and depth of flavor. It’s a game-changer! If you’re sensitive to mustard, yellow mustard works well too, or – for something different – try a tablespoon of vinegar.
-
Lemon Juice: Freshly squeezed is best and adds a bright, zesty kick that cuts through the creaminess perfectly. If you don’t have fresh lemons, a splash of vinegar can work in a pinch.
-
Celery: For that crisp crunch! It adds a refreshing bite and a pop of color. If you’re not a fan of celery, chopped bell peppers or carrots can offer similar crunch with their own flavor twist.
-
Red Onion: This gives the potato salad its kick! Apple cider vinegar-soaked onions can substitute if you’re looking for a milder flavor.
-
Fresh Dill: It’s a must for that classic potato salad flavor! If you can’t find fresh, dried dill works, but you’ll need much less—about a teaspoon.
-
Salt and Pepper: Essential for seasoning! A little salt boosts all the flavors, and freshly cracked black pepper adds a nice peppery kick.
These simple ingredients come together to create a potato salad that’s creamy, tangy, and will surely steal the show at your next gathering!
Step-by-Step Instructions
Let’s get cooking! Follow these simple steps and keep an eye out for my chef hacks along the way:
-
Prep the Potatoes: Start by washing your Yukon gold potatoes. You can peel them or leave the skins on for extra texture and nutrients—personal choice here! Cut them into equal-sized chunks, about 1–2 inches, for even cooking.
Chef Hack: Do you want to save time? You can boil the potatoes whole and chop them afterward! Just ensure they’re fork-tender.
-
Boil the Potatoes: Place the potatoes in a large pot, cover them with cold water, and add a generous pinch of salt. Bring to a boil and let ’em cook for 12–15 minutes until tender but not mushy—nobody likes mushy potato salad! Test by poking with a fork; it should go in easily but have a little resistance.
-
Cool the Potatoes: Once cooked, drain the potatoes and let them cool on the counter. This step is crucial—if they’re too hot when you mix in the mayo, it can turn into a gloppy mess!
Chef Hack: For even faster cooling, spread them out on a baking sheet.
-
Make the Dressing: In a large mixing bowl, combine mayo, Dijon mustard, lemon juice, salt, and pepper. Give it a good mix until it’s creamy and smooth.
-
Chop the Veggies: While the potatoes are cooling, finely chop your celery, red onion, and fresh dill. You want everything to be bite-sized and evenly distributed throughout the salad.
-
Combine: Once the potatoes are cool, gently fold them into the dressing along with the chopped veggies. Be careful not to mash them; we want those lovely chunks of potato to shine!
-
Taste Test: This is my favorite part! Give your potato salad a taste, and adjust the seasoning as needed. Need more zing? Add more lemon juice or salt; craving even more creaminess? Fold in a bit more mayo.
-
Chill: Cover the potato salad and let it chill in the fridge for at least 1 hour before serving. This rest time allows the flavors to meld beautifully.
Chef Hack: If you can, make this the day before! It gets better overnight!
-
Serve: When ready to serve, give it a gentle toss and top with a sprinkle of fresh dill for a pop of color.
Serving Suggestions
Serve the Ultimate Potato Salad chilled, either in a large bowl or for a more elegant presentation, scoop it into individual serving dishes. Garnish with a pinch of paprika or more dill on top to add flair. Pair it with grilled meats, sandwiches, or enjoy it by itself as a satisfying bite!
Recipe Variations
- Bacon & Chive: Add crispy cooked bacon and chopped chives for extra flavor and crunch!
- Mediterranean Twist: Toss in some olives, cherry tomatoes, and feta cheese for a fresh, tangy bite.
- Vegan Delight: Swap mayo for avocado or vegan mayo, and use chickpeas instead of potatoes for a protein-rich alternative.
- Spicy Kick: Add diced jalapeños or a dash of hot sauce for those who like it a little hot!
- Herb Blend: Experiment with different herbs like parsley, tarragon, or basil for a unique flavor profile.
Chef’s Notes
Potato salad is one of those fantastic recipes that can evolve with your tastes and the seasons. Over the years, I’ve added and tweaked many versions, but the heart of it always remains the same: comfort food. One funny memory I have is attempting to impress a friend by infusing my potato salad with an array of spices—only to find that they were not a fan of "spicy" salad. Let’s stick to flavors that make people feel warm and satisfied!
As you create your own versions, don’t forget to make this recipe your own. It’s all about the love you put into it (and maybe a bit of trial and error)!
FAQs and Troubleshooting
1. My potato salad is too mushy. What went wrong?
- It sounds like the potatoes may have been overcooked. For the best texture, test them with a fork and remove them from heat before they turn into mush.
2. Can I make this dish ahead of time?
- Absolutely! In fact, it tastes better after a night in the fridge as the flavors meld together. Just be sure to give it a good stir before serving!
3. What can I use if I don’t have fresh dill?
- No worries! Dried dill works well; just use about 1/3 of the amount for the best balance. Fresh herbs like parsley or chives can also be great alternatives.
4. Can I add other veggies?
- Definitely! Chopped bell peppers, corn, or even peas can add a pop of color and flavor. Get creative!
Nutritional Info (Optional)
This potato salad can serve as a hearty side dish, providing essential nutrients from the potatoes and veggies. Here’s a rough breakdown per serving:
- Calories: 200
- Protein: 3g
- Carbohydrates: 30g
- Fats: 10g
- Fiber: 2g
Feel free to adjust portions for a lighter version by reducing mayo or potatoes!
And there you have it: the Ultimate Potato Salad to help you create memories in your kitchen! I can’t wait for you to try this recipe and see the joy it brings to your gatherings. Happy cooking, my friends! 🍽️
Print
The Ultimate Potato Salad
- Total Time: 30 minutes
- Yield: 8 servings 1x
- Diet: Vegetarian
Description
A creamy, tangy potato salad that brings everyone together, perfect for summer BBQs and family gatherings.
Ingredients
- 3 lbs Yukon Gold Potatoes, cubed
- 1 cup mayonnaise
- 1/4 cup Dijon Mustard
- 2 tbsp Lemon Juice
- 1 cup Celery, chopped
- 1/2 cup Red Onion, finely chopped
- 1/4 cup Fresh Dill, chopped
- Salt and Pepper, to taste
Instructions
- Prep the Potatoes: Wash and cut potatoes into equal-sized chunks, about 1–2 inches.
- Boil the Potatoes: Place potatoes in a pot, cover with cold water, add salt, and bring to a boil. Cook for 12–15 minutes until tender.
- Cool the Potatoes: Drain and let cool on a counter.
- Make the Dressing: In a bowl, mix mayo, Dijon mustard, lemon juice, salt, and pepper.
- Chop the Veggies: Finely chop celery, red onion, and dill.
- Combine: Fold cooled potatoes into the dressing with chopped veggies.
- Taste Test: Adjust seasoning as needed.
- Chill: Cover and chill for at least 1 hour.
- Serve: Toss before serving, garnish with fresh dill.
Notes
This dish tastes better if made a day in advance.
- Prep Time: 15 minutes
- Cook Time: 15 minutes
- Category: Side Dish
- Method: Boiling
- Cuisine: American
Nutrition
- Serving Size: 1 cup
- Calories: 200
- Sugar: 1g
- Sodium: 300mg
- Fat: 10g
- Saturated Fat: 1g
- Unsaturated Fat: 9g
- Trans Fat: 0g
- Carbohydrates: 30g
- Fiber: 3g
- Protein: 3g
- Cholesterol: 10mg
Keywords: potato salad, summer recipes, BBQ side dish, creamy potato salad, family recipes

Deviled Egg Potato Salad
Deviled Egg Potato Salad: A Creamy Twist on a Classic Dish
Hello, fellow food lovers! Welcome back to my cozy kitchen! Today, I’m thrilled to share a delightful twist on a classic that’s guaranteed to spark joy at your next gathering or even just a laid-back dinner at home. We’re diving into my Deviled Egg Potato Salad — a creamy, tangy dish that brings all the nostalgic vibes with a fancy, flavorful kick! Trust me; this is not your ordinary potato salad.
Growing up, summer picnics were not complete without my grandmother’s renowned potato salad. It was creamy, packed with flavors, and always had that garnish of paprika on top that just made it look extra special. Fast forward to my culinary adventures, and I found myself craving the flavors of deviled eggs, which were another family favorite. It struck me—what if I combined the best of both worlds? And, just like that, Deviled Egg Potato Salad was born!
This dish gives you the comfort of classic potato salad while introducing the rich creaminess and zesty kick of deviled eggs. It’s perfect for potlucks, barbecues, or just a side dish that feels gourmet without breaking a sweat. Prepare for some delightful kitchen antics and cooking tips, all while creating a dish that’s as beautiful as it is delectable.
So, roll up those sleeves, grab your apron (get ready for a little mess!), and let’s dive into this scrumptious recipe that’s sure to become a staple in your kitchen!
Personal Story
The memories I cherish most often revolve around food. I remember bustling around my grandmother’s kitchen, the air thick with the aroma of garlic and herbs, while she would deftly chop vegetables and guide me through her age-old family recipes. One of my favorites was her potato salad, with its smooth texture and vibrant flavors. It was the highlight of every family barbecue, always served alongside juicy burgers and grilled corn.
I was the self-proclaimed potato salad expert among my cousins, and my only job was to sprinkle the paprika on top—oh, the pride! As I grew older and started experimenting in the kitchen, I couldn’t resist adding my little twist to the classic flavors I loved so much. When I eventually made this Deviled Egg Potato Salad, I couldn’t help but smile, not just from the deliciousness that unfolded but from the memories that flooded back.
Now, as I share this recipe with you, I believe food has a special way of connecting us, evoking memories, and creating new ones. I can’t wait for you to create your version, with laughter and joy woven into every bite!
Ingredients
Here are the ingredients you’ll need to make this scrumptious Deviled Egg Potato Salad:
-
Potatoes (about 2 pounds)
- I love using Yukon Golds for their buttery flavor, but Russets work well too! Just remember to peel and cube them before boiling for even cooking.
-
Eggs (4 large)
- Hard-boiled eggs are key! They not only enhance the creaminess but also provide protein. For easier peeling, try using older eggs or steaming them before boiling.
-
Mayonnaise (1/2 cup)
- The creamy base of our salad! Feel free to use Greek yogurt for a lighter option or an avocado-based mayo for a healthier twist.
-
Dijon Mustard (1 tablespoon)
- A little tang goes a long way. If you’re a mustard fan, you can double this for that zesty kick!
-
Apple Cider Vinegar (1 tablespoon)
- Brightens the flavors. White vinegar works too, or lemon juice if you want a fresh twist!
-
Celery (2 stalks, chopped)
- Adds crunch! If you prefer a sweeter flavor, try using chopped pickles or relish instead.
-
Red Onion (1/4 cup, finely chopped)
- A punch of flavor! If red onion feels too strong, go for green onions or shallots.
-
Salt and Pepper (to taste)
- Essential for balancing flavors! Always taste as you go—you want that perfect savory touch!
-
Paprika (for garnish)
- The crowning glory! Smoked paprika adds an amazing depth, but sweet paprika works just as well.
Step-by-Step Instructions
Let’s get cooking! Follow these detailed steps to create a creamy and indulgent Deviled Egg Potato Salad.
Step 1: Boil the Potatoes
-
Prepare the potatoes: Start by washing and peeling the potatoes. Cut them into uniform cubes, about 1-inch in size. This will ensure even cooking.
-
Boil them up: Fill a large pot with water, add a generous pinch of salt, and bring it to a rolling boil. Carefully add the cubed potatoes, letting them cook for 10-15 minutes until fork-tender (but not mushy!). You want them to hold their shape.
-
Drain and cool: Once cooked, drain the potatoes and let them cool slightly in the sink, giving them a little shake to release some steam. You want them warm but not steaming hot when you mix them in.
Step 2: Hard-Boil the Eggs
-
Boil the eggs: In a separate pot, gently place the eggs and cover them with cold water. Bring it to a boil, then cover and remove from heat. Let them sit for about 12-14 minutes.
-
Cool and peel: Once done, transfer the eggs to an ice bath to stop the cooking process. After they cool for about 5-10 minutes, peel them under running water for easier shell removal.
Step 3: Mix the Creamy Base
- Prepare the dressing: In a large bowl, combine the mayonnaise, Dijon mustard, apple cider vinegar, salt, and pepper. Mix well until it’s creamy and smooth. This will be the glorious dressing that brings everything together!
Step 4: Assemble the Salad
-
Chop the eggs and veggies: Dice the hard-boiled eggs. You can either chop them finely for a more blended texture or leave them in bigger pieces for a chunkier bite—totally your call!
-
Combine ingredients: Add the cooled potatoes, chopped celery, and red onion to the bowl with the dressing. Gently fold in the chopped eggs, being careful not to mash the potatoes or eggs.
-
Taste and adjust: This is your moment! Taste your salad and adjust the seasoning as needed. If you prefer more tanginess, add a little more vinegar or mustard.
Step 5: Chill and Garnish
-
Chill out: Once everything is beautifully mixed, cover the bowl and let the salad chill in the refrigerator for at least an hour. This allows all the flavors to meld beautifully.
-
Serve with flair: Before serving, sprinkle a generous dusting of paprika on top for that pop of color and flavor.
Serving Suggestions
When it’s time to serve your Deviled Egg Potato Salad, consider presenting it in a lovely bowl garnished with fresh herbs like parsley or chives. Pair it alongside classic barbecue dishes, grilled meats, or serve it on a picnic platter. It’s equally fantastic as a hearty side or as the centerpiece of a lunch spread!
Recipe Variations
-
Herbed Delight: Add fresh dill or parsley for an herbal touch that brightens up the flavors.
-
Spicy Kick: Mix in a dash of sriracha or hot sauce for a spicy twist on the classic taste.
-
Bacon Love: Crumble crispy bacon on top for a smoky flavor that contrasts beautifully with the creaminess.
-
Veggie Lovers: Toss in some sweet peas or diced bell peppers for extra color and sweetness.
-
Dietary Swaps: Use plant-based mayo for a vegan option, or swap potatoes for diced cauliflower for a low-carb alternative.
Chef’s Notes
I like to think of this recipe as a canvas. The foundations of potatoes and eggs create a perfect base, while your creativity can shine through in the seasonings and toppings. Over the years, I’ve played around with various herbs and spices, and each iteration tells a story of its own. One fateful summer, I even tossed in some pickled jalapeños, and it became a favorite among friends—we dubbed it the “spicy deviled egg potato salad”!
In the kitchen, the possibilities are endless, and that’s what makes cooking such a joy. So, don’t hesitate to make it your own and let your personality shine!
FAQs and Troubleshooting
Q: My potatoes are mushy. What went wrong?
A: If they’re mushy, it usually means they were over-boiled. Aim for that fork-tender state!
Q: How can I make my eggs easier to peel?
A: Use older eggs or steam them instead of boiling; it works like a charm to loosen the shell.
Q: Can I prep this ahead of time?
A: Absolutely! It’s best made a day in advance; just ensure you store it in an airtight container in the fridge.
Q: How long does it last in the refrigerator?
A: Your Deviled Egg Potato Salad will last about 3-4 days in the fridge. Just give it a stir before serving again!
Nutritional Info
While this dish is rich and creamy, it’s also packed with protein and vitamins! Each serving provides a satisfying blend of healthy fats and nutrients, perfect as a side at your next meal.
I hope you loved this journey into the world of Deviled Egg Potato Salad! Remember, the best meals are the ones that stir our hearts and fill our bellies. So, gather your loved ones and feast on this deliciousness. Cheers to cozy cooking and happy memories in the kitchen!
Print
Deviled Egg Potato Salad
- Total Time: 45 minutes
- Yield: 6 servings 1x
- Diet: Vegetarian
Description
A creamy twist on classic potato salad combined with the flavors of deviled eggs.
Ingredients
- 2 pounds Potatoes (peeled and cubed)
- 4 large Eggs (hard-boiled)
- 1/2 cup Mayonnaise
- 1 tablespoon Dijon Mustard
- 1 tablespoon Apple Cider Vinegar
- 2 stalks Celery (chopped)
- 1/4 cup Red Onion (finely chopped)
- Salt and Pepper (to taste)
- Paprika (for garnish)
Instructions
- Prepare the potatoes: Start by washing and peeling the potatoes. Cut them into uniform cubes, about 1-inch in size.
- Boil them up: Fill a large pot with water, add a pinch of salt, and bring it to a rolling boil. Carefully add the cubed potatoes, cooking for 10-15 minutes until fork-tender.
- Drain and cool: Once cooked, drain the potatoes and let them cool slightly.
- Boil the eggs: In a separate pot, place the eggs and cover with cold water. Bring to a boil, cover, and let sit for 12-14 minutes.
- Cool and peel: Transfer the eggs to an ice bath and cool for 5-10 minutes before peeling.
- Prepare the dressing: In a large bowl, combine the mayonnaise, Dijon mustard, apple cider vinegar, salt, and pepper. Mix well until creamy.
- Chop the eggs and veggies: Dice the hard-boiled eggs, and add the cooled potatoes, chopped celery, and red onion to the bowl with the dressing.
- Combine ingredients: Carefully fold in the chopped eggs without mashing.
- Taste and adjust: Taste the salad and adjust seasoning as necessary.
- Chill out: Cover the salad and chill in the refrigerator for at least an hour.
- Serve with flair: Sprinkle paprika on top before serving.
Notes
Feel free to add herbs or spices to tailor to your taste. Best if made a day ahead!
- Prep Time: 15 minutes
- Cook Time: 30 minutes
- Category: Side Dish
- Method: Boiling, Chilling
- Cuisine: American
Nutrition
- Serving Size: 1 serving
- Calories: 350
- Sugar: 2g
- Sodium: 400mg
- Fat: 22g
- Saturated Fat: 5g
- Unsaturated Fat: 15g
- Trans Fat: 0g
- Carbohydrates: 35g
- Fiber: 4g
- Protein: 8g
- Cholesterol: 190mg
Keywords: deviled eggs, potato salad, creamy salad, side dish, summer picnic


